project development - Part 1
Week 18 Overview
This weeks Fab Academy was orientated around completing our final project.
During the development we are to track our progress and note the following:
- what tasks have been completed, and what tasks remain?
- what has worked? what hasn't?
- what questions need to be resolved?
- what will happen when?
- what have you learned?
Initial Project Idea
The initial idea was to create a water installation where you can manipulate water coming from
a hose by playing a sine wave at different frequencies on a speaker that's attached to the hose (shown on the right). You
also need to use a camera at a specific frame rate. The naked eye wouldn't see this.
Problem: A problem is obtaining a speaker that will play a low enough frequency. I
did some research into this and I would have to rent a really expensive speaker to carry out the project
so I've decided to modify the idea a bit.
New Project Idea
Solution: change of plan to do something similar to the initial concept where I would be playing waves to manipulate
a liquid but it wouldn't require a specialised speaker or sub woofer.
I'm going to create an installation where you can manipulate cornflour into unusual shapes using
different wave forms and frequencies. It's know as a non-Newtonian substance and is a classic
science experiments for schools. You can see an image of it here, shown on the right.
Some other projects use an amp as well but we don't need to because there is an amp built into the
speakers.
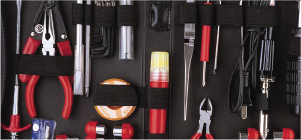
So I'm making a shield for the Arduino that will have a DAC on it and connect to buttons and a potentiometer. I wanted to use an arduino as in the future I may use this project with children. The idea is they could make the shield with the DAC on it themselves and connect it to an arduino.
Main Elements of the Project
- 1) Fabricate an enclosure to house the components of the installation (eg. electronics & speakers)
- 2) Create a control panel for user input with 4 buttons to change from different wave forms being output (sine, square, triangle, sawtooth) and include a potentiometer so the user can change the frequency of the wave.
- 3) Design and fabricate a shield for an arduino with a DAC chip on it. The Arduino Uno doesn't have this.
- 4) Create a program to handle the inputs and outputs of the system
Program Overview
3 main parts of that are needed in the program.
- 1) communicating with the DAC (Digital-to-analog Converter)
- 2) creating different waves and variable frequency
- 3) User input via a pot & 4 buttons
Step 1:
Understanding how to use a DAC (Digital-to-analog Converter)
and SPI (serial Peripheral Interface) communication
First I build circuit to get read a voltage from the DAC.
To create the circuit and code to read the voltage from the DAC I start out with:
- I used is a 12 bit DAC (MCP4921)
- Data sheet for the DAC
- Arduino SPI (Serial Peripheral Interaface)Library
- referred to this link to help understand DAC and SPI communication & circuit - http://happyrobotlabs.com/posts/project/artemis-synthesizer-2-interfacing-with-the-mcp4921-spi-dac/#schematic. It particularly helped with understanding the circuit.
- Another very useful reference for understand Digital to Analog Conversion
- Tutorial on how to connect the Potentiometer

The above image shows the mapping between the DAC and Arduino pins.
I first tried this out with a Piezo speaker and it worked (shown in the below image). Amazing!!!

I got this working by following this tutorial I found online about Digital to Analog conversion -
http://web.csulb.edu/~hill/ee470/Lab%202a%20-%20Digital_to_Analog_Conversion.pdf
or if that link gives you any problems you can downloaded here - Lab2a-Digital_to_Analog_Conversion.pdf
I started off with their codes and altered it for my needs.
Mainly their code was just communicating with the DAC but I
wanted to have an output to the speaker.
Here's my code
Step 2:
Next step is to test out what wave forms and
frequencies will manipulate the cornflour in an interesting way.
We want to have 4 different wave types. A sine, Square, Saw tooth and triangle.
We want to be able to manipulate the frequency using a potentiometer. By just using
an online tone generator and running this through the DAC circuit to the Speaker we
could work out best frequencies to manipulate the cornflour.
It seemed like the cornflour worked best between 50Hz to 1KHz.

Step 3:
Create a Program to generate the wave forms
We want to have 4 different wave types. A sine, Square, Saw tooth and triangle.
We want to be able to manipulate the frequency using a potentiometer. I wanted to do this
and test it on the breadboard before making the fabricating the circuit.
I referred to 2 tutorials to create the code:
- http://www.instructables.com/id/Arduino-Waveform-Generator/?ALLSTEPS I mainly used this tutorial to create the code that generates the tones.
- http://happyrobotlabs.com/posts/project/artemis-synthesizer-2-interfacing-with-the-mcp4921-spi-dac/#schematic. I used this tutorial to help me modify the code to communicate with the DAC.
I also followed the instructables tutorial (Arduino Waveform Generator Tutorial) to create an Arduino Waveform Generator. They had made a DAC by using a series of resistors, where as I wanted to use a DAC chip. I also had different components and circuit set up from them so I changed a lot of the code and circuit to suit the application and components I have.
Changes I made from the instructables tutorial:
- The tutorial changes the amplitude of the waves via a potentiometer. As I'm using a speaker that has a built in Amp we don't need this part of the circuit or code
- The instructables tutorial uses a series of resistors as a DAC. I'm using a DAC chip so I'll need to modify the circuit and the code
- The instructables tutorial modifies the PWM (The amount of time a specific signal will be output. Eg. will it be output for 90% of the wavelength or 10%. ) As I'm only aimed to manipulate the cornflour I've taken this out f the circuit and code.
- The instructables circuit has the resistors for the buttons at the buttons. We'll move these onto the IC
- The instructables tutorial uses a low pass filter (resistor and capacitor in series) to smooth out the steps in the waves and get rid of noise. They made this to be testing circuits and debugging circuits. As we don't need a perfect tone I've removed this from the circuit.
- She used debounce to smooth out fluctuating noise on the pots or buttons. We don't need this as it's not necessary for the purpose of moving cornflour on a speaker. Only the code is modified for this.
- Buttons we are going to use have LEDs built into them rather than separate ones. So we need to change the circuit for this. We'll change the code too. In the code here they read the buttons using analog reading which isn't necessary. So I've changed it to be digital read, either HIGH or LOW (buttons pressed or not)
Continued on project development part 2
Week 18, May 22
Week 18 Write up - Part 1
Week 18 Write up - Part 2
Week 18 Write up - Part 3
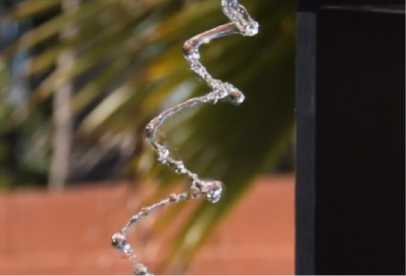
Example of Wave being manipulated by vibrations from speaker
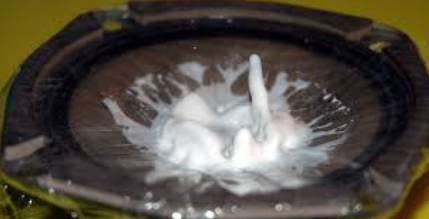
Example of Cornflour in speaker experiment