vinyl_cutter_cn
Vinyl Cutter 刻绘机
The vinyl cutter model we have at AS220 Labs is a Roland Camm-1 CX-24.
我们在AS220 Labs的刻绘机型号是Roland Camm-1 CX-24.
A vinyl cutter is a uses a computer-controlled blade to cut out shapes designed using vector graphics. The vinyl cutter is primarily used for cutting vinyl into signs or stickers, but can also be used to cut copper tape into circuit traces.
刻绘机由电脑控制,可以切出设计好的矢量图形. 刻绘机主要用于将乙烯材料切割为标志物或者贴纸, 但也可以将铜纸切割成电路板.
This tutorial uses Inkscape to prepare files for the vinyl cutter.
这份指南用 Inkscape给刻绘机绘制文件.
For short instructions on file prep, download the Vinyl Cutter Quickstart Tutorial
这里有一份简单的指南, 从这里下载 Vinyl Cutter Quickstart Tutorial


File Preparation / 文件准备
Overview
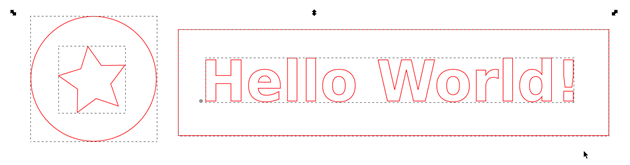
- Your vinyl cutter files must contain only vectors.
- The vectors must be lines only, with no fill.
- The vinyl cutter drivers can only interpret cut lines.
- All vectors must be contained within the bounds of the document canvas.
概括
- 你的刻绘文件必须都是矢量图 vectors.
- 矢量图必须都是线条,不能有填充
- 刻绘机的驱动程序只能进行线条的切割.
- 所以的矢量图都必须在文档的画布边界内
Document Setup
You will need to size your page in your drawing program appropriately for the width of vinyl that you are using. Vinyl comes in two widths, 24" and 15".
文件设置
你需要在你的绘图程序中调整合适的页面大小去适应你的耗材宽度. 耗材(国内称作即时贴和PVC贴纸)有两种尺寸, 24" and 15".
Wide Vinyl (24")
- Machine rollers will take up 1" on either side of the vinyl.
- Set Document Width to 22"
- Set Document Height to a minimum of 23"
较宽的PVC贴纸 (24")
- 机器滚轮将压住PVC贴纸的一端
- 设置文件宽度为22"
- 设置文件最小的宽度为23"
Narrow Vinyl (15")
- Machine rollers will take up 1" on either side of the vinyl.
- Set Document Width to 13"
- Set Document Height to a minimum 14".
较小的PVC贴纸 (15")
- 机器滚轮将压住PVC贴纸的一端
- 设置文件宽度为13"
- 设置文件最小的宽度为14" .
Warning: the document height is must be larger than the document width. If the width is larger than the height, the machine may rotate your design by 90 degrees. 警告: 文档的高度必须大于文档的宽度. 假如宽度大于高度, 机器将会把你的设计选择90度.
Step 1: From the "File" menu > select "Document Properties"
第一步: 从 "File" menu > 选择 "Document Properties"

Step 2: Modify the Document Width
第二步: 修改文件宽度
The document properties dialog box will open.
- Set the units to inches.
- Set the document width the vinyl width (22" or 13").
文件属性的对话框将会打开.
- 设置单位为英寸
- 设置文档的宽度为PVC贴纸的宽度 (22" or 13").
Step 3: Modify the Document Height
第三步: 修改文档高度
Vinyl is on a roll - so the max height could be as long as the length of vinyl on the rolll.
PVC贴纸是一卷的 - 所以最大的宽度可能是整卷PVC贴纸的长度
Set the document height to a minimum of 24" (if using wide vinyl) or to a larger value that whatever value works for your drawing.
设置文档最小的高度为24" (假设你使用较宽的贴纸) ,你也可以根据情况使用更大的值.
Make sure you hit the ENTER key after each entry to ensure Inkscape registers your changes.
确保你按下回车键确保你的Inkscape保存了你的所以变化.
Warning: the document height is must be larger than the document width. If the width is larger than the height, the machine may rotate your design by 90 degrees.
注意: 文档的高度必须大于文档的宽度.假如宽度大于高度,机器会把你的设计旋转90度

Step 4: Create a Vector Drawing
第四步:创建一个矢量的绘图

Step 5: Select all Vectors
第五步:选择所以的矢量图
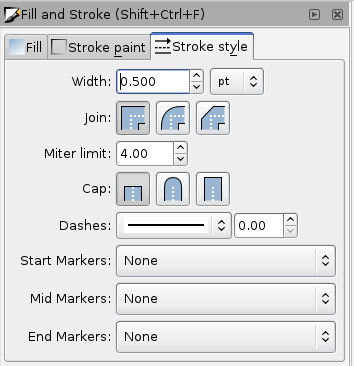
Step 6: Then click "Object" menu > Fill and Stroke.
第六步: 点击 "Object" menu > Fill and Stroke.
The fill and stroke panel will appear to on the right of the screen. 填充和线条面板在屏幕的右边
Step 7: Make sure there is no fill by clicking on the "X" button in the "Fill" menu.
第七步: 确保点击了菜单中的非填充按钮.

Step 8: Click the stroke paint tab. Make sure "R" is at the max - "255".
第八步:点击线条选项. 确保 "R" 值是最大的 - "255".

Step 9: Go to stroke style and make sure width is set to 0.500 pt.
第九部: 到线条风格选项并确保宽度为0.500 pt.
Loading Vinyl
Select a roll of vinyl and place it on the rollers behind the machine.
On the back right of the machine you will see a lever; place it in the "down" position so you can load the vinyl.
Make sure the vinyl side is facing up as you feed it through the rollers into the vinyl cutter.
Under the rubber wheels there is a white sticker indicator.
- Ensure that the vinyl is aligned properly under the rubber wheels.
- The left wheel must always be under the wide white sticker on the left.
- The right rubber wheel must be under any one of the three white stickers on the right, depending on the width of your vinyl.
- Make sure your vinyl is straight and about 2-3 inches past the rubber wheels.
After inserting the vinyl into the machine, pull up the lever at the back of the machine to ensure that the vinyl is securly loaded.
加载PVC贴纸
- 选择一卷PVC贴纸并放置在机器后面的滚柱上
- 在机器的后面你会见到一个杠杆; 放置在下面以便你加载PVC贴纸.
- 确保PVC贴纸朝着你的那面通过刻绘机
- 在橡胶滚轮的下面有个白色的贴纸指示
- 确保PVC贴纸对齐在白色橡胶轮下面
- 左边的滚轮必须放置在白色指示贴纸的左边
- 右边橡胶滚轮必须在三个白色贴纸之一的右边,根据贴纸的长度.
- 确保你的贴纸是整齐的并超过橡胶滚轮2~3英寸
- 把PVC贴纸放进机器后, 拉起机器背后的杠杆确保PVC贴纸安全的加载
Turn On the Vinyl Cutter / Final Steps
打开刻绘机/ 最后一步
On the left side of the vinyl cutter is the power button. 刻绘机左边有个电源键
Turn it on. 打开它
Now you will notice on the screen it says "select roll". 这时你会注意到屏幕写着 "select roll".
Press the enter button. 按下 enter 按钮.
The vinyl cutter will measure the width of the roll (in mm). Take note of the measurement, you many need to adjust the width of your file depending on the measured width of the vinyl. 刻绘机会测量这卷耗材的宽度(mm单位). 注意测量,你可能会根据测量结果调整文件的宽度.
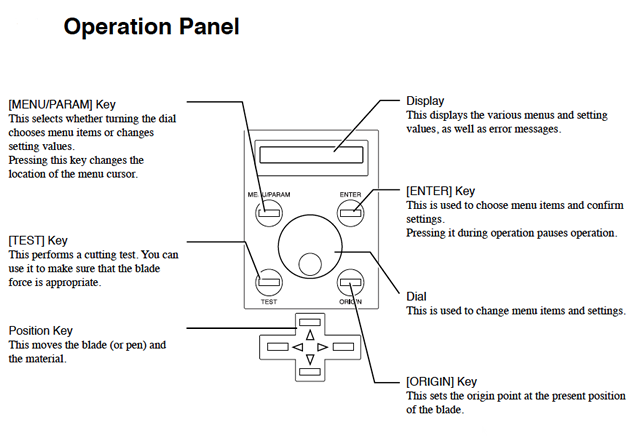
Set the origin by pressing the "Origin" button on the control panel. 设置原点通过控制板上的 "Origin" 按钮
Print to the Vinyl Cutter
控制刻绘机打印
To print the file, go to File > Print > select the "vinyl cuter" driver from the print menu. 需要打印文件时, 从 File > Print > 选择打印目录中的"vinyl cuter"驱动
Hit the "print" button to send the file to the vinyl cutter. 点击 "print" 按钮,发送文件到刻绘机
The vinyl cutter will begin printing once you send the print job. 一旦你发送打印文件,刻绘机会立即打印.
After the vinyl cutter is done cutting your file, use scissors to cut off the section with your cut design. 在刻绘机切割完你的文件,用剪刀切下你切割文件的部分
Weed the Vinyl
除杂
"Weeding" the cut vinyl is the process of removing the unwanted areas from the final cut design. 去除贴纸不要的部分.
Gather Your Tools
- Transfer Tape
- Scissors
- X-Acto knife
- Tweezers
你需要用到的相关工具
- 转移胶带
- 剪刀
- 美工刀
- 镊子
Trim
裁剪
After cutting, trim area you want to keep with scissors. 在切割后,你可以用剪刀裁剪
Weed
除杂
Then remove the unwanted parts of vinyl with an X-Axcto knife and / or tweezers. 通过美工刀和镊子去除不想要的部分
Transfer to the Desired Surface
转移想要的部分
Carefully apply transer tape to the surface of the weeded vinyl. Rub the transfer tape onto the vinyl to form a strong bond between the tape and the top surface of the vinyl design. 小心的将转移胶带贴在已经除杂的贴纸, 摩擦转移带使得转移带和贴纸表面形成牢固的连接
After rubbing, carefully pull the transfer tape (with the vinyl adhering to it) away from the vinyl paper backing. 在摩擦后, 小心的在背面贴纸上撕开转移带 (包括附着在上面的正面贴纸) .
After you have removed the vinyl from the paper backing and it is attached to the transfer tape, apply it to the desired surface. Rub the surface of the transfer tape to ensure that the vinyl will adhere to the new surface. 在你撕下附着转印带的PVC贴纸后,贴在你希望的表面, 摩擦转移胶带的表面并确保PVC贴纸附着在新的表面.
Carefully pull the transfer tape away from the vinyl, leaving the vinyl attached to the desired surface. 小心的将转移胶带从PVC贴纸上撕下来, 留下PVC贴纸在你想要的表面上.
Troubleshooting
问题
The vinyl pressure must be adequate to cut through the vinyl, but too much force will tear up the paper under the vinyl. 必须要有足够的切割压力去切穿PVC贴纸, 但太大压力会撕毁底层.
The thicker the material, the more pressure (force) you need to apply to cut through it. However, if you are ripping up the vinyl or paper under the vinyl, your force setting is too high. 越厚的材料你需要越大的力。加入你撕破了PVC贴纸或者它的底层,说明你的压力设置太大了
There are two factors that affect your cuts: force and speed.
还有两个因素影响你的切割: 压力和速度 force and speed.
To adjust the force
调整压力
- Rotate the wheel under the LCD screen on the vinyl cutter to the right.
- When the menu reads "Force", then press the menu buton.
- To reduce / increase the force setting, rotate the wheel up or down, you will see the values change in the LCD screen.
- When finished, press the enter button.
Next, preform a test cut by pressing the "test" button on the vinyl cutter.
旋转在刻绘机右边的LCD屏幕下面的方向盘
- 当目录读取到 "Force", 按下menu 按钮
- 为了减少或增加压力设置,旋转方向盘两个方向, 你会在LCD屏幕看到改变的数值.
- 当完成后, 按下 enter 按钮.
- 接着, 通过刻字机上的"test"按钮进行测试.
To adjust the speed:
速度调节:
If your file has lots of small curves or tiny details, you may need to slow down the speed. The slower the speed of the machine, the more precisely it will cut. 加入你的设计文件有大量的小曲线和细节, 你需要调慢速度.速度越小,切割得越精准.
- Rotate the wheel under the LCD screen on the vinyl cutter to the right until the the menu reads "Speed", then press the menu buton.
- To reduce / increase the speed setting, rotate the wheel up or down,you will see the values change in the LCD screen.
- When finished, press the enter button.
Next, preform a test of a small section of a file with tiny details or small curves to test your settings.
旋转在刻绘机右边的LCD屏幕下面的方向盘, 直到菜单出现 "Speed"选项, 然后按下 menu 按钮.
- 减小或增加速度设置,旋转方向盘两个方向的设置, 你会在LCD屏幕看到改变的数值.
- 当完成后, 按下 enter 按钮.
- 接着, 设计一个小文件,用细节和小的曲线测试你的设置。
 All content © 2013 Anna Kaziunas France(except where otherwise noted) Some rights reserved.Licensed under a Creative Commons Attribution-NonCommercial-ShareAlike 3.0 Unported License