corel_draw_laser_cn
原文: Using CorelDraw with the Laser Cutter
CorelDraw与激光切割
I. Introduction
This guide will introduce you to using CorelDraw with the Epilog Mini 24 Laser Cutter, and teach you how to create a new document or import your pre-existing design and format properly to be sent to the laser cutter. This is the current supported system at the AS220 Labs, use this as a reference if you forget the steps to laser cutting.
I. 介绍
这份指南会介绍如何用CorelDraw使用Epilog Mini 24激光切割机,并教你如何做出适合激光切割机使用的文件,包括创建新的和转换已经设计好的文件。这份文档在AS220 Labs是可用的,你可以用它作为激光切割步骤的参考
II. CorelDraw X5
CorelDraw is a vector design program that is compatible only on the Windows Operating System. It is recommended that you design outside of CorelDraw and import your design. CorelDraw is only a means to job setup and printing, please avoid designing with it. Our laser cutter computer is located directly to the right of the machine, you will find the software shortcut on the desktop on the computer, double click on it to open.
CorelDraw是一个只能在Windows上运行的矢量设计软件。你可以在其它软件设计好文件,再导入Coreldraw里面。CorelDraw主要作用是工作设置和打印,尽量不要用它进行设计(有更好的设计软件)。我们的激光切割用的电脑就在激光切割机的旁边,在电脑系统桌面上,你可以找到软件的快捷方式,双击打开它

1. Welcome Screen
1. 欢迎界面
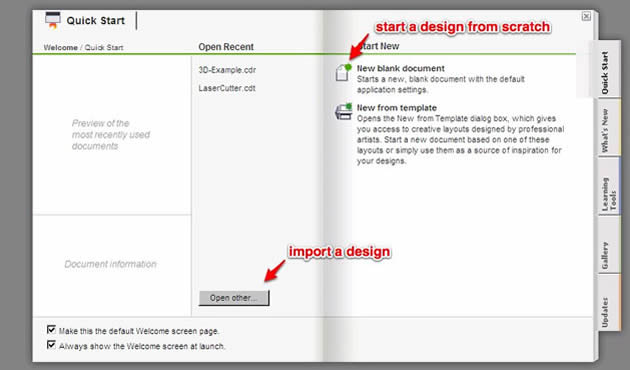
On this screen, you must decide whether you want to create a new document or import a design that you have already prepared. Select “Open other...” and navigate to your design file to import it. Check out the “Importing Files” section to find out more about file format and compatibility. If you wish to start from scratch, select “New blank document” and you will be prompted with the new document settings menu.
在这个界面,你可以选择创建一个新的文档或者导入你已经准备好的设计文件。选择 “Open other...” 找到和导入你的设计文件. 点击 “Importing Files”部分,可以看到导入文件的格式和兼容性。假如你希望画张草图, 选择 “New blank document” 然后你会进入新文档的设置界面.
2. New Document Properties Menu
2. 新文档属性菜单

There are a couple of important settings that all laser cutter documents should have:
- useful file name - please include a name that is easily recognizable and a date and/or version number - example of a good file name =“10_21_2011_pressfit_birdhouse.cdr”
- document size - our laser cutter has a 24” (width) x 12” (height) working area, please keep all documents sizes to a maximum size of 24” x 12”.
- color mode - the laser cutter coverts the color mode into a greyscale mode before engraving and cutting, for the most successful results please always use RGB.
这里有一些重要的设置, 所有的激光切割文件里 必须有:
- 有用的文件名 -请使用容易识别的的名字和日期还有版本号 - 比如“10_21_2011_pressfit_birdhouse.cdr”
- 文件尺寸 - 我们的激光切割有24” (width) x 12” (height) 工作范围,请保证所以的文件大小小于24” x 12”的尺寸.
- 颜色模式 - 在激光雕刻和切割前,需要把颜色模式调为灰度模式greyscale mode , 使用用 RGB会有最好的效果.
3. Document View
3. 文档浏览
Whether you open a preexisting file or create a new one, you will see the document view when you are prepping your design for cutting/engraving. If you have set your document to 24” x 12” in size, then you will see a document that represents the entire work area of the laser cutter. The orientation of your document and the laser cutter are the same, the X direction is the width of your document and the direction that the X Carriage of the laser cutter travels. Likewise, the Y direction is the height of your document and is the direction that the Y Carriage that the laser cutter travels. The home position for both is the top-left corner.
无论你是打开设计好的文件或者创建一个新的文件, 在激光雕刻或切割前你都需要浏览文件界面. 假如你设置文档为24x12的大小, 那么你整个文档的的界面就代表着激光切割的界面. 你文档的方向和激光切割的方向是一致的,X方向是你文件的宽度和激光切割X轴支架运动的方向。同样的,Y方向是你文件的宽度和激光切割Y轴支架运动的方向。 原点都是在左上角。

4. Setting up an Object to Vector Cut
Vector cutting is when the machine is tracing the shapes of the vectors cutting through the material. If we want to cut shapes out of our material, this is the mode we want the laser to be in. In order to the machine to cut an object out, we have to set the properties of that object to the following:
- No Fill = remove the fill of the object.
- Stroke Color = set the stroke color to black (RGB = #000).
- Stroke Width = set the stroke width to “hairline”, a dimensionless unit.
4. 设置矢量切割
我们可以用矢量切割把材料切穿成矢量图形,假如我们要从材料中切出图形来,这将是我们想要的模式. 为了切出物体,我们要进行以下设置
- No Fill非填充 = 去除填充的物体.
- Stroke Color线条颜色 = 设置线条颜色为黑色 (RGB = #000).
- Stroke Width线宽 = 设置线条宽度为 to “hairline发丝”, 无维度单位


5. Setting up an Object to Raster Engrave
5. 设置激光雕刻
Rastering is when the machine is engraving a graphic into the material,it is a similar process to an inkjet printer except that it removes materials to create the graphic instead of adding layers of ink. Raster engraving is a bit more forgiving than vectoring, we have some room for experimenting with different settings. This also means there is not a clear path to a “good” engrave, that will determined by you and the job you are trying to do.
当要在材料上雕刻图像时可以用光栅雕刻,有点像喷墨打印机的打印过程,不同的是,它是通过去除材料的方式代替喷墨的方式去制图,光栅雕刻会比激光切割的设置更加广泛.我们需要对不同设置进行试验,也就是说没有明确的标准来衡量激光雕刻,它由你最后想要的效果决定
In general the following properties can be applied for engraving jobs:
- No Stroke = remove the stroke of the object to avoid accidentally cutting it out.
- Fill Color = set it to black (RGB = #000).
一般来说,下面的属性设置可以用于激光切割:
No Stroke无线条 = 去除对象的线条避免不小心把它切下来.
Fill Color充满颜色 = 设置为黑色(RGB = #000).
Note about colors and etching - the machine is going to map different colors to different etching depths. This is how the machine is about to etch a complex graphic into a piece of material. The machine will map Black (RGB = #000) to the deepest part of the etch and it will not etch White (RGB = #FFF). Any colors will be mapped to a gray scale mode and will etch to depth somewhere in between Black and White.
注意颜色和雕刻的关系 - 不同颜色对于着不同雕刻深度.这就是机器如何在原料上雕刻复杂图像. 机器将把黑色 (RGB = #000)对应为最深深度,白色 (RGB = #FFF)不会雕刻. 所有颜色将对于到灰度模式,雕刻深度介于黑色和白色之间

III. Using the Epilog Print Driver
III. 使用 Epilog 打印驱动
1. Setting the Laser Cutter Properties
1. 设置激光切割机属性
Once you have gone through and properly formatted all of your vector cuts and rasters, you are ready to set up the appropriate machine settings based on the material that you are using. This is a very crucial step! Failure to pay attention to all the settings and you may ruin a perfect piece of material.
当你把所有的切割和雕刻文件格式设置好后,你需要根据材料为机器做合适的设置. 这是非常重要的一个步骤! 不注意这些设置可能会毁坏好材料
To edit the machine settings, first enter the general print menu. The laser shows up just like a normal home printer machine.
为了编辑机器设置,首先进入打印菜单,切割机的菜单就跟家用打印机一样

Once in the printing menu, select “preferences” to edit the machine properties.
在打印目录中, 选择 “preferences” 编辑机器的属性

You will then be prompted with the official Epilog Laser Cutter Printer Properties dialogue. This is where you adjust all of the machines settings according to the material that you are using. Please check out the materials guide located above the machine, and also check out the Epilog recommended settings.
接着会有Epilog激光切割机官方的打印属性对话框的提示。这是你根据材料调节机器设置的地方. 请检查使用的材料说明, 同时参考机器的建议设置.
IMPORANT: If you don’t know what you material is, don’t cut it! Especially if you think it is made of vinyl, pvc, or any chlorinated material.
注意: 假如你不知道你使用的是什么材料, 不要切它! 特别是你觉得有可能是氯乙烯,PVC等氯化物.
Step 1 - Resolution (only if you are engraving)
If you are engraving any objects into the material, you need to select what resolution you want the machine to operate at. It has the ability to do high resolution (1200dpi max) for really delicate and detailed engraving, but it also has the ability to do low res work (75 dpi min) for rough sketches or mark making. 300dpi is a good standard resolution to use for most jobs. An important to know if that job time increases significantly with an increase in resolution. If you are just prototyping, its usually best to keep the resolution low.
第一步 - Resolution/分辨率调节 (假如你要雕刻的话)
假如你在材料上雕刻物体, 选择你想要机器运行的分辨率. 该机器具有高分辨率(最大1200dpi)去进行细节精确的雕刻, 它同样有能力去雕刻低分辨率(75 dpi min)的粗糙草图或记号. 300dpi是非常标准的分辨率可以满足大部分工作. 非常重要的一点是雕刻的工作时间会随着分辨率的增加而明显增加.假如你只是做原型,你最好使用低分辨率

Step 2 - Job Type
There are three different types of job types on the laser cutter.
Raster - used for only engraving onto material
Vector - used for only cutting through a material
Combined - used for doing both engraving and cutting in the same job
第二步 - Job Type/工作类型
激光切割机有非常多的工作类型
Raster光栅雕刻 - 用于材料的雕刻
Vector矢量切割 - 用于材料的切割
Combined混合 - 在同一个作业中同时使用雕刻和切割

Step 3 - Options
The only option you ever need to change is “Auto Focus”. By default, this will be set to be off, which means you need to manually focus the machine. If you want to use the auto focus feature on the machine, click on the button to activate it.
第三步 - Options/选择项
你位于需要改变的选项是“Auto Focus”. 它默认是关闭的, 这意味你需要手动去调焦.假如你想要机器自动调焦,点击按钮去激活.

Step 4 - Piece Size
This is important. If you do not change this, it will be set to 8.5” x 11” by default. This is not the size of the laser cutter or your document, and will result in a incorrect job. Change this to 24” x 12” which matches your document, this will give you the best results.
第四步 - Piece Size/尺寸大小
这非常重要,假如你不改变它,它会默认设置为8.5” x 11” . 这并不是激光切割机工作尺寸, 这会导致出错. 改变尺寸为24” x 12”(根据你的机器实际情况), 这会给你最好的结果.

Step 5 - Raster Settings (if applicable)
If you are doing any engraving you will need to set a couple of settings here:
Speed - This controls how fast the machine will engrave into the material. Slower speeds will result in a more power etch, because it will be spending more time on the material
Power - This controls how much power (out of 35 Watts) you use to engrave. The higher that this is set, the more power will be used and the deeper the engraving will be.
Please refer to Epilog’s Material Settings guide if you are unsure of the settings you need to use for your material.
第五步 - 光栅雕刻设置
假如你准备雕刻一些东西,你需要做以下的一些设置
Speed速度 - 这个选项控制机器雕刻的速度. 速度越慢雕刻得越深,因为你花更多时间去雕刻材料
Power能量 - 这个选项控制用多大的能量(该机器最大35W)去进行雕刻.越大的能量雕刻得越深
假如你不知道怎么设置你的材料,请参考Epilog材料设置指南

Step 6 - Vector Settings (if applicable)
If you are doing any cutting you will need to set a couple of settings here:
Speed - This controls how fast the machine will cut through the material. Slower speeds will result in a more power, because it will spend more time on the machine.
Power - This controls how much power (out of 35 Watts) you use to cut. The higher that this is set, the more power will be used and the deeper the laser will cut into the material.
Frequency - The laser is not a continuous stream of energy, it is actually pulsing down on your material. The rate at which it does so is determined by the frequency. You can set it from 20-5000 Hz (pulses per second).
Vector Sorting - You select from “inside-out” which will cut the vectors in your design from the inside out, prevent larger objects with inside cuts to cut first. The other option is “optimize” which will cut your design in the most efficient way.
第六步 - 矢量切割设置
假如你准备切割些东西,你需要做以下的一些设置:
Speed速度 - 这个选项控制你用多快的速度切割材料,越慢的速度消耗越多能量(切得也会更深), 因为机器会花费更多时间.
Power - 这个选项控制你用多大的能量(最大35W)去切割材料,越高能量材料切得越深.
Frequency频率 - 激光并不是连续发射的,实际上是以脉冲的形式打在材料上. 这个比例是由频率决定的.你可以设置20-5000 Hz的频率.
Vector Sorting矢量排序 - 选择“inside-out”,它将会从内部切割到外部, 这可以防止大的物体先切割.另外一个选项是 “optimize” 它会帮你优化切割的效率。

7. Sending the Job
Once you have entered in all of the settings you need, double check to make sure everything looks okay. Then press “OK”. You will then be brought back to the normal print menu, click “Apply” to save the settings in case you need to go back and make some small tweaks, otherwise you’ll have to start from scratch. Finally, select “Print” on the print menu and your job will be sent to the laser cutter and will show up on the display screen of the machine
7. 作业设置
一旦你完成所有的设置, 确保所有的设置正确. 然后点击 “OK” 按钮. 接着你将会进入正常的打印设置, 点击 “Apply”去保存设置以防你需要返回之前设置做些小修改,不然你又要重新设置. 最后点击在打印目录点击 “Print”,然后你的作业将会发送到激光切割机,机器的屏幕也会显示相关信息

 All content © 2013 Anna Kaziunas France(except where otherwise noted) Some rights reserved.Licensed under a Creative Commons Attribution-NonCommercial-ShareAlike 3.0 Unported License