NODO

Definition of the Smart Lean Cell: what it does, why it matters, what was designed, how it was made, and what still needs to be finished before the final presentation.
This checklist organizes the Week 18 requirements and shows how the Smart Lean Cell documentation addresses each evaluation point. I used it as a guide to make sure the page does not only describe the object, but also explains the purpose, users, fabrication decisions, implications, evaluation method and remaining presentation tasks.
| Requirement | Status | Where it is addressed |
|---|---|---|
| Explain what the final project does | Completed | Final Project Summary and Final Project Questions. |
| Describe who has done what beforehand | Completed | Related work and references with links to previous Fab Academy projects. |
| Identify sources used | Completed | Sources, weekly assignments, software tools, component references and Fab Lab feedback. |
| Document what I designed | Completed | Mechanical station, Lean tools, PCB, dashboard and gamification system. |
| List materials and components | Completed | Bill of Materials with cost estimate and reference links. |
| Explain where materials came from | Completed | BOM and Final Project Questions. |
| Estimate cost | Completed | BOM with estimated costs and external price references. |
| Document parts and systems made | Completed | Project Development, System Architecture and Evidence sections. |
| Document fabrication and programming processes | Completed | Project Development and Process Planning sections. |
| Explain evaluation | Completed | Evaluation and Implications section. |
| Define the scope of the project | Completed | Project Scope section: objectives, target users, included systems, exclusions and success criteria. |
| Track the progress of the project | Completed | Project Progress Tracking section: phase-by-phase status, deliverables, evidence and closure notes. |
| Prepare final slide | Completed | presentation.png was added to the website root. |
| Prepare final video | Completed | presentation.mp4 was added to the website root. |
| Uploaded summary slide placeholder | Completed | The placeholder requirement was replaced by the final 1920 x 1080 summary slide: presentation.png. |
| Uploaded video clip placeholder | Completed | The placeholder requirement was replaced by the final presentation video: presentation.mp4. |
| Checked they are linked in the final presentation schedule | Completed | The Presentation Assets section links both files and documents their location in the website root. |
| Include downloadable files | Completed | Downloadable Files section. |
The table below maps the Fab Academy project development questions to the specific evidence generated for the Smart Lean Cell. This makes the documentation easier to review because each question is connected to a concrete part of the prototype.
| Fab Academy Question | Short Answer | Evidence |
|---|---|---|
| What will it do? | It teaches Lean, TPS and optimization to children through a physical gamified assembly cell. | Final Project Questions and Gamification evidence. |
| Who has done what beforehand? | Lean dojos, 5S training boards, STEM kits and dashboards inspired the approach. | Related work explanation and Lean tools section. |
| What sources will I use? | Fab Academy assignments, KiCad, Fusion 360, Arduino IDE, Blynk and component references. | Sources table and linked weekly work. |
| What will I design? | Workstation, trays, panel, PCB, case, sensor system, dashboard and learning sequence. | Design and fabrication photos. |
| What materials will be used? | MDF/plywood, PLA, PCB material, XIAO ESP32-C3, HC-SR04, LEDs, resistors and wiring. | BOM. |
| How much will it cost? | The prototype uses low-cost materials and standard electronics. | BOM with estimated cost and reference links. |
| What systems will be made? | Mechanical, Lean tools, electronics, networking/dashboard and gamification subsystems. | System Architecture. |
| How will it be evaluated? | By testing usability, sensor detection, dashboard data, cycle-time calculation and child interaction. | Evaluation and Implications. |
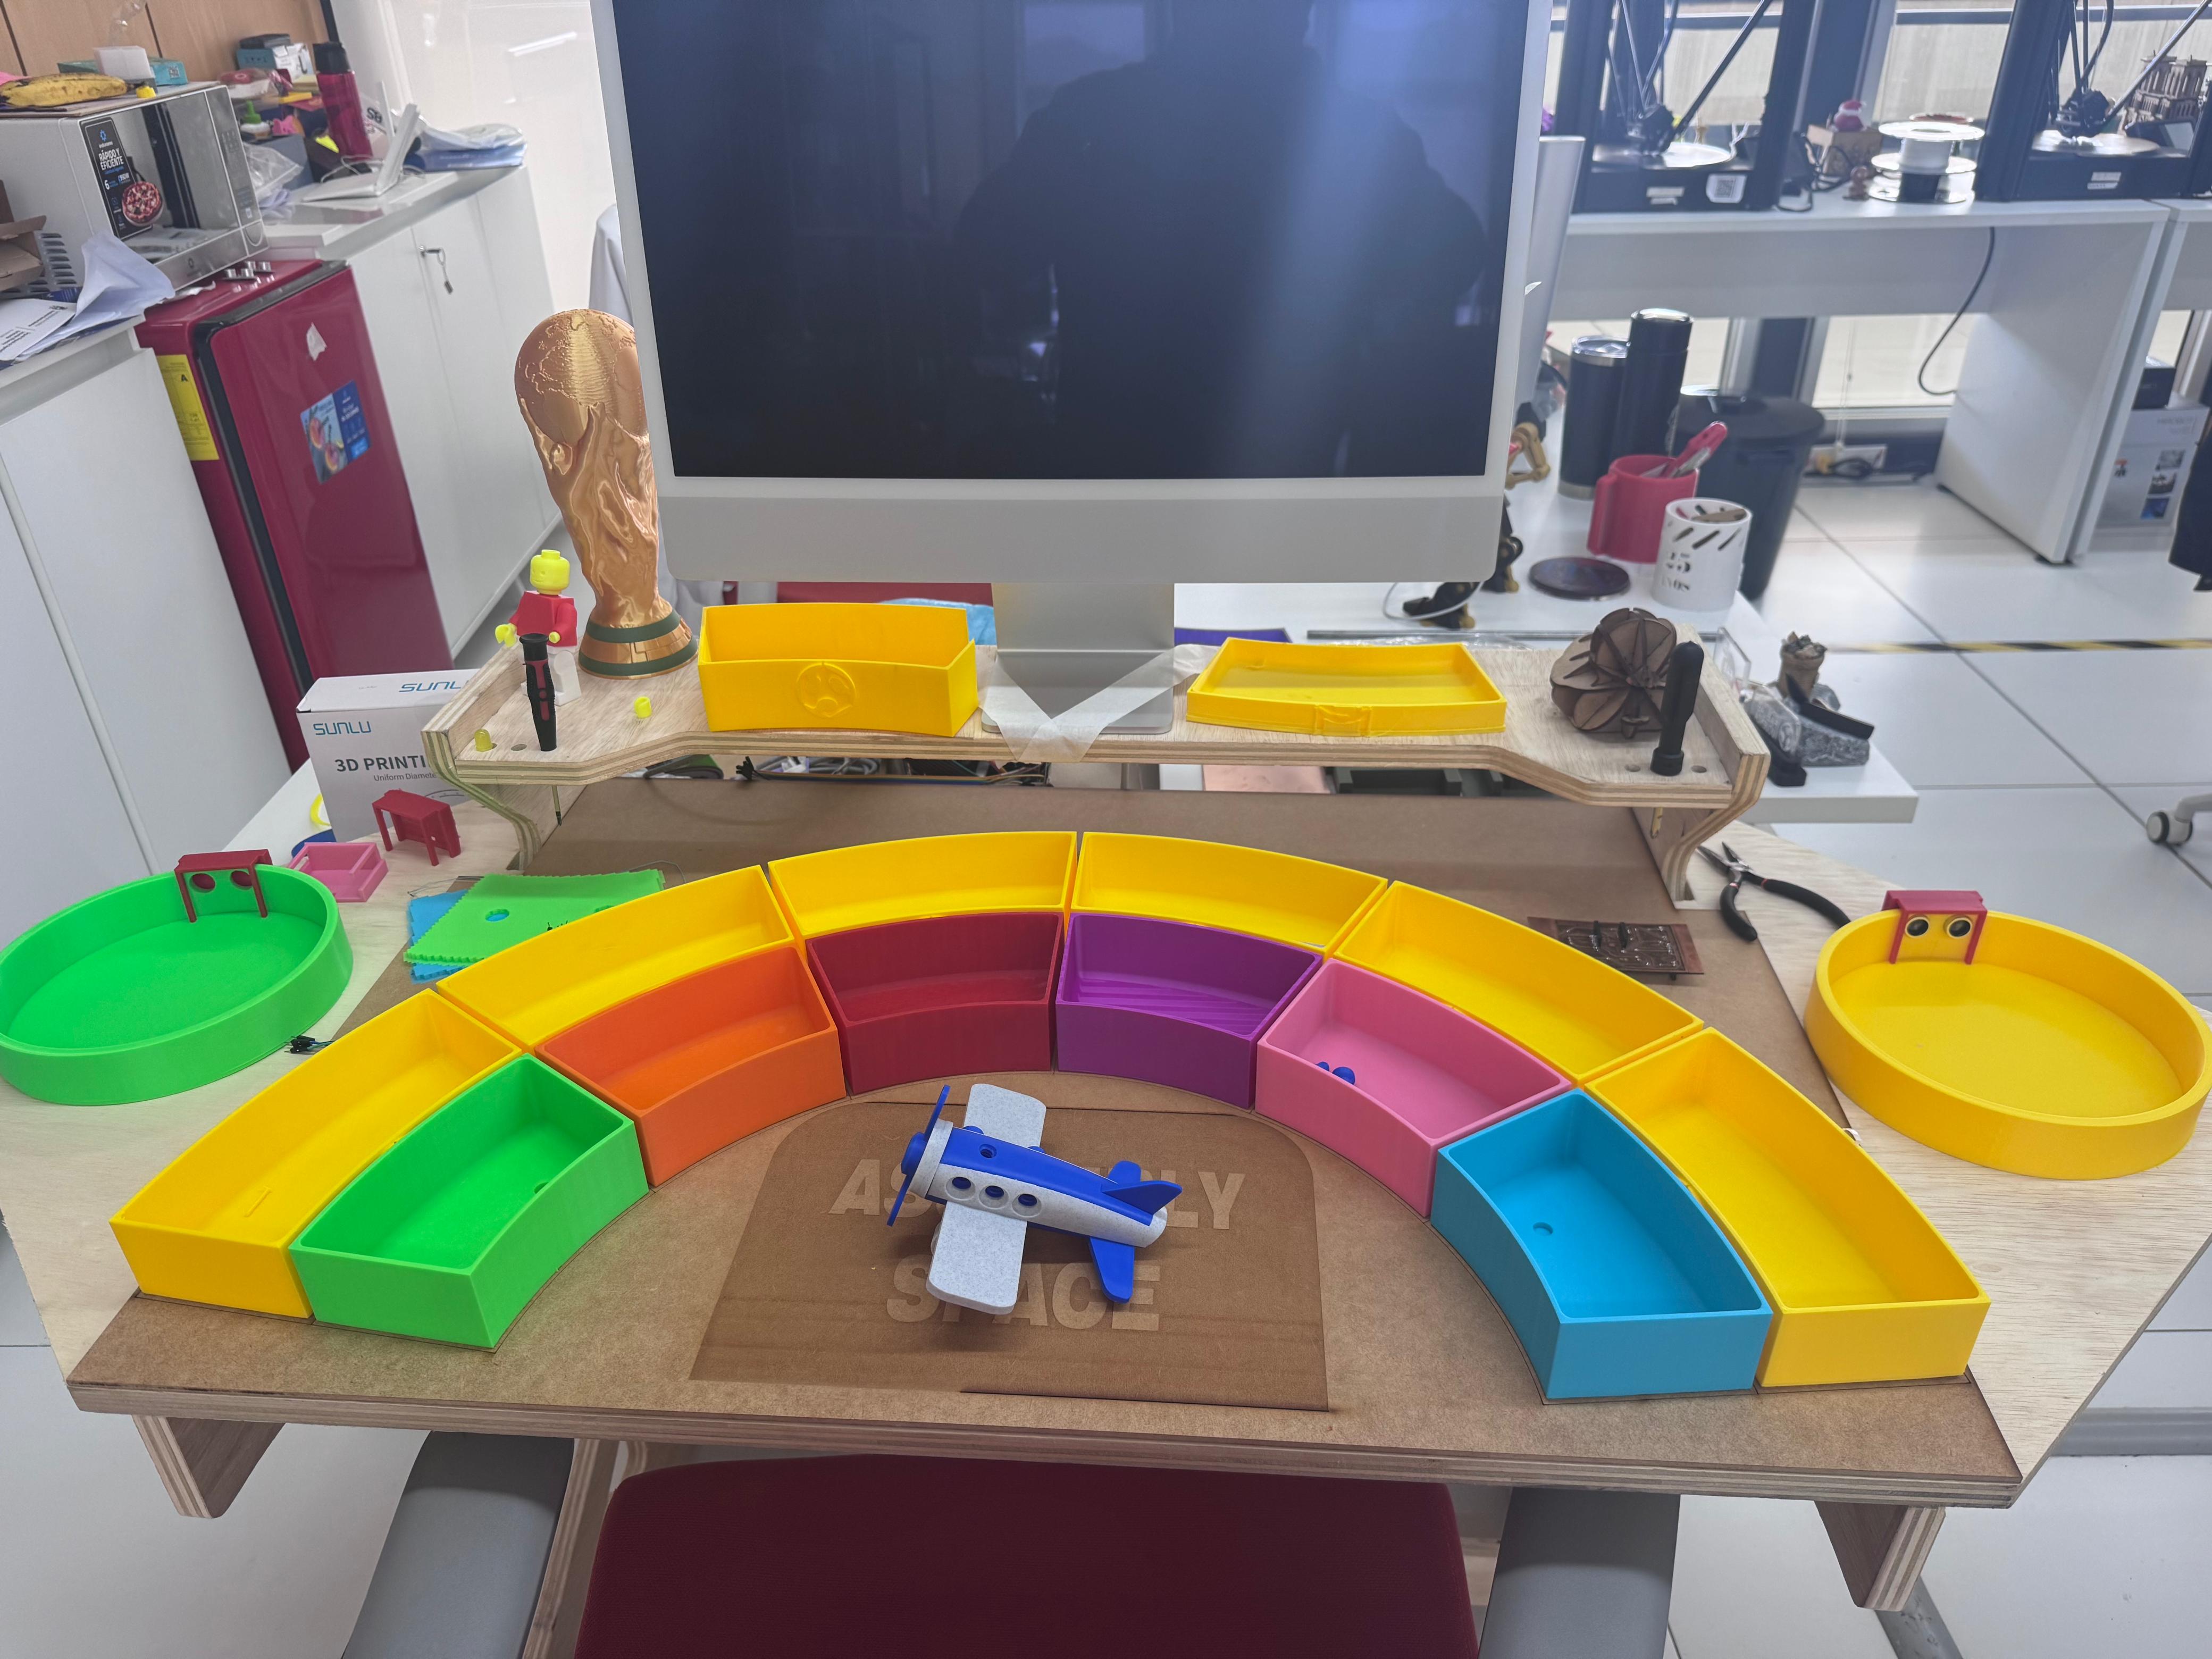
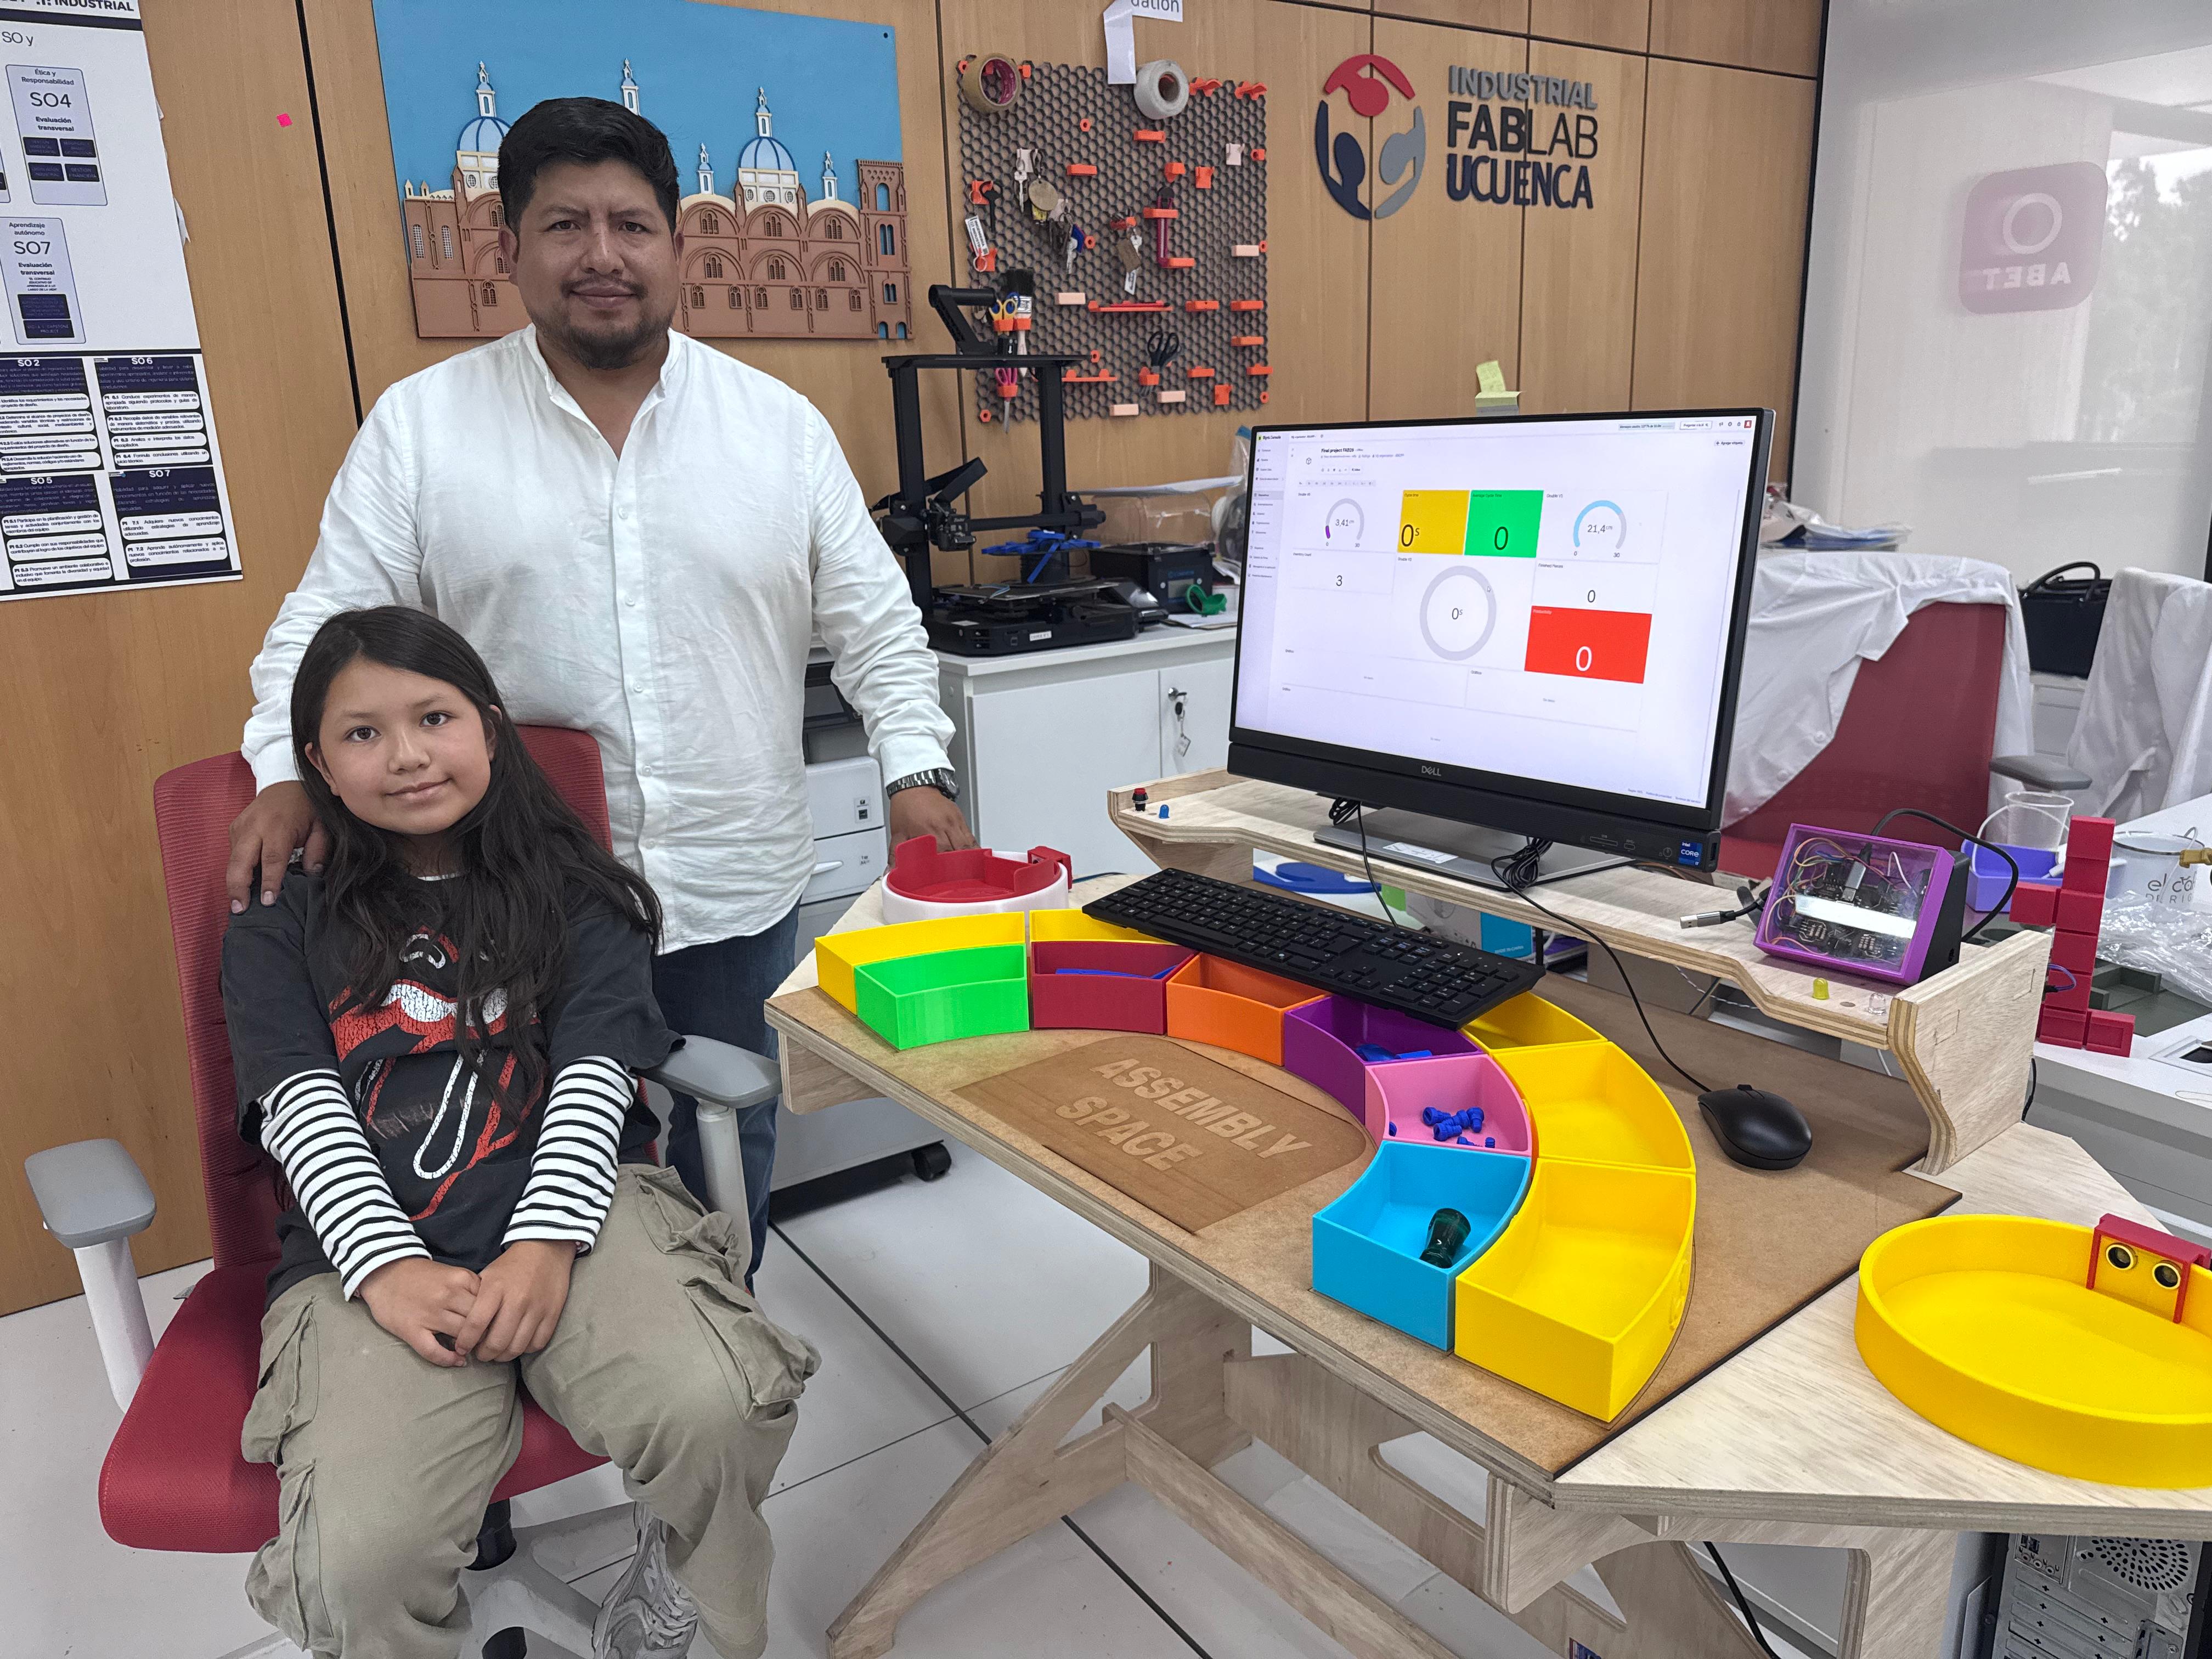
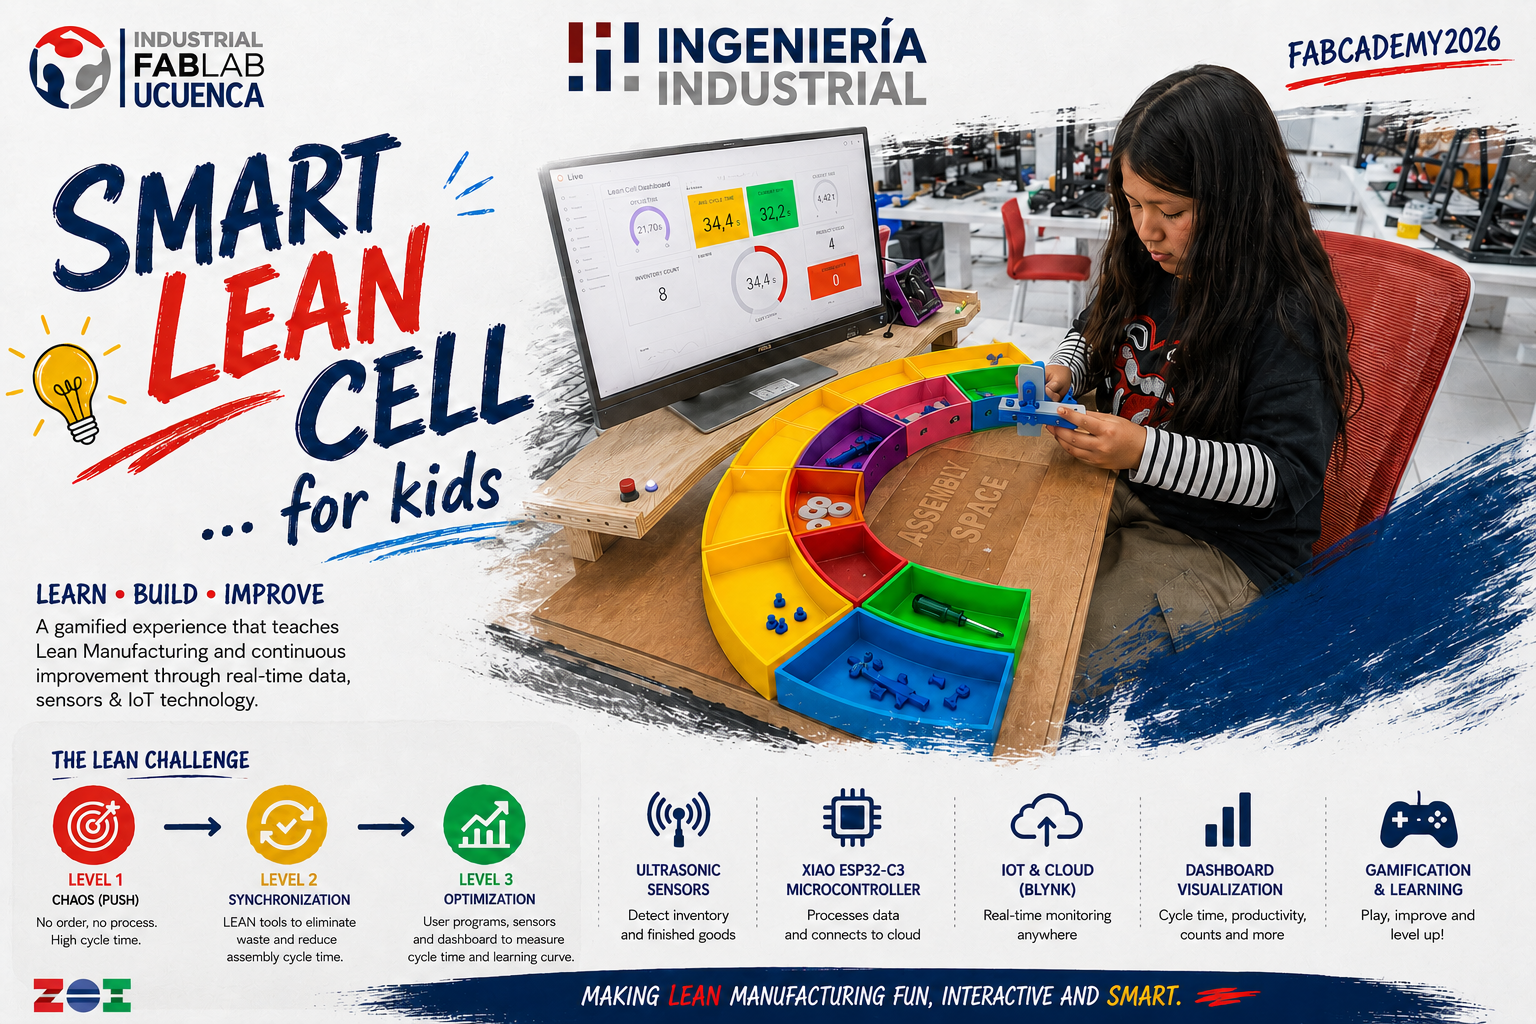
My final project is Smart Lean Cell, a gamified STEM learning platform that introduces children to Lean Manufacturing, TPS (Toyota Production System), flow, 5S organization and process optimization through a physical modular assembly station. The project transforms industrial engineering concepts into an interactive activity: children assemble simple products, move parts through a defined process, and receive visual and digital feedback from sensors, LEDs and a Blynk dashboard.
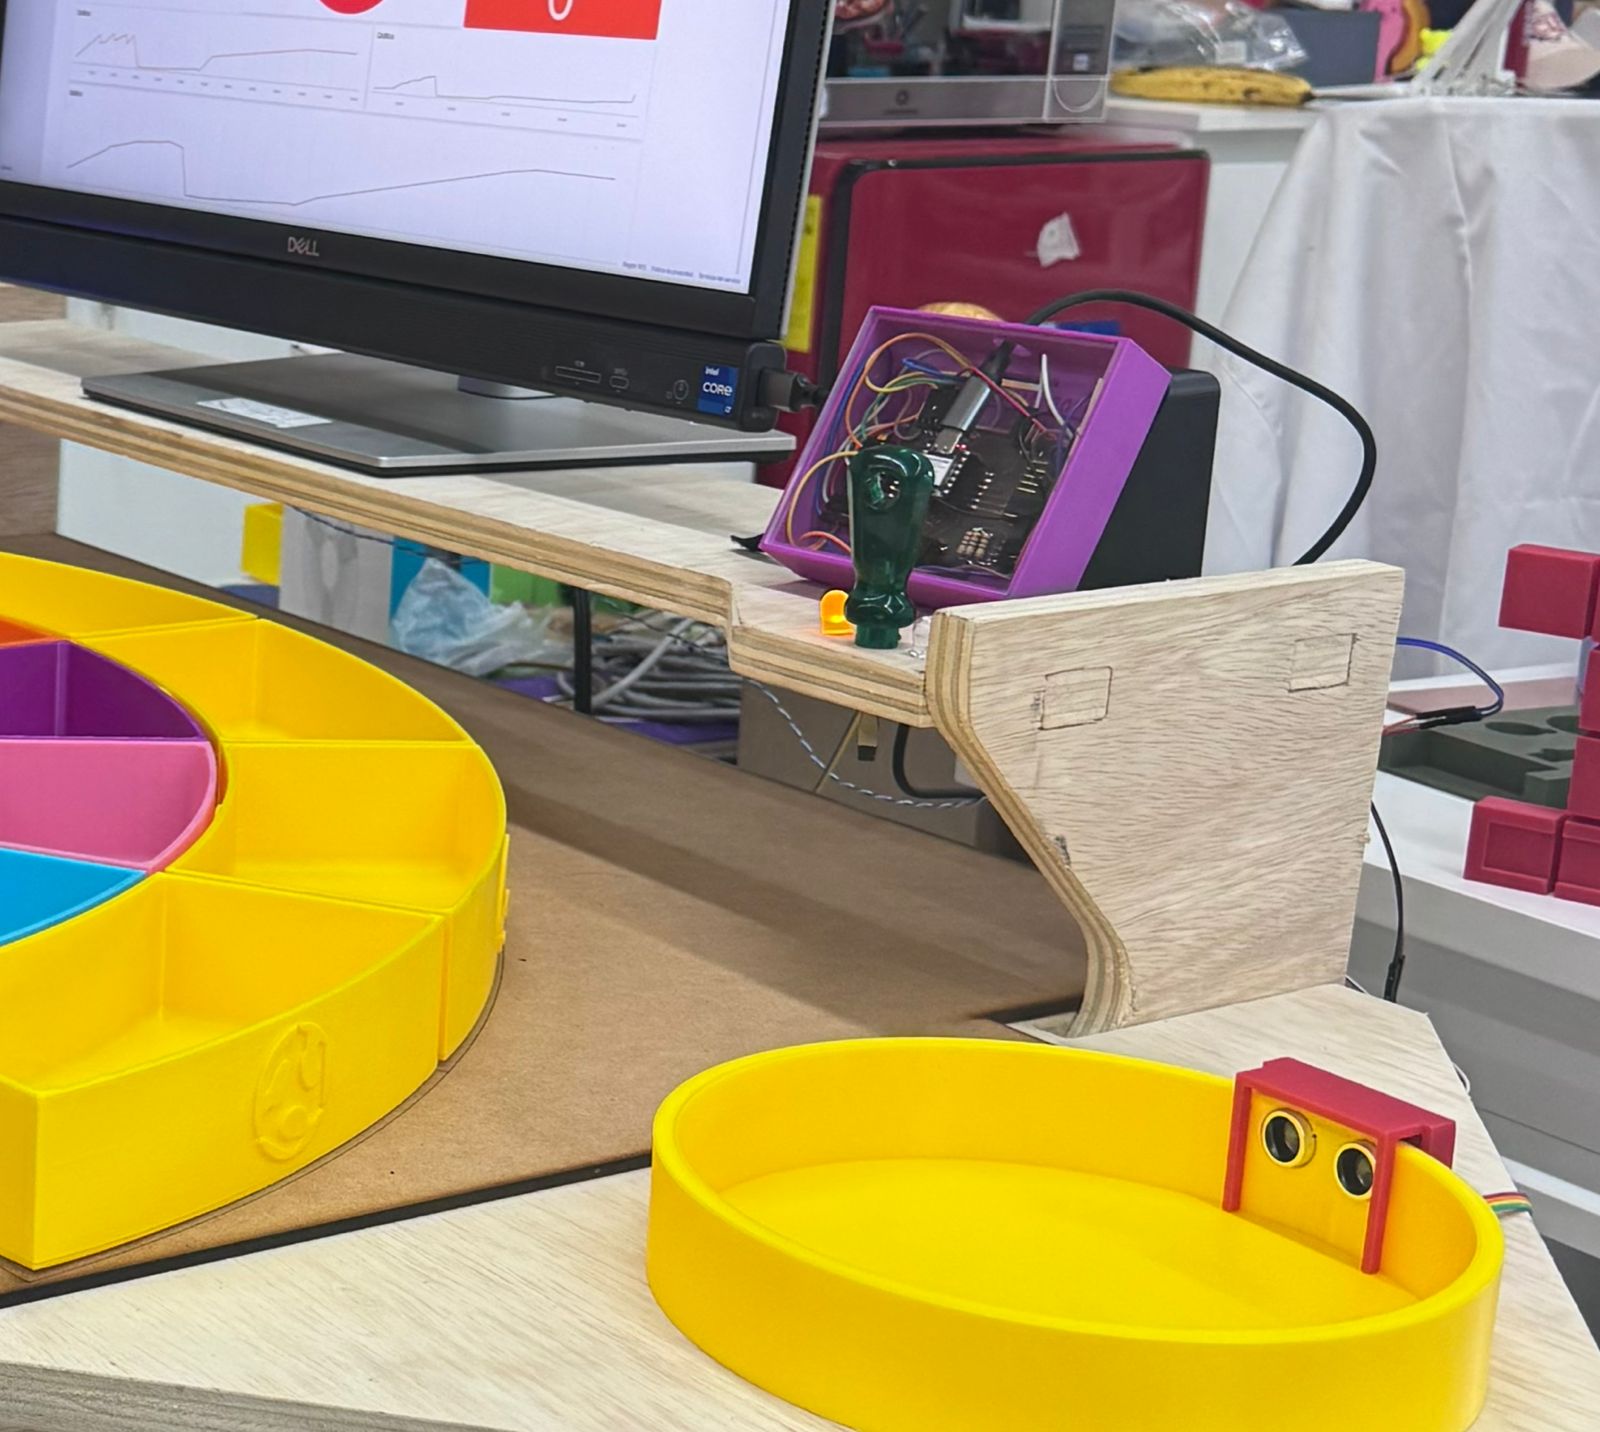
The system integrates a CNC-machined workstation, laser-cut physical panels, 3D printed Kanban-style trays, a custom PCB based on a Seeed Studio XIAO ESP32-C3, HC-SR04 ultrasonic sensors, status LEDs, embedded programming, network communication and a dashboard for cycle-time measurement.
Open Final Project Page Open Published Page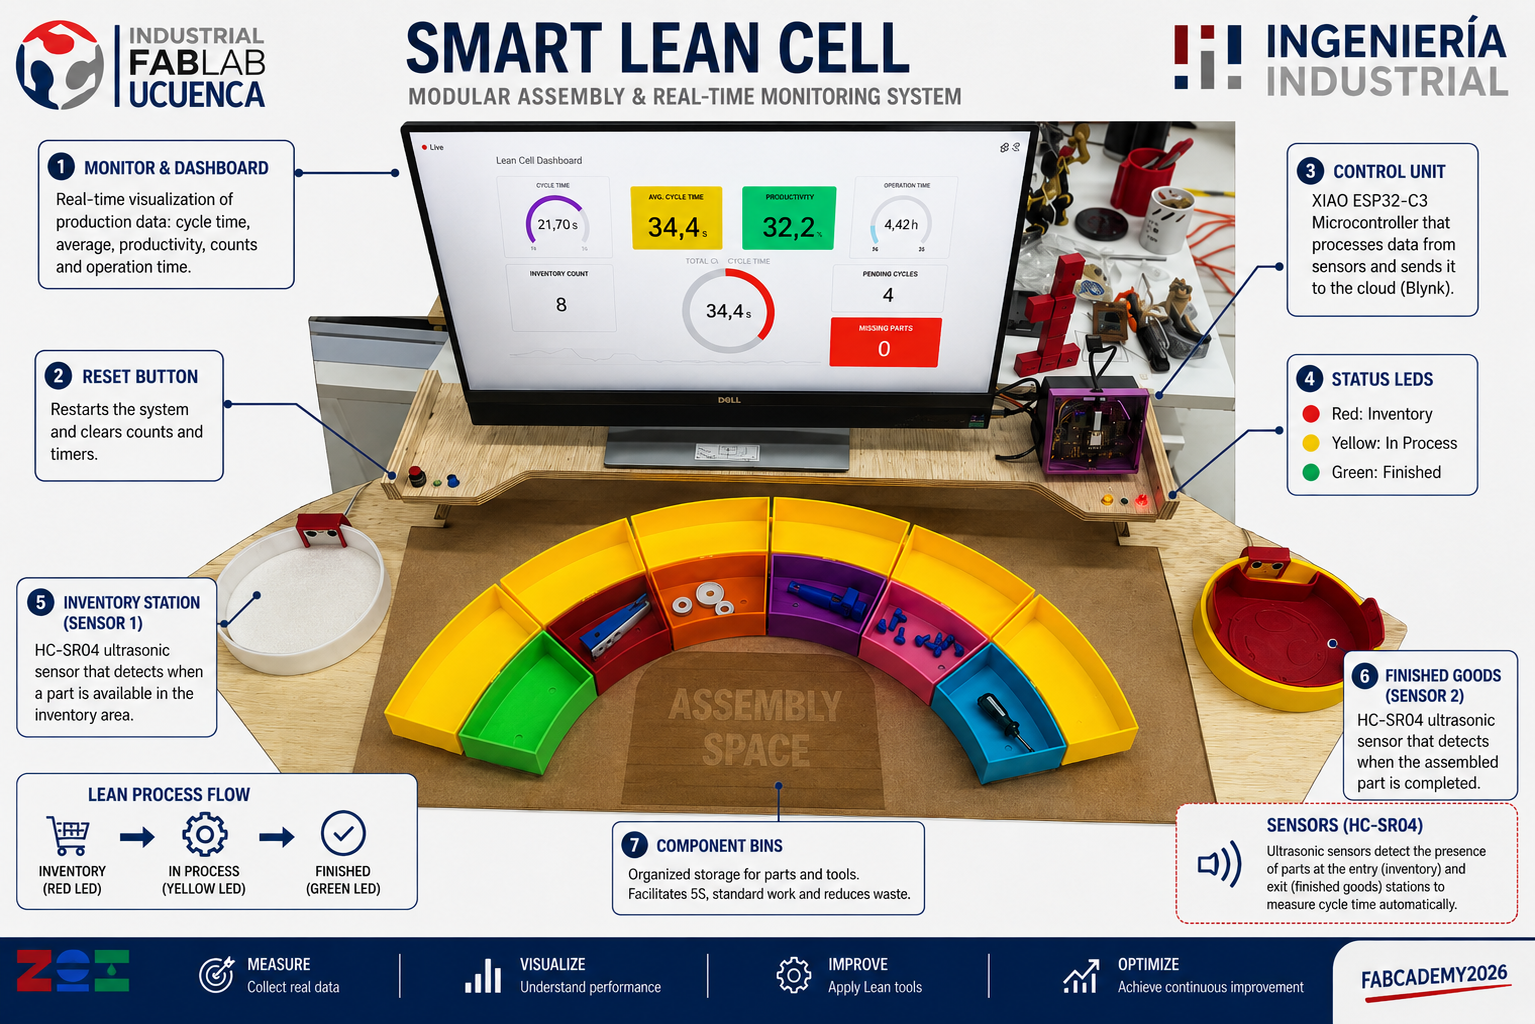
The main application is education. Smart Lean Cell is intended for children, students and training environments where abstract production concepts are difficult to understand only through theory. By using a physical game-like workstation, learners can see how disorder affects time, how organization improves flow, and how data makes improvement decisions more objective.
Children interact with fabricated objects, sensors, LEDs and a dashboard while learning by doing.
The platform demonstrates 5S, standard work, visual management, flow and waste reduction.
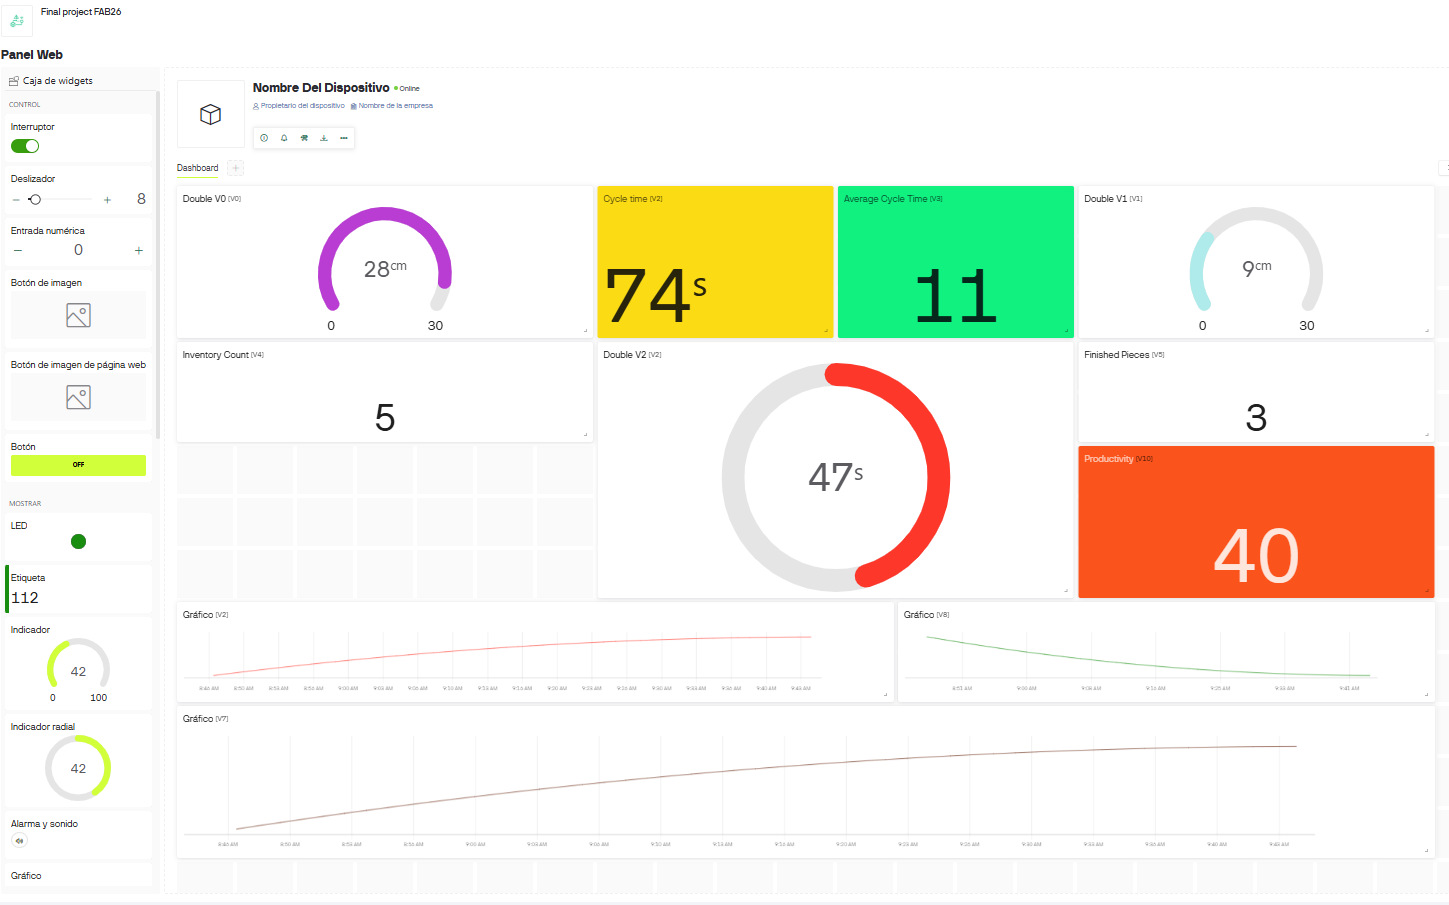
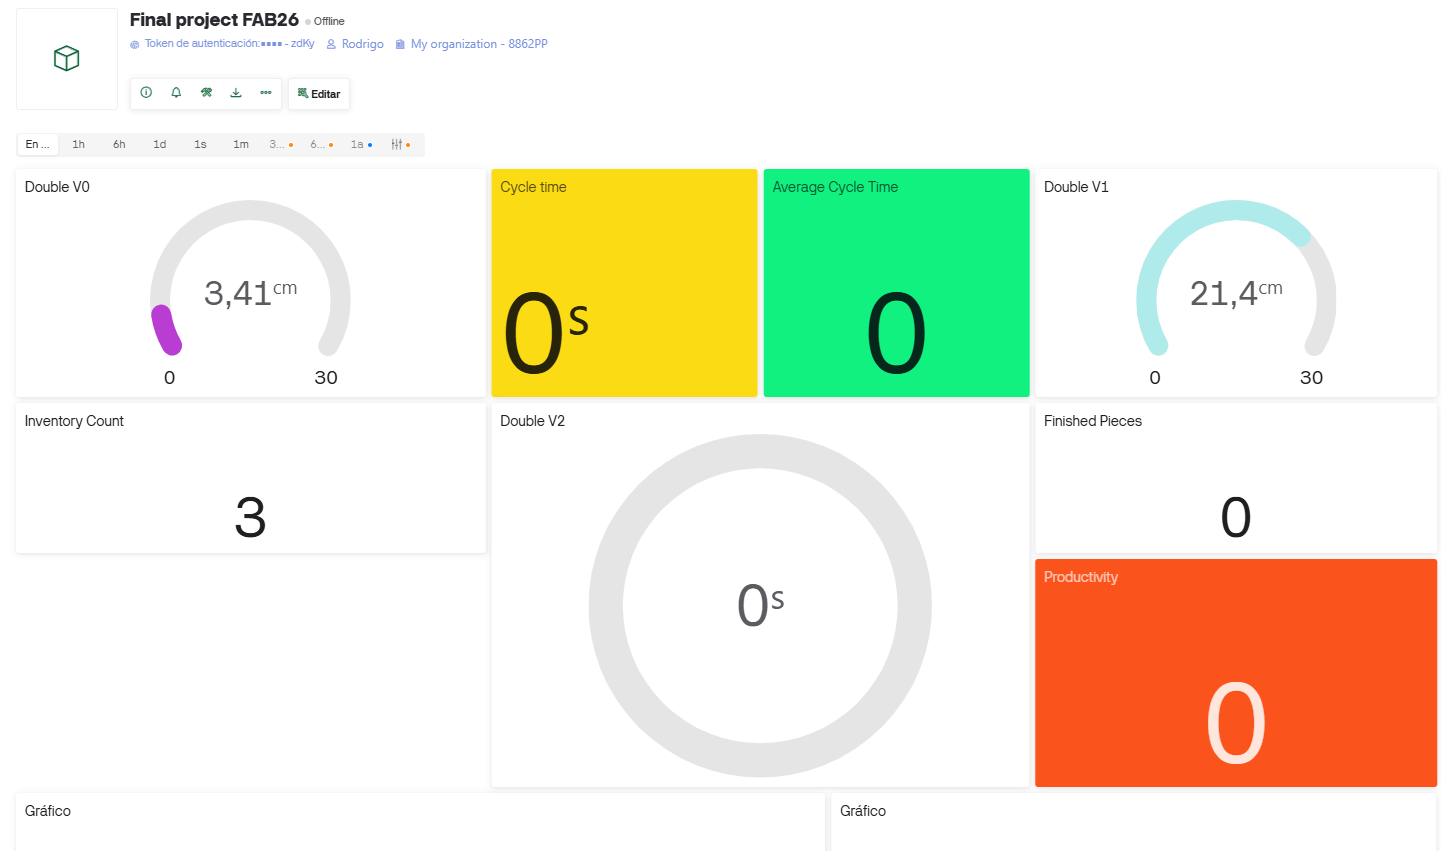
Cycle time, inventory count, finished parts and productivity are visualized in real time.
Smart Lean Cell was developed from the intersection of three fields: Lean Manufacturing education, STEM learning and digital fabrication. In industry, Lean training often uses dojos or simulated production cells so workers can practice standard work, waste identification and flow before entering the real production line. In education, STEM activities are more effective when learners can touch, assemble, test and iterate. Fab Academy made it possible to connect both ideas through local fabrication.
The project is also related to 5S and methods engineering. 5S explains why each tool and component should have a defined place. Therbligs and motion study explain why unnecessary searching, holding, reaching or waiting affects productivity. For children, these concepts are introduced in a simplified way: if the parts are mixed, the task is slower; if the workstation is organized, the task becomes easier; if the system measures time, the learner can see improvement.
| Reference Area | How it influenced the project | Implementation in Smart Lean Cell |
|---|---|---|
| Toyota Production System | Inspired the focus on flow, standard work, visual management and continuous improvement. | Three learning levels: chaos, synchronization and optimization. |
| Lean Dojo Training | Inspired the idea of preparing people through practice before real production. | A safe, small-scale learning cell for children and STEM activities. |
| STEM Construction Kits | Showed the value of learning by manipulating physical pieces, making mistakes and trying again. | The airplane assembly challenge lets children build, compare, reorganize and improve. |
| Educational Production Simulators | Influenced the decision to make the workstation measurable, not only visual. | The dashboard compares cycle time, inventory, finished parts and productivity between activity levels. |
| 5S and Visual Management | Defined the importance of organizing tools, parts and work areas. | Laser-cut panel, color-coded trays, inventory area and finished goods area. |
| Methods Engineering | Supported the analysis of unnecessary motion, searching and waiting. | The activity compares disorganized assembly with organized assembly. |
| Digital Fabrication | Allowed the learning cell to be made locally and modified quickly. | CNC machining, laser cutting, 3D printing and custom PCB fabrication. |
I reviewed projects and references that connect manufacturing education, digital fabrication and live monitoring. These references helped me define the project decisions: make the process visible, reduce search time, create a clear before/after comparison, and use data to support continuous improvement.
| Reference | Relevant Idea | How I Adapted It |
|---|---|---|
| Toyota Production System | Flow, waste reduction, standard work and continuous improvement. | Converted TPS concepts into three child-friendly game levels: chaos, synchronization and optimization. |
| Fab Academy integrated final projects | Integration of design, fabrication, electronics, programming, networking and documentation. | Structured Smart Lean Cell as a complete synthesis project rather than a single fabricated object. |
| Fab Academy 2026 ZOI - Networking and Communications group assignment | Used XIAO ESP32 boards, Wi-Fi and Blynk Cloud to exchange messages and control LEDs. | Supported my decision to use Wi-Fi and Blynk as the communication layer for real-time process monitoring. |
| Hideo Oguri - Input Devices, HC-SR04 and Blynk | Documented ultrasonic sensing with HC-SR04 and experiments sending values through Blynk. | Confirmed that ultrasonic distance sensing can be used as a low-cost event detector for inventory and finished-goods stations. |
| Sangay Dorji - Door Butler final project planning | Proposed a XIAO ESP32-based system with ultrasonic detection, app communication and user feedback. | Inspired the idea of packaging sensing, feedback and app communication into one accessible IoT prototype. |
| Techworks Fab Academy - Blynk interface exploration | Compared interface tools and described Blynk as a fast way to build IoT dashboards with widgets. | Helped justify the use of Blynk widgets for gauges, indicators and production metrics instead of building a dashboard from zero. |
| Noor Suwaidan - EduTile final project | Developed an educational tangible interface inspired by interactive learning systems for children. | Reinforced the importance of physical interaction, modularity and playful learning for young users. |
| Gail Myers - STEM racetrack timing system proposal | Proposed a timing system for young children in a STEM school context. | Related directly to my goal of measuring time as part of a child-friendly learning activity. |
| Blynk IoT platform | Cloud dashboard, virtual datastreams and real-time visualization. | Used Blynk to show cycle time, average time, inventory count, finished parts and productivity. |
| Seeed Studio XIAO ESP32-C3 documentation | Small Wi-Fi microcontroller suitable for embedded IoT projects. | Designed the custom PCB around the XIAO ESP32-C3 and used Wi-Fi to connect the prototype to the dashboard. |
| Arduino documentation | Embedded programming workflow, pin control and serial debugging. | Programmed sensor reading, LED states, Blynk communication and cycle-time calculation in Arduino IDE. |
The final project is organized as an integrated system. The physical layer guides the learner, the electronic layer detects process events, the programming layer calculates cycle time, and the dashboard layer visualizes the results. This architecture was important because the prototype needed to be understandable for children while also demonstrating technical integration for Fab Academy.
| Layer | Function | Fabrication / Tool |
|---|---|---|
| Learning layer | Defines the gamified Lean Challenge and learning objectives. | Instructional design based on TPS, Lean and STEM. |
| Mechanical layer | Supports the workstation, monitor, trays and activity area. | CNC-machined press-fit module. |
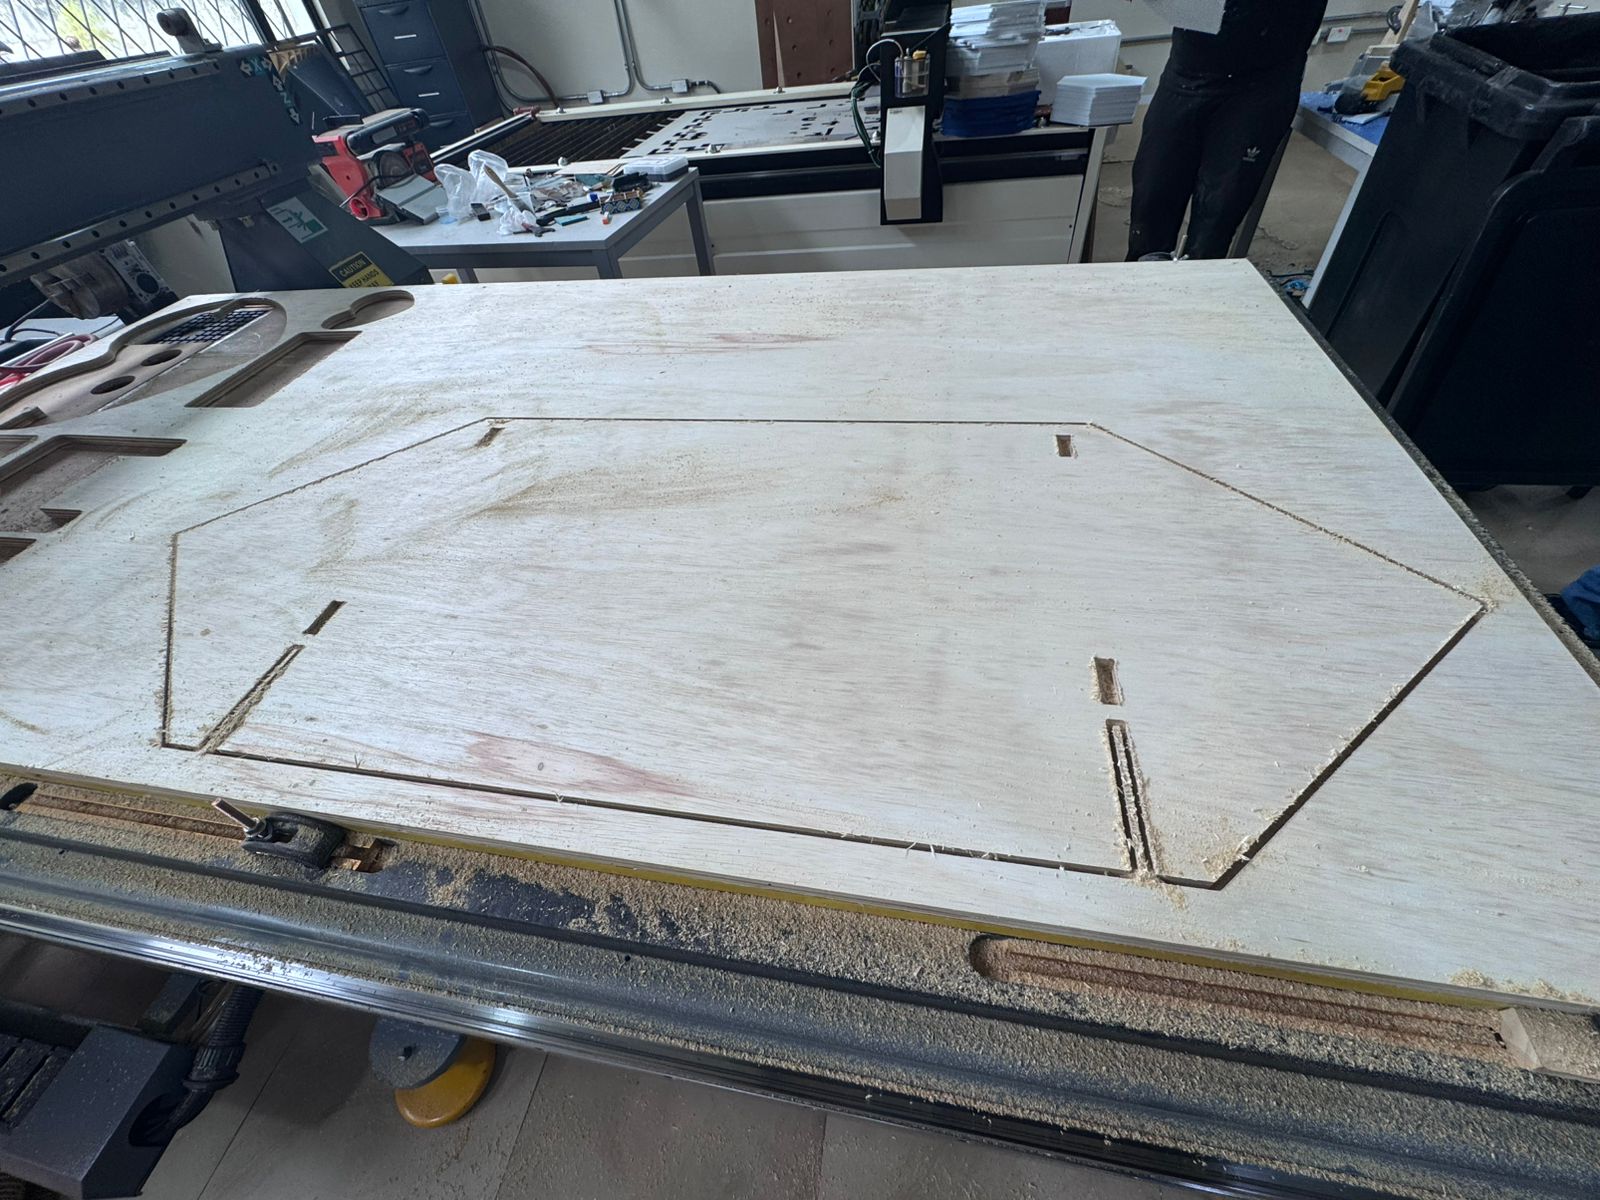
| Organization layer | Separates parts, inventory and finished goods. | Laser-cut panel and 3D printed trays. |
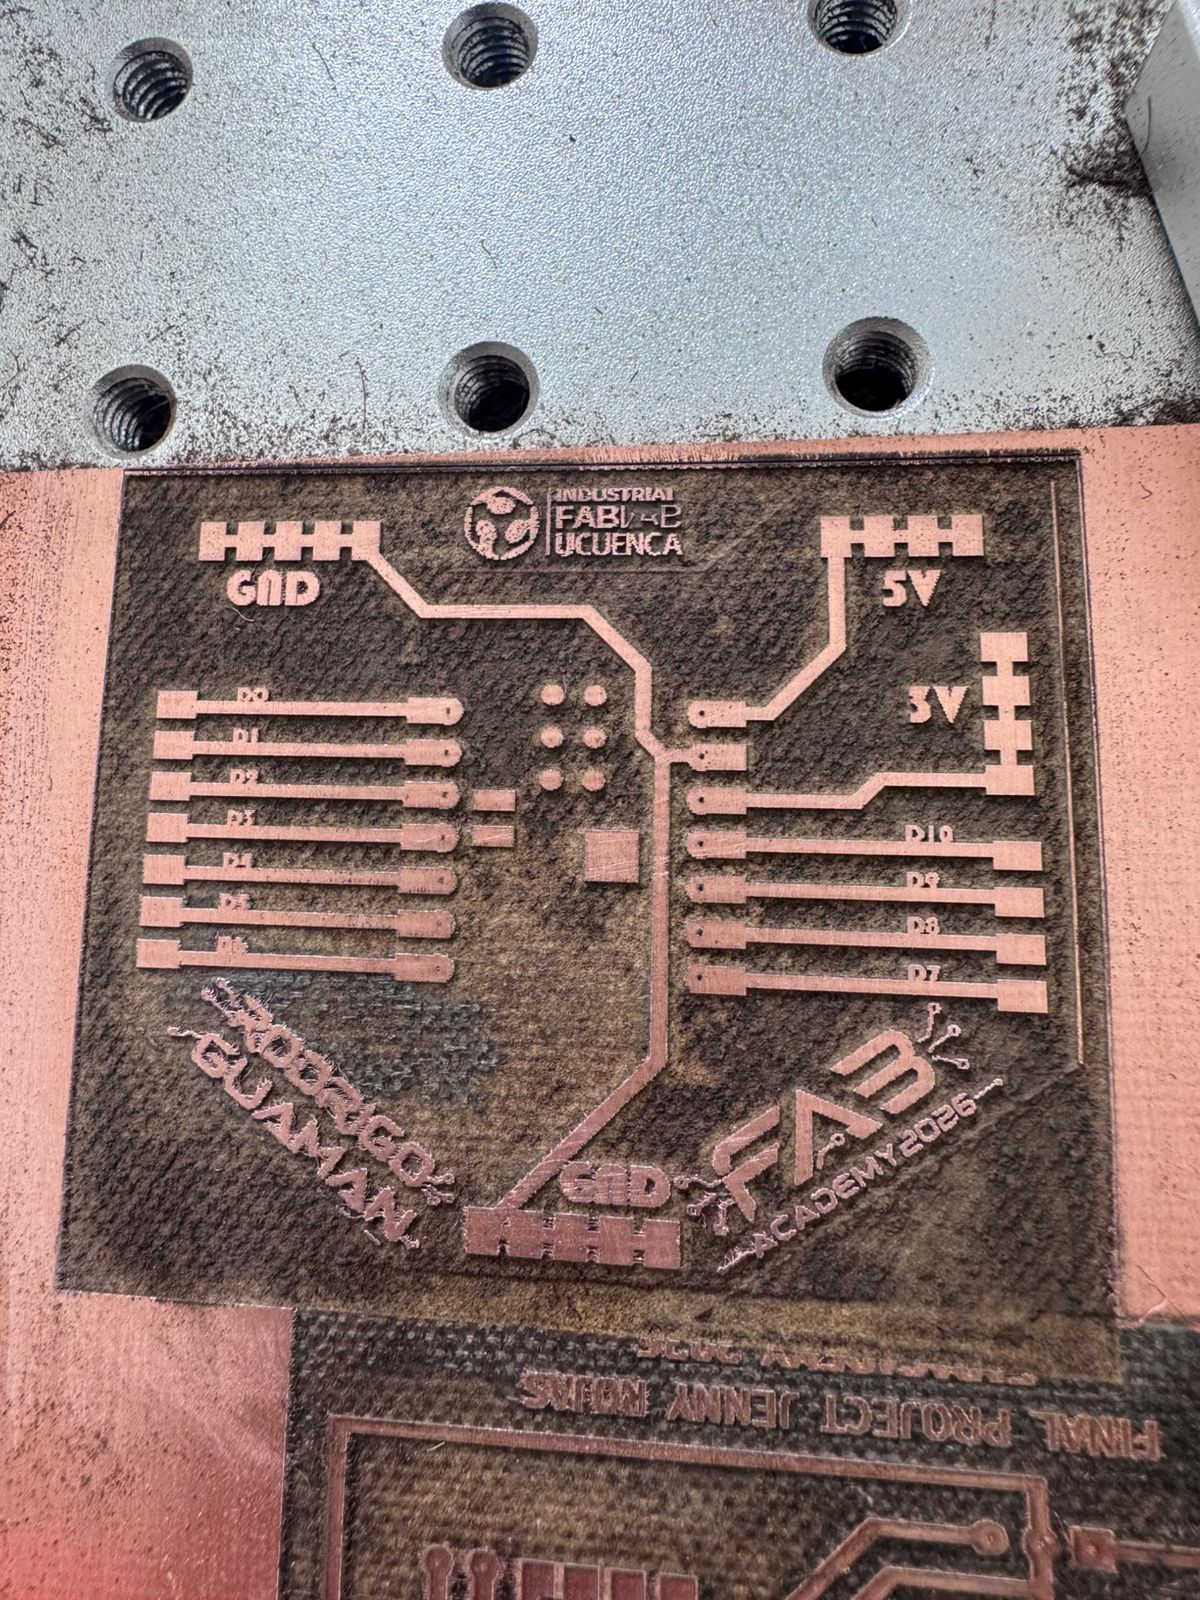
| Electronic layer | Connects sensors, LEDs and microcontroller. | KiCad PCB fabricated with fiber laser process. |
| Embedded layer | Reads sensors, controls LEDs and calculates cycle time. | Arduino IDE on XIAO ESP32-C3. |
| Network layer | Sends production data to the cloud dashboard. | Blynk datastreams and Wi-Fi communication. |
| Evaluation layer | Shows cycle time, inventory, finished parts and productivity. | Blynk web dashboard. |
The following development notes answer the Fab Academy final project questions without duplicating the information in a summary table. Each answer includes the reasoning behind the design decision, the implementation in the Smart Lean Cell and the visual evidence available from the final project documentation.
Smart Lean Cell is an educational manufacturing cell that turns Lean Manufacturing into a physical and measurable experience for children. The user does not only read about Lean; the user performs an assembly activity, moves a part through a process and receives immediate feedback from the workstation.
In practice, the system works as a small Lean dojo. It allows the facilitator to compare a chaotic process with an organized process and then with a monitored process. This makes the learning path progressive and easier to understand.
The project is based on ideas that already exist in industrial training and education: Toyota Production System simulations, 5S workstations, Lean dojos, classroom production games and STEM kits. These previous works show that people learn process improvement better when they can see the problem and test a new method.
My project adapts those ideas to a Fab Academy context. Instead of buying a commercial training kit, I fabricated the cell using CNC machining, laser cutting, 3D printing and a custom PCB. The novelty is not claiming that Lean or assembly games are new; the contribution is creating a compact, child-oriented, digitally fabricated and sensorized version that can be replicated or modified in a Fab Lab.
I also reviewed previous Fab Academy work to understand how other students approached similar technical or educational problems. These projects did not solve the same problem as Smart Lean Cell, but each one contributed a useful precedent: wireless communication with Blynk, ultrasonic sensing, child-centered tangible interfaces, time measurement and integrated IoT prototypes.
| Previous Fab Academy Work | What Was Done Beforehand | Connection with Smart Lean Cell |
|---|---|---|
| ZOI Week 11 Group Assignment | Custom boards with Seeed Studio XIAO ESP32 modules communicated through Wi-Fi using Blynk Cloud as the IoT message broker. | I used the same communication logic to send process data from the XIAO ESP32-C3 to a dashboard. |
| Hideo Oguri - Input Devices | Tested HC-SR04 ultrasonic sensing and documented Blynk experiments for sending sensor information. | Supported the choice of HC-SR04 sensors as low-cost detectors for part movement and cycle-time events. |
| Sangay Dorji - Door Butler | Planned an IoT door-monitoring project using ultrasonic detection, XIAO ESP32 hardware and Blynk app interaction. | Provided a precedent for combining detection, feedback and remote visualization in a compact fabricated object. |
| Techworks - Interface and Application Programming | Explored Blynk as an IoT interface tool with drag-and-drop widgets for microcontroller projects. | Helped validate Blynk as a practical dashboard platform for cycle time, inventory and productivity indicators. |
| Noor Suwaidan - EduTile | Created a tangible educational interface inspired by interactive board games and learning systems. | Connected with my goal of making abstract concepts understandable through physical play and modular interaction. |
| Gail Myers - Race Track Timing System | Proposed a timing system for young children in a STEM school context. | Related to my decision to make cycle time visible and measurable as part of the learning experience. |
I designed the Smart Lean Cell as a system, not as isolated parts. The design includes the learning sequence, the physical workstation, the organization tools, the electronic control layer and the dashboard. Each element was designed with two criteria: it had to work technically, and it had to be understandable for children.
The design therefore connects physical layout, human behavior and data collection. The objective was to make the workstation itself teach the idea of flow and waste reduction.
The project used both technical and conceptual sources. Technical sources helped me fabricate and program the prototype. Conceptual sources helped me define what the learning experience should communicate.
These sources were not used as disconnected references. They were translated into design requirements: low-cost materials, visible process states, measurable performance, modular fabrication and a safe learning environment.
The material selection followed the educational nature of the project. I selected accessible materials that can be fabricated locally and replaced easily if the prototype is replicated in another Fab Lab or classroom.
The use of PLA and plywood also supports iteration. If a tray or panel dimension changes, the part can be redesigned and fabricated again quickly.
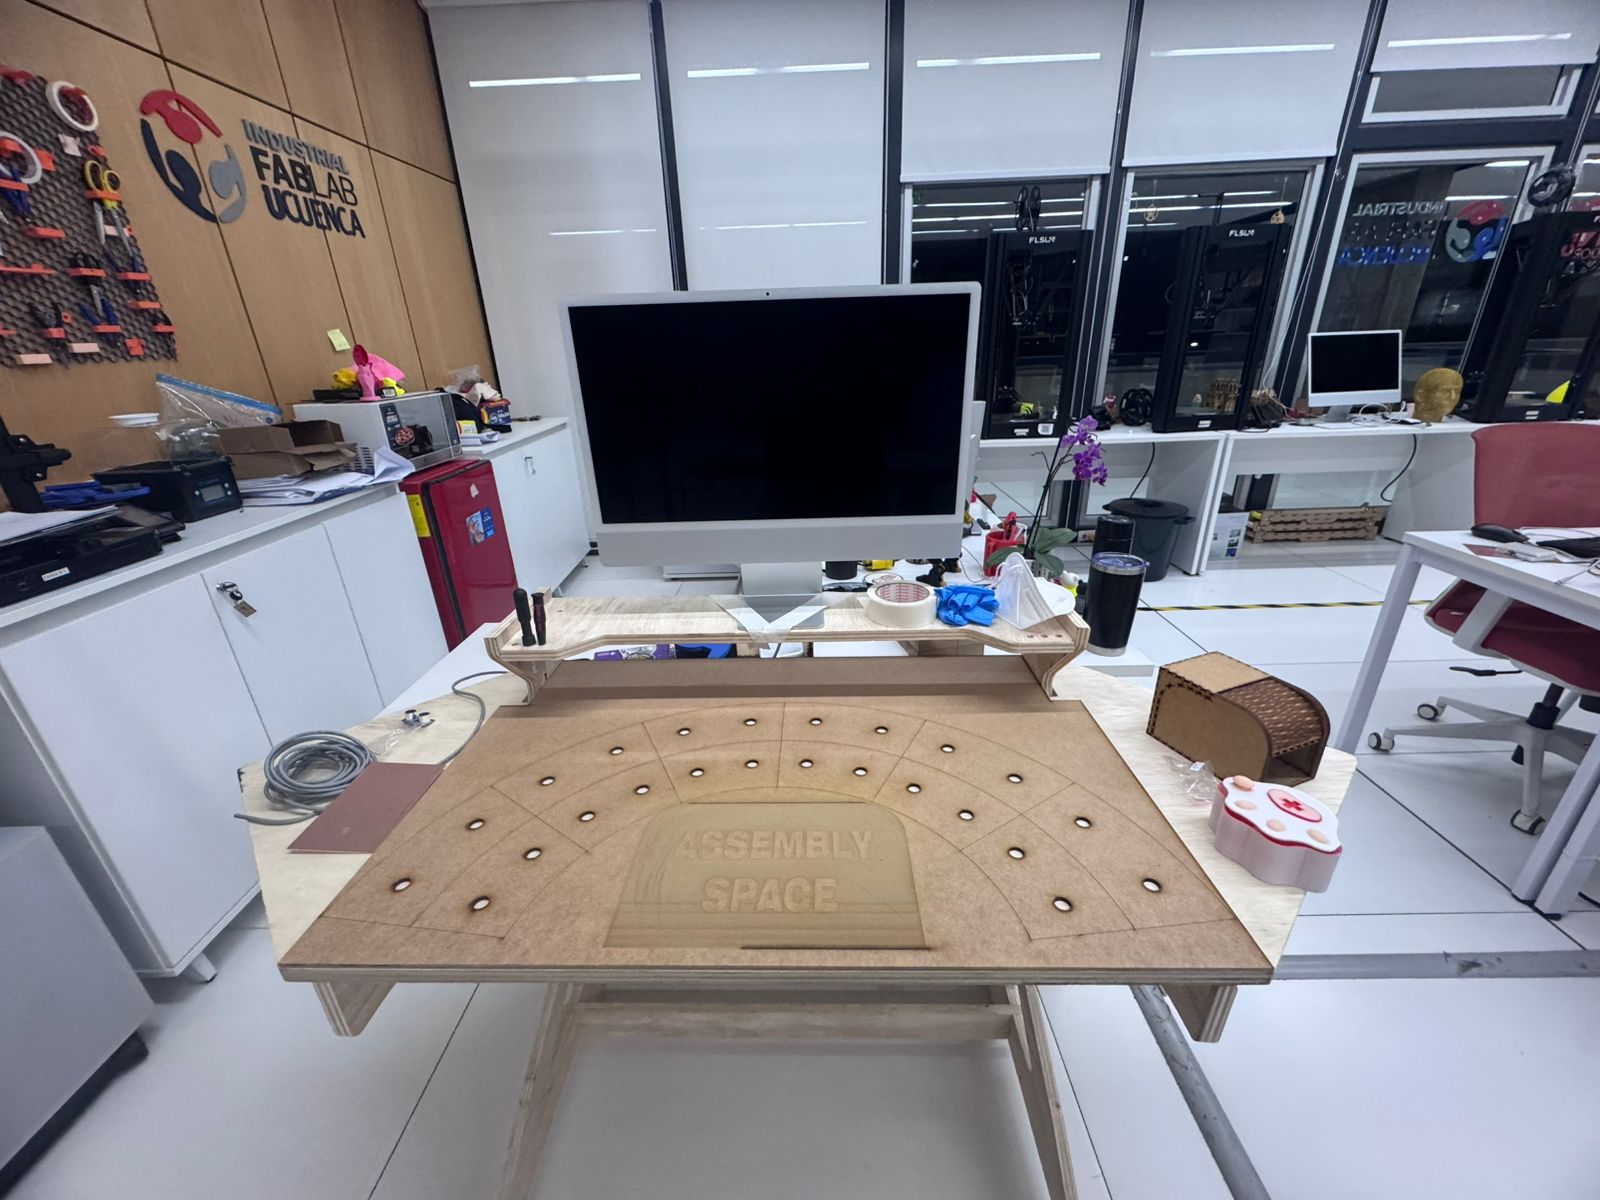
The fabricated parts came from the digital fabrication workflow at Industrial FabLab UCuenca. This includes the CNC machining of the structure, laser cutting of the panel, 3D printing of trays and fabrication of the PCB. Electronics came from laboratory stock and standard maker suppliers.
This matters because the project follows the Fab Academy principle of making as much as possible instead of buying a finished product. I bought or used stock components only where it made sense: microcontroller, sensors, LEDs, resistors and wiring. The value of the project is in the designed integration of these elements.
The project was planned as a low-cost prototype. The largest variable costs are the wood sheet, filament, microcontroller and sensors. Since prices vary by country and supplier, the BOM includes reference cost ranges and reference purchase links.
The cost strategy is important for future use. If the Smart Lean Cell is used in schools or workshops, the design must be affordable enough to fabricate more than one station or replace parts after repeated use. For that reason, the project avoids expensive industrial sensors or proprietary automation hardware.
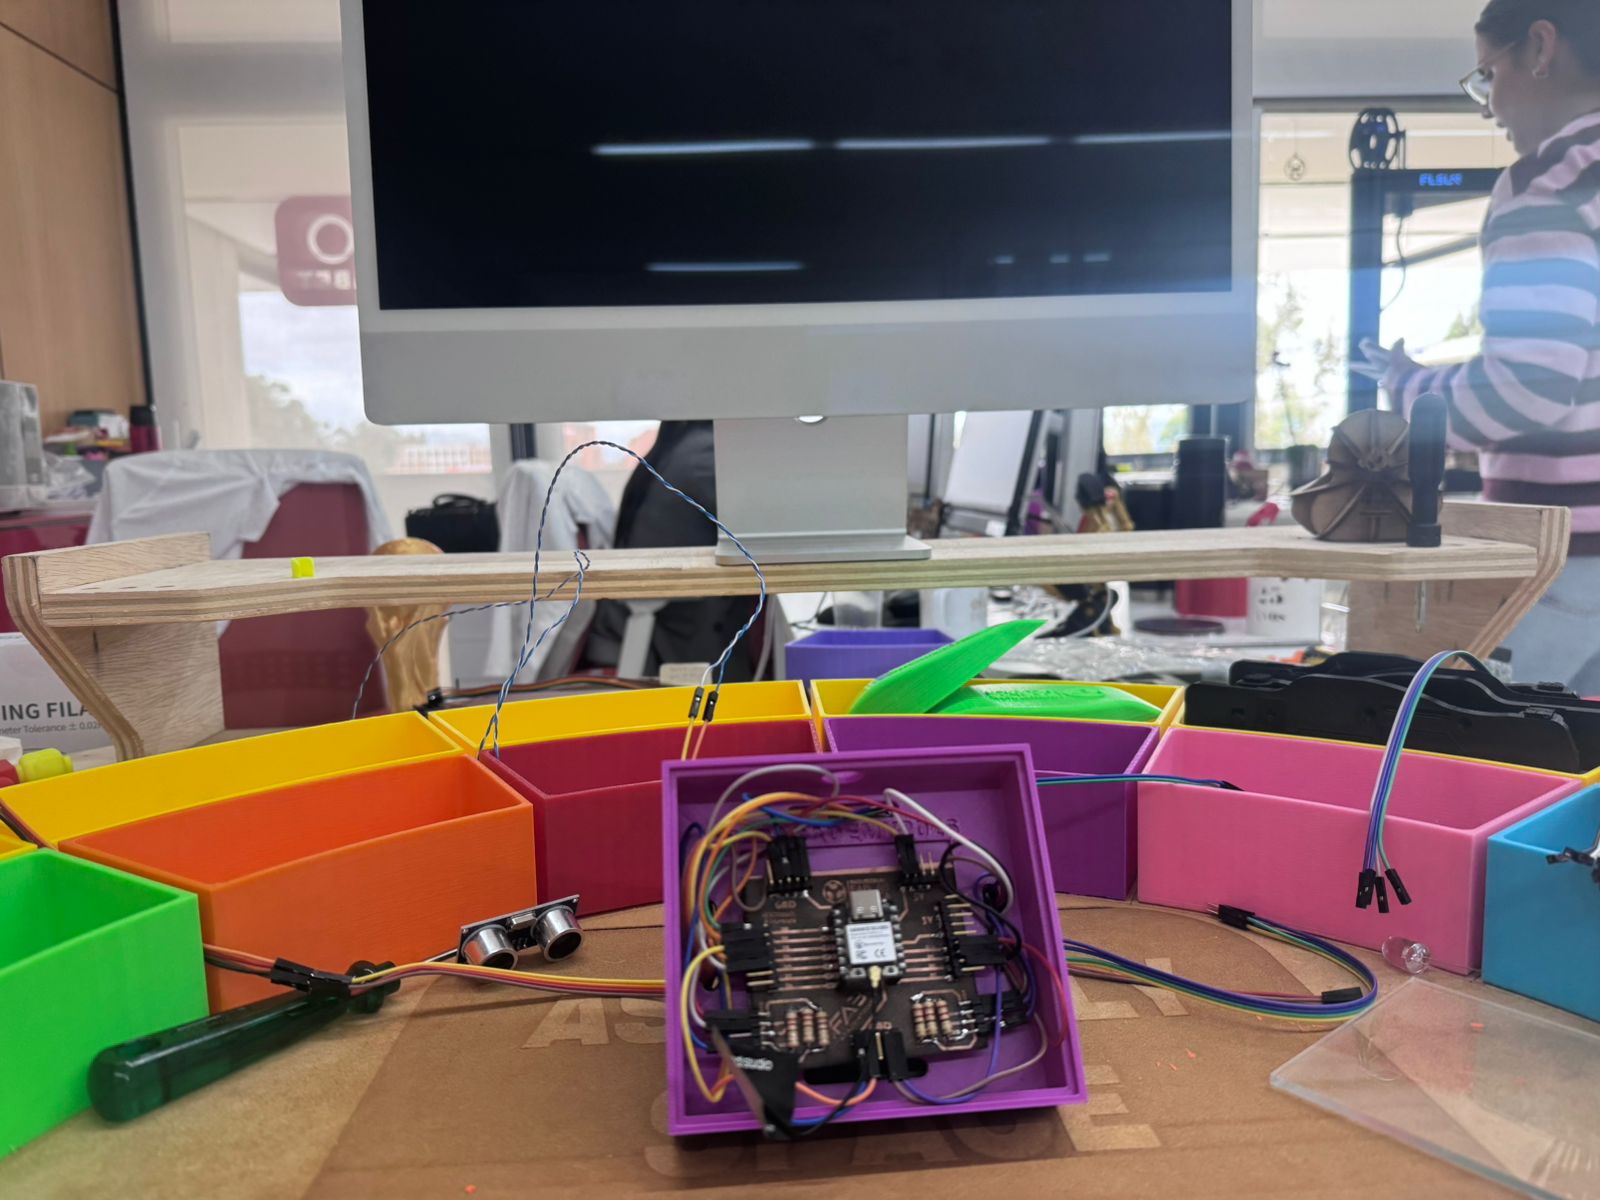
The final prototype is made from several subsystems that work together. The mechanical system holds the workstation. The organization system controls the way parts are presented. The electronic system detects events. The dashboard system visualizes the process. The gamification system gives meaning to the activity.
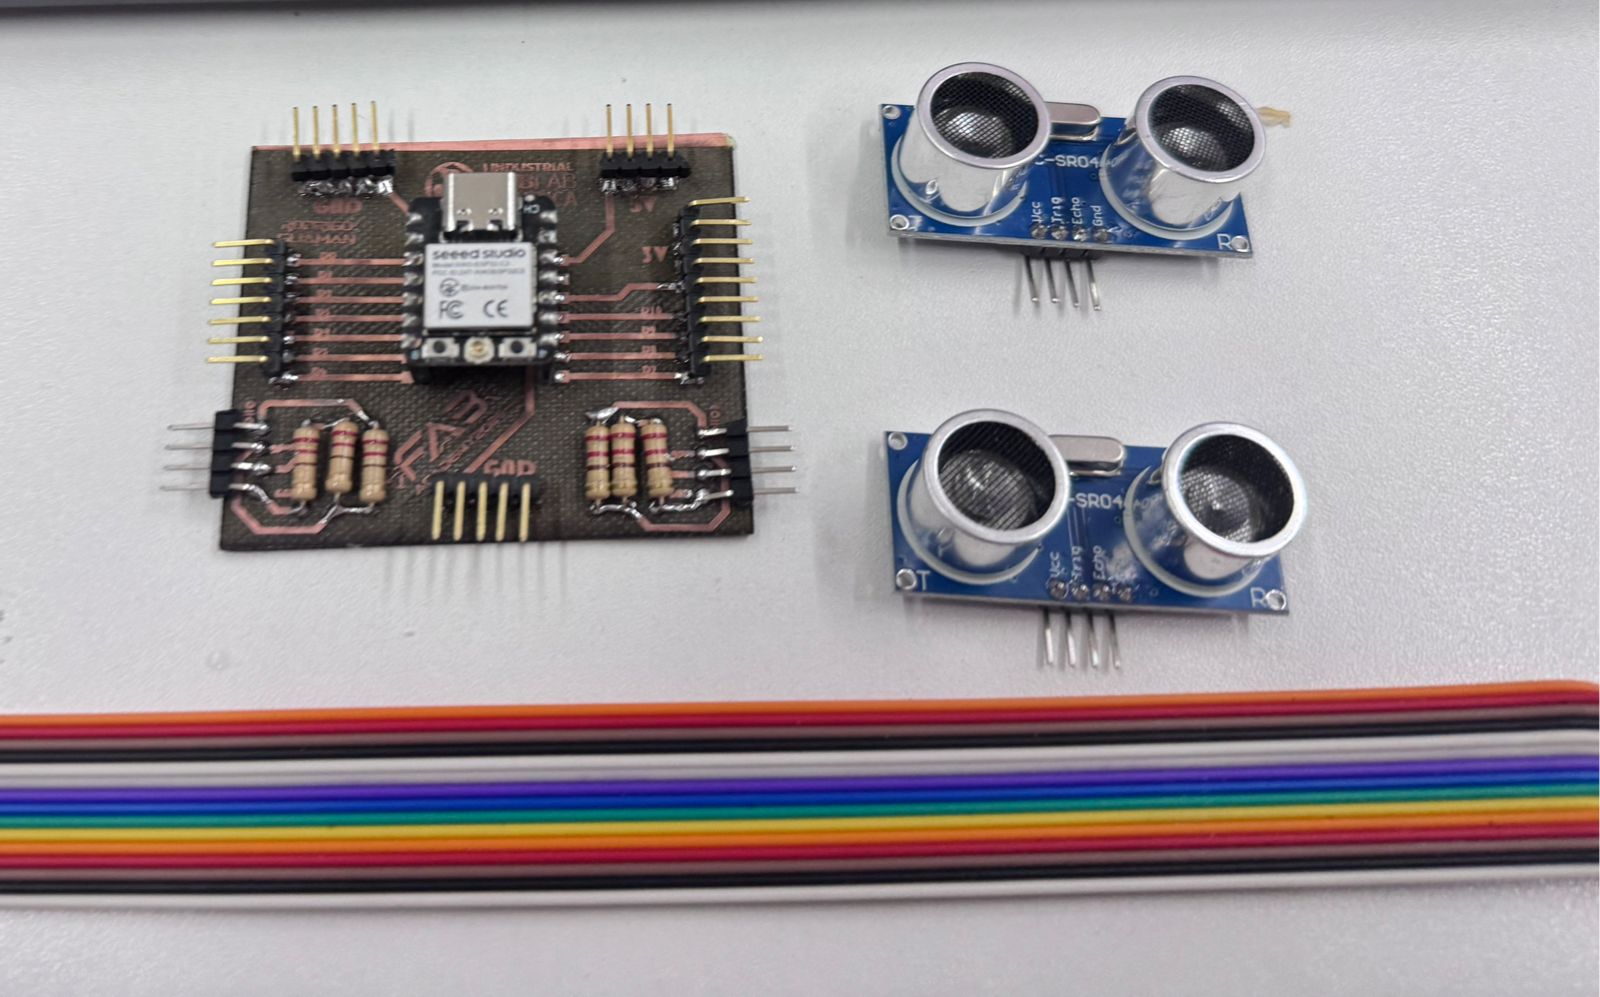
The project integrates multiple Fab Academy processes. Each process was selected because it solved a specific need in the system. CNC machining gave structural rigidity, laser cutting gave fast 2D organization elements, 3D printing gave customized trays, PCB fabrication gave a cleaner electronic system, and programming connected the physical activity to real-time data.

The development answered questions at three levels: educational, mechanical and electronic. Educationally, it tested whether children could understand Lean concepts by playing. Mechanically, it tested whether a fabricated workstation could support the complete activity. Electronically, it tested whether simple sensors could measure the process in a meaningful way.
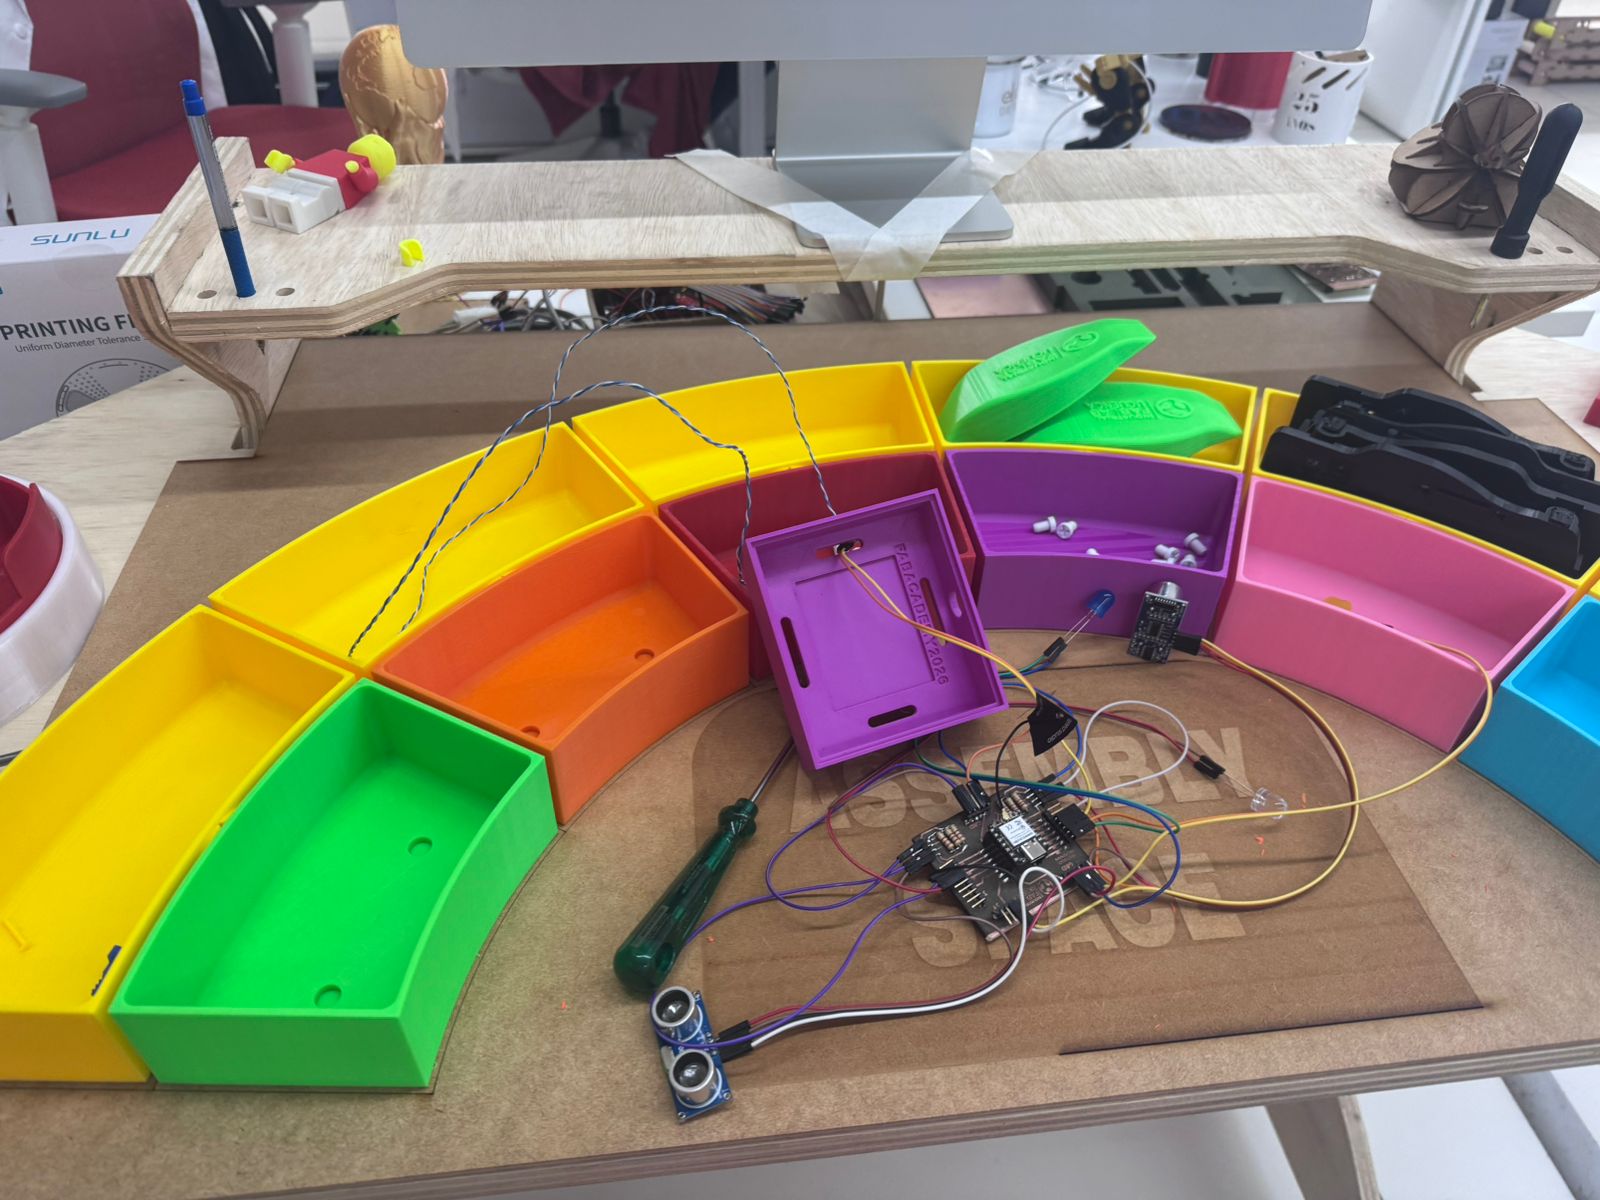
The main systems worked: the CNC module supported the cell, the trays organized components, the PCB connected the electronics, the sensors detected process events, the LEDs gave visual feedback and Blynk displayed live indicators. The project also worked as a learning experience because children could interact with it and understand the activity through colors, movement and feedback.
The main problems were related to refinement. Cable organization needed improvement, sensor placement required adjustment, and the dashboard indicators needed to be explained in a child-friendly way. These issues did not block the prototype, but they showed what should be improved in the next version.
The evaluation combined technical testing and user validation. I checked whether the sensor readings changed correctly, whether the LEDs represented the system state, whether the dashboard received data and whether cycle time was calculated from the intended events: Sensor 1 stops detecting to start the cycle, and Sensor 2 detects the finished object to end the cycle.
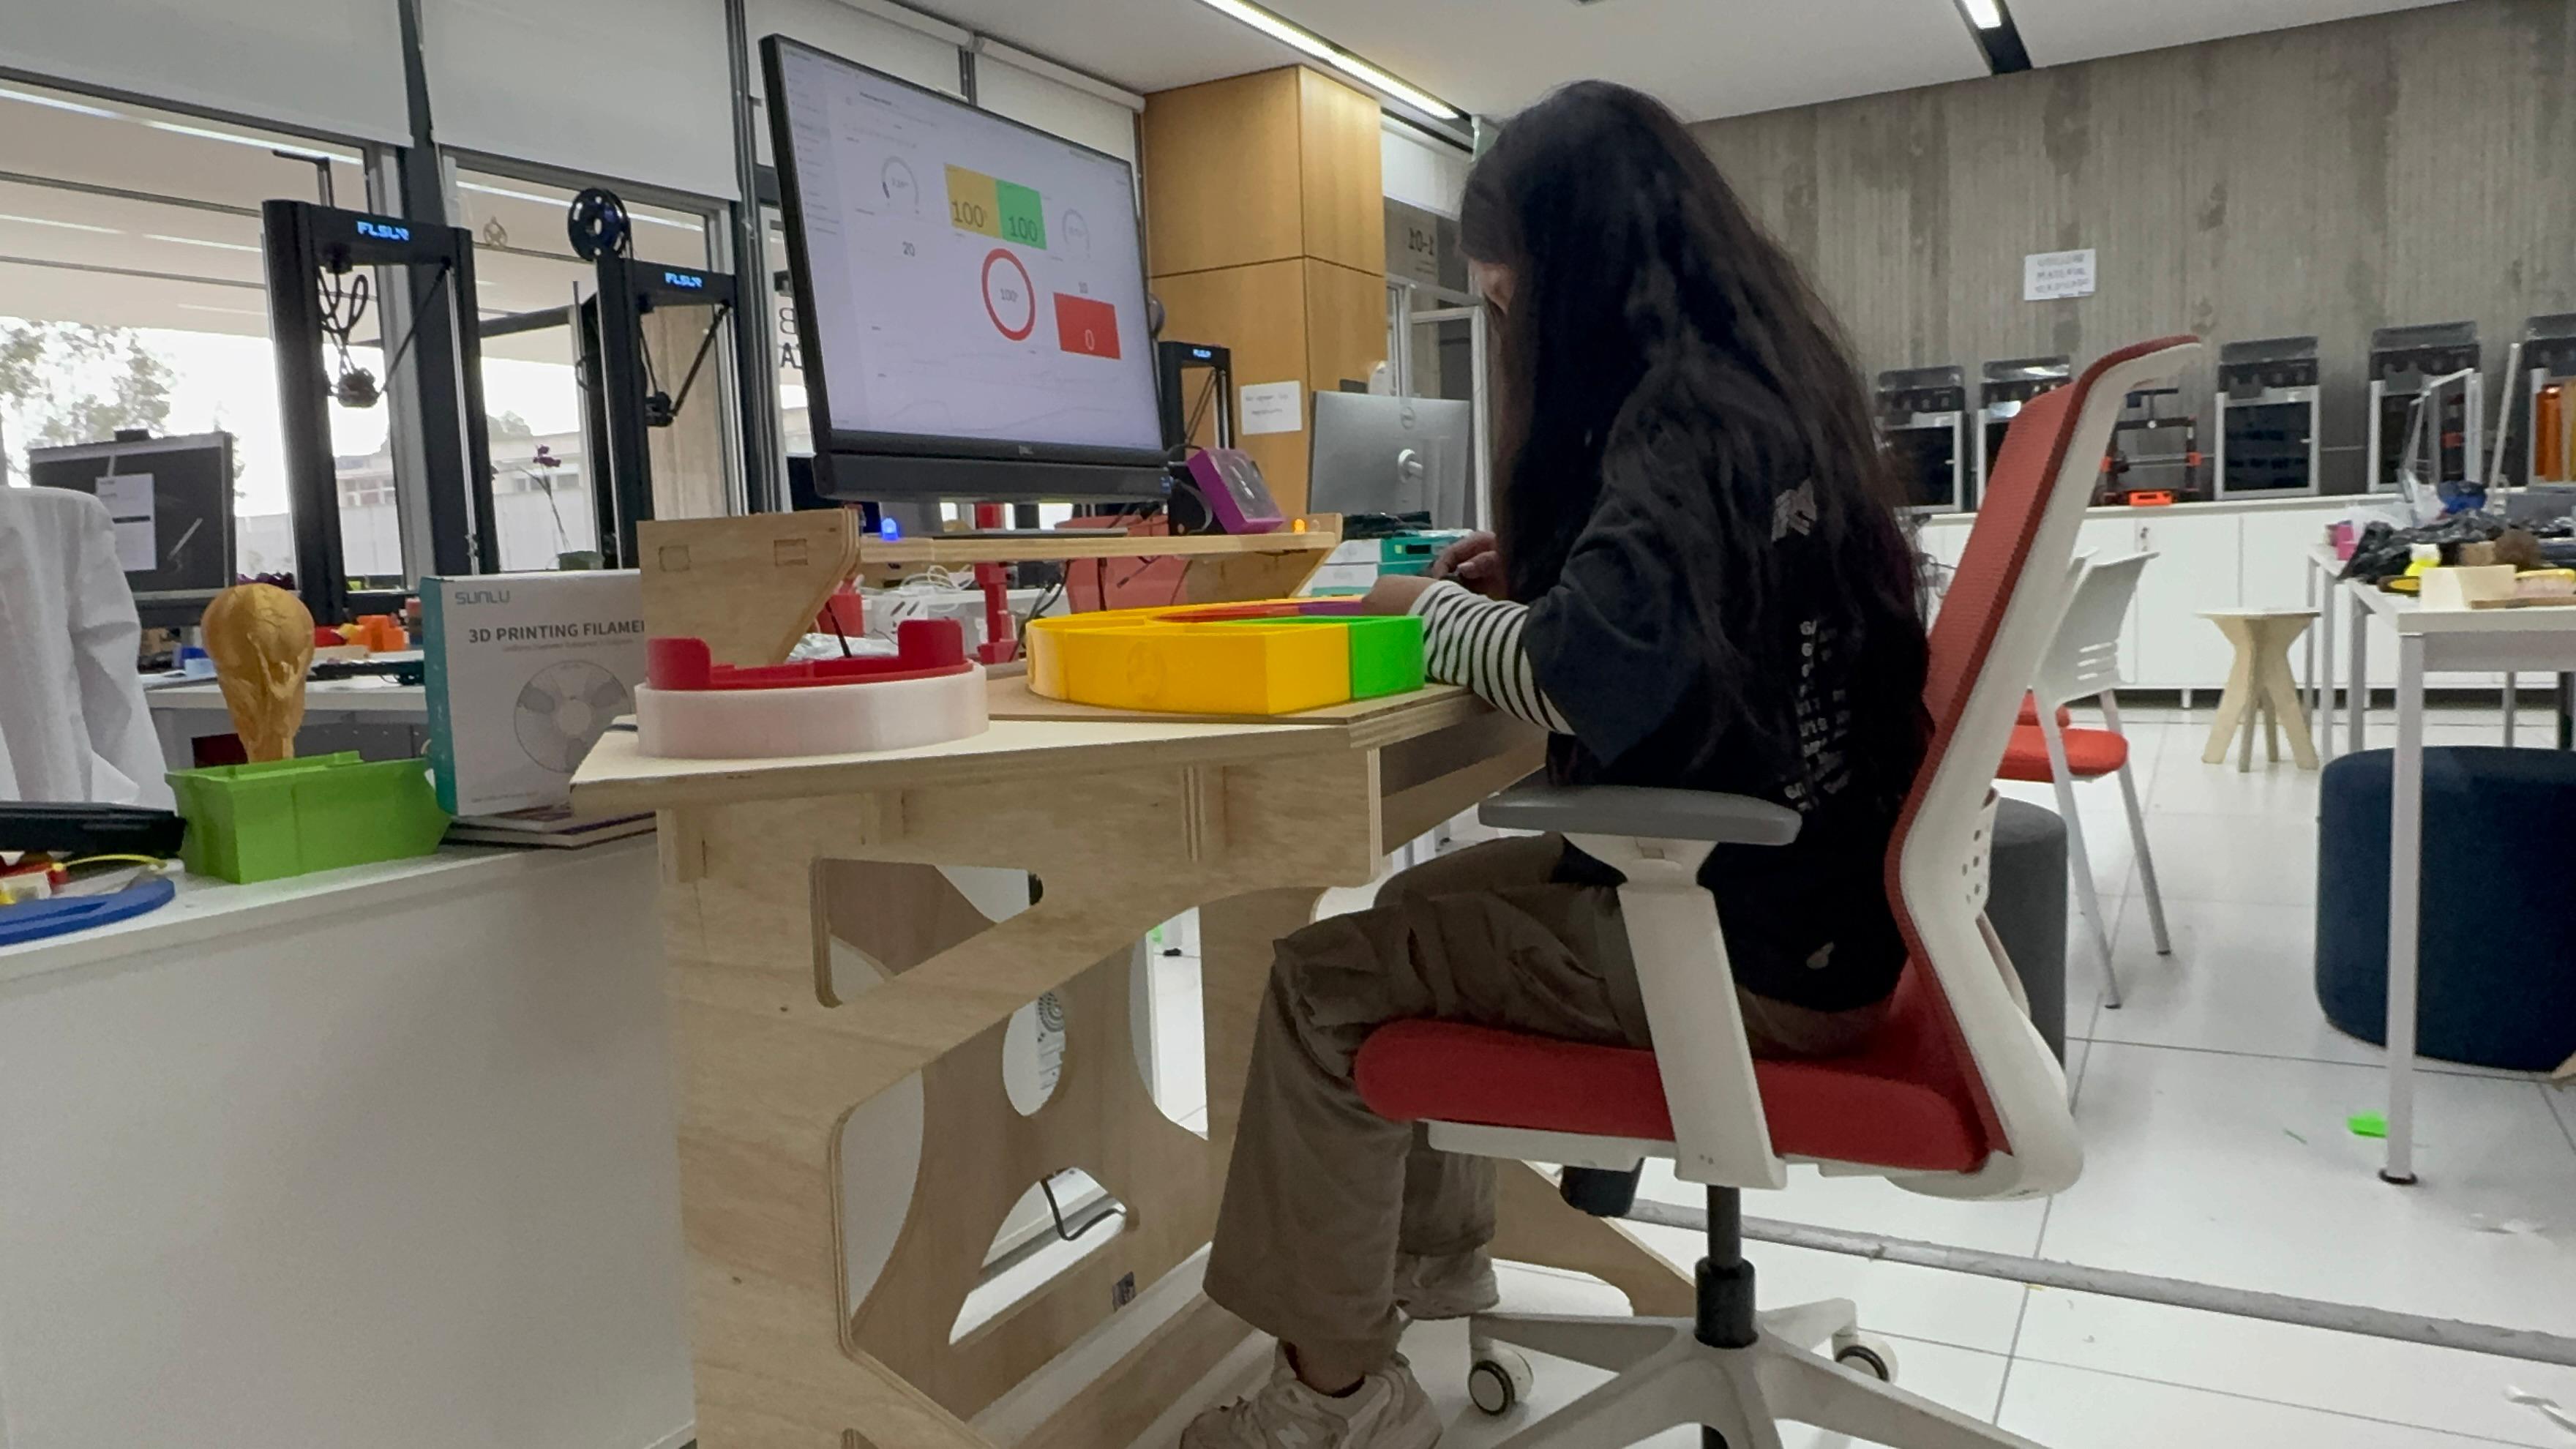
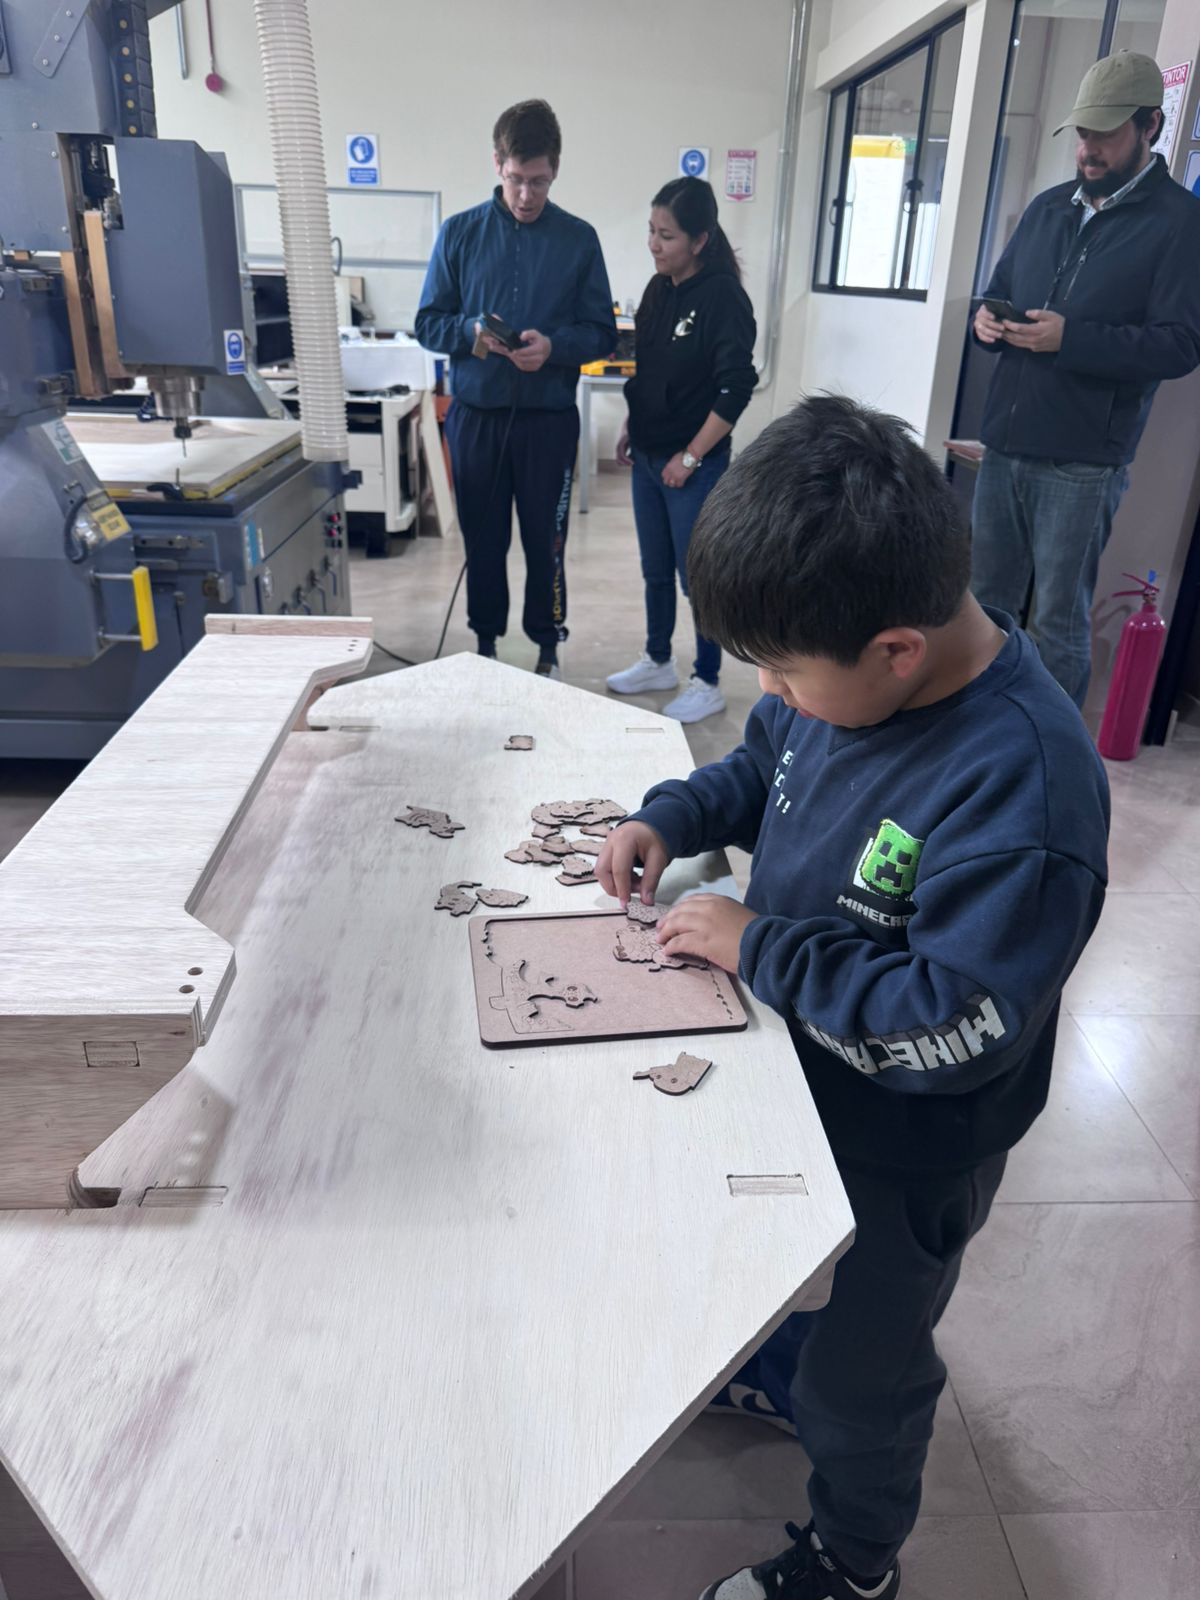
User validation was done by observing children interacting with the workstation. This was essential because the intended users are not engineers. The prototype had to be understandable, attractive and safe enough for them to use while still communicating the industrial engineering ideas behind the activity.
The main implication is educational. Smart Lean Cell shows that digital fabrication can create meaningful tools for teaching industrial engineering concepts to children. It also shows that Lean, TPS and optimization do not need to be introduced only at university or company level; they can be transformed into age-appropriate STEM experiences.
For Fab Labs, the project demonstrates a path for creating educational manufacturing cells from local resources. For schools, it offers a playful way to discuss organization, time, teamwork and improvement. For industrial engineering, it creates a bridge between professional methods and early STEM learning.
The following BOM summarizes the main physical, electronic and fabricated elements used in the Smart Lean Cell prototype. To calculate the project material cost, I used the actual amount consumed when it was known and a conservative market reference when the item was purchased or would need to be purchased externally. The prices are reference values because they change depending on supplier, country, stock, taxes and shipping. I added purchase/reference links so the component cost can be checked or updated later. The Ecuador column estimates local purchase or replacement costs, while the Amazon / other stores column keeps an external online reference and does not include possible import fees, shipping to Ecuador or local taxes.
| Item | Quantity / used amount | Source / origin | Smart LEAN Cell | Ecuador reference cost (USD) | Amazon / other stores reference cost (USD) |
|---|---|---|---|---|---|
| Plywood board, 15 mm | 1 sheet, 122 x 244 cm | Local wood supplier / Industrial FabLab UCuenca stock | Main structural body of the workstation, CNC-machined support module and physical assembly surface. | $51.99 | $70 |
| MDF board, 3 mm | 1 panel, 60 x 90 cm | Local material supplier / FabLab stock; reference: 3 mm MDF board | Laser-cut physical organization panel and low-cost learning surfaces for visual management. | $5.00 | $24.69 |
| PLA filament | Approximately 2 kg | Bambu Lab / FabLab stock; reference: PLA filament | 3D printed Kanban trays, modular bins, inventory station, finished-goods station and sensor supports. | $40.00 | $27.98 |
| Seeed Studio XIAO ESP32-C3 | 1 unit | Seeed Studio / electronics supplier; reference: XIAO ESP32-C3 | Main microcontroller for reading sensors, controlling LEDs and sending data to the Blynk dashboard through Wi-Fi. | $25.00 | $4.74 |
| Custom PCB material | 1 board, 10 x 10 cm | FabLab stock; reference: copper-clad PCB board | Custom controller board for XIAO ESP32-C3, pin expansion, sensor wiring and voltage-divider integration. | $2.50 | $9.99 |
| HC-SR04 ultrasonic sensors | 2 units | Electronics supplier / lab stock; reference: HC-SR04 sensors | Sensor 1 detects inventory availability; Sensor 2 detects finished parts and closes the cycle-time measurement. | $10.00 | $9.99 |
| 220 ohm resistors | 6 units | Electronics stock; reference: resistor kit | Voltage divider and signal conditioning to adapt the HC-SR04 echo signal to the ESP32-C3 logic level. | $0.30 | $7.00 |
| LEDs | 3 units: red, yellow and green/blue status indicators | Electronics stock; reference: LED assortment | Visual feedback for inventory, in-process status and finished-piece detection during the learning activity. | $1.00 | $6.99 |
| Jumper wires and pin headers | 1 connection set | Electronics stock; reference: jumper wires and headers | Modular wiring between the PCB, sensors, LEDs, reset button and physical stations. | $5.00 | $14.99 |
| USB-C cable | 1 unit | Lab stock; reference: USB-C data cable | Programming, serial monitoring and power supply for the XIAO ESP32-C3 controller. | $5.00 | $8.09 |
| Push buttons | 1 set used | Electronics stock / panel mounting; reference: push buttons | User interaction and reset control for restarting counts, timers and dashboard values during demonstrations. | $4.00 | $9.00 |
| Sensor holders and small printed fixtures | Several small printed parts | 3D printed at FabLab; reference: PLA fixture material | Mechanical support for the ultrasonic sensors and small accessories used in the inventory and finished stations. | $1.00 | $2.00 |
| Blynk cloud dashboard | 1 simple license / monthly plan | Blynk web platform; reference: Blynk Starter pricing | Real-time visualization of cycle time, average time, productivity, inventory count and finished parts. | $29.00 | $29.00 |
| All-in-one PC for control and dashboard | 1 unit | Market reference; example: HP all-in-one desktop on Amazon | Local control, dashboard visualization, programming support and final demonstration monitor. | $650.00 | $489.99 |
| Acrylic sheet for PCB case cover | 1 piece, 15 x 15 cm | Local acrylic supplier / FabLab stock; reference: clear acrylic sheet | Transparent cover for the PCB case, allowing the electronic system to be visible and protected. | $2.00 | $8.00 |
| Total estimated cost in Ecuador | Reference total using Ecuador market or local supplier prices. | $831.79 | |||
| Total estimated cost using Amazon / other stores references | Reference total using Amazon, Seeed Studio, Blynk and other external store links, without local import/tax variation. | $704.44 | |||
The scope of the final project is to design and fabricate a functional educational prototype called Smart Lean Cell. The project is focused on children and young STEM learners, with the purpose of introducing Lean Manufacturing, TPS, 5S, visual management, cycle time and continuous improvement through a playful assembly challenge. The expected result is not an industrial production machine, but a measurable learning cell that converts industrial engineering concepts into an interactive, physical and digital experience.
| Scope Element | Definition for Smart Lean Cell | Evidence / Output |
|---|---|---|
| Main objective | Create a gamified assembly station that lets children compare disorder, organization and data-driven improvement. | Three learning levels: chaos, synchronization and optimization. |
| Target users | Children, STEM learners, Fab Lab visitors and introductory industrial engineering students. | User validation photos and gamification documentation in the final project page. |
| Physical scope | CNC-machined workstation, laser-cut panel, 3D printed trays, inventory area, finished goods area and assembly space. | Mechanical system, Lean tools and downloadable fabrication files. |
| Electronic scope | Custom PCB with XIAO ESP32-C3, HC-SR04 sensors, LEDs, voltage dividers, wiring and protected 3D printed case. | KiCad files, PCB photos, system integration case and embedded code. |
| Digital scope | Blynk dashboard for cycle time, average cycle time, inventory count, finished parts, pending cycles and productivity. | Dashboard screenshots, demo video and Arduino IDE code. |
| What is intentionally out of scope | Industrial-grade automation, commercial safety certification, mass production, permanent classroom deployment and advanced AI analytics. | Prototype focused on Fab Academy integration and educational validation. |
| Success criteria | The project must be understandable for children, physically assembled, electronically functional, connected to the dashboard and documented with original files. | Final project page, Week 18, Week 20, presentation slide and one-minute video. |
The development process started with the learning objective: to introduce Lean and TPS principles to children through a clear, playful and measurable assembly challenge. From that point, the project was separated into mechanical structure, Lean tools, electronics, dashboard and gamification.
| Stage | Development Work | Evidence |
|---|---|---|
| Concept | Defined a Smart Lean Cell for children and STEM learning. | Project overview |
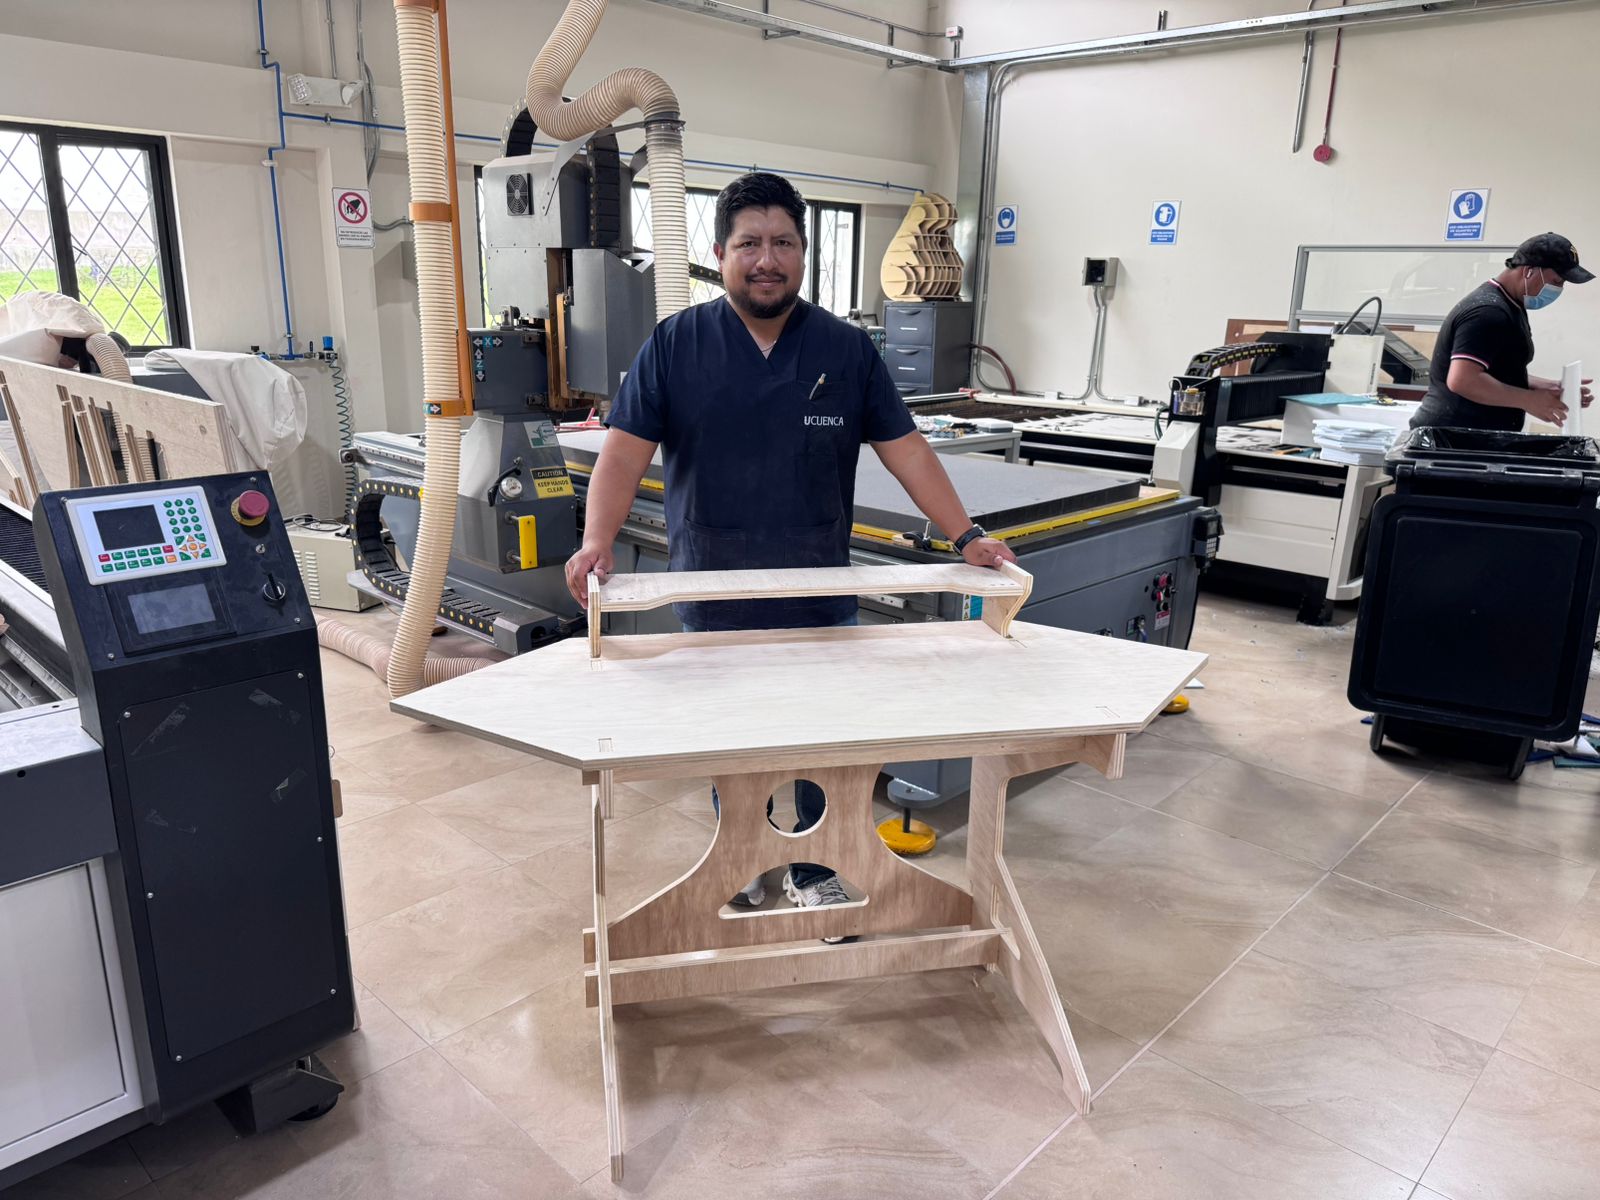
| Mechanical system | CNC-machined press-fit module without glue, nails or screws. | Mechanical Systems |
| Lean tools | Laser-cut organization panel and 3D printed Kanban trays. | LEAN Tool Construction |
| Electronics | Designed and fabricated a custom PCB for XIAO ESP32-C3 and sensors. | Electronic System |
| Networking | Created a Blynk dashboard for cycle time, inventory and productivity. | Networking & Dashboard |
| Gamification | Structured the Lean Challenge in levels: chaos, synchronization and optimization. | Gamification |
| Final validation | Tested the activity with children and reflected on learning outcomes. | Reflection |
I tracked the project as a sequence of interconnected deliverables. Each phase produced evidence that could be tested before moving to the next phase. This was important because the Smart Lean Cell depends on the interaction between physical fabrication, electronics, embedded programming, networking and the learning activity.
| Milestone | Progress Status | Deliverable Produced | How Progress Was Verified |
|---|---|---|---|
| Learning concept and scope | Completed | Smart Lean Cell concept for children, Lean Challenge levels and STEM learning objective. | Final project overview and scope definition in this page. |
| Mechanical structure | Completed | CNC-machined press-fit workstation, assembled without glue, nails or screws. | Assembly photos, CNC process videos and downloadable DXF file. |
| LEAN tools and work organization | Completed | Laser-cut physical panel and 3D printed Kanban trays for parts, inventory and finished products. | Panel photos, tray printing videos, 3MF/F3D/G-code files and integrated layout photos. |
| Electronic system | Completed | Custom PCB for XIAO ESP32-C3, HC-SR04 sensors, voltage dividers, LEDs and wiring. | KiCad files, fiber laser PCB fabrication evidence and sensor wiring documentation. |
| System integration and packaging | Completed | 3D printed PCB case, cable routing and electronics installed in the final station. | Week 16 system integration checklist, packaging documentation and integrated case photos. |
| Networking and dashboard | Completed | Blynk dashboard connected by Wi-Fi to the XIAO ESP32-C3. | Datastream screenshots, dashboard live view, demo video and IDE code download. |
| Gamification and validation | Completed | Three-level Lean Challenge tested with children as project validators. | Validation photos, videos and final reflection in the final project page. |
| Final communication | Completed | Summary slide, one-minute video, final page, downloadable files and compliance checklist. | presentation.png, presentation.mp4 and Week 20 requirements page. |
The Gantt below shows how I tracked the Smart Lean Cell from the first project definition to the final delivery. The Midterm Review was used as a checkpoint to verify that the project had a clear educational scope, a feasible fabrication route and a realistic integration strategy before moving into the final prototype.
After the Midterm Review, the project moved from concept validation to execution: mechanical fabrication, Lean tool construction, electronics production, dashboard programming, system packaging, user testing and final communication assets.
The project was planned as a sequence of fabrication and integration tasks. Each task produced a physical or digital output that later became part of the final system. This planning was useful because the Smart Lean Cell has several dependencies: the mechanical structure must support the electronics, the trays must match the learning flow, the PCB must expose the sensor pins, and the dashboard must receive values that make sense for the activity.
| Phase | Main Tasks | Output | Risk Managed |
|---|---|---|---|
| Concept and learning flow | Define users, learning objectives, Lean concepts and gamified levels. | Smart Lean Cell concept and Lean Challenge structure. | Avoid building a technical object without a clear educational purpose. |
| Mechanical fabrication | Design and machine the CNC module, verify press-fit joints and assemble the station. | Stable workstation without glue, nails or screws. | Prevent weak assembly, poor fit or unstable support. |
| Lean tool construction | Laser cut the physical panel and 3D print the color-coded trays. | Organized assembly environment and visible inventory areas. | Reduce confusion and unnecessary searching during the activity. |
| Electronic design | Create schematic, PCB layout, voltage dividers and pin headers. | Custom PCB for XIAO ESP32-C3 and HC-SR04 sensors. | Protect 3.3 V microcontroller inputs from 5 V sensor signals. |
| Programming and dashboard | Read sensors, calculate cycle time, control LEDs and send data to Blynk. | Live dashboard with cycle time, inventory and productivity data. | Make the data useful and understandable for evaluation. |
| User validation | Test the activity with children and observe interaction. | Feedback about usability, engagement and comprehension. | Ensure that the final project works for the intended audience. |
At this stage, the prototype has been designed, fabricated, assembled and tested as an integrated system. The mechanical station, Lean tools, electronics, dashboard and gamified learning strategy are documented in the final project page. The final communication deliverables are also complete: the summary slide and the one-minute video were exported and placed in the root of the website using the Fab Academy filenames.
| Element | Status | Comment |
|---|---|---|
| Mechanical station | Completed | CNC machined and assembled with press-fit joints. |
| Lean tools | Completed | Laser-cut panel and 3D printed trays integrated in the workstation. |
| Custom PCB | Completed | Designed in KiCad and fabricated using the fiber laser PCB process. |
| Embedded code | Completed | Reads sensors, controls LEDs, calculates cycle time and sends data to Blynk. |
| Dashboard | Completed | Blynk dashboard displays production indicators in real time. |
| User validation | Completed | Children interacted with the system and helped validate the learning activity. |
| Summary slide | Completed | Exported as presentation.png and placed in the root of the website. |
| Final video | Completed | Exported as presentation.mp4 and placed in the root of the website. |
The project was evaluated by checking if the learner could understand the activity, if the sensors detected the process transitions, if the dashboard received live data, and if the physical organization helped reduce confusion during assembly. The result confirms that the Smart Lean Cell can be used as an educational bridge between fabrication, industrial engineering and STEM learning.
Its implications are relevant for schools, Fab Labs and university outreach activities. Instead of showing Lean as a theoretical business topic, the project introduces it as a hands-on system where children can experiment with order, waste, flow, timing and continuous improvement.
The project works as a functional educational prototype, but the development process also identified areas that could be improved in a future version. These improvements are important because the system is intended for repeated use by children, so durability, clarity and safety matter as much as technical performance.
| Aspect | Observed Risk or Limitation | Future Improvement |
|---|---|---|
| Sensor detection | Ultrasonic sensors depend on distance, angle and the shape of the object. | Add mechanical guides or fixed sensor brackets to make detection more repeatable. |
| Cable management | Loose cables can distract learners and affect reliability. | Add cable channels, labels and strain relief inside the electronic module. |
| Child interaction | Young users may move parts in unexpected ways or skip process steps. | Add clearer visual cues, arrows, colors and simplified instructions for each level. |
| Dashboard interpretation | Some indicators may be too technical for children without guidance. | Create a child-friendly dashboard mode with icons, colors and simple messages. |
| Mechanical durability | Press-fit joints must resist repeated assembly, movement and transportation. | Test different plywood thicknesses, tolerances and protective finishes. |
| Scalability | The current prototype is focused on one learning activity. | Develop interchangeable product kits and new Lean challenges. |
The final project documentation includes original design files so the system can be reviewed, modified or replicated. The files below are the main downloadable assets reused from the final project page.
The final project requires a 1920 x 1080 summary slide and a one-minute video showing conception, construction and operation. Both files were prepared and placed in the root of the website using the standard Fab Academy filenames: presentation.png and presentation.mp4.
| Asset | Status | Next Step |
|---|---|---|
| presentation.png | Completed | Open final slide |
| presentation.mp4 | Completed | Open final video |
| Final project page | Documented | Continue updating the published page with final files and presentation assets. |
I checked the final presentation requirements and confirmed that the two required assets are linked from this documentation using the Fab Academy root filenames. This means the slide and video can be accessed directly by reviewers during the final presentation schedule review.
| Checklist Item | File Used | Link Check |
|---|---|---|
| Uploaded summary slide placeholder | presentation.png |
Linked and accessible |
| Uploaded video clip placeholder | presentation.mp4 |
Linked and accessible |
| Checked they are linked in the final presentation schedule | Root website presentation assets | Both links are documented in this Week 18 page for final review. |
Week 18 defines the Smart Lean Cell as an integrated final project. The project is not only a fabricated object: it is a complete learning system that connects design, fabrication, electronics, programming, networking, gamification and industrial engineering education for children.