Prior Knowledge
Before starting this week, I had a general background in web development from Week 1 of Fab Academy, but I had never connected a web page to a physical device. Below is a summary of what I already knew and what was completely new.
What I knew before this week:
- I knew how to build HTML web pages from scratch, since this is exactly what I have been doing every single week of Fab Academy starting from Week 1 to document my process.
- I was familiar with basic CSS styling: colors, fonts, spacing, containers, etc.
- I had used JavaScript only for very small interactions in my documentation pages (slideshows, lightbox galleries, tab navigation), but nothing related to communication or real-time data.
- I had no previous knowledge about MQTT, brokers, WebSockets, or how a web page can communicate with a microcontroller.
- I had never used Arduino IDE with an ESP32 or any WiFi-enabled microcontroller before.
- I had never installed Node.js, npm, or used the command line for anything beyond basic
cdandlscommands. - I had never used Claude Code as an AI coding assistant integrated into my editor.
Group Assignment
Group Page
- Compare as many tool options as possible.
- Document your work on the group work page and reflect on your individual page what you learned.
For this week's group assignment, we explored and compared three different tools for building graphical user interfaces and connecting them to hardware: Tkinter, Qt Designer (PyQt6), and LabVIEW. Each one represents a very different philosophy of how to build an interface, from pure code to fully visual block programming.
What I learned from the group assignment:
- I learned that there is no single "best" tool for building interfaces — the right choice depends entirely on the project's requirements, the target platform, and how the interface needs to communicate with hardware.
- Tkinter is the most accessible option because it comes bundled with Python and requires no extra installation. It is ideal for small projects, learning, and rapid prototyping, but its visual style feels outdated and it does not scale well for complex layouts.
- Qt Designer (with PyQt6) introduces a visual drag-and-drop workflow that separates the interface design from the application logic. The interface is built graphically and saved as a
.uifile, which is then converted to Python withpyuic6. This approach is much more scalable for desktop applications with many widgets, but it requires installing extra libraries and following a more involved setup. - LabVIEW takes a completely different approach: programs are not written in text but in graphical block diagrams called VIs (Virtual Instruments), with a Front Panel for the user interface and a Block Diagram for the logic. It is especially powerful for instrumentation, data acquisition, and real-time hardware control, and it can communicate with embedded platforms like Arduino through the LINX toolkit or directly via VISA Serial Port.
- I learned that web-based interfaces (like the one I built for my individual assignment using HTML, CSS and JavaScript with MQTT) occupy a fourth category that none of the three group-assignment tools covers: they run inside a browser, are platform-independent, and communicate with hardware over a network instead of a serial cable. This made me appreciate how the choice of interface technology directly shapes how the user accesses the system — locally on a desktop, on lab equipment, or remotely from any device with a browser.
- Comparing the three tools side by side helped me understand that interface programming is not just about how the screen looks, but about the full pipeline: design tool → generated code → communication protocol → physical device.
My Professor's Reference Files
My instructor Rafa shared with me a folder named docs_rafa containing a complete example project of an MQTT-controlled crystal assembly line. The purpose of this folder was to give me a working reference of how the three components of an MQTT system are written: a publisher (sender), a subscriber (receiver), and a more complex simulator that combines both roles. The structure he gave me was:
- frontend/ — A web dashboard (HTML + CSS + JS) that publishes batch configurations and subscribes to real-time progress.
- scripts/publisher.py — A minimal Python script that only publishes messages. Used as a learning exercise.
- scripts/subscriber.py — A minimal Python script that only subscribes to messages. Used as a learning exercise.
- scripts/simulador.py — The full simulator that pretends to be a XIAO ESP32, both publishing and subscribing. This is the actual "engine" of the example project.
- README.md — Documentation explaining how to run the example.
How the MQTT Protocol Works
MQTT (Message Queuing Telemetry Transport) is a lightweight messaging protocol designed for devices with limited resources (like microcontrollers) that need to talk to each other over an unreliable network. The key idea is that devices never talk to each other directly; they all talk to a central server called a broker.
Key Concepts:
- Broker: The central server that receives messages and forwards them to whoever is interested. In my project I used the free public broker
broker.hivemq.com. - Topic: A "channel" identified by a string (e.g.
ibero/arquitecturas/config). Devices publish to topics and subscribe to topics. - Publish: Send a message to a topic.
- Subscribe: Tell the broker "I want to receive everything that gets published to this topic".
- Payload: The actual content of the message. In my case, JSON strings.
How I Used MQTT in My Project
My project has three components that communicate exclusively through the broker:
- The web dashboard (browser) — publishes batch configurations and START/STOP commands; subscribes to the assembly progress.
- The HiveMQ broker — passes messages between the dashboard and the XIAO ESP32-S3.
- The XIAO ESP32-S3 — subscribes to configuration and commands; publishes the live progress of the simulated assembly line.
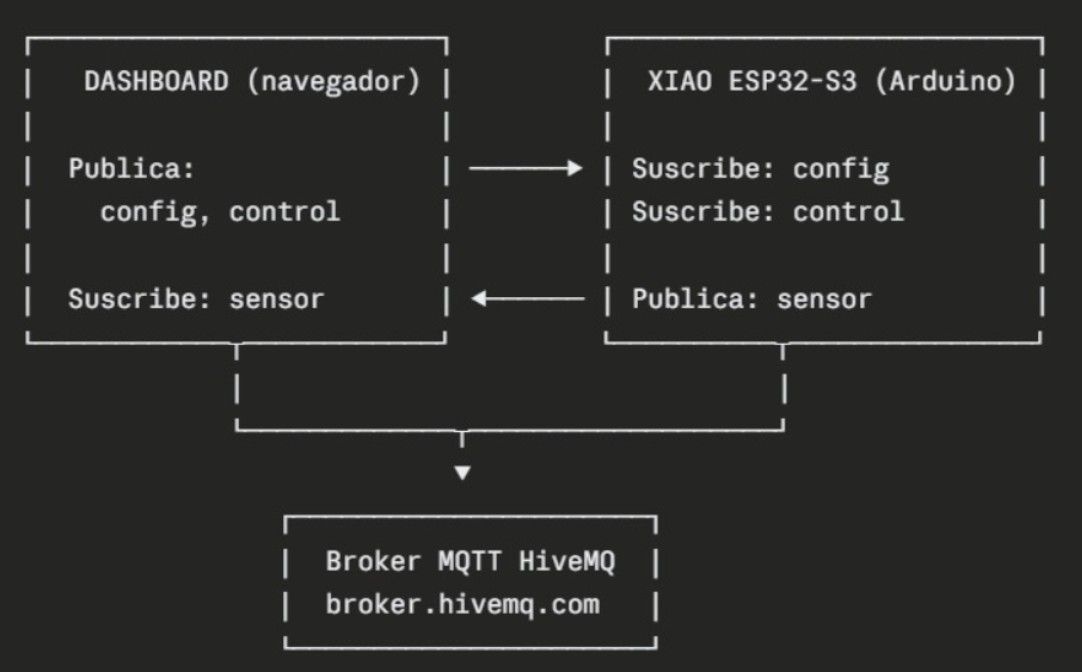
Diagram of the MQTT Communication workflow
The three topics that connect everything together are:
| Topic | Published by | Subscribed by | Purpose |
|---|---|---|---|
ibero/arquitecturas/config |
Dashboard | ESP32-S3 | Sends batch configuration (lot, crystals per series, total series). |
ibero/arquitecturas/control |
Dashboard | ESP32-S3 | Sends START/STOP commands. |
ibero/arquitecturas/sensor |
ESP32-S3 | Dashboard | Sends real-time progress (current crystal, current series, status). |
Professor's Code
import time                                      # Standard library for the time.sleep() function
import paho.mqtt.client as mqtt                  # MQTT client library for Python

BROKER = "broker.hivemq.com"                     # Public MQTT broker address
PORT = 1883                                      # Standard TCP port for MQTT (not WebSocket)

TOPIC = "ibero/arquitecturas/sensor"             # Channel where messages will be sent

client = mqtt.Client(mqtt.CallbackAPIVersion.VERSION2)   # Create the MQTT client object
client.connect(BROKER, PORT, 60)                 # Open the connection to the broker (60s keepalive)

contador = 0                                     # Counter to make each message slightly different

try:
    while True:                                  # Infinite loop until the user stops it with Ctrl+C
        mensaje = f"Temperatura simulada: {25 + contador} °C"   # Build a fake temperature message
        client.publish(TOPIC, mensaje)           # Send the message to the topic
        print(f"Mensaje enviado: {mensaje}")     # Print confirmation in the console
        contador += 1                            # Increase the counter for next iteration
        time.sleep(2)                            # Wait 2 seconds before sending the next message
except KeyboardInterrupt:                        # Catch Ctrl+C to exit cleanly
    print("Publisher detenido")
finally:
    client.disconnect()                          # Always close the connection at the end
subscriber.py — Minimal MQTT Subscriber (learning exercise)
import paho.mqtt.client as mqtt                  # MQTT client library for Python

BROKER = "broker.hivemq.com"                     # Same broker as publisher
PORT = 1883                                      # Same port as publisher
TOPIC = "ibero/arquitecturas/sensor"             # Same topic, otherwise it wouldn't hear anything

def on_connect(client, userdata, flags, reason_code, properties):  # Runs when connection succeeds
    print("Conectado al broker MQTT")
    print(f"Código de conexión: {reason_code}")
    client.subscribe(TOPIC)                      # Subscribe to receive everything sent to this topic
    print(f"Suscrito al tópico: {TOPIC}")

def on_message(client, userdata, message):       # Runs every time a message arrives
    payload = message.payload.decode("utf-8")    # Convert the bytes to a readable string
    print("-------------------------")
    print(f"Tópico: {message.topic}")            # Print which topic the message came from
    print(f"Mensaje recibido: {payload}")        # Print the actual message content

client = mqtt.Client(mqtt.CallbackAPIVersion.VERSION2)   # Create the client
client.on_connect = on_connect                   # Hook up the connect callback
client.on_message = on_message                   # Hook up the message callback
client.connect(BROKER, PORT, 60)                 # Open the connection

print("Esperando mensajes...")
client.loop_forever()                            # Keep the script running and processing messages
simulador.py — The actual XIAO ESP32 simulator (publishes AND subscribes)
This is the most important file from my professor's example. It receives configuration and commands from the dashboard, and publishes the assembly progress back. It is the file I later replaced with my own Arduino code on the real XIAO ESP32-S3.
import time                                              # For time.sleep()
import json                                              # To convert Python dicts to JSON strings and back
import threading                                         # To run the assembly loop in parallel with MQTT
import paho.mqtt.client as mqtt                          # MQTT client library

BROKER = "broker.hivemq.com"                             # Public broker
PORT   = 1883                                            # TCP port for MQTT

TOPIC_CONFIG  = "ibero/arquitecturas/config"             # Receives batch config from dashboard
TOPIC_CONTROL = "ibero/arquitecturas/control"            # Receives START/STOP commands
TOPIC_STATUS  = "ibero/arquitecturas/sensor"             # Publishes progress back to dashboard

config_lote    = {}                                      # Stores the current batch configuration
stop_event     = threading.Event()                       # Flag set when the emergency stop is pressed
ensamble_hilo  = None                                    # Reference to the assembly thread

def publicar_estado(client, estado, cristal, serie, cfg):  # Helper to publish a status message
    payload = json.dumps({                               # Build a JSON string with the current state
        "estado":              estado,
        "cristal_actual":      cristal,
        "serie_actual":        serie,
        "cristales_por_serie": cfg["cristales_por_serie"],
        "total_series":        cfg["total_series"],
        "lote":                cfg["lote"],
    })
    client.publish(TOPIC_STATUS, payload)                # Send the JSON to the broker

def ensamblar(client, cfg):                              # The actual assembly simulation loop
    lote     = cfg["lote"]
    cristales = cfg["cristales_por_serie"]
    series    = cfg["total_series"]
    print(f"\n[INICIO] Lote: {lote} | {series} series x {cristales} cristales")

    for s in range(1, series + 1):                       # Loop through each series
        for c in range(1, cristales + 1):                # Loop through each crystal within a series
            if stop_event.is_set():                      # If the STOP button was pressed
                publicar_estado(client, "detenido", c, s, cfg)
                print(f"  [DETENIDO] Serie {s}, cristal {c}")
                return                                   # Exit the whole assembly
            publicar_estado(client, "ensamblando", c, s, cfg)  # Publish "assembling" for this crystal
            print(f"  Serie {s}/{series} — Cristal {c}/{cristales}")
            time.sleep(0.8)                              # Simulate the time it takes to place a crystal
        publicar_estado(client, "serie_completa", cristales, s, cfg)  # Notify series completion
        print(f"  ✓ Serie {s} de {series} completada")
        time.sleep(1.0)                                  # Short pause between series
    publicar_estado(client, "lote_completo", cristales, series, cfg)  # Whole batch done
    print(f"\n[COMPLETO] Lote '{lote}' finalizado.")

def on_connect(client, userdata, flags, reason_code, properties):  # When MQTT connects
    print(f"Conectado al broker (código: {reason_code})")
    client.subscribe(TOPIC_CONFIG)                       # Listen for batch configurations
    client.subscribe(TOPIC_CONTROL)                      # Listen for START/STOP commands

def on_message(client, userdata, message):               # Runs on every received message
    global config_lote, ensamble_hilo
    topic   = message.topic
    payload = json.loads(message.payload.decode("utf-8"))  # Parse the JSON payload

    if topic == TOPIC_CONFIG:                            # Configuration arrived
        config_lote = payload
        print(f"\n[CONFIG] Lote: {payload['lote']} ...")

    elif topic == TOPIC_CONTROL:                         # Control command arrived
        comando = payload.get("comando")
        if comando == "INICIAR":                         # START
            if not config_lote:
                print("[ERROR] No hay configuración recibida.")
                return
            stop_event.clear()                           # Reset the stop flag
            ensamble_hilo = threading.Thread(            # Start the assembly in a new thread
                target=ensamblar,
                args=(client, config_lote),
                daemon=True,
            )
            ensamble_hilo.start()
        elif comando == "DETENER":                       # STOP
            stop_event.set()                             # Signal the assembly loop to exit

client = mqtt.Client(mqtt.CallbackAPIVersion.VERSION2)   # Create the MQTT client
client.on_connect = on_connect
client.on_message = on_message
client.connect(BROKER, PORT, 60)                         # Connect to the broker

print("Simulador ESP32 activo. Esperando configuración desde el dashboard...\n")
client.loop_forever()                                    # Block forever processing MQTT events
Setting Up the Environment in PowerShell
Before I could install Claude Code and start building my interface, I had to set up the development environment on Windows. My professor demonstrated the process on a Mac, so I had to adapt every command to Windows PowerShell.
Step 1 — Open PowerShell and Navigate to my Project Folder
cd "C:\Users\danie\OneDrive\Documentos\IBERO\FB 2026\fab2026\daniela-barranco\public\weeks\w14"The cd command (change directory) moves PowerShell into the folder where my project will live. The quotes are necessary because the path has spaces in it.
Step 2 — List Files to Confirm the Location
lsThe ls command lists the files and folders in the current directory. It works in PowerShell as an alias for Get-ChildItem.
Step 3 — Create the Project Folders
mkdir mi_proyecto_real
cd mi_proyecto_real
I created a folder called mi_proyecto_real with mkdir (make directory) and entered it with cd.
Step 4 — Install Python (if it wasn't installed)
I downloaded Python 3 from the official site python.org/downloads. During the installation I made sure to check the option "Add Python to PATH", which is critical so that PowerShell can find the python command later.
Step 5 — Create a Virtual Environment
python -m venv venvWhat is a virtual environment and why does it matter?
A Python virtual environment (or venv) is an isolated "bubble" that lives inside a project folder. When you install Python libraries (like paho-mqtt) inside this bubble, they stay there — they don't mix with the global Python installation on the system.
This matters because:
- Isolation: Different projects can use different versions of the same library without conflicting.
- Reproducibility: Another person can recreate the exact same environment by installing the same packages.
- Cleanliness: The system-wide Python installation stays untouched, which avoids "it works on my machine" problems.
The command above does:
python— invoke the Python interpreter.-m venv— run Python's built-invenvmodule.venv(the second one) — the name of the folder where the virtual environment will live.
After running it, a new folder called venv/ appears inside the project, containing its own isolated Python interpreter and pip.
Step 6 — Activate the Virtual Environment
.\venv\Scripts\Activate.ps1The .\ prefix tells PowerShell to run the script from the current folder. The script lives in venv\Scripts\ on Windows (on Mac/Linux it would be venv/bin/activate with the source command). Once active, the prompt changes and shows (venv) at the beginning, confirming that the bubble is on.
Error I ran into: When I tried to activate the venv, PowerShell rejected the script with an "execution policy" error, blocking unsigned scripts by default for security.
Solution: I had to allow signed local scripts in the current user scope by running:
Set-ExecutionPolicy -ExecutionPolicy RemoteSigned -Scope CurrentUserThis is a one-time fix that allows local scripts to run while still blocking unsigned scripts downloaded from the internet. After accepting with S (Sí), the venv activated correctly.
Step 7 — Install the paho-mqtt Library
pip install paho-mqttWith the venv active, pip installs the library only inside the bubble, not system-wide. paho-mqtt is the Python library that allows the script to communicate via MQTT (it is the equivalent of mqtt.js for the browser).
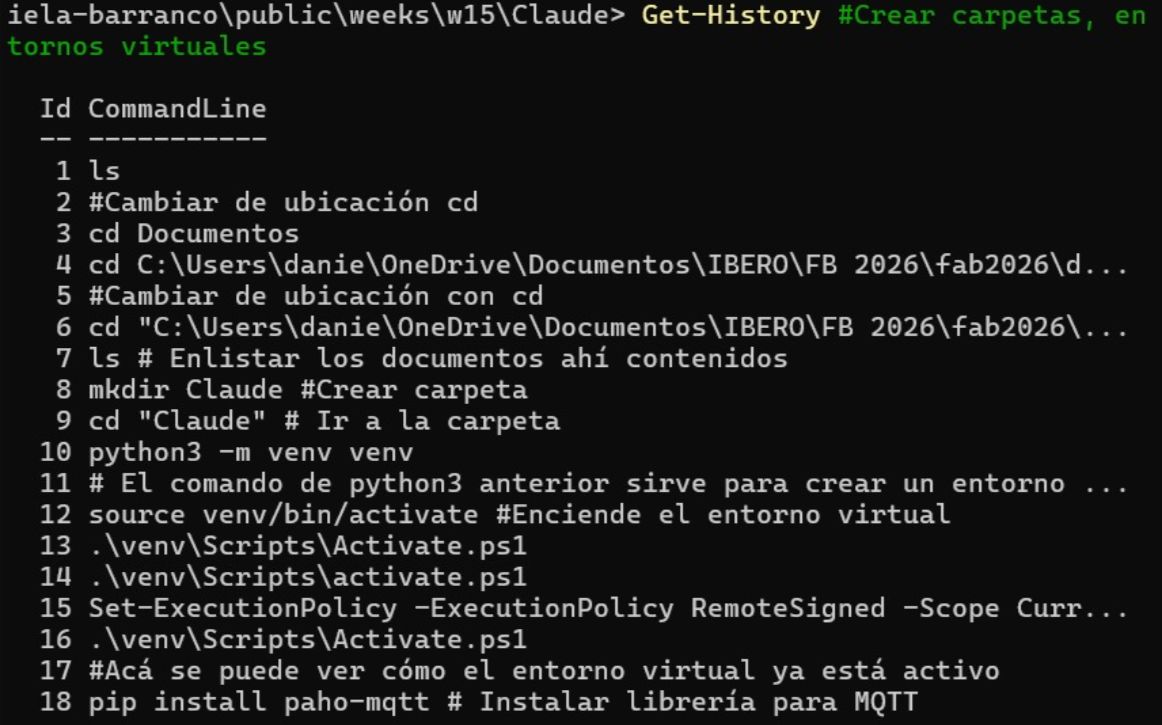
Command Get-History to view command the commands I´ve used
Step 8 — Install Node.js
To install Claude Code later, I needed Node.js (and its package manager npm). I downloaded the LTS version from nodejs.org and ran the .msi installer, making sure the "Add to PATH" option was enabled.
After closing and reopening PowerShell, I verified the install:
node --version
npm --version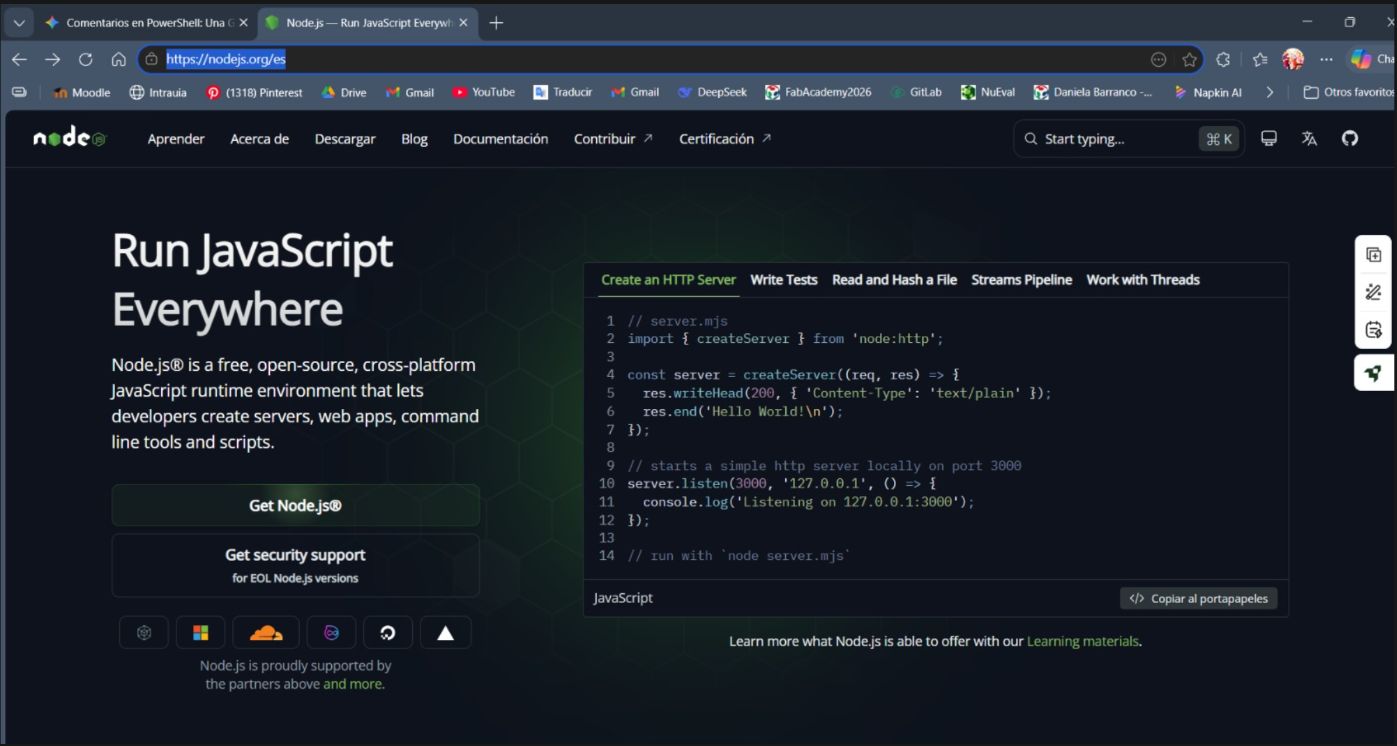
Verification of Node.js and npm installation
Step 9 — Create the Project Files
I created the three empty files my interface needed (the actual content was generated later by Claude Code):
ni interface.html
ni style.css
ni app.js
In PowerShell, ni is an alias of New-Item and is the Windows equivalent of the Unix touch command. It creates an empty file with the given name.
Tip: Instead of creating the files from the terminal, I could have also created them later directly from inside VS Code (right-click → New File). Both approaches give the same result.
Installing and Running Claude Code Inside VS Code
Claude Code is the official command-line tool from Anthropic that lets Claude read and modify files in a project directly from the terminal. By running it inside the integrated terminal of VS Code, I get the best of both worlds: a visual editor for the files and an AI assistant that can edit them on demand.
Step 1 — Install Claude Code Globally with npm
To install Claude Code globally, I ran the following command in my computer Terminal
npm install -g @anthropic-ai/claude-code| Part of the command | Purpose |
|---|---|
npm | Node.js package manager (installed with Node.js). |
install | The action of installing. |
-g | Global. Installs the package system-wide, so the claude command can be used from any folder. |
@anthropic-ai/claude-code | Official package name from Anthropic. |
Step 2 — Verify the Installation
claude --versionIf it returns a version number, Claude Code is correctly installed.
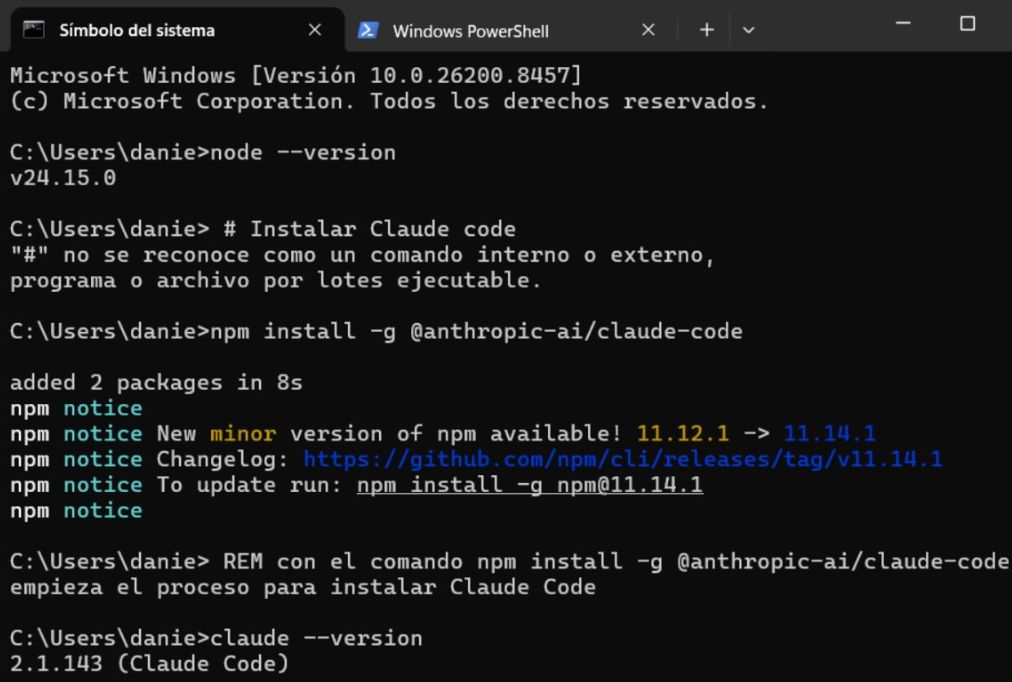
Step 3 — Open the Project in VS Code
code .The code command (installed alongside VS Code) opens VS Code with the current folder loaded as a project. The dot (.) means "the current folder".
Step 4 — Open the Integrated Terminal Inside VS Code
Inside VS Code I opened the integrated terminal with the shortcut Ctrl + ñ (or from the menu View → Terminal). This terminal is a regular PowerShell, but it runs inside the editor — giving me code and AI assistant in the same window.
Step 5 — Launch Claude Code with the claude Command
claudeThe first time I ran claude, it asked me to log in with my Anthropic account. I selected the option "Log in with Claude account", which automatically opened my browser. After authenticating with my Anthropic credentials and accepting the permissions, the browser confirmed the success and I went back to the terminal — where Claude Code was now waiting for my prompts.
Important: From now on, every time I open VS Code, I just type claude in the integrated terminal to start Claude Code in the context of my current project. It has full read/write access to the files in the open folder, but always asks me for confirmation before applying any change.
Building the Interface with Claude Code
With the environment ready and Claude Code running inside VS Code, the next step was to actually build the dashboard. Instead of writing the HTML/CSS/JavaScript by hand, I used a visual-first approach: I generated two mockup images with AI describing how I wanted the final interface to look, and then Claude Code transformed those mockups into a fully functional web page.
Step 1 — Designing the Mockups with AI
I generated two design mockups using AI image generation. These images are the visual contract that Claude Code follows to build the page — they define colors, typography, layout, spacing, and overall feel.
Next step was to manually modified that pictures in the app Canva, so the last version is the one in the pictures below:
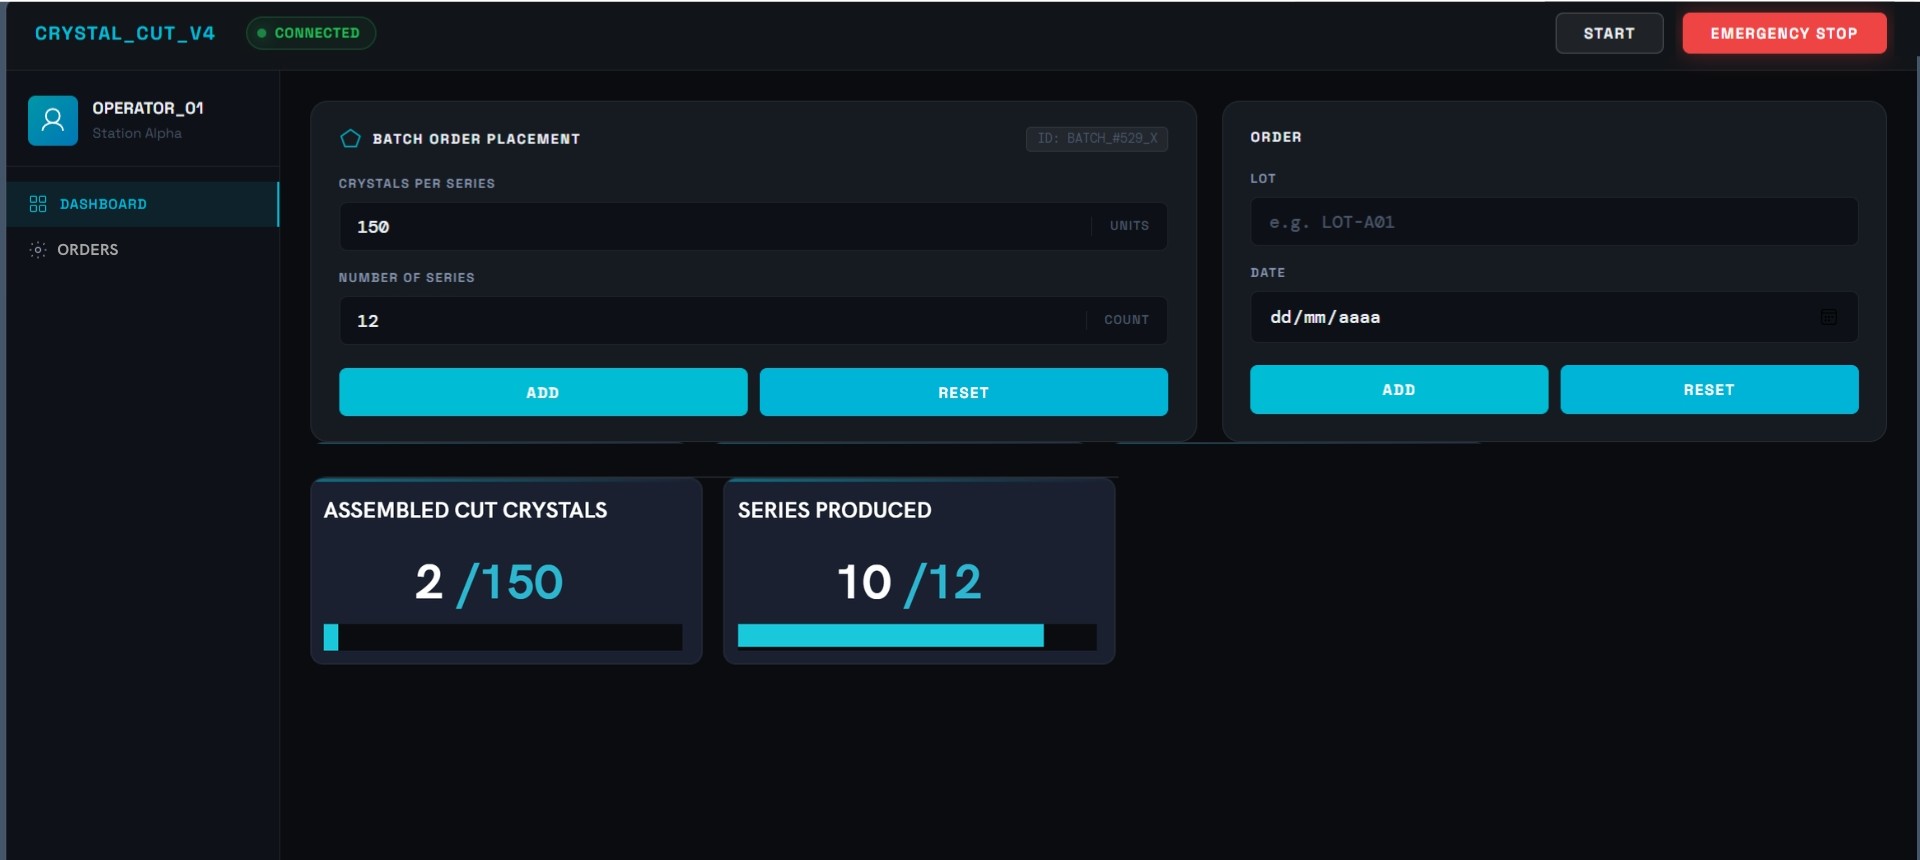
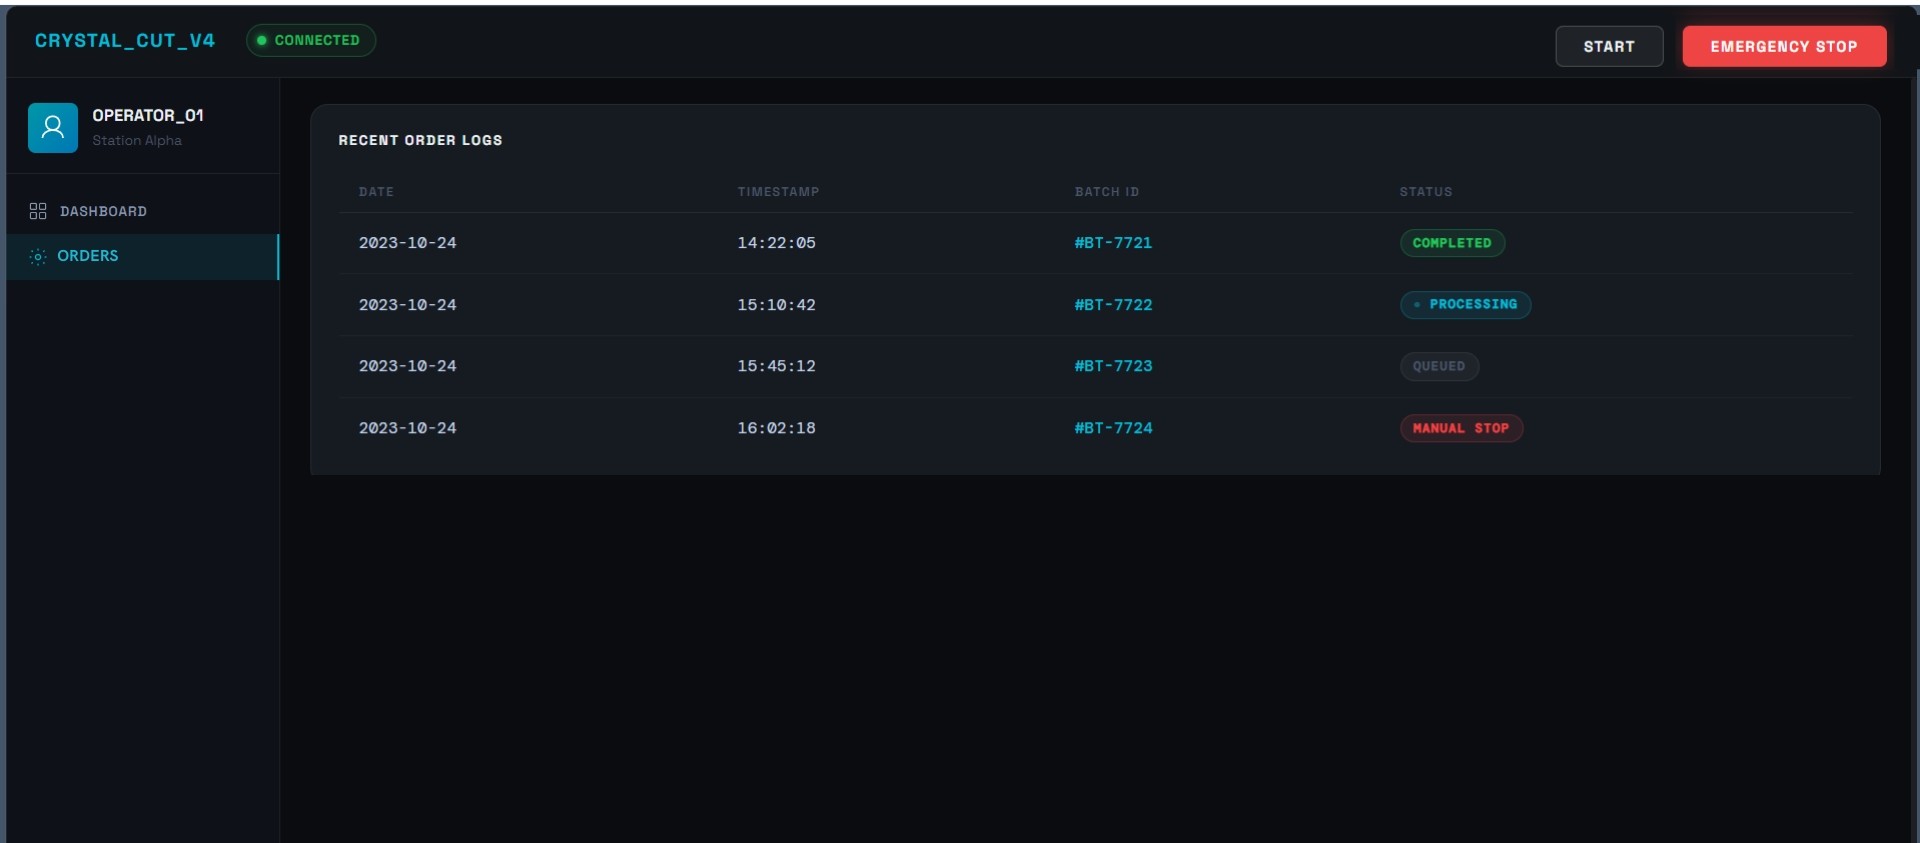
Step 2 — Organizing the Project Folders
Before launching Claude Code, I organized my folders strictly so the AI would not get confused between my actual project files and my professor's reference materials.
w14/                              ← root folder where I run `claude`
├── mi_proyecto_real/             ← MY actual project (Claude works here)
│   ├── interface.html            → all the HTML
│   ├── style.css                 → all the CSS
│   ├── app.js                    → all the JavaScript (MQTT logic)
│   ├── arduino/                  → microcontroller code (READ ONLY)
│   │   └── crystal_cut/
│   │       └── crystal_cut.ino
│   └── mockups/                  → AI-generated design references
│       ├── dashboard.jpg
│       └── orders.jpg
└── referencia_profe/             ← professor's example (READ ONLY)
    └── docs_rafa/
        ├── frontend/
        ├── scripts/
└── README.md| Folder / File | Purpose |
|---|---|
mi_proyecto_real/interface.html | Empty HTML file where Claude wrote the page structure. |
mi_proyecto_real/style.css | Empty CSS file where Claude wrote all the visual styles. |
mi_proyecto_real/app.js | Empty JavaScript file where Claude wrote the MQTT logic. |
mi_proyecto_real/arduino/crystal_cut/crystal_cut.ino | My XIAO ESP32-S3 code (treated as read-only by Claude). |
mi_proyecto_real/mockups/ | The two AI-generated design references. |
referencia_profe/docs_rafa/ | My professor's full example project — Claude can read it for context but cannot modify it. |
Step 3 — The Master Prompt
The most important part of working with Claude Code is the prompt. A vague prompt produces a generic, low-quality result; a detailed, structured prompt produces a precise, working dashboard on the first try. Below is a summary of what I asked Claude to do, followed by the full prompt I actually used.
In summary, the prompt asks Claude to:
- Build the dashboard from scratch in three separate files (HTML, CSS, JavaScript).
- Use only the files in
mi_proyecto_real/as editable, treatingreferencia_profe/andarduino/as read-only references. - Follow the visual design defined by the two mockup images.
- Connect to the public HiveMQ broker over WebSocket on port 8000.
- Use exactly the three MQTT topics that the Arduino expects (
ibero/arquitecturas/config,control,sensor). - Match the JSON message format the Arduino publishes and subscribes to.
- Implement the full dynamic behavior: automatic batch IDs, auto-filled date/time, real-time progress bars, status badges, START/EMERGENCY STOP buttons, and a persistent order log.
- Show a plan before writing any code, and ask for confirmation file by file.
Full prompt I used
Necesito que me ayudes a construir DESDE CERO una interfaz web para un sistema
de ensamble de cristales. Mis archivos principales están en la subcarpeta
mi_proyecto_real/ con esta estructura:

w14/
├── mi_proyecto_real/
│   ├── interface.html
│   ├── style.css
│   ├── app.js
│   ├── arduino/
│   │   └── crystal_cut/
│   │       └── crystal_cut.ino
│   └── mockups/
│       ├── dashboard.jpg
│       └── orders.jpg
└── referencia_profe/
    └── docs_rafa/

CONTEXTO DEL SISTEMA COMPLETO
Mi sistema tiene TRES componentes que se comunican vía MQTT:
  1. NAVEGADOR (interfaz web)     ← lo que tú vas a construir
  2. BROKER MQTT (HiveMQ público) ← intermediario, no se toca
  3. XIAO ESP32-S3 (Arduino)      ← ya tengo el código, no lo modifiques

El XIAO ESP32-S3 corre código Arduino que SIMULA una línea de ensamble:
recibe la configuración del lote, recibe comandos INICIAR/DETENER, y publica
el progreso en tiempo real (1 cristal cada 2 segundos, hasta completar
todas las series).

REGLA DE CARPETAS
NO modificar bajo ninguna circunstancia:
  - referencia_profe/  (material del profesor, solo lectura)
  - arduino/           (código del microcontrolador, solo lectura)
Trabaja SOLO en:
  - mi_proyecto_real/interface.html
  - mi_proyecto_real/style.css
  - mi_proyecto_real/app.js

REFERENCIAS VISUALES
- mi_proyecto_real/mockups/dashboard.jpg
- mi_proyecto_real/mockups/orders.jpg

SEPARACIÓN DE CÓDIGO POR ARCHIVO
- TODO el HTML va en interface.html
- TODO el CSS va en style.css
- TODO el JavaScript va en app.js
- La librería mqtt.js sí va por CDN en interface.html

DISEÑO VISUAL
- Tema oscuro (fondo #0a0e14, acentos cian/turquesa #2dd4bf)
- Tipografía monoespaciada en títulos (estilo "CRYSTAL_CUT_V4")

HEADER: título "CRYSTAL_CUT_V4" + badge "● CONNECTED" + START y EMERGENCY STOP
SIDEBAR: OPERATOR_01 + Station Alpha + menú DASHBOARD/ORDERS

VISTA "DASHBOARD"
- Panel "Batch Order Placement": Crystals Per Series (UNITS), Number of Series (COUNT), ADD, RESET
- Panel "Order": Lot, Date (auto), ADD, RESET
- Tarjetas de métricas: "Assembled Cut Crystals" X/Y, "Series Produced" X/Y, con barras

VISTA "ORDERS"
- Tabla "Recent Order Logs": Date, Timestamp, Batch ID, Status
- Estados: COMPLETED (verde), PROCESSING (cian parpadeante), QUEUED (gris), MANUAL STOP (rojo)
- BATCH ID incremental guardado en localStorage

COMUNICACIÓN MQTT
- Broker: ws://broker.hivemq.com:8000/mqtt
- ibero/arquitecturas/config   → frontend publica config
- ibero/arquitecturas/control  → frontend publica INICIAR/DETENER
- ibero/arquitecturas/sensor   → frontend recibe estado

Formato JSON:
- config: {"lote": "LOT-A01", "cristales_por_serie": 150, "total_series": 12, "fecha": "ISO"}
- control: {"comando": "INICIAR"} o {"comando": "DETENER"}
- sensor: {"estado", "cristal_actual", "serie_actual", "cristales_por_serie", "total_series", "lote"}

Estados del Arduino: "ensamblando", "serie_completa", "lote_completo", "detenido"

COMPORTAMIENTO DINÁMICO
1. Llenar CRYSTALS PER SERIES + NUMBER OF SERIES → ADD → guardar y habilitar ORDER
2. Llenar LOT → ADD → fecha automática, publicar config, crear orden QUEUED, generar BATCH ID
3. START → publicar INICIAR, orden a PROCESSING, métricas se actualizan en tiempo real
4. Recibir estado del sensor → actualizar métricas y barras
5. "lote_completo" → orden a COMPLETED, métricas al total final
6. EMERGENCY STOP → publicar DETENER, orden a MANUAL STOP
7. Badge ● CONNECTED refleja estado real de MQTT

INSTRUCCIONES FINALES
1. Lee mis tres archivos en mi_proyecto_real/ para confirmar que están vacíos
2. Abre las dos imágenes en mockups/ y analízalas
3. Lee arduino/crystal_cut/crystal_cut.ino para confirmar el formato MQTT
4. Lee referencia_profe/docs_rafa/ SOLO para entender el contexto MQTT
5. Muéstrame un plan antes de escribir código
6. Aplica los cambios archivo por archivo pidiendo confirmación
7. Diseño limpio y responsive (1280px+)
Why this prompt is so important: A long, structured prompt is the difference between a generic page and a working dashboard. It defines the folder structure, the visual rules, the read-only boundaries, the exact MQTT contract (broker, topics, JSON format), and the precise dynamic behavior expected. By giving Claude all this context upfront, it produces the right files on the first try and avoids invented behaviors that would not match my Arduino.
Codes I used for the Interface
Style CSS
/* ── CSS CUSTOM PROPERTIES ───────────────────────────── */
:root {
  --bg-base:       #0a0c0f;
  --bg-surface:    #111418;
  --bg-panel:      #161b22;
  --bg-card:       #1a2030;
  --bg-input:      #0d1117;
  --bg-sidebar:    #0e1117;

  --border:        rgba(255, 255, 255, 0.07);
  --border-active: rgba(0, 188, 212, 0.35);

  --primary:       #00BCD4;
  --primary-dark:  #0097A7;

  --text-primary:  #f0f4f8;
  --text-secondary:#8b9ab0;
  --text-muted:    #4a5568;
  --text-data:     #c8d8e8;

  --green:         #22c55e;
  --red:           #ef4444;
  --red-dark:      #b91c1c;

  --sidebar-w:     220px;
  --header-h:      58px;
  --radius-sm:     6px;
  --radius-md:     10px;
  --radius-lg:     14px;

  --font-ui:       'Space Grotesk', sans-serif;
  --font-mono:     'DM Mono', monospace;
}

/* ── RESET ───────────────────────────────────────────── */
*, *::before, *::after { box-sizing: border-box; margin: 0; padding: 0; }
html, body { height: 100%; }
body {
  font-family: var(--font-ui);
  background: var(--bg-base);
  color: var(--text-primary);
  font-size: 14px;
  line-height: 1.5;
  overflow: hidden;
}
input, button, select { font-family: inherit; }
button { cursor: pointer; border: none; background: none; }
input  { outline: none; }
svg    { display: block; }

/* ── APP SHELL ───────────────────────────────────────── */
.app { display: flex; flex-direction: column; height: 100vh; }

/* ── HEADER ──────────────────────────────────────────── */
.header {
  height: var(--header-h);
  background: var(--bg-surface);
  border-bottom: 1px solid var(--border);
  display: flex;
  align-items: center;
  padding: 0 24px;
  gap: 16px;
  flex-shrink: 0;
  z-index: 100;
}

.header__logo {
  font-family: var(--font-mono);
  font-size: 15px;
  font-weight: 700;
  letter-spacing: 0.08em;
  color: var(--primary);
  text-transform: uppercase;
  white-space: nowrap;
}

.header__status {
  display: flex;
  align-items: center;
  gap: 7px;
  font-size: 11px;
  font-weight: 600;
  letter-spacing: 0.06em;
  text-transform: uppercase;
  border-radius: 20px;
  padding: 4px 12px 4px 8px;
  transition: color 0.3s, border-color 0.3s, background 0.3s;
}
.header__status.connected    { color: var(--green);  border: 1px solid rgba(34,197,94,0.3);  background: rgba(34,197,94,0.06);  }
.header__status.connecting   { color: #f59e0b;       border: 1px solid rgba(245,158,11,0.3); background: rgba(245,158,11,0.06); }
.header__status.disconnected { color: var(--red);    border: 1px solid rgba(239,68,68,0.3);  background: rgba(239,68,68,0.06);  }

.header__status-dot {
  width: 7px;
  height: 7px;
  border-radius: 50%;
  flex-shrink: 0;
}
.connected    .header__status-dot { background: var(--green); animation: pulse-green 2s ease-in-out infinite; }
.connecting   .header__status-dot { background: #f59e0b;      animation: pulse-amber 1s ease-in-out infinite; }
.disconnected .header__status-dot { background: var(--red); }

@keyframes pulse-green {
  0%, 100% { box-shadow: 0 0 6px var(--green); }
  50%       { box-shadow: 0 0 14px var(--green); opacity: 0.6; }
}
@keyframes pulse-amber {
  0%, 100% { opacity: 1; }
  50%       { opacity: 0.35; }
}

.header__spacer { flex: 1; }

.btn-start {
  padding: 8px 22px;
  border-radius: var(--radius-sm);
  font-size: 12px;
  font-weight: 700;
  letter-spacing: 0.1em;
  text-transform: uppercase;
  border: 1px solid rgba(255, 255, 255, 0.2);
  color: var(--text-primary);
  background: rgba(255, 255, 255, 0.06);
  transition: background 0.18s, border-color 0.18s, color 0.18s;
}
.btn-start:hover {
  background: rgba(0, 188, 212, 0.15);
  border-color: var(--primary);
  color: var(--primary);
}

.btn-emergency {
  padding: 8px 22px;
  border-radius: var(--radius-sm);
  font-size: 12px;
  font-weight: 700;
  letter-spacing: 0.1em;
  text-transform: uppercase;
  background: var(--red);
  color: #fff;
  border: 1px solid var(--red);
  box-shadow: 0 0 18px rgba(239, 68, 68, 0.35);
  transition: background 0.18s, box-shadow 0.18s, transform 0.1s;
}
.btn-emergency:hover  { background: var(--red-dark); box-shadow: 0 0 28px rgba(239,68,68,0.6); transform: scale(1.02); }
.btn-emergency:active { transform: scale(0.98); }

/* ── BODY ────────────────────────────────────────────── */
.body { display: flex; flex: 1; overflow: hidden; }

/* ── SIDEBAR ─────────────────────────────────────────── */
.sidebar {
  width: var(--sidebar-w);
  background: var(--bg-sidebar);
  border-right: 1px solid var(--border);
  display: flex;
  flex-direction: column;
  flex-shrink: 0;
  overflow-y: auto;
}

.sidebar__operator {
  padding: 20px 18px 16px;
  border-bottom: 1px solid var(--border);
  display: flex;
  align-items: center;
  gap: 12px;
}

.sidebar__avatar {
  width: 40px;
  height: 40px;
  border-radius: var(--radius-sm);
  background: linear-gradient(135deg, var(--primary-dark), #0077b6);
  display: flex;
  align-items: center;
  justify-content: center;
  flex-shrink: 0;
}
.sidebar__avatar svg { width: 22px; height: 22px; color: #fff; }

.sidebar__op-name {
  font-size: 13px;
  font-weight: 600;
  color: var(--text-primary);
  letter-spacing: 0.02em;
}
.sidebar__op-role {
  font-size: 11px;
  color: var(--text-muted);
  margin-top: 1px;
}

.sidebar__nav { padding: 12px 0; flex: 1; }

.sidebar__nav-item {
  display: flex;
  align-items: center;
  gap: 10px;
  padding: 10px 18px;
  font-size: 11px;
  font-weight: 500;
  color: var(--text-secondary);
  text-transform: uppercase;
  letter-spacing: 0.06em;
  cursor: pointer;
  transition: background 0.15s, color 0.15s;
  user-select: none;
}
.sidebar__nav-item:hover  { background: rgba(255,255,255,0.04); color: var(--text-primary); }
.sidebar__nav-item.active { background: rgba(0,188,212,0.1); color: var(--primary); border-right: 2px solid var(--primary); }
.sidebar__nav-item svg    { width: 16px; height: 16px; flex-shrink: 0; }

/* ── MAIN ────────────────────────────────────────────── */
.main {
  flex: 1;
  overflow-y: auto;
  padding: 24px;
  display: flex;
  flex-direction: column;
  gap: 20px;
}

/* ── PANEL ───────────────────────────────────────────── */
.panel {
  background: var(--bg-panel);
  border: 1px solid var(--border);
  border-radius: var(--radius-lg);
  padding: 20px 22px;
}

.panel__header {
  display: flex;
  align-items: center;
  gap: 9px;
  margin-bottom: 18px;
}
.panel__header-icon { width: 18px; height: 18px; color: var(--primary); flex-shrink: 0; }
.panel__title {
  font-size: 11px;
  font-weight: 700;
  letter-spacing: 0.13em;
  text-transform: uppercase;
  color: var(--text-primary);
}
.panel__badge {
  margin-left: auto;
  font-size: 10px;
  font-family: var(--font-mono);
  color: var(--text-muted);
  background: rgba(255, 255, 255, 0.05);
  border: 1px solid var(--border);
  border-radius: 4px;
  padding: 2px 8px;
  white-space: nowrap;
}

/* ── FORMS ───────────────────────────────────────────── */
.form-group { margin-bottom: 14px; }

.form-label {
  display: block;
  font-size: 10px;
  font-weight: 600;
  letter-spacing: 0.12em;
  text-transform: uppercase;
  color: var(--text-secondary);
  margin-bottom: 7px;
}

.input-wrapper {
  display: flex;
  align-items: center;
  background: var(--bg-input);
  border: 1px solid var(--border);
  border-radius: var(--radius-sm);
  overflow: hidden;
  transition: border-color 0.15s, box-shadow 0.15s;
}
.input-wrapper:focus-within {
  border-color: var(--border-active);
  box-shadow: 0 0 0 3px rgba(0, 188, 212, 0.08);
}

.input-wrapper input {
  flex: 1;
  background: transparent;
  border: none;
  padding: 10px 14px;
  font-family: var(--font-mono);
  font-size: 14px;
  font-weight: 500;
  color: var(--text-primary);
}
.input-wrapper input::placeholder { color: var(--text-muted); }
.input-wrapper input[readonly]    { cursor: default; color: var(--text-secondary); }

.input-unit {
  padding: 0 14px;
  font-size: 10px;
  font-weight: 600;
  letter-spacing: 0.08em;
  text-transform: uppercase;
  color: var(--text-muted);
  border-left: 1px solid var(--border);
  align-self: stretch;
  display: flex;
  align-items: center;
  white-space: nowrap;
}

/* ── PANEL BUTTONS ───────────────────────────────────── */
.btn-row {
  display: grid;
  grid-template-columns: 1fr 1fr;
  gap: 10px;
  margin-top: 18px;
}

.btn-add,
.btn-reset {
  padding: 11px;
  border-radius: var(--radius-sm);
  font-size: 12px;
  font-weight: 700;
  letter-spacing: 0.1em;
  text-transform: uppercase;
  background: var(--primary);
  color: #fff;
  border: 1px solid var(--primary);
  transition: background 0.18s, border-color 0.18s, opacity 0.18s;
}
.btn-add:hover:not(:disabled),
.btn-reset:hover { background: var(--primary-dark); border-color: var(--primary-dark); }

.btn-add:disabled { opacity: 0.35; cursor: not-allowed; }

/* ── DASHBOARD LAYOUT ────────────────────────────────── */
.top-row {
  display: grid;
  grid-template-columns: 1fr 0.75fr;
  gap: 20px;
}

.metrics-row {
  display: grid;
  grid-template-columns: 1fr 1fr;
  gap: 20px;
}

/* ── METRIC CARDS ────────────────────────────────────── */
.metric-card {
  background: var(--bg-card);
  border: 1px solid var(--border);
  border-radius: var(--radius-md);
  padding: 22px 24px;
}

.metric-card__title {
  font-size: 11px;
  font-weight: 700;
  letter-spacing: 0.12em;
  text-transform: uppercase;
  color: var(--text-secondary);
  margin-bottom: 16px;
}

.metric-card__value {
  font-family: var(--font-mono);
  line-height: 1;
  margin-bottom: 18px;
}

.metric-card__current {
  font-size: 32px;
  font-weight: 500;
  color: var(--text-primary);
}

.metric-card__total {
  font-size: 26px;
  font-weight: 400;
  color: var(--primary);
}

/* ── PROGRESS BAR ────────────────────────────────────── */
.progress-bar {
  width: 100%;
  height: 5px;
  background: rgba(255, 255, 255, 0.07);
  border-radius: 3px;
  overflow: hidden;
}
.progress-bar__fill {
  height: 100%;
  border-radius: 3px;
  background: linear-gradient(90deg, var(--primary-dark), var(--primary));
  transition: width 0.5s ease;
}

/* ── ORDERS TABLE ────────────────────────────────────── */
.logs-table { width: 100%; border-collapse: collapse; }

.logs-table th {
  font-size: 10px;
  font-weight: 600;
  letter-spacing: 0.12em;
  text-transform: uppercase;
  color: var(--text-muted);
  padding: 8px 16px;
  text-align: left;
  border-bottom: 1px solid var(--border);
}

.logs-table td {
  padding: 13px 16px;
  font-family: var(--font-mono);
  font-size: 13px;
  color: var(--text-data);
  border-bottom: 1px solid rgba(255, 255, 255, 0.04);
}
.logs-table tr:last-child td { border-bottom: none; }
.logs-table tr:hover td { background: rgba(255, 255, 255, 0.02); }

.batch-id { color: var(--primary); font-weight: 500; }

/* ── STATUS BADGES ───────────────────────────────────── */
.status-badge {
  display: inline-block;
  font-size: 10px;
  font-weight: 700;
  letter-spacing: 0.1em;
  text-transform: uppercase;
  padding: 3px 10px;
  border-radius: 20px;
}
.status-badge.completed   { color: var(--green);  background: rgba(34,197,94,0.1);  border: 1px solid rgba(34,197,94,0.25);  }
.status-badge.processing  { color: var(--primary); background: rgba(0,188,212,0.1);  border: 1px solid rgba(0,188,212,0.25);  }
.status-badge.queued      { color: var(--text-muted); background: rgba(255,255,255,0.04); border: 1px solid var(--border);   }
.status-badge.manual-stop { color: var(--red);    background: rgba(239,68,68,0.1);   border: 1px solid rgba(239,68,68,0.25);  }

.status-badge.processing::before {
  content: '● ';
  animation: blink 1.2s ease-in-out infinite;
}
@keyframes blink { 0%, 100% { opacity: 1; } 50% { opacity: 0.2; } }

/* ── SCROLLBAR ───────────────────────────────────────── */
::-webkit-scrollbar       { width: 5px; height: 5px; }
::-webkit-scrollbar-track { background: transparent; }
::-webkit-scrollbar-thumb { background: rgba(255,255,255,0.08); border-radius: 3px; }

/* ── RESPONSIVE ──────────────────────────────────────── */
@media (max-width: 1200px) {
  .top-row     { grid-template-columns: 1fr; }
  .metrics-row { grid-template-columns: 1fr; }
}
@media (max-width: 900px) {
  :root { --sidebar-w: 64px; }
  .sidebar__op-info,
  .sidebar__nav-item span { display: none; }
  .sidebar__nav-item { justify-content: center; padding: 12px; }
  .sidebar__operator { justify-content: center; padding: 14px 8px; }
  .main { padding: 16px; }
}
@media (max-width: 640px) {
  .btn-emergency { font-size: 10px; padding: 7px 12px; }
  .header__logo  { font-size: 13px; }
}
JavaScript (app.js) — MQTT logic for the dashboard
This is the central code of the assignment: the JavaScript that runs in the browser and handles the entire MQTT connection. It connects to the HiveMQ broker over WebSocket, publishes the batch configuration and the START/STOP commands, and subscribes to the live sensor topic to update the dashboard in real time.
/* ══════════════════════════════════════════════════════
                CRYSTAL_CUT_V4 — app.js
                MQTT communication with XIAO ESP32-S3 via HiveMQ broker
                ══════════════════════════════════════════════════════ */

                /* ── MQTT topic and broker constants ─────────────────── */
                const BROKER_URL    = 'ws://broker.hivemq.com:8000/mqtt';   // Public HiveMQ broker via WebSocket
                const TOPIC_CONFIG  = 'ibero/arquitecturas/config';         // Dashboard publishes batch configuration
                const TOPIC_CONTROL = 'ibero/arquitecturas/control';        // Dashboard publishes START/STOP commands
                const TOPIC_SENSOR  = 'ibero/arquitecturas/sensor';         // Dashboard subscribes to real-time progress

                /* ── State ──────────────────────────────────────────── */
                let batchConfig   = null;   // { crystals, series } — set by BATCH ADD
                let activeOrderId = null;   // DOM row id of the order currently processing
                let mqttClient    = null;   // The MQTT client instance

                /* ── Batch ID counter — persists across page reloads using localStorage ── */
                function getNextBatchId() {
                const n = parseInt(localStorage.getItem('crystalBatchCounter') || '7720', 10) + 1;
                localStorage.setItem('crystalBatchCounter', String(n));
                return '#BT-' + n;
                }

                function peekNextBatchId() {
                const n = parseInt(localStorage.getItem('crystalBatchCounter') || '7720', 10) + 1;
                return '#BT-' + n;
                }

                /* ── Date/time helpers ──────────────────────────────── */
                function pad(n) { return String(n).padStart(2, '0'); }

                function nowFormatted() {
                const d = new Date();
                return {
                    date: `${pad(d.getDate())}-${pad(d.getMonth() + 1)}-${d.getFullYear()}`,
                    time: `${pad(d.getHours())}:${pad(d.getMinutes())}:${pad(d.getSeconds())}`,
                };
                }

                /* ── Navigation between dashboard and orders views ──── */
                function showView(view) {
                document.getElementById('view-dashboard').style.display = view === 'dashboard' ? '' : 'none';
                document.getElementById('view-orders').style.display    = view === 'orders'    ? '' : 'none';
                document.getElementById('nav-dashboard').classList.toggle('active', view === 'dashboard');
                document.getElementById('nav-orders').classList.toggle('active', view === 'orders');
                }

                /* ── Connection badge ────────────────────────────────── */
                function setConnectionStatus(state) {
                const badge = document.getElementById('connection-status');
                const text  = document.getElementById('status-text');
                badge.className = 'header__status ' + state;
                const labels = { connected: 'CONNECTED', connecting: 'CONNECTING...', disconnected: 'DISCONNECTED' };
                text.textContent = labels[state] || state;
                }

                /* ── Metric cards (real-time progress display) ───────── */
                function updateMetrics(crystalCurrent, crystalTotal, seriesCurrent, seriesTotal) {
                document.getElementById('val-crystals-current').textContent = crystalCurrent;
                document.getElementById('val-crystals-total').textContent   = '/' + crystalTotal;
                document.getElementById('val-series-current').textContent   = seriesCurrent;
                document.getElementById('val-series-total').textContent     = '/' + seriesTotal;

                const cPct = crystalTotal > 0 ? (crystalCurrent / crystalTotal) * 100 : 0;
                const sPct = seriesTotal  > 0 ? (seriesCurrent  / seriesTotal)  * 100 : 0;
                document.getElementById('bar-crystals').style.width = cPct + '%';
                document.getElementById('bar-series').style.width   = sPct + '%';
                }

                /* ── Orders table helpers ────────────────────────────── */
                function statusClass(s) {
                return { completed: 'completed', processing: 'processing', queued: 'queued', 'manual-stop': 'manual-stop' }[s] || 'queued';
                }
                function statusLabel(s) {
                return { completed: 'COMPLETED', processing: 'PROCESSING', queued: 'QUEUED', 'manual-stop': 'MANUAL STOP' }[s] || s.toUpperCase();
                }

                function addOrderRow(batchId, date, time, lot, status) {
                const tbody = document.getElementById('orders-tbody');
                const tr    = document.createElement('tr');
                const rowId = 'order-' + batchId.replace('#', '');
                tr.id = rowId;
                tr.innerHTML =
                    `<td>${date}</td>` +
                    `<td>${time}</td>` +
                    `<td>${lot}</td>` +
                    `<td><span class="batch-id">${batchId}</span></td>` +
                    `<td><span class="status-badge ${statusClass(status)}">${statusLabel(status)}</span></td>`;
                tbody.prepend(tr);
                return rowId;
                }

                function setOrderStatus(rowId, status) {
                const row = document.getElementById(rowId);
                if (!row) return;
                const badge = row.querySelector('.status-badge');
                badge.className   = 'status-badge ' + statusClass(status);
                badge.textContent = statusLabel(status);
                }

                /* ── MQTT — Connect to the broker over WebSocket ─────── */
                function initMQTT() {
                setConnectionStatus('connecting');

                const clientId = 'crystal_web_' + Math.random().toString(16).slice(2, 8);
                mqttClient = mqtt.connect(BROKER_URL, { clientId });

                // When the connection succeeds, subscribe to the sensor topic to receive updates from the ESP32
                mqttClient.on('connect', () => {
                    setConnectionStatus('connected');
                    mqttClient.subscribe(TOPIC_SENSOR);
                });

                mqttClient.on('reconnect', () => setConnectionStatus('connecting'));
                mqttClient.on('error',     () => setConnectionStatus('disconnected'));
                mqttClient.on('close',     () => setConnectionStatus('disconnected'));

                // Every time a message arrives on the sensor topic, parse it and update the UI
                mqttClient.on('message', (topic, message) => {
                    if (topic !== TOPIC_SENSOR) return;
                    let data;
                    try { data = JSON.parse(message.toString()); } catch { return; }
                    handleSensor(data);
                });
                }

                // Publish a JSON payload to a topic
                function mqttPublish(topic, payload) {
                if (mqttClient && mqttClient.connected) {
                    mqttClient.publish(topic, JSON.stringify(payload));
                }
                }

                /* ── Sensor message handler (data coming from the ESP32) ── */
                function handleSensor(data) {
                const { estado, cristal_actual, serie_actual, cristales_por_serie, total_series } = data;

                // Update the real-time metric cards and progress bars
                updateMetrics(cristal_actual, cristales_por_serie, serie_actual, total_series);

                // React to special states
                if (estado === 'lote_completo') {
                    if (activeOrderId) { setOrderStatus(activeOrderId, 'completed'); activeOrderId = null; }
                } else if (estado === 'detenido') {
                    if (activeOrderId) { setOrderStatus(activeOrderId, 'manual-stop'); activeOrderId = null; }
                }
                }

                /* ── BATCH ADD — Save batch configuration in memory ─── */
                document.getElementById('btn-batch-add').addEventListener('click', () => {
                const crystals = parseInt(document.getElementById('input-crystals').value, 10);
                const series   = parseInt(document.getElementById('input-series').value,   10);

                if (!crystals || crystals < 1 || !series || series < 1) return;

                batchConfig = { crystals, series };
                document.getElementById('batch-id-display').textContent = 'ID: ' + peekNextBatchId();
                document.getElementById('btn-order-add').disabled = false;
                });

                /* ── BATCH RESET ─────────────────────────────────────── */
                document.getElementById('btn-batch-reset').addEventListener('click', () => {
                document.getElementById('input-crystals').value = '';
                document.getElementById('input-series').value   = '';
                batchConfig = null;
                document.getElementById('btn-order-add').disabled = true;
                document.getElementById('batch-id-display').textContent = 'ID: ——';
                });

                /* ── ORDER ADD — Publish the batch config to MQTT ───── */
                document.getElementById('btn-order-add').addEventListener('click', () => {
                if (!batchConfig) return;

                const lot = document.getElementById('input-lot').value.trim();
                if (!lot) return;

                // Auto-fill the date with the current moment
                const { date, time } = nowFormatted();
                document.getElementById('input-date').value = date;

                // Generate a new batch ID
                const batchId = getNextBatchId();
                document.getElementById('batch-id-display').textContent = 'ID: ' + batchId;

                // PUBLISH the configuration to the broker — the ESP32 receives it
                mqttPublish(TOPIC_CONFIG, {
                    lote:                lot,
                    cristales_por_serie: batchConfig.crystals,
                    total_series:        batchConfig.series,
                    fecha:               new Date().toISOString(),
                });

                // Create a new row in the orders table with status QUEUED
                const rowId = addOrderRow(batchId, date, time, lot, 'queued');
                activeOrderId = rowId;

                // Reset the metric cards for the new batch
                updateMetrics(0, batchConfig.crystals, 0, batchConfig.series);

                batchConfig = null;
                document.getElementById('btn-order-add').disabled = true;
                });

                /* ── ORDER RESET ─────────────────────────────────────── */
                document.getElementById('btn-order-reset').addEventListener('click', () => {
                document.getElementById('input-lot').value  = '';
                document.getElementById('input-date').value = '';
                });

                /* ── START — Tell the ESP32 to begin the assembly ────── */
                document.getElementById('btn-start').addEventListener('click', () => {
                mqttPublish(TOPIC_CONTROL, { comando: 'INICIAR' });
                if (activeOrderId) setOrderStatus(activeOrderId, 'processing');
                });

                /* ── EMERGENCY STOP — Tell the ESP32 to halt ────────── */
                document.getElementById('btn-emergency').addEventListener('click', () => {
                mqttPublish(TOPIC_CONTROL, { comando: 'DETENER' });
                if (activeOrderId) { setOrderStatus(activeOrderId, 'manual-stop'); activeOrderId = null; }
                });

                /* ── Initialize the MQTT connection on page load ────── */
                initMQTT();
The Arduino IDE Code for the XIAO ESP32-S3
The XIAO ESP32-S3 runs a sketch that simulates a crystal-assembly line: it receives a batch configuration over MQTT, waits for a START command, and then "produces" one crystal every 2 seconds, publishing the progress back to the dashboard. The same code will later be extended to read from a real camera or sensor — but for now the simulation lives entirely in software.
Installing the Required Libraries
The sketch depends on two external libraries. I installed both from the Arduino IDE Library Manager:
- Open Arduino IDE.
- Go to Tools → Manage Libraries (or press
Ctrl + Shift + I). - Search for "PubSubClient" by Nick O'Leary and click Install. This library implements the MQTT protocol on the ESP32.
- Search for "ArduinoJson" by Benoit Blanchon and click Install (version 7.x). This library handles JSON serialization and parsing for the MQTT messages.
I also added the ESP32 board package by going to File → Preferences and adding the URL https://espressif.github.io/arduino-esp32/package_esp32_index.json in "Additional Boards Manager URLs", then installing the "esp32 by Espressif Systems" package from Tools → Board → Boards Manager.
Board Configuration
| Setting | Value |
|---|---|
| Board | XIAO_ESP32S3 |
| USB CDC On Boot | Enabled |
| CPU Frequency | 240MHz (WiFi) |
| PSRAM | OPI PSRAM |
| Upload Speed | 921600 |
| Port | The COM that appears when the board is connected via USB-C |
The Only Lines You Need to Change
Important: If you want to replicate this code on your own XIAO ESP32-S3, the only two lines you need to edit are the WiFi credentials. Everything else (broker, topics, logic) is universal and can stay as-is.
const char* WIFI_SSID     = "TU_RED_WIFI";       // ← put your WiFi network name here
const char* WIFI_PASSWORD = "TU_PASSWORD_WIFI";  // ← put your WiFi password here
Two important details about the WiFi:
- The XIAO ESP32-S3 only supports 2.4 GHz networks, not 5 GHz.
- The SSID and password are case-sensitive — they must match the router exactly.
Full Arduino Sketch with Line-by-Line Comments
#include <WiFi.h>                                  // ESP32 WiFi library (built in with the ESP32 board package)
#include <PubSubClient.h>                          // MQTT client library for the ESP32
#include <ArduinoJson.h>                           // JSON parser/builder for creating MQTT payloads

const char* WIFI_SSID     = "TU_RED_WIFI";         // CHANGE: your 2.4 GHz WiFi network name
const char* WIFI_PASSWORD = "TU_PASSWORD_WIFI";    // CHANGE: your WiFi password

const char* MQTT_BROKER = "broker.hivemq.com";     // Public MQTT broker (same one used by the dashboard)
const int   MQTT_PORT   = 1883;                    // Standard MQTT TCP port

const char* TOPIC_CONFIG  = "ibero/arquitecturas/config";   // Receives the batch configuration
const char* TOPIC_CONTROL = "ibero/arquitecturas/control";  // Receives INICIAR / DETENER commands
const char* TOPIC_SENSOR  = "ibero/arquitecturas/sensor";   // Publishes the assembly progress

const unsigned long INTERVALO_CRISTAL  = 2000;     // Milliseconds between each "crystal" (2 seconds)
const unsigned long PAUSA_ENTRE_SERIES = 1000;    // Pause between two consecutive series

WiFiClient    wifiClient;                          // Underlying TCP client for the MQTT connection
PubSubClient  mqttClient(wifiClient);              // MQTT client built on top of the WiFi client

String  lote              = "";                    // Name of the current batch (received from dashboard)
int     cristalesPorSerie = 0;                     // How many crystals per series (from dashboard)
int     totalSeries       = 0;                     // How many series in total (from dashboard)
bool    configRecibida    = false;                 // Flag: did we already receive a configuration?

bool    ensambleActivo    = false;                 // Flag: is the assembly currently running?
int     cristalActual     = 0;                     // Counter: which crystal of the current series
int     serieActual       = 1;                     // Counter: which series we are on
unsigned long ultimoCristal = 0;                   // Timestamp (millis) of the last published crystal

void conectarWiFi() {                              // Connects the ESP32 to the WiFi network
  Serial.print("Conectando a WiFi: ");
  Serial.println(WIFI_SSID);
  WiFi.begin(WIFI_SSID, WIFI_PASSWORD);            // Start the WiFi connection attempt

  int intentos = 0;
  while (WiFi.status() != WL_CONNECTED && intentos < 40) {  // Wait up to 20 seconds
    delay(500);
    Serial.print(".");
    intentos++;
  }
  Serial.println();

  if (WiFi.status() == WL_CONNECTED) {             // Print success or failure
    Serial.print("✓ WiFi conectado. IP local: ");
    Serial.println(WiFi.localIP());
  } else {
    Serial.println("✗ No se pudo conectar al WiFi. Revisa SSID/password.");
  }
}

void publicarEstado(const char* estado) {          // Publishes the current state to the sensor topic
  StaticJsonDocument<256> doc;                     // Allocate a small JSON document on the stack
  doc["estado"]              = estado;             // Add the state string ("ensamblando", etc.)
  doc["cristal_actual"]      = cristalActual;      // Add the current crystal number
  doc["serie_actual"]        = serieActual;        // Add the current series number
  doc["cristales_por_serie"] = cristalesPorSerie;  // Add the configured crystals per series
  doc["total_series"]        = totalSeries;        // Add the configured total series
  doc["lote"]                = lote;               // Add the batch name

  char buffer[256];
  serializeJson(doc, buffer);                      // Convert the JSON document into a string
  mqttClient.publish(TOPIC_SENSOR, buffer);        // Publish the JSON string to the broker

  Serial.print("[PUB] ");
  Serial.println(buffer);                          // Echo to the Serial Monitor for debugging
}

void onMessage(char* topic, byte* payload, unsigned int length) {  // Runs on every received MQTT message
  String mensaje = "";
  for (unsigned int i = 0; i < length; i++) {
    mensaje += (char)payload[i];                   // Convert the byte array to a String
  }

  Serial.print("[RX] ");
  Serial.print(topic);
  Serial.print(" : ");
  Serial.println(mensaje);

  StaticJsonDocument<256> doc;
  DeserializationError err = deserializeJson(doc, mensaje);  // Try to parse the message as JSON
  if (err) {
    Serial.print("Error al parsear JSON: ");
    Serial.println(err.c_str());
    return;
  }

  if (String(topic) == TOPIC_CONFIG) {             // Branch 1: configuration arrived
    lote              = doc["lote"].as<String>();  // Save lot name
    cristalesPorSerie = doc["cristales_por_serie"];// Save crystals per series
    totalSeries       = doc["total_series"];      // Save total series
    configRecibida    = true;                      // Mark configuration as valid

    Serial.println("─────────────────────────────");
    Serial.print("[CONFIG] Lote: ");           Serial.println(lote);
    Serial.print("         Cristales por serie: "); Serial.println(cristalesPorSerie);
    Serial.print("         Total de series: "); Serial.println(totalSeries);
    Serial.println("─────────────────────────────");
  }

  else if (String(topic) == TOPIC_CONTROL) {       // Branch 2: control command arrived
    String comando = doc["comando"].as<String>();

    if (comando == "INICIAR") {                    // START command
      if (!configRecibida) {
        Serial.println("[ERROR] Recibí INICIAR sin configuración previa.");
        return;
      }
      cristalActual  = 0;                          // Reset crystal counter
      serieActual    = 1;                          // Reset series counter
      ensambleActivo = true;                       // Activate the assembly loop
      ultimoCristal  = millis();                   // Initialize the timestamp
      Serial.println(">>> ENSAMBLE INICIADO <<<");
    }
    else if (comando == "DETENER") {               // STOP command
      ensambleActivo = false;                      // Stop the assembly loop
      publicarEstado("detenido");                  // Notify the dashboard
      Serial.println(">>> PARO DE EMERGENCIA <<<");
    }
  }
}

void reconectarMQTT() {                            // Reconnects to MQTT if the connection drops
  while (!mqttClient.connected()) {
    Serial.print("Conectando a MQTT broker... ");
    String clientId = "xiao_esp32s3_" + String(random(0xffff), HEX);  // Random unique client ID

    if (mqttClient.connect(clientId.c_str())) {    // Try to connect
      Serial.println("✓ conectado.");
      mqttClient.subscribe(TOPIC_CONFIG);          // Listen for configuration messages
      mqttClient.subscribe(TOPIC_CONTROL);         // Listen for control commands
      Serial.print("Suscrito a: "); Serial.println(TOPIC_CONFIG);
      Serial.print("Suscrito a: "); Serial.println(TOPIC_CONTROL);
      Serial.println("Esperando configuración del dashboard...");
    } else {
      Serial.print("✗ falló (rc=");
      Serial.print(mqttClient.state());            // Print error code (-2 means MQTT_CONNECT_FAILED)
      Serial.println("). Reintentando en 3s...");
      delay(3000);                                 // Wait 3 seconds and retry
    }
  }
}

void setup() {                                     // Runs once when the board powers on
  Serial.begin(115200);                            // Open the Serial Monitor connection
  delay(1000);

  Serial.println();
  Serial.println("═══════════════════════════════════════");
  Serial.println("   CRYSTAL_CUT_V4 - XIAO ESP32-S3");
  Serial.println("═══════════════════════════════════════");

  conectarWiFi();                                  // Connect to WiFi first

  mqttClient.setServer(MQTT_BROKER, MQTT_PORT);    // Configure the MQTT client
  mqttClient.setCallback(onMessage);               // Register the message handler
}

void loop() {                                      // Runs infinitely (thousands of times per second)
  if (!mqttClient.connected()) {                   // Keep MQTT connection alive
    reconectarMQTT();
  }
  mqttClient.loop();                               // Process incoming MQTT events

  if (ensambleActivo) {                            // Only run the simulation when active
    unsigned long ahora = millis();

    if (ahora - ultimoCristal >= INTERVALO_CRISTAL) {  // Has 2 seconds elapsed since the last crystal?
      ultimoCristal = ahora;                       // Reset timestamp
      cristalActual++;                             // Increment crystal counter

      publicarEstado("ensamblando");               // Publish progress
      Serial.print("  Serie ");
      Serial.print(serieActual);
      Serial.print("/");
      Serial.print(totalSeries);
      Serial.print(" — Cristal ");
      Serial.print(cristalActual);
      Serial.print("/");
      Serial.println(cristalesPorSerie);

      if (cristalActual >= cristalesPorSerie) {    // Did we finish the current series?
        publicarEstado("serie_completa");
        Serial.print("  ✓ Serie ");
        Serial.print(serieActual);
        Serial.println(" completada.");

        if (serieActual >= totalSeries) {          // Did we finish the whole batch?
          publicarEstado("lote_completo");
          Serial.println();
          Serial.print("[COMPLETO] Lote '");
          Serial.print(lote);
          Serial.println("' finalizado.");
          Serial.println("═══════════════════════════════════════");
          ensambleActivo = false;                  // Stop the assembly loop
          configRecibida = false;                  // Require a new configuration before next batch
        } else {
          serieActual++;                           // Move to next series
          cristalActual = 0;                       // Reset crystal counter
          delay(PAUSA_ENTRE_SERIES);               // Brief pause between series
        }
      }
    }
  }
}
Troubleshooting — Problems I Ran Into and How I Fixed Them
Problems I had while trying to connect my XIAO ESP32-S3 and the dashboard to MQTT — and the solutions:
Problem 1 — PowerShell rejected the venv activation script.
When I tried .\venv\Scripts\Activate.ps1, PowerShell blocked it with an "execution policy" error.
Solution: Ran Set-ExecutionPolicy -ExecutionPolicy RemoteSigned -Scope CurrentUser and confirmed with S.
Problem 2 — node --version returned "not recognized".
Node.js wasn't installed.
Solution: Downloaded and installed Node.js LTS from nodejs.org, making sure "Add to PATH" was checked, then restarted PowerShell.
Problem 3 — I tried source venv/bin/activate and it failed.
That is the Mac/Linux command; Windows uses a different syntax.
Solution: Used .\venv\Scripts\Activate.ps1 instead.
Problem 4 — Serial Monitor kept showing rc=-2 and never connected to the broker.
The dashboard counters did not move because the ESP32 could not reach the MQTT broker. There were two underlying causes:
- VS Code was open at the same time as Arduino IDE and they were fighting over the same serial port / network resources, preventing the ESP32 from establishing a stable connection.
- The external WiFi antenna was not connected to the XIAO ESP32-S3. The XIAO ESP32-S3 requires a small external antenna to be plugged in to its IPEX connector — without it, WiFi signal is too weak to reach the broker reliably.
Solution: I closed VS Code while flashing and testing the ESP32, and I physically connected the antenna to the board. Both connections (WiFi + MQTT) succeeded immediately after that.
Problem 5 — START button pressed but the dashboard counters stayed at zero.
This was caused by the same issues as Problem 4. Once they were fixed, the metric cards started updating in real time and the order moved from PROCESSING to COMPLETED as expected.
Results
Here it is how the interface looks finally:
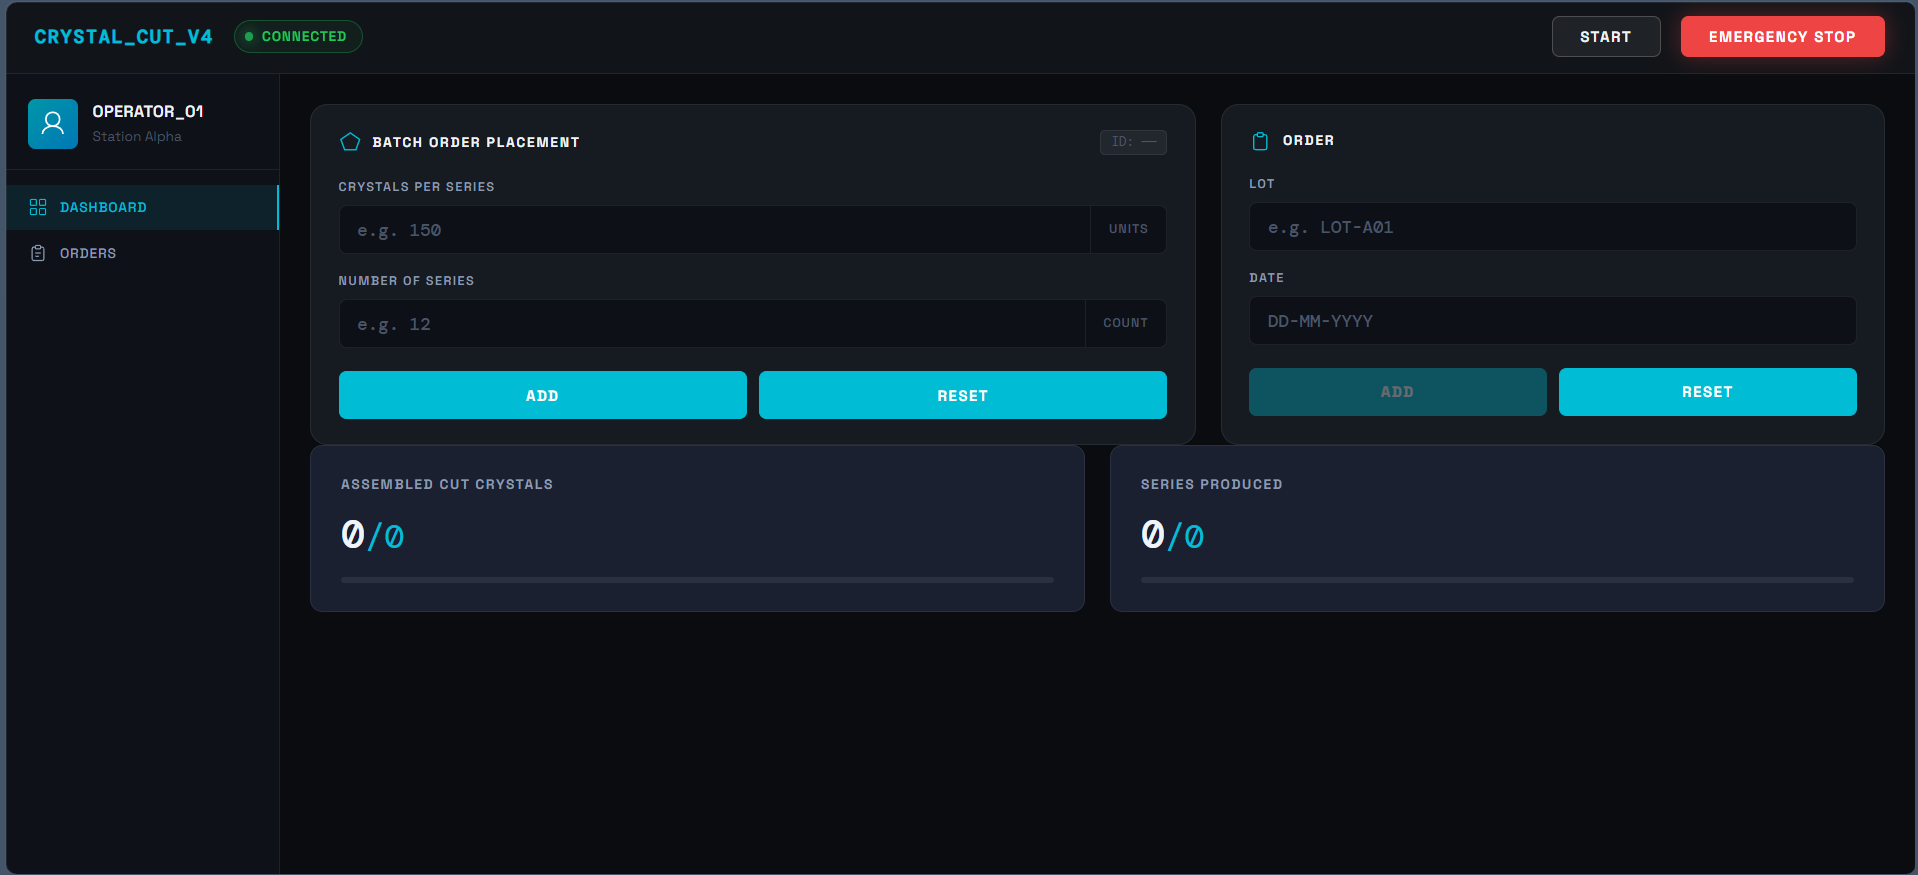
Final Dashboard.
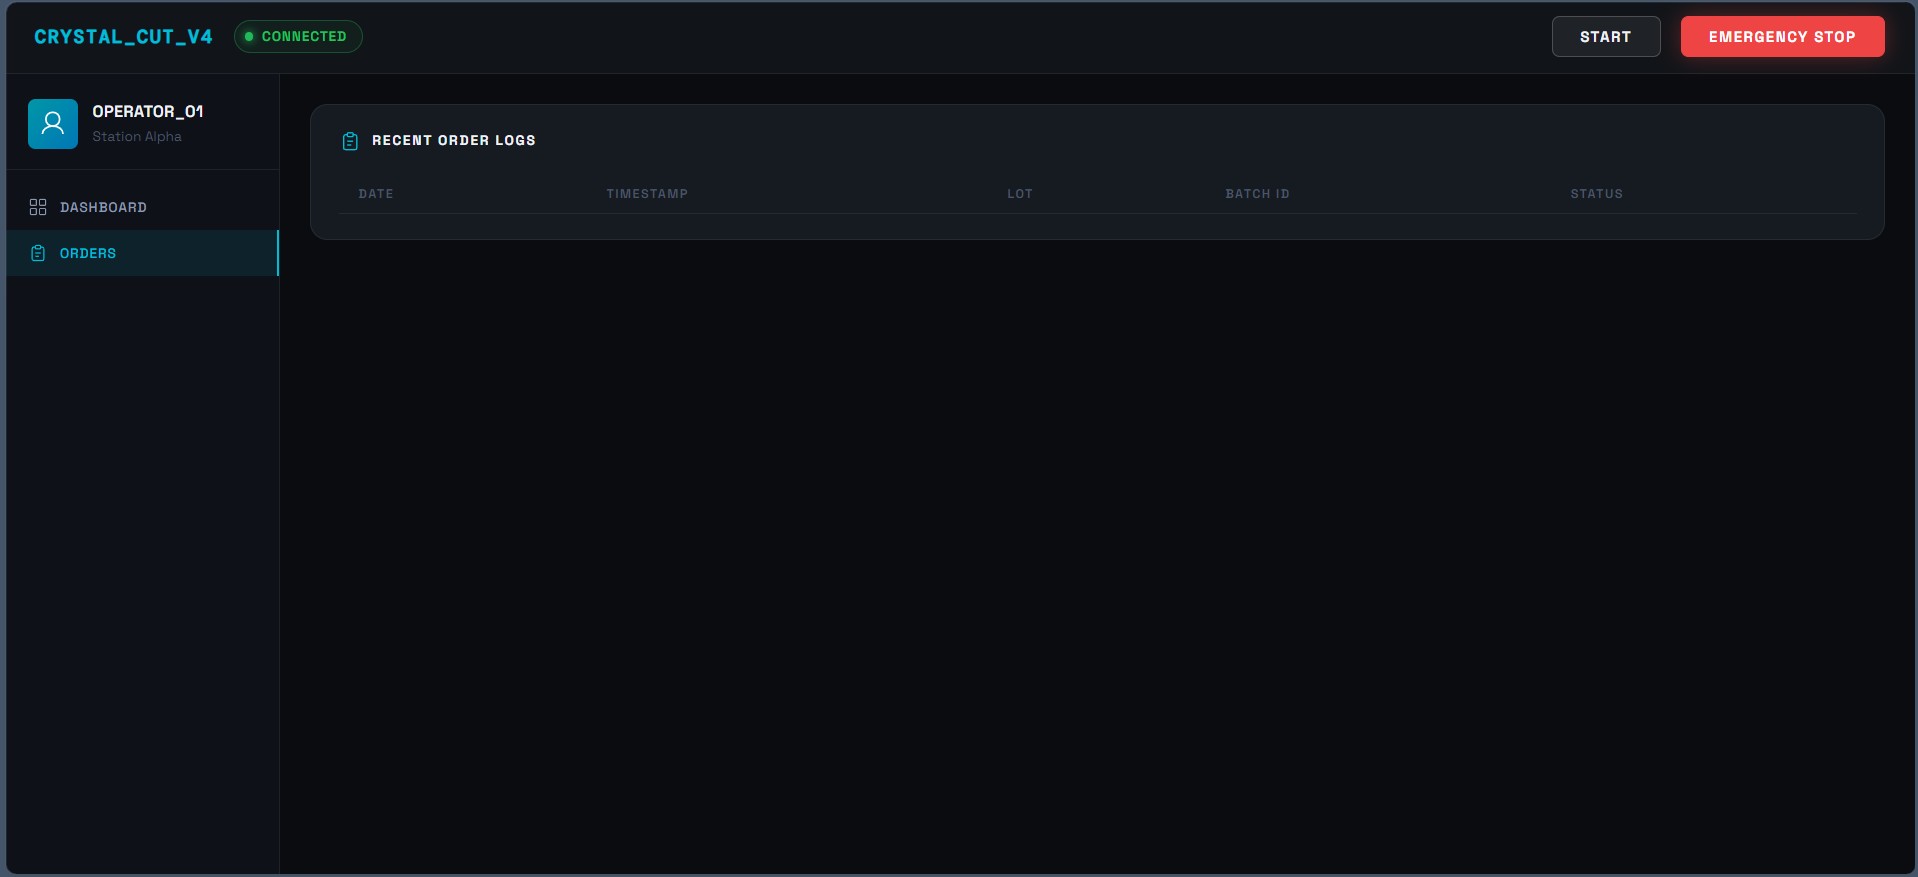
Final Orders View.
Below are the videos that show the final dashboard in operation, communicating in real time with the XIAO ESP32-S3 over MQTT.
[Video 1 — Full workflow: configuring a batch, starting the assembly, and watching the live progress in the dashboard.]
[Video 2 — Orders view: order status transitions from QUEUED → PROCESSING → COMPLETED.]
[Video 3 — Emergency stop: pressing EMERGENCY STOP marks the order as MANUAL STOP.]
Electronic Board: Stepper Motor
This is the board that it was used for this week. The board was made on Week 12, to move the stepper motors.
These are the schematics for both boards, made in KiCad.
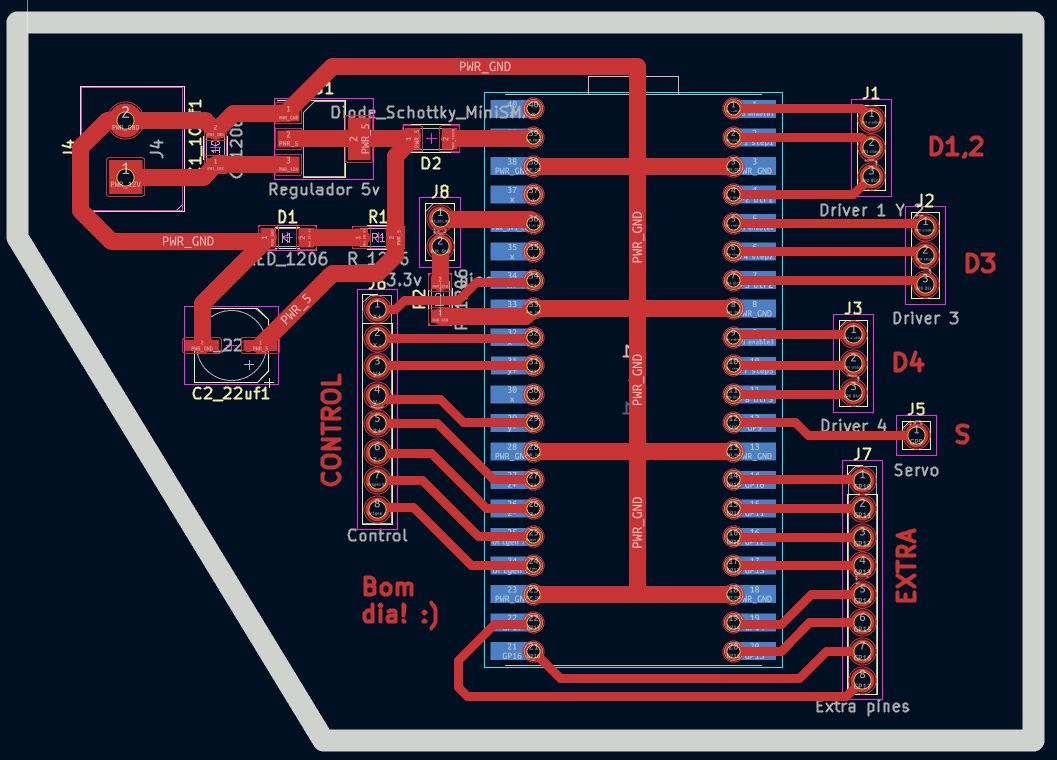
This is the microcontroller board
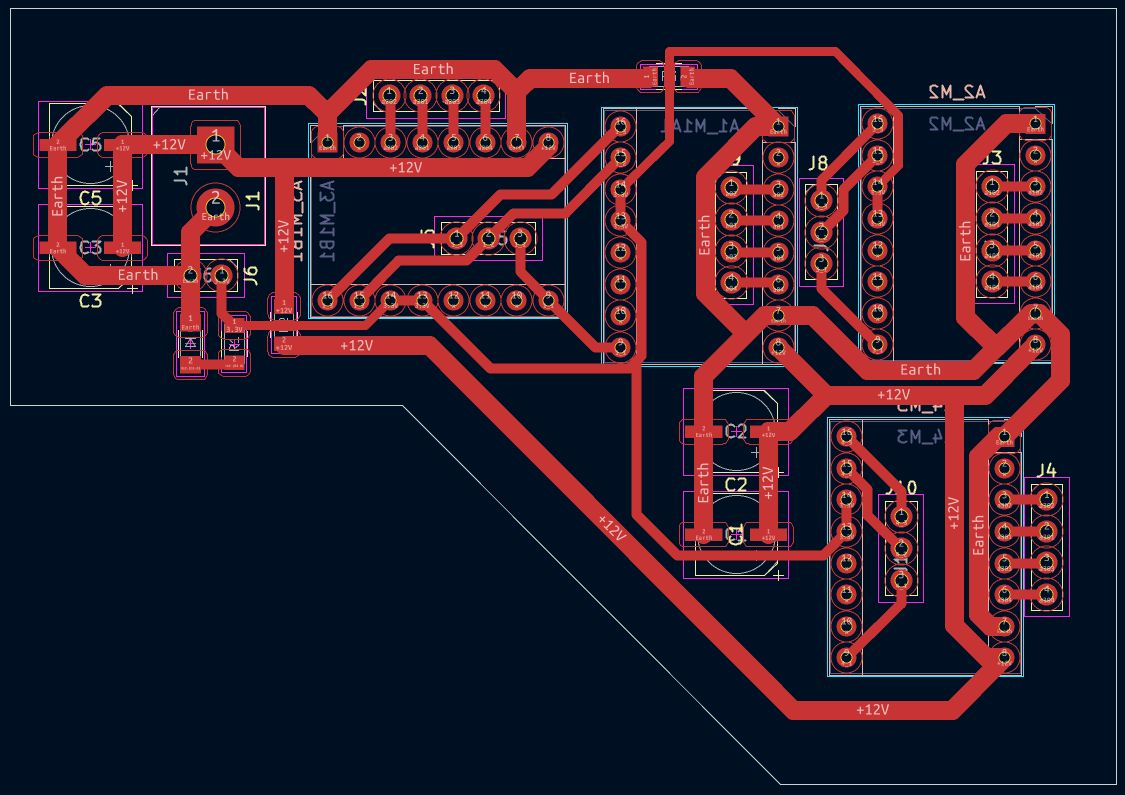
Stepper motor board
[Video 4 — Steppermotor controlled via MQTT]
Try the Interface Live
You can open the dashboard directly in your browser and see exactly how it looks and behaves. The page automatically connects to the public HiveMQ MQTT broker as soon as it loads.
▶ View App⚠ Important: The dashboard only displays real-time data when a publisher is actively running and connected to the same MQTT broker. In my case, the publisher is the XIAO ESP32-S3 running my Arduino sketch (or alternatively, the professor's simulador.py script). If no publisher is running, the dashboard will still load and connect to the broker (the badge will turn green and show CONNECTED), but the metric cards will stay at zero because nothing is publishing sensor messages.
My conclusion:
- I learned how MQTT works as a publish/subscribe messaging system, and how a public broker like HiveMQ acts as a bridge between any number of devices.
- I learned to write Arduino code for a XIAO ESP32-S3 that connects to WiFi, talks MQTT, and publishes structured JSON messages.
- I learned to set up a complete Windows development environment from scratch: Python venv, Node.js, npm, and Claude Code inside VS Code.
- I learned that a precise, structured prompt for Claude Code produces a working dashboard on the first try, where a vague prompt would not.
- Most importantly: I built a system where a web page running in my browser can control and monitor a physical microcontroller in real time — and the same architecture will work later when the ESP32 is connected to a real camera/sensor instead of simulating in software.
Files I used this week
W14_files.zip
Interface & Application Programming Files
The following files are included in the package:
- interface.html: Dashboard HTML structure.
- style.css: All visual styles (dark theme, cards, badges, progress bars).
- app.js: MQTT client and dashboard logic (browser-side).
- arduino/crystal_cut/crystal_cut.ino: Code for the XIAO ESP32-S3.
- mockups/: AI-generated reference images used to design the dashboard.