Week 12
Machine Design
ASSIGNMENT
Design and build a machine as a team — including the mechanical structure, actuation, and control system. Document your individual contribution to the group project.
TOOLS
Arduino IDE · ESP32 · Metal Saw · Servo Motor
Our Machine: Water Marbling
What is water marbling?
Water marbling is a surface decoration technique that dates back centuries — originating in Central Asia and later refined in Turkey (where it is known as ebru) and Persia. The technique involves floating paint on the surface of water and manipulating it into patterns before transferring the design onto paper, fabric, or other materials.
The paint floats because it is mixed with a surfactant or applied onto a size — typically a viscous solution of carrageenan or ox gall — that prevents the pigment from sinking. Once the pattern is formed by dragging combs, styluses, or other tools through the floating paint, a sheet of paper is laid on the surface and lifted, picking up the design in a single transfer.
Our team's machine automates this process: a CNC-controlled dropper system deposits precise amounts of paint onto the water surface at programmable positions, allowing repeatable and parametric marbling patterns that would be very difficult to achieve by hand.
Why automate it?
Traditional water marbling depends heavily on the practitioner's experience — the amount of paint dropped, the height of the dropper, the timing, and the sequence all affect the final result. By automating the deposition step with a CNC machine, we can control these variables precisely, reproduce patterns, and experiment with parameters systematically. The machine doesn't replace the art — it opens new possibilities for it.
Group Assignment
The full group documentation — including the machine's electronic design, firmware, motion system, and final results — is available on the group page.
View Group Assignment →My Contribution
Overview
My individual contribution to the machine covered six areas: researching and sourcing the paints and materials needed for the marbling process, cutting and preparing the metal structure, painting and finishing the profiles, testing servo angles for the dropper mechanism, testing paint height and color combinations, and producing the group presentation slide.
00. Paint Research & Material Sourcing
Before any physical work began, I researched what types of paint are compatible with the water marbling technique. Not all paints float — the paint needs the right density and surface tension properties to spread on water without sinking or clumping.
I ran initial tests at home with two types of paint I already had: textile paint and acrylic paint. Textile paints are water-based and tend to have a thinner consistency, while acrylics are denser and require more dilution to float correctly. Testing both allowed the team to understand the behavior of each before committing to one for the final machine demonstration.
Textile paint
Water-based and lighter in consistency. Floated more easily on the water surface with minimal preparation, making it a good candidate for the machine.
Acrylic paint
Denser than textile paint. Requires dilution to reduce viscosity before it floats correctly. Works well once thinned but needs more preparation time.
Marble Paint
A paint specifically formulated to float on water. No dilution or special preparation needed — it spreads naturally on the surface and produces clean, well-defined pattern edges. This became the final choice for the machine demonstration.
Kevlar thread
I also sourced Kevlar thread for the project — a high-strength synthetic fiber needed for one of the mechanical components of the machine structure.
Conclusion
Both paint types can work for water marbling, but they behave differently. Textile paint requires less preparation and is more forgiving for automated deposition. Acrylic paint produces more vibrant colors but needs to be thinned before use. After testing both, the team decided to use Marble Paint for the final demonstration — a paint specifically formulated to float on water, which gave the most consistent and reliable results without requiring any additional preparation.
01. Materials — Metal Structure
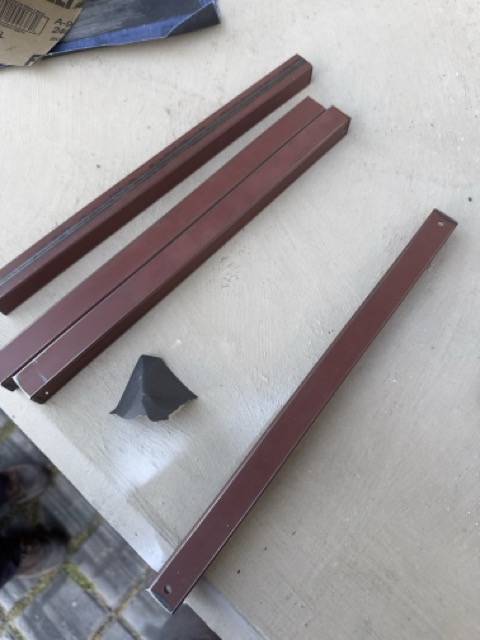
For the structural frame, we needed specific lengths of a ¾" metal profile. I was responsible for measuring, marking, and cutting all the pieces to size.
- 1 Measured each piece to 35 cm and marked the cut line using a metal scriber and a square.
- 2 Cut the profiles on the metal cutter saw wearing full protective gear: overall, face shield, soldering gloves, and safety footwear.
- 3 Repeated the measuring and cutting process for all required pieces.
- 4 Deburred all cut edges with a file to remove sharp burrs.
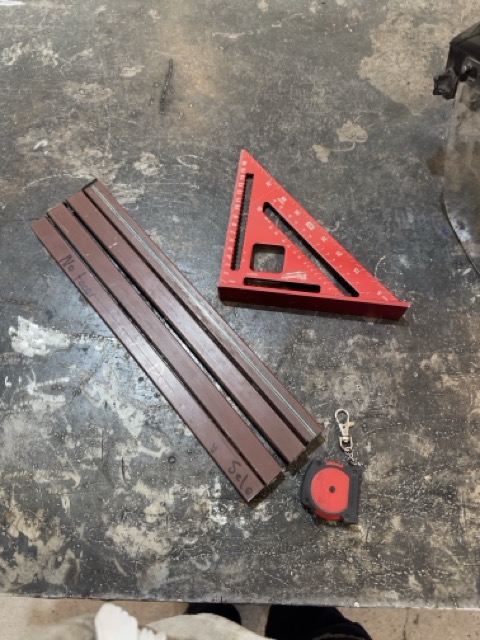
Measuring & marking
Each piece measured to 35 cm and traced with a metal scriber and square to ensure a clean, accurate cut line.
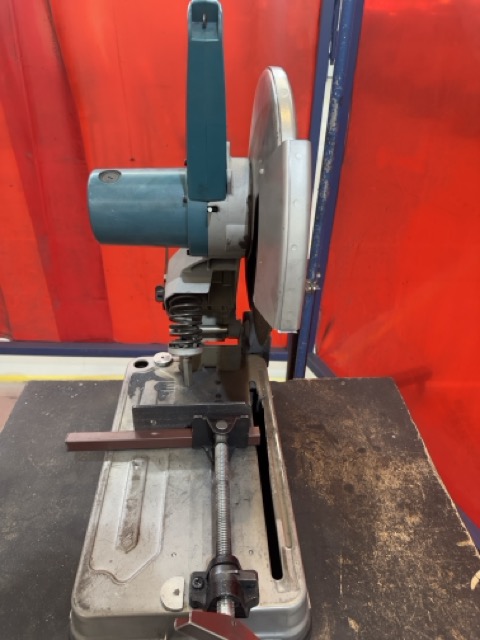
Cutting on the metal saw
The profiles were cut on a metal cutter saw. Full PPE was required: face shield, overall, soldering gloves, and safety footwear.
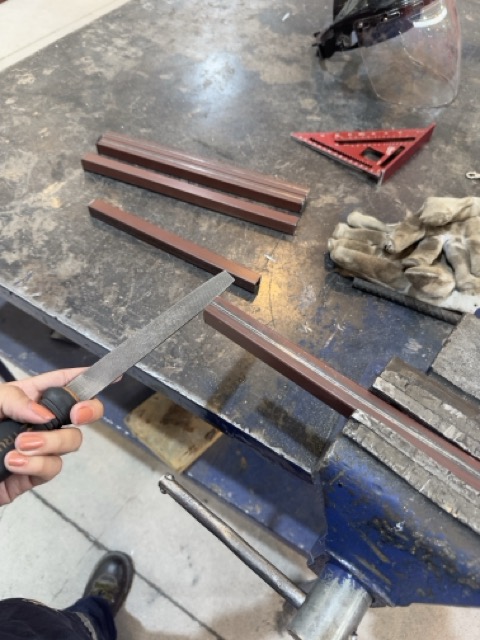
Filing the edges
After cutting, a file was used to remove all sharp burrs from the cut edges before assembly.
02. Painting & Surface Finish
Once all pieces were cut and deburred, I prepared and painted the metal profiles so the final machine would have a clean, finished appearance.
- 1 Sanded all profiles to remove surface imperfections and smooth the metal.
- 2 Wiped off the sanding dust with a damp cloth and let the pieces dry completely.
- 3 Applied 2 coats of primer to fill micro-imperfections and improve paint adhesion.
- 4 After the primer dried, applied 2 coats of silver spray paint for the final finish.
Sanding
All profiles sanded to remove imperfections and create a surface that holds primer and paint properly.
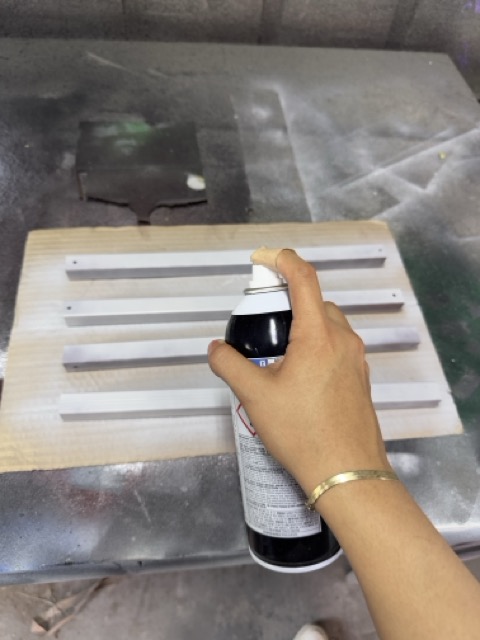
Primer coat
Two coats of primer applied to fill micro-imperfections and help the paint adhere evenly to the metal surface.
Silver paint
Two coats of silver paint applied over the dried primer for the final clean finish.
03. Checking Servo Angles
The dropper mechanism uses a servo motor to press a dropper and release a small, controlled amount of paint onto the water surface. I was responsible for finding the correct angle range at which the servo arm activates the dropper effectively.
| Component | Model | Connection |
|---|---|---|
| Microcontroller | ESP32 | Controls the servo via PWM signal |
| Actuator | Servo Motor | GND · POWER · VCC → ESP32 |
| Power Supply | GW Instek GPE-3323 | Powers the servo externally |
| Output device | Dropper | Pressed by the servo arm to release paint |
After connecting the servo to the ESP32 and the external power supply, I used the following code in Arduino IDE to sweep through angles and identify at which point the arm correctly pressed the dropper to release a small, consistent drop of paint.
Angle testing code (Arduino IDE)
Servo sweep sketch
This sketch sweeps the servo from 0° to 90° in 1° increments so I could visually identify the exact angle at which the dropper activated.
// Servo angle test — ESP32 + Arduino IDE
#includeServo myservo; int pos = 0; // Variable para almacenar el ángulo deseado void setup() { Serial.begin(115200); // Inicializamos la comunicación serie myservo.attach(25); // El servo sigue en el pin 25 Serial.println("Introduce un ángulo entre 0 y 180:"); } void loop() { // Comprobamos si hay datos disponibles en el Monitor Serie if (Serial.available() > 0) { // Leemos el número entero que escribas int anguloManual = Serial.parseInt(); // Validamos que el ángulo esté en el rango permitido if (anguloManual >= 0 && anguloManual <= 180) { pos = anguloManual; Serial.print("Moviendo servo a: "); Serial.print(pos); Serial.println(" grados."); myservo.write(pos); // Movemos el servo a la posición única } else { Serial.println("Por favor, ingresa un valor entre 0 y 180."); } // Limpiamos el buffer para evitar lecturas erróneas while(Serial.available() > 0) Serial.read(); } }

Servo + ESP32 setup
The servo connected to the ESP32 and powered through the GW Instek GPE-3323 bench power supply.
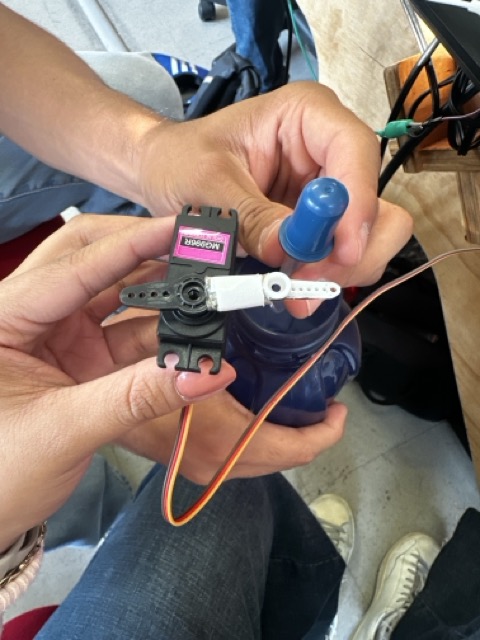
Arm adjustment
The original servo arm was too short to reach the dropper effectively. Kamil updated the design parameters to account for this.
Result
After testing multiple angles, I determined that the effective range for activating the dropper is between 53° and 56°. Below 53° the arm doesn't press far enough; above 56° it releases too much paint at once. This range was passed on to the team to configure in the main firmware.
04. Color & Height Testing
In this phase I worked together with Carlos to validate two critical variables: the height of the dropper above the water surface, and which color combinations produced the best visual results.
The height matters because dropping from too high causes the paint to break the water's surface tension and sink rather than float. Dropping from too low limits the spread of the pigment. We tested multiple heights to find the optimal range.

Height testing
Testing different dropper heights to find the range where paint floats correctly without breaking the surface tension of the water.
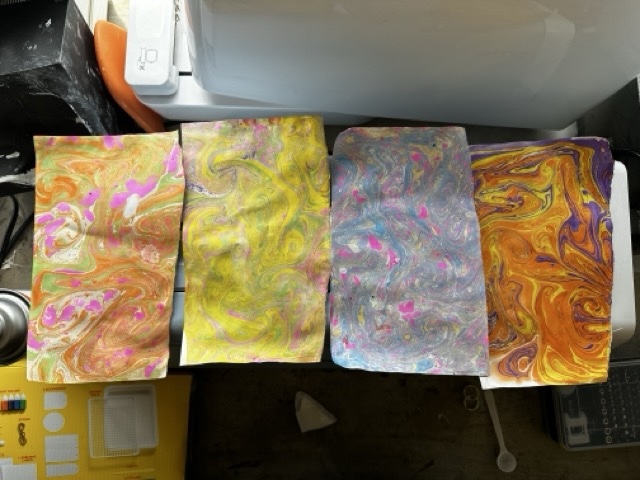
Color combinations
We tested multiple color pairings and identified 4 combinations that produced clear, well-defined marbling patterns on the water surface.
Findings
After testing, we identified 4 color combinations that worked well together — producing clear contrast and defined pattern edges without the colors blending into a muddy result. These combinations were used for the final machine demonstration.
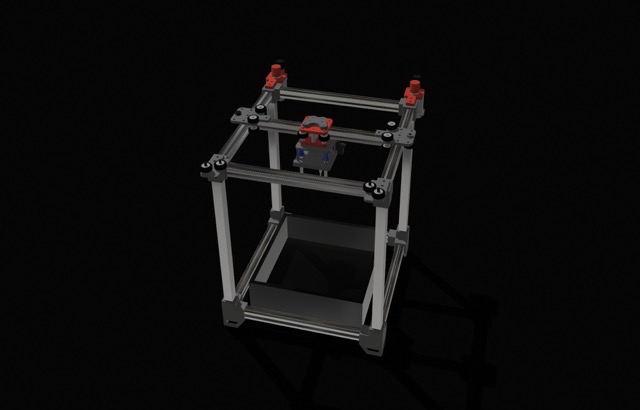
05. Render
As part of the documentation process, I created a render of the water marbling machine to visualize the final assembly before it was fully built. This helped the team review proportions, structure, and the placement of components.
05. Group Presentation Slide
Finally, I was in charge of designing the group slide summarizing the machine, its purpose, and the team's process. The slide was used for the weekly review presentation.
