Week 15 – Interface and Application Programming
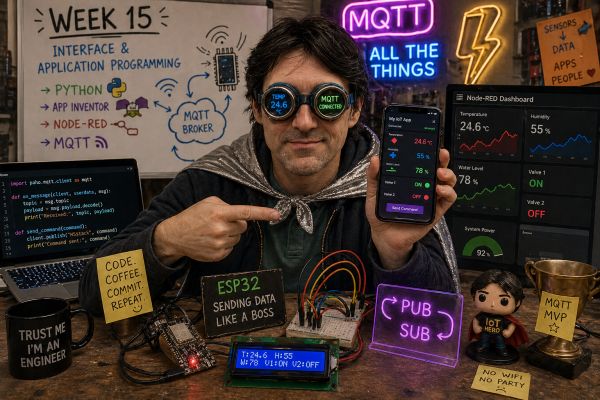
This week is focused on Interface and Application Programming. The goal was to write an application that allows a user to interact with an input and/or output device connected to an embedded microcontroller board.
In my case, I decided not to use Processing. Instead, I used Python, MIT App Inventor and Node-RED, all connected through MQTT. This allowed me to create different user interfaces for monitoring data and sending commands to my embedded system.
On this page I document:
- The group assignment: comparison of interface tool options.
- My individual assignment: application connected to my embedded board.
- The UI design and how I made it.
- How the application communicates with the microcontroller using MQTT.
- The problems I found and how I fixed them.
- The source code and screenshots of the app logic.
- A hero shot of the application running and communicating with the board.
Assignment and Learning Outcomes
The weekly assignment is:
- Group assignment:
- Compare as many interface tool options as possible.
- Individual assignment:
- Write an application that interfaces a user with an input and/or output device that I made.
Checklist
- Linked to the group assignment page.
- Documented my process.
- Explained the UI that I made and how I made it.
- Explained how my application communicates with my embedded microcontroller board.
- Explained the problems I encountered and how I fixed them.
- Included original source code or screenshots of the application code.
- Included a hero shot of the application running and communicating with my board.
Group Assignment – Tool Options Comparison
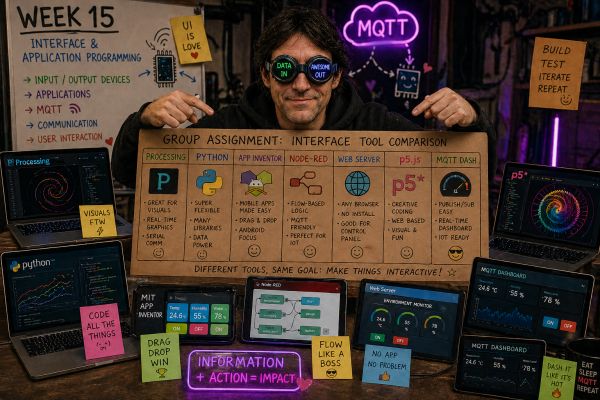
For the group assignment we compared different tools that can be used to create user interfaces for embedded systems. The objective was not to connect all of them to a board, but to understand their typical use cases, workflows, advantages and limitations.
Tools Compared
| Tool | Typical Use | Advantages | Limitations |
|---|---|---|---|
| Processing | Visual desktop interfaces, graphics and serial communication | Simple, visual, good for quick experiments | Requires coding and normally runs on a computer |
| Python | Desktop apps, dashboards, data processing and MQTT clients | Flexible, powerful and easy to connect with MQTT | Requires libraries and some programming knowledge |
| MIT App Inventor | Mobile applications for Android | Visual programming, fast app prototyping | Less flexible than full native development |
| Node-RED | IoT dashboards, MQTT flows and automation logic | Very useful for MQTT, fast to build and debug | Needs a server or device running Node-RED |
| Web Server | Browser-based control interface hosted on a microcontroller | No app installation needed | Can be limited by microcontroller memory and network reliability |
| MQTT Dashboard | Monitoring and control through MQTT topics | Good for IoT systems and remote control | Requires an MQTT broker and correct topic structure |
| p5.js | Creative web interfaces and visual interaction | Very visual and browser based | Needs web programming knowledge |
What I Learned from the Group Assignment
- There are many ways to create an interface for an embedded system.
- The best tool depends on the type of project and the user interaction needed.
- Processing is good for simple visual desktop interfaces.
- App Inventor is useful when the interface must run on a mobile phone.
- Node-RED and MQTT are very powerful for IoT systems.
- Python gives more flexibility for custom dashboards and data processing.
You can see the group documentation here:
Types of Communication
In embedded systems and networking, there are different ways devices can exchange data. These communication models define how information flows between nodes and how the system is structured.
1. Point-to-Point Communication

This is the simplest type of communication, where one device communicates directly with another device.
- Only two nodes are involved.
- Direct communication without intermediaries.
- Easy to implement.
Examples: UART, Serial communication, Bluetooth.
In this type of system, one board sends data directly to another board.
2. Master–Slave Communication
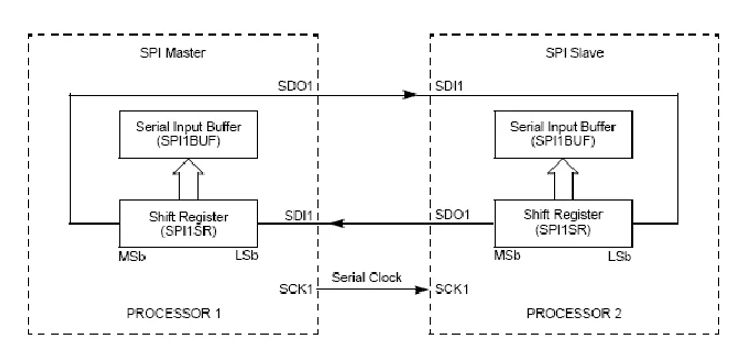
In this model, one device (master) controls the communication and the other devices (slaves) respond when requested.
- The master initiates all communication.
- Slaves only respond when addressed.
- Uses addresses to identify devices.
Examples: I2C, SPI.
This type of communication is very common in embedded systems where one microcontroller controls multiple devices.
3. Client–Server Communication
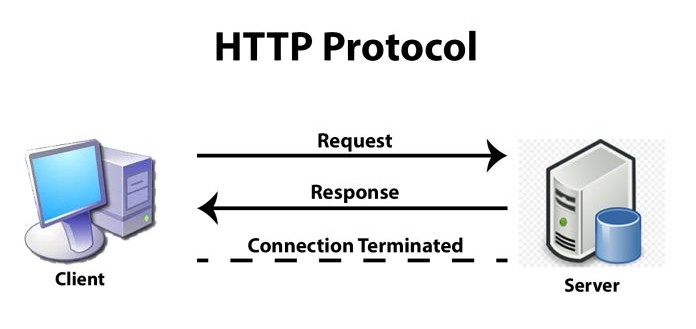
This model is widely used in networking and web systems. One device acts as a client and requests data, while another acts as a server and provides it.
- The client sends requests.
- The server responds.
- Based on request/response logic.
Examples: HTTP, Web servers, REST APIs.
For example, an ESP32 can host a web server and another device can connect to it to retrieve data.
4. Publish–Subscribe Communication
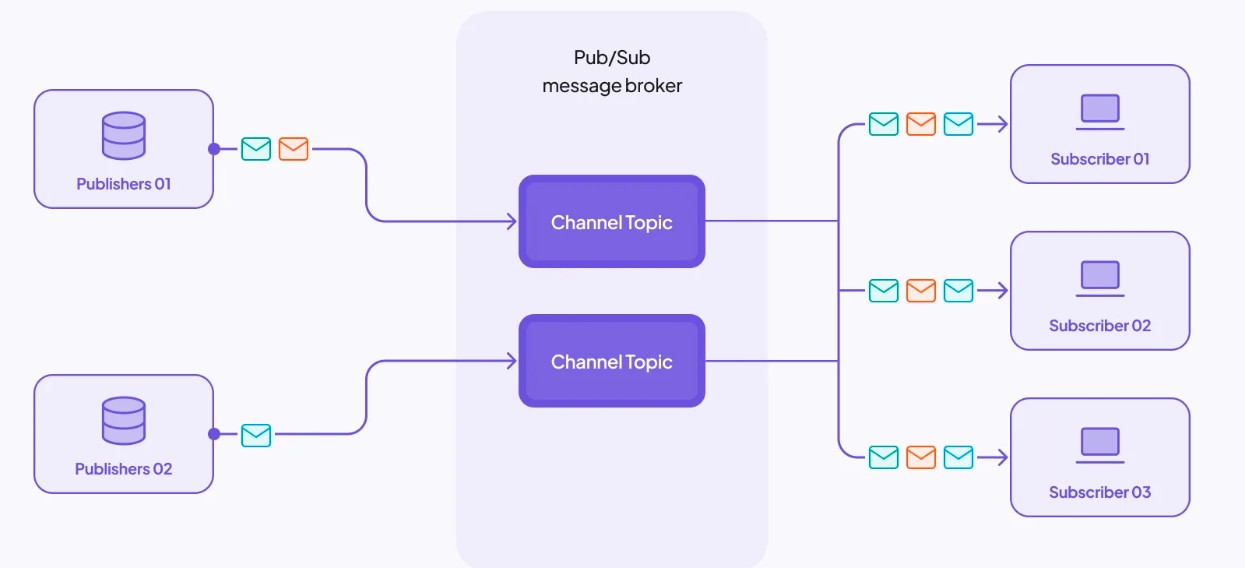
This model is commonly used in IoT systems. Devices do not communicate directly but through an intermediary called a broker.
- Devices can publish messages.
- Devices can subscribe to topics.
- Communication is asynchronous.
Example: MQTT protocol.
In this system, one node publishes data to a topic, and any subscribed devices receive that data automatically.
5. Broadcast and Multicast
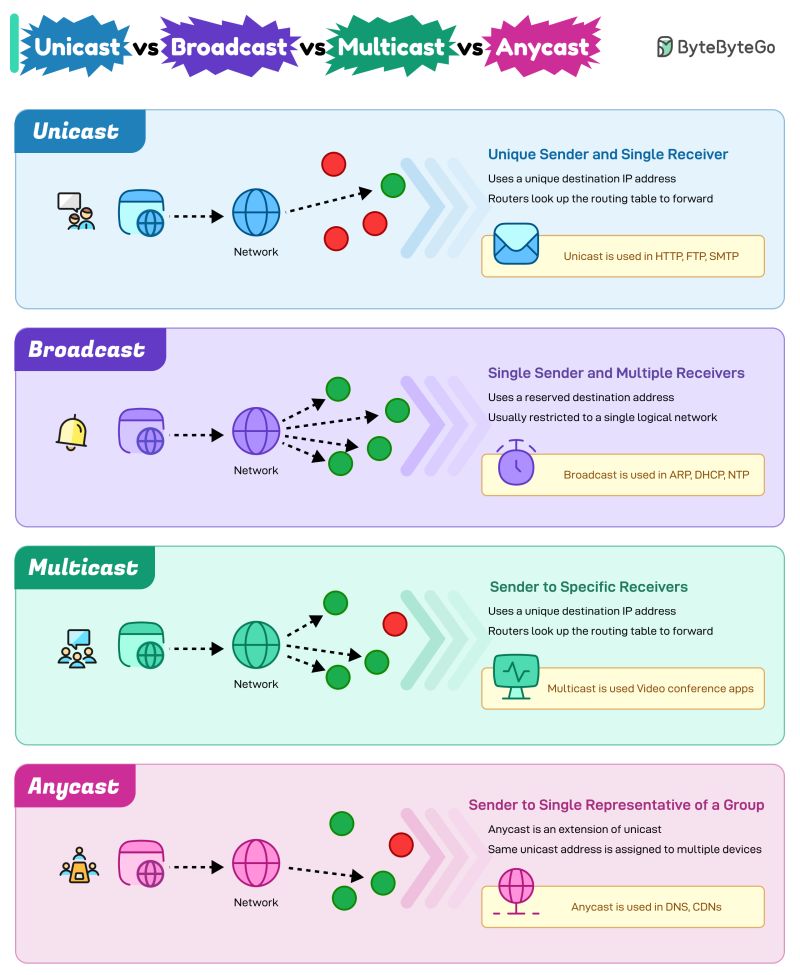
In these models, a device sends data to multiple devices at the same time.
- Broadcast: message is sent to all devices.
- Multicast: message is sent to a specific group.
Examples: UDP broadcast, local networks.
Comparison
| Type | Complexity | Scalability | Typical Use |
|---|---|---|---|
| Point-to-Point | Low | Low | UART, Bluetooth |
| Master–Slave | Medium | Medium | I2C, SPI |
| Client–Server | Medium | High | Web, APIs |
| Publish–Subscribe | High | Very High | MQTT, IoT |
| Broadcast | Low | High | Local networks |
Individual Assignment – My Interface System
For my individual assignment I created an interface system that communicates with my embedded board and with the sensors and actuators used in my final project. Instead of using Processing, I used a combination of Python, App Inventor and Node-RED.
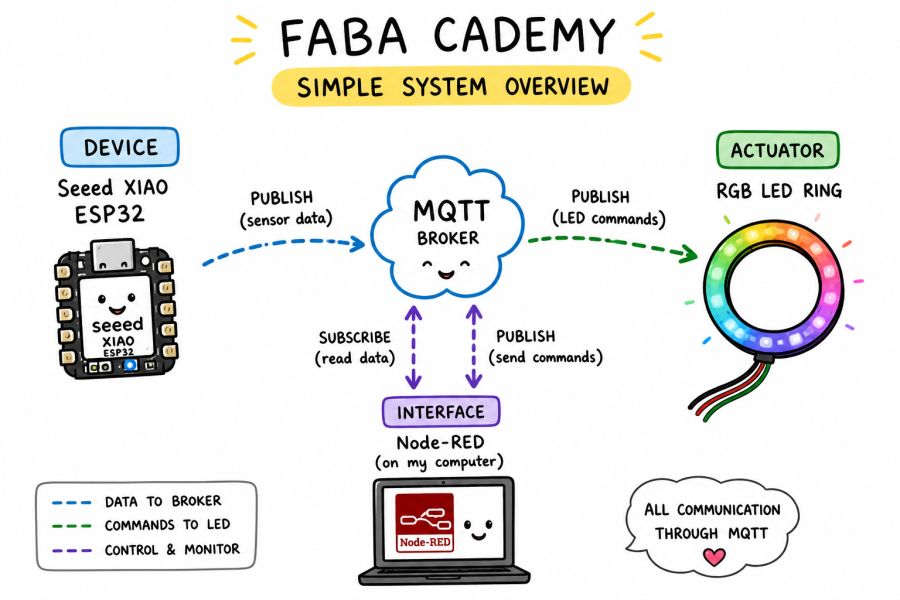
This image was created with ChatGPT. You can see the prompt below.
Click to view the AI prompt
Create a cute hand-drawn infographic in a clean doodle style for a Fab Academy 2026 project.

Title: "FAB ACADEMY – Simple System Overview"

Use a white background with colorful handwritten labels and simple cartoon-style icons.

Include:
- Seeed Studio XIAO ESP32 as the device.
- MQTT broker in the center.
- Node-RED as the interface.
- RGB LED ring as the actuator.

Show dashed arrows for:
- Data to broker.
- Commands to LED.
- Control and monitor.

Add a small legend and a speech bubble saying:
"ALL COMMUNICATION THROUGH MQTT"

Use a playful, educational, hand-sketched style.
System Overview
- Embedded board: XIAO ESP32 connected to sensors or actuators.
- Communication protocol: MQTT.
- Broker: MQTT broker used during the networking week.
- Interfaces: Node-RED dashboard.
- Output devices: LED ring controlled through MQTT commands.
This work is connected to my previous input and output device assignments, because the application is not isolated: it communicates with a real board and real data.
Previous related assignments:
Page Navigation
This documentation is divided into two clearly separated parts:
Part 1 – Individual Assignment: RGB LED Ring
- MQTT RGB LED Ring with XIAO ESP32-S3
- System Architecture
- Hardware Setup
- MQTT Control
- Node-RED Integration
- Source Code
- Conclusion
Part 2 – Extended IoT Cabin Platform
Part 1 – MQTT RGB LED Ring with XIAO ESP32-S3
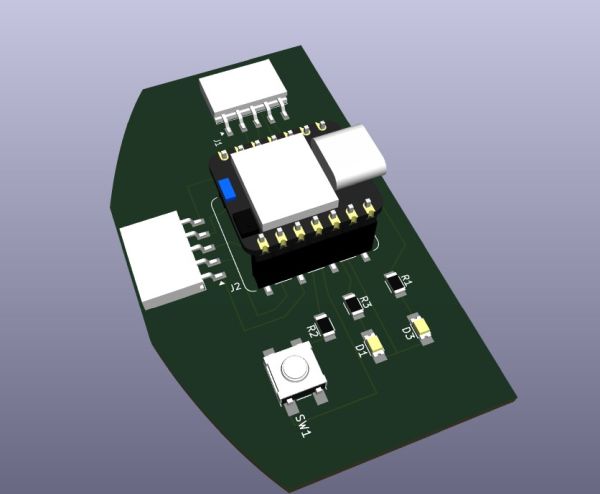
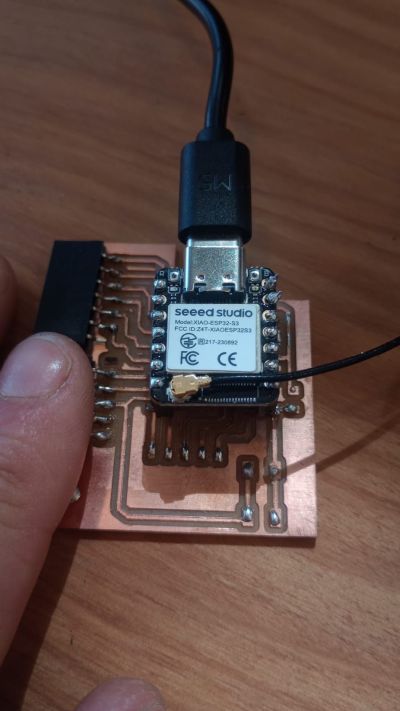
During this week, I implemented a simple IoT system using MQTT and Node-RED to control an RGB LED ring connected to a XIAO ESP32-S3. I used the board I designed in Week 6.
Embedded Programming Assignment – Week 6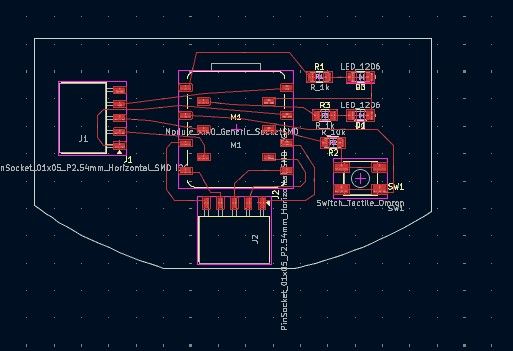
The goal was to send commands from a computer to the microcontroller over Wi-Fi and MQTT and change the LED colors in real time.
System Architecture
The system is based on the MQTT protocol, where:
- The XIAO ESP32-S3 acts as an MQTT client (subscriber).
- Node-RED acts as a publisher.
- A remote MQTT broker manages the communication.
Node-RED sends messages to the topic xiao/servo, and the ESP32 listens to this topic and reacts accordingly.
Hardware Setup
- XIAO ESP32-S3
- WS2812 RGB LED ring (16 LEDs)
- External 5V power supply
The LED ring is connected as follows:
- Red wire → 5V
- White wire → GND
- Green wire → GPIO2 (D1)
A common ground between the power supply and the ESP32 is required for proper operation.
MQTT Control
The ESP32 subscribes to the topic xiao/servo. Depending on the received message, it changes the LED ring color:
- red → LEDs turn red
- green → LEDs turn green
- white → LEDs turn white
- off → LEDs turn off
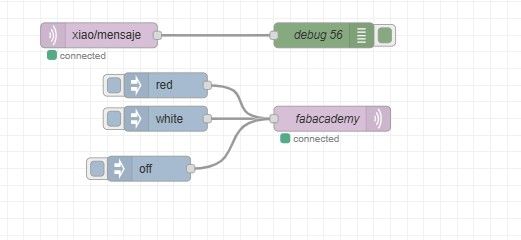
Node-RED Integration
In Node-RED, I created a simple flow with inject nodes that send different payloads (red, green, white, and off) to the MQTT broker. This allows real-time control of the LEDs through a graphical interface. With only two blocks, we can implement the entire process.
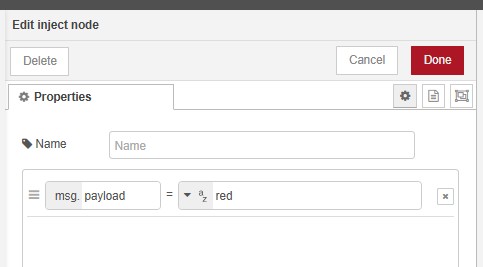
The inject node sends the strings (red, green, white, and off) to the next node through its payload.
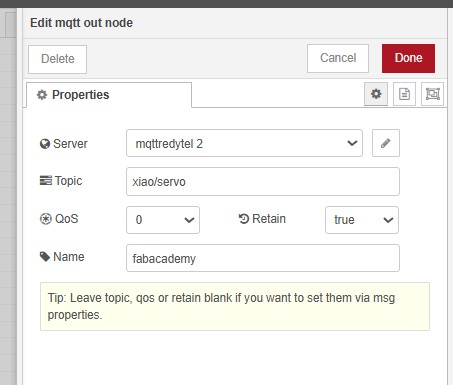
The MQTT topic is configured in this node as xiao/servo.
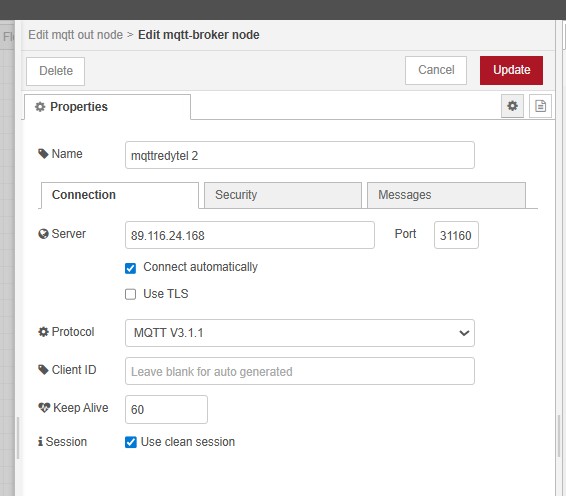
The MQTT node must be configured with the MQTT broker settings.
Arduino code - MQTT RGB LED ring Show code
#include <Wi-Fi.h>
#include <PubSubClient.h>
#include <FastLED.h>

// ====== WIFI & MQTT CONFIG ======
const char* ssid = "Oskar";
const char* password = "claritabonita";

const char* MQTT_server = "89.116.24.168";
const int MQTT_port = 31160;

const char* MQTT_user = "oskar";
const char* MQTT_password = "";

const char* topic_pub = "xiao/mensaje";
const char* topic_sub = "xiao/servo";

// ====== LED RING CONFIG ======
#define LED_PIN 2
#define NUM_LEDS 16
#define BRIGHTNESS 20

CRGB leds[NUM_LEDS];

Wi-FiClient espClient;
PubSubClient client(espClient);

void setup() {
  Serial.begin(115200);
  delay(2000);

  FastLED.addLeds<WS2812B, LED_PIN, GRB>(leds, NUM_LEDS);
  FastLED.setBrightness(BRIGHTNESS);
  FastLED.clear();
  FastLED.show();
}

void loop() {
}
Node-RED code - MQTT RGB LED ring Show code
[
    {
        "id": "a9e017e080aa6993",
        "type": "tab",
        "label": "fabacademy",
        "disabled": false,
        "info": "",
        "env": []
    },
    {
        "id": "5c16b9743155a35a",
        "type": "MQTT in",
        "z": "a9e017e080aa6993",
        "name": "",
        "topic": "fabacademy/grupo/fotovoltaica",
        "qos": "0",
        "datatype": "auto-detect",
        "broker": "edfb10176aa5e617",
        "nl": false,
        "rap": true,
        "rh": 0,
        "inputs": 0,
        "x": 270,
        "y": 140,
        "wires": [
            []
        ]
    },
    {
        "id": "77d1379c80a816ff",
        "type": "MQTT out",
        "z": "a9e017e080aa6993",
        "name": "fabacademy",
        "topic": "fabacademy/grupo/oscar",
        "qos": "0",
        "retain": "true",
        "respTopic": "",
        "contentType": "",
        "userProps": "",
        "correl": "",
        "expiry": "",
        "broker": "edfb10176aa5e617",
        "x": 370,
        "y": 220,
        "wires": []
    },
    {
        "id": "94e2243da8d5ad4f",
        "type": "inject",
        "z": "a9e017e080aa6993",
        "name": "",
        "props": [
            {
                "p": "payload"
            },
            {
                "p": "topic",
                "vt": "str"
            }
        ],
        "repeat": "",
        "crontab": "",
        "once": false,
        "onceDelay": 0.1,
        "topic": "",
        "payload": "",
        "payloadType": "date",
        "x": 180,
        "y": 220,
        "wires": [
            [
                "77d1379c80a816ff"
            ]
        ]
    },
    {
        "id": "70a35d114a8dfde4",
        "type": "MQTT in",
        "z": "a9e017e080aa6993",
        "name": "",
        "topic": "xiao/mensaje",
        "qos": "0",
        "datatype": "auto-detect",
        "broker": "edfb10176aa5e617",
        "nl": false,
        "rap": true,
        "rh": 0,
        "inputs": 0,
        "x": 150,
        "y": 340,
        "wires": [
            [
                "167afe07b21bc573"
            ]
        ]
    },
    {
        "id": "167afe07b21bc573",
        "type": "debug",
        "z": "a9e017e080aa6993",
        "name": "debug 56",
        "active": true,
        "tosidebar": true,
        "console": false,
        "tostatus": false,
        "complete": "false",
        "statusVal": "",
        "statusType": "auto",
        "x": 420,
        "y": 340,
        "wires": []
    },
    {
        "id": "041bb7edc22764b8",
        "type": "inject",
        "z": "a9e017e080aa6993",
        "name": "",
        "props": [
            {
                "p": "payload"
            }
        ],
        "repeat": "",
        "crontab": "",
        "once": false,
        "onceDelay": 0.1,
        "topic": "",
        "payload": "white",
        "payloadType": "str",
        "x": 230,
        "y": 440,
        "wires": [
            [
                "be543abed4889a2e"
            ]
        ]
    },
    {
        "id": "be543abed4889a2e",
        "type": "MQTT out",
        "z": "a9e017e080aa6993",
        "name": "fabacademy",
        "topic": "xiao/servo",
        "qos": "0",
        "retain": "true",
        "respTopic": "",
        "contentType": "",
        "userProps": "",
        "correl": "",
        "expiry": "",
        "broker": "edfb10176aa5e617",
        "x": 430,
        "y": 440,
        "wires": []
    },
    {
        "id": "b957869340decff4",
        "type": "inject",
        "z": "a9e017e080aa6993",
        "name": "",
        "props": [
            {
                "p": "payload"
            }
        ],
        "repeat": "",
        "crontab": "",
        "once": false,
        "onceDelay": 0.1,
        "topic": "",
        "payload": "off",
        "payloadType": "str",
        "x": 210,
        "y": 500,
        "wires": [
            [
                "be543abed4889a2e"
            ]
        ]
    },
    {
        "id": "5304bffc65d7974a",
        "type": "inject",
        "z": "a9e017e080aa6993",
        "name": "",
        "props": [
            {
                "p": "payload"
            }
        ],
        "repeat": "",
        "crontab": "",
        "once": false,
        "onceDelay": 0.1,
        "topic": "",
        "payload": "red",
        "payloadType": "str",
        "x": 230,
        "y": 400,
        "wires": [
            [
                "be543abed4889a2e"
            ]
        ]
    },
    {
        "id": "edfb10176aa5e617",
        "type": "mqtt-broker",
        "name": "mqttredytel 2",
        "broker": "89.116.24.168",
        "port": "31160",
        "clientid": "",
        "autoConnect": true,
        "usetls": false,
        "protocolVersion": "4",
        "keepalive": "60",
        "cleansession": true,
        "birthTopic": "",
        "birthQos": "0",
        "birthPayload": "",
        "birthMsg": {},
        "closeTopic": "",
        "closeQos": "0",
        "closePayload": "",
        "closeMsg": {},
        "willTopic": "",
        "willQos": "0",
        "willPayload": "",
        "willMsg": {},
        "userProps": "",
        "sessionExpiry": ""
    }
]
Conclusion
This exercise demonstrates how MQTT can be used as a lightweight communication protocol for IoT applications. By combining Node-RED and ESP32, it is possible to create simple, flexible and scalable systems for remote control and automation.
Part 2 – Extended IoT Cabin Platform
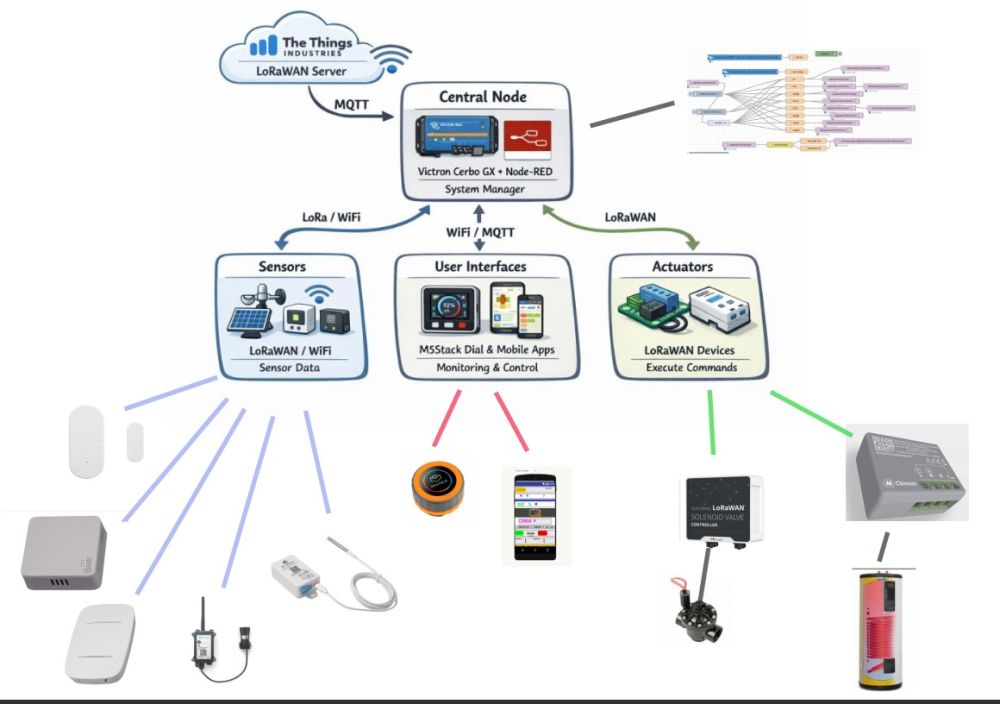
The following sections describe an extended IoT platform developed for my final project. This system integrates Wi-Fi, MQTT, LoRaWAN, Node-RED, Victron Energy devices, sensors, and actuators to create a distributed monitoring and control platform.
The communication architecture is based on MQTT. The embedded board publishes sensor values to specific MQTT topics, and the applications subscribe to those topics to display the information. When the user presses a button or changes a control in the interface, the application publishes a command to another MQTT topic.
I will use the project developed in Week 11 to communicate with my cabin. The system uses Node-RED and an M5Stack ESP32 device.

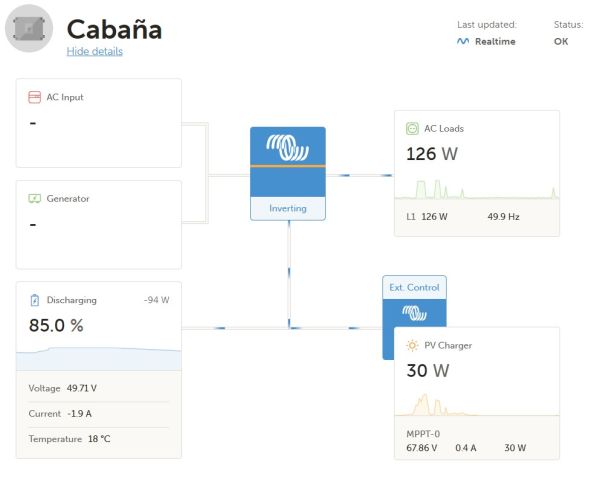
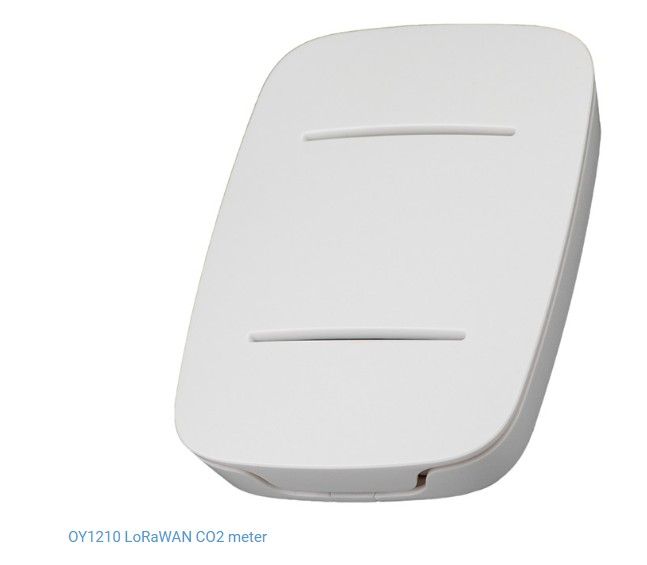
In the cabin, I have a Wi-Fi network and a photovoltaic installation connected to that network from the manufacturer Victron Energy. The operating system is Linux, which allows the installation of Node-RED, from which I collect data such as photovoltaic power, energy consumption, and remaining battery capacity. In the house, I also have various LoRaWAN devices that act as actuators or sensors through a network provided by The Things Industries. The sensors measure temperature, humidity, CO₂ levels, and door status. The actuators control irrigation and hot water systems, operating either the irrigation system or the water heater. Additionally, I have another actuator connected to a dehumidifier and a fan in the cellar to maintain the desired environmental conditions through the LoRaWAN network.
All communication is carried out via MQTT. In the previous image, we can see the structure of the topics used by the inverter to manage the energy system.
How Communication Works
- The board connects to Wi-Fi.
- The board connects to the MQTT broker.
- The board publishes sensor data to MQTT topics.
- LoRaWAN sensors publish data to MQTT topics.
- The Python app, App Inventor app and Node-RED dashboard subscribe to those topics.
- The user interacts with the interface.
- The interface publishes a command to an MQTT topic.
- The embedded system receives the command and activates an output device.
- The LoRaWAN actuators receive commands and activate the corresponding output devices.
My System with Sensor Interfaces and Actuators
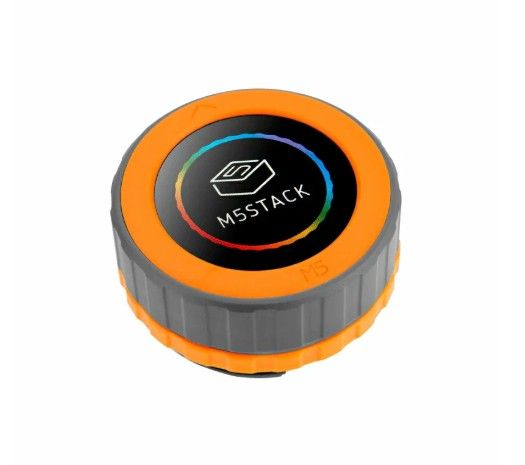
- Main board: M5Stack Dial (ESP32)
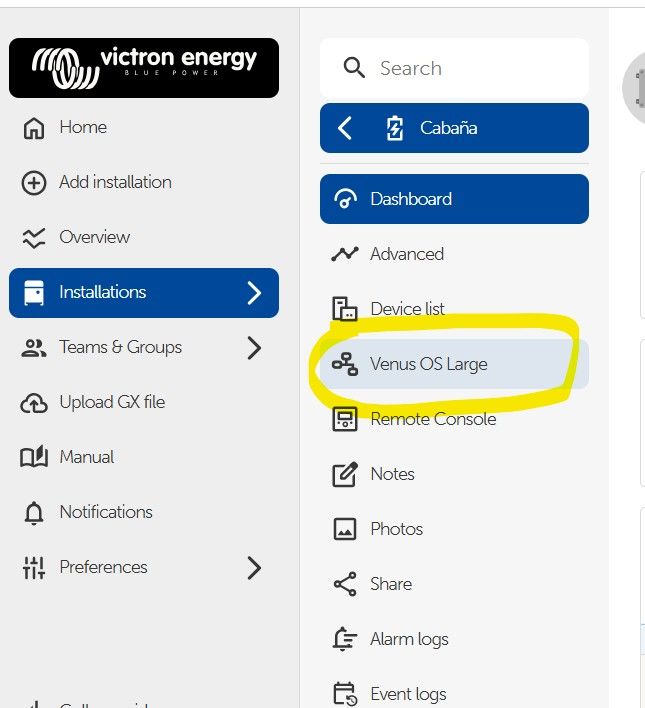
- Secondary board/module: Victron Cerbo GX running Venus OS Large with Node-RED
- Communication method: MQTT over Wi-Fi and LoRaWAN through The Things Industries
- Communication method: Mosquitto MQTT Broker
- Input device: Environmental sensors, water level sensor, door sensor, and photovoltaic energy data
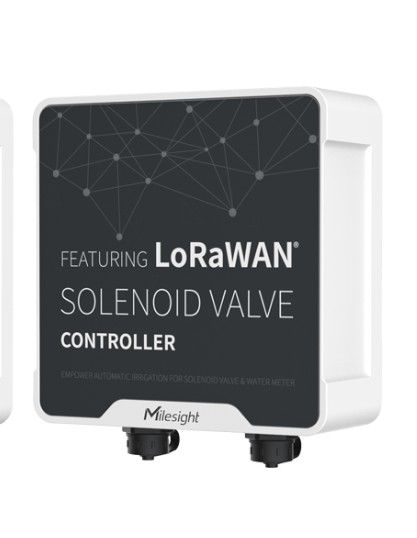
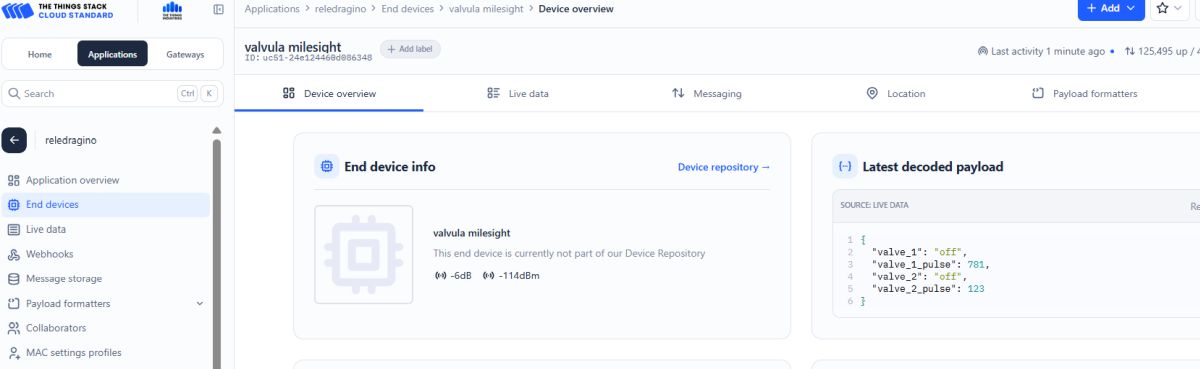
- Output device: LoRaWAN actuators such as the MClimate 16A Switch and Milesight UC511 irrigation valves

In my case, the purpose of the system was to build a distributed monitoring and control platform for a photovoltaic and environmental management system. The system collects data from different sensors, centralizes all measurements in Node-RED through MQTT, and sends commands to remote actuators depending on the operating conditions.
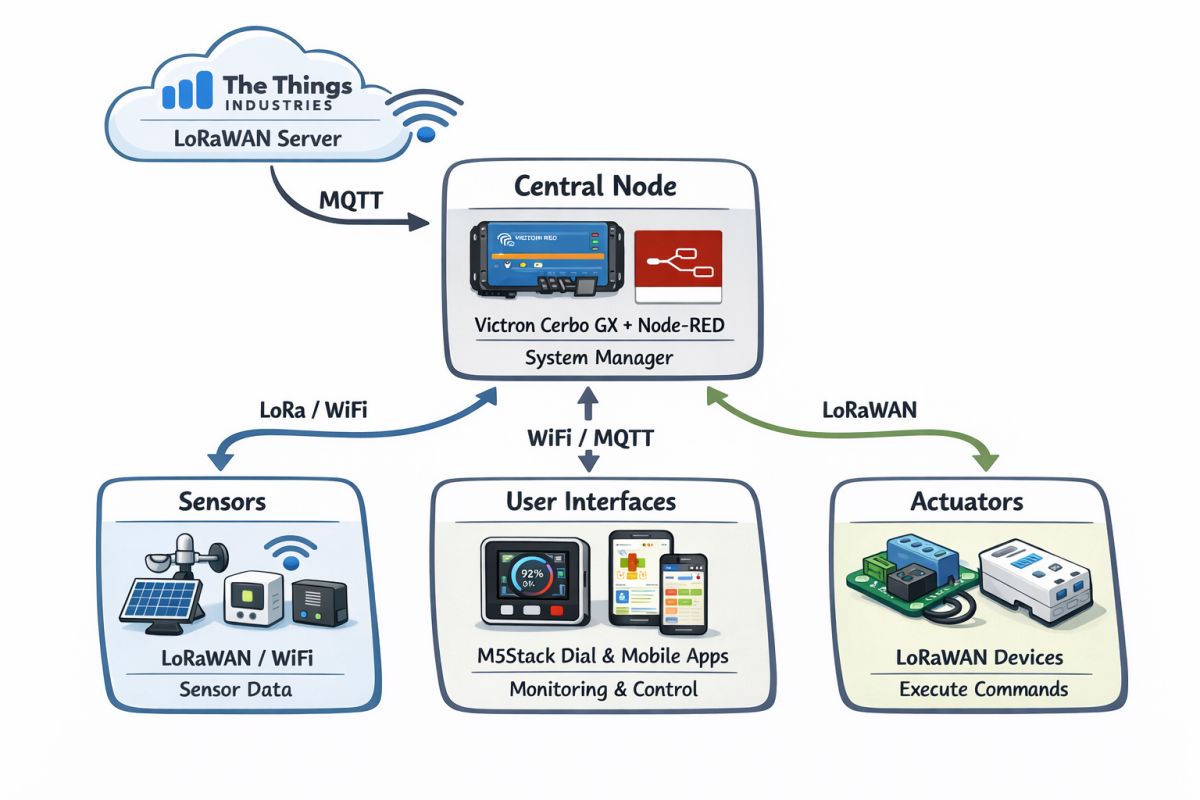
System Design and Architecture
The architecture of the system is based on communication between different nodes connected through Wi-Fi, MQTT, and LoRaWAN. The central node works as the server and message manager, while the remote devices act as sensors, receivers, and actuators.
- Central node: Victron Cerbo GX running Venus OS Large with Node-RED, used as the main system manager.
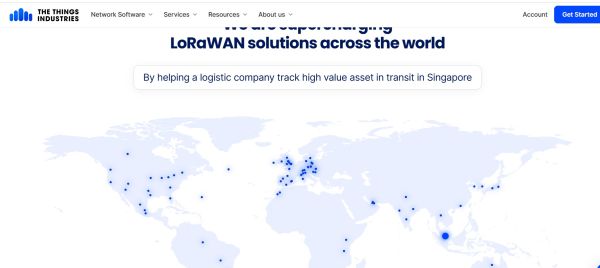
- Network server: The Things Industries, used as the LoRaWAN network server and integrated with MQTT.
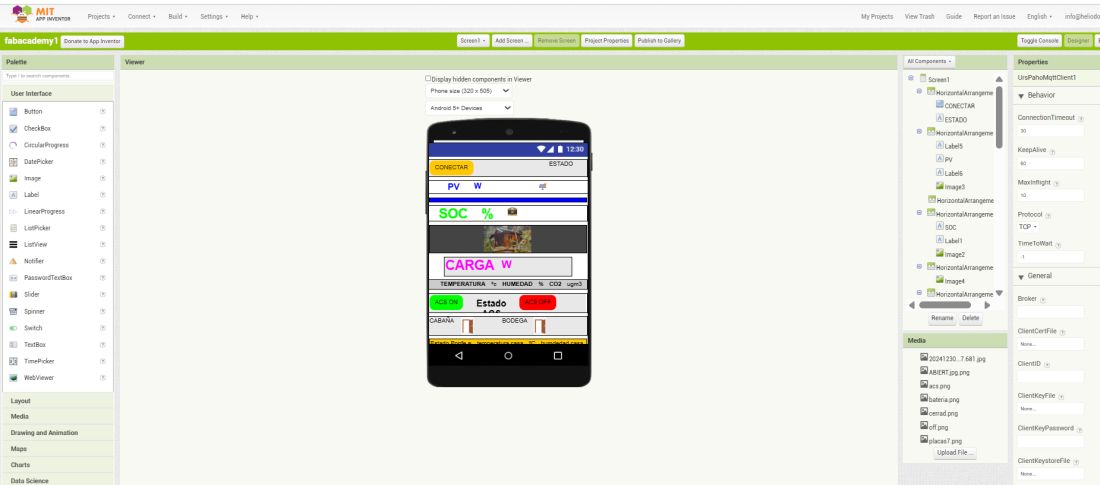
- User interface node: M5Stack Dial (ESP32) and App Inventor applications, used to display information and interact with the system.
- Sensor nodes: LoRaWAN and Wi-Fi devices that measure environmental and energy variables.
- Actuator nodes: LoRaWAN devices that receive commands from Node-RED through MQTT integration.
The system manager is a Node-RED platform running on a Victron energy system. From this central point, all sensor measurements are collected and all commands to the actuators are distributed. MQTT is used as the common communication layer to exchange data between the different parts of the system.
Communication Layers
- Wi-Fi communication: used to access Victron system data and local services.
- MQTT communication: used to centralize measurements and commands in Node-RED.
- LoRaWAN communication: used for long-range, low-power sensors and actuators connected through The Things Industries.
Devices and Data Sources
The system combines data from energy devices, environmental sensors, and control actuators.
- Wi-Fi / Victron Cerbo:
- Photovoltaic power
- Battery status
- Instantaneous consumption
- LoRaWAN sensors:
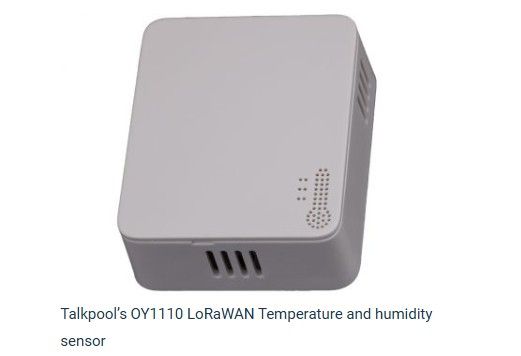
- Indoor temperature – Talkpool OY1210
- Outdoor temperature
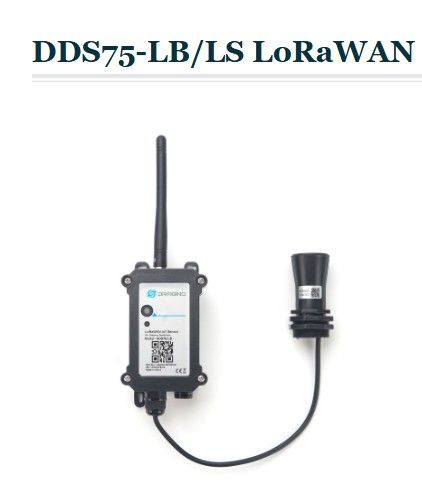
- Water level – DDS75-LB/LS LoRaWAN Distance Detection Sensor
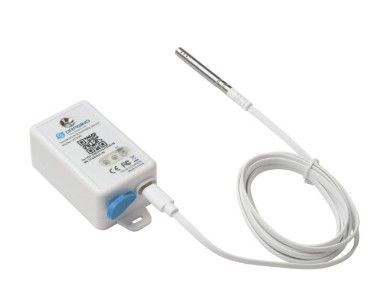
- Cellar humidity – LHT65N-E31F LoRaWAN Temperature & Humidity Sensor
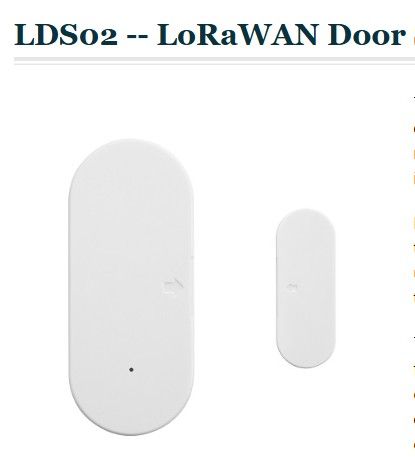
- Door sensor
- LoRaWAN actuators:
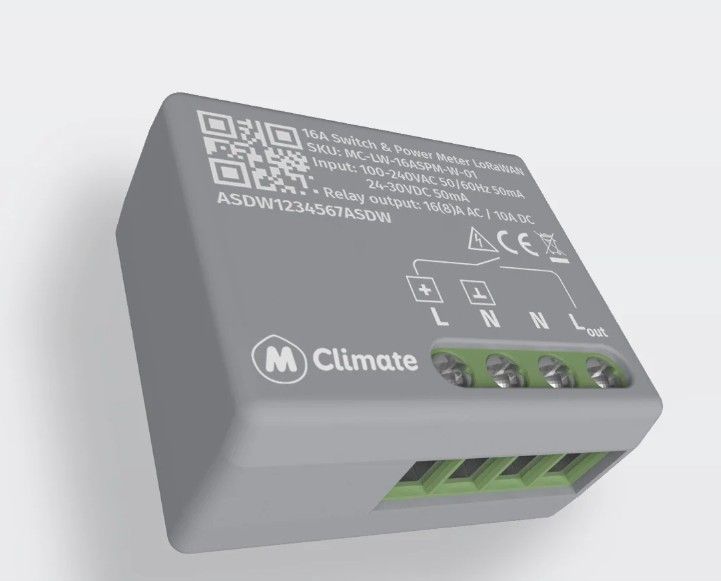
- MClimate 16A Switch
- Milesight UC511 irrigation valves
Addressing Strategy
One of the key requirements this week is to make sure that the board addressing works correctly.
In my implementation I used MQTT topics and LoRaWAN device identities to organize the communication between nodes.
- Bus or network address: MQTT topics and LoRaWAN end-device identifiers
- Sender node: Sensor nodes, Victron Cerbo GX, and Node-RED flows
- Receiver node: M5Stack Dial, App Inventor interface, and LoRaWAN actuators
I verified the addressing by checking that each device published and received data on the correct MQTT topics, and by confirming that commands were delivered to the expected actuator without affecting the others.
Programming Process
The programming process was based on integrating different communication technologies into a single distributed system. I used Node-RED as the main orchestration tool, MQTT as the messaging protocol, and LoRaWAN through The Things Industries to connect remote sensors and actuators.
Main Steps
- Configure Node-RED on Venus OS Large running on the Victron system.
- Connect Node-RED to MQTT topics for data acquisition and command transmission.
- Integrate The Things Industries as the LoRaWAN network server.
- Subscribe to sensor topics in Node-RED to receive measurements.
- Process the data and define control logic inside Node-RED flows.
- Send commands back to the actuators through MQTT integration.
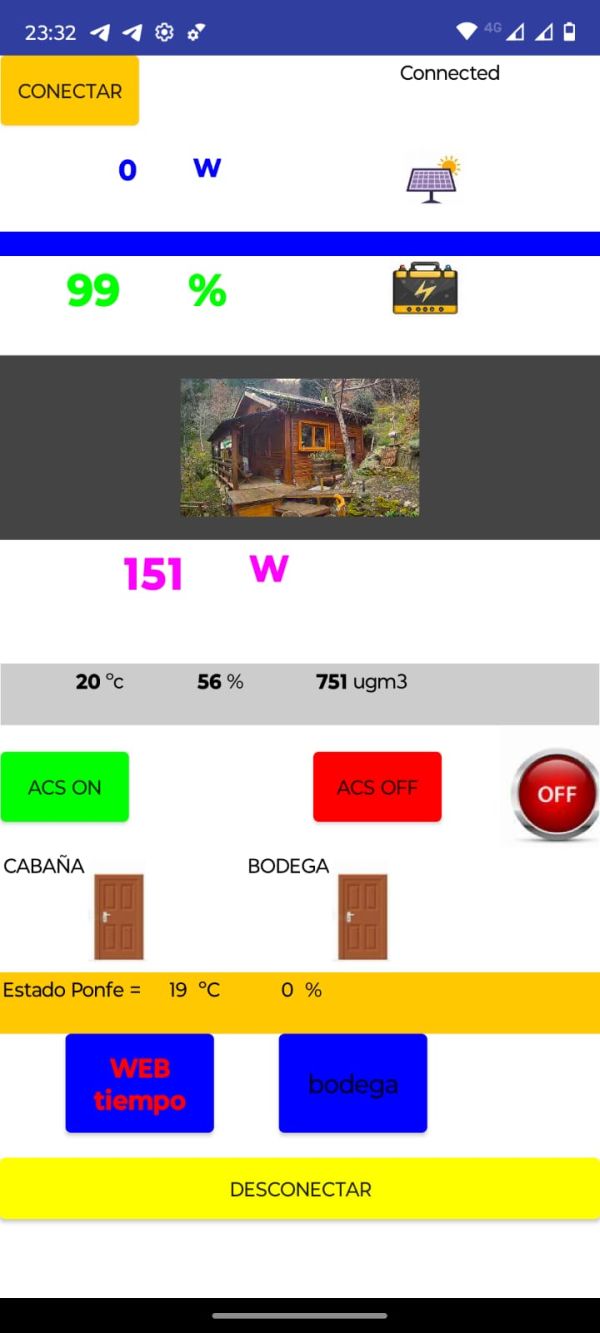
- Display information and user controls on the M5Stack Dial and App Inventor interface.
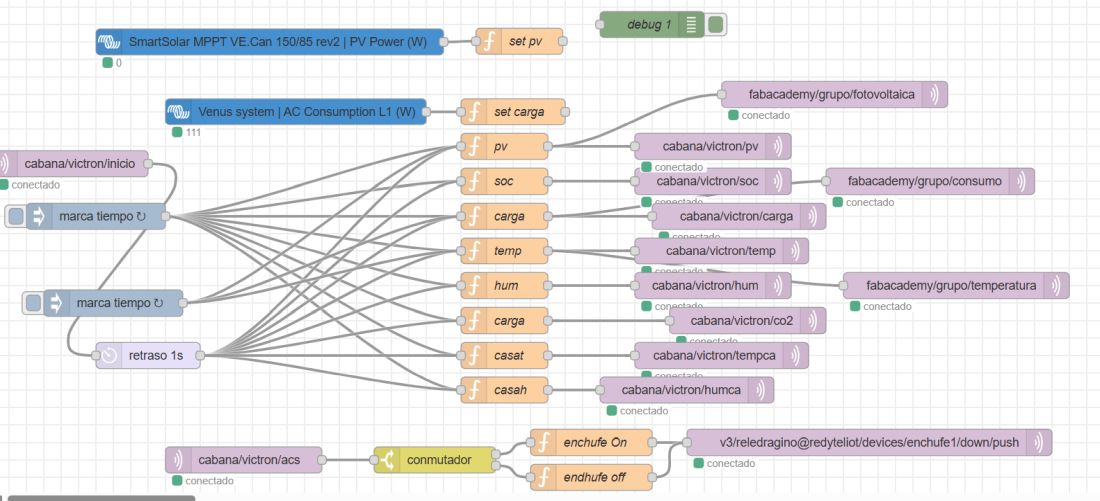
This is the complete application. It is difficult to see all the details in the image, but you can download the source code at the end of this section.
How the code works
The sensor nodes continuously measure environmental and energy variables and send their values through LoRaWAN or Wi-Fi. These values are received by The Things Industries or directly by the Victron system and then forwarded to Node-RED using MQTT.
Inside Node-RED, the flows subscribe to the corresponding MQTT topics, process the incoming data, and make decisions according to the system logic. When a condition is met, Node-RED publishes a command to the actuator topic. The actuator receives the command and performs the required action, such as switching a load or opening an irrigation valve.
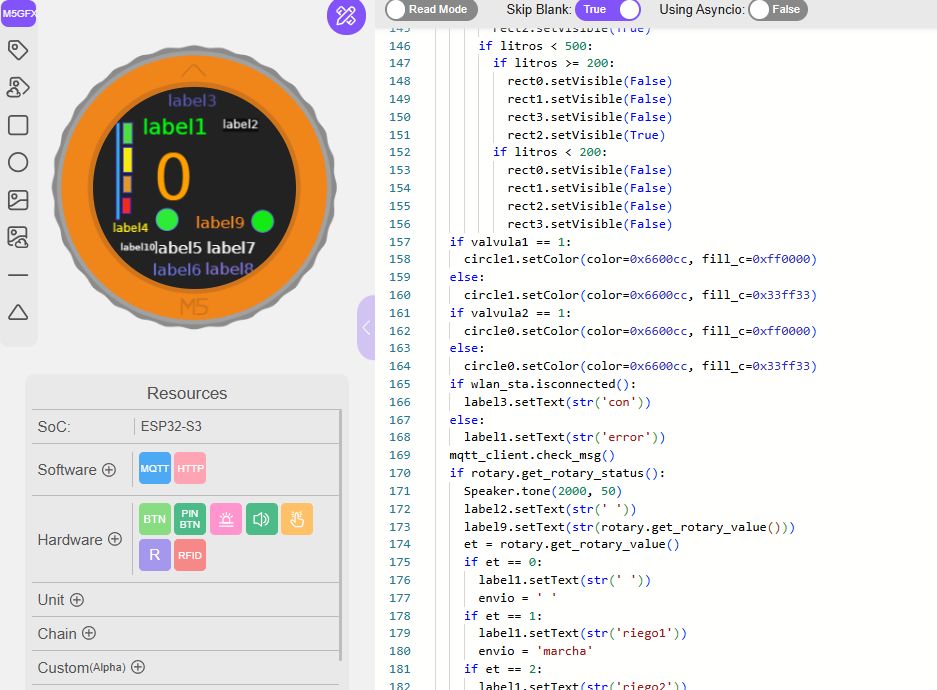
M5 Dial ESP32 / MQTT Logic Show code
import os, sys, io
import M5
from M5 import *
from uMQTT import MQTTClient
from hardware import Rotary
import network
from hardware import Button


label1 = None
rect0 = None
rect4 = None
label5 = None
label9 = None
label0 = None
label2 = None
label3 = None
rect1 = None
label6 = None
circle0 = None
image0 = None
rect2 = None
label7 = None
circle1 = None
rect3 = None
label8 = None
label10 = None
label4 = None
mqtt_client = None
rotary = None
wlan_sta = None
Btn1 = None


temporal = None
temperatura = None
litros = None
valvula1 = None
valvula2 = None
envio = None
et = None


def MQTT_M5Stack_d_event(data):
  global label1, rect0, rect4, label5, label9, label0, label2, label3, rect1, label6, circle0, image0, rect2, label7, circle1, rect3, label8, label10, label4, MQTT_client, rotary, wlan_sta, Btn1, temporal, temperatura, litros, valvula1, valvula2, envio, et
  temporal = data[1]
  label2.setText(str(temporal))


def MQTT_M5Stack_t_event(data):
  global label1, rect0, rect4, label5, label9, label0, label2, label3, rect1, label6, circle0, image0, rect2, label7, circle1, rect3, label8, label10, label4, MQTT_client, rotary, wlan_sta, Btn1, temporal, temperatura, litros, valvula1, valvula2, envio, et
  temperatura = float(data[1])
  label5.setText(str(temperatura))


def MQTT_M5Stack_l_event(data):
  global label1, rect0, rect4, label5, label9, label0, label2, label3, rect1, label6, circle0, image0, rect2, label7, circle1, rect3, label8, label10, label4, MQTT_client, rotary, wlan_sta, Btn1, temporal, temperatura, litros, valvula1, valvula2, envio, et
  litros = int(data[1])
  label4.setText(str(litros))


def MQTT_M5Stack_h_event(data):
  global label1, rect0, rect4, label5, label9, label0, label2, label3, rect1, label6, circle0, image0, rect2, label7, circle1, rect3, label8, label10, label4, MQTT_client, rotary, wlan_sta, Btn1, temporal, temperatura, litros, valvula1, valvula2, envio, et
  temporal = float(data[1])
  label6.setText(str(temporal))


def MQTT_M5Stack_i_event(data):
  global label1, rect0, rect4, label5, label9, label0, label2, label3, rect1, label6, circle0, image0, rect2, label7, circle1, rect3, label8, label10, label4, MQTT_client, rotary, wlan_sta, Btn1, temporal, temperatura, litros, valvula1, valvula2, envio, et
  valvula1 = int(data[1])


def MQTT_M5Stack_c_event(data):
  global label1, rect0, rect4, label5, label9, label0, label2, label3, rect1, label6, circle0, image0, rect2, label7, circle1, rect3, label8, label10, label4, MQTT_client, rotary, wlan_sta, Btn1, temporal, temperatura, litros, valvula1, valvula2, envio, et
  temporal = float(data[1])
  label0.setText(str(temporal))


def btnA_wasClicked_event(state):
  global label1, rect0, rect4, label5, label9, label0, label2, label3, rect1, label6, circle0, image0, rect2, label7, circle1, rect3, label8, label10, label4, MQTT_client, rotary, wlan_sta, Btn1, temporal, temperatura, litros, valvula1, valvula2, envio, et
  MQTT_client.publish('M5Stack', envio, qos=0)
  label2.setText(str(envio))
  Speaker.tone(4000, 400)


def MQTT_M5Stack_i2_event(data):
  global label1, rect0, rect4, label5, label9, label0, label2, label3, rect1, label6, circle0, image0, rect2, label7, circle1, rect3, label8, label10, label4, MQTT_client, rotary, wlan_sta, Btn1, temporal, temperatura, litros, valvula1, valvula2, envio, et
  valvula2 = int(data[1])
  label0.setText(str(temporal))


def setup():
  global label1, rect0, rect4, label5, label9, label0, label2, label3, rect1, label6, circle0, image0, rect2, label7, circle1, rect3, label8, label10, label4, MQTT_client, rotary, wlan_sta, Btn1, temporal, temperatura, litros, valvula1, valvula2, envio, et

  M5.begin()
  Widgets.fillScreen(0x222222)
  label1 = Widgets.Label("label1", 58, 34, 1.0, 0x00ff0d, 0x222222, Widgets.FONTS.DejaVu24)
  rect0 = Widgets.Rectangle(35, 42, 11, 25, 0x5641e4, 0x4fde42)
  rect4 = Widgets.Rectangle(27, 42, 4, 115, 0x5322dc, 0x20c5c8)
  label5 = Widgets.Label("label5", 71, 180, 1.0, 0xf4f4f5, 0x222222, Widgets.FONTS.DejaVu18)
  label9 = Widgets.Label("label9", 121, 150, 1.0, 0xff8a1d, 0x222222, Widgets.FONTS.DejaVu18)
  label0 = Widgets.Label("0", 71, 68, 1.0, 0xffa000, 0x222222, Widgets.FONTS.DejaVu72)
  label2 = Widgets.Label("label2", 153, 37, 1.0, 0xf7f9f8, 0x0d0d0d, Widgets.FONTS.DejaVu12)
  label3 = Widgets.Label("label3", 88, 5, 1.0, 0x5f5bc4, 0x222222, Widgets.FONTS.DejaVu18)
  rect1 = Widgets.Rectangle(35, 105, 10, 20, 0x182ce4, 0xe09a28)
  label6 = Widgets.Label("label6", 70, 206, 1.0, 0x6f76e7, 0x222222, Widgets.FONTS.DejaVu18)
  circle0 = Widgets.Circle(200, 159, 13, 0x5c6fe0, 0x14eb15)
  image0 = Widgets.Image("/flash/res/img/logo favicon Y.png", -56, 33, scale_x=1, scale_y=1)
  rect2 = Widgets.Rectangle(34, 131, 10, 19, 0x2b1ae2, 0xef2b1d)
  label7 = Widgets.Label("label7", 134, 180, 1.0, 0xffffff, 0x222222, Widgets.FONTS.DejaVu18)
  circle1 = Widgets.Circle(87, 157, 13, 0x5e87ed, 0x2deb37)
  rect3 = Widgets.Rectangle(35, 71, 11, 30, 0x2527e7, 0xf7ea0d)
  label8 = Widgets.Label("label8", 132, 205, 1.0, 0x897be9, 0x222222, Widgets.FONTS.DejaVu18)
  label10 = Widgets.Label("label10", 32, 184, 1.0, 0xffffff, 0x222222, Widgets.FONTS.DejaVu9)
  label4 = Widgets.Label("label4", 23, 160, 1.0, 0xfff21a, 0x222222, Widgets.FONTS.DejaVu12)

  BtnA.setCallback(type=BtnA.CB_TYPE.WAS_CLICKED, cb=btnA_wasClicked_event)

  rotary = Rotary()
  wlan_sta = network.WLAN(network.STA_IF)
  wlan_sta.connect('TP-Link_EA20', '15437716')
  label0.setText(str(' '))
  label1.setText(str('0'))
  label2.setText(str(' '))
  label3.setText(str(' '))
  label5.setText(str(' '))
  label6.setText(str(' '))
  label7.setText(str('C'))
  label8.setText(str('%'))
  label9.setText(str('0'))
  label10.setText(str(' '))
  valvula1 = 0
  MQTT_client = MQTTClient('1', 'xxx', port=xxx, user='xxx', password='xxxx', keepalive=0)
  MQTT_client.connect(clean_session=True)
  MQTT_client.subscribe('M5Stack/d', MQTT_M5Stack_d_event, qos=0)
  MQTT_client.subscribe('M5Stack/t', MQTT_M5Stack_t_event, qos=0)
  MQTT_client.subscribe('M5Stack/l', MQTT_M5Stack_l_event, qos=0)
  MQTT_client.subscribe('M5Stack/h', MQTT_M5Stack_h_event, qos=0)
  MQTT_client.subscribe('M5Stack/i', MQTT_M5Stack_i_event, qos=0)
  MQTT_client.subscribe('M5Stack/c', MQTT_M5Stack_c_event, qos=0)
  MQTT_client.subscribe('M5Stack/i2', MQTT_M5Stack_i2_event, qos=0)
  Btn1 = Button(1, active_low=True, pullup_active=True)
  MQTT_client.publish('M5Stack', 'conectado', qos=0)
  rect0.setVisible(False)
  rect1.setVisible(False)
  rect2.setVisible(False)
  rect3.setVisible(False)
  circle0.setVisible(False)
  litros = 0
  label4.setText(str(litros))


def loop():
  global label1, rect0, rect4, label5, label9, label0, label2, label3, rect1, label6, circle0, image0, rect2, label7, circle1, rect3, label8, label10, label4, MQTT_client, rotary, wlan_sta, Btn1, temporal, temperatura, litros, valvula1, valvula2, envio, et
  M5.update()
  if litros >= 700:
    rect0.setVisible(True)
    rect1.setVisible(True)
    rect2.setVisible(True)
    rect3.setVisible(True)
  if litros < 700:
    if litros >= 600:
      rect0.setVisible(False)
      rect1.setVisible(True)
      rect2.setVisible(True)
      rect3.setVisible(True)
    if litros < 600:
      if litros >= 500:
        rect0.setVisible(False)
        rect3.setVisible(False)
        rect1.setVisible(True)
        rect2.setVisible(True)
      if litros < 500:
        if litros >= 200:
          rect0.setVisible(False)
          rect1.setVisible(False)
          rect3.setVisible(False)
          rect2.setVisible(True)
        if litros < 200:
          rect0.setVisible(False)
          rect1.setVisible(False)
          rect2.setVisible(False)
          rect3.setVisible(False)
  if valvula1 == 1:
    circle1.setColor(color=0x6600cc, fill_c=0xff0000)
  else:
    circle1.setColor(color=0x6600cc, fill_c=0x33ff33)
  if valvula2 == 1:
    circle0.setColor(color=0x6600cc, fill_c=0xff0000)
  else:
    circle0.setColor(color=0x6600cc, fill_c=0x33ff33)
  if wlan_sta.isconnected():
    label3.setText(str('con'))
  else:
    label1.setText(str('error'))
  MQTT_client.check_msg()
  if rotary.get_rotary_status():
    Speaker.tone(2000, 50)
    label2.setText(str(' '))
    label9.setText(str(rotary.get_rotary_value()))
    et = rotary.get_rotary_value()
    if et == 0:
      label1.setText(str(' '))
      envio = ' '
    if et == 1:
      label1.setText(str('riego1'))
      envio = 'marcha'
    if et == 2:
      label1.setText(str('riego2'))
      envio = 'marcha2'
    if et == 3:
      label1.setText(str('on 1'))
      envio = 'on1'
    if et == 4:
      label1.setText(str('paro 1'))
      envio = 'off1'
    if et == 5:
      label1.setText(str('on 2'))
      envio = 'on2'
    if et == 6:
      label1.setText(str('paro 2'))
      envio = 'off2'


if __name__ == '__main__':
  try:
    setup()
    while True:
      loop()
  except (Exception, KeyboardInterrupt) as e:
    try:
      from utility import print_error_msg
      print_error_msg(e)
    except ImportError:
      print("please update to latest firmware")
System Behaviour Show code
{
        "id": "3668b635052adb91",
        "type": "MQTT in",
        "z": "038433144c224c22",
        "name": "",
        "topic": "cabana/fuego/valvula1",
        "qos": "0",
        "datatype": "auto-detect",
        "broker": "XXXXXX",
        "nl": false,
        "rap": true,
        "rh": 0,
        "inputs": 0,
        "x": 160,
        "y": 360,
        "wires": [
            [
                "1373f8ec17e39bc7",
                "19d61a87a37a72e9",
                "4ab1d6199d65b170"
            ]
        ]
    },
    {
        "id": "6939dd1dcfc96f37",
        "type": "MQTT in",
        "z": "038433144c224c22",
        "name": "",
        "topic": "cabana/fuego/bomba1",
        "qos": "0",
        "datatype": "auto-detect",
        "broker": "XXXXXXX",
        "nl": false,
        "rap": true,
        "rh": 0,
        "inputs": 0,
        "x": 180,
        "y": 440,
        "wires": [
            [
                "84bf8e4251b1e69f",
                "54c1885508cffee6"
            ]
        ]
    },
    {
        "id": "1373f8ec17e39bc7",
        "type": "switch",
        "z": "038433144c224c22",
        "name": "ON",
        "property": "payload",
        "propertyType": "msg",
        "rules": [
            {
                "t": "eq",
                "v": "ON",
                "vt": "str"
            }
        ],
        "checkall": "true",
        "repair": false,
        "outputs": 1,
        "x": 370,
        "y": 320,
        "wires": [
            [
                "5c0f3b2750669514"
            ]
        ]
    },
    {
        "id": "37b028c476cad5ae",
        "type": "debug",
        "z": "038433144c224c22",
        "name": "debug 28",
        "active": true,
        "tosidebar": true,
        "console": false,
        "tostatus": false,
        "complete": "false",
        "statusVal": "",
        "statusType": "auto",
        "x": 860,
        "y": 300,
        "wires": []
    },
    {
        "id": "a71a624baf2f49d8",
        "type": "debug",
        "z": "038433144c224c22",
        "name": "debug 29",
        "active": true,
        "tosidebar": true,
        "console": false,
        "tostatus": false,
        "complete": "false",
        "statusVal": "",
        "statusType": "auto",
        "x": 600,
        "y": 440,
        "wires": []
    },
    {
        "id": "84bf8e4251b1e69f",
        "type": "switch",
        "z": "038433144c224c22",
        "name": "ON",
        "property": "payload",
        "propertyType": "msg",
        "rules": [
            {
                "t": "eq",
                "v": "ON",
                "vt": "str"
            }
        ],
        "checkall": "true",
        "repair": false,
        "outputs": 1,
        "x": 370,
        "y": 440,
        "wires": [
            [
                "a71a624baf2f49d8"
            ]
        ]
    },
    {
        "id": "19d61a87a37a72e9",
        "type": "switch",
        "z": "038433144c224c22",
        "name": "OFF",
        "property": "payload",
        "propertyType": "msg",
        "rules": [
            {
                "t": "eq",
                "v": "OFF",
                "vt": "str"
            }
        ],
        "checkall": "true",
        "repair": false,
        "outputs": 1,
        "x": 370,
        "y": 360,
        "wires": [
            [
                "5d34222c1706403e"
            ]
        ]
    },
    {
        "id": "e3068f6bbcd73dc0",
        "type": "debug",
        "z": "038433144c224c22",
        "name": "debug 30",
        "active": true,
        "tosidebar": true,
        "console": false,
        "tostatus": false,
        "complete": "false",
        "statusVal": "",
        "statusType": "auto",
        "x": 780,
        "y": 360,
        "wires": []
    },
    {
        "id": "54c1885508cffee6",
        "type": "switch",
        "z": "038433144c224c22",
        "name": "OFF",
        "property": "payload",
        "propertyType": "msg",
        "rules": [
            {
                "t": "eq",
                "v": "OFF",
                "vt": "str"
            }
        ],
        "checkall": "true",
        "repair": false,
        "outputs": 1,
        "x": 370,
        "y": 500,
        "wires": [
            [
                "316adf2a29890dd7"
            ]
        ]
    },
    {
        "id": "316adf2a29890dd7",
        "type": "debug",
        "z": "038433144c224c22",
        "name": "debug 31",
        "active": true,
        "tosidebar": true,
        "console": false,
        "tostatus": false,
        "complete": "false",
        "statusVal": "",
        "statusType": "auto",
        "x": 600,
        "y": 500,
        "wires": []
    },
    {
        "id": "4ab1d6199d65b170",
        "type": "debug",
        "z": "038433144c224c22",
        "name": "debug 32",
        "active": true,
        "tosidebar": true,
        "console": false,
        "tostatus": false,
        "complete": "false",
        "statusVal": "",
        "statusType": "auto",
        "x": 240,
        "y": 280,
        "wires": []
    },
    {
        "id": "5c0f3b2750669514",
        "type": "function",
        "z": "038433144c224c22",
        "name": "abrir valvula 2",
        "func": "\nvar  puerto=85;\nvar confirmado=true;\nvar campos=0;\nvar bite=[0x01];\nvar co=msg.payload;\n\n\nvar uno = \"/x0hAA==\";\nmsg.payload= {\"downlinks\":[{\"f_port\": puerto,\"frm_payload\":uno,\"priority\": \"NORMAL\",\"confirmed\":confirmado}]};\nreturn msg;\n\n\n",
        "outputs": 1,
        "timeout": 0,
        "noerr": 0,
        "initialize": "",
        "finalize": "",
        "libs": [],
        "x": 580,
        "y": 320,
        "wires": [
            [
                "37b028c476cad5ae"
            ]
        ]
    },
    {
        "id": "5d34222c1706403e",
        "type": "function",
        "z": "038433144c224c22",
        "name": "cerrar valvula 2",
        "func": "\nvar  puerto=85;\nvar confirmado=true;\nvar campos=0;\nvar bite=[0x01];\nvar co=msg.payload;\n\n\nvar uno = \"/x0BAA==\";\nmsg.payload= {\"downlinks\":[{\"f_port\": puerto,\"frm_payload\":uno,\"priority\": \"NORMAL\",\"confirmed\":confirmado}]};\nreturn msg;\n\n\n",
        "outputs": 1,
        "timeout": 0,
        "noerr": 0,
        "initialize": "",
        "finalize": "",
        "libs": [],
        "x": 560,
        "y": 360,
        "wires": [
            [
                "e3068f6bbcd73dc0"
            ]
        ]
    },
    {
        "id": "a15e9485.4c07c8",
        "type": "mqtt-broker",
        "name": "XXXXX",
        "broker": "XXXXXXX",
        "port": "xXXXX",
        "clientid": "",
        "autoConnect": true,
        "usetls": false,
        "compatmode": false,
        "protocolVersion": 4,
        "keepalive": "60",
        "cleansession": true,
        "autoUnsubscribe": true,
        "birthTopic": "",
        "birthQos": "0",
        "birthPayload": "",
        "birthMsg": {},
        "closeTopic": "",
        "closeQos": "0",
        "closePayload": "",
        "closeMsg": {},
        "willTopic": "",
        "willQos": "0",
        "willPayload": "",
        "willMsg": {},
        "userProps": "",
        "sessionExpiry": ""
    }
]
Validation of Communication and Addressing
To validate the project, I checked both the physical communication links and the logical data flow between the different nodes.
- The Victron Cerbo GX and Node-RED platform powered up correctly.
- The MQTT communication layer initialized correctly.
- The LoRaWAN devices were correctly registered and recognized by The Things Industries.
- The MQTT topics were correctly assigned and subscribed.
- The M5Stack Dial and App Inventor interface received and displayed the correct data.
- The LoRaWAN actuators responded correctly when commands were sent from Node-RED.
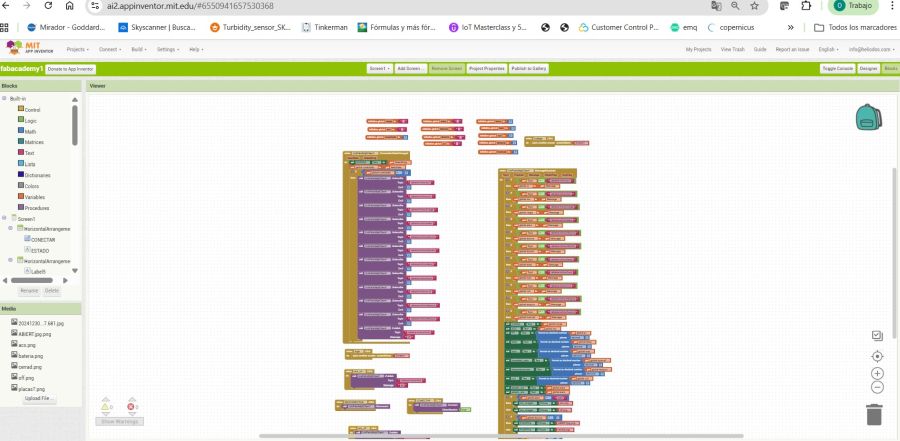
The App Inventor code:
⬇ Download CodeResults
The final system successfully demonstrates communication between multiple embedded and IoT nodes using a combination of Wi-Fi, MQTT, and LoRaWAN.
- Sensor data is transmitted correctly from the remote devices.
- Node-RED centralizes all information in a single control platform.
- The user can monitor the system through App Inventor and the M5Stack Dial.
- Commands are sent reliably to the LoRaWAN actuators.
- The addressing strategy using MQTT topics and LoRaWAN identifiers works correctly.
This project helped me understand how different communication technologies can be integrated into a unified architecture for monitoring and control. It also showed me the importance of using a central broker and a clear topic structure when building an IoT system.
Week 15 – Useful Resources
The following links provide access to the main platforms and tools used in this project:
- MIT App Inventor – Mobile Application Development Platform
- The Things Industries – LoRaWAN Network Server
- Eclipse Mosquitto – MQTT Broker
Problems and Fixes
Problem 1 – MQTT connection problems
- Problem: Some clients did not connect correctly to the broker.
- Fix: I checked the broker address, port, username, password and client ID.
Problem 2 – Wrong topic names
- Problem: The app did not receive some values because the subscribed topic was different from the published topic.
- Fix: I created a clear topic structure and checked each topic in Node-RED.
Problem 3 – Payload format
- Problem: Some values arrived as text and had to be converted to numbers.
- Fix: I converted the payloads using float or integer conversion depending on the value.
Problem 4 – Debugging several interfaces at the same time
- Problem: Using Python, App Inventor and Node-RED at the same time made debugging more complex.
- Fix: I tested one interface at a time and used Node-RED debug nodes to verify the MQTT messages.
Summary and Reflection
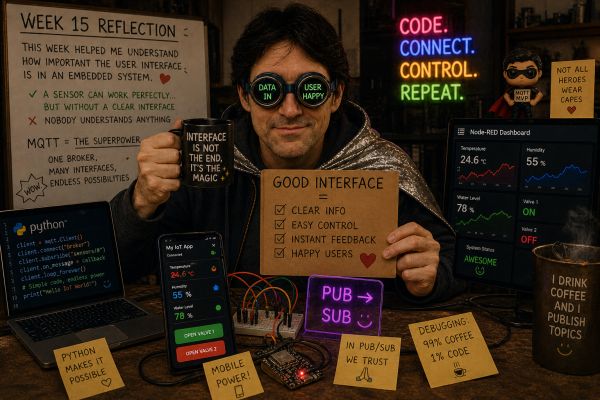
This week helped me understand how important the user interface is in an embedded system. A sensor or actuator can work correctly, but without a clear interface it is difficult for the user to understand or control the system.
I learned that MQTT is a very useful communication layer because it allows different applications to interact with the same embedded board. Python, App Inventor and Node-RED can all communicate with the same MQTT broker, which makes the system flexible and scalable.
The most important lesson was that the interface must be designed around the user. It should show only the important information, use clear controls, and provide feedback when a command is sent or when the connection is active.
This assignment is directly related to my final project because it gives me a practical way to monitor sensor data and control outputs from different interfaces. It also helped me improve the communication structure that I started during the networking week.