
Week 14
Week 14: Molding and Casting
I explored molding and casting through wax-stamp, fridge-magnet, low-melt metal, and biomaterial tests, then compared the processes and what each one is good for.

This week was very new to me. It was a very interesting to try a completely new type of fabrication and seeing how our previous skills came in handy while for designing and creating our molds.
This week, I created a letter stamp with my logo, a fridge magnet with the Syrian emblem and map (inverted, lol), and some experimentation with biomaterials, all made using different materials/techniques :D

Group Assignment: Checking Safety Instructions and Comparing Molding & Casting Processes
The group assignment focused on reading the safety information for the molding and casting materials and comparing different molding/casting processes.
The basic workflow we were first introduced to: 1) design the part and mold in CAD, 2) machine a mold from machinable wax, 3) pour Mold Star 31T silicone into/over the wax tool to make a flexible silicone mold, and 4) pour Smooth-Cast 320 polyurethane resin into the silicone mold to make the final cast part.
I will talk more about this process below in my individual assignment section :P
I tried tin to create a stamp and low-melting point metal, and with the group at the lab, we tried some biomaterial recipes from materiom (listed below). Also, Kieran used the PLA scraps from 3D printer alongside an oven to create a mold from it.
Here are the recipes we did as a group, for some of them, I wasn’t at the lab, but got to see the final results and I tried one on my own:
Coffee Composite Co02 (Kieran and Fumiko did it together)
Eggshell-Starch Biomaterial (Kieran and Fumiko did it together)
Eggshell Biocomposite (I did this one)
Each material needed different amount of time in the fridge and to dry. The eggshell biocomposite material was very simple and straightforward, and the produced output was pretty strong.
All the ingredients needed for these biomaterials were common household kitchen staples.
The main safety references were the Mold Star 31T Safety Data Sheet (SDS) and the Smooth-Cast 320 SDS, plus the Materiom recipe pages linked above.
Mold Star 31T is the lower-risk silicone, but we still had proper ventilation in the lab, eye protection (cool thing is that I already have my glasses on 24/7), and liquid-tight gloves, and kept the two parts separate until mixing.
Smooth-Cast 320 needed stricter care because Part A is classified for skin and respiratory inhalation hazards, so I avoided breathing vapors, made sure the lab was ventilated, used gloves/eye protection, and avoided skin contact.
For the eggshell/coffee biomaterials, PLA scraps in the oven, and the low-melting-point metal/tin processes, the safe approach was gloves, eye protection, heat-safe tools, ventilation (yes, again), and cleanup/disposal after the material cooled.
Learning from Global Session
Neil opened with the fact that molding and casting is how most things around us are actually made industrially.
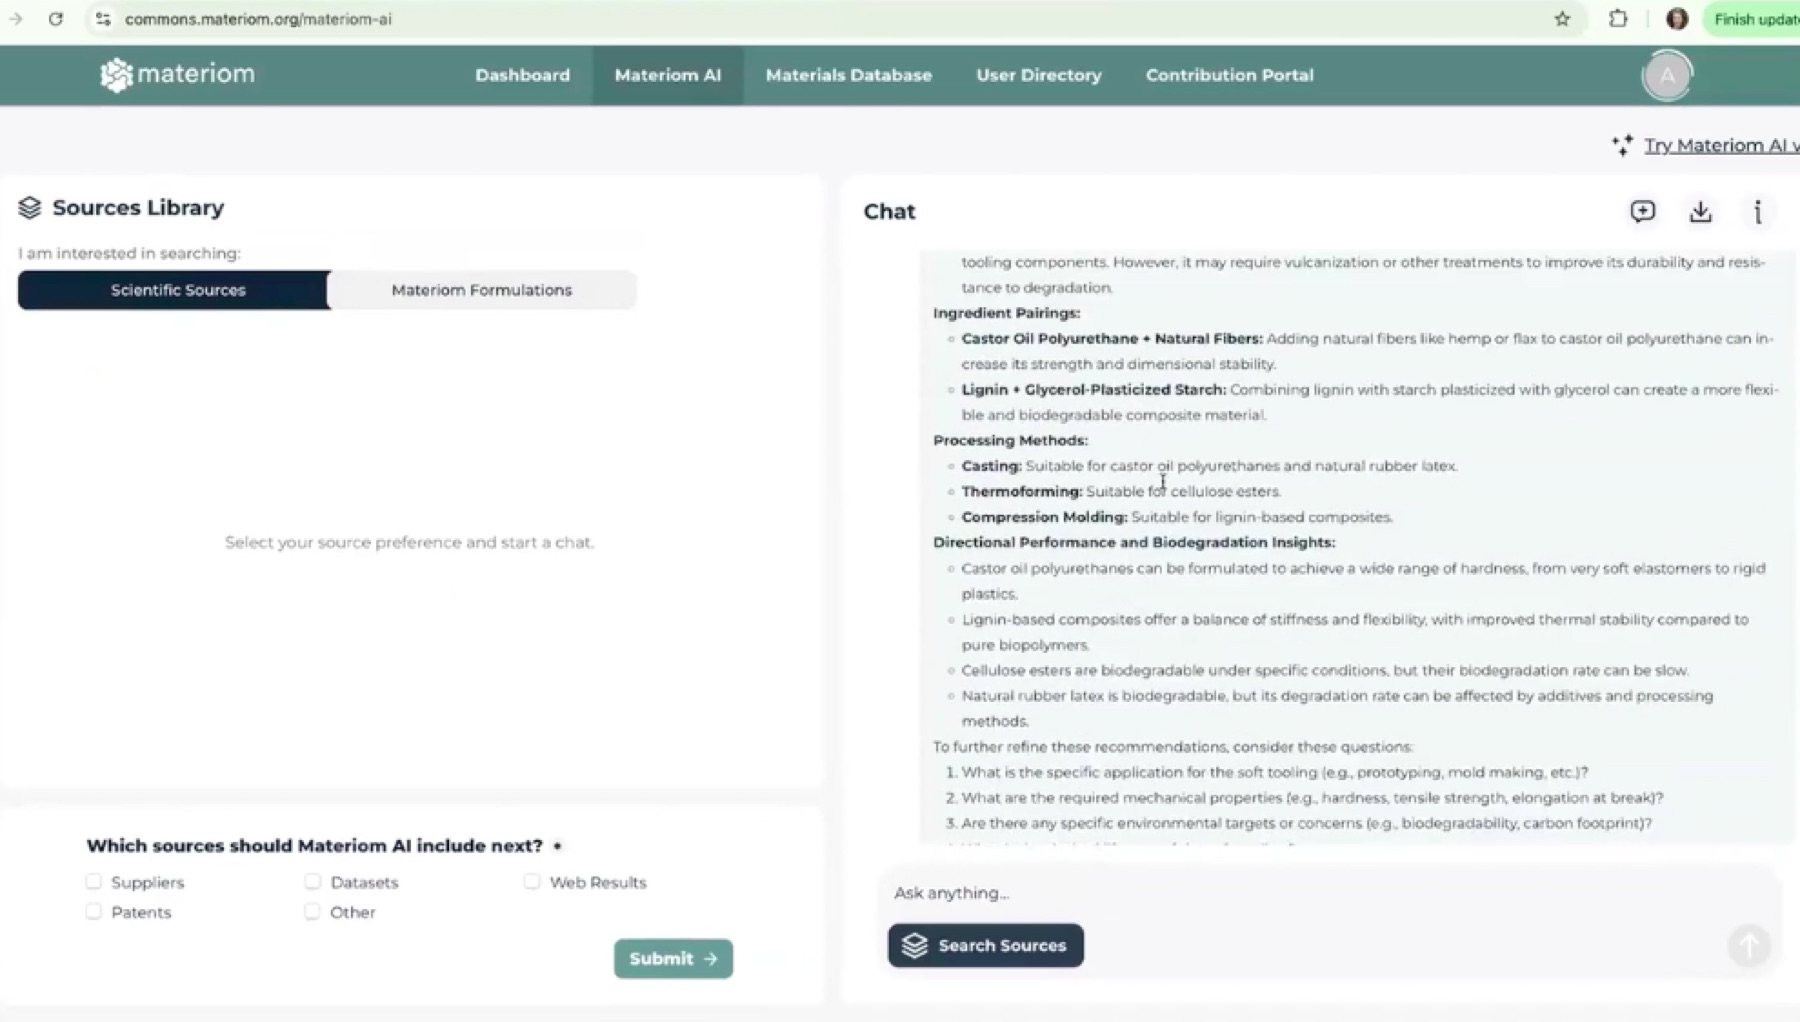
He then handed it over to Alysia Garmulewicz and Pilar from Materiom, the open materials platform that runs a community-contributed database of biobased recipes plus an AI design assistant on top of it.
After the biomaterials half, Saverio and Adrian took us through the practical side: what materials are usually at the labs, how to mix and pour them, and how to design a mold you can extract a part from without destroying everything.
Molding, Casting, and Choosing the Right Mold
Alysia defined molding as making the negative cavity/tool, and casting as putting a liquid or pliable material into that mold so it solidifies into the positive finished part. I honestly was labeling everything as molding, lol.
She also explained why mold design depends on geometry. A simple object can use a one-piece mold, a more enclosed object usually needs a two-piece mold with registration keys, and complex undercuts may need three or more parts.
Saverio showed an extreme example of a tesseract that needed a six-part mold, which made it obvious that the mold is sometimes the real engineering project.
A rule to remember also: soft cast usually needs a rigid mold, while a rigid cast usually needs a flexible mold. That is why hard resin or plaster is often cast inside silicone, and why soft materials can be cast inside a harder tool.
If the cured part cannot flex and the mold cannot flex, the part can get mechanically locked inside.
Neil also pointed out that gravity is only one way to fill a mold (no waaaay, :P). Depending on the material viscosity and geometry, you can use pressure, vacuum, screws/extrusion, or spinning/rotational casting.
That’s why a thick concrete-like material or a fiber-filled biomaterial may need a different filling strategy than a runny silicone or resin.
Biomaterials and Materiom
Alysia and Pilar showed that the material can also be something you formulate locally from biomass or waste streams. That’s one of the big things behind Materiom.
Materiom is an open materials platform where people can share and remix biobased material recipes. Their AI assistant is connected to a structured database built from community recipes and open scientific literature.
Neil asked Alysia to demo it with a question about bio-based soft tooling, and it returned possible materials and starter recipes, pretty cool tbh.
A major point from Alysia was that biobased does not automatically mean biodegradable.
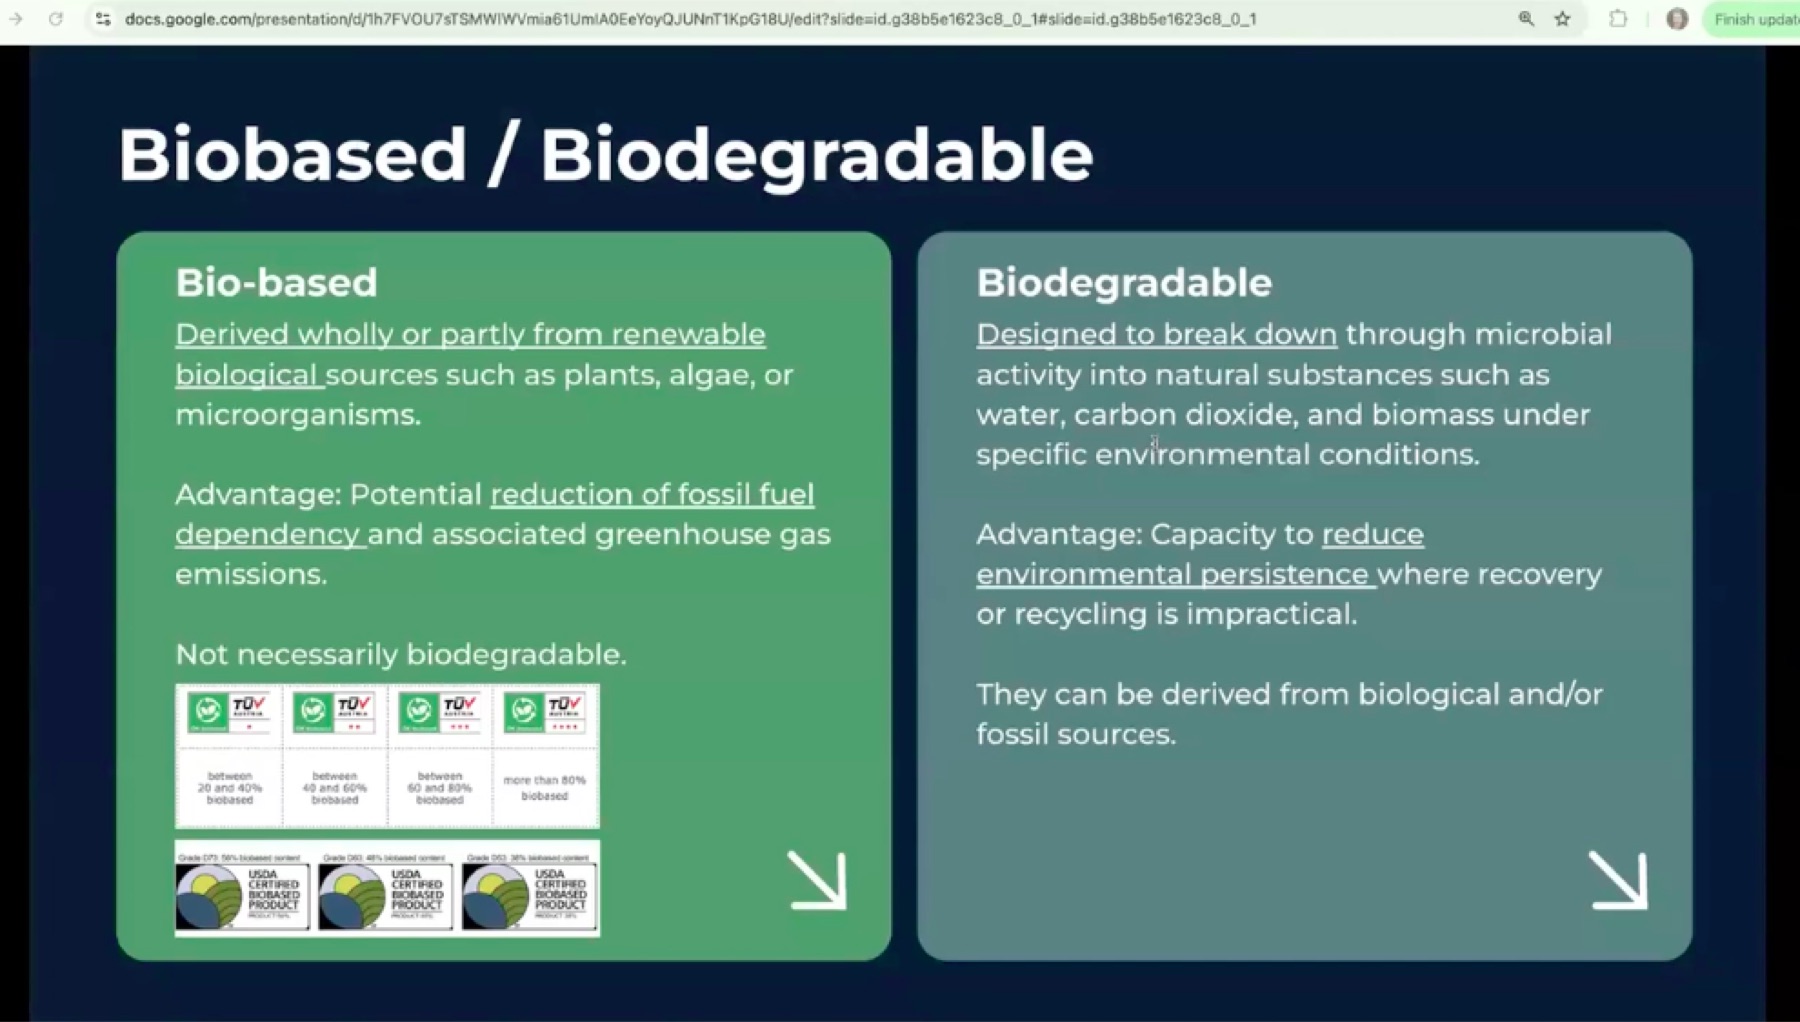
A material can be made from organic carbon sources and still become a persistent pollutant after industrial heat, pressure, or chemistry changes its molecular structure.
She also mentioned that industry can call something biobased at around 30 percent biobased content, which means the rest may still be petroleum-based.
What Changes From Material to Material
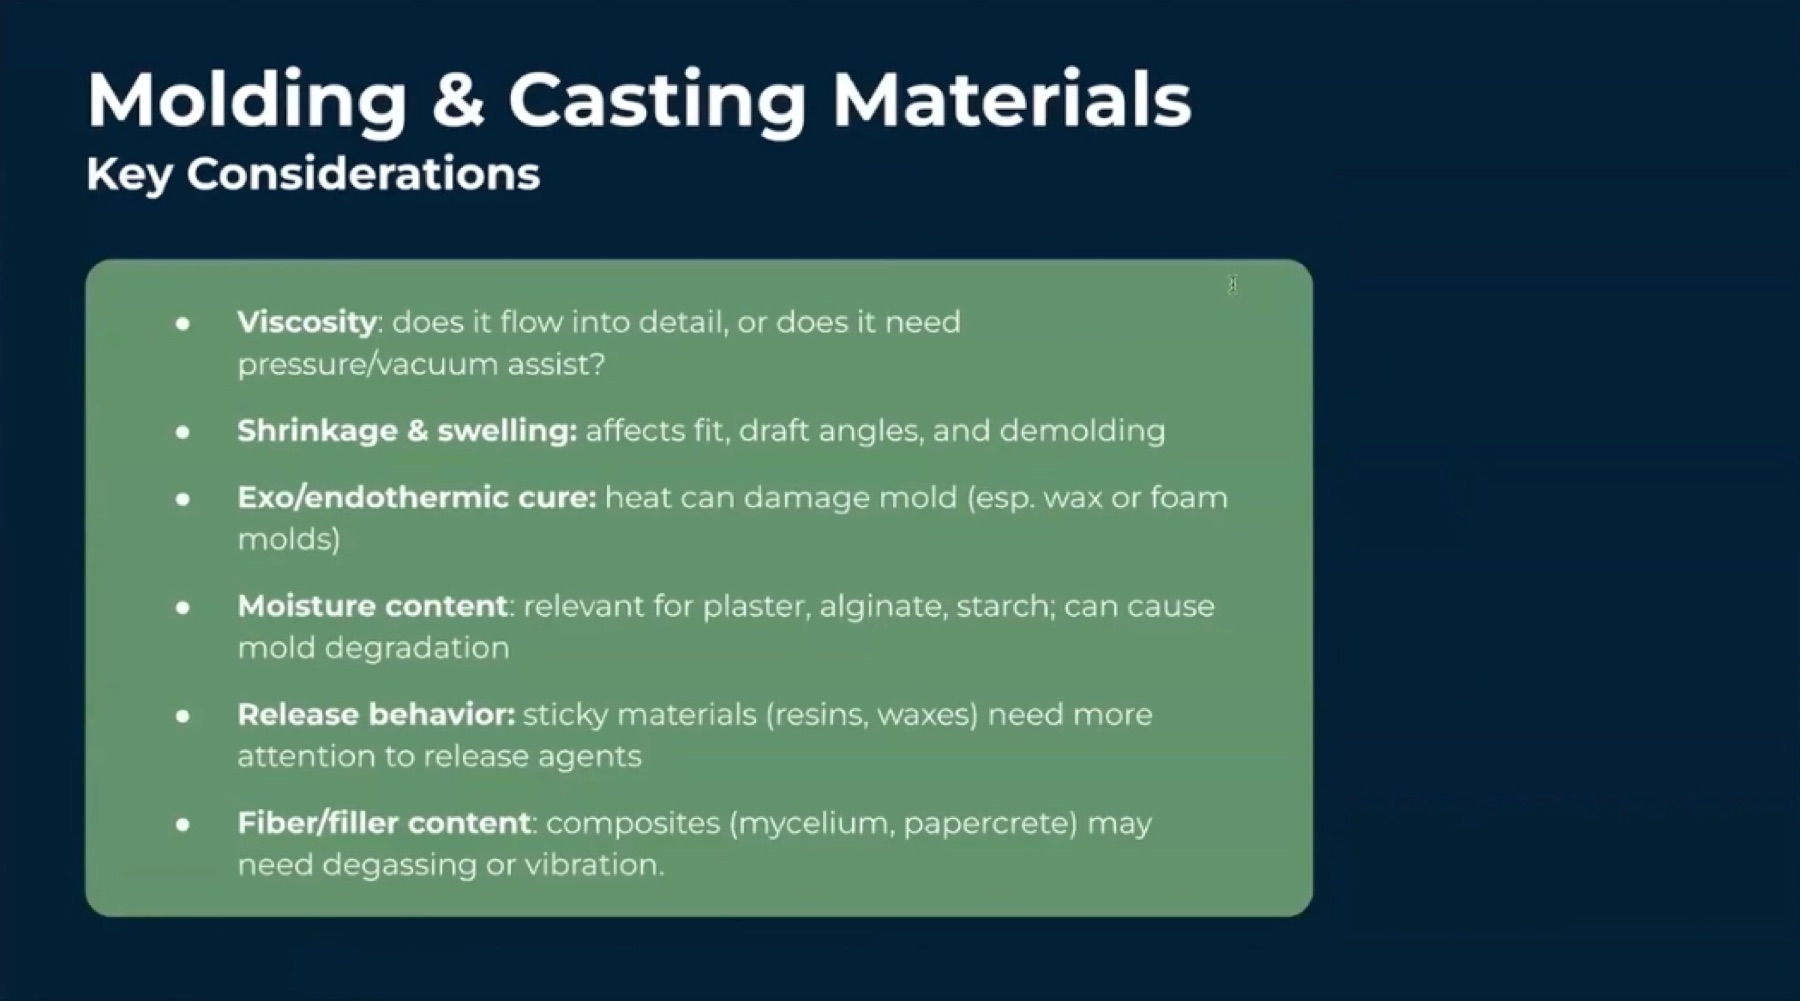
Alysia walked through many material families, and each material family comes with its own design rules and uses.
There are lots of variables to take into account including viscosity, shrinkage/swelling, cure temperature, moisture content, release behavior, and fiber/filler content.
Viscosity controls whether the material naturally flows into small details or needs help from vibration, pressure, or vacuum.
Shrinkage and swelling affect whether the final part keeps its intended size and whether it demolds cleanly.
Exothermic cure matters because some materials heat up while curing and can damage wax, foam, plastic, or some bio-based molds.
Moisture matters a lot for plaster, alginate, starch, and gelatin because drying can make molds shrink or degrade.
This is why a recipe that works for a tile might fail for a fine-detail mold, and why a mold that works for silicone might fail with a hot resin. The material, the mold, and the demolding path all have to be designed together.
Practical Fab Lab Materials
Saverio then moved from biomaterials to the materials we usually find in Fab Labs: machinable wax, insulation foam, urethane rubbers and plastics, epoxy, silicone rubber, plaster/Hydro-Stone/dry stone, low-melting alloys, and additives like glass microspheres, carbon powder, and fibers.
Machinable wax gives a clean CNC-machined mold. Foam is cheap and easy to machine for large forms but does not give the same surface finish. Urethane can become rubber, plastic, or foam depending on the product.
Silicone is especially useful for molds because it is inert and usually does not stick to other materials, except other silicone.
Calcium-based materials like plaster, Hydro-Stone, or dry stone are easier and more forgiving than urethane plastics, and can still give strong cast parts.
Low-melting alloys make metal casting possible in a Fab Lab setting without needing aluminum or steel temperatures.
Additives can change properties: glass microspheres reduce density, carbon powder can make a cast conductive, and fibers can reinforce or change flexibility.
Mixing and Pouring Rules
Molding and casting is messy, so close bottles properly, clean containers, and wear clothes that can get dirty.
Most of the materials are two-part systems, and the way we mix matters.
We should stir/shear and scrape the sides of the cup, not scoop from the bottom upward, because scooping pulls air into the material.
When pouring silicone, pour a thin stream into the lowest point of the mold and let the material rise by itself.
Air bubbles were one of the big practical warnings. You can reduce them by mixing slowly, tapping or vibrating the mold, using a vacuum chamber to remove bubbles, or using pressure to compress bubbles while curing.
Saverio also warned about mixing too much material at once: exothermic materials can heat up, cure too fast, and become unusable in minutes if the batch is too large or the ratio is wrong.
Safety, Shelf Life, and Release
Saverio told the story of a student who ignored warnings, breathed material repeatedly, and developed a life-changing allergy.
The main lesson is simple: read the SDS before using the material, use ventilation, gloves, eye protection, and appropriate masks, and understand disposal.
Shelf life also matters.
A bottle can say it has a one-year shelf life, but once it has been opened it may absorb humidity or be sealed badly.
Saverio’s advice was to test a small amount before trusting an opened material on the real mold.
Release behavior also has to be planned. Sometimes the right material pairing is enough, but sometimes you need a release agent such as a commercial spray, Vaseline, or dish soap.
Food-safe casting has an extra condition: the material alone is not enough. The tools, workspace, and whole process also need to be food-safe, otherwise the cast can still be contaminated.
Making the Mold: Milling or Printing
Adrian covered how to actually produce the mold. The assignment now allows both milling and 3D printing, but Neil stressed that the finished mold must have a smooth surface that does not show the production process.
If it is milled, visible toolpaths are a problem. If it is FDM printed, visible lines are a problem, so the print needs post-processing or a finer process. However, from my experience, the printers are now much better, which helps you overcome it.
We were also warned that some silicones can react badly with some SLA resins, so a small compatibility test should happen before committing to a full mold.
For milling, the basic process is a roughing pass followed by a finishing pass.
A flat end mill is good for clearing material quickly during roughing, while a ball end or bull nose end mill is better for smoothing curved surfaces during finishing.
The stepover controls surface quality: smaller stepover gives better resolution but takes longer.
The other important CAM lesson was collision.
It is not enough to think only about the cutting tip. The collet and spindle are wider than the end mill and can hit the mold walls if the cavity is deep and vertical.
The design should account for tool diameter, tool length, collet clearance, chamfers or draft angles, and sometimes a longer or tapered tool.
He also reminded us to recover machinable wax chips because they can be melted down and reused, we did that a couple of times.
Creating Some Cool Molds and Casts!
This week, I wanted to both focus on progress with my final project while also exploring this interesting area of fabricating things.
I used tin to create a wax stamp, used machinable wax + silicon mold + plastic cast & low-melting point metal for a two-part mold fridge magnet, and experimented with eggshell biocomposite for a chopstick holder mold (mold was made by previous students at the lab).
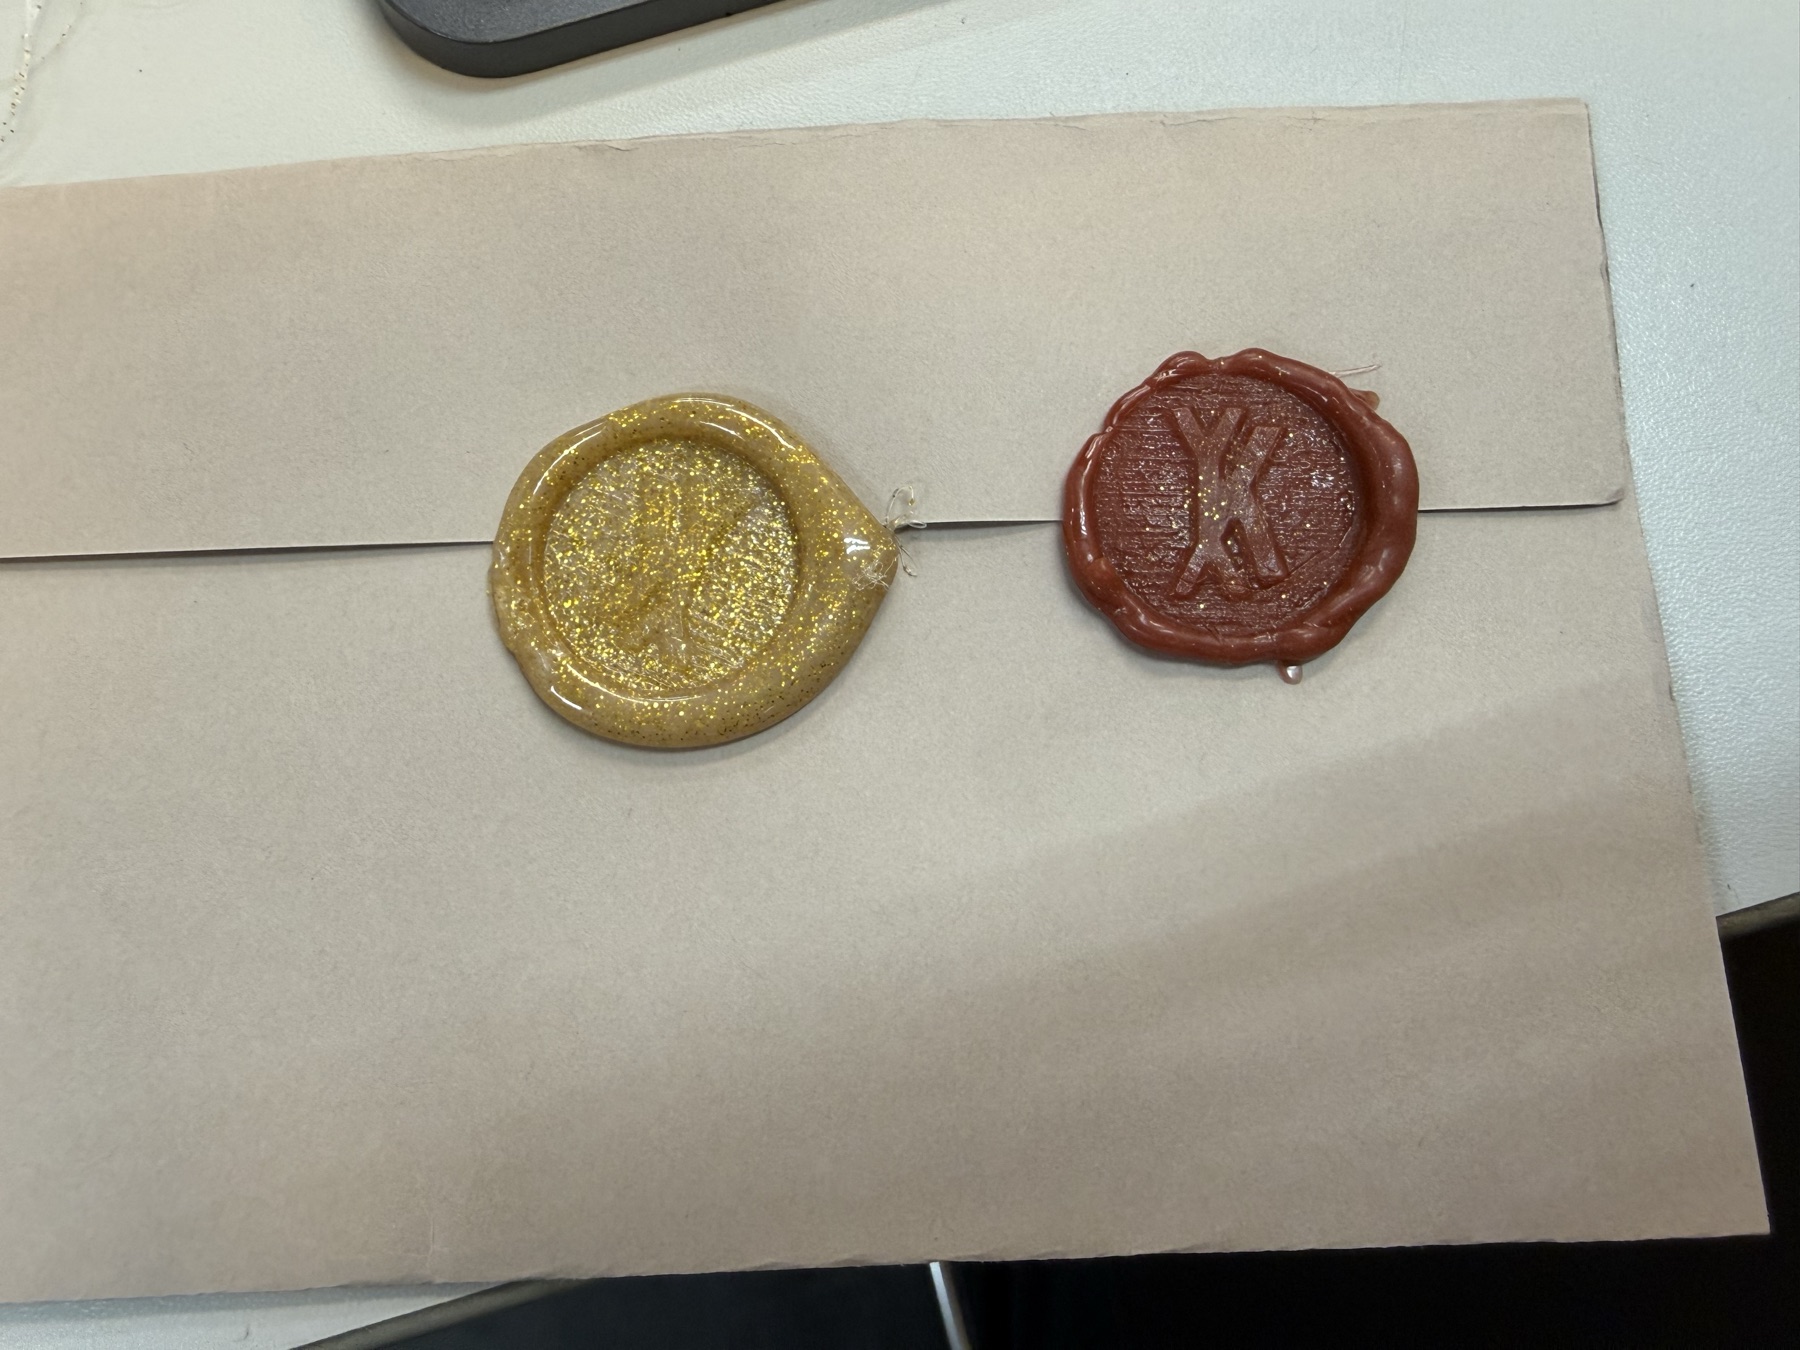
Using Tin to Create a Wax Stamp
At the start of our local session, Yuichi showed us a wax stamp that was made in the previous year, and honestly, I thought it was cool and wanted to make one myself with my own design.
The first was to create a design, and of course, if I wanted to wax stamp something, it SHOULD be my logo, so first step was to have a ready SVG file of my logo.

I had the original design on phone as a jpg since I apparently designed it originally as a raster file on Photoshop, but it was a hassle to obtain that original design file and change it to SVG.

Soooo, I just made it black and white (to make it easier to clearly define the shape) and fed it into Adobe Express’ raster to SVG tool (another option that I found in a later week was Recraft AI). I just opened the SVG in Inkscape and cleaned it up.

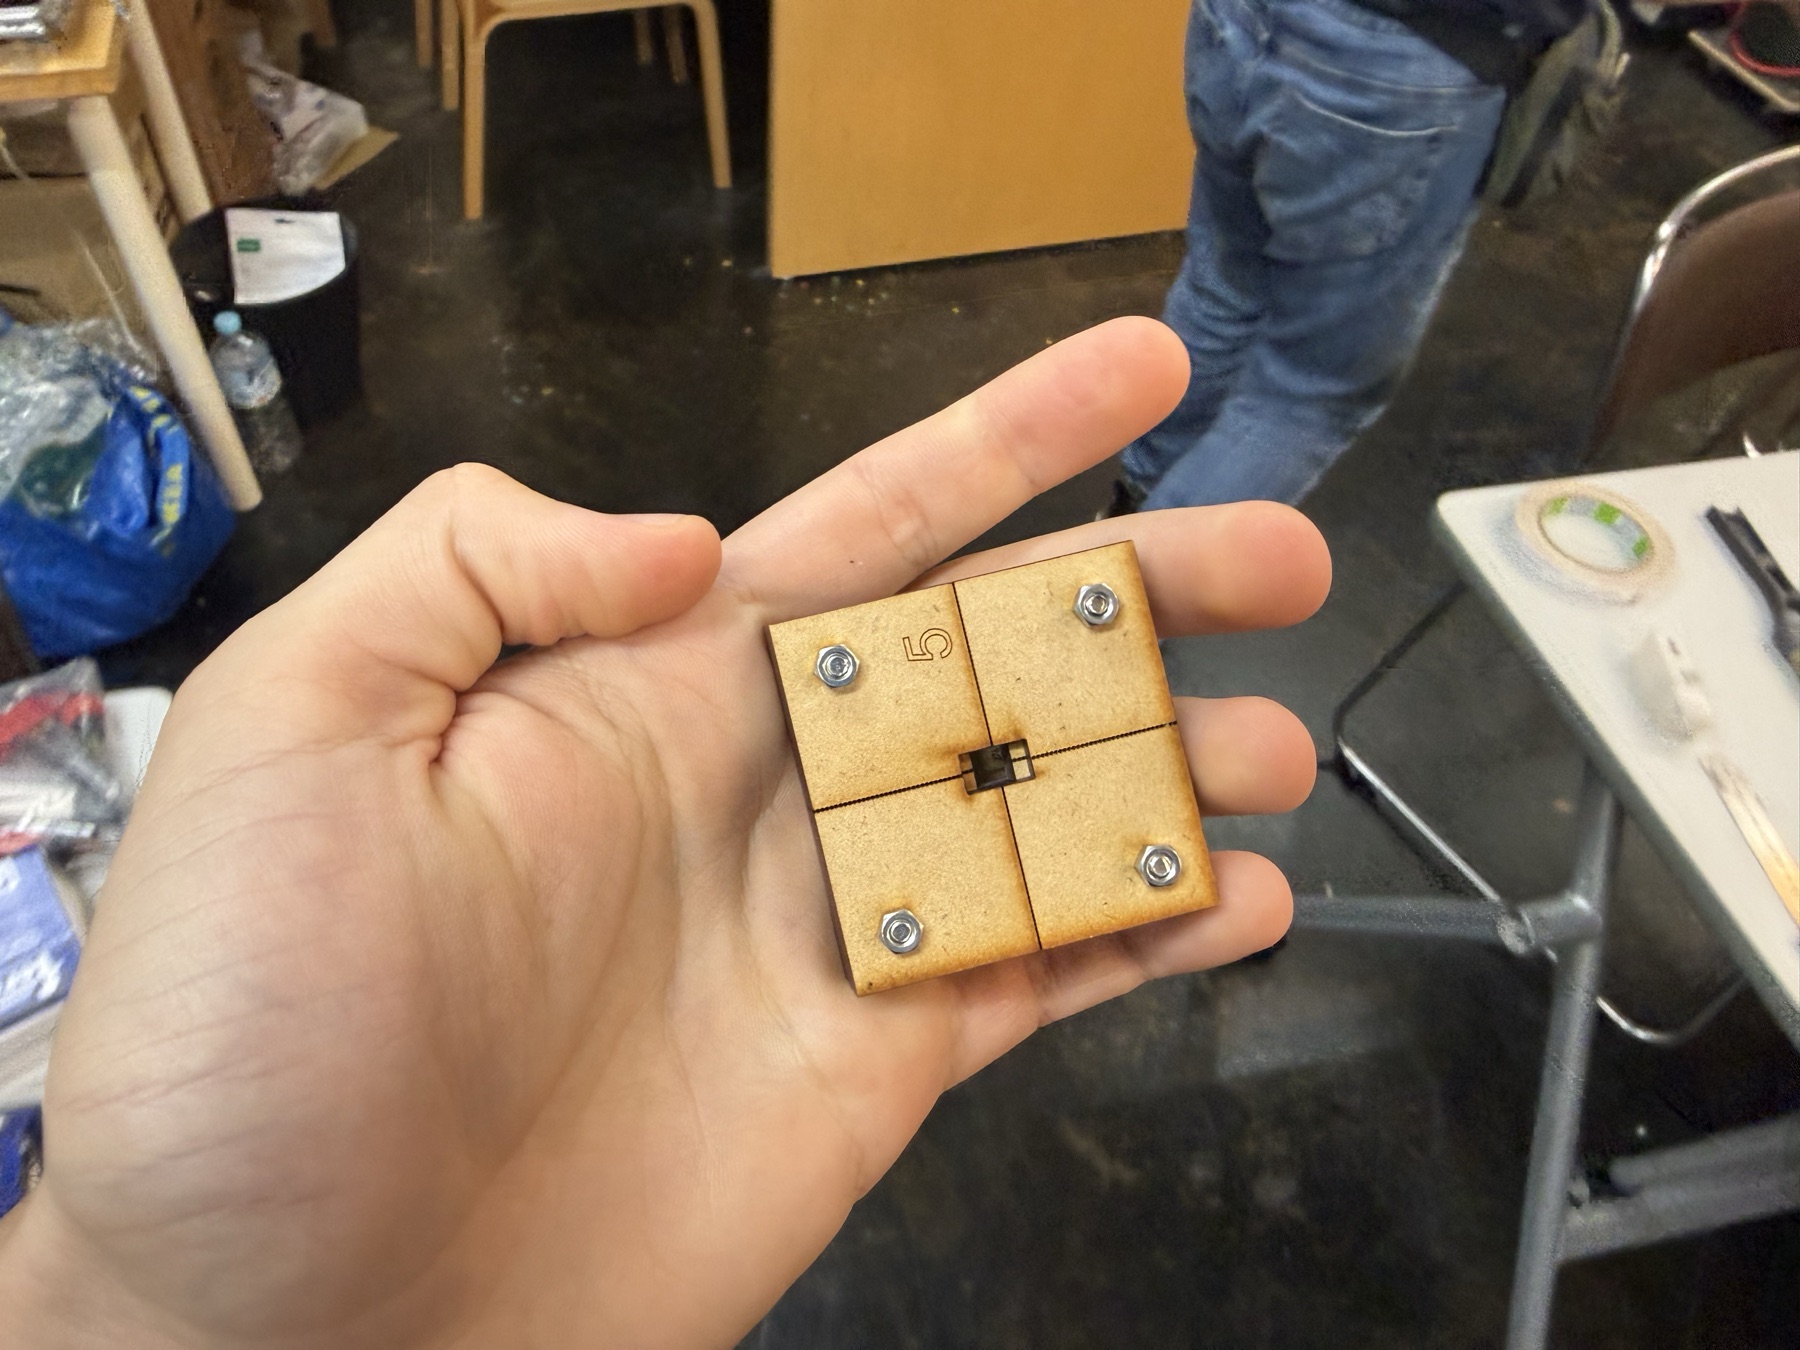
The next step was to create the mold itself. Yuichi had a design for a 5 piece mold (including the piece that has the design) with places designed for screws to be placed to hold everything together.
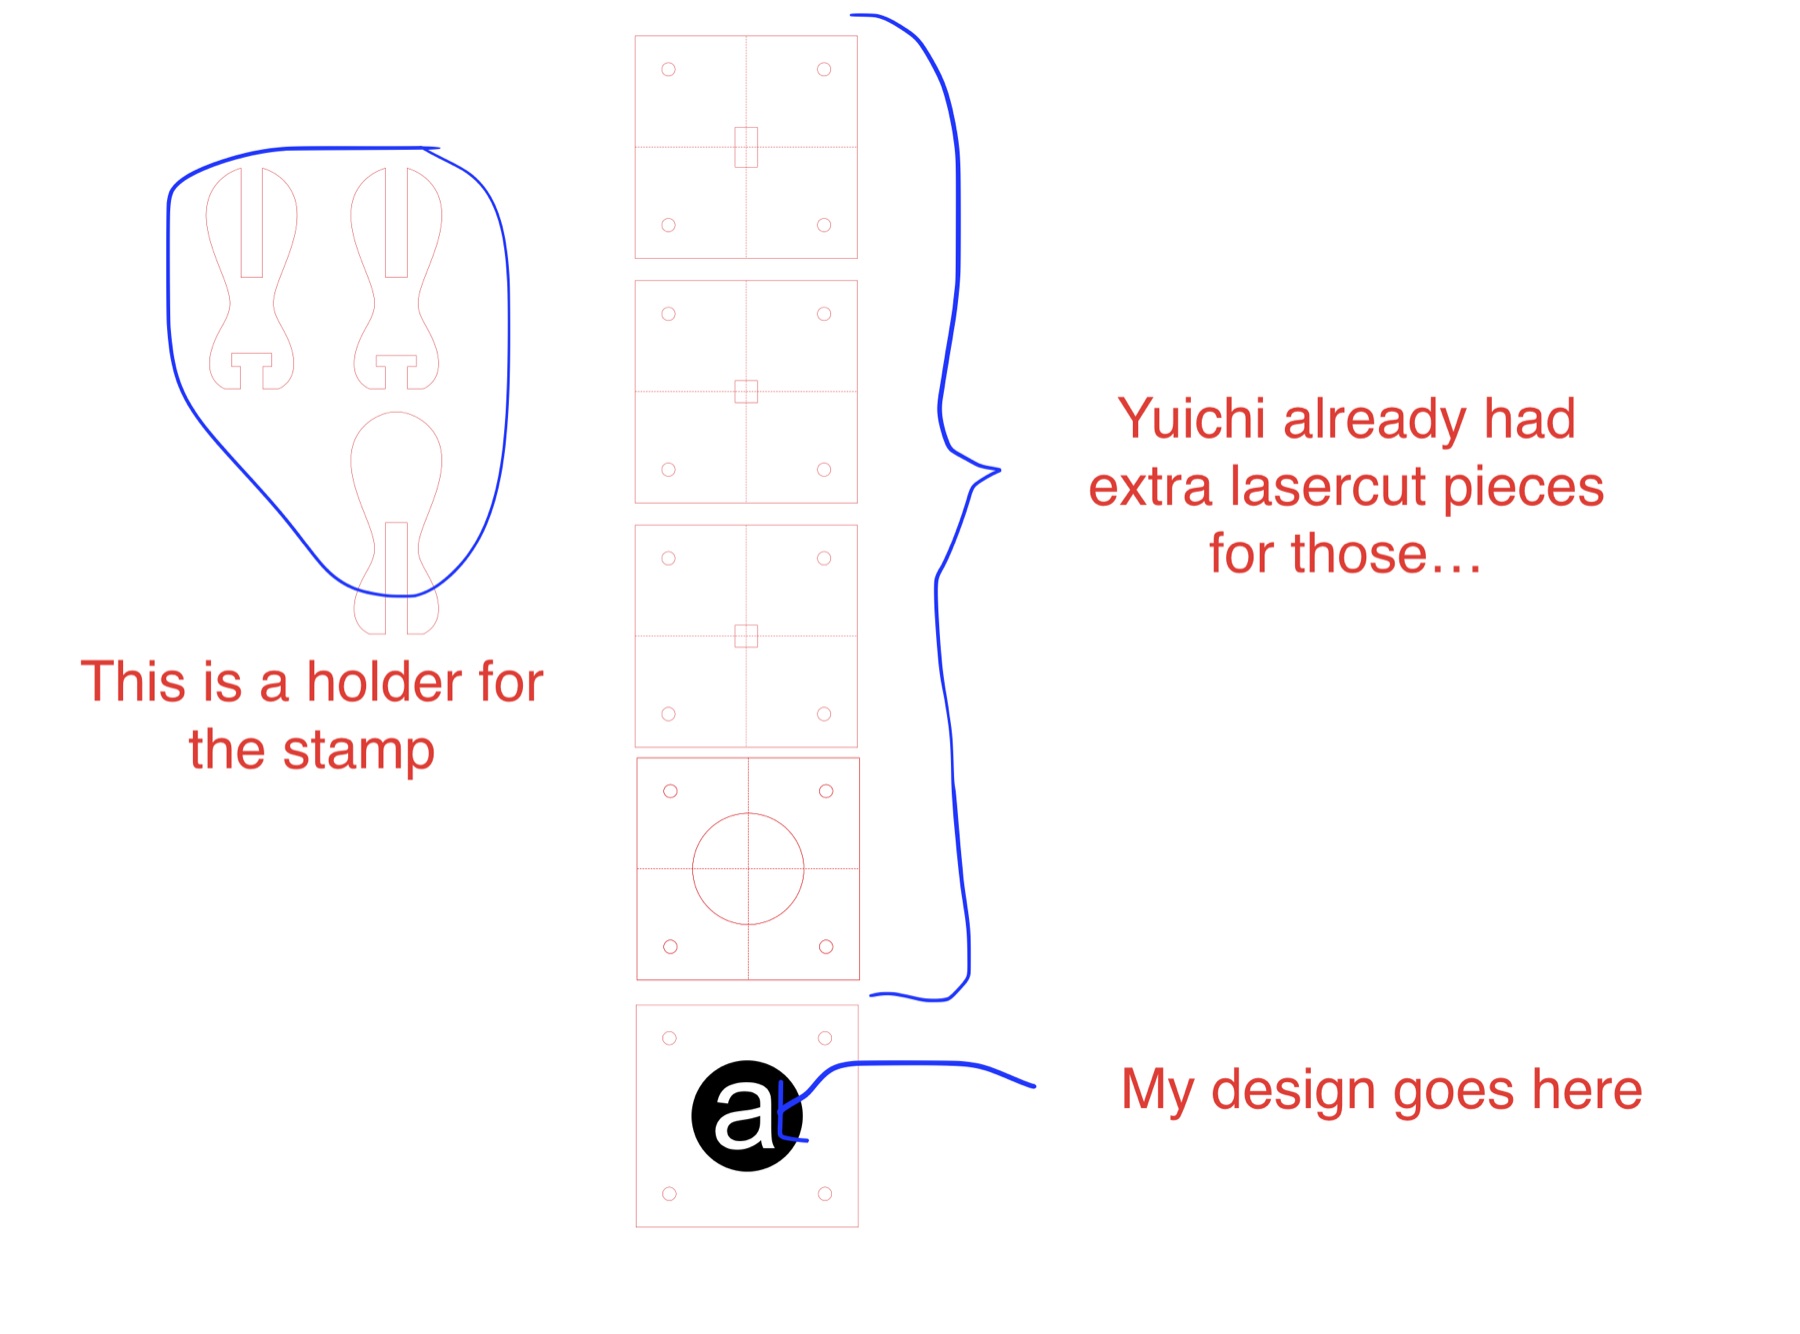
I put my logo design in its spot and I prepare it for laser cutting by definign the black area for engraving and the red, hairline stroke for cutting.
I wanted to make the YYK logo be the lowest part on the final wax stamp.
We lasercut the pieces!
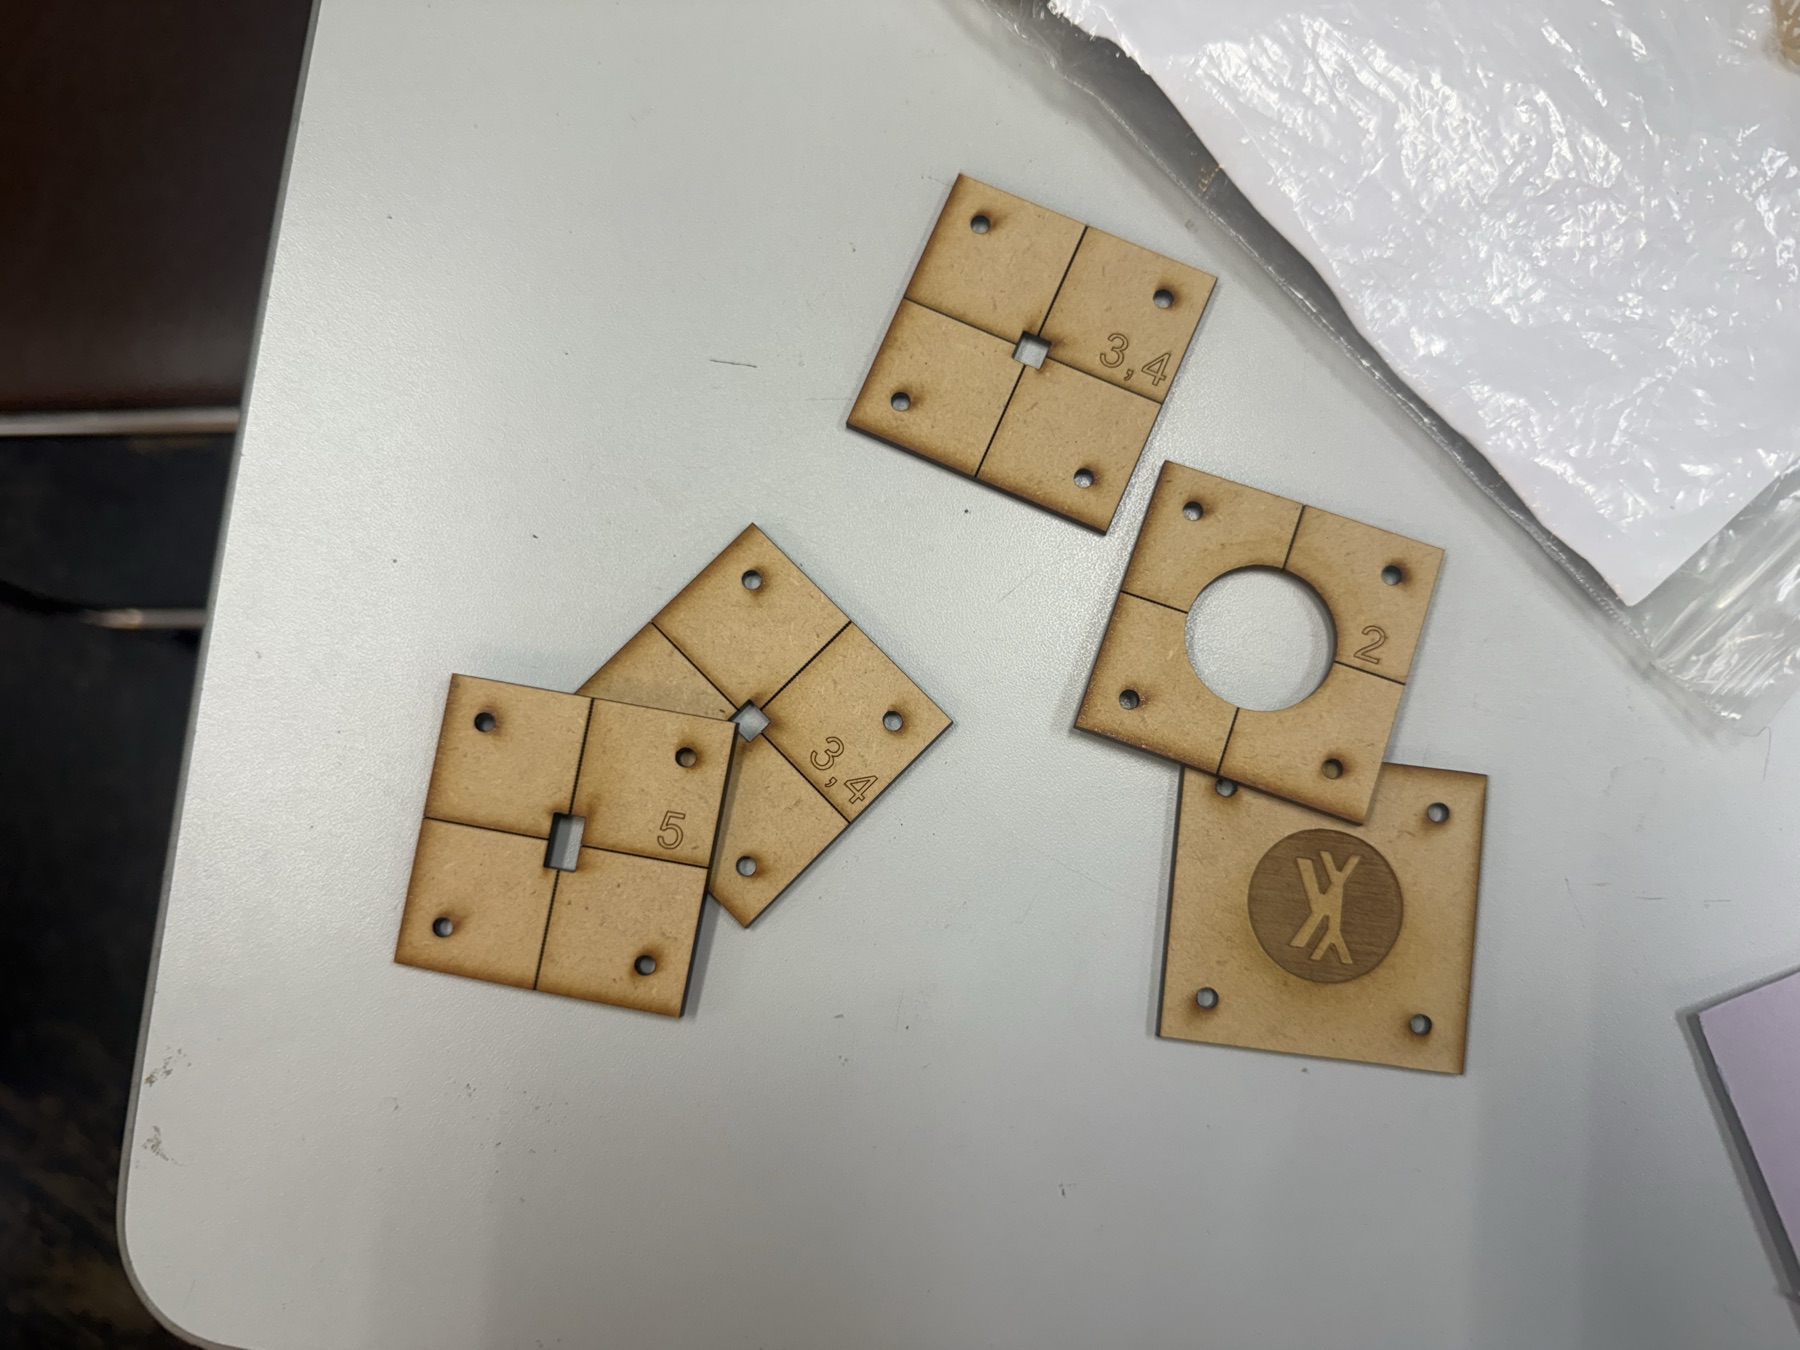
Then, we hold them together using some screws and nuts.
Then, we measured the amount of tin we needed for this, we just kinda eye-balled it tbh.
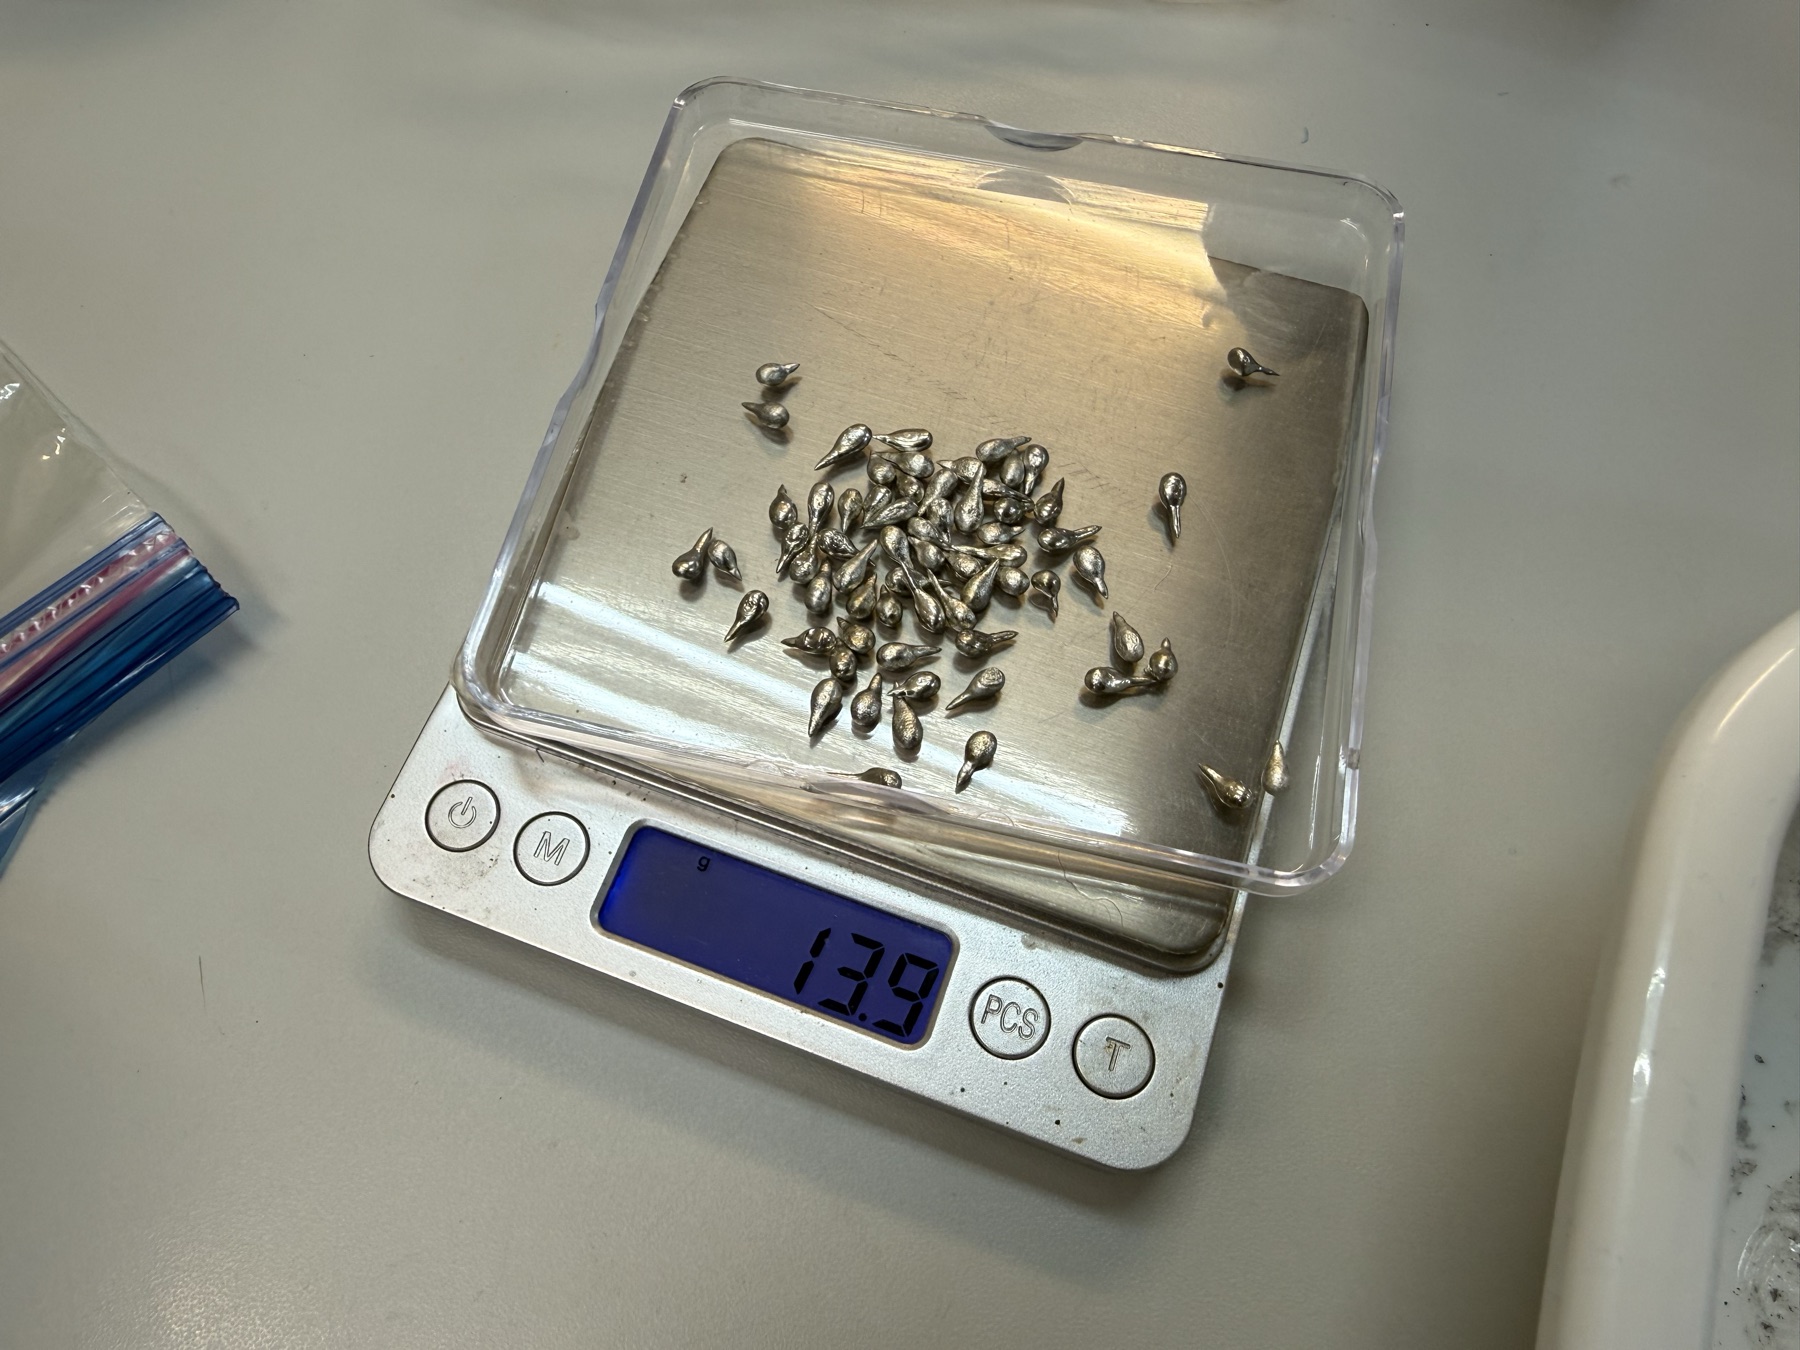
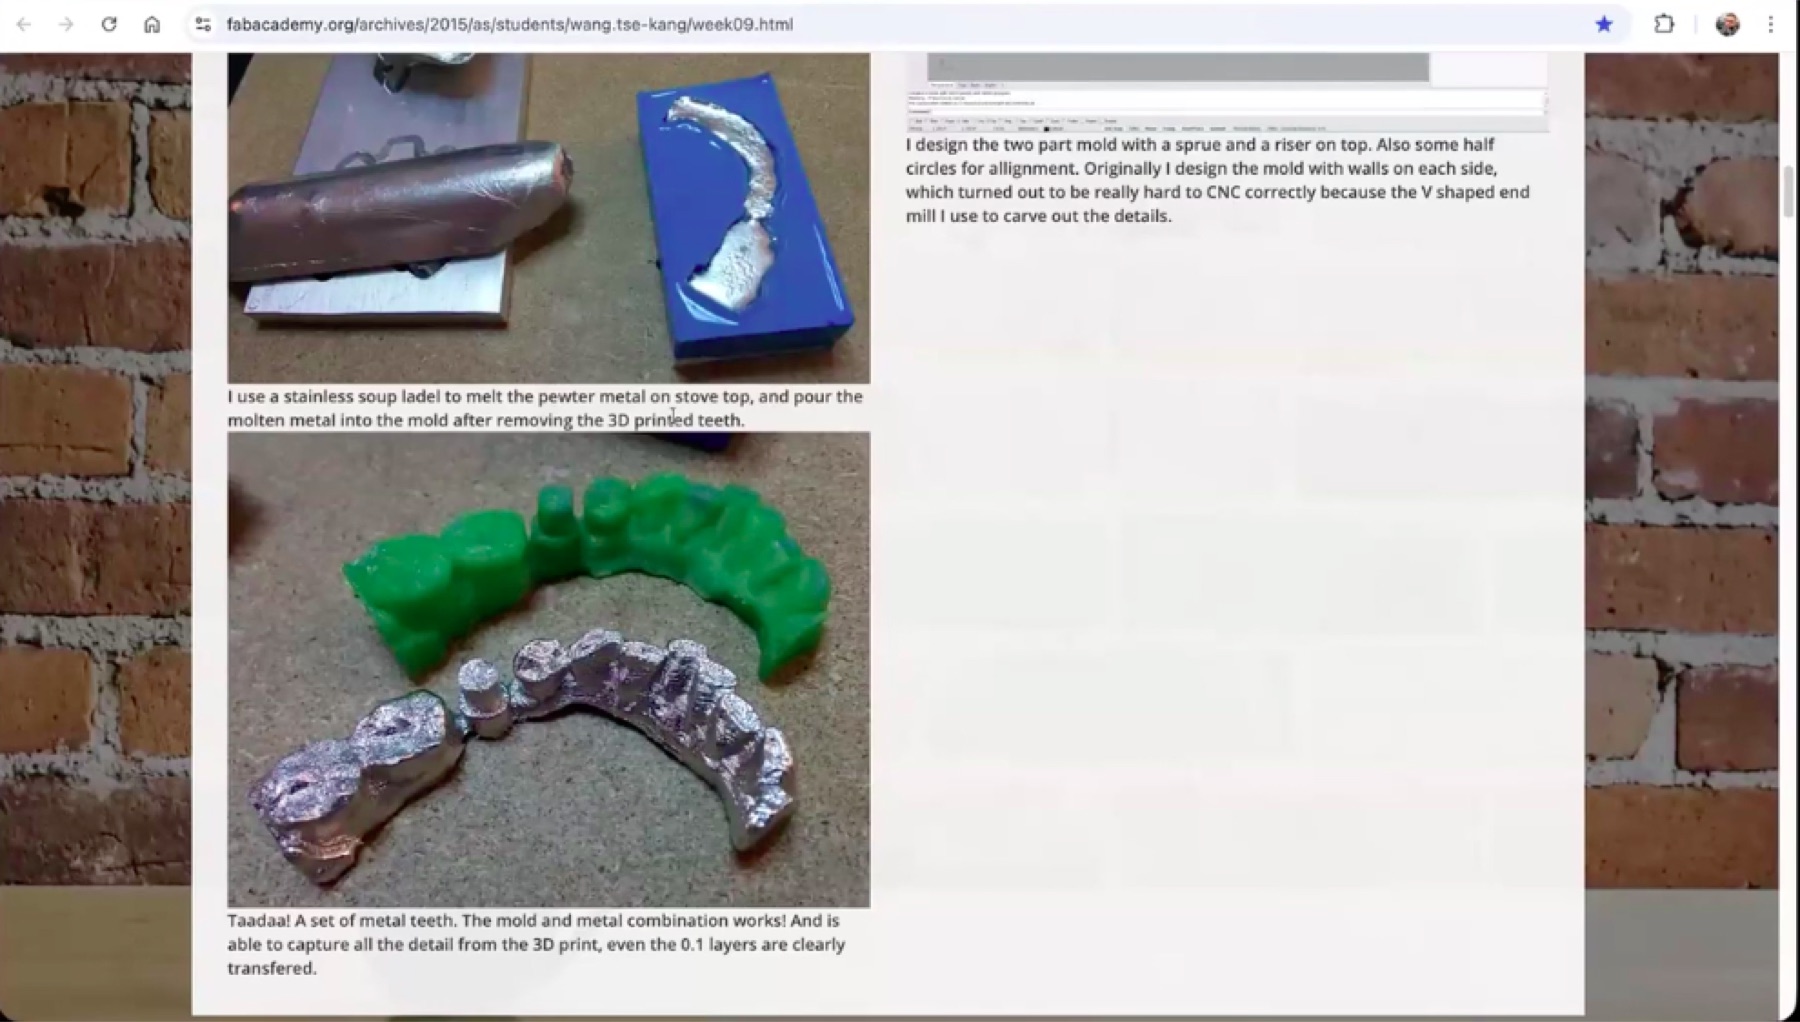
Then, we heated it up to at least 232 C, and poured it inside our mold, and the mold piece break off easily as it was design that way because otherwise it would be impossible to get it off as the ton will be holding it together.
The key is in the lines that cut through each of the mold’s pieces that make it easier to break them.
The part needed some sanding….
Here’s how it looked after a bit of an annoying sanding process, it needed a lot of patience to avoid scratching it xD.
We already had extra stamp holders from clear acrylic, so I just used them.
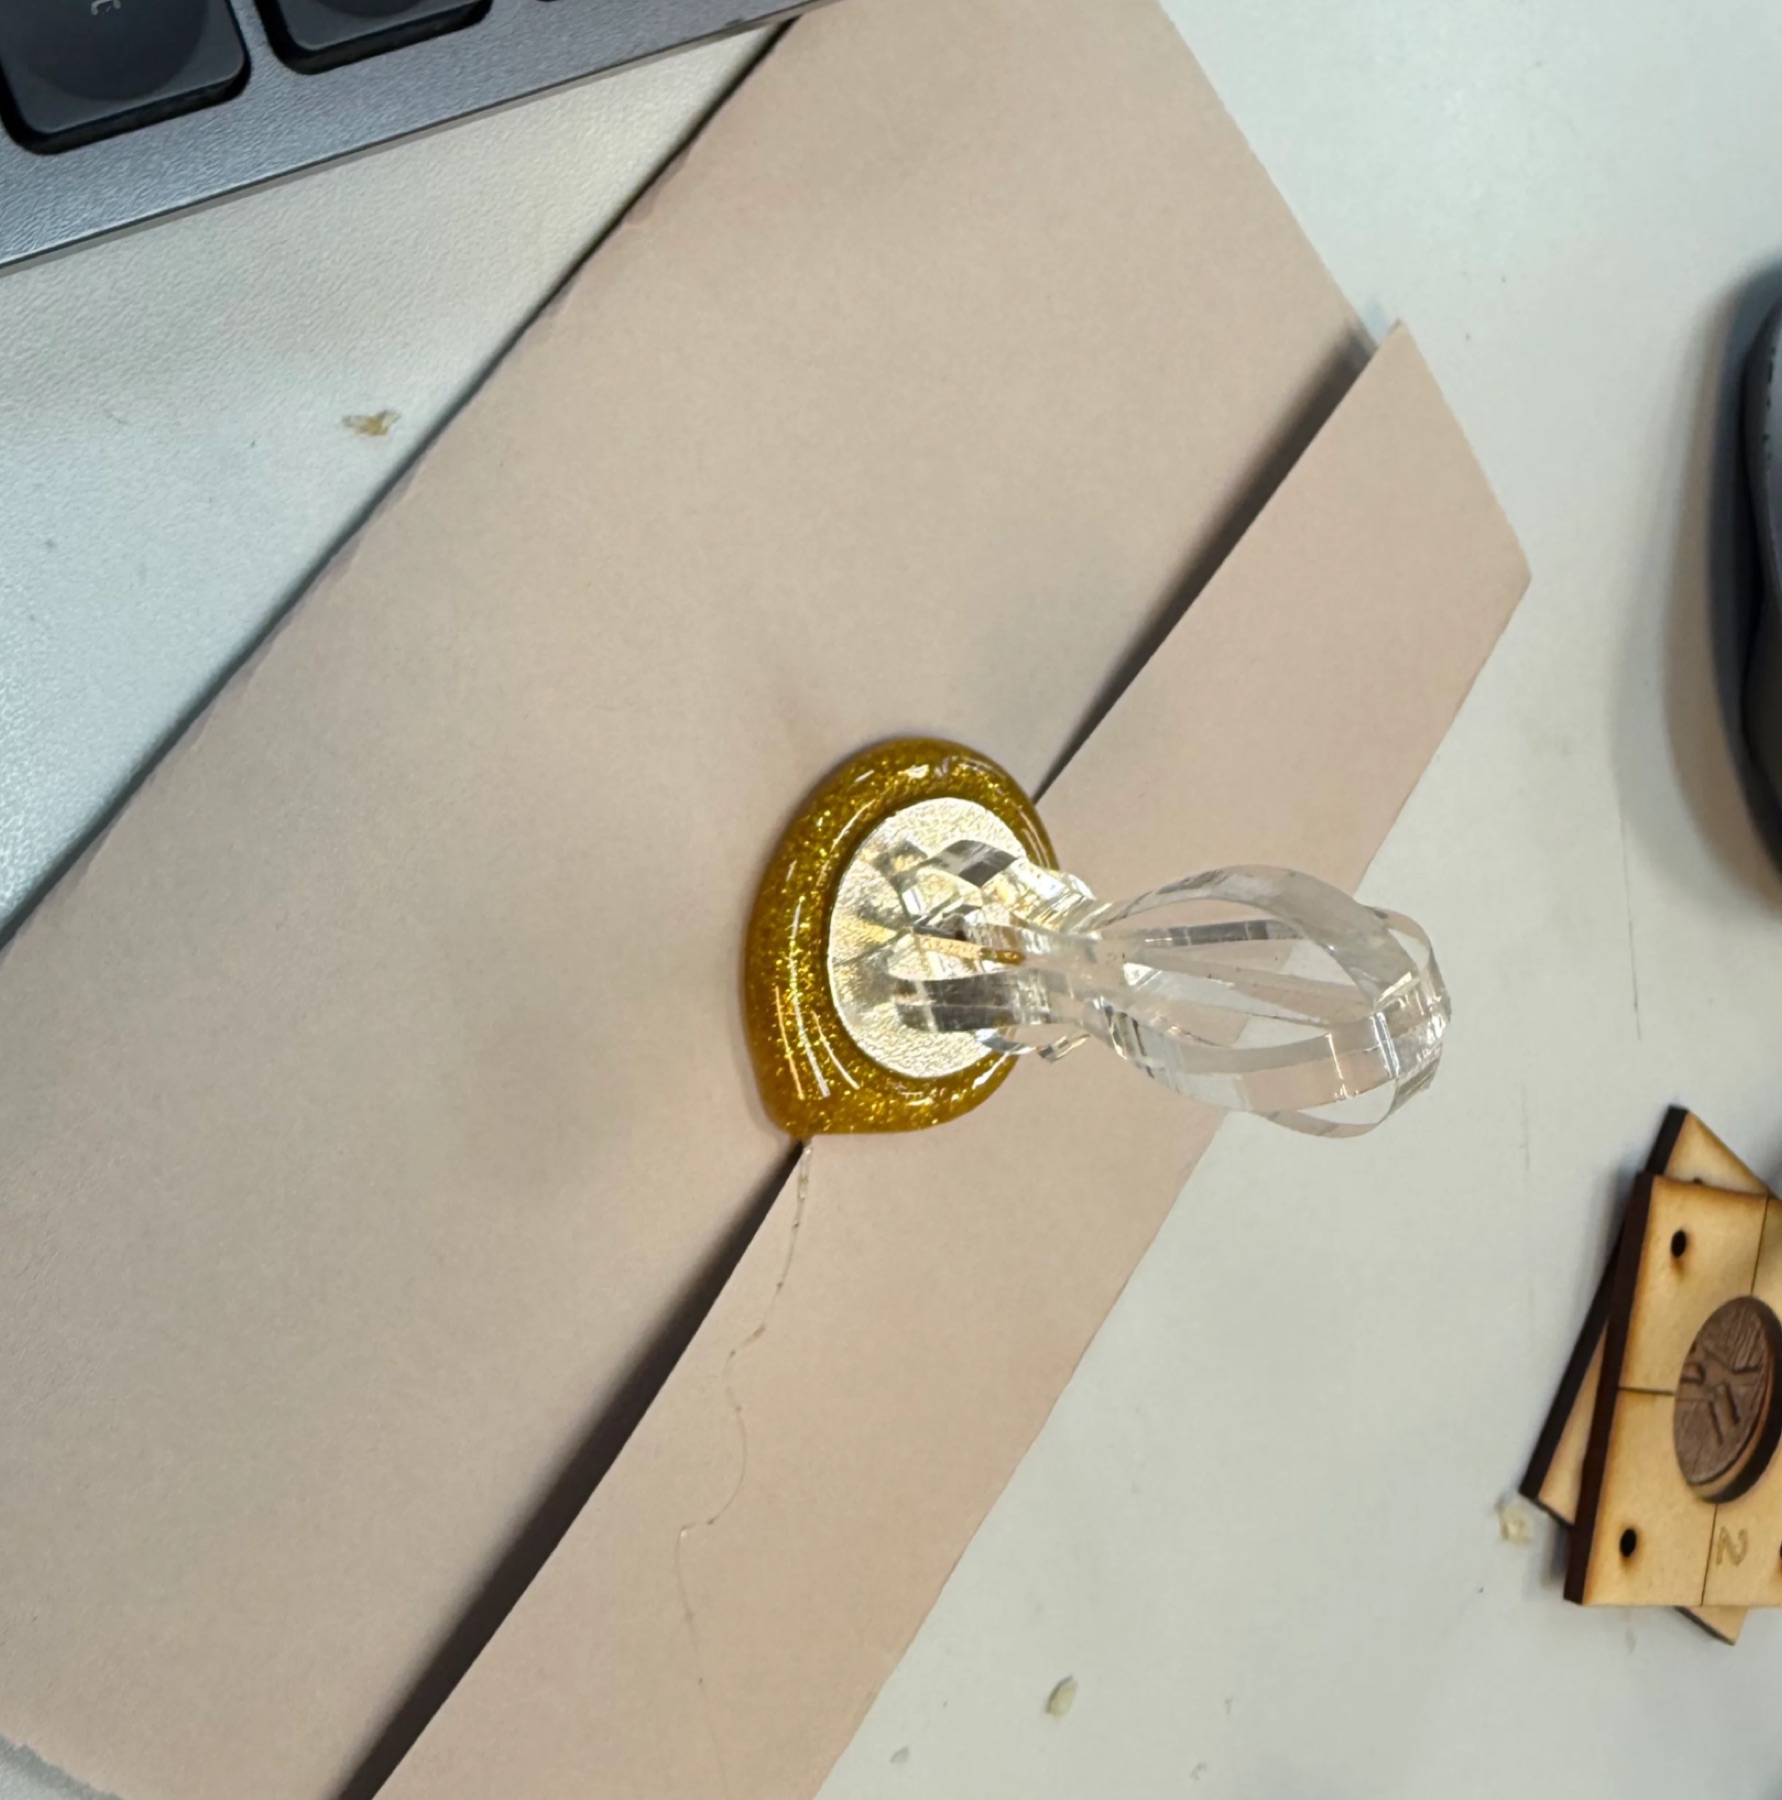
Here’s how the stamps look like. Yuichi didn’t have wax but hot glue also does the trick, but it worked with the darker maroon color better than the glittery gold.
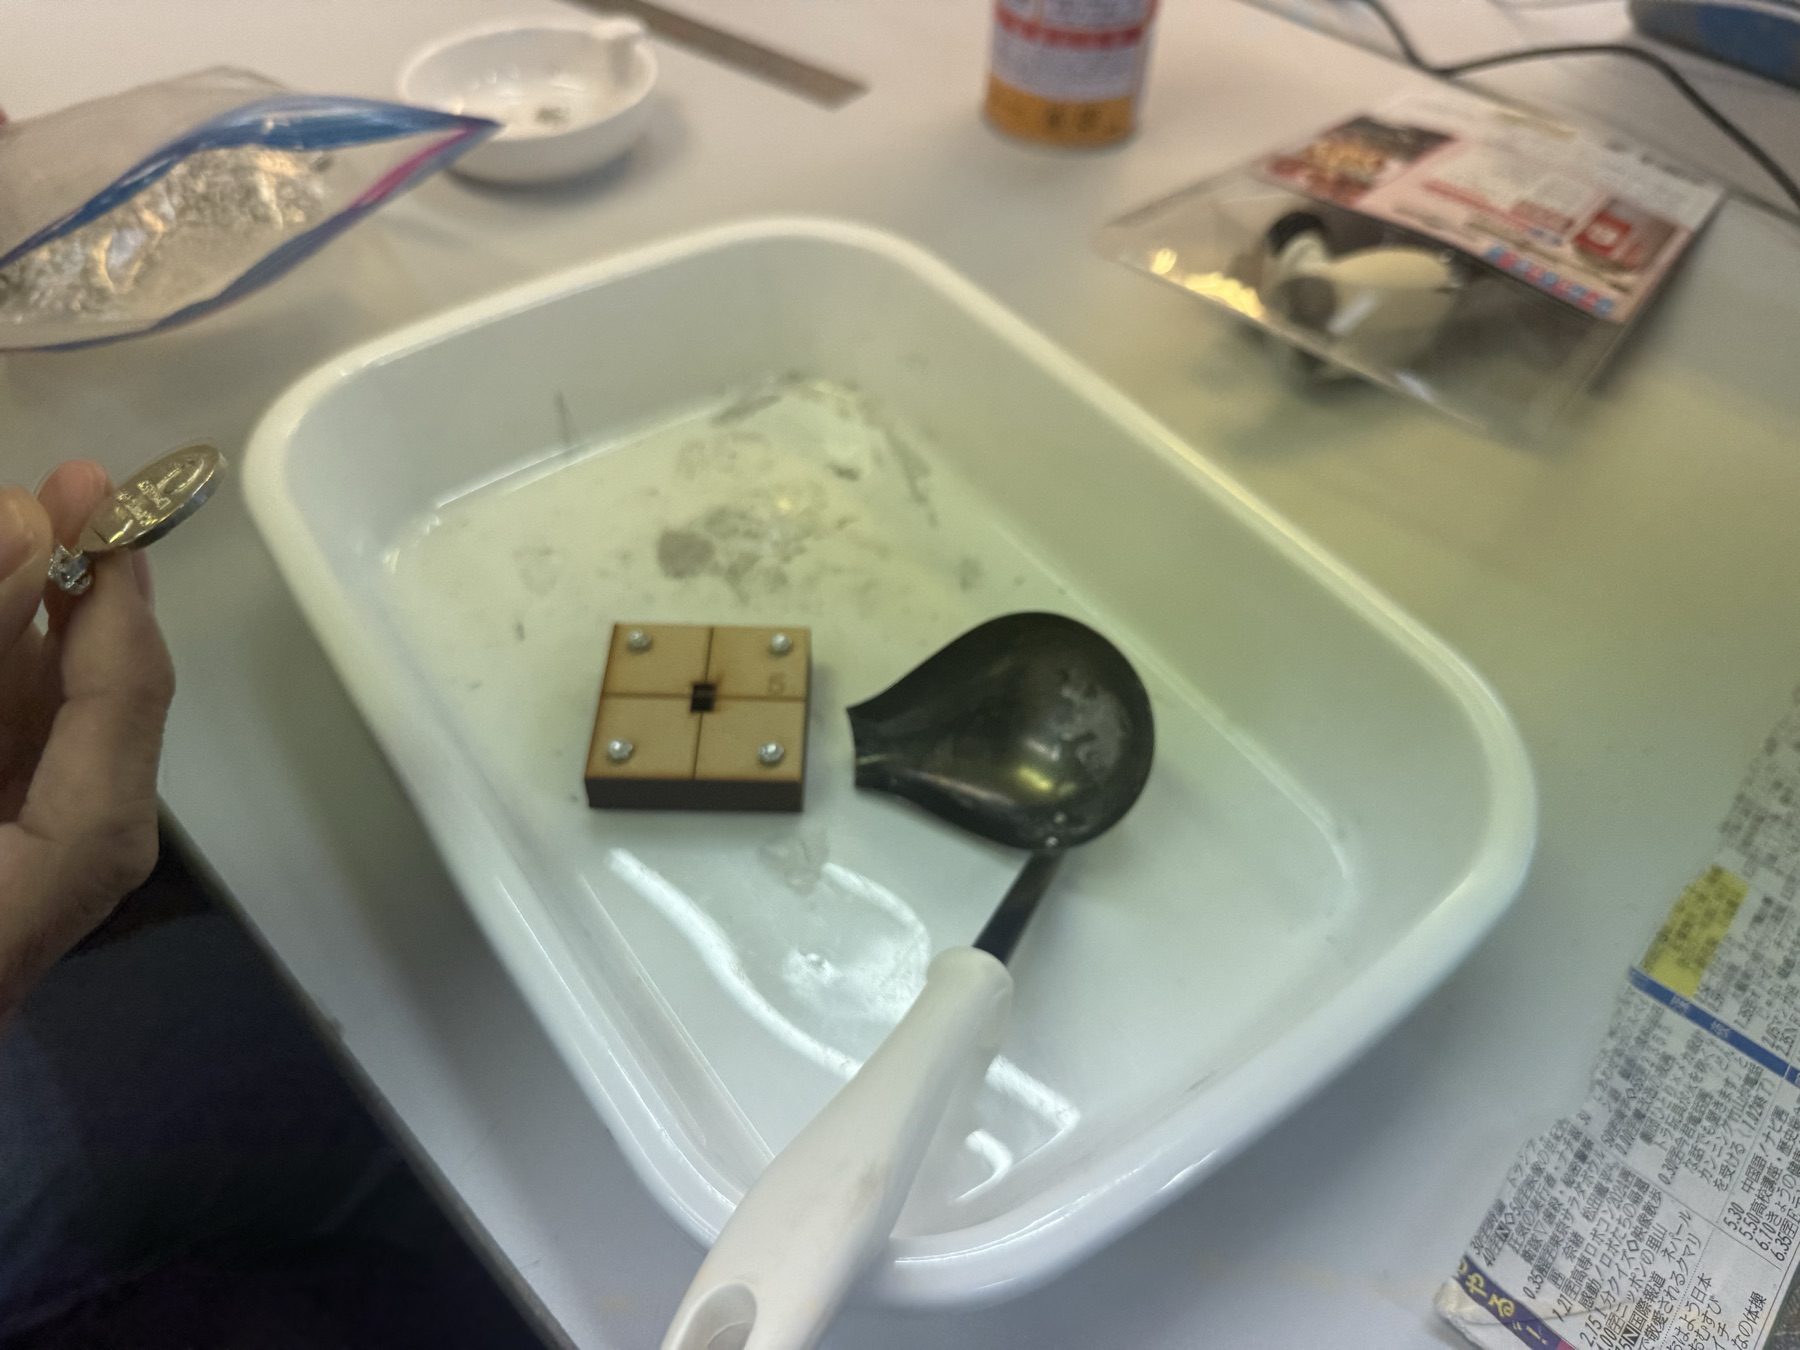
Creating a Two-Part Mold Fridge Magnet
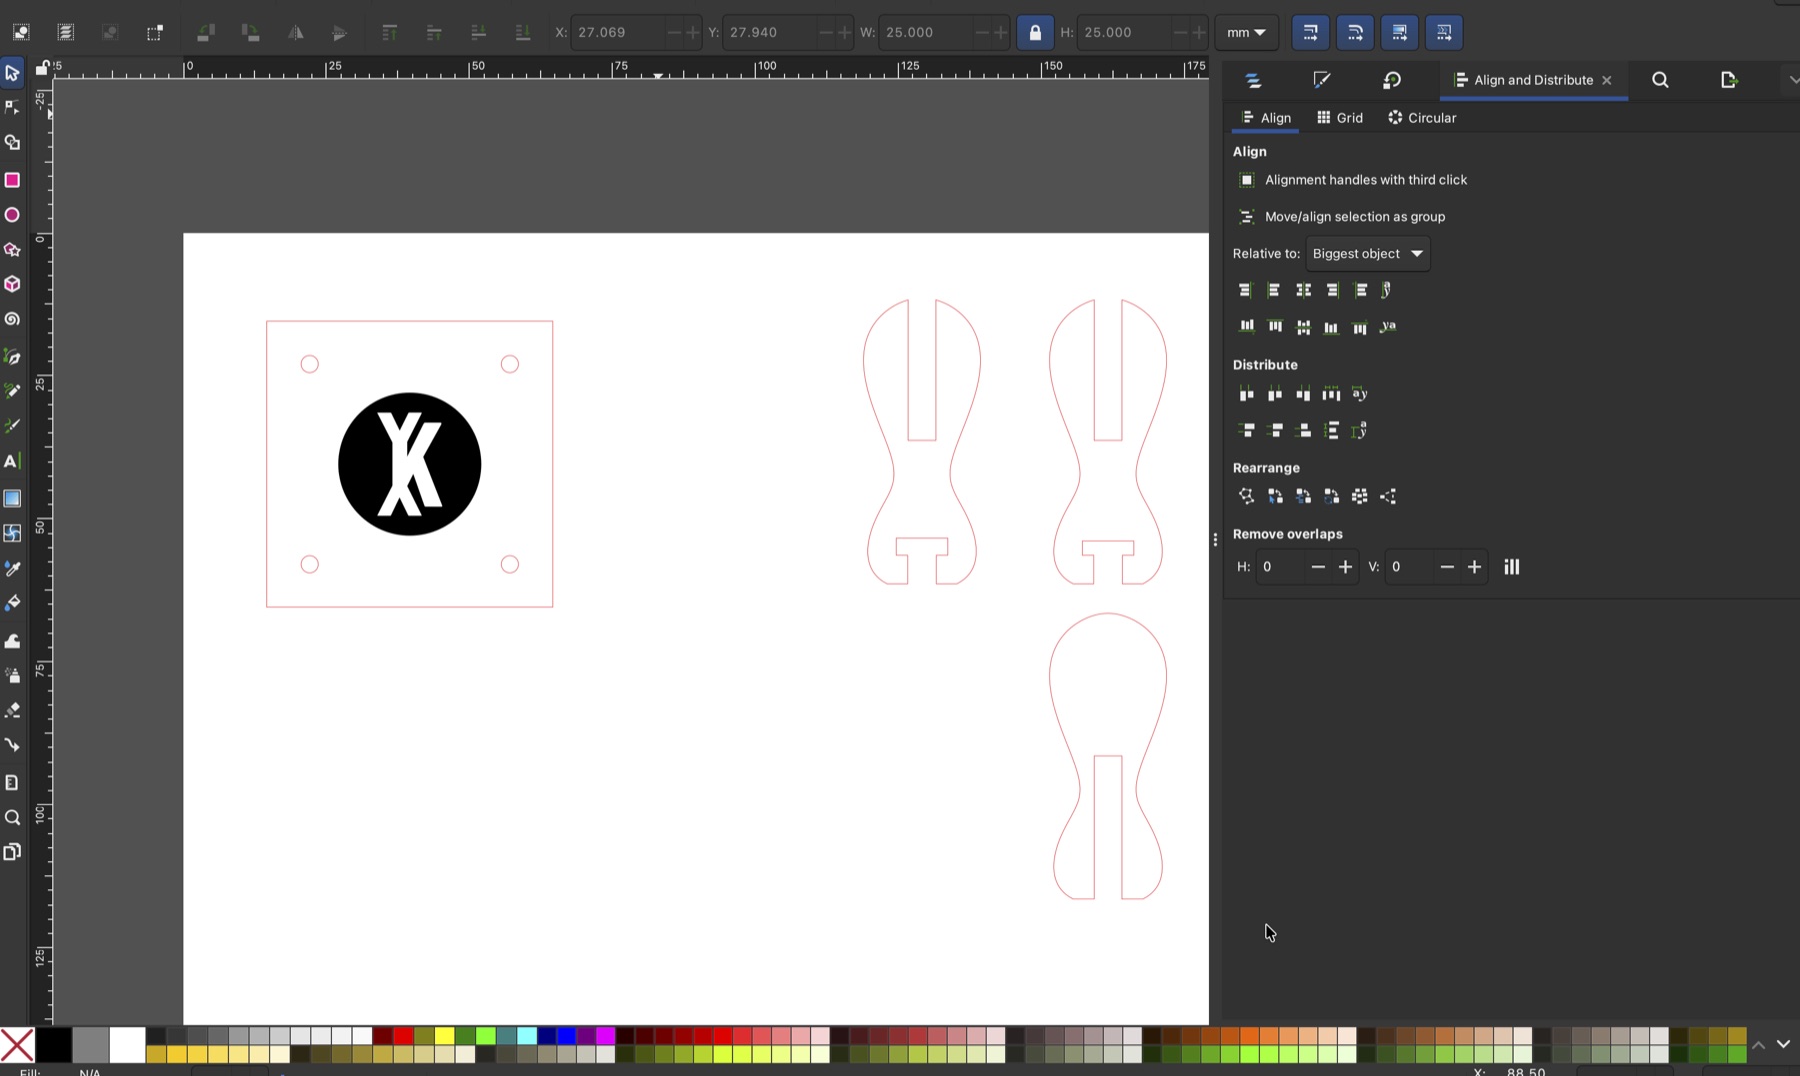
The initial idea for this was to create a two-part mold fridge magnet that has Syria’s map and emblem. First, I needed a quick walkthrough by Yuichi on the fundamentals on how to design a two-part mold to ensure that the materials flows through properly.
The main idea is that you should have the 2 holes at the same level: 1) for pouring in your material and 2) to let the air out, ensuring that the holes are wide enough so the material doesn’t get clogged and it fills up before the hole gets full.
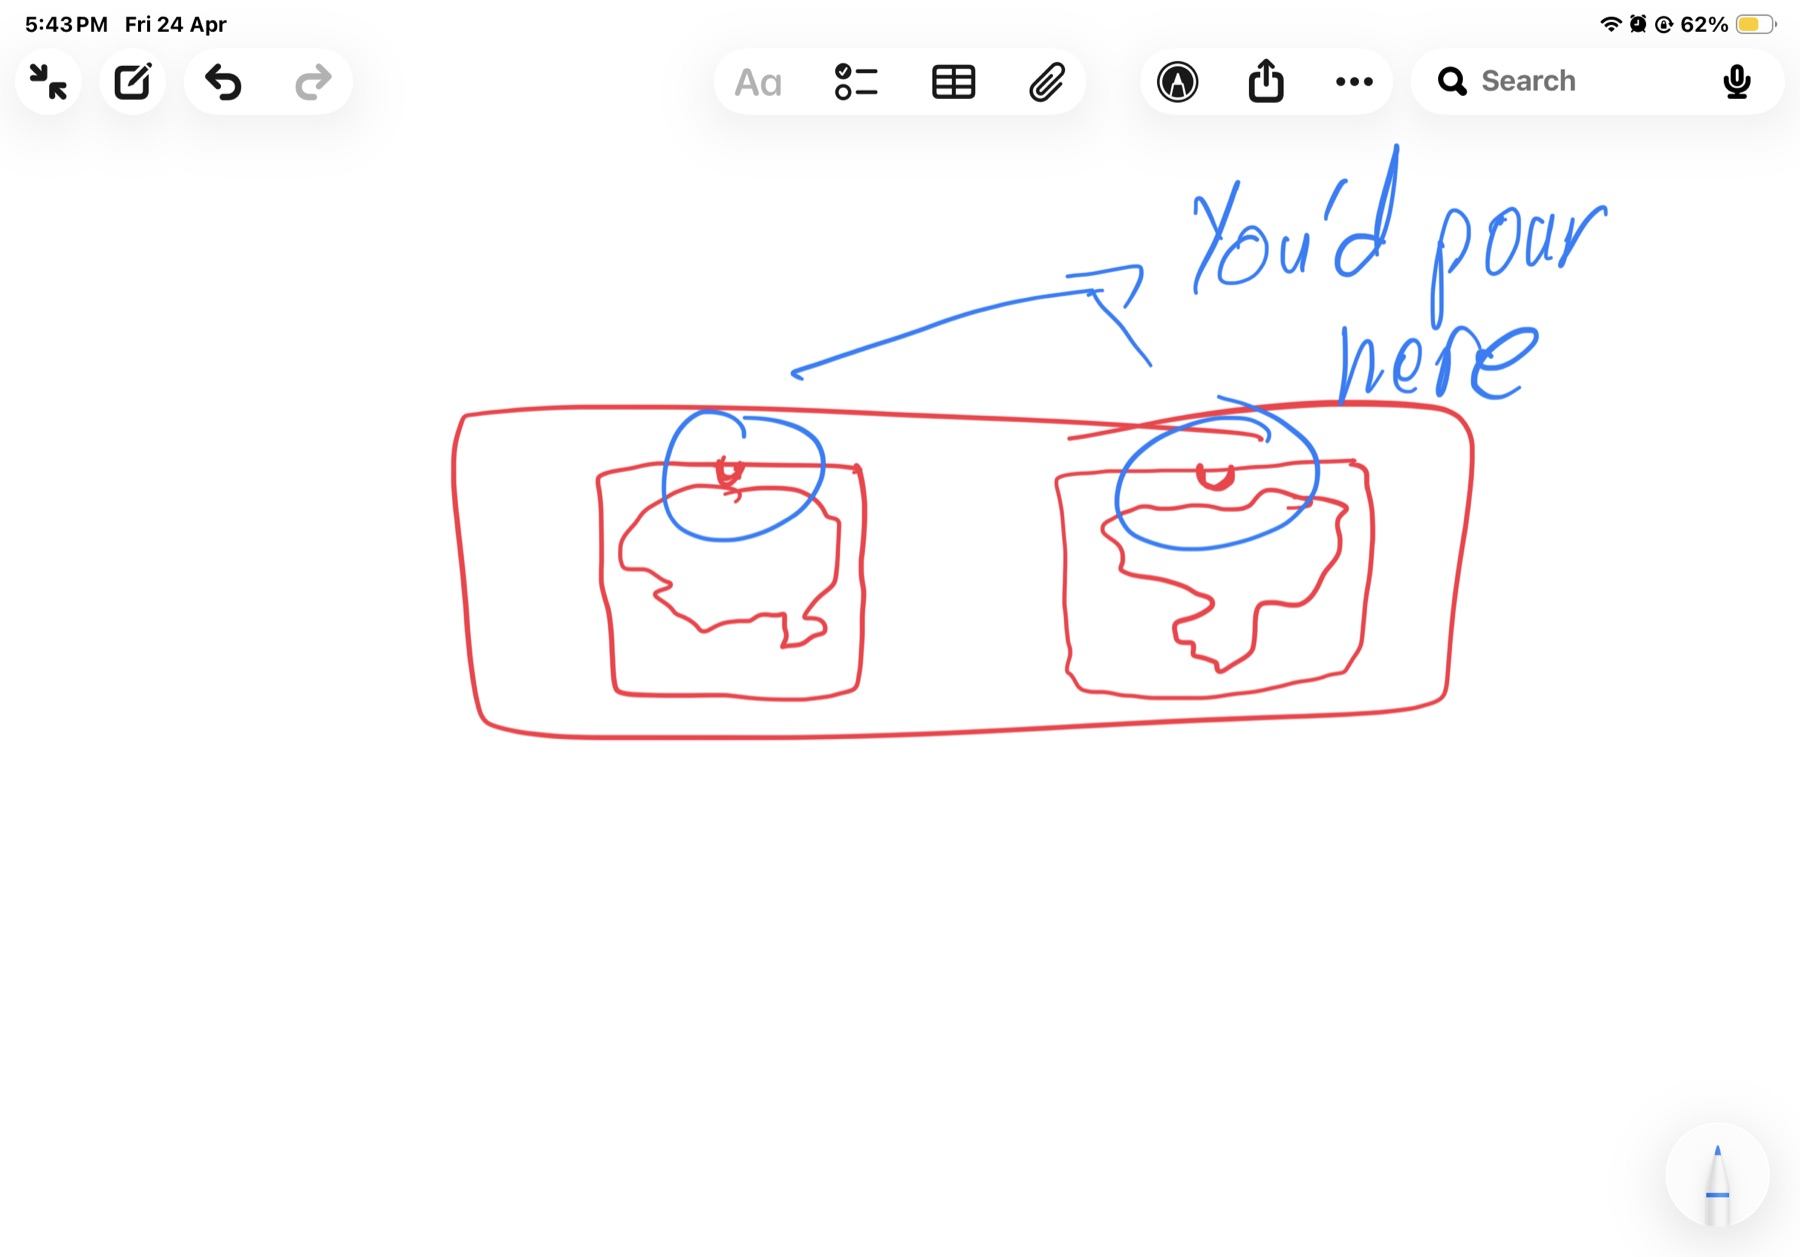
Sketch while we were thinking about the design.
I was thinking of getting a detailed model of the Syrian emblem, but all of the models I got weren’t getting properly process by Fusion on my computer since they were all meshes with a TON of polygons.
I tried stitching the different surfaces
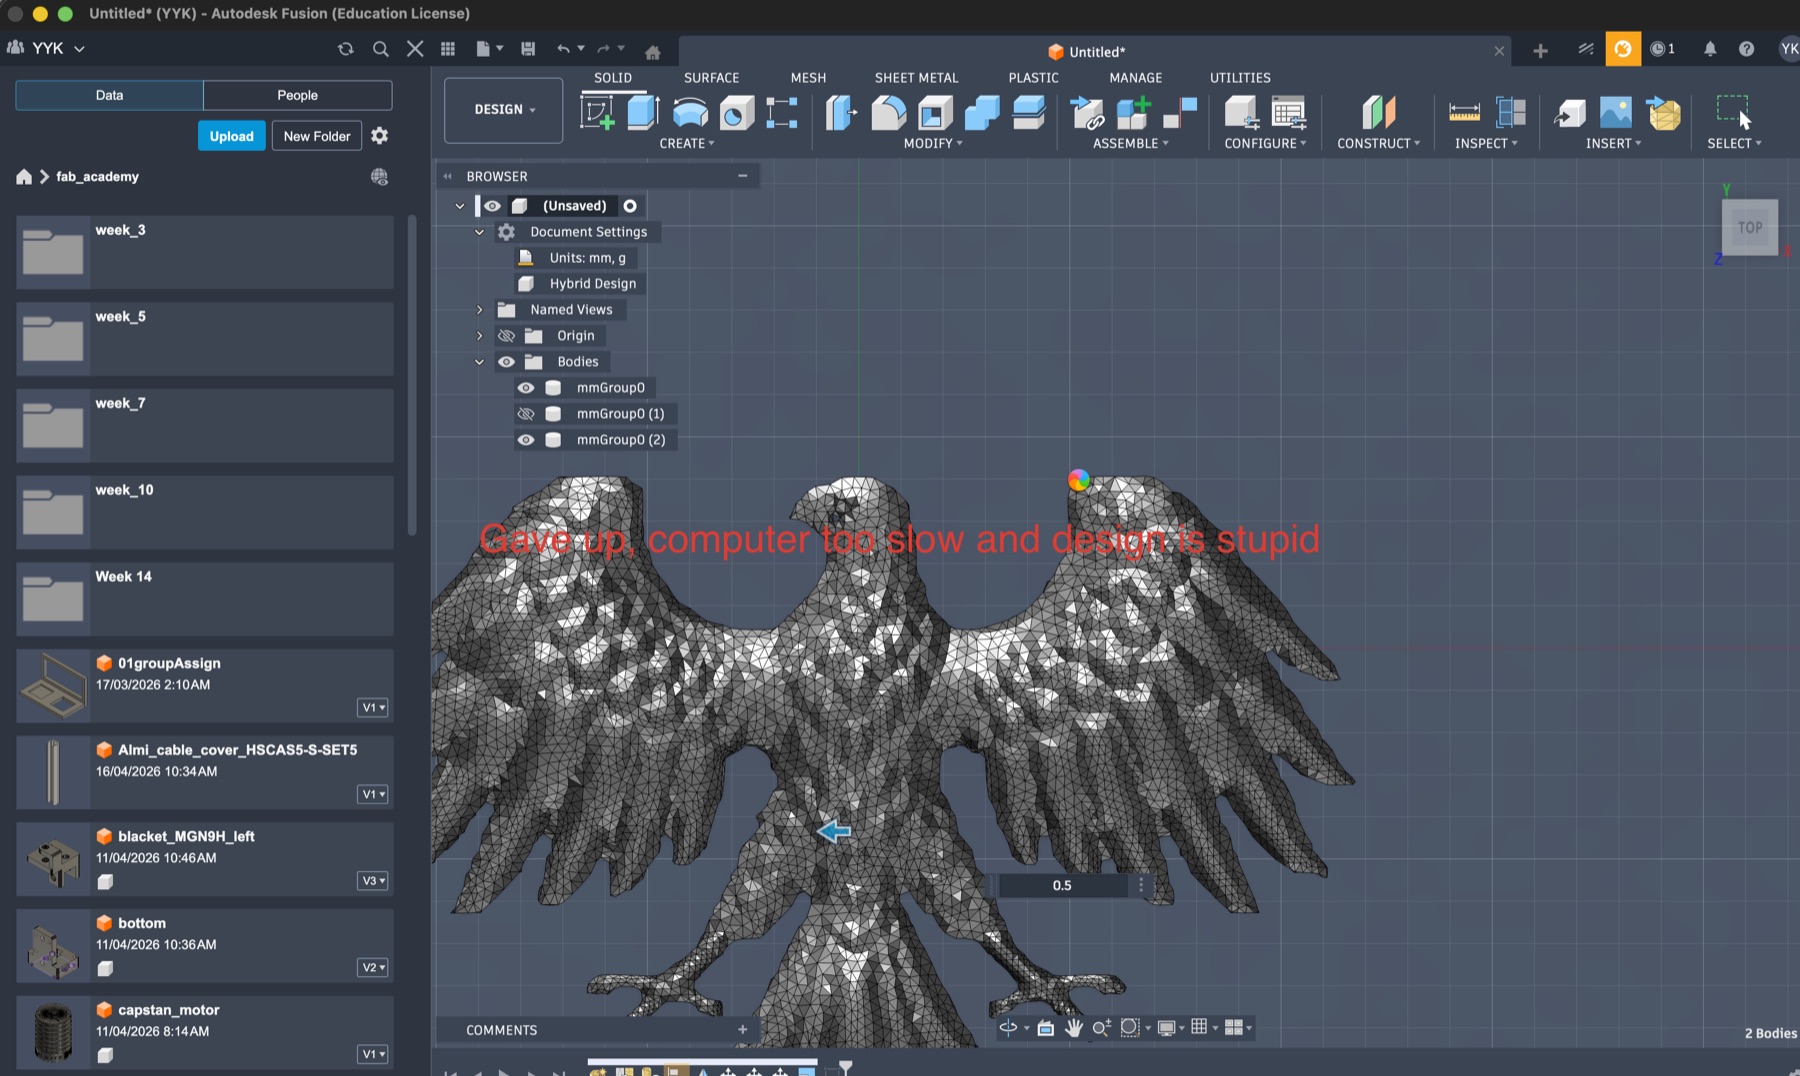
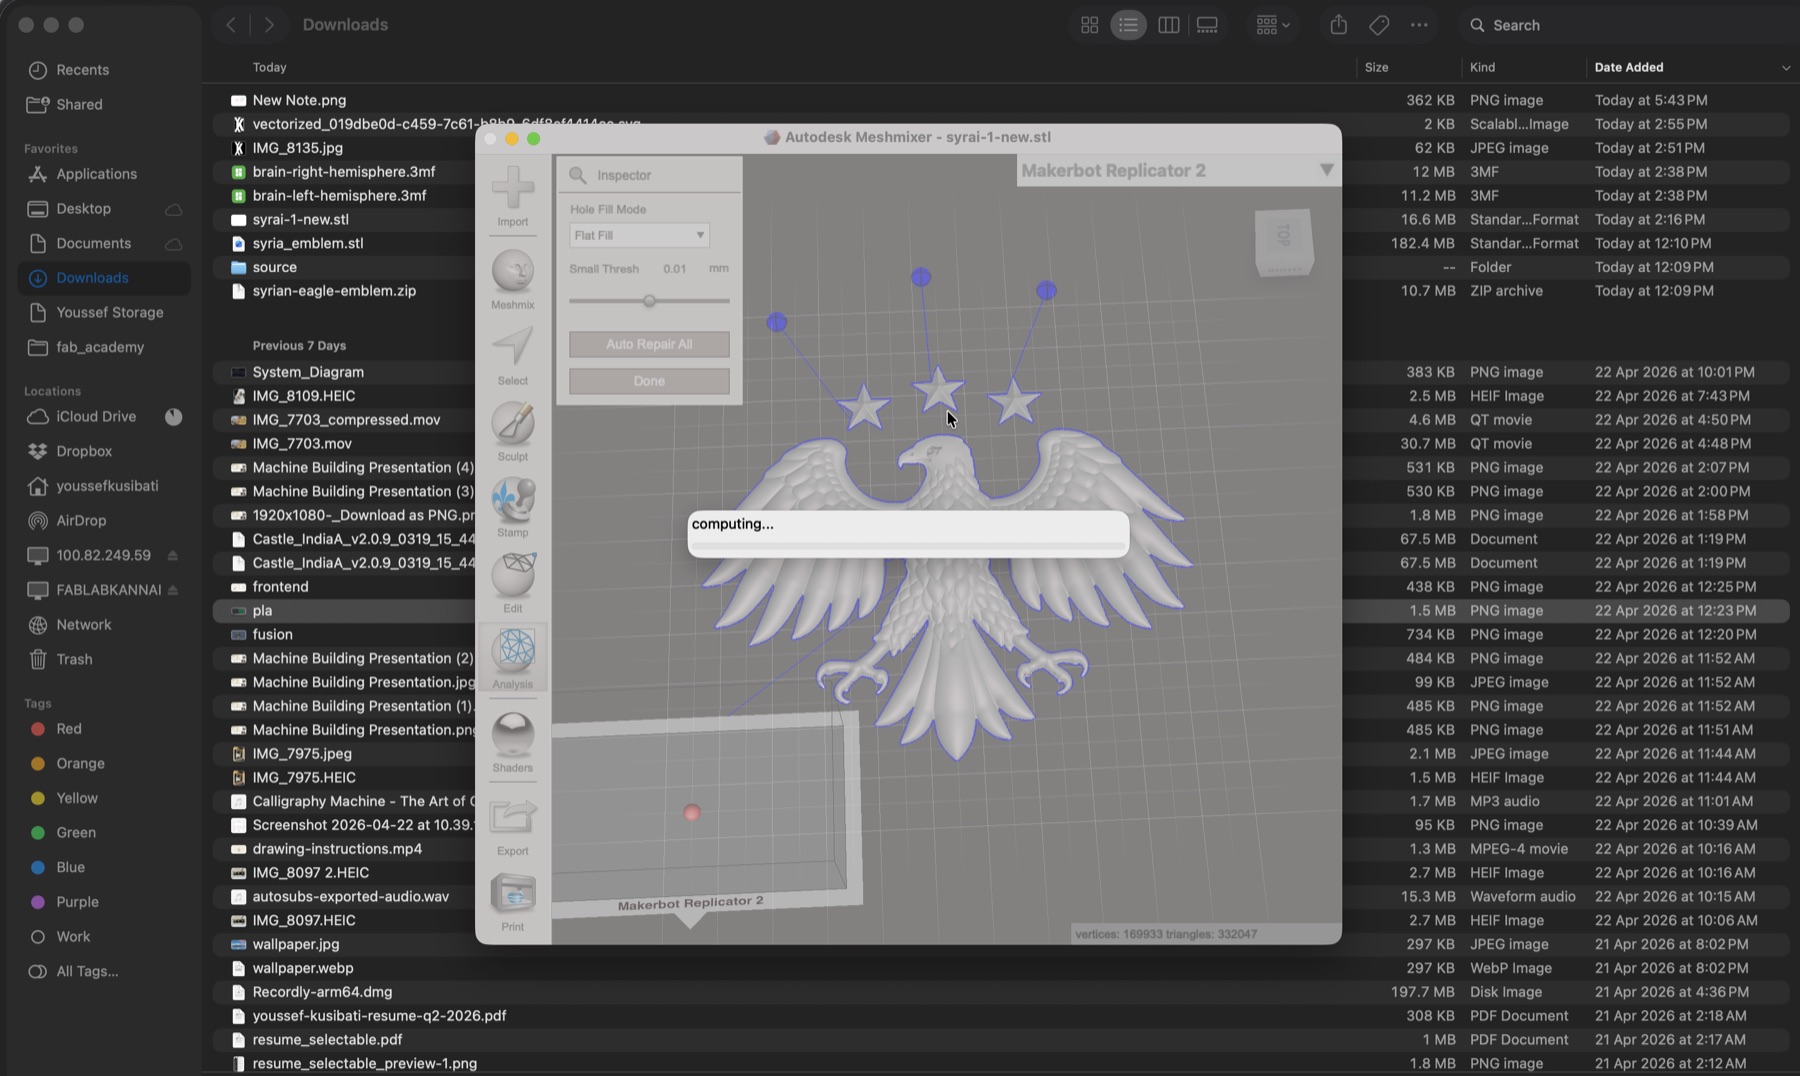
I also tried using the Autodesk Meshmixer to fix the shape and reduce the number of polygons on it, but unfortunately, failed, so I did the second best thing and use the flat version of the emblem.
I got Syria’s map and emblem SVGs, you’ll find it in the original code and design files too, and imported it all to fusion and started designing the mold by centering everything and putting them inside a square.
.svg)
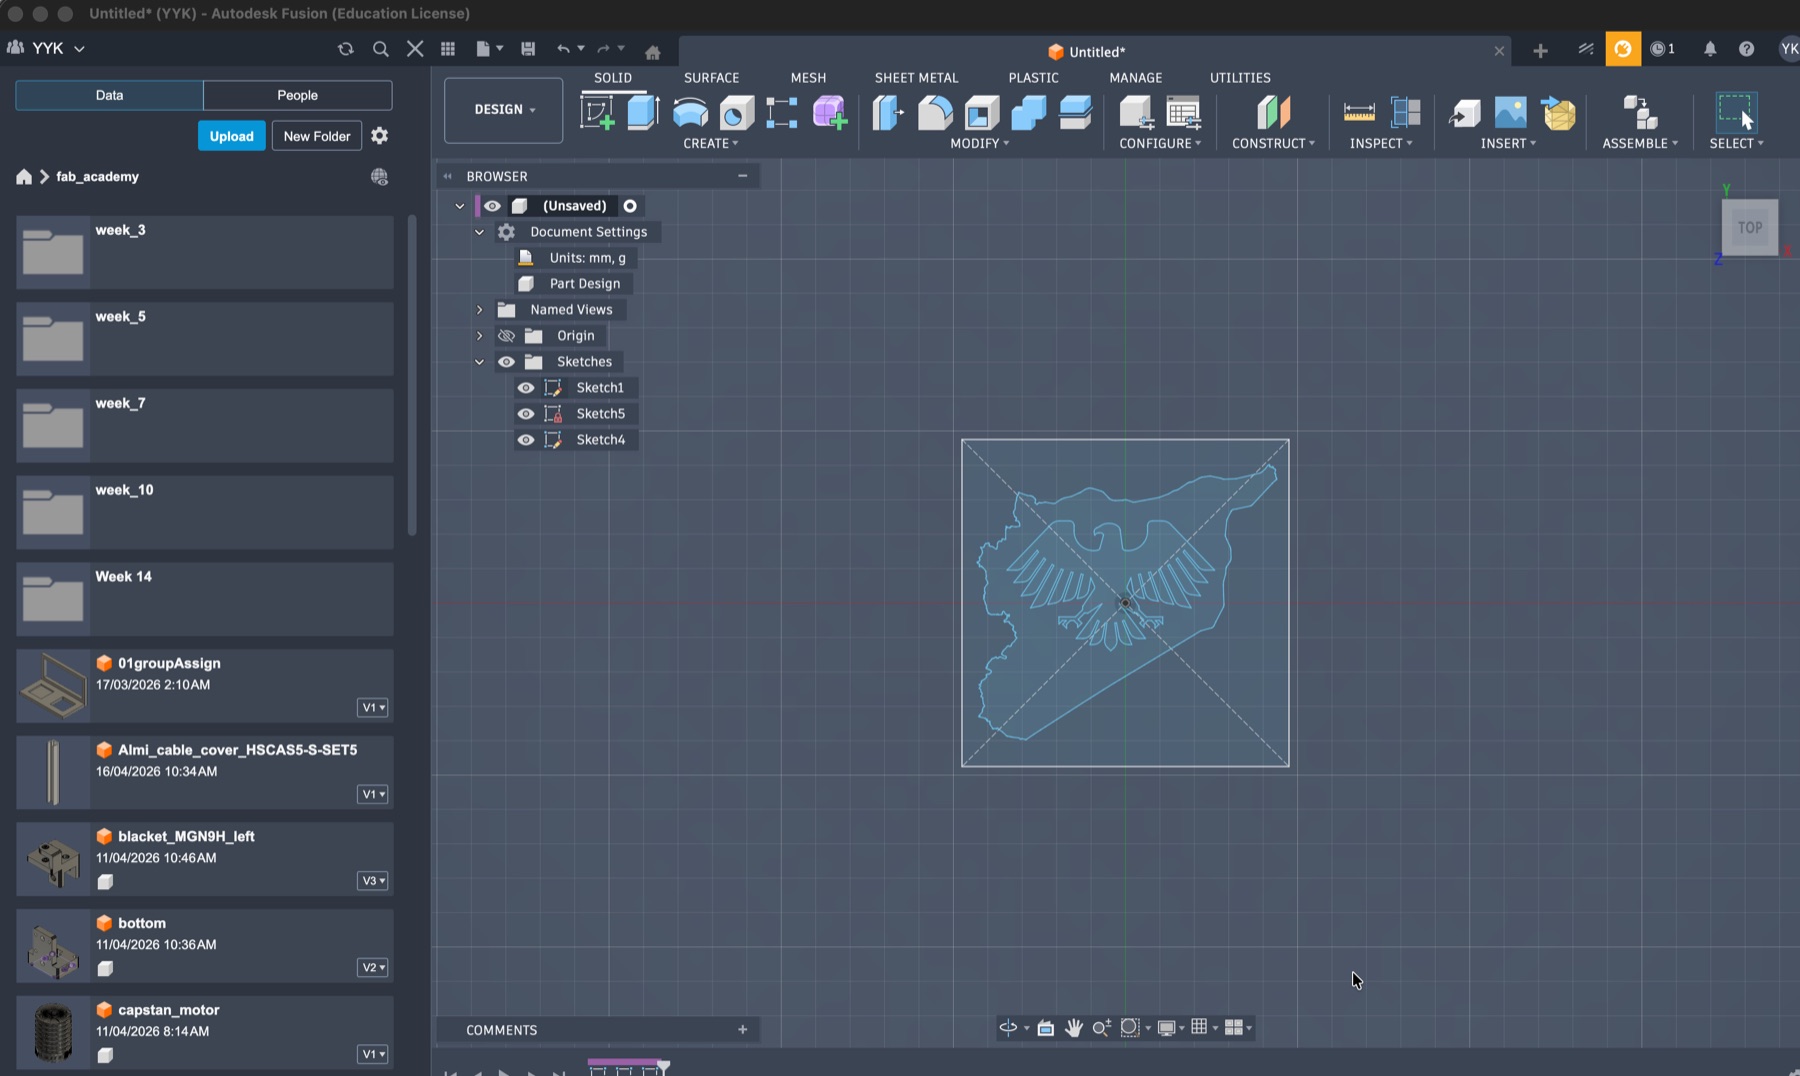
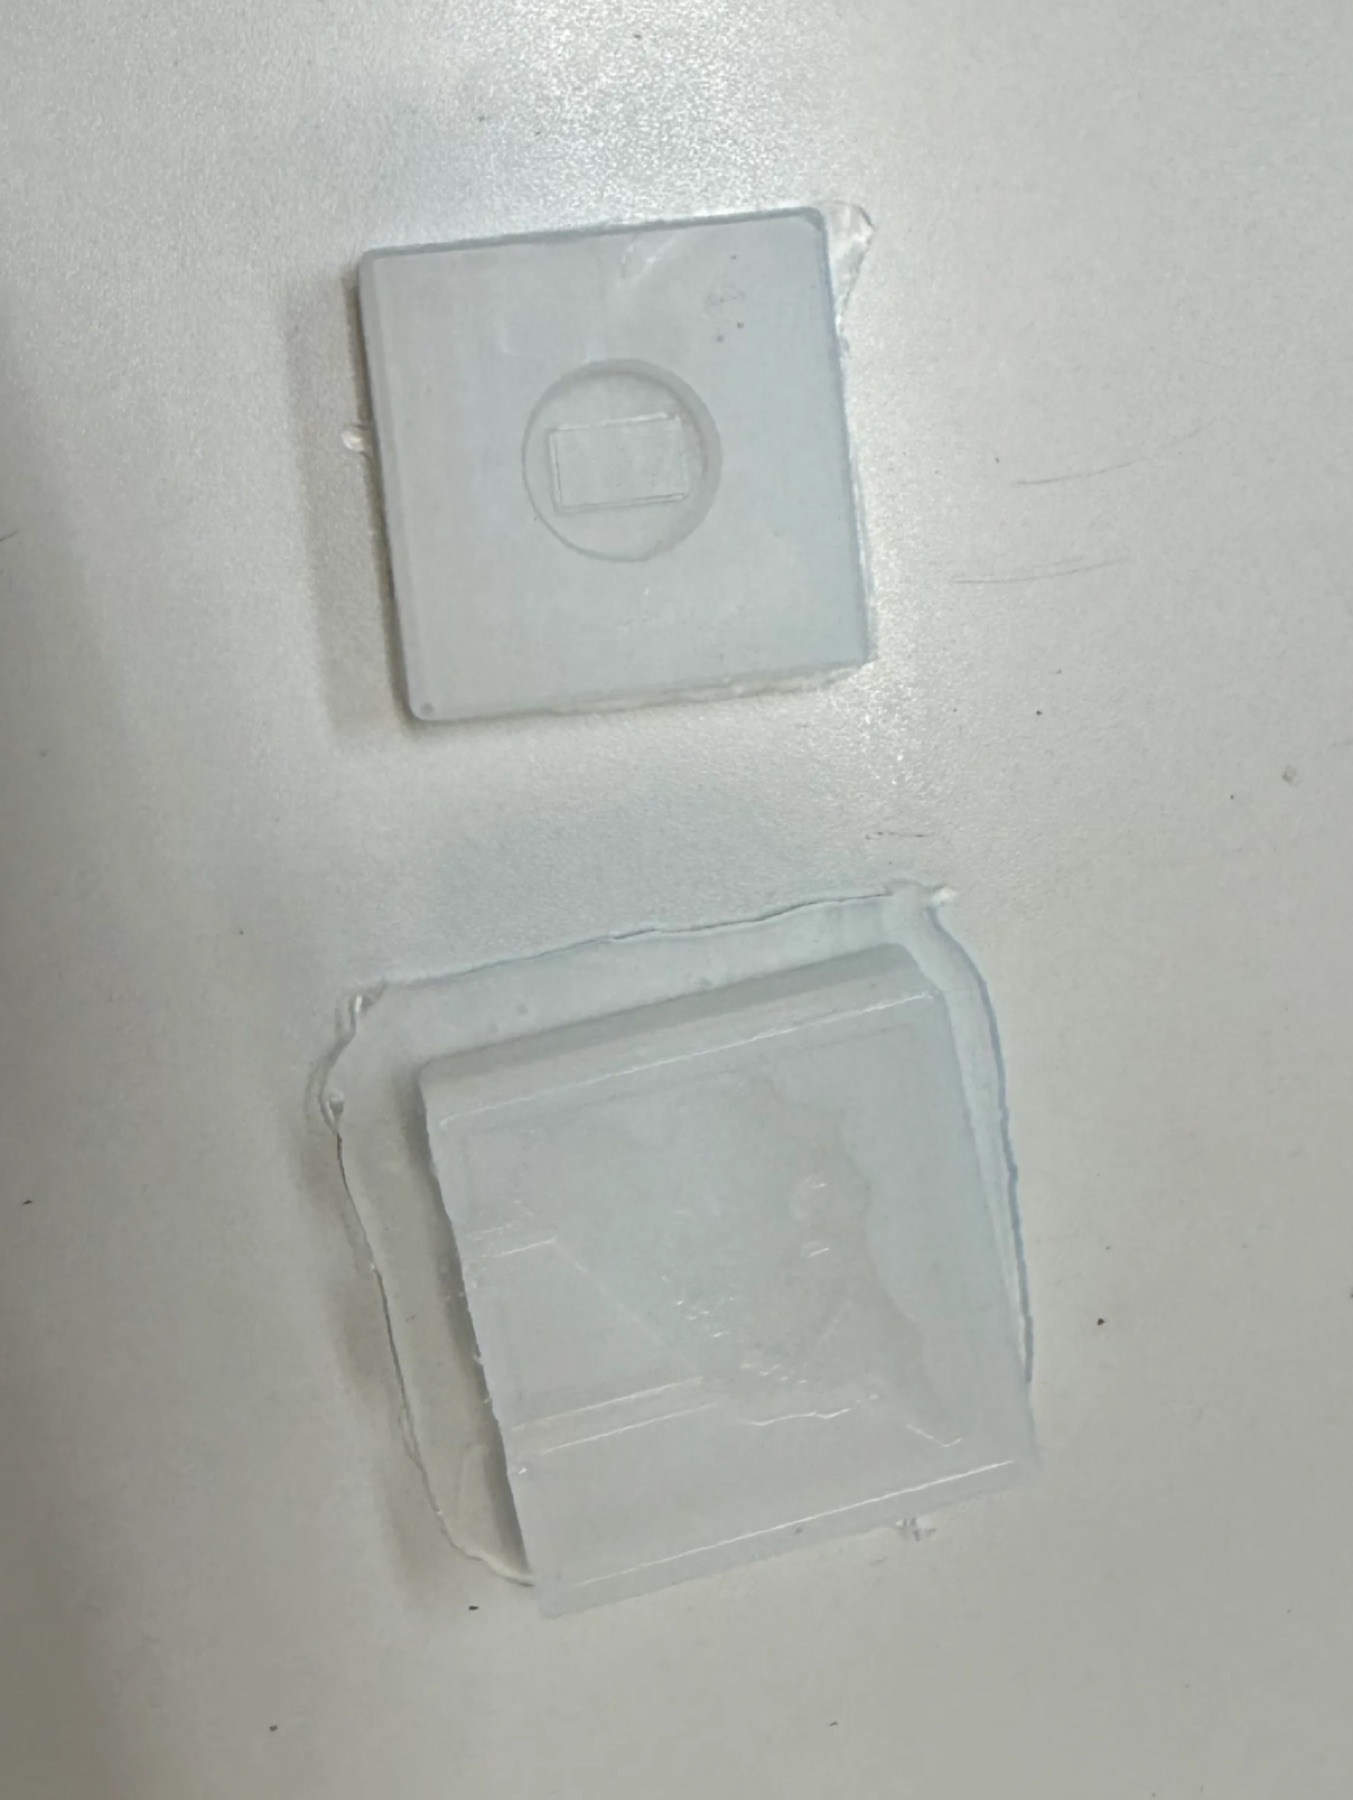
Then, I designed a part for me to place the magnet in the final casted object that I can just push inside a cavity.
I created objects from the designs and added holes for where the material will be poured in.
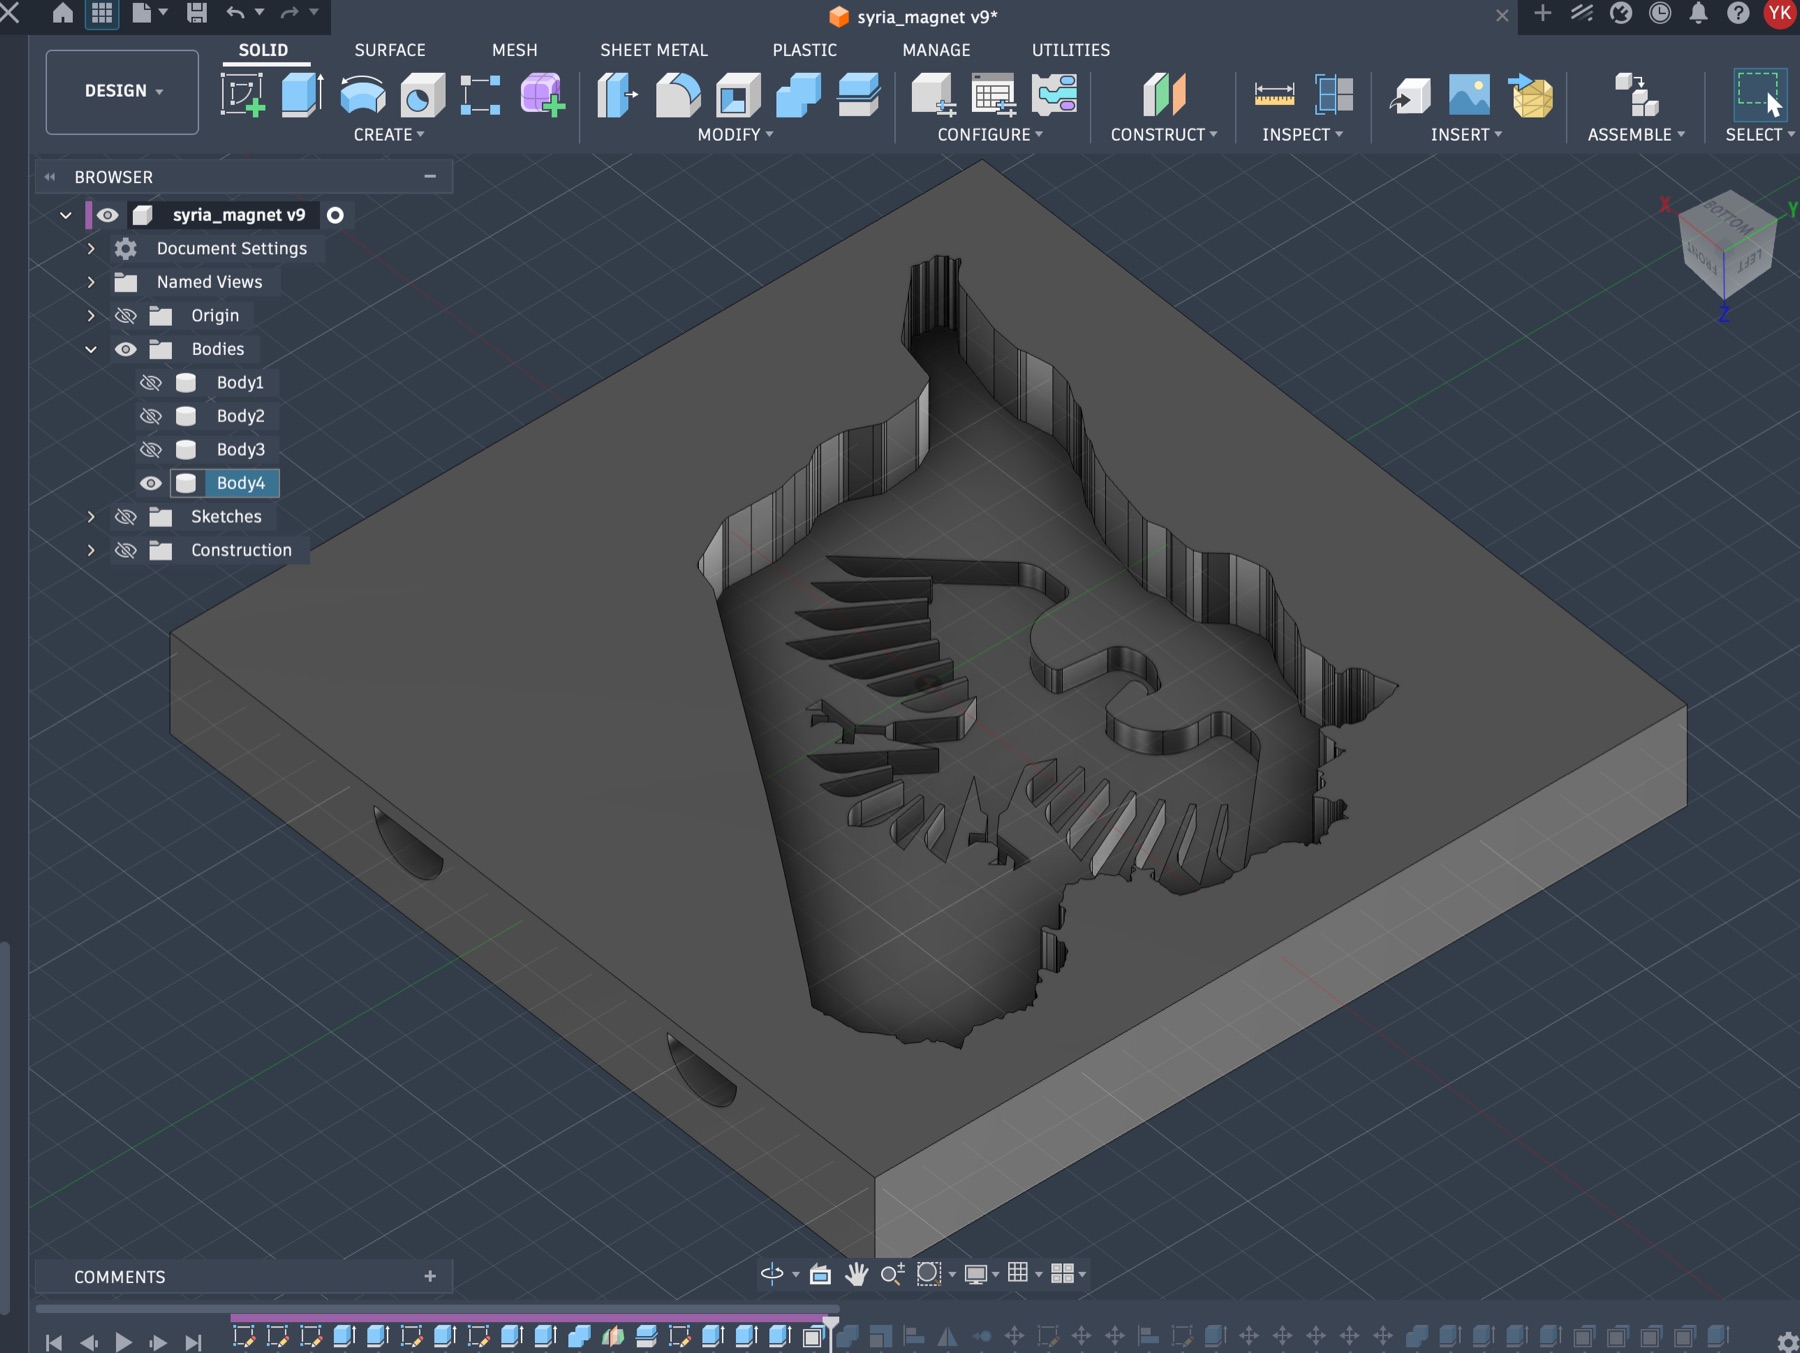
I created a big block that it meant to represent the machinable wax, and subtracted the design from it. Additionally, I made one piece bigger and added borders to it so the second part of the mold would press-fit nicely into it.
However, I forgot to also mirror the design of the map since I forgot that it will get flipped as I create the silicone mold first and then cast it.
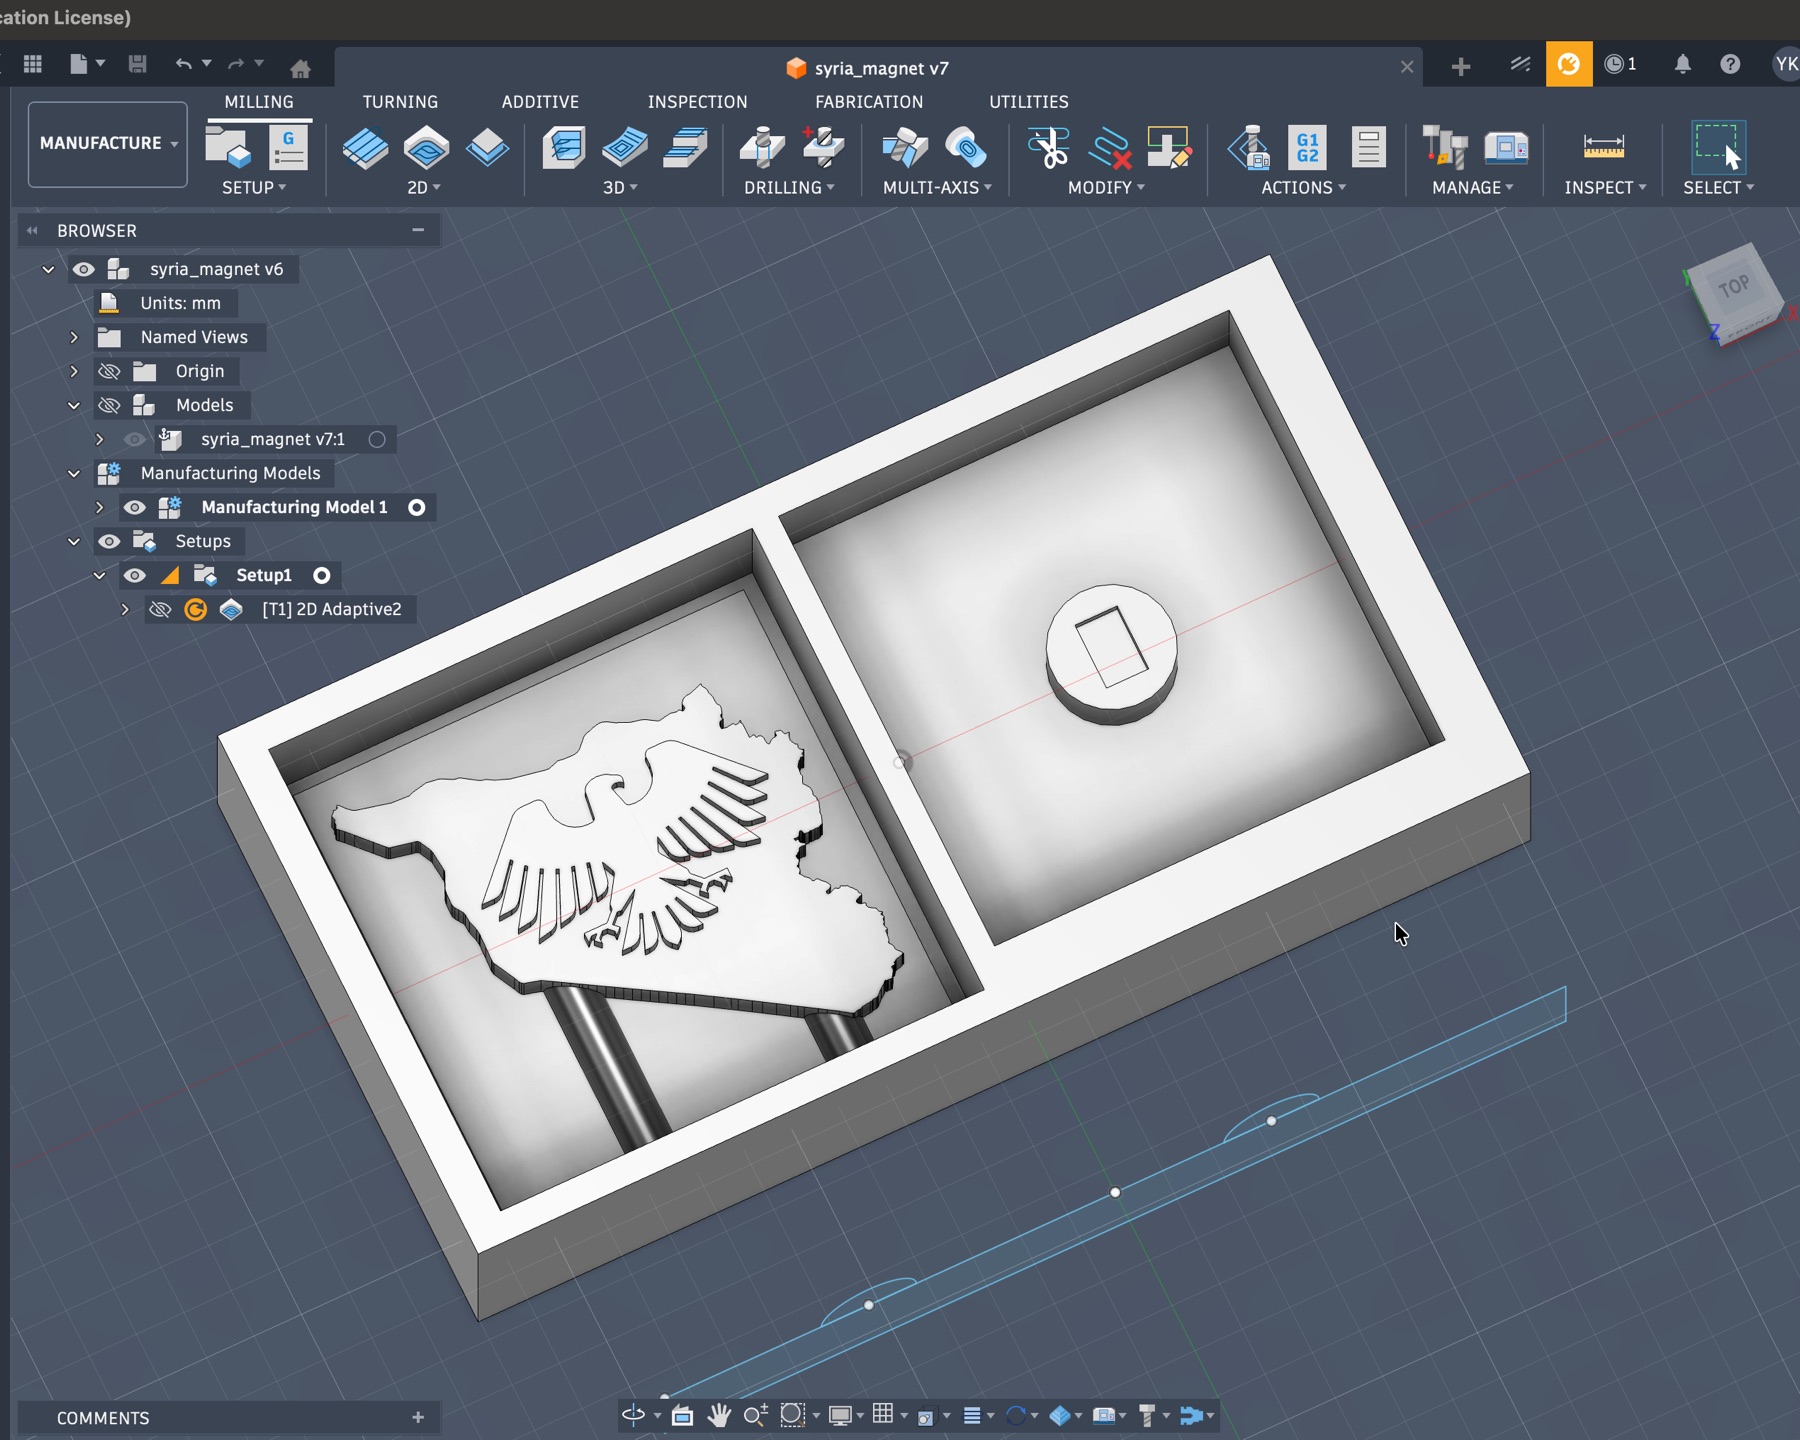
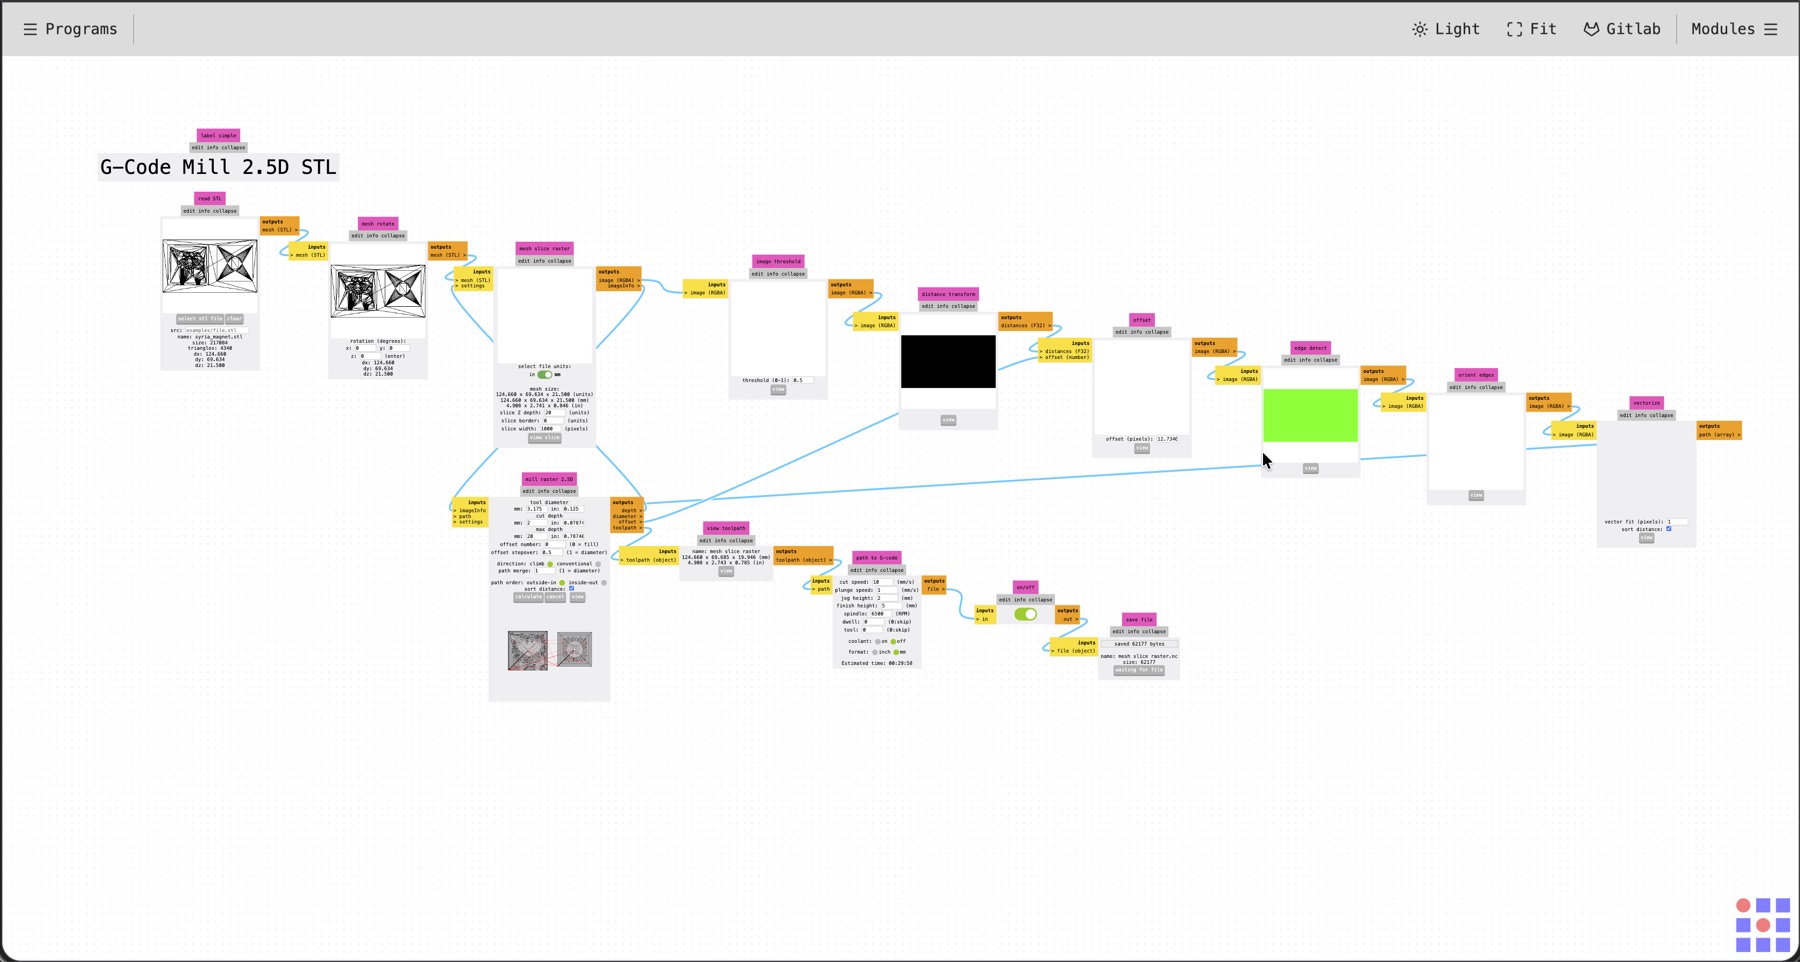
Then, I exported the design from fusion as STL, and I used MODS as my CAM tool. I needed to do 2 passes, a rough cut and a finish cut.
The rough cut was done using a 1/8th of an inch flat-end mill, using the MODS G-Code Mill 2.5D STL. I got the settings from Yuichi, who was experimenting with our PCB milling machine, a Genmitsu, to be used for this, and provided us with parameters.
The Issue We Faced in MODS, and How it Got Patched?
MODS had an issue where it recognized the full design and it would instruct the machine to cut properly, but then add another layer where it just cuts and remove all the details causing the final result to be just an empty square, lol.
Didn’t notice this issue until we cut unsuccessfully the first time, and we thought it was a spelling mistake we found in the code for the module, and while it definitely was a mistake, but wasn’t enough to solve the issue, so Yuichi reported the issue to Fran (it’s fixed now), meanwhile, I used Opus 4.7 and Yuichi used Gemini to debug the issue, and it got fixed!
Here’s the local file, but now MODS is fixed too.
I later had another issue, but it ended up being an issue with my exported file, so the fix was as simple as re-exporting the file from fusion!
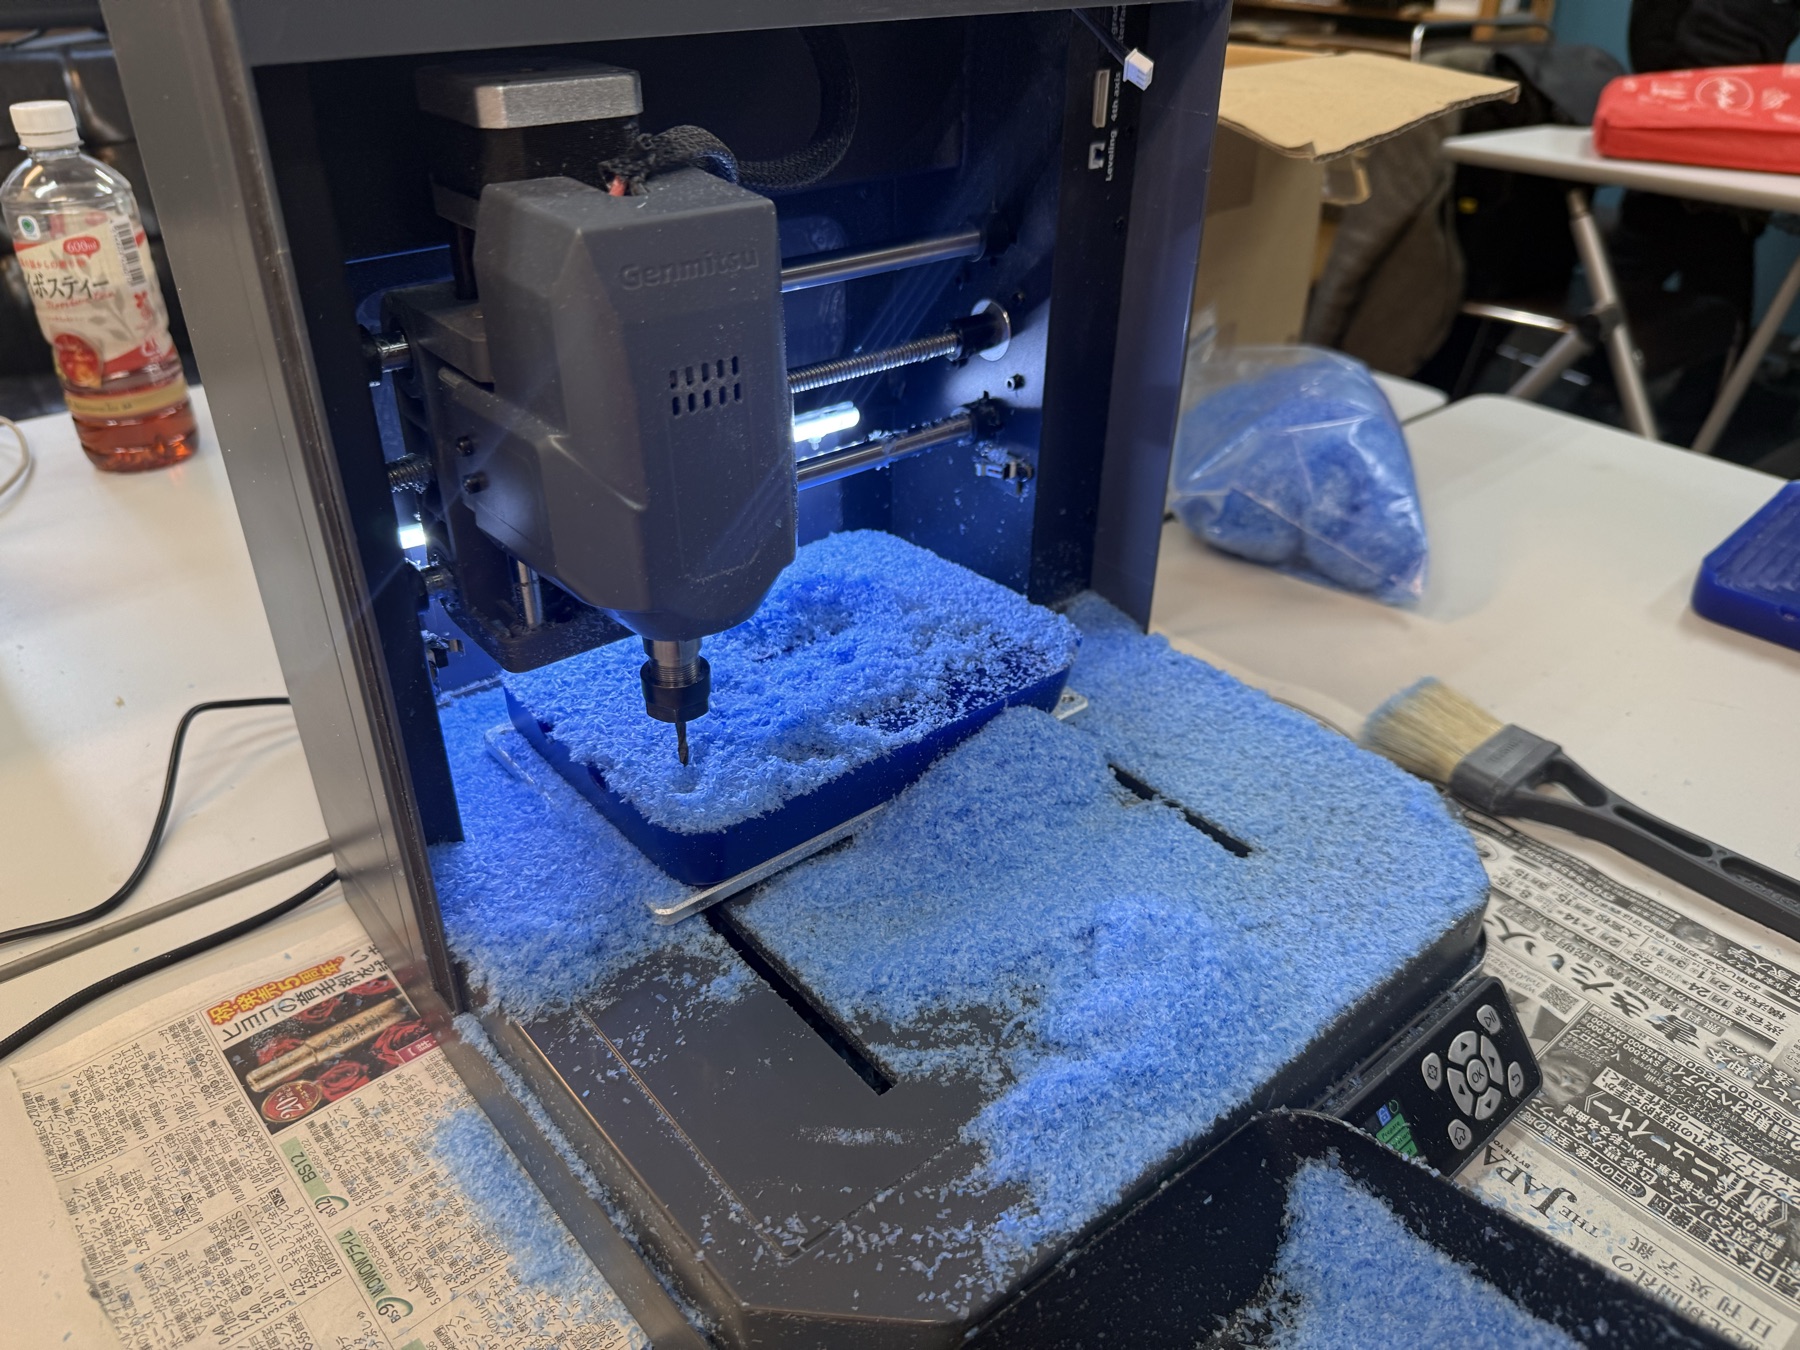
Then, using the G-Code Mill 3D STL program on MODS, I configured it for a 1/16th of an inch flat-end mill for a finish cut. Also, I got the parameters that Yuichi tested.
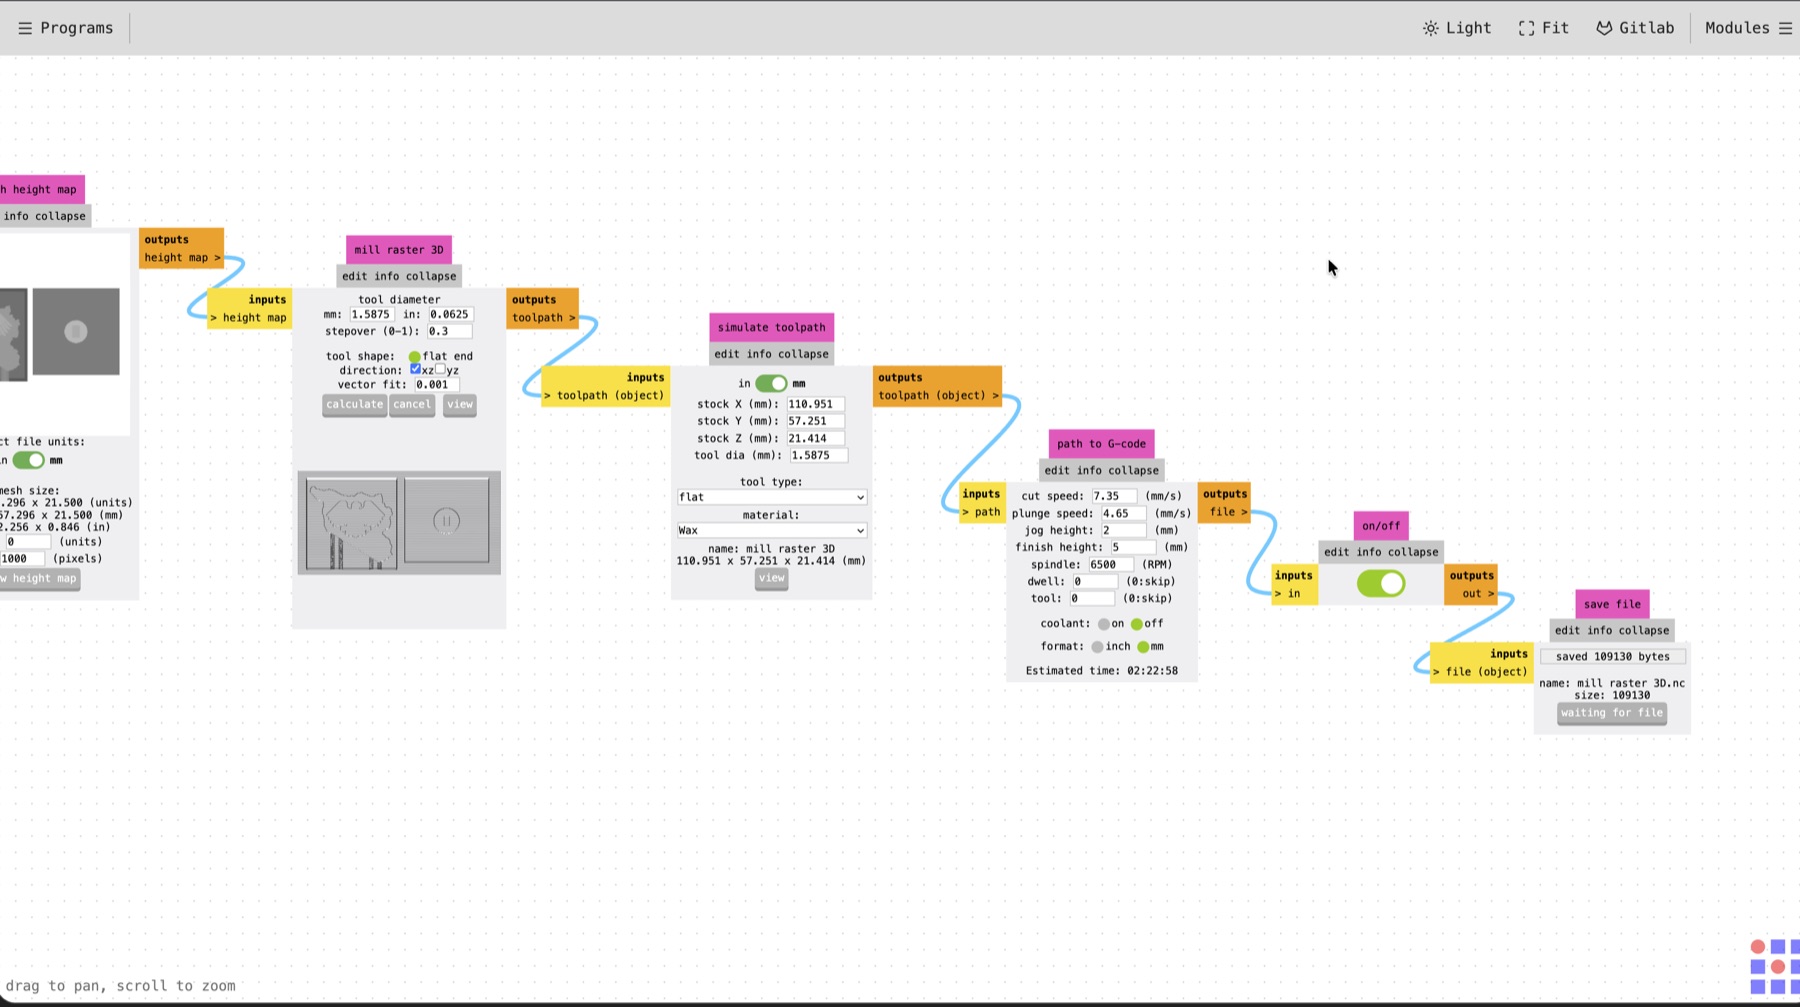
| Parameter | Rough cut | Finish cut |
|---|---|---|
| MODS program | G-Code Mill 2.5D STL | G-Code Mill 3D STL |
| Tool/Diameter | 1/8 in flat-end mill (3.175 mm) | 1/16 in flat-end mill (1.5875 mm ) |
| Stepover | 0.5 offset stepover | 0.3 stepover |
| Cut/feed speed | 10 mm/s | 7.35 mm/s |
| Spindle speed | 6500 rpm | 6500 rpm |
| Time it took (just for context, lol) | ~30 mins | ~2:30 hours |
We used G-sender instead of Candle for this since it display the paths more clearly compared to Candle.
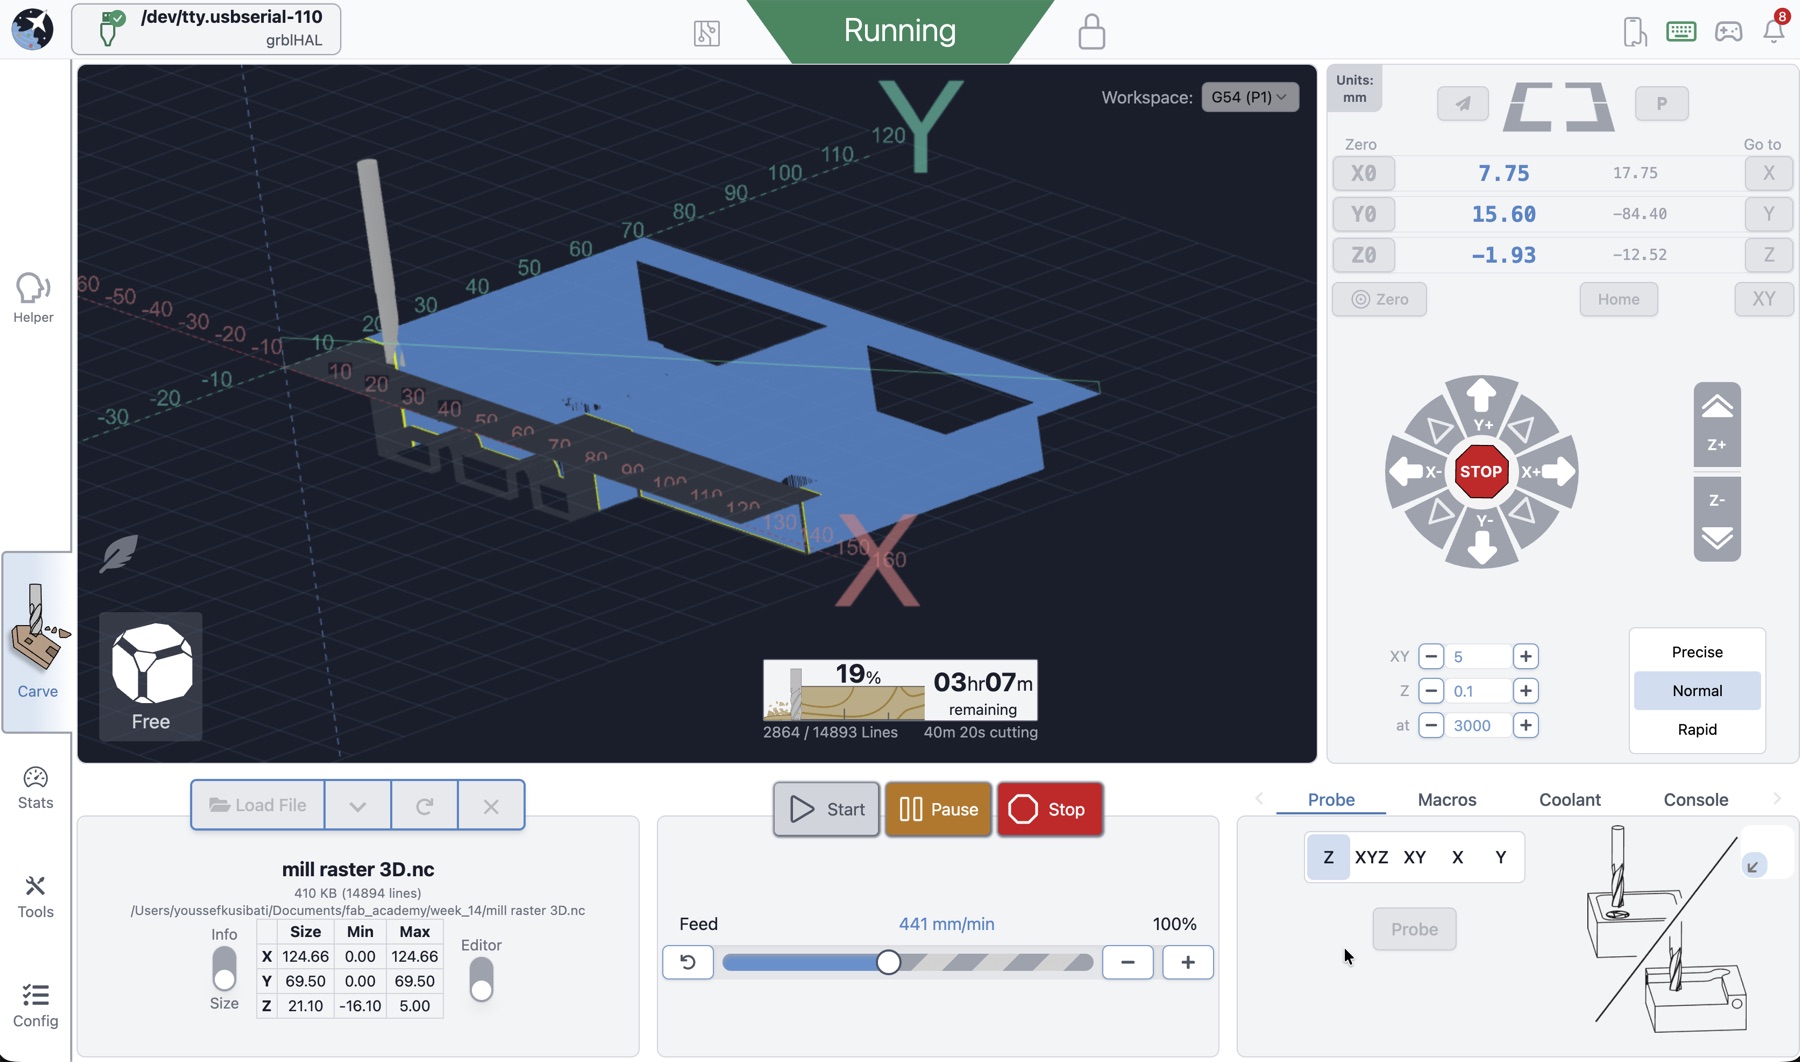
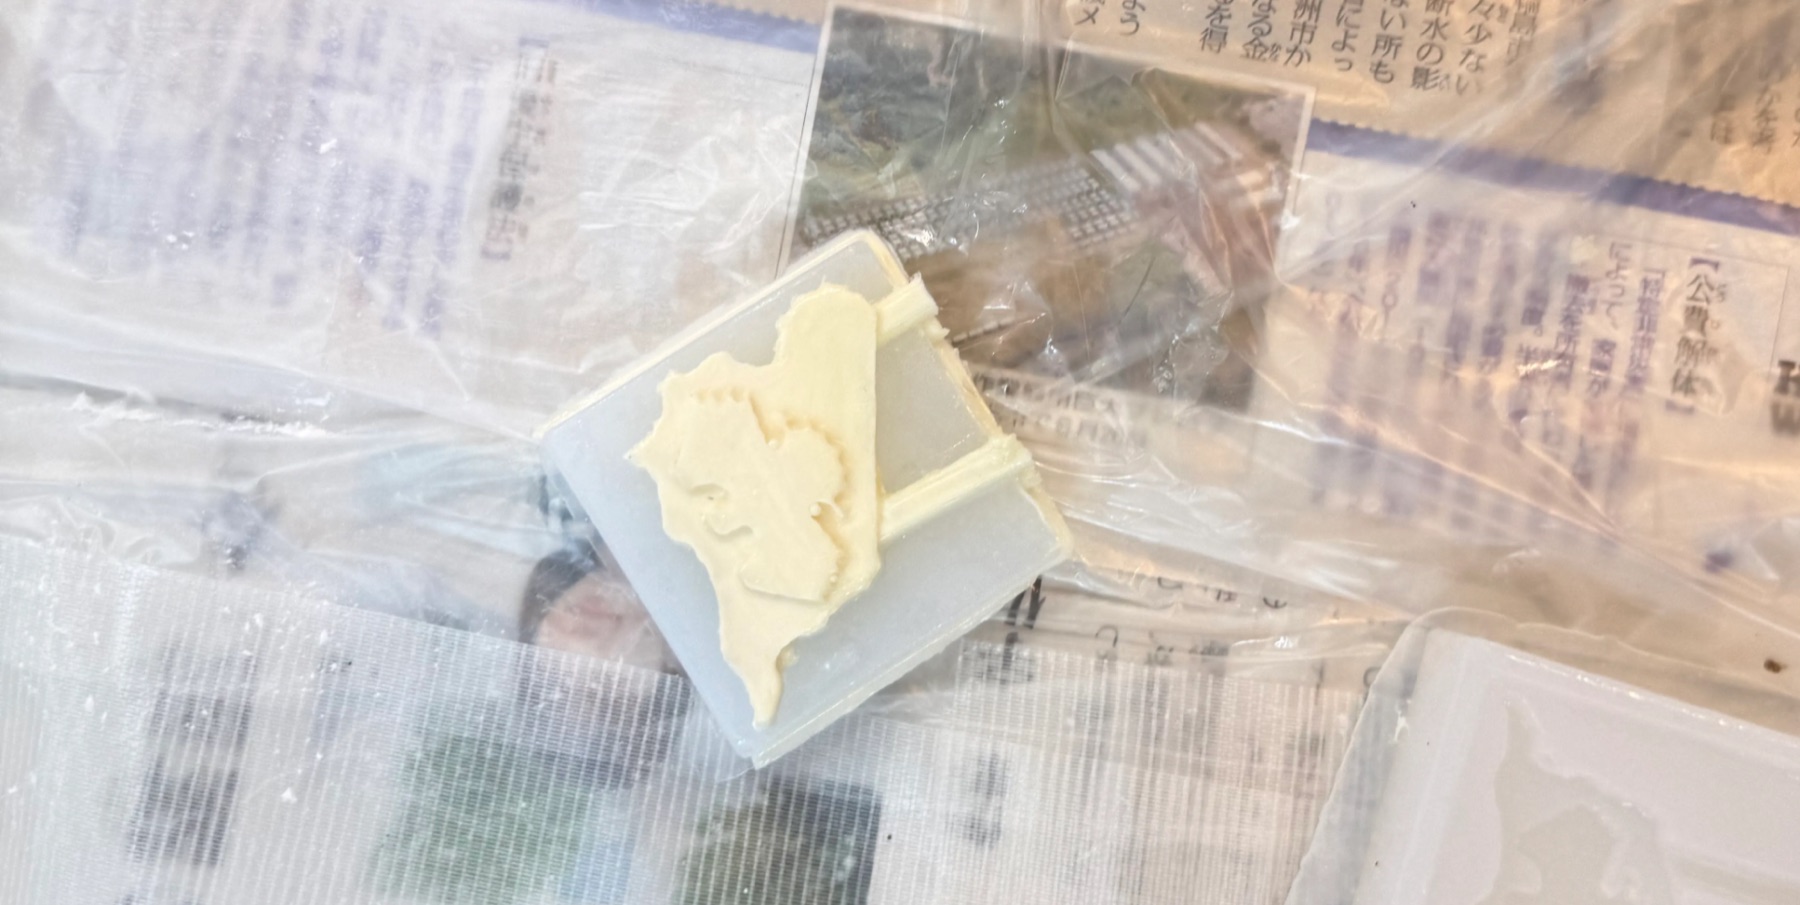
The mold was looking pretty good tbh!

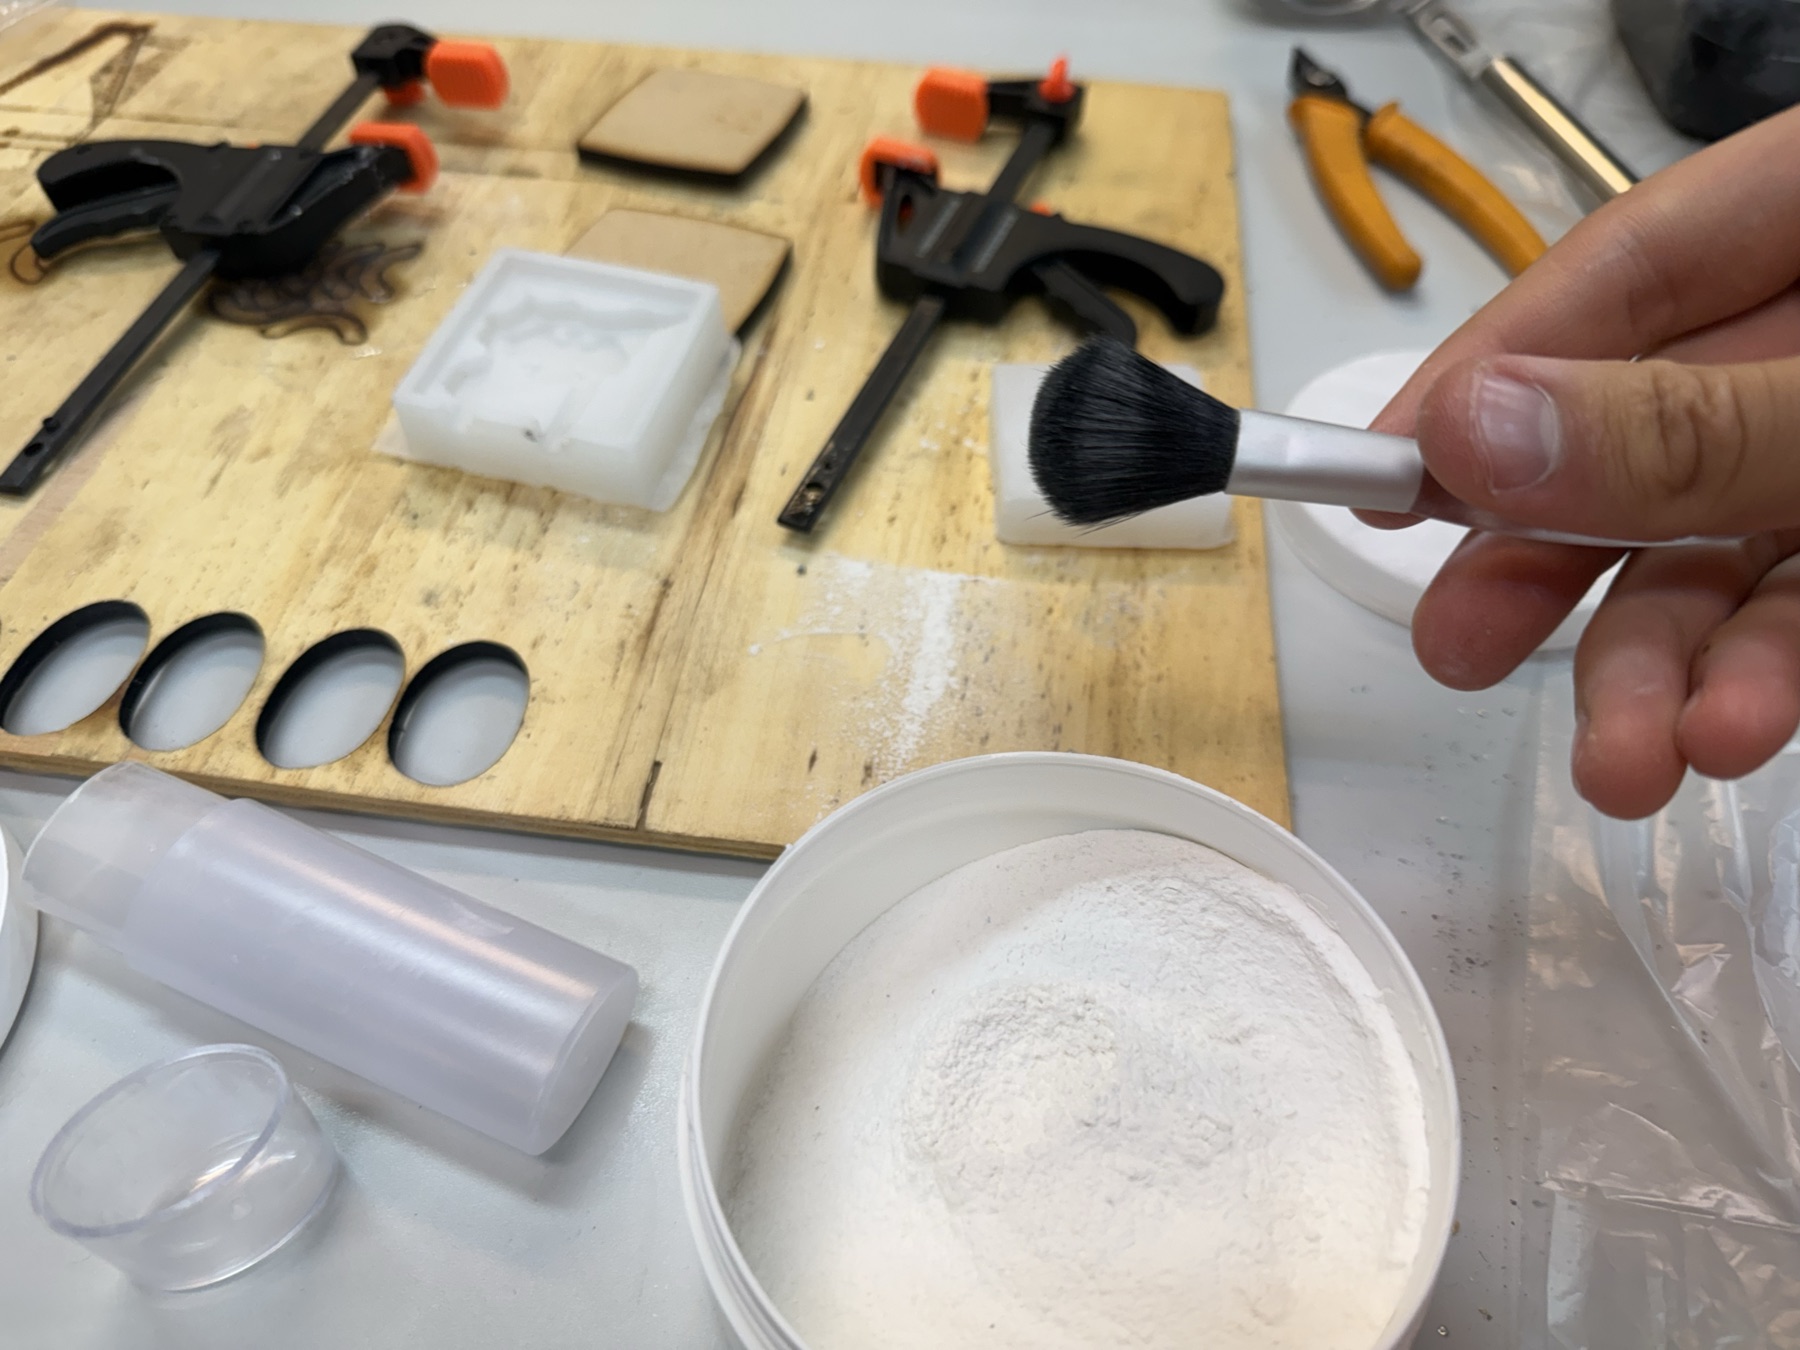
The next step, was to measure it volume by measuring how much water it takes to fill it up. This was to guide the process for using Part A and B of the Mold Star 31T silicone.
I also checked the Mold Star 31T product page because it shows the mix ratio and working time more directly.
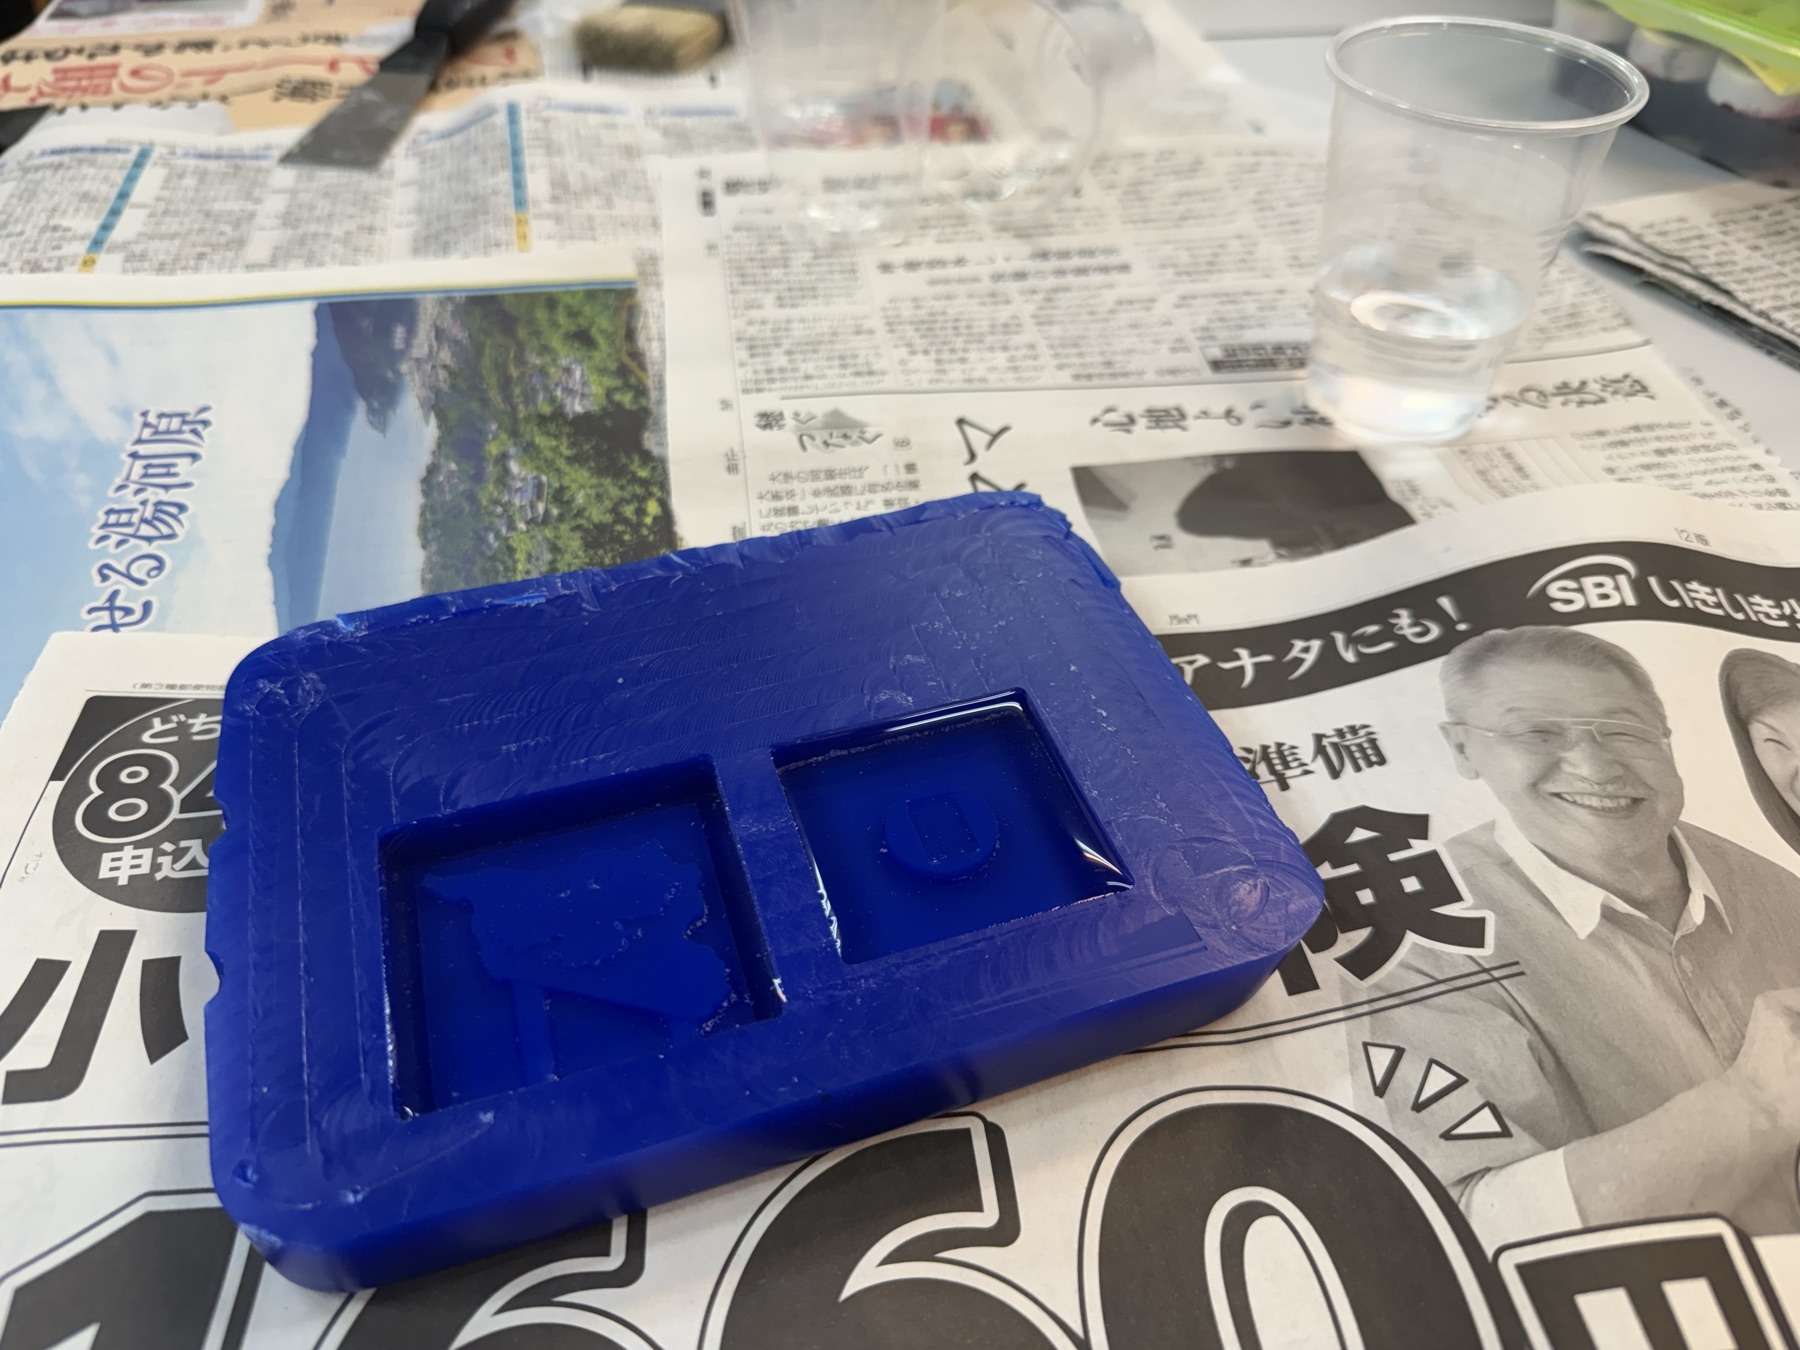
Mold Star 31T silicone part A and B are mixed by a 1A : 1B ratio by volume or by weight. So I just mixed what was around ~30 ml (30 g) for each part in a cup and then pour them quickly but steadily into the machinable wax after I removes the water and dried it properly.
This is in order to make sure it is in place before the 5 min pot life expires.
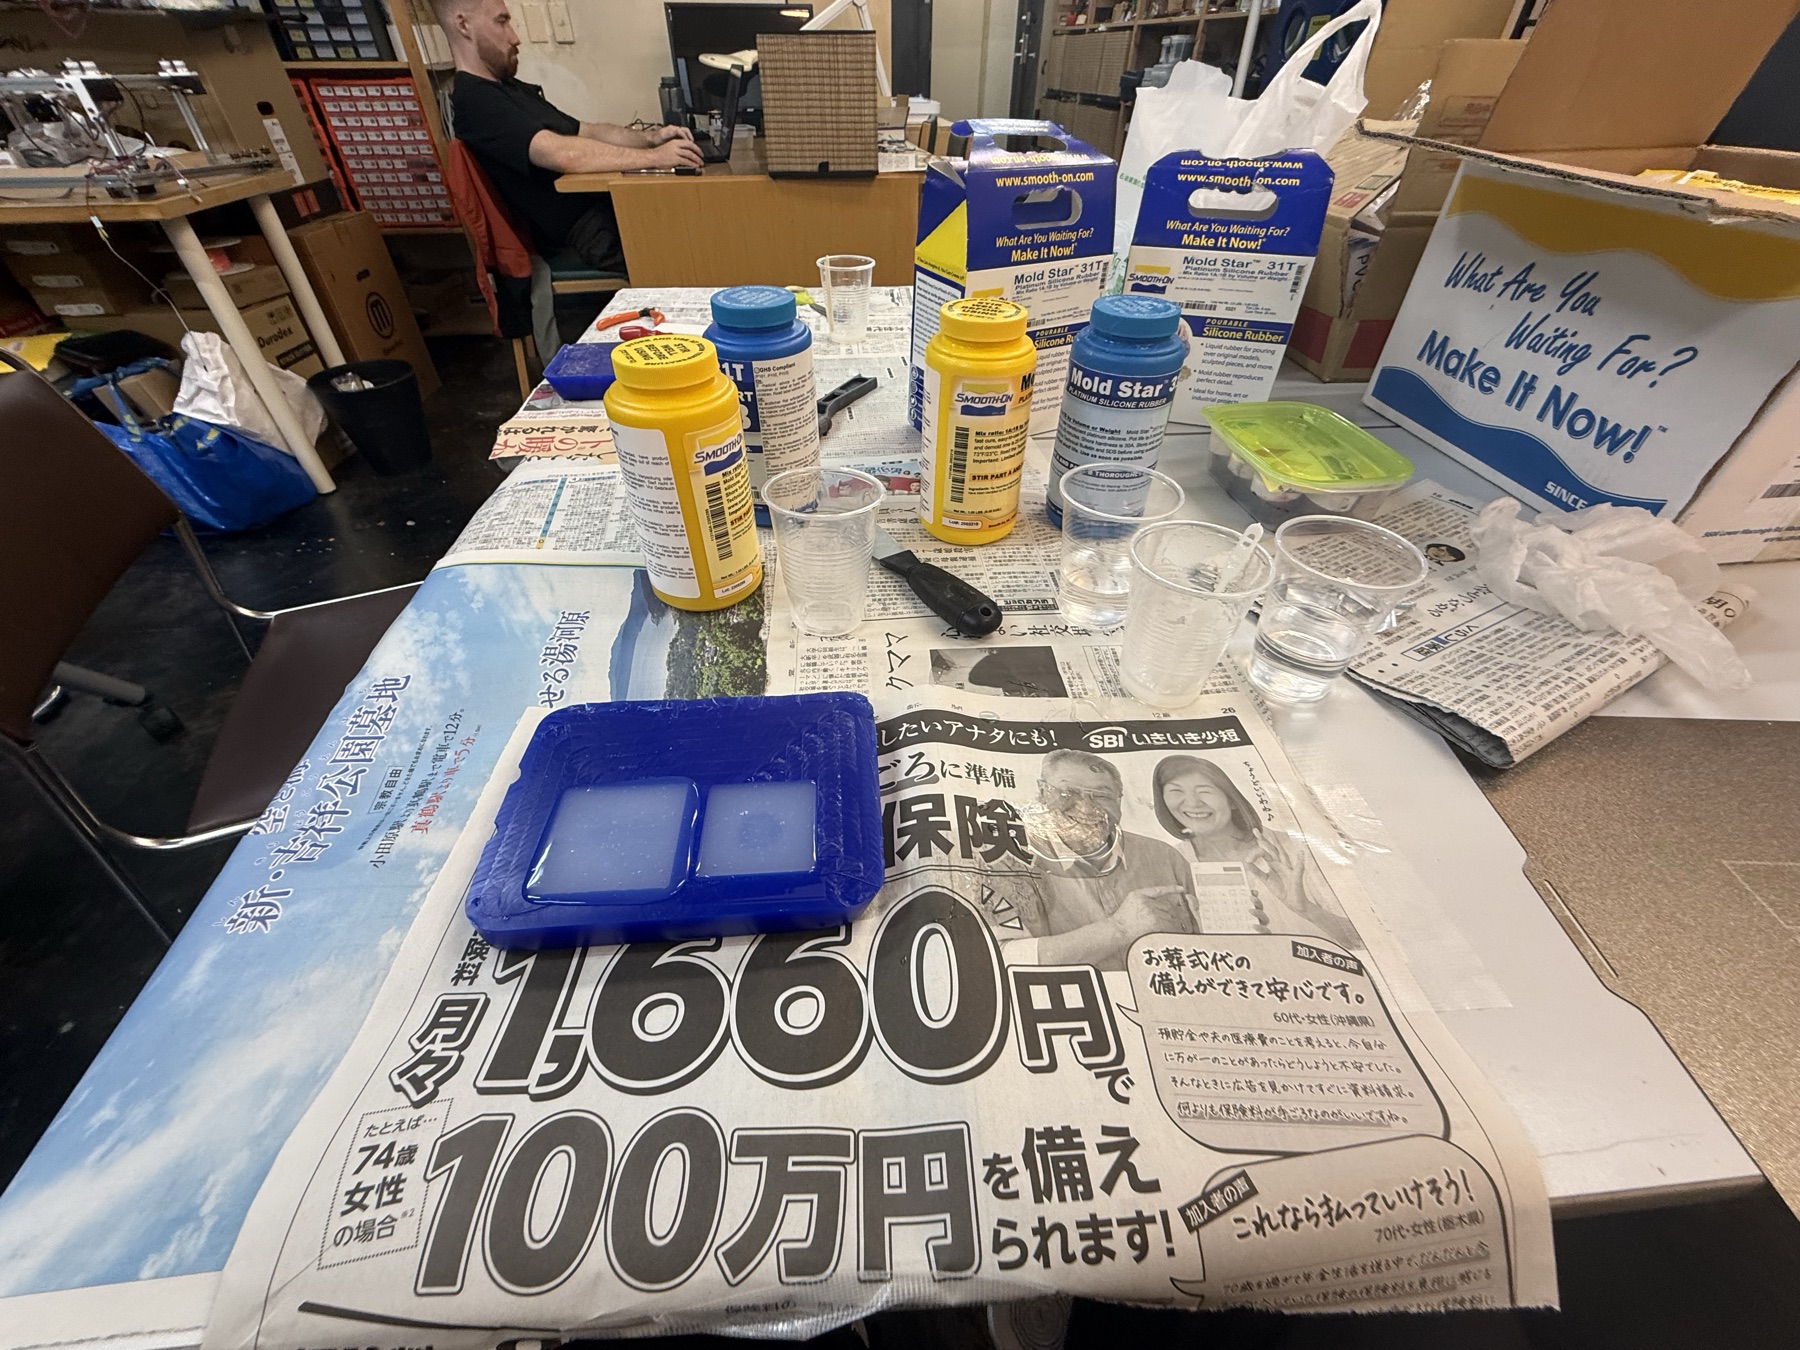
The listed cure time is about 23 mins at room temperature but i decided to keep it for an hour. The molds were ready!
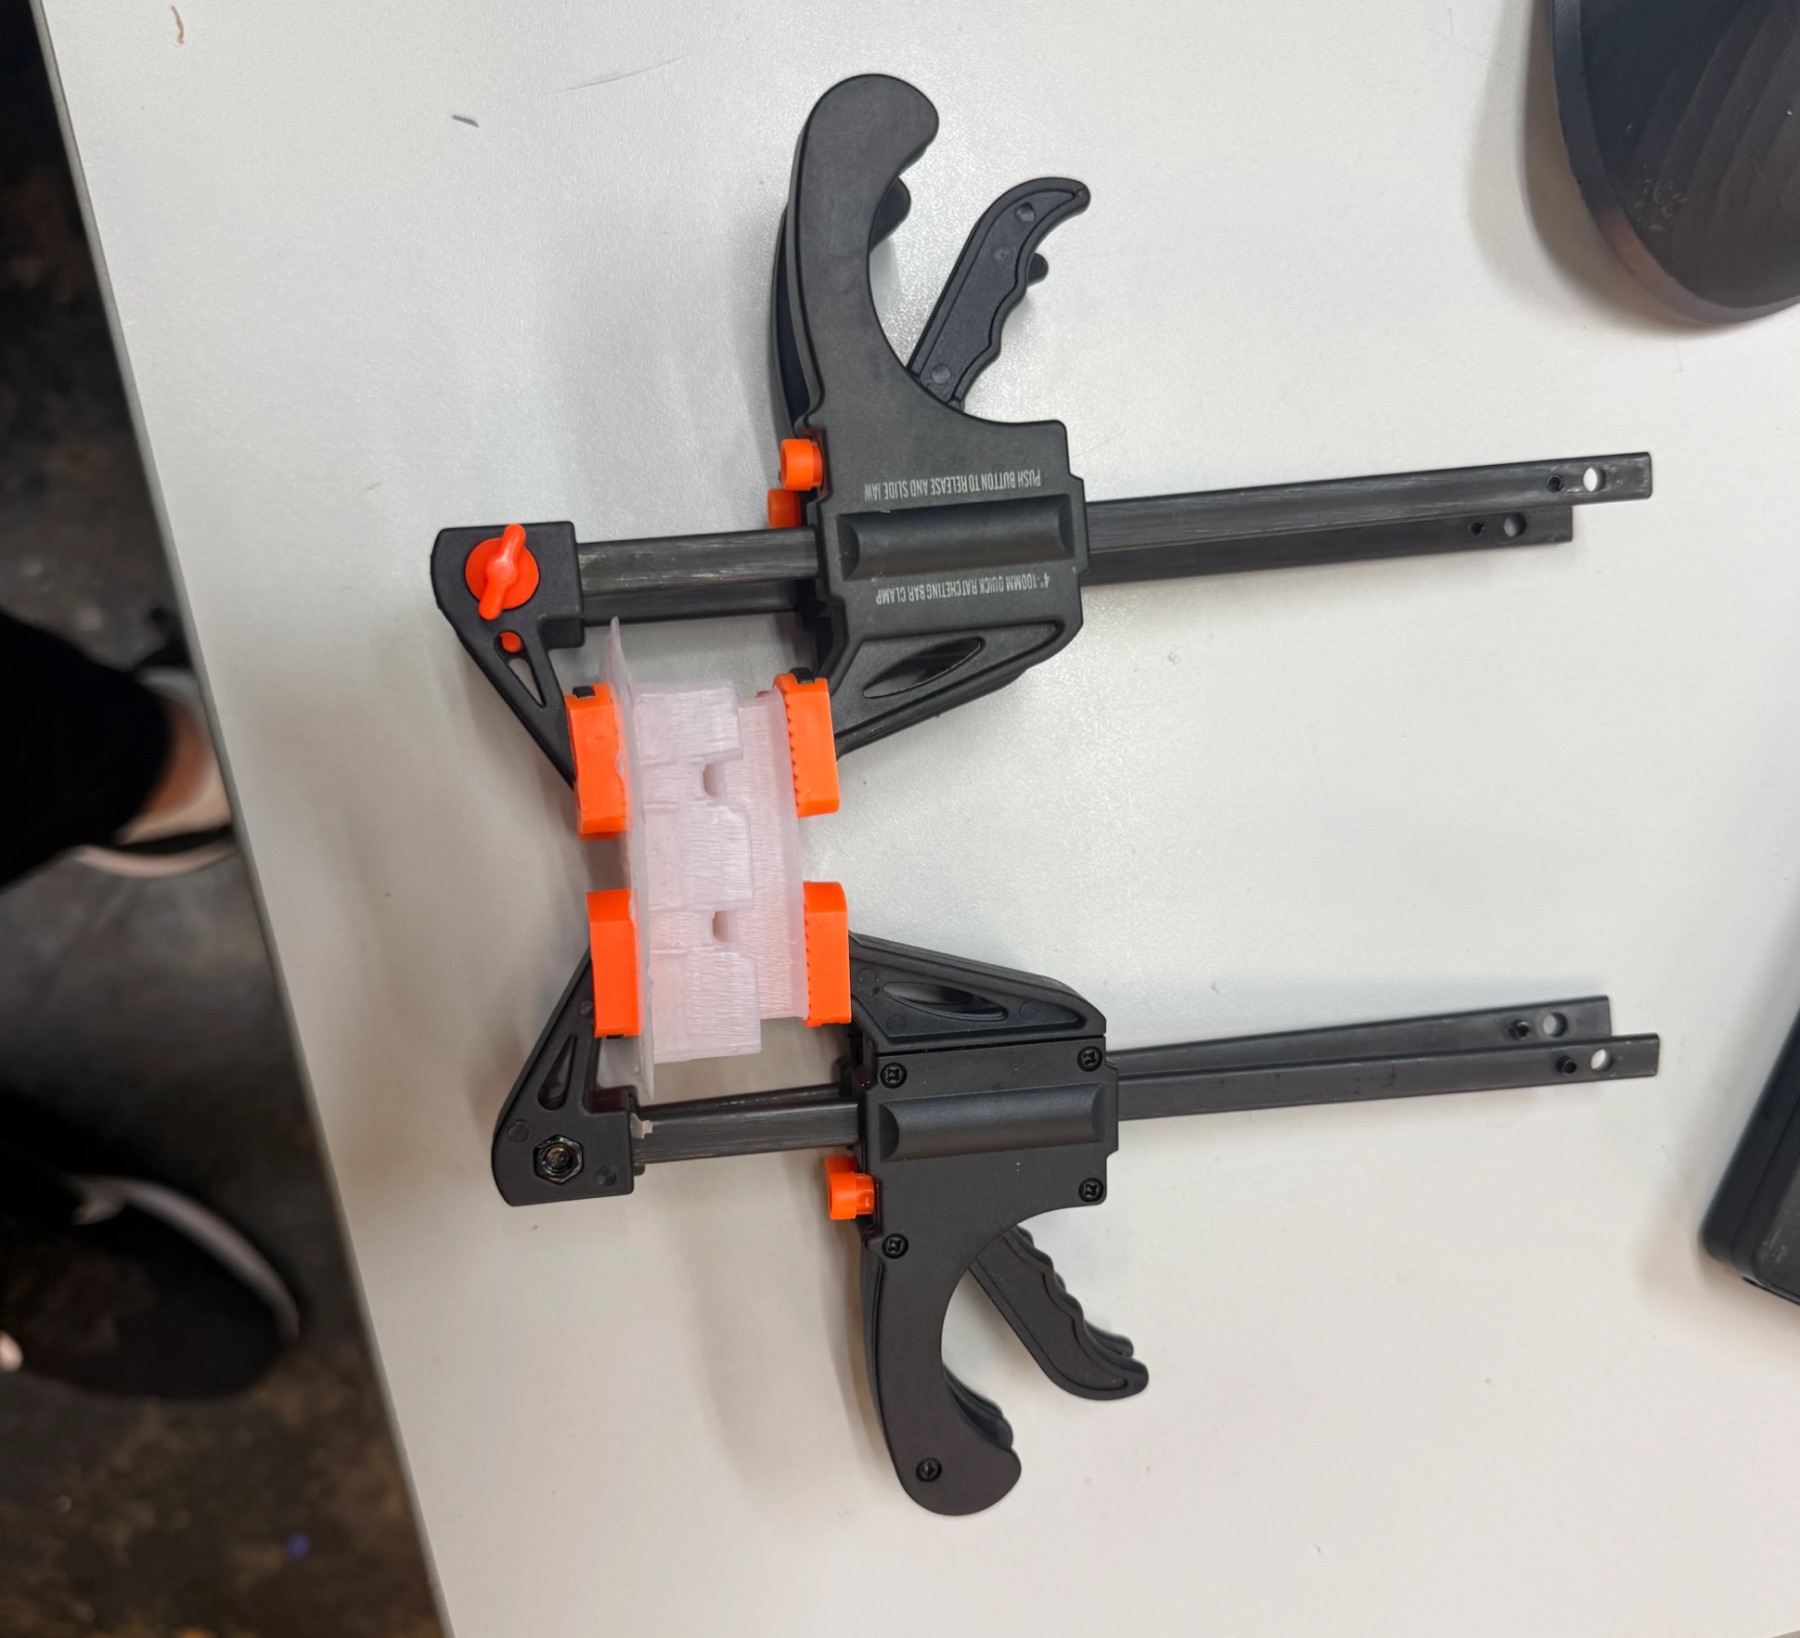
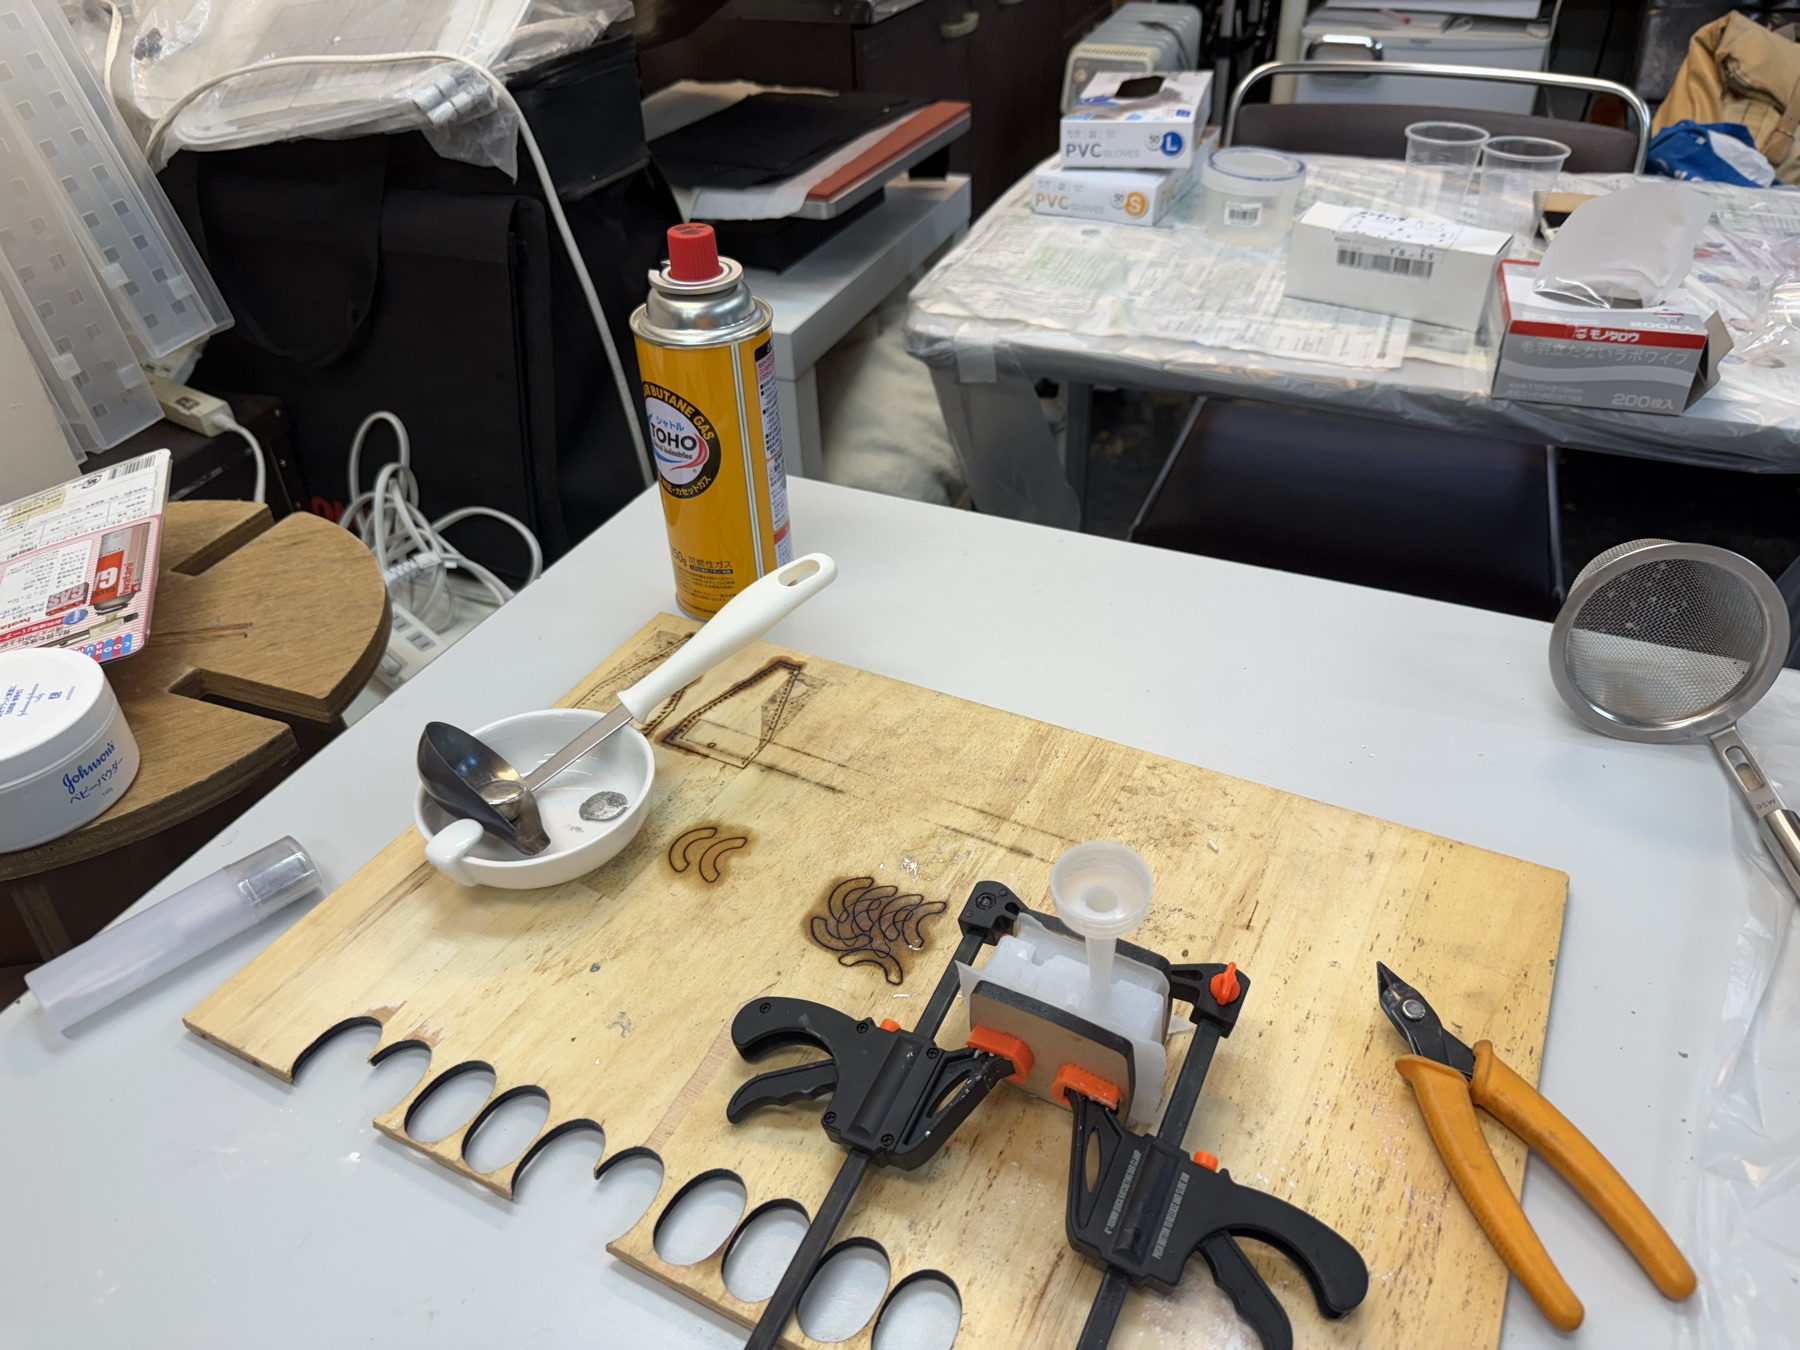
I essentially press-fitted the 2 parts, and got clamps to hold everything together.
Then, I mixed part A and B of the Smooth-Cast 320, in this first attempt, I actually missed that it said 1A:1B by volume and 100A:90B by weight, and since I was doing the measurements by weight, it ended up having a very bad finish tbh.
I also checked the Smooth-Cast 320 product page because it makes the volume and weight ratios easier to find.
Two important notes here: mixing the two parts creates an exothermic reaction, so 1) I had to work quickly and carefully to pour within the 3 min pot life while still stirring/scraping properly and pouring steadily to avoid air bubbles. 2) Any mixed residue left in the cups should be allowed to fully react, cure, and cool before disposal. Unmixed or badly mixed chemicals should not just be thrown away. If small leftovers are intentionally combined, they should be kept close to the correct ratio and mixed thoroughly, because adding a widely different proportion can leave even more material unreacted.

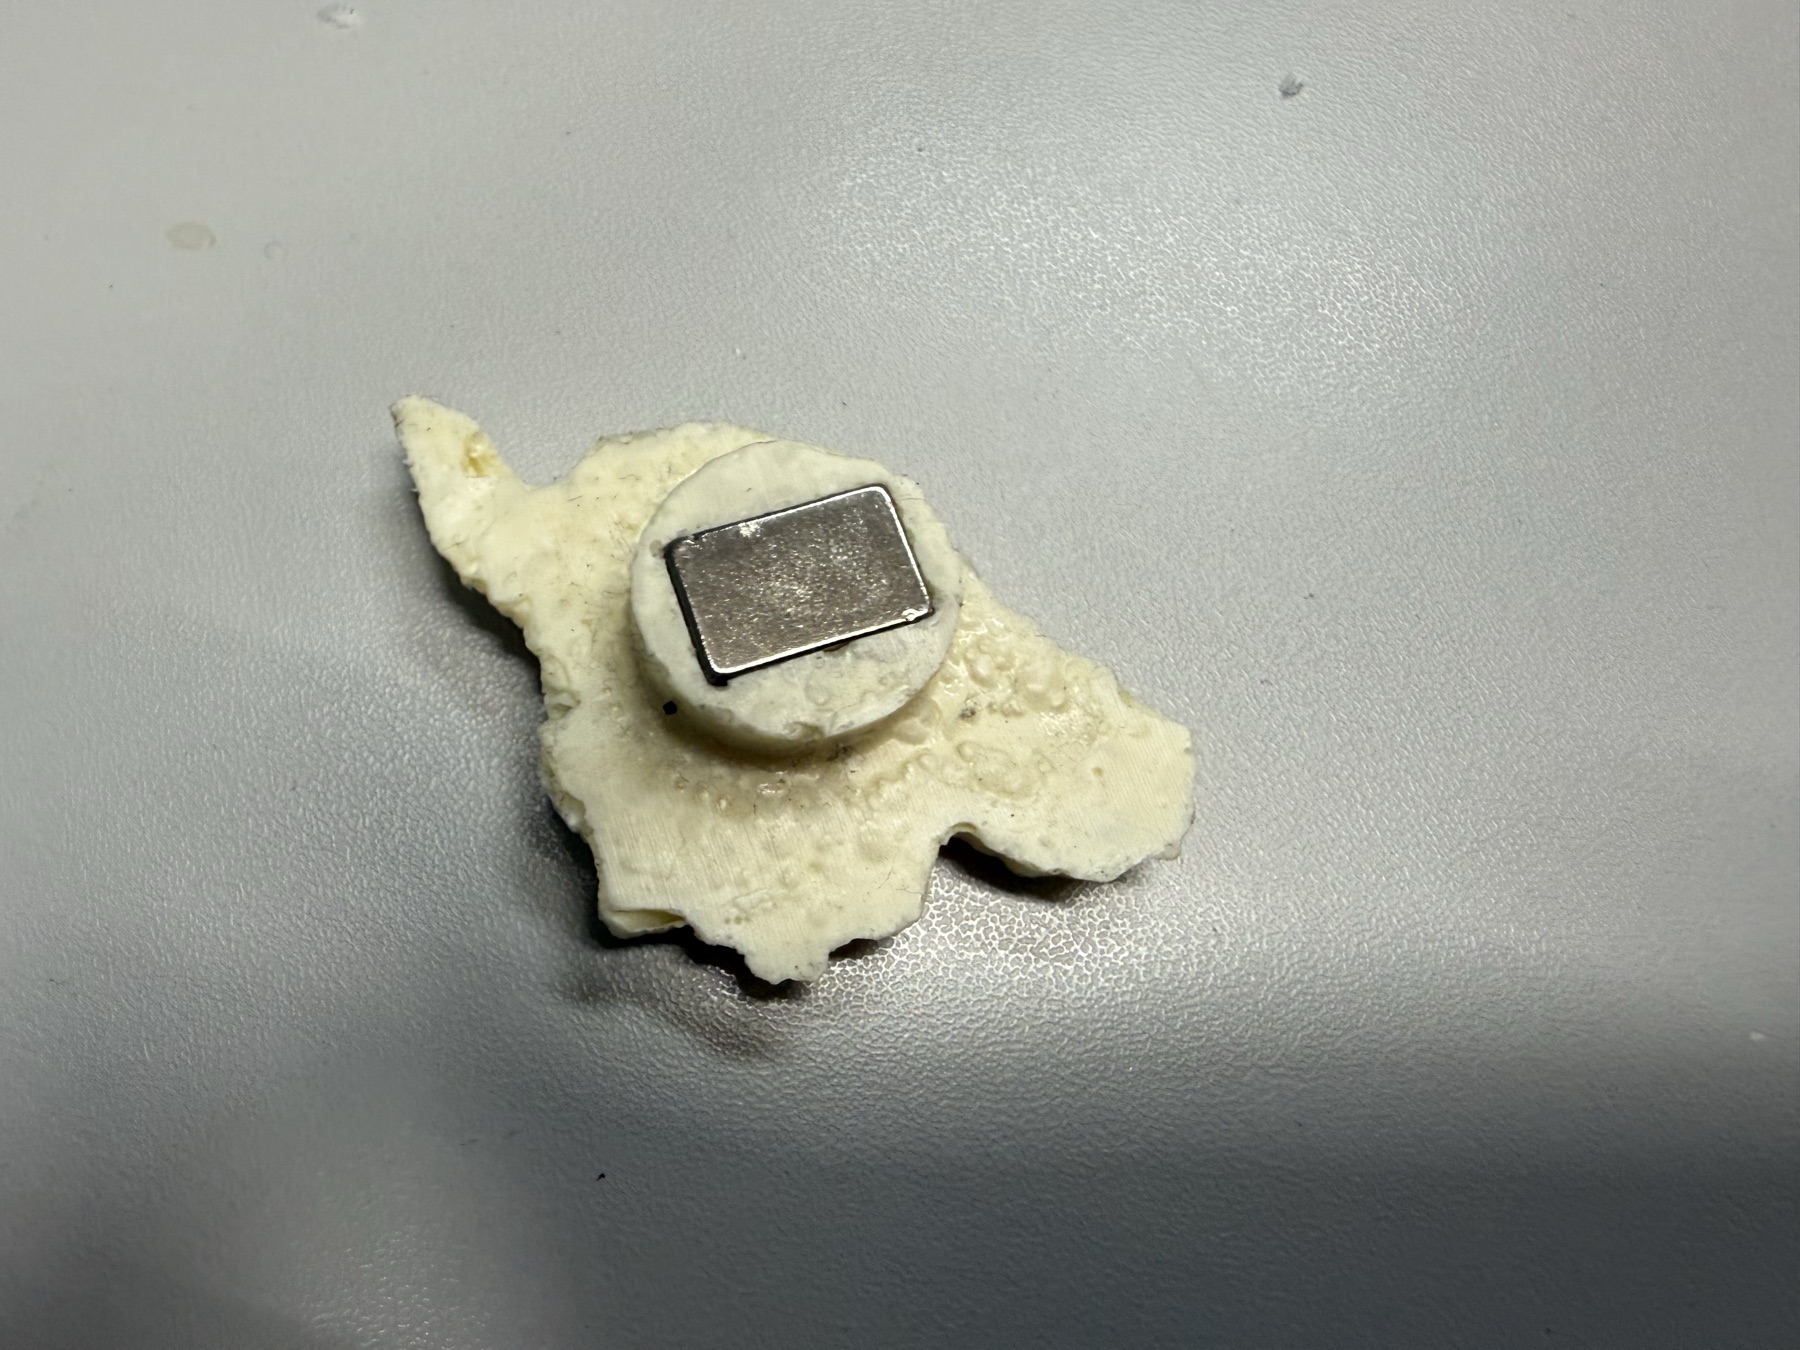
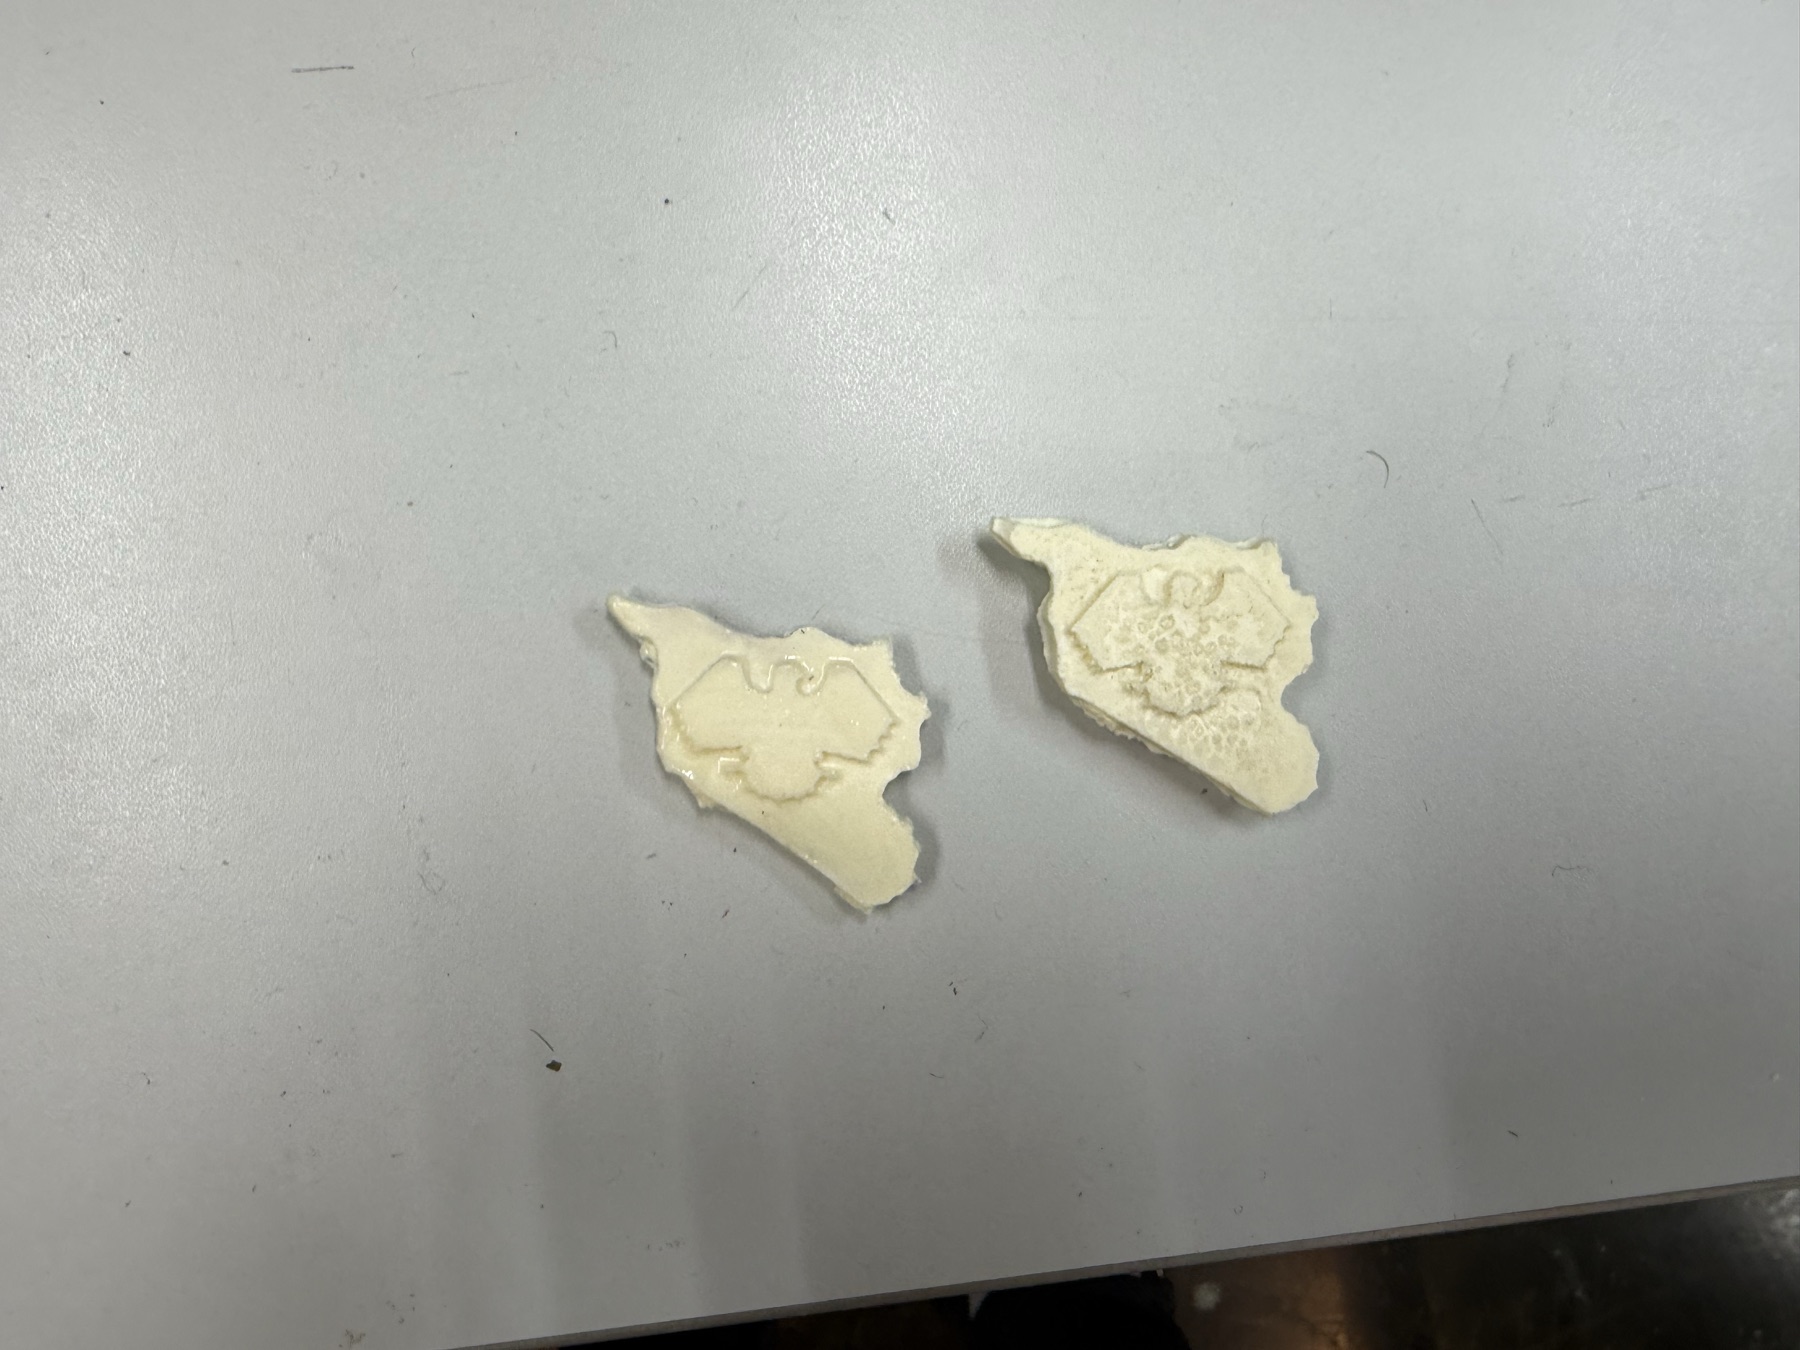
It takes about 7-10 mins to cure, but I left it a bit longer, and then added the magnet to it.
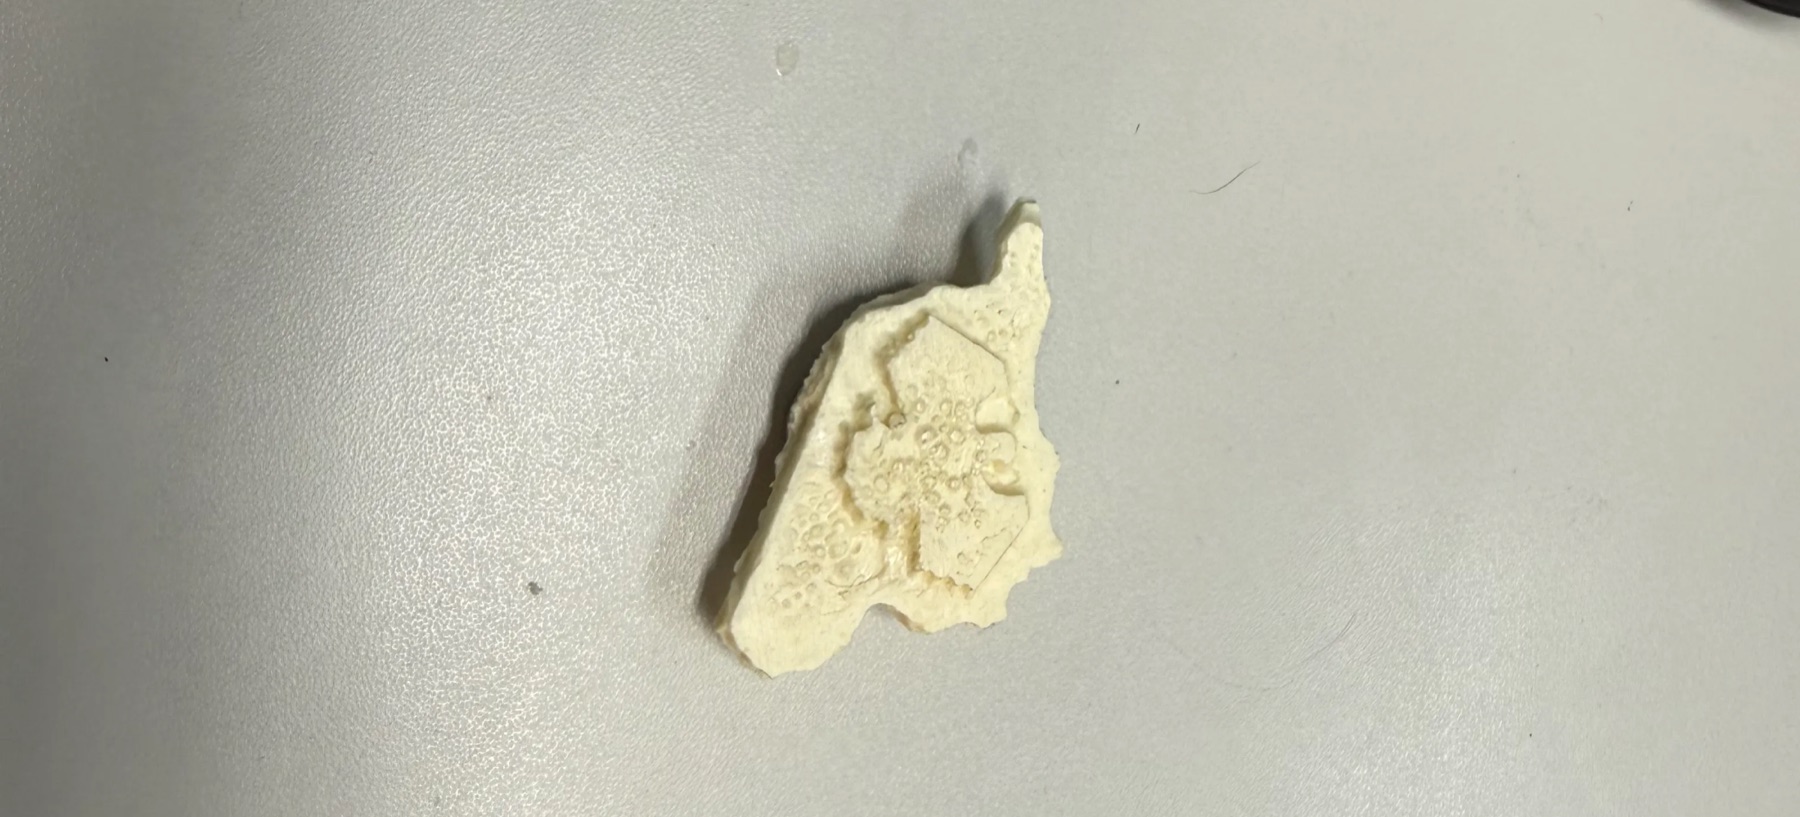
The second attempt came out much cleaner and barely needed any post-processing. Fixing the ratio to 100A:90B by weight sorted out the rough finish from the first pour.
For the bubbles, two other things helped. I mixed more slowly and scraped the sides of the cup instead of scooping from the bottom, so I wasn’t dragging air into the resin. I also used the tip from another bottle to pour a thin, steady stream into the lowest hole and let the material rise on its own instead of dumping it in.
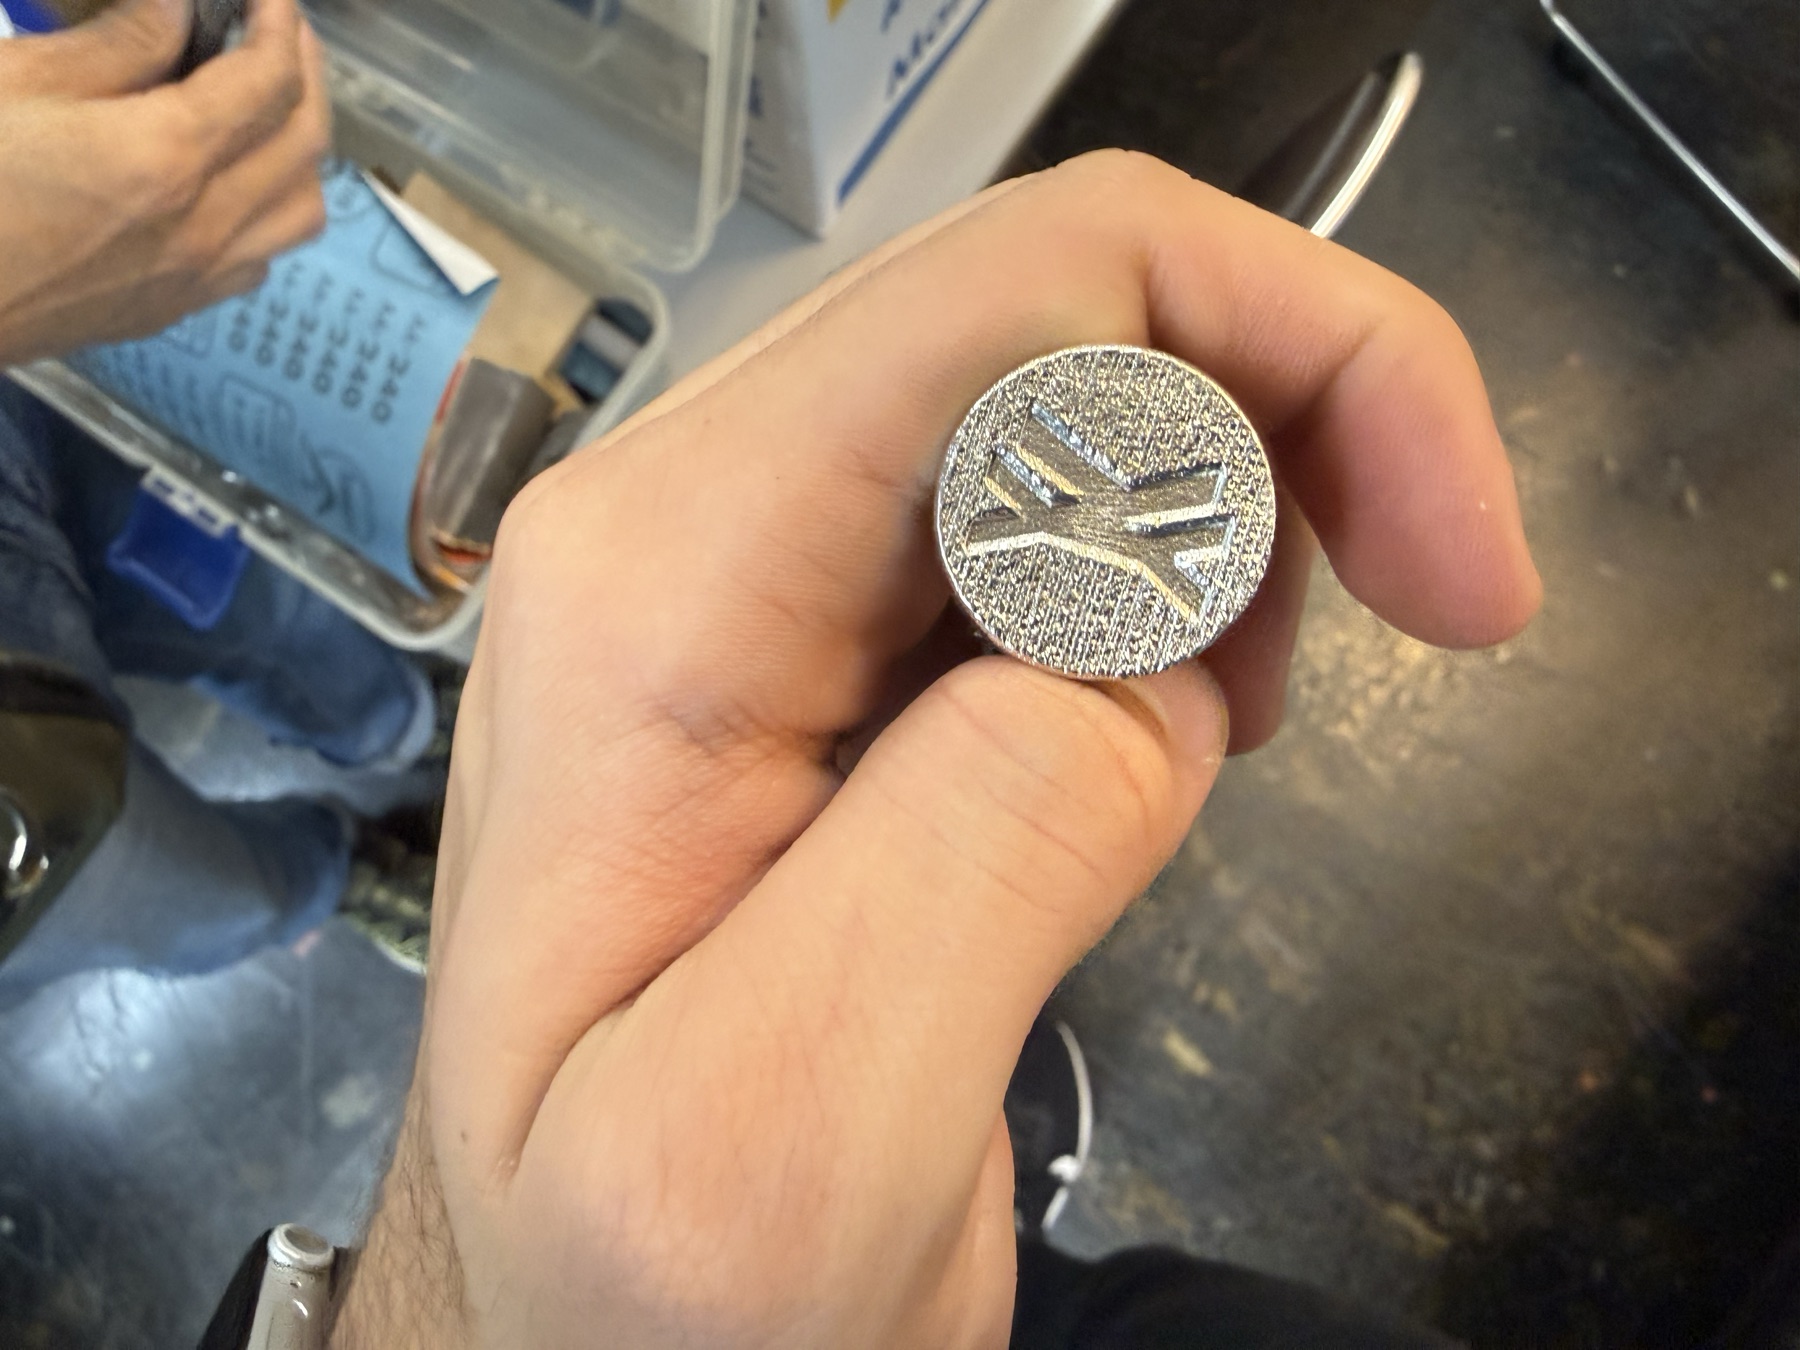
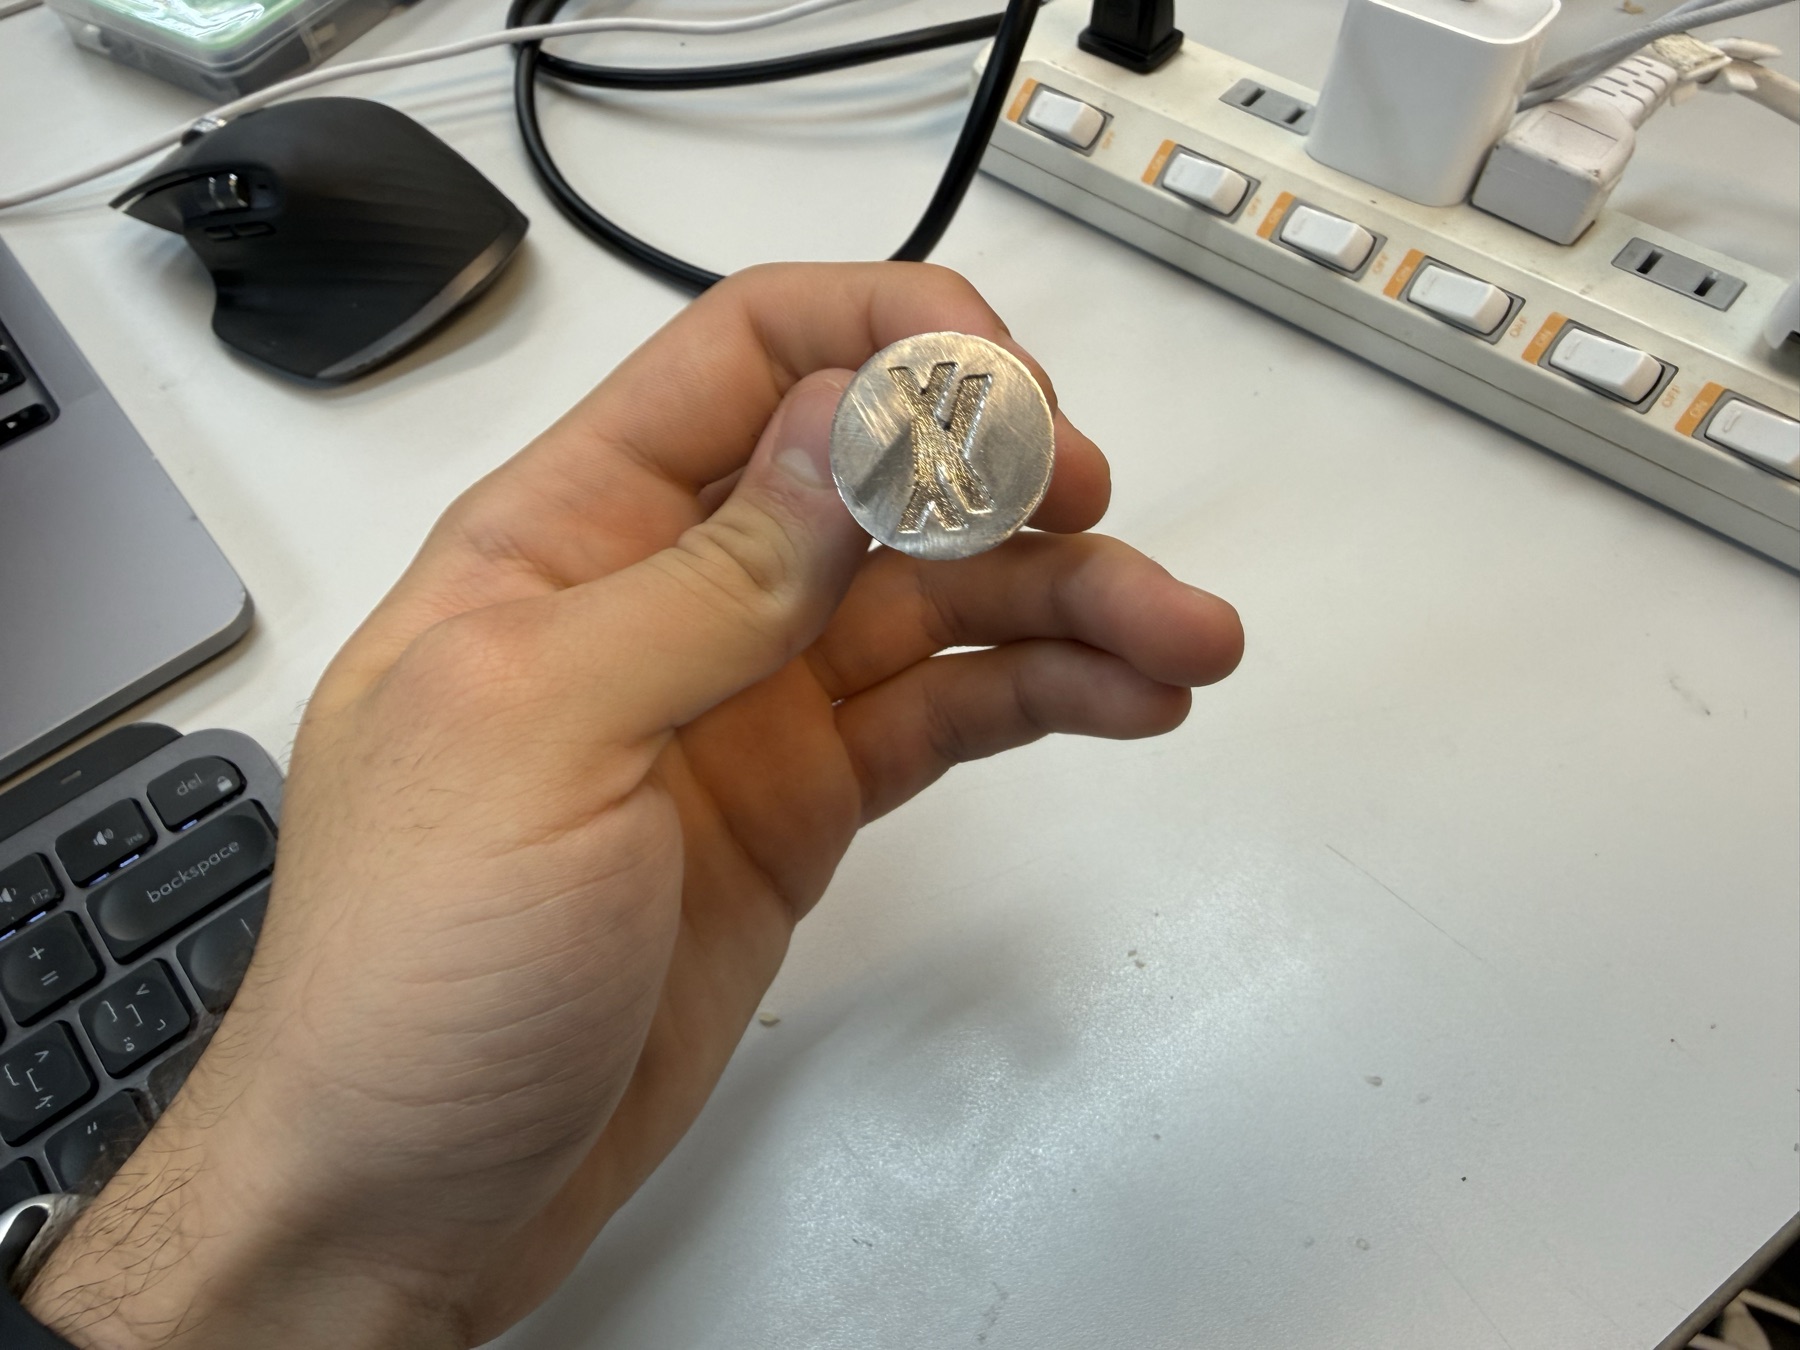
Casting using Low-Melting Point Metal
At the lab, we had low-melting point metal (#138), which is essentially a tin-bismuth low-melting alloy: around 42-43% tin (Sn) and 57-58% bismuth (Bi), free of lead (Pb) and cadmium (Cd), and its melting point is 138 C. That is very low for a metal, but I still needed to make sure that my silicone rubber mold could withstand the heat (its heat resistance is 232 C).
Here’s how it comes in those blocks:
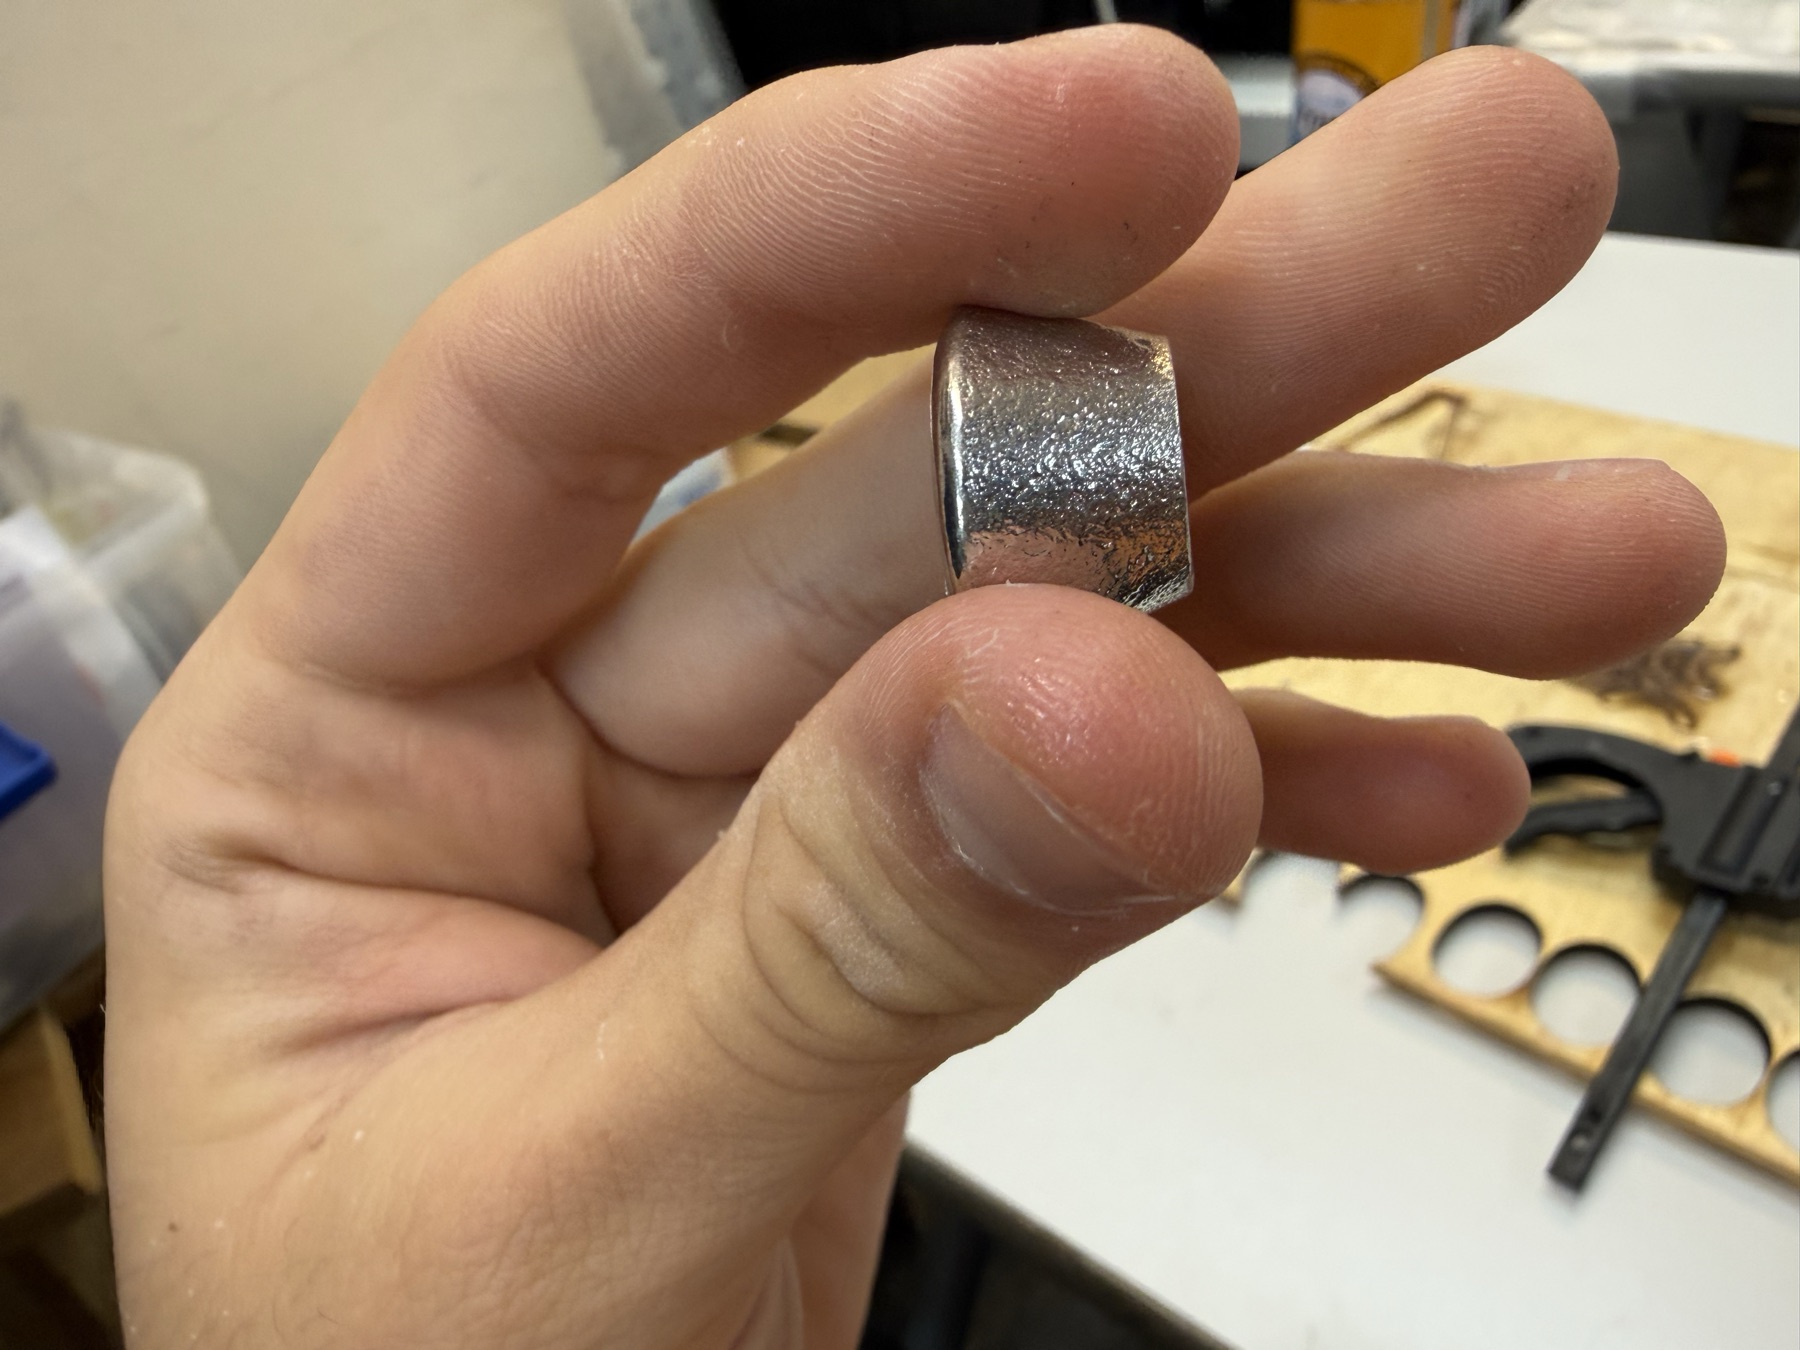
I prepared the setup, and Yuichi helped me heat up the metal. Don’t forget to put some talk in the mold to avoid the metal sticking to the mold.
After I poured, I left it for a bit to cool down, and then removed the extras liek the tubes…
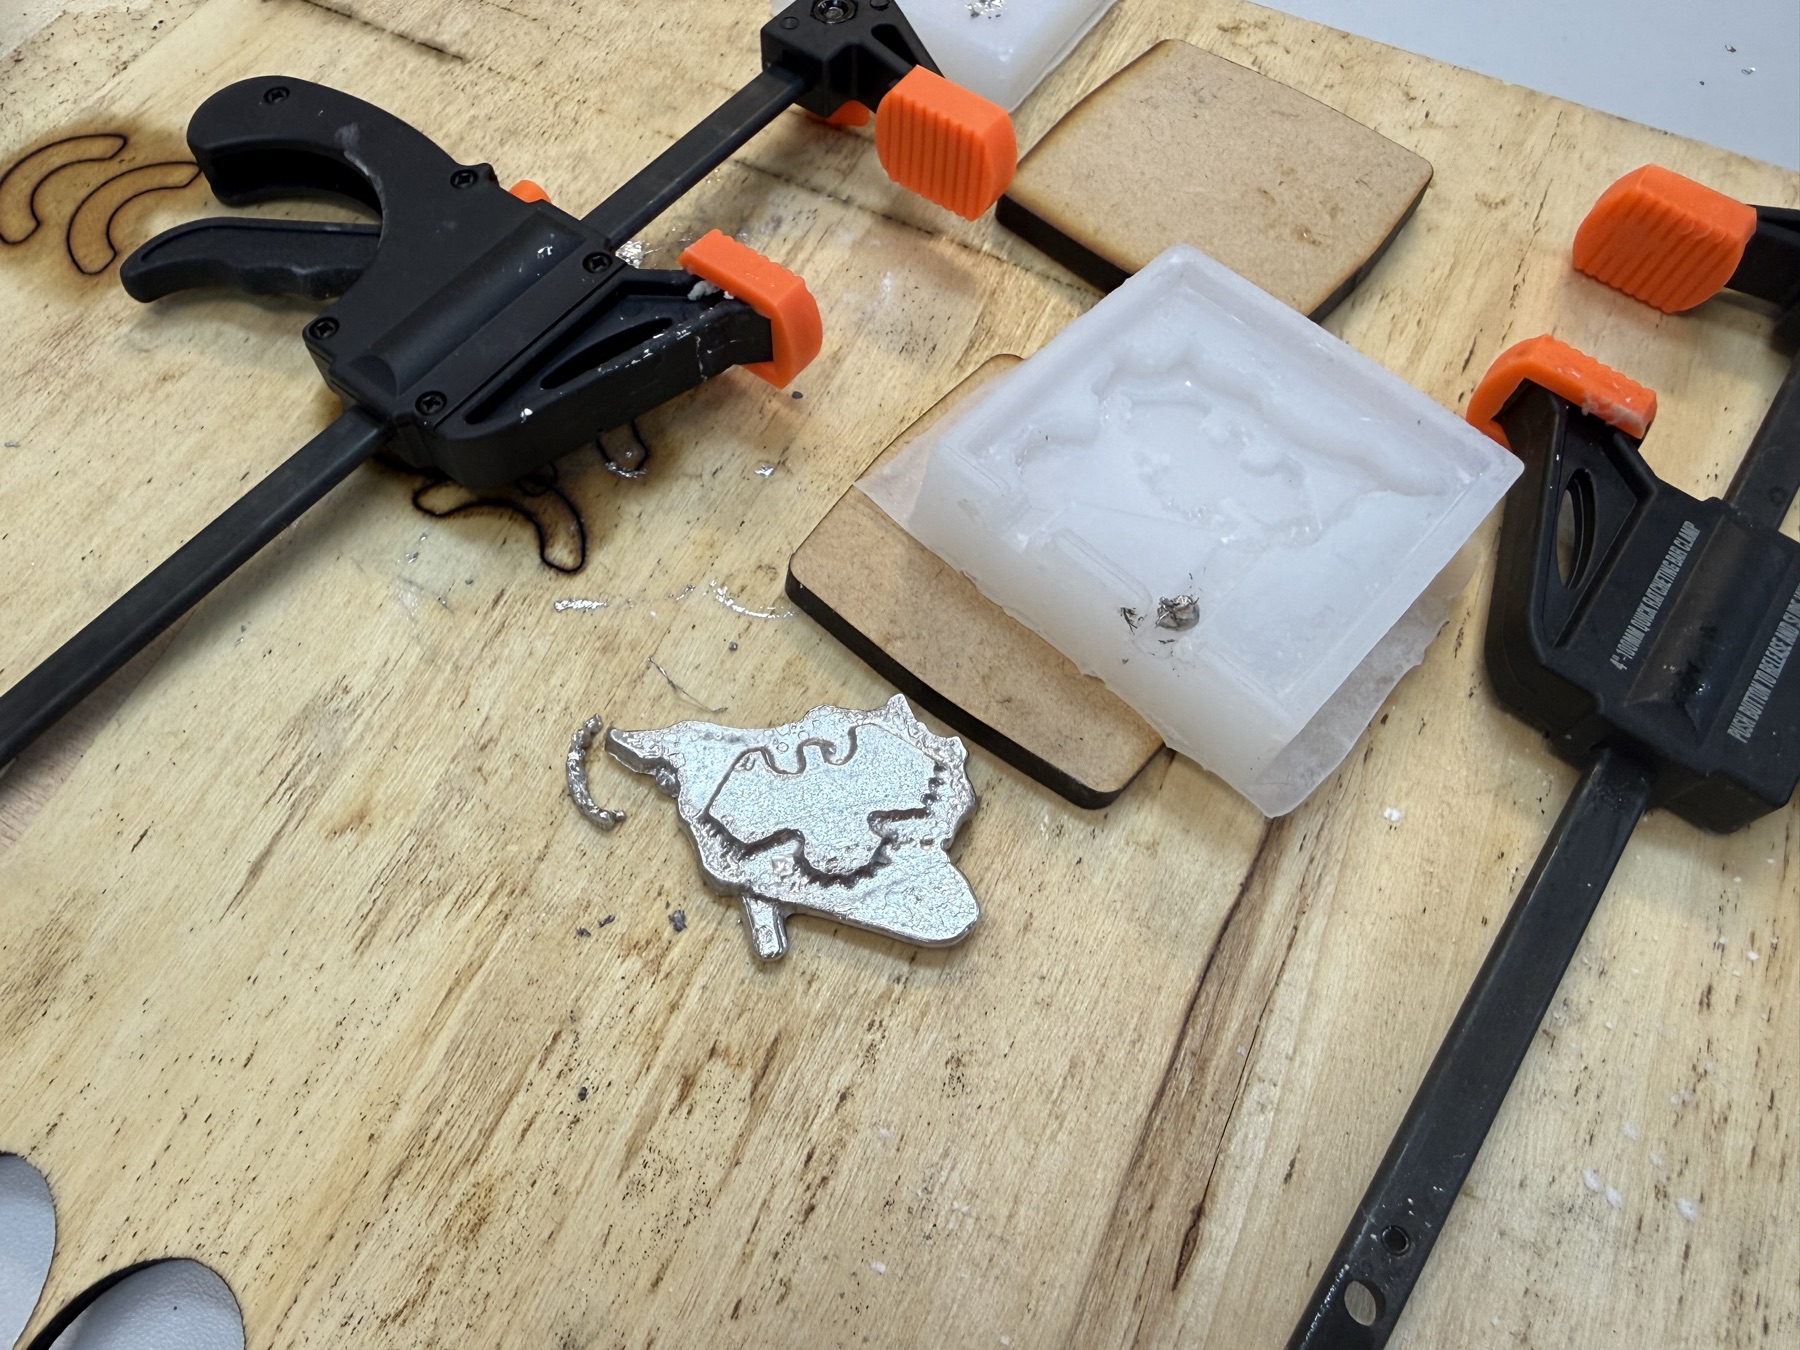
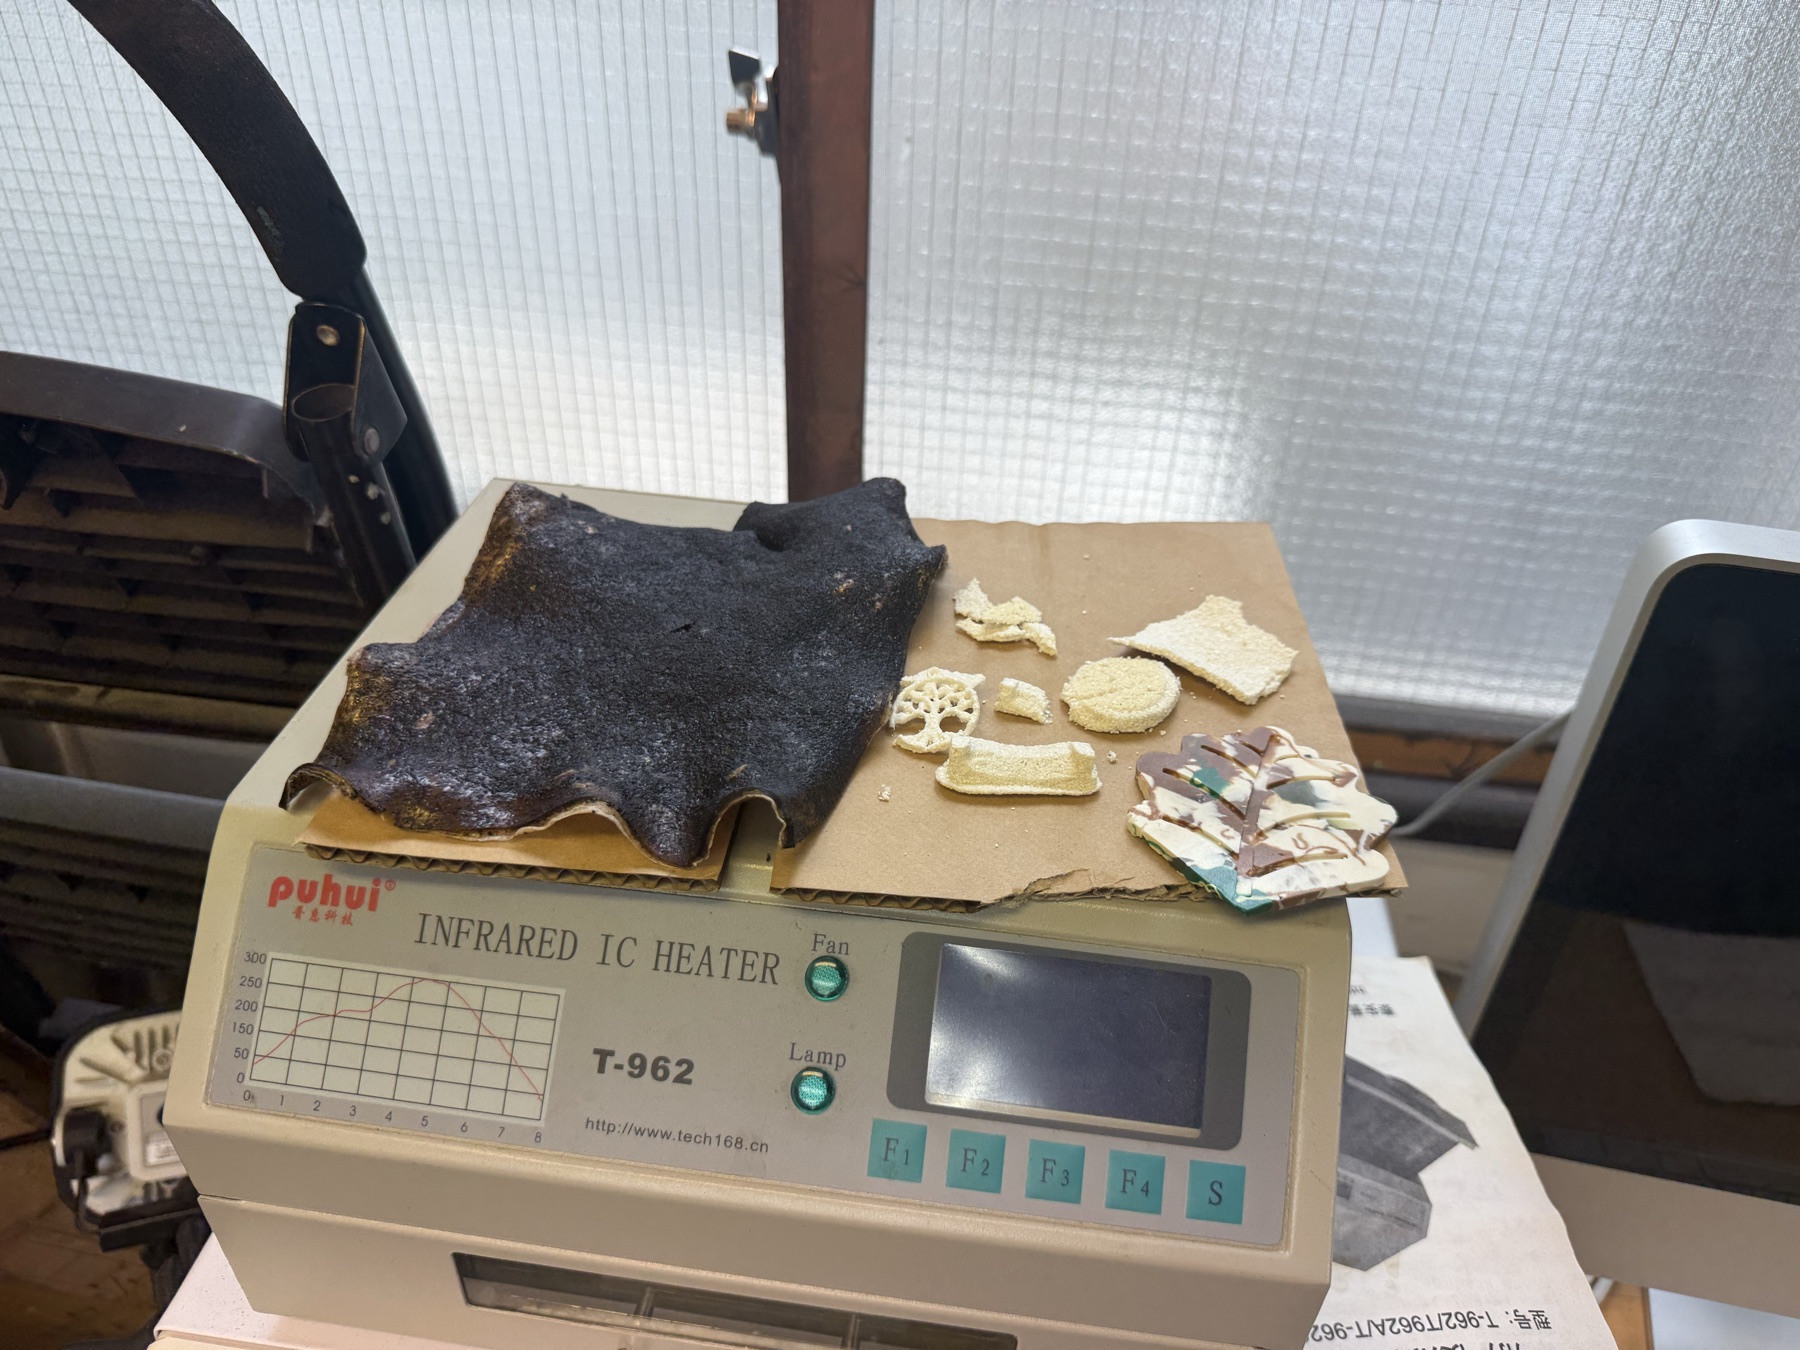
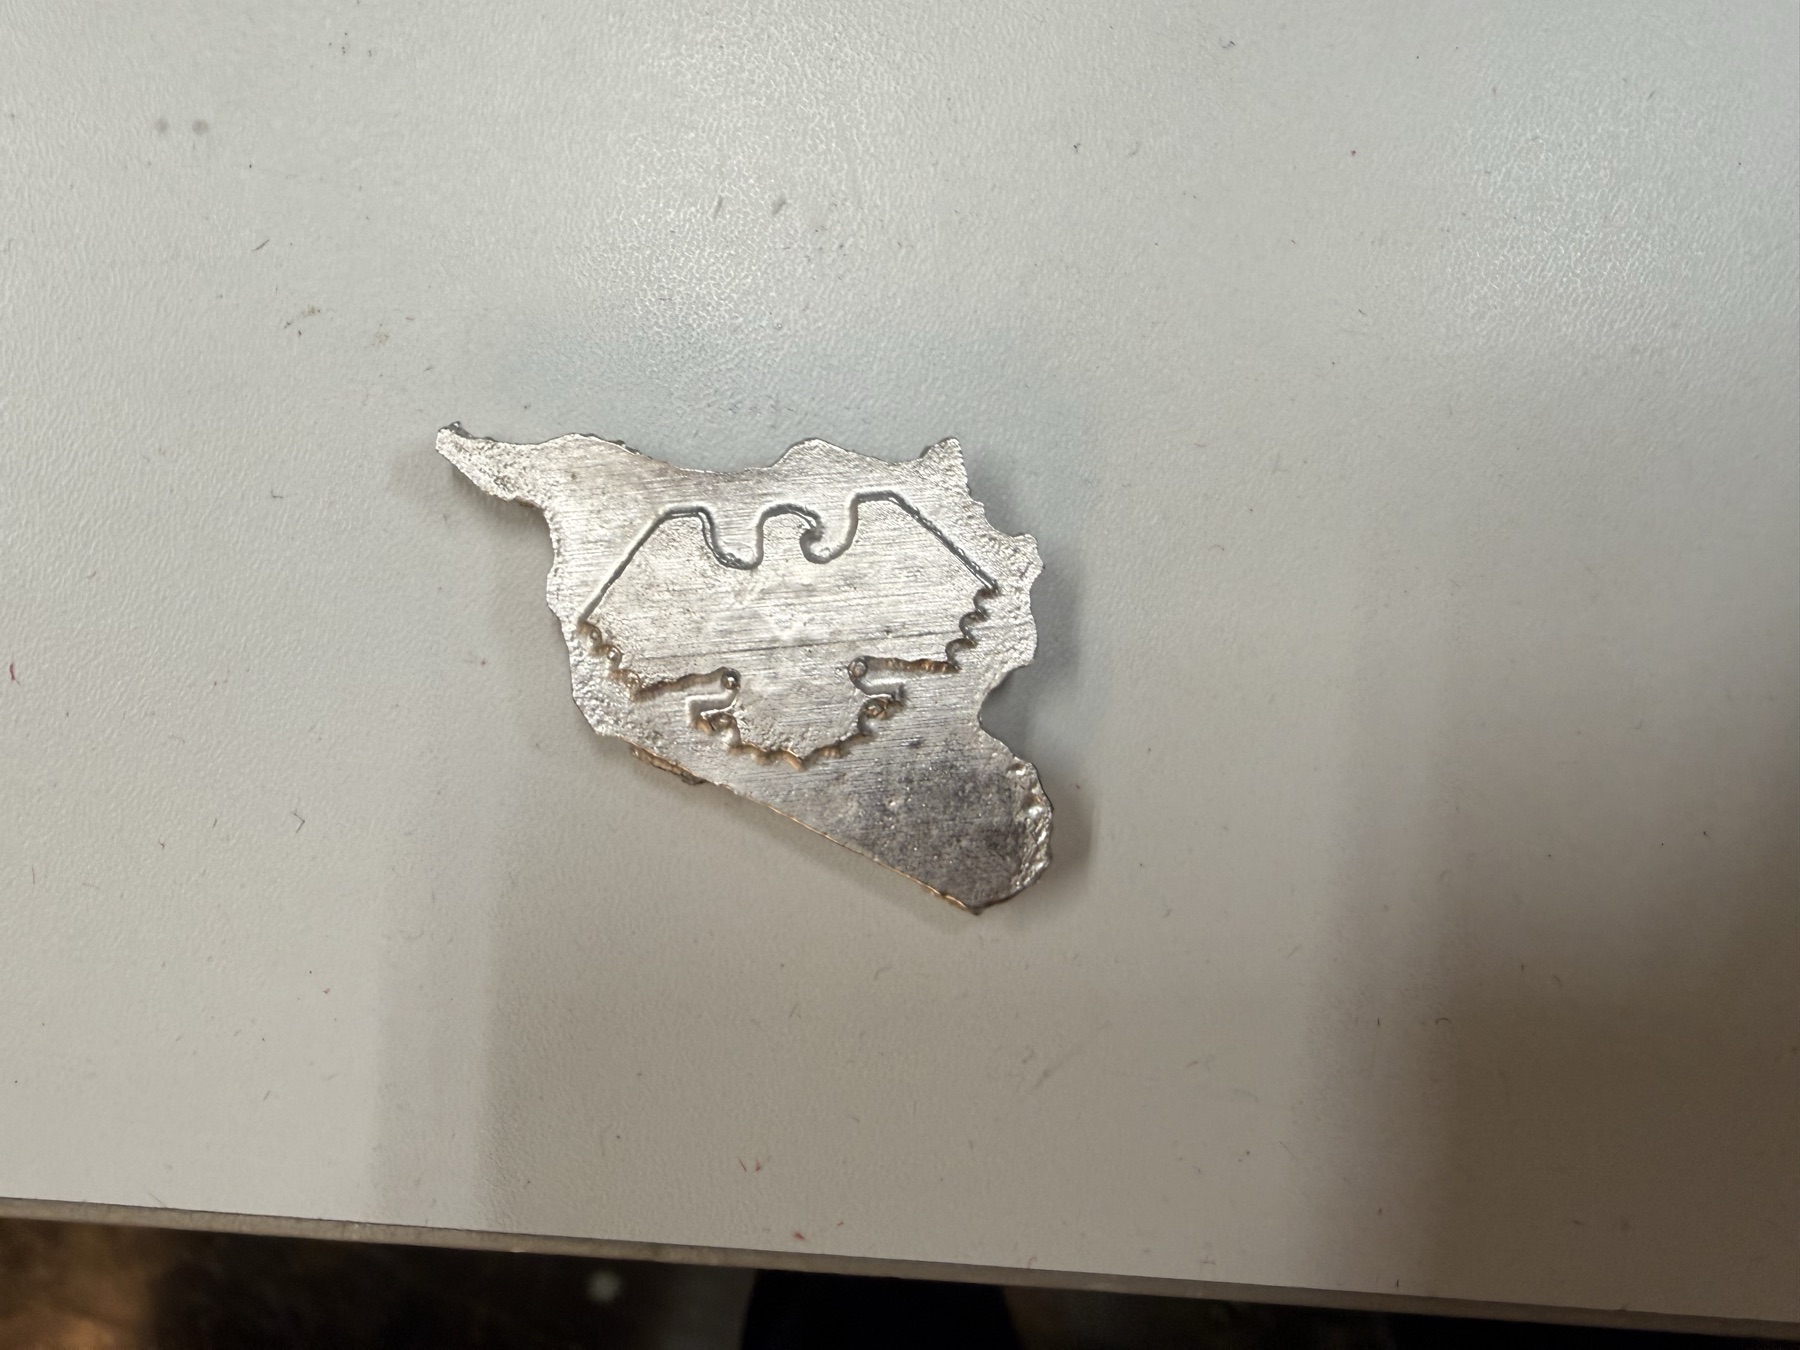
Here’s how the final result looked like!
Casting with a Biomaterial
Since HALF the session was about biomaterials and Materiom, the team at the lab tried different biomaterial recipes, and I was responsible for doing an eggshell biocomposite.
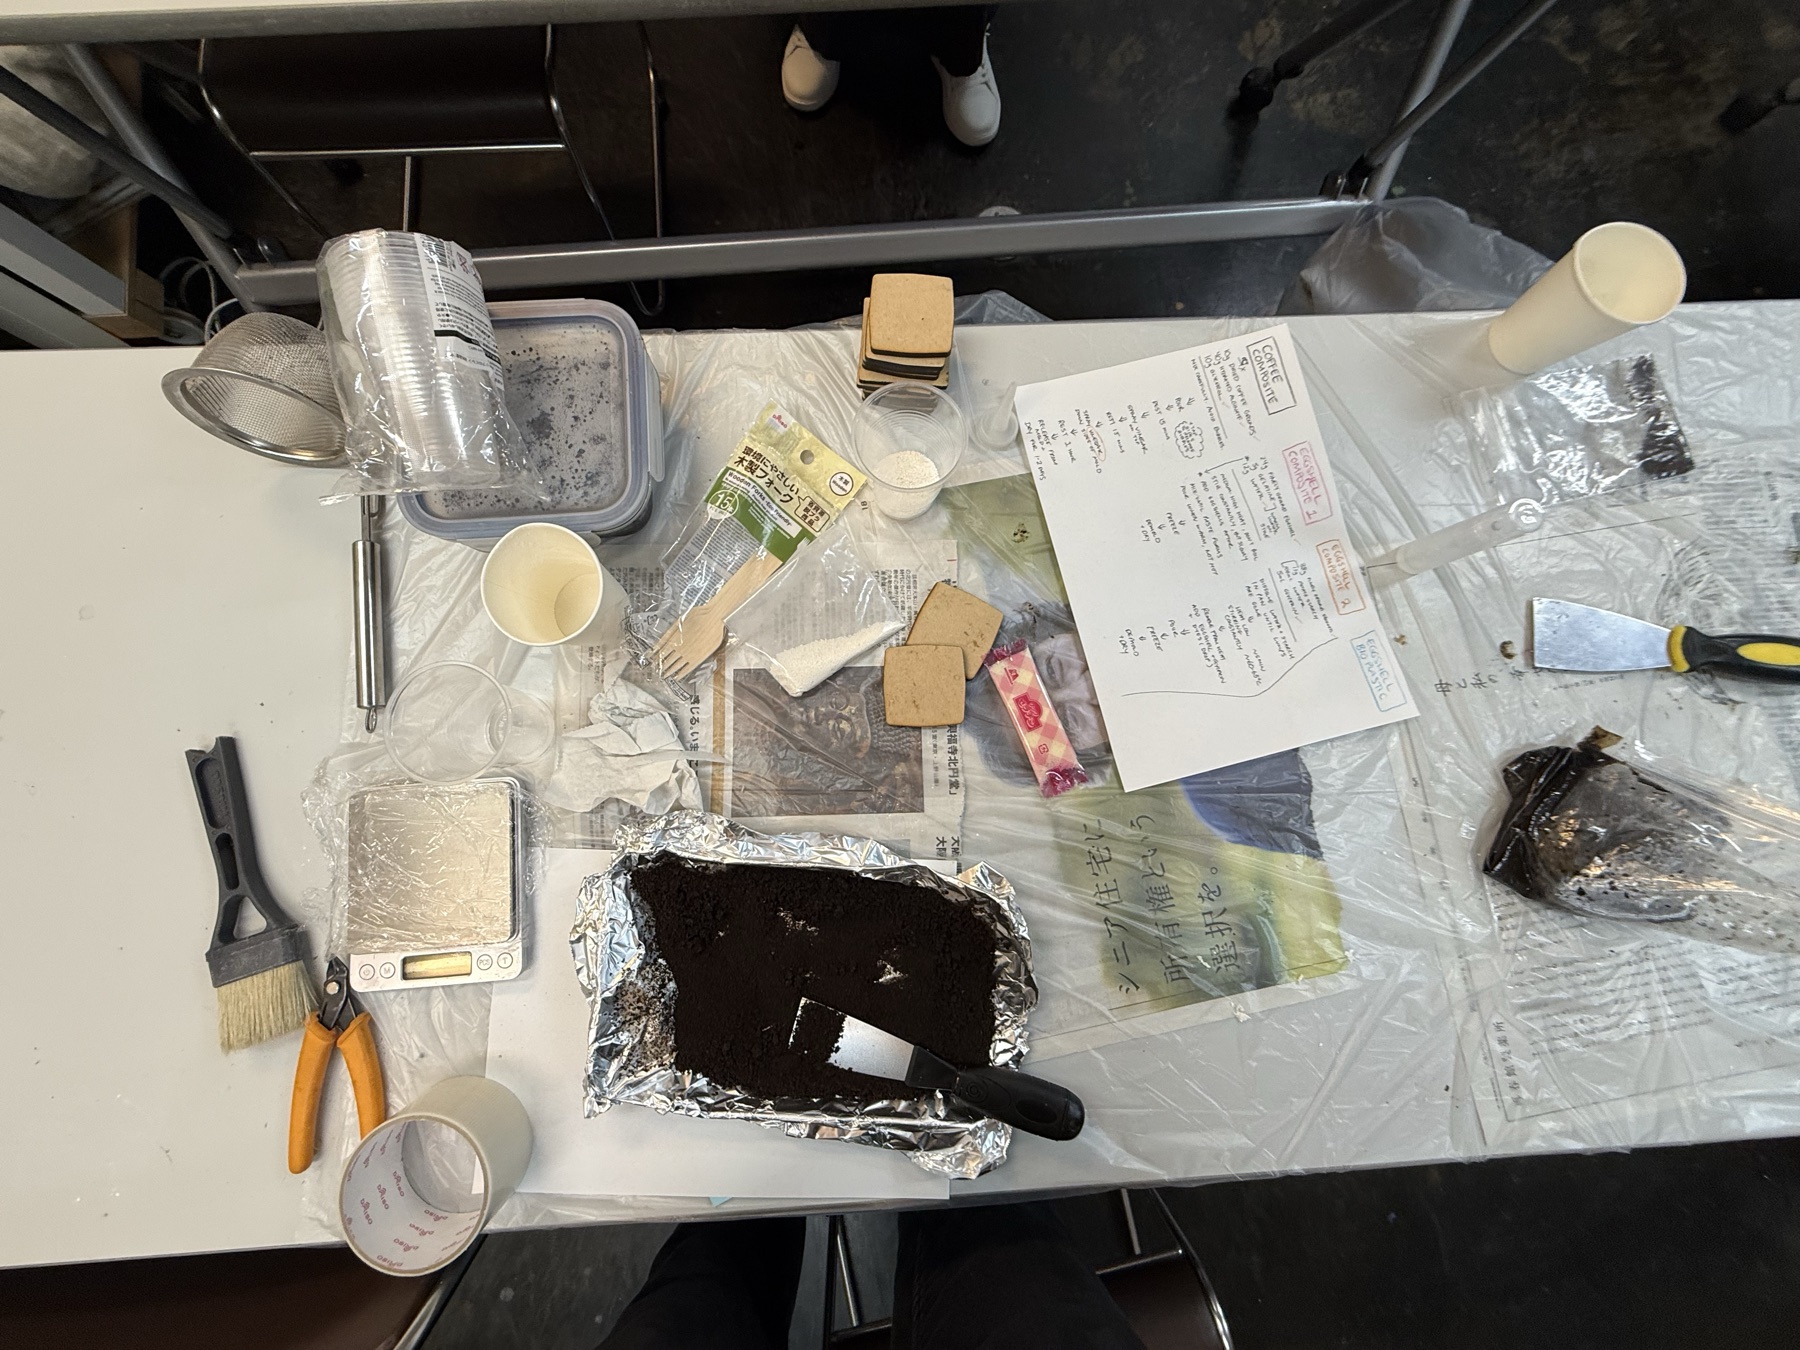
The recipe was quite simple. I needed 1) 12 ml of water 2) 24 g of eggshells 3) 5 g of gelatin. The rest of the process was to first prepare the eggshells by boiling them to clean/kill bacteria, drying them, grinding them, and sieving them into a fine powder.
Then, the water and gelatin are heated together in a pan, the eggshell powder is added before the gelatin becomes too liquid, and everything is mixed until it becomes a slightly viscous, sandy paste.
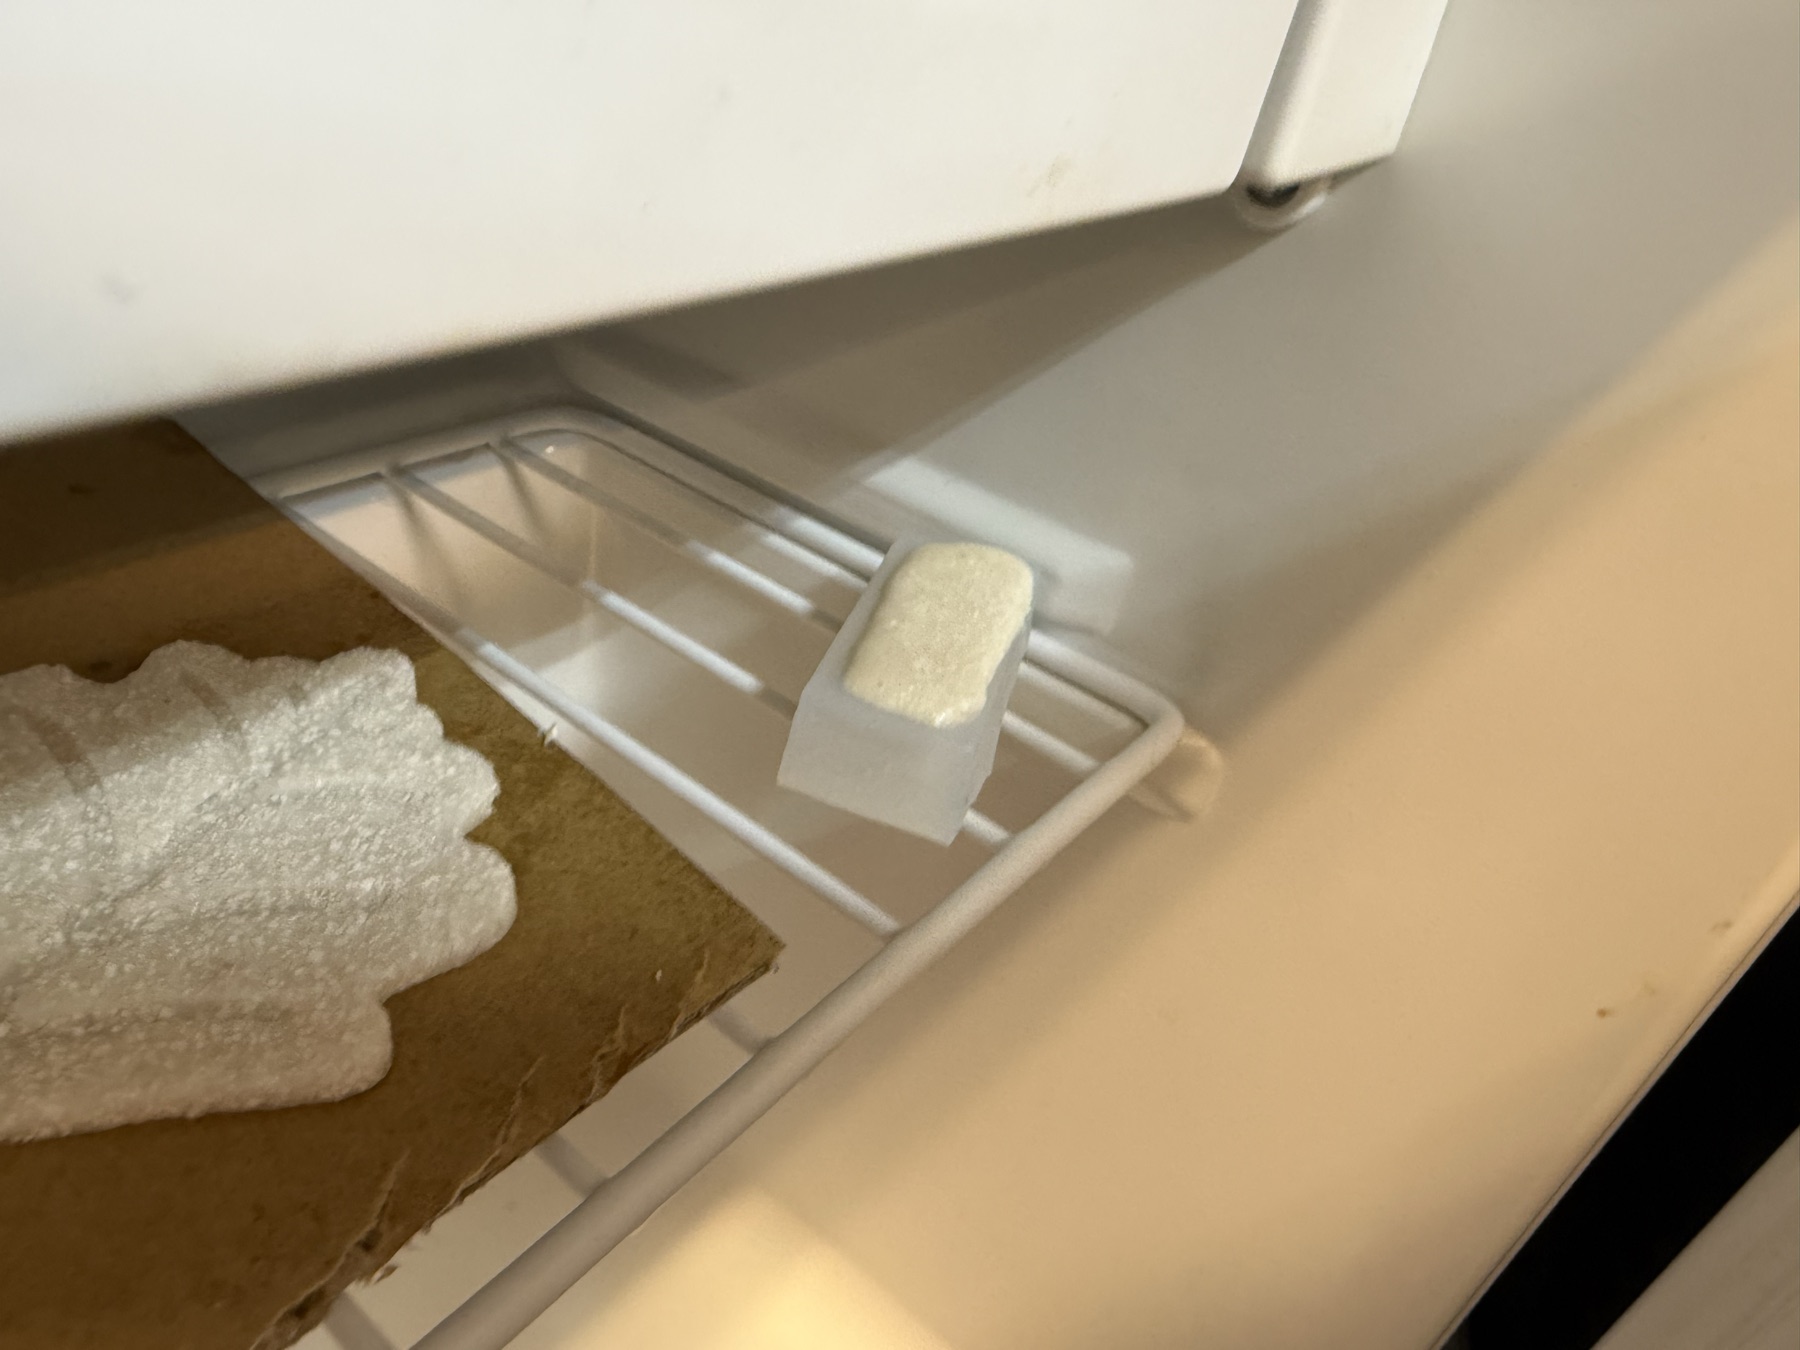
Finally, the mix is poured into the mold and left to dry. I freezed the filled mold to help it demold faster, then the I left it to dry a bit.
Comparison Between the Different Processes I Used
| Process/material | Mold or tool used | Result | Safety Note |
|---|---|---|---|
| Tin wax stamp | Laser-cut stamp mold for YYK logo stamp | A rigid metal stamp for sealing wax | Hot metal and tools, eye protection, and waiting until the cast cools before touching it. I can assure you the cast will stay hot for a bit, don’t let your intrusive thoughts make you touch it, lmao. |
| Mold Star 31T silicone | CNC-machined machinable wax negative | Flexible silicone mold for casting rigid parts | Gloves, eye protection, ventilation, and mixing/pouring within the short working time |
| Smooth-Cast 320 plastic resin | Mold Star 31T silicone mold | Rigid plastic cast/fridge magnet | Part A has stronger skin and respiratory hazards, the pot life is short, and mixed residue should fully cure before disposal |
| Bismuth-tin low-melting alloy (Pb/Cd-free) | Mold Star 31T silicone mold | Metal version of the fridge magnet | Heat-safe tools/gloves, eye protection, dry mold, and allowing the metal to cool fully |
| Eggshell Biocomposite | Existing mold from the lab/chopstick holder | Biomaterial sample from eggshell, gelatin, and water | Heating the mixture, cleaning/sanitizing eggshells, and allowing enough drying time |
Original Design Files
- YYK stamp design SVG
- Stamp mold laser-cut SVG
- Syria map SVG
- Syria emblem SVG
- Syria magnet STEP file
- Patched MODS 2.5D STL module
This week’s checklist
- Linked to the group assignment page and reflected on your individual page what you have learned
- Reviewed the safety data sheets for each of your molding and casting materials, then made and compared test casts with each of them
- Documented how you designed and created your 3D mold, including machine settings
- Ensured your mold has smooth surface finish, that does not show the production process (by postprocessing if necessary)
- Shown how you safely made your mold and cast the parts
- Described problems and how you fixed them
- Included your design files and ‘hero shot’ of the mold and the final object