Week 14: interface and application programming
Group assignment:
- Compare as many tool options as possible.
- Document your work on the group work page and reflect on your individual page what you learned.
Individual assignment
- Write an application for the embedded board that you made that interfaces a user with an input and/or output device(s)
Learning Outcomes:
Implement a User Interface (UI) using programming and explore protocols to communicate with a microcontroller board that you designed and made.
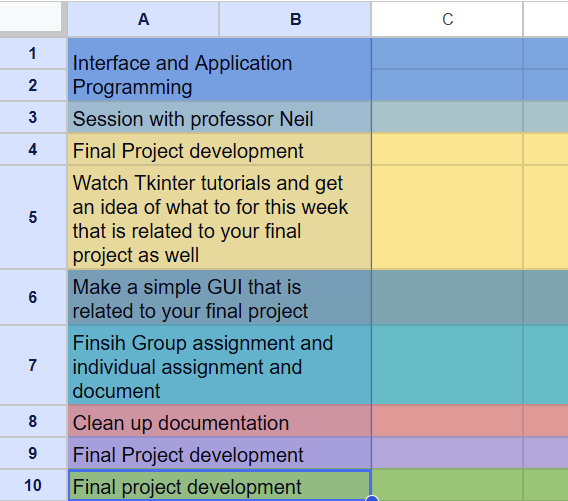
This is the schedule for this week 😮💨
Group assignment:
For the group assignment, we tried out a few interface tools—Processing, p5.js, and Node RED using our XIAO ESP32-C3 board from earlier weeks to send data from the microcontroller to a screen. Processing and p5.js used USB serial to show live data on a computer or browser, while Node RED used Wi-Fi with MQTT to send data wirelessly to a dashboard. We compared how each one works, how easy they are to set up, and what they're best used for.Overall, we learned how different communication methods affect interface design.
You can access our group assignment here for more details.
Individual assignment:
So for this week's individual assignment, we have to write an application that lets a user interact with the embedded board we made like either reading data from an input device, controlling an output device, or both. At first, I thought this week was very similar to Networking and Communications week but unlike the networking and communications week where the focus was on boards talking to each other, this week is about creating an interface that allows a human to interact with the board through an application with a visual UI
Tkinter:
Tkinter short for "Tk interface" is the standard library built into Python used to create Graphical User Interfaces (GUIs). A Graphical User Interface (GUI) is a way to interact with a computer using visuals like icons, menus, and buttons instead of typing commands. It makes things easier by letting you click or tap to do tasks on your computer. So Tkinter is the tool you use to build desktop applications that have windows, buttons, and text boxes instead of just running in a text only command line window.

Installing Python:
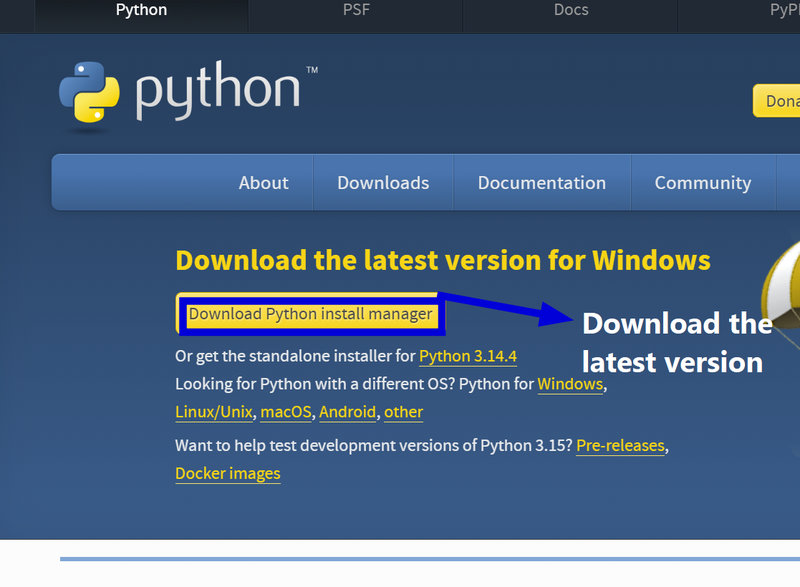
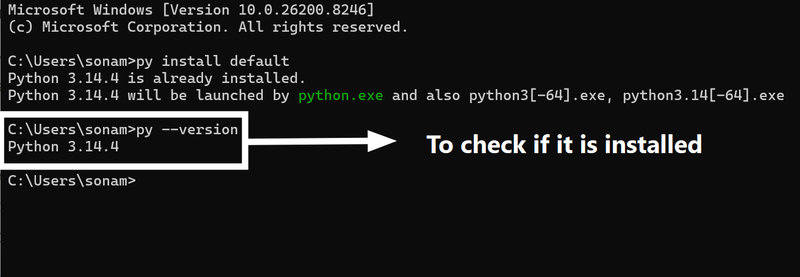
Before starting with Tkinter, I first had to install Python on my computer, since Tkinter runs using Python.I went to python.org/downloads and downloaded Python 3.11 or a newer version.Then run the downloaded .exe file
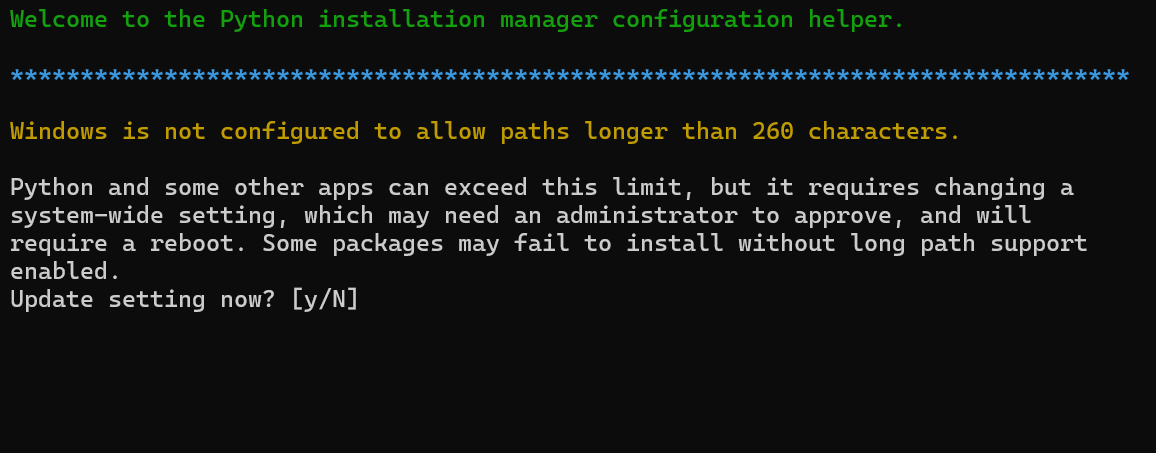
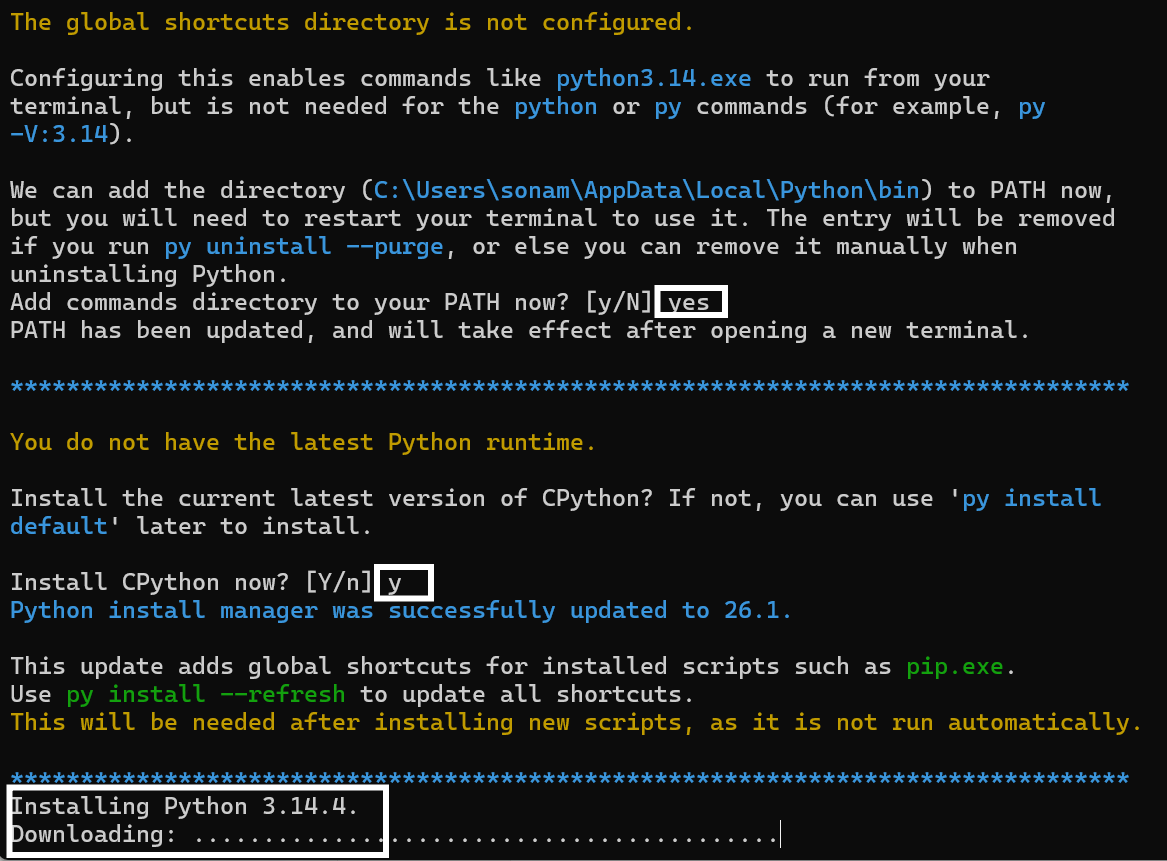
The Python installer popped up in the terminal, and I just followed the prompts by typing y/yes for the configuration options until Python finished installing.
Then to check whether Python has been installed or not, I typed the command python --version and pressed Enter.
Getting Started with Tkinter
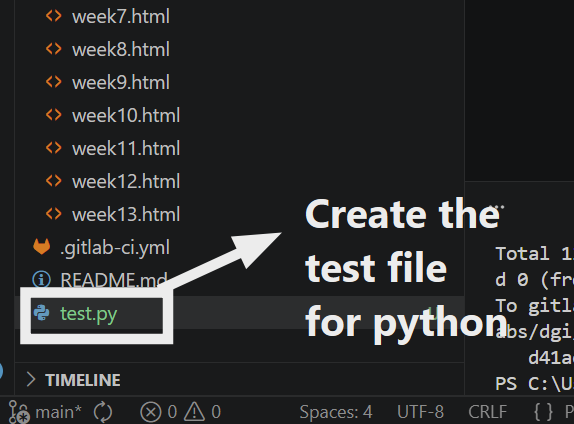
Now that I have installed python on my computer, I had to make a python file in VSCode
- Open VS Code, go to the Extensions tab, search for "Python," and install the one by Microsoft.
- Click File → New File, then Save As, and name it test.py. The .py tells the computer that it's a Python file.

Tkinter is a library so it already comes with Python. You just import it at the top of your code.
How to import it:
import tkinter as tk
The as tk part just means instead of typing tkinter.Button every time you can just type tk.Button. It's a shortcut nickname.
Creating a main window:
root = tk.Tk()
Creates the actual window/pop up where all your widgets will live.
Adding widgets like labels, buttons :
label = tk.Label(root, text="Hello, Tkinter!")
button = tk.Button(root, text="Click me!")
Creates a text label and a clickable button, attaching both to the root window.
Organizing widgets:
Pack manager:
label.pack()
button.pack()
Stacks widgets vertically (or horizontally) like packing items in a box.
Grid manager:
Grid manager:
label.grid(row=0, column=0)
button.grid(row=1, column=0)
Places widgets in a table like layout using rows and columns (like Excel cells).
Configuring widget properties:
label.config(font=("Arial", 12), fg="blue")
button.config(bg="green", command=some_function)
Changes how widgets look (font, fg=text color, bg=background) and behaves (command=what happens when clicked).
Defining event handlers:
def some_function():
print("Button clicked!")
Creates a function that runs automatically when an event occurs (like clicking the button).
Running the main event loop:
root.mainloop()
Keeps the window open and constantly waits for user actions (clicks, key presses, etc.). Without this, the window would flash and disappear instantly.
This was a simple GUI I created for practice:
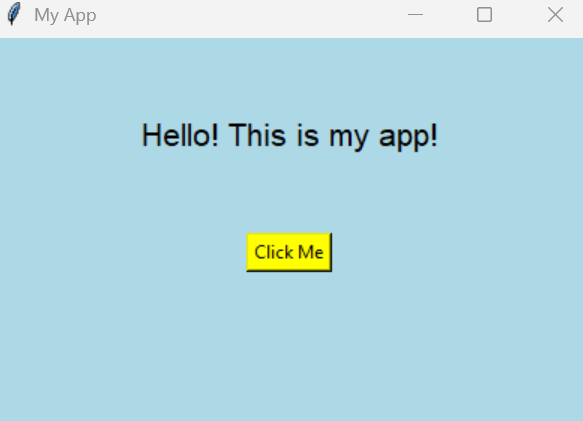
Time to design my own GUI!
I also wanted to make some progress on my final project this week, so I decided to test the posture correction part pf my final project.
I generated a flowchart form Mermaid flowcharts for the workflow this assignment:
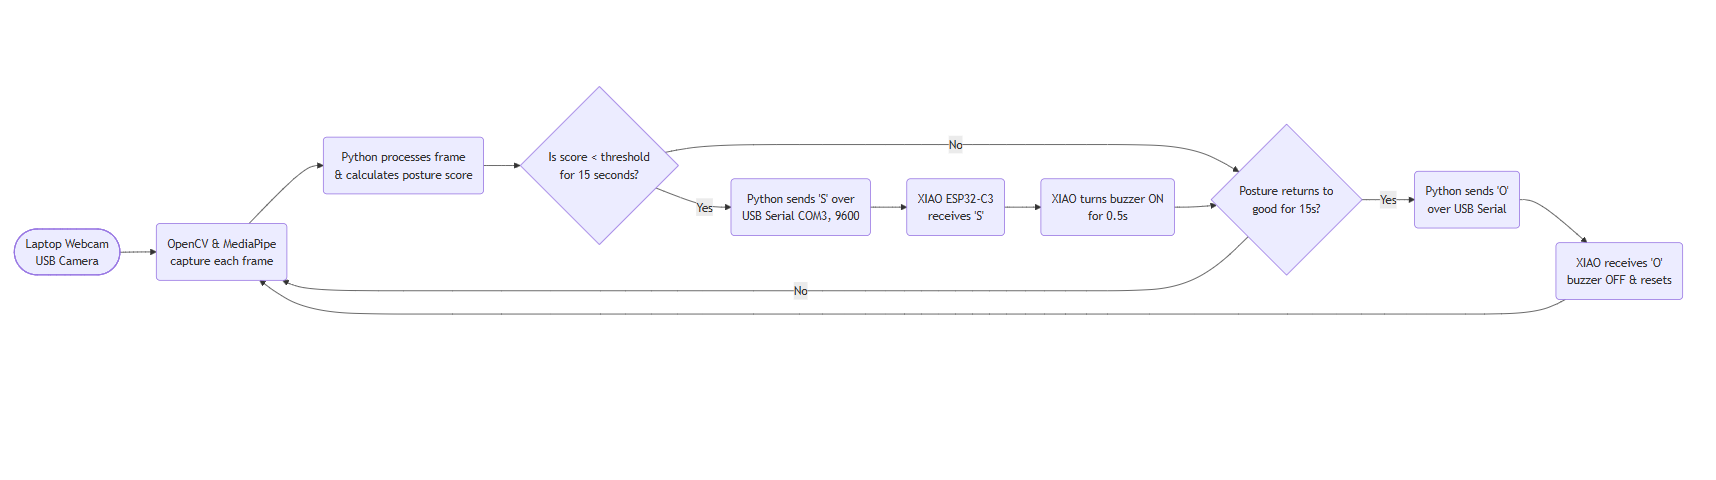
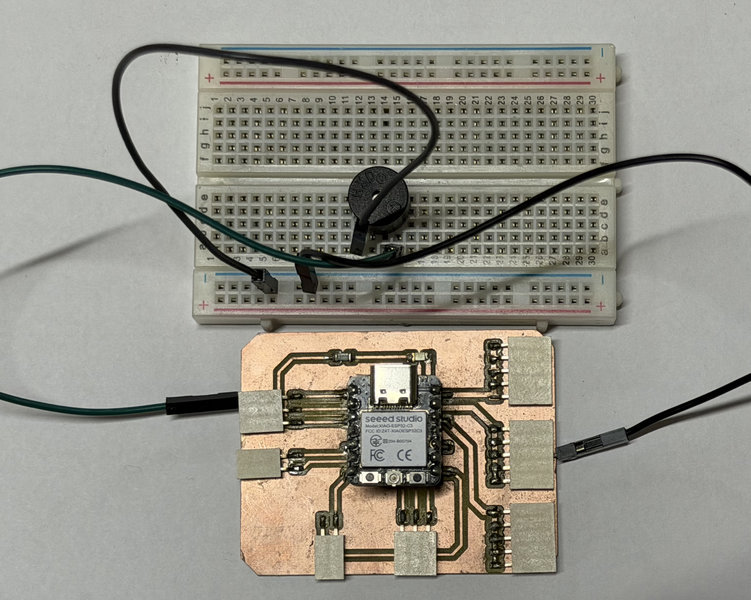
I'll be using the Xiao ESP32-C3 board I made during Output week, connected to a buzzer that will beep whenever a slouch is detected.
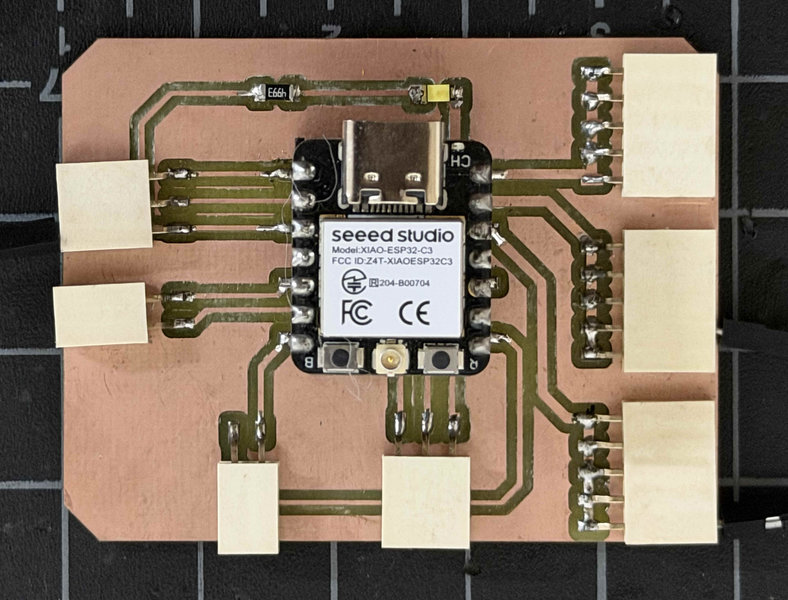
Connections:
I connected the positive wire into pin D0 on the XIAO (GPIO 0). This is the signal pin that will turn the buzzer on and off.
I then connected the negative wire into any GND pin on the XIAO.
The two main libraries I used for posture detection and video processing were MediaPipe and OpenCV:
Mediapipe
MediaPipe is a machine learning framework developed by Google that provides ready made models for tasks like pose detection, hand tracking, and face recognition. MediaPipe was chosen because it provides real time, on device pose estimation that runs efficiently on a standard CPU without requiring a GPU or cloud services.
OpenCV
OpenCV (Open Source Computer Vision Library) is a powerful library for image and video processing. OpenCV was used because it makes it easy to capture and process live webcam video in real time, which is important for a smooth posture tracking system.
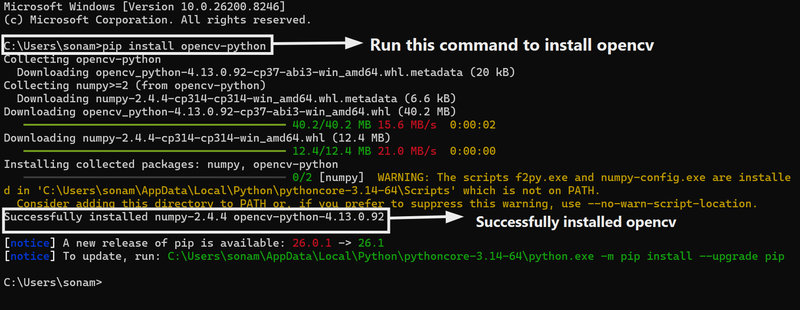
I first downloaded all the required libraries
Open your terminal and make sure you are connected to the internet. Then use the following commands to install the libraries.
# 1. Install OpenCV (for camera and image processing)
pip install opencv-python
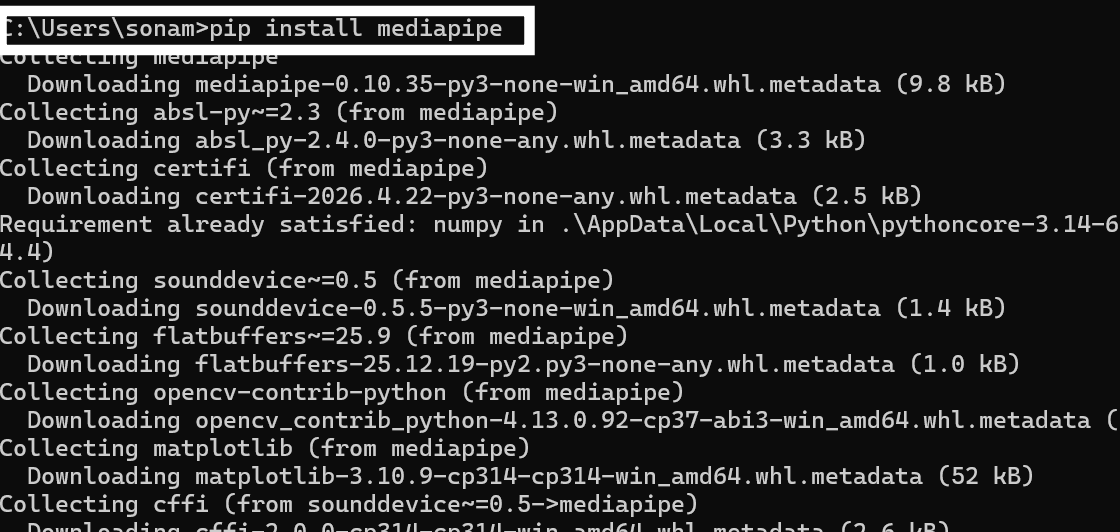
 # 2. Install MediaPipe (for pose detection)
pip install mediapipe
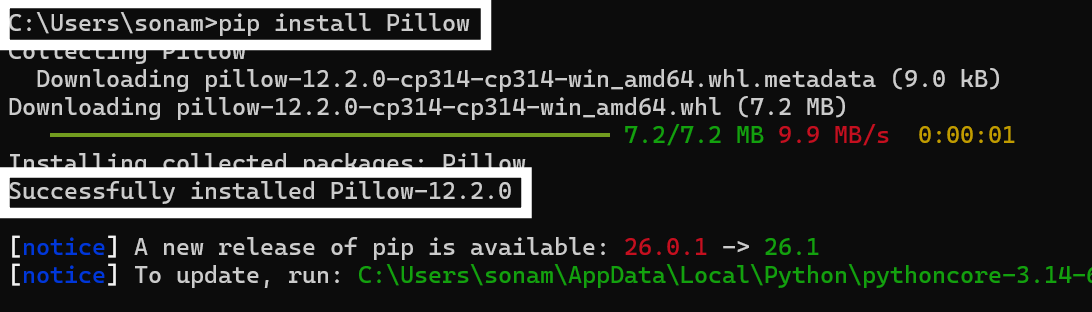
 # 3. Install Pillow (to show images in Tkinter)
pip install pillow
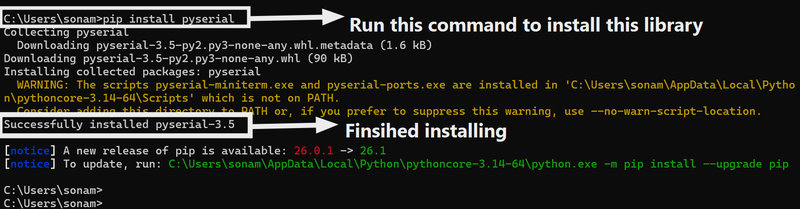
 # 4. Install PySerial (to communicate with ourXIAO ESP32 C3 via USB)
pip install pyserial
After installing all the required libraries, I used Claude AI to help generate the code for both the GUI and the posture detection. I designed the GUI to use the laptop's webcam to detect whether the user is slouching from a front view while sitting. This is also the main idea behind my final project. This was the prompt I used "Generate a Python script that uses my laptop's front webcam to detect slouching in real time. Even though a front view hides the spine, there are 5 methods for the detection: shoulders narrowing, one shoulder tilting down which is a sign for side ways lean, and head dropping. The script should calculate a weighted posture score like for exampel, shoulder width 40%, forward head 30%, shoulder tilt 15%, head drop 15%, show a clean Tkinter GUI with live metrics showing all the stats, and talk to an ESP32‑C3 (COM3, 9600 baud) " Even though it's very hard especially considering the camera is going to be infront of you instead of somewhere at the side where your spine could be seen, I indentified 4 main ways through which the computer can tell whether you're slouching or not from the front:
- Shoulders get closer together:When you slouch, your shoulders roll forward and look narrower. The computer measures the distance between them. If they become much closer than when you sit straight, it thinks you're slouching.
- Head moves forward:Good posture keeps your ears roughly above your shoulders. When you slouch, your head pokes forward, making your ears sit higher than your shoulders. The computer notices that gap and counts it as a slouch.
- One shoulder drops lower:If you lean to one side, one shoulder ends up lower than the other. The computer checks the tilt of your shoulder line. Too much tilt means you're slouching sideways.
- Head droops down:Slouching often makes your head drop downward. The computer compares the height of your nose to your shoulders. If your nose is significantly lower, it's a slouch.
- Face looks bigger:When you lean forward, your face gets closer to the camera and appears larger. The computer compares your face width to your shoulder width. If that ratio increases, you're leaning forward – confirming a true slouch, not just sitting crooked.
Claude generated a very long code for me to explain so I'll explain some of the most important parts of the code:
Explanation of the code:
Importing Libraries
import cv2
import mediapipe as mp
import serial
from PIL import Image, ImageTk
import tkinter as tk
Connecting to Arduino
xiao = serial.Serial(PORT, BAUD, timeout=1)
- Opens a connection to the Arduino on a USB port
- If no Arduino is plugged in, the app still runs but just prints the command instead of sending it
Loading the AI Model
landmarker = PoseLandmarker.create_from_options(landmarker_options)
- Loads a pre trained MediaPipe model that can find 33 body points from a photo
- If the model file isn't on the computer yet, the code downloads it automatically from Google
Reading Body Points from Camera
result = landmarker.detect(mp_image)
pts = get_landmarks_dict(result.pose_landmarks[0], w, h)
- Runs the AI on one camera frame and gets back a list of body point coordinates
- get_landmarks_dict converts those into simple pixel positions like (x, y)
if vis < 0.35:
pts[idx] = None
- If a body part is blocked or unclear, its visibility score is low — so it gets ignored to avoid bad readings
Measuring Posture
shoulder_width = math.hypot(r_sho[0] - l_sho[0], r_sho[1] - l_sho[1])
- Measures the pixel distance between left and right shoulders,so gets smaller when you hunch
forward_head_px = shoulder_mid_y - ear_mid_y
- Measures how far the ears are above the shoulders — a small gap means your head is dropping forward
head_drop_ratio = nose_to_shoulder_y / max(face_width, 1.0)
- Measures how far the nose has dropped toward the shoulders which rises when you slump down
- Divides by face width so the measurement stays consistent regardless of how close you sit to the camera
depth_ratio = face_width / shoulder_width
- Face gets bigger and shoulders get narrower when you lean toward the camera, this ratio catches that
User Calibration
Instead of using fixed thresholds that might work differently for each person (body proportions, sitting height, camera distance), my system uses a calibration phase that runs every time the application starts.
How it works:
- First 5 seconds: The user sits upright with good posture. The system records metrics (shoulder width, head position, shoulder tilt, etc.) and averages them into an
upright_baseline. - Next 5 seconds: The user intentionally slouches as they normally would. The system records these metrics and averages them into a
slouch_baseline. - Scoring: For every new frame, the current metrics are compared against BOTH baselines. A score of 100 means "exactly like my good posture," 0 means "exactly like my slouch posture," and values in between represent degrees of slouching.
This means the system adapts to each user's unique body and sitting style. A tall person with broad shoulders and a child sitting closer to the camera both get calibrated thresholds that work for them individually, without me having to guess fixed numbers.
Why this matters for accuracy: During my initial testing with fixed thresholds, the system worked fine for me but would have failed for anyone else. The dynamic calibration solves this completely.
Scoring Posture (0–100)
sw = map_metric_to_score(metrics['shoulder_width'], up_base['shoulder_width'], sl_base['shoulder_width'])
- Compares current shoulder width against both baselines. 100 means matches good posture, 0 means a very bad posture.
combined = sw*0.50 + fh*0.20 + st*0.15 + hd_score*0.10
- Combines all 4 metric scores into one final score using weights
- Shoulder width matters most (50%) since it's the most reliable signal
Smoothing the Score
score_buffer = deque(maxlen=61)
score_buffer.append(score_with_offset)
median_score = sorted(score_buffer)[len(score_buffer)//2]
- Stores the last 61 score readings and takes the middle value (median)
- This prevents the score from jumping around due to small movements
Why 61? At 30 frames per second, 61 frames equals about 2 seconds of history. It's just enough to filter out natural body movements, but quick enough to catch when you really slouch. An odd number (61) gives us a clean middle value without needing to average two numbers.
Determining the Slouch Threshold
After getting the posture detection working, I had to decide at what score the system should switch from 'O' (good posture) to 'S' (slouch). Initially, I tried a fixed threshold of 50, meaning anything below 50 would trigger the buzzer. However, this caused constant fluctuations because my score would jump between 48 and 52 during normal sitting due to small movements like breathing or shifting in my chair.
To find the right threshold, I ran a simple test:
- I sat in my normal relaxed posture for 30 seconds and recorded the posture scores
- I intentionally slouched deeply for 30 seconds and recorded those scores
- I plotted the range of both sets
| Posture State | Score Range Observed |
|---|---|
| Good posture | 55 to 78 |
| Slouched | 22 to 45 |
The gap between 45 and 55 showed a clear separation. I set my threshold at 48 — this means normal good posture (above 55) never triggers the buzzer, but actual slouching (below 45) always does. The small buffer of 3 points between 45 and 48 stops the system from switching back and forth rapidly when my score lands right on the edge.
I also added a 15 second delay before the buzzer goes off. So even if my score drops below 48, the buzzer won't trigger unless I stay slouched for 15 seconds straight. This fixed the rapid on/off toggling in my earlier trials
Camera & Display
ret, frame = cap.read()
frame_disp = cv2.flip(frame, 1)
- cap.read() grabs one frame from the webcam
- cv2.flip(frame, 1) mirrors it horizontally so it feels like a selfie camera
preview_rgb = cv2.cvtColor(preview, cv2.COLOR_BGR2RGB)
img = Image.fromarray(preview_rgb)
- OpenCV stores colors as BGR (Blue-Green-Red) but Tkinter needs RGB so this just swaps it around.
- Image.fromarray converts the raw pixel array into an image Tkinter can display
The code was quite long, and I had to modify and debug it many times. One issue I faced was the camera feed lagging and glitching because it was processing too many frames. To fix this, I lowered the camera resolution and adjusted the program to run the heavy posture detection only every few frames instead of every single one.
First, I lowered the camera resolution by changing these lines:
cap.set(cv2.CAP_PROP_FRAME_WIDTH, 320)
cap.set(cv2.CAP_PROP_FRAME_HEIGHT, 240)
That made each frame smaller and faster to process. Then, instead of running the posture detection on every frame, I added a counter so it only runs every 3rd frame:
if frame_counter % 3 == 0:
# run MediaPipe detection
That cut down the workload a lot.
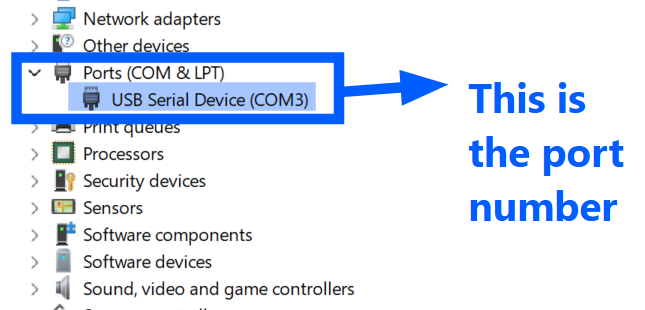
Then uplaod the buzzer code as well and make sure to get the port number right. To check go to Device managers and click on Ports and check your port number. The Python posture code and the Arduino buzzer code must use the same COM port number (e.g., COM3) because they communicate over that serial connection. The Python script sends characters like 'S' (slouch) or 'O' (good posture) through the port, and the Arduino reads them to control the buzzer.

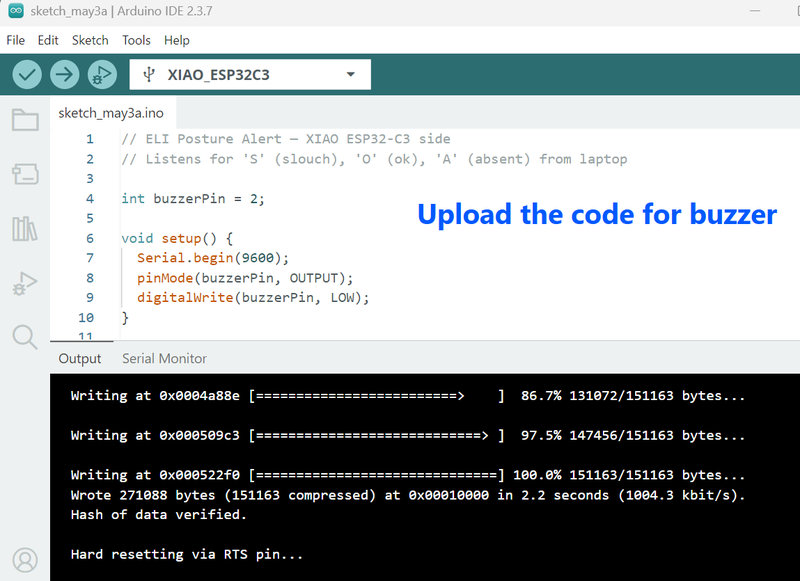
This was the buzzer code:
#define BUZZER_PIN D0
#define LEDC_CHANNEL 0
#define LEDC_RESOLUTION 8
char lastCmd = ' ';
void setup() {
Serial.begin(9600);
// attach buzzer pin to LEDC channel
ledcAttachChannel(BUZZER_PIN, 1000, LEDC_RESOLUTION, LEDC_CHANNEL);
ledcWrite(LEDC_CHANNEL, 0); // silent at start
}
void beep(int freq, int duration_ms) {
ledcWriteTone(BUZZER_PIN, freq);
delay(duration_ms);
ledcWriteTone(BUZZER_PIN, 0);
}
void loop() {
if (Serial.available() > 0) {
char cmd = Serial.read();
if (cmd != lastCmd) {
lastCmd = cmd;
if (cmd == 'S') {
beep(2000, 400); // 2000Hz for 400ms — one sharp beep
}
if (cmd == 'O') {
ledcWriteTone(BUZZER_PIN, 0); // make sure silent
}
}
}
}
Code Explaination:
Pin definations:
#define BUZZER_PIN D0
#define LEDC_CHANNEL 0
#define LEDC_RESOLUTION 8
Last command variable:
This variable stores the previous serial command so the code only reacts when the command actually changes:
char lastCmd = ' ';
Setup:
Starts serial communication at 9600 baud, attaches the buzzer pin to the chosen LEDC channel, and sets the buzzer silent at the beginning:
void setup() {
Serial.begin(9600);
ledcAttachChannel(BUZZER_PIN, 1000, LEDC_RESOLUTION, LEDC_CHANNEL);
ledcWrite(LEDC_CHANNEL, 0);
}
The beep() function:
This function plays a tone at a given frequency for a specified duration (in milliseconds), then stops the sound:
void beep(int freq, int duration_ms) {
ledcWriteTone(BUZZER_PIN, freq);
delay(duration_ms);
ledcWriteTone(BUZZER_PIN, 0);
}
Loop – command handling:
Reads incoming serial commands. Only reacts when the command changes from the previous one. If the command is 'S', it calls beep(2000, 400) to produce one sharp beep. If the command is 'O', it immediately silences the buzzer:
void loop() {
if (Serial.available() > 0) {
char cmd = Serial.read();
if (cmd != lastCmd) {
lastCmd = cmd;
if (cmd == 'S') {
beep(2000, 400);
}
if (cmd == 'O') {
ledcWriteTone(BUZZER_PIN, 0);
}
}
}
}
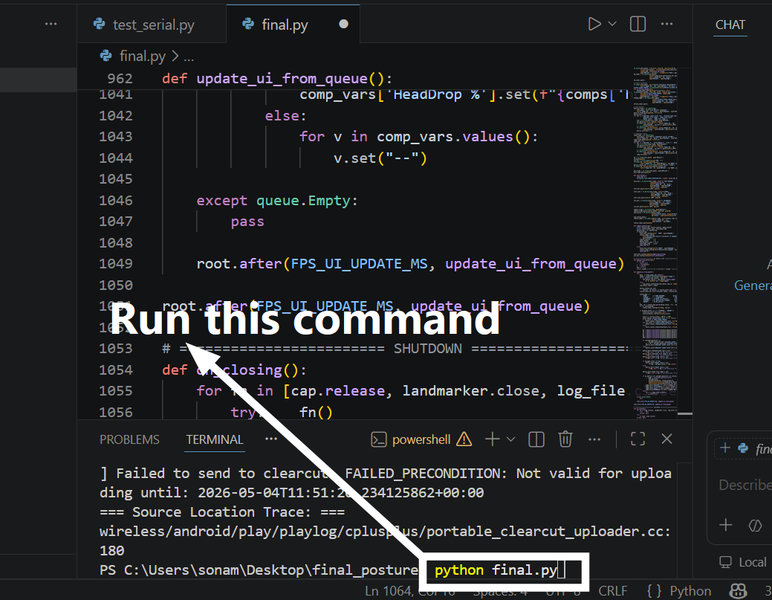
After running the buzzer code in arduino ide, close the serial monitor and open the python file. Then in the VS Code terminal, run this command to open the GUI.
It took me several trial and errors to get the posture detection to be able to detect a basic slouch and straight posture 😵 . Most of the times, even when I sat up straight, it fluctuated between 'good posture' and 'slouched' mainly because the thresholds for what counts as "good" or "slouched" were too close together. Small natural movements like shifting in my chair, would push my posture score just above or below the limit.

This was trial 2 😅 :
Trial 3 😐 :
Trial 4 🥲 :
Trial 5 😭 :
After a lot of changes, I got it partly working, but it still kept switching between good posture and slouching 😮💨 . The main issue was that it was checking every frame, so even small changes in the measurements would quickly make it say "slouching."
To fix this, I got feedback from different AIs like DeepSeek, Claude, and Gemini. Most of them suggested making the system less sensitive, since you won't have perfect posture while working and there will always be small movements. So instead of reacting to every tiny change, I set a threshold for what counts as slouching. I also made the system less sensitive and slower to react. I as in, I asked pointed out what lines to chnage to what, to Copilot.
- It now looks at the average of many measurements instead of each single one.
- It requires you to stay slouched for a long time (15 seconds) before it calls it a slouch.
- Once it says "good posture", it will ignore small changes unless you really slouch deeply and for a long time.
- The posture is re checked only every 5 seconds, not every frame.
The posture detection works, but I still need to improve it to make it more accurate, especially when used while working. I also need to account for situations where the user is looking down at their table, like when studying, so it doesn't get misread as bad posture.
Reflection:
I think this week was really productive since I got to test a key part of my final project, and I had fun too so this week's a win win 🥳
That's all for this week. Thank you bye! (o゚v゚)ノ