Networking and Communication
Group assignment:
- Send a message between two projects
- Document your work to the group work page and reflect on your individual page what you learned.
We basically have to communicate between two projects. This communication could either be wired or wireless 😃.
Communication Types :
Before starting with the assignment, we learned about the different ways in which baords communicate with each other .There are two main ways boards can communicate to each other, through wires, or wirelessly.
Wired Communication
Wired communication is pretty straightforward: devices exchange data through a physical cable connecting them. Two of the most common protocols used in embedded systems are SPI and I2C.
SPI (Serial Peripheral Interface)
SPI works by having one main device controlling one or more peripheral devices. It uses 4 wires which are MISO, MOSI, SCLK, and SS and the cool thing about it is that data can flow in both directions at the same time. This makes it faster than some other protocols, and it’s also handy for saving GPIO pins.
I2C Communication
I2C is great when you want to connect a bunch of devices but only have two pins to spare. It runs on just two wires. SDA for data and SCL for the clock. What makes it really useful is that many devices can share those same two wires, so you’re not wasting pins on your microcontroller.
Wireless Communication
Wireless communication does the same job as wired, just without the cables. The two most common options we worked with are WiFi and Bluetooth.
WiFi
Boards like the ESP32 have WiFi built in, so no extra hardware is needed. For boards like Arduino or ATtiny, you’d need to add an external module. Connection is handled through an SSID and password like any normal network.
Bluetooth
Bluetooth works in a master slave setup where one device sends and the other receives. Again, ESP boards have this built in, while older boards like Arduino need an external module for it.
Communicating Between Boards
Since the two projects needed to communicate, we could have used a wired connection or gone wireless with Wi-Fi or Bluetooth. For this assignment, we chose wireless to see how the boards could talk to each other without using any wires.
ESP-NOW
Now we needed to decide how the boards would communicate wirelessly. We decided to use the ESP-NOW as the communication protocol between the two XIAO ESP32 C3 boards. ESP-NOW is a peer to peer, connectionless protocol which means the two boards communicate directly with each other without needing a WiFi router or internet connection in between.
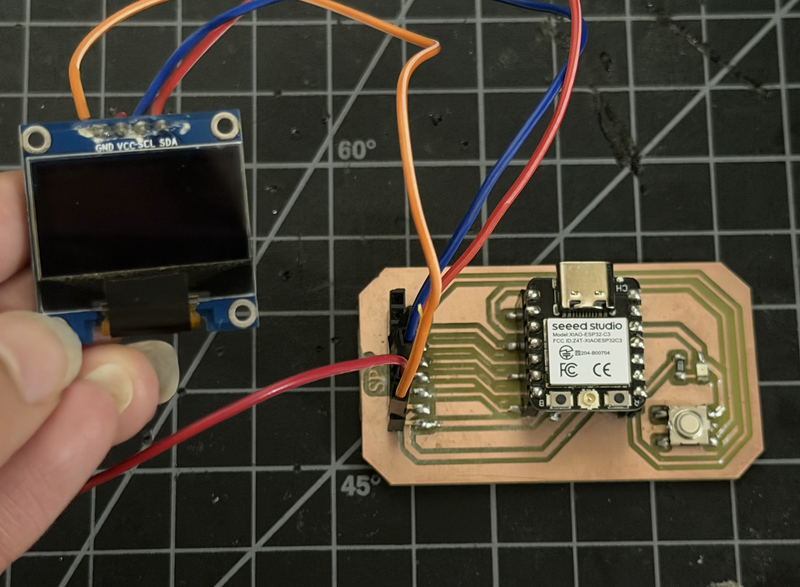
Connections
For this assignment, we used the Xiao ESP32 C3 boards made by Sonam Tshering and Sonam Pema.
- Transmitter : Board 1
- The TRIG pin was connected to D0
- The ECHO pin was connected to D1
- The VCC pin was connected to 3.3V or 5V
- The GND pin was connected to GND

- Receiver : Board 2
- The SDA pin was connected to the SDA pin on the board
- The SCL pin was connected to the SCL pin on the board
- The VCC pin was connected to 3.3V
- The GND pin was connected to GND
Programming
After finishing connecting all the devices to the microcontrollers, we can start programming.
Board 1 : Transmitter
#include <esp_now.h>
#include <WiFi.h>

// MAC ADDRESS OF THE RECEIVER (OLED BOARD)
uint8_t xiao2Address[] = {0xD4, 0xF9, 0x8D, 0x04, 0x04, 0x40};

// This struct MUST match the receive_message struct on the receiver board
typedef struct send_message {
  float distance;
} send_message;

send_message myData;

// Ultrasonic Sensor Pins (Using D0 and D1)
const int trigPin = D0;
const int echoPin = D1;

esp_now_peer_info_t peerInfo;

// Callback when data is sent
void OnDataSent(const uint8_t *mac_addr, esp_now_send_status_t status) {
  Serial.print("Connection Status: ");
  if (status == ESP_NOW_SEND_SUCCESS) {
    Serial.println("Connected (Message Delivered)");
  } else {
    Serial.println("Disconnected (Message Failed)");
  }
}

void setup() {
  Serial.begin(115200);

  // Initialize Ultrasonic Pins
  pinMode(trigPin, OUTPUT);
  pinMode(echoPin, INPUT);

  WiFi.mode(WIFI_STA);

  if (esp_now_init() != ESP_OK) {
    Serial.println("Error initializing ESP-NOW");
    return;
  }

  // Register the send callback
  esp_now_register_send_cb(OnDataSent);

  // Register peer (Receiver Board)
  memcpy(peerInfo.peer_addr, xiao2Address, 6);
  peerInfo.channel = 0;
  peerInfo.encrypt = false;

  if (esp_now_add_peer(&peerInfo) != ESP_OK) {
    Serial.println("Failed to add peer");
    return;
  }
}

void loop() {
  // 1. Clear the trigPin
  digitalWrite(trigPin, LOW);
  delayMicroseconds(2);

  // 2. Trigger the sensor by setting trigPin HIGH for 10 microseconds
  digitalWrite(trigPin, HIGH);
  delayMicroseconds(10);
  digitalWrite(trigPin, LOW);

  // 3. Read the echoPin (returns sound wave travel time in microseconds)
  long duration = pulseIn(echoPin, HIGH);

  // 4. Calculate the distance in cm (Speed of sound is ~0.034 cm/µs)
  float distanceCm = duration * 0.034 / 2.0;

  // Print to Serial monitor for local debugging
  Serial.print("Distance: ");
  Serial.print(distanceCm);
  Serial.println(" cm");

  // 5. Package the data and send it via ESP-NOW
  myData.distance = distanceCm;
  esp_now_send(xiao2Address, (uint8_t *) &myData, sizeof(myData));

  // Delay before the next reading (minimum 60ms recommended for HC-SR04, using 200ms for stability)
  delay(200);
}
Board 2: Receiver
#include <esp_now.h>
#include <WiFi.h>
#include <Wire.h>
#include <Adafruit_GFX.h>
#include <Adafruit_SSD1306.h>

// OLED Configuration
#define SCREEN_WIDTH 128
#define SCREEN_HEIGHT 64
#define OLED_RESET -1
Adafruit_SSD1306 display(SCREEN_WIDTH, SCREEN_HEIGHT, &Wire, OLED_RESET);

// Data structure to receive the ultrasonic distance.
// IMPORTANT: The sending board MUST use this exact same struct!
typedef struct receive_message {
  float distance;
} receive_message;

receive_message incomingData;

// Variables to track connection health
float currentDistance = 0.0;
unsigned long lastRecvTime = 0;

void OnDataRecv(const uint8_t * mac, const uint8_t *incomingDataPtr, int len) {
  // Copy the incoming data into our struct
  memcpy(&incomingData, incomingDataPtr, sizeof(incomingData));

  // Update our global distance variable and the timestamp
  currentDistance = incomingData.distance;
  lastRecvTime = millis();
}

void setup() {
  Serial.begin(115200);

  if(!display.begin(SSD1306_SWITCHCAPVCC, 0x3C)) {
    Serial.println(F("SSD1306 allocation failed"));
    for(;;);
  }

  display.clearDisplay();
  display.setTextSize(1);
  display.setTextColor(SSD1306_WHITE);
  display.setCursor(0, 10);
  display.println("ESP-NOW Init...");
  display.display();

  // Initialize WiFi in Station Mode for ESP-NOW
  WiFi.mode(WIFI_STA);

  if (esp_now_init() != ESP_OK) {
    Serial.println("Error initializing ESP-NOW");
    display.clearDisplay();
    display.setCursor(0, 10);
    display.println("ESP-NOW Error!");
    display.display();
    return;
  }

  esp_now_register_recv_cb(OnDataRecv);
}

void loop() {
  display.clearDisplay();

  if (millis() - lastRecvTime > 2000) {
    display.setTextSize(1);
    display.setCursor(0, 10);
    display.println("Waiting for data...");
    display.setCursor(0, 30);
    display.println("Status: Disconnected");
  } else {

    display.setTextSize(1);
    display.setCursor(0, 0);
    display.println("Status: Connected");

    display.setTextSize(2);
    display.setCursor(0, 25);
    display.print(currentDistance);
    display.println(" cm");
  }

  display.display();

  // Small delay to prevent the OLED screen from flickering
  delay(100);
}
How does the code work? 🤨
- Board 1 : Transmitter
- Uses an ultrasonic sensor to measure the distance of an object in cm
- Packages that distance value and wirelessly sends it to Board 2 using ESP-NOW (ESP NOW is a wireless communication protocol made by Espressif that allows ESP32 boards to talk directly to each other without needing a WiFi router or internet connection.)
-
Also prints the distance to the serial monitor for debugging
-
Board 2 : Receiver
- Waits to receive the distance data sent from Board 1
- Displays the received distance on an OLED screen in real time
- If no data is received for more than 2 seconds it shows a disconnected status on the screen
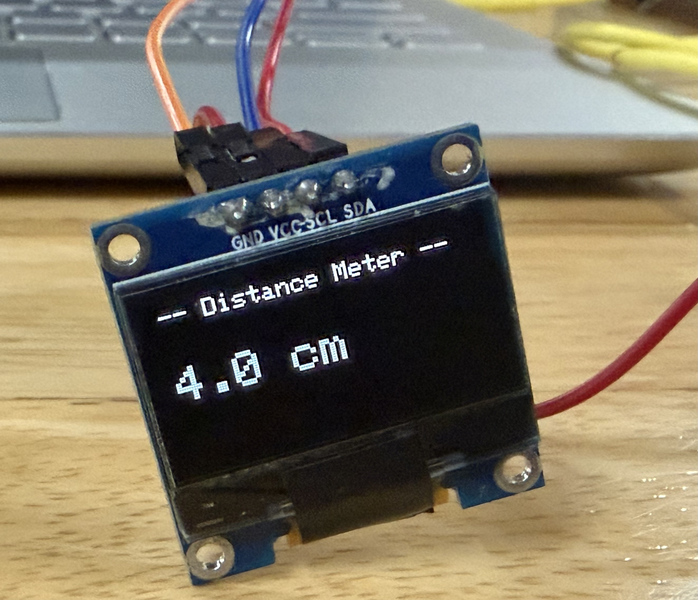
### Testing ### We uploaded the code and yay it worked! 😆
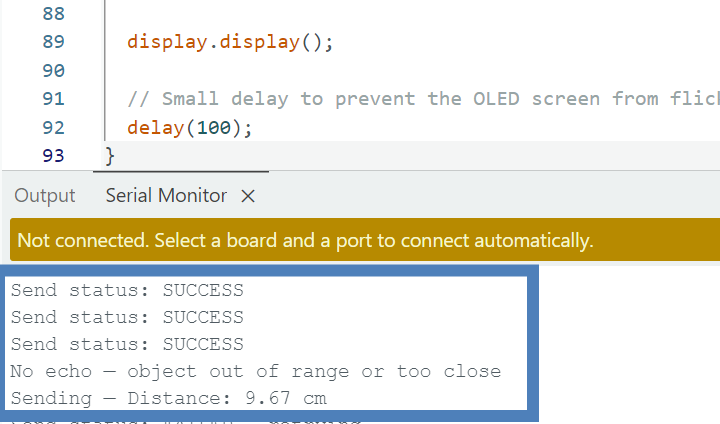
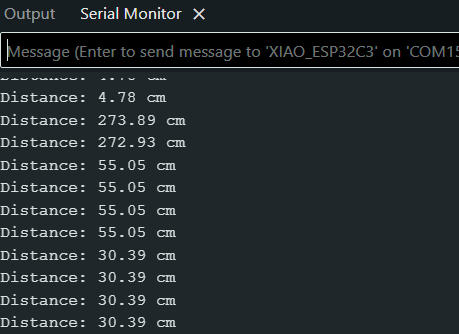
The oled displayed the distance of the object detected by the ultrasonic sensor:
Conclusion
This week’s group assignment was successfully completed. Both boards were able to communicate with each other wirelessly using ESP-NOW, which was pretty straightforward to set up. One board measured distance using an ultrasonic sensor and sent the data over to the other board, which displayed it live on an OLED screen. Overall it was a good demonstration of how two separate projects can exchange data wirelessly with a very simple setup.