15. Interface and Application Programming
Individual Assignment: Application Interface for My Robotic Arm Lamp Prototype
Project Title: Web-Based User Interface for Controlling a Robotic Arm Lamp Prototype
Assignment checklist
- Linked to the group assignment page
- Described the user interface / application design
- Documented the programming process and tool comparison
- Built a working interface controlling output devices on embedded hardware
- Included source code and demonstration of the interface
Assignment Objective
For this assignment, I designed and programmed an application that interfaces a user with output devices connected to my embedded board. My final project is a robotic arm lamp, so I used this assignment as a functional prototype.
I created a web-based control interface that allows the user to control:
- One servo motor
- One NeoPixel LED
Link to Group Assignment
Group assignment page: https://fabacademy.org/2026/labs/chaihuo/docs/week15/chaihuo/week15_group_assignment
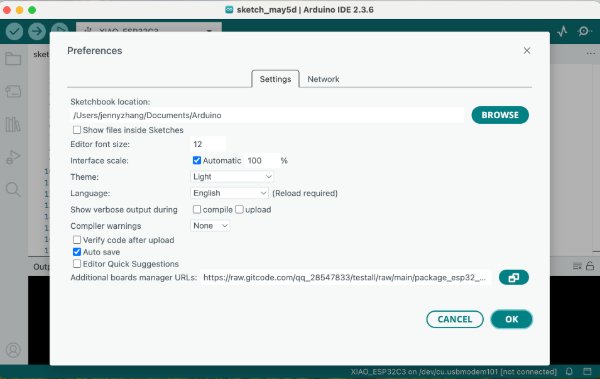
For implementation, I mainly used Cursor for writing and refining documentation and project structure, and Arduino IDE for compiling and uploading firmware to ESP32. I also used ChatGPT as a coding assistant, especially to speed up drafting the web server logic and HTTP route handlers. After generating initial code, I tested each feature on hardware and adjusted pin mapping, route behavior, and network setup until the interface and output devices worked reliably.
I compared different tool options for application and interface programming, including browser-based control methods, desktop-based workflows, and message-based IoT approaches. Through this comparison, I decided to use a web-based interface hosted directly on XIAO ESP32 because it gives a good balance of simplicity, portability, and real-time interaction for my prototype.
Project Overview
The user opens a webpage from a phone or laptop browser. The page includes:
- A slider to control servo angle
- A slider to control NeoPixel brightness
- Color control (color picker / color commands)
- A reset button to return to default state
XIAO ESP32 receives HTTP requests and then controls the servo motor and NeoPixel LED.
Relevance to Final Project
This prototype demonstrates the core interaction model of my final project.
| Final Project Function | Assignment Prototype |
|---|---|
| Robotic arm movement | One servo motor controls one joint |
| Lamp lighting | One NeoPixel controls color and brightness |
| User control system | Web-based control interface |
| Communication system | HTTP requests over Wi-Fi |
Input and Output Devices
Input
The input is the web user interface in the browser.
- Servo angle slider: sends angle value from 0 to 180
- Brightness slider: sends brightness value from 0 to 255
- Color control: sends color command to NeoPixel
- Reset button: resets servo and light state
Output
- Servo motor: moves one part of the robotic arm lamp
- NeoPixel LED: works as the lamp light
Technology Track
| Category | Tool / Technology |
|---|---|
| Embedded board | XIAO ESP32 |
| Programming language | Arduino C/C++ |
| User interface | HTML, CSS, JavaScript |
| Communication protocol | HTTP over Wi-Fi |
| Servo control | ESP32Servo library |
| LED control | Adafruit NeoPixel library |
| Application type | Web-based interface |
Method Comparison
| Method | How It Works | Advantages | Disadvantages |
|---|---|---|---|
| HTTP Web Server | ESP32 hosts webpage and receives control requests | Simple, wireless, no extra app, easy to document | Usually best on same Wi-Fi network |
| MQTT + Node-RED | Node-RED publishes MQTT messages to ESP32 | Scalable, good for multi-device systems | Needs broker, more setup and debugging |
| USB Serial + Python Tkinter | Desktop app sends serial commands by USB | Stable and easy to debug | Wired to computer, less suitable for smart lamp use |
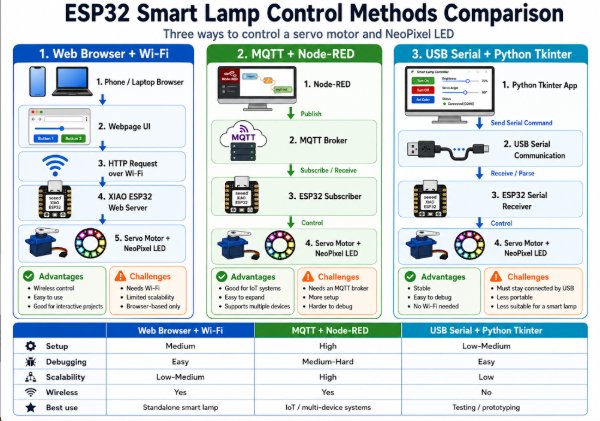
Why I Chose HTTP Web Server
- It runs directly on XIAO ESP32 with built-in Wi-Fi
- It does not require external broker or mobile app
- It is simple to explain and test in browser
- It matches the wireless interaction expected for a smart lamp
Example requests:
/servo?angle=90/brightness?value=180/color?r=255&g=100&b=50/off/reset
System Diagram
sliders and buttons
Hardware Used
| Component | Purpose |
|---|---|
| XIAO ESP32 | Main embedded board |
| Servo motor | Controls lamp arm / lamp head position |
| NeoPixel LED | Represents lamp light |
Wiring
Servo
| Servo Wire | Connection |
|---|---|
| Signal | XIAO ESP32 D2 |
| VCC | External 5V |
| GND | Common GND |
NeoPixel
| NeoPixel Pin | Connection |
|---|---|
| DIN | XIAO ESP32 D3 |
| VCC | 5V |
| GND | Common GND |
Important note: XIAO ESP32 GND, servo GND, NeoPixel GND, and external power GND must be connected together.
UI Design
The webpage includes:
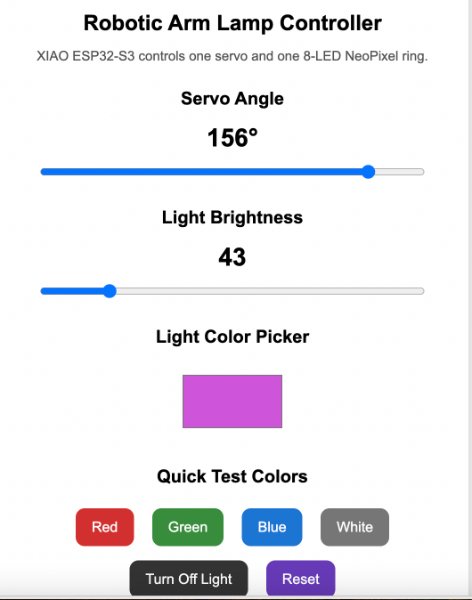
- Servo angle slider (0 to 180)
- Brightness slider (0 to 255)
- Color control
- Turn off light button
- Reset button
The UI is intentionally simple so communication behavior is easy to test and debug.
Communication Between App and Board
The board runs as a web server. When the user moves sliders or clicks buttons, JavaScript fetch()
sends HTTP requests to ESP32 routes. ESP32 parses parameters and updates servo or NeoPixel state.
| User Action | HTTP Request | Board Action |
|---|---|---|
| Move servo to 90 | /servo?angle=90 | Servo moves to 90 |
| Set brightness to 180 | /brightness?value=180 | NeoPixel brightness changes |
| Set color | /color?r=255&g=100&b=50 | NeoPixel color updates |
| Turn off light | /off | NeoPixel turns off |
| Reset | /reset | Servo to 90, light reset |
Programming Process
-
Set up the development environment: Installed the ESP32 board package in Arduino IDE and selected the correct XIAO ESP32 board profile.

-
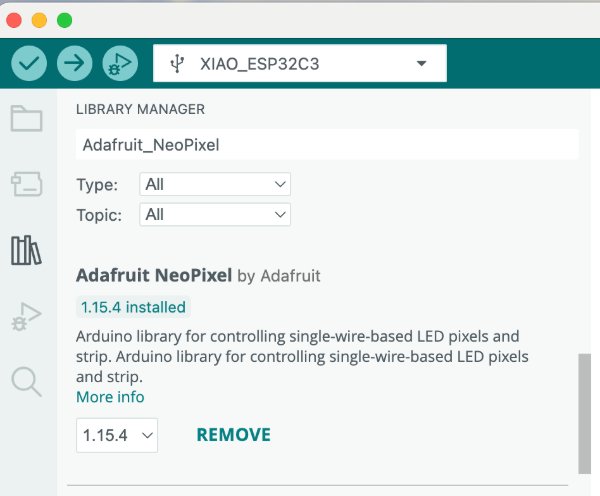
Install required libraries: Added
ESP32ServoandAdafruit NeoPixelso the firmware can control both actuator and lighting.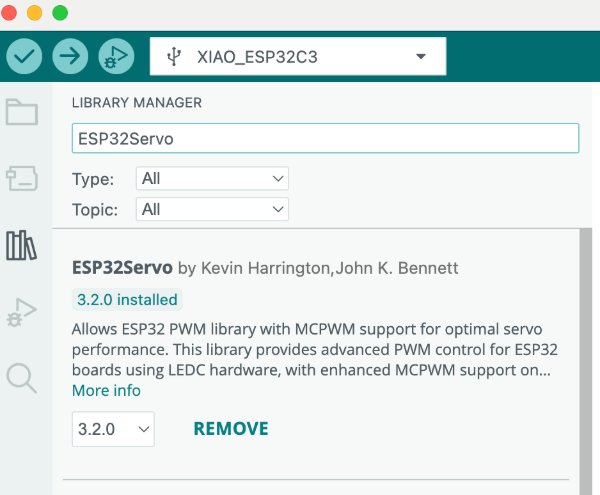
- Test each output device independently: Verified servo angle control (0/90/180) and NeoPixel color/brightness using separate test sketches before system integration.
- Implement Wi-Fi connection and web server: Developed the web server and HTTP route logic, connected the board to the hotspot, started the server, and verified the assigned IP address in Serial Monitor.
- Build the web interface: Created an HTML/CSS/JavaScript page with a servo slider, brightness slider, color control, and reset/off buttons.
-
Map UI actions to HTTP routes: Implemented
/servo,/brightness,/color,/off, and/resethandlers on the board. - Integrate and debug end-to-end behavior: Validated that browser actions trigger correct hardware responses, then fixed pin mapping, hotspot/network, and NeoPixel color update issues.
Source Code (Full Firmware)
#include <WiFi.h>
#include <WebServer.h>
#include <ESP32Servo.h>
#include <Adafruit_NeoPixel.h>

// ==================================================
// Wi-Fi Settings
// Change these to your own Wi-Fi name and password
// ==================================================
const char* ssid = "YOUR_WIFI_NAME";
const char* password = "YOUR_WIFI_PASSWORD";

// ==================================================
// Pin Settings
// ==================================================
const int SERVO_PIN = D2;
const int NEOPIXEL_PIN = D3;
const int NUM_PIXELS = 1;

// ==================================================
// Objects
// ==================================================
WebServer server(80);
Servo lampServo;
Adafruit_NeoPixel pixels(NUM_PIXELS, NEOPIXEL_PIN, NEO_GRB + NEO_KHZ800);

// ==================================================
// Current Lamp States
// ==================================================
int servoAngle = 90;
int brightness = 100;

int redValue = 255;
int greenValue = 255;
int blueValue = 255;

// ==================================================
// Function: Update NeoPixel
// ==================================================
void updateNeoPixel() {
  pixels.setBrightness(brightness);

  for (int i = 0; i < NUM_PIXELS; i++) {
    pixels.setPixelColor(i, pixels.Color(redValue, greenValue, blueValue));
  }

  pixels.show();
}

// ==================================================
// Function: Turn off NeoPixel
// ==================================================
void turnOffNeoPixel() {
  redValue = 0;
  greenValue = 0;
  blueValue = 0;

  updateNeoPixel();
}

// ==================================================
// Web Page
// ==================================================
String webPage() {
  String html = R"rawliteral(
<!DOCTYPE html>
<html>
<head>
  <meta charset="UTF-8">
  <title>Robotic Arm Lamp Controller</title>

  <style>
    body {
      margin: 0;
      padding: 30px;
      font-family: Arial, sans-serif;
      background: #f2f2f2;
      text-align: center;
    }

    .container {
      max-width: 480px;
      margin: auto;
      background: white;
      padding: 25px;
      border-radius: 20px;
      box-shadow: 0 4px 18px rgba(0, 0, 0, 0.15);
    }

    h1 {
      font-size: 24px;
      margin-bottom: 8px;
    }

    p {
      color: #555;
      font-size: 15px;
    }

    h2 {
      margin-top: 28px;
      font-size: 20px;
    }

    .value {
      font-size: 28px;
      font-weight: bold;
      margin: 12px;
    }

    input[type="range"] {
      width: 90%;
    }

    input[type="color"] {
      width: 110px;
      height: 60px;
      border: none;
      background: none;
      cursor: pointer;
      margin: 10px;
    }

    button {
      font-size: 16px;
      padding: 12px 18px;
      margin: 8px;
      border: none;
      border-radius: 10px;
      color: white;
      cursor: pointer;
    }

    .offButton {
      background: #333;
    }

    .resetButton {
      background: #673AB7;
    }

    .status {
      margin-top: 18px;
      font-size: 14px;
      color: #333;
    }
  </style>
</head>

<body>
  <div class="container">
    <h1>Robotic Arm Lamp Controller</h1>
    <p>Control one servo motor and one NeoPixel with XIAO ESP32.</p>

    <h2>Servo Angle</h2>
    <div class="value">
      <span id="servoValue">90</span>°
    </div>

    <input
      type="range"
      min="0"
      max="180"
      value="90"
      id="servoSlider"
      oninput="setServo(this.value)"
    >

    <h2>Light Brightness</h2>
    <div class="value">
      <span id="brightnessValue">100</span>
    </div>

    <input
      type="range"
      min="0"
      max="255"
      value="100"
      id="brightnessSlider"
      oninput="setBrightness(this.value)"
    >

    <h2>Light Color</h2>
    <input
      type="color"
      id="colorPicker"
      value="#ffffff"
      onchange="setColor(this.value)"
    >

    <br>

    <button class="offButton" onclick="turnOffLight()">Turn Off Light</button>
    <button class="resetButton" onclick="resetLamp()">Reset</button>

    <div class="status" id="statusText">
      Status: Ready
    </div>
  </div>

  <script>
    function setServo(angle) {
      document.getElementById("servoValue").innerText = angle;
      document.getElementById("statusText").innerText =
        "Status: Servo angle set to " + angle + "°";

      fetch("/servo?angle=" + angle);
    }

    function setBrightness(value) {
      document.getElementById("brightnessValue").innerText = value;
      document.getElementById("statusText").innerText =
        "Status: Brightness set to " + value;

      fetch("/brightness?value=" + value);
    }

    function setColor(hexColor) {
      let r = parseInt(hexColor.substring(1, 3), 16);
      let g = parseInt(hexColor.substring(3, 5), 16);
      let b = parseInt(hexColor.substring(5, 7), 16);

      document.getElementById("statusText").innerText =
        "Status: Color set to RGB(" + r + ", " + g + ", " + b + ")";

      fetch("/color?r=" + r + "&g=" + g + "&b=" + b);
    }

    function turnOffLight() {
      document.getElementById("statusText").innerText =
        "Status: Light turned off";

      fetch("/off");
    }

    function resetLamp() {
      document.getElementById("servoSlider").value = 90;
      document.getElementById("servoValue").innerText = 90;

      document.getElementById("brightnessSlider").value = 100;
      document.getElementById("brightnessValue").innerText = 100;

      document.getElementById("colorPicker").value = "#ffffff";

      document.getElementById("statusText").innerText =
        "Status: Lamp reset";

      fetch("/reset");
    }
  </script>
</body>
</html>
)rawliteral";

  return html;
}

void handleServo();
void handleBrightness();
void handleColor();
void handleOff();
void handleReset();

// ==================================================
// Route: Home Page
// ==================================================
void handleRoot() {
  server.send(200, "text/html", webPage());
}

// ==================================================
// Route: Servo Control
// Example: /servo?angle=90
// ==================================================
void handleServo() {
  if (!server.hasArg("angle")) {
    server.send(400, "text/plain", "Missing servo angle");
    return;
  }

  servoAngle = server.arg("angle").toInt();
  servoAngle = constrain(servoAngle, 0, 180);

  lampServo.write(servoAngle);

  Serial.print("Servo angle: ");
  Serial.println(servoAngle);

  server.send(200, "text/plain", "Servo angle updated");
}

// ==================================================
// Route: Brightness Control
// Example: /brightness?value=120
// ==================================================
void handleBrightness() {
  if (!server.hasArg("value")) {
    server.send(400, "text/plain", "Missing brightness value");
    return;
  }

  brightness = server.arg("value").toInt();
  brightness = constrain(brightness, 0, 255);

  updateNeoPixel();

  Serial.print("Brightness: ");
  Serial.println(brightness);

  server.send(200, "text/plain", "Brightness updated");
}

// ==================================================
// Route: Color Picker Control
// Example: /color?r=255&g=100&b=50
// ==================================================
void handleColor() {
  if (!server.hasArg("r") || !server.hasArg("g") || !server.hasArg("b")) {
    server.send(400, "text/plain", "Missing RGB values");
    return;
  }

  redValue = constrain(server.arg("r").toInt(), 0, 255);
  greenValue = constrain(server.arg("g").toInt(), 0, 255);
  blueValue = constrain(server.arg("b").toInt(), 0, 255);

  updateNeoPixel();

  Serial.print("Color RGB: ");
  Serial.print(redValue);
  Serial.print(", ");
  Serial.print(greenValue);
  Serial.print(", ");
  Serial.println(blueValue);

  server.send(200, "text/plain", "Color updated");
}

// ==================================================
// Route: Turn Off Light
// Example: /off
// ==================================================
void handleOff() {
  turnOffNeoPixel();

  Serial.println("Light turned off");

  server.send(200, "text/plain", "Light turned off");
}

// ==================================================
// Route: Reset Lamp
// Example: /reset
// ==================================================
void handleReset() {
  servoAngle = 90;
  brightness = 100;

  redValue = 255;
  greenValue = 255;
  blueValue = 255;

  lampServo.write(servoAngle);
  updateNeoPixel();

  Serial.println("Lamp reset: Servo 90°, white light, brightness 100");

  server.send(200, "text/plain", "Lamp reset");
}

void setup() {
  Serial.begin(115200);
  delay(1000);

  // Servo setup
  lampServo.setPeriodHertz(50);
  lampServo.attach(SERVO_PIN, 500, 2400);
  lampServo.write(servoAngle);

  // NeoPixel setup
  pixels.begin();
  pixels.clear();
  updateNeoPixel();

  // Wi-Fi setup
  Serial.println();
  Serial.println("Connecting to Wi-Fi...");

  WiFi.begin(ssid, password);

  while (WiFi.status() != WL_CONNECTED) {
    delay(500);
    Serial.print(".");
  }

  Serial.println();
  Serial.println("Wi-Fi connected.");
  Serial.print("Open this IP address in your browser: ");
  Serial.println(WiFi.localIP());

  // Web server routes
  server.on("/", handleRoot);
  server.on("/servo", handleServo);
  server.on("/brightness", handleBrightness);
  server.on("/color", handleColor);
  server.on("/off", handleOff);
  server.on("/reset", handleReset);

  server.begin();

  Serial.println("Web server started.");
}

void loop() {
  server.handleClient();
}
Problems Encountered and Fixes
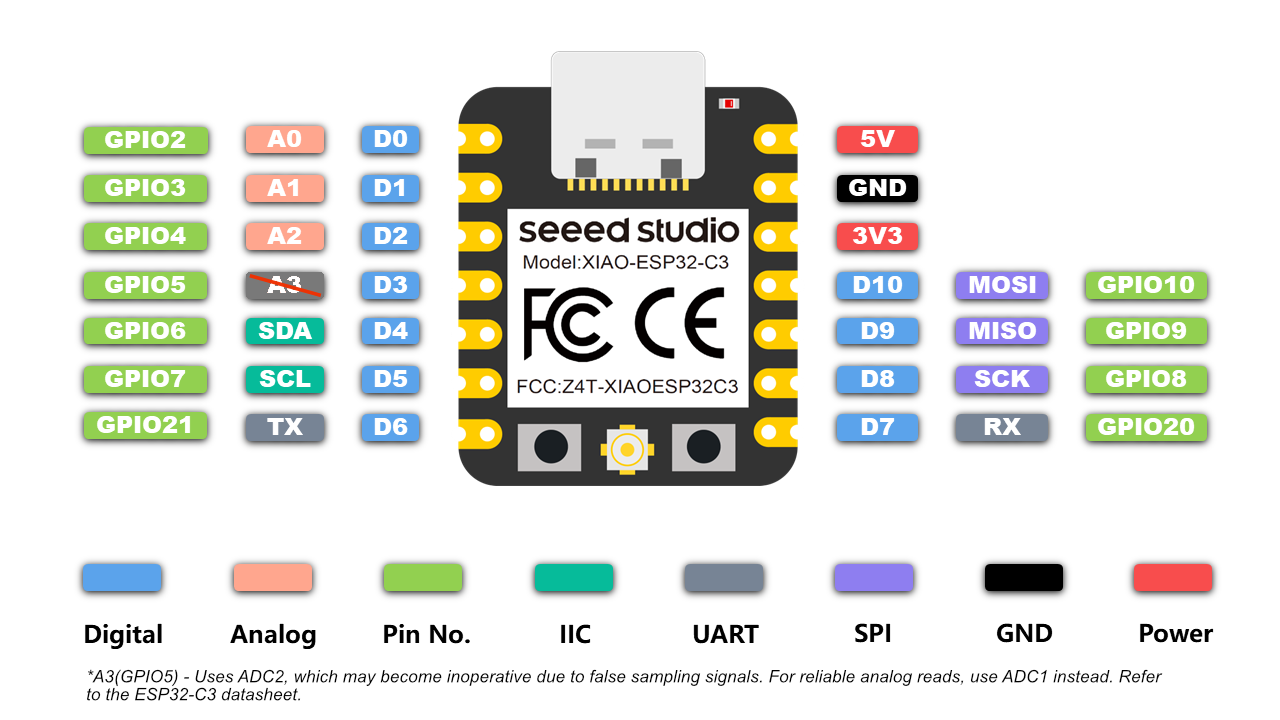
I was confused about whether to use board pin labels (like D1/A0) or GPIO numbers in code. I assigned the wrong pin at first, so the hardware did not respond as expected.
I checked the XIAO ESP32 pin mapping and used the correct pin definitions consistently in both wiring and code (servo on D2 and NeoPixel on D3). After correcting the pin mapping, the outputs worked normally.
The board connected to the hotspot, but the laptop was not on the same hotspot network, so I could not access the control webpage.
I verified the hotspot name and password in code and made sure the laptop joined the same hotspot. Then I used the IP printed in Serial Monitor to open the webpage successfully.
The browser UI updated correctly, but the NeoPixel stayed the same color, which meant the color command was not being applied properly on the board side.
I updated the color route code to parse RGB values correctly, then called the NeoPixel update function after setting the new values. After this code fix, UI color changes matched the real NeoPixel color.
Learning Reflection
Based on our group comparison in the Week 15 group page, my biggest takeaway is that tool choice should follow the real product context, not just technical preference. MQTT + Node-RED is powerful and scalable, and USB serial control is very stable for debugging, but for my robotic arm lamp prototype, HTTP on XIAO ESP32 gave the best balance of simplicity, portability, and user experience.
I also learned that a "working demo" is different from a reliable interaction system. The group tests highlighted trade-offs between setup complexity, network dependency, and maintainability. In my individual implementation, these lessons directly changed my decisions: I kept the interface minimal, used explicit route design, and added validation in handlers so user actions translate into predictable hardware behavior.
Another important reflection is that interface programming for embedded systems is not only about frontend controls. It also includes communication clarity, timing behavior, and power stability. Debugging servo jitter and inconsistent LED response made me realize that software structure and hardware constraints must be designed together. This gives me a clearer direction for my final project: build interaction features incrementally, test each layer independently, and only then integrate them into the full robotic arm lamp system.
Hero Shot
Final setup photo showing the web UI controlling the robotic arm lamp prototype in real time.