Embedded Systems Assignment
Embedded Systems Assignment
Group Assignment
Link to Group Assignment
Individual Assignment - My Chosen Micro Controller - Raspberry Pi for my Project.
Raspberry Pi PicO
1. I went through the data sheet of my chosen micro controller microcontroller to become familiar with its features. The Raspberry Pi Pico is a
low-cost, versatile microcontroller based on the RP2040 chip, which features a dual-core ARM Cortex-M0+ processor running at up to 133 MHz.
This chip provides 264 KB of SRAM and 2 MB of Flash memory, making it well-suited for embedded applications. The board offers 26 multifunction GPIO
pins, which can be used for a variety of interfaces like I2C, SPI, UART, PWM, and ADC.
Unlike the ARM Cortex-M0+, which is an entry-level core for low-power, real-time applications, the Pi Pico adds extra flexibility with features like
USB support (Micro-USB for power and programming), hardware timers, and 8 PWM channels. The 12-bit ADC allows for analog input handling, and an internal
temperature sensor is included for additional functionality. The Pico operates at 3.3V logic, but can be powered with 1.8V to 5.5V. For power efficiency,
it supports deep sleep and dormant modes, making it ideal for battery-powered projects.
In comparison, while the ARM Cortex-M0+ core provides the backbone for the Pico’s processing power, the Raspberry Pi Pico integrates this with practical,
high-level features like USB connectivity, a large number of GPIO pins, and real-time performance suitable for embedded and IoT applications.
Below is link to the data sheet
Raspberry Pi Pico Data Sheet
Objective: To become familiar with the specifications and features of your Raspberry Pi Pico..
The Raspberry Pi Pico uses the RP2040 microcontroller which features a dual-core ARM Cortex-M0+ processor running at up to 133 MHz. It's designed for
embedded, low-power applications with a wide range of input/output options.
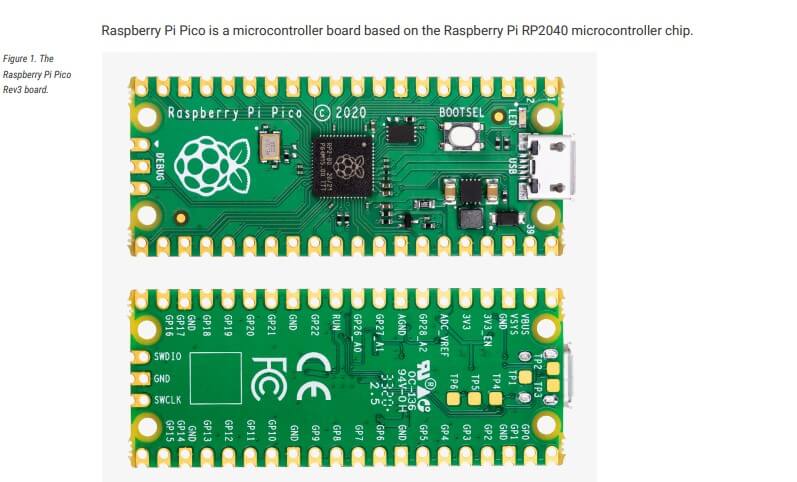
RaspberryPi Pico Chip

Raspberry Pi Pico Printout Board

Having red through the Raspberry Pi Pico data sheet I have noticed the folowing features;
Memory
- 264kb SRAM (static RAM)
- 2MB Flash memory
GIPO
- 26 multifunction GPIO pins for digital input/output, with support for I2C, SPI, UART, PWM, and ADC.
Power
- Voltage Range: Operates from 1.8V to 5.5V.
- 3.3V logic level (compatible with most logic circuits).
- Low Power: Deep sleep and dormant mode for energy-saving applications.
USB and Communication
- Micro-USB port for power and data (programming and serial communication).
- Debugging: SWD (Serial Wire Debug) interface for debugging.
- Programming: Can be programmed via Micro-USB or SWD for advanced debugging.
- Timers & Performance
- Timers: Flexible hardware timers for precise timing control.
- PWM: Supports 8 PWM channels for motor and light control.
- ADC: 12-bit ADC with 26 channels for analog signal input (suitable for sensor integration).
- Clock: Capable of running at up to 133 MHz with a stable system clock.
- Peripherals
- Internal Temperature Sensor: Can read the internal temperature of the microcontroller.
- I2C, SPI, UART: Fully supported for external peripheral communication.
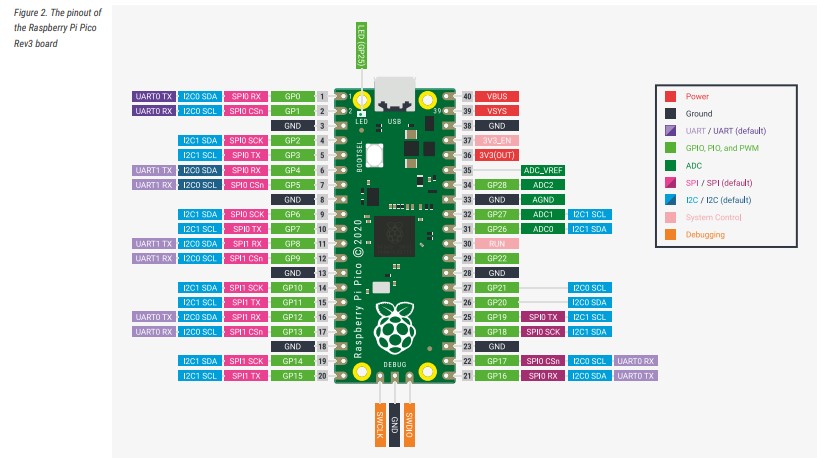
- Pinout
- Pinout
- 26 GPIO Pins (26 pins total, but only 22 are accessible for I/O).
- 3.3V and 5V pins.
- Ground pins for system grounding.
- Special function pins like ADC, PWM, SPI, I2C
- Power Consumption
- Low Power Consumption: In low-power modes, the power consumption is minimal,
making it suitable for battery-powered applications.
- Package
- Form Factor: 21mm x 51mm, with 40 pins in Dual Inline Package (DIP) style.
- Use Cases
- Robotics: Low-power motion and sensor control.
- IoT: Can be used in small devices that need to communicate with the cloud or other devices.
- Educational: Ideal for beginner projects and learning about embedded systems.
- Read: Go through the data sheet of your chosen microcontroller.
- Note important parameters like pin configuration, memory, peripherals, and communication interfaces.
2. Write a Program for a Microcontroller
Objective: To create a program that interacts with input/output devices and communicates with remote devices.
I first downloaded the micropython extension from the extensios marketplace in vscode so that i can have the MicroPython Environment. I then
opened micropython command palette by selcting MicroPython:configurure interpreter, i then chose Raspberry Pi Pico board. This configures
VS Code to recognize the Pico as the device I will be working with, setting up communication between my computer and the board (via USB, typically)
Installing the MicroPython Extension


