Computer-Aided Design
We were assigned the task of week 02 which consists of: Modeling (raster, vector, 2D, 3D, rendering, animating, simulating, ...) a possible final project, compressing your images and videos, and publishing a description with your design files on your class page
This video is a result of this week's assignment.
2D Design
2D Raster
To start with this activity, I had to look up what Raster is in order to understand where the task would take me. By doing so, I understood that the concept refers to a "method for creating two-dimensional images from pixels." From this foundation, I realized that it's possible to create lines and polylines from raster images, and these images can also be vectorized.
So, I started using two software programs, Photoshop and GIMP, to compare their pros and cons.
Photoshop was already installed on my laptop, while I didn’t have GIMP, so I started the download process.
Here, I have marked the software download process with green boxes and arrows to make it easier to understand.
The advantage of GIMP is that it is an open-source image editor, which can be downloaded from gimp.org. I didn’t have it installed, nor did I know much about it, so I decided to try it out out of curiosity and see what would happen.
GIMP has some similarities to Photoshop since both are image editors. The graphical interfaces are similar, which made it easy to interpret, although the commands are different. I started creating similar images in both programs to draw a conclusion.
One thing I liked about GIMP is that its startup process is faster compared to Photoshop, which is a bit slower. However, when it comes to drawing a basic rectangle, it was more complicated to find the tools in GIMP, and it’s not as user-friendly for quick editing as Photoshop is.
What is similar between the two is that both are easy for photo editing; in that aspect, they are alike.
With these comparisons, I personally prefer Photoshop, as it’s a tool I’m more familiar with and know better compared to GIMP. I would recommend GIMP more for photo editing, but not as much for creating images from scratch.
| Photoshop |
GIMP |
| Similar photos and images. |
Similar photos and images. |
| User-friendly interface |
Not-so-user-friendly interface. |
2D vector
Continuing to explore new tools, I started working with vectors. But what’s the difference between raster and vector? Rasters are made up of pixels, while vectors are created with lines.
A few years ago, for vectorization, I used Corel Draw, but now I use Illustrator. However, I decided to try Inkscape to experiment with other tools and enhance my learning process.
Having these basic concepts clear will help us understand and dive deeper into 3D modeling.
The first thing I did was download Inkscape and try this tool. Later, I will make a comparison between Inkscape and Corel Draw.
The instructions for this download process are highlighted with arrows and green boxes to make it easier to understand.
I open the Inkscape program.
The Inkscape menu is located at the top of the interface and is divided into several sections. In the first section, you will find basic options like "File", "Edit", and "View". Under "File", you can save, open, or export your projects. The "Edit" section allows you to undo or redo actions and modify the program settings. The "View" option provides tools for zooming and organizing the interface. Other sections in the menu include "Layer", "Object", "Path", among others, which allow you to manage layers, objects, and make advanced adjustments to your graphic projects.
After downloading Inkscape, I opened a new file, but before starting, I took a moment to familiarize myself with the graphical interface.
I was able to easily recognize some tools that allowed me to work with vectors for the final project I have in mind. I used the "Pen Tool" to diagram the project and give it shape, detailing the idea further.
On the right sidebar, I found two tools I used to help me with vector graphics: Layers and Objects, and Fill and Stroke.
I recorded a screen capture of Inkscape, but the video was large in MB. To solve this, I did post-production in CapCut, where I optimized the video to reduce its size (131 KB), allowing me to upload it to the web without any issues.
| Corel Draw |
Inkscape |
| CorelDRAW is a paid software with different pricing models, including subscription and one-time purchase options. |
Inkscape is free and open-source, which makes it a more accessible option for users who want to avoid software costs. |
| CorelDRAW has a polished, professional interface that many users find intuitive and user-friendly. It offers a wide range of customization options for workspace layouts. |
Inkscape also has a clean interface, but it can feel more basic compared to CorelDRAW. However, it’s highly customizable for users who want to adjust the workspace. |
| CorelDRAW provides advanced tools for vector illustration, graphic design, and page layout. It also offers enhanced support for text and typography, color management, and PDF export features. |
Inkscape offers a comprehensive set of vector design tools, including path operations, drawing, and text tools. While it lacks some of the more advanced features that CorelDRAW has, Inkscape still provides solid functionality for most vector-based tasks. |
| CorelDRAW can have a steep learning curve due to its feature-rich environment, especially for beginners. However, once mastered, it becomes a powerful tool for professional work. |
Inkscape has a gentler learning curve, especially for beginners. While some advanced features may require additional time to master, overall, it is easier to start with compared to CorelDRAW. |
In conclusion, working in Inkscape was a very pleasant experience. I found it easy to understand the tools and familiarize myself with the interface, which made the design process smooth. Throughout the experience, I was able to easily visualize my idea for the final project, taking advantage of the program's options for working with vectors. Additionally, the layout of the tools and the easy access to key functions made the whole process more intuitive. Without a doubt, Inkscape is a very useful and efficient tool for creating vector graphics, and I am satisfied with the results I achieved.
3D Design
To begin this assignment, I started by analyzing the project I intend to develop, and for this, both my instructor Cristian and Roberto's have been guiding me through the process.
To design properly, it's essential to conduct prior research on the design. In the case of the design I'm proposing, I've decided to focus on a whale. However, the question arises: which species of whale should I choose? One of the species that migrates to Peru between June and October to warmer waters to reproduce is the humpback whale, known mainly for its acrobatic jumps (such as leaping, tail slapping, pectoral fin slapping, swimming) and its songs.
The electronic toy I intend to develop should take the shape of this humpback whale, and in my vision, it should incorporate the characteristic movement of this animal while swimming in the water. To achieve this, my instructor Cristian and I discussed the project and concluded that the electronic components, such as motion sensors and artificial intelligence, should be integrated within the whale. Additionally, the threads that will hold it up will serve to hang the toy from a ceiling.
During one of Roberto's critiques, he suggested that the whale should be divided more to make the movement more organic, and that it should have a spine, which would be the structure holding the different parts of the whale together.
Taking these two observations into account, both the electronics and the structure of the design will be integrated into the whale's body, and it will be suspended by support threads from the ceiling.
When reviewing the available programs, I was considering whether to do the work in Rhinoceros or Blender. Rhinoceros is a program that I already have installed on my computer and know at a basic to intermediate level, but I decided to try Blender because of its flexibility and interesting features that I have seen online. I will now proceed to install Blender and start familiarizing myself with it, and see what happens along the way.
The first thing I did was download and install the program on my laptop. Once it was installed, I opened a window to familiarize myself with Blender's interface.
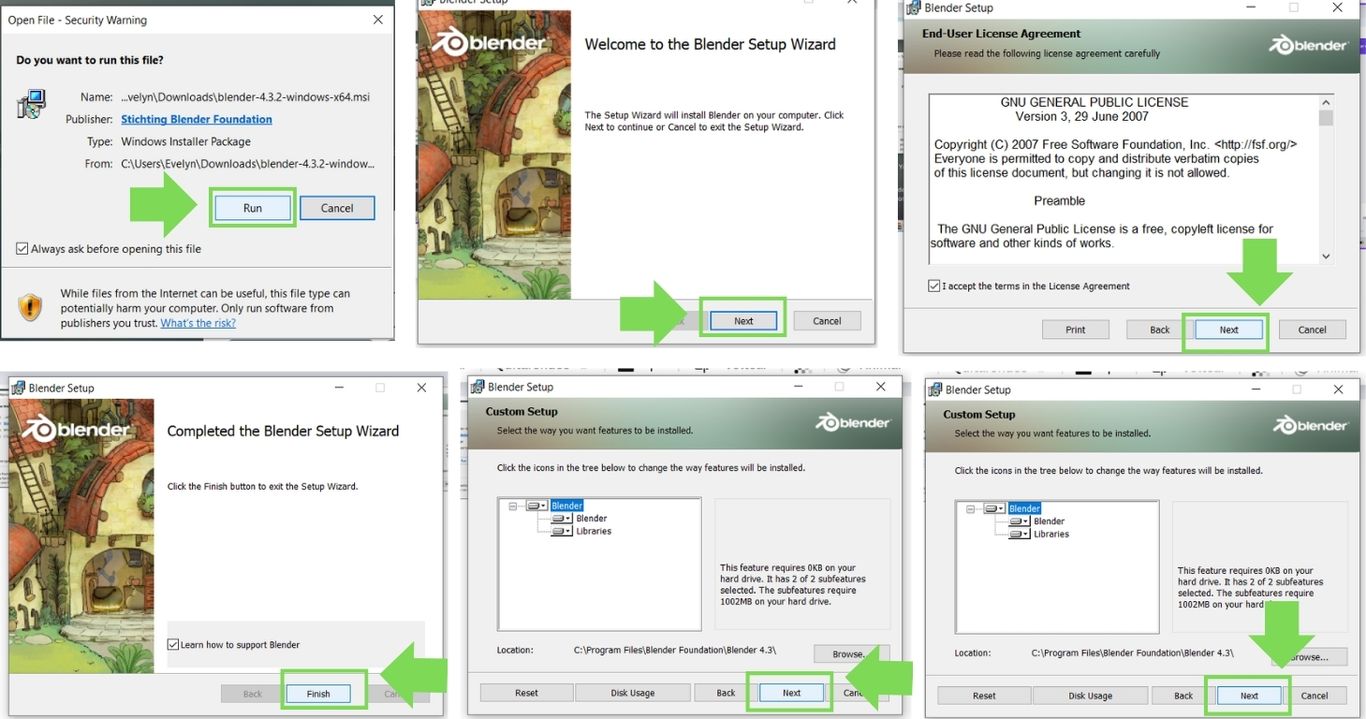
We access the Blender page, where the download options immediately appear. We click on the corresponding option (the instructions are highlighted with boxes and green arrows).
Then, we click on "Download Blender 4.3.2". At that moment, the software is automatically downloaded to the computer in use.
We click on the software and begin the download on the computer, following the steps indicated, which are marked in green. Once the process is complete, the program will automatically open at the end of the download.
I followed the download and installation process, which is marked with green boxes and arrows to make it easier to understand.
Immediately, the Blender program opens.
Before starting with the design, I take some time to familiarize myself with the program.
As we familiarized ourselves with Blender's interface, we noticed that it has some similarities to other design programs.
One thing I liked about Blender is that it has a manual that explains the different parts of the interface, the tools, and other important aspects.
Click here to view it.
Header (green), Main area (yellow), Toolbar (blue), Sidebar (red), and the Adjust Last Operation panel (pink).
I started modeling, but the truth is, it wasn’t as easy as it seemed. I failed several times and had to try again and again.
I watched tutorials on how to model fish, which helped me a lot with my 3D work.
Click here to view it.
This tutorial is in Spanish, but it helped me model the whale.
The shape of the whale, with its curves, was especially difficult to model, as I have no experience creating this type of shape. However, since it was a challenge, I spent several hours working to make the 3D model I was creating look as aesthetically pleasing as possible, just as I had imagined or as close as I could get to what I had in mind.
After many hours of brainpower, I finally managed to get an approximation of the whale shape I wanted.
I watched tutorials on how to model fish, which helped me a lot with my 3D work.
Once the 3D modeling was done, the next step was to add animation. Part of the project is for the whale to emit light and move on its own, so the challenge was to achieve that.
I watched a tutorial, which I will link here, that helped me understand how to add movement to objects. The tutorial focused on an internal structure of the object, known as "bones." These bones need to be structured according to the shape of the object, in this case, the whale. I also watched videos of whale movements, which I will link here, that helped me figure out where to place the bones to create more realistic movement.
I searched for a 360° image to help with the animation, so it would closely match the idea of the project. To do this, I downloaded an image from Freepik.
With the scene ready, I generated a view that projects the idea.
With the scene ready, I rendered an image of the assignment and then created the animation, rendering, and simulation. Click here to view it.
After using the Blender program and struggling at times, I felt great satisfaction seeing how I got closer to the design I had in mind. I can confidently recommend this program as it has powerful features, such as its flexibility in design, the quality of images it offers, and the ability to render and create animations simultaneously. It is truly a versatile tool. Although I still have a lot to improve, I believe I have made significant progress with the activity I completed.
When we were assigned the challenge of creating a parametric kit in the week 03 assignment, I had no experience with this topic. Therefore, I researched which software I could use for this activity. I came across Maria Angela's page page, who took the course at the Academy in 2024. I found the application she used interesting, so I decided to follow her steps and accessed the video tutorial to better understand it. Click here to watch the video.
Within this week of Computer-Aided Design, I am attaching this information, which is valuable to me.
Once the account was created, I clicked on "Next" to continue advancing.
Then, I set the working unit to millimeters. The page also explains how to control the mouse, which I found interesting as part of the learning process of the application.
I edited my profile and chose a nickname. With that done, I began exploring the application interface.
Inside the interface, I started exploring the elements. It wasn't easy at first, so I opened the video tutorial and began practicing simultaneously with the tutorial example.
It took me some time to understand how the application works step by step.
But I was finally able to recreate the parametric module, which consisted of three squares forming a cube.
This cube allowed modifying several parameters, such as the shape, material thickness, length, height, and holes, which could be adjusted according to needs.
To export the file in DXF format, you need to go to the first tab located in the lower-left corner. Within this tab, right-click outside the image, which will open a menu. There, select the 'Export as DXF' option. And that's it!
|
Blender |
Oneshape |
| Focus |
3D modeling and animation for art, film, and games. |
Cloud-based CAD design, ideal for engineering and industrial design. |
| Interface |
Complex, requires time to learn, but highly customizable. |
Intuitive and accessible from any browser, no need for powerful hardware. |
| Tools |
Modeling, sculpting, animation, texturing, simulations, rendering. |
Parametric modeling, assembly tools, version control. |
| Cost |
Free and open-source. |
Free for personal use, but requires a subscription for advanced features. |
| Learning curve |
Steep, but with many learning resources. |
Gentle, easier for those with CAD experience. |
| Collaboration |
Does not have real-time collaboration features. |
Real-time collaboration in the cloud, with simultaneous editing by multiple users. |
Blender and Onshape are two very different programs, each with distinct purposes. I used Blender to model my potential final project, and Onshape to create a parametric kit. Both programs were helpful, although each had its challenges. Blender wasn’t easy to use compared to Onshape, which had a more intuitive and user-friendly interface. Despite the differences in complexity, I was able to complete my assignments using these tools, and I am pleased with the results.
To generate images with AI, I didn't have much success with the pages that were recommended to me, so I decided to try another platform called Microsoft Bing. There, I was able to obtain AI-generated images related to the project I want to work on. Although they are not exactly what I envision, I did this activity as a test to see how it works.
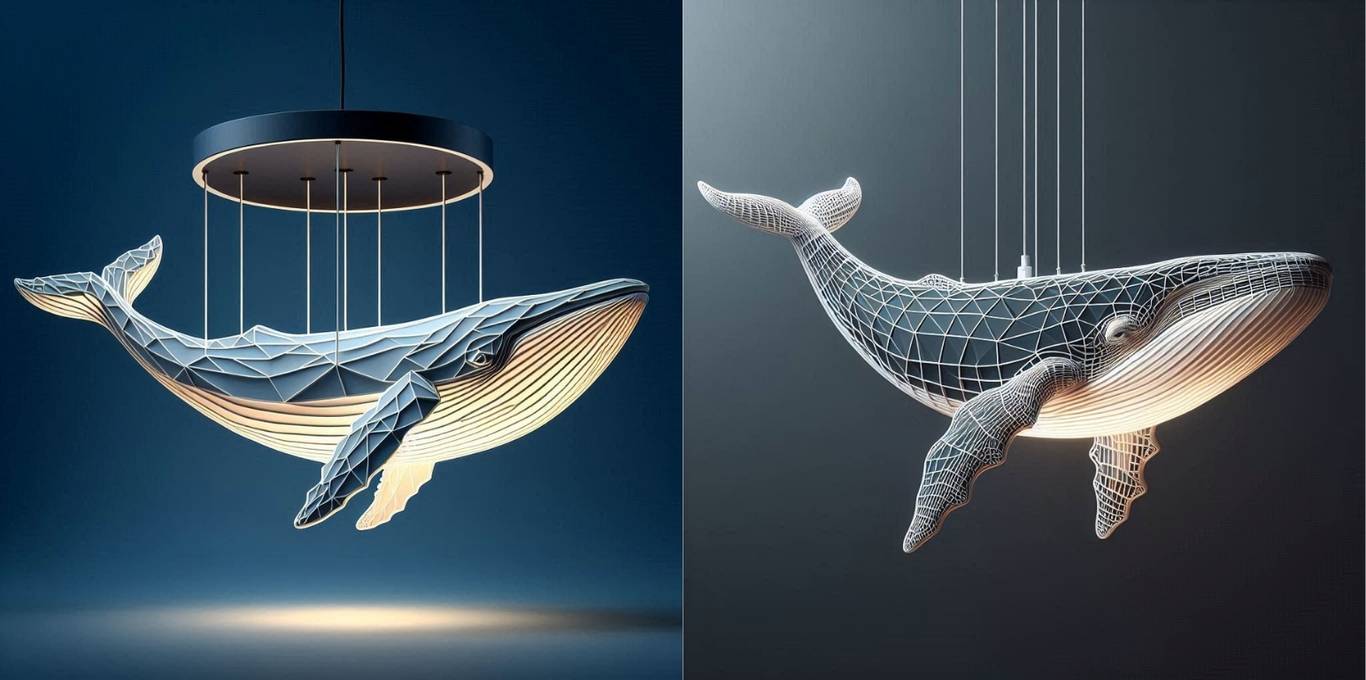
The keywords I used to generate the images were: "humpback whale," "hanging lamp," and "minimalism." With these words, I was able to obtain images that are quite close to the idea I have for my final project.
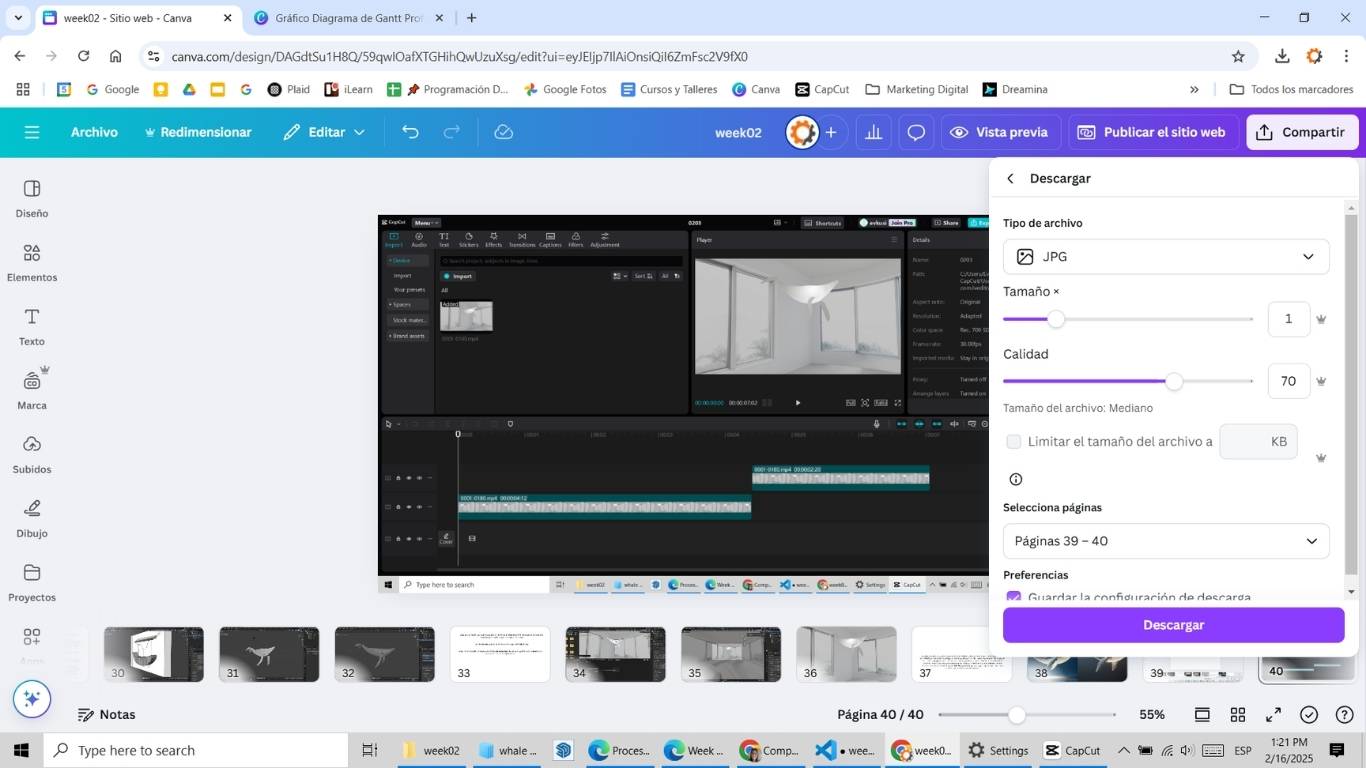
To ensure uniform image sizes, I worked with Canva Pro, where I was able to edit and adjust the image quality, making sure they didn't exceed the weight limit for the page.
 I create or open my design in Canva.
Once finished, I click on the "Download" button (in the top right corner).
I select the file type I prefer (PNG, JPEG).
In the "Settings," if I choose JPEG, I can select the image quality. Reducing the quality makes the image file size smaller.
I click "Download," and the compressed image is saved to my device.
I create or open my design in Canva.
Once finished, I click on the "Download" button (in the top right corner).
I select the file type I prefer (PNG, JPEG).
In the "Settings," if I choose JPEG, I can select the image quality. Reducing the quality makes the image file size smaller.
I click "Download," and the compressed image is saved to my device.
To edit the videos I created, I used the CapCut tool, which also allowed me to adjust and lower the image quality so it wouldn't exceed the size limit.
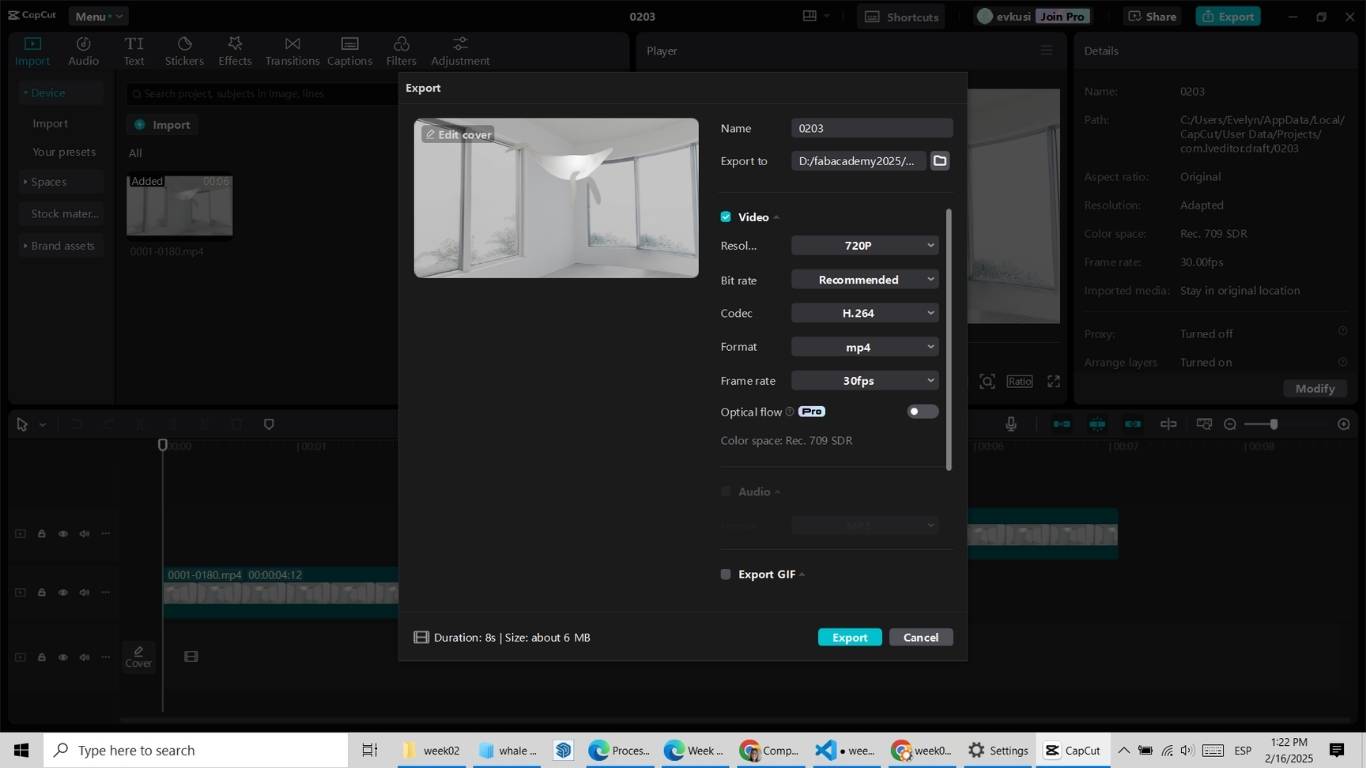 I open CapCut and load the video I want to compress.
I make any necessary edits, if I have them.
I click on "Export."
On the export screen, I adjust the resolution and bitrate of the video. Reducing the resolution and bitrate contributes to video compression.
I save the video to my device. CapCut processes the video with the new settings, thereby reducing the file size.
I open CapCut and load the video I want to compress.
I make any necessary edits, if I have them.
I click on "Export."
On the export screen, I adjust the resolution and bitrate of the video. Reducing the resolution and bitrate contributes to video compression.
I save the video to my device. CapCut processes the video with the new settings, thereby reducing the file size.
Conclusions
- 2D Raster, after using Photoshop and GIMP, I can say the following: personally, the GIMP interface feels new to me and is not as user-friendly as Photoshop's, which can create some imbalance. Photoshop is a tool I am more familiar with, and I find it easier to make edits there compared to GIMP. For this reason, I would recommend Photoshop, as it offers a smoother and more accessible experience for those of us already accustomed to its interface and features.
- 2D Vector, For this activity, I used Inkscape, and I found it to be a very user-friendly software compared to Illustrator, which is the program I usually work with. Inkscape easily handles lines and shapes, and I found its interface very easy to understand. I would recommend it to people who are not familiar with other design programs, as it really makes the process much easier.
- 3D Design,For this activity, which I consider a challenge, I decided to use a new software, Blender. At first, after watching tutorial videos, it seemed easy, but in reality, I struggled quite a bit to understand its interface. It took me about two days to get familiar with it. By the second day, I had a clearer understanding and was really satisfied with the result.
In conclusion, if I were asked if I would recommend it, my answer would be yes. The program is very versatile, allowing you to render images and videos with excellent quality in the results. Personally, I believe that with more time, I could improve my use of this tool.
- OnShapeAfter learning to use the program, I was really satisfied with the results (you can find them here). I was able to create a parametric kit, configuring the measurements while keeping the design. I truly recommend it 1000%. The program is very user-friendly and easy to understand. I believe that, if I continue using it, I’ll be able to create even more interesting things.
- IA
After using AI to generate images for my project, I learned that the process can be very useful for visualizing concepts and bringing ideas to life. While the results were not exactly what I envisioned, they provided a great starting point and inspired new directions for my project. AI tools like this offer a creative way to experiment and refine ideas, though they may require further customization and interpretation to match the specific vision. Overall, it was an exciting and valuable experience that helped me move closer to the realization of my final project.
- Compressing Images
Utilicé Canva y CapCut para comprimir imágenes y videos porque son herramientas accesibles y fáciles de usar que me permiten ajustar la calidad y tamaño de los archivos sin necesidad de software especializado. Aunque no son programas dedicados exclusivamente a la compresión, me ayudaron a optimizar mis archivos para proyectos y presentaciones.