Week 14: Interface & Application Programming
Objectives
- Individual Assignment:
- Write an application that interfaces a user with an input &/or output device that you made
- Group Assignment:
- Compare as many tool options as possible
Training
Using Java Script to perform Document Object Model (DOM) Manipulation
First our instructor, Midlaj helped us undertand how to use Javascript. I learnt to use document.getElementById and .addEventListener able to use Java script to use buttons and for updating text in real time as shown here
                            <!DOCTYPE html>
                            <html lang="en">
                            <head>
                                <meta charset="UTF-8">
                                <meta name="viewport" content="width=device-width, initial-scale=1.0">
                                <title>Document
                            </head>
                            <body>
                                <h1>My name is
                                <p id="Hello">
                                <input id="type" placeholder="Enter your name">
                                <button id="button">Click Here

                                <script>
                                    const button = document.getElementById('button');
                                    const type =  document.getElementById('type');
                                    const Hello = document.getElementById('Hello');
                                    const name= document.getElementById('name');

                                    button.addEventListener('click', function(Clicktext){
                                        Hello.textContent='Hello There';
                                    });

                                    type.addEventListener('input', function(Update){
                                        name.textContent=type.value;
                                        const nameLen =  name.textContent.length;

                                        if (nameLen>=5 && nameLen<=10){
                                            name.style.color="red";
                                        }
                                        else if (nameLen>10){
                                            name.style.color="blue";
                                        }

                                        else{
                                            name.style.color="black";
                                        }
                                    })
                                </script>
                            </body>
                            </html>
To speed up my process of learning, I used the help of ChatGPT
ChatGPT Prompt 1: Explain this code to me
Prompt 1: Explain this code to me
This HTML/JavaScript code creates an interactive webpage that displays a header saying "My Name is <name>", which updates in real time as the user types their name into a textbox. Additionally, the color and font size of the name changes based on the length of the input.
Key Features:
<input>: Allows user input of a name.<span id="name">: Dynamically updates to show the name.- Real-time event listener for
input events: Changes the text and its style based on length.
Dynamic Styling Logic:
- Length > 10 → Red color, font size 2em
- Length > 5 → Black color, font size 1em
- Length ≤ 5 → Green color, font size 1.5em
ChatGPT Prompt 2: What do you call this type of DOM?
Prompt 2: What do you call this type of DOM?
This is an example of DOM manipulation using JavaScript, specifically:
- Event-driven DOM updates: Reacting to user input events to update HTML elements.
- Real-time DOM updates: Dynamically modifying element properties (text, color, font size) based on input.
To search for tutorials, use terms like: "JavaScript DOM manipulation", "real-time input handling in JavaScript", "interactive HTML with JS".
ChatGPT Prompt 3: Explain const inputValue = inputBox.value;
Prompt 3: Explain const inputValue = inputBox.value;
This line gets the current value from the input box and stores it in the variable inputValue:
inputBox is the input element (referenced with getElementById)..value gets the current text typed by the user.const inputValue stores that value into a new variable.
It's commonly used in event listeners to grab user input in real-time.
ChatGPT Prompt 4: else if (nameLen > 5 && < 9)
Prompt 4: else if (nameLen > 5 && < 9)
This code is syntactically incorrect. You must repeat the variable after each comparison operator.
❌ Wrong:
else if (nameLen > 5 && < 9)
✅ Correct:
else if (nameLen > 5 && nameLen < 9)
JavaScript requires complete expressions on both sides of logical operators.
ChatGPT Prompt 5: Problem in this code
Prompt 5: Problem in this code
In the code you shared, everything works except one minor inefficiency:
Line:
const nameLen = nameSpan.textContent;
This stores the entire text content (a string), not the length.
Fix:
const nameLen = nameSpan.textContent.length;
This ensures you're comparing the actual number of characters, not a string object.
ChatGPT Prompt 6: What is the error here?
Prompt 6: What is the error here?
❌ Error: Variable Shadowing
button.addEventListener('click', function(Hello) {
                        Hello.textContent = 'Hello There';
                    });
Here, Hello is used both as a variable (the <p> element) and a function parameter (event object).
✅ Fix:
button.addEventListener('click', function(event) {
                        Hello.textContent = 'Hello There';
                    });
⚠️ Also recommended:
Don't use name as a variable name, as it's a global browser property. Use nameSpan instead to avoid bugs.
Connecting to ESP32 via Web Serial
This is the JavaScript code used for the interface:
    <!DOCTYPE html>
    <html lang="en">
    <head>
        <meta charset="UTF-8">
        <meta name="viewport" content="width=device-width, initial-scale=1.0">
        <title>Document</title>
        <link rel="stylesheet" href="https://cdnjs.cloudflare.com/ajax/libs/font-awesome/6.5.1/css/all.min.css" crossorigin="anonymous"/>
        <!--Link to stylesheet to add bulb icon, crossorigin required to load bulb icon from different domain without credentials -->
    </head>
    <body>
    <h1>Web Serial</h1>
    <button id="connect">Connect</button>  <!-- Adding a button to Connect to USB port -->

    <button id="toggle"><i class="fa-solid fa-lightbulb" style="color:#000000"></i></button> <!-- Adding a toggle button to switch ON and OFF an inbuilt LED in PCB -->


    <div>  <!-- Required for proper alignment of visual elements-->
        <textarea id="SerialOut" rows="10" cols ="30" disabled></textarea> <!-- Serial Monitor where we can read and write data-->
    </div>

    <input type ="type" id="input" placeholder="Enter data here."> <!-- Text box where we can read and write data-->

    <button id="upload">Upload</button> <!-- Button that we can press to upload user input written in input box above-->

        <script>
            //defining variables
            let port;
            let reader;
            let writer;
            let toggle;

            //defining user input textbox, 'Connect' and 'Upload' buttons as different variables.
            const Connect = document.getElementById('connect');

            const addUser = document.getElementById('input');
            const Upload = document.getElementById('upload');
            const toggleBtn = document.getElementById('toggle');

            Connect.addEventListener('click', connectToSerial); //on clicking 'Connect' button, run connecttoSerial function
            Upload.addEventListener('click', uploadMessage); //on clicking 'Upload' button, run uploadMessage function
            toggleBtn.addEventListener('click',toggleLED); //on clicking, LED switches between OFF and ON

            async function connectToSerial(){
                port = await navigator.serial.requestPort(); //Wait until a port has been chosen
                await port.open({baudRate:9600}); //Keep connection via port open at baud rate of 9600

                writer = port.writable.getWriter(); //get writer object
                reader = port.readable.getReader(); //get reader object
                const decoder = new TextDecoder(); //get decoder object from TextDecoder class that can convert binary code to human readable format

                while(true){
                    const {value,done}= await reader.read(); //keep reading until data stream has been stopped; extract the data and store in 'value', and whether data stream has been stopped in 'done' variable
                    if (done) break; //if data stream has been stopped; 'done' = true, then exit the while loop
                    const string = decoder.decode(value); //convert the data contained in value to a string constant
                    document.getElementById('SerialOut').textContent+=string;  //add string constant data to text content in <textarea>
                }
            }

            async function uploadMessage(){
                let userInput = addUser.value; //store user input written in input box as data in a variable 'userInput'
                if (!writer) return; //if writer is not found then exit the function

                const encoder = new TextEncoder(); //get new encoder object that can convert human readable text to machine code

                await writer.write(encoder.encode(userInput+'\n')); //keep writing until entire data has been written; write to microncontroller; \n tells the ESP32 that it is the end of the message.
                // document.getElementById('input').value="";
                addUser.value=""; //clear the textbox so that user can add new input.
            }

            async function toggleLED(){
                if (!writer) return; //if writer does not exist, return

                const dataToSend = toggle ? '1' : '0' ; //if toggle is true, dataToSend ='1'; else datatoSend='0'
                const encoder = new TextEncoder(); //get new encoder object that can convert human readable text to machine code

                await writer.write(encoder.encode(dataToSend)); //wait until writer has written dataToSend as machine code

                if (dataToSend === '0'){
                    toggleBtn.innerHTML=`<i class="fa-solid fa-lightbulb" style="color:#000000"></i>`; // if dataToSend matches value and datatype of string value of 0, then update bulb icon to black to signify LED is OFF.
                }else{
                    toggleBtn.innerHTML=`<i class="fa-solid fa-lightbulb" style="color:yellow"></i>`; // if dataToSend matches value and datatype of string value of 1, then update bulb icon to black to signify LED is ON.
                }
                toggle=!toggle; //flips state of toggle, ie. if toggle was 'true', now toggle is set to 'false' & viceversa.
            }
        </script>
    </body>
    </html>
This is the code for the Xiao ESP32 S3, programmed in Arduino IDE
    #define LED D3
    char user;

    void setup() {
        pinMode(LED,OUTPUT);
        Serial.begin(9600);
    }

    void loop() {
        user = Serial.read();

        if (user == '1') {
        digitalWrite(LED, HIGH);
        Serial.println("ON");
        }

        else if (user == '0') {
        digitalWrite(LED, LOW);
        Serial.println("OFF");
        }
    }
Using Java Script to perform Document Object Model (DOM) Manipulation
First our instructor, Midlaj helped us undertand how to use Javascript. I learnt to use document.getElementById and .addEventListener able to use Java script to use buttons and for updating text in real time as shown here
<!DOCTYPE html>
<html lang="en">
<head>
<meta charset="UTF-8">
<meta name="viewport" content="width=device-width, initial-scale=1.0">
<title>Document
</head>
<body>
<h1>My name is
<p id="Hello">
<input id="type" placeholder="Enter your name">
<button id="button">Click Here
<script>
const button = document.getElementById('button');
const type = document.getElementById('type');
const Hello = document.getElementById('Hello');
const name= document.getElementById('name');
button.addEventListener('click', function(Clicktext){
Hello.textContent='Hello There';
});
type.addEventListener('input', function(Update){
name.textContent=type.value;
const nameLen = name.textContent.length;
if (nameLen>=5 && nameLen<=10){
name.style.color="red";
}
else if (nameLen>10){
name.style.color="blue";
}
else{
name.style.color="black";
}
})
</script>
</body>
</html>
To speed up my process of learning, I used the help of ChatGPT
Prompt 1: Explain this code to me
This HTML/JavaScript code creates an interactive webpage that displays a header saying "My Name is <name>", which updates in real time as the user types their name into a textbox. Additionally, the color and font size of the name changes based on the length of the input.
Key Features:
<input>: Allows user input of a name.<span id="name">: Dynamically updates to show the name.- Real-time event listener for
inputevents: Changes the text and its style based on length.
Dynamic Styling Logic:
- Length > 10 → Red color, font size 2em
- Length > 5 → Black color, font size 1em
- Length ≤ 5 → Green color, font size 1.5em
Prompt 2: What do you call this type of DOM?
This is an example of DOM manipulation using JavaScript, specifically:
- Event-driven DOM updates: Reacting to user input events to update HTML elements.
- Real-time DOM updates: Dynamically modifying element properties (text, color, font size) based on input.
To search for tutorials, use terms like: "JavaScript DOM manipulation", "real-time input handling in JavaScript", "interactive HTML with JS".
Prompt 3: Explain const inputValue = inputBox.value;
This line gets the current value from the input box and stores it in the variable inputValue:
inputBoxis the input element (referenced withgetElementById)..valuegets the current text typed by the user.const inputValuestores that value into a new variable.
It's commonly used in event listeners to grab user input in real-time.
Prompt 4: else if (nameLen > 5 && < 9)
This code is syntactically incorrect. You must repeat the variable after each comparison operator.
❌ Wrong:
else if (nameLen > 5 && < 9)
✅ Correct:
else if (nameLen > 5 && nameLen < 9)
JavaScript requires complete expressions on both sides of logical operators.
Prompt 5: Problem in this code
In the code you shared, everything works except one minor inefficiency:
Line:
const nameLen = nameSpan.textContent;
This stores the entire text content (a string), not the length.
Fix:
const nameLen = nameSpan.textContent.length;
This ensures you're comparing the actual number of characters, not a string object.
Prompt 6: What is the error here?
❌ Error: Variable Shadowing
button.addEventListener('click', function(Hello) {
Hello.textContent = 'Hello There';
});
Here, Hello is used both as a variable (the <p> element) and a function parameter (event object).
✅ Fix:
button.addEventListener('click', function(event) {
Hello.textContent = 'Hello There';
});
⚠️ Also recommended:
Don't use name as a variable name, as it's a global browser property. Use nameSpan instead to avoid bugs.
Connecting to ESP32 via Web Serial
This is the JavaScript code used for the interface:
<!DOCTYPE html>
<html lang="en">
<head>
<meta charset="UTF-8">
<meta name="viewport" content="width=device-width, initial-scale=1.0">
<title>Document</title>
<link rel="stylesheet" href="https://cdnjs.cloudflare.com/ajax/libs/font-awesome/6.5.1/css/all.min.css" crossorigin="anonymous"/>
<!--Link to stylesheet to add bulb icon, crossorigin required to load bulb icon from different domain without credentials -->
</head>
<body>
<h1>Web Serial</h1>
<button id="connect">Connect</button> <!-- Adding a button to Connect to USB port -->
<button id="toggle"><i class="fa-solid fa-lightbulb" style="color:#000000"></i></button> <!-- Adding a toggle button to switch ON and OFF an inbuilt LED in PCB -->
<div> <!-- Required for proper alignment of visual elements-->
<textarea id="SerialOut" rows="10" cols ="30" disabled></textarea> <!-- Serial Monitor where we can read and write data-->
</div>
<input type ="type" id="input" placeholder="Enter data here."> <!-- Text box where we can read and write data-->
<button id="upload">Upload</button> <!-- Button that we can press to upload user input written in input box above-->
<script>
//defining variables
let port;
let reader;
let writer;
let toggle;
//defining user input textbox, 'Connect' and 'Upload' buttons as different variables.
const Connect = document.getElementById('connect');
const addUser = document.getElementById('input');
const Upload = document.getElementById('upload');
const toggleBtn = document.getElementById('toggle');
Connect.addEventListener('click', connectToSerial); //on clicking 'Connect' button, run connecttoSerial function
Upload.addEventListener('click', uploadMessage); //on clicking 'Upload' button, run uploadMessage function
toggleBtn.addEventListener('click',toggleLED); //on clicking, LED switches between OFF and ON
async function connectToSerial(){
port = await navigator.serial.requestPort(); //Wait until a port has been chosen
await port.open({baudRate:9600}); //Keep connection via port open at baud rate of 9600
writer = port.writable.getWriter(); //get writer object
reader = port.readable.getReader(); //get reader object
const decoder = new TextDecoder(); //get decoder object from TextDecoder class that can convert binary code to human readable format
while(true){
const {value,done}= await reader.read(); //keep reading until data stream has been stopped; extract the data and store in 'value', and whether data stream has been stopped in 'done' variable
if (done) break; //if data stream has been stopped; 'done' = true, then exit the while loop
const string = decoder.decode(value); //convert the data contained in value to a string constant
document.getElementById('SerialOut').textContent+=string; //add string constant data to text content in <textarea>
}
}
async function uploadMessage(){
let userInput = addUser.value; //store user input written in input box as data in a variable 'userInput'
if (!writer) return; //if writer is not found then exit the function
const encoder = new TextEncoder(); //get new encoder object that can convert human readable text to machine code
await writer.write(encoder.encode(userInput+'\n')); //keep writing until entire data has been written; write to microncontroller; \n tells the ESP32 that it is the end of the message.
// document.getElementById('input').value="";
addUser.value=""; //clear the textbox so that user can add new input.
}
async function toggleLED(){
if (!writer) return; //if writer does not exist, return
const dataToSend = toggle ? '1' : '0' ; //if toggle is true, dataToSend ='1'; else datatoSend='0'
const encoder = new TextEncoder(); //get new encoder object that can convert human readable text to machine code
await writer.write(encoder.encode(dataToSend)); //wait until writer has written dataToSend as machine code
if (dataToSend === '0'){
toggleBtn.innerHTML=`<i class="fa-solid fa-lightbulb" style="color:#000000"></i>`; // if dataToSend matches value and datatype of string value of 0, then update bulb icon to black to signify LED is OFF.
}else{
toggleBtn.innerHTML=`<i class="fa-solid fa-lightbulb" style="color:yellow"></i>`; // if dataToSend matches value and datatype of string value of 1, then update bulb icon to black to signify LED is ON.
}
toggle=!toggle; //flips state of toggle, ie. if toggle was 'true', now toggle is set to 'false' & viceversa.
}
</script>
</body>
</html>
This is the code for the Xiao ESP32 S3, programmed in Arduino IDE
#define LED D3
char user;
void setup() {
pinMode(LED,OUTPUT);
Serial.begin(9600);
}
void loop() {
user = Serial.read();
if (user == '1') {
digitalWrite(LED, HIGH);
Serial.println("ON");
}
else if (user == '0') {
digitalWrite(LED, LOW);
Serial.println("OFF");
}
}
Chat GPT prompts I used to learn to write this piece of code are listed below:
Prompt 1: Explain this code async function sendMessage()
This code defines an asynchronous function that reads input from a text box and sends it over a serial connection:
async function sendMessage() {
                    const input = document.getElementById('input').value;
                    if (!writer) return;
                    const encoder = new TextEncoder();
                    await writer.write(encoder.encode(input + '\n'));
                    document.getElementById('input').value = ""
}inputcaptures text from a textbox with ID 'input'.!writerchecks if the serial writer exists; if not, it exits.TextEncoder()converts human-readable text to binary.await writer.write(...)writes to the microcontroller.+ '\n'signals end of message for serial communication.input.value = ""clears the textbox after sending.
Prompt 2: Confirm if this LED toggle algorithm is used
Yes, the algorithm you've described is generally what the code implements, with a correction in the logic:
- When toggle = true →
dataToSend = 1(LED ON) writer.write(encoder.encode(dataToSend))sends '1'- Bulb icon turns green (indicating ON)
- Toggle state is flipped to false
- On next press, toggle = false →
dataToSend = 0(LED OFF) - Sends '0', icon turns black, toggle flips again
Prompt 3: Why is .then() required here?
.then() is used for handling a Promise’s result after it resolves. In your code:
writer.write(encoder.encode(dataToSend)).then(() => {
                ... UI changes
                })
This ensures that the UI updates (changing bulb icon, flipping toggle) happen only after data is written to the serial port.
Prompt 4: What are the differences between .then and await?
.then(): Method chaining style; used in classic Promise handlingawait: Cleaner syntax for async code insideasyncfunctions
Key Differences:
awaitpauses execution;.then()continues chainingawaitworks only insideasyncfunctions.then()can be used in non-async contexts
Prompt 5: Why does this use '\n' in some places but not others?
'\n' is used to signify the end of a message for the receiving microcontroller, especially in multi-character inputs.
writer.write(encoder.encode(userInput + '\n')): Needed so ESP32 knows when to stop reading.writer.write(encoder.encode(dataToSend)): Not needed if data is a single character and the receiver reads only 1 byte.
Prompt 6: Why is the lightbulb not visible?
There are 2 main issues:
- Missing Font Awesome CDN: You didn’t include the external script for the icon set.
- Incorrect HTML in
innerHTML: You wrote<i="...">, but it should be<i class="...">.
Fix:
<script src="https://kit.fontawesome.com/yourkitid.js" crossorigin="anonymous"></script>Also correct the toggle logic to:
toggleBtn.innerHTML = `<i class="fa-solid fa-lightbulb" style="color: yellow">`;Prompt 7: What is crossorigin="anonymous"?
crossorigin="anonymous" is used in tags like <script> or <link> when loading resources from another domain.
- It prevents user credentials from being sent (no cookies, auth headers).
- Improves security when fetching assets like fonts/scripts from CDNs.
- Browser only uses the response if the server explicitly allows it via CORS headers.
Example:
<script src="https://kit.fontawesome.com/abc123.js" crossorigin="anonymous"></script>const inputValue = inputBox.value;
Prompt 8: Explain const inputValue = inputBox.value;
This line stores the current text inside the input box into a variable called inputValue. inputBox is the reference to the input field, and .value is used to access what the user typed.
else if (nameLen > 5 && < 9)
Prompt 9: What's wrong with this line? else if (nameLen > 5 && < 9)
The correct syntax should be: else if (nameLen > 5 && nameLen < 9). You must repeat nameLen on both sides of the logical condition.
Prompt 10: Problem in the code snippet with color logic
Your code mostly works, but you used nameLen = nameSpan.textContent, which makes nameLen a string. You should use nameLen = nameSpan.textContent.length to get the number of characters. Without this, the conditions using nameLen.length would behave incorrectly.
Prompt 11: Explain this serial connection code block
This function connects your webpage to a USB serial device using the Web Serial API. It requests a port, opens it, and sets up reading and writing. It reads data continuously and updates a textarea with the received text.
requestPort()prompts the user to select a device.open()sets the baud rate.getReader()andgetWriter()handle input/output.TextDecoderconverts raw data to readable text.while(true)loops forever reading new data.
{ value, done } = await reader.read();
Prompt 12: What is { value, done } = await reader.read();
This is called destructuring assignment. The function reader.read() returns an object like { value: ..., done: ... }. You are directly extracting those two properties into variables.
Prompt 13: Explain to someone with no coding experience
Imagine you're reading a book out loud. Each time you flip a page, you read what’s written. The line { value, done } = await reader.read(); is like flipping a page and checking if there's anything written and whether you're done reading the book.
Prompt 14: Full explanation of the connectToSerial code
This function sets up communication with a USB device. It continuously listens for messages and displays them on the webpage. The key steps:
- User clicks a button to connect.
- Browser asks which USB device to use.
- It opens the device at 9600 baud rate.
- Creates tools to send/receive messages.
- It loops forever, checking for new messages.
- When data comes in, it's decoded into readable text and displayed in a textarea.
Prompt 15 Syntax of destructuring assignment
The syntax const { value, done } = await reader.read(); pulls out the value and done fields from the result of reader.read(). It’s like saying: “give me just the parts I care about from this object.”
Prompt 16: Does break exit out of if or while?
break exits out of a loop like while, for, etc. It does not exit an if block. In your code, it stops the while(true) loop when there’s no more data.
Individual Assignment
Controlling a Servo via Web Serial
Web Serial API provides a way for websites to read from and write to serial devices (which includes the input/output/networking devices we made during past weeks) that are connected to a computerc (via USB in our case).
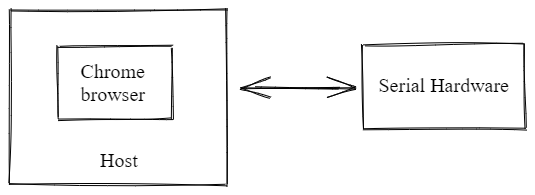
Note that Web Serial only works in Chromium browsers like Microsoft Edge, Google Chrome, etc (See Mistakes and Solutions)
Creating a Webpage
HTML file for webpage
            <!DOCTYPE html>
            <html>
                <head> <h1>Web Serial Servo Controller </head>

                <!--Styling for webpage -->
                <style>
                    body{
                        font-family:'Franklin Gothic Medium', 'Arial Narrow', Arial, sans-serif; /* Sets the font */
                        background-color: rgb(103, 197, 197); /* Sets the background color */
                        display: flex; /* Uses Flexbox for layout */
                        flex-direction:column;
                        justify-content: center;
                        align-items:center;
                        height:100vh;
                        margin:0;

                    }
                    /* Styling for button */
                    button {
                        padding: 10px 20px;
                        margin:10px;
                        background-color:green;
                        color: white;
                        border-radius: 5px;
                        cursor:pointer;
                    }

                    .textarea{
                        margin:auto;  /* Centers the textarea */
                    }

                </style>

            <body>
                <div>
                <button id="ConnBn">Connect</button>  /* Button to connect/disconnect serial  */
                </div>
                <div style="margin-auto">  /* Required for proper alignment of visual elements */
                <textarea id="SerialOut" style="margin-auto;" rows="10" cols ="30" disabled></textarea> /* Serial Monitor where we can read and write data */
                </div>
                <div>
                <input type="range" min="0" max="180" value="0" id="Slider"> /* Slider for servo angle */
                <span id="aDisplay" style = "background-color: #e0e0e0;">000 /* Shows current angle */
                </div>

                <script>
                    /* Get references to DOM elements */
                    const connectBtn = document.getElementById('ConnBn');
                    const dataSlider = document.getElementById('Slider');
                    const angleDisplay = document.getElementById('aDisplay');

                    // angleDisplay.addListenerEvent('input',sendAngle);

                    /* declaring variables for Serial communication */
                    let port
                    let writer
                    let reader
                    let toggleConnect = false

                    connectBtn.addEventListener('click',connectToSerial); /* When button is clicked, connect or disconnect */
                    dataSlider.addEventListener('input',sendAngle); /* When slider changes, send new angle */

                    /* Function to connect or disconnect from serial port */
                    async function connectToSerial(){
                        if (!toggleConnect){ /* If not connected yet */
                            try{
                                port = await navigator.serial.requestPort() /* Request access to a serial port */
                                await port.open({baudRate:9600}); /* Open with 9600 baud rate */

                                /* Get reader and writer data stream */

                                writer = port.writable.getWriter();
                                reader = port.readable.getReader();

                                sendData(); /* Send initial data */

                                /*Update button*/

                                connectBtn.style.backgroundColor = "red";  /* Change button to red */
                                connectBtn.textContent = "Disconnect";  /* Update button text to Disconnect*/
                                toggleConnect=!toggleConnect /* Flag indicates as connected */

                            }
                            catch(error){
                                console.error("Error, unable to open serial port", error); /*In case of error, display this message' */
                            }
                        }
                        else{ /* If already connected */
                            try{

                                /*Release locks on writer and reader */

                                await writer.releaseLock();
                                await reader.releaseLock();
                                await port.close();

                                /*Remove reference as a fail safe*/

                                writer=null;
                                reader=null;
                                port=null;

                                /*Update button*/

                                connectBtn.style.backgroundColor = "green"; */Update button colour*/
                                connectBtn.textContent = "Connect"; /* Update button text*/
                                toggleConnect=!toggleConnect; /* Flag indicates as disconnected */
                            }
                            catch(error){
                                console.error("Error, unable to close serial port", error); /*In case error, print this message in Serial Monitor */
                            }
                        }

                    }

                    /* Function to send angle values when slider moves */

                    async function sendAngle(){
                        sendData(dataSlider.value) /* Send the current slider value */
                        angleDisplay.textContent=dataSlider.value.padStart(3,"0"); /* Display the angle as a 3 digit number */
                    }

                    /* Function to send data to serial */

                    function sendData(value = dataSlider.value){
                        const encoder = new TextEncoder(); /*Create encoder to convert text to bytes */
                        if (!writer) return; /* Exit the function if no writer exists*/

                        value = value.toString().padStart(3,"0"); /*represent as a 3 digit number */

                        writer
                            .write(encoder.encode(value)) /* Send value to serial port */
                            .then (()=>{
                                console.log("Sent: " + value);
                                document.getElementById('SerialOut').scrollTop= document.getElementById('SerialOut').scrollHeight; /*For autoscroll*/
                            });
                            const end = '\n' /* Define line break */
                            writer.write(encoder.encode(end)); /* Send newline to serial */
                            document.getElementById('SerialOut').textContent+="Servo 1 Angle: " + value + '\n'; /* Add message to serial output */
                        }

                </script>
            </body>
            </html>
Code for Xiao ESP32 S3 I programmed on the Arduino IDE
            //Firmware to serially control a servo
            #include <ESP32Servo.h>

            #define PULSEMIN 500
            #define PULSEMAX 2500
            #define SERVO_PIN D6

            Servo myServo;
            String inputString;

            void setup() {
            Serial.begin(9600);
            ESP32PWM::allocateTimer(0);
            myServo.attach (SERVO_PIN, PULSEMIN, PULSEMAX);

            Serial.println("Serial connection successful!");
            Serial.println("Type servo angle: ");
            }

            void loop() {

            if (Serial.available()){
                char digit = Serial.read();

                if (digit == '\n'){
                Serial.println(inputString);
                int servoAngle = (inputString[0]-48)*100 + (inputString[1]-48)*10 + (inputString[2]-48);
                Serial.println(servoAngle);
                myServo.write(servoAngle);

                inputString = "";
                }
                else{
                    inputString=inputString+digit;
                }
                }
            }
value = value.toString().padStart(3, "0");
Prompt 1: Explain what this line of code does
This line ensures that the value being sent is always three characters long, padded with leading zeroes if needed.
Code Breakdown:
value.toString(): Converts the numeric value to a string.padStart(3, "0"): Pads the string on the left with "0" until its length is 3.
Example:
let value = 5;
                    value = value.toString().padStart(3, "0");
                    console.log(value); // "005"
This is especially useful when communicating with devices that expect values in a fixed-width format, such as microcontrollers via serial ports.
Prompt 2: Web Serial API - Continuous Read Example
Here's how to use the Web Serial API to read data continuously from a microcontroller like an Arduino:
✅ Full HTML + JavaScript Example:
<!DOCTYPE html>
                    <html lang="en">
                    <head>
                        <meta charset="UTF-8" />
                        <title>Serial Read Demo</title>
                    </head>
                    <body>
                        <button id="connect">Connect</button>
                        <textarea id="output" rows="10" cols="50"></textarea>

                        <script>
                        const connectButton = document.getElementById('connect');
                        const outputTextarea = document.getElementById('output');
                        let port, reader;

                        connectButton.addEventListener('click', async () => {
                            try {
                            port = await navigator.serial.requestPort();
                            await port.open({ baudRate: 9600 });

                            const decoder = new TextDecoderStream();
                            const readableStreamClosed = port.readable.pipeTo(decoder.writable);
                            reader = decoder.readable.getReader();

                            while (true) {
                                const { value, done } = await reader.read();
                                if (done) break;
                                outputTextarea.value += value;
                            }
                            } catch (err) {
                            console.error('Serial read error:', err);
                            }
                        });
                        </script>
                    </body>
                    </html>
💡 Notes:
- The
await reader.read()ensures that the browser waits for data before continuing the loop. - This approach prevents the UI from freezing by avoiding a tight infinite loop.
await navigator.serial.requestPort()?
Root Cause: Freezing After Serial Connect
Your screen most likely freezes after connecting because of an improperly handled infinite loop without await. This causes the browser’s main thread to become blocked.
❌ Problematic Code Example:
while (true) {
                        const { value, done } = reader.read(); // ❌ missing await!
                        if (done) break;
                        outputTextarea.value += value;
                    }
This loop runs extremely fast and doesn’t give control back to the event loop, freezing the page.
✅ Correct Version:
while (true) {
                        const { value, done } = await reader.read(); // ✅ awaits incoming data
                        if (done) break;
                        outputTextarea.value += value;
                    }
✔️ Add Try/Catch for Robustness:
try {
                        while (true) {
                        const { value, done } = await reader.read();
                        if (done) break;
                        outputTextarea.value += value;
                        }
                    } catch (error) {
                        console.error("Error while reading serial:", error);
}Prompt 4: Add Disconnect Button
Include a "Disconnect" button to safely close the serial connection and free resources:
HTML:
<button id="disconnect">Disconnect</button>JavaScript:
document.getElementById('disconnect').addEventListener('click', async () => {
                        if (reader) {
                        await reader.cancel();     // Stops the reader loop
                        await reader.releaseLock();
                        }
                        if (port) {
                        await port.close();        // Closes the serial port
                        }
                    });
This prevents potential memory leaks or app crashes due to lingering open connections.
let port = await navigator.serial.requestPort();
Prompt 5: Explain what this line of code does
This line prompts the user to select a serial port on their device and returns a reference to the selected port.
Code Breakdown:
navigator.serial.requestPort(): This function opens a prompt to allow the user to choose a serial port from available options.await: Ensures the code execution pauses until the user makes a selection or cancels the prompt.
Example:
let port;
                    try {
                        port = await navigator.serial.requestPort();
                        console.log('Selected port:', port);
                    } catch (error) {
                        console.error('User canceled port selection:', error);
                    }
This is the first step before any further serial communication, such as reading or writing data to the microcontroller.
navigator.serial.requestPort() return if the user cancels the port selection?
Prompt 6: What happens when the user cancels port selection?
If the user cancels the port selection, navigator.serial.requestPort() will throw an error, which can be caught in a try...catch block.
Handling the Cancellation:
let port;
                    try {
                        port = await navigator.serial.requestPort();
                        console.log('Selected port:', port);
                    } catch (error) {
                        console.error('User canceled port selection:', error);
                    }
In this case, the error caught will inform you that the user canceled the operation, and no serial port is selected.
TextDecoderStream used for in the Web Serial API?
Prompt 7: What is TextDecoderStream in the Web Serial API?
TextDecoderStream is used to convert raw byte streams (such as data received over a serial connection) into text. It decodes data from a byte stream into human-readable characters, making it easier to process serial input.
Code Example:
const decoder = new TextDecoderStream();
                    const readableStreamClosed = port.readable.pipeTo(decoder.writable);
                    const reader = decoder.readable.getReader();
How it works:
TextDecoderStream(): Creates a decoder that converts binary data into text.pipeTo(decoder.writable): This pipes the serial port’s readable stream to the decoder’s writable stream, allowing the raw byte data to be decoded.getReader(): Returns a reader from the decoded stream, allowing you to read the decoded text data.
This is particularly useful when dealing with data sent by microcontrollers or other devices over serial communication, as they often send raw byte streams that need to be decoded into text for further processing.
Prompt 8: How to handle errors while reading from serial port?
To handle errors gracefully while reading from a serial port, use try...catch blocks to catch and manage any potential issues, such as communication failures or unexpected disconnections.
Error Handling Example:
try {
                        while (true) {
                        const { value, done } = await reader.read();
                        if (done) break;
                        outputTextarea.value += value;
                        }
                    } catch (error) {
                        console.error("Error reading from serial port:", error);
                    }
This ensures that if there is an issue with the serial communication, it is caught and handled properly, preventing your app from crashing unexpectedly.
Tips:
- Always provide meaningful error messages when catching exceptions.
- Consider implementing user-friendly notifications in the UI to inform the user about connection or read failures.
Prompt 9: Browser Compatibility of Web Serial API
The Web Serial API is supported in modern browsers like Google Chrome, Edge, and Opera, but is not available in all browsers.
Supported Browsers:
- Google Chrome: Fully supports the Web Serial API (with appropriate flags enabled in some cases).
- Microsoft Edge: Also supports the Web Serial API, as it is built on Chromium.
- Opera: Has Web Serial API support since it is based on Chromium.
- Firefox/Safari: These browsers currently do not support the Web Serial API.
How to Check if Web Serial API is Supported:
if ('serial' in navigator) {
                        console.log('Web Serial API is supported!');
                    } else {
                        console.log('Web Serial API is not supported in this browser.');
                    }
For non-supported browsers, you can provide alternative instructions or fallback options, like using Bluetooth or WebSockets for serial communication.
navigator.serial.requestPort() and navigator.serial.getPorts()?
Prompt 10: Difference between navigator.serial.requestPort() and navigator.serial.getPorts()
The primary difference is that navigator.serial.requestPort() prompts the user to select a port, while navigator.serial.getPorts() returns a list of all available ports without requiring user interaction.
Code Breakdown:
navigator.serial.requestPort(): Opens a prompt that allows the user to select a port.navigator.serial.getPorts(): Returns an array of available ports without any user interaction, typically used when you want to display all available options without prompting.
Examples:
// Requesting a port
                    let port = await navigator.serial.requestPort();
                    console.log(port);

                    // Getting all available ports
                    const ports = await navigator.serial.getPorts();
                    console.log(ports);
Use getPorts() if you want to automatically detect all available ports, and use requestPort() when you want the user to choose a specific one.
port.open() do in the Web Serial API?
Prompt 11: What does port.open() do in the Web Serial API?
The port.open() method is used to open a serial port and establish a communication session. Once the port is open, you can begin reading and writing data to and from the device connected to the port.
Code Breakdown:
port.open(options): Opens the selected serial port with the provided options (e.g., baud rate, data bits, etc.).
Example:
const port = await navigator.serial.requestPort();
                    await port.open({ baudRate: 9600 });
                    console.log('Port is now open!');
Once the port is open, you can proceed with reading and writing data using the available readable and writable streams.
baudRate option do when opening a serial port?
Prompt 12: What does baudRate do when opening a serial port?
The baudRate option specifies the communication speed between the computer and the connected device. It is measured in bits per second (bps), and both the computer and the device must use the same baud rate for successful communication.
Example:
const port = await navigator.serial.requestPort();
                    await port.open({ baudRate: 115200 });
                    console.log('Port is open with baud rate of 115200');
Common baud rates include 9600, 115200, and 250000. You should consult the documentation for your device to determine the correct baud rate.
Prompt 13: How to send data to a serial port using the Web Serial API?
To send data to a serial port, you need to write to the port's writable stream. This is done by creating a WritableStream and then using its getWriter() method to write data.
Code Example:
const port = await navigator.serial.requestPort();
                    await port.open({ baudRate: 9600 });

                    const writer = port.writable.getWriter();
                    const encoder = new TextEncoder();
                    const data = encoder.encode("Hello, device!");

                    writer.write(data).then(() => {
                        console.log('Data sent successfully');
                    }).catch((error) => {
                        console.error('Error sending data:', error);
                    });
In this example, we use TextEncoder to convert the text into a binary format, which can then be written to the serial port.
TextEncoder in the Web Serial API?
Prompt 14: What is the purpose of TextEncoder in the Web Serial API?
The TextEncoder class is used to encode text into a sequence of bytes, which can be transmitted over a serial port or any other binary stream.
How it works:
TextEncoder: Converts strings into binary data that can be sent over a serial connection.encode(): This method takes a string and encodes it into aUint8Array(a binary representation of the string).
Example:
const encoder = new TextEncoder();
                    const byteArray = encoder.encode("Hello, world!");
                    console.log(byteArray); // Uint8Array [72, 101, 108, 108, 111, 44, 32, 119, 111, 114, 108, 100, 33]
This is useful when you need to send string data as binary over a serial connection, which is typically how serial communication works.
Prompt 15: How do I close a serial port using the Web Serial API?
You can close a serial port by calling the port.close() method. This closes the connection and releases the port for other uses.
Code Example:
const port = await navigator.serial.requestPort();
                    await port.open({ baudRate: 9600 });

                    // After communication is done
                    await port.close();
                    console.log('Port closed successfully');
After closing the port, you cannot use it for communication until it is reopened, typically by requesting the user to select it again.
name="" in a textarea?
Prompt 17: What is name="" in a textarea?
The name attribute is used when submitting form data. It gives that field a key in the submitted data. If it’s empty, then it won’t be referenced during submission. It’s safe to omit it unless using a form.
const input = document.getElementById('input').value;
Prompt 18: Syntax of const input = document.getElementById('input').value;
This line finds the HTML element with ID input and gets its current value (what the user typed in). That value is stored in a variable called input.
Prompt 19: Why does my screen freeze when I connect to USB device?
Your screen likely freezes because you forgot to await the reader.read() function call inside the while(true) loop. Without await, the browser doesn’t pause to wait for data, and the loop runs uncontrollably fast, locking the UI.
// Wrong
                    const {value, done} = reader.read();

                    // Correct ✅
const { value, done } = await reader.read();Prompt 20: Write an Arduino code to test serial read and write
Here is an example Arduino code to test serial communication, including both reading and writing data:
                    #define LED_BUILTIN 13

                    void setup() {
                        // Start serial communication at 9600 baud rate
                        Serial.begin(9600);
                        pinMode(LED_BUILTIN, OUTPUT);  // Initialize the built-in LED pin as an output
                    }

                    void loop() {
                        if (Serial.available() > 0) {
                            // Read the incoming byte
                            char receivedChar = Serial.read();

                            // Check if the received character is 'H'
                            if (receivedChar == 'H') {
                                digitalWrite(LED_BUILTIN, HIGH);  // Turn on the LED
                                Serial.println("LED is ON");
                            }
                            // Check if the received character is 'L'
                            else if (receivedChar == 'L') {
                                digitalWrite(LED_BUILTIN, LOW);   // Turn off the LED
                                Serial.println("LED is OFF");
                            }
                            else {
                                Serial.println("Invalid input");
                            }
                        }
                    }
- The Arduino code listens for serial data.
- If 'H' is received, it turns on the LED and prints "LED is ON".
- If 'L' is received, it turns off the LED and prints "LED is OFF".
- For any other input, it prints "Invalid input".
Prompt 21: Explain this Arduino code
This code reads serial input, compares it, and turns an LED on or off accordingly:
Serial.begin(9600);initializes serial communication at 9600 baud rate.pinMode(LED_BUILTIN, OUTPUT);sets the built-in LED as an output.if (Serial.available() > 0)checks if there is any data available to read from serial.char receivedChar = Serial.read();reads a character from the serial input.- If the received character is 'H', the LED turns on, and if it's 'L', the LED turns off.
- If the input is neither 'H' nor 'L', it prints "Invalid input".
Prompt 22: Explain why the type "servo angle" prints 2 times each time before I input ServoAngle
The reason the prompt "Type servo angle" prints twice is likely due to how the serial monitor refreshes. This happens because the program is repeatedly executing the serial.print function inside the loop, even before you start typing the input:
- The code is printing the prompt every time the loop starts, regardless of user input.
- Every time the loop executes, the message gets printed once in each cycle of the loop.
- To fix this, you can ensure the prompt is only printed once by setting up a condition or flag that only prints it the first time.
Prompt 23: Explain how to convert bytes from Serial.read to integer
To convert bytes read from the serial input into an integer, you need to interpret the bytes as characters and then convert those characters to their respective numerical values:
                    char data = Serial.read();
                    int value = data - '0';  // Convert the ASCII byte to an integer
Serial.read()reads a byte from the serial input.data - '0'converts the ASCII value of the byte to its corresponding integer value.- This works for single-digit numbers (0-9). For multi-digit numbers, you can multiply and add the digits in a loop to construct the full number.
Prompt 24: Explain the error 'i was not declared in this scope'
The error "i was not declared in this scope" occurs because the variable i is being used without being declared first:
- The variable
iis likely being used as an index or counter but has not been initialized. - To fix this, declare
ibefore using it, like this:
int i = 0;Prompt 25: Explain why `angleDisplay.textConnect` is incorrect
The issue with angleDisplay.textConnect is that it's an incorrect property name. The correct property for modifying the text content of an HTML element is textContent, not textConnect. Here's the corrected code:
angleDisplay.textContent = dataSlider.value.padStart(3, "0");textContentis the proper way to set or get the textual content of an HTML element.- By using
textContent, you can update the displayed angle value from the slider correctly.
Prompt 26: Explain the use of `await` in async functions
The await keyword is used inside an async function to pause the execution of the function until a promise is resolved or rejected. It makes asynchronous code behave more like synchronous code:
awaitwaits for the promise to resolve and returns the result.- If the promise is rejected, an error is thrown and can be caught using
try-catchblocks. awaitcan only be used inside functions declared withasync.
Example usage:
                    async function connectToSerial() {
                        try {
                            const port = await navigator.serial.requestPort();
                            await port.open({ baudRate: 9600 });
                            console.log('Connected to the serial port');
                        } catch (error) {
                            console.error('Error:', error);
                        }
                    }
Prompt 27: What does `navigator.serial.requestPort()` do?
The method navigator.serial.requestPort() is used to request access to a connected serial port on a device. This is part of the Web Serial API, which allows web pages to interact with hardware devices like microcontrollers and sensors via serial communication:
requestPort()opens a dialog box where the user can select a serial port to connect to.- It returns a promise that resolves to the selected serial port if successful.
- If the user denies the request or no port is available, the promise is rejected.
Example usage:
                    async function connectToSerial() {
                        try {
                            const port = await navigator.serial.requestPort();
                            console.log('Serial port opened:', port);
                        } catch (error) {
                            console.error('Failed to access serial port:', error);
                        }
                    }
Prompt 28: Explain the error `Uncaught (in promise) TypeError: angleDisplay is null`
This error indicates that the angleDisplay element could not be found in the DOM when the script tried to access it. The most likely reasons for this error include:
- The element with ID
angleDisplaydoesn't exist in the HTML at the time the script is running. - The JavaScript might be running before the DOM is fully loaded, so the element hasn't been created yet.
- The element ID in the script doesn't match the one in the HTML (e.g., `angleDisplay` vs `aDisplay`).
To fix this, ensure the element exists and is correctly referenced, and make sure the script is executed after the DOM is ready. You can do this by:
- Placing the
<script>tag at the end of the HTML body, or - Using
document.addEventListener('DOMContentLoaded', ...);to wait for the DOM to be fully loaded before running the script.
Example fix:
                    document.addEventListener('DOMContentLoaded', function() {
                        const angleDisplay = document.getElementById('angleDisplay');
                        // Now you can safely interact with the angleDisplay element
                    });
Prompt 29: Explain the error `TypeError: Cannot read properties of null (reading 'value')`
This error occurs when trying to access the value property of an element that is null. This typically happens if the JavaScript code attempts to reference an element that has not been found in the DOM:
- The most common cause is that the element ID in
document.getElementById()does not match the actual ID in the HTML. - Another possibility is that the script is trying to access the element before it is created in the DOM.
To resolve this:
- Ensure the element ID in the script matches the one in the HTML.
- Check that the element exists before trying to access its properties.
- Ensure the script is executed after the DOM is fully loaded.
Example fix:
                    document.addEventListener('DOMContentLoaded', function() {
                        const slider = document.getElementById('Slider');
                        if (slider) {
                            console.log(slider.value);  // Safe to access the value now
                        }
                    });
Hosting using Vercel
To be able to access this webpage from any computer connected to the internet, I hosted my webpage using Vercel using the help of one of my instructors. Midlaj.

Hosting in Vercel has many advantages, including:
- Simple and easy deployment
- Can manage APIs without managing servers
- You can enable automatic deployments from your repository using Git
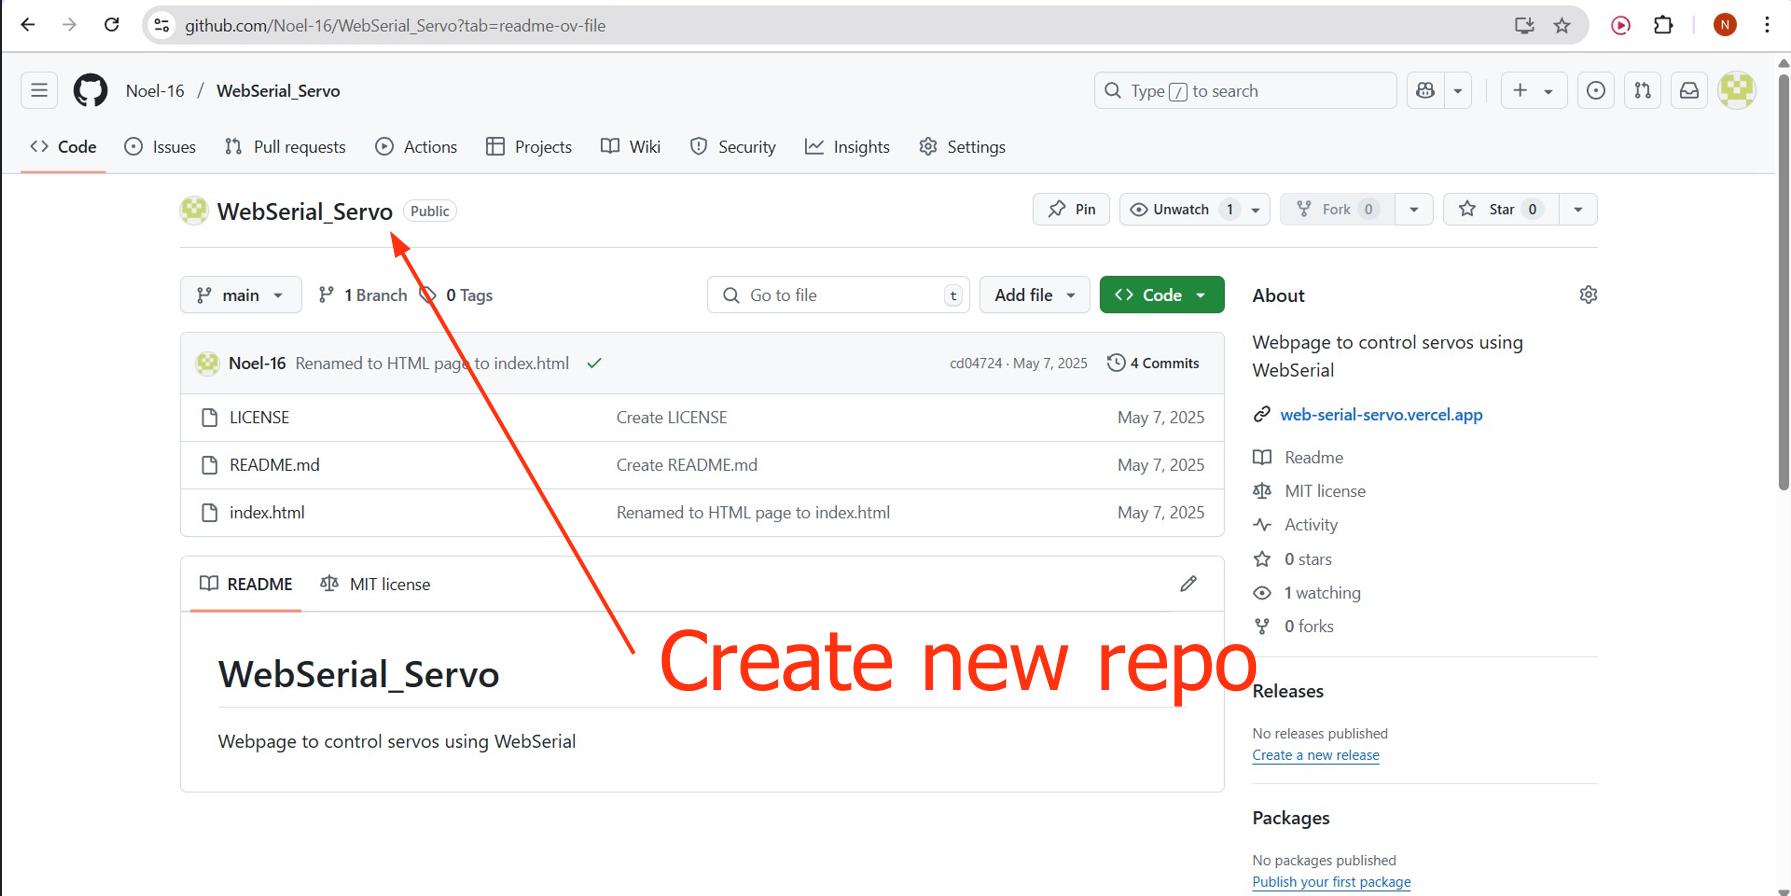
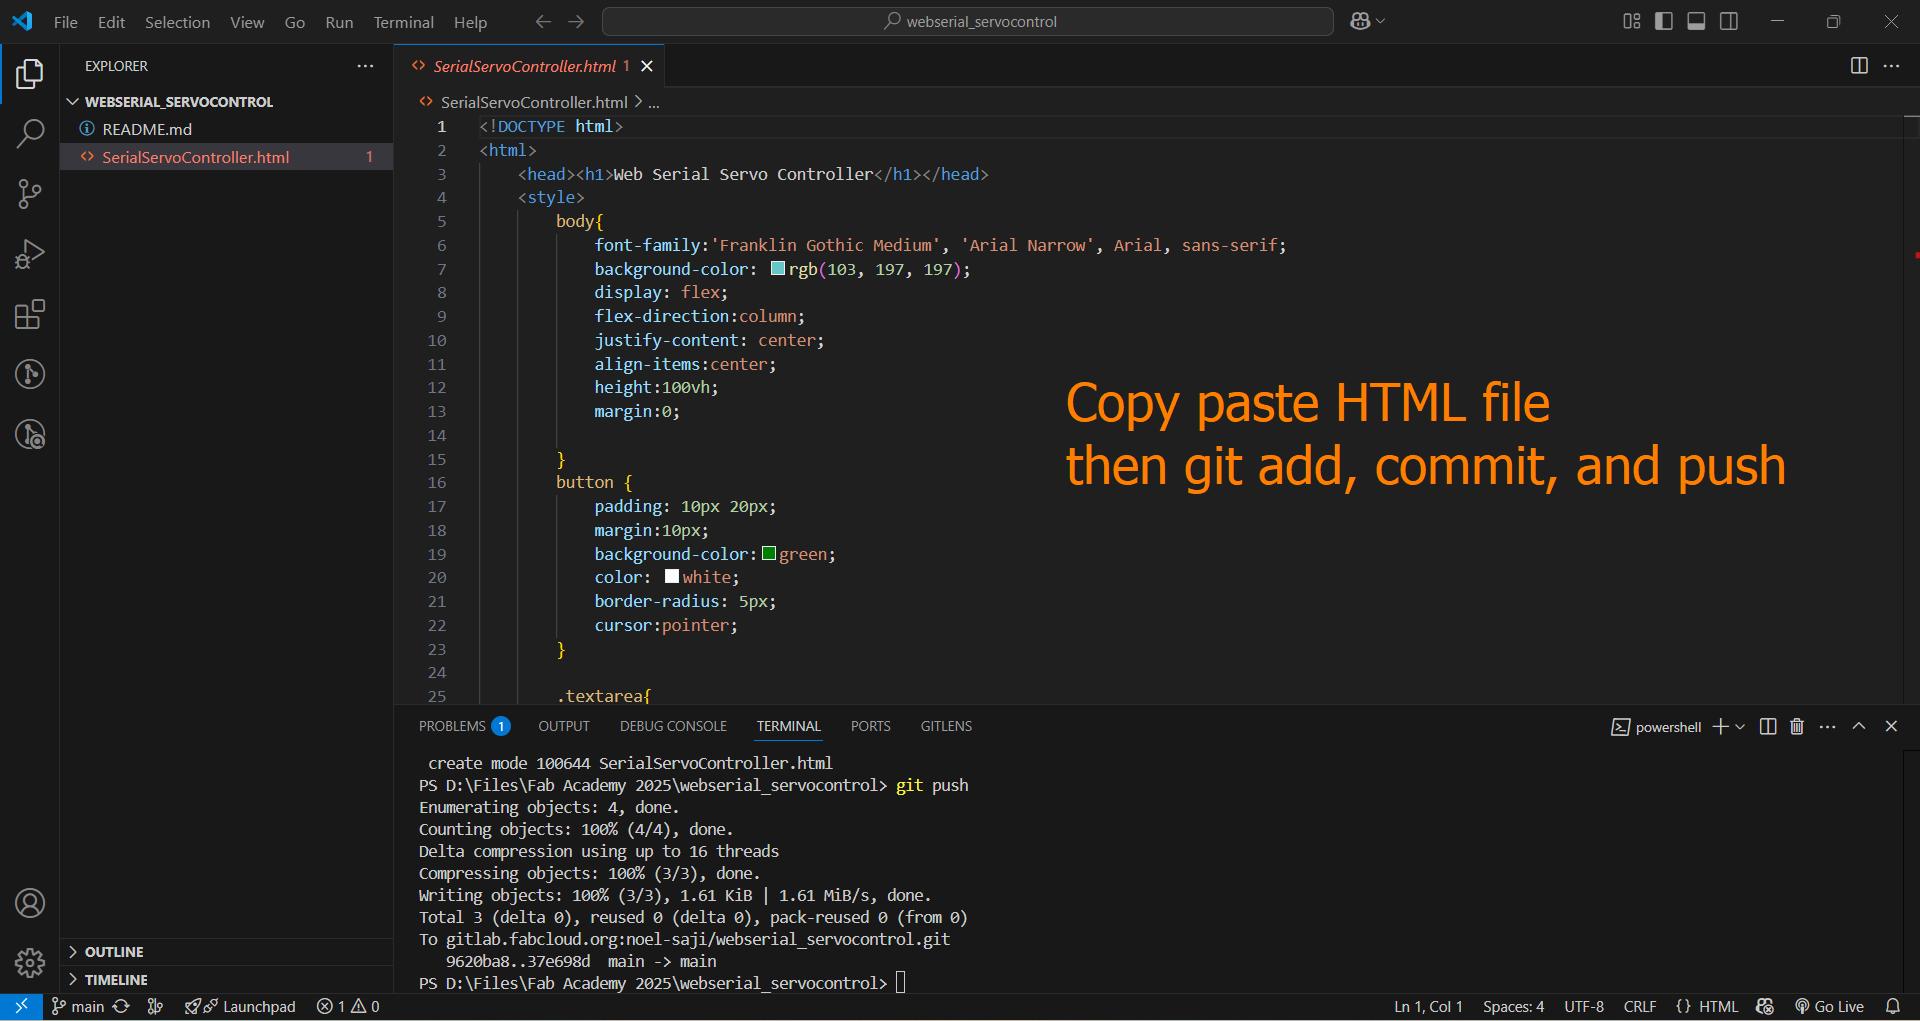
To host via Vercel, I need to create a new Github repository and clone it like we have done before. Then I we copy paste the HTML file, rename it to index.html if not already done so and push the file into global repo, which can be accessed by clicking here.
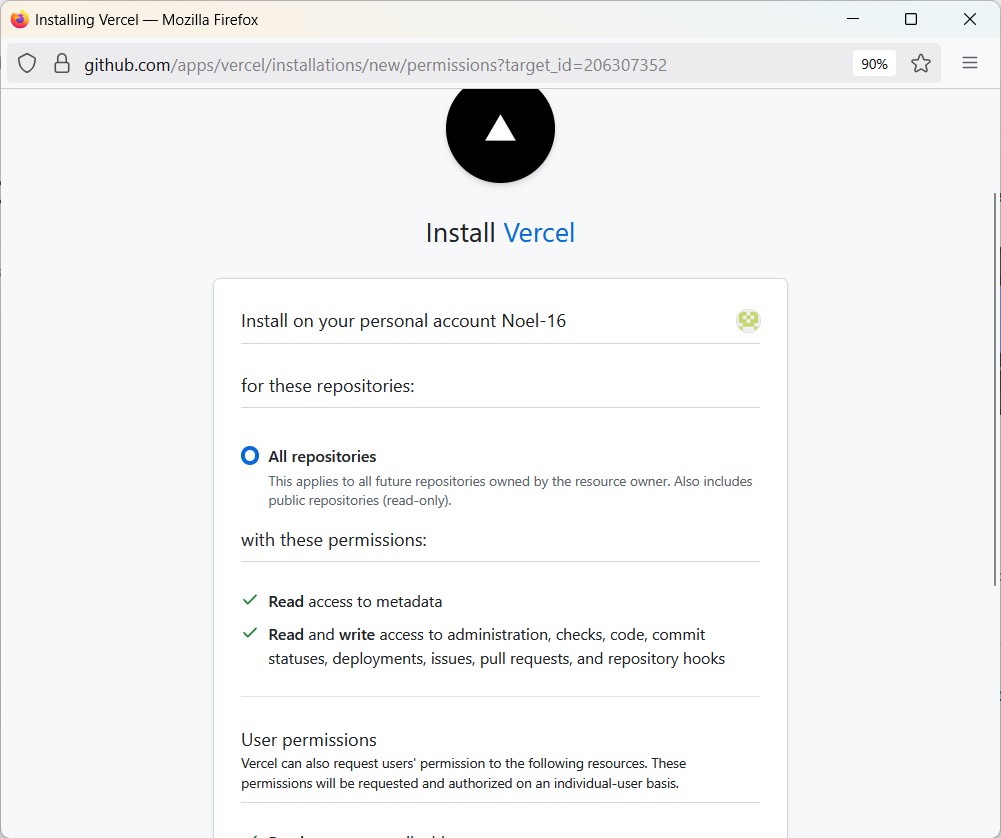
Then link your github account to Vercel, install Vercel, and import your git repo
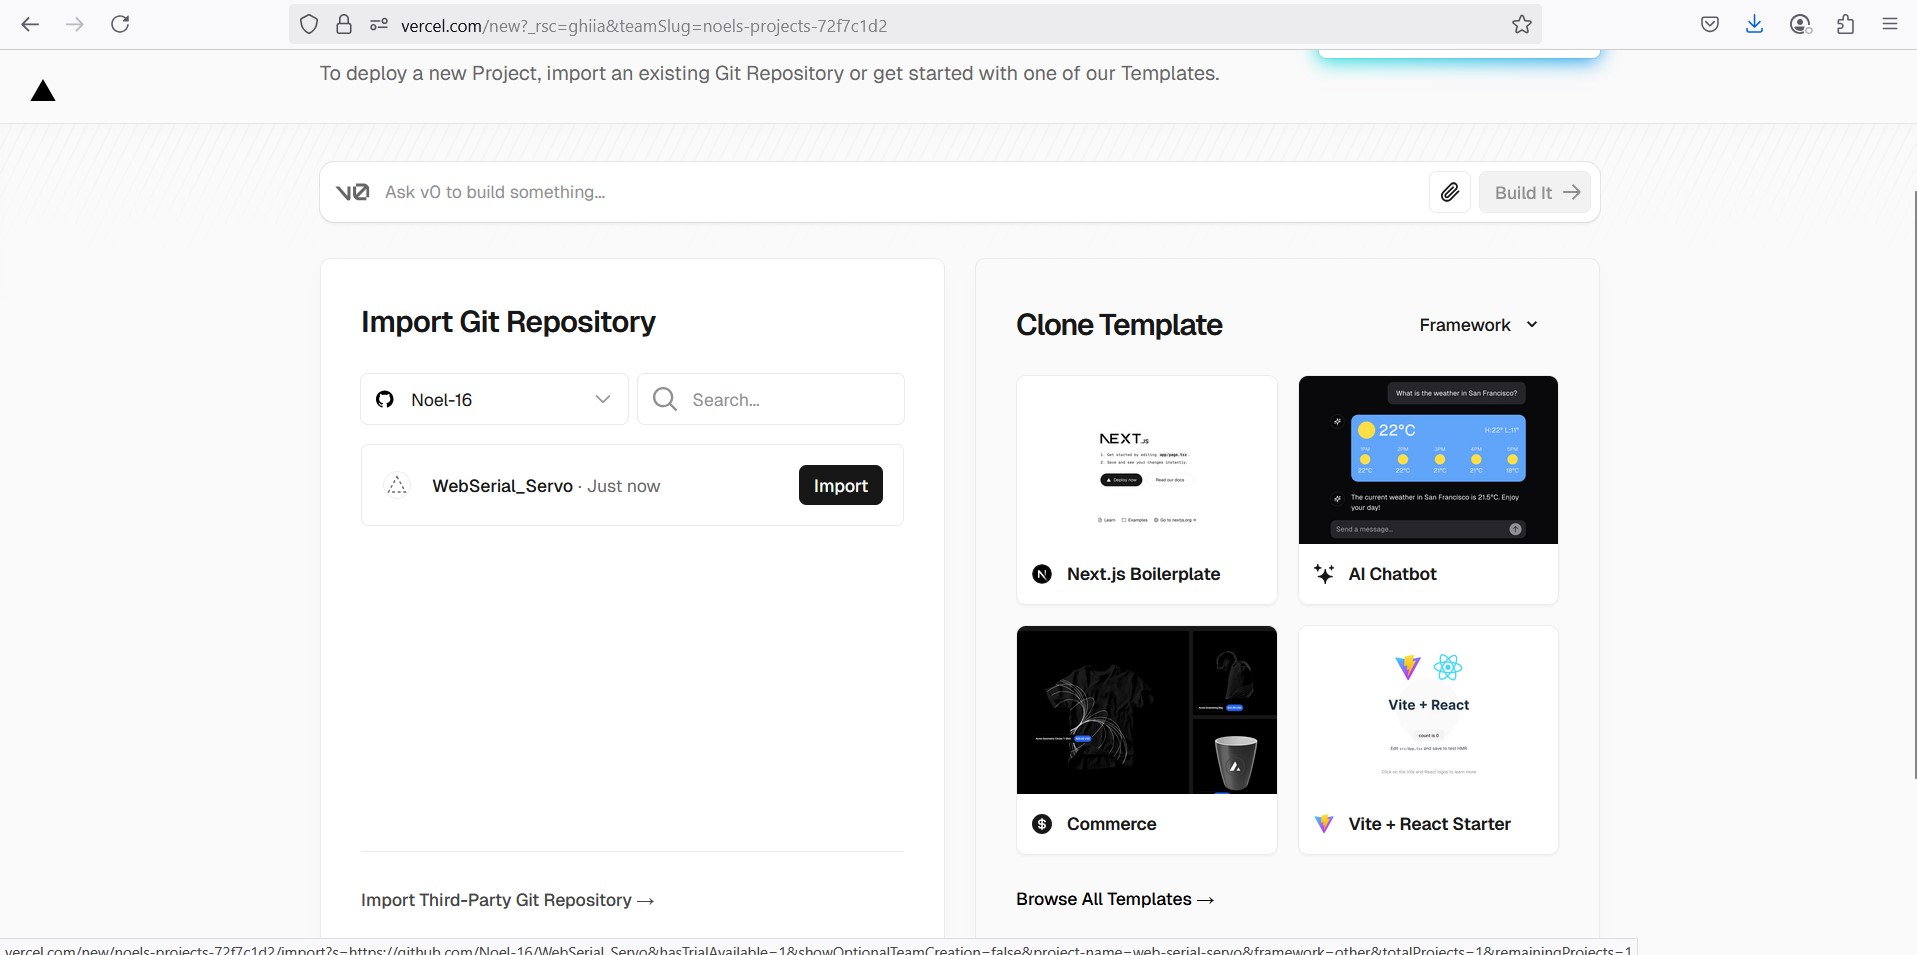
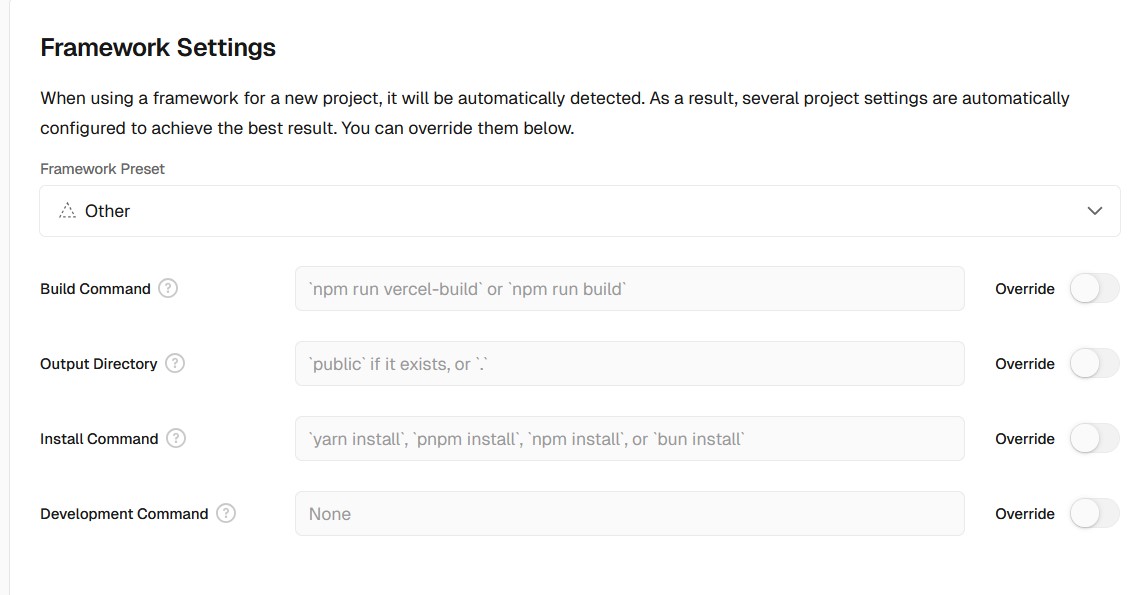
While deploying I dont have to use any specific framework preset, so I chose Other
This is what a succesful deployment should look like
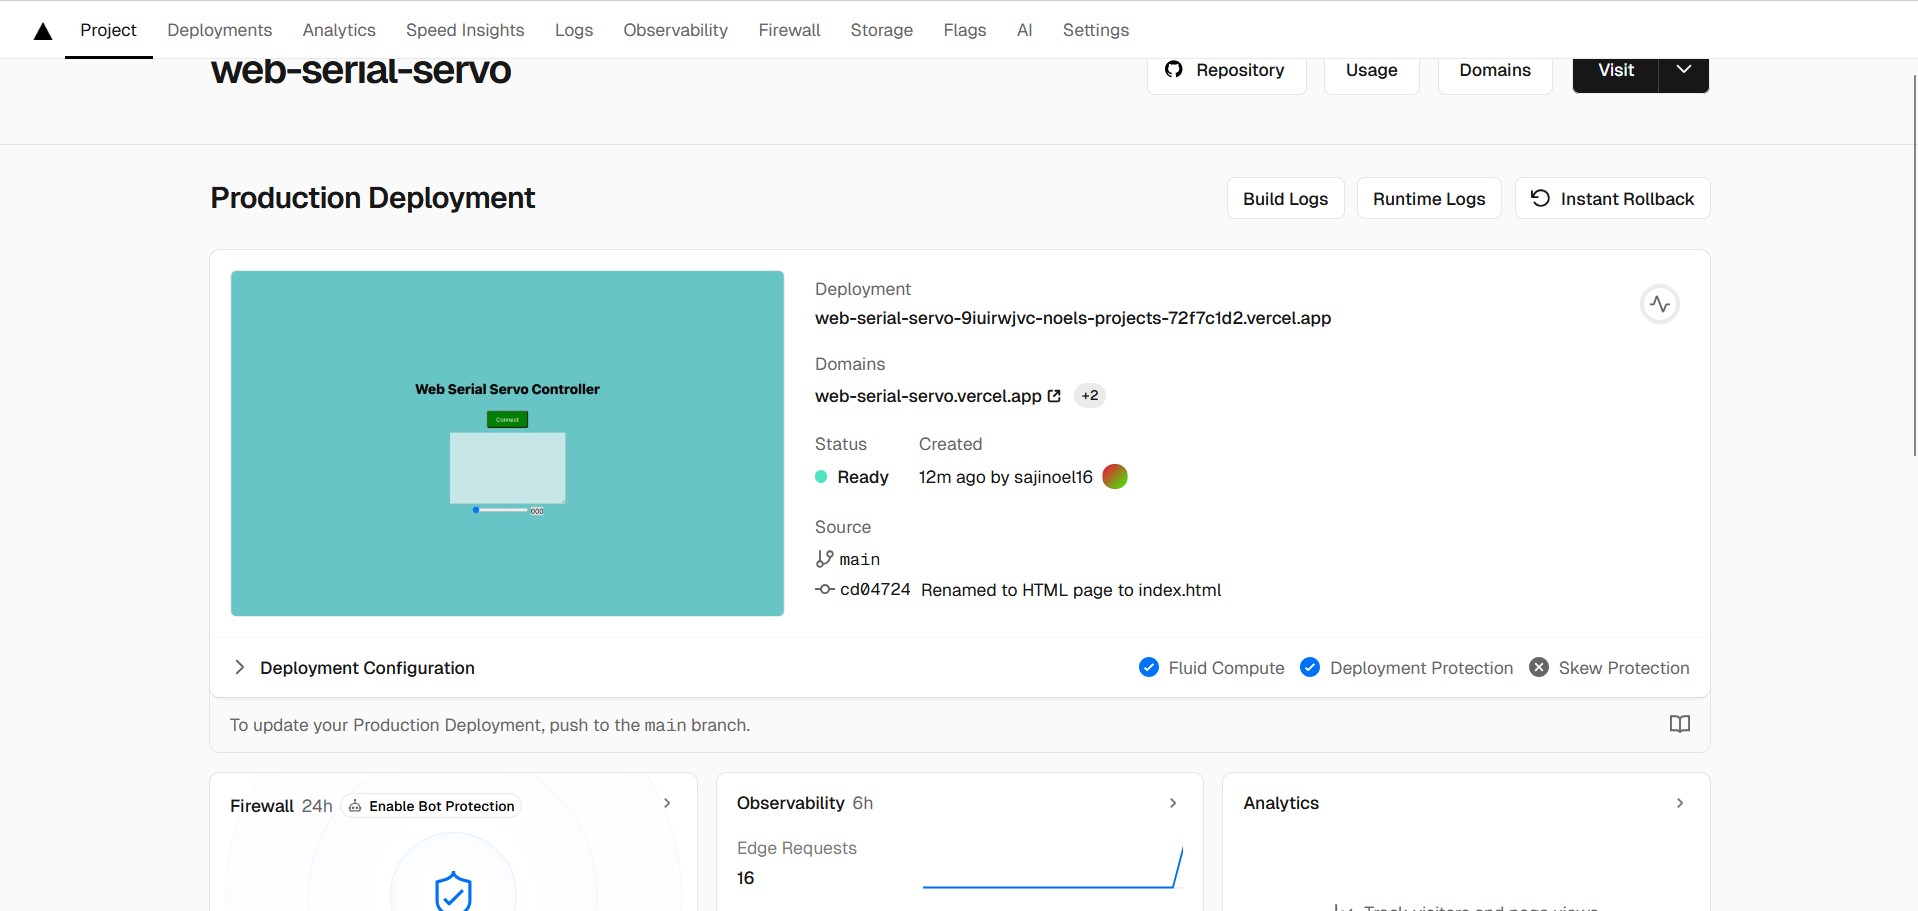
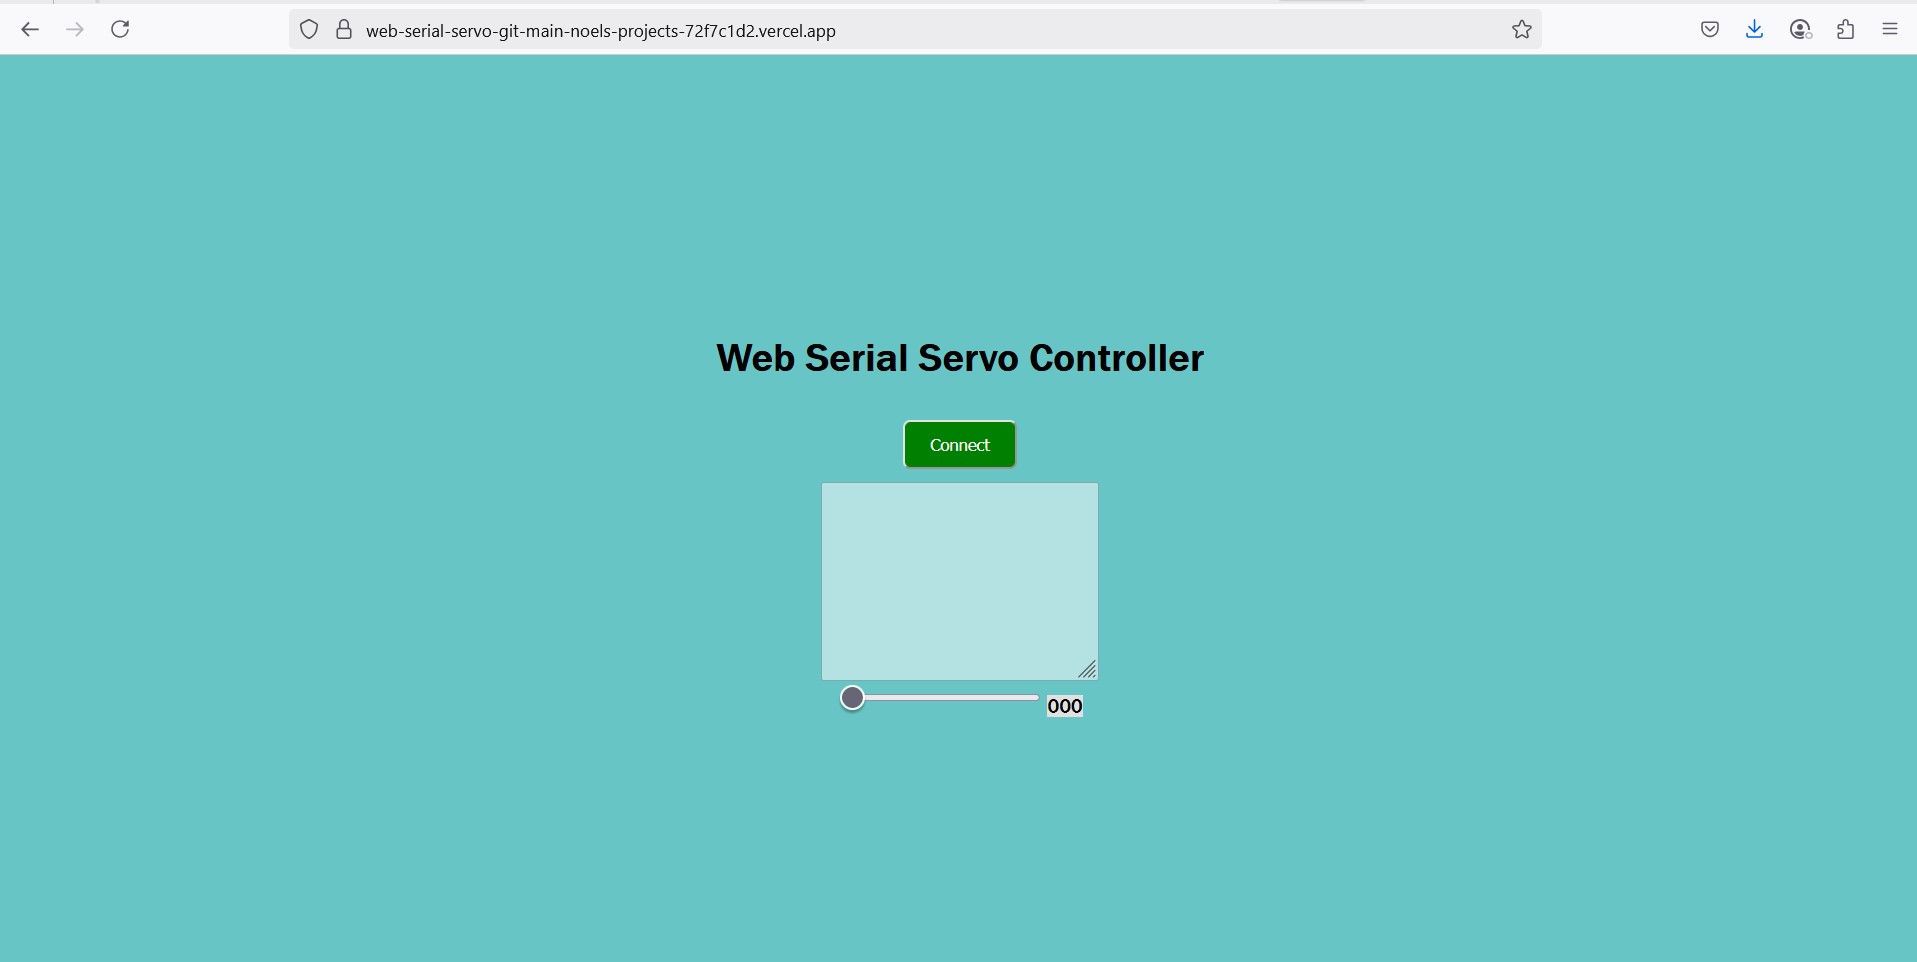
I have deployed the site here
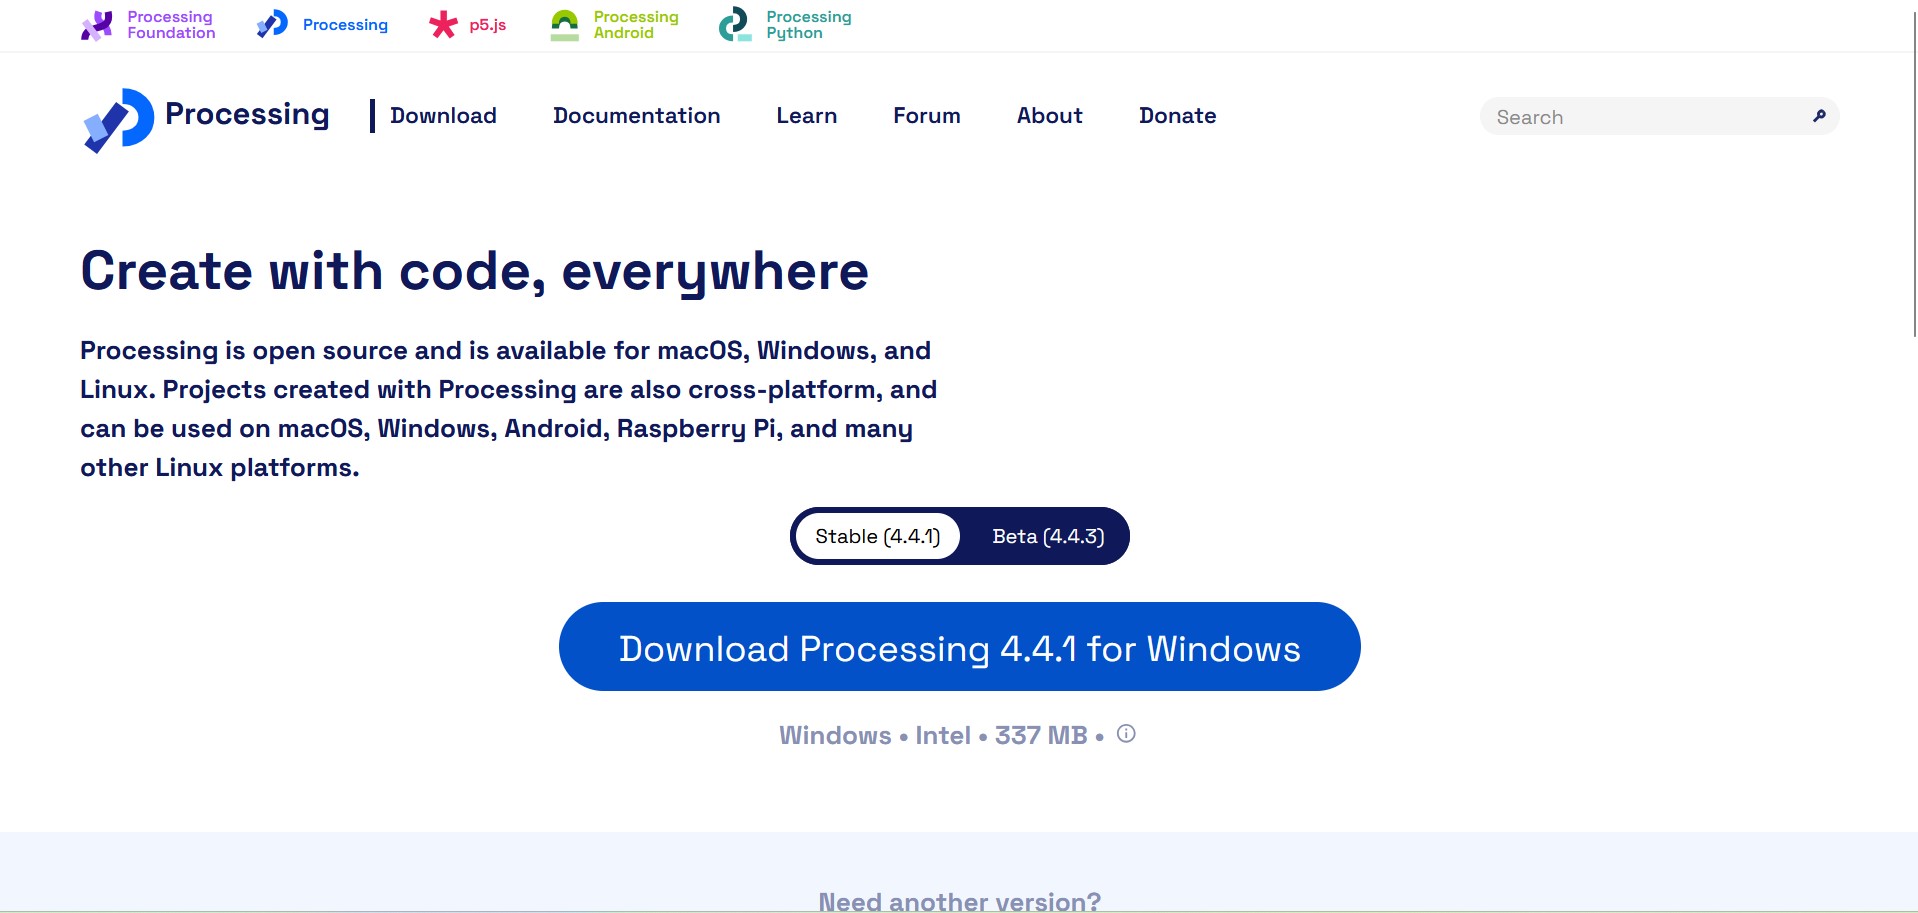
Using Processing to make a Servo Controller
Processing is an open-source programming language and developmet environment initiated by Ben Fry and Casey Reas in 2001. Processing programming language is based off of Java for the purpose of creating visual graphics and animations for designers and creative professionals easily. To download Processing IDE click here
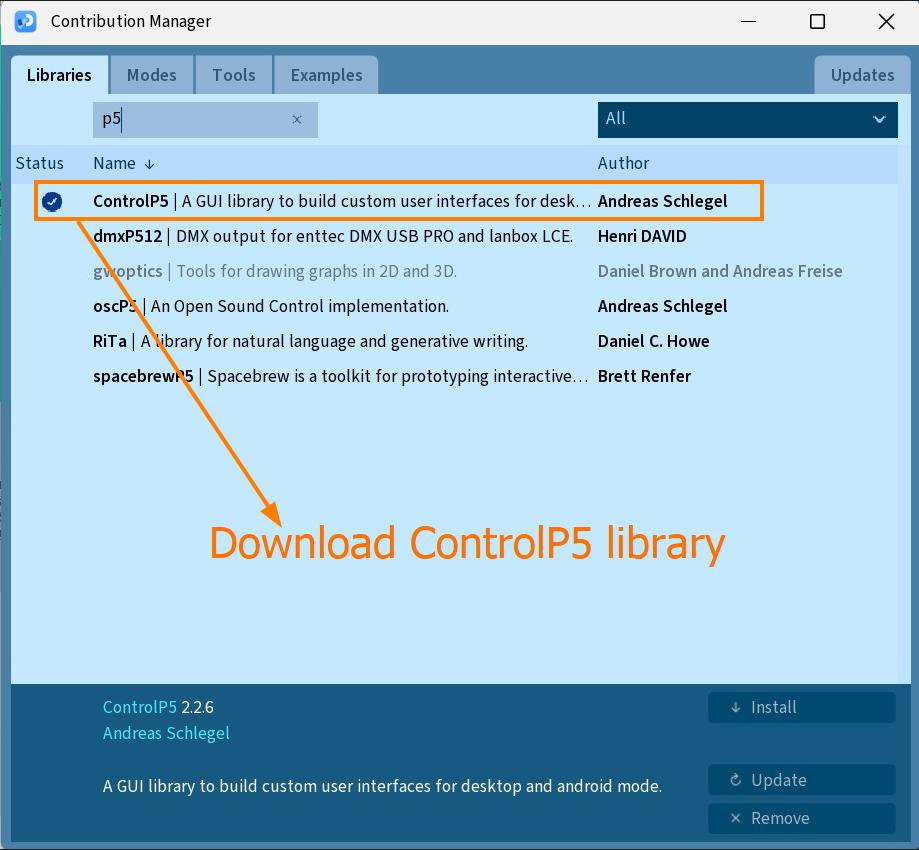
p5Control library is a graphical user interface (GUI) library used to create different kinds of controllers, including buttons, sliders, knobs, etc. To downloaded p5 Control library, go to Processing IDE > Sketch > Import Library > Manage Library, and type in p5, and click Download
A big portion of the code I used is based off off this instructable that discusses how to control Servo Motors with Processing and Arduino IDE, among other sources. I have listed all references in References
This is the code I used in the Processing IDE
    import processing.serial.*; //Importing Processing library
    import controlP5.*; //Importing controlP5 library
    Knob KnobX; //call KnobX object from Knob class
    Knob KnobY; //call KnobY object from Knob class
    int xpos; // set xpos integer
    int ypos; // set ypos integer

    ControlP5 cp5; //create object cp5 from class ControlP5
    Serial myPort; //create object myPort from class Serial

    void setup(){
    size(500,500); //set size of canvas/window
    frameRate(100); //set frame rate for animation
    printArray(Serial.list());
    myPort=new Serial(this, Serial.list()[4], 9600);
    cp5 = new ControlP5(this);
    PFont pfont = createFont("Arial",20,true); // use true/false for smooth/no-smooth
    ControlFont font = new ControlFont(pfont,15); //creating new object font from class ControlFont. Font size can be adjusted here

    KnobX = cp5.addKnob("Servo X")
            .setRange(0,180) //range of knob
            .setValue(0)  //set deafult value
            .setPosition(150,25)  //set corordinates
            .setRadius(100) //adjust radius of knob
            .setNumberOfTickMarks(36) //add 36 tick marks that divide 180 degrees into 5 degree divisions
            .setTickMarkLength(10) //adjust length of tick marks
            .snapToTickMarks(true) //snap to 5 degree marks when dragging/moving pointer, angle varies in multiples of 5 degrees
            .setDragDirection(Knob.VERTICAL) //set drag direction
            .setFont(font); //adjust font size according to prespecified font size

    KnobY = cp5.addKnob("Servo Y")
        .setRange(0,180)
        .setValue(0)
        .setPosition(150,275)
        .setRadius(100)
        .setNumberOfTickMarks(36)
        .setTickMarkLength(10)
        .snapToTickMarks(true)
        .setDragDirection(Knob.VERTICAL)
        .setFont(font);
    }

    void draw(){
    background(0); //set background to black colour
    xpos=Math.round(KnobX.getValue()); //round pointer value in Knob X to nearest integer and store in xpos
    ypos=Math.round(KnobY.getValue()); //round pointer value in Knob Y to nearest integer and store in ypos
    myPort.write("x"); //Write 'x' as a byte through Serial Port
    //print("x");
    //print(xpos);
    myPort.write(xpos); //Write xpos as multiple bytes through Serial Port
    myPort.write("y"); //Write 'y' as a byte through Serial Port
    myPort.write(ypos); //Write ypos as multiple bytes through Serial Port
    }
This is the code I uploaded to the Xiao ESP32S3 board from Output Devices Week
        #include <ESP32Servo.h>
        char xChannel='x', yChannel='y';
        Servo servoX, servoY;
        #define servoXpin D6
        #define servoYpin D7
        #define PULSEMIN 500
        #define PULSEMAX 2500

        char serialChar=0;
        void setup()
        {
            ESP32PWM::allocateTimer(0); //Allocate timer for pulse width modulation
            servoX.attach (servoXpin, PULSEMIN, PULSEMAX); //Set up servo X connection
            servoY.attach (servoYpin, PULSEMIN, PULSEMAX); //Set up servo Y connection
            Serial.begin(9600);  //Set up a serial connection for 9600 bps.
        }
        void loop(){
            while(Serial.available() ==0);  //Wait for a character on the serial port.
            serialChar = Serial.read();     //Returns data in ASCII format (eg: x100 is xd in ASCII)

            if(serialChar == xChannel){  //Check to see if the character is the servo ID (ie. x in ASCII format) for the servo X
            while(Serial.available() ==0);  //Wait for the second command byte from the serial port.
            servoX.write(Serial.read());  //Set the servoX position to the value of the second command byte (eg: d = 100) received on the serial port
            }
            else if(serialChar == yChannel){ //Check to see if the character is the servo ID (ie. x in ASCII format) for the servo Y
            while(Serial.available() <= 0);  //Wait for the second command byte from the serial port.
            servoY.write(Serial.read());   //Set the servoY position to the value of the second command byte received on the serial port
            }
        }
Group Assignment
As a group, we explored using Kodular, Pygame, Processing, WebSerial (Java Script), & Flutter to make interfaces. Interfaces are a point of comtact between two different kinds of systems; human or machines, helping them communicate and exchange information. In our case us humans use these interfaces to communicate and control devices we made during previous weeks.
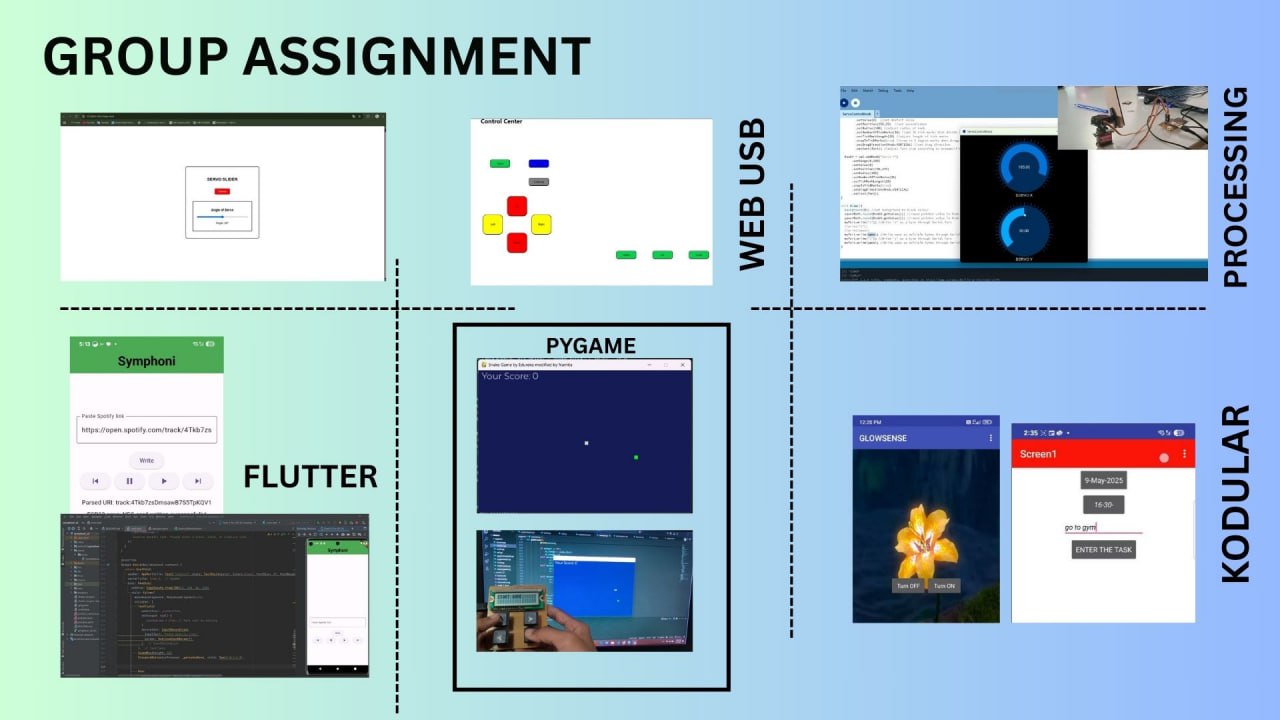
To read more, click here
Conclusion
Mistakes, Solutions & Tips
- Using Serial.parseInt: sends an additional value of '0' that messed with the code logic; used Serial.read to read as bytes which I manually converted into a integer data type.
- Web Serial incompatible with Mozilla Firefox: Web Serial is compatible with Chromium browsers, eg: Google Chrome, Microsoft Edge
References
References to help reader understand in detail
- ControlP5 library github documentation
- Processing ControlP5 example 2: Style and setValue
- Servo Motor Control Using Arduino and Processing
- How do I control servos using Processing code and an Arduino UNO Board?
- Connecting Processing and Arduino to Make 7 Segment and Servo GUI Controller
- fill() - Processing Reference
- Processing Tutorial #5: mouseX and mouseY
- How to convert float to int with Java - Stack Overflow
- How do I get controlP5 generated knob in Processing to change values in Arduino - Arduino Forum
- Example code showing how to use load and use a PFont with controlP5
- ASCII table
Design Files
Connecting to ESP32 via Web Serial: For design files of the PCB check Electronics Design Week
Controlling a Servo via Web Serial: For design files of the PCB check Output Devices Week
For all other code-related files, click here