Fab Academy Week 5 Group Assignment: 3D Printer Design Rules Testing
Assignment Objective
This group assignment aims to test the design rules and performance limitations of the Bambu Lab A1 mini 3D printer, evaluating its performance with different materials (PLA Basic and TPU95A). By printing three test files (angle.stl, and thickness.stl), we will analyze the following key characteristics:
- Overhang: Maximum overhang angle and bridging distance without supports.
- Wall Thickness: Minimum thickness for structural integrity.
- Slot Width Precision: Minimum width of slotted structures.
- First Layer Adhesion: Platform leveling and material compatibility with the print bed.
Test Equipment and Materials
- Printer: Bambu Lab A1 mini
- Print volume: 180 x 180 x 180 mm
- Nozzle diameter: 0.4 mm (default)
- Supported materials: PLA, PETG, TPU, etc. (no enclosure required)
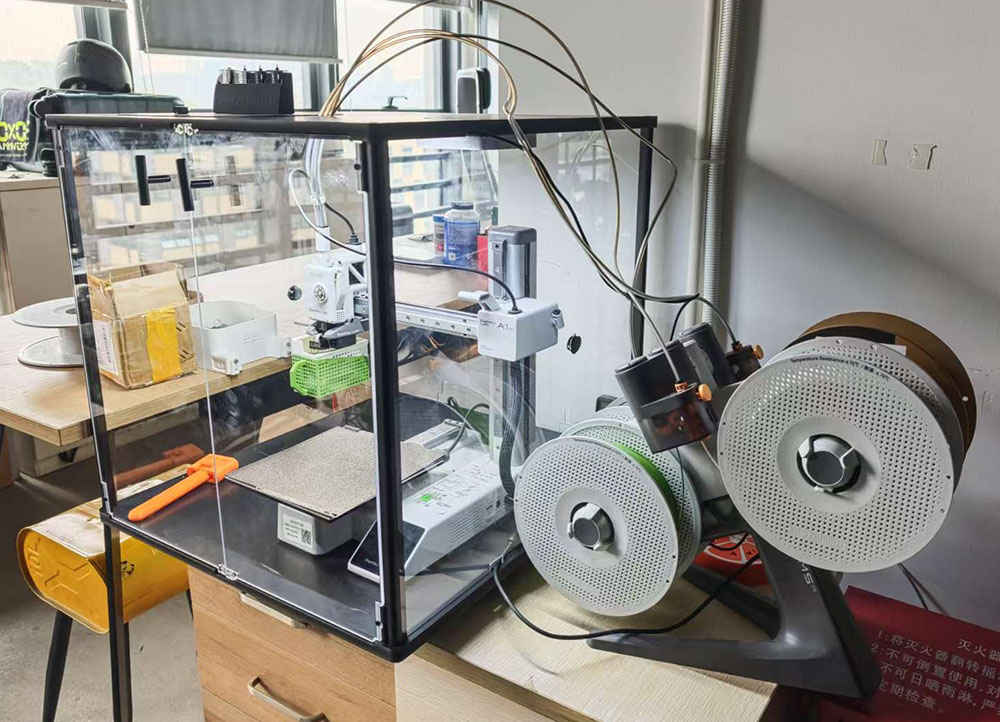
Bambu Lab A1 mini 3D printer with AMS lite
According to the printer specifications, it supports various materials, so we purchased two types to test different printing effects.
-
Materials:
- Bambu PLA Basic: Easy to print, good rigidity, suitable for testing precision and overhangs.
- TPU95A: Flexible material, suitable for testing flexible structures and bridging performance.
-
Slicing Software: Bambu Studio (recommended, optimized for Bambu Lab printers)
-
Test Files:
angle.stl: Tests overhang angles.thickness.stl: Tests minimum wall thickness.
3D Model Display of Test Files
We use VitePress to convert Markdown documents into web pages and embed <model-viewer> to display 3D models. Assuming the test files have been placed in the project's public/models folder, the implementation is as follows:
angle.stl
thickness.stl
Note: To ensure the models display correctly on the webpage, place the .stl files in the public/models/ directory and globally import the <model-viewer> script in docs/.vitepress/config.js:
// docs/.vitepress/config.ts
export default defineConfig({
  // Existing configuration...

  vue: {
    template: {
      compilerOptions: {
        isCustomElement: (tag) => tag === 'model-viewer'
      }
    }
  },

  // Remaining configuration...
})


head: [
  // Existing head elements...
  ['script', {
    type: 'module',
    src: 'https://ajax.googleapis.com/ajax/libs/model-viewer/4.0.0/model-viewer.min.js'
  }],
  // Remove the legacy script as it's not necessary with the latest version
],
Filament Loading Error
When we received the PLA material, we purchased it without a spool. Due to lack of experience, we cut the spool's securing tape before loading the new filament, resulting in an inability to install the spool, making this roll of material unusable with the printer.
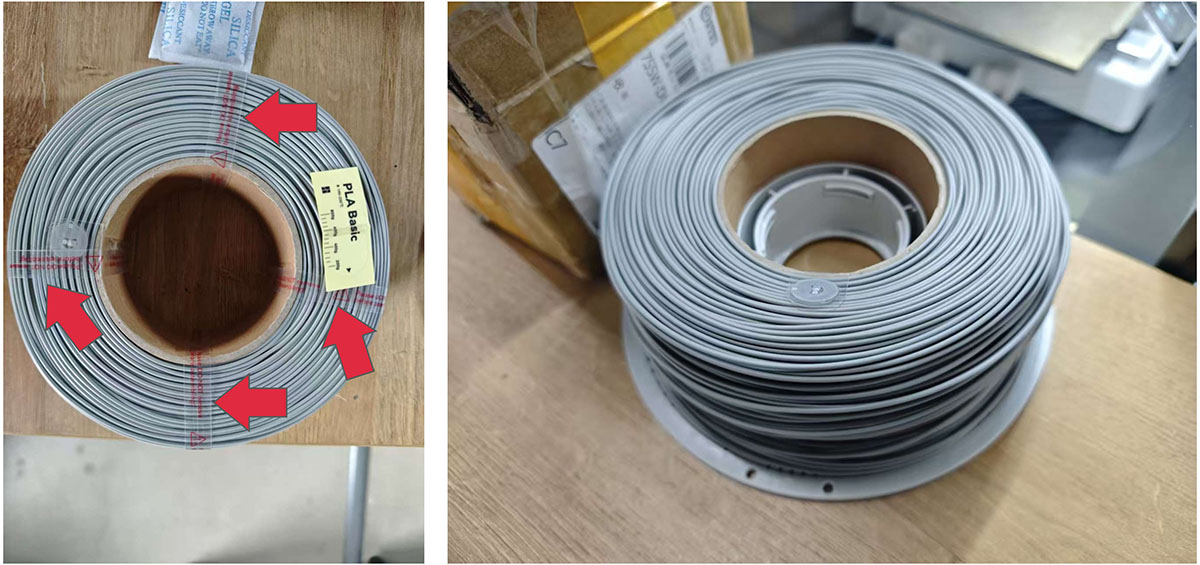
Remember: When changing filament, only cut the securing tape (indicated by the arrow) after loading the new filament into the spool; otherwise, it will "explode" like the one on the right, making it impossible to install the spool
Later, we found other PLA material and successfully connected both types of filament to the 3D printer. As shown below, white PLA was placed in AMS lite position 4, and TPU in position 1.
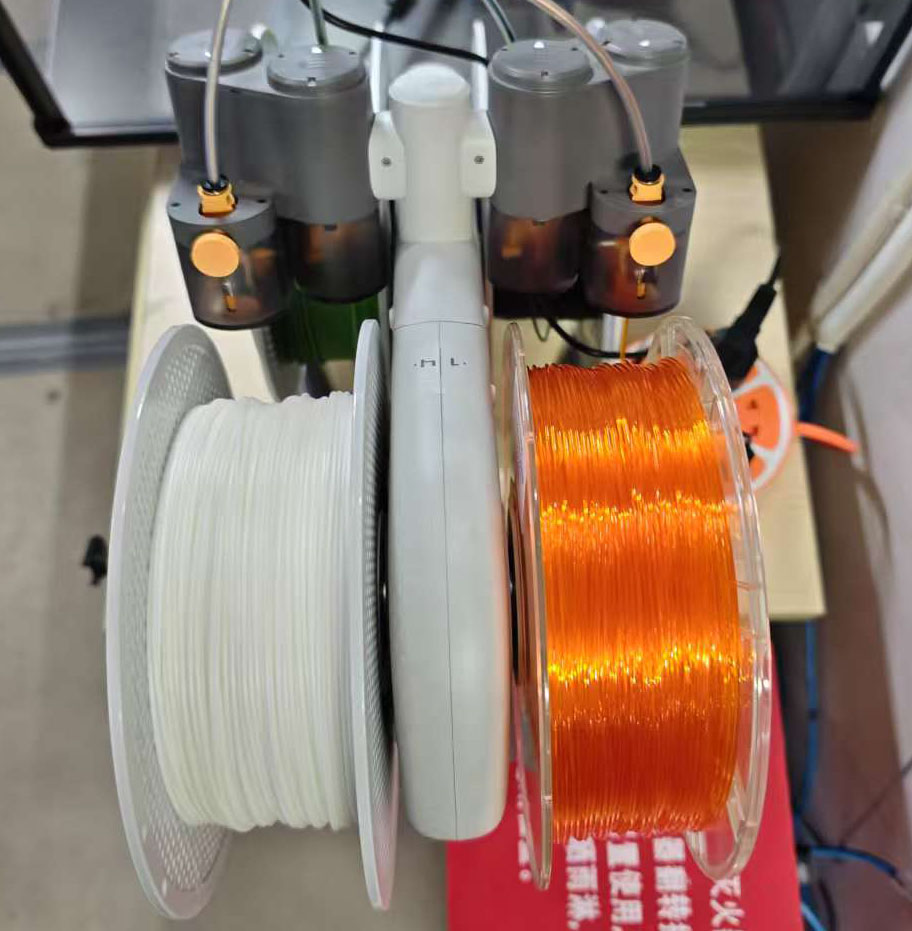
White PLA material on the left, and the orange flexible TPU material on the right
The printer can identify the color and type of material through the electronic marker on the spool, as shown below.
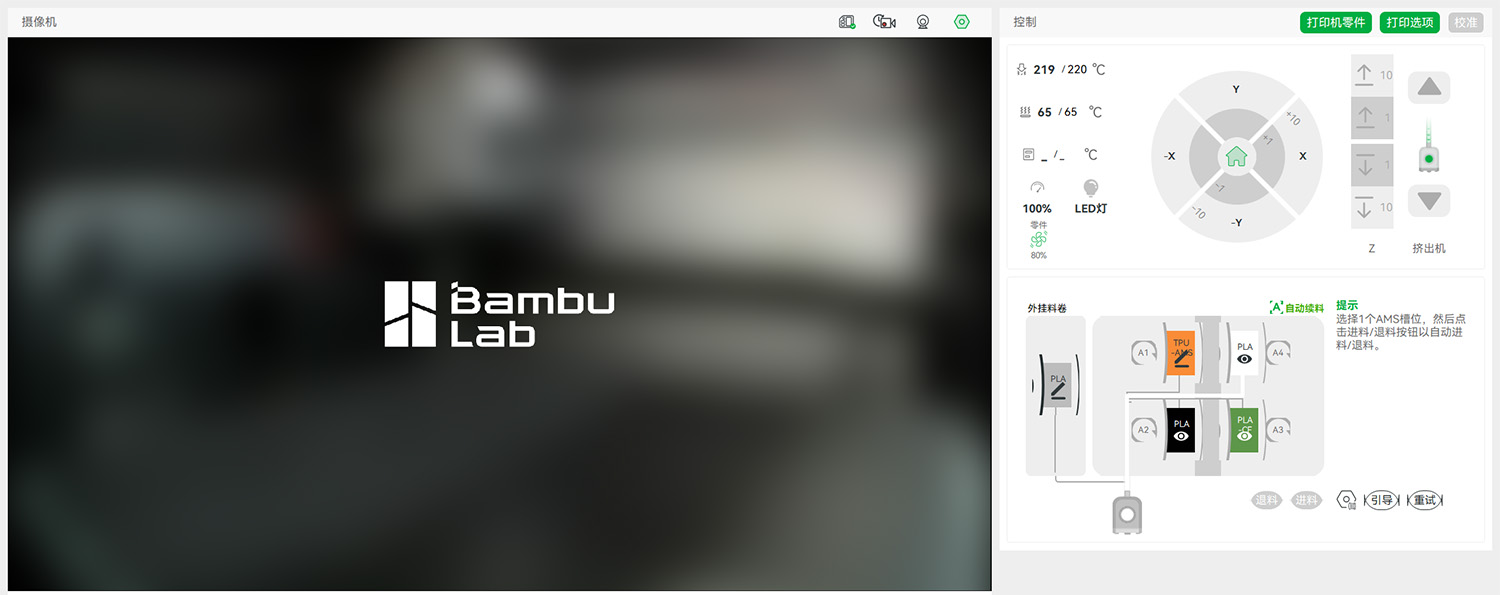
The printer identified the material type and color after loading
Testing Process
1. Preparation
- Check Printer Status:
- Ensure the Bambu Lab A1 mini is fully assembled and passed self-test.
- Calibrate the print bed (using Bambu Studio's auto-leveling function).
- Clean the print platform (PEI textured sheet recommended, suitable for PLA and TPU).
- Install Materials:
- Install white PLA Basic in AMS lite position 4, TPU95A in position 1.
2. PLA Slicing Configuration
We used Bambu Studio for slicing, with different parameters for PLA and TPU, using a 0.4mm nozzle.
PLA Basic Settings
- Layer Height: 0.2 mm (balancing precision and speed)
- Infill Density: 20% (testing structural strength)
- Print Speed: 50 mm/s
- Nozzle Temperature: 250°C (as recommended for Bambu PLA)
- Bed Temperature: 60°C
- Supports: Disabled (testing performance without supports)
- First Layer Settings:
- Speed: 20 mm/s
- Height: 0.25 mm
For the angle.stl file, we disabled supports to evaluate performance with large angle overhangs.
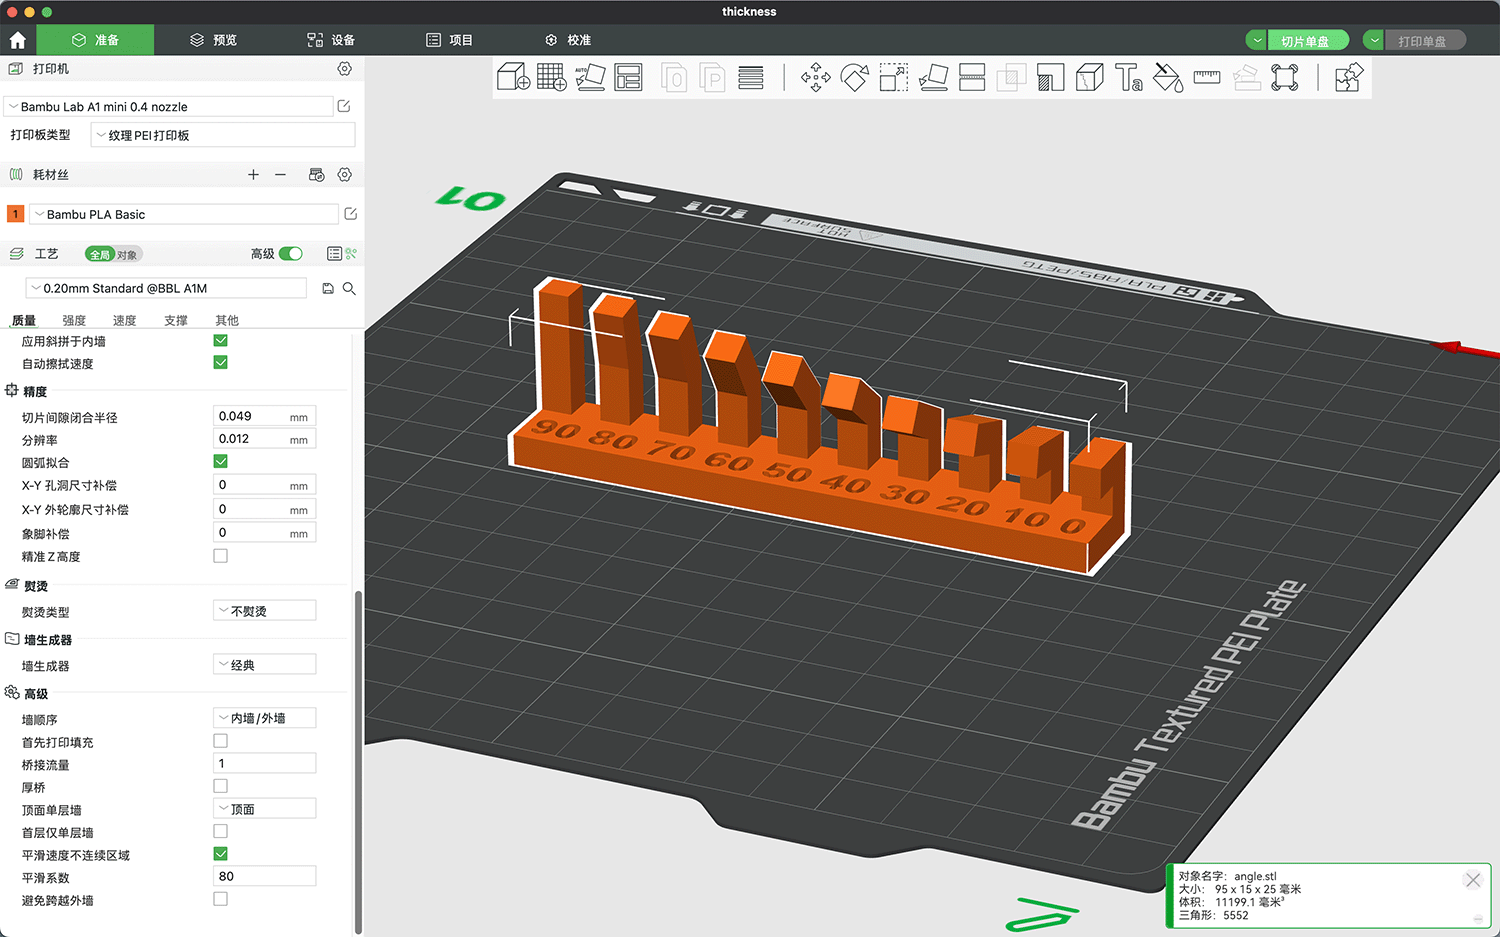
Setting print parameters for material, precision, strength, speed, supports, etc. in the Prepare tab
Before printing the angle.stl file, we sliced it to generate a report showing material consumption weight, printing time, and other information.
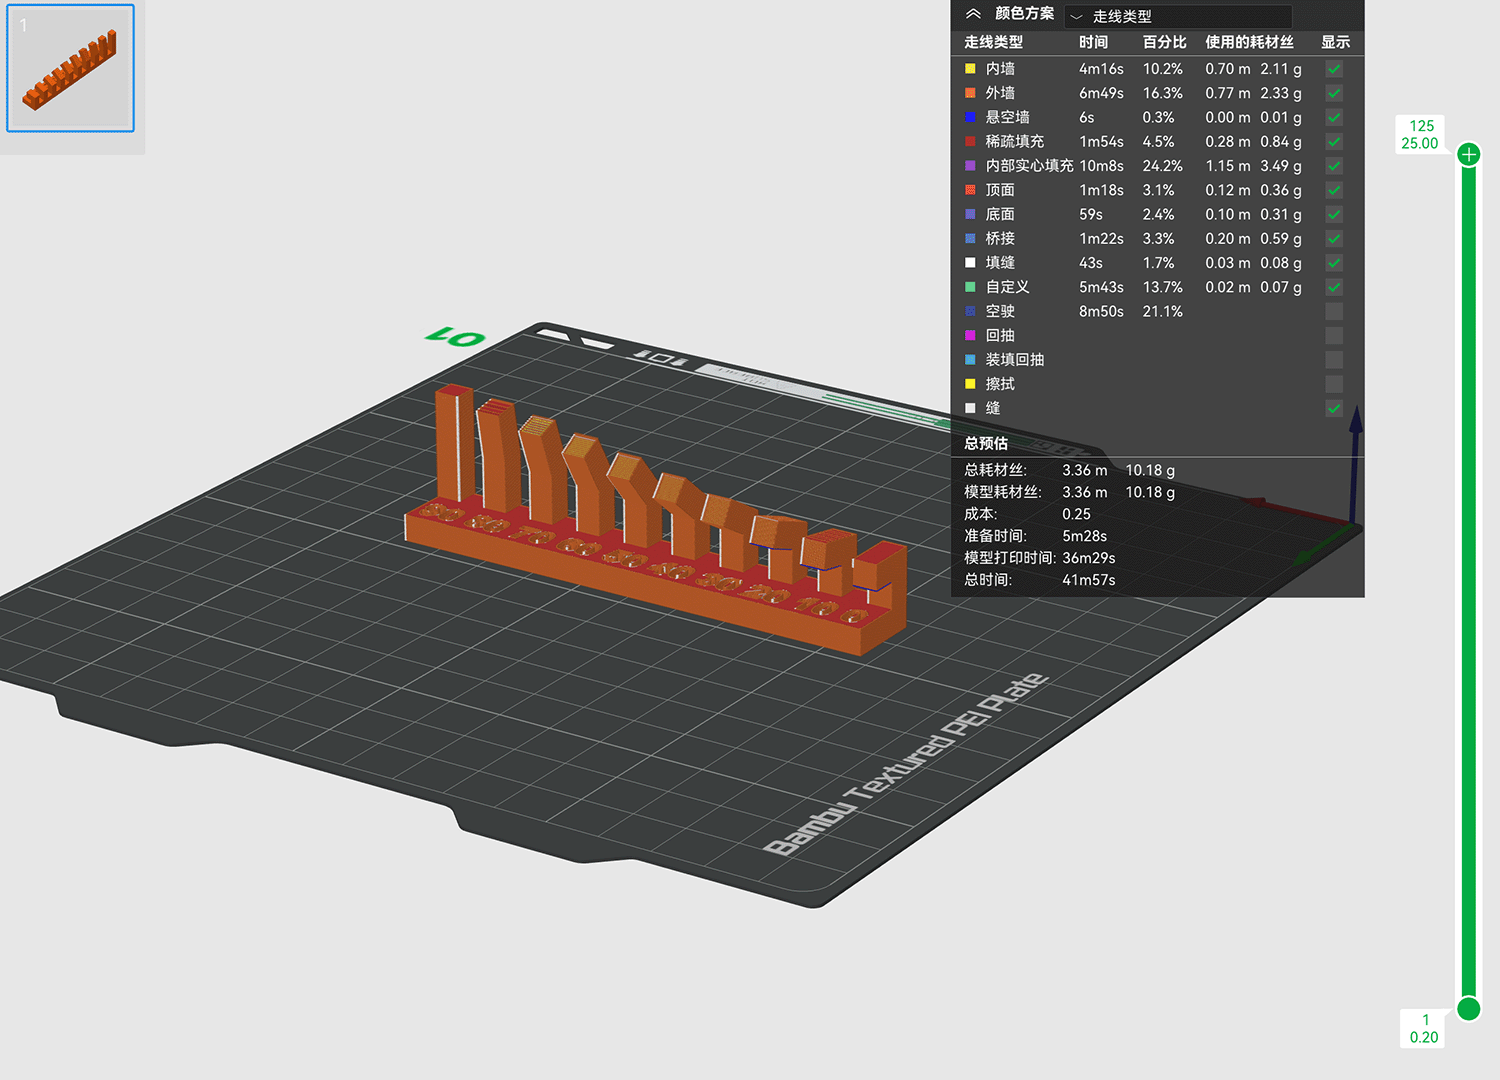
The slicing report summary
We applied settings to thickness.stl.
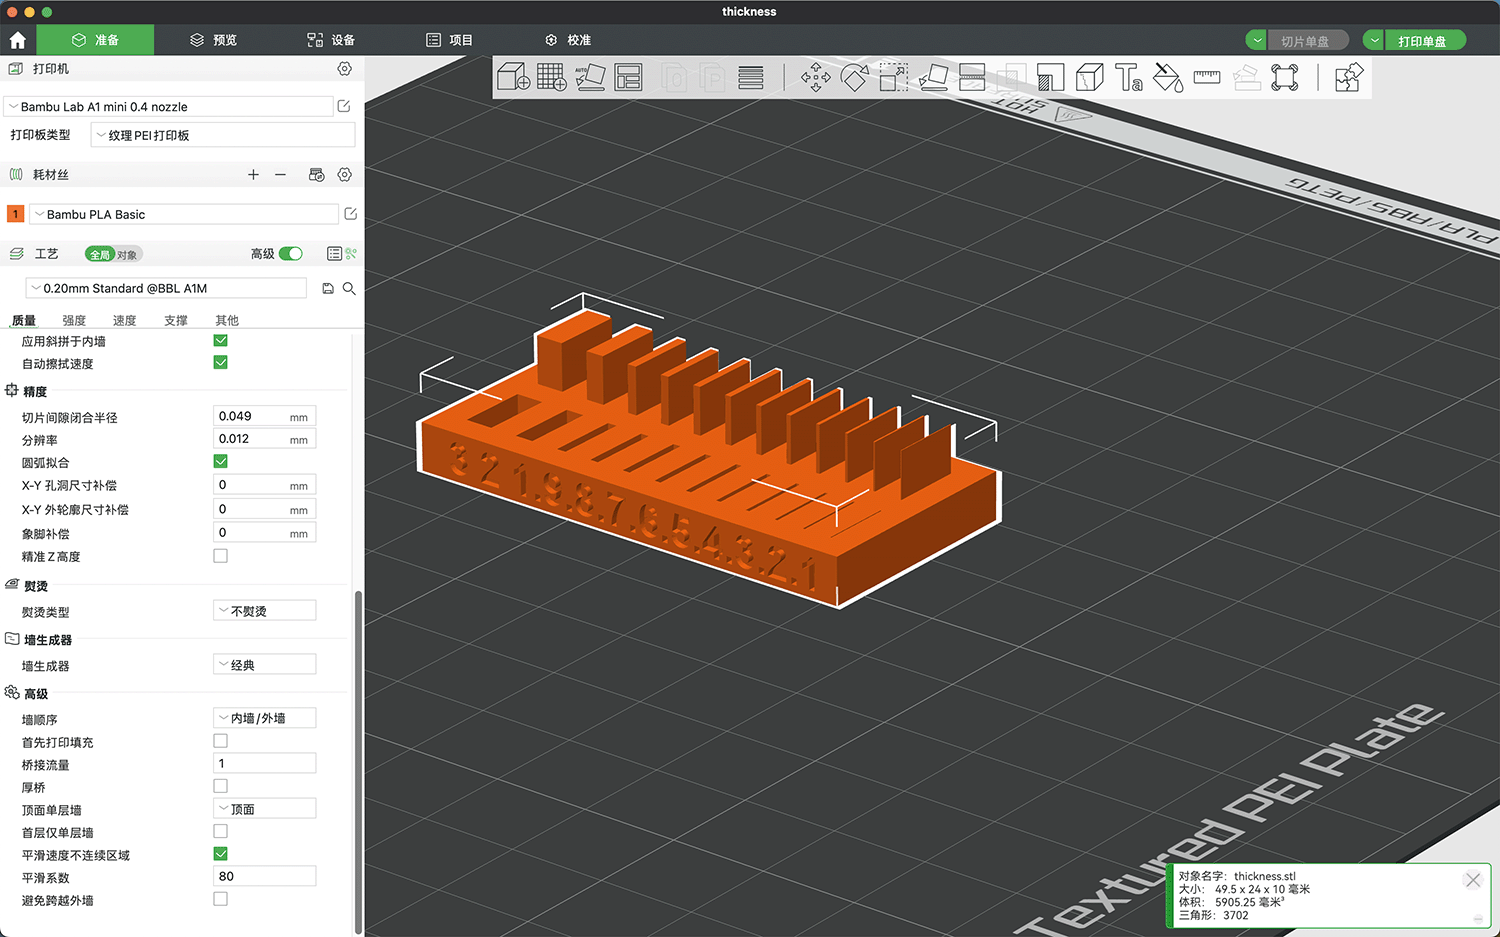
Before printing the thickness.stl file, we sliced it and observed that the three thinnest sections on the right (0.3mm, 0.2mm, 0.1mm) appeared semi-transparent because they were below the minimum printable thickness, indicating these parts would not print.

Starting the Print
We initiated the print, sending the files wirelessly to the printer.
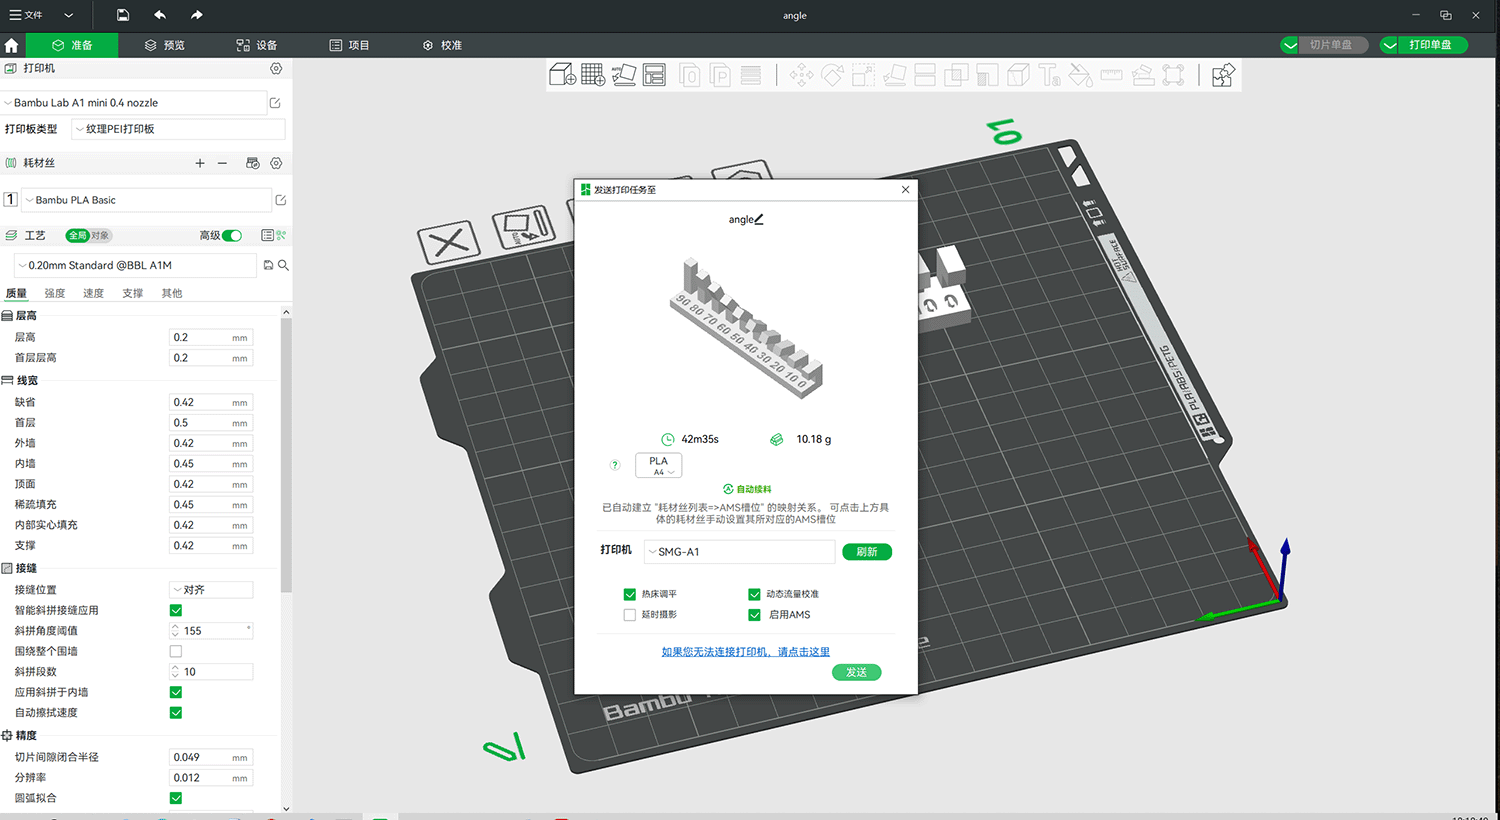
Starting the angle.stl print, estimated time: 42m35s
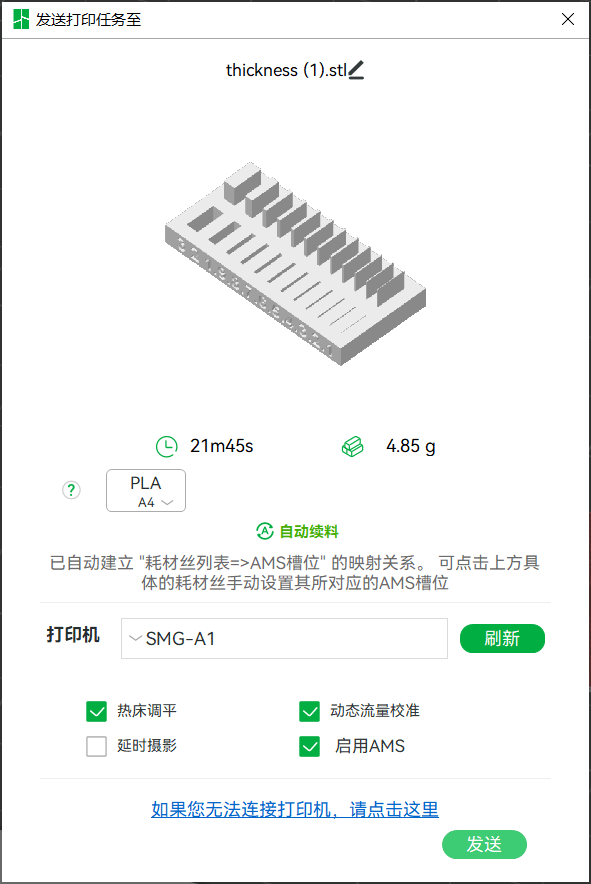
Starting the thickness.stl print, estimated time: 21m45s
3. Printing Process
Printing PLA Material Test Pieces:
- We printed
angle.stlandthickness.stlsequentially. - We recorded the printing time for each piece and any failures (such as warping or breakage).
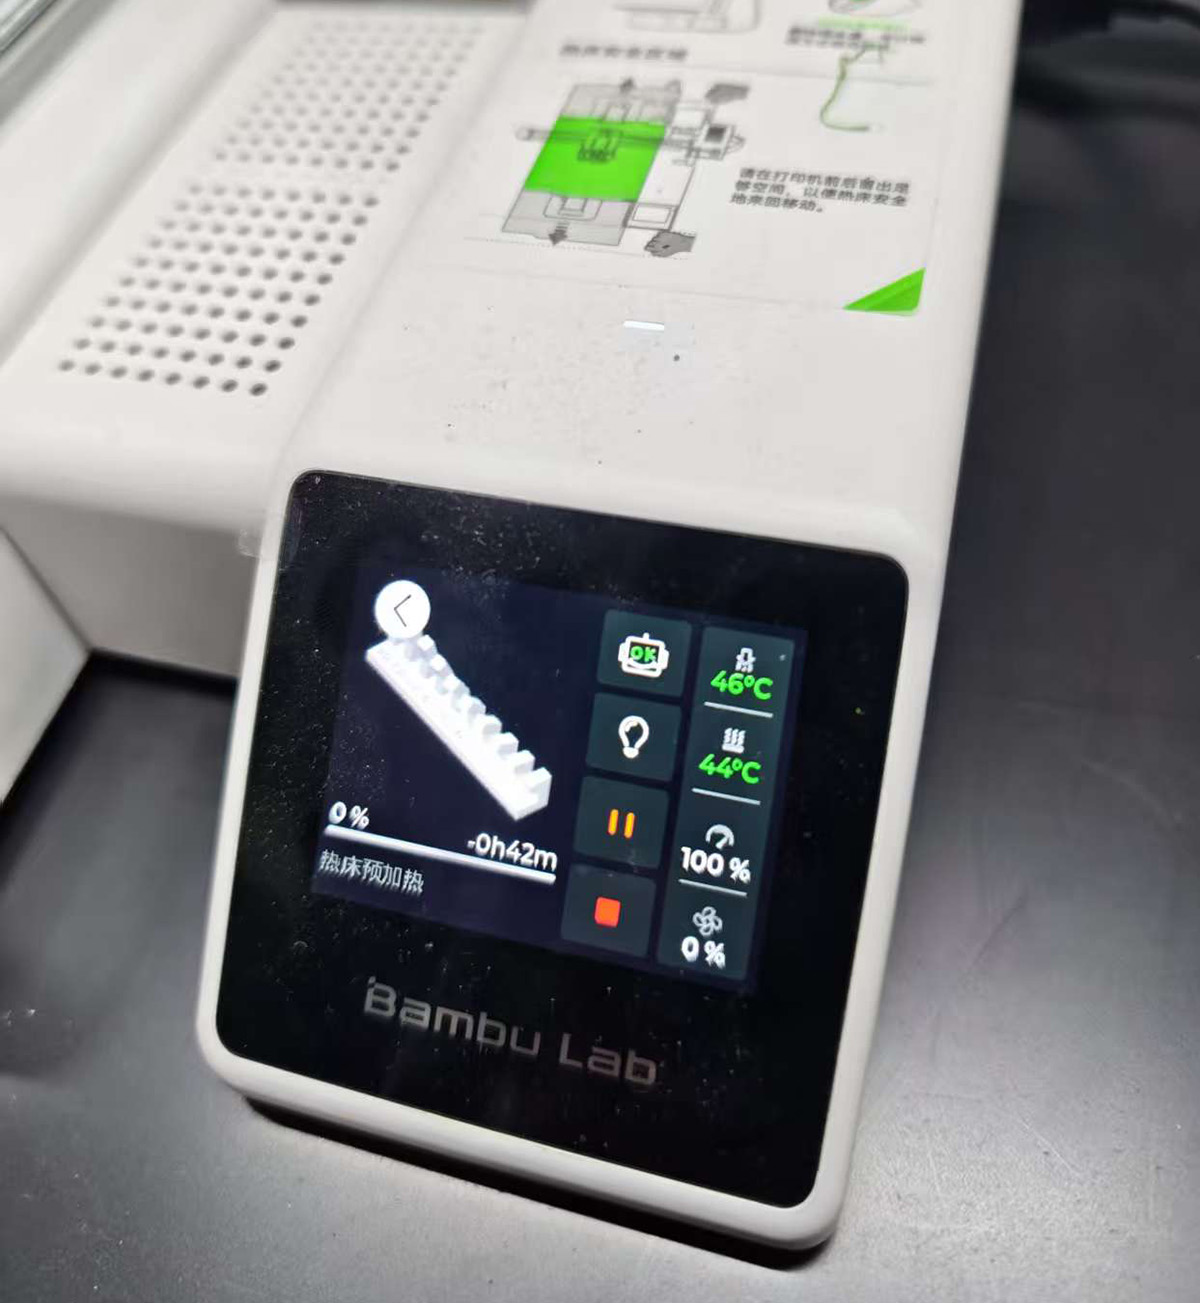
Print files were wirelessly transmitted to the 3D printer, which began preheating
TPU Material Printing Failure
After completing the PLA material print tests, we attempted to switch to TPU material, but encountered problems. The TPU 95A material could not be successfully loaded. When we tried to switch back to PLA, we couldn't unload the filament either. The printer constantly indicated that filament was stuck in the print head. We suspect this occurred because when loading TPU, we didn't adjust the temperature (TPU requires 200-220°C), while the previous PLA was set to 250°C, possibly causing a clog. None of us had experience with this situation, so we needed to wait for the print head to cool down before disassembling it for inspection.
When switching to TPU material, the print head displayed a clog during the loading operation, preventing further printing
4. Testing and Recording
The printing process went more smoothly than expected, and the time estimates were quite accurate. We successfully obtained printed samples of both test pieces.
The angle.stl showed some stringing and uneven surfaces at angles below 30 degrees.
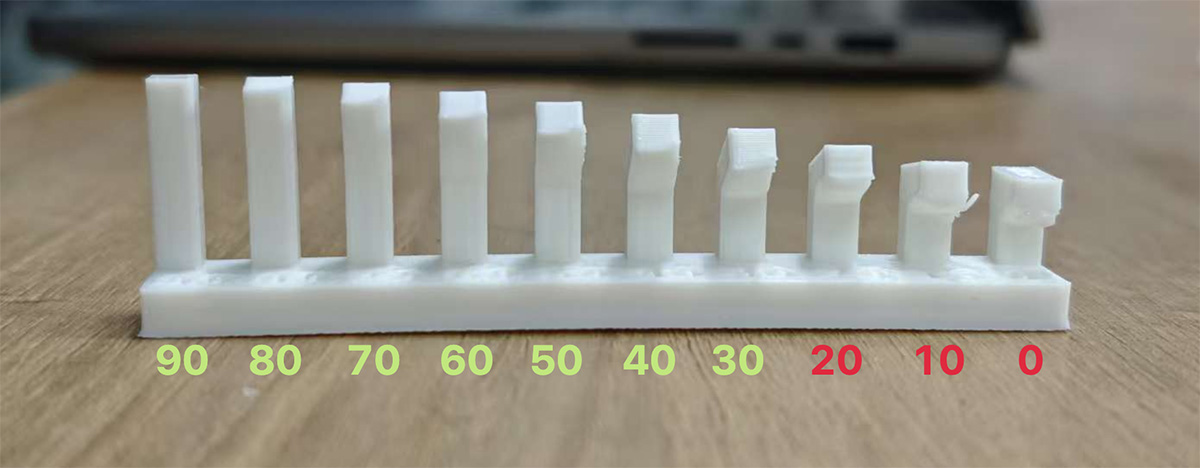
Print quality assessment: the 20, 10, and 0 degree overhang surfaces showed collapse and could not maintain flatness
As expected from the slicing preview, thickness.stl had three thin sections completely missing from the print
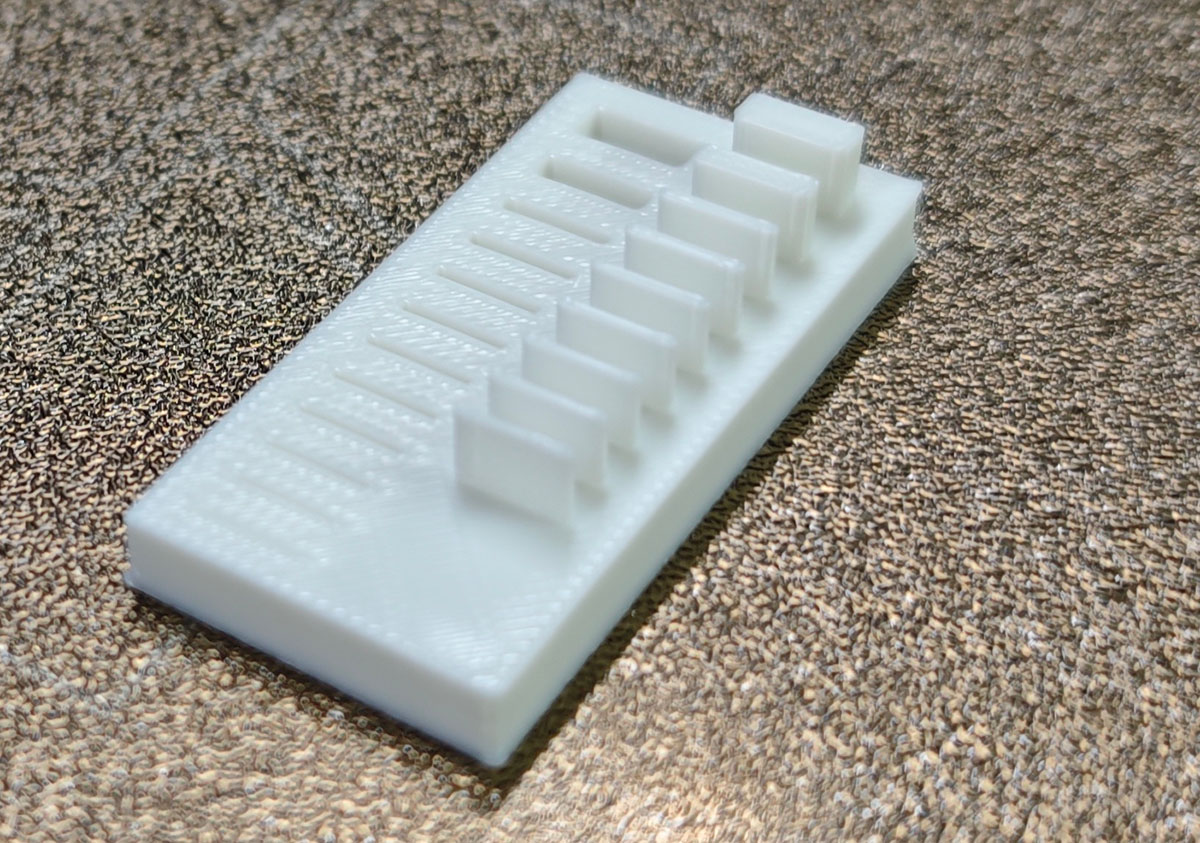
Print quality assessment: the 3 thin sections ignored during slicing did not appear on the printed sample, but all the slots were present
Overhang and Bridging
- Test Method:
- Check the quality of different overhang angles on
angle.stl.
- Check the quality of different overhang angles on
- Results Table:
| Overhang Angle (degrees) | Overhang Surface Quality |
|---|---|
| 90 | Perfect |
| 80 | Perfect |
| 70 | Perfect |
| 60 | Perfect |
| 50 | Perfect |
| 30 | Good, slight protrusion at edges |
| 20 | Good, slight protrusion at edges |
| 10 | Noticeable stringing |
| 0 | Accumulation and uneven surface |
Wall Thickness
- Test Method:
- Check the completeness of different wall thicknesses on
thickness.stl.
- Check the completeness of different wall thicknesses on
- Results Table:
| Design Thickness (mm) | Actual Thickness (mm) | Deviation (mm) |
|---|---|---|
| 0.1 | Not printed | |
| 0.2 | Not printed | |
| 0.3 | Not printed | |
| 0.4 | 0.5 | 0.1 |
| 0.5 | 0.5 | 0 |
| 0.6 | 0.6 | 0 |
| 0.7 | 0.7 | 0 |
| 0.8 | 0.8 | 0 |
| 0.9 | 0.9 | 0 |
| 1 | 1 | 0 |
| 2 | 2 | 0 |
| 3 | 3 | 0 |
Slot Width Precision
- Test Method:
- Measure the actual dimensions of slot widths in
thickness.stl.
- Measure the actual dimensions of slot widths in
- Results Table:
| Design Slot Width (mm) | Actual Slot Width (mm) | Deviation (mm) |
|---|---|---|
| 0.1 | Only shallow surface marks | 0.1 |
| 0.2 | Approximately 0.1 | 0.1 |
| 0.3 | Approximately 0.2 | 0.1 |
| 0.4 | Approximately 0.3 | 0.1 |
| 0.5 | 0.4 | 0.1 |
| 0.6 | 0.6 | 0 |
| 0.7 | 0.7 | 0 |
| 0.8 | 0.8 | 0 |
| 0.9 | 0.9 | 0 |
| 1 | 1 | 0 |
| 2 | 2 | 0 |
| 3 | 3 | 0 |
First Layer Adhesion
- Test Method:
- Check if the first layer of each model is flat and without warping.
- Results Table:
| File | Material | First Layer Quality (Excellent/Good/Poor) | Notes |
|---|---|---|---|
| angle.stl | PLA | Excellent | |
| thickness.stl | PLA | Excellent |
Conclusion
Through this test, we gained an understanding of the design rules and performance limitations of the Bambu Lab A1 mini with PLA material, providing valuable reference for future projects.