

Week 15: Intarface and Applications Programming
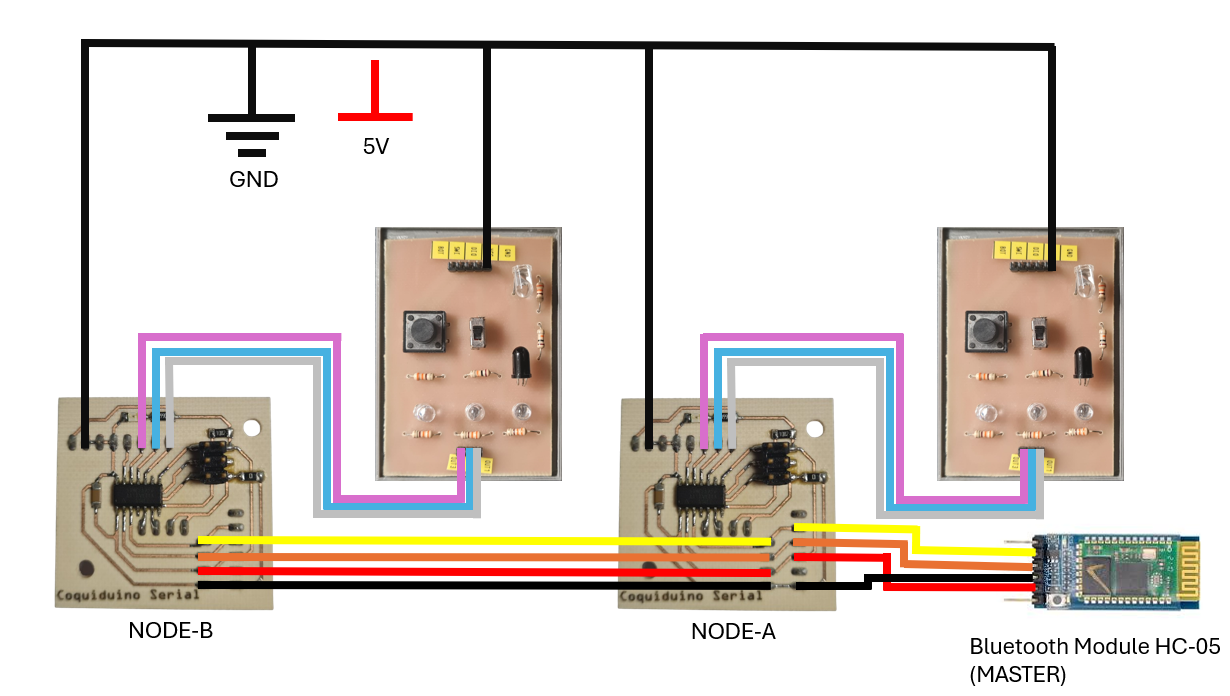
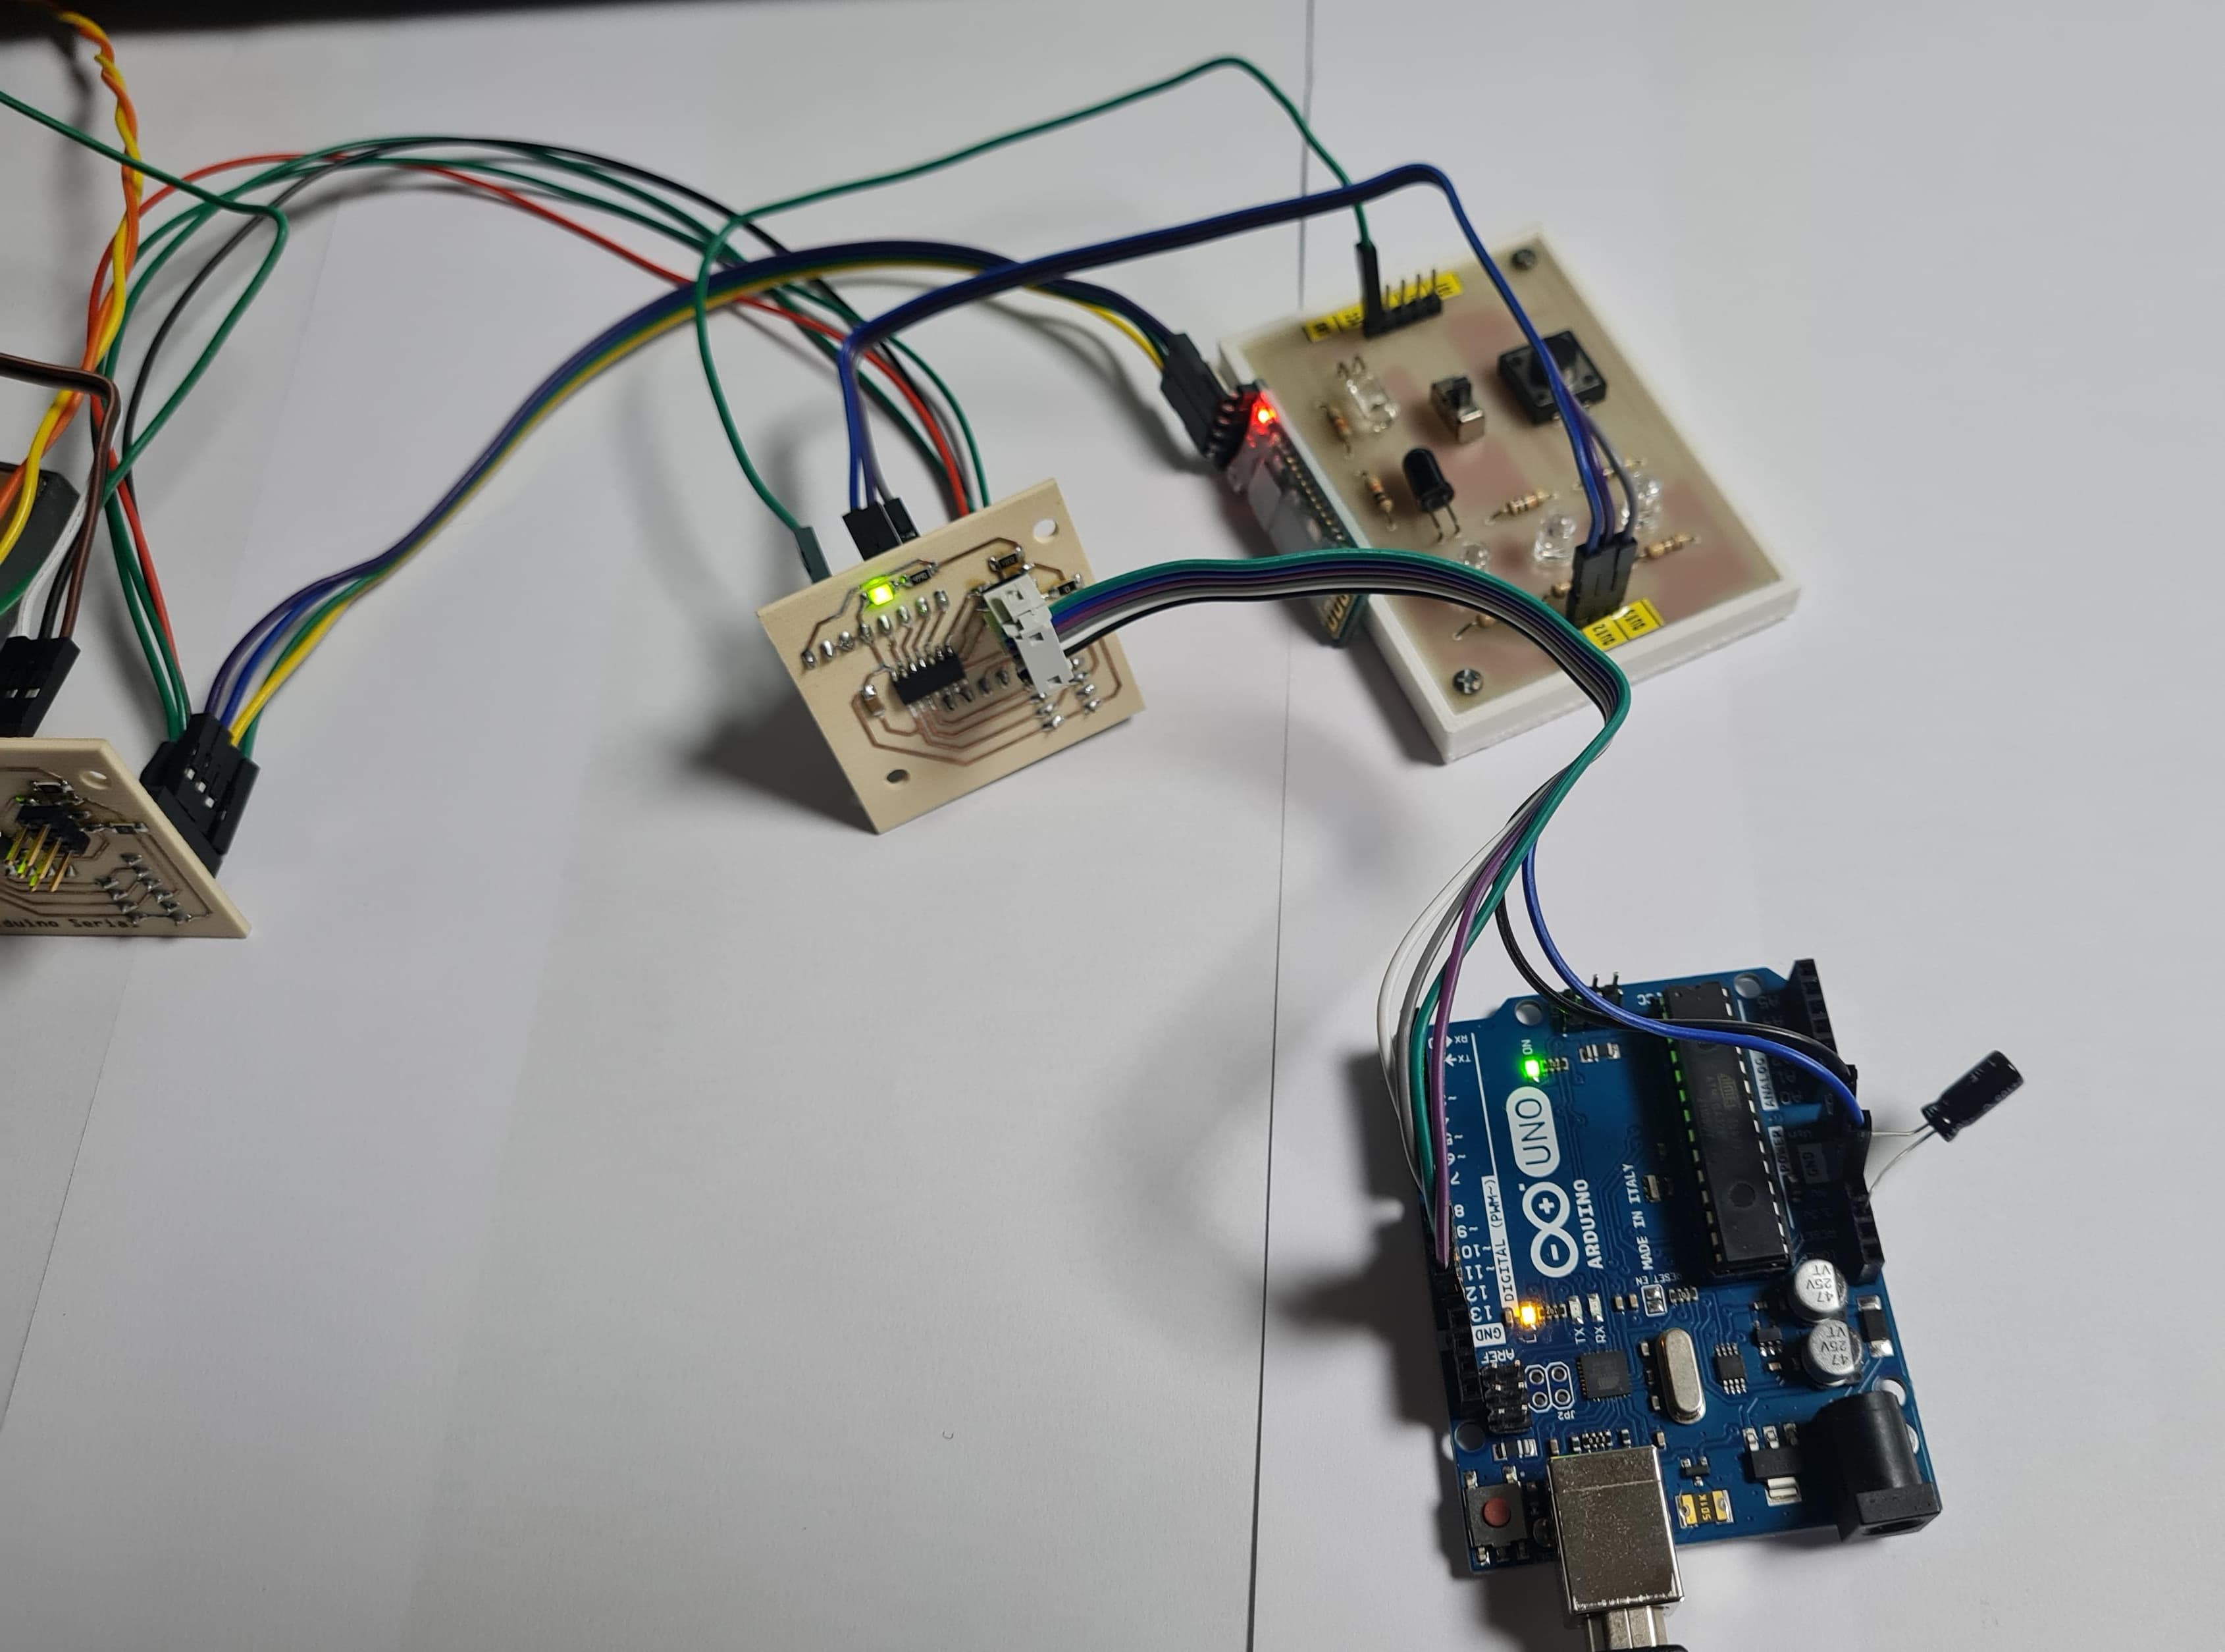
This week's assignment requires me to develop an application that interfaces with input and/or output devices on a custom-made board. For this task, I am utilizing the Coquiduino Serial board from Week 14, which enables the connection of two ATtiny microcontrollers via serial communication in parallel. Each slave is connected to a digital module via output signal control. The HC-05 Bluetooth module will serve as the master, sending instructions to the Coquiduino Serial slaves.
To create the application, I used MIT App Inventor to design a straightforward interface. This interface includes controls for managing LEDs on Node A and Node B, with on/off buttons for each node. The objective of this project is to establish efficient communication and control between the mobile application and the hardware components, demonstrating the integration of wireless technology with embedded systems.

App Inventor has well-developed documentation that enhances understanding of its functionality, providing a user-friendly experience where anyone can quickly and efficiently learn to implement applications.
This comprehensive documentation ensures that users of all levels can easily navigate and utilize the platform's features, fostering rapid and effective application development.
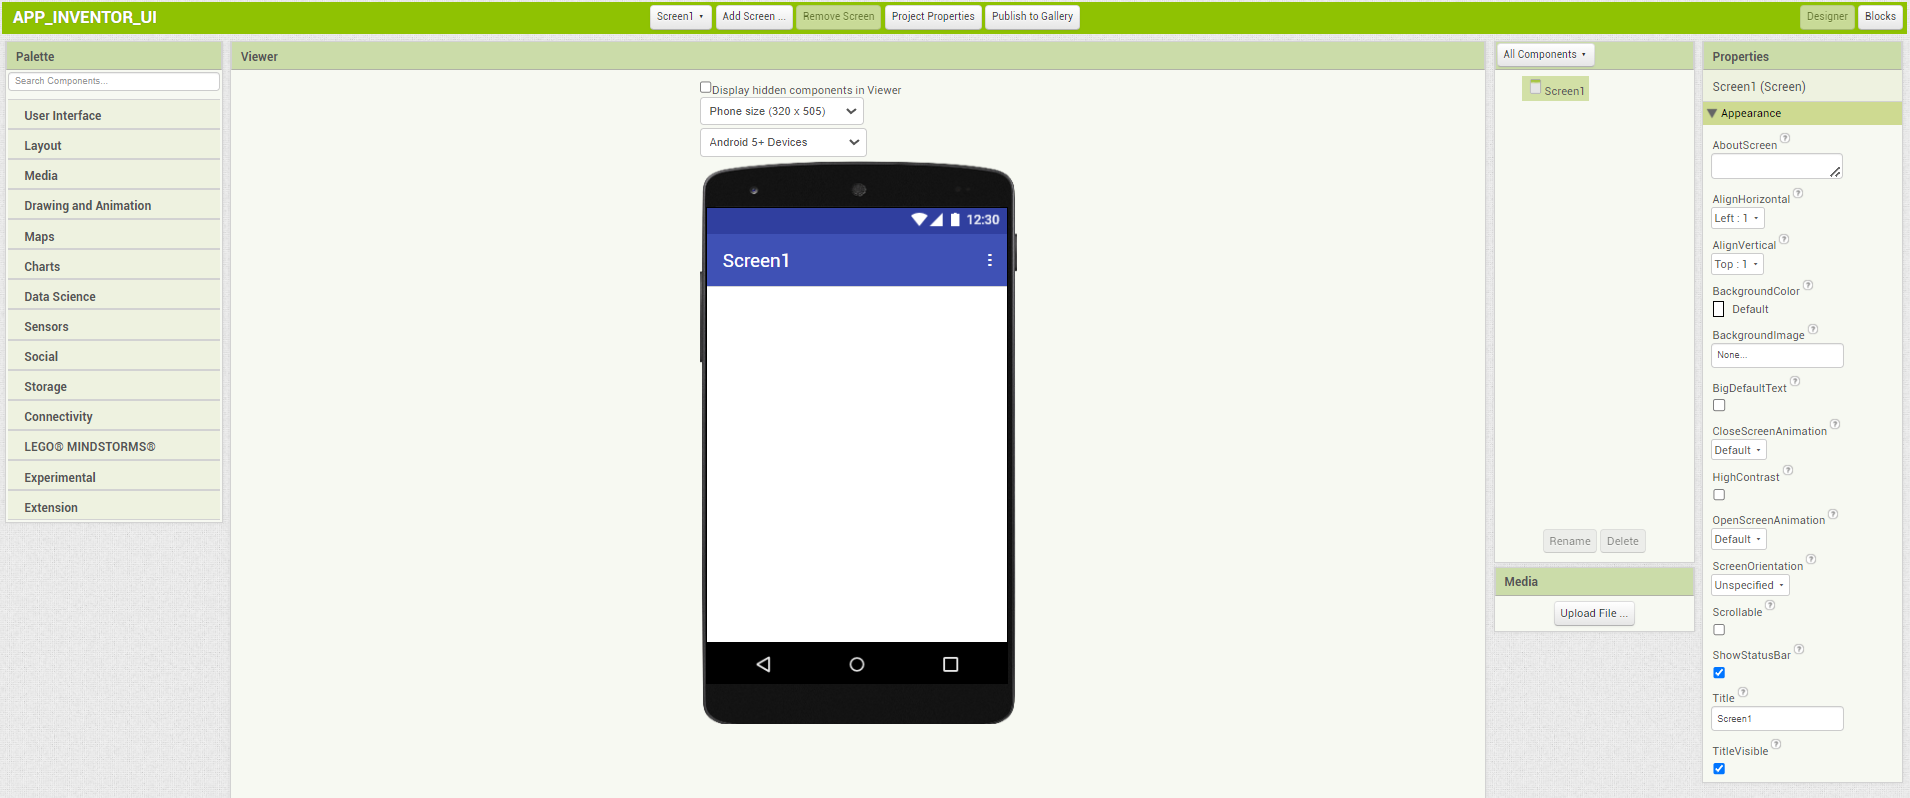
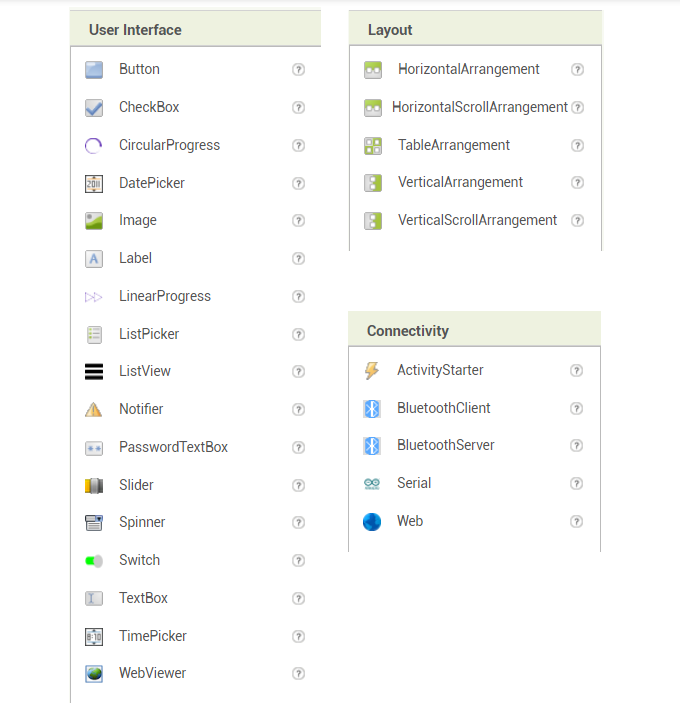
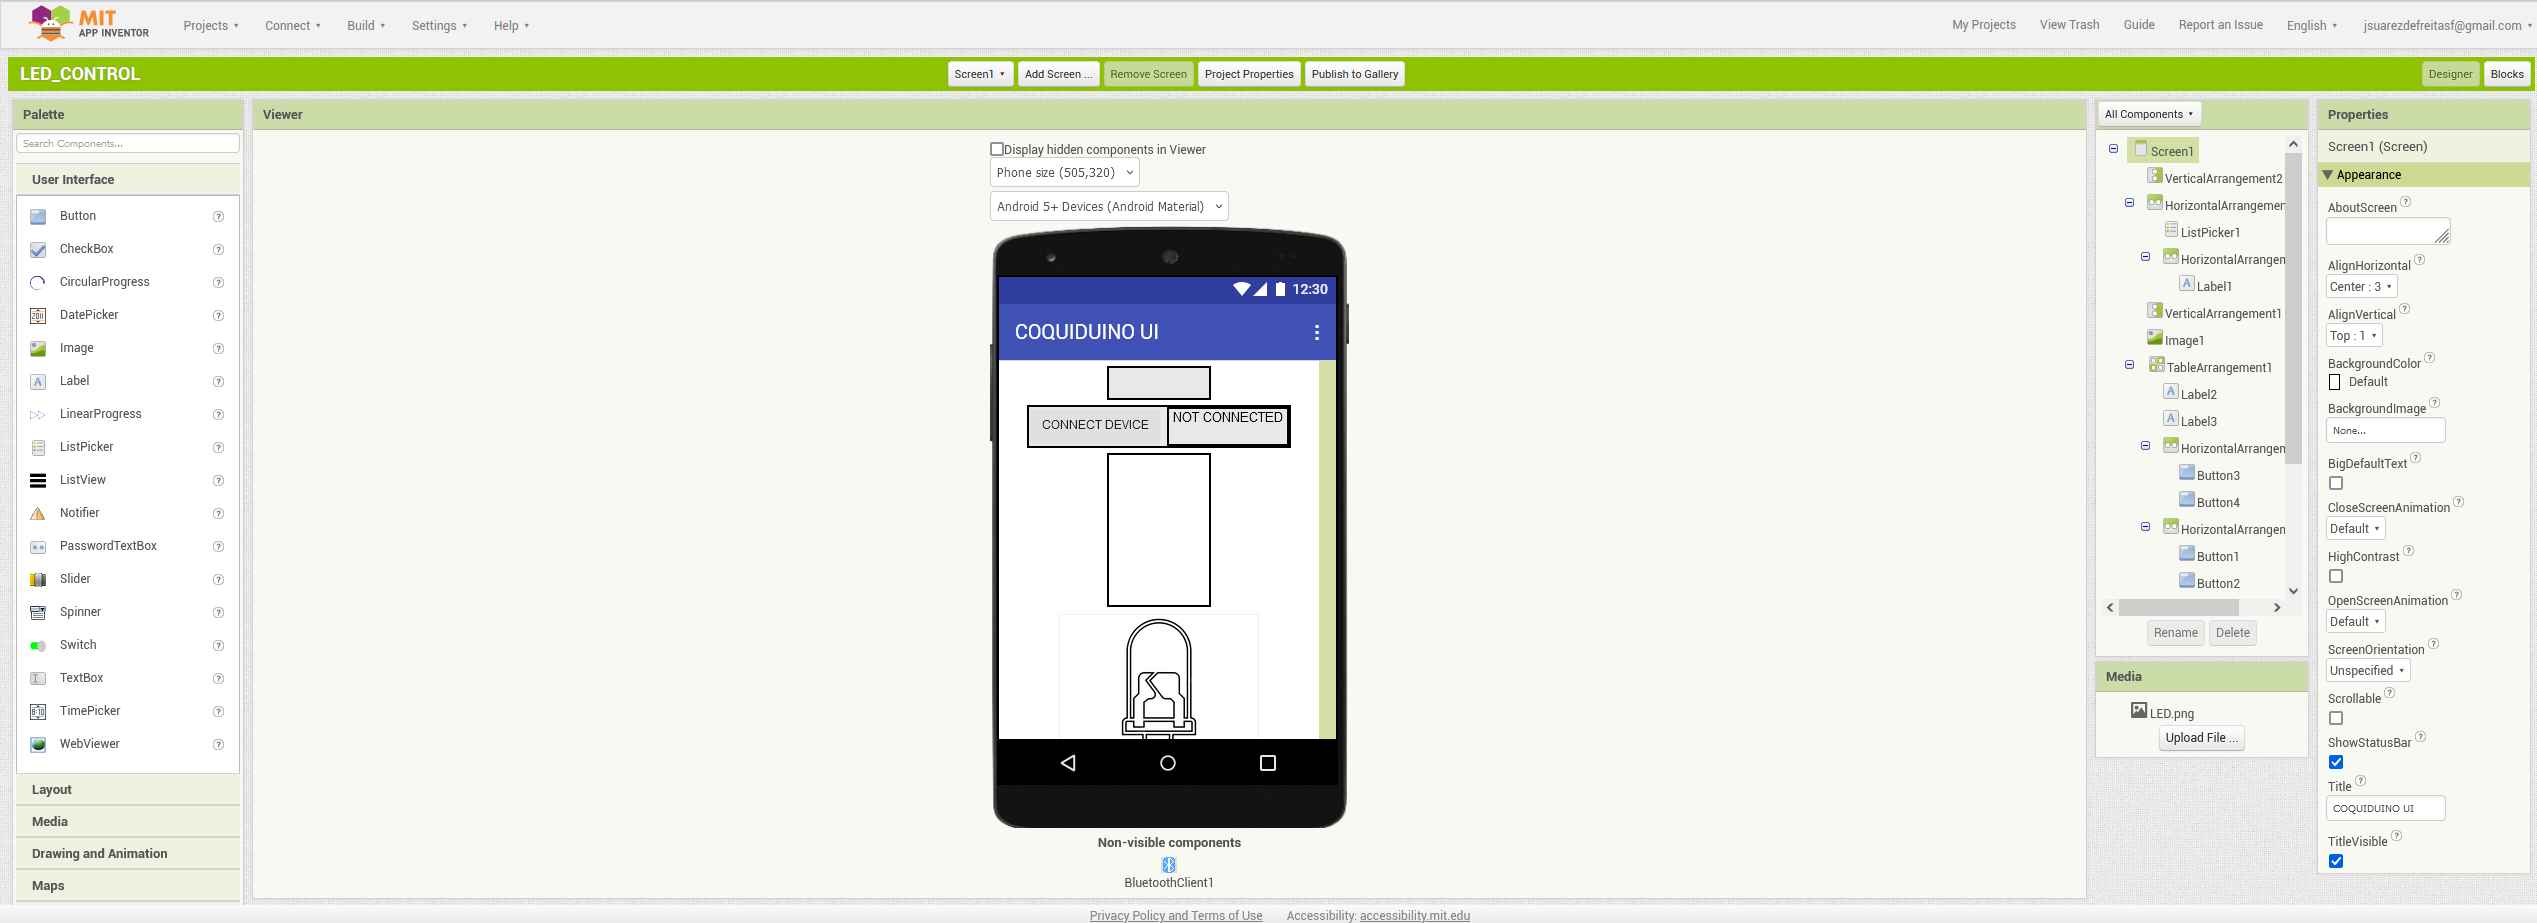
To start with MIT App Inventor, begin by dragging an item from the Palette section, which offers several options depending on your application's requirements. For my application, I utilized elements from the User Interface, Layout, and Connectivity sections. In the User Interface section, I used buttons, images, labels, and a list picker. In the Layout section, I incorporated vertical, horizontal, and table arrangements. From the Connectivity section, I used the Bluetooth client. When you pick and place components on the screen, they will also appear in the Component section. Here, you can modify the properties of the elements, such as changing names and sizes, among other settings.
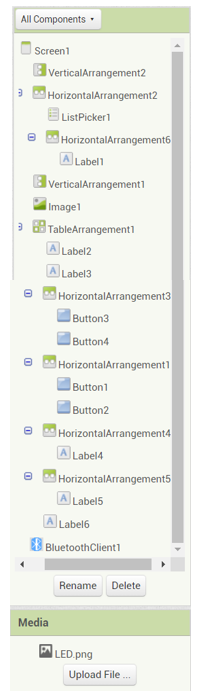
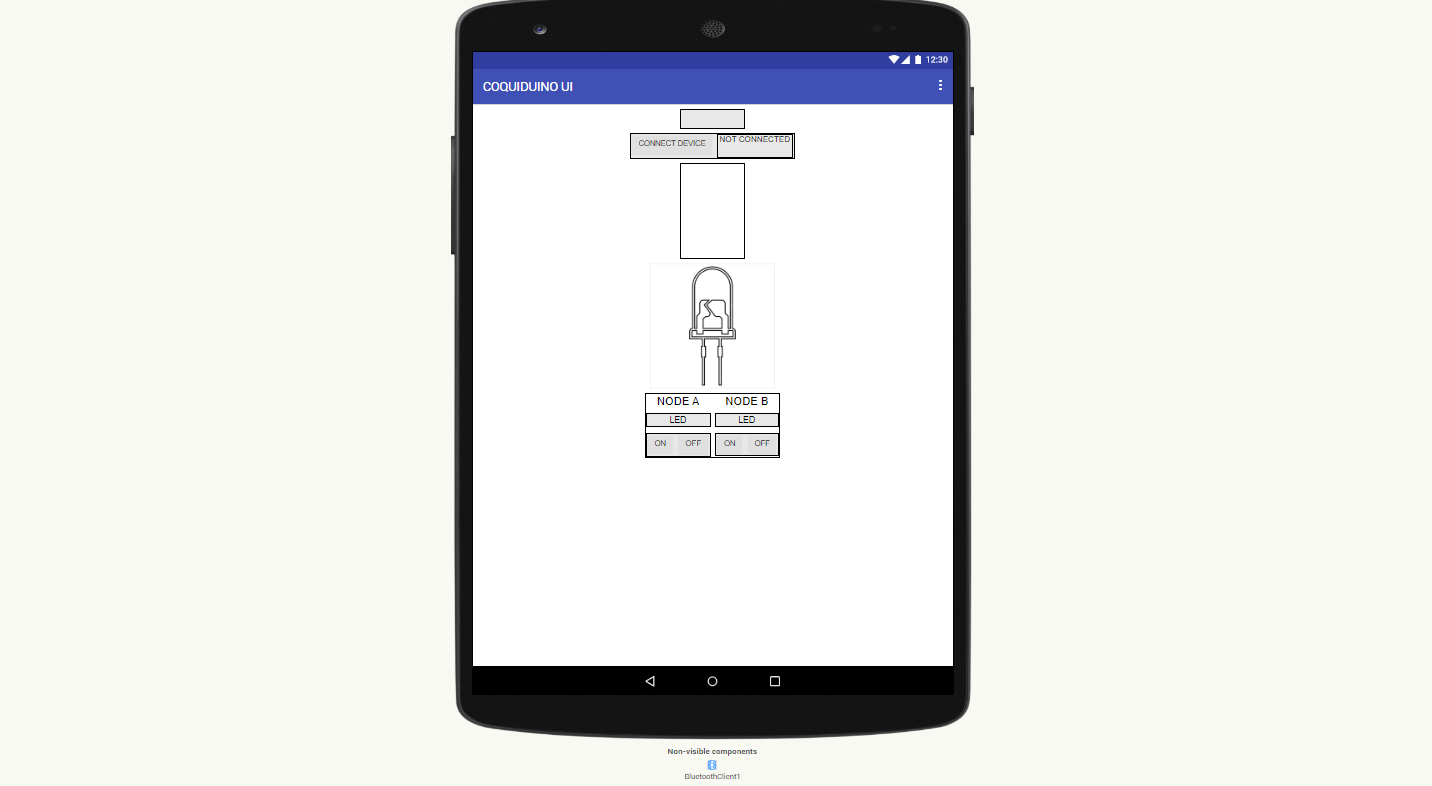
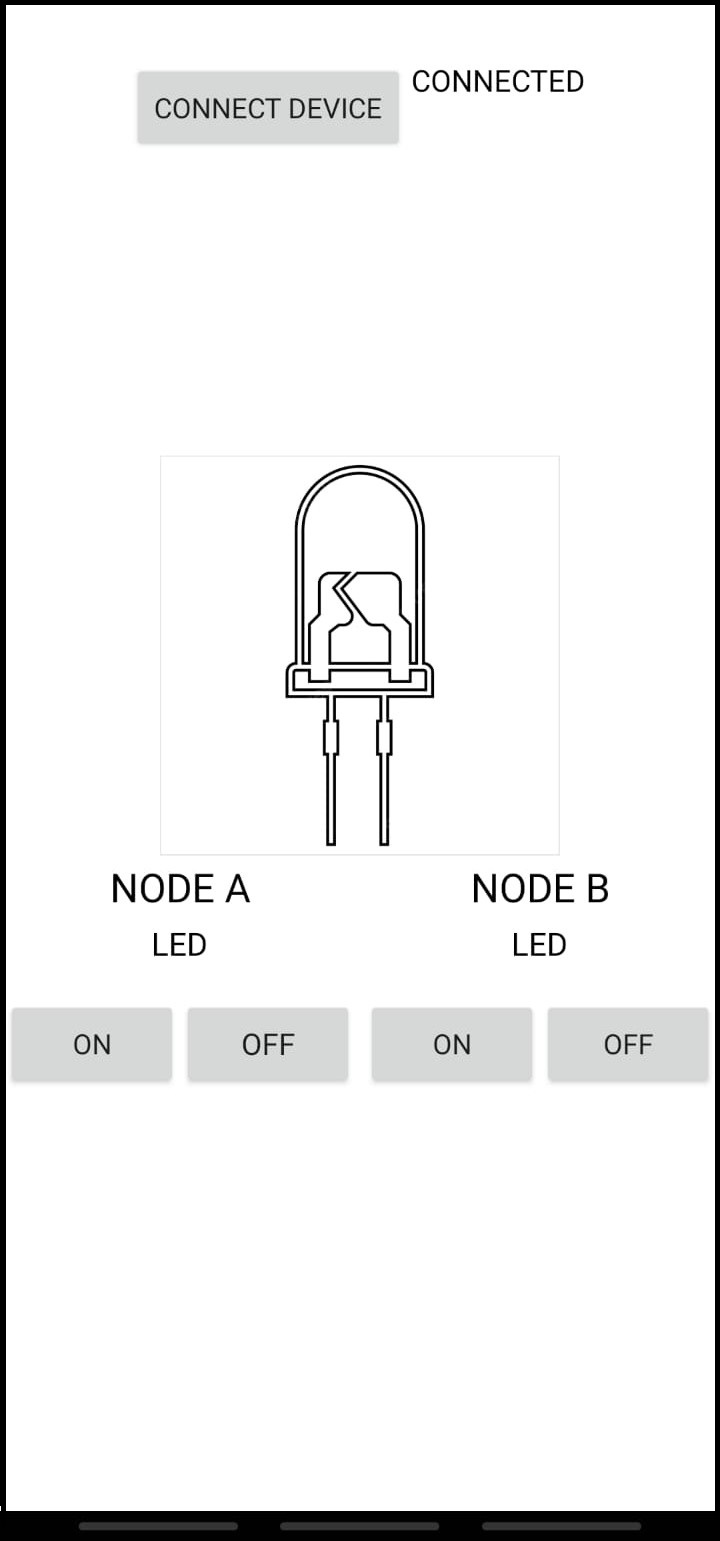
The main screen, titled "COQUIDUINO UI," features a structured layout using vertical and horizontal arrangements. A VerticalArrangement2 at the top of the screen provides a margin between the top of the app and the Bluetooth connection section. Within this section, a HorizontalArrangement2 contains a ListPicker1 for device selection and a Label1 to display the connection status. Initially, Label1 shows the message "NOT CONNECTED," and when connected to a Bluetooth device, it changes to "CONNECTED." Below this, another VerticalArrangement1 to provide a margin. Then is an image (Image1) of an LED, which is purely decorative. For better alignment and accessibility, a TableArrangement1 organizes multiple labels (Label2, Label3) and buttons in a grid format. Additionally, HorizontalArrangement1 houses two buttons (Button1 and Button2) to control the LEDs on Node A, with Button1 designated as "Node A ON" and Button2 as "Node A OFF." Similarly, HorizontalArrangement3 contains two buttons (Button3 and Button4) to manage the LEDs on Node B, with Button3 labeled as "Node B ON" and Button4 as "Node B OFF." Non-visible components include a Bluetooth client component, which manages Bluetooth communication, enabling the app to connect and send commands to the hardware.
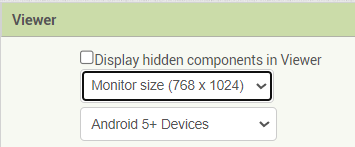
While designing the user interface (UI) for the Coquiduino UI application, I noticed that the initial screen dimensions did not match those of my smartphone. To ensure a perfect fit, I experimented with various layout combinations and adjustments until the interface correctly aligned with my device's screen dimensions. I also set the screen size to Monitor Size to have a better look of the layout.
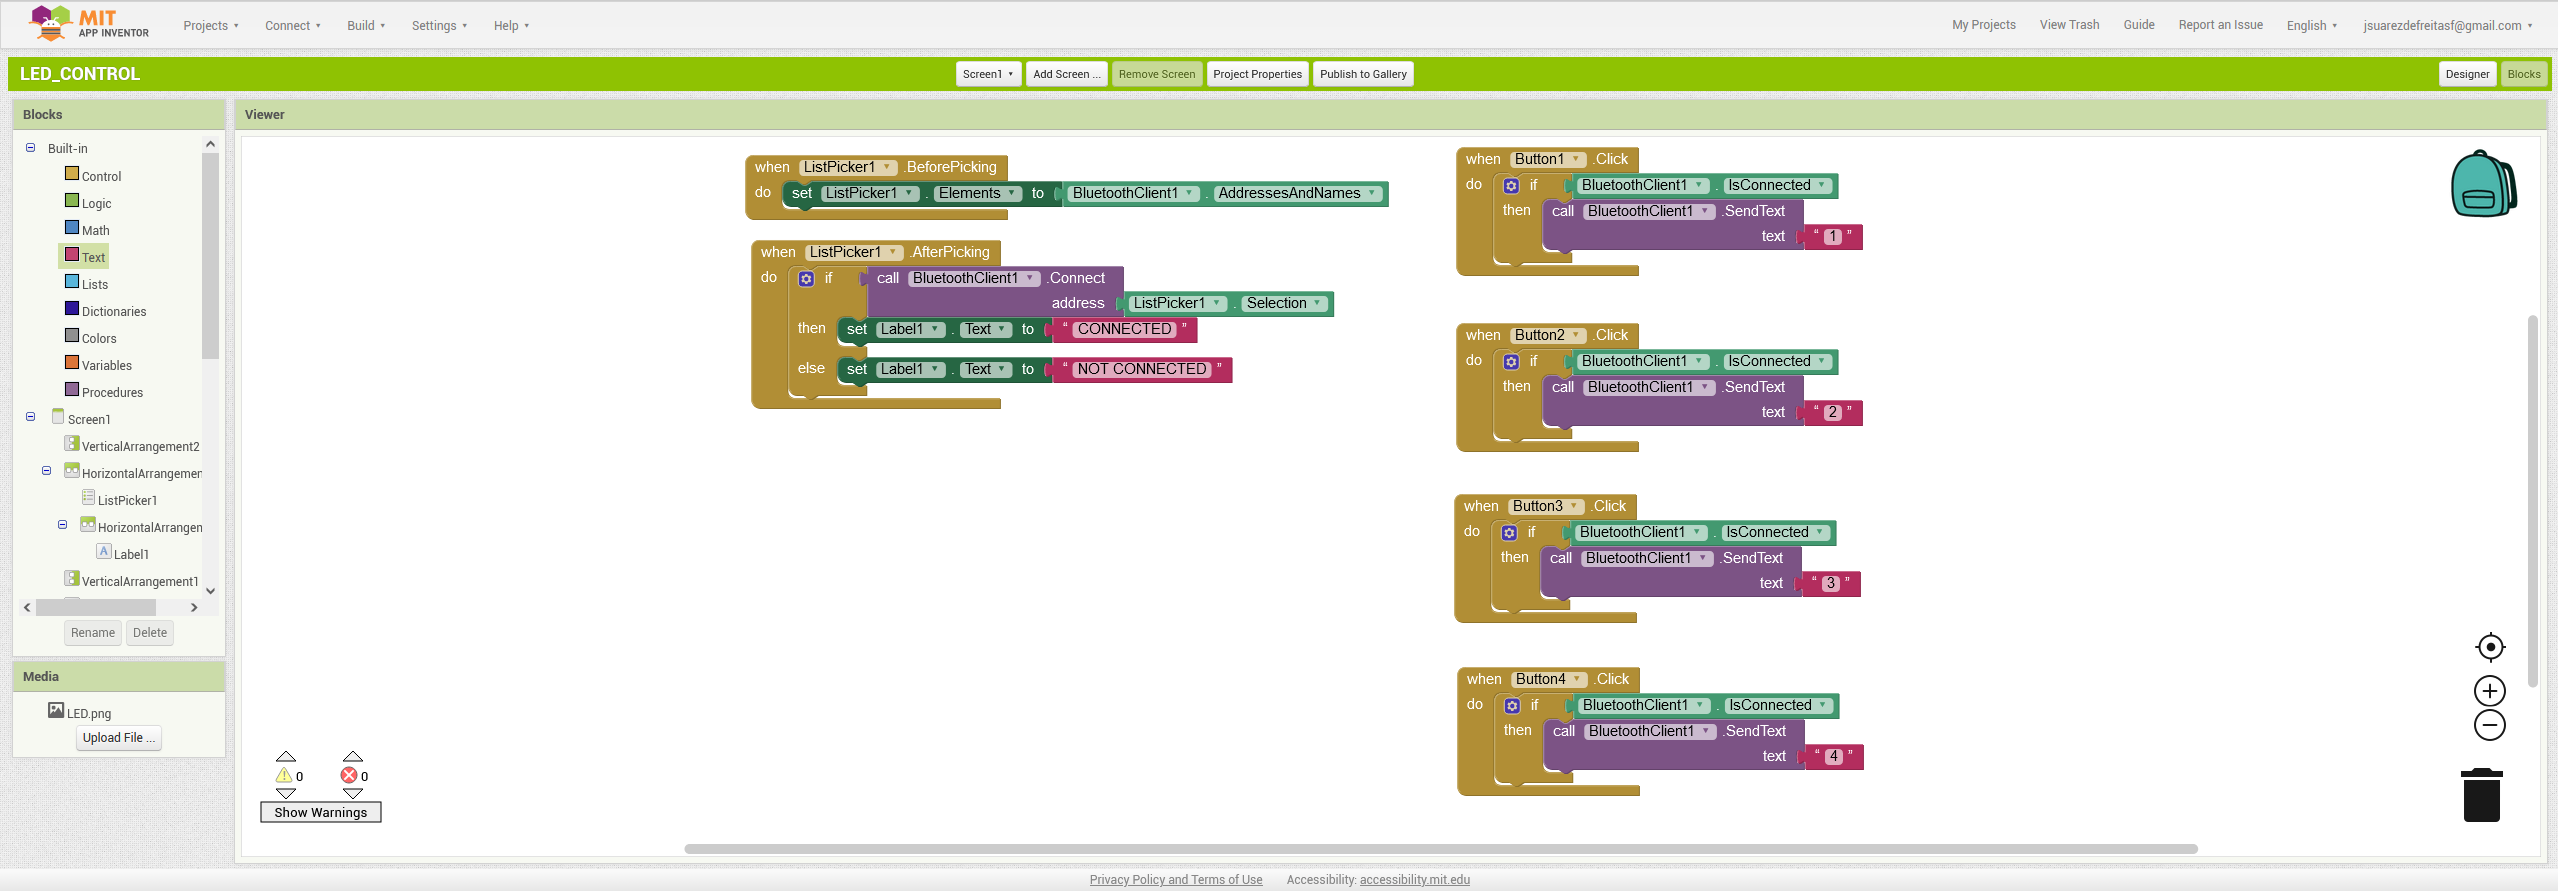
For the block programming of the Coquiduino UI application I used the ListPicker1.BeforePicking block to set the available Bluetooth device addresses and names. After a device is selected, the ListPicker1.AfterPicking block attempts to connect to it, updating Label1.Text to "CONNECTED" if successful or "NOT CONNECTED" if it fails. For LED control, the Button1.Click block checks if the Bluetooth client is connected and sends the text "1" to turn on the LED on Node A if the connection is established. Similarly, the Button2.Click block sends the text "2" to turn off the LED on Node A. For Node B, the Button3.Click block sends the text "3" to turn on the LED, and the Button4.Click block sends the text "4" to turn off the LED, both after checking the Bluetooth connection. This programming ensures reliable communication with the Coquiduino Serial boards.
When installing the APK on an Android phone, you will need to enable the installation of third-party APKs. This is a safety feature of Android to prevent the installation of potentially harmful software. After successfully installing the APK, it is necessary to grant the application access rights to the Bluetooth module of the smartphone. Once these steps are completed, you can proceed with the Arduino code to enable the ATtiny modules to read the serial commands and execute them successfully.
For this week, I modified my Week 14 assignment code and adapted it for this application. The slave nodes will receive commands via serial communication through the Bluetooth module and handle the information as follows: The code initializes serial communication and sets up the LED pins. Upon receiving a command, the loop() function reads it and determines the action to be performed. For Node A, if the command is '1', the node sequentially turns on LEDs (LED1, LED2, and LED3) in a wave pattern, with a 500-millisecond delay between each. If the command is '2', the node turns off all three LEDs simultaneously.Similarly, for Node B, receiving '3' triggers the wave pattern to turn on the LEDs, while '4' turns them all off at once. The code also sends status information via the Tx pin; however, I did not implement reading serial commands in App Inventor. I have tested reading these messages using a TTL cable connected in parallel, as the Coquiduino Serial has a port for it.
        // Program Code: APPINVENTOR NODE A //

        // Written by: Jorge Suarez de Freitas + Samuel Zegarra //

    #include <SoftwareSerial.h>
    // Define the RX and TX pins
    #define TX 9   // Transmit pin
    #define RX 10  // Receive pin

    // Define the LED pins
    #define LED1 1
    #define LED2 2
    #define LED3 3

    // Define the Button pin
    #define Button 0

    // Initialize SoftwareSerial with RX and TX pins
    SoftwareSerial mySerial(RX, TX);

    void setup() {
      // Initialize serial communications at 9600 bps
      mySerial.begin(9600);

      // Set initial pin modes
      pinMode(TX, INPUT); // Set TX as input to ensure it's tri-stated (high impedance)
      pinMode(LED1, OUTPUT);
      pinMode(LED2, OUTPUT);
      pinMode(LED3, OUTPUT);
      }

       void loop() {
      if (mySerial.available() > 0) {
       char chr = mySerial.read();


       if (chr == '1') {
       // Turn 'On' LEDs
       digitalWrite(LED1, HIGH);
       delay(500);
       digitalWrite(LED2, HIGH);
       delay(500);
       digitalWrite(LED3, HIGH);
       delay(500);


        pinMode(TX,OUTPUT);
        mySerial.println("Node A: LED ON");
        delay(1000);
       pinMode(TX,INPUT);
      }

      else if (chr == '2') {
      // Turn 'Off' LEDs
      digitalWrite(LED1, LOW);
       delay(500);
       digitalWrite(LED2, LOW);
       delay(500);
       digitalWrite(LED3, LOW);
       delay(500);


        pinMode(TX,OUTPUT);
        mySerial.println("Node A: LED OFF");
        delay(1000);
       pinMode(TX,INPUT);
      }
      }
      }
        // Program Code: APPINVENTOR NODE B //

        // Written by: Jorge Suarez de Freitas + Samuel Zegarra//

    #include <SoftwareSerial.h>
    // Define the RX and TX pins
    #define TX 9   // Transmit pin
    #define RX 10  // Receive pin

    // Define the LED pins
    #define LED1 1
    #define LED2 2
    #define LED3 3

    // Define the Button pin
    #define Button 0

    // Initialize SoftwareSerial with RX and TX pins
    SoftwareSerial mySerial(RX, TX);

    void setup() {
      // Initialize serial communications at 9600 bps
      mySerial.begin(9600);

      // Set initial pin modes
      pinMode(TX, INPUT); // Set TX as input to ensure it's tri-stated (high impedance)
      pinMode(LED1, OUTPUT);
      pinMode(LED2, OUTPUT);
      pinMode(LED3, OUTPUT);
      }

       void loop() {
      if (mySerial.available() > 0) {
       char chr = mySerial.read();


       if (chr == '3') {
       // Turn 'On' LEDs
       digitalWrite(LED1, HIGH);
       delay(500);
       digitalWrite(LED2, HIGH);
       delay(500);
       digitalWrite(LED3, HIGH);
       delay(500);


        pinMode(TX,OUTPUT);
        mySerial.println("Node B: LED ON");
        delay(1000);
       pinMode(TX,INPUT);
      }

      else if (chr == '4') {
      // Turn 'Off' LEDs
       digitalWrite(LED1, LOW);
       delay(500);
       digitalWrite(LED2, LOW);
       delay(500);
       digitalWrite(LED3, LOW);
       delay(500);


        pinMode(TX,OUTPUT);
        mySerial.println("Node B: LED OFF");
        delay(1000);
       pinMode(TX,INPUT);
      }
      }
      }
To change the name and passkey (PSK) of an HC-05 module, first, connect the HC-05 to the Arduino: VCC to 5V, GND to GND, TX to pin 10, and RX to pin 11. Enter AT mode by powering the module while holding the key/button on the HC-05. In the Arduino IDE, use the SoftwareSerial library to communicate with the HC-05. Open the serial monitor, set the baud rate to 38400, and use "AT" commands. To change the name, send AT+NAME=NewName, and to change the passkey, send AT+PSWD=NewPasskey. The module will respond with "OK" if the commands are successful.
        // Program Code: Set HC-05 Name and PSK //

        // Written by: ChatGPT + Jorge Suarez de Freitas//

    #include <SoftwareSerial.h>
    SoftwareSerial BTSerial(11, 10); // RX, TX

    void setup() {
      // Open serial communications and wait for port to open:
      Serial.begin(9600);
      Serial.println("Enter AT commands:");

      // The HC-05 default baud rate for AT mode is 38400
      BTSerial.begin(38400);
    }

    void loop() {
      // Read from the Bluetooth module and send to the Serial Monitor
      if (BTSerial.available()) {
        Serial.write(BTSerial.read());
      }

      // Read from the Serial Monitor and send to the Bluetooth module
      if (Serial.available()) {
        BTSerial.write(Serial.read());
      }
    }
This week's group assignment provided valuable insights into various development tools and their applications. We compared several platforms including Arduino IDE, MIT App Inventor, p5.js, Node-RED, Flutter, Unity, and Blynk. Each tool offers unique features and benefits, making them suitable for different types of projects:
| Tool | Description | Key Features | Applications |
|---|---|---|---|
| Arduino IDE | Open-source electronics platform based on easy-to-use hardware and software. |
|
Interactive prototypes |
| MIT App Inventor | Web-based IDE for creating Android applications, originally by Google, now maintained by MIT. |
|
Educational projects, prototype projects |
| JavaScript with p5.js | Library aimed at making coding accessible for artists, designers, educators, and beginners. |
|
Web applications, interactive art, dashboards visualization |
| Node-RED | Flow-based development tool for visual programming, originally developed by IBM. |
|
IoT applications, automation, data integration |
| Flutter | Open-source UI software development kit created by Google. |
|
Mobile, web, and desktop applications |
| Unity | Cross-platform game engine developed by Unity Technologies. |
|
Games, interactive simulations |
| Blynk | Platform for controlling Arduino, Raspberry Pi, and other microcontroller boards over the Internet. |
|
IoT projects |
Knowing the tools available and understanding how they work helps us make informed decisions depending on the kind of application required. This approach allows us to search for an efficient workflow and reduce time consumption. This assignment underscored the importance of understanding the strengths and applications of different development tools. By leveraging the right tool for each project, we can enhance efficiency, creativity, and functionality in our Fab Academy projects, ultimately pushing the boundaries of digital fabrication and embedded system design.