Midterm Review
Breakdown
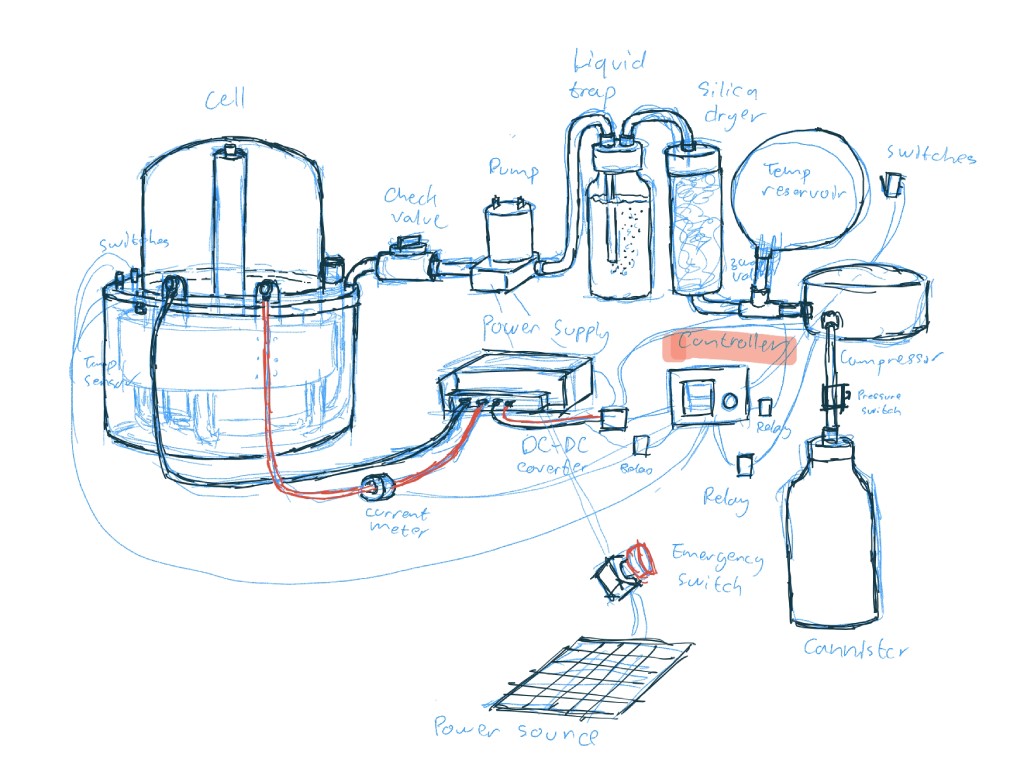
Components
| Name | Quantity | Price | Link |
|---|---|---|---|
| Solar charge controller | |||
| Solar panel | |||
| Relay | |||
| Current sensor | |||
| Check valve | |||
| Thick wire gauge | |||
| Wire terminal | |||
| DC-DC converter | |||
| Temperature sensor | |||
| Magnetron hall effect sensor | |||
| Neodymium magnet | |||
| Emergency stop | |||
| 3 way valve | |||
| Fuel cell | |||
| Fridge compressor | |||
| Canister | |||
| Air pressure sensor | |||
| Ballon | |||
| Air pump |
System Diagram
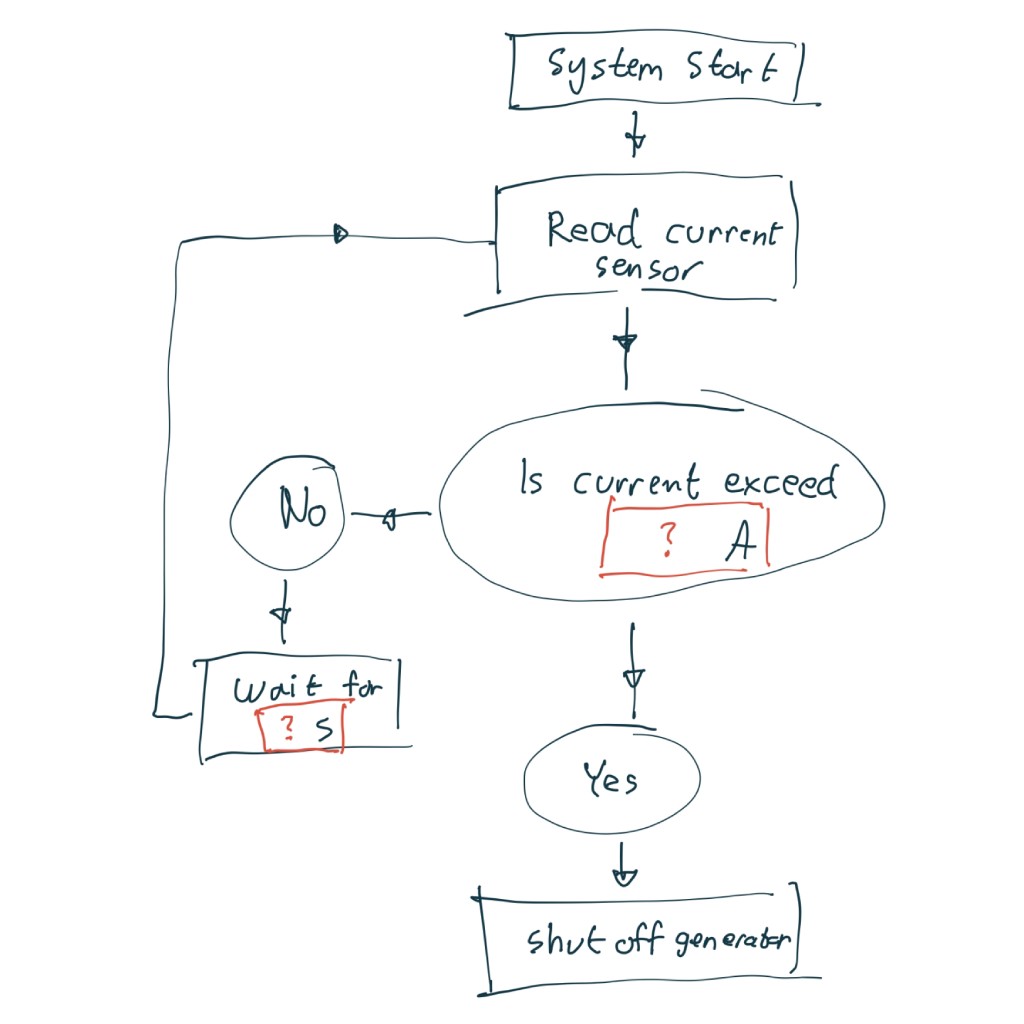
Current Monitor
- Measure current draw periodically
- Halt electrolyzer when current draw exceed [...] A to prevent overdraw
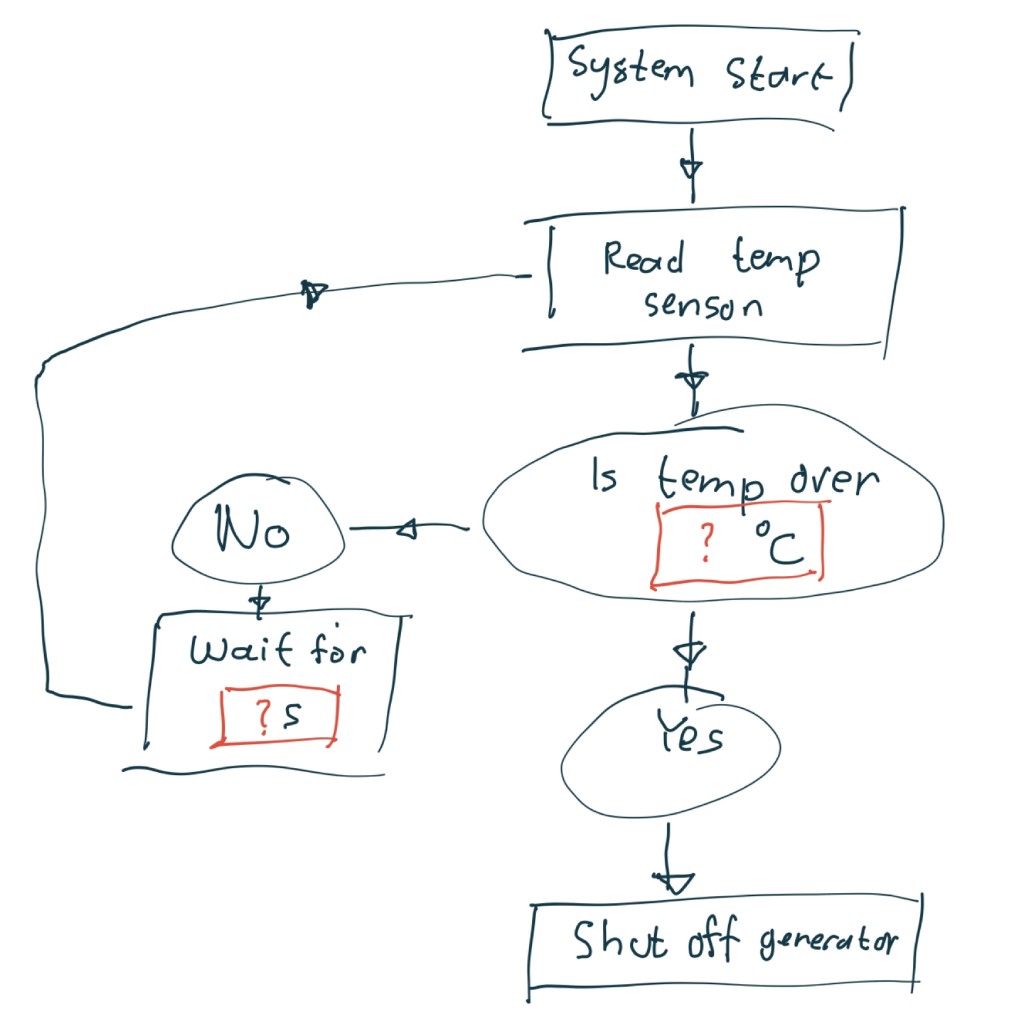
Temperature Monitor
- Measure liquid solution temperature periodically
- Halt electrolyzer when temperature exceed [...] °C to prevent thermal runaway
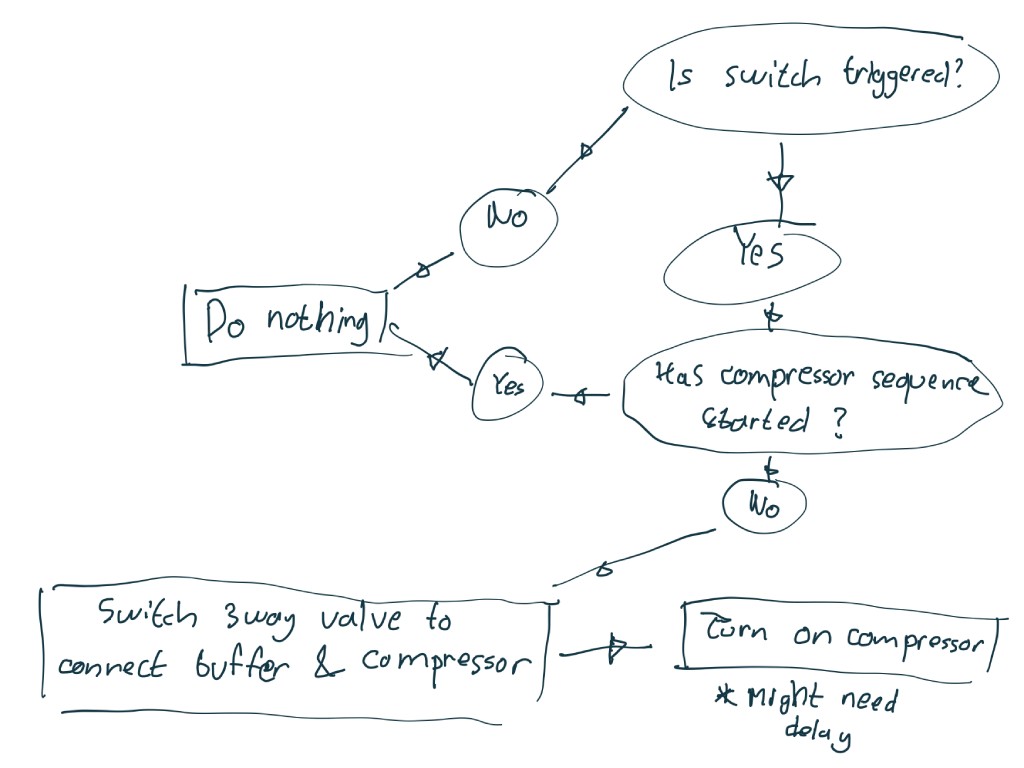
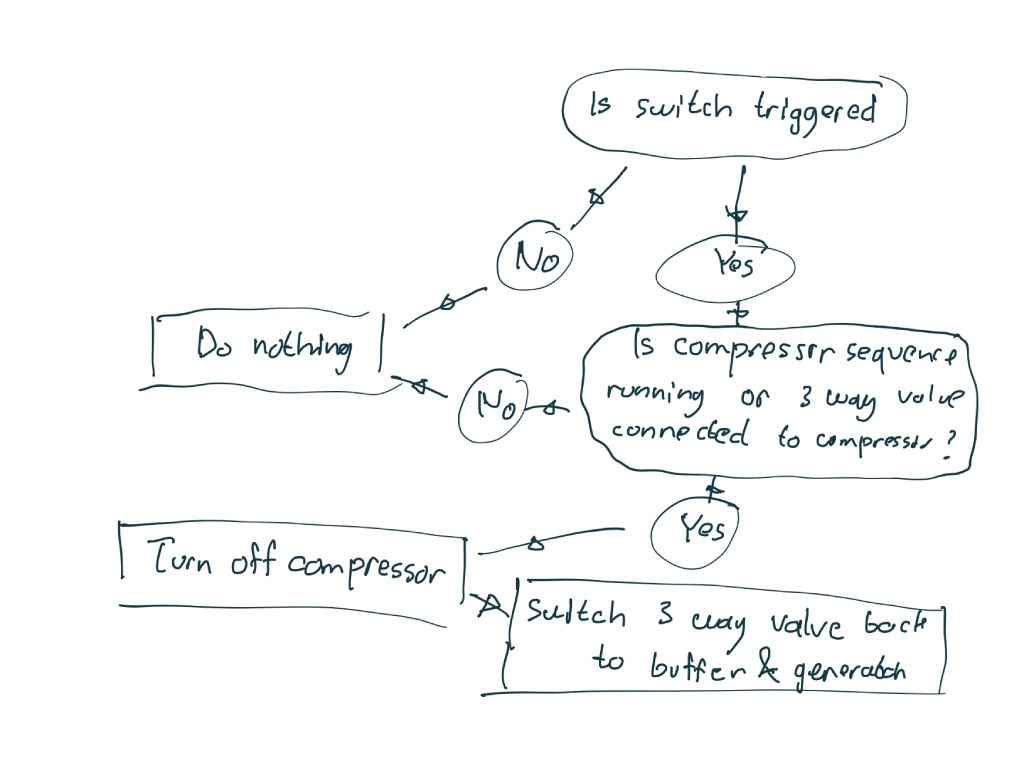
Gas Buffer Switch - Full
- Detect when the gas buffer has been filled over certain volume
- Trigger mechanism to transfer the gas from buffer to canister using compressor
Gas Buffer Switch - Empty
- Detect when the gas buffer has been emptied
- Turn off compressor and revert back valve connection between fuel cell and gas buffer
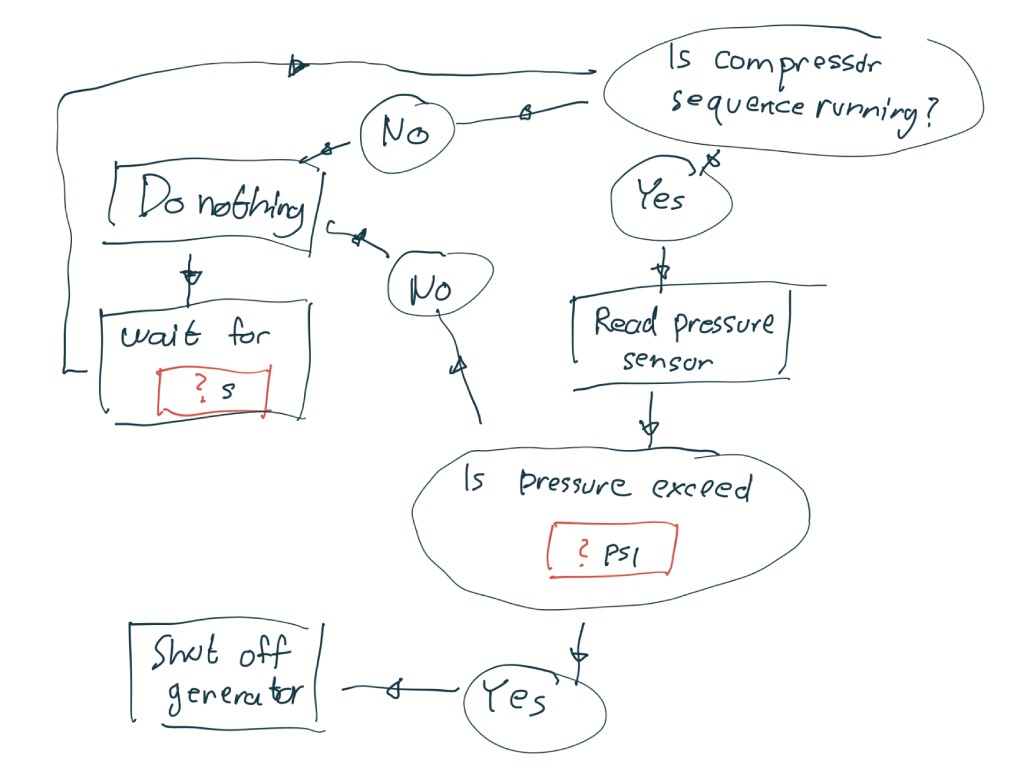
Pressure Monitor
- Measure canister pressure periodically
- Halt electrolyzer when the canister has been filled up to [...] psi
Task List
- Construct simple fuel cell generator. This will determine the feasibility of fabricating one. If it isn't then sourcing would need to be arrange as soon as possible.
- Program and test each individual sub-system
- Purchase components
- Construct low fidelity prototype
- Design and fabricate electronics
- Assemble all sub-systems into a working prototype
- Design and fabricate enclosure
- Assembly
- Documentation
Schedule

Reflection
As per my final project discussion in the class with Neil, the scope of this project is actually rather wide. It has multiple different sub systems that are complex enough on its own to stand as its own project; from the chemistry process of electrolysis, the gas pressurization system through mechanical process, all the safety precautions needed, to the embedded programming of the electronic controller.
I know from the beginning that it is unrealistic to complete this project in one go of a semester of Fab Academy program. My goal is to kick start the project by making a proof of concept that we will keep develop further after the program finished.
Spiral Development
With that in mind, in my midterm review with my instructor Rico, he helps me to strips all the extra elements and only selects the essential parts of the project I can focus on. This essentially sets up as the first spiral development milestone to create an MVP for this project that satisfy all of the final project requirements. After that, I breakdown the rest of the projects into milestones shown below:
Spiral 1
Create an MVP automated gas production storage & pressurization controller. The minimum required peripheral will be sensors for detecting when the gas buffer has been filled and emptied, relays to turn on and off higher voltage peripherals, and a screen to show device status.
Spiral 2
Implement additional input for interacting with the device, sensors for added safety, monitoring, and other features
Spiral 3
Add wireless networking capability to improve usability and possibility for data collection
Spiral 4
Replace the pump intended for simulating gas production with an electrolyzer to start producing hydrogen gas
Spiral 5
Double up the gas storage & pressurization system to capture the oxygen too
Spiral 6
Replace the power supply with solar power system
Electronic Components
Now that the goal is clearer, it makes things easier to identify which components I have to prioritize. For the first spiral goal, the embedded programming is rather simple because I only need to program two routines that basically an inverse of each other.


Both of these routines are triggered by a limit switch, it could be a simple limit switch or a hall effect switch. Below is a list of electronic components I'll need to purchase to complete the MVP:
- XIAO ESP32 C3
- Limit switch or hall effect switch
- 12V power supply
- DC buck converter
- Relay
- Mosfet
- Wires, connectors, and terminals
Mechanical Components
Now, for the mechanical components are totally different story. The two main components are a compressor - to pull the gas from the buffer - and a canister - to contained the pressurized gas. The question is, which compressor and canister can I use for hydrogen? Just like I mentioned in the project description, consumer level hydrogen usage is extremely rare if it exists at all. This mean most of equipments in the market are never really intended to use with hydrogen.
Some people simply use refrigerator compressor and a steel tank in their system like shown in the video by The DIY Science Guy. Though, the video by Hyperspace Pirate explains the hydrogen entitlement effect on steel and suggest using an aluminum tank instead. Great, another specialize component that might not be available in Bali or even in Indonesia.
Although those videos shows their device works really well producing and compressing hydrogen, because we are working with a highly volatile gas, I still want to consult directly with someone that understand more about hydrogen than myself. Luckily we have partnered up with scientists from BRIN and after some consultation with them, they gave me some good insights to choose these components.
Compressor
Most air compressor in the market are oil-lubricated and some small amount of oil will got mixed with the compressed air. It will be very dangerous to use this type of compressor for hydrogen gas because the oil contamination can potentially create a highly flammable mixture. To avoid this, it is recommended to use an oil-less compressor or even better a diaphragm compressor where the compression chamber and the crankshaft completely seperated.
Unfortunately air diaphragm compressor is prohibitively expensive and will be out of reach for many. Luckily oil-less compressors are available here and priced quite reasonably. However, I remembered that I bought a compressor for airbrush painting years ago back home. And when I checked, the compressor unit is an oil-less type! I'll have to take it back with me to Bali next time I go back to Jakarta.