6. Embedded Programming
Trying to control our microcontrollers.
Assignment
-
Group assignment:
- Browse through the datasheet for your microcontroller
- Compare the performance and development workflows for other architectures
- Document your work to the group work page and reflect on your individual page what you learned
-
Individual assignment:
- Write a program for a microcontroller development board to interact (with local input &/or output devices) and communicate (with remote wired or wireless devices)
Group Assignment
This week we tried to program some different microcontrollers we have in our lab, some of which that I've never used before. It's intresting to try and explore the different functionalities of the boards and find out what they can do. It's really fascinating how some of the new microcontrollers are more powerful and the more things they can do. We even found an error in Seeed Studio's documentation.
Link to this week's group assignment
Input and Output Devices
The PCB I made is a simple dev board for ATmega328p processor, it's using the internal oscillator of the 328p, so it requires a special configuration for the Arduino IDE and upload the program via a programmer. The process of uploading the code using an Arduino Uno-emulated programmer has been documented on week04.
Below is the ATmega328p connected to the Arduino Uno via SPI interface to be programmed.
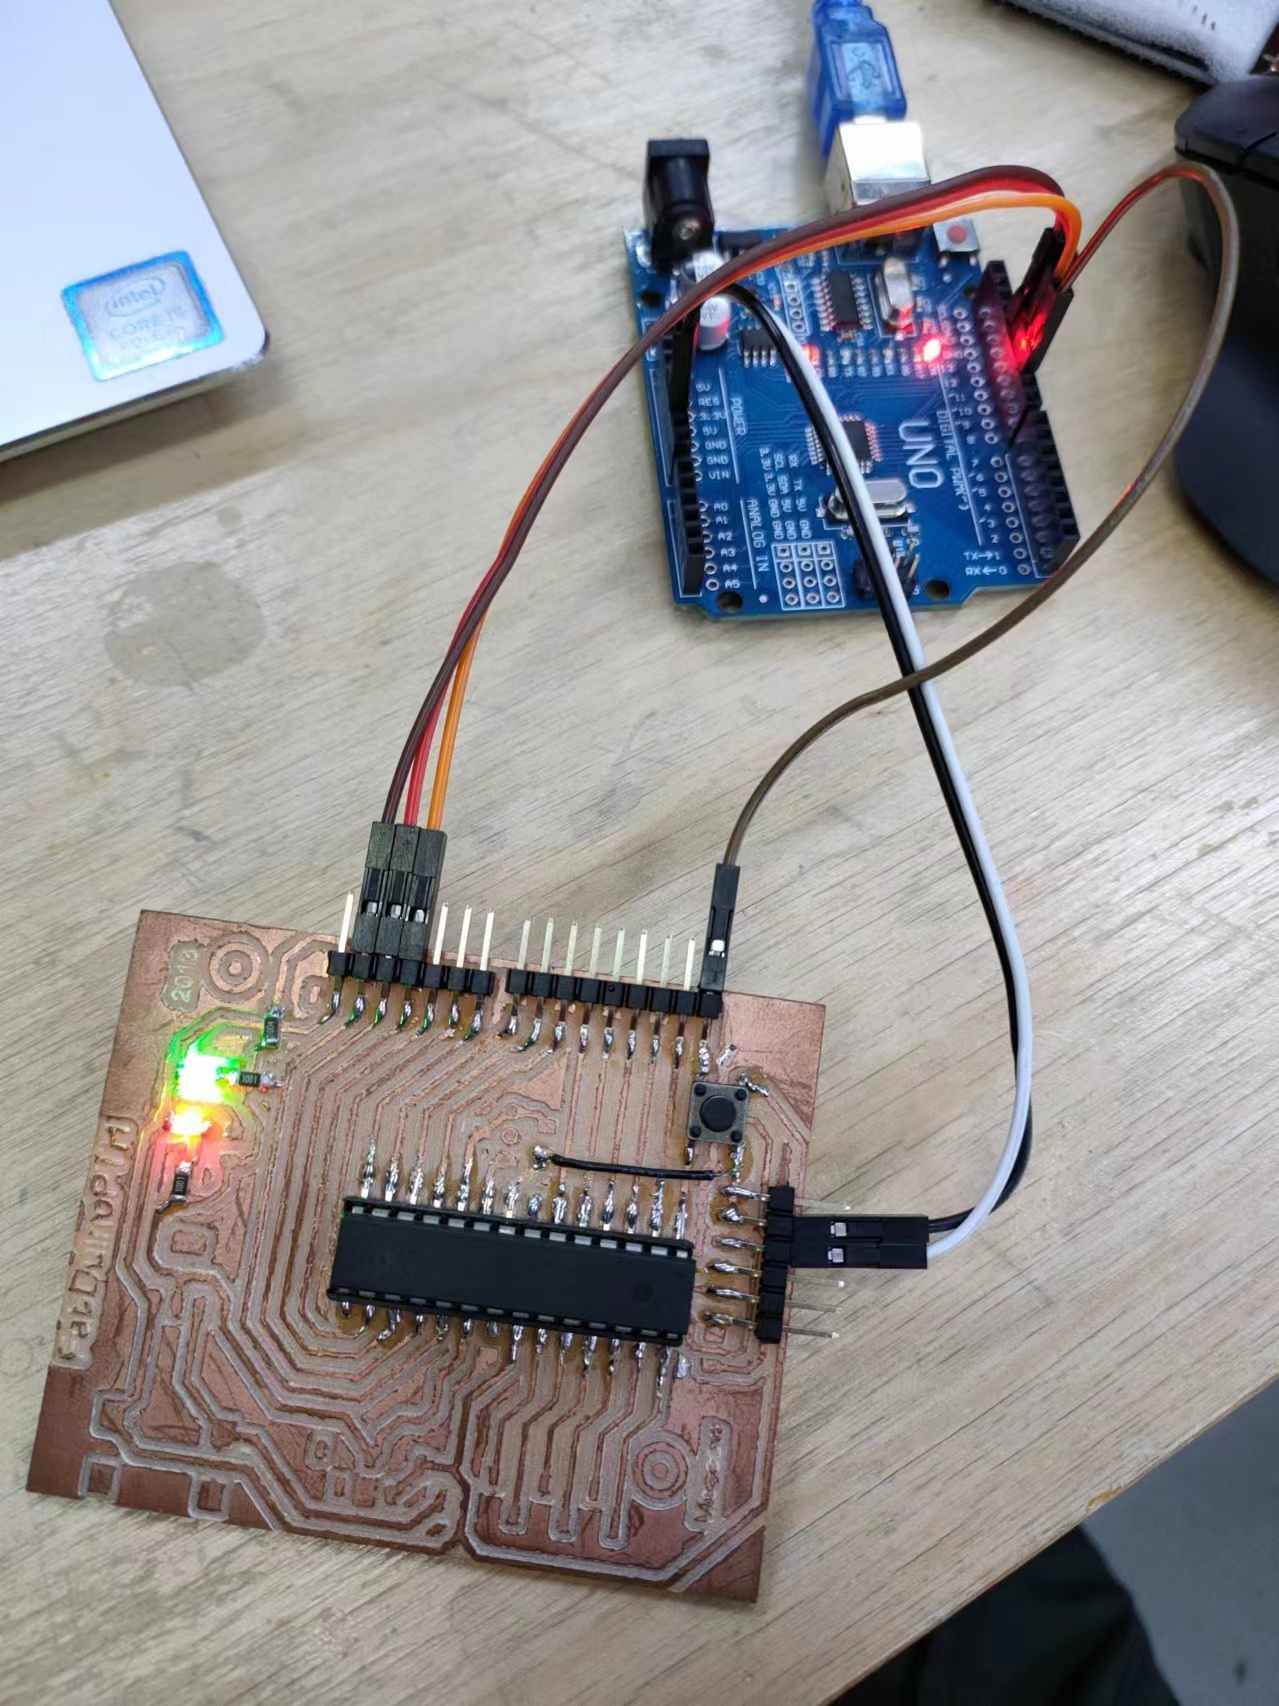
This week I uploaded the following program to control the on-board LED with a button.
void setup() {
  pinMode(9, INPUT);
  pinMode(10, OUTPUT);
  pinMode(13, OUTPUT);

  digitalWrite(10, HIGH);
}

void loop() {
  digitalWrite(13, !digitalRead(9));
}
Communication Between Devices
For communication between different devices, me and my teammates tried many different prorocols at the lab.
Serial Communication
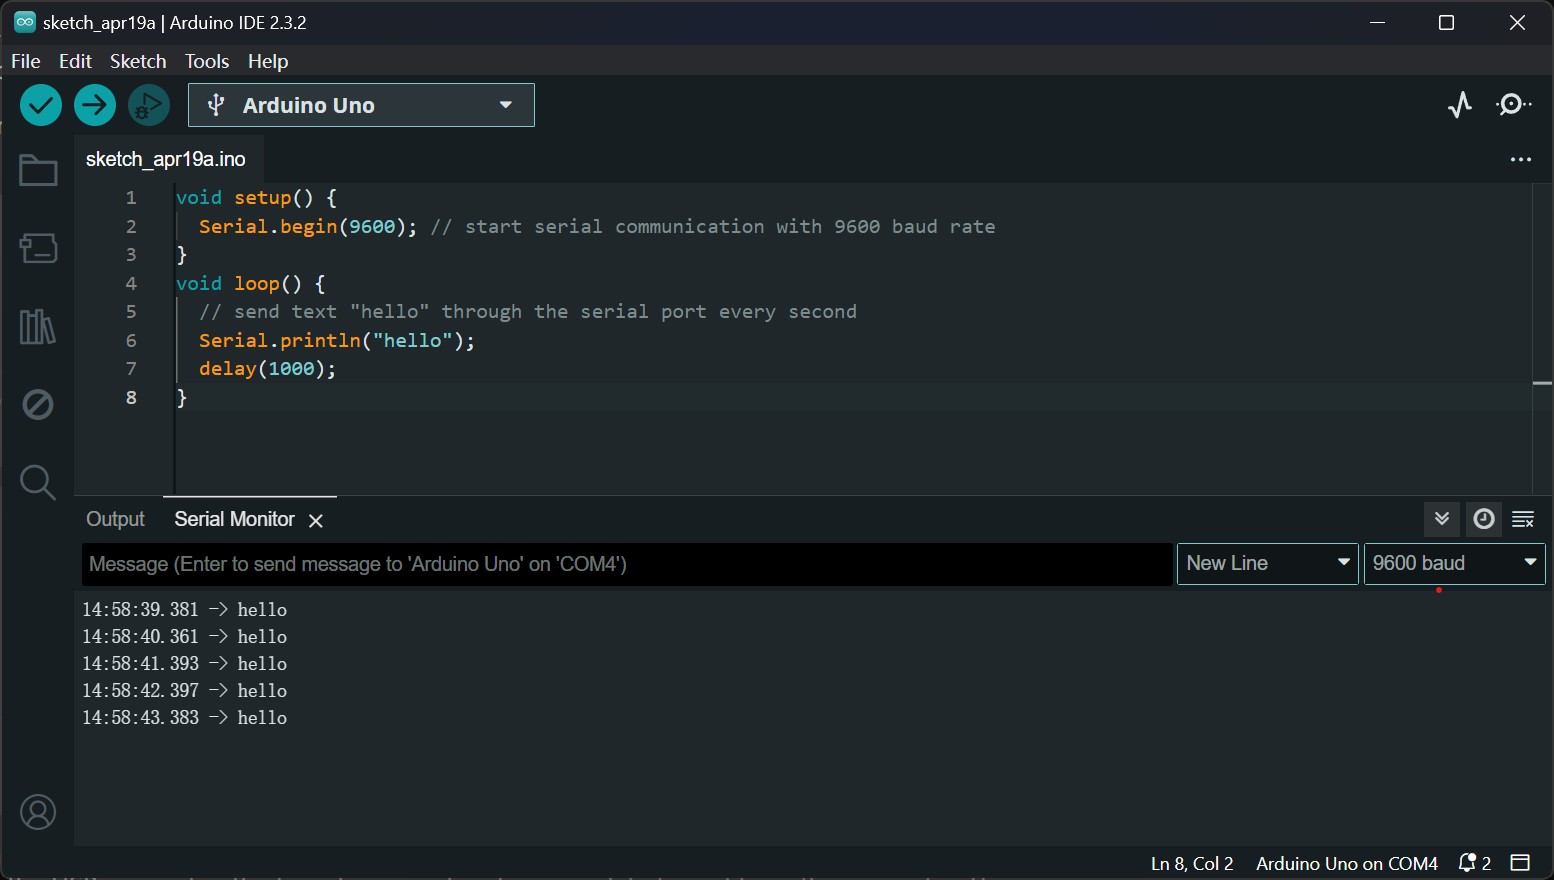
First, I did very simple serial communication between the board and the computer, I used an Arduino Uno for simplicity.
At the beginning, I uploaded the following two sketches to the board using Arduino IDE to test the basic functionality.
void setup() {
  Serial.begin(9600); // start serial communication with 9600 baud rate
}
void loop() {
  // send text "hello" through the serial port every second
  Serial.println("hello");
  delay(1000);
}
void setup() {
  Serial.begin(9600);
}
void loop() {
  // loop if the serial port have data to read
  while (Serial.available() > 0) {
    char c = Serial.read(); // read one character from the serial port
    Serial.write(c);        // write the character through serial
  }
}
And both of the two programs worked fine, as the serial port of the Arduino Uno is connect with the computer with the USB connector, the board can send and receive data to and from the computer. The data sent by the board can be viewed with the Serial Monitor of the Arduino IDE on the PC, and PC can also send data with the input box to the board.
Chat program between two boards
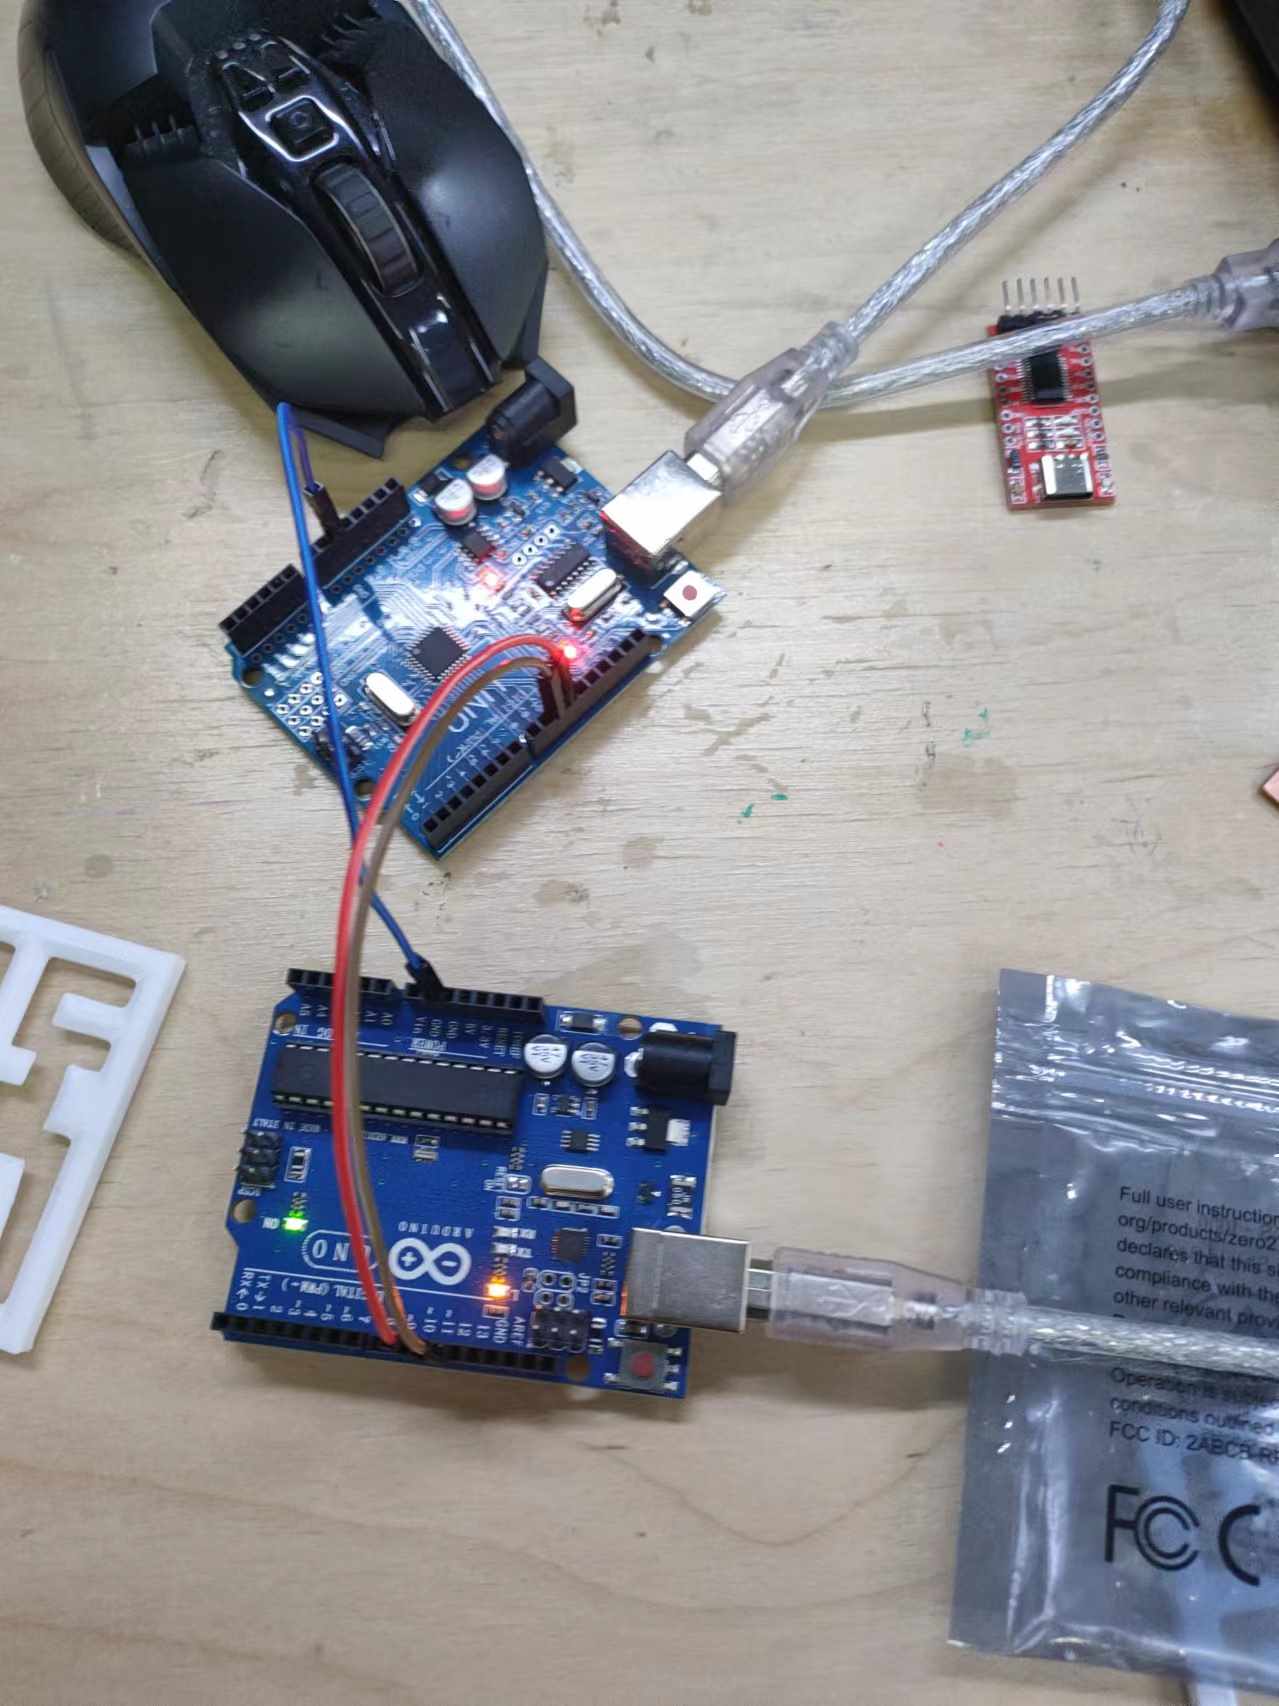
Then we want to do serial communication between two boards, also between two Arduino Unos.
We want to do the chat application between two boards, both of them receive input from the computer, then send the message to the other board with the serial connectiono between them, then send the data received from the other board to the computer they were connected to to display the message in their corresponding serial monitor.

As it shows above, each board needs two serial port, one to connect with the computer, the other to connect them with each other. But the Arduino Uno only comes with one serial port, and it is connected with the computer through USB.
The Arduino IDE comes with a library for Uno that can address this problem, which is the Software Serial library.
It allows us to choose any two GPIO pins to be the TX and RX pin of a software emulated serial port, and we can
send data using those two pins just like using a regular serial port.
We started with the example code the Arduino IDE, first select Arduino Uno as the developement board in the menu entry Tools > Board > Arduino AVR Boards > Arduino Uno, then from File > Examples > Software Serial > SoftwareSerialExample, open the example program from Tom Igoe and Mikal Hart.
/*
  Software serial multiple serial test

 Receives from the hardware serial, sends to software serial.
 Receives from software serial, sends to hardware serial.

 The circuit:
 * RX is digital pin 10 (connect to TX of other device)
 * TX is digital pin 11 (connect to RX of other device)

 Note:
 Not all pins on the Mega and Mega 2560 support change interrupts,
 so only the following can be used for RX:
 10, 11, 12, 13, 50, 51, 52, 53, 62, 63, 64, 65, 66, 67, 68, 69

 Not all pins on the Leonardo and Micro support change interrupts,
 so only the following can be used for RX:
 8, 9, 10, 11, 14 (MISO), 15 (SCK), 16 (MOSI).

 created back in the mists of time
 modified 25 May 2012
 by Tom Igoe
 based on Mikal Hart's example

 This example code is in the public domain.

 */
#include <SoftwareSerial.h>

SoftwareSerial mySerial(10, 11); // RX, TX

void setup() {
  // Open serial communications and wait for port to open:
  Serial.begin(57600);
  while (!Serial) {
    ; // wait for serial port to connect. Needed for native USB port only
  }


  Serial.println("Goodnight moon!");

  // set the data rate for the SoftwareSerial port
  mySerial.begin(4800);
  mySerial.println("Hello, world?");
}

void loop() { // run over and over
  if (mySerial.available()) {
    Serial.write(mySerial.read());
  }
  if (Serial.available()) {
    mySerial.write(Serial.read());
  }
}
It's an example program basicly doing what we want, so we wrote our code based on the example program, with some small modification. Because the two boards are doing exactly the same operation, they can use the same program. We connected the two boards with their TX and RX pins and thought this will be no problem, but all we got was garbage values showing up in the serial monitor.
After some times of debuging and checking different parts of our program and still didn't fixed the issue, I realized that it was we didn't connect the ground pins of the two boards together, resulting them having different base voltage and couldn't read the correct voltage value between their serial pins. And after we connected the GND pins of the two boards together, we got the correct values, the problem wasn't in our code after all.
#include <SoftwareSerial.h>
// declare second serial port with pin 10 and 11 for RX and TX pin
SoftwareSerial serial2(10, 11); // RX, TX

void setup() {
  Serial.begin(9600);  // start serial port between self and computer with 9600 baud rate
  serial2.begin(4800); // start software serial with other board with 4800 baud rate
}

// string to hold current message from the computer
String current_msg = "";

void loop() {
  // loop while there's data from other board
  while (serial2.available() > 0) {
    // send received data to computer
    char c = serial2.read();
    Serial.write(c);
  }
  // read data input by the computer
  while (Serial.available() > 0) {
    char c = Serial.read();
    if (c == '\n') {
      // newline means we've read the whole message
      // show what we've entered on the serial monitor
      Serial.print("me: ");
      Serial.println(current_msg);
      current_msg = ""; // reset the string
    } else {
      current_msg += c; // append the character to the string
    }
    serial2.write(c); // send the data to other board
  }
}
Apart from the GND problem, we also found that when using the same 57600 baud rate for the hardware serial the same as the example code, we sometime have missing characters. The problem went away when using the 9600 baud rate, it might be that the 57600 baud rate is too fast for the Uno to handle.
The other small inconvience with the example is that you can't see the message that you sent yourself, so I added the functionality to show what we've just typed in the serial monitor.
I2C communictaion
Then I went on doing communication with my other teammate. She tried to use the Xiao RP2040 development board, and we also wanted to implement the same chat program between her board and another device.
At the time of doing the exercise, we consult the Seeed Official Website for the documentation of the serial communication of the Xiao RP2040. And the documentation is a little bit confusing and we thought that the Xiao RP2040 was the same as the Uno that it uses the same serial port to communicate with other devices and the computer. (But later after we examined the data sheet and the source code of the Arduino Core for RP2040, we found that it was not the case.) And we also didn't found example code of software serial for the RP2040, so we thought it doesn't have the functionality and we could not have two serial port simaltinously on the Xiao RP2040 (, which is also not true after we looked through the source code, it turned out that we can just use it with no problem).
Findings about the RP2040 Serial situation
According to Seeed's documentation on serial ports of the Xiao RP2040, the code below:
void setup() {
    Serial.begin(115200);
    while (!Serial);
}

void loop() {
    Serial.println("Hello,World");
    delay(1000);
}
controls the UART port on pin D6 and D7 to send out message "Hello,World". It turns out that this is not the case. According to the
arduino-pico(Arduino core for the RP2040 boards)documentation on Serial Ports, theSerialinstance refers to the USB serial port, which is connected to the computer via the USB cable, and the serial port on pin D6 and D7 is controlled by theSerial1instance.This can also be confirmed by checking the source code of the Arduino core:
// SerialUSB.cpp
SerialUSB Serial;
// in SerialUART.cpp
SerialUART Serial1(__SERIAL1_DEVICE, PIN_SERIAL1_TX, PIN_SERIAL1_RX);
This is an error in Seeed's documentation, which could lead to confusion when exploring new projects.
Anyway, we thought we can only have one serial port between the computer and Xiao RP2040 so we cannot use serial communictation between the devices. So we decided to try I2C communictaion for this one.
The Xiao and Arduino Uno all have I2C capability. We based our code on the examples that come with the Wire library.
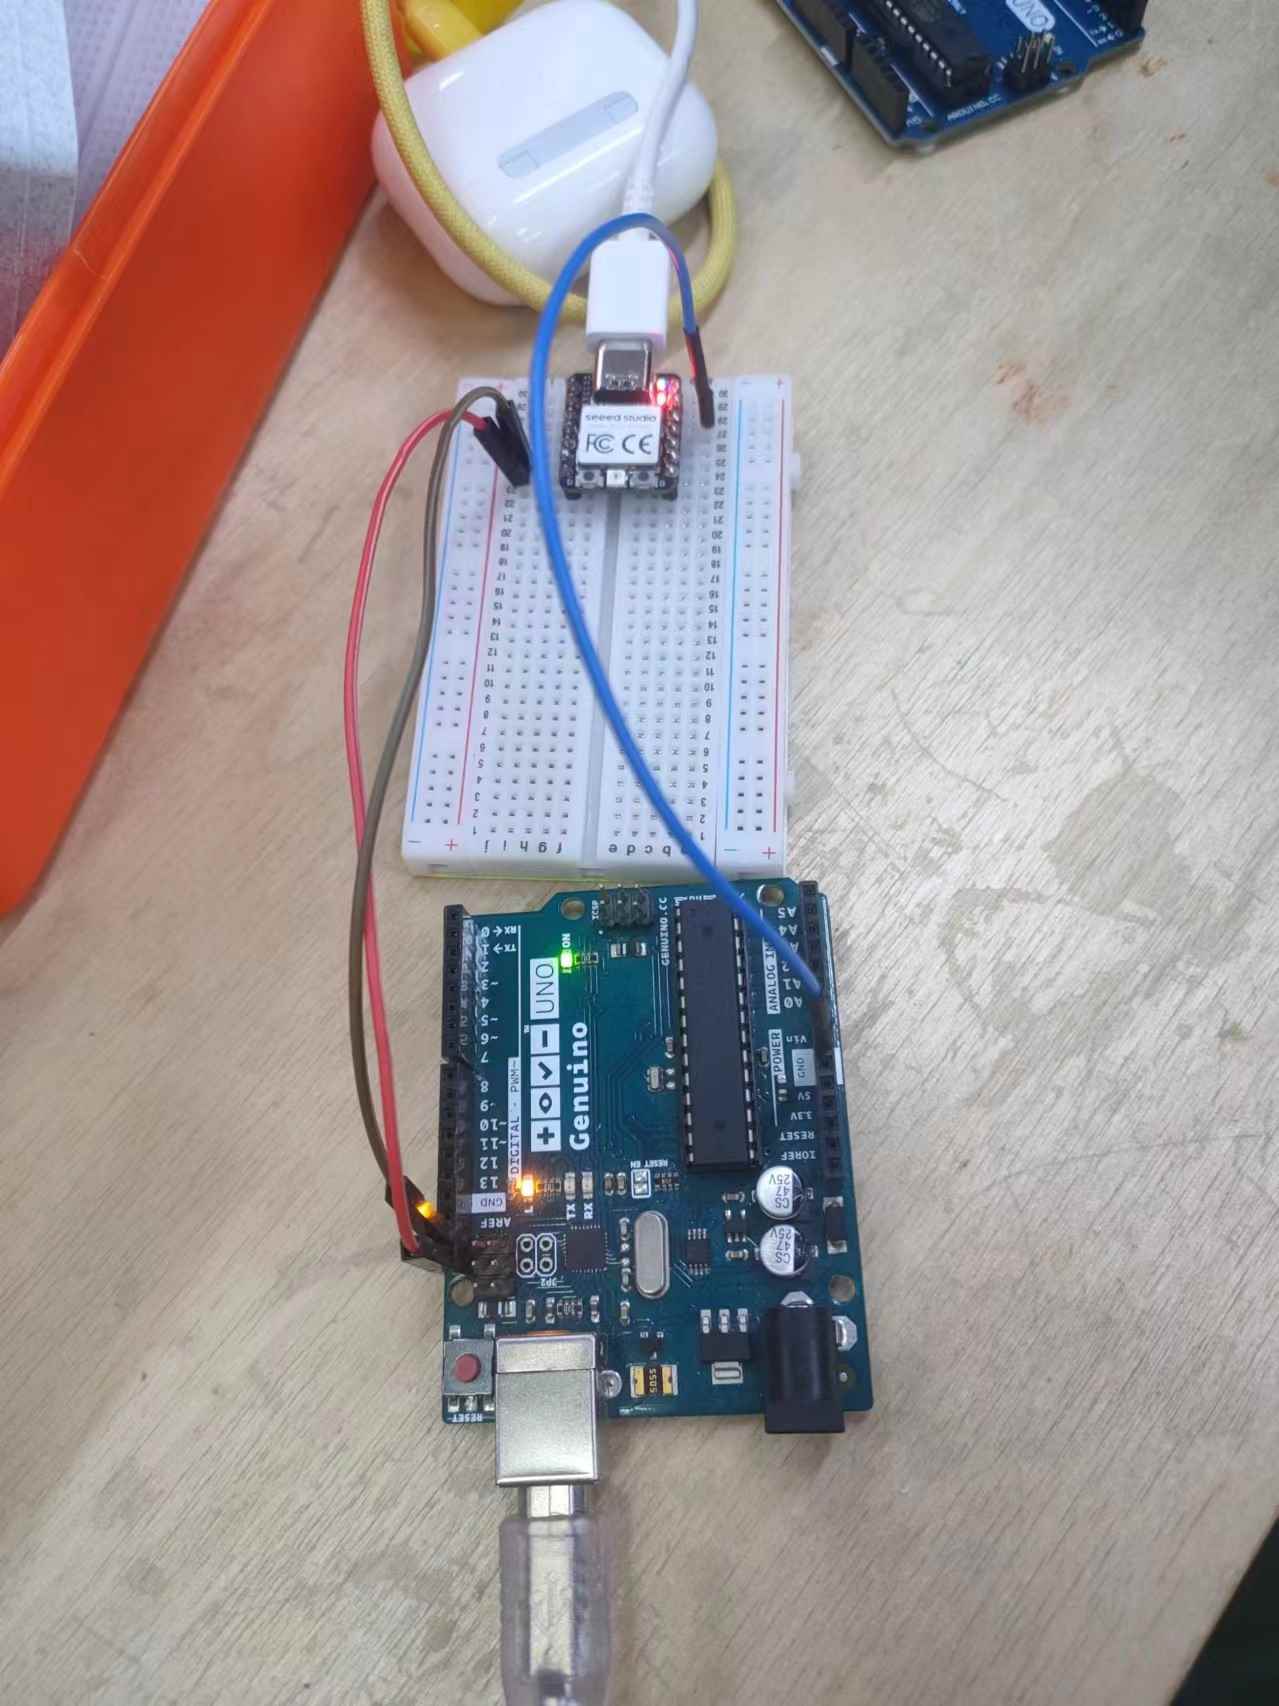
Program Detail
We try to make the same chat program as before using the I2C protocol, it turns out we need more logic to control the communication.
Using the serial communication, both of the device can use the same code, as they are completey symmetrical to each other. But the I2C protocol has a main device to dictate the whole network as it supports multiple devices on the same data bus.
So in our program, one of the device has to control when and which device is to send or receive a message, and the other has to reply when it is requested. It cannot send the message as it's receiving input from the computer but has to first accumulate the message and send them at once when requested.
And there's another caveat that the master has to specify how many bytes to request from the peer, but it cannot know how long the message is in advance so it has to query the size first, then request the actual message.
We added a state variable to indicate whether the master is querying the message length, or the actual message, or sending data, so that our slave device can send the requested data accordingly.
The final code on the Xiao RP2040 and the Arduino Uno are shown below.
/* This is the sketch that is uploaded on the Xiao RP2040.
 * The Xiao acts as a master device on the I2C bus to send and
 * receive message from the slave at address 8.
 */

#include <Wire.h>

String input = "";  // stores the input message for echoing on the serial monitor

void setup() {
  Wire.begin();        // join I2C bus (address optional for master)
  Serial.begin(9600);  // start serial for output
}

void loop() {
  Wire.beginTransmission(8);      // Sends a '0' to indicate that we are listening
  Wire.write(0);
  Wire.endTransmission();
  int l = Wire.requestFrom(8, 1); // Read from peer
  if (l == 1) {                   // A '1' means the peer is sending
    char n = Wire.read();         // First read the length of the message
    if (n > 0) {                  // If we have any data
      Wire.beginTransmission(8);  // Send '1' means we are requesting the data
      Wire.write(1);
      Wire.endTransmission();
      Wire.requestFrom(8, n);     // request n bytes from slave device #8
      while (Wire.available()) {  // slave may send less than requested
        char c = Wire.read();     // receive a byte as character
        Serial.print(c);          // print the character
      }
    }
  }

  // Take input from the computer
  if (Serial.available() > 0) {
    Wire.beginTransmission(8);    // Starts sending message to peer
    Wire.write(2);                // A '2' indicates the master is sending
    while (Serial.available() > 0) {
      char c = Serial.read();
      Wire.write(c);              // Send the message to peer

      input += c;                 // Collects the input message
      if (c == '\n') {            // Print the message that we sent and reset the buffer
        Serial.print("me: ");
        Serial.print(input);
        input = "";
      }
    }
    Wire.endTransmission();
  }
}
/* This sketch is uploaded on the Arduino Uno.
 * It acts as the slave device at address 8 on the I2C bus.
 */

#include <Wire.h>

String msg = "";        // stores the message to be sent
String input = "";      // buffers the input we get from the computer to output them at once
int mode;               // indicates transmission state

// handler function for incomming data
void recv(int count) {
  char c = Wire.read();             // read the transmition state from peer and save
  if (c == 0 || c == 1) {           // '0' means the peer is listening for data, '1' means the peer is requesting the data
    mode = c;
  } else if (c == 2) {              // '2' means the peer is sending data
    while (Wire.available() > 0) {
      char c = Wire.read();         // read message and print
      Serial.write(c);
    }
  }
}

// handler function when requested data by the peer
void req() {
  if (mode == 0) {                  // '0' means the peer is waiting for data
    Wire.write(msg.length());       // send the length of the message
  } else if (mode == 1) {           // '1' means the peer is requesting data
    Wire.write(msg.c_str(), msg.length());  // send the actual message
    msg = "";                       // resets the message buffer
  }
}

void setup() {
  Serial.begin(9600);

  Wire.begin(8);                    // set the address of the device
  Wire.onReceive(recv);             // setup callback functions
  Wire.onRequest(req);
}

void loop() {
  while (Serial.available() > 0) {  // read input from the computer
    char c = Serial.read;
    msg += c;                       // buffer the message to be send when requested by peer
    input += c;                     // buffer the line we input
    if (c == '\n') {                // input end, print to the serial monitor and reset
      Serial.print("me: ");
      Serial.print(input);
      input = "";
    }
  }
}
Source files
-
Input/Ouput test program: io-test-button-led.ino
-
Serial communication:
- Serial send test: serial-test-send.ino
- Serial receive test: serial-test-receive.ino
- SoftwareSerial example from Arduino IDE: SoftwareSerialExample.ino
- UNO software serial chat program: software-serial-chat-uno.ino
-
I2C chat program:
- Master device code: i2c-chat-master.ino
- Slave device code: i2c-chat-slave.ino