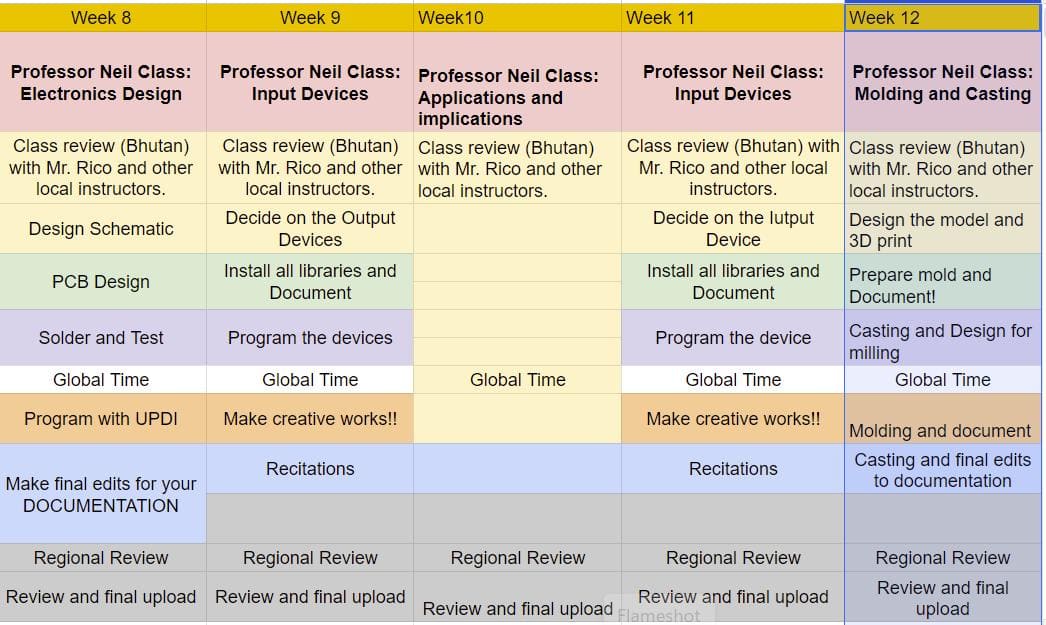
Week 12: Molding and Casting

Assignment of the week:

Group assignment:

Review the safety data sheets for each of your molding and casting materials

Make and compare test casts with each of them

Compare printing vs milling molds

Individual assignments

Design a mold around the process you'll be using, produce it with a smooth surface finish, and use it to cast parts.

Learning outcomes:

Design appropriate objects within the limitations of your process

Demonstrate workflows used in mold design, construction and casting

Requirements for the assignment:

Linked to the group assignment page and reflected on your individual page what you have learned

Reviewed the safety data sheets for each of your molding and casting materials, then made and compared test casts with each of them

Documented how you designed and created your 3D mold, including machine settings

Shown how you safely made your mold and cast the parts Described problems and how you fixed them

Included your design files and ‘hero shot’ of the mold and the final object

Here comes another schedule for another week!!

alt text

Group Assignment:

Learning Highlights:

  1. Safety First: Reviewing safety data sheets is crucial before handling any molding and casting materials. It includes wearing appropriate protective gear, working in well-ventilated areas, and understanding potential hazards and first-aid measures.
  2. Material Characteristics: Different molding and casting materials have unique properties such as viscosity, curing time, hardness, and compatibility with other substances. Understanding these characteristics helps in selecting the right material for specific applications.
  3. Mixing and Handling: Proper mixing and handling techniques are essential for achieving desired results. This includes following recommended mix ratios, curing times, and post-curing processes for optimal performance.
  4. Molding and Casting Techniques: Various molding and casting techniques like injection molding, slip casting, and die casting offer versatility in creating different types of molds and final products. Each technique has its advantages and limitations.
  5. Comparison of Printing vs Milling Molds: Both 3D printing and milling offer unique advantages and drawbacks in mold creation. 3D printing allows for intricate and detailed designs but may result in textured finishes, while milling produces smoother outcomes but is limited by the size of the drill bit.
  6. Design Considerations: Designing molds requires considering factors like mold complexity, detail level, surface finish, and the intended use of the final product. Choosing the right technique depends on balancing these factors to achieve the desired outcome.

Conclusion:

The exploration of molding and casting techniques, along with the comparison of printing vs milling molds, provides valuable insights into the versatility and considerations involved in these processes. Safety precautions, material properties, mixing techniques, and molding methods all contribute to successful mold creation and casting. Understanding the strengths and limitations of each approach allows for informed decision-making based on project requirements and desired outcomes. Whether opting for 3D printing for intricate designs or milling for smoother finishes, careful planning and execution are key to achieving quality results in molding and casting endeavors.

Here is the complete group assignment

Individual Assignment

Definitions

  1. Molding: Molding, also known as moldmaking, is the process of creating a cavity or form that replicates a negative or reverse impression of an original model. This mold can be made from rigid materials like plaster or plastic resin, or flexible materials like rubber. The choice of material depends on factors such as the material of the original model, the casting material, and the presence of any undercuts.

  2. Casting: Casting refers to the act of pouring a liquid material into the cavity of a mold. Over time, this liquid material undergoes a chemical reaction or cooling process, leading to its solidification. The resulting solid part, known as a casting, is then ejected or removed from the mold to complete the casting process. Casting materials can range from metals to various cold-setting substances like epoxy, concrete, plaster, and clay.

  3. Differences between Molding and Casting:

Image Source.

Mold Design

For the mold design, I am using Fusion 360 as my design software.

I first thought of creating a mold design from the donut model that I made in the Computer Aided Design week using blender. But as I have been mostly using Fusion 360, I found it difficult to use the blender tools.

Therefore, I ended up using Fusion 360 only. While I was exploring on YouTube, I came across this video tutorial that made a hello kitty figure through an image so I decided on this!!

Fusion 360

1. I first downloaded a hello kitty image and imported it in fusion.

2. Then after adjusting the image to my desired size, I went to the create drop down menu and chose form.

3. Then I created a sphere for the head and modified it according to the image by using the modify tool.

4. Repeat the steps for the eyes and nose but for the ears, you have to create a box form.

5. Don't forget to adjust the position of the eyes, ears and nose on the head.

6. Now, here comes the tricky part....How to make the mustache?? Well, I used the cylinder form to make the mustache. I selected create cylinder from the dropdown menu and inserted the diameters as per the design.After that I extruded the cylinder and again modified it using the modify tool.

8. After that I went to the modify dropdown menu and selected the fill hole tool to close the base and top of the cylinder.

9. Then I extruded the boarders.

Added some finishing touch and here are the RESULTS!!

After exporting the design in stl. format, I sliced it using Prusa Slicer and here is the printing processes.

Done Printing!!

It wasn't that bad but it would have looked better with the bow.

Here is me removing the support.

Just as I was doing so, I realized that there were some spaces under the whiskers so I had to cut them off as they would not let the demolding process possible!!

Molding

For molding, we used the SmoothOn Sorta-Clear star 37 which falls under the food safe category.

We used this as we were planning to make a chocolate cast from it :)))

Measuring and Mixing

Now, to prepare the mold first we need to mix equal parts of Part A and Part B.

Use a weighing machine to measure them.

Remember to pre-mix Part B thoroughly before you begin.

After dispensing the required amounts of Part A and Part B into a mixing container, we mixed thoroughly for 3 mins.

Make sure to scrape the the sides and bottom of the mixing container several times.

Pouring, Curing, and Mold performance

Here, I poured the mixture in the design cavity and set it gently by tapping it simultaneously on the floor.

Then allowed the material to cure fully at room temperature before demolding.

The instructions say that the time to demold can be reduced with mild heat and as we had our heater on in the fablab, it was the perfect temperature.

I kept the leftover mixture so that I would be able to know when the mold gets ready.

The next day

The next morning as I checked on the leftover mixture and it was almost ready.

Casting

For casting, we used the Smooth-On Smooth Cast 305.

Safety First!!⚠️

Image Source.

Read the full Material Safety Data Sheet for safety.

The process for casting is similar to the molding process.

First we need to take equal parts of Part A and Part B.

Then mix them thoroughly with a popsicle for about 3 mins.

Lastly pour it in your mold design!!

One eye got out.

Milling

Next, our instructor Sir Anith taught us the proccesses for milling a wax.

So before milling, we had to make our designs. For this, all of us decided to make different emoji designs.

Fusion 360

First I searched up for a winking emoji outline. Then traced its bitmap on inkscape and scaled it according to the wax dimensions.

Then saved the file in dxf. format.

In fusion, I inserted the dxf. file.

Then extruded the face 5 mm and the eyes and mouth 10 mm.

Then made a 5 mm tall platform and here are the results!!

Toolpath

For the wax milling, we need the Modela software to make the roughing and finishing files.

Here are the processes:

  1. Import the STL file you designed.

  2. Choose the material from the dropdown menu (select modeling wax).

  1. Select "New Process" and choose "Roughing" type, then click next.

  1. Choose the cutting surface as "Top" and proceed to the next step.

  2. Select the 3.175mm Square tool for Roughing from the dropdown menu and press next.

  1. Opt for "Partial" and manually adjust the cutting area.

  1. Choose "Contour Lines" as the tool path type and set the cutting parameters. Name the process and preview the path.

  1. Move to the "Finishing" process, select the bit used for finishing, and minimize the cutting area manually.

  1. Choose the tool path type and set cutting parameters accordingly.

  2. Select the 3.175mm ball tool for Roughing from the dropdown menu and press next.

Now, repeat the processes as we did for the roughing file and save the files.

Milling

Setting Origin

Before I started milling, I drew 2 diagonal lines across the wax to mark the center of the wax. This is because the origin point is in the center for the tool path created by modella player.

Picture Courtesy:Yangtshel Wangyel

Now follow the steps for milling a PCB to mill the wax.

Milling.....

...fail

Turns out I made the platform way to big and now there are no borders for the emoji.

I had to redesign the platform and mill the design again!

Here are the results!!

After that, I prepared the mold for the emoji pattern with the same processes that I followed for the hello kitty.

Then I also followed the same processes for casting but this time, I added a little color (yellow) to the mixture.

Here are the results!!

Learning Highlights:

Zipped Design Files

That's it for the week!!

Thank You Message

Thank you for visiting!!!