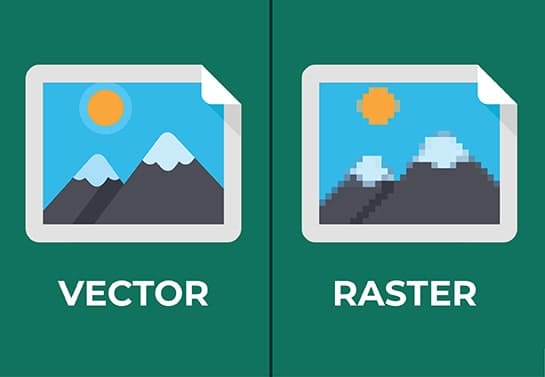
Raster images are created using pixels while vector images are created using lines, curves and fills.
For information, on each type of graphic;
Raster Images
- Pixel based: Raster images consist of a grid of pixels with each pixel having its own color to collectively form the image.
- Dependent on resolution: Raster images can lose quality. Appear pixelated when resized or zoomed in especially if the resolution is low.
- File formats: Common raster image formats include JPEG, PNG, GIF, and BMP.
- Editing: Photo editing software like Adobe Photoshop is commonly used to edit raster images. They work well for photographs and images with color gradients.
Vector Images
- Mathematically defined: Vector images are made up of paths or lines defined by equations. These paths can encompass shapes, curves, and text.
- Resolution independent: Vector images can be resized to any scale without losing quality. This makes them perfect for logos and illustrations.
- File formats: Popular vector image formats include SVG (Scalable Vector Graphics), AI (Adobe Illustrator), and EPS (Encapsulated PostScript).
- Editing: Vector graphics software, like Adobe Illustrator or CorelDRAW, is used to edit vector images. Great for projects that need to scale up and demand accuracy, like designing logos and icons.
Now it's time for DESIGN!!!
HEROSHOT!!
Download Links for all the software used:
2-D Design:
Inkscape
Inkscape is one of the most popular free and open-source vector graphics editor. It is mostly used for creating and editing scalable vector images. You must have seen Inkscape being used for logo design, illustration, and web graphics. It has many precise tools along with a simple user interface which makes it easy for beginners as well as professionals to use it. Being a vector graphics editor, it provides lossless resizing of images. It has good compatibility with other file formats as well. Regular updates and input from the community make it an effective and worthwhile alternative to other graphic designers, as it maintains industry standards.
I already had inkscape downloaded on my laptop, so I didn't give the installtion steps here.
The first tutorial I referred to was the Trace Bitmap Tool Tutorial.
Before proceeding with the tutorial, it's essential to understand why the trace bitmap tool is employed. Here are some key reasons:
- Vectorization: Converting raster images into scalable vector graphics to maintain quality when resized.
- Editing Flexibility: Gaining greater flexibility in editing elements within an image, such as shapes and colors, without loss of quality.
- Simplification: Removing unnecessary details or simplifying complex shapes for a cleaner graphic.
Different detection modes in Inkscape:
Detection mode in Inkscape refers to the specific method or approach employed by the Trace Bitmap tool to identify and trace elements within an image.
In the context of tracing, different detection modes, such as Brightness Cutoff, Edge Detection, and Color Quantization, provide users with distinct techniques for capturing and outlining various features in the image. I used two detection modes which are the brightness cutoff and edge detection modes.
I followed the same steps in the tutorial for my plant image
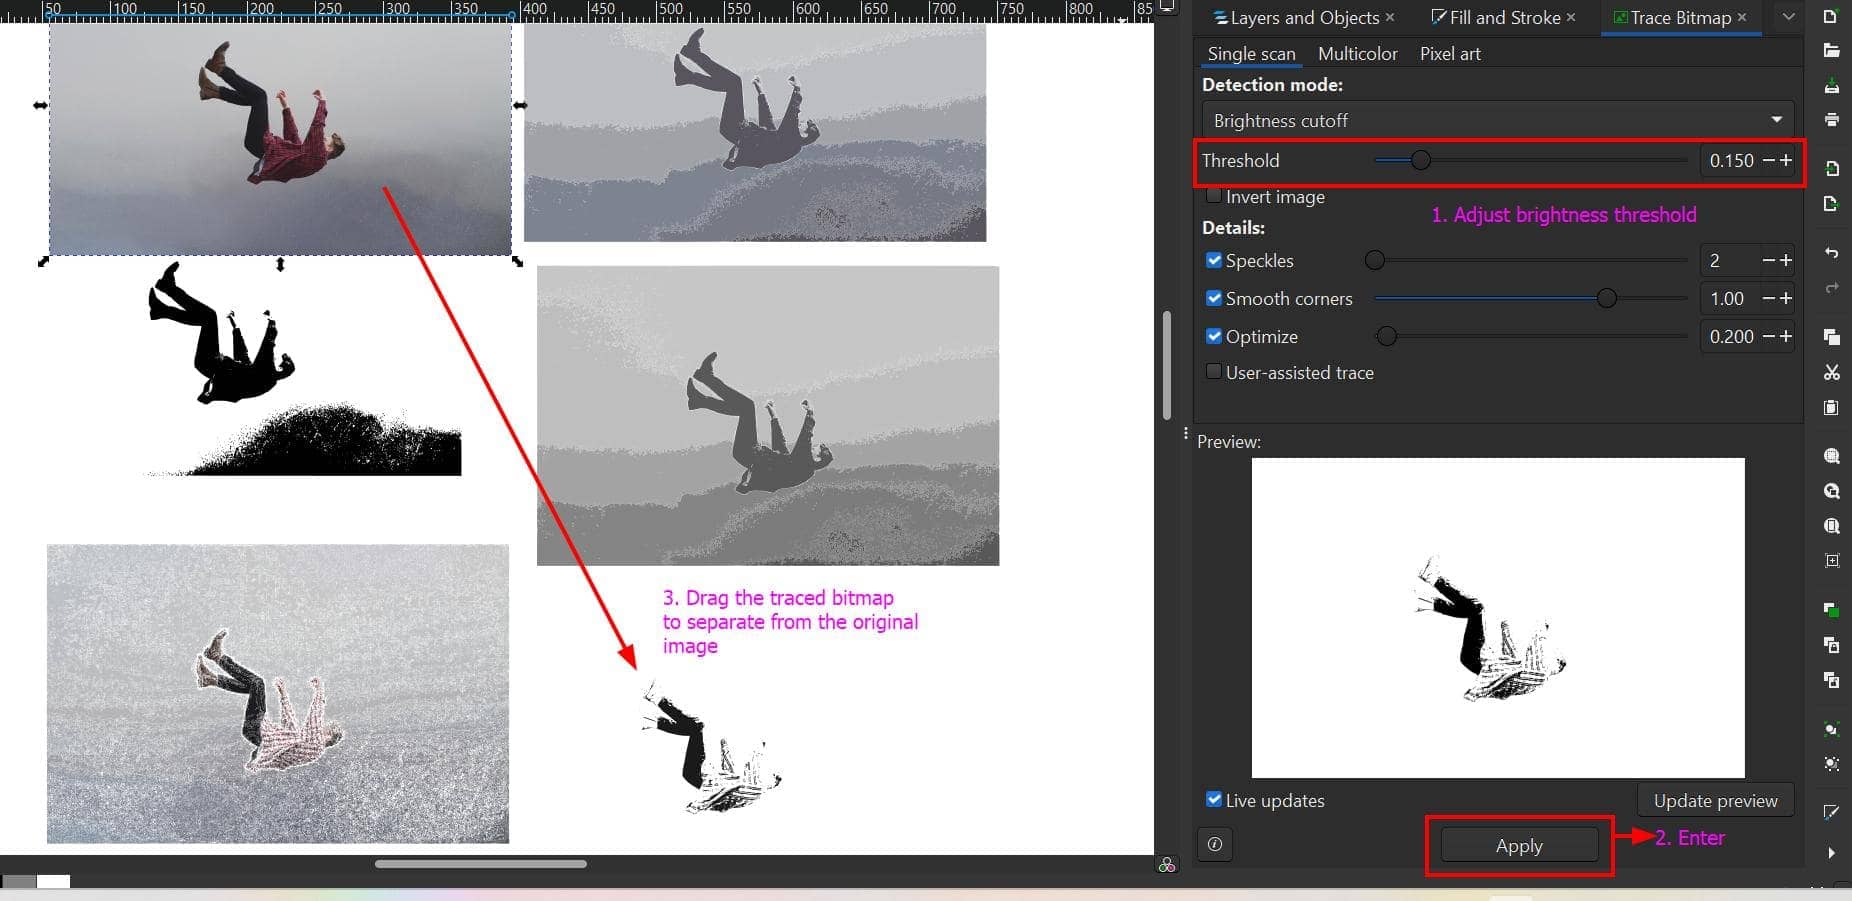
Brightness Cutoff:
Brightness cut-off in the context of the Trace Bitmap tool refers to a threshold level for how bright a pixel should be to be considered part of the traced image.
- Step 1: Import the image you want to trace in Inkscape.
- Step 2: Access Trace Bitmap Tool: Navigate to the toolbar and go to Path > Trace Bitmap. Ensure your image is selected before proceeding with the trace.
- Step 3: Apply the bitmap trace and drag it from the original image.

Edge Detection:
- Step 1: Import the image you want to work with in Inkscape. I will work on the same image of the falling man.
- Step 2: In the Trace Bitmap dialog box, select the "Edge detection" option.
- Step 3: Locate the "Threshold" slider and adjust it to control the sensitivity of the edge detection. Move the slider to a value that captures the edges you want without including too much detail.
- Step 4: Once satisfied with the preview, click "apply" to confirm the edge detection settings and perform the trace.
Combining both the results to see an even interesting result!!:
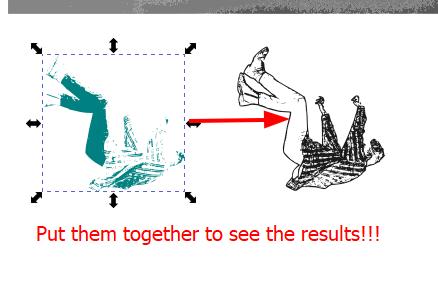

Note: You can also change the colors!
CorelDRAW
The next vector editing software that I am using is CorelDRAW. So, CorelDraw is a vector graphics editor which is comparable to Adobe Illustrator. It provides precise tools for every design element, from selecting vibrant templates to integrating images and customising text.
Installing CorelDraw
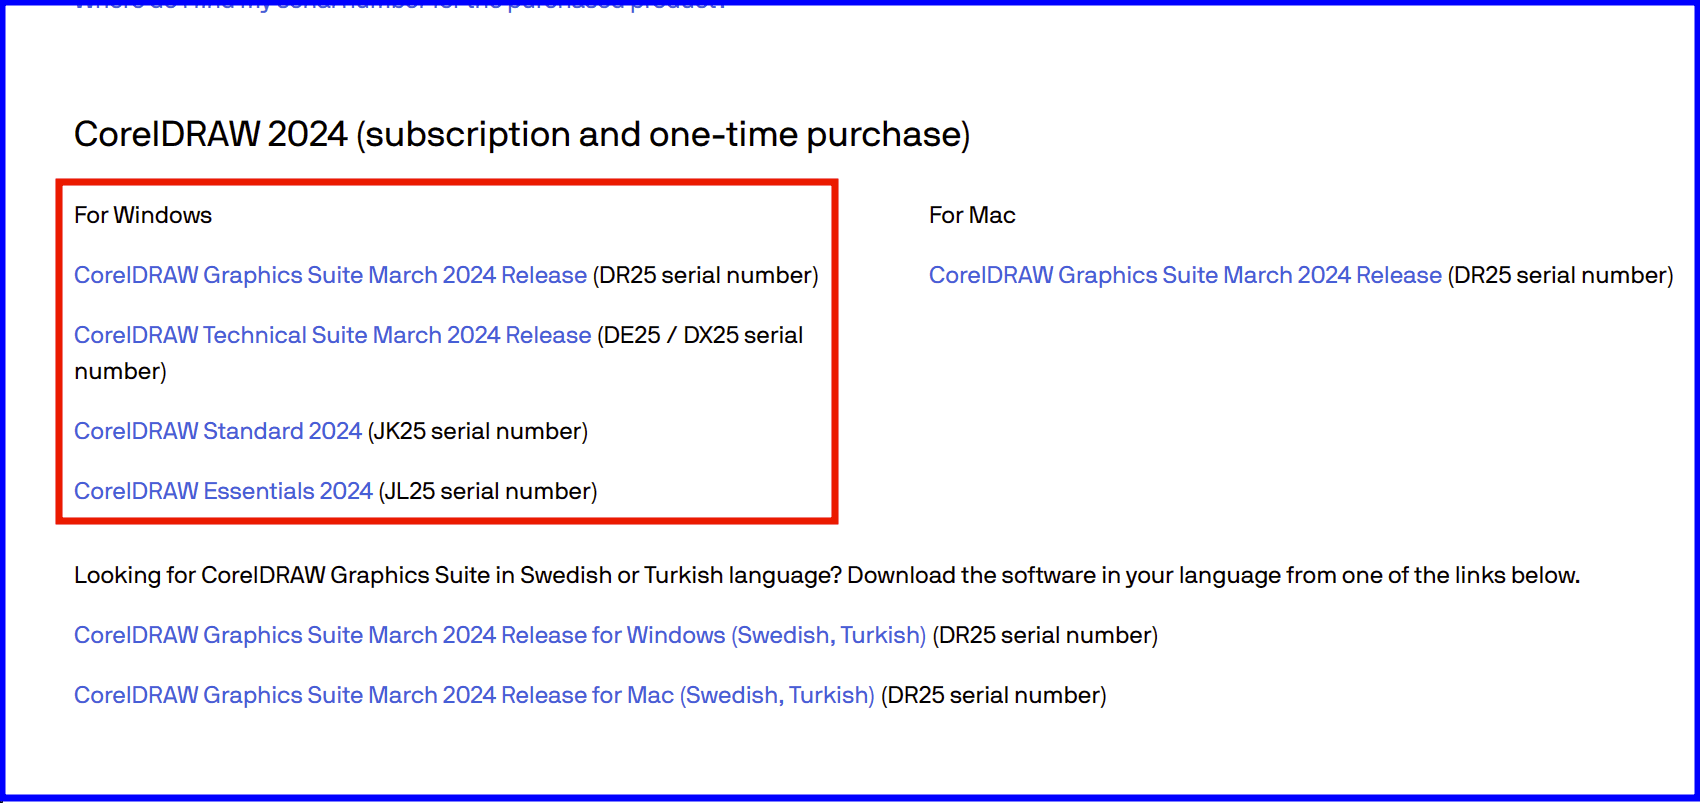
To install the CorelDraw software, I first went to the link provided above and selected the software for windows.
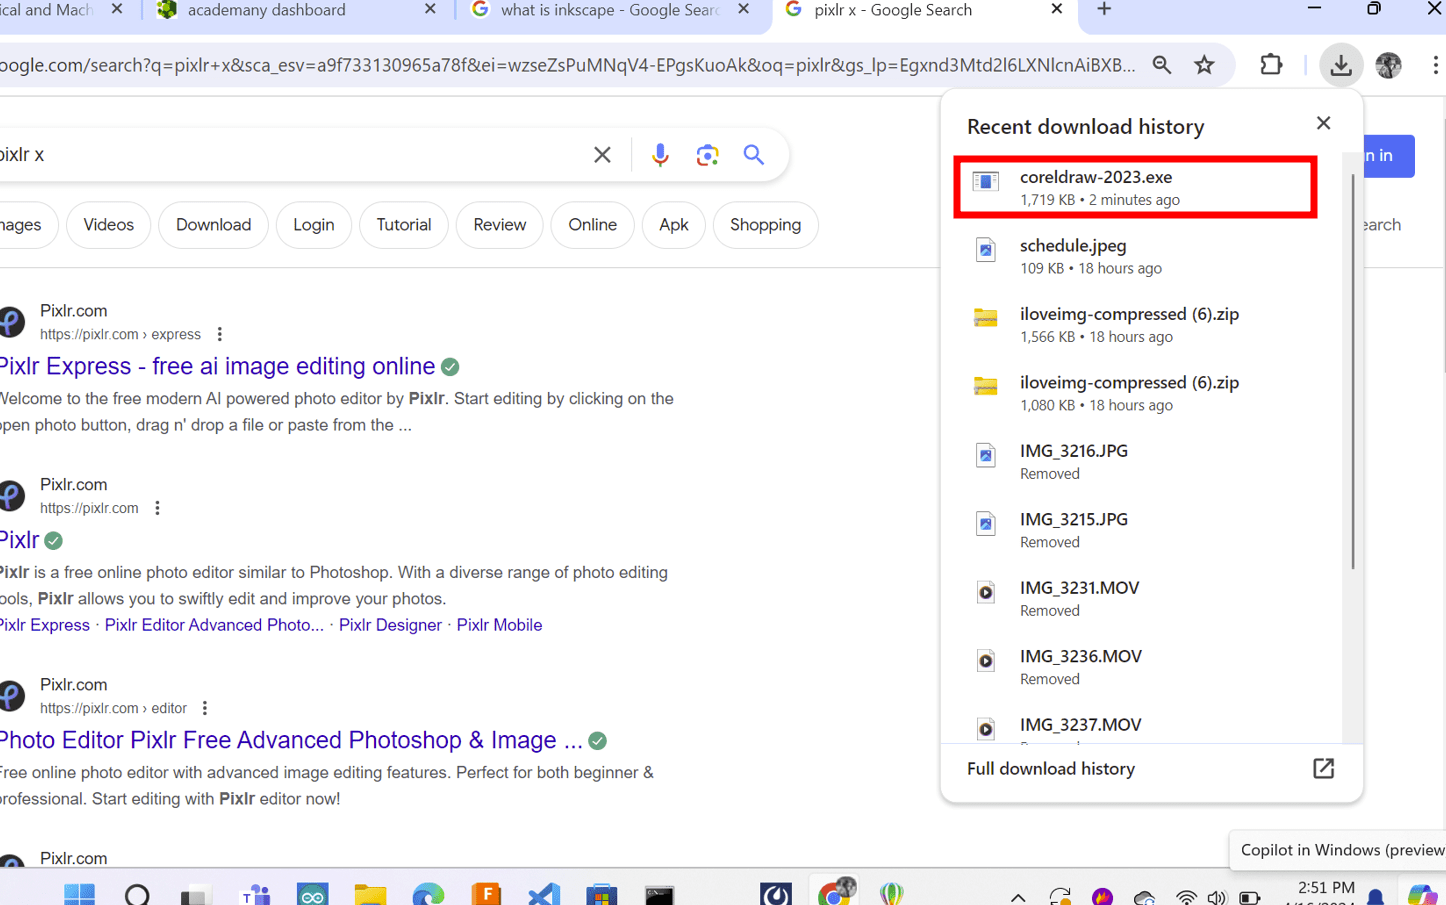
Then I extracted the .exe file on my laptop.
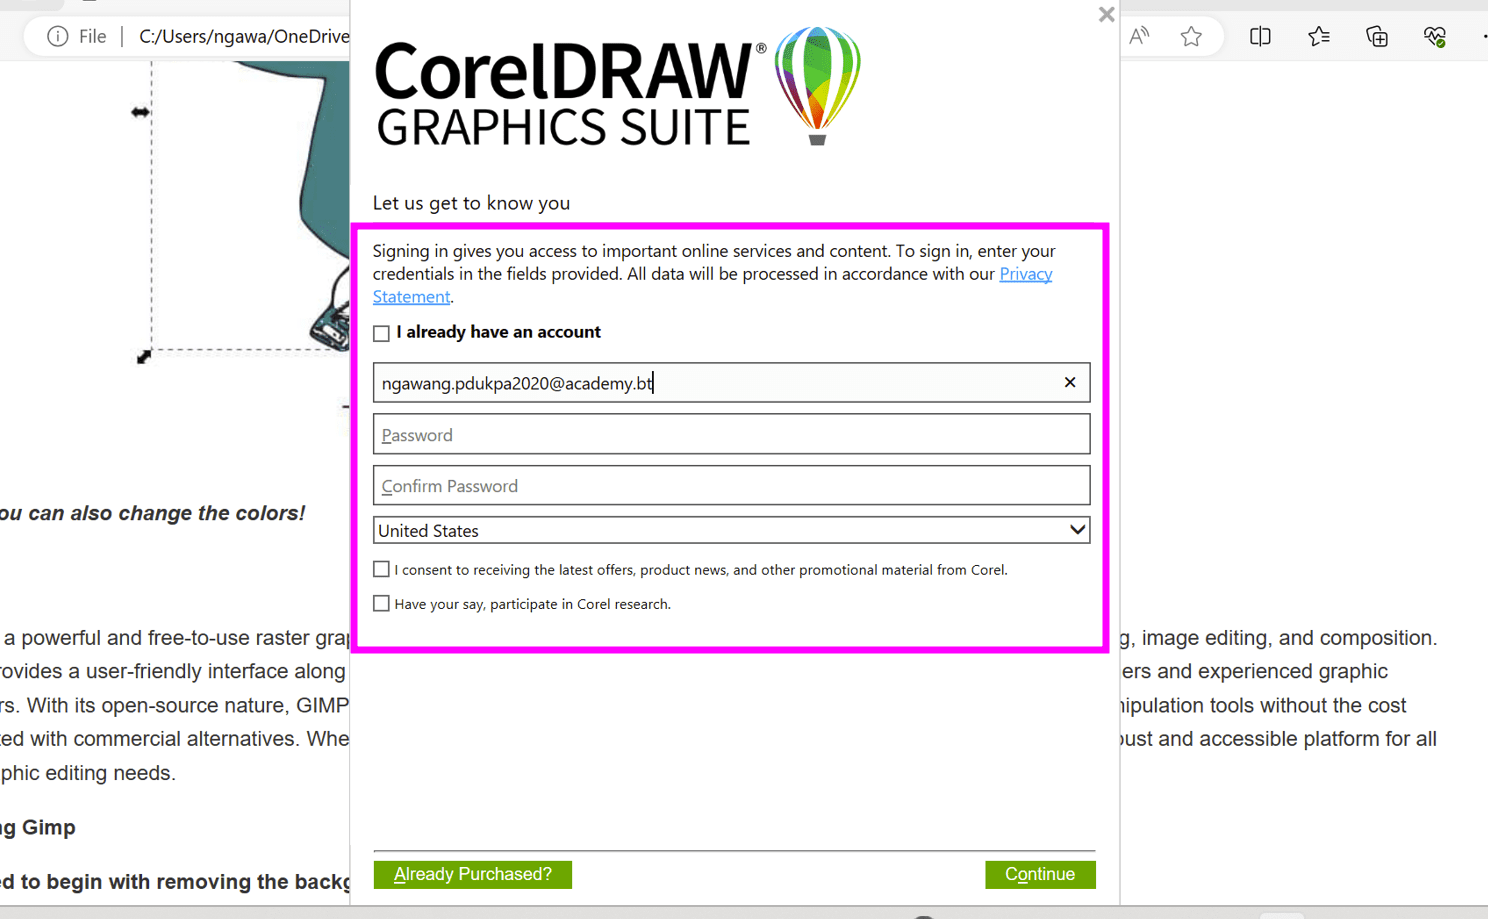
Lastly, I created an account for this and began editing!!
Here is a labelled image of the CorelDRAW tools. It is a Google Image
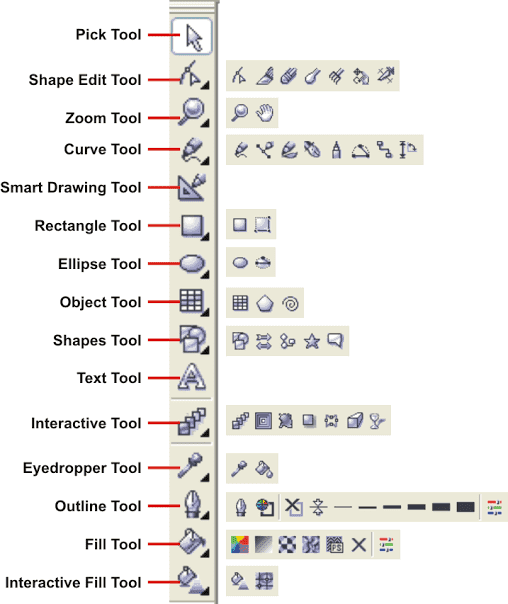
Here is again a list of basic tools that I referred to.
To import images I used the shortcut keys ctrl+I
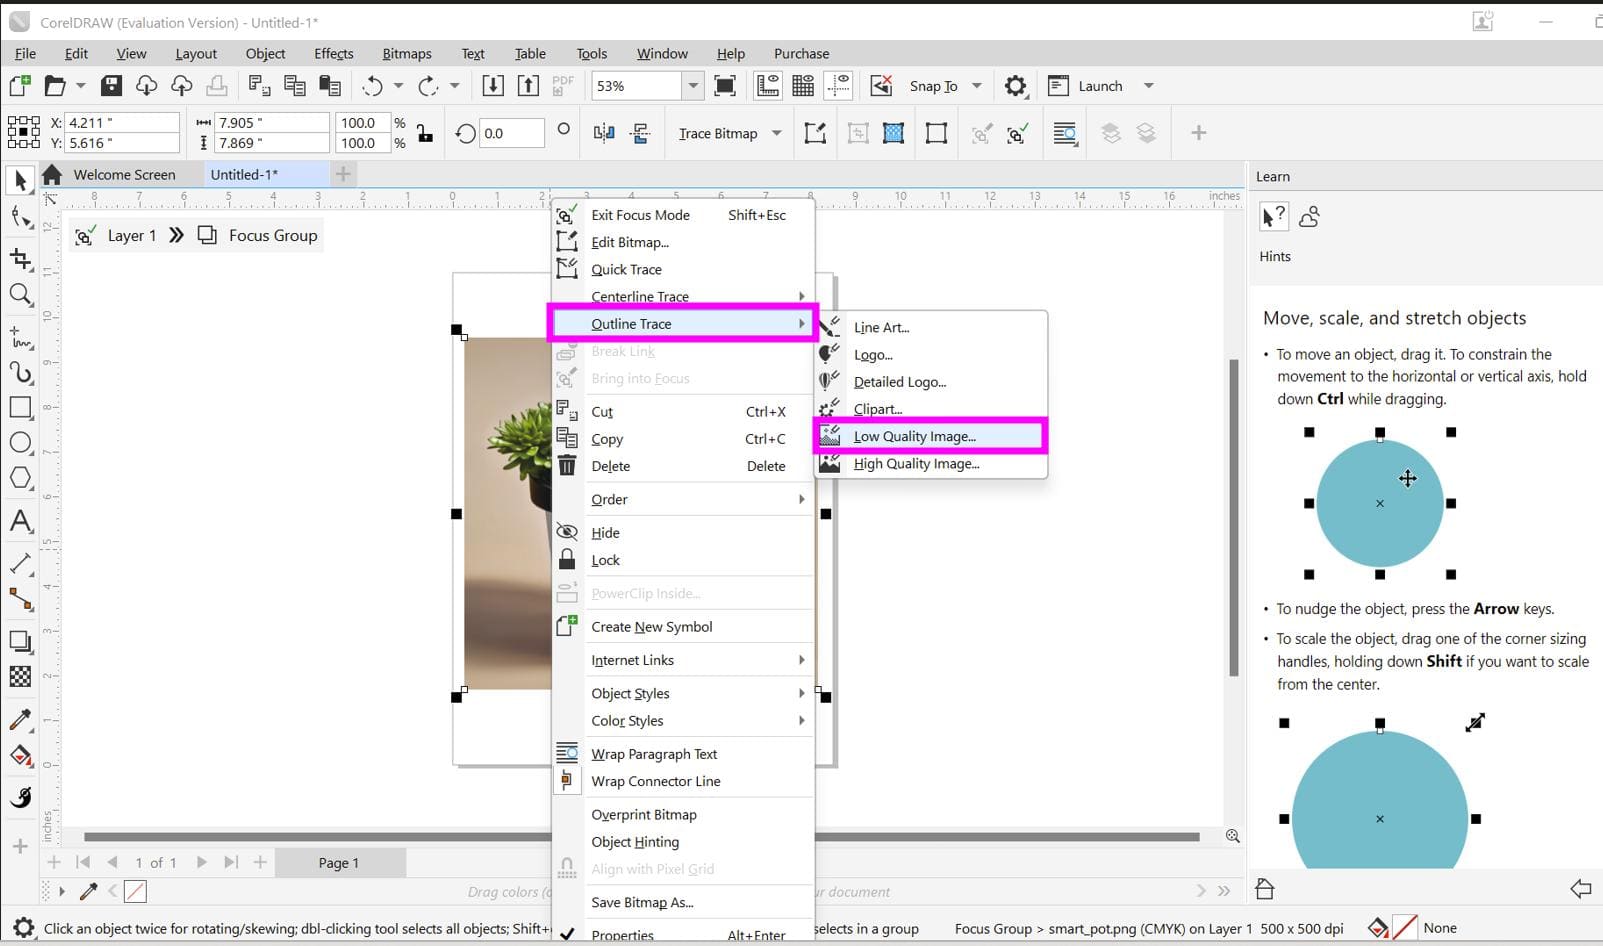
I used the Pixlr AI image generator to generate the following image.
I wanted to convert this raster image to a vector image, so I explore on YouTube and found this tutorial
Following the tutorial, first right click on the image and select the outline trace and then
low quality image option
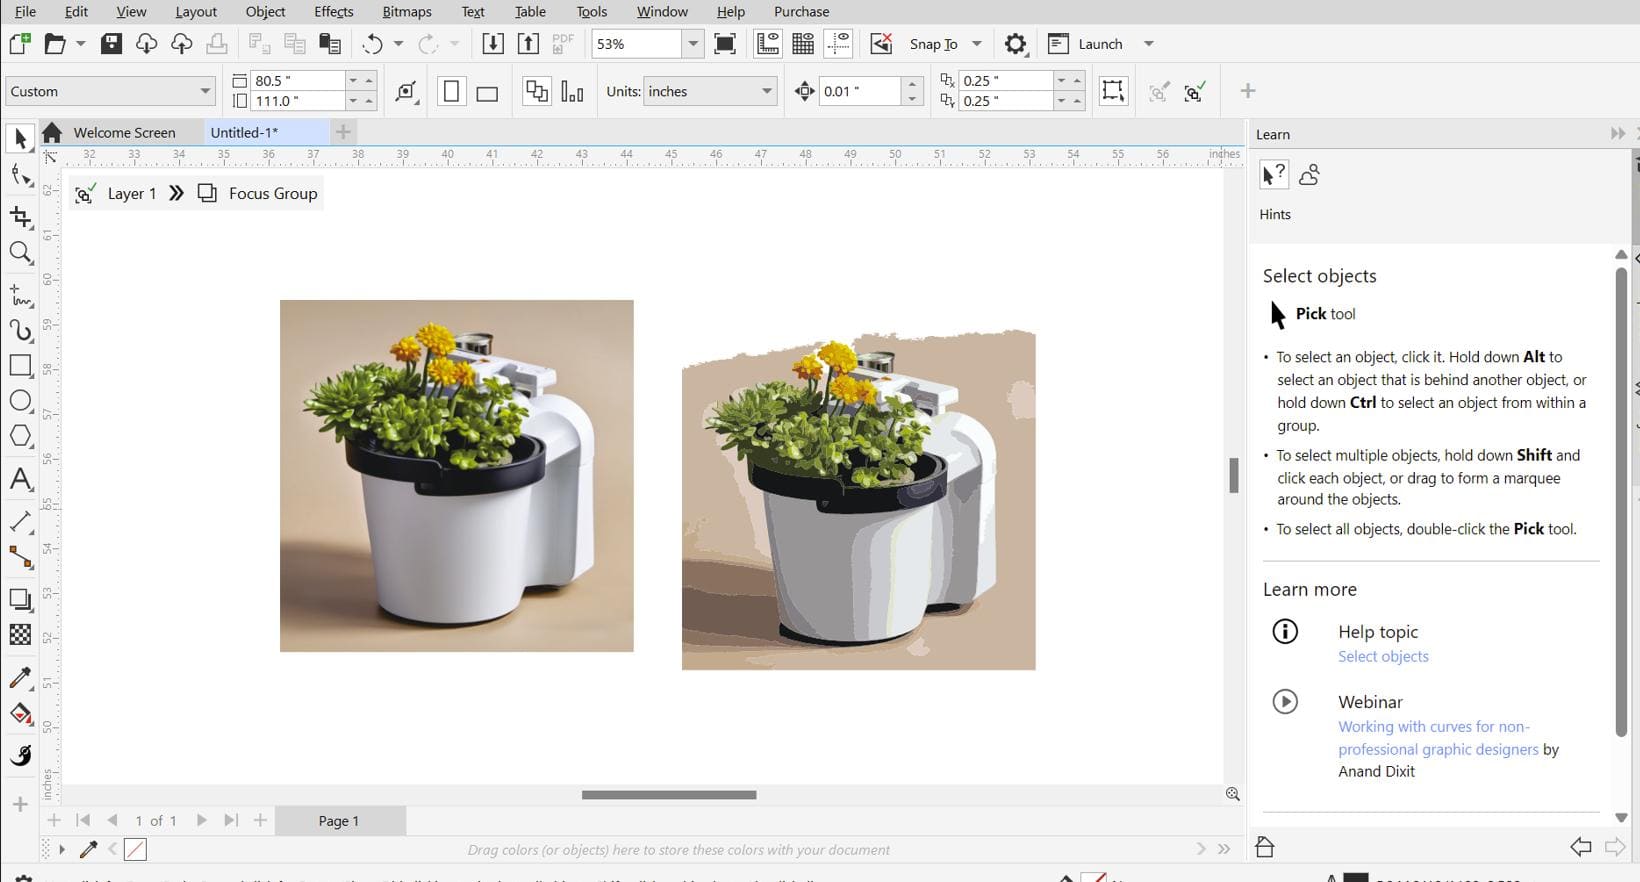
Here, I zoomed into the two different graphics

Gimp
GIMP is a free raster graphics editor. It is easy to see that it can be used for editing, retouching and creating some complex pictures. The interface may seem a bit "raw" to a person who is not very familiar with the graphic design. Nevertheless, GIMP has a lot of options. The complexity and ease of use of GIMP allows this graphic editor to be successfully used by both novices and professionals in the field of graphic design. As an open-source software, GIMP allows you to use the full features of a professional image editor without paying for commercial software. You can perform simple photo manipulations or create intricate digital paintings and designs, the only limit is your imagination.
Installing Gimp
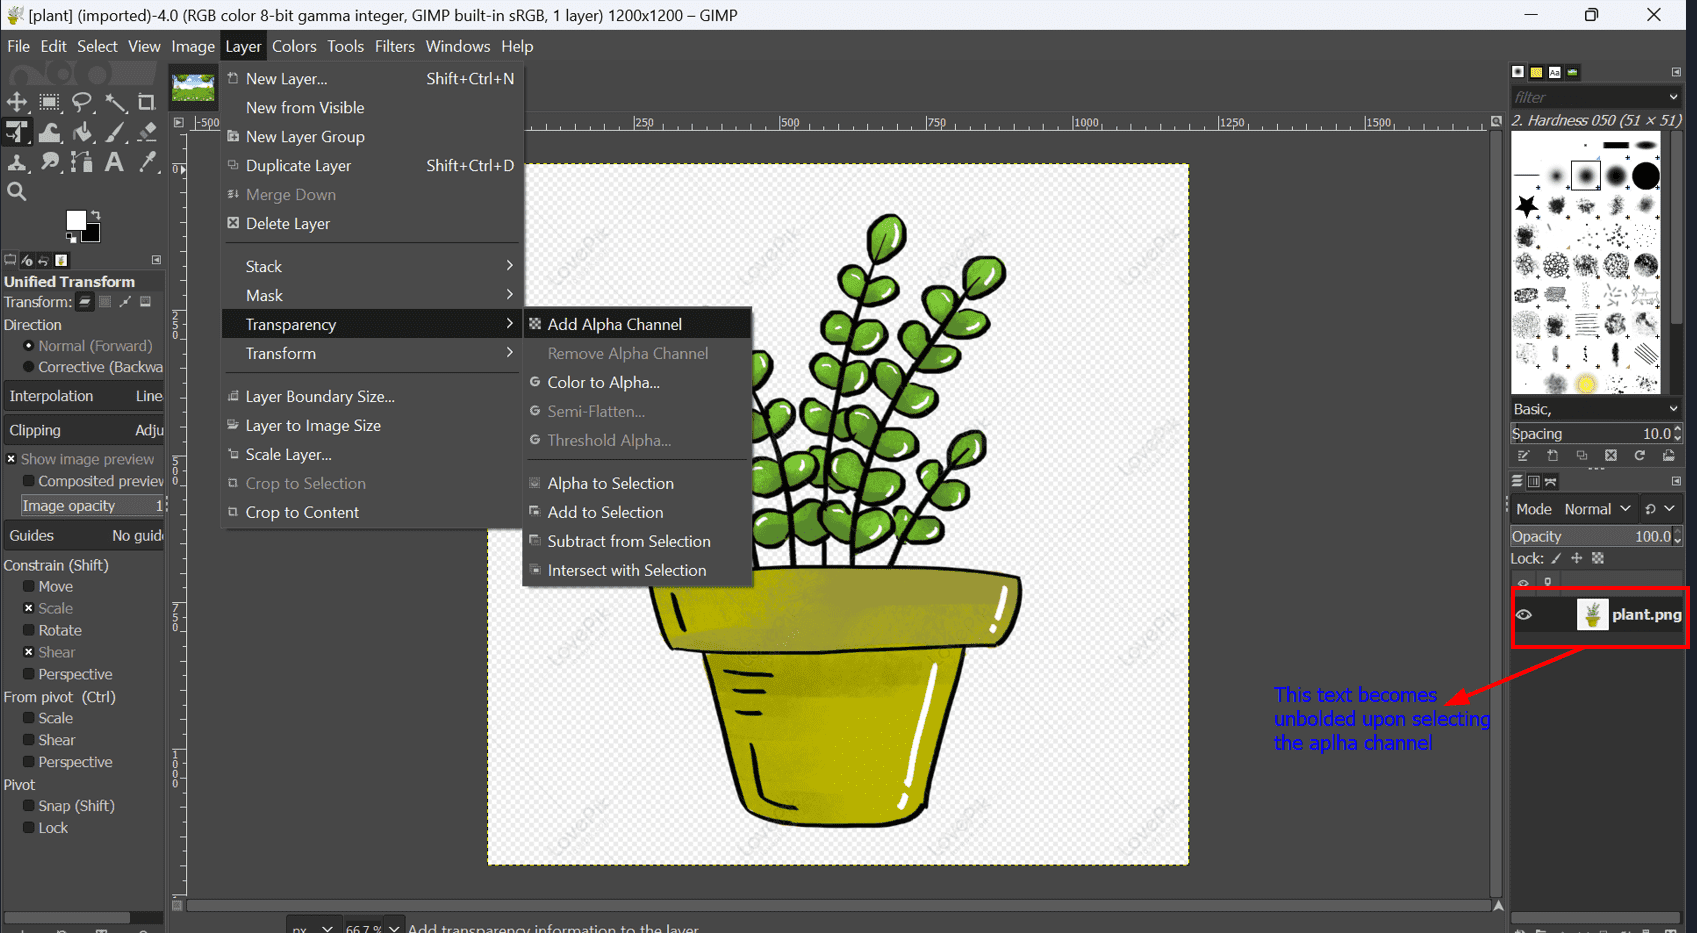
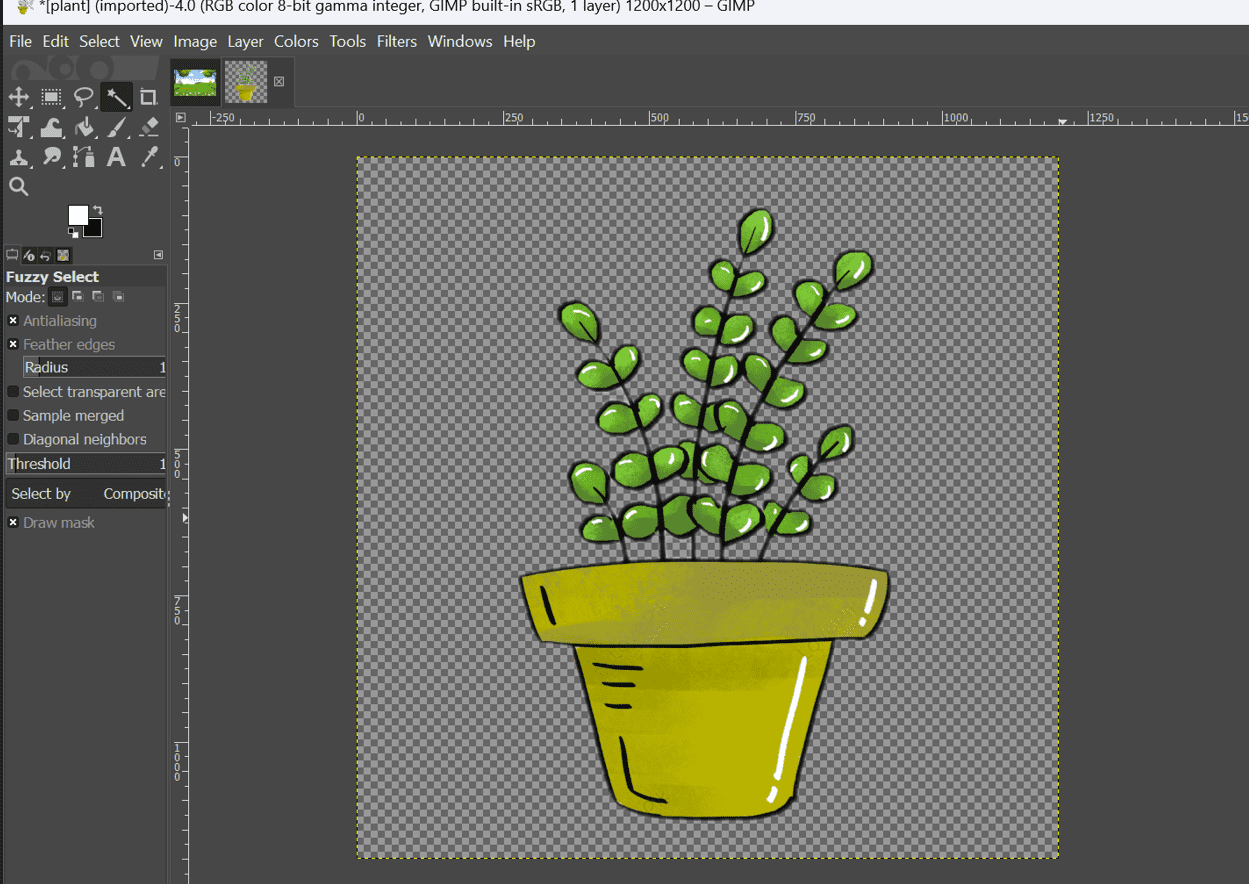
I decided to begin with removing the background in GIMP using the fuzzy select tool. I referred to this tutorial.
How to Use the Fuzzy Select Tool to Remove Background in GIMP:
- Step 1: Prepare Your Image Layer
- Right-click on your image layer.
- Click on "Add Alpha Channel" to ensure the selection will be deleted to transparency.
- Note: If the "Add Alpha Channel" option is grayed out, you already have an alpha channel, and you're good to go.
- Step 2: Access the Fuzzy Select Tool
- Select the Fuzzy Select Tool from the toolbar.
- Step 3: Configure Fuzzy Select Tool Settings
- Ensure that "Anti-Aliasing," "Feather Edges," and "Draw Mask" are all checked.
- The "Draw Mask" setting generates a colored overlay for a clearer selection visualization.
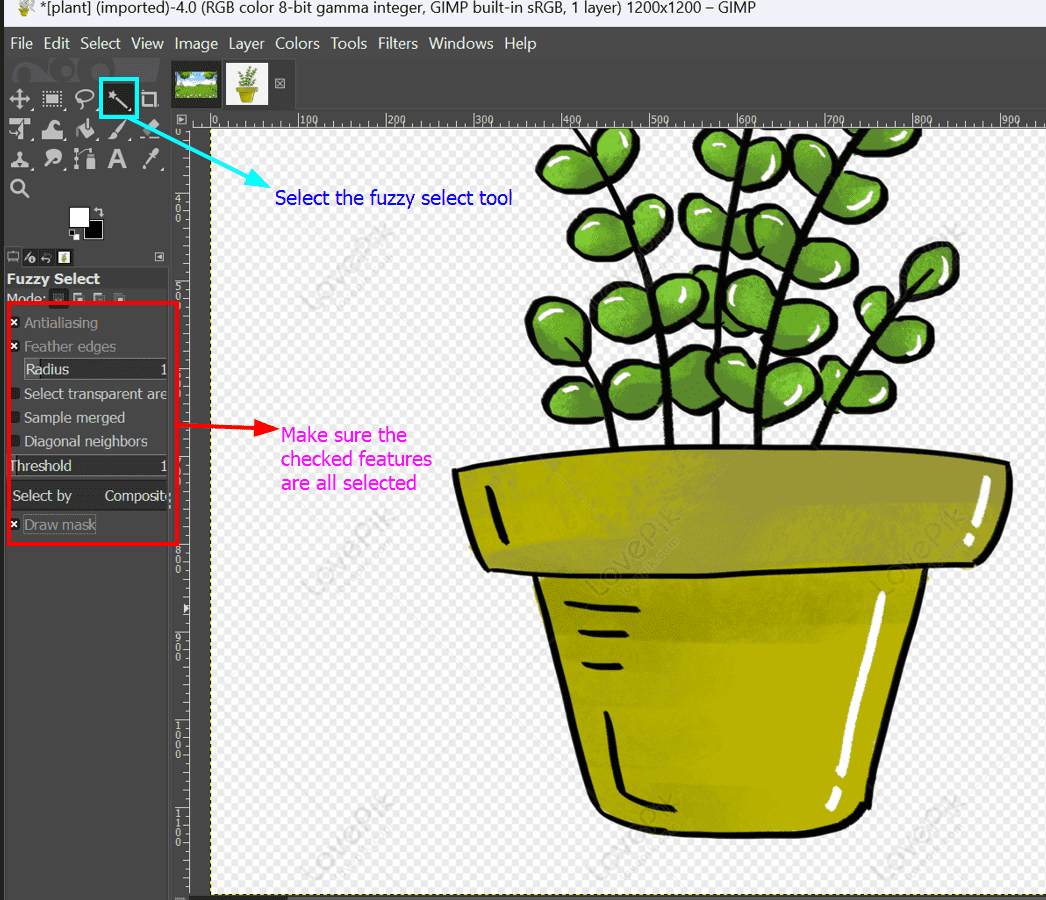
- Ensure that "Anti-Aliasing," "Feather Edges," and "Draw Mask" are all checked.
- Step 4: Make Your Selection
- Click and hold over the part of your image you want to delete.
- The colored mask indicates the selection area.
- Drag downward to increase the threshold and upward to reduce it.
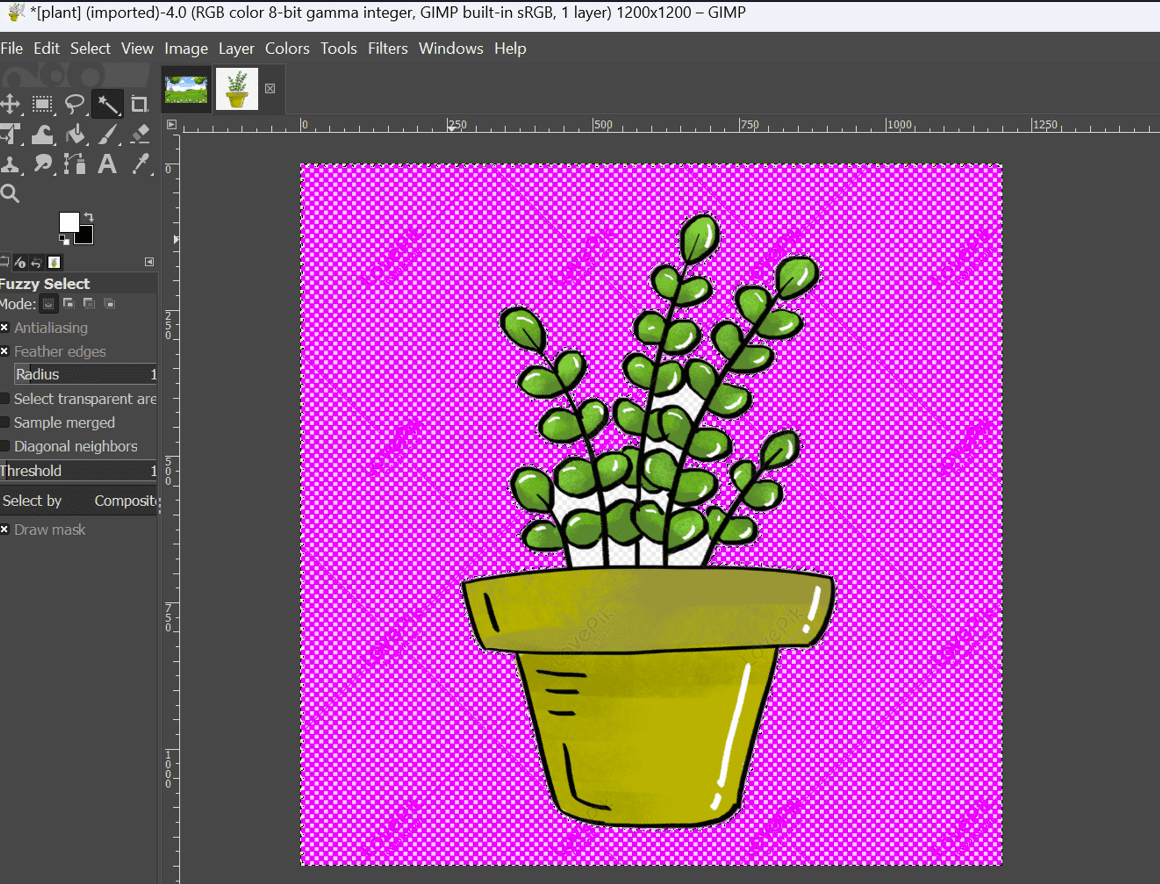
- Step 5: Refine and Confirm Your Selection
- Release the click once satisfied with the selection.
- Press the "Delete" key on your keyboard to delete the selected segment.
- You may need to repeat this process based on your image's composition.
- This is my final result!!
Finally, I decided to enhance the image by adding a colorful forest background. After downloading the desired background, I copied and pasted the plant image onto it.
To ensure a proper fit, I adjusted the image size using the "Shift + S" command.

Note:
- This method works well for images with some distinction between foreground and background.
- Useful for photos with subtle nuances like gradients and different shades of colors.
- Remember to add an alpha channel to your image layer before using the Fuzzy Select Tool.
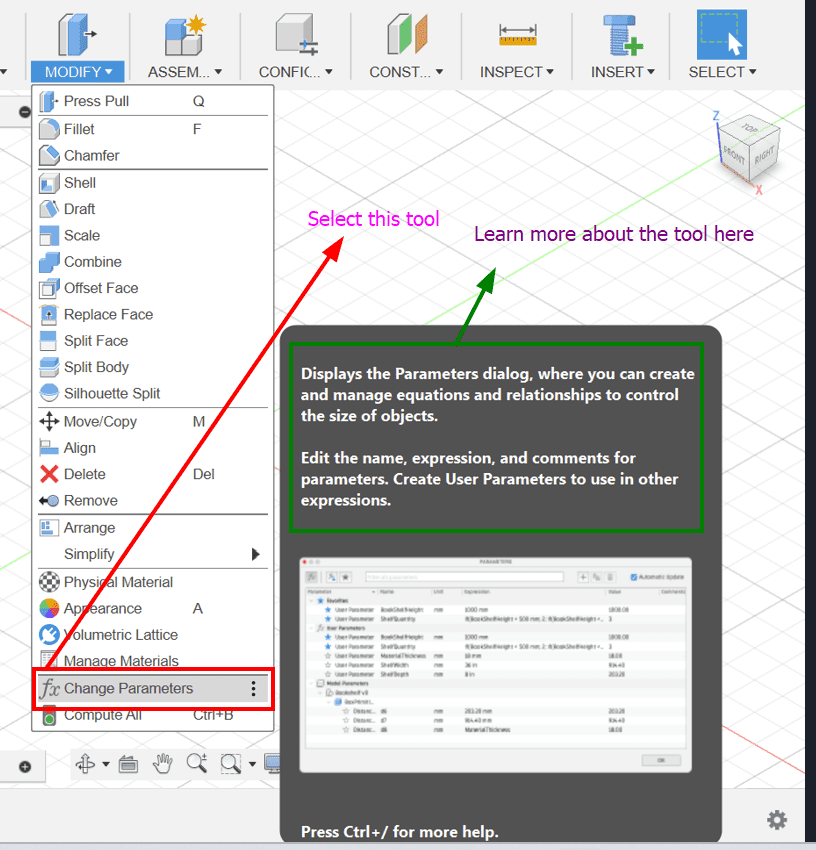
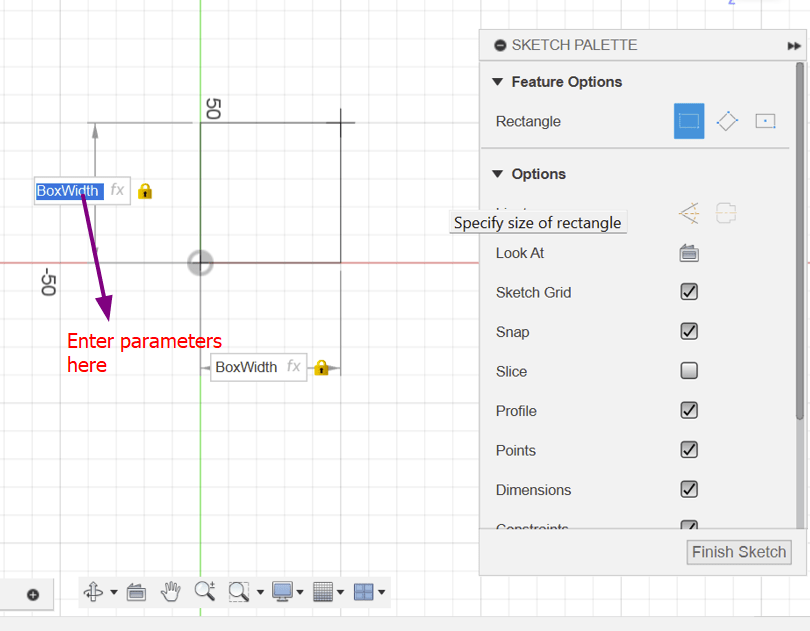
- Open Fusion 360 and activate the "Change Parameters" dialog from the Modify menu.
- User Parameters allow you to control the size of your designs using equations and relationships.
- Create new parameters like "BoxWidth" and "BoxHeight" with values (e.g., 50mm and 40mm) to define the dimensions of your box.
- Start a new component called "Box Bottom."
- Create a sketch on the bottom origin plane.
- Use the 2-point rectangle tool and input "BoxWidth" for both dimensions to define the sketch.
- Rename the sketch for better organization in the Browser.
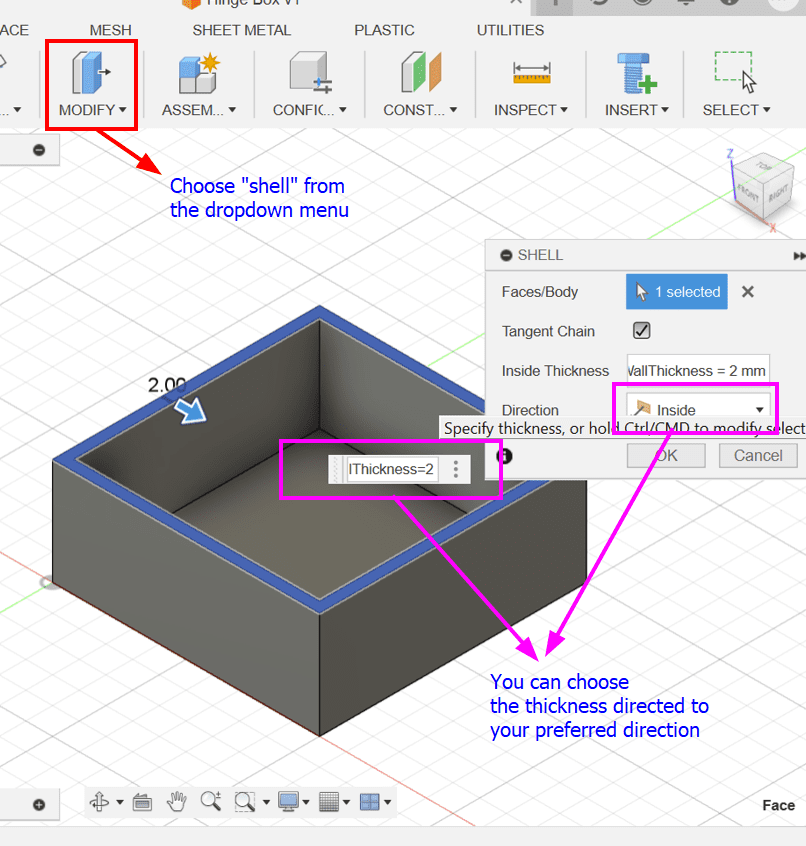
- Extrude the sketch using the "BoxHeight" user parameter.
- Adjust the height by dividing it by 2 to create the bottom and top part of the box equal.
- Apply the Shell command to hollow out the box by selecting the top planar face.
- Right-click on the "Box Bottom" component in the Browser.
- Select "Copy" and then right-click on the root component.
- You can either select "paste" to keep changes made to one appear to the other as well or select "paste new" to break the link between the top and bottom part.
- Rename the new component in the Browser for convenience.
- Activate the Box Bottom component.
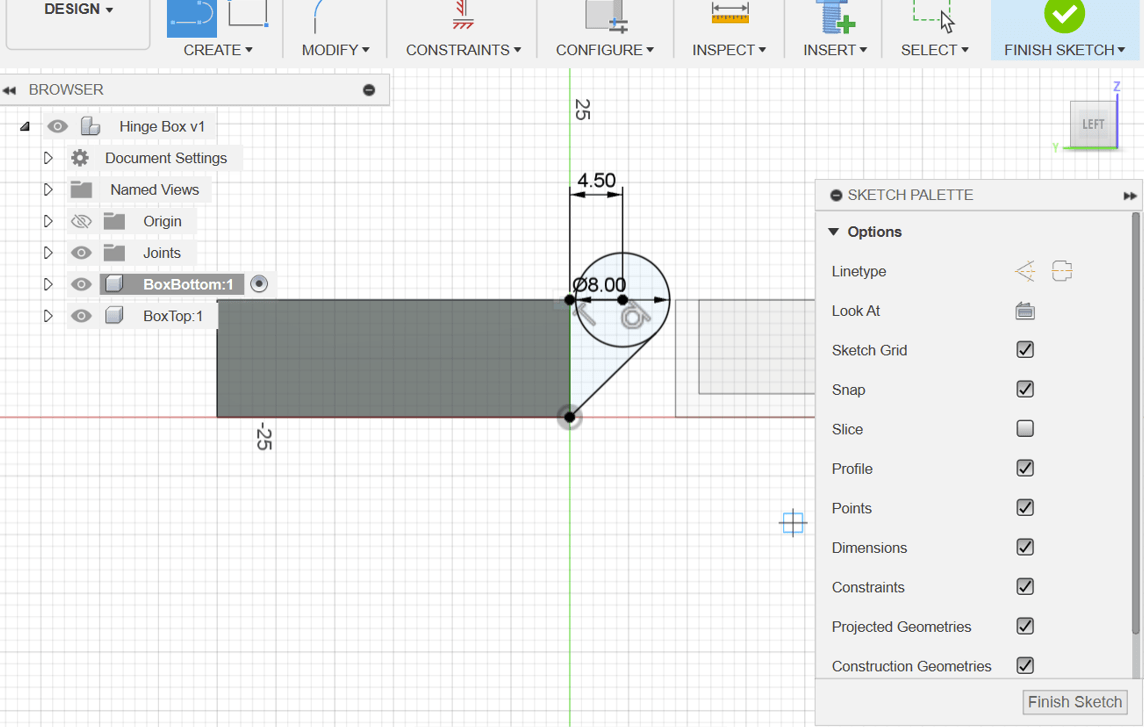
- Start a new sketch on one side.
- Draw a 4.5mm horizontal line from the top corner.
- Create an 8mm center circle at the endpoint of the line.
- Add an angled line connecting the box to the circle.
- Extrude the sketch to 5mm, ensuring it's a 'New Body.'
- Activate the Box Top component.
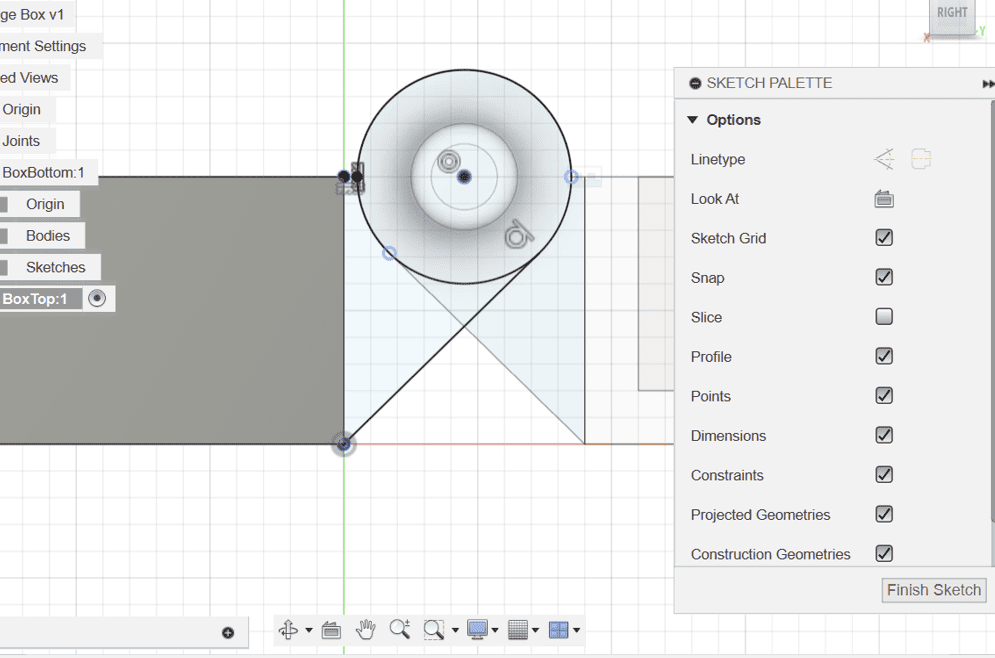
- Create a new sketch on the inner side of the existing hinge.
- Project the geometry to maintain references.
- Draw a circle starting from the projected center point (4mm).
- Connect the circle to the box with lines, ensuring tangency.
- Extrude the sketch to 3.8mm with a taper for smooth movement.
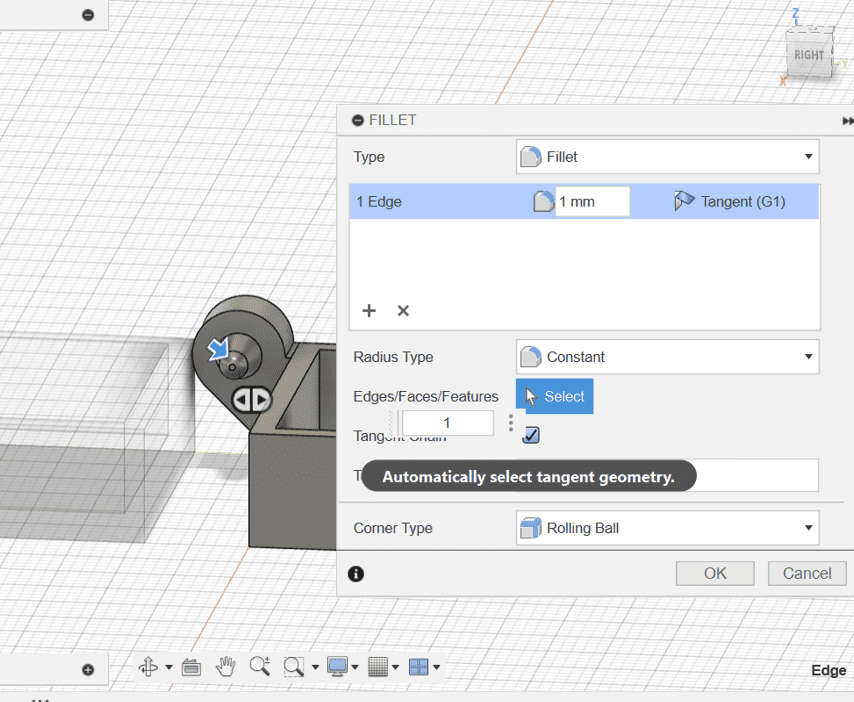
- Add a 1mm fillet to the outer edge.
- Use the Combine command to cut the nub from the inner hinge.
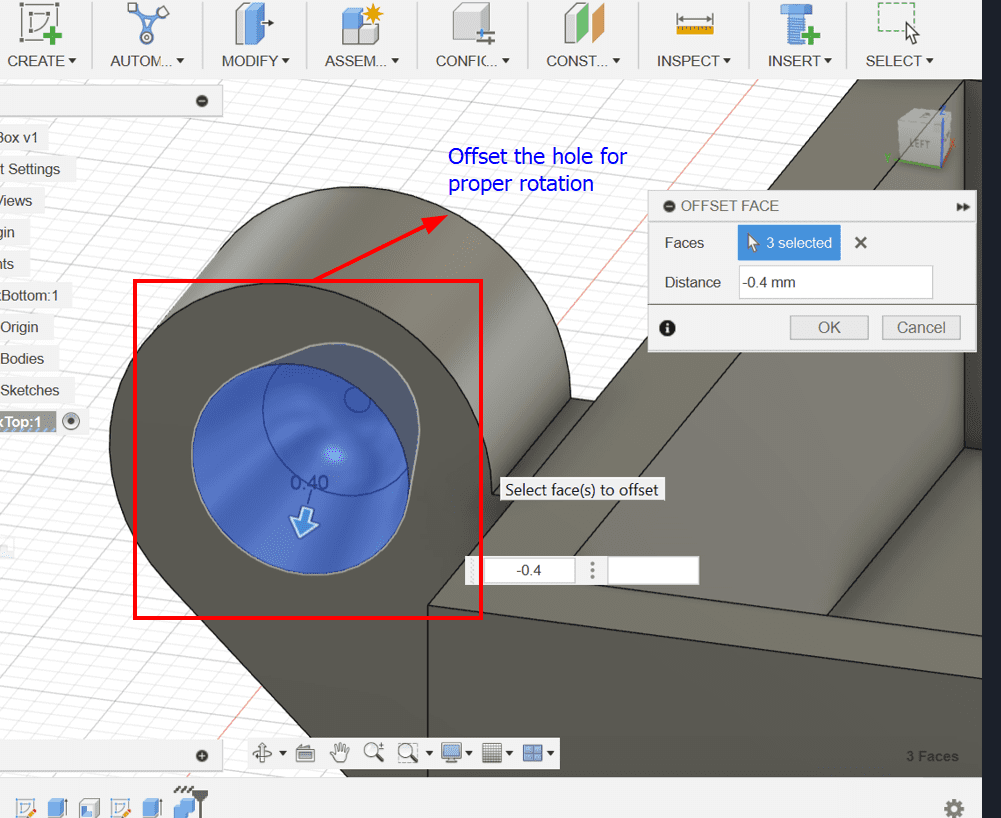
- Adjust the clearance between hinges using "Offset Face" (-0.4mm).
- Ensure the clearance meets your 3D printer and slicer settings.
- The goal is to have a smooth and functional movement.
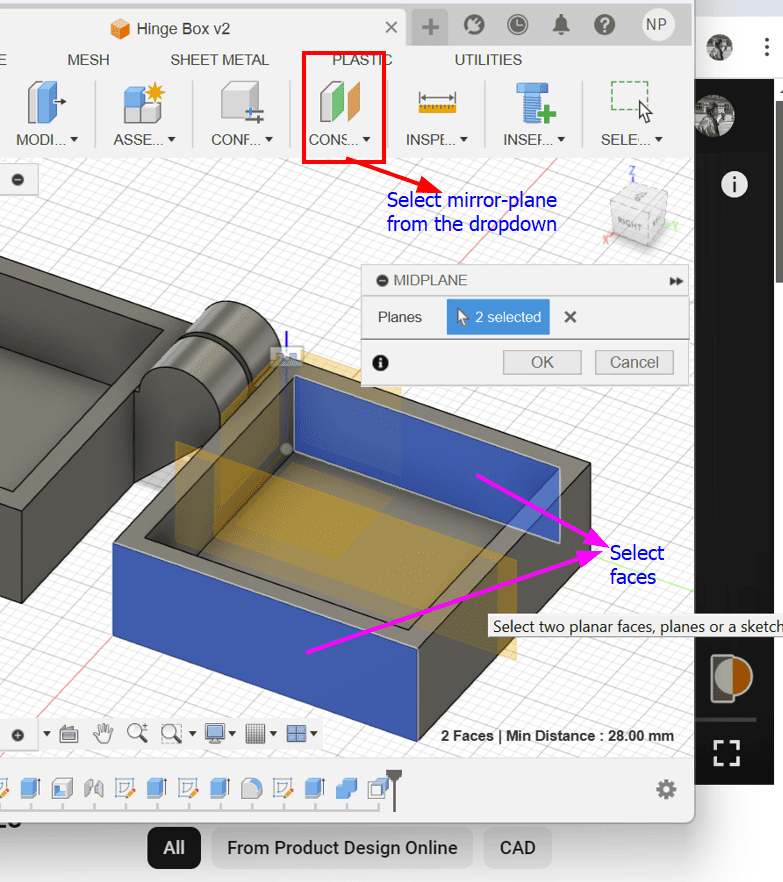
- Create a Midplane construction plane in the top-level component.
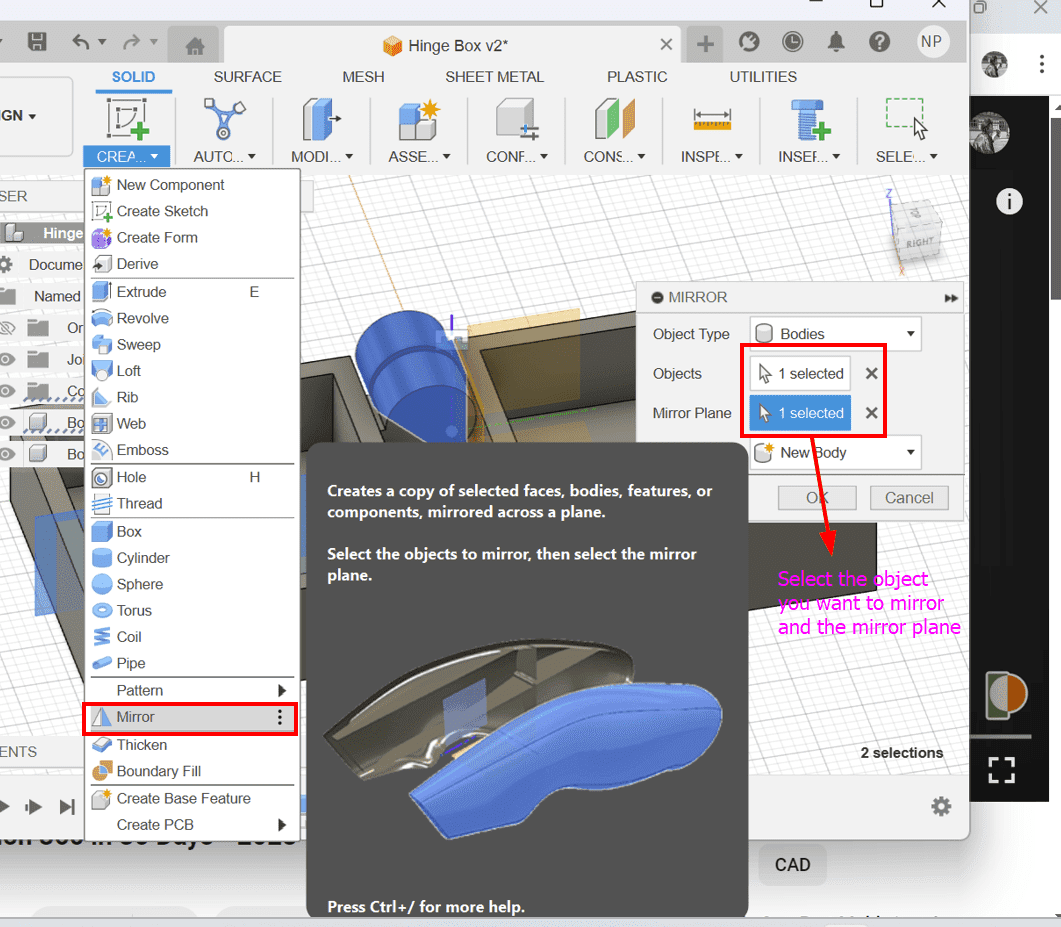
- Use the Mirror tool to mirror each hinge body to the opposite side.
- Optionally, use the Combine tool to join the hinge pieces to their respective boxes.
- Visit the Blender Official Website: https://www.blender.org/
- Navigate to the Download Section: Look for the "Download" section on the homepage.
- Choose Your Operating System: Select the version for your operating system (Windows, macOS, Linux).
- For Windows: Double-click the installer file (.exe) and follow on-screen instructions.
- Use the shortcut key
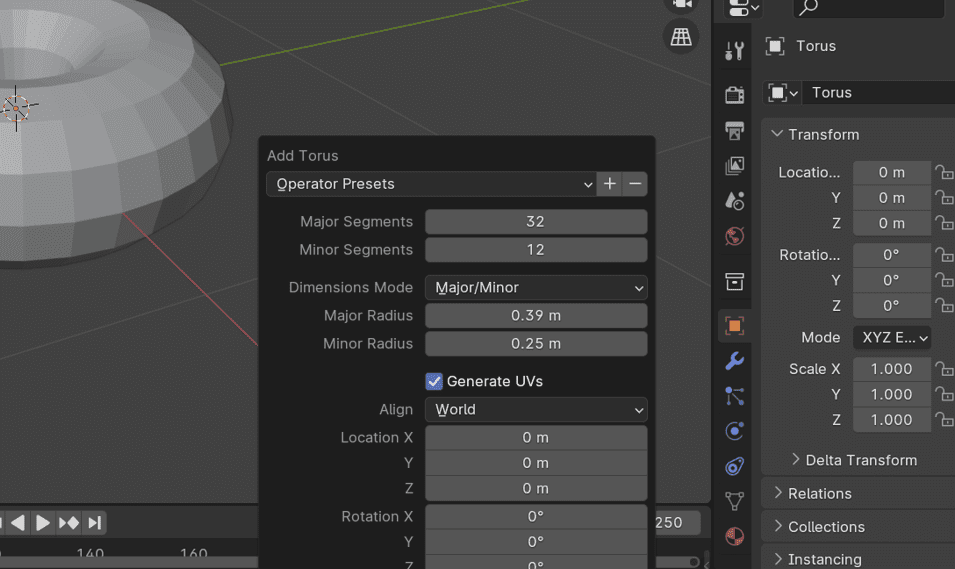
Shift + Ato add a new object. - Select "Mesh" and then "Torus."
- Immediately after adding, adjust the torus parameters in the bottom left corner.
- Set dimensions and resolution (e.g., 32 major, 12 minor).
- Enable "Smooth Shading" for a more refined appearance.
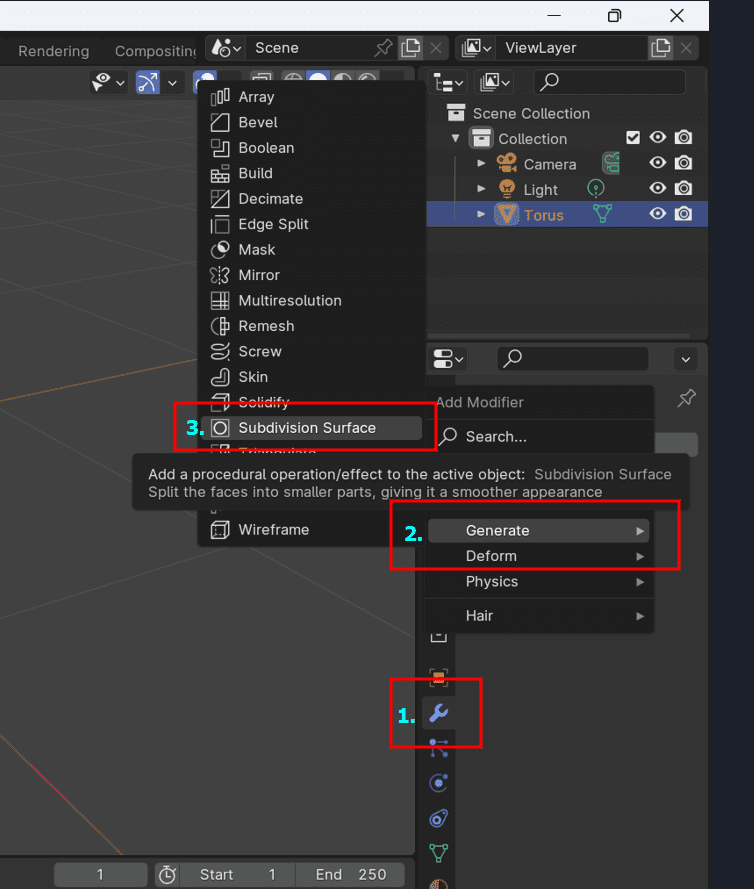
- In the Properties panel, go to the "Modifiers" tab (wrench icon).
- Add a "Subdivision Surface" modifier to smooth the mesh. Adjust levels if needed.
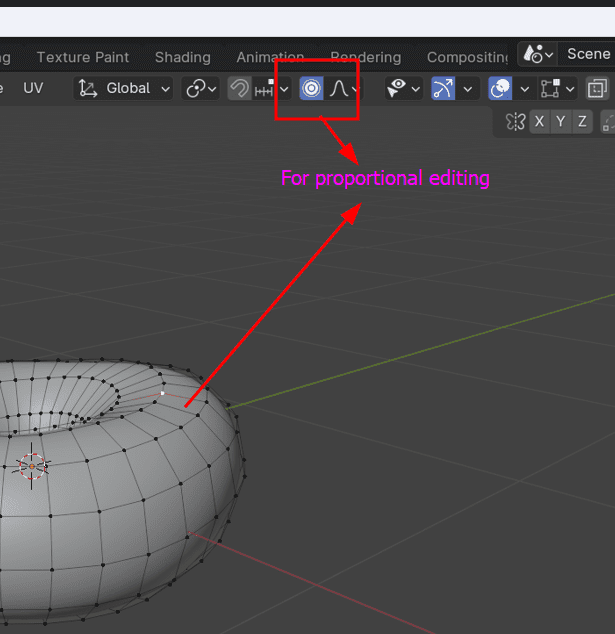
- Press
Tabto enter Edit Mode. - Enable Proportional Editing in the toolbar.
- Select vertices and use
Gto move them, adjusting the circle of influence with the mouse wheel. - Create lumps and variations by moving vertices in Edit Mode.
- Add imperfections to make the doughnut look more natural.
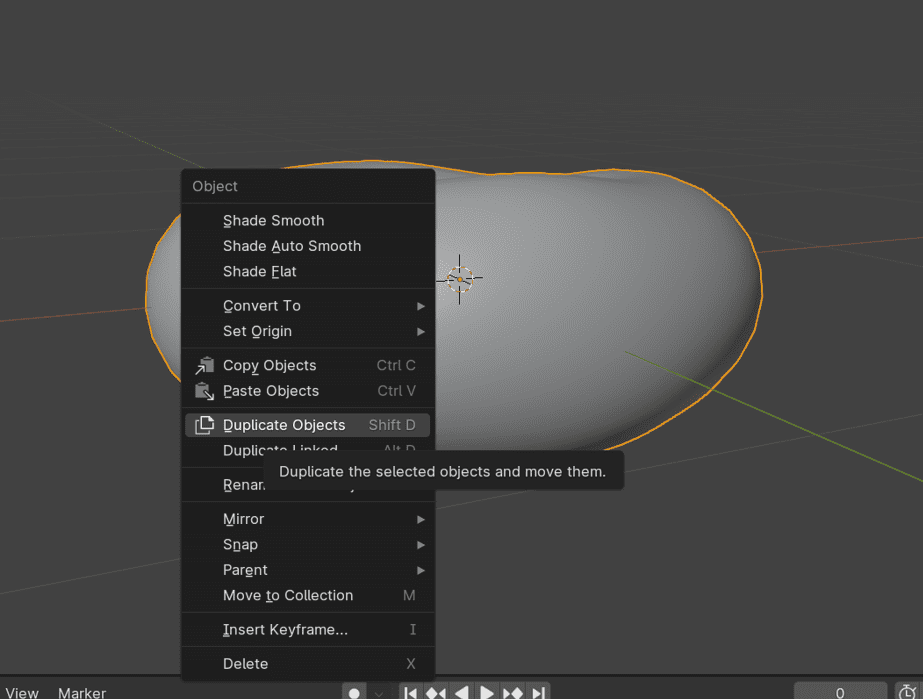
- Select the donut object.
- Duplicate it using the shortcut
Shift + D. - This is done to make the icing for the donut.
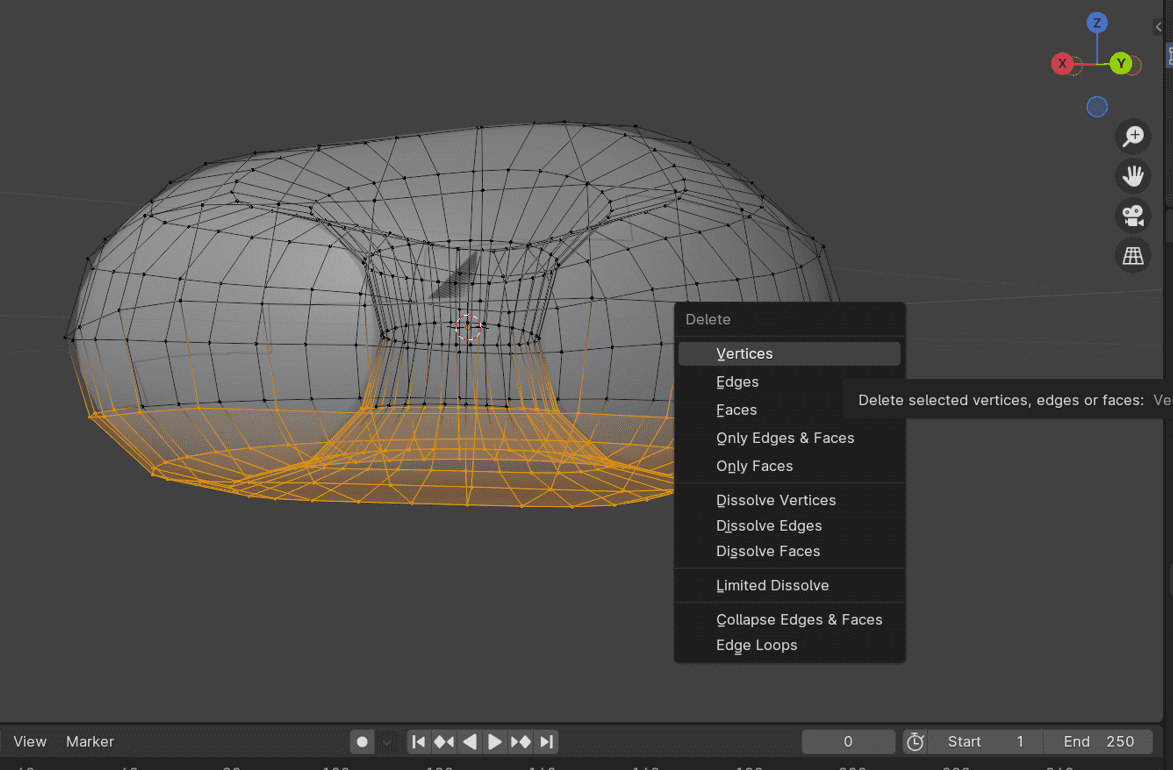
- Enter edit mode by pressing
Tab. - Select the bottom half of the mesh.
- Delete the selected geometry.
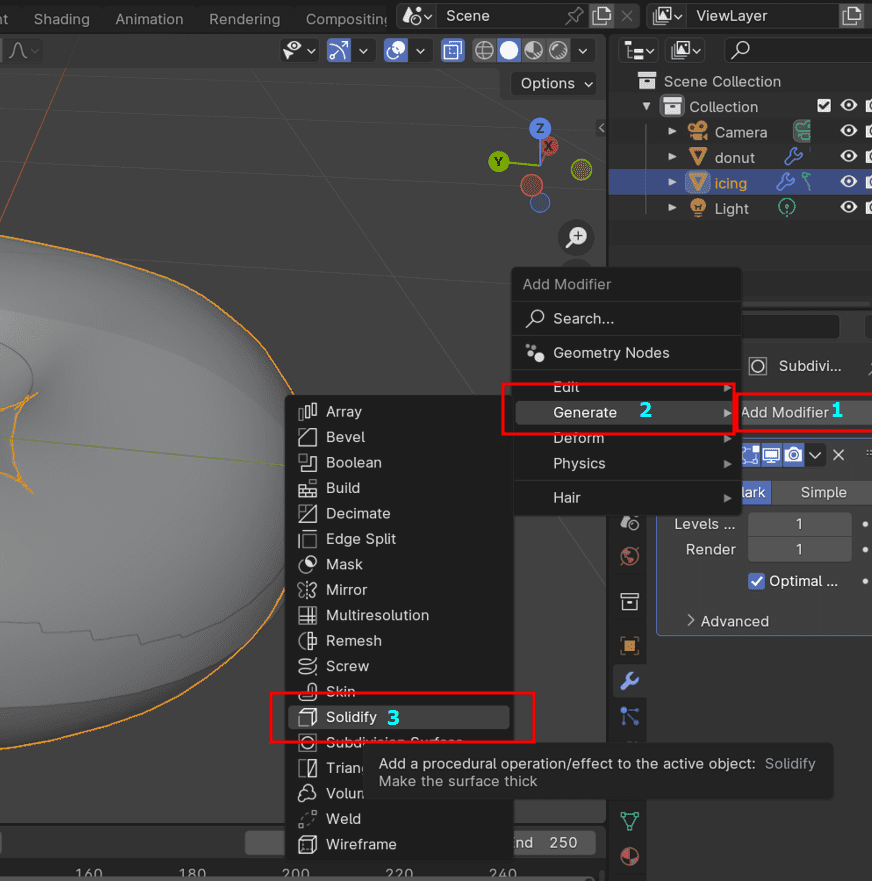
- Rename the duplicated object.
- Add a Solidify modifier to give thickness to the icing.
- Adjust settings, ensuring the offset is set correctly.
- Enter edit mode again.
- Use proportional editing to shape the icing with a wavy edge.
- Adjust proportional editing settings as needed.
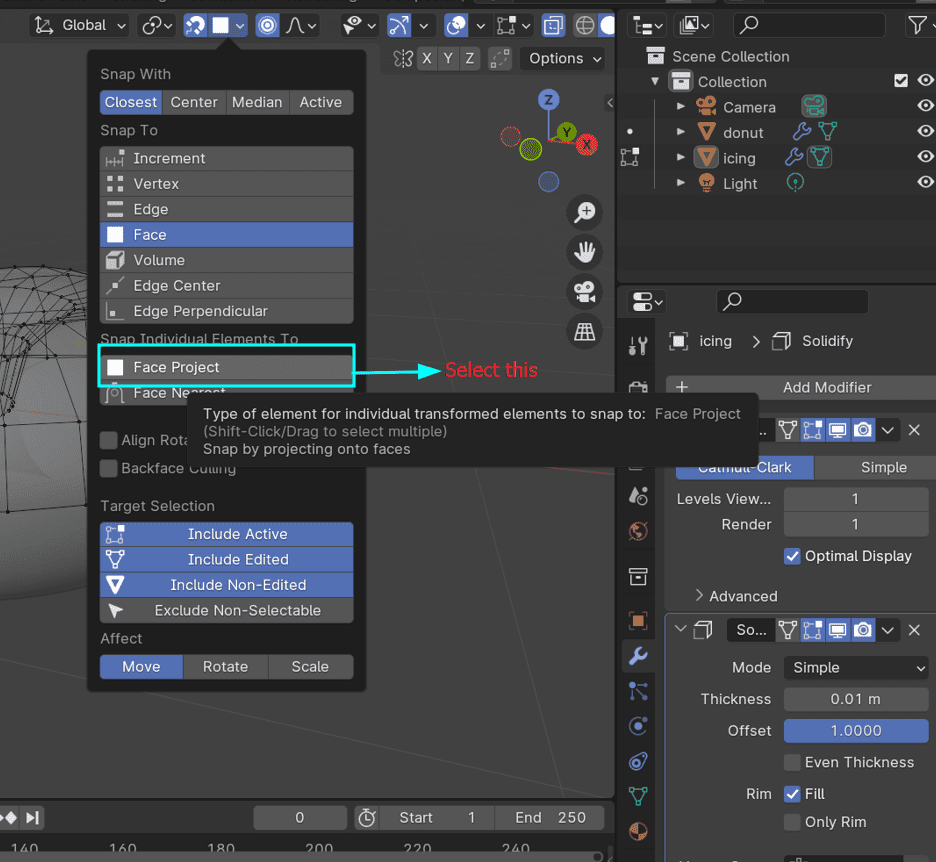
- Don't forget to select the backface projection to keep the icing attached to the donut.
- Add a Subdivision Surface modifier like we did before to round the edges.
- Ensure the order of modifiers is correct (Solidify on top, Subdivision underneath).
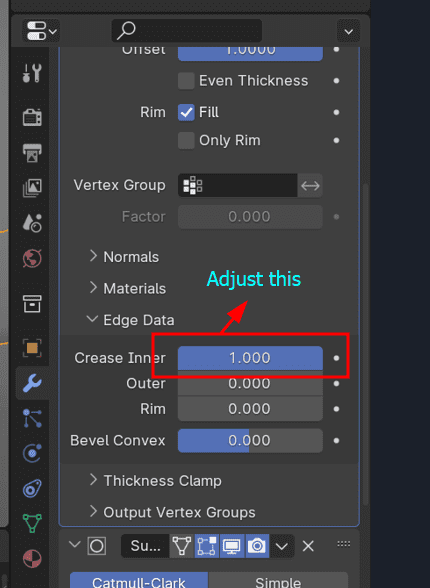
- Adjust the Solidify modifier's edge data settings to create a crease on the inner part.
- This helps in making the inner edge hug the donut.
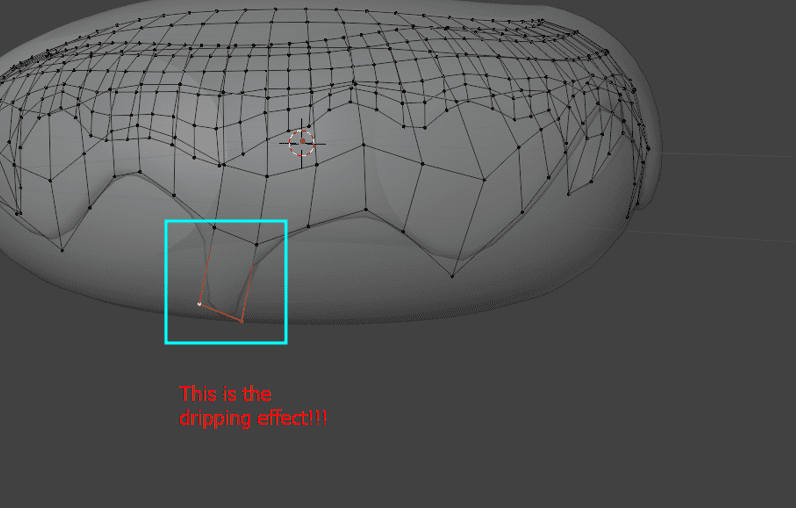
- Select vertices and extrude to create a dripping effect.
- Repeat the extrusion process to add more detail.
- Repeat the dripping effect process all around the donut for a consistent and appealing design.
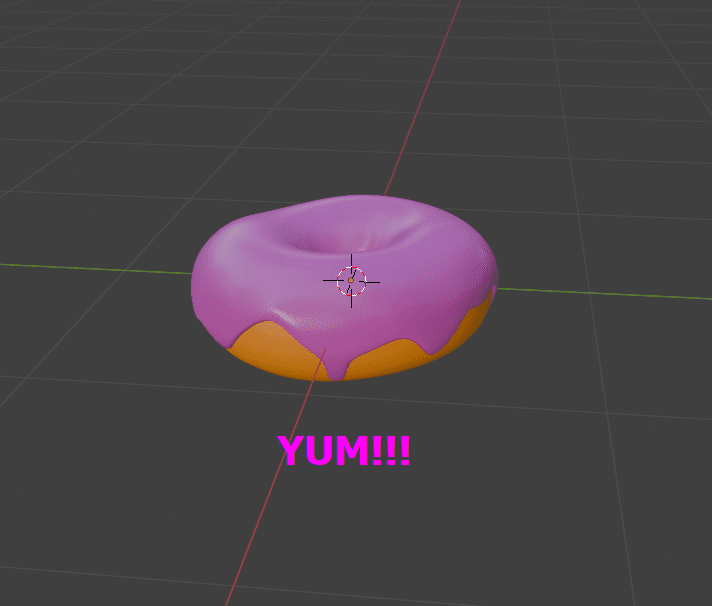
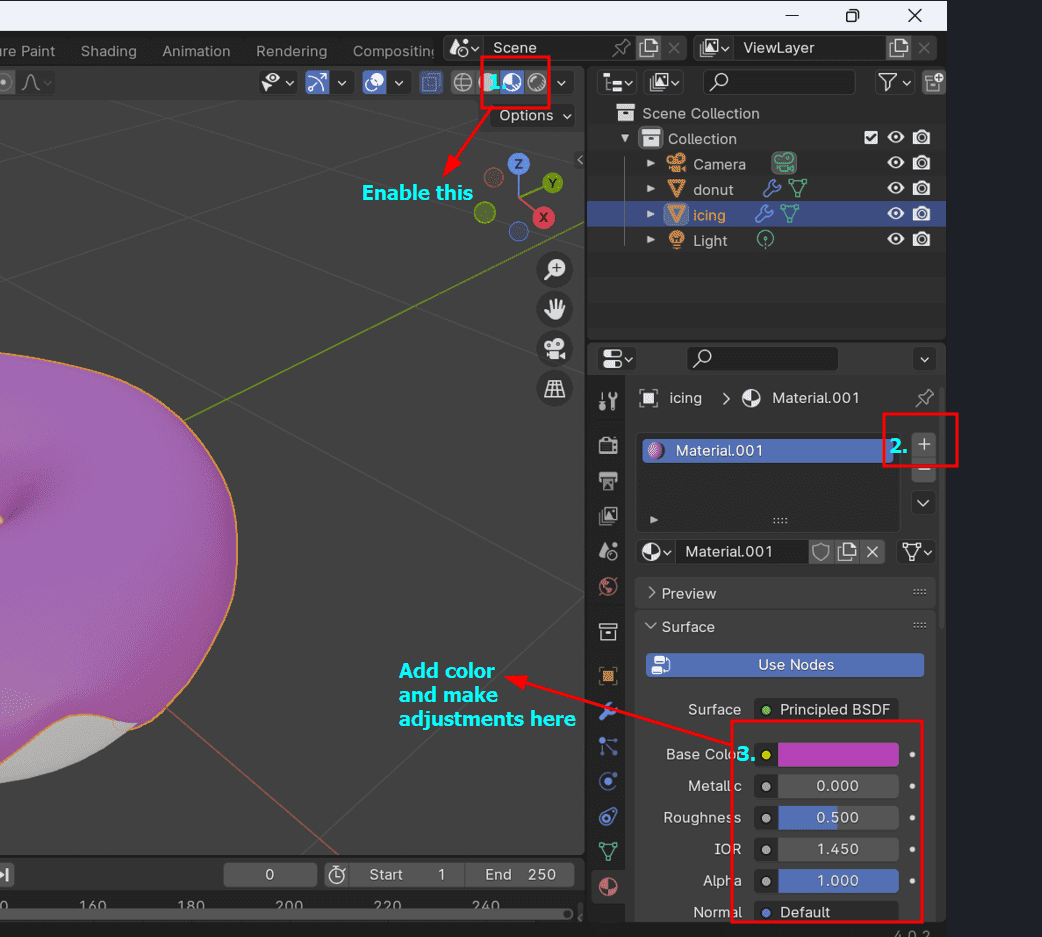
- Add the final touch to the donut by adding some colors!!!
- Windows:
- Download the Windows installer from the ImageMagick Download Page.
- Run the installer and follow the on-screen instructions.
- Ensure that the "Add to PATH" option is selected during installation for easier command-line access.
Pixlr
Pixlr is a free online photo editor similar to Photoshop. With a diverse range of photo editing tools, Pixlr allows you to swiftly edit and improve your photos.
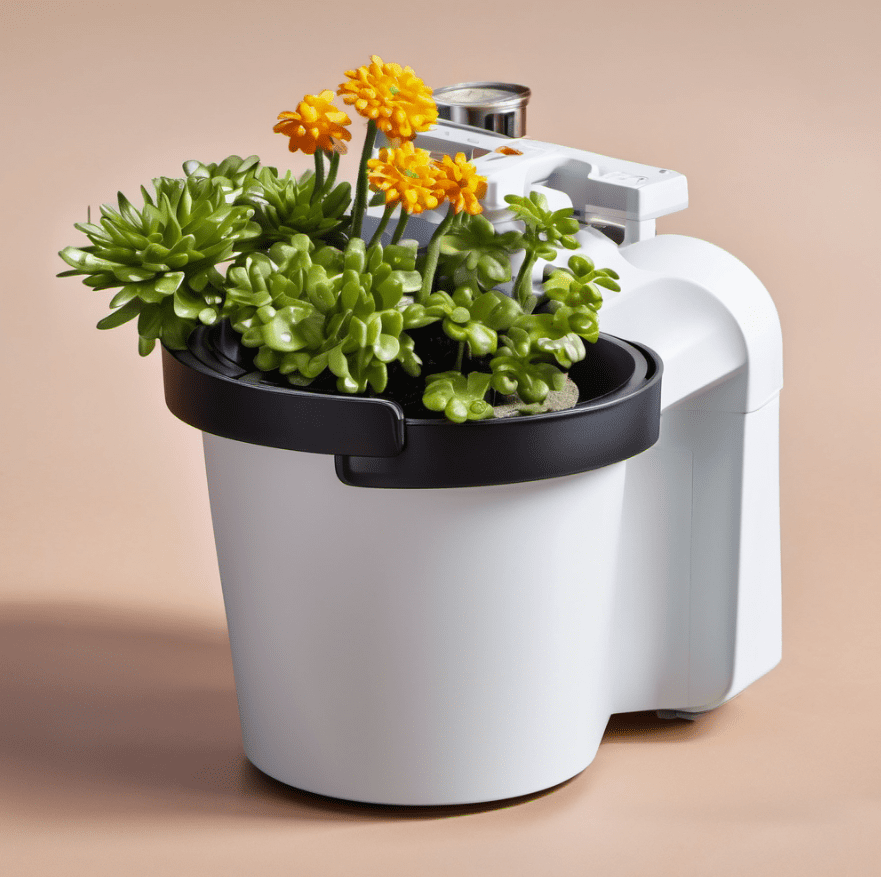
Regarding this software, I decided to do it online with its AI image generating feature. So, I gave a prompt to generate an image of a watering flower pot machine which is my final project idea.

Here is the output image that I really liked. I also edited this image in the CorelDRAW software.
3-D Design:
Fusion-360
Fusion 360 is another popular CAD and CAE software. It is a powerful, all-in-one platform that features parametric design, solid modeling, and simulation tools. Used in many industries across the world, Fusion 360 is a single solution for all stages of product development. Notably, Fusion 360 is a cloud service, meaning that you can create models anywhere and on any device. Also, you can open projects, quickly make edits, or add comments. In addition to its intuitive user interface, Fusion 360 has everything a designer or engineer might need.
I already had fusion downloaded on my laptop, so I didn't give the installtion steps here
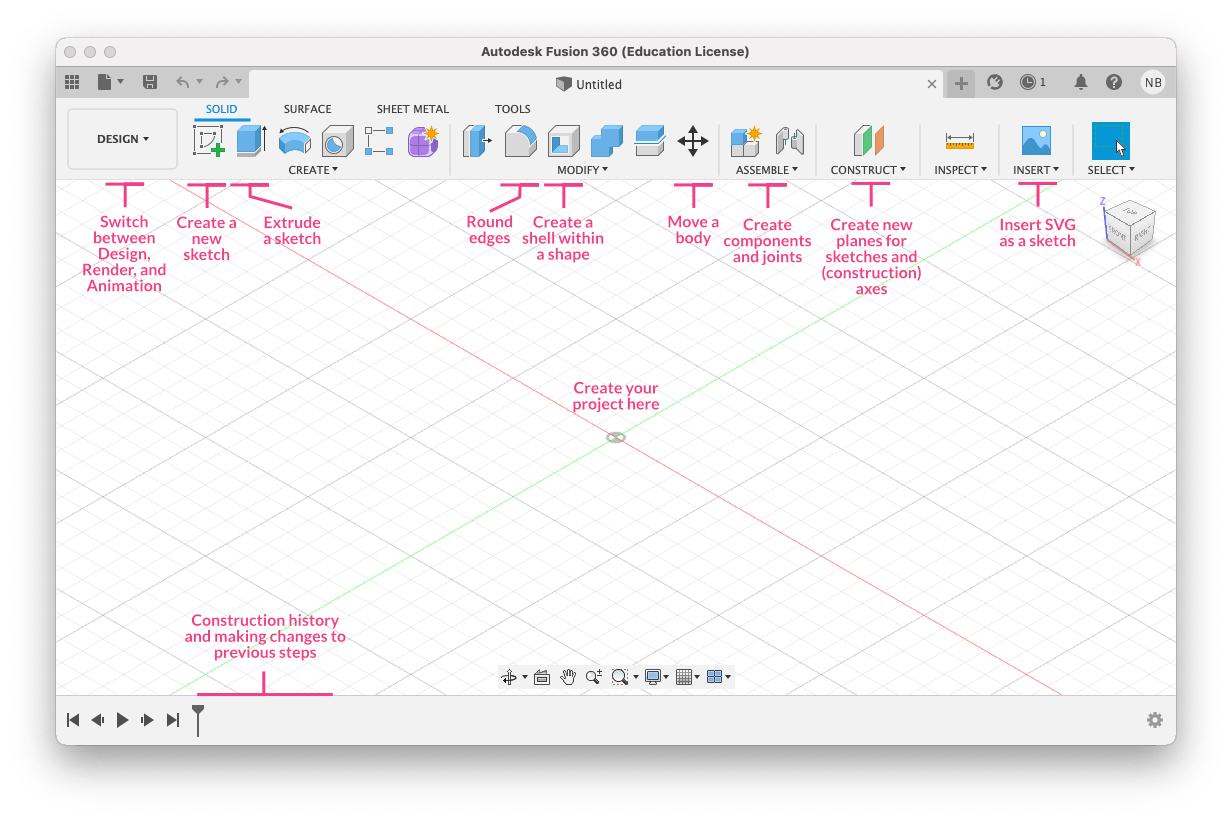
Here is a user interface of Fusion 360, from Nadieh's Fab Academy Page
Creating a Parametric Box with Hinges in Fusion 360:
I designed the box by referring to this tutorial on YouTube Hinge Box Tutorial.
Step 1: Understanding User Parameters
Step 2: Sketching the Box Bottom
Step 3: Extruding the Box Bottom
Step 4: Copy and Paste for the Box Top
Step 5: Creating the Hinge Side Profile
Step 6: Creating the Inner Hinge Pin (Nub)
Step 7: Adding Clearance to the Inner Hinge
Step 8: Mirroring the Hinges
This is the final result of the box!!!:

Blender
Blender is a free and open-source 3D computer graphics software tool set used for creating animated films, visual effects, art, 3D printed models, interactive 3D applications and video games.
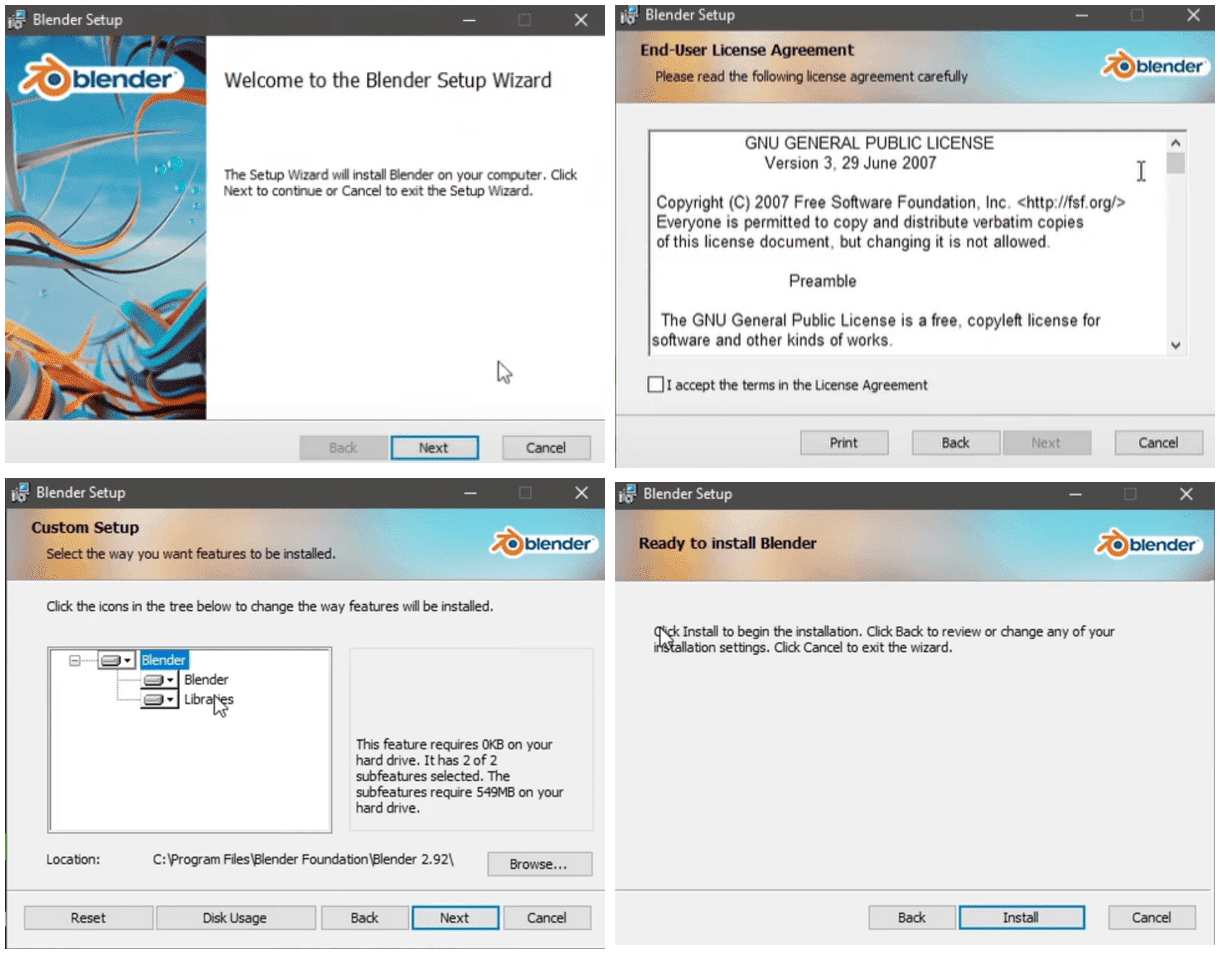
Installing Blender: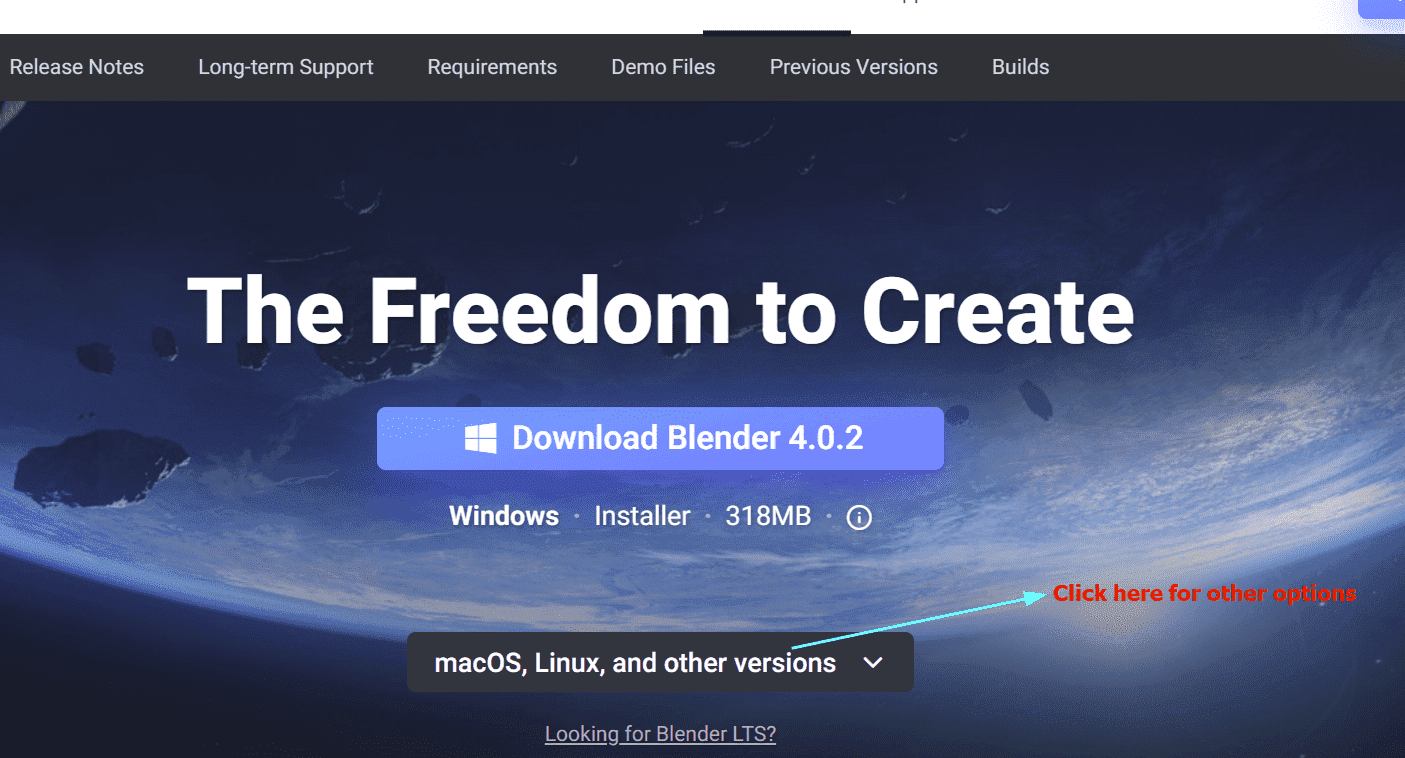
I designed a donut in blender by referring to this tutorial series Blender Tutorial for Beginners.
1. Add a Torus:

2. Adjust Torus Parameters:
3. Apply Subdivision Surface Modifier:
4. Enter Edit Mode:
Note: Regularly save your progress
5. Duplicate the Donut:
6. Delete Unnecessary Geometry:
7. Add Solidify Modifier:
8. Refine Geometry:
9. Apply Subdivision Surface Modifier:
10. Make Inner Edge Hug the Donut:
11. Extrude for Dripping Effect:
12. Add Materials:
This is the final look of my donut:
Software preference
After using several designing softwares, I came to the following conclusion:
I’d say I prefer Inkscape because it’s free, open-source, and highly customizable. Its user interface feels more user-friendly to me, and I really like its extensive support for various file formats and robust vector editing tools. In comparison, CorelDRAW, while powerful, comes with a price tag and doesn’t offer the same level of flexibility in terms of customization and community support.
When it comes to GIMP and Pixlr, I prefer GIMP because of its advanced features and plugin support. GIMP’s versatility and compatibility across different platforms make it my go-to choice for image editing tasks. Pixlr, while convenient, may lack some of the functionalities and customization options that I find usually use.
Regarding Fusion and Blender, I prefer Fusion primarily due to its seamless integration with other Autodesk products and its features like visual effects and motion graphics. While Blender is a great software, I find fusion more user-friendly, especially when working on complex 3D modeling and animation projects.
Images and Video Compression
I chose ImageMagick to compress my images because it provides a straightforward and efficient solution. With its command-line interface, I can easily apply compression settings to multiple images in batch, ensuring a streamlined and automated process. This not only reduces file sizes for faster web loading but also maintains image quality, making it a reliable choice for optimizing my image assets.
ImageMagick
Installation:1. Convert Image Format:
Convert an image from one format to another (e.g., JPEG to PNG):
magick convert "C:\Path\To\Your\Input.jpg" output.png2. Resize Image:
Resize an image to a specific width and height:
magick convert "C:\Path\To\Your\Input.jpg" -resize 800x600 output.jpg3. Compression:
Adjust image quality for compression:
magick convert "C:\Path\To\Your\Input.jpg" -quality 80 output.jpg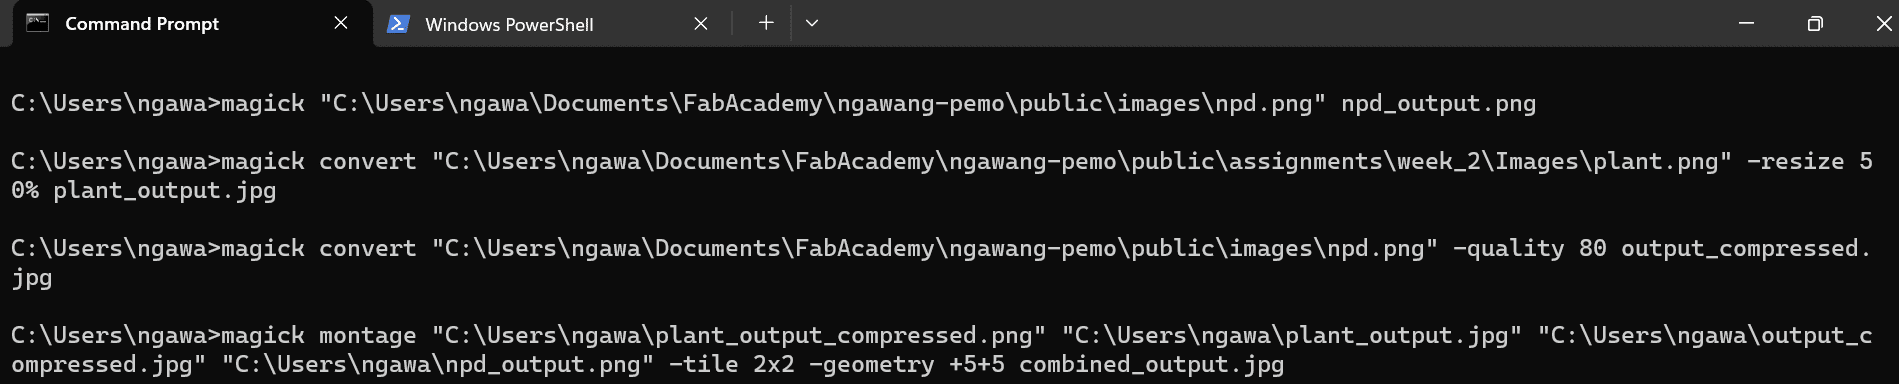
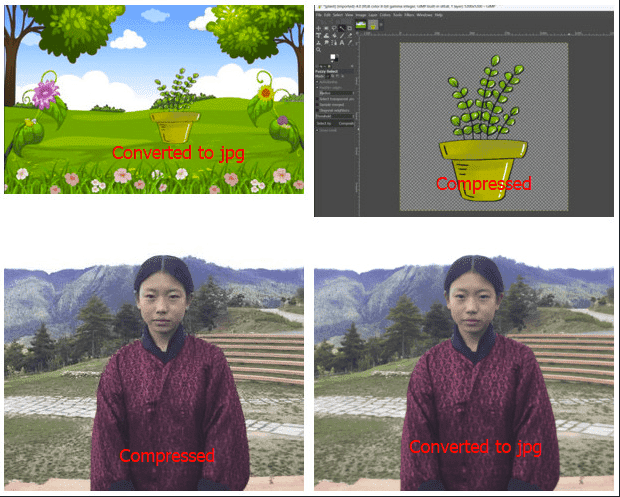
4. Image Montage:
Combine four images into a 2x2 grid with equal resizing:
        magick convert "C:\Path\To\Image1.jpg" -resize 300x300 "C:\Path\To\Image1_resized.jpg"
        magick convert "C:\Path\To\Image2.jpg" -resize 300x300 "C:\Path\To\Image2_resized.jpg"
        magick convert "C:\Path\To\Image3.jpg" -resize 300x300 "C:\Path\To\Image3_resized.jpg"
        magick convert "C:\Path\To\Image4.jpg" -resize 300x300 "C:\Path\To\Image4_resized.jpg"

        magick montage "C:\Path\To\Image1_resized.jpg" "C:\Path\To\Image2_resized.jpg"
"C:\Path\To\Image3_resized.jpg" "C:\Path\To\Image4_resized.jpg" -tile 2x2 -geometry +5+5 output_combined.jpg

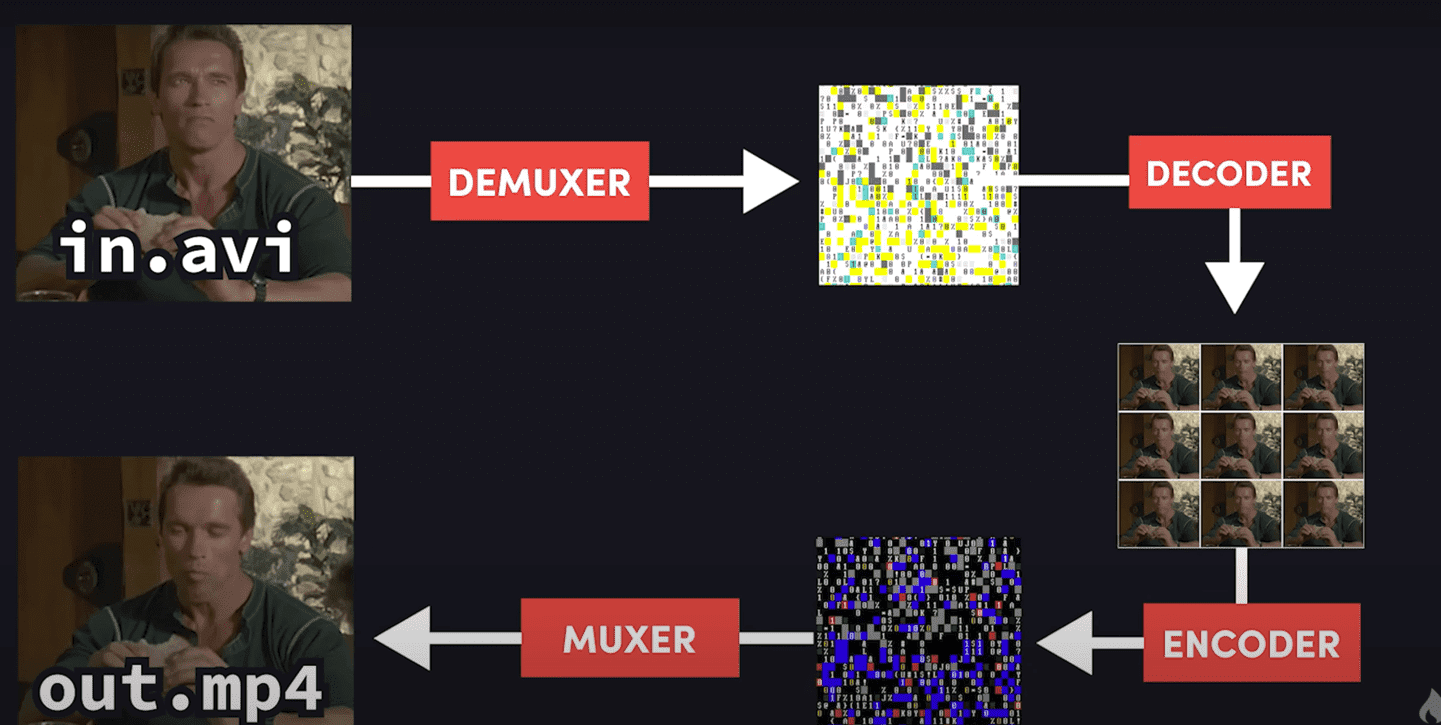
FFmpeg (Video-compression)
FFmpeg is a powerful open-source tool for audio and video processing. Renowned for its versatility, it supports various codecs, format conversions, and scripting, making it a go-to solution for efficient multimedia tasks.
Installation:Visit the official FFmpeg website at https://ffmpeg.org/download.html. Download the appropriate version for your operating system (Windows, macOS, or Linux). Extract the downloaded ZIP file to a location on your computer.
Step 1: Navigate to the Directory with Your Video:
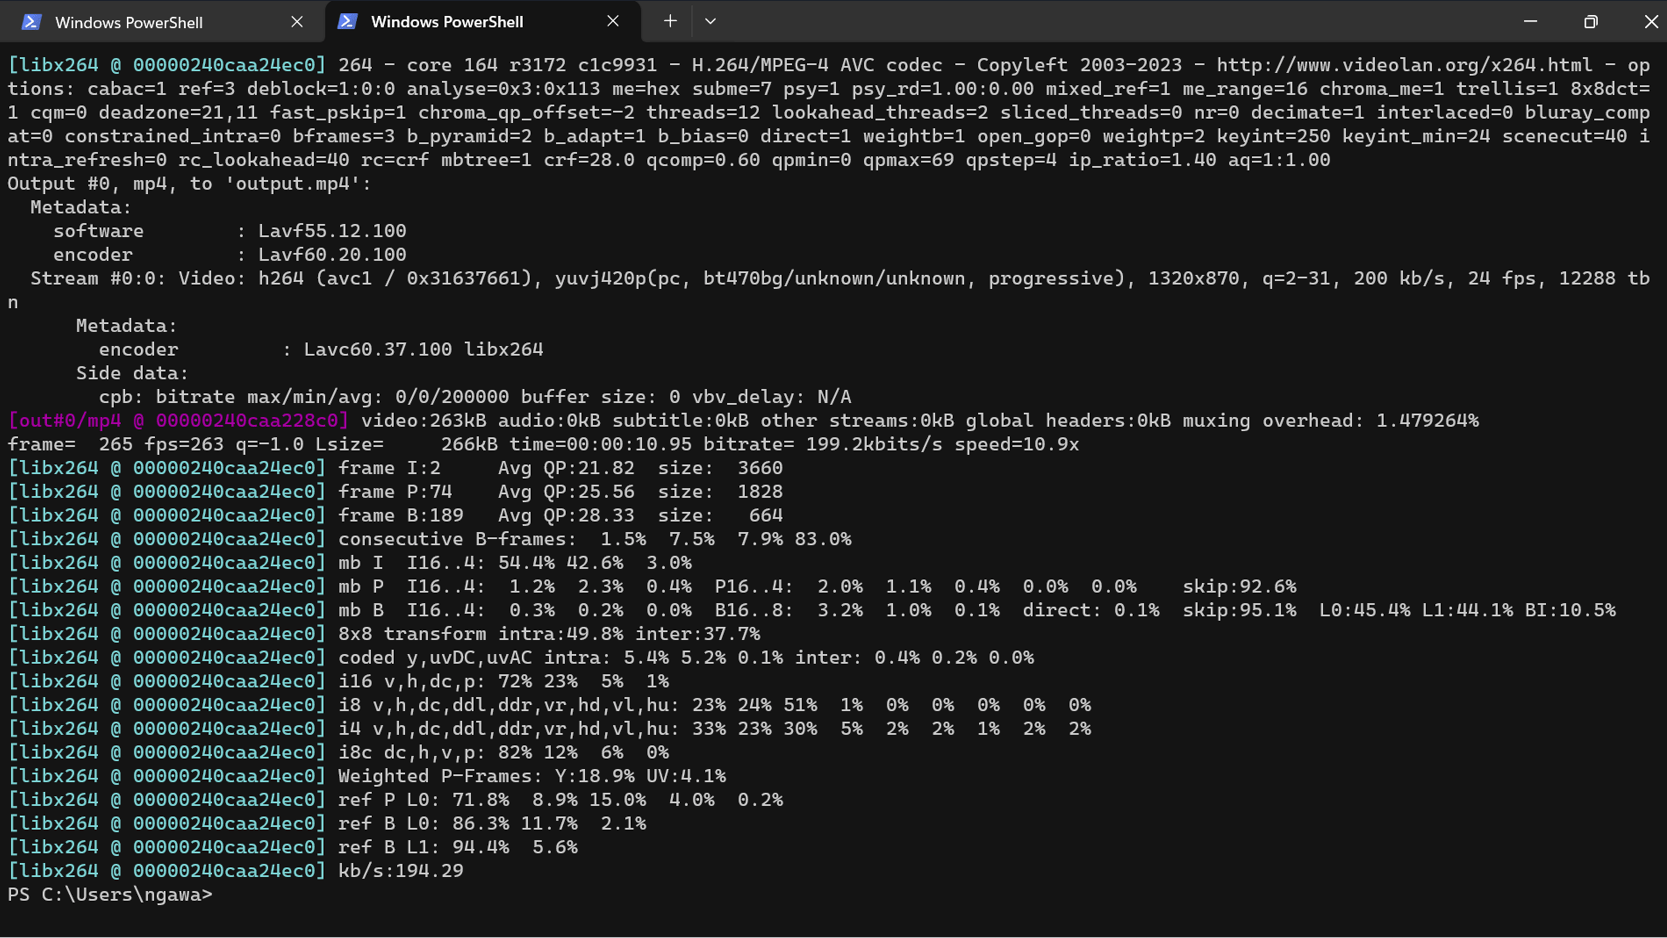
cd path\to\your\video\directoryStep 2: Compress the Video:
The following pic is a screenshot from this tutorial. It shows the basic function of ffmpeg:
Use the following command as a template, replacing the placeholder paths with your actual file paths:
ffmpeg -i "input.avi" -c:v libx264 -crf 28 -b:v 200k -c:a aac -strict experimental -b:a 64k "output.mp4"Explanation of the command:
-i "input.avi": Specify the path to your original video file.-c:v libx264: Set the video codec to H.264 (libx264).-crf 28: Adjust the video quality. Higher values result in more compression but lower quality.-b:v 200k: Set the video bitrate to control compression.-c:a aac: Set the audio codec to AAC.-strict experimental: Enable experimental codecs like AAC.-b:a 64k: Set the audio bitrate for compression."output.mp4": Specify the desired name for the compressed output file.
I generated the above response from chatGPT.

Here is my compressed video:
These are my original design files:
I made the whole documentation in markdown and generated the html format from chatGPT. So, special thanks to chatGPT for helping me convert my whole Markdown file to HTML!!!