Group Assignment:
Group Assignment Link:
____________
Machinable Wax Milling (Group Assignment)
For the group assignment we needed to compare the smoothness of machinable wax molds and 3D printed resin molds. As Enterprise Fablab had yet to test the wax milling machine, our local technician joined us in our Group Project.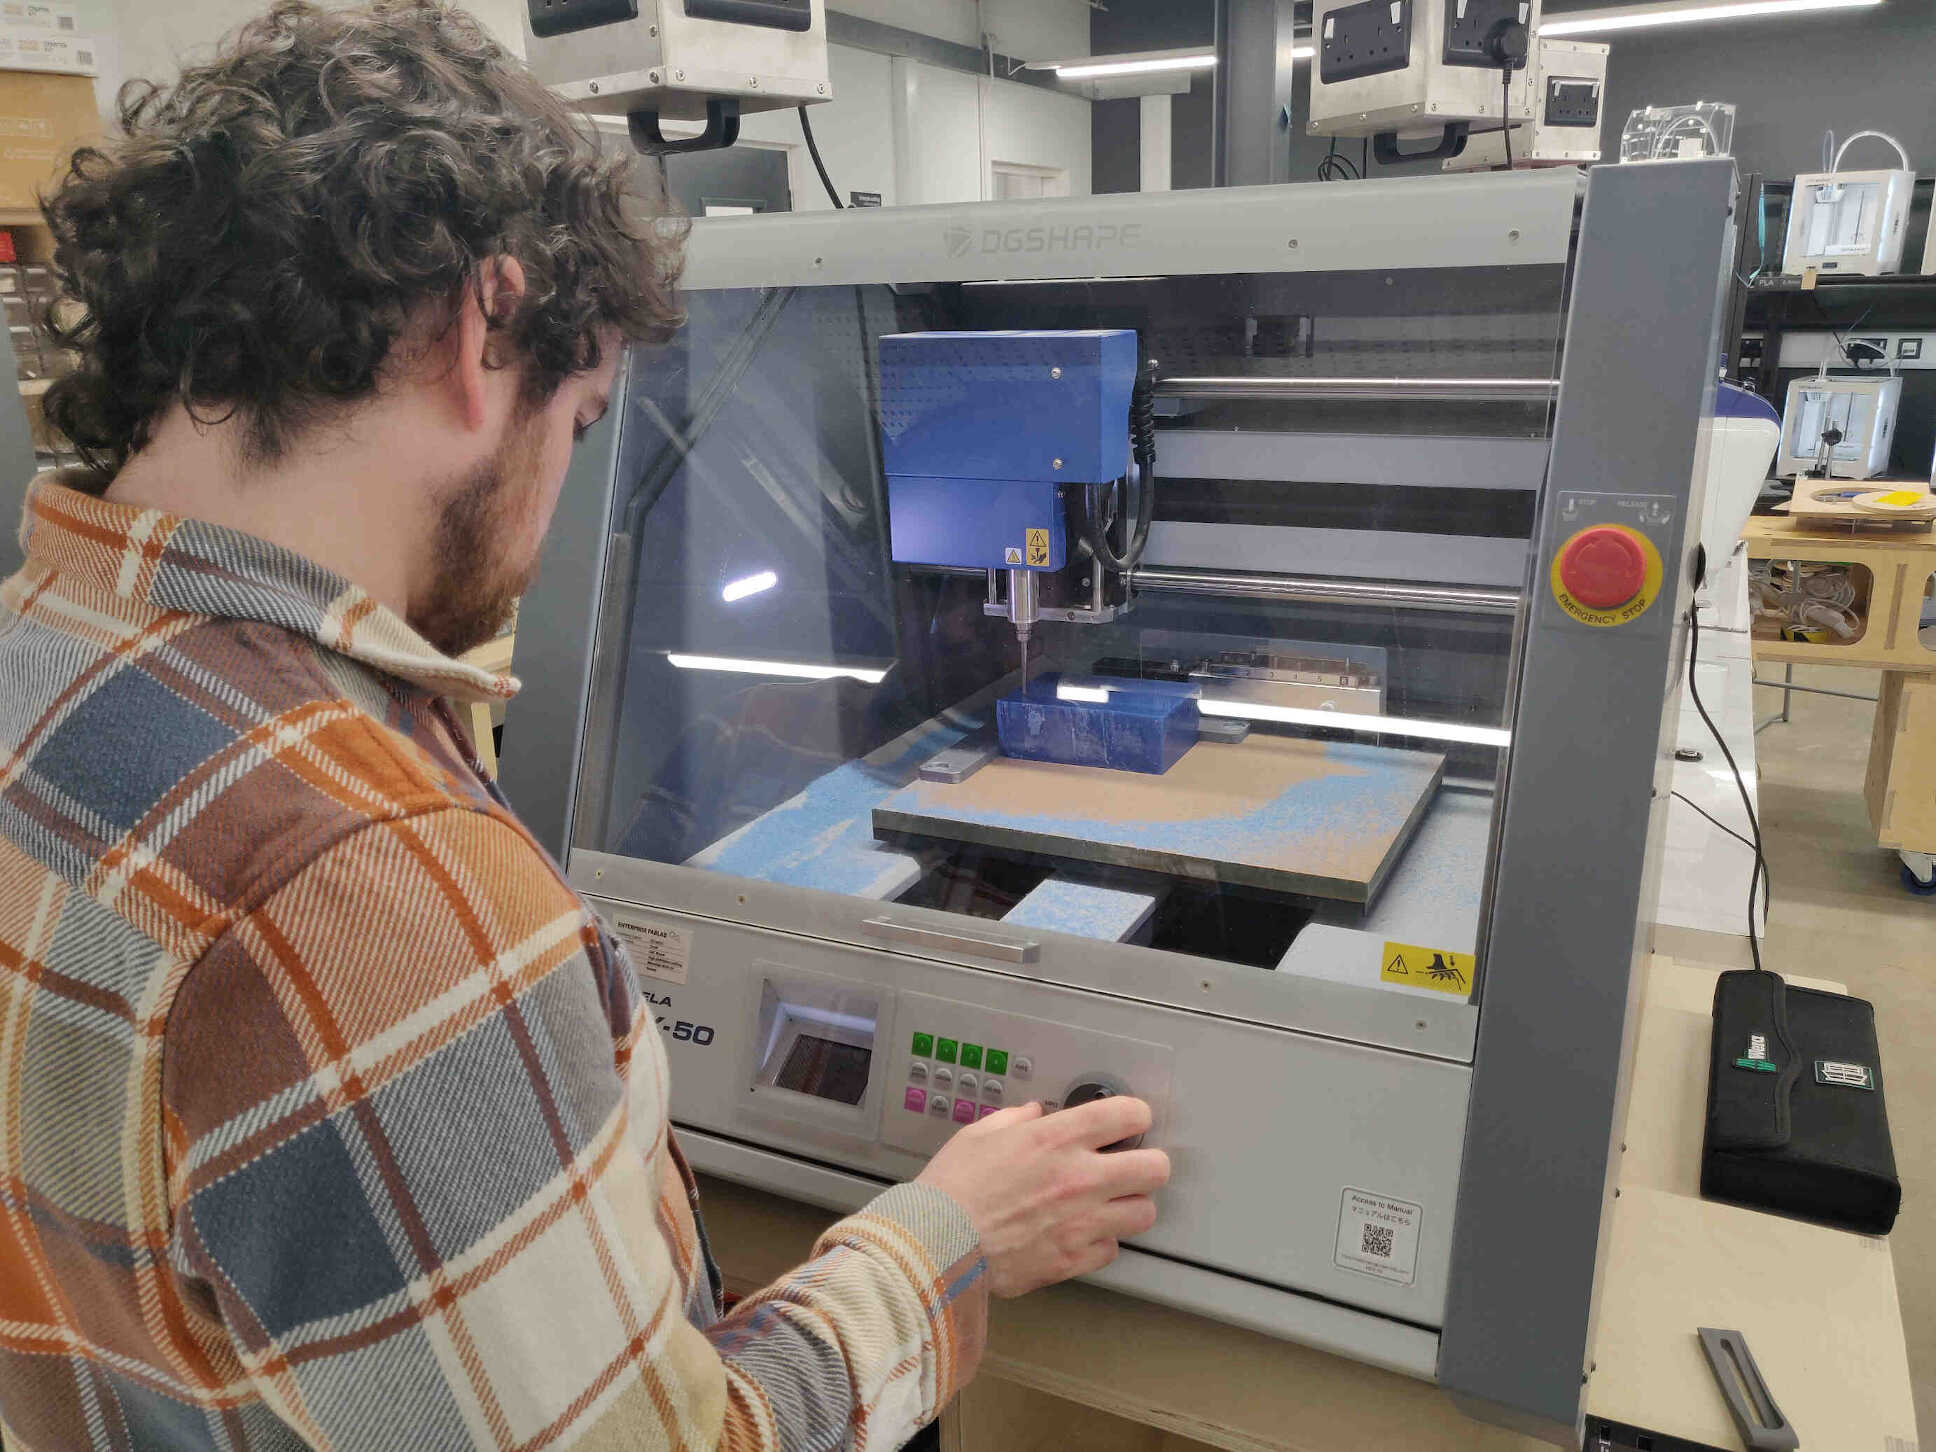
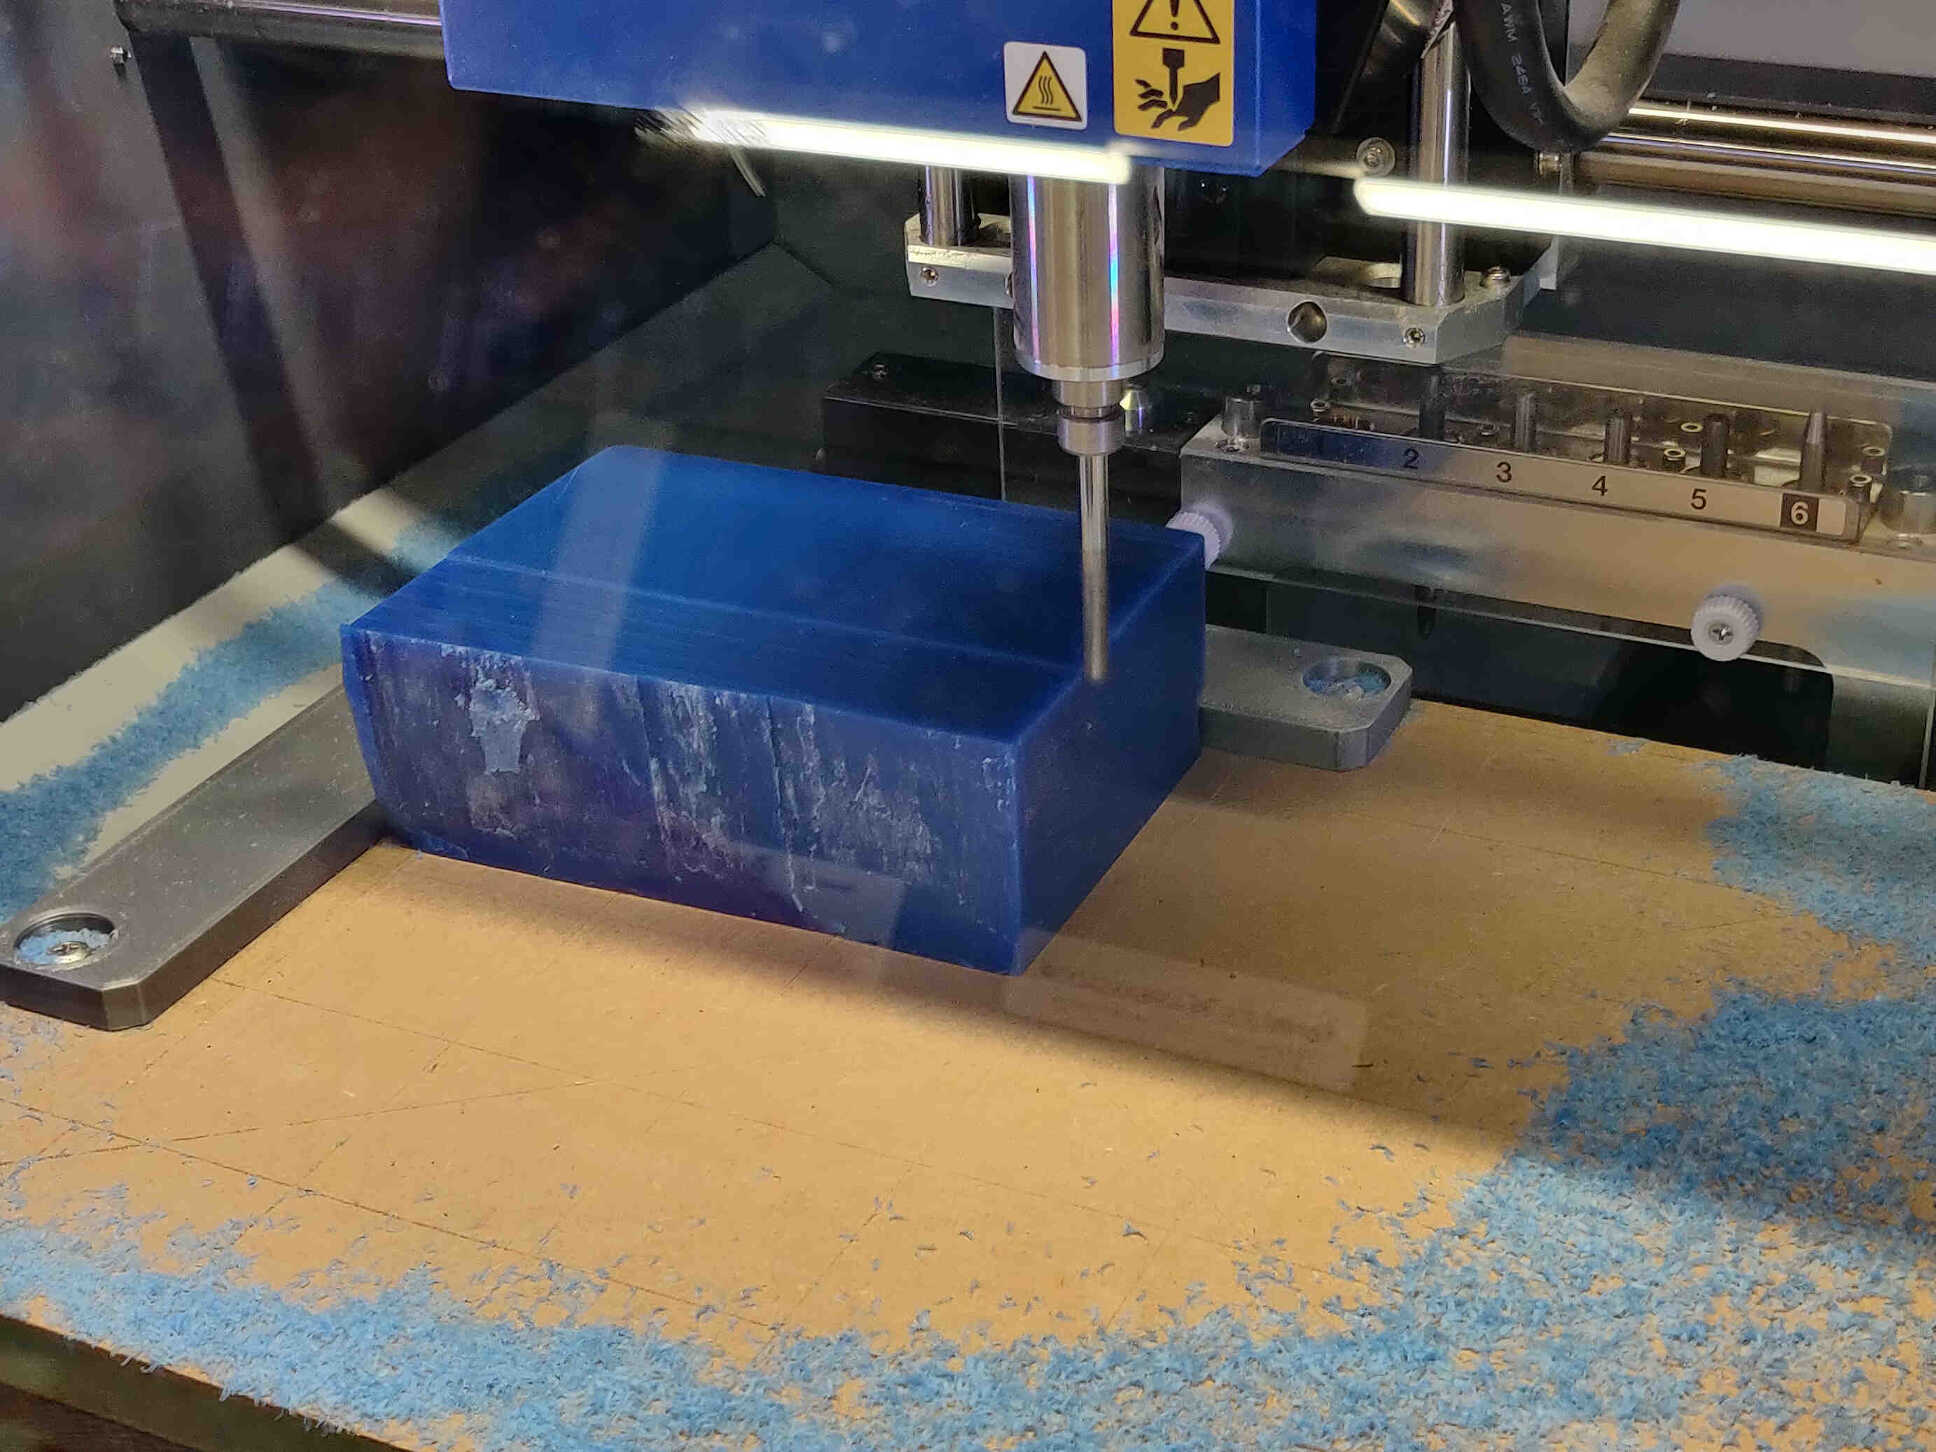

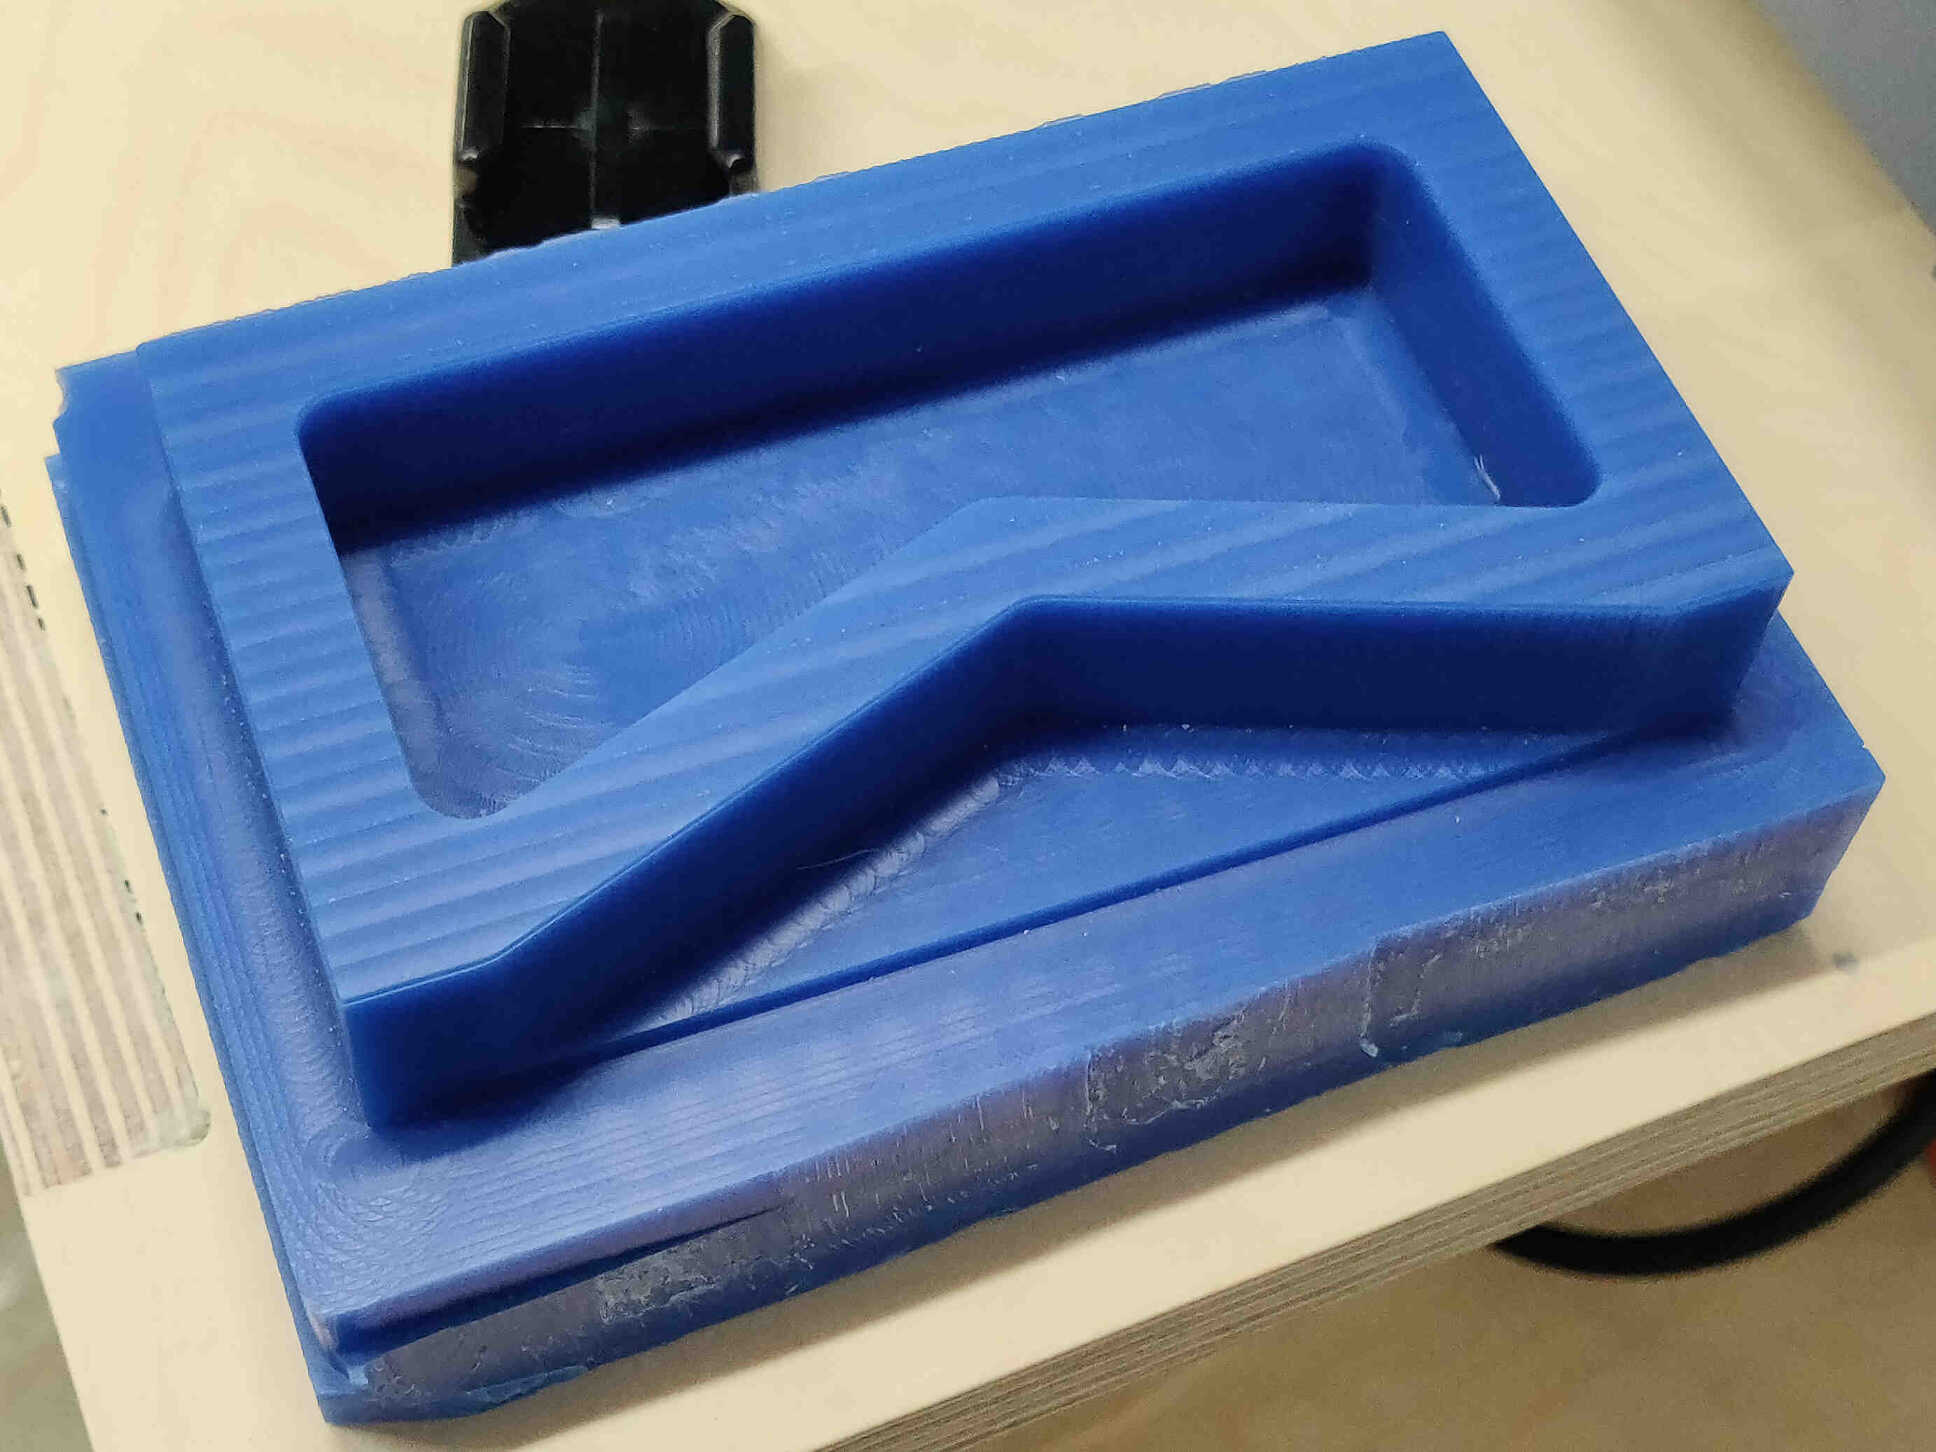
The smoothness and result of the machinable wax mold was undeniable. Though the Draft V2 Resin mold I made could still give the wax milling a run for it's money, the Wax mold was sleek and flawless - though not originally. Oscar and our technicial 'Carl' spent a lot of time refining the cuts to acheive perfection.
Group Assignment Link:
____________
Machine Wax Milling
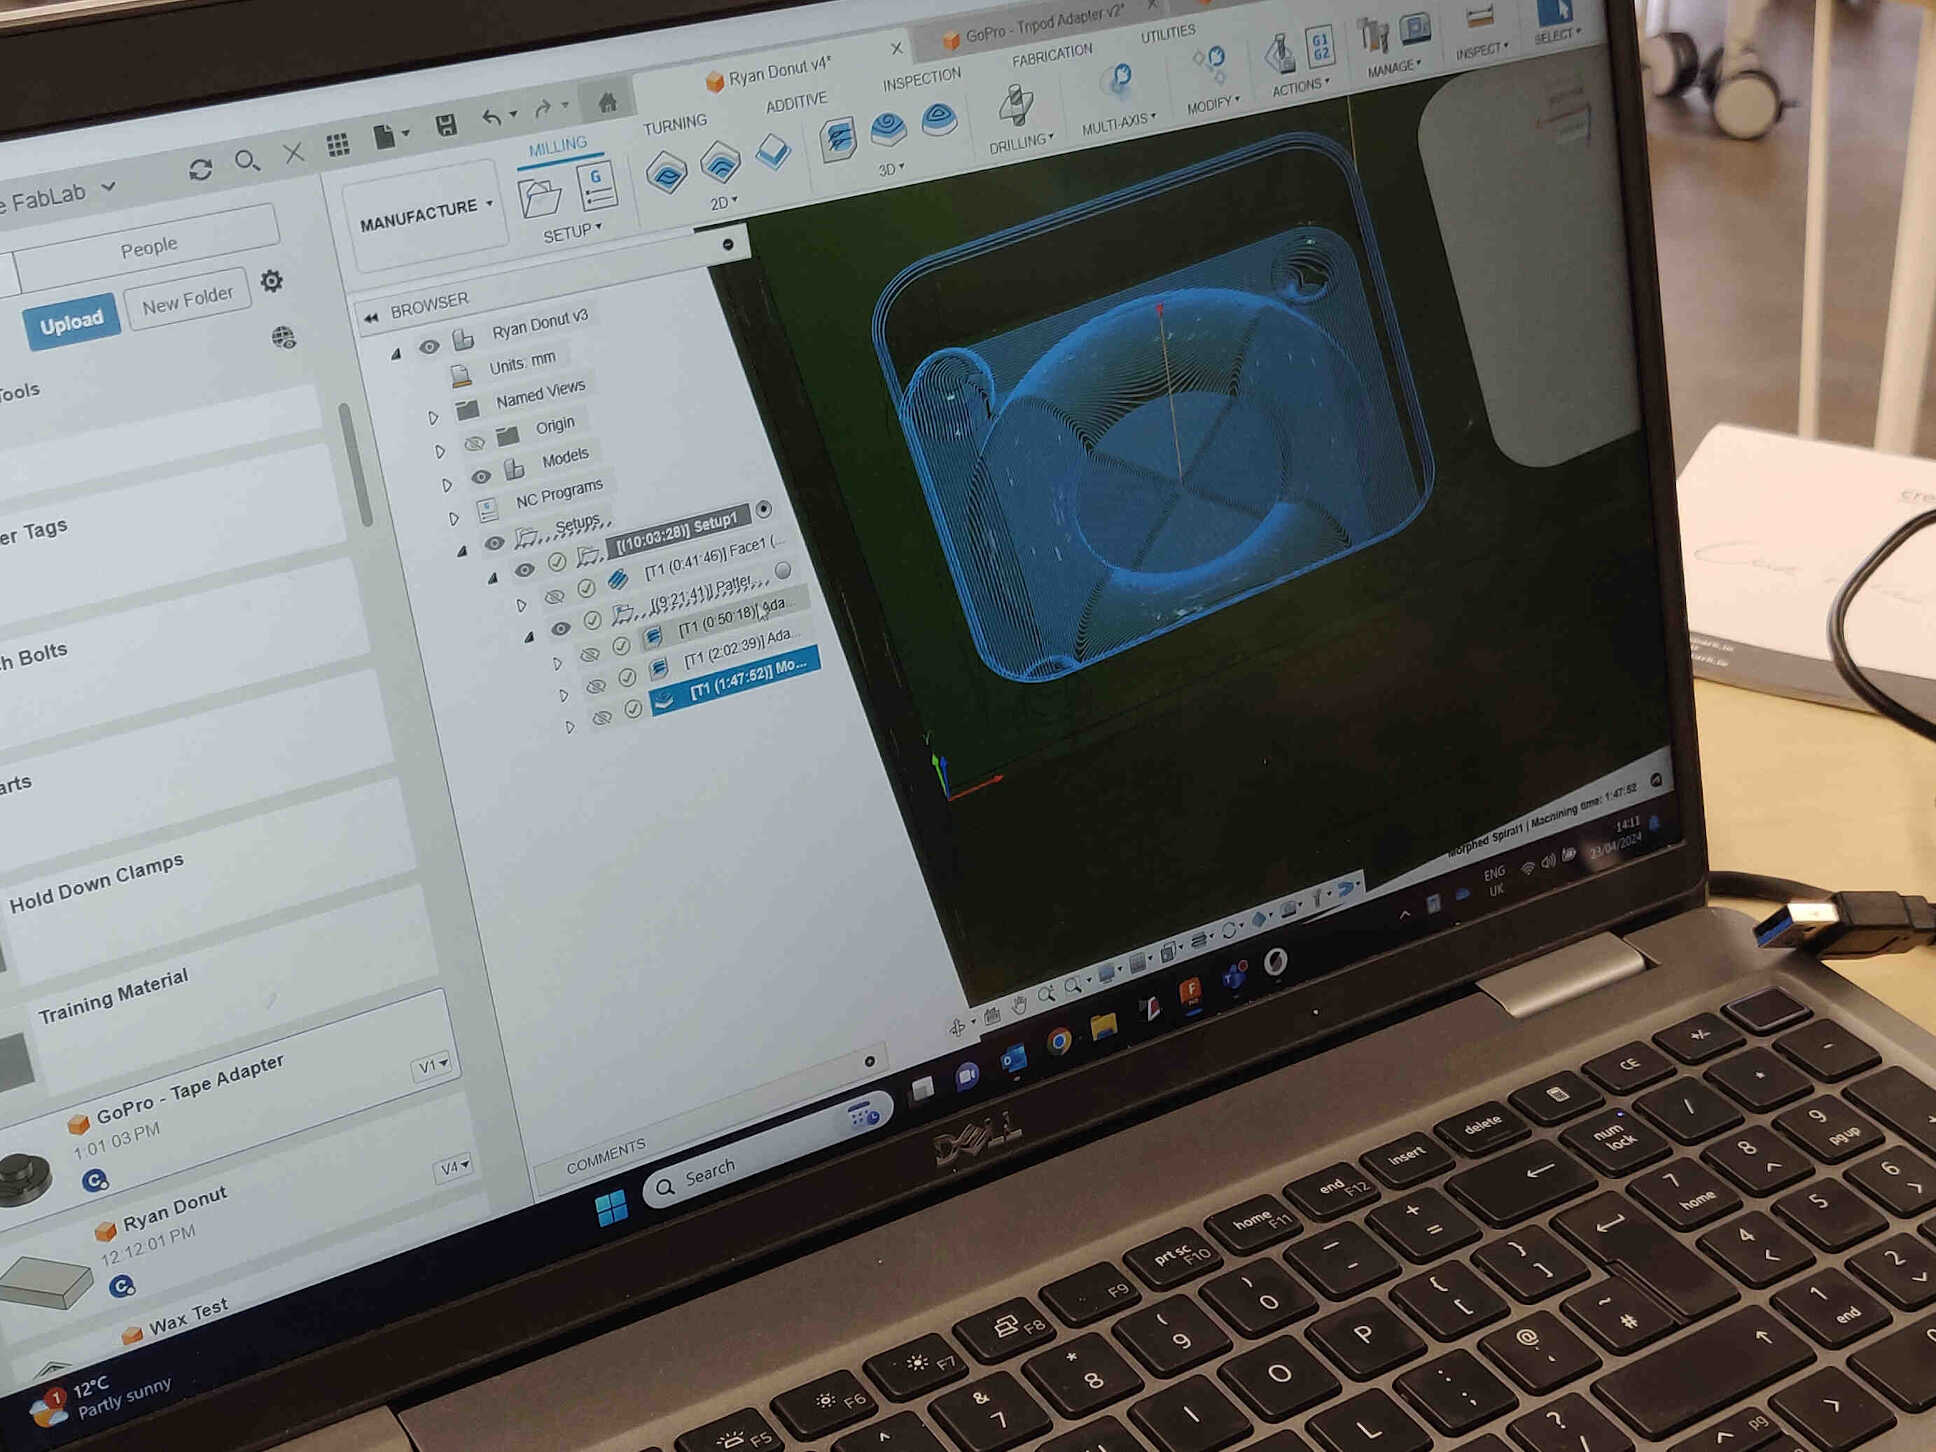
Milling Simulation
Mill Control / Milling Machinable Wax
Design a mold around the process you'll be using, produce it with a smooth surface finish, and use it to cast parts.
Extra Credit: Use more then two mold parts
Molding and casting are both techniques used in manufacturing and crafting, but they serve different purposes:1. Molding: Molding involves creating a negative impression or cavity of an object, called a mold, into which a material such as clay, plaster, or silicone is poured or pressed. The material then solidifies to take the shape of the mold. Molding is often used for creating multiple copies of an object or for replicating intricate details.
2. Casting: Casting is the process of pouring a liquid material, such as metal, plastic, or resin, into a mold to create a solid object. The liquid material takes the shape of the mold as it solidifies, resulting in a replica of the original object. Casting is commonly used in manufacturing to produce metal parts, jewelry, sculptures, and various other objects.
In summary, molding is about creating a mold, while casting is about filling that mold to create a final object.
Molding and casting involve creating a mold of an object and then pouring a material like resin or plaster into the mold to create a replica. Here's a basic step-by-step process:
1. Prepare the Object: Clean the object you want to mold to remove any dirt or debris. If it's a porous material like wood or clay, you may need to seal it with a mold release agent.
2. Create a Mold Box: Construct a box around the object using materials like wood, plastic, or foam board. Make sure the box is larger than the object and will contain the mold material.
3. Prepare Mold Material: Choose a mold-making material such as silicone rubber, latex, or alginate. Mix the mold material according to the manufacturer's instructions, making sure to remove any air bubbles.
4. Apply Mold Material: Pour or brush the mold material over the object in the mold box, making sure to cover it completely and evenly. Build up multiple layers if necessary for strength.
5. Let the Mold Cure: Allow the mold material to cure or set according to the manufacturer's instructions. This may take several hours or overnight, depending on the type of material used.
6. Remove the Mold Box and Object: Once the mold material is fully cured, carefully remove the mold box and separate the mold from the object. Be gentle to avoid damaging the mold.
7. Prepare Casting Material: Choose a casting material such as resin, plaster, or concrete. Mix the casting material according to the manufacturer's instructions, adding any desired pigments or additives.
8. Pour Casting Material: Carefully pour the casting material into the mold, filling it to the desired level. Tap the mold gently to release any air bubbles and ensure the material fills all the details of the mold.
9. Let the Casting Cure: Allow the casting material to cure or set completely. This may take several hours or longer depending on the material used.
10. Remove the Casting: Once the casting is fully cured, carefully demold it by flexing or gently prying the mold apart. Remove any excess material and clean up any rough edges if necessary.
11. Finish the Casting: Sand, paint, or otherwise finish the casting as desired to achieve the desired final appearance.
12. Optional: Repeat Steps: If you want to make multiple castings, you can reuse the mold to create additional replicas.
Remember to always follow safety precautions when working with mold-making and casting materials, such as wearing gloves and working in a well-ventilated area.
(- Written by ChatGPT v3.5, April 18th 2024)
Initial Goals for assignment completion:
- Design a weapon mold based on a game.
- Use a 3D SLA/Resin printed mold.
- Look through the formlabs Materials Library for the appropriate materials and properties for molding and casting with them.
This is something I’m interested in making and ‘should’ be easy to do. But what should I use for the design? The game ‘FFVII Rebirth’ recently came out to critical acclaim, so perhaps something to do with that?
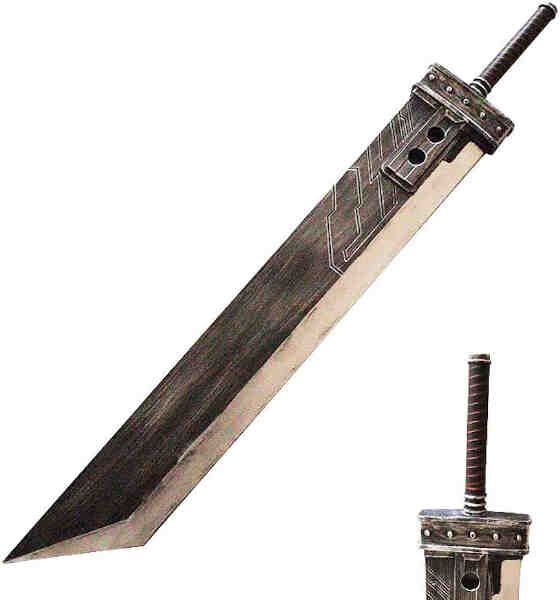
- FF7 Buster Sword could be made with Metal & wrap cloth around it?
- FF7 Logo could be made partly with metal and green/black resin?

For my cast I’m gonna be using 3D Printed SLA Felixible 80A Resin. After the cast is printed and washed/cleaned thoroughly, I could use a spray primer on the inside and spray with a metal finish. Originally for my mold, I was considering the possibility of using a Liquid Metal to pour into the cast, but I was immediately told that wouldn’t be viable in my fab lab environment - also that it wouldn’t be suitable for resin casts.
I decided that I would mold & cast the Buster Sword from the video game ‘Final Fantasy VII’ to celebrate the release of its recently released remake. Also to mold & cast the logo from the game with a metal finish and pour green & black resin on top to give it that iconic look.
Update: Decided to focus on the sword rather than the Sword & Logo, as the logo may be complicated to recreate in Blender and it may be overly difficult to post-process, along with the fact I would need to create two separate 2-piece molds.
I could have done a very simple, blocky design but that would defeat the purpose of getting a high quality resin mold, so I followed this timelapse video at x0.25 Playback Speed to get a better example of a high quality and well structured model.
Learn Blender Knife Tool in 1 Minute
The other reason I chose to follow a timelapse video is because I’m getting rusty at 3d modeling and I could really use a refresher on techniques I could use for my final project, though I made some changes so that my version of the sword had a bit of my own flair put into it. I won’t go into too much detail when describing the 3D Building as it’s not the focus point of this assignment, but still worth mentioning the process.
Buster Sword Timelapse

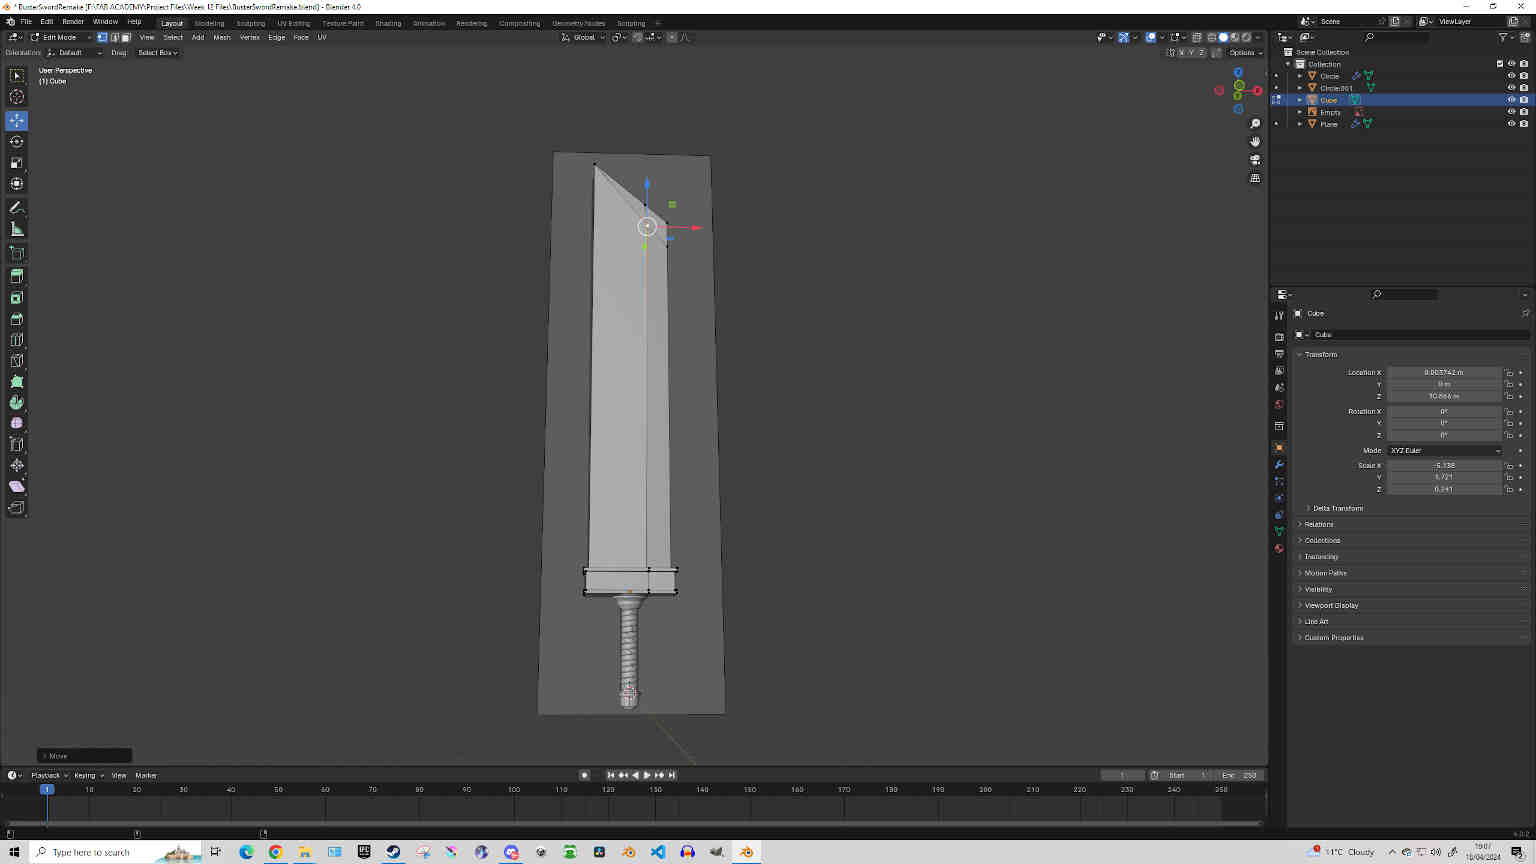
Going from the bottom of the handle upwards to the tip of the sword. Placing a Circle Mesh down flat, I extruded it to make a handle, then added a square and deleted 2 vertices to make a line. Then added Screw, Shrinkwrap, Solidify & Subdivision modifiers to the line to create a ribbed spiral leather design around the handle.

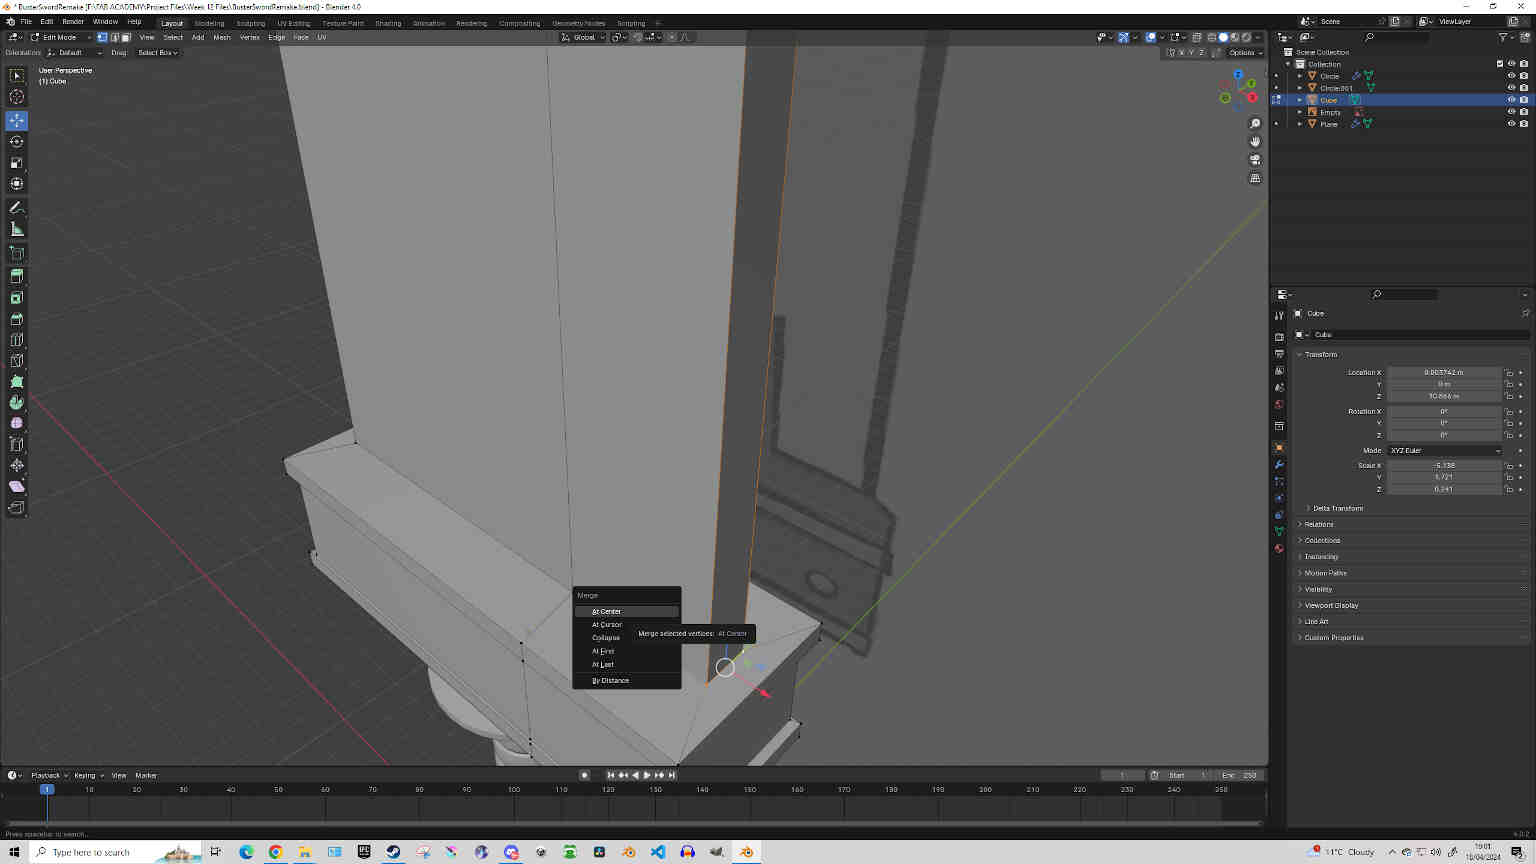
Then using basic cube scaling and Extrusion, I created the cross guard and the large blade attached. Then added 2 loop cuts along the blade going vertically and horizontally. Thanks to these loop cuts, I can select two vertices along the sharp end of the blade and hit ‘M’ key to ‘Merge at Center’, creating the sharp edges.
With the blade shape complete we can add more aesthetic features. First off we can use the ‘Knife Tool’ to create the line marking along the blade. After making your first cut, press ‘C’ before continuing - this will make sure that the cut goes all the way through the model. Then to finish making the cut just hit the ‘Enter’ key.
Then by adding more cube meshes and using the ‘Extrude’ tools to create more designs, I can add more parts for aesthetics. Also using the Bevel tool (Ctrl+B) to round out the corners of some objects. Then using the Boolean modifier to cut out or add shapes to the overall objects. Mainly I used a Boolean modifier to cut out 2 holes for the Materia Slots, then by selecting the vertices over the empty edges, I can shift-select the points and press ‘F’ to Fill.
With that, our model is finished! But now it’s time to create the mold. To do this we need to add two large cubes that will encompass the sword model. These cubes will become our printed molds. A tip I was given was to make the outside of the cube a bit larger than the outside as it will make the removal process a lot easier.
The electronics side of Fab Academy deflates my confidence so much that whenever a design-related week comes up, I always want to make something cool and interesting - almost to prove my worth in being there. But in doing so this time, I actively missed out on the point of this week’s assignment. I should be learning how to ‘mold and cast’, not learning how to ‘make something cool that I can mold and cast’. If I knew the intricacies of the process, I would have known not to design something that isn’t fit for molding.
In a last stitch attempt to make something that works for my Final Project, I attempted to design a Doll Head mold, but due to similar boolean issues, I was not able to complete the mold design.

So despite my disappointment, I took heed of the technician’s words and scraped my idea to print a mold for a sword or head mold. Instead I stayed late on Friday to start fresh with a torus/donut design and made a simple mold for it with additive & subtractive keys along the corners. I saved it as an STL file, brought it over to the formlabs resin printer where I slotted in the ‘Draft v2’ resin material container and began the printing process of my donut mold. I stayed until the first layer was complete, then I went home for the weekend. I’m sure the mold won’t be up to par as there weren’t many tricks I implemented in terms of making a reliable mold. I was determined to spend the weekend researching and documenting how it could have been better, along with necessary precautions I need for casting on Monday.
Final Project Discussion: Potentially forget about the motors on the arms and focus on the motor for the neck. Possibly even using a gearing system for the arm movements. Could also use molding and casting for creating the head or arms/legs. PID control for smooth accelerated movement - requires more effort in coding though.
Xiao + TIME OF FLIGHT VL53L1X Servo Motors
1. Design: Create or obtain the design for the object you want to mold.
2. Prepare the Wax: Cut or shape the machinable wax to the desired size and shape using CNC machines or manual tools.
3. Mold Box: Build a mold box around the wax model. This box will contain the liquid silicone or other molding material.
4. Release Agent: Apply a release agent to the wax model and inside of the mold box to prevent the mold material from sticking to the wax.
5. Mix and Pour Mold Material: Follow the manufacturer's instructions to mix the mold material and pour it into the mold box, covering the wax model completely.
6.Curing: Allow the mold material to cure and harden according to the recommended time frame.
7. Remove the Mold: Once the mold material has cured, carefully remove the mold box and separate the two halves of the mold.
8. Extract the Wax: Take out the machinable wax model from the mold. This leaves a negative impression of the model in the mold.
9. Pouring: Pour your desired casting material (e.g., resin, plaster) into the mold to create the final object.
10. Curing and Finishing: Allow the casting material to cure fully. Once cured, remove it from the mold, trim any excess material, and finish as needed.
11. Clean Up: Clean up your work area and store or dispose of any leftover materials properly.
Remember to follow safety guidelines when working with any materials and equipment, and always refer to the specific instructions provided by the manufacturers of the materials you're using.
1. Conceptualization: Start by conceptualizing the design of the object you want to create. Consider its purpose, dimensions, and any specific features it should have.
2. Sketching or CAD Modeling: Depending on your preference and expertise, you can either sketch the design by hand or use computer-aided design (CAD) software to create a digital model. CAD software offers precision and the ability to make adjustments easily.
3. Dimensional Accuracy: Ensure that your design has the desired dimensional accuracy. Machinable wax is often used for creating precise models, so attention to detail is crucial during this stage.
4. Consider Machinability: Keep in mind the limitations and capabilities of the CNC machine or manual tools you'll use to shape the machinable wax. Avoid designs with intricate features that may be challenging to machine accurately.
5. Material Considerations: Understand the properties of machinable wax, such as its hardness and machinability. Design features that take advantage of these properties can help streamline the machining process.
6. Prototype Iteration: If possible, create a prototype of your design using a 3D printer or other rapid prototyping methods. This allows you to evaluate the design and make any necessary adjustments before machining the final model in machinable wax.
7. Finalize the Design: Once you're satisfied with the prototype and have made any necessary adjustments, finalize the design for machining in machinable wax.
8. Toolpath Generation: If you're using CAD/CAM software with CNC machines, generate toolpaths for machining the machinable wax based on your finalized design. This involves specifying cutting paths, tool sizes, speeds, and feeds.
9. Prepare for Machining: Set up the machinable wax stock material in the CNC machine or prepare manual tools for shaping the wax according to the design.
10. Machining: Execute the machining process to shape the machinable wax into the desired form based on your design. Monitor the machining process to ensure accuracy and quality.
By following these steps, you can create a well-designed model for molding with machinable wax, which serves as the basis for producing molds for casting the final objects.
(- Written by ChatGPT v3.5, April 21st 2023)
Machinable Wax Low Temp Wax CNC Machinable Wax
Creating the interlocking keys: Add a cube and shape it into a rectangle for creating keys. When happy with the shape and positioning, go into Edit mode for the rectangle. Select the face of the rectangle that is sticking outwards from the mold and scale it down slightly by 0.01mm. This will allow for easier separation when removing the mold. Another option being to add a Taper and Bevel modifier and adjust the scale there. Use SHIFT+D to duplicate and put the duplicated key on the same side but different corner. Now go back into object mode, select the rectangle object, then SHIFT-Select the Mold object. Then press Ctrl+Shift+B for the Bool Tool modifier and select ‘difference’. This will cut those shapes into the mold.
Now move the rectangle keys to the other side of the mold. Individually scale down the Male keys by 0.01 mm for clearance. Select the rectangle object, then SHIFT-Select the Mold object. Then press Ctrl+Shift+B for the Bool Tool modifier and select ‘Union’. Now you are ready to export your mold as an STL file and bring it to the SLA resin printer.
SLA Molding Important things to know about Molding and Casting Introduction into Mold Making Casting

The print itself had a really nice and smooth finish, however our first mold didn’t use and Tapering or Bevelling around the keys to smoothly lock it into place, so there was a bit of gap along the edges. This was expected for our first print so we continued on preparing for casting so that I could start another mold print with a new model while the other one cures overnight.
I chose the casting material ‘Smooth-On OOMOO Series Silicon Rubber’ which had to be mixed 1A:1B and had to be mixed for 3 minutes, had a pot life of 40minutes and cure time of 16 hours. I was warned that stirring the mixture too quickly will cause bubbles which will create unwanted imprints in the design. I was happy with the mixture after 3 minutes, though it seems the bottom of it wasn’t entirely mixed which we noticed when using the excess material to form another mold.
I used 2 clamps to hold the mold into place. The 4 fitting keys on the mold were quickly made and wouldn’t fully stick together. This shows that using exact additive and subtractive methods isn’t enough - the keys needed to be tapered and beveled to account for clearance, which I did for my 2nd SLA mold design.

After the silicon was poured slowly through the opening, I left it to cure while I set up my 2nd mold design on the formlabs printer - this time using Flexible 80A material. I noticed after a little while that the silicon rubber was leaking through the bottom and sides of my mold which was to be expected. It stopped leaking after a couple minutes but I’m expecting the result to be only half complete. This could be easily fixed with this dodgy mold by taping up the sides of the mold - which I’ll try to do once I prep the silicon for the 2nd mold - which will be done.
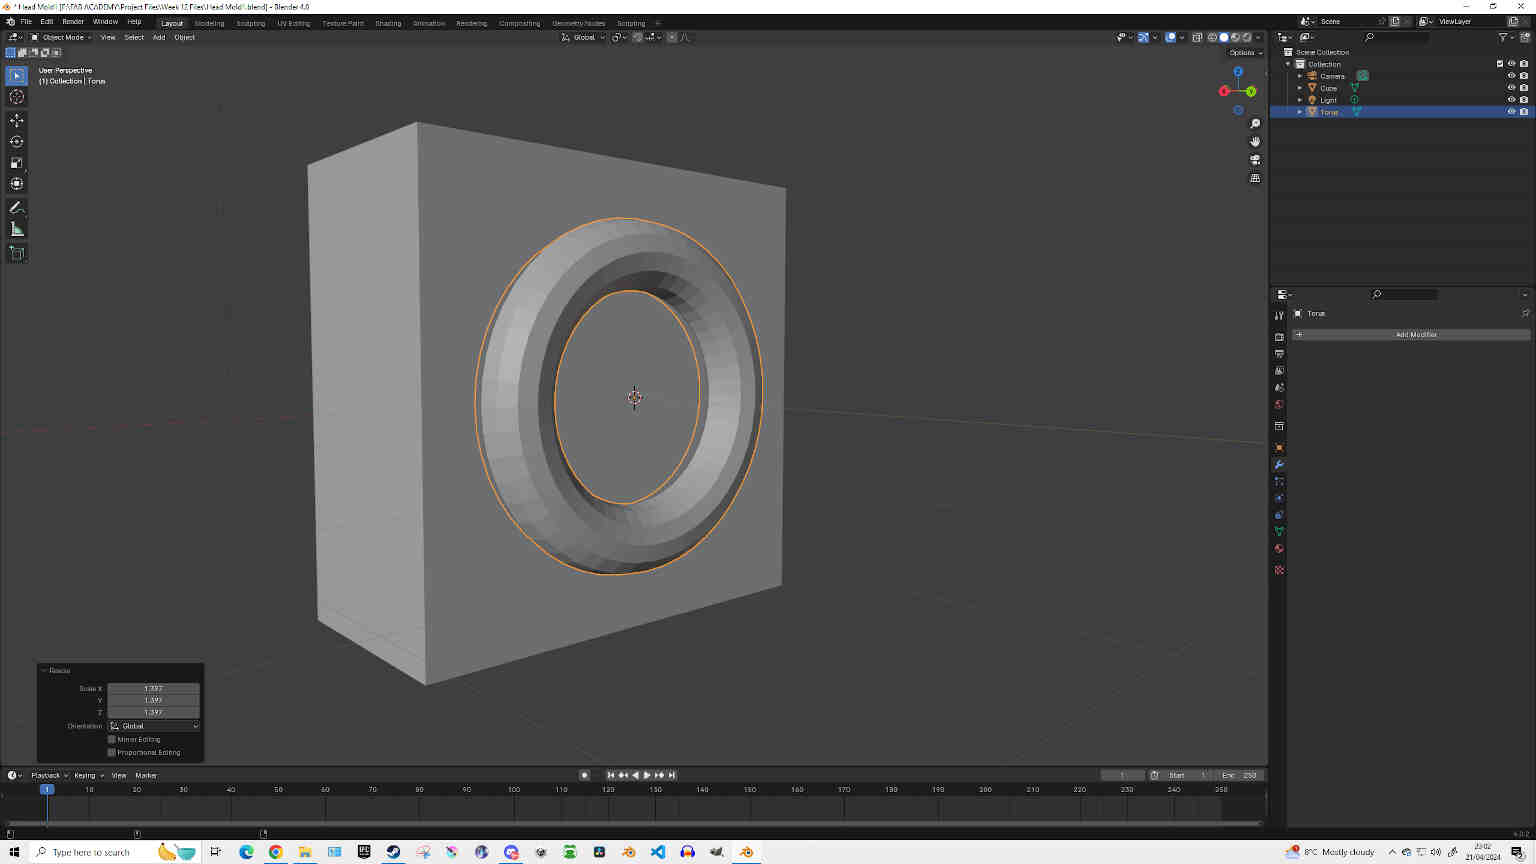
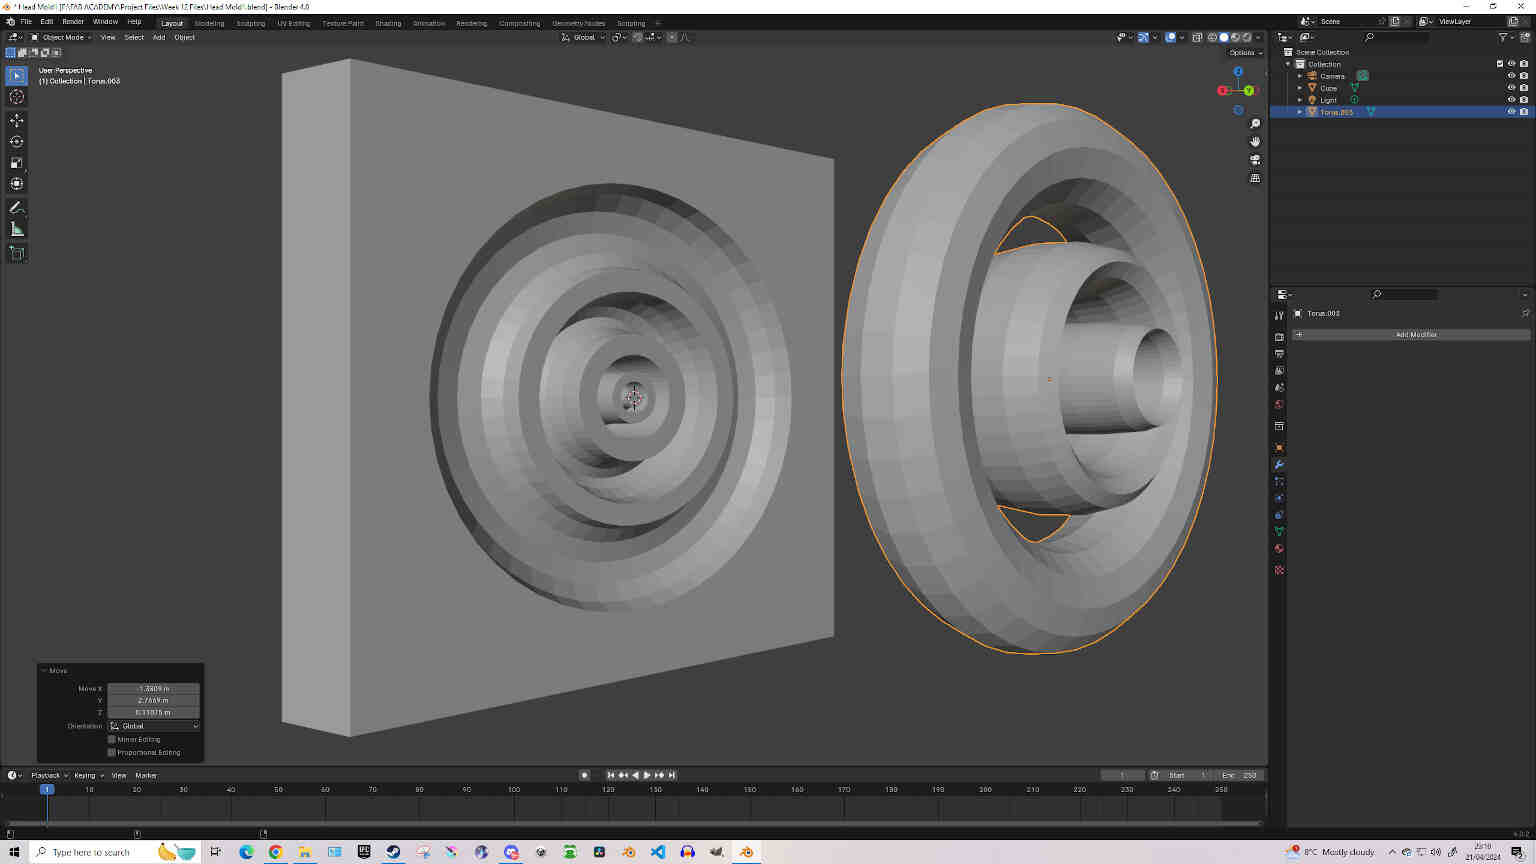
For my second mold and cast, I made a quick torus mold with multiple inner layers. The reason for this was to see how tight the cavity can be before being unable to form further. Using the same techniques above, I designed this new mold to be SLA Printed using Flexible 80A Resin and Cast with Smooth Cast Liquid Plastic.
Using the Formlabs SLA Printer and Preform Software, I was able to easily navigate my desired options. I was very satifised with Preform's user interface and simulations.

With the aid and guidence of Enterprise Fablab's local technician, I learned how to swap the Formlabs bedding and Tank Canisters according to the resin that was being used.
Once the Print was finished, I needed to scoop the molds off the upper formlabs plate and into a IPA Alcohol washing container for 10 minutes. Afterwards it needed to be put into a separate Curing machine for 10 minutes. This allows the resin mold to harden and lets you remove supports without fear of touching / breathing in toxic liquids or fumes.
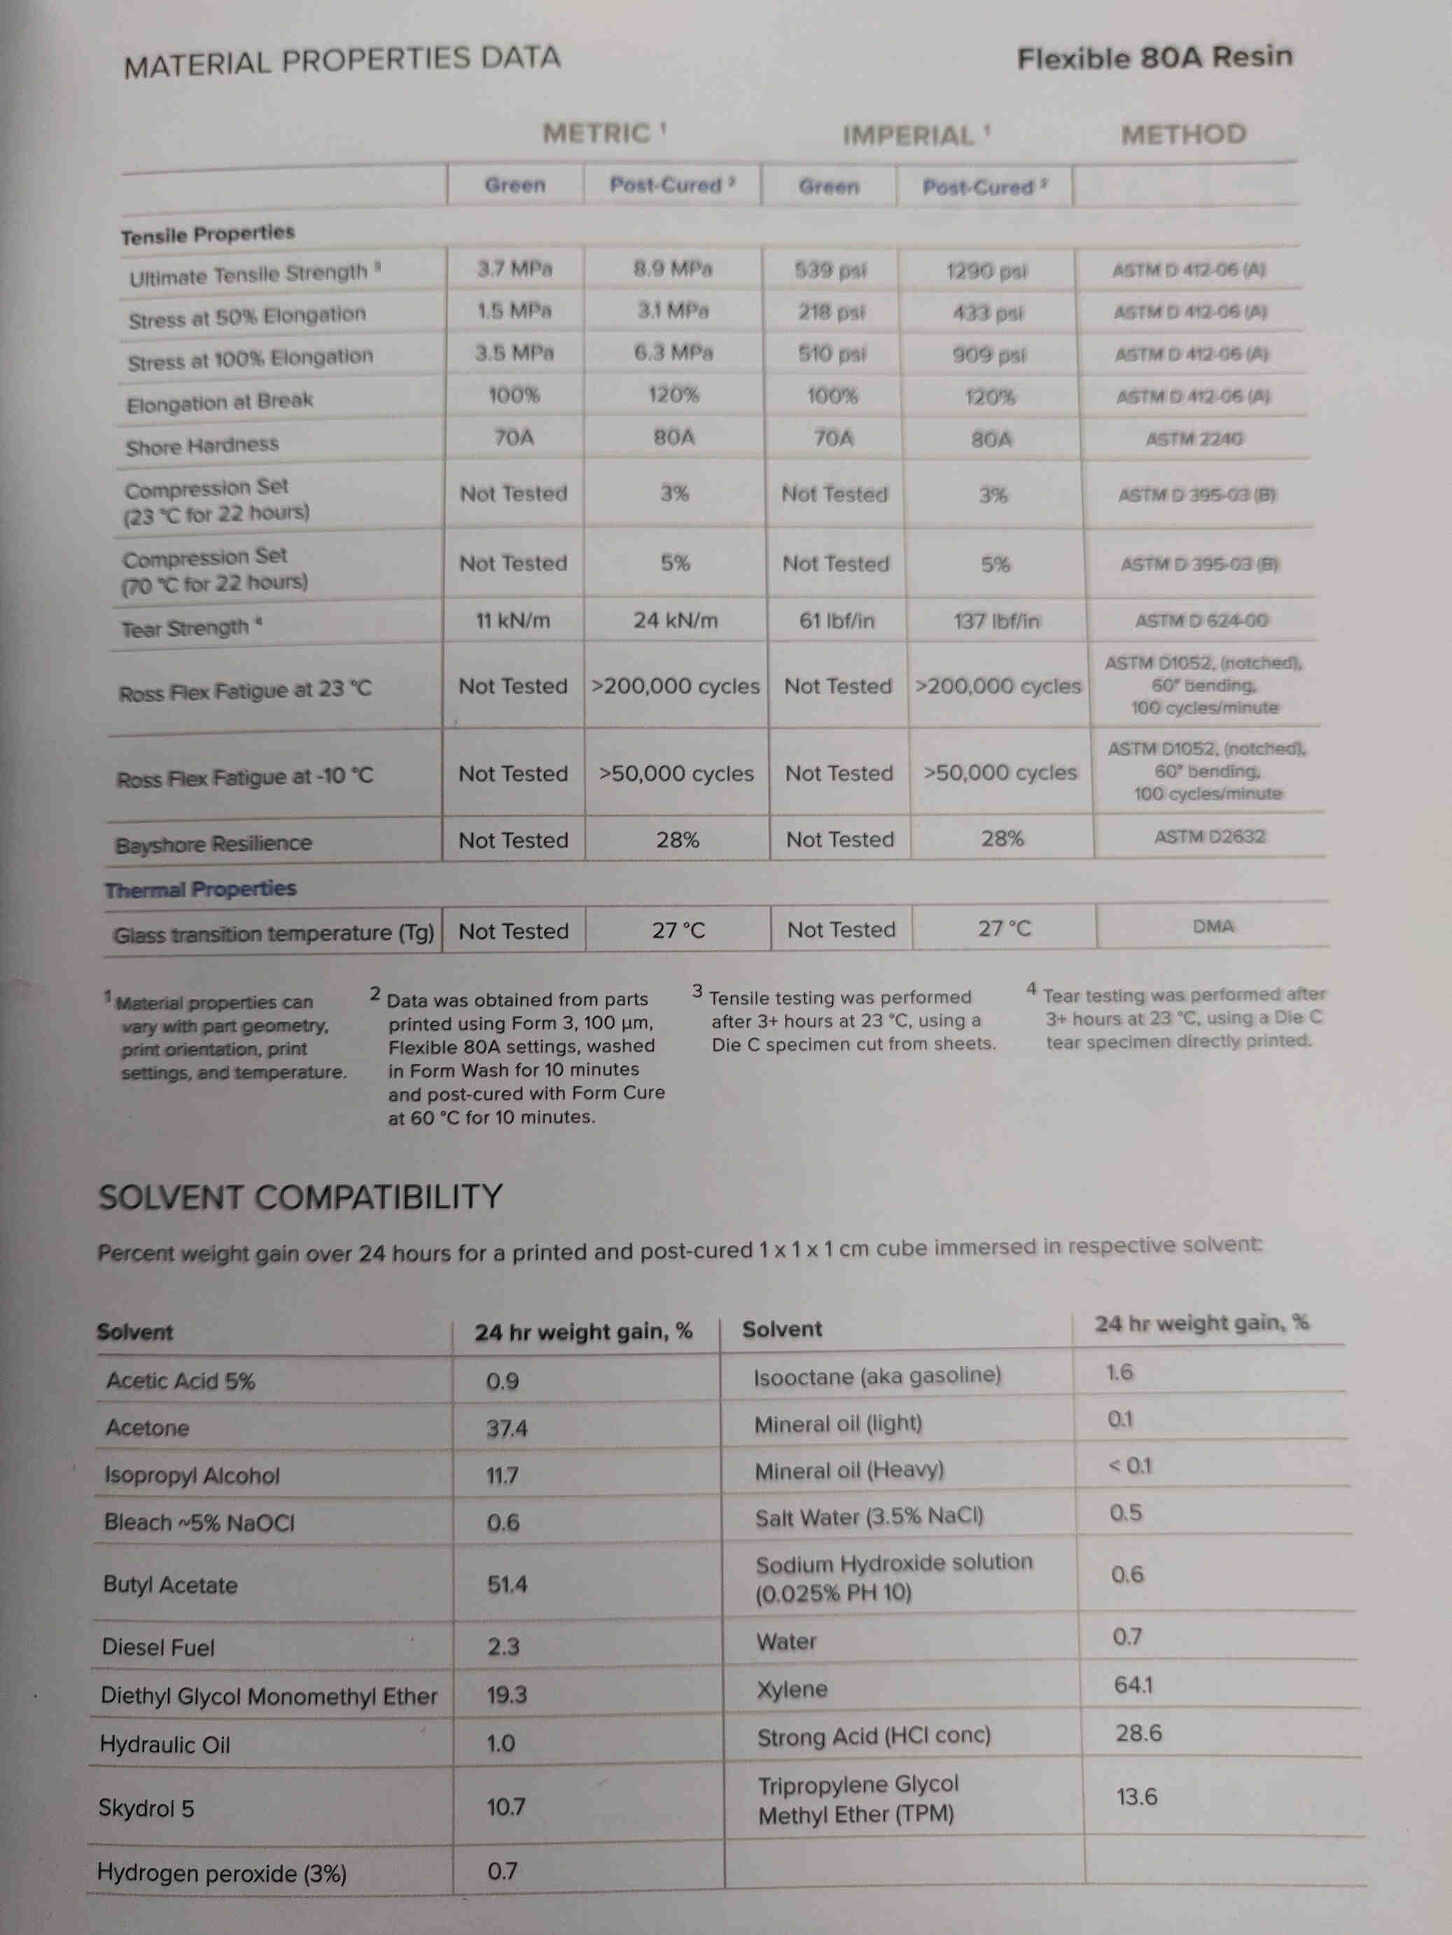
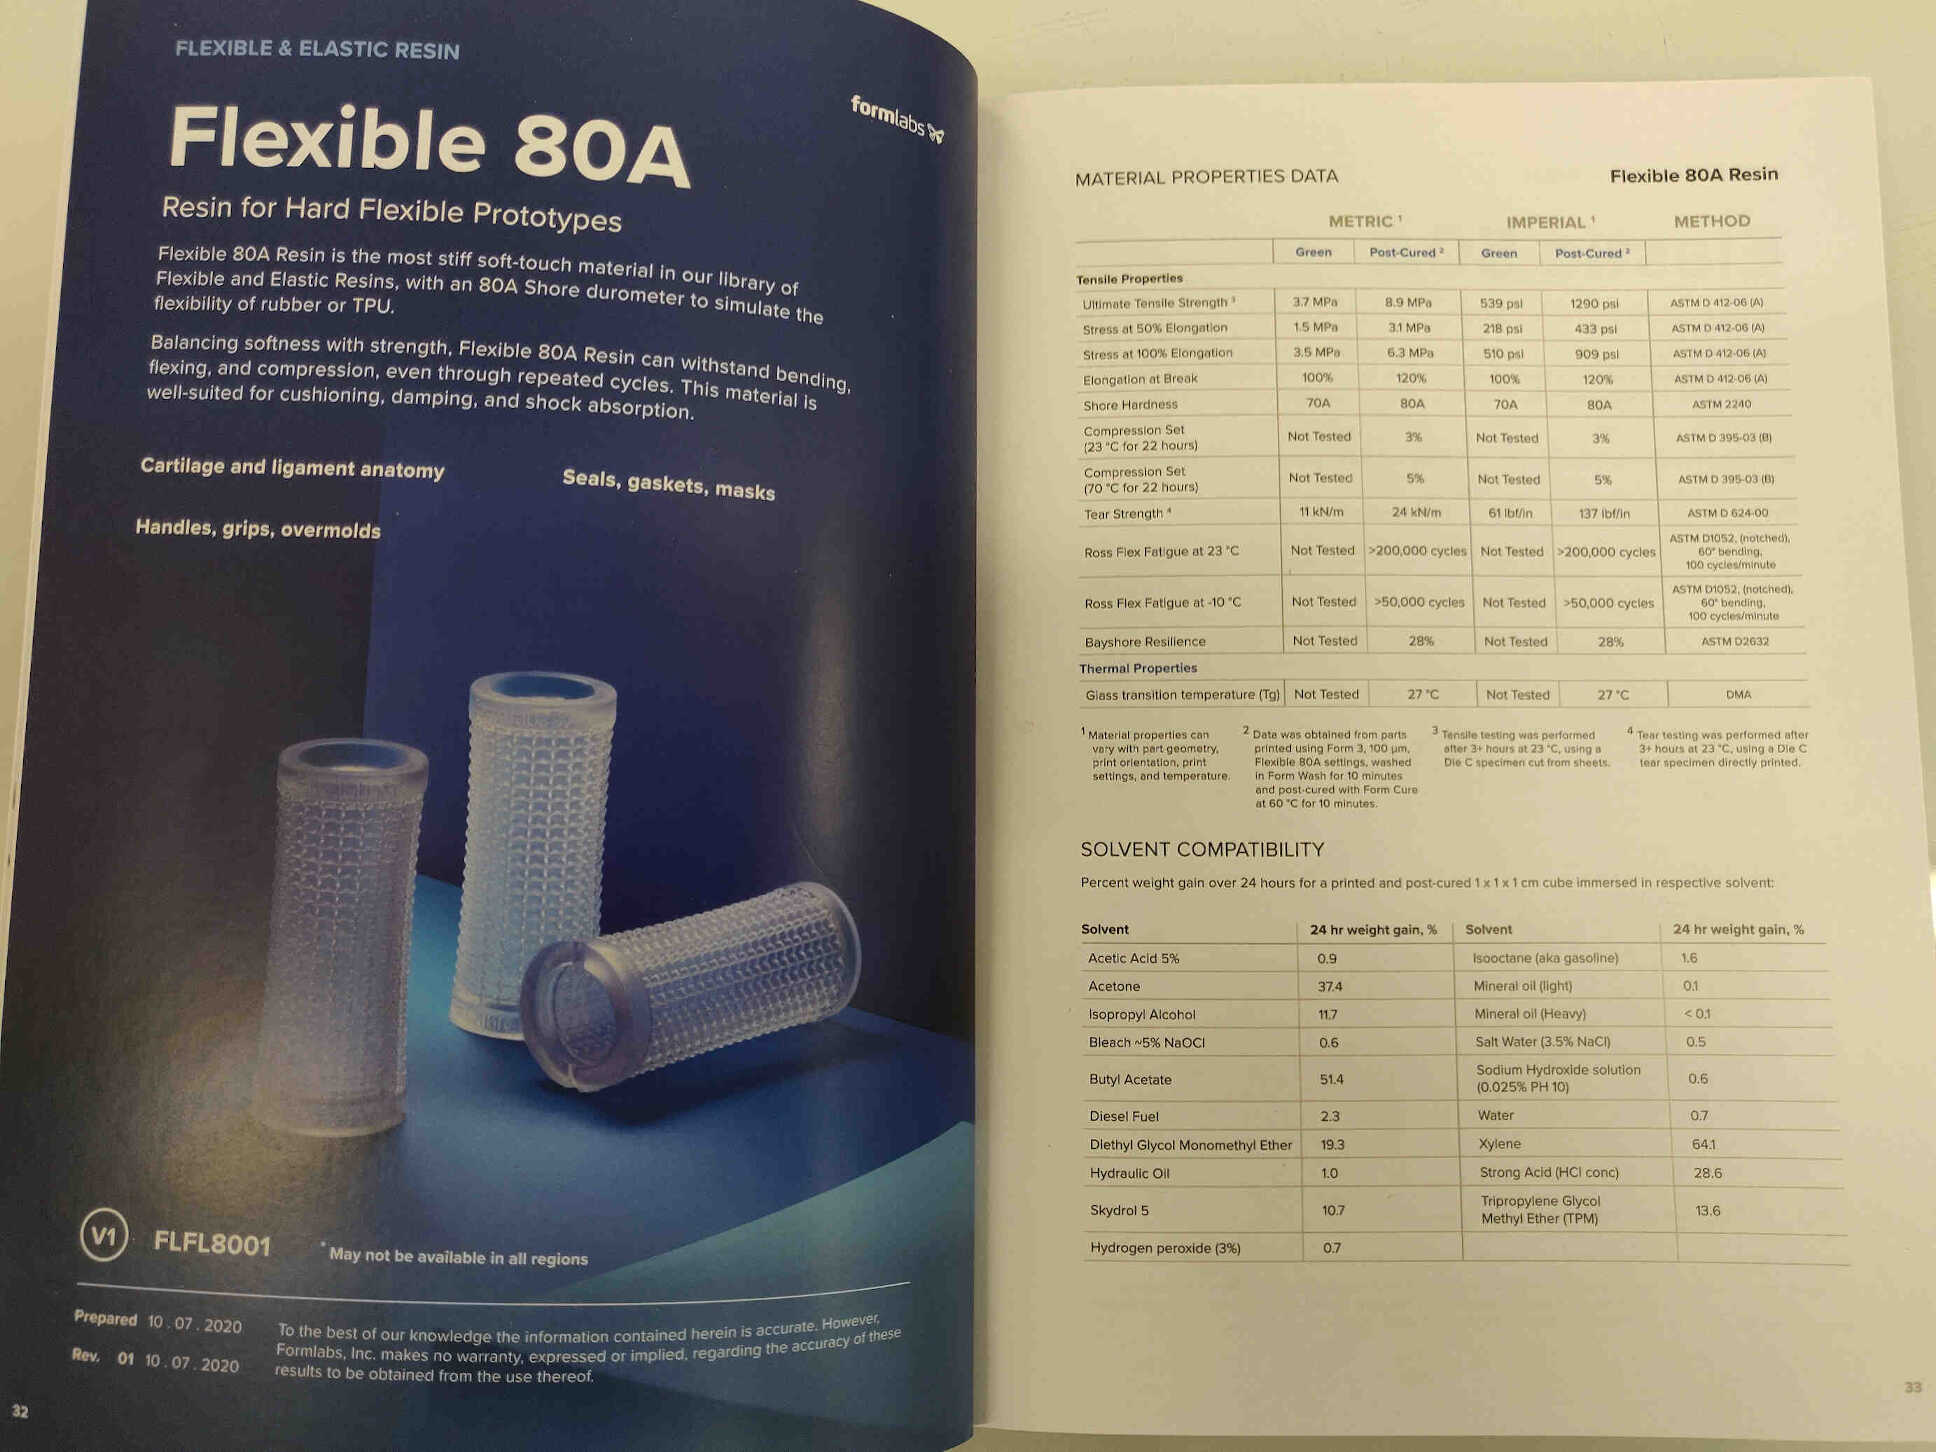
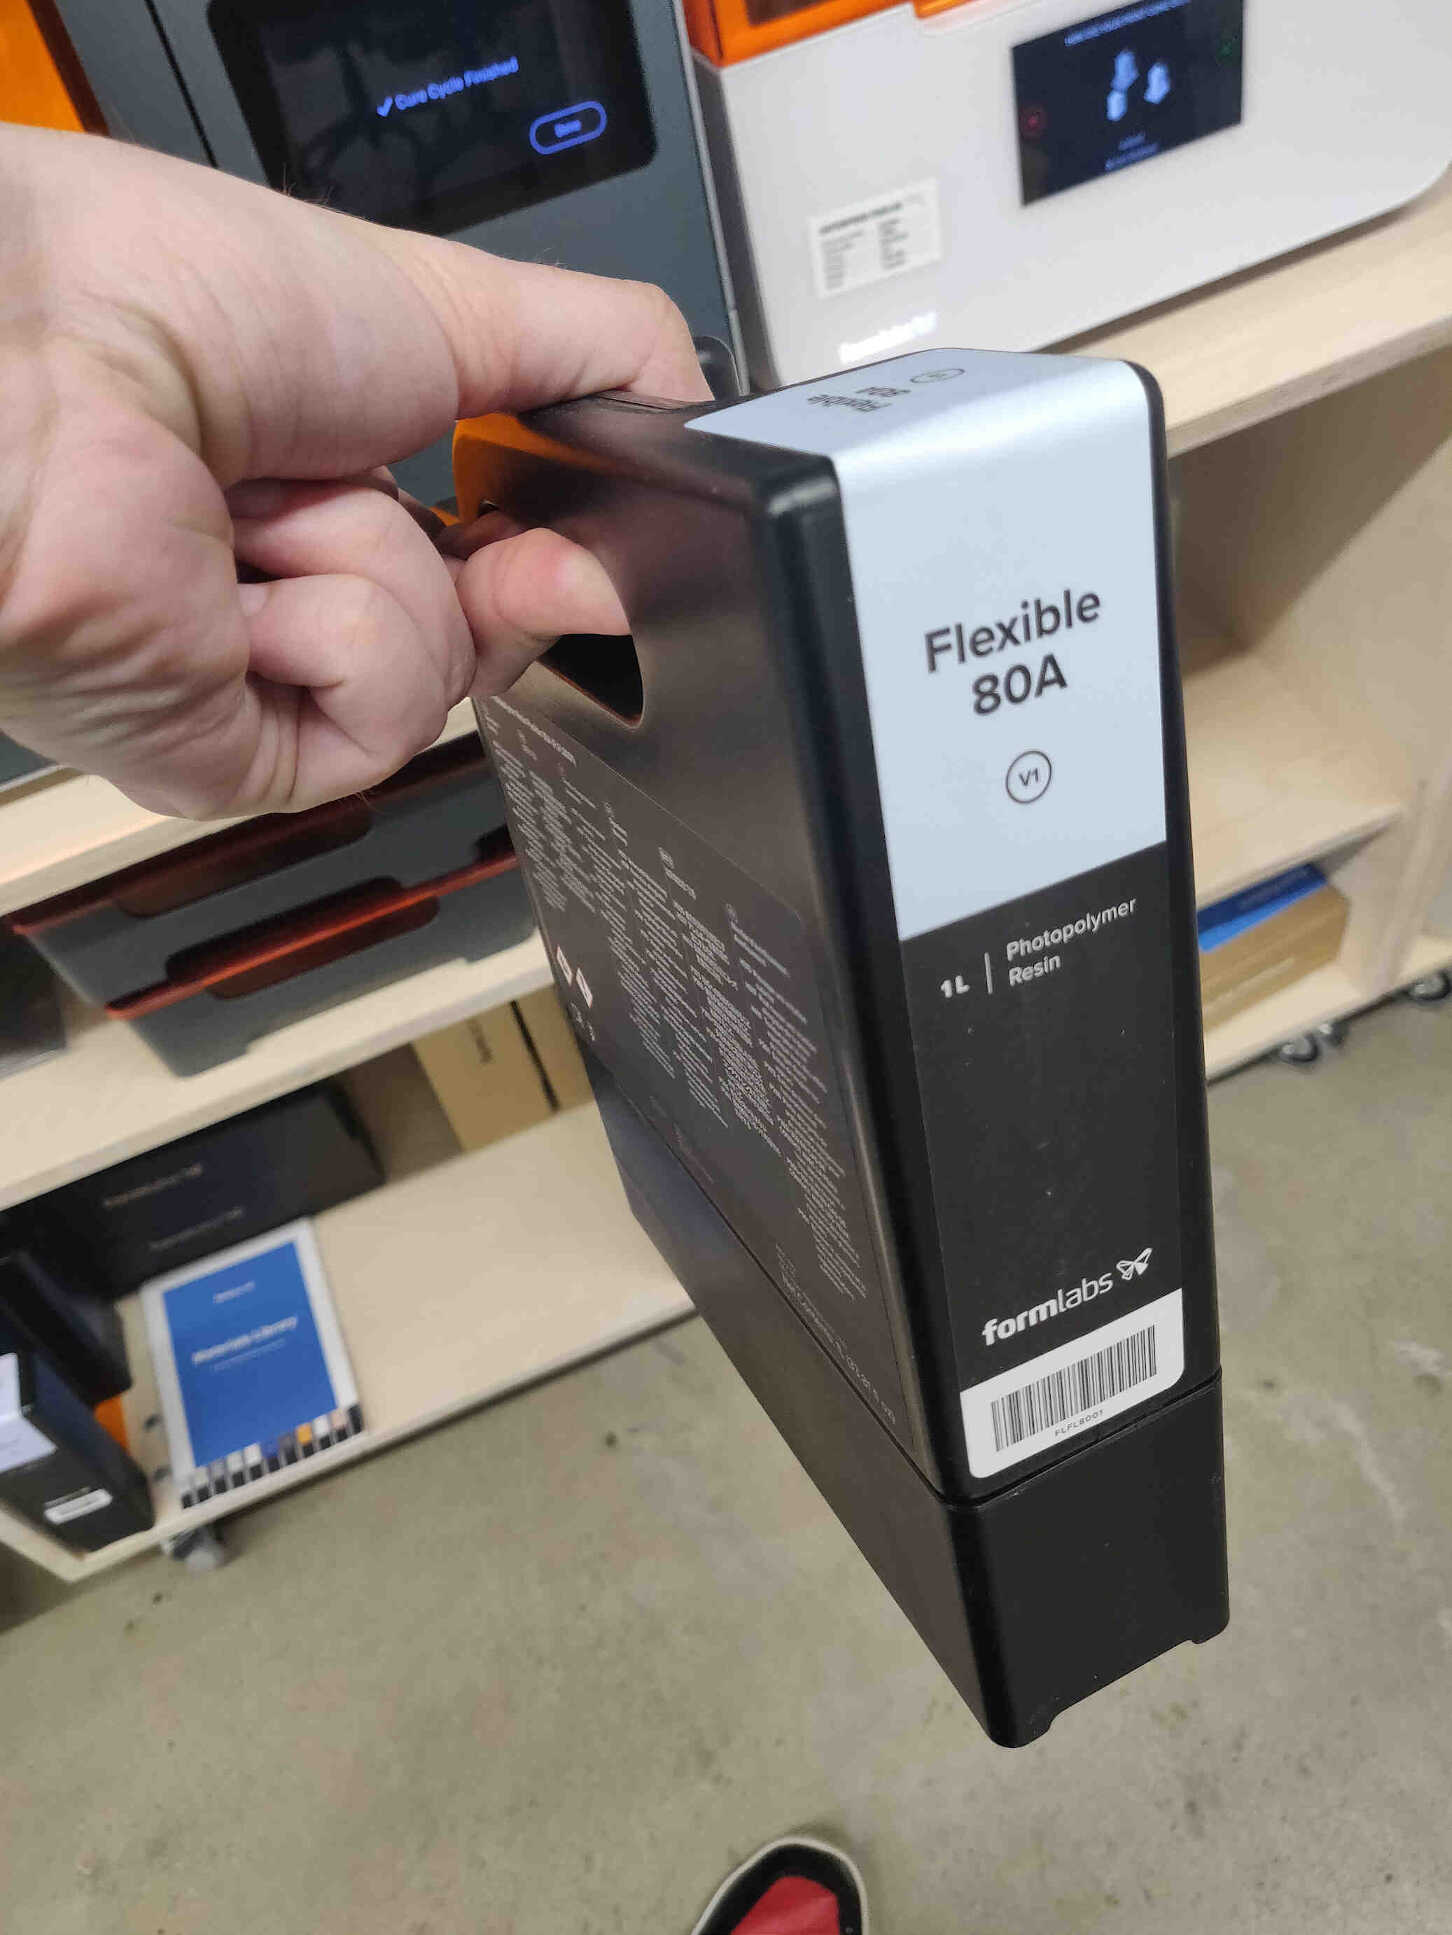
I had choosen Flexible 80A Resin as I imagined with would be perfect material for the molding / post-processing process - but I was entirely wrong. A ton of each mold's supports had fused together, creating an extremely strong / flexible mass of resin that formed together and was difficult to remove. And because of how flexible the material was, it was difficult to get the locking keys to slot in and connect without bending or expanding.
I clamped both molds together and started the Casting Process. This time I used Smooth Cast Liquid Plastic 1A:1B by Volume. The one I chose had a slightly longer Pot Life (7mins) and Cure Time (5mins) than the other option I had, however I still didn't expect how quickly it set. I didn't have a lot of confidence for this print as the Liquid Plastic and Flexible 80A resin didn't react as I expected.
This mold and cast were eventually destroyed in the remove process as the Liquid Plastic and Flexible Resin ended up being essentially glued together. It took 40 mins of strongarming, 2 flat-end chisels and 2 scapel knives to take the mold apart. In the process, the cast and molds were warped and destroyed. Though the results were the opposite of what I expected, I still learned valuable lessons from this process.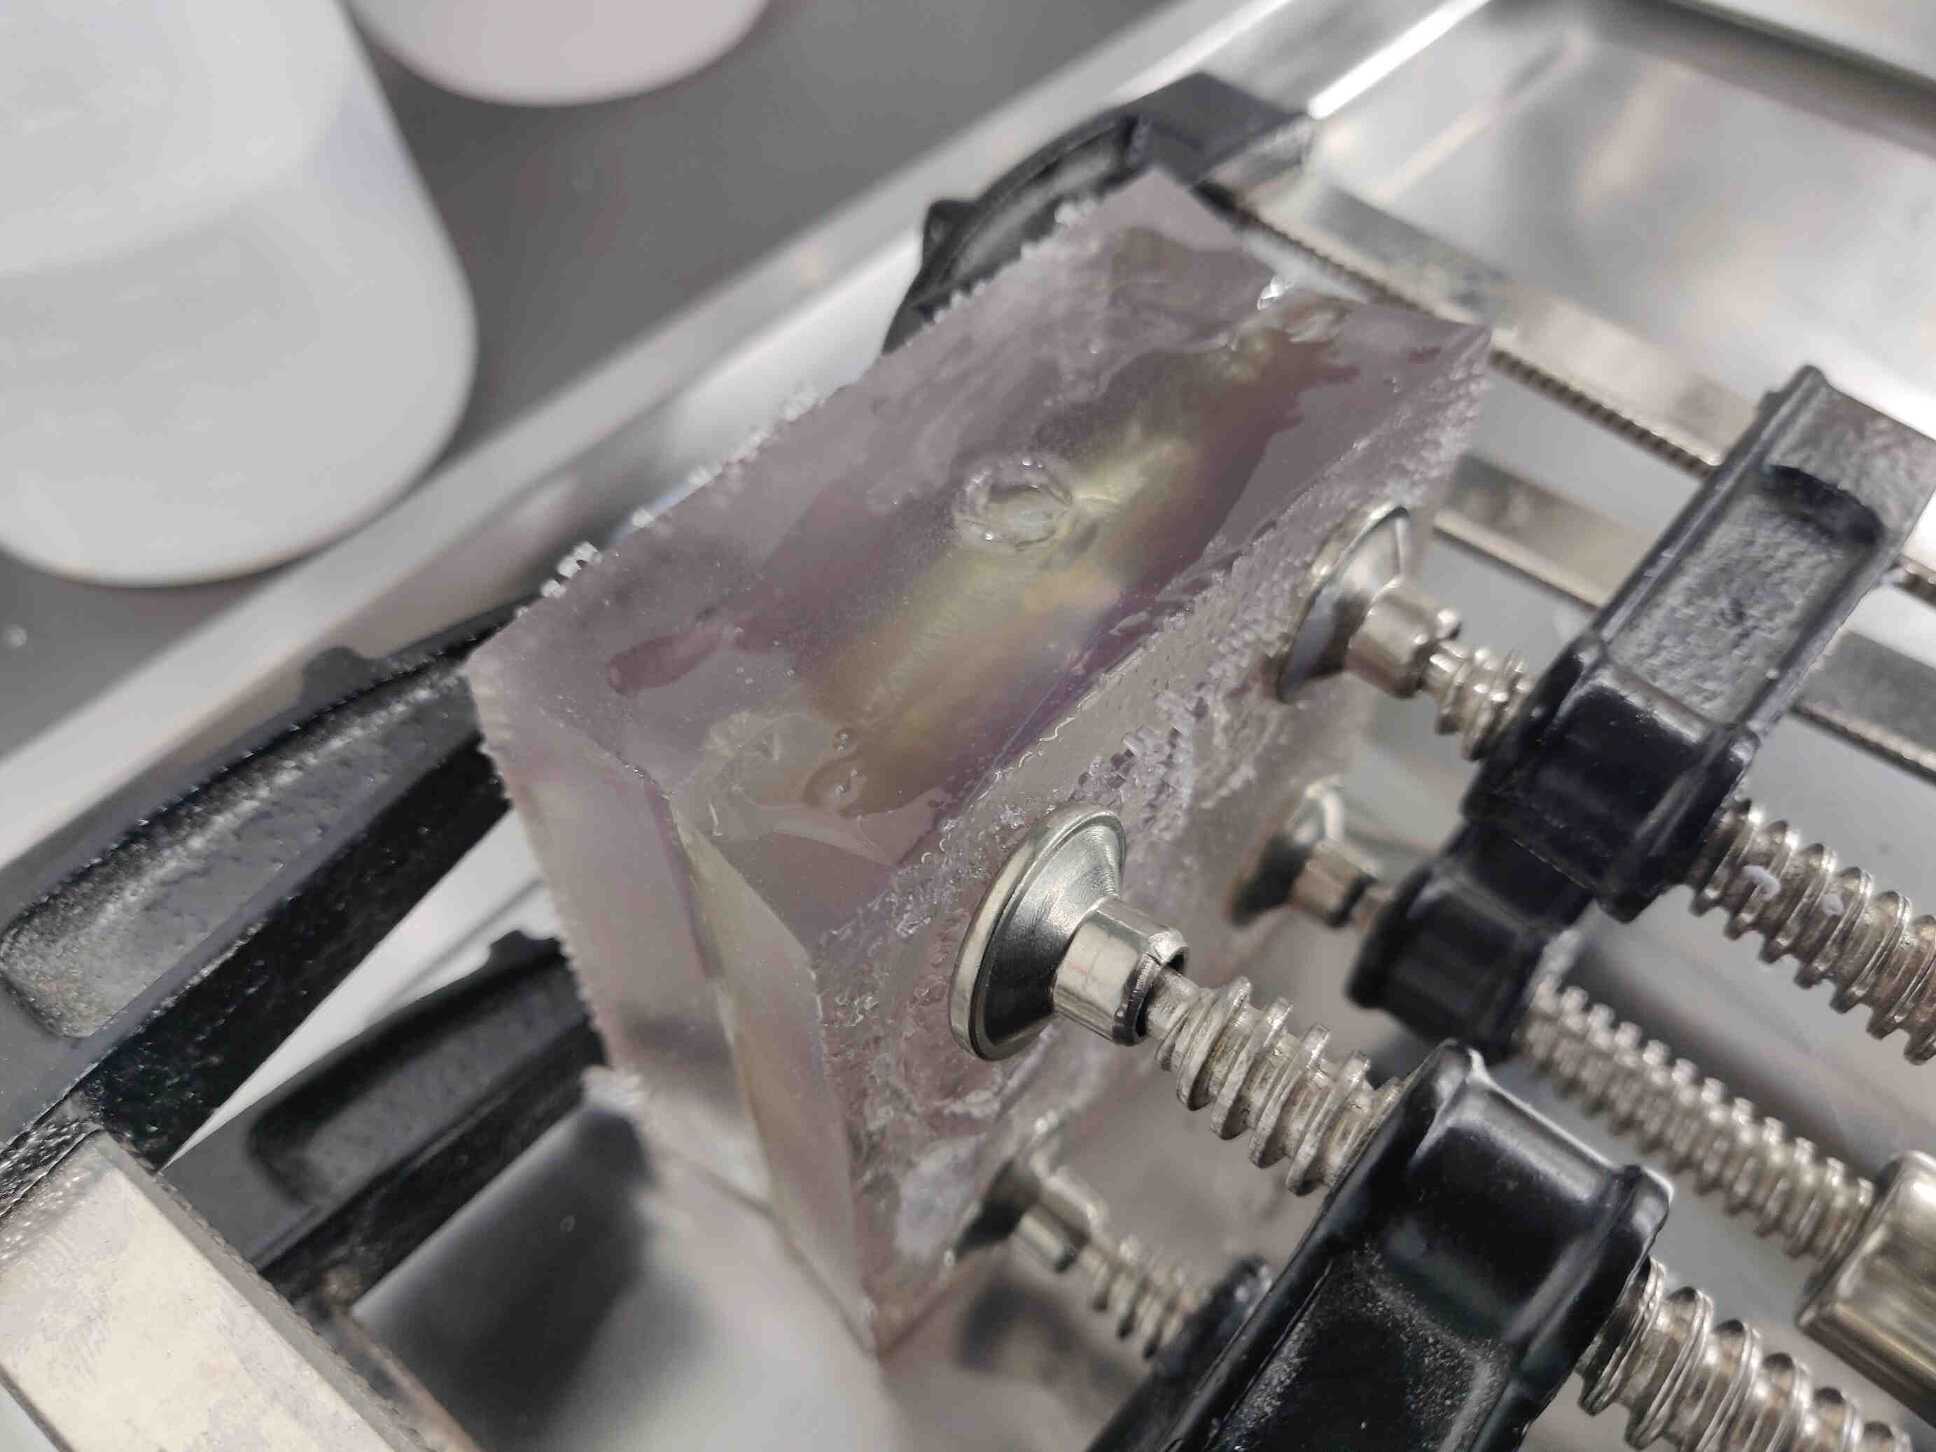
Washing and Curing SLA Resin Print
Create Molds with Key in 3D Blender
Trycut Prototyping Machining
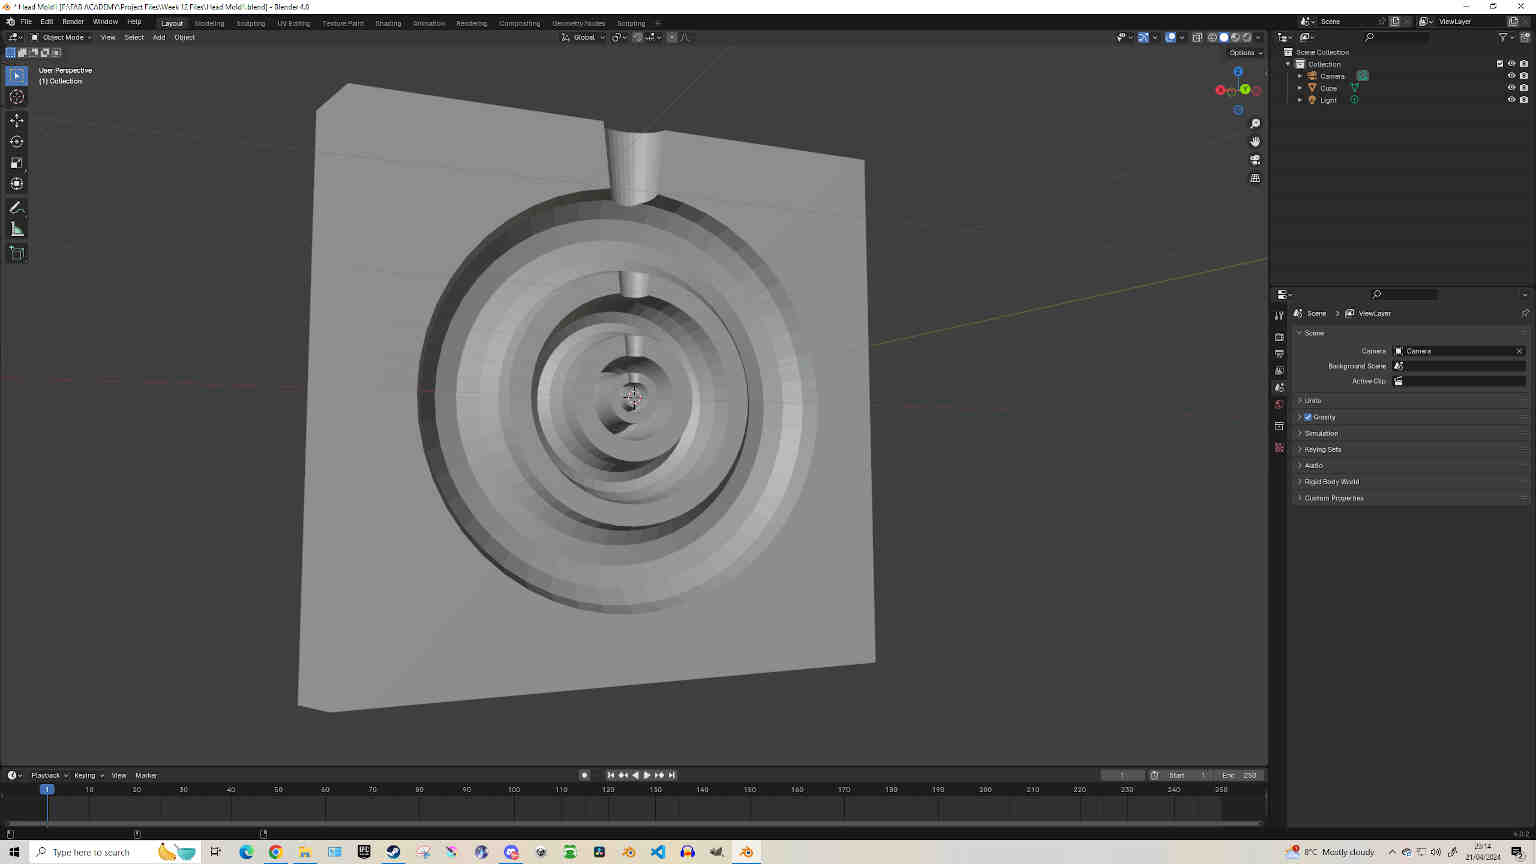
In my defeat, I settled for a very simple torus/donut design mold and focused on researching the techniques in making a proper mold and cast. Our first mold print (which was a rushed design made before the weekend) was made with Draft Resin and it resulted in a very smooth surface, sturdy and clean 3D print. Formlabs continues to be user friendly and produces highly detailed and satisfying results. There were a couple dented edges that were developed during the printing process which led to the Silicone Rubber cast leaking out and deforming my cast - but this could have been easily fixed by sellotaping the edges. Also proved something I researched over the weekend - that forming keys strictly through subtractive and additive boolean operations isn’t enough for a real world product - the keys need to be tapered, beveled and slightly resized for a satisfying result.
I intended on using a Flexible Resin Mold originally but the results were far less than satisfactory when I eventually did. Partly because of the supports that fused together into a very tough formed resin that was difficult to remove or shave off. After removing the supports, I noticed the mold became warped during the removal process, making it very awkward for the keys to slot in together properly. Along with these issues, I also used a Liquid Plastic mixture to cast which began to cure a lot sooner than the pot life suggested. During the removal process I basically had to destroy the flexible resin to remove the cast as the liquid plastic partly fused all around the mold - forcing me to remove the cast with a hammer and 2 flat-end chisels. I don’t intend on using flexible resin again unless I have a purpose for it.
Part of our Group Assignment was to compare 3D Printed Resin Molds and Machinable Wax Molds created through a milling process. I overlooked the process and the results were practically flawless. It took a while to get a purely smooth finish with very clean edges but the results were undeniable. We used Silicon Rubber for the mold and liquid plastic for the cast. I intend on using draft resin again for any future molds as I was very happy with the result and it was an incredibly easy process with great results - but the machinable wax milling (when done properly) produced the greatest result by far.
Keeping this assignment simple didn’t go as planned and the stress levels for completing my backlog is rising, but I learned a lot of useful tips and tricks this week and plan on continuing this research further in the future.
![]()
Mill Control / Milling Machinable Wax
____________
Individual Assignment:
____________
Molding and Casting Definition (ChatGPT)
So… What is molding and casting? Let's check in with ChatGPT!Molding and casting are both techniques used in manufacturing and crafting, but they serve different purposes:
In summary, molding is about creating a mold, while casting is about filling that mold to create a final object.
____________
Molding and casting involve creating a mold of an object and then pouring a material like resin or plaster into the mold to create a replica. Here's a basic step-by-step process:
Remember to always follow safety precautions when working with mold-making and casting materials, such as wearing gloves and working in a well-ventilated area.
(- Written by ChatGPT v3.5, April 18th 2024)
____________
Mold Concepting:
Was considering designing a mold of the head or body of my final project but I don’t think that will be a viable option since I most likely need those parts to be hollow and light.Initial Goals for assignment completion:
- Design a weapon mold based on a game.
- Use a 3D SLA/Resin printed mold.
- Look through the formlabs Materials Library for the appropriate materials and properties for molding and casting with them.
This is something I’m interested in making and ‘should’ be easy to do. But what should I use for the design? The game ‘FFVII Rebirth’ recently came out to critical acclaim, so perhaps something to do with that?
- FF7 Buster Sword could be made with Metal & wrap cloth around it?
- FF7 Logo could be made partly with metal and green/black resin?
For my cast I’m gonna be using 3D Printed SLA Felixible 80A Resin. After the cast is printed and washed/cleaned thoroughly, I could use a spray primer on the inside and spray with a metal finish. Originally for my mold, I was considering the possibility of using a Liquid Metal to pour into the cast, but I was immediately told that wouldn’t be viable in my fab lab environment - also that it wouldn’t be suitable for resin casts.
I decided that I would mold & cast the Buster Sword from the video game ‘Final Fantasy VII’ to celebrate the release of its recently released remake. Also to mold & cast the logo from the game with a metal finish and pour green & black resin on top to give it that iconic look.
Update: Decided to focus on the sword rather than the Sword & Logo, as the logo may be complicated to recreate in Blender and it may be overly difficult to post-process, along with the fact I would need to create two separate 2-piece molds.
____________
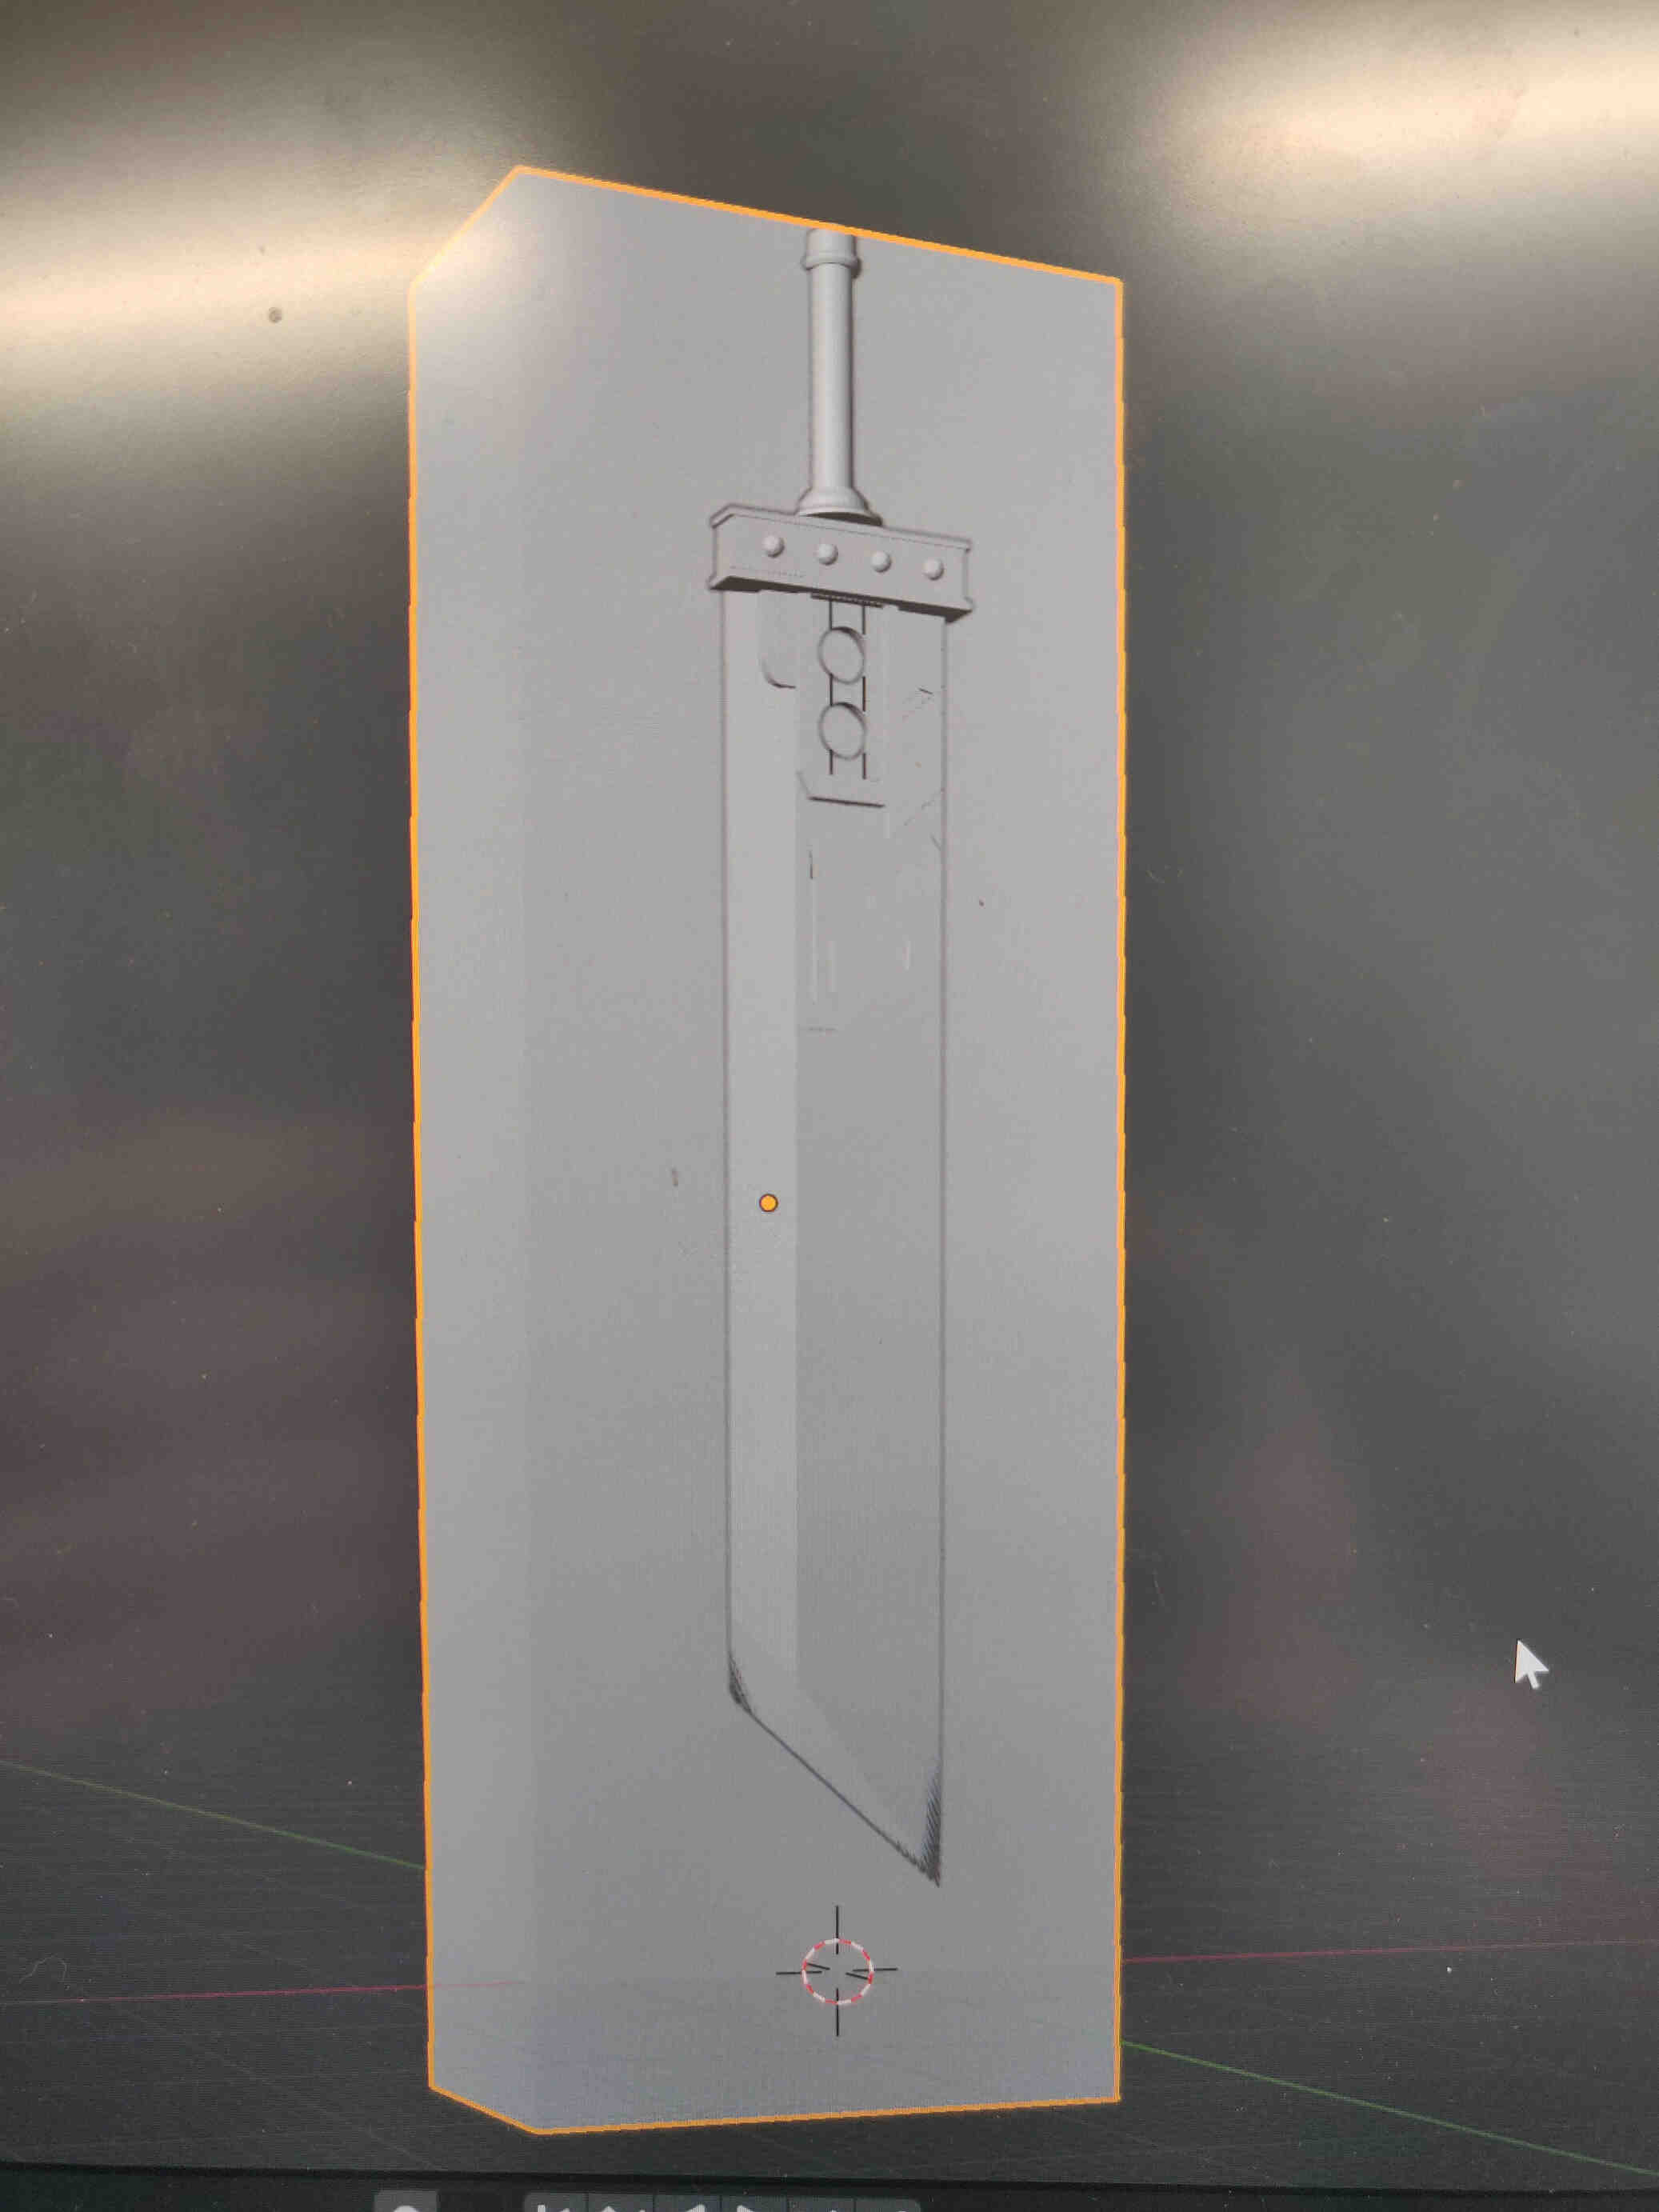
Buster Sword Design Process:
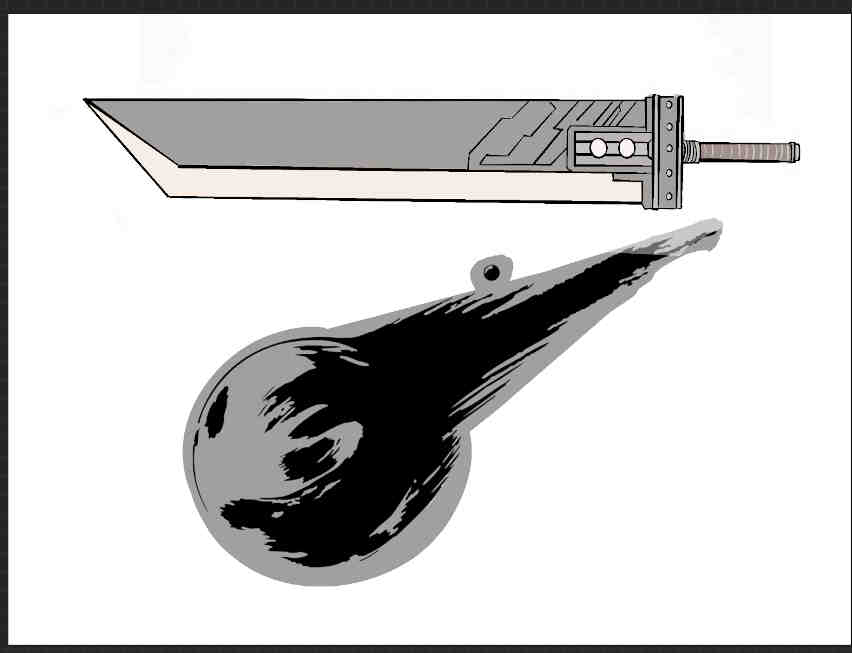
I started off by downloading an image of the sword and logo, then brought them into Procreate where I traced over them in black and white, with grey shading used to identify the depth of the slots. It was at the early point where I decided that doing the logo as well would take too much time and overcomplicate things. Then I brought the traced sword design over into Blender and recreated the model there. I could have done a very simple, blocky design but that would defeat the purpose of getting a high quality resin mold, so I followed this timelapse video at x0.25 Playback Speed to get a better example of a high quality and well structured model.
Learn Blender Knife Tool in 1 Minute
The other reason I chose to follow a timelapse video is because I’m getting rusty at 3d modeling and I could really use a refresher on techniques I could use for my final project, though I made some changes so that my version of the sword had a bit of my own flair put into it. I won’t go into too much detail when describing the 3D Building as it’s not the focus point of this assignment, but still worth mentioning the process.
Buster Sword Timelapse
____________
Building an Iconic Sword & Failures
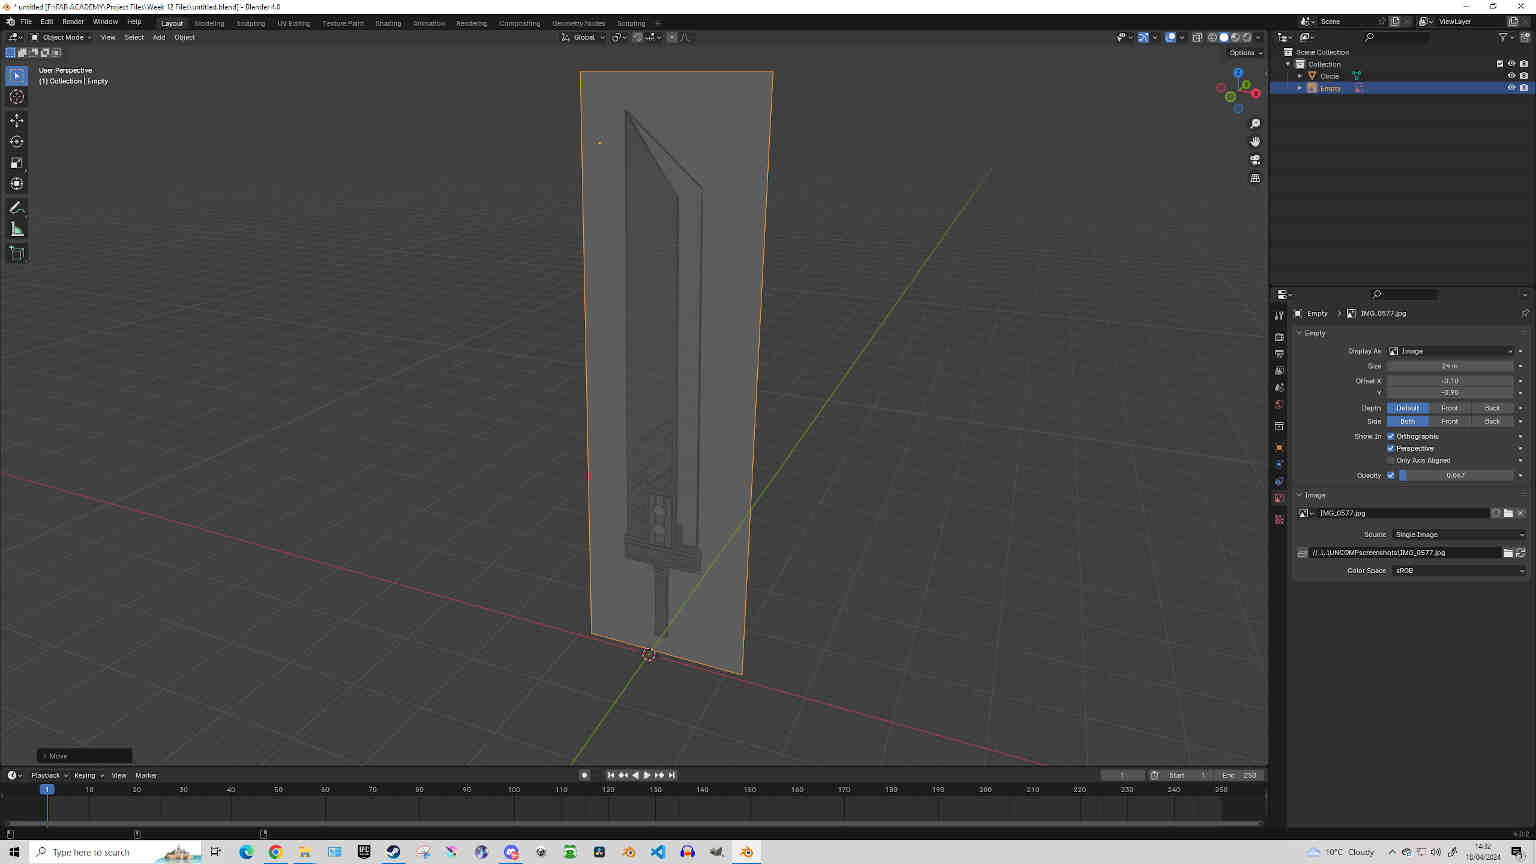
Starting with a new Blender file, I deleted the camera, light and cube from the workspace and started fresh by importing my illustration and using it as a reference along with the timelapse video. Before beginning the design, I clicked on the 2D view on the X axis, which stops me from accidentally bringing a part too far in or out of the 3D space.
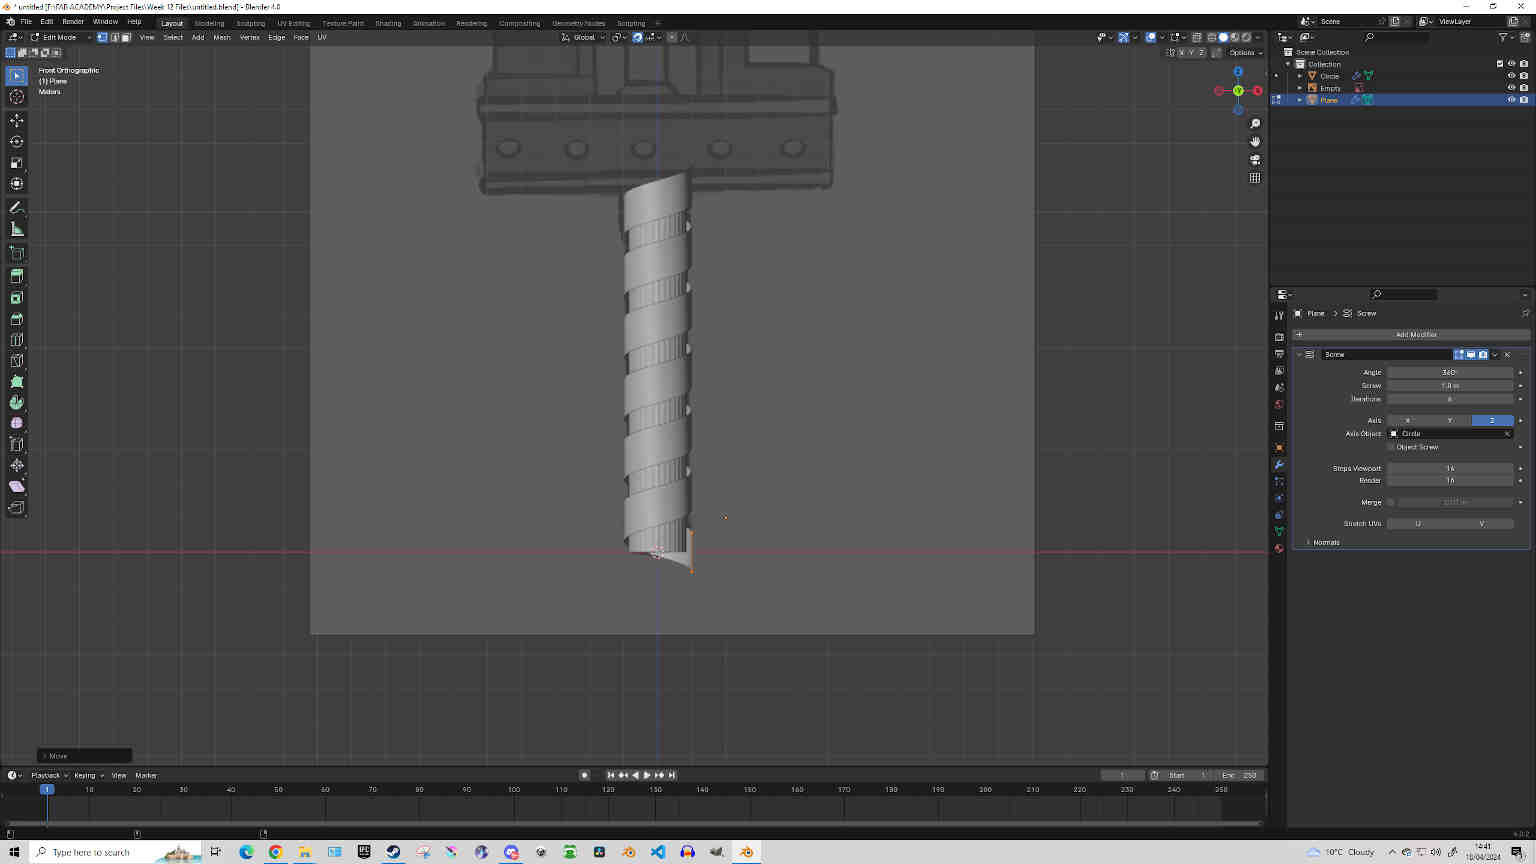
Going from the bottom of the handle upwards to the tip of the sword. Placing a Circle Mesh down flat, I extruded it to make a handle, then added a square and deleted 2 vertices to make a line. Then added Screw, Shrinkwrap, Solidify & Subdivision modifiers to the line to create a ribbed spiral leather design around the handle.
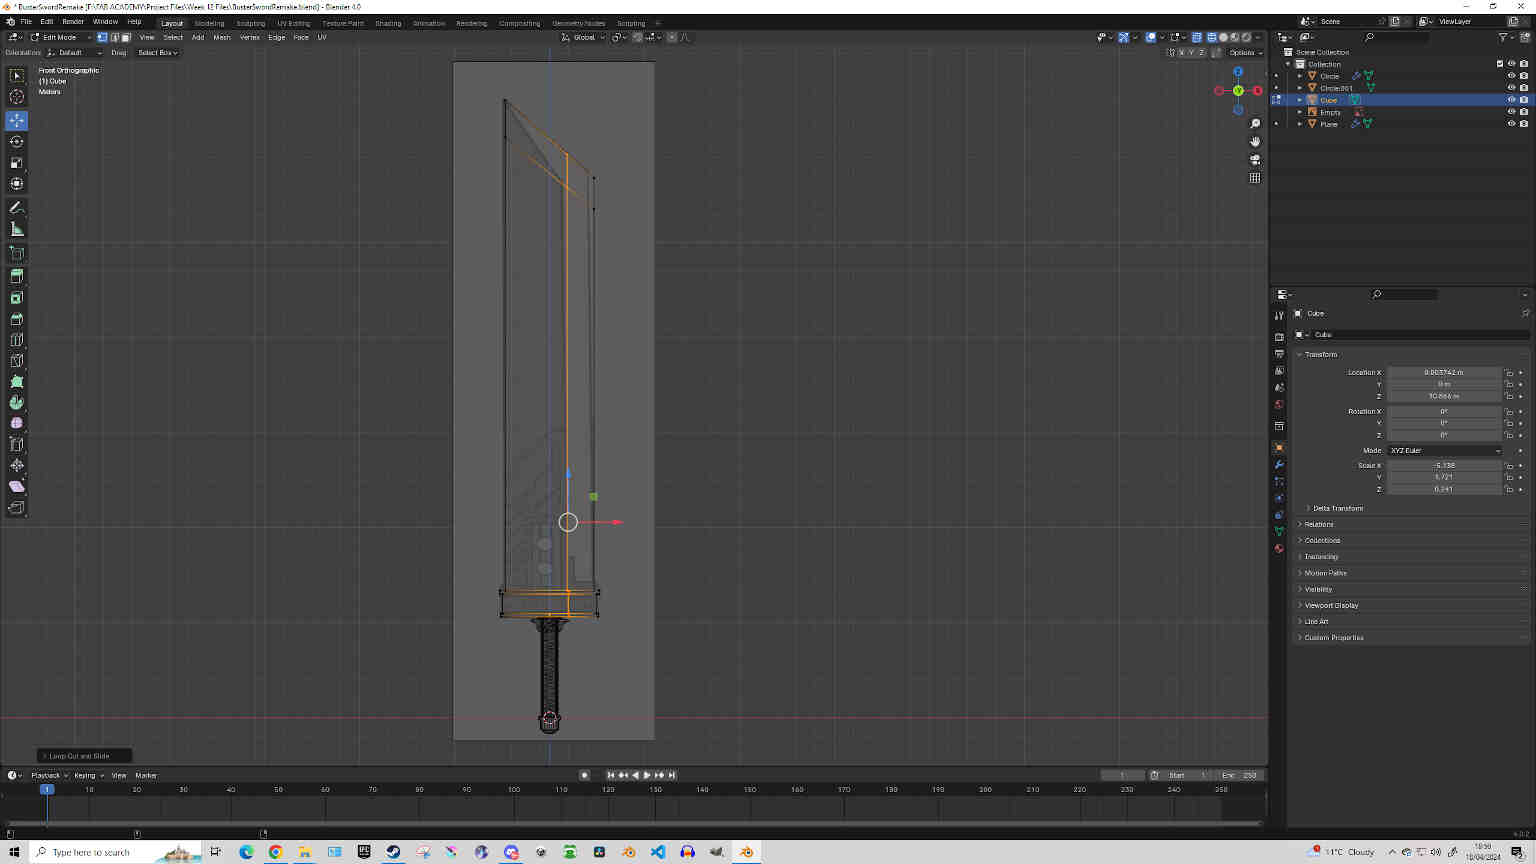
Then using basic cube scaling and Extrusion, I created the cross guard and the large blade attached. Then added 2 loop cuts along the blade going vertically and horizontally. Thanks to these loop cuts, I can select two vertices along the sharp end of the blade and hit ‘M’ key to ‘Merge at Center’, creating the sharp edges.
With the blade shape complete we can add more aesthetic features. First off we can use the ‘Knife Tool’ to create the line marking along the blade. After making your first cut, press ‘C’ before continuing - this will make sure that the cut goes all the way through the model. Then to finish making the cut just hit the ‘Enter’ key.
Then by adding more cube meshes and using the ‘Extrude’ tools to create more designs, I can add more parts for aesthetics. Also using the Bevel tool (Ctrl+B) to round out the corners of some objects. Then using the Boolean modifier to cut out or add shapes to the overall objects. Mainly I used a Boolean modifier to cut out 2 holes for the Materia Slots, then by selecting the vertices over the empty edges, I can shift-select the points and press ‘F’ to Fill.
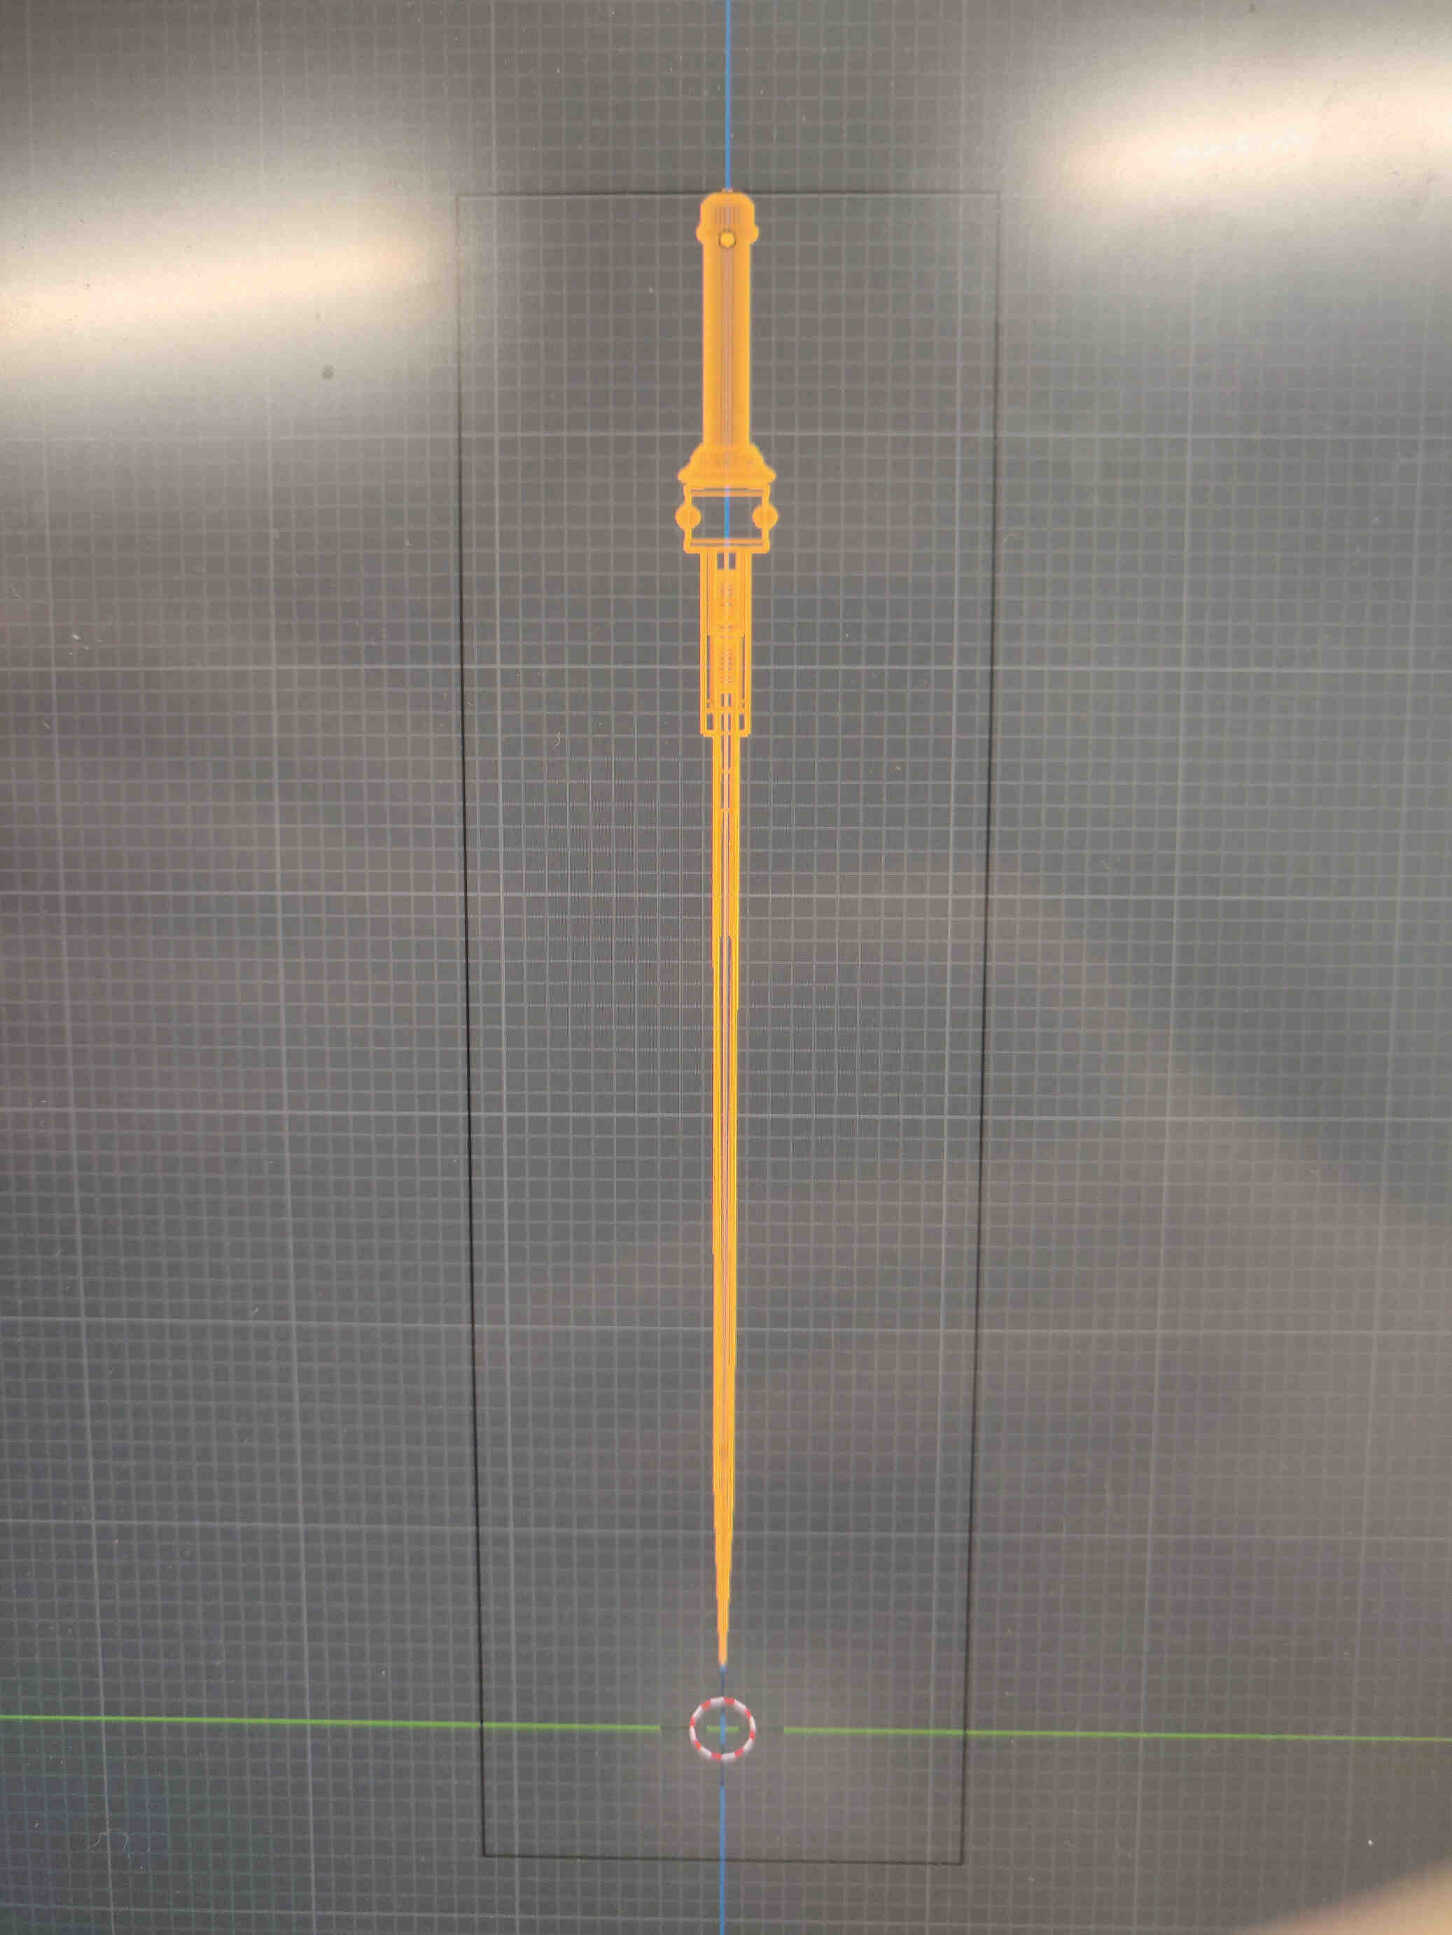
With that, our model is finished! But now it’s time to create the mold. To do this we need to add two large cubes that will encompass the sword model. These cubes will become our printed molds. A tip I was given was to make the outside of the cube a bit larger than the outside as it will make the removal process a lot easier.
____________
Learning my Lesson…
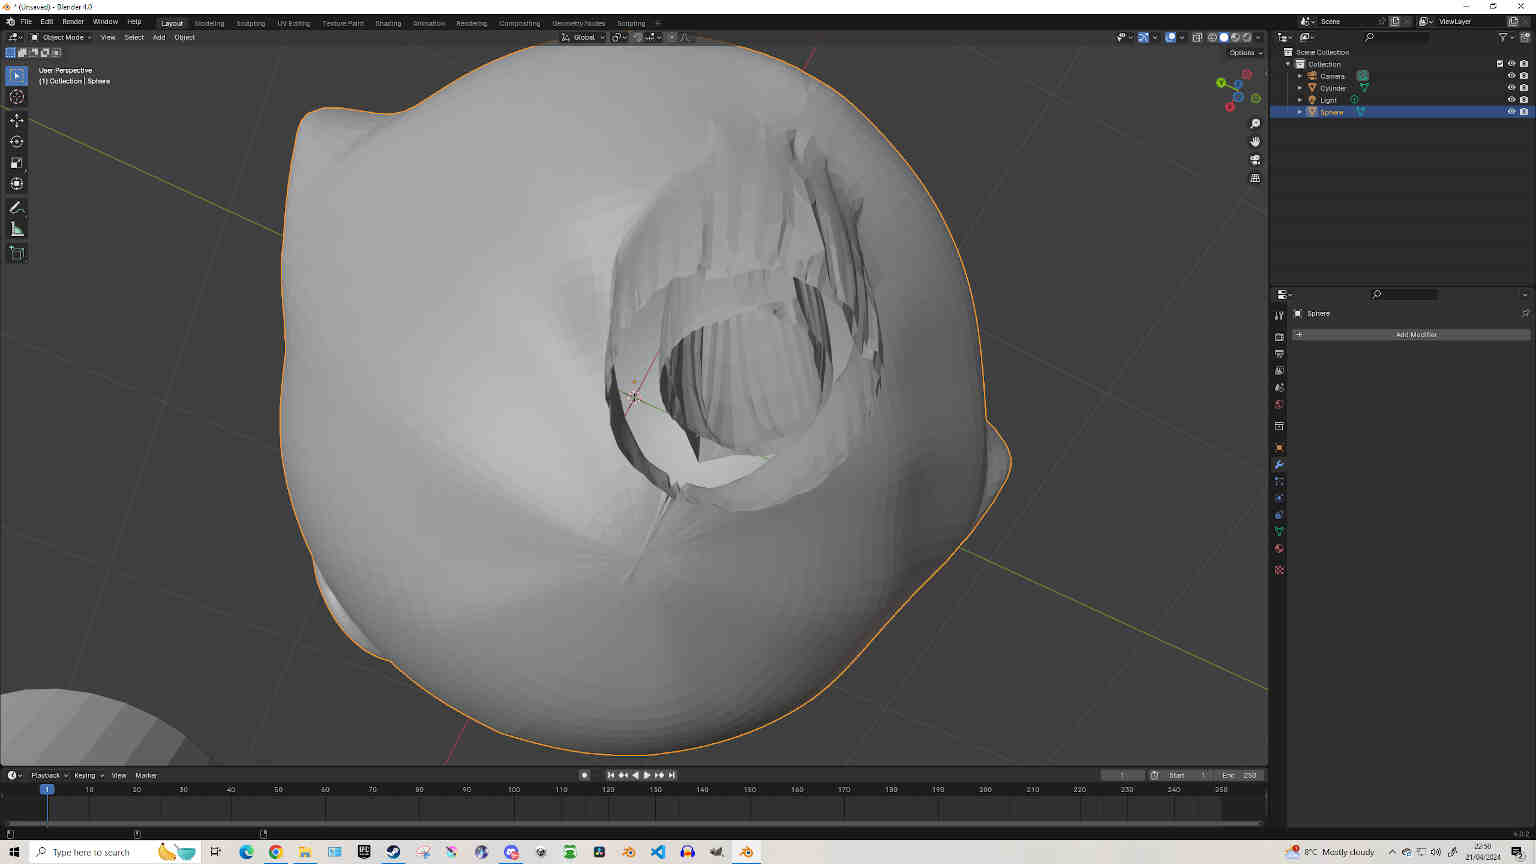
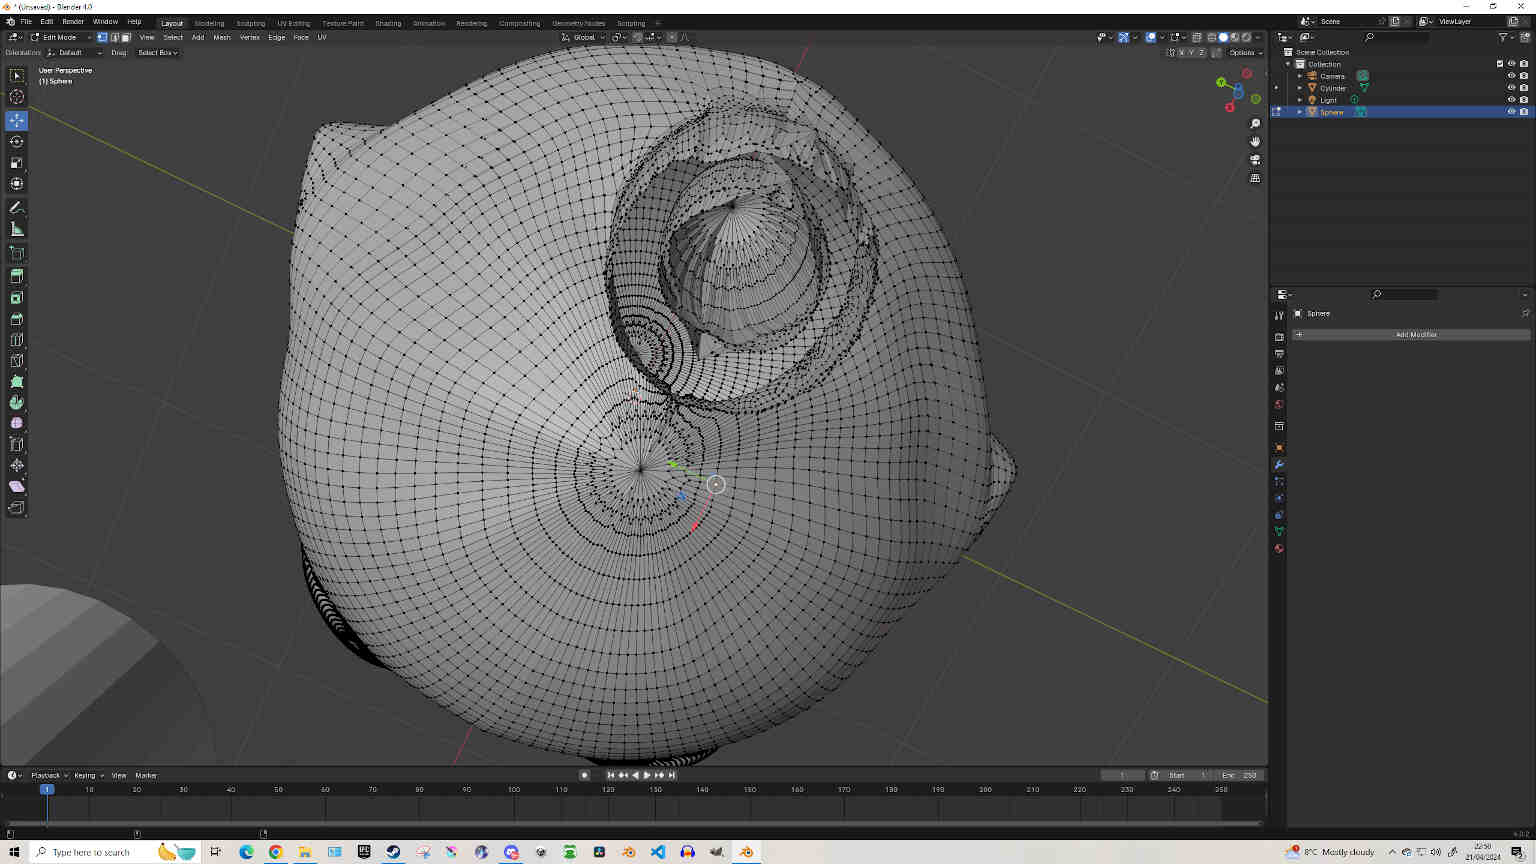
As I was getting ready to form the mold of my sword design, I kept running into issues with the Boolean modifier to create the mold shape. I tried a variety of ways, even the Fablab technician attempted to help me. But after a couple hours, he’d told me it couldn’t be done, and that I needed to have made something much simpler and mold-friendly. I had told him that I thought I did pick something simple enough, as I had heard from Neil and the instructors that there is a push to get students up to date with their assignments, documentation and Nueval as students are too far behind schedule - and that certainly is the case for my Electronics assignments. The technician responded: “Making a donut to mold and cast is simple. Spending several hours in Blender creating a sword that isn’t made for molding is not simple”.The electronics side of Fab Academy deflates my confidence so much that whenever a design-related week comes up, I always want to make something cool and interesting - almost to prove my worth in being there. But in doing so this time, I actively missed out on the point of this week’s assignment. I should be learning how to ‘mold and cast’, not learning how to ‘make something cool that I can mold and cast’. If I knew the intricacies of the process, I would have known not to design something that isn’t fit for molding.
In a last stitch attempt to make something that works for my Final Project, I attempted to design a Doll Head mold, but due to similar boolean issues, I was not able to complete the mold design.
Attempting a 'Doll Head' Mold Design (Failed Attempt)
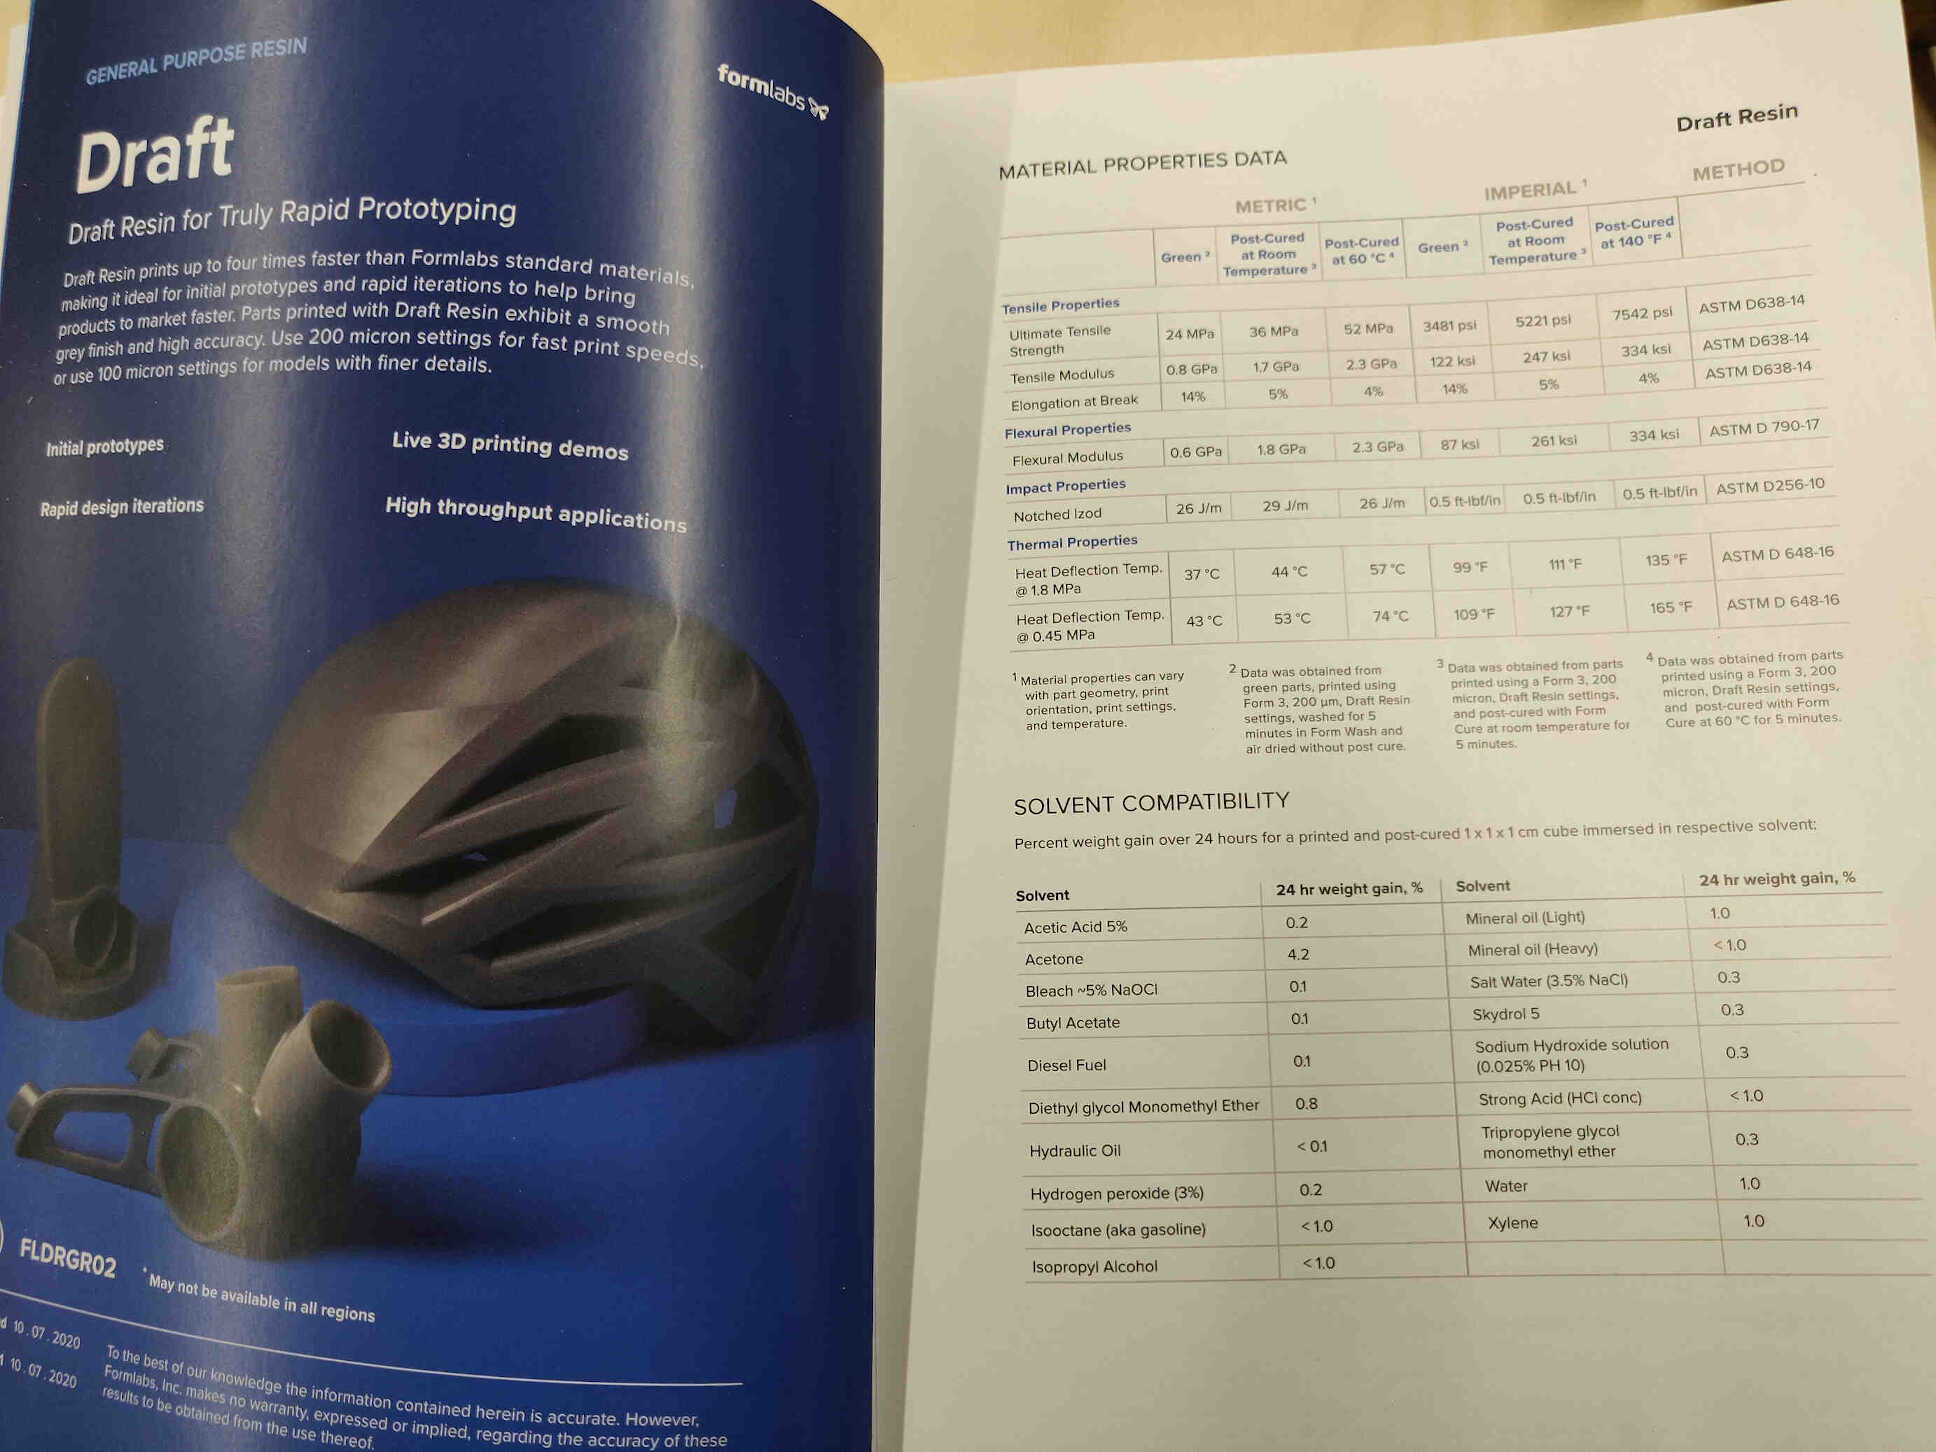
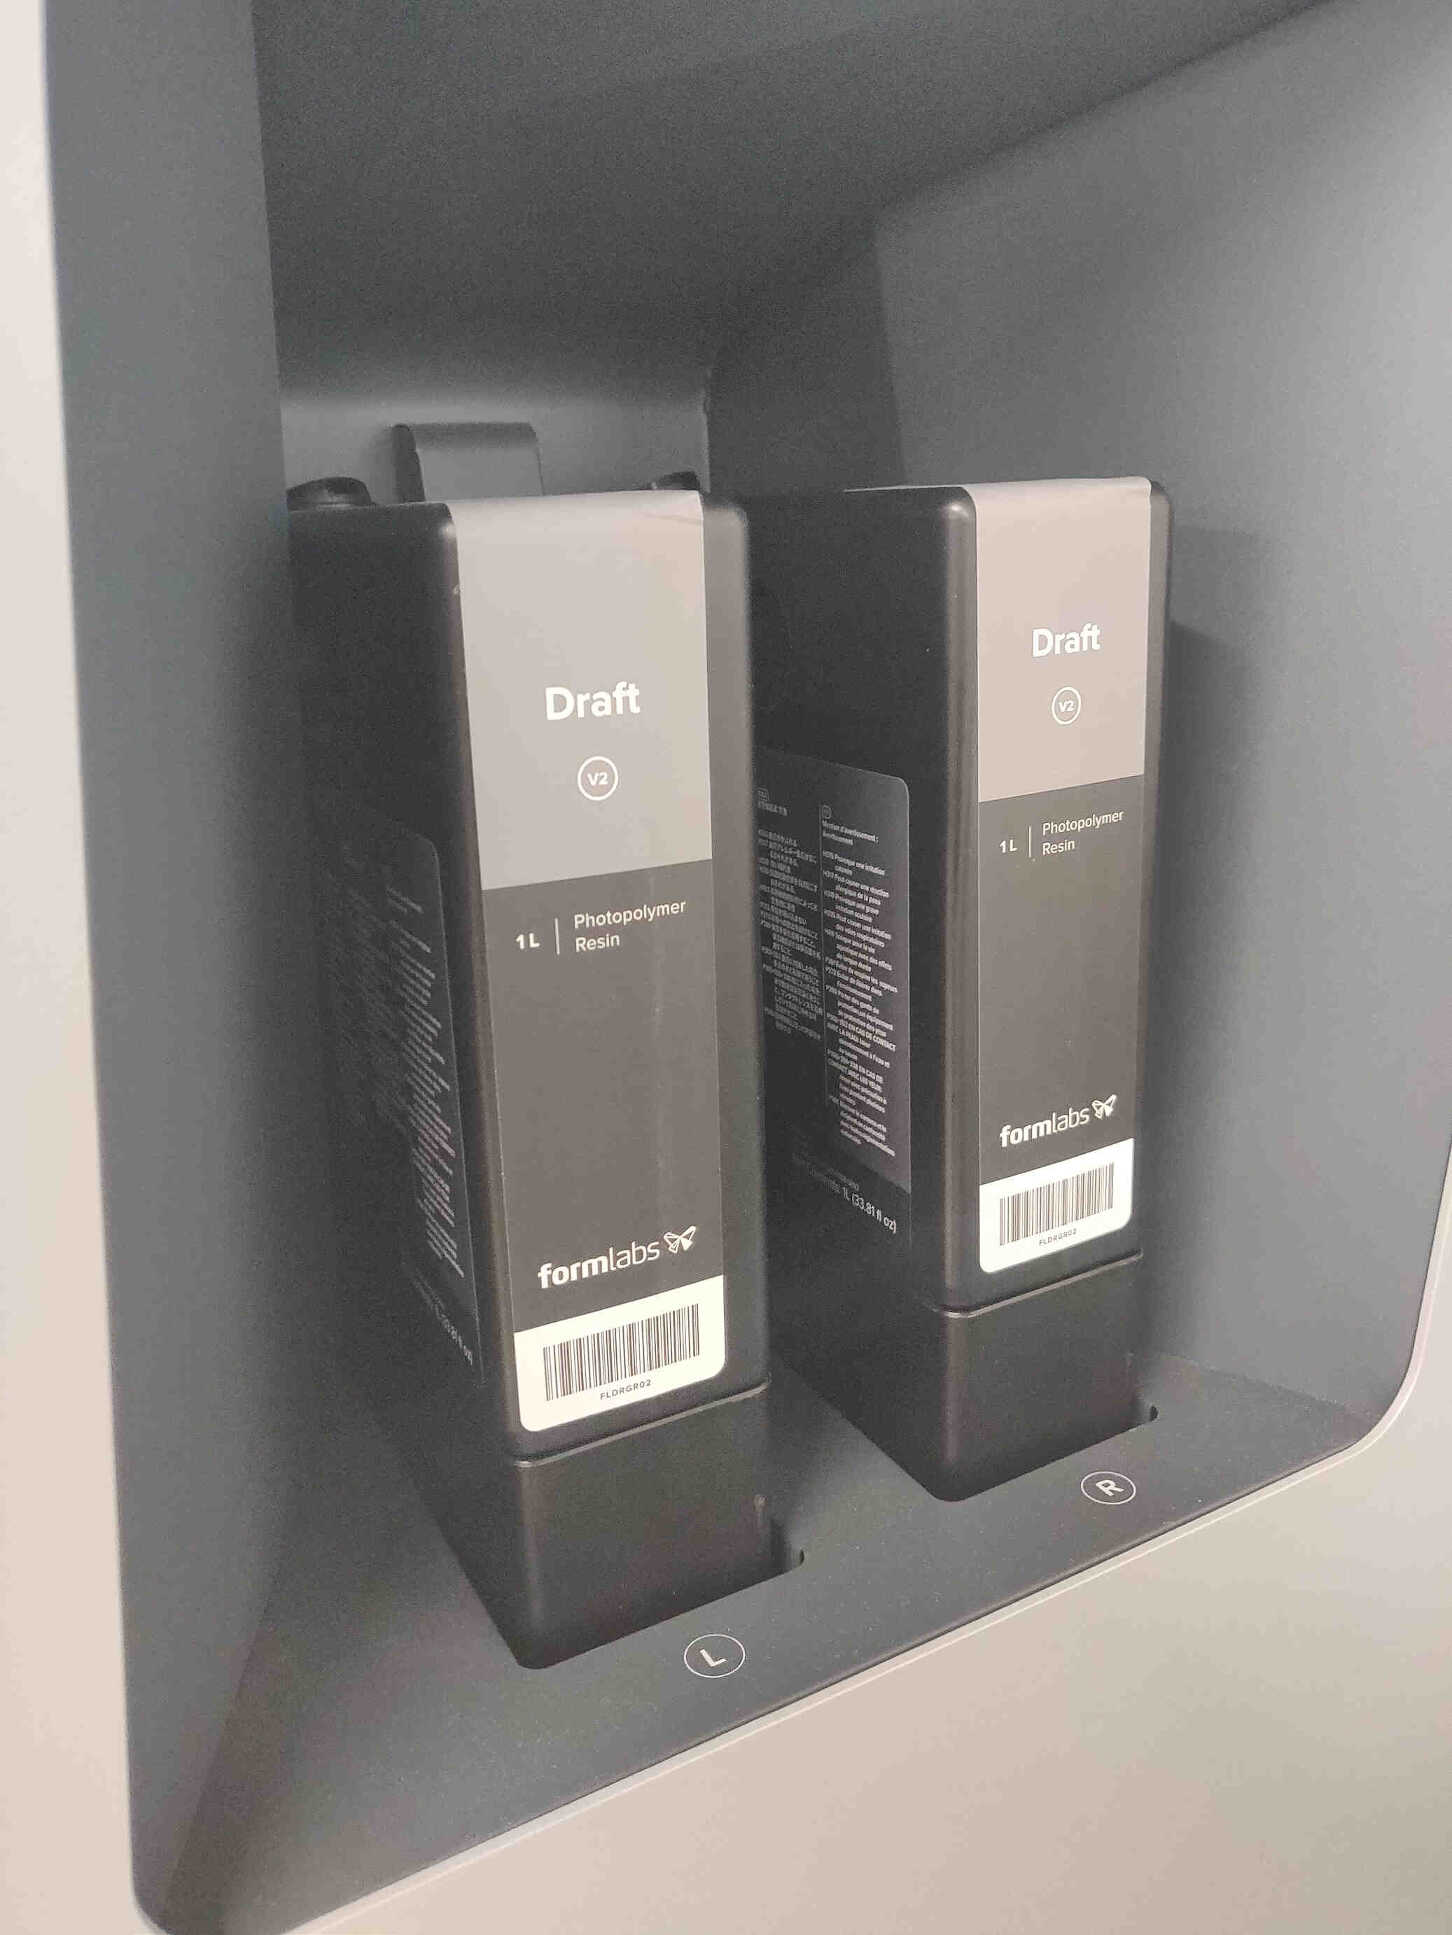
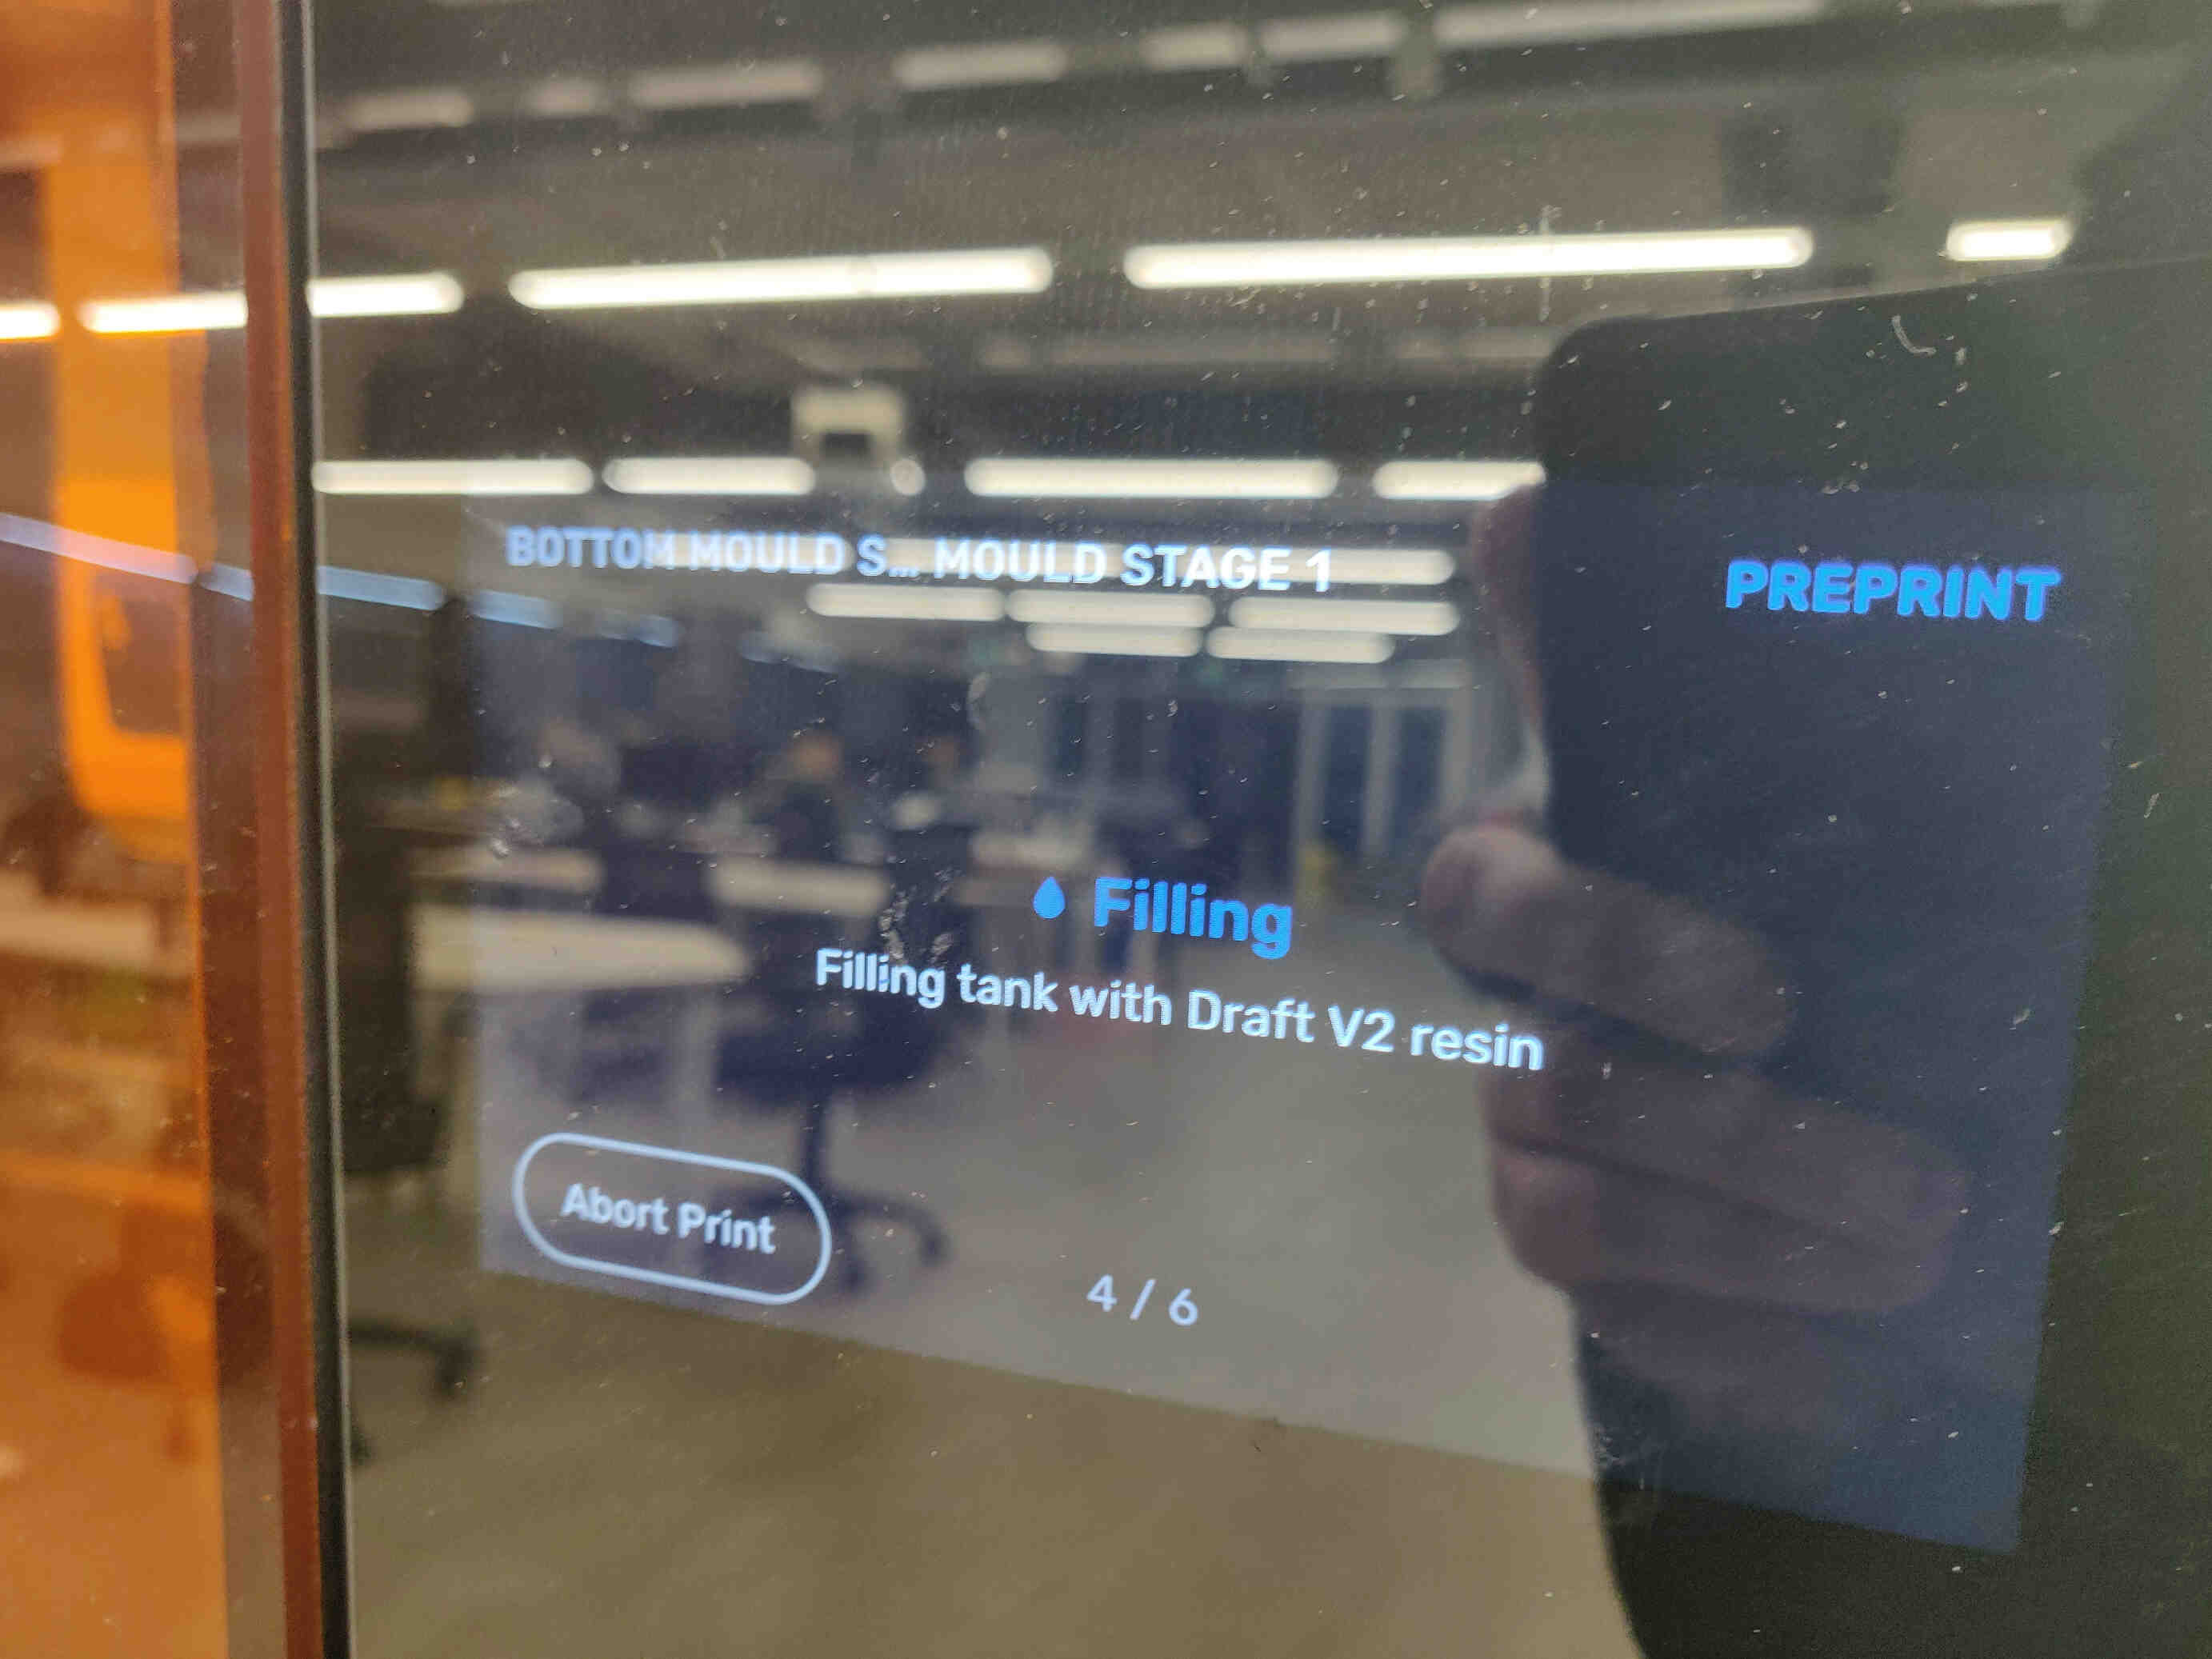
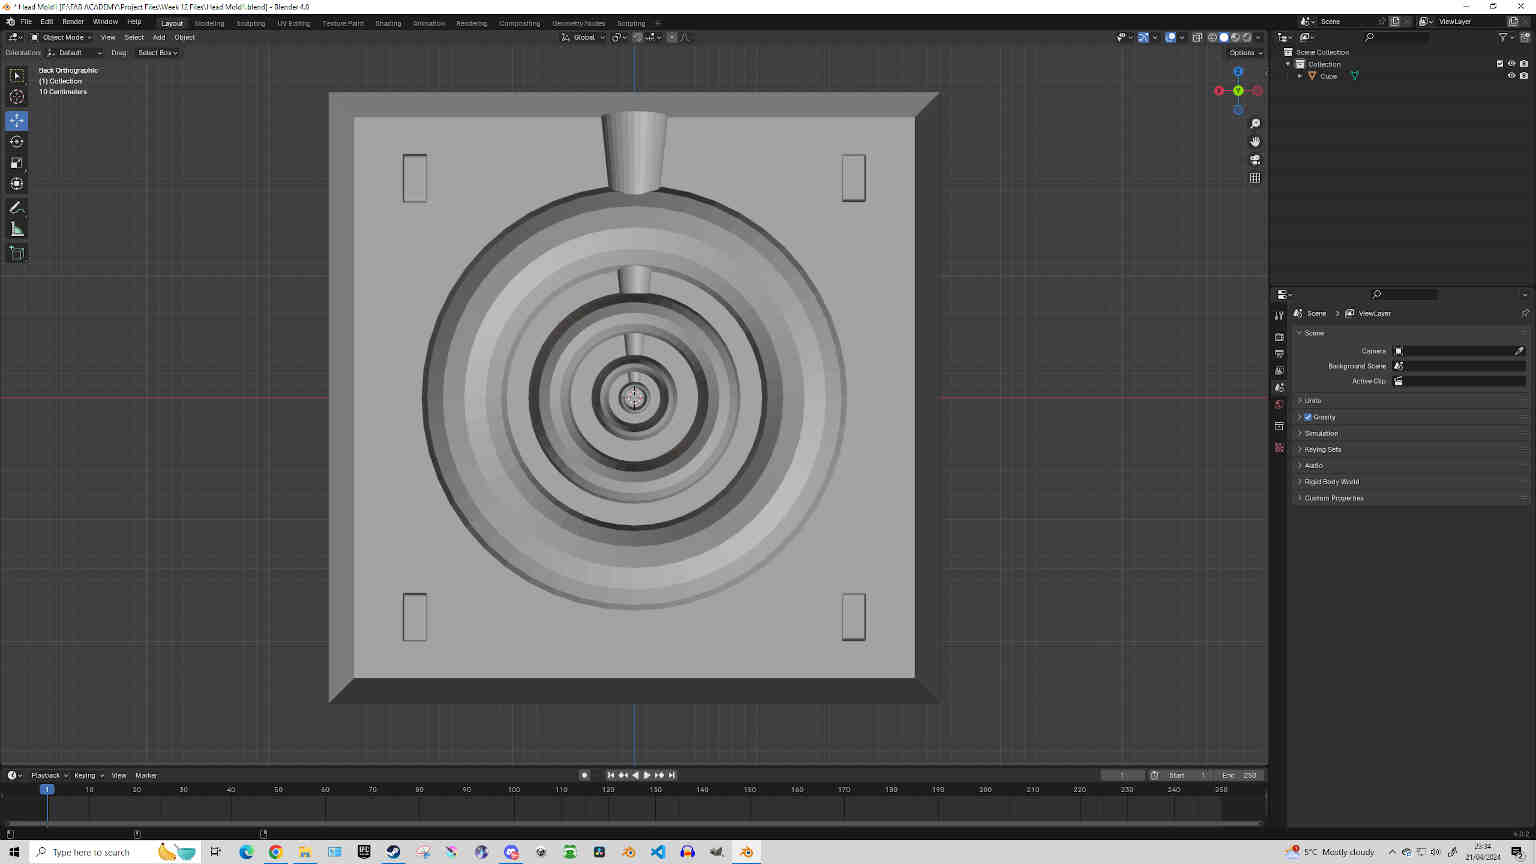
So despite my disappointment, I took heed of the technician’s words and scraped my idea to print a mold for a sword or head mold. Instead I stayed late on Friday to start fresh with a torus/donut design and made a simple mold for it with additive & subtractive keys along the corners. I saved it as an STL file, brought it over to the formlabs resin printer where I slotted in the ‘Draft v2’ resin material container and began the printing process of my donut mold. I stayed until the first layer was complete, then I went home for the weekend. I’m sure the mold won’t be up to par as there weren’t many tricks I implemented in terms of making a reliable mold. I was determined to spend the weekend researching and documenting how it could have been better, along with necessary precautions I need for casting on Monday.
____________
Global Open Time
I got a great amount of support from Adrian and Rico during Open Time, giving me loads of advice for my final project and the direction of where this week’s assignment is heading. They also explained that I misunderstood the assignment. That I was supposed to be making something like a wax mold for the Molding and Casting Individual Assignment. The SLA print that I was focused on making was only for the Group Assignment comparison. I’ll need to focus on a wax mold as I know for sure my fablab is set up for that and there’s plenty of documentation showing me the wax molding process.Final Project Discussion: Potentially forget about the motors on the arms and focus on the motor for the neck. Possibly even using a gearing system for the arm movements. Could also use molding and casting for creating the head or arms/legs. PID control for smooth accelerated movement - requires more effort in coding though.
Xiao + TIME OF FLIGHT VL53L1X Servo Motors
____________
General Process of molding with Machinable Wax (Chat GPT)
Machinable wax is often used for rapid prototyping and mold making. Here's a basic process for molding with machinable wax:Remember to follow safety guidelines when working with any materials and equipment, and always refer to the specific instructions provided by the manufacturers of the materials you're using.
Question: Can you go into more detail about the design process?
Answer: The design process for molding with machinable wax involves several steps:(- Written by ChatGPT v3.5, April 21st 2023)
Machinable Wax Low Temp Wax CNC Machinable Wax
____________
Tips on making Digital Molds
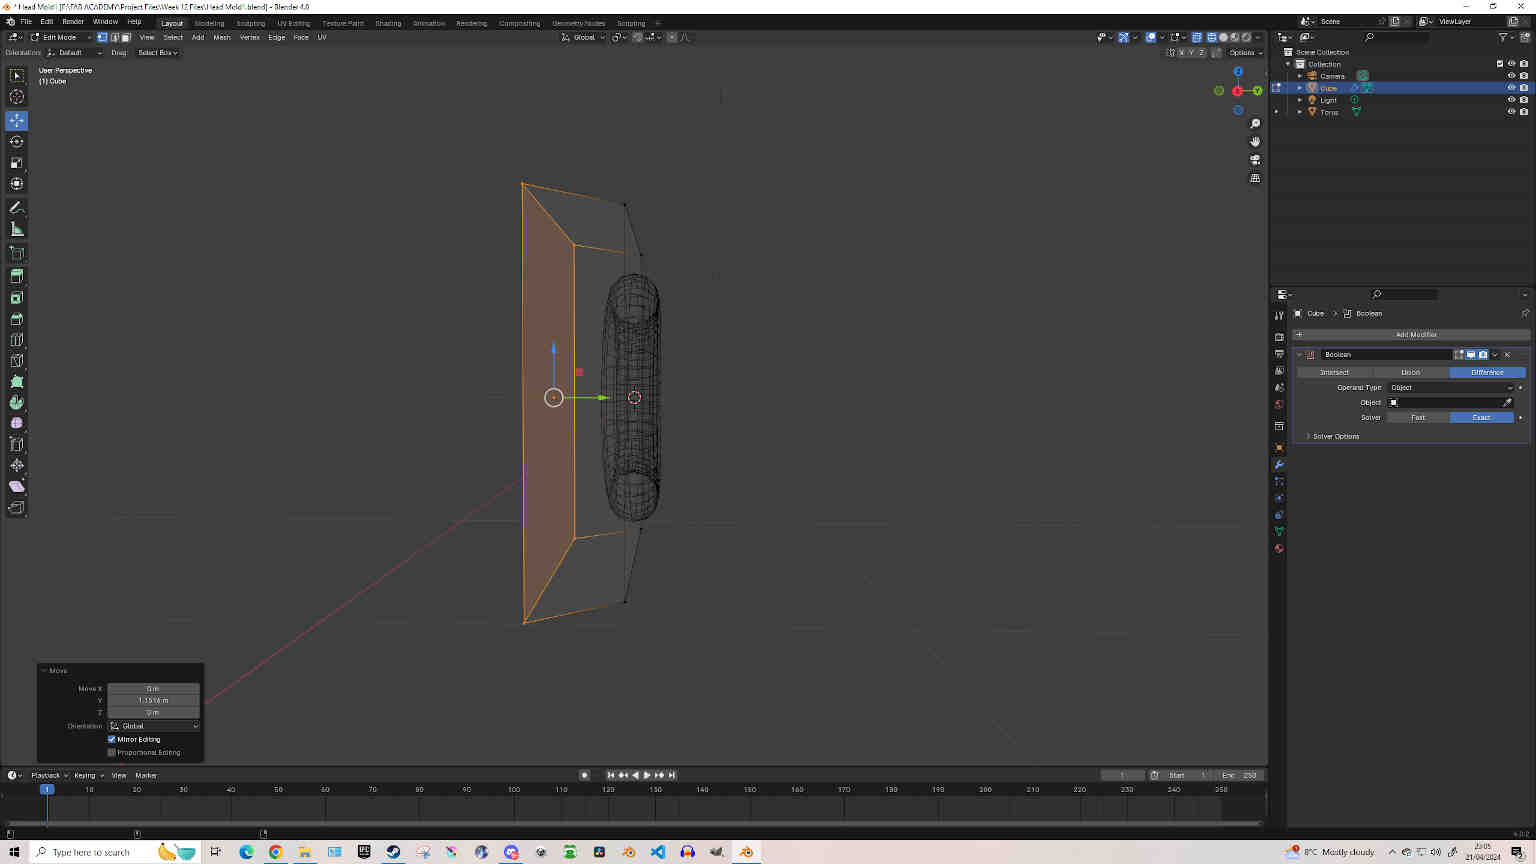
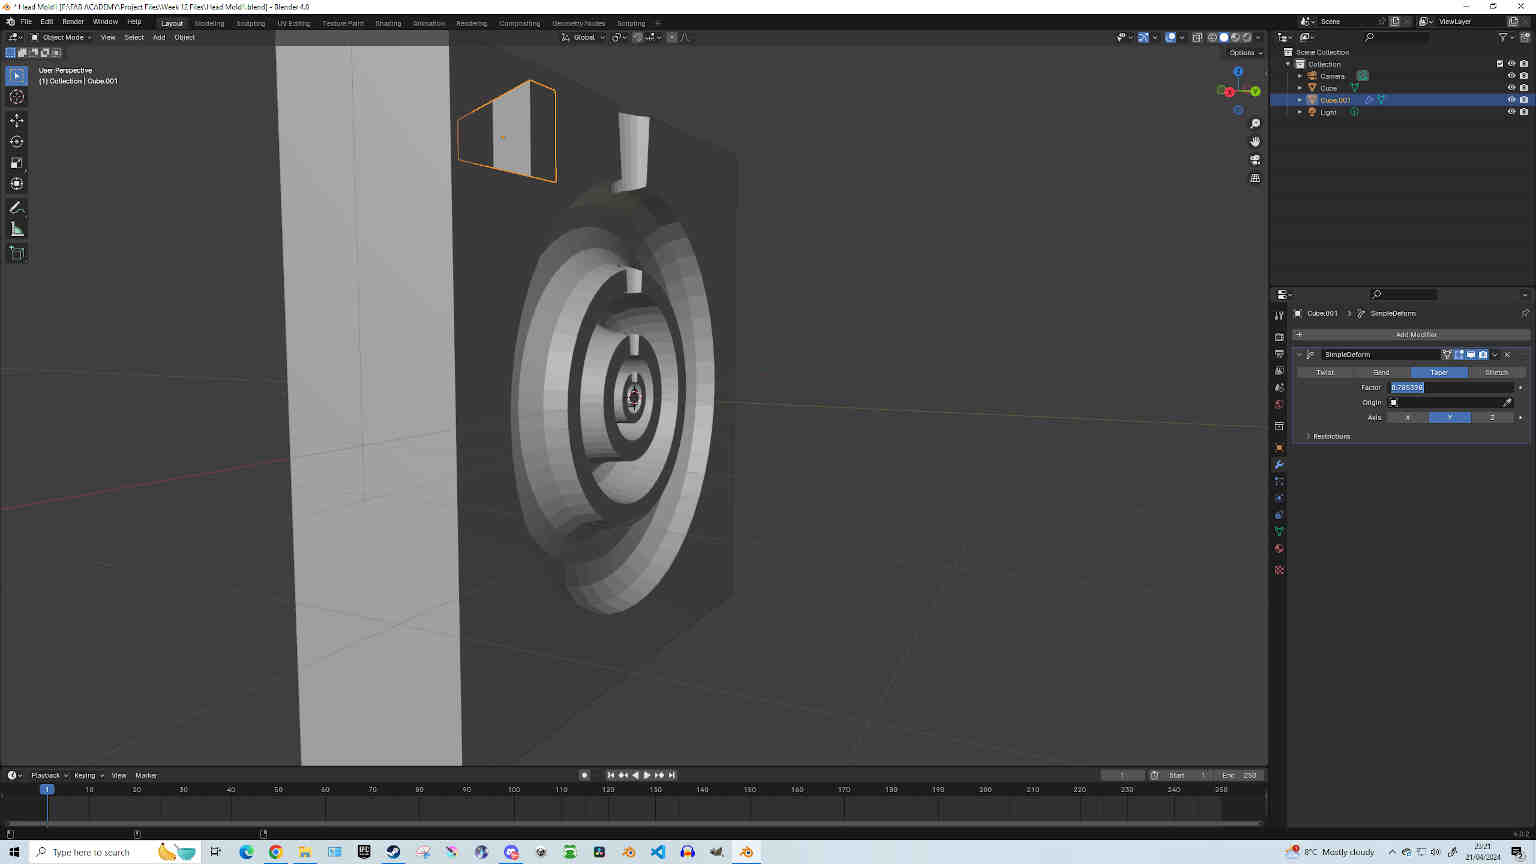
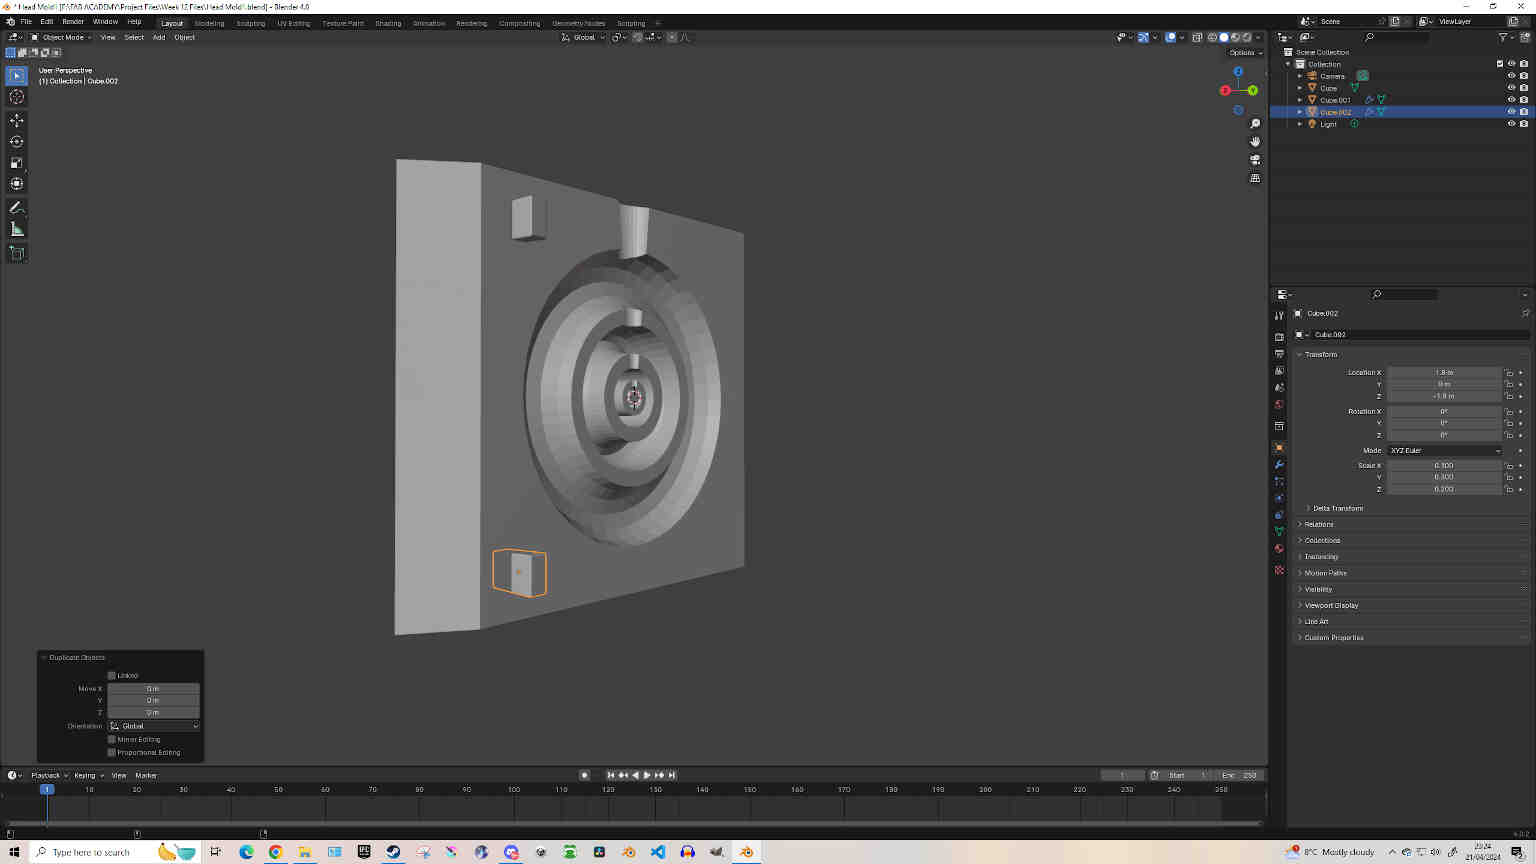
Start off with having your design directly centered in the 3D workspace. Add a Mesh Cube and scale it so that it encompasses your design - not too big but enough to add room for keys (fitting slots). Now we need to reduce the size of the cube by half to make ONE HALF of the mold. Reduced the Scale on the X-axis by HALF. Depending on the positioning of your workpace, you may need to reduce the Y or Z Axis by half instead of the X-Axis. If you are doing a 1-piece mold then this is the only mold you need. If you are using a 2-piece mold and your design is symmetrical, you can duplicate this half of the mold and mirror it to the other side making the 2nd-piece. Creating the interlocking keys: Add a cube and shape it into a rectangle for creating keys. When happy with the shape and positioning, go into Edit mode for the rectangle. Select the face of the rectangle that is sticking outwards from the mold and scale it down slightly by 0.01mm. This will allow for easier separation when removing the mold. Another option being to add a Taper and Bevel modifier and adjust the scale there. Use SHIFT+D to duplicate and put the duplicated key on the same side but different corner. Now go back into object mode, select the rectangle object, then SHIFT-Select the Mold object. Then press Ctrl+Shift+B for the Bool Tool modifier and select ‘difference’. This will cut those shapes into the mold.
Now move the rectangle keys to the other side of the mold. Individually scale down the Male keys by 0.01 mm for clearance. Select the rectangle object, then SHIFT-Select the Mold object. Then press Ctrl+Shift+B for the Bool Tool modifier and select ‘Union’. Now you are ready to export your mold as an STL file and bring it to the SLA resin printer.
SLA Molding Important things to know about Molding and Casting Introduction into Mold Making Casting
____________
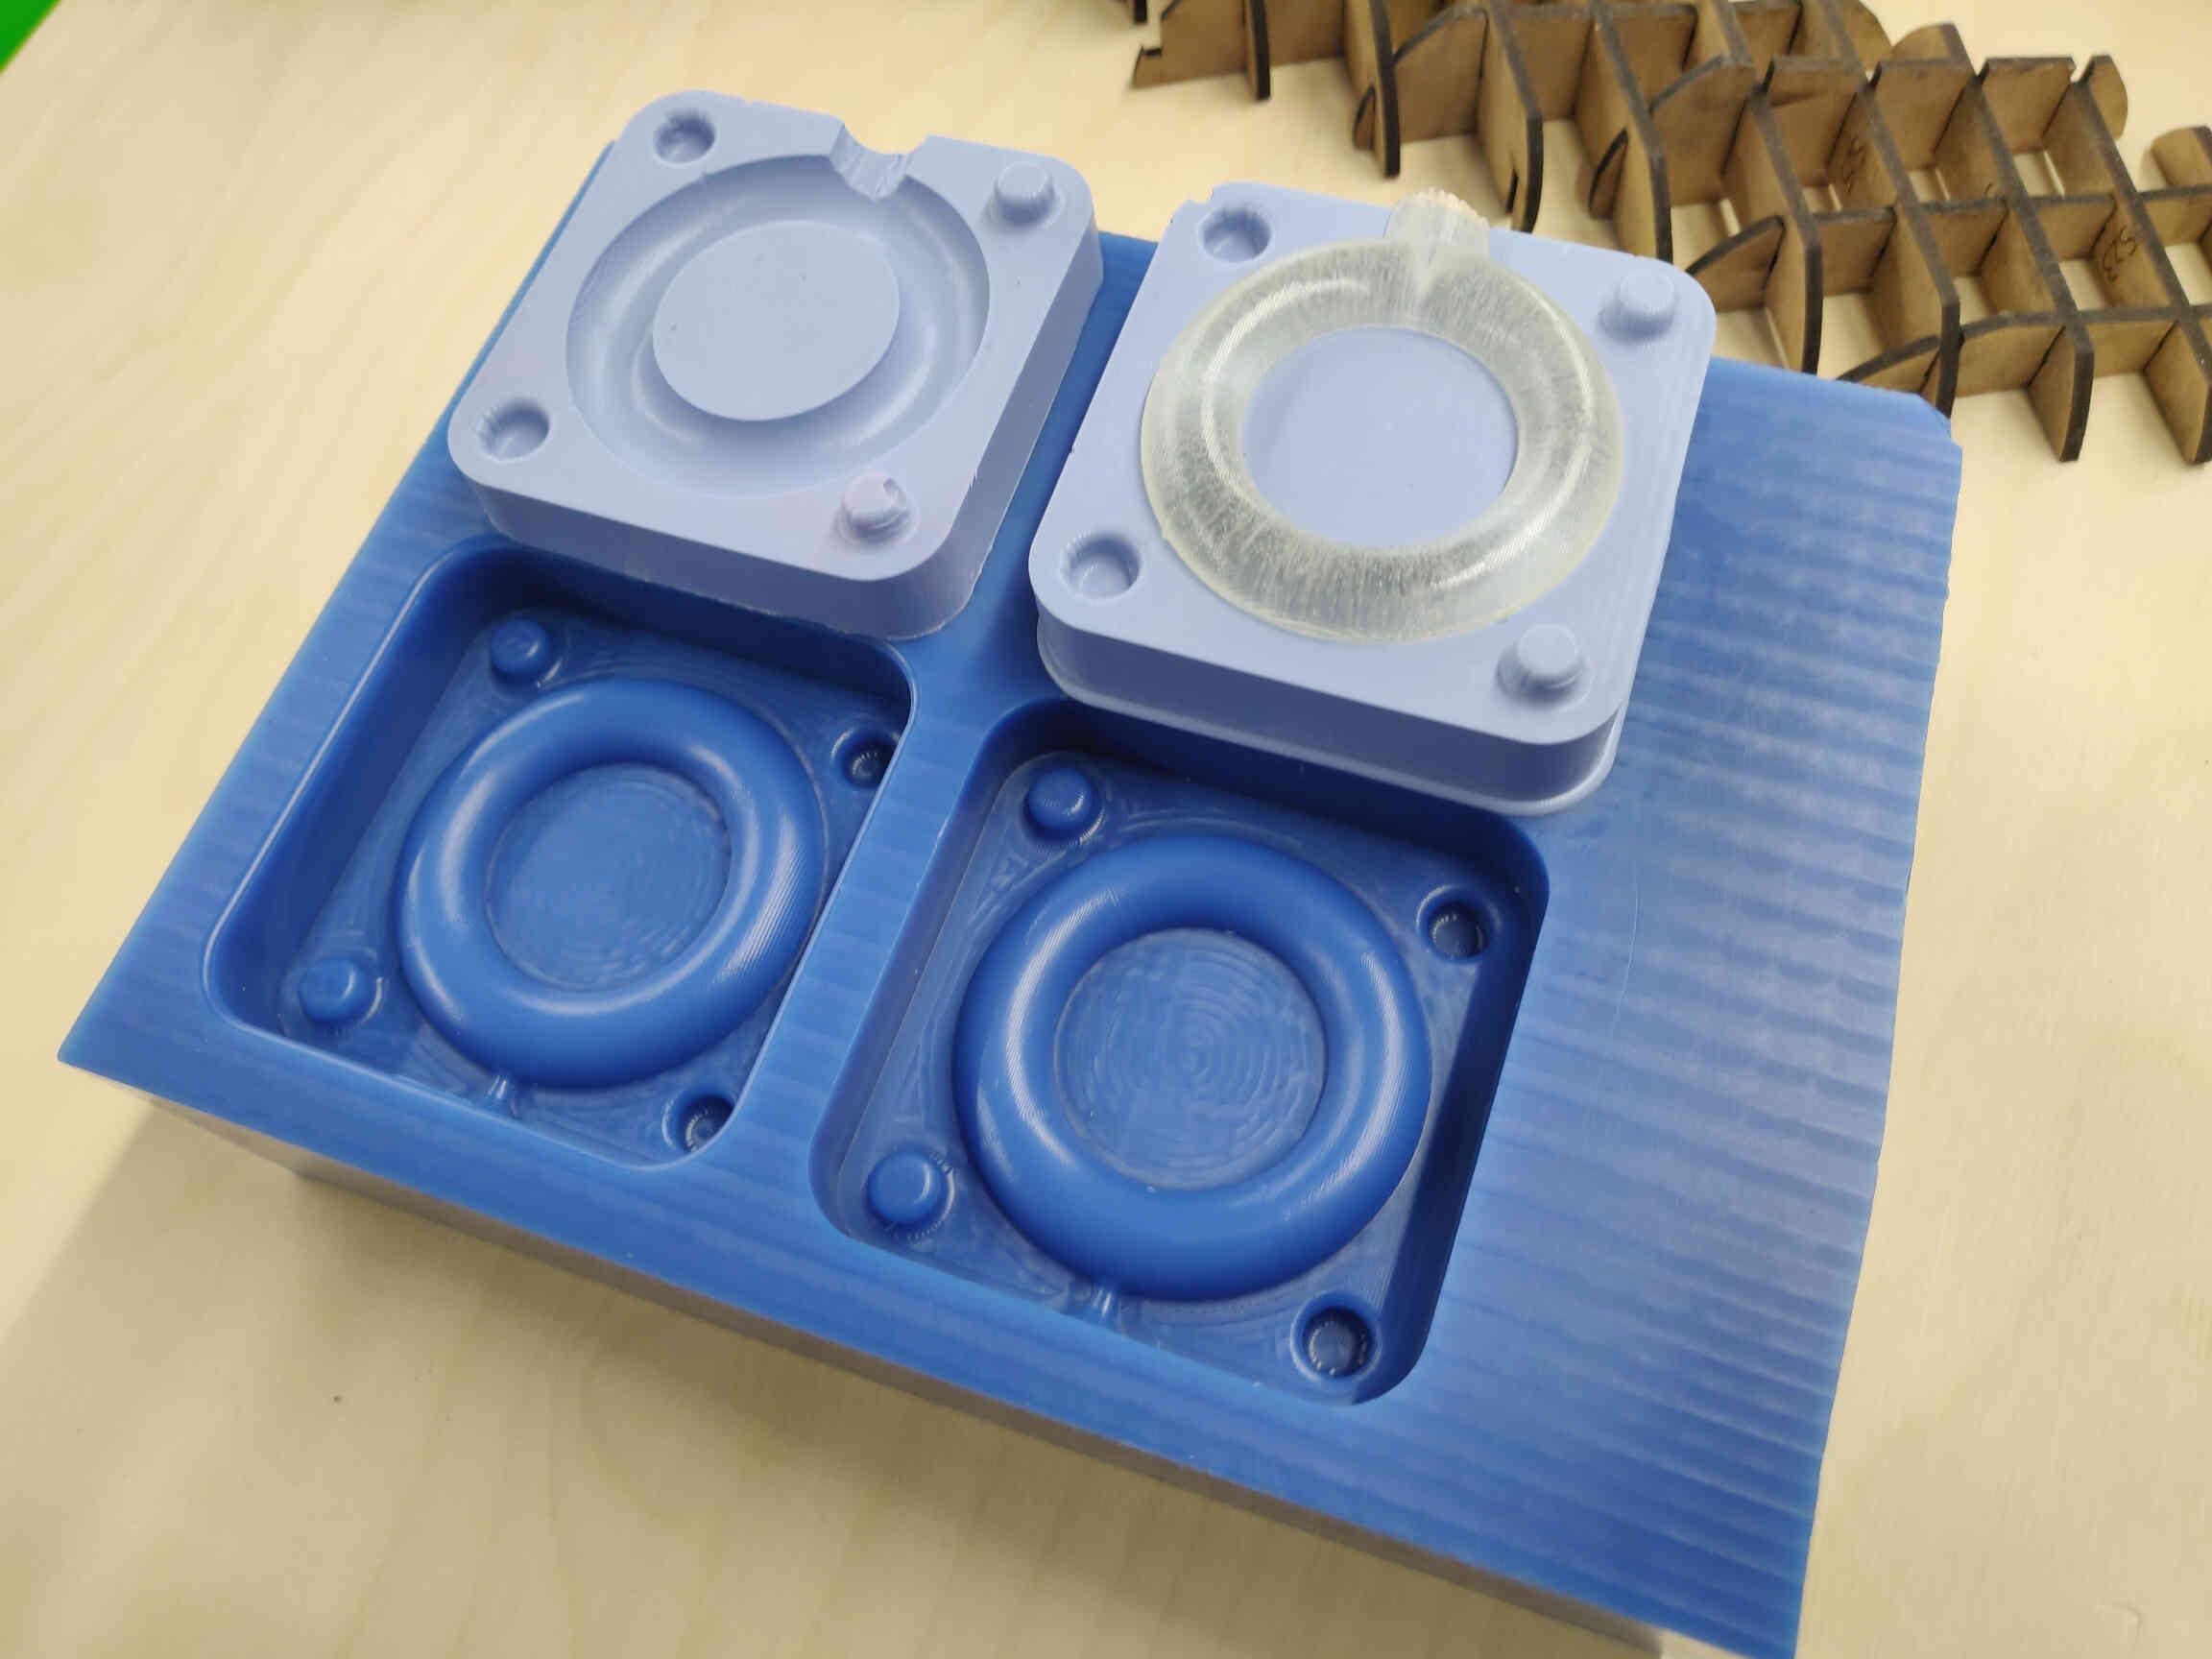
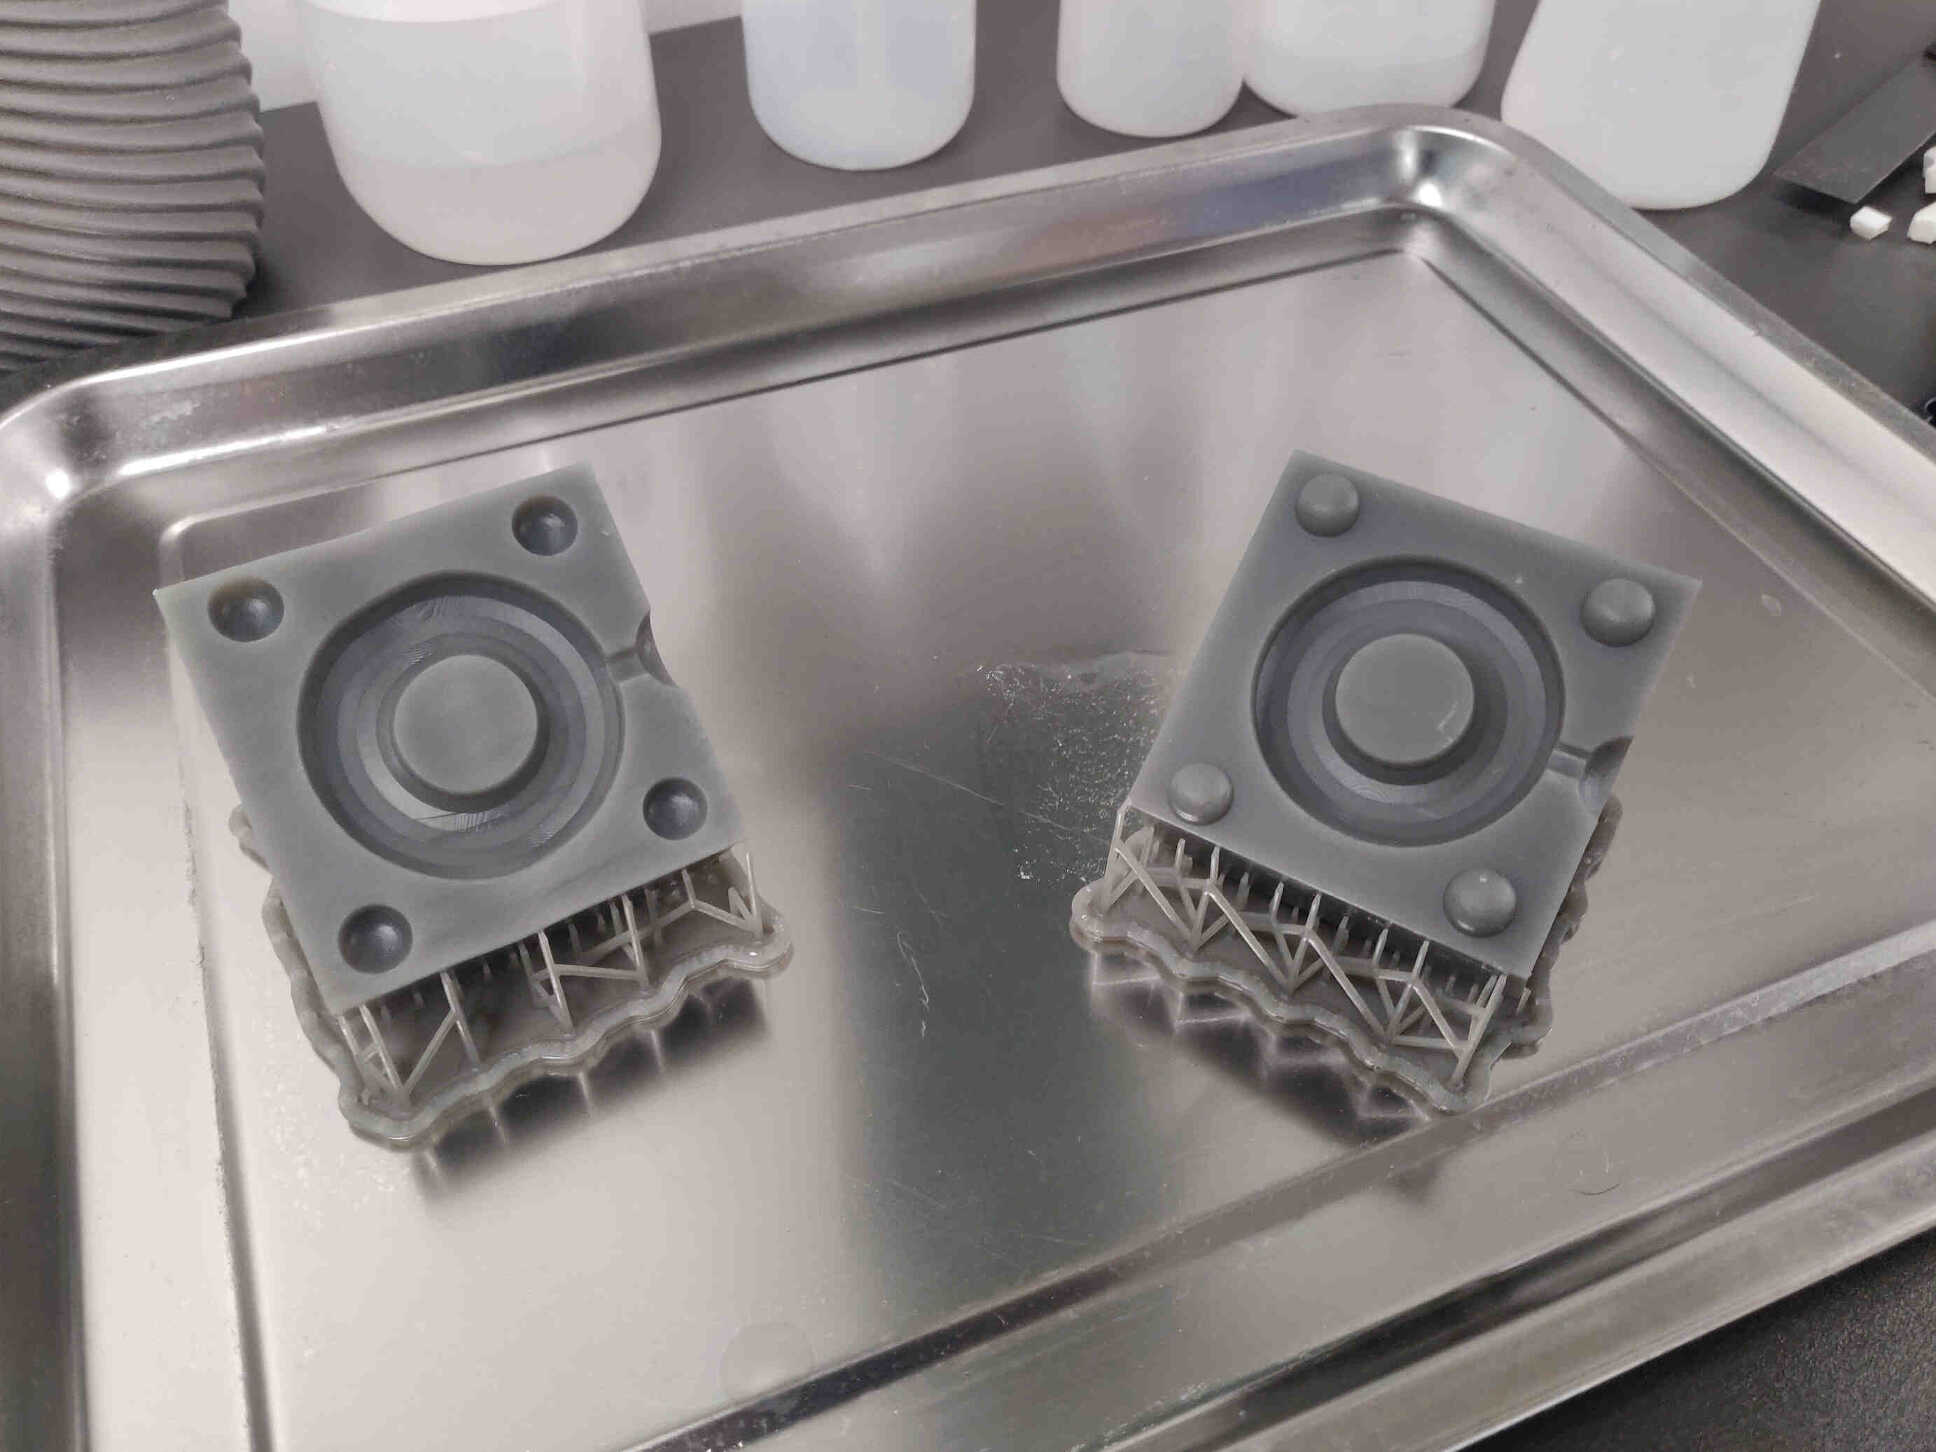
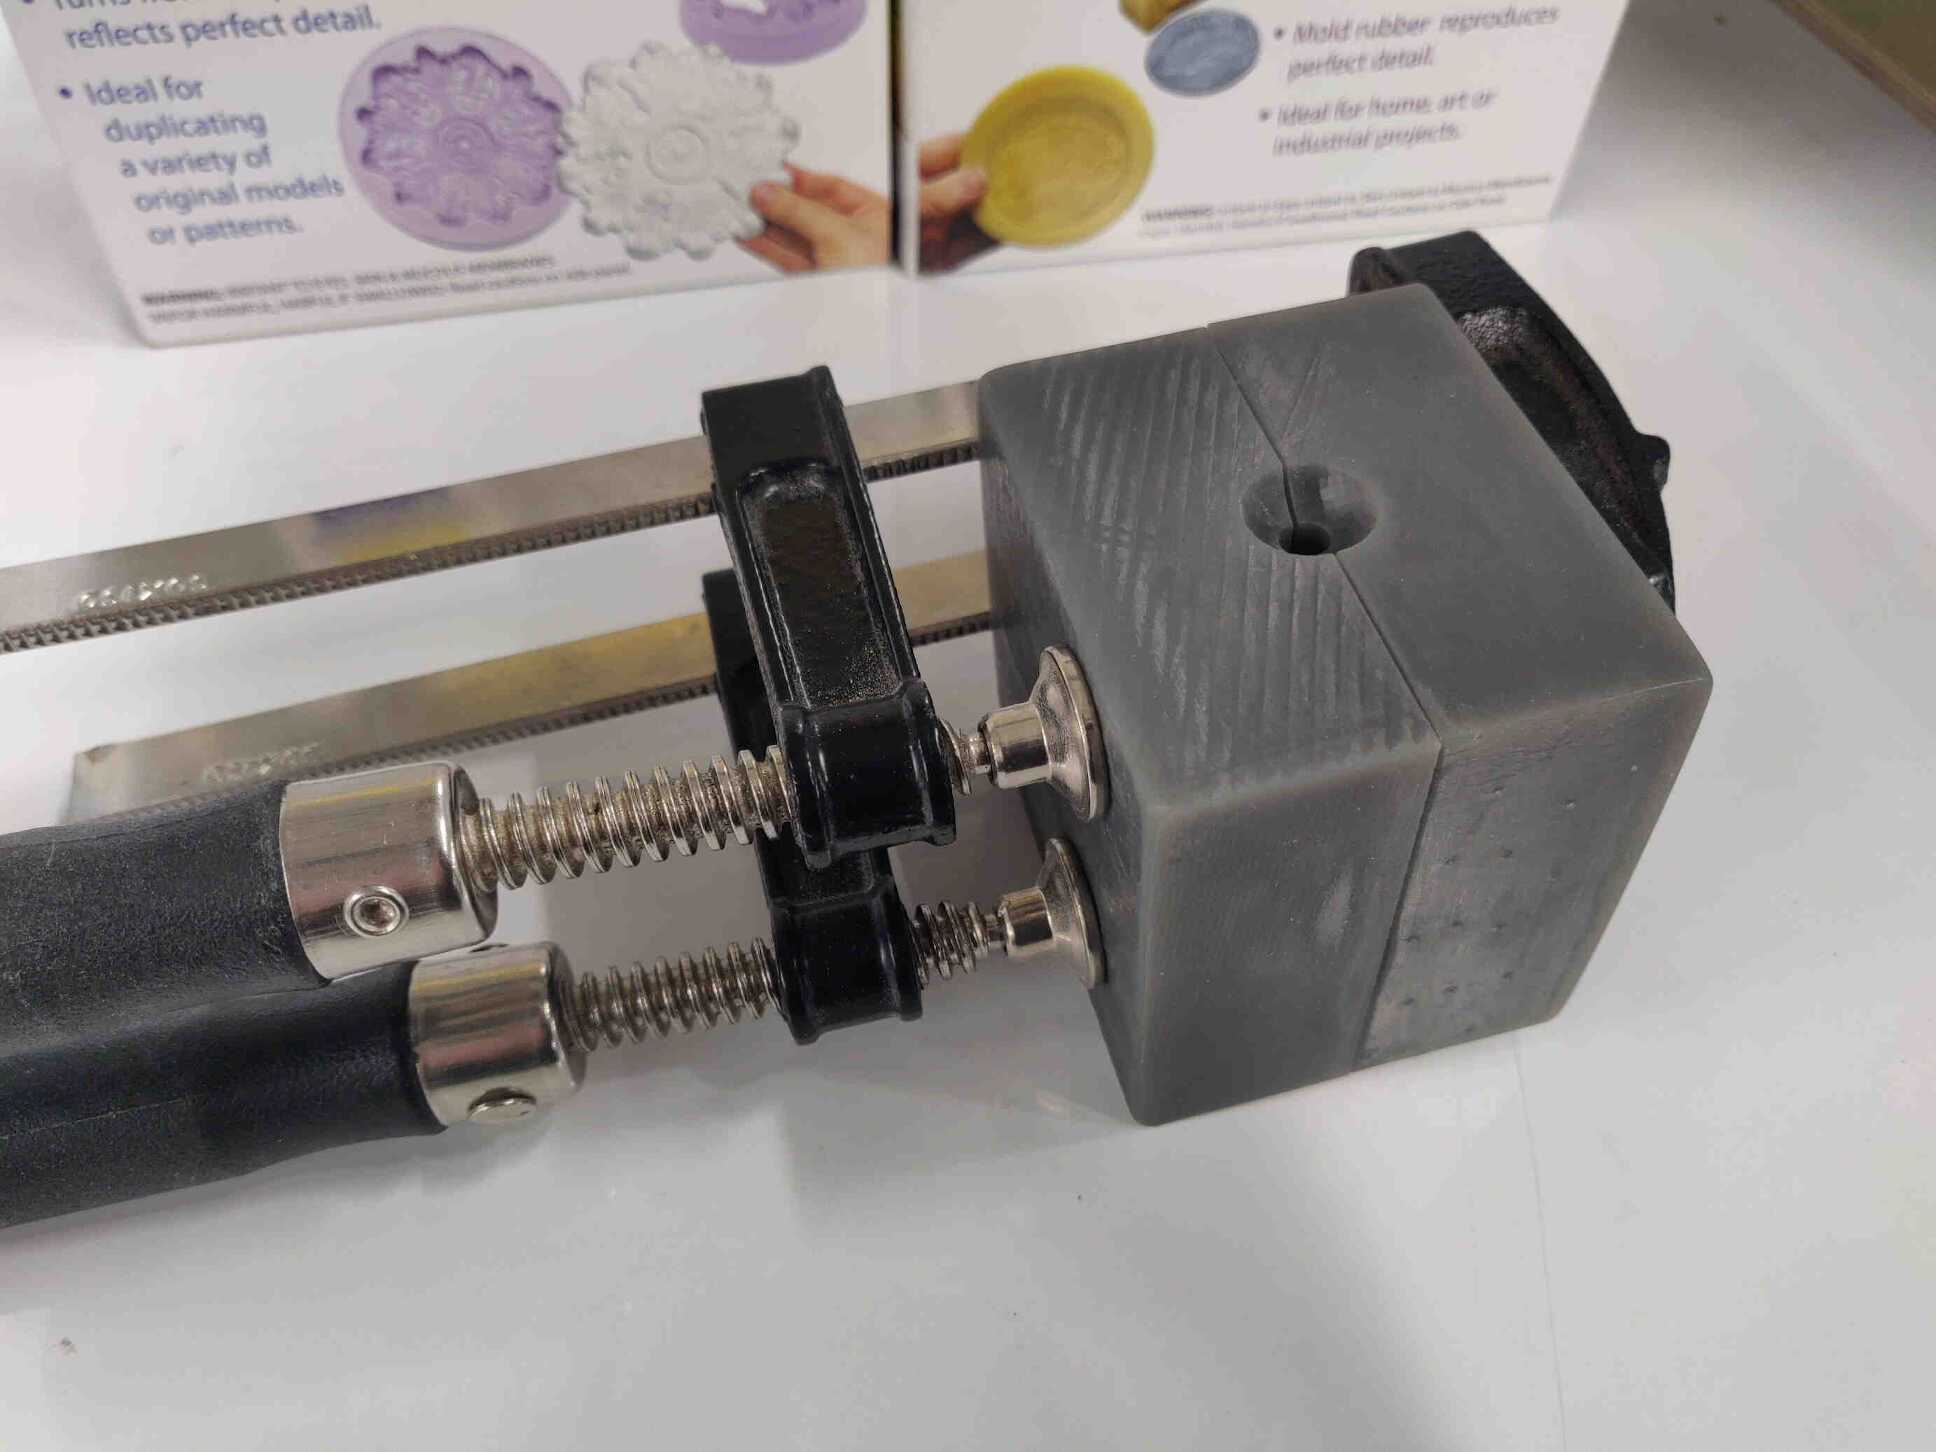
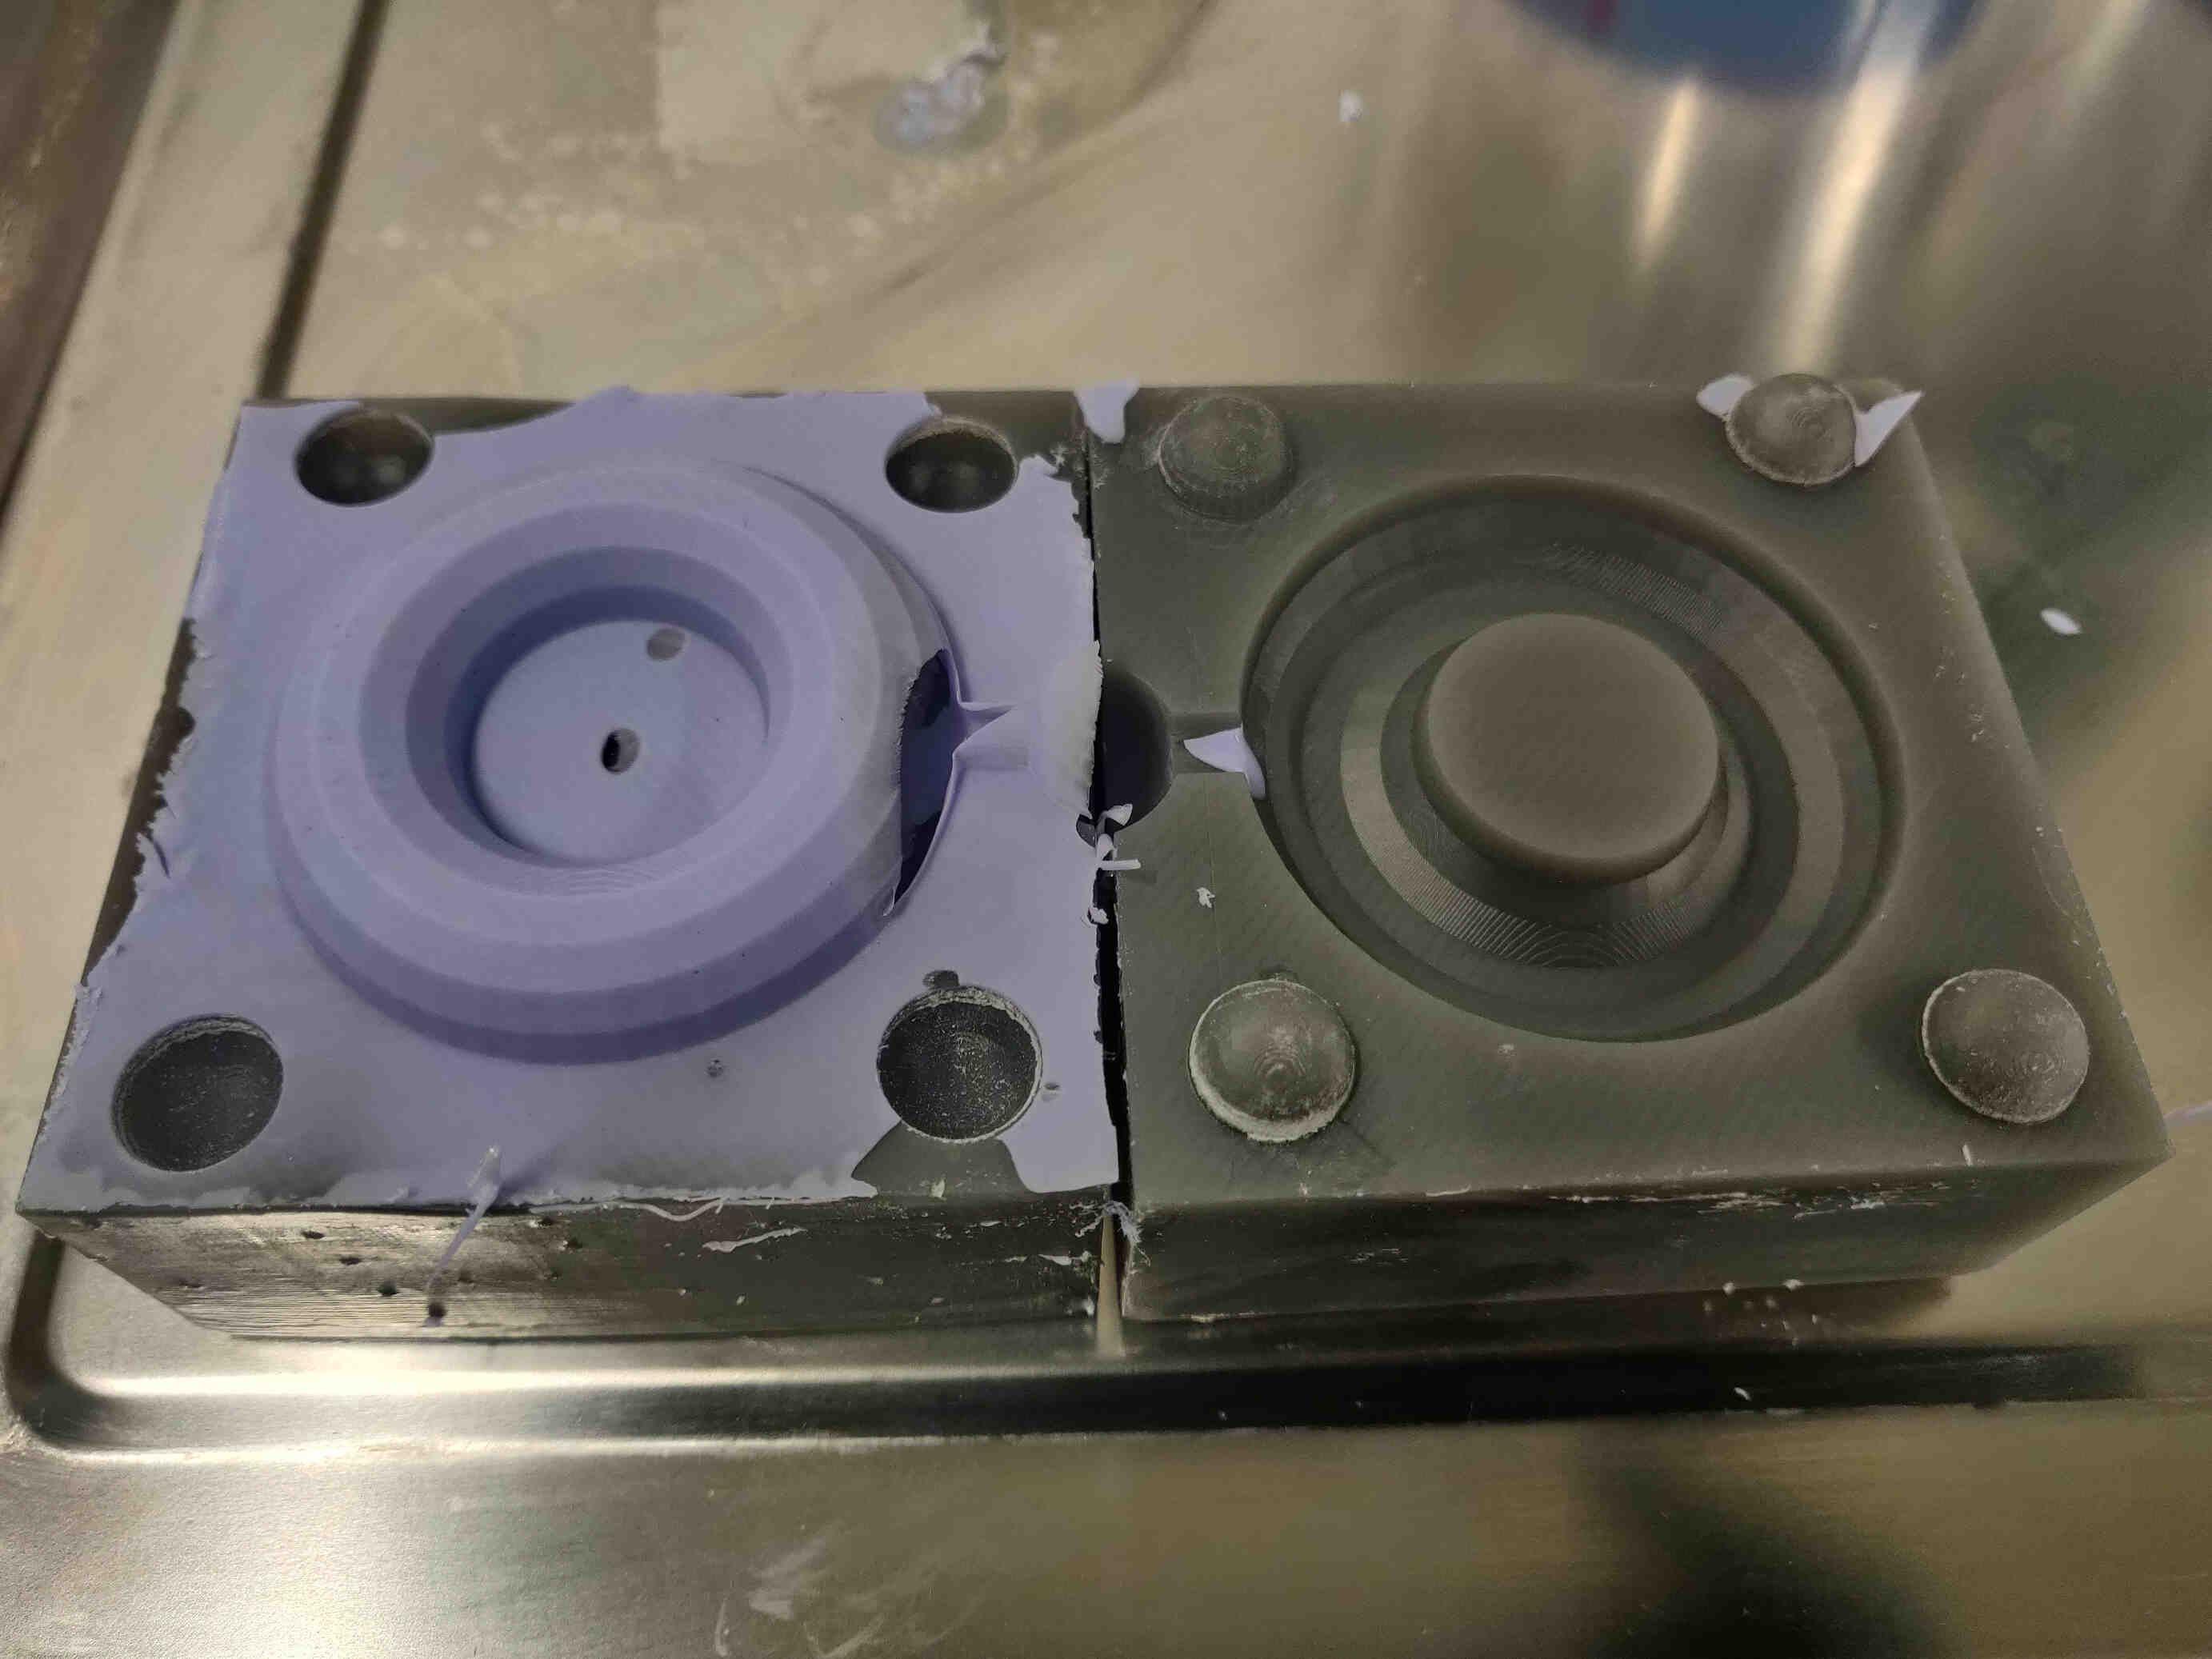
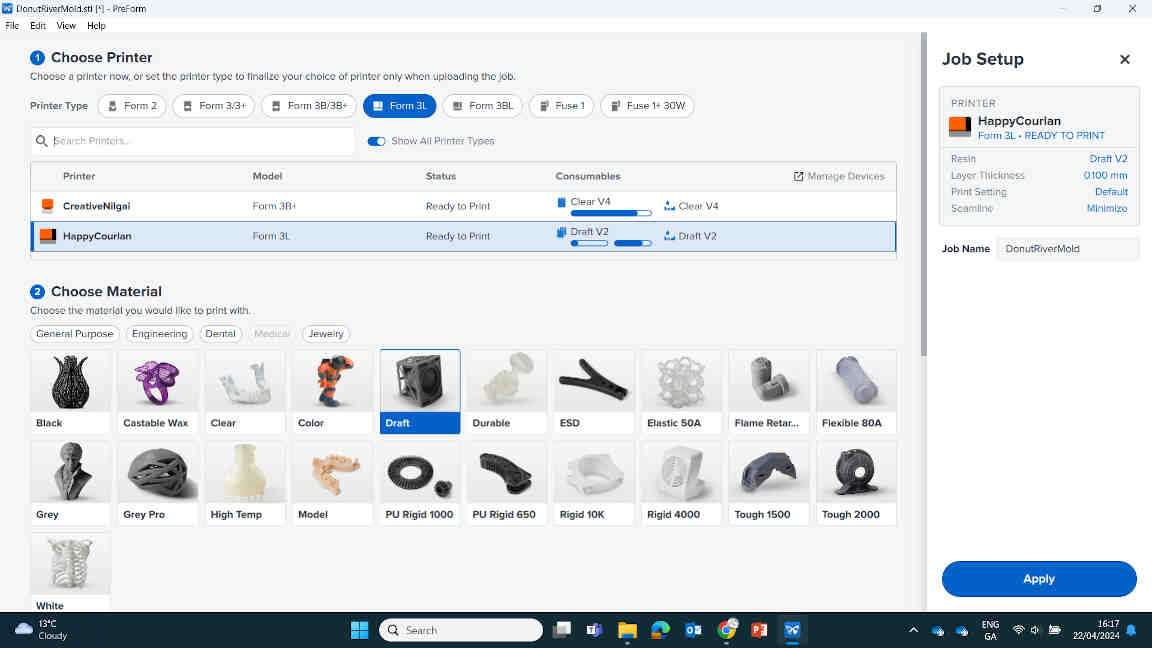
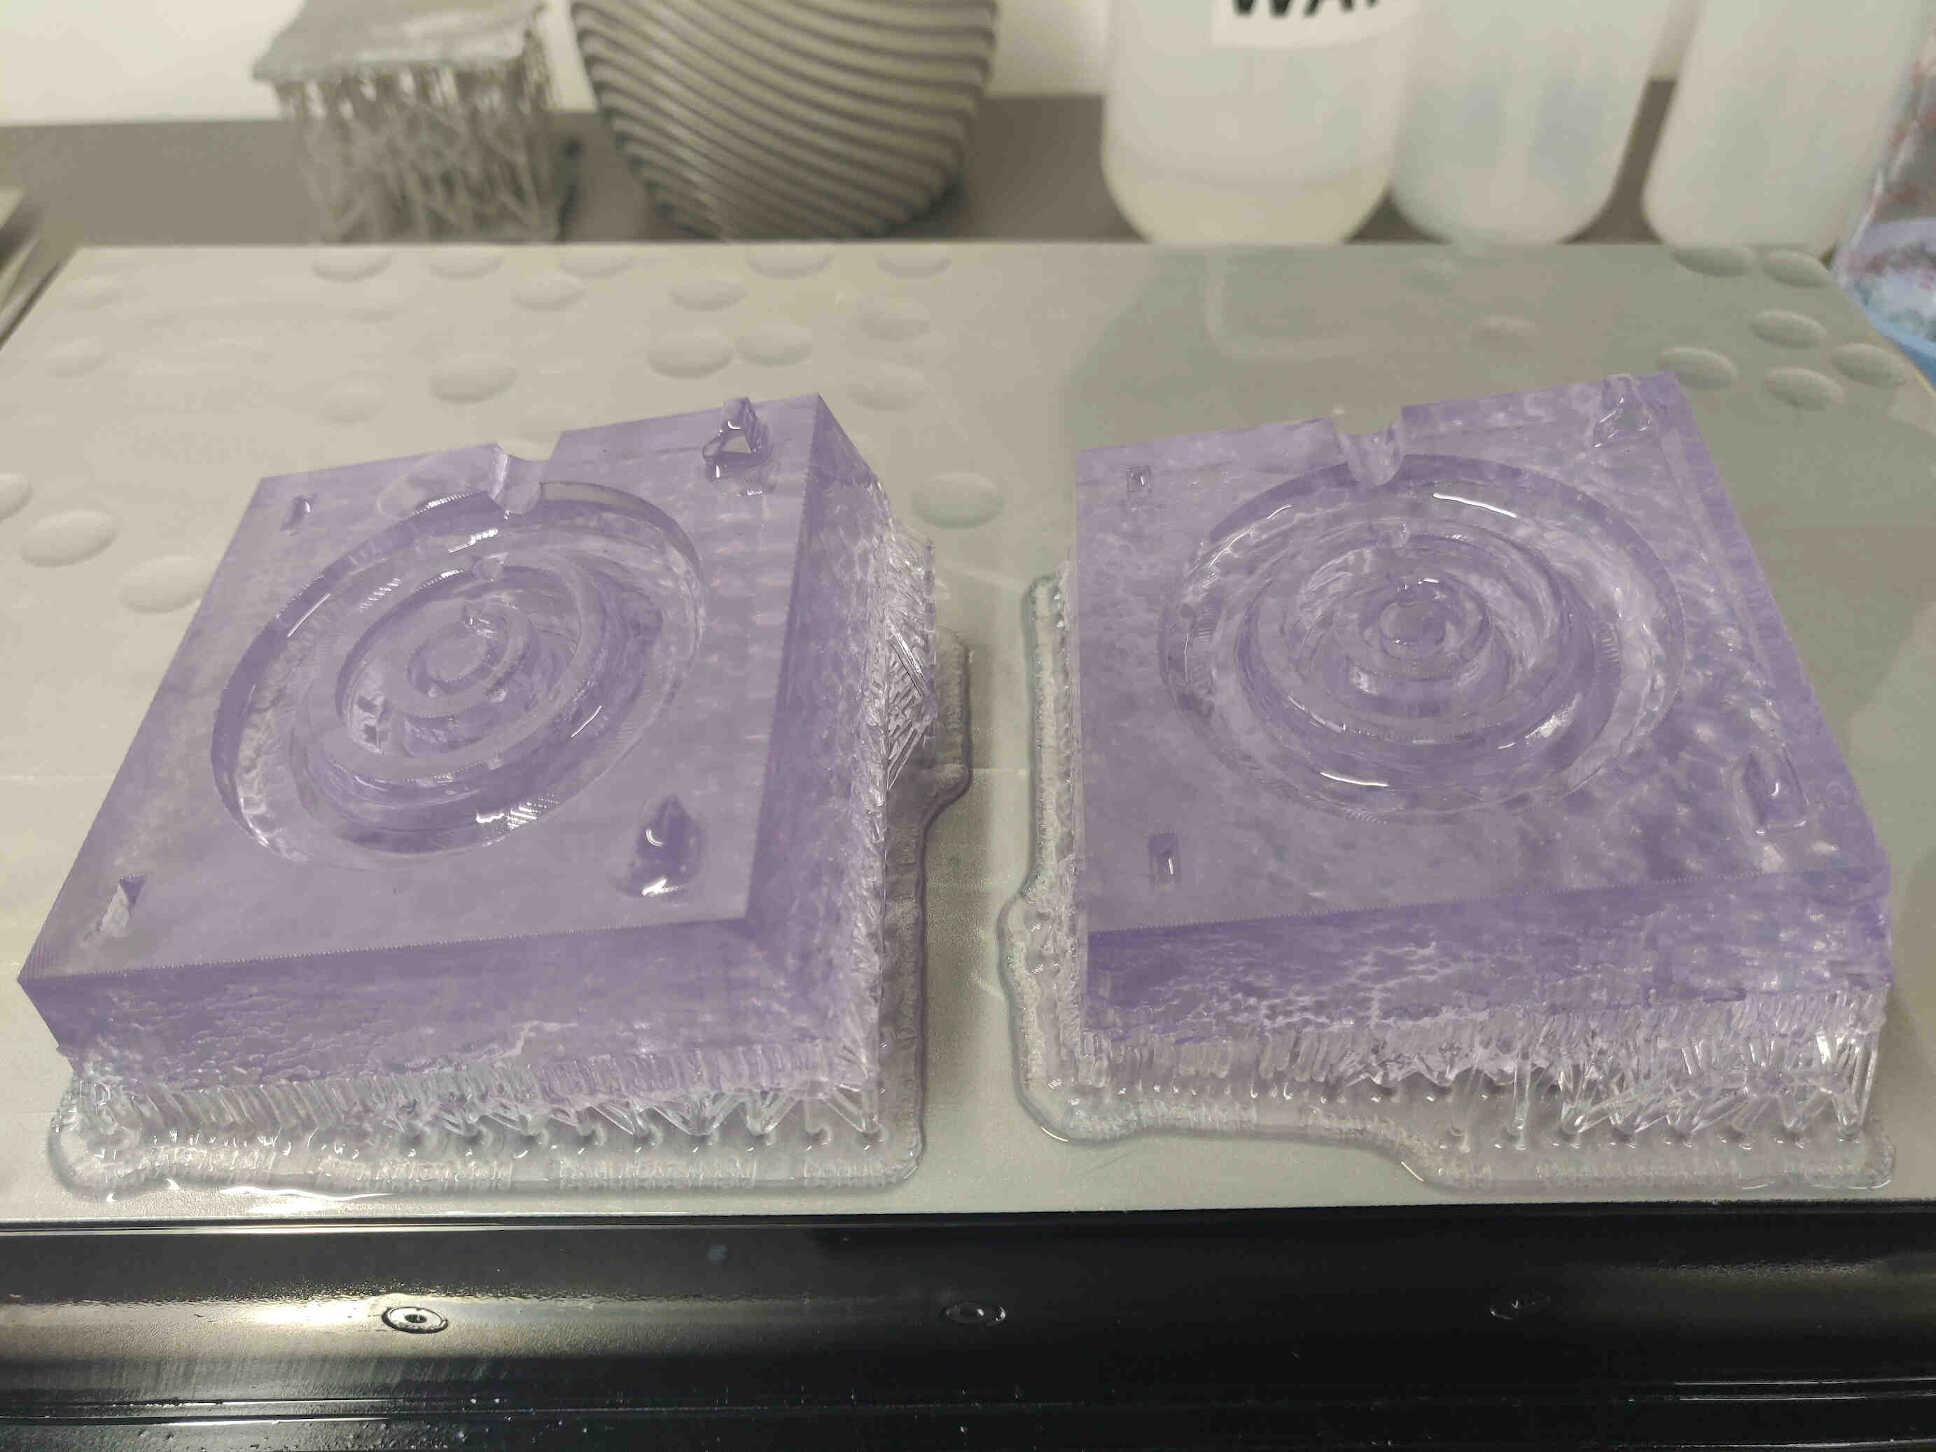
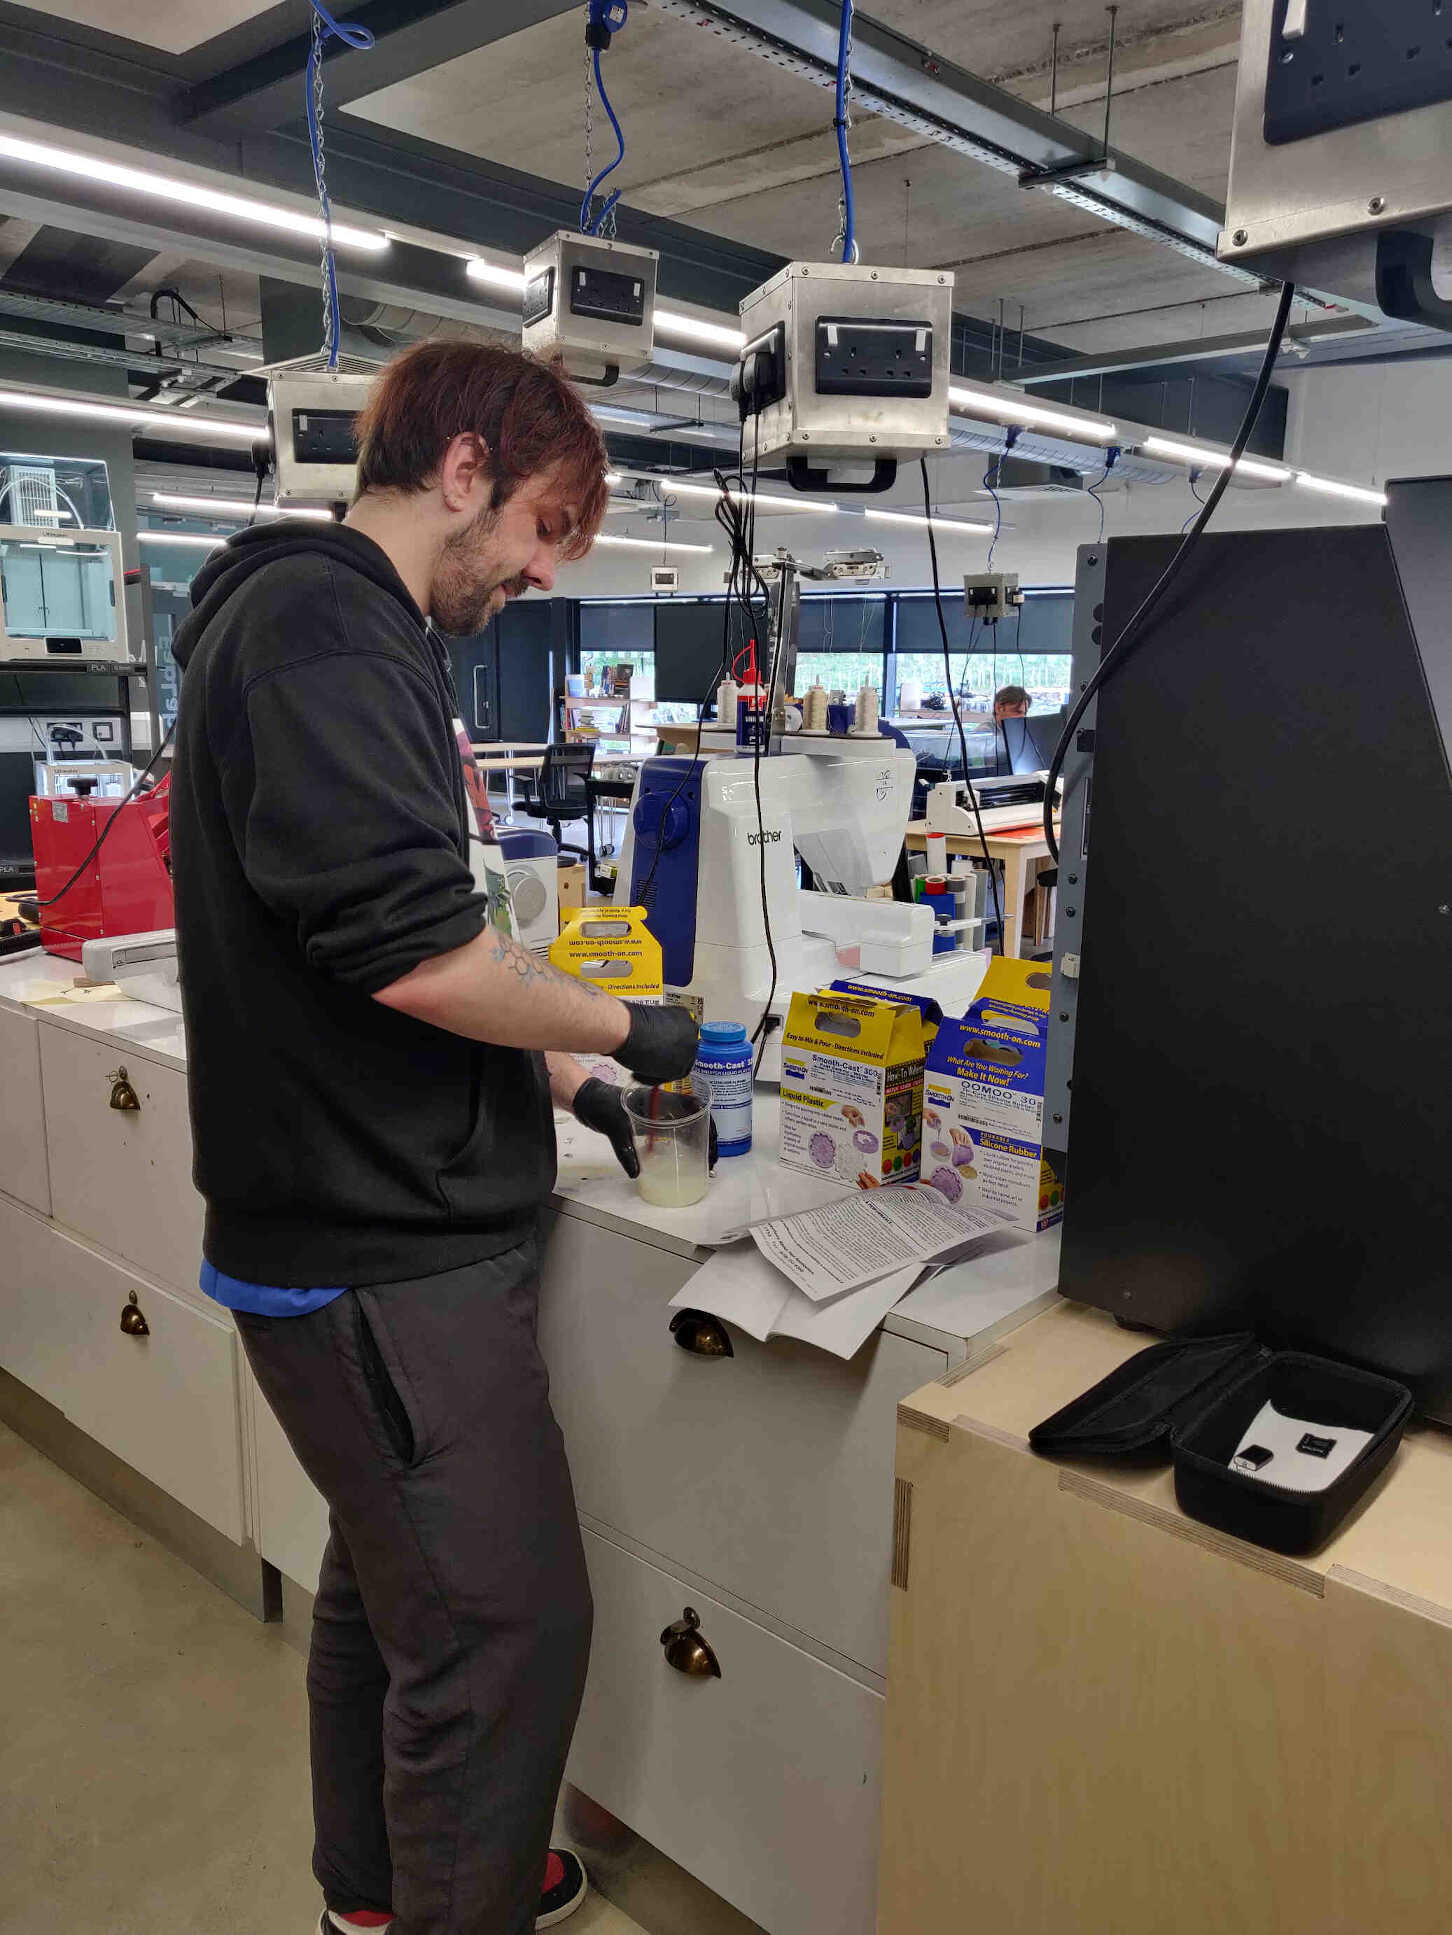
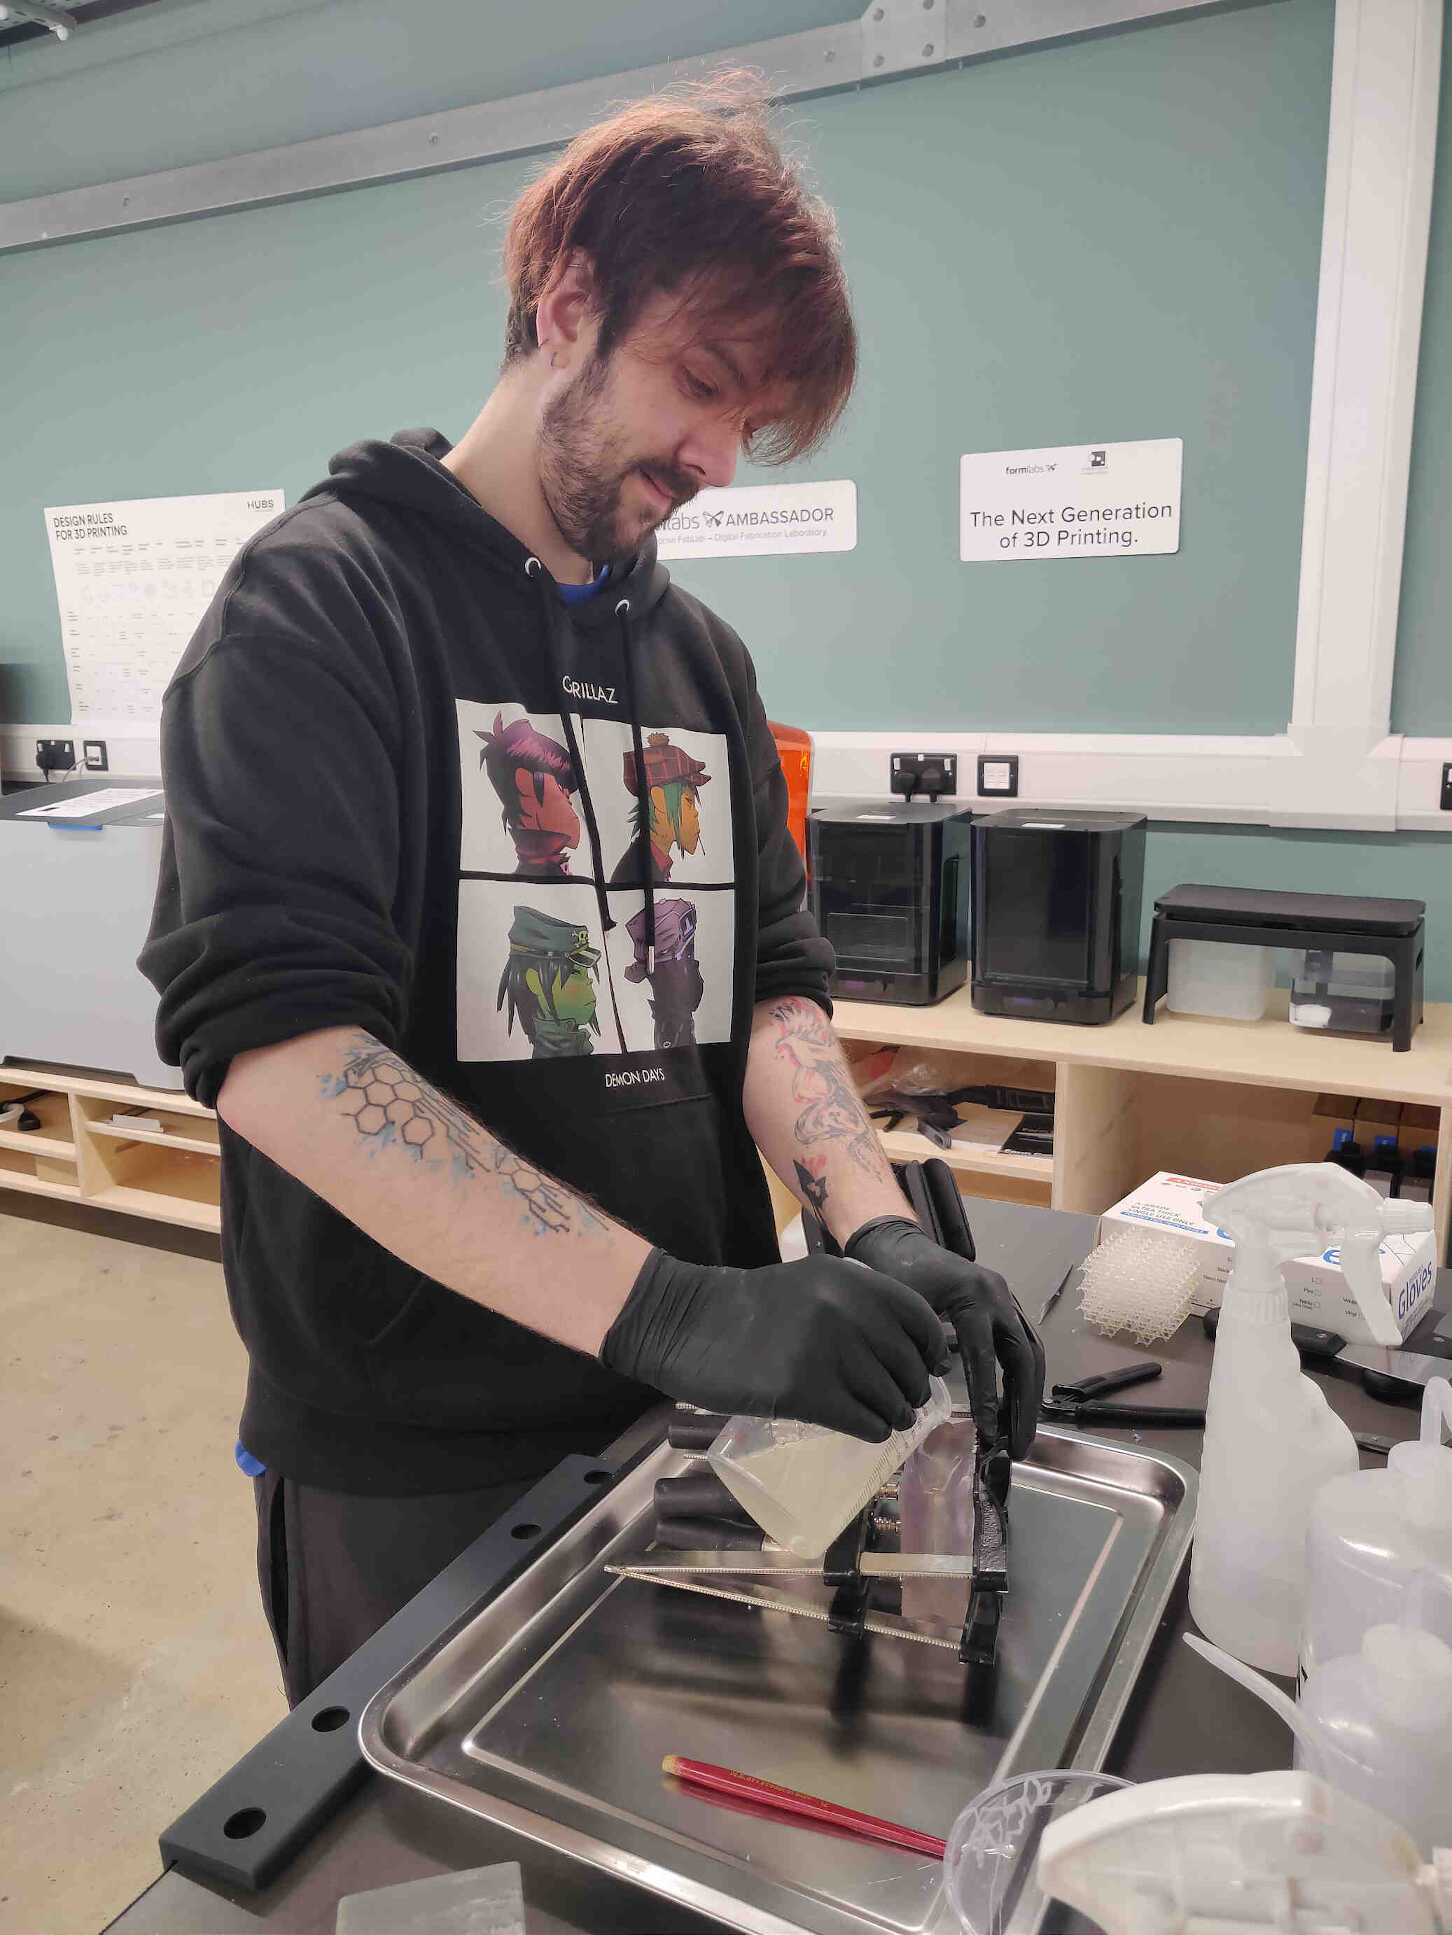
Printing our Mold First Mold - Draft V2 / Silicone Rubber
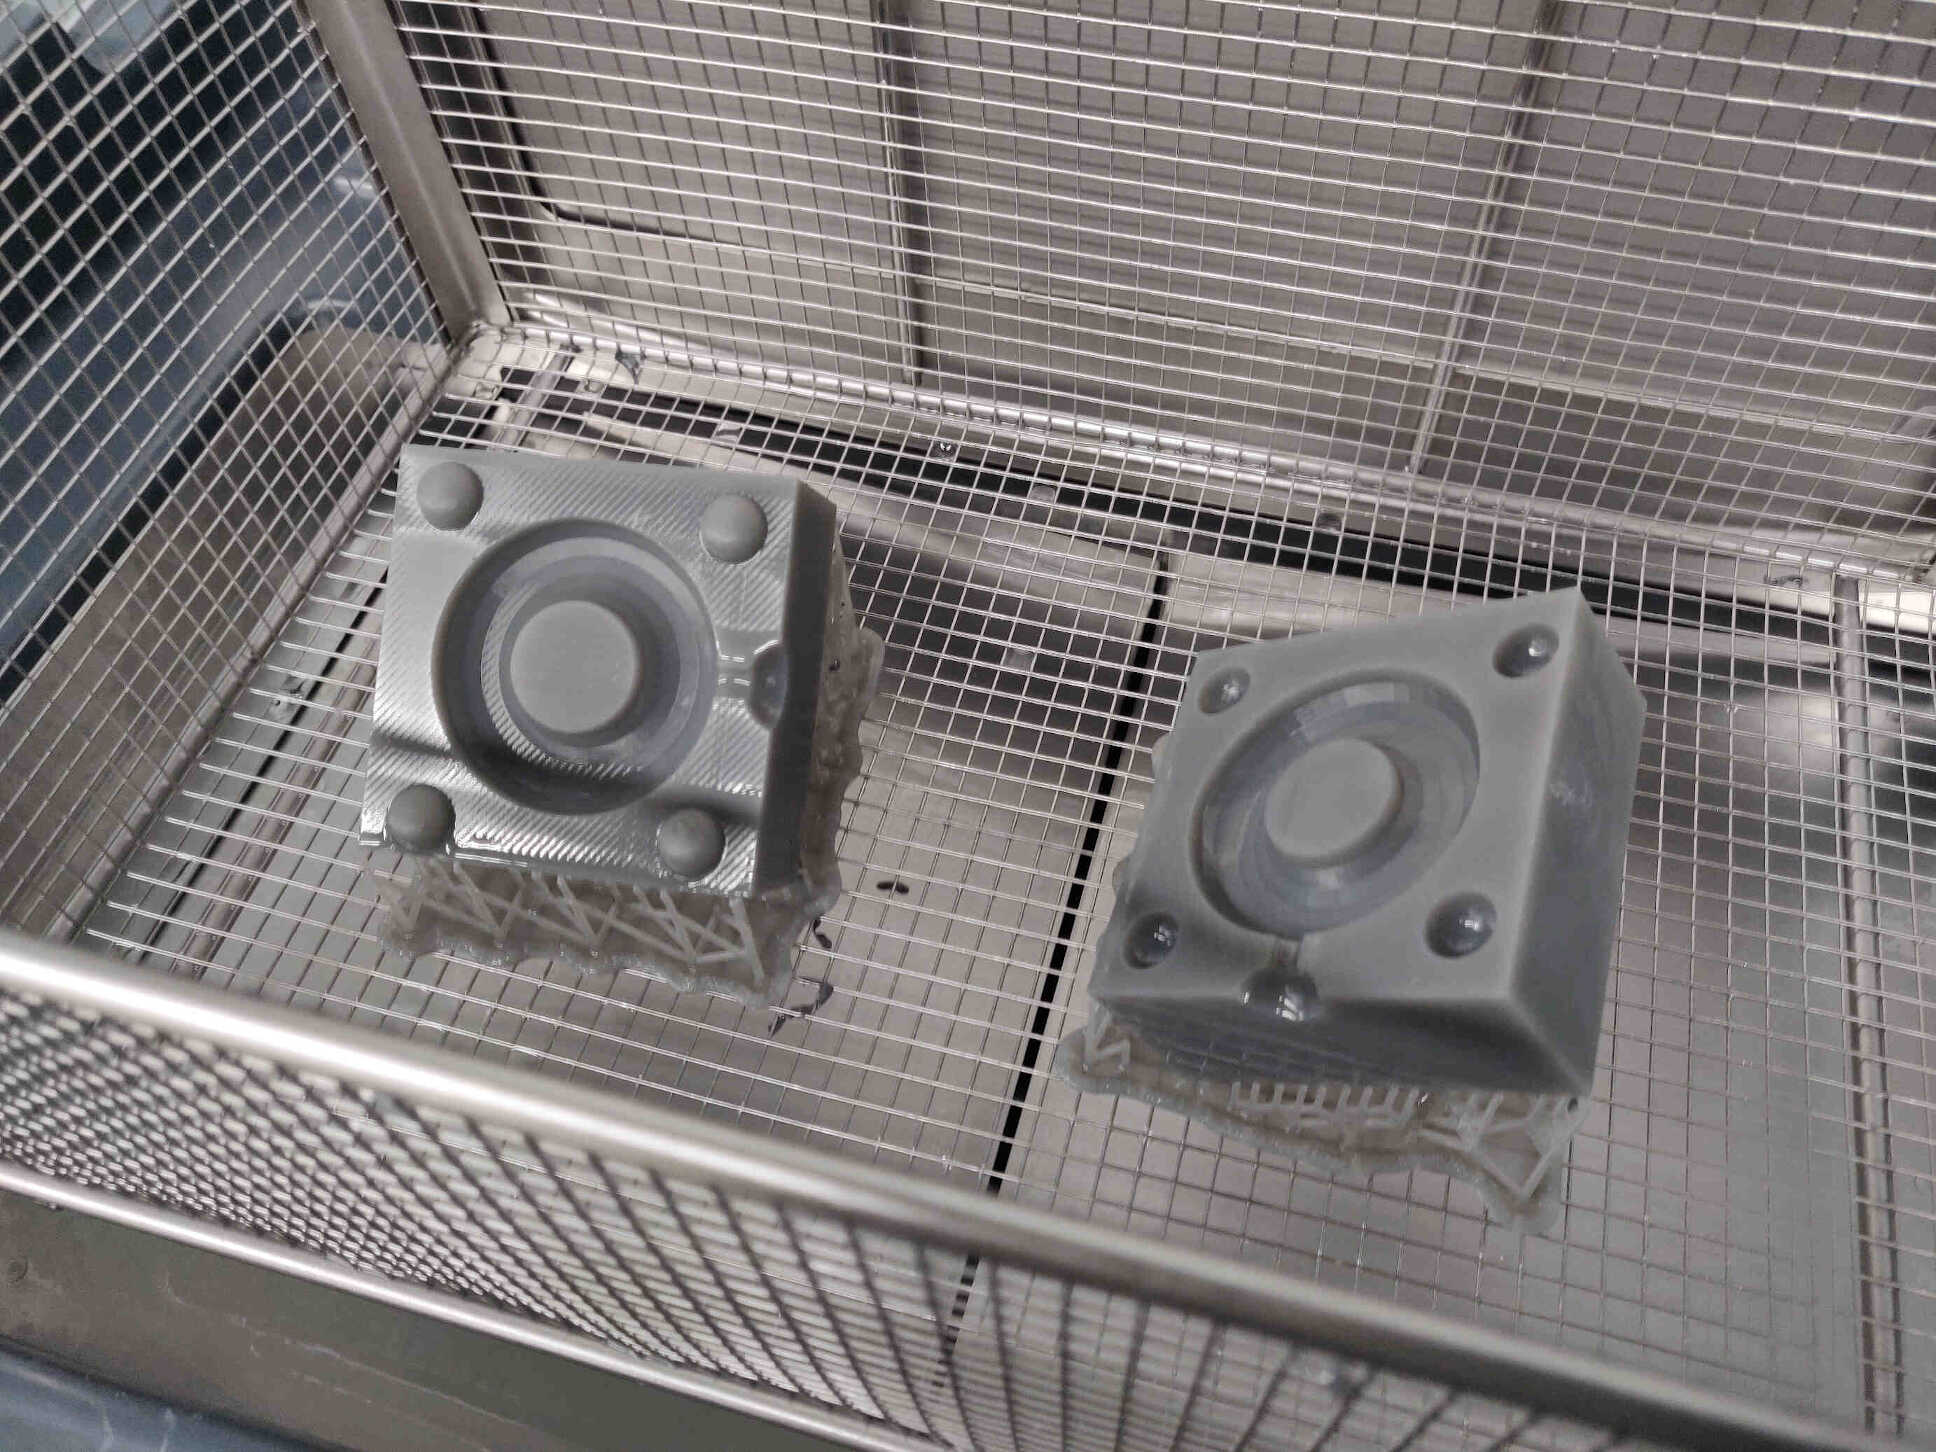
Then brought the files into ‘Preform’ for the formlabs resin print. The first print took 6 hours using DraftV2 material using the formlabs SLA printer. Afterwards the mold was taken out to be washed for 10 mins with IPA in the formlabs washer and cured for another 10 minutes. Then I removed the supports which came off very easily, then I sanded down some of the sharper edges on the mold. Then washed it down for a clean and sleek look.
The print itself had a really nice and smooth finish, however our first mold didn’t use and Tapering or Bevelling around the keys to smoothly lock it into place, so there was a bit of gap along the edges. This was expected for our first print so we continued on preparing for casting so that I could start another mold print with a new model while the other one cures overnight.
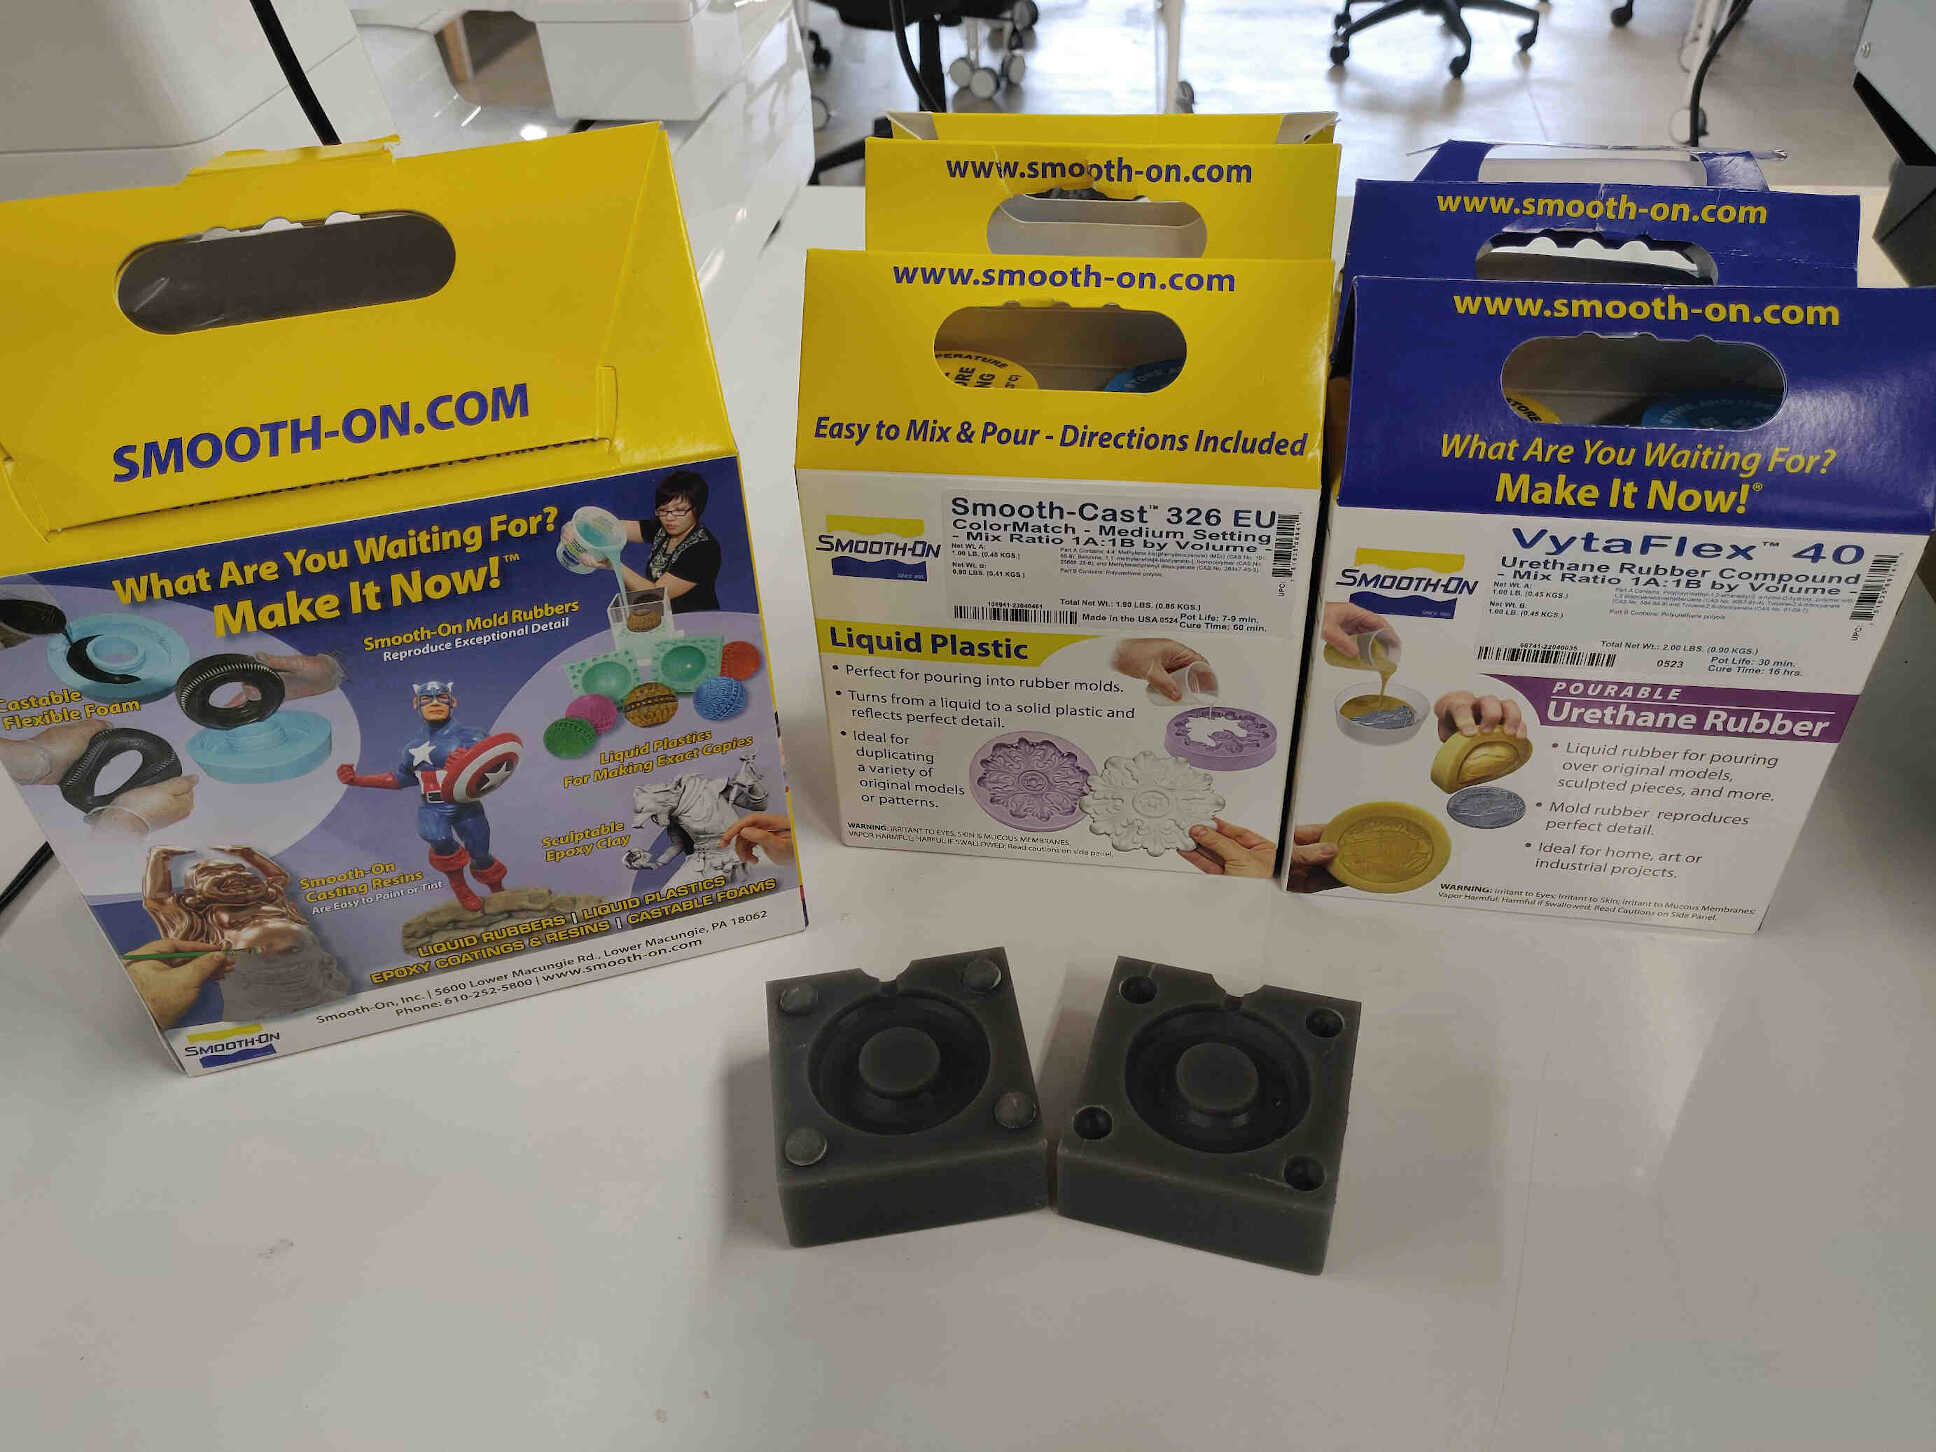
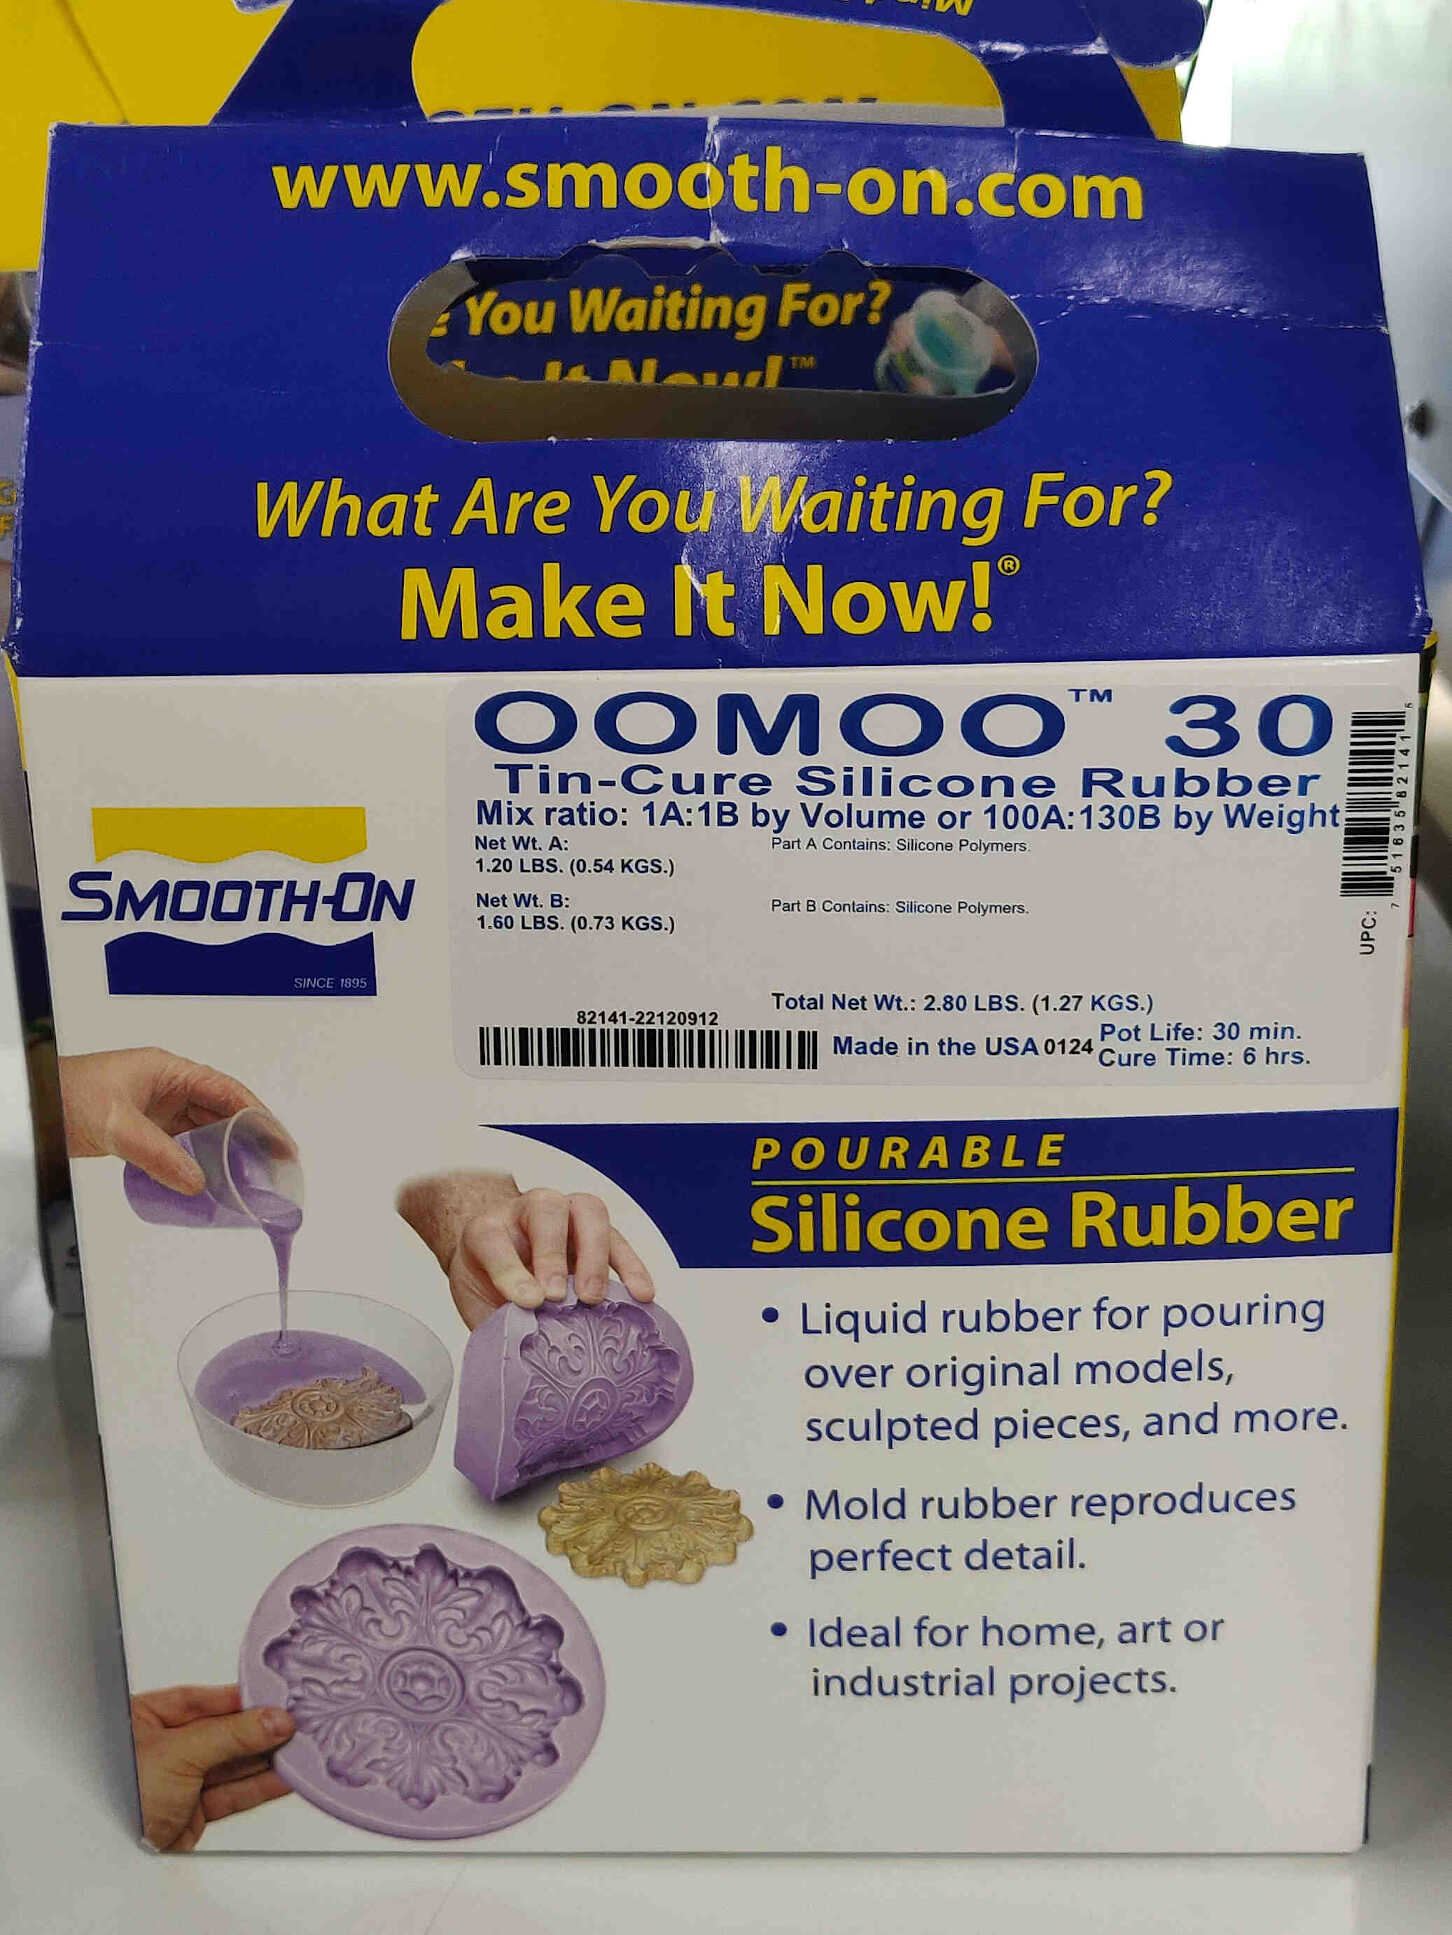
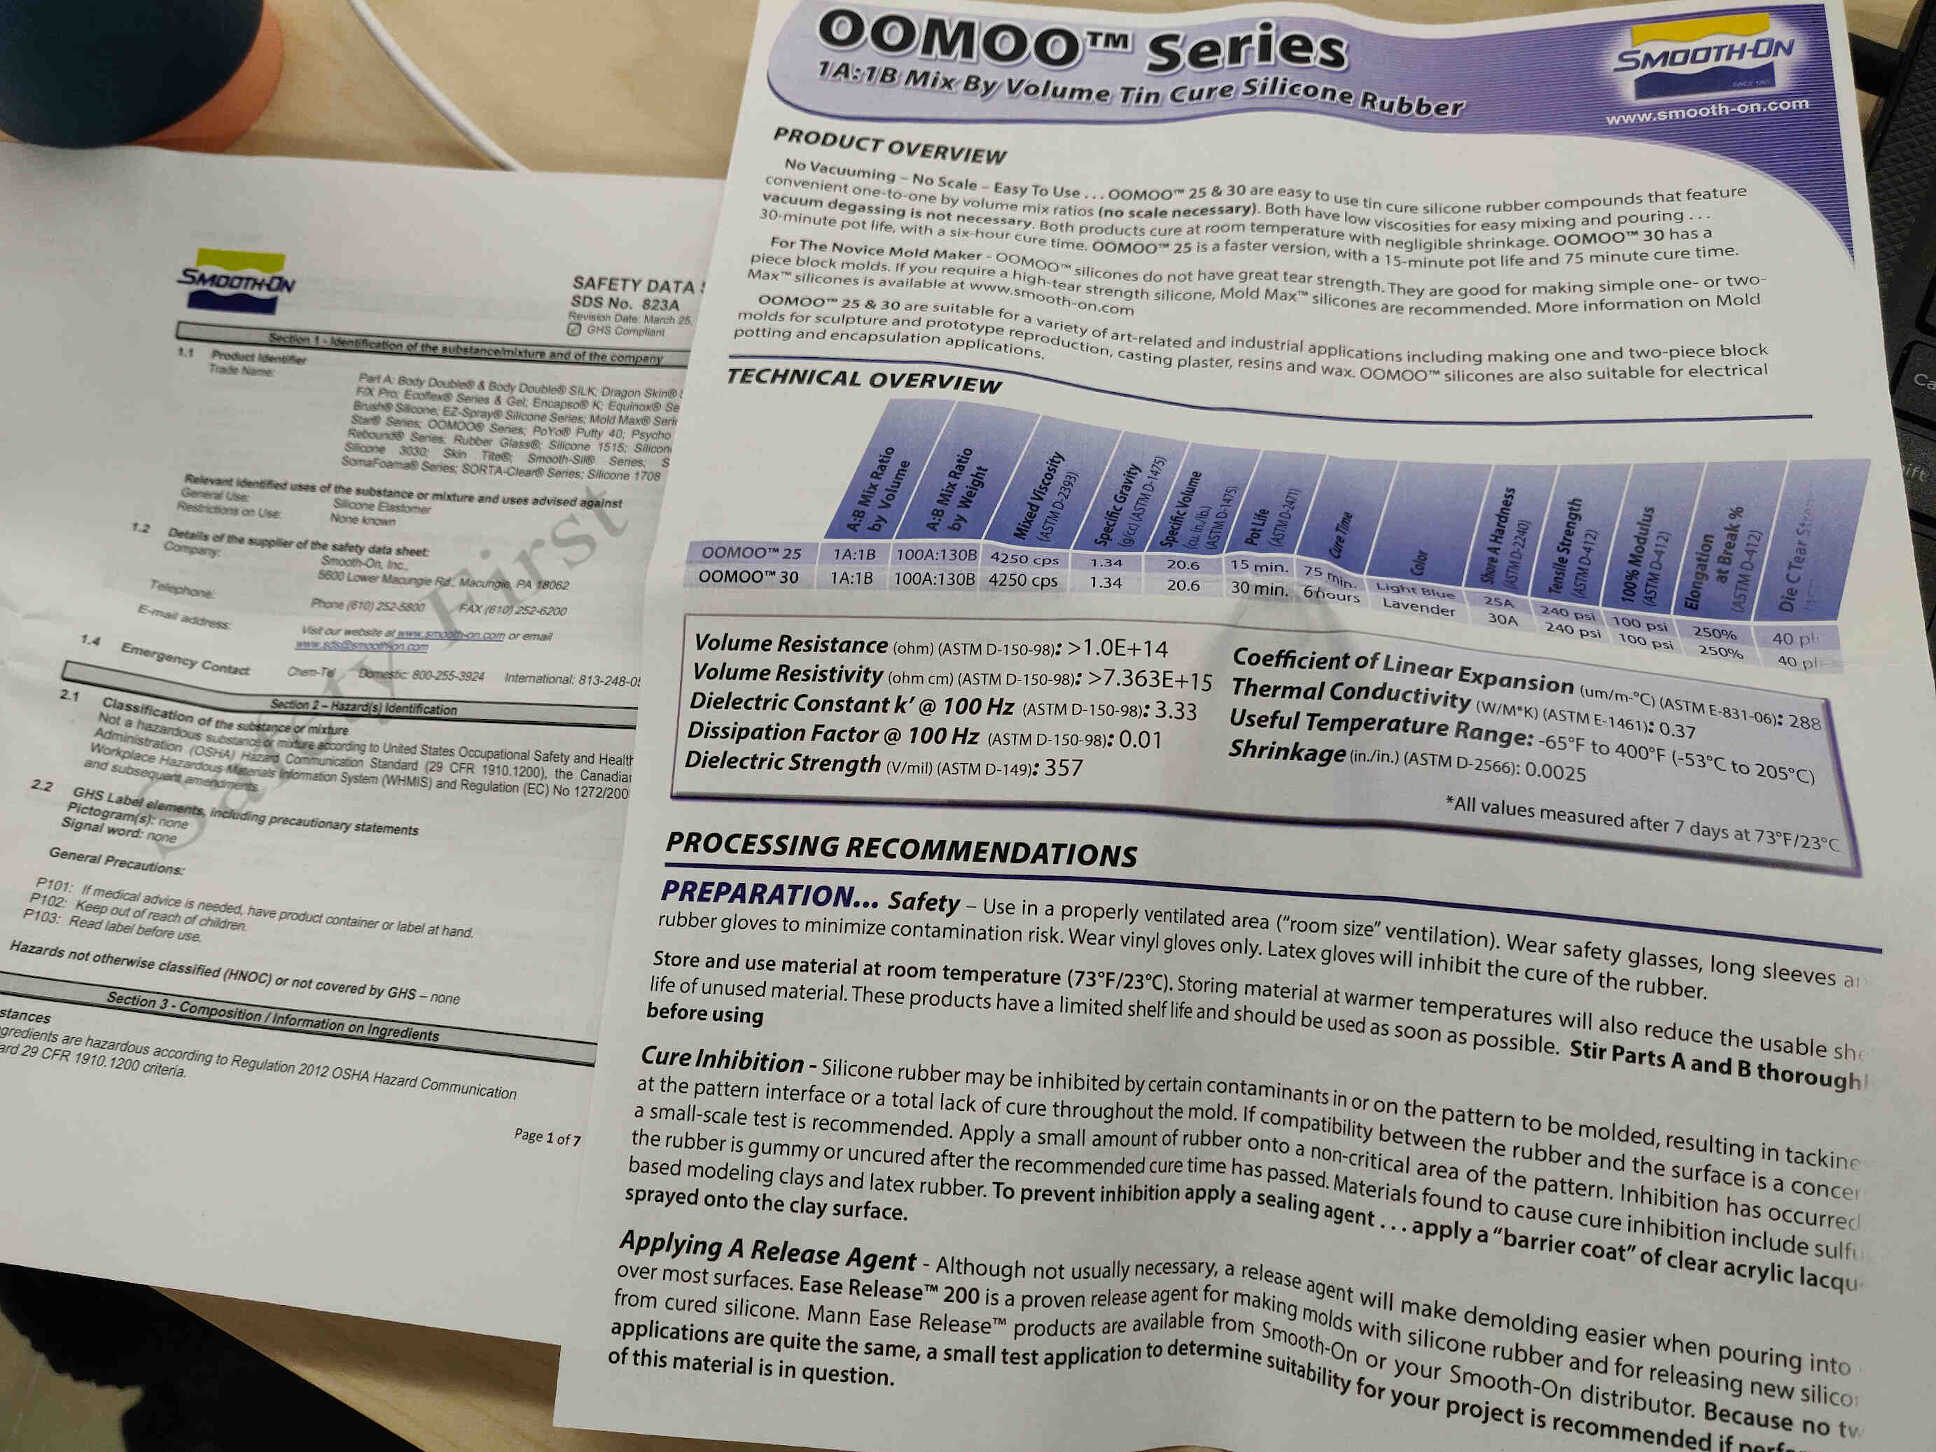
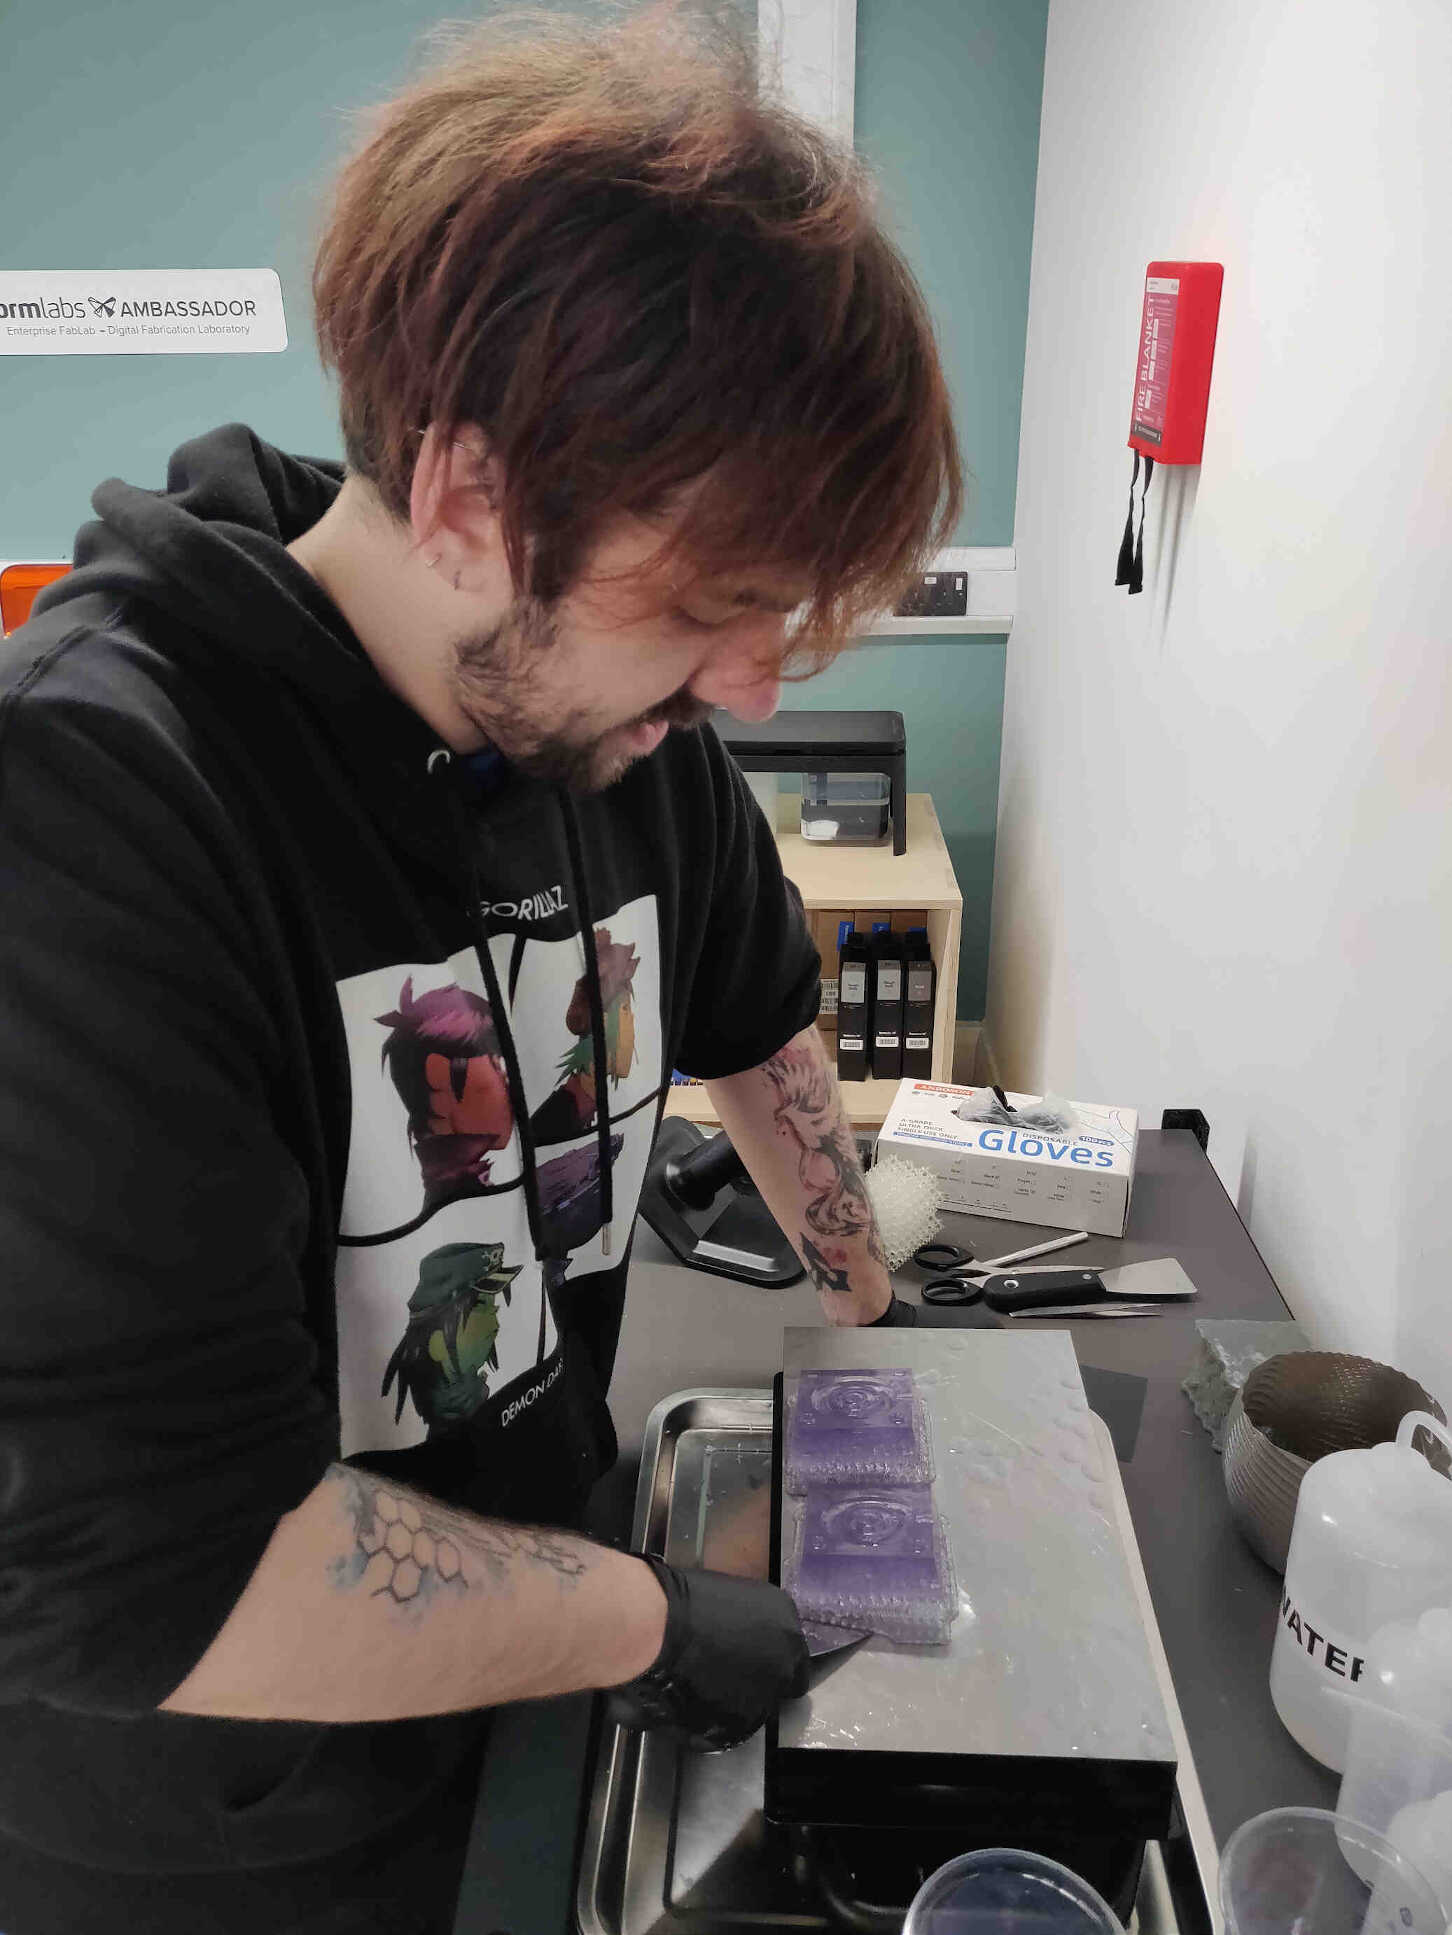
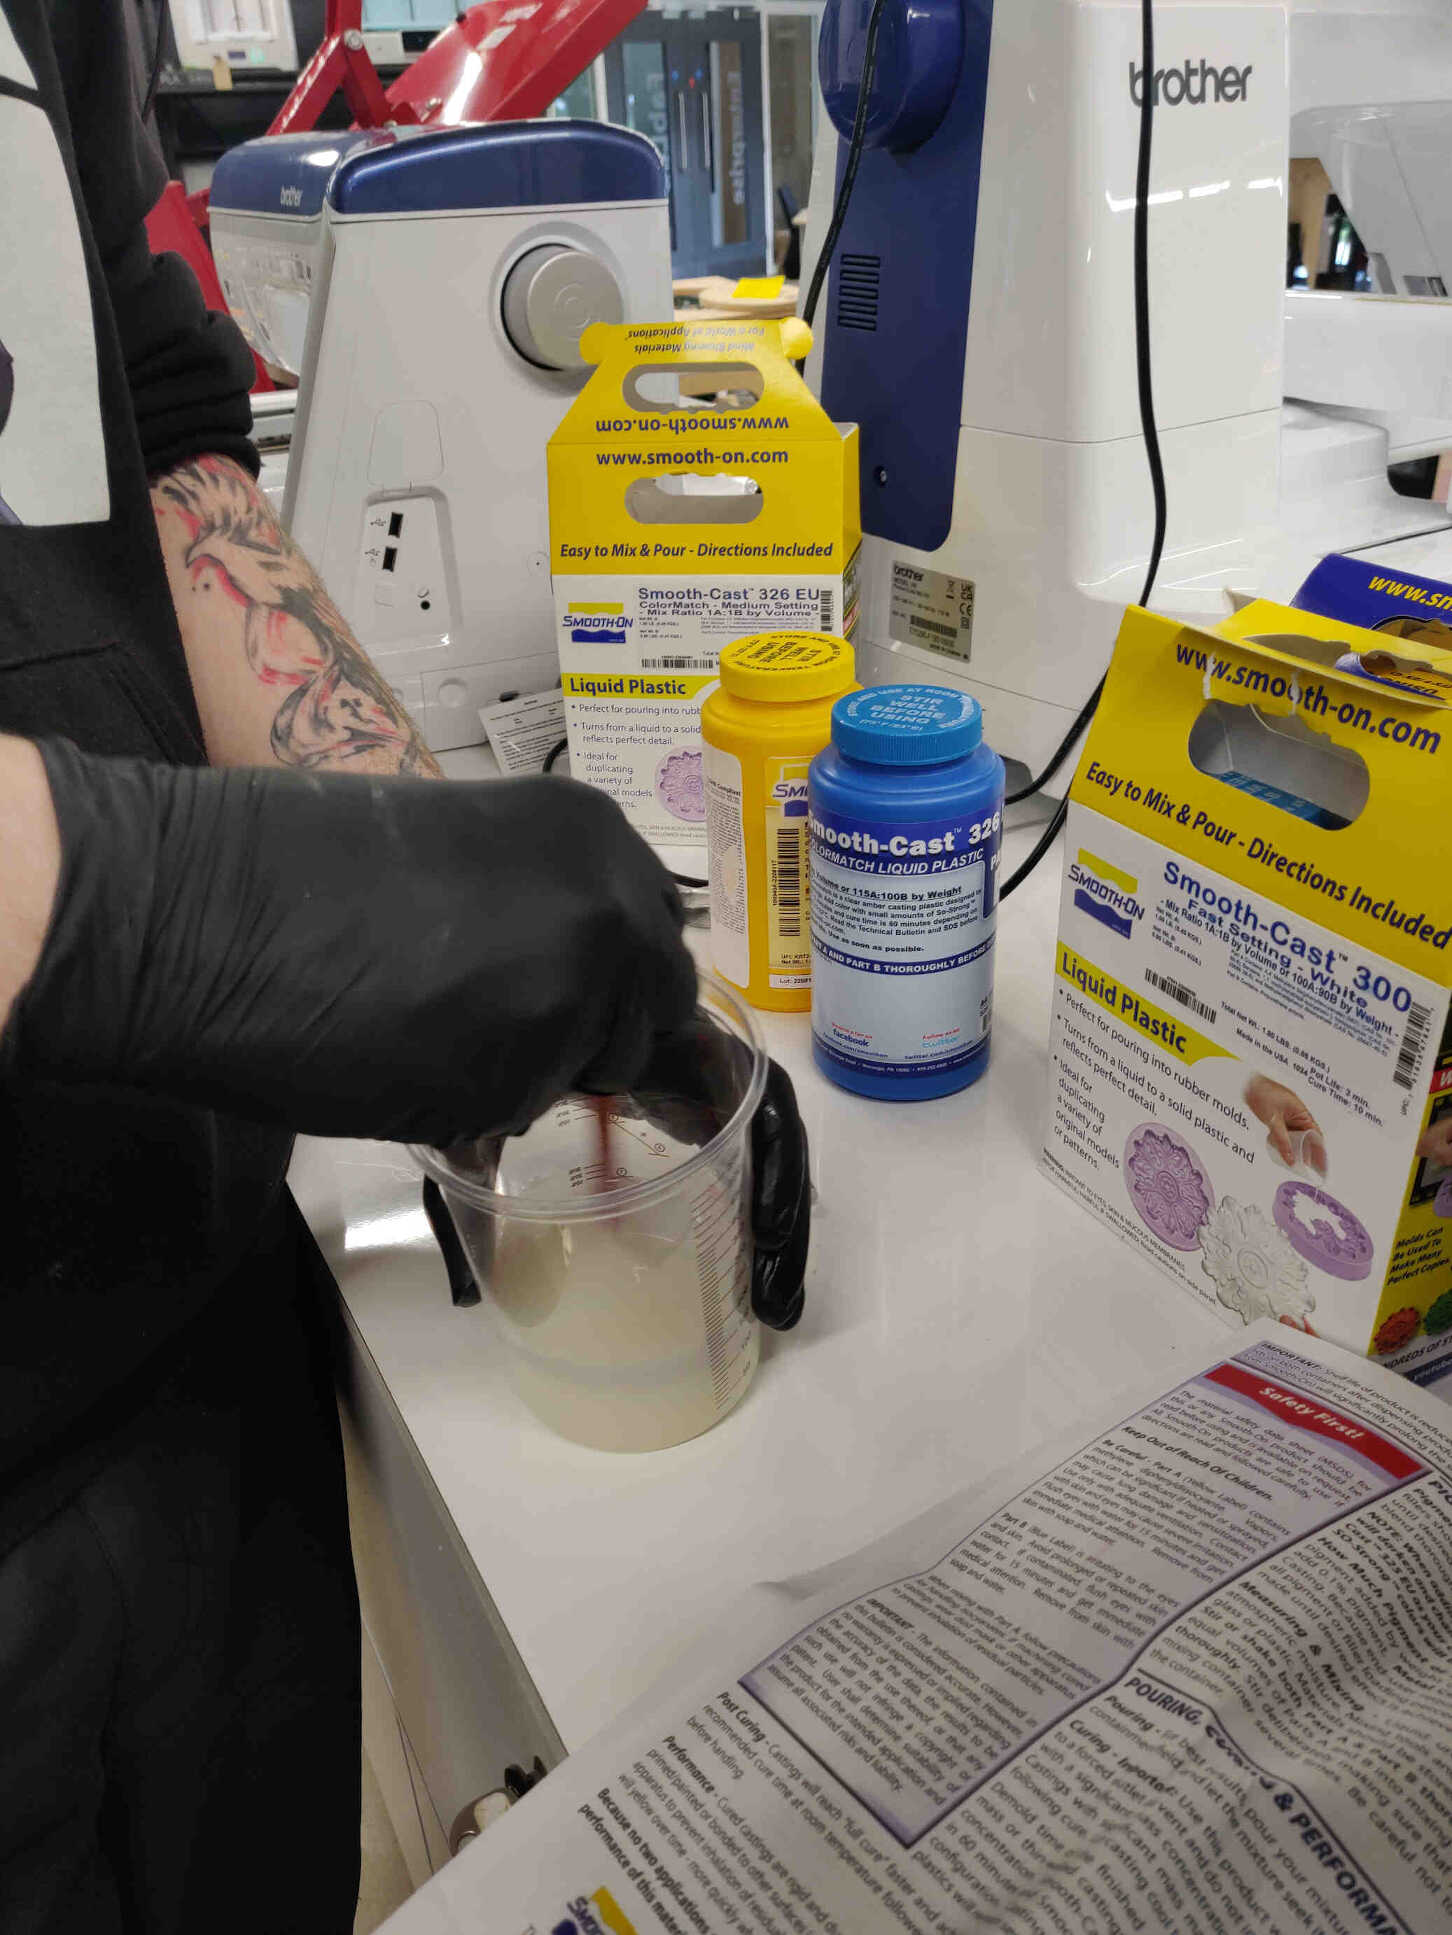
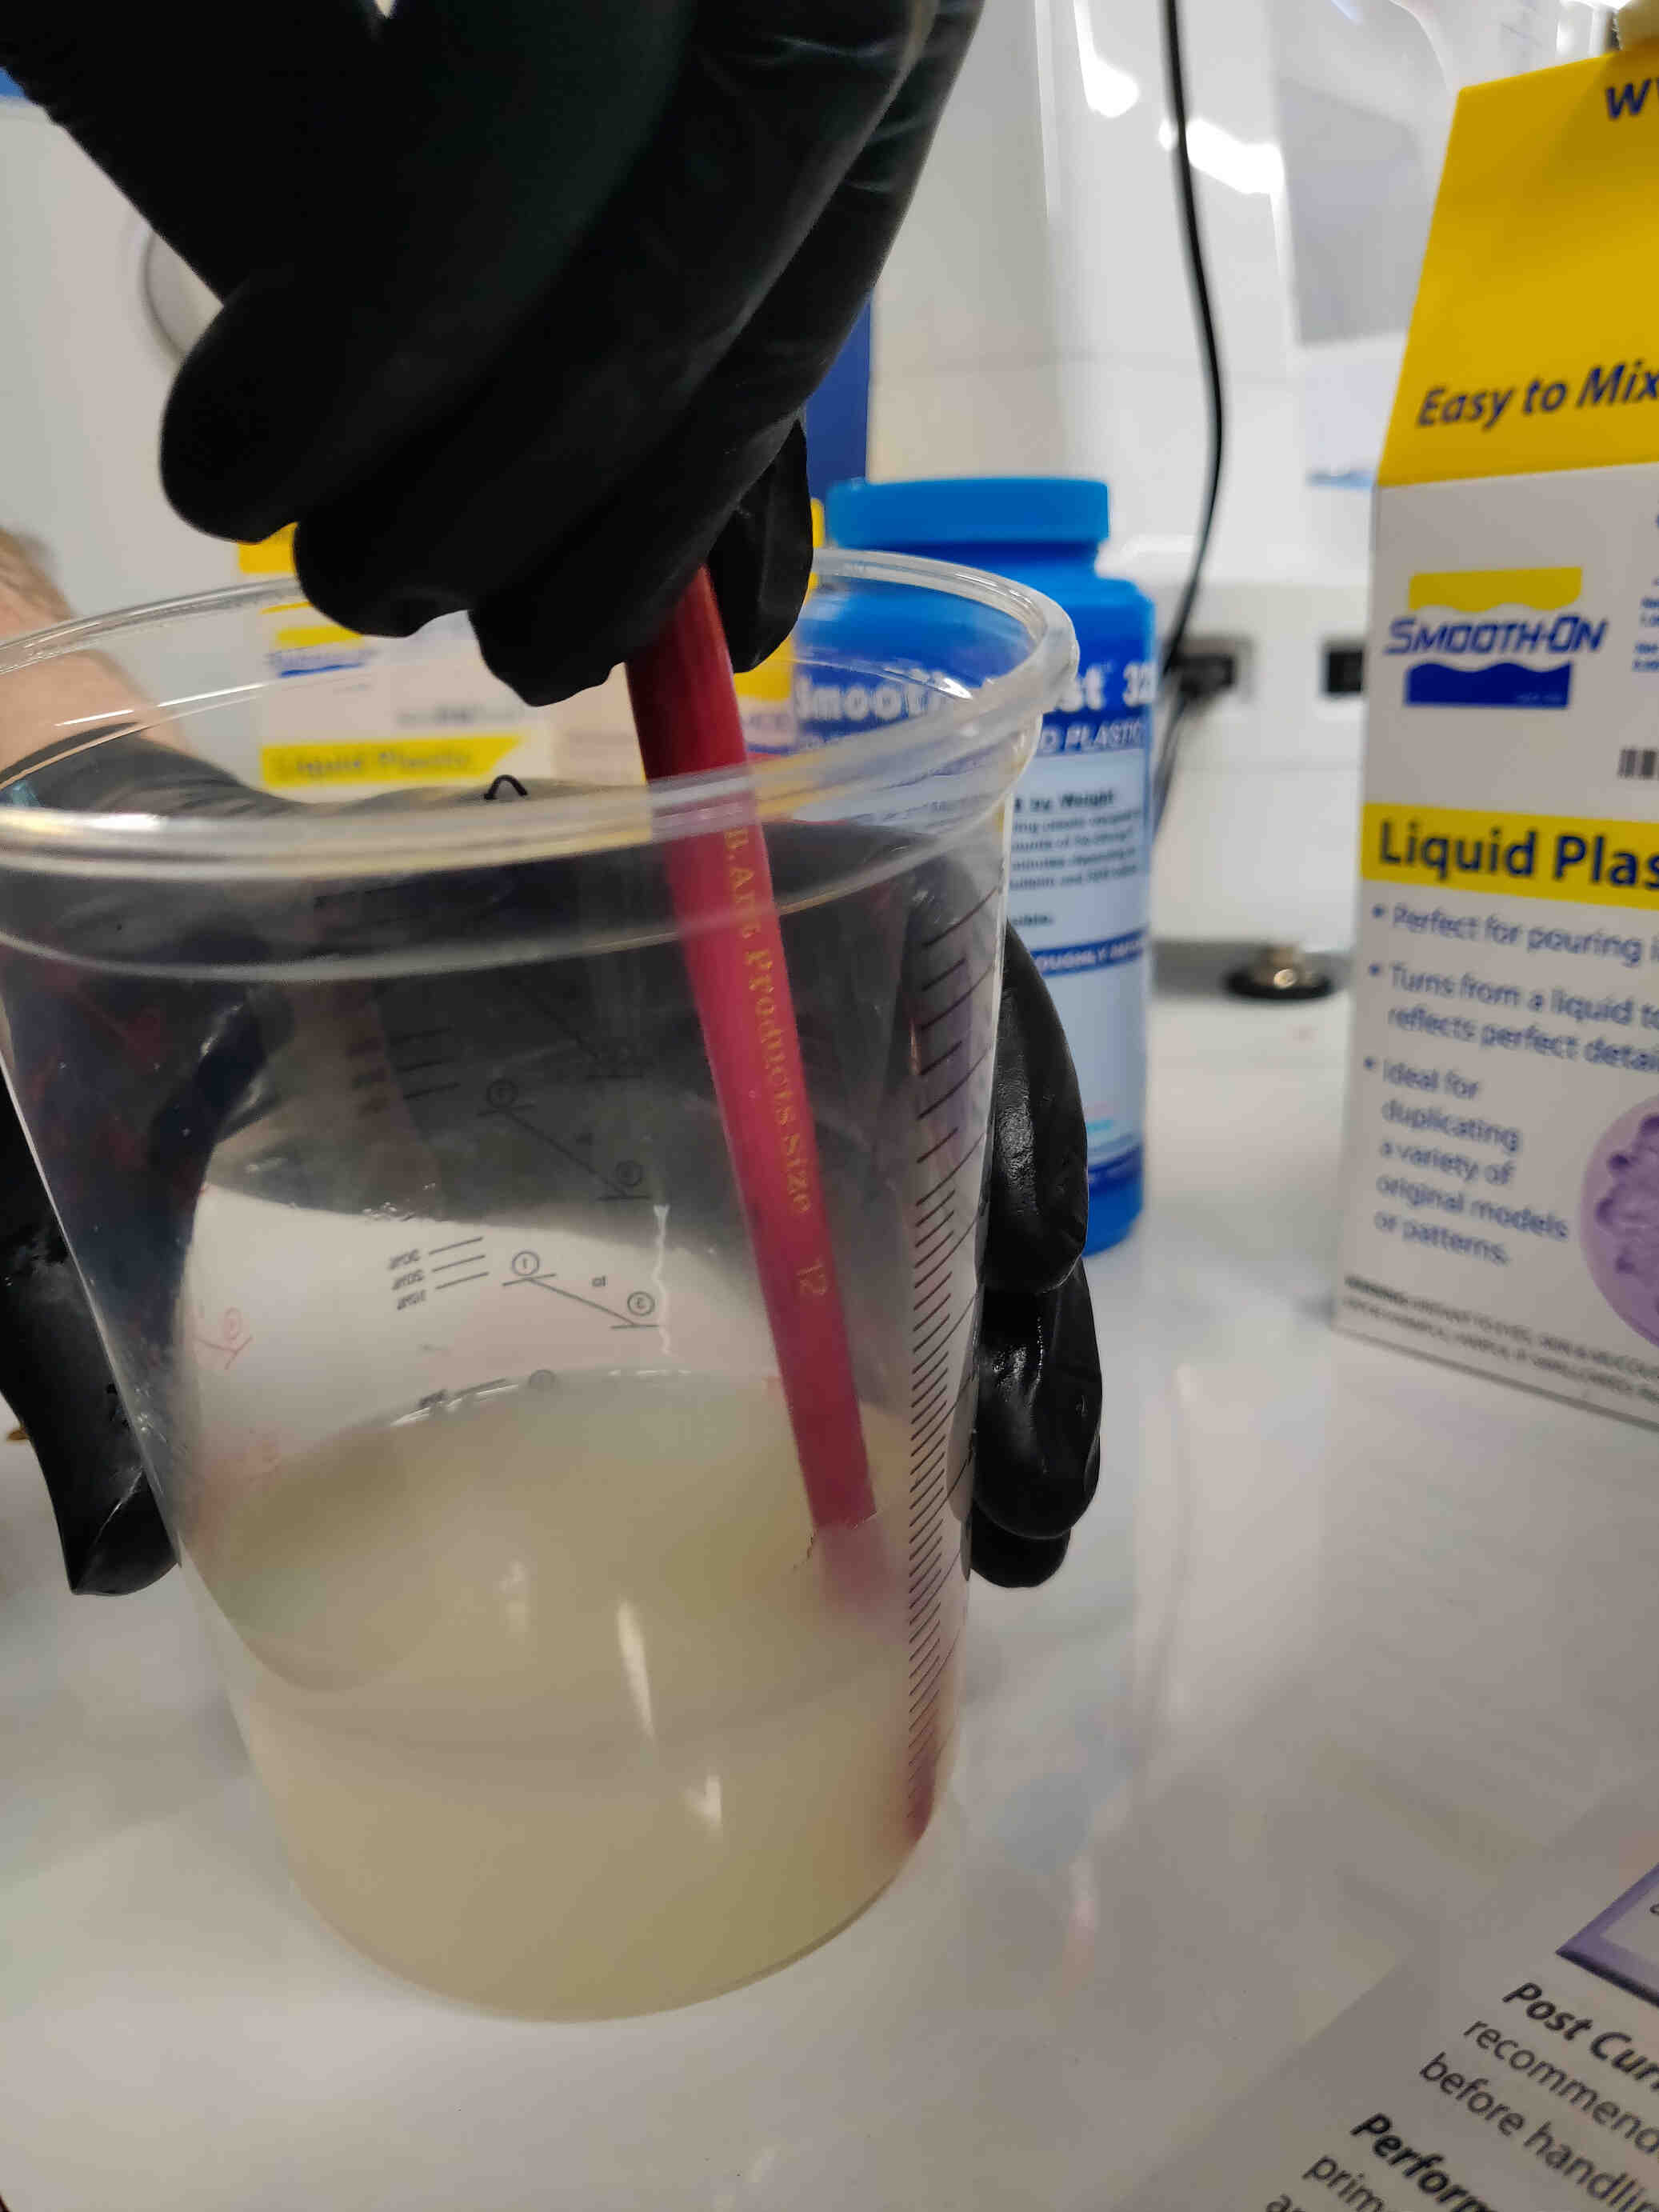
I chose the casting material ‘Smooth-On OOMOO Series Silicon Rubber’ which had to be mixed 1A:1B and had to be mixed for 3 minutes, had a pot life of 40minutes and cure time of 16 hours. I was warned that stirring the mixture too quickly will cause bubbles which will create unwanted imprints in the design. I was happy with the mixture after 3 minutes, though it seems the bottom of it wasn’t entirely mixed which we noticed when using the excess material to form another mold.
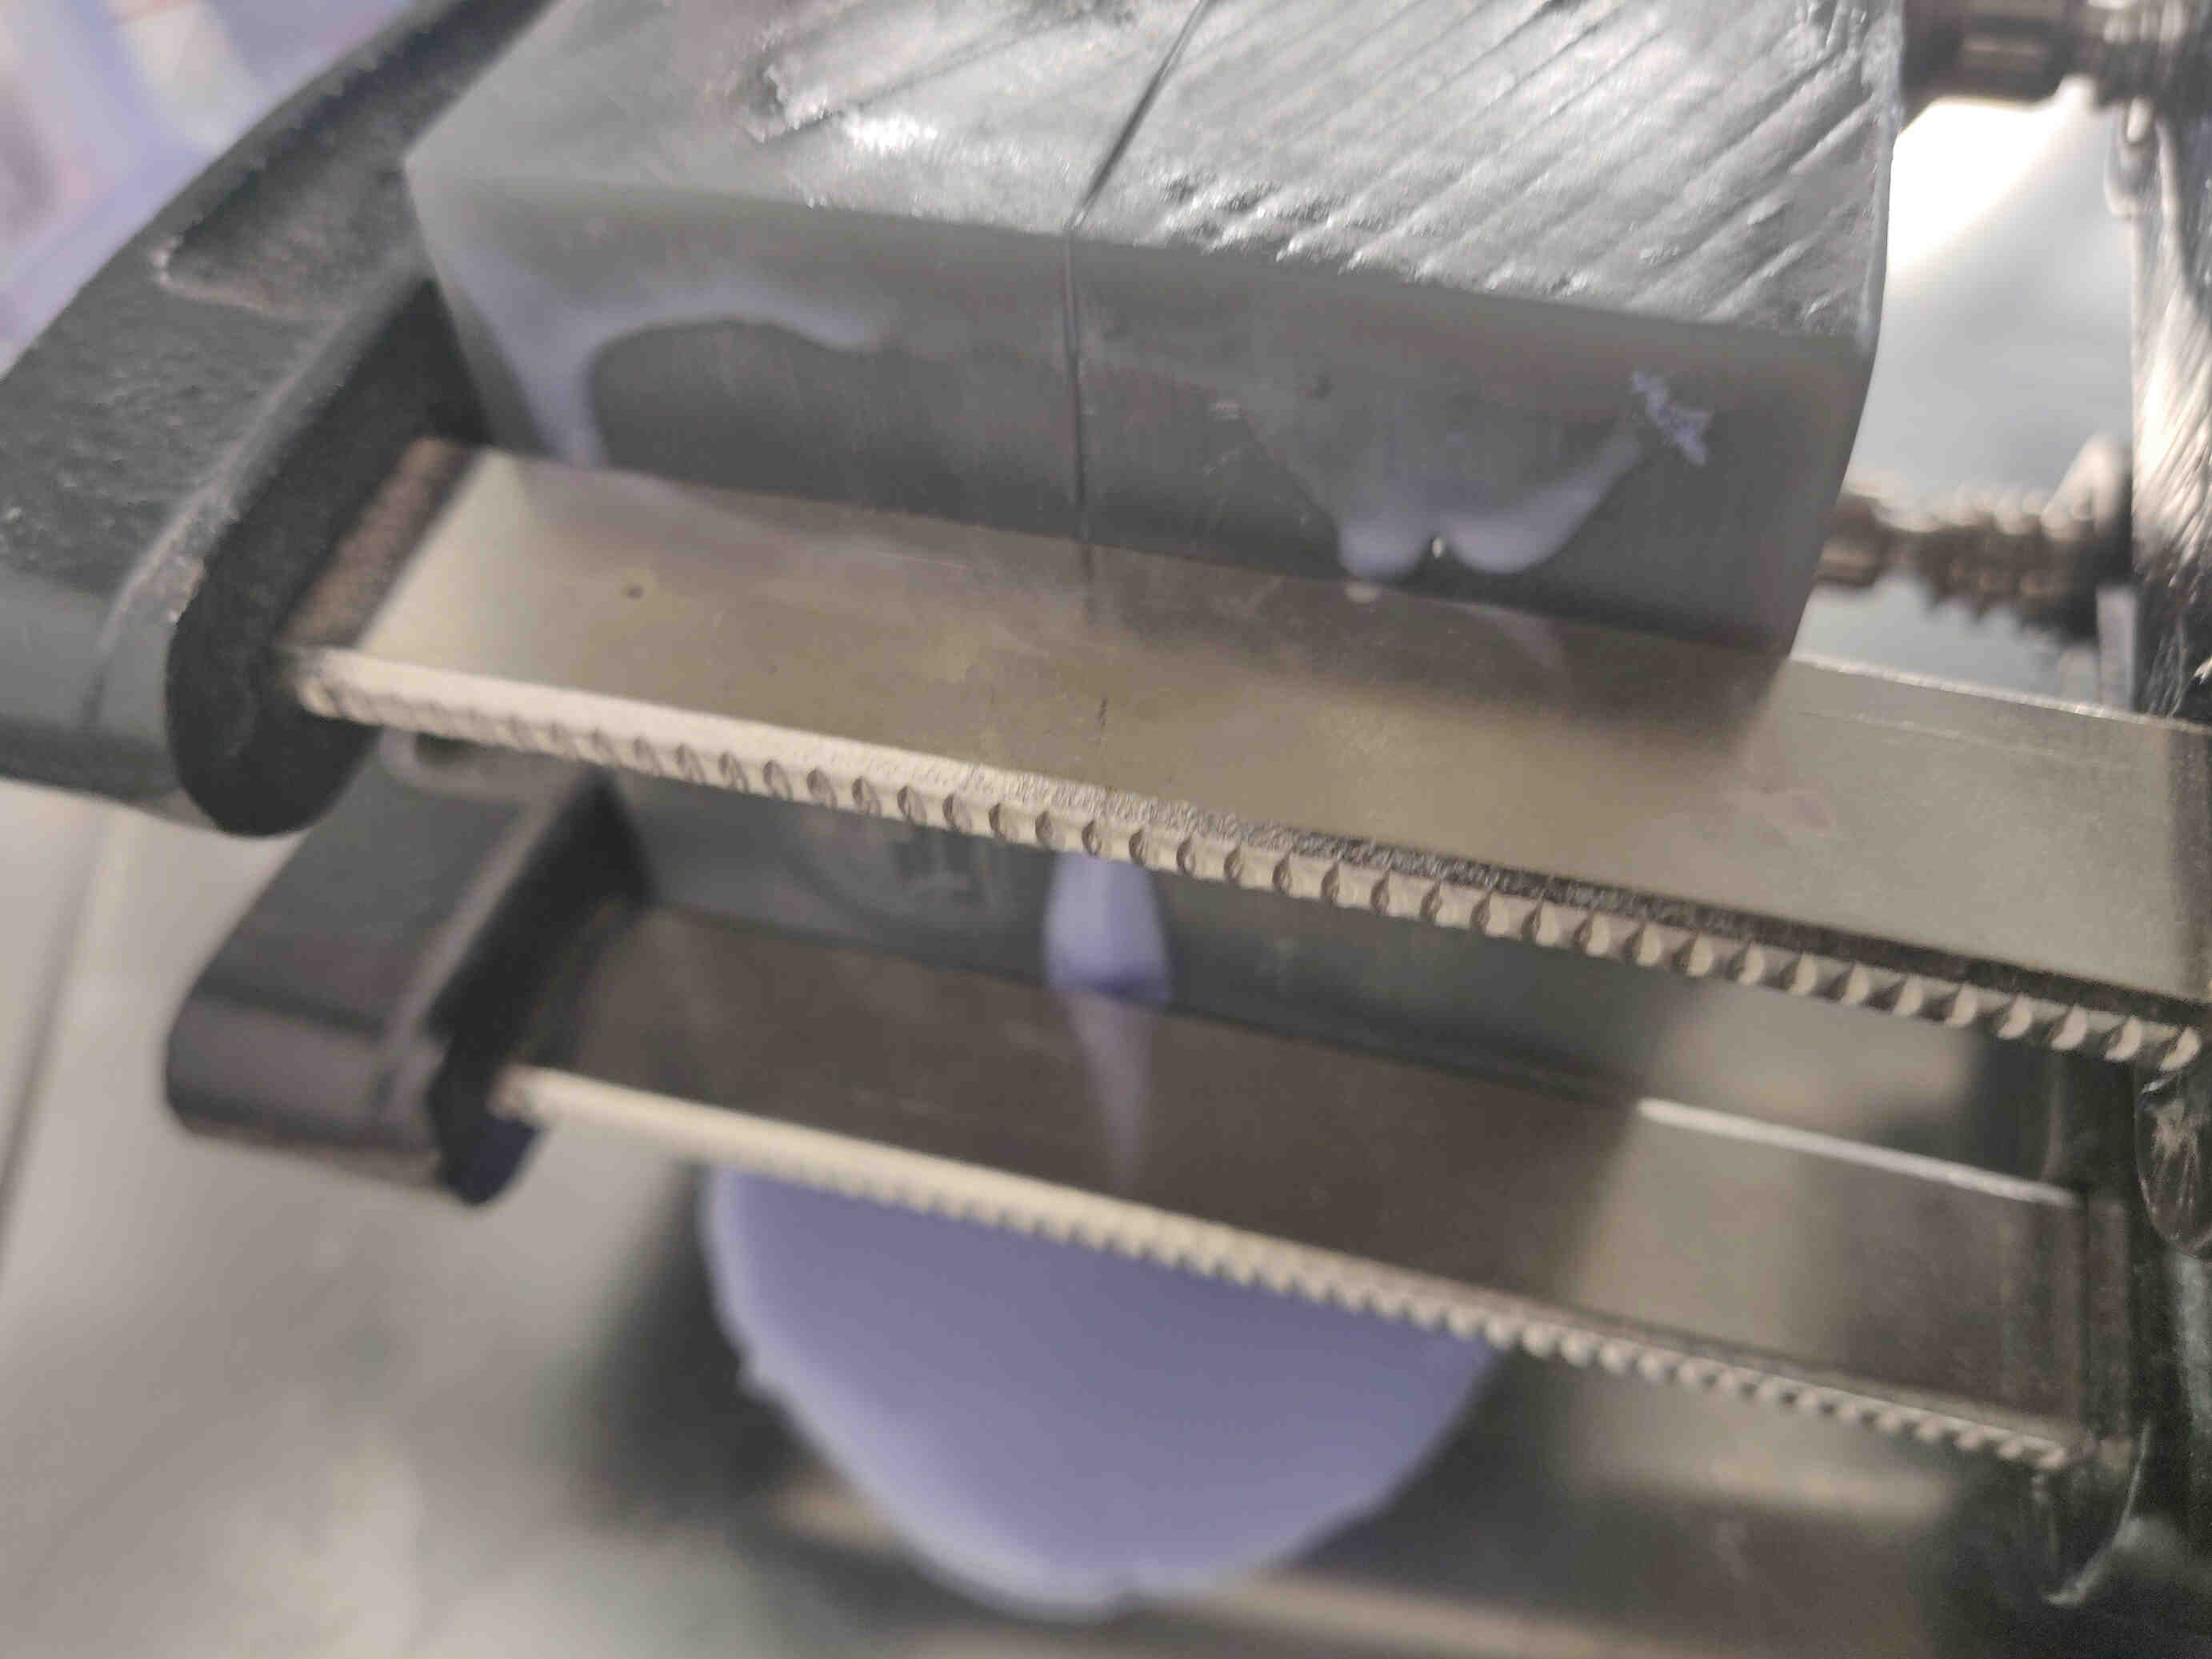
I used 2 clamps to hold the mold into place. The 4 fitting keys on the mold were quickly made and wouldn’t fully stick together. This shows that using exact additive and subtractive methods isn’t enough - the keys needed to be tapered and beveled to account for clearance, which I did for my 2nd SLA mold design.
After the silicon was poured slowly through the opening, I left it to cure while I set up my 2nd mold design on the formlabs printer - this time using Flexible 80A material. I noticed after a little while that the silicon rubber was leaking through the bottom and sides of my mold which was to be expected. It stopped leaking after a couple minutes but I’m expecting the result to be only half complete. This could be easily fixed with this dodgy mold by taping up the sides of the mold - which I’ll try to do once I prep the silicon for the 2nd mold - which will be done.
Final Day of Molding and Casting
First Cast Result
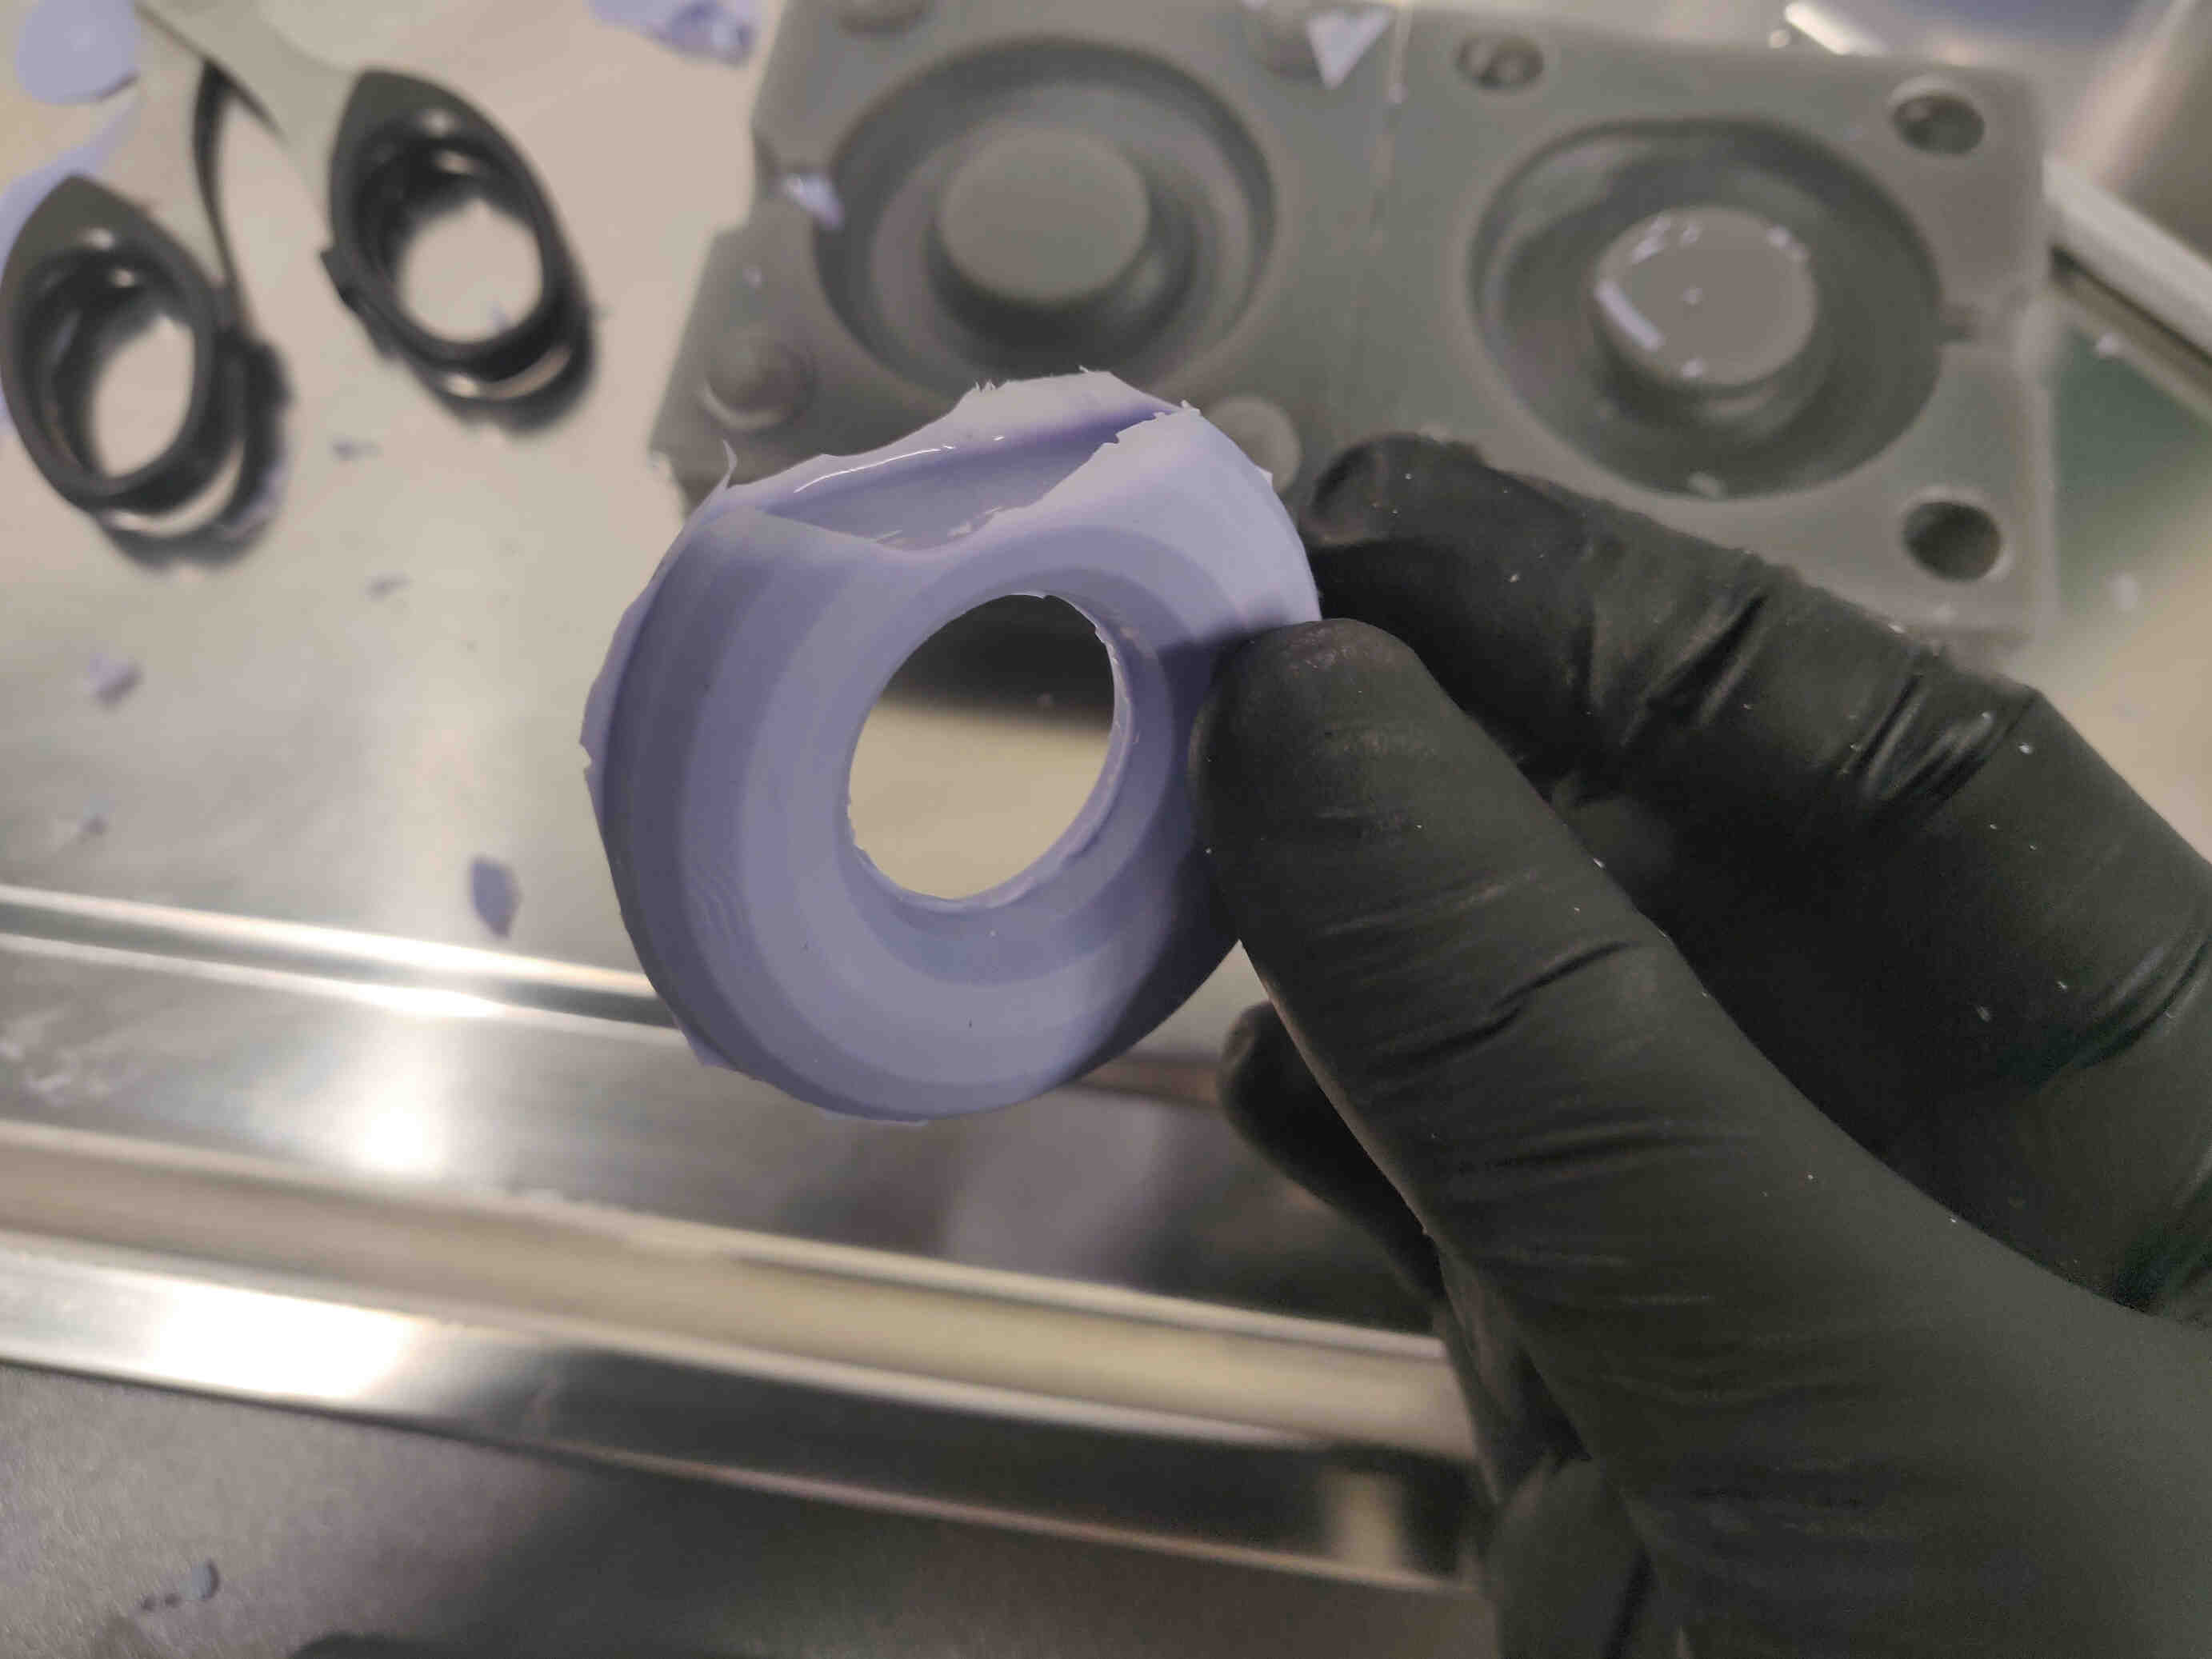
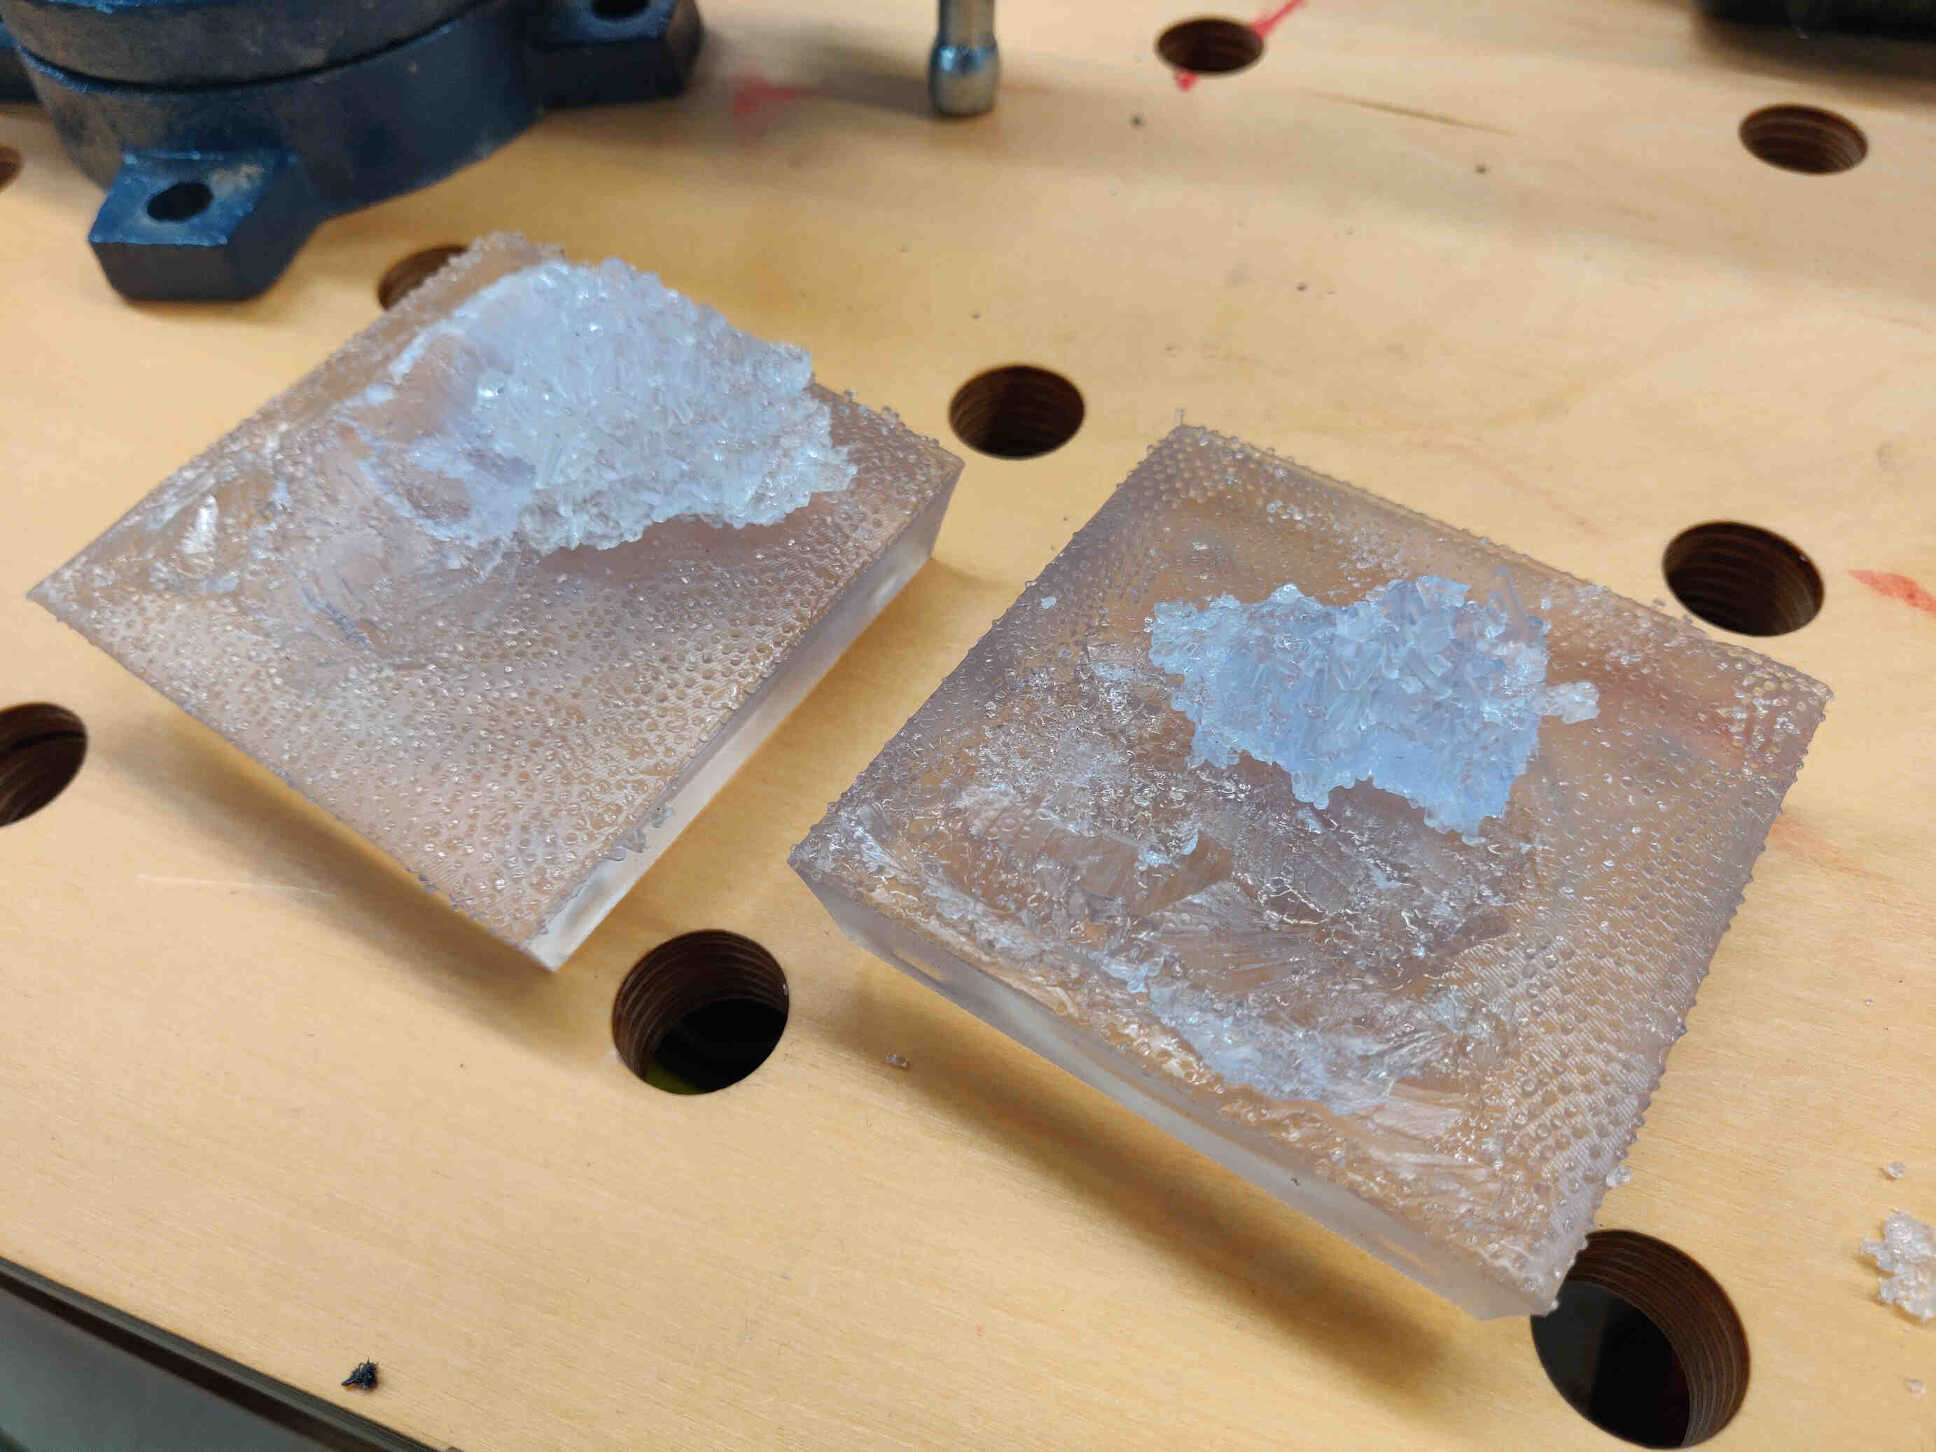
The cast for my first mold wasnt as bad as I thought it would be after I noticed the leakage before the weekend. I expected holes and bubbles or a mess entirely, but it ended up being perfectly formed - just missing the top of its head.
____________
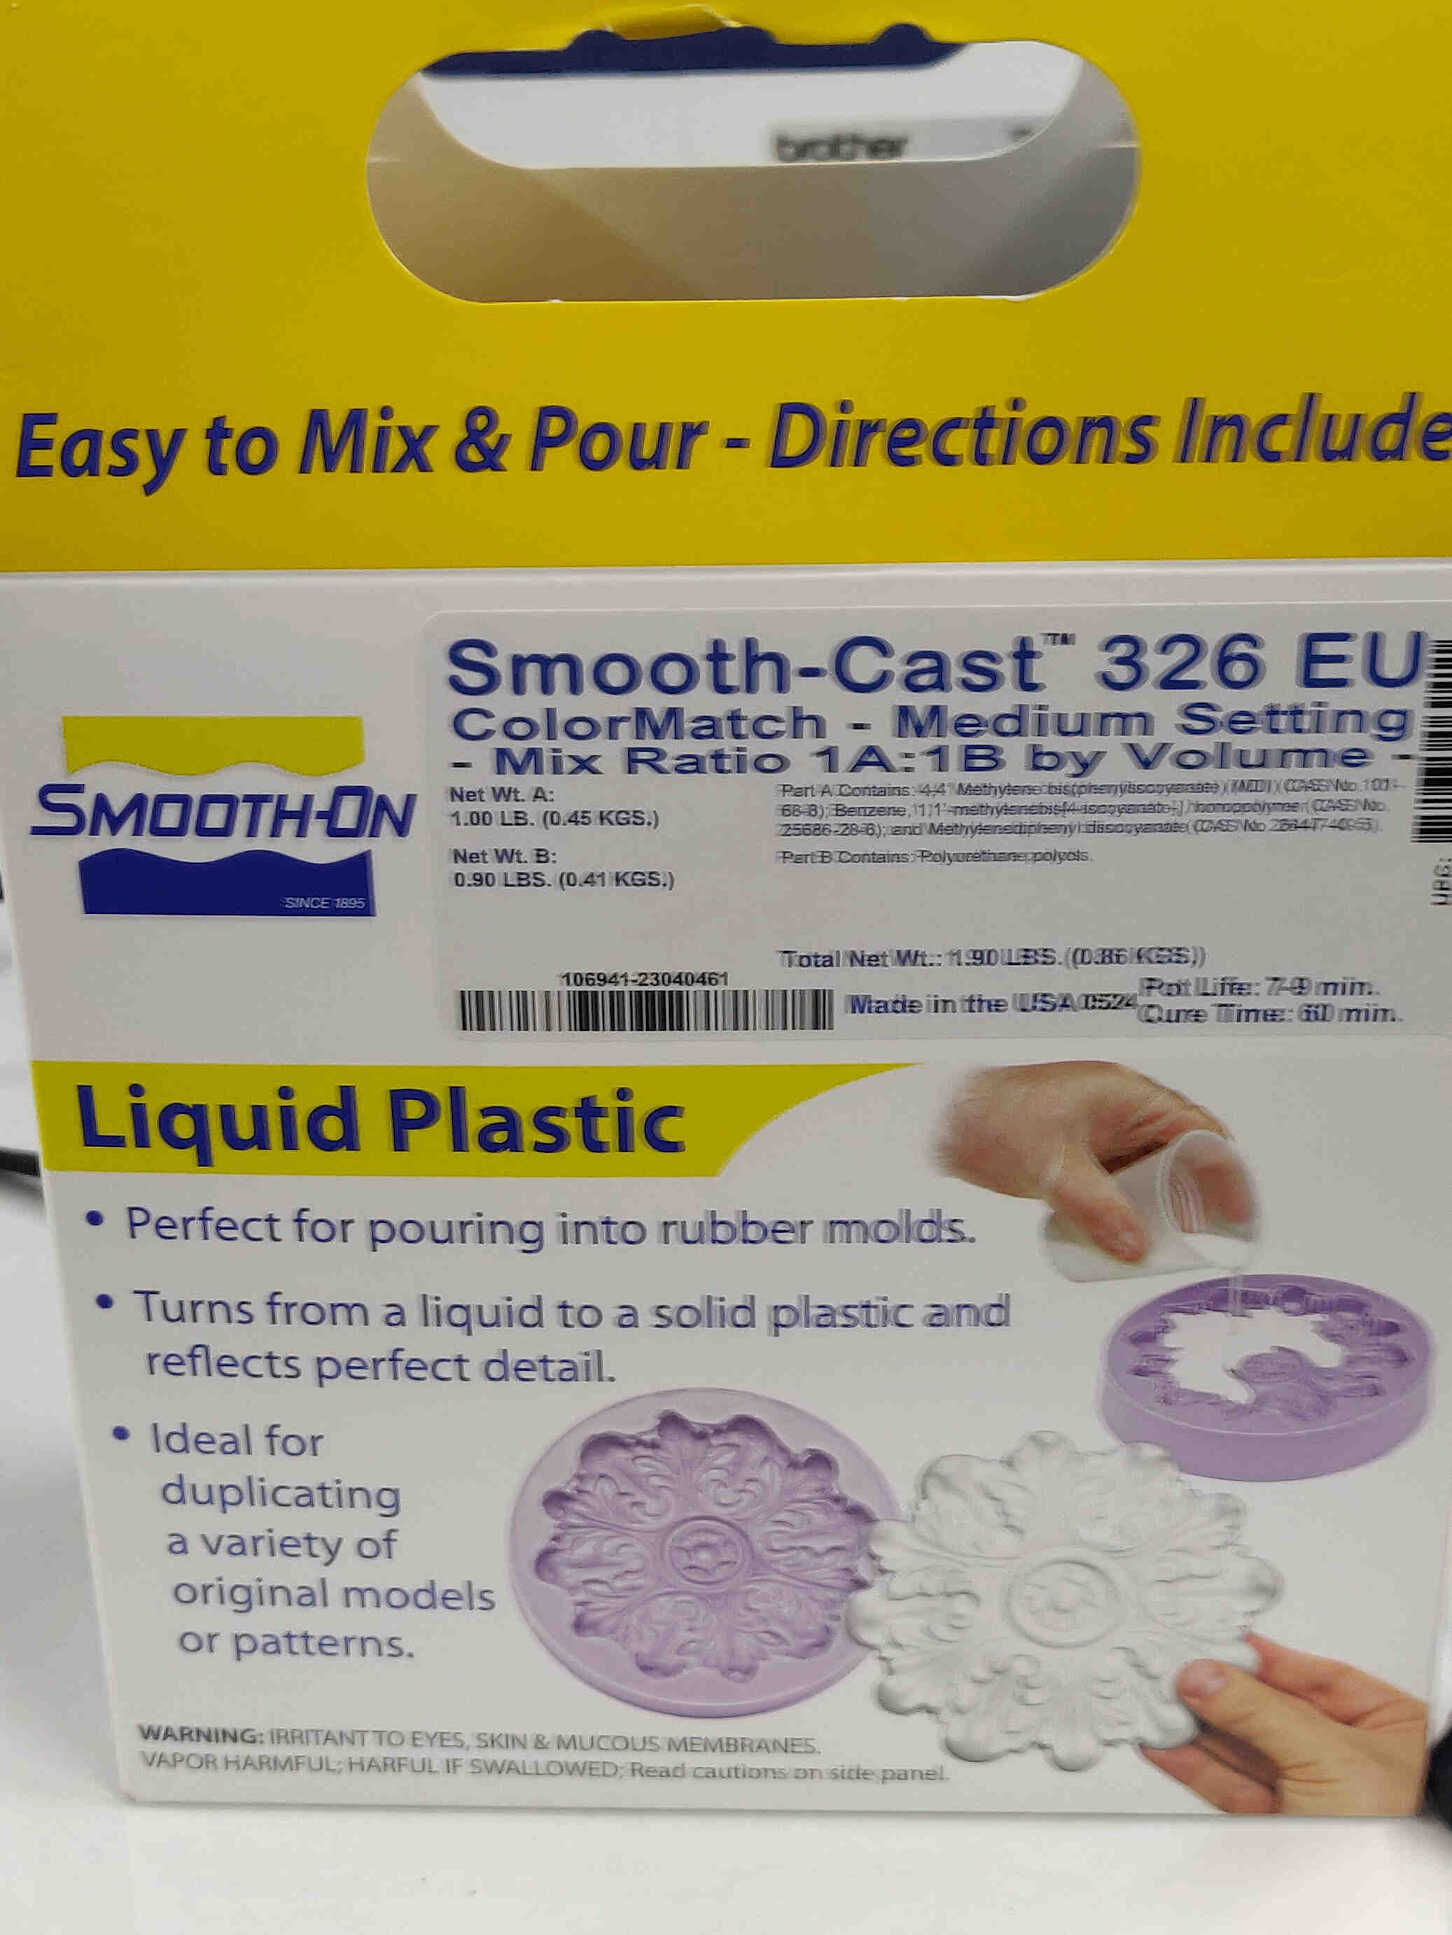
Second Mold & Cast = Flexible 80A / Smooth Cast Liquid Plastic
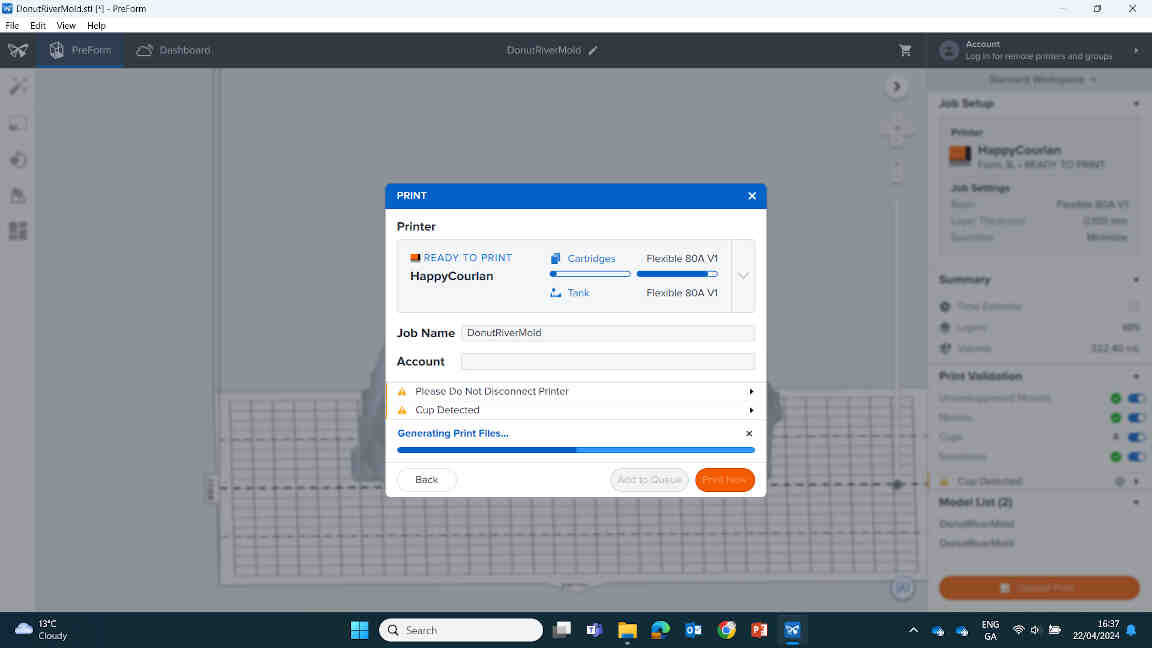
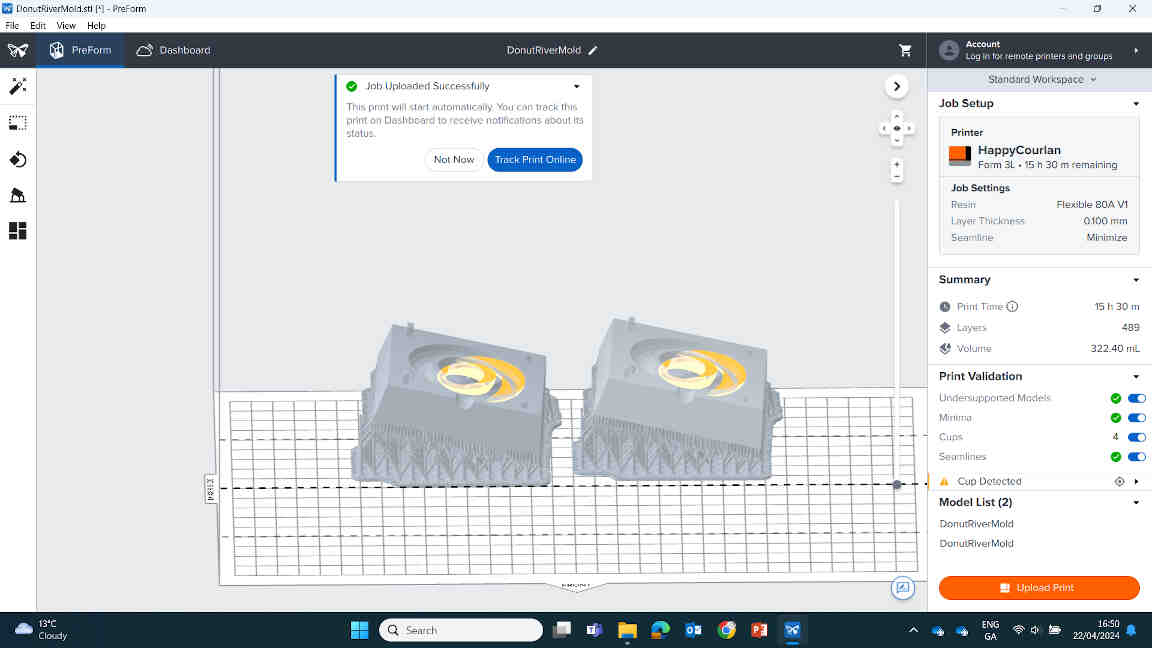
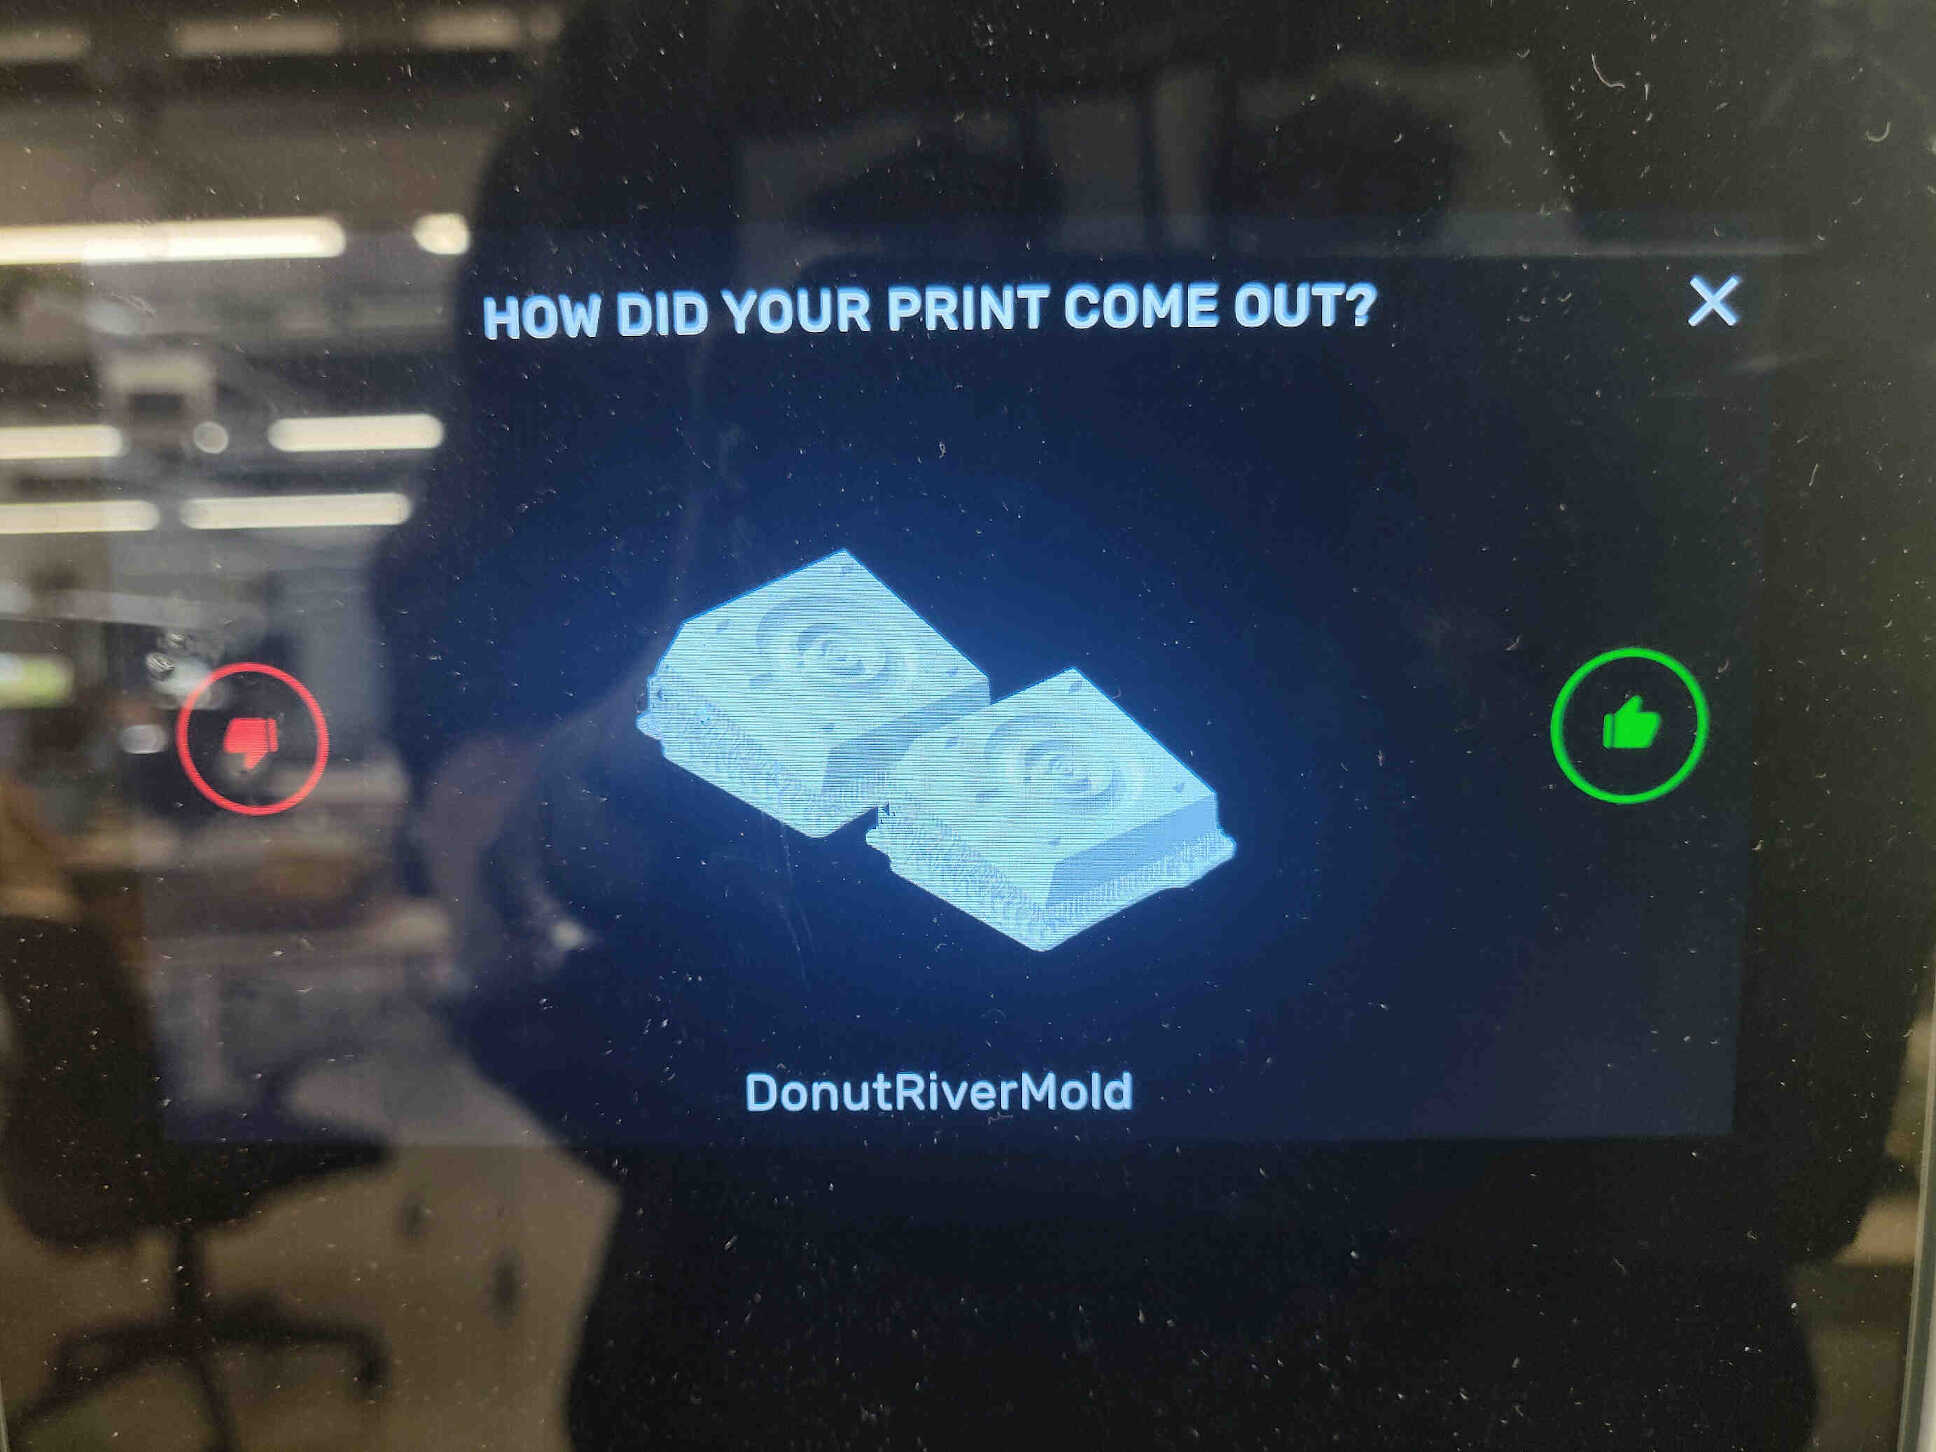
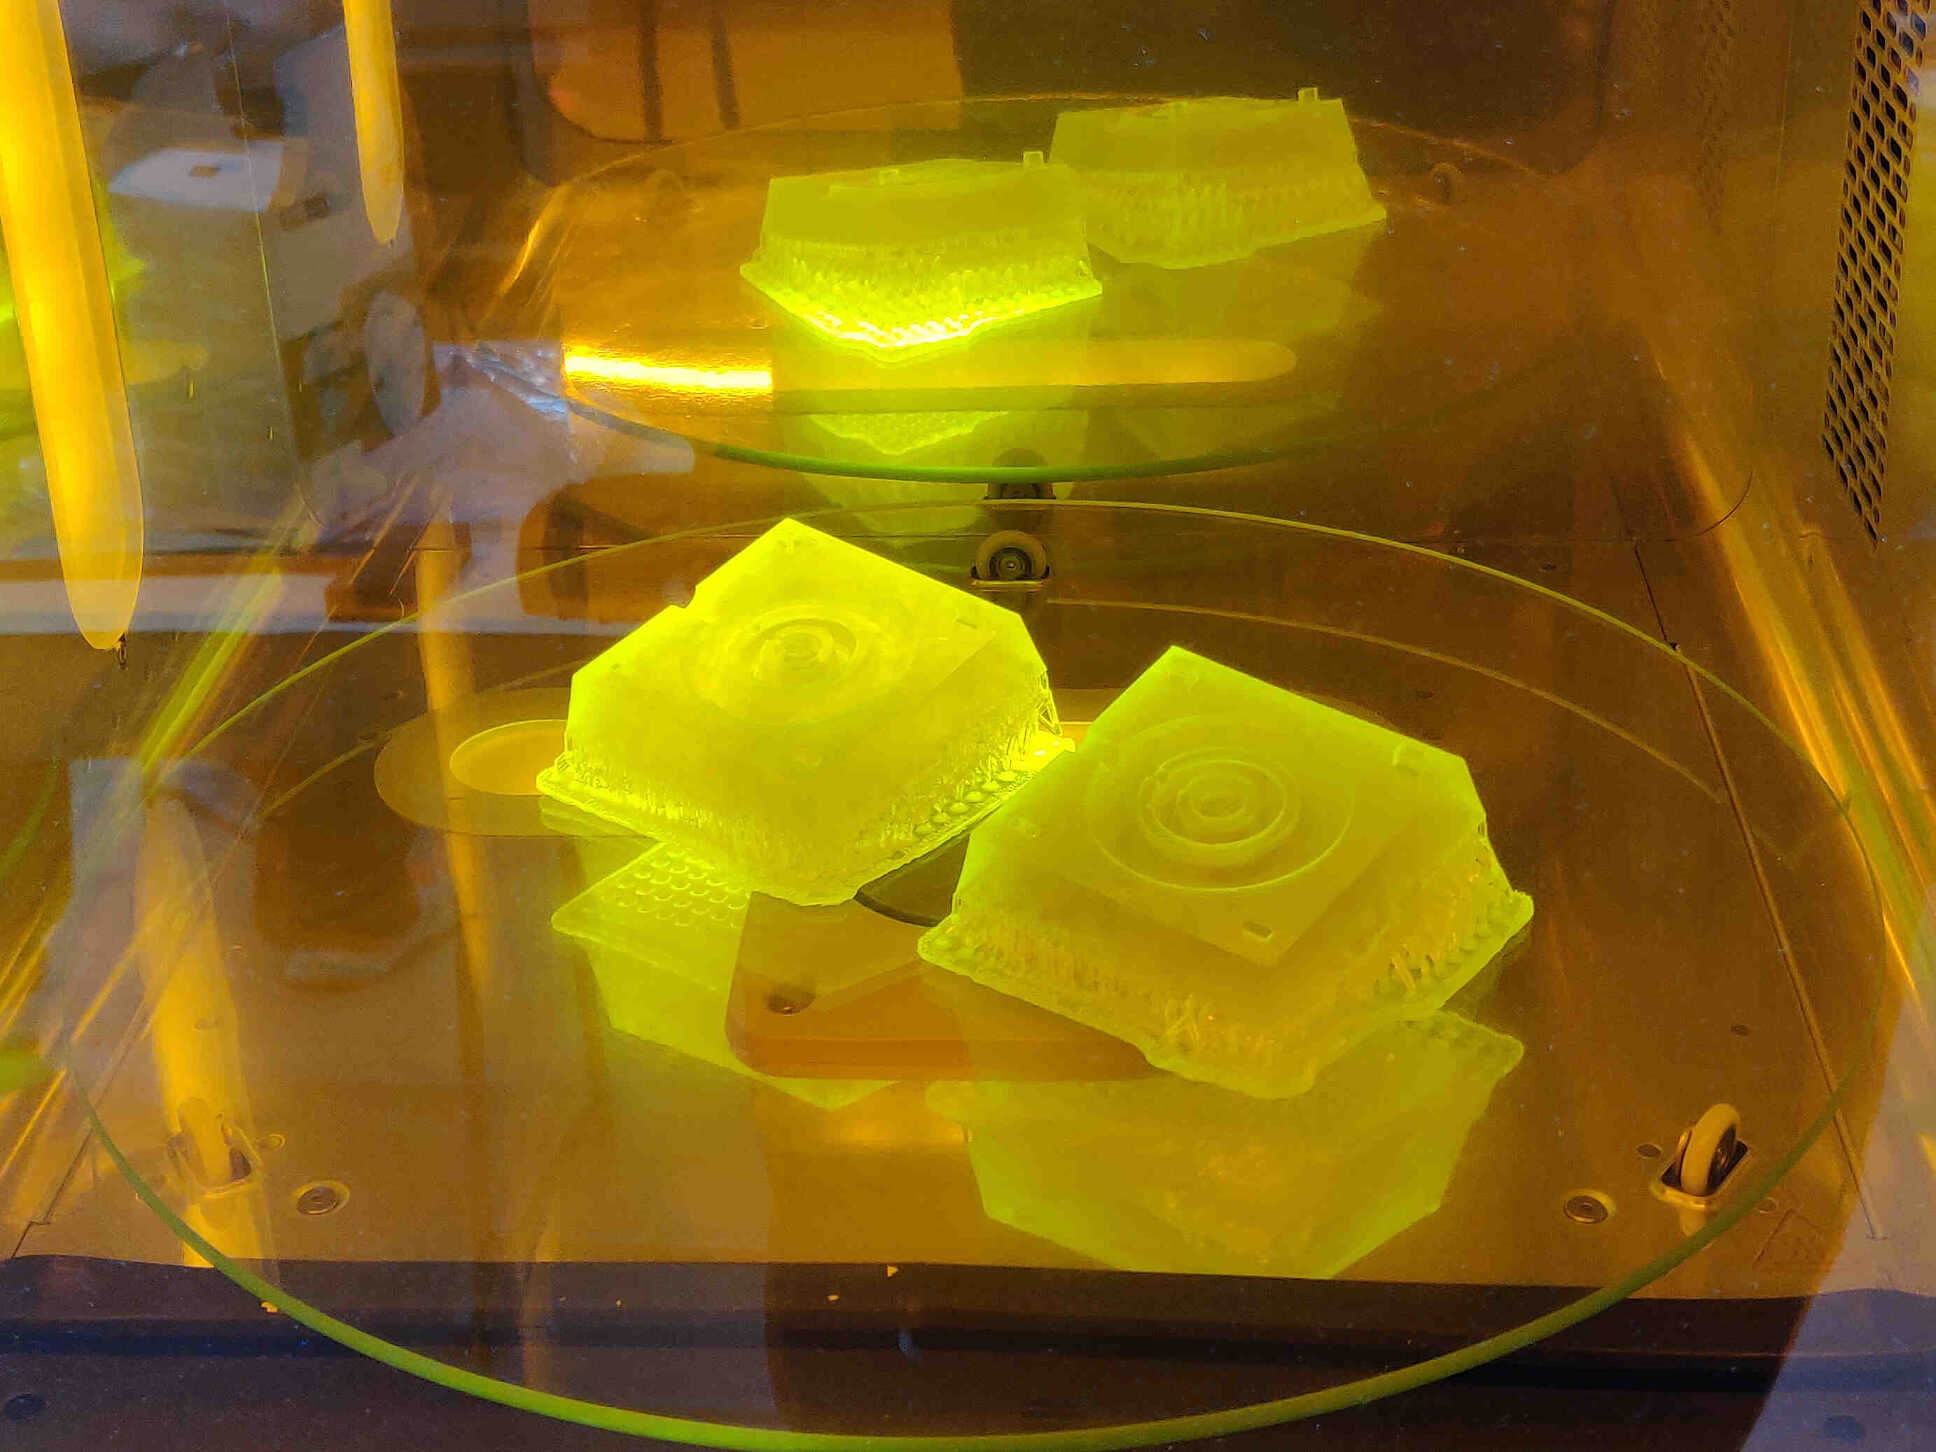
For my second mold and cast, I made a quick torus mold with multiple inner layers. The reason for this was to see how tight the cavity can be before being unable to form further. Using the same techniques above, I designed this new mold to be SLA Printed using Flexible 80A Resin and Cast with Smooth Cast Liquid Plastic.
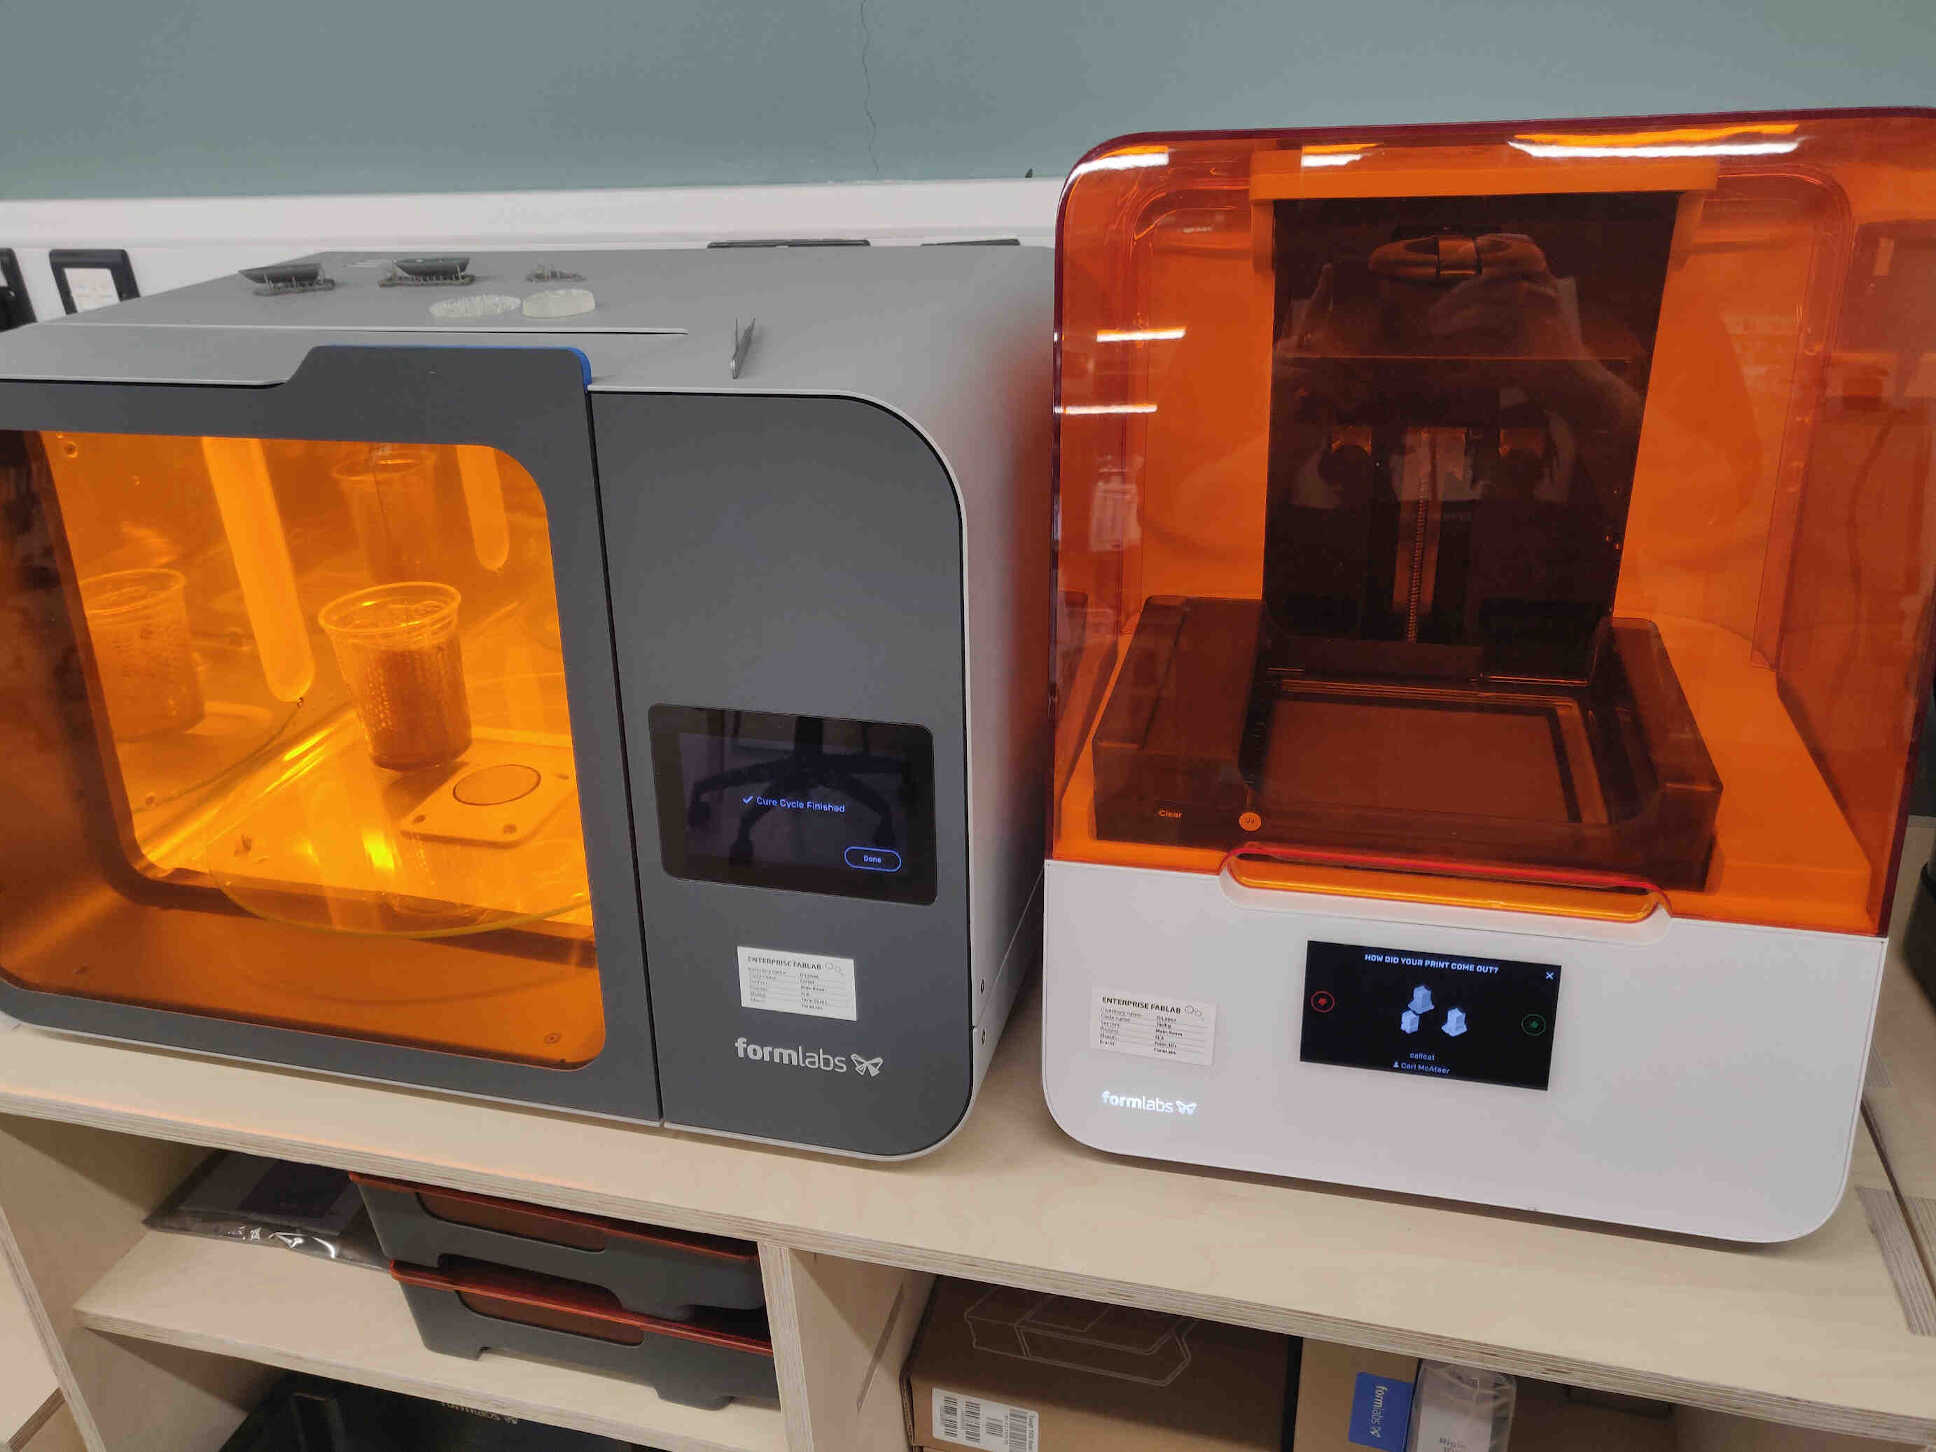
Using the Formlabs SLA Printer and Preform Software, I was able to easily navigate my desired options. I was very satifised with Preform's user interface and simulations.
With the aid and guidence of Enterprise Fablab's local technician, I learned how to swap the Formlabs bedding and Tank Canisters according to the resin that was being used.
Once the Print was finished, I needed to scoop the molds off the upper formlabs plate and into a IPA Alcohol washing container for 10 minutes. Afterwards it needed to be put into a separate Curing machine for 10 minutes. This allows the resin mold to harden and lets you remove supports without fear of touching / breathing in toxic liquids or fumes.
I had choosen Flexible 80A Resin as I imagined with would be perfect material for the molding / post-processing process - but I was entirely wrong. A ton of each mold's supports had fused together, creating an extremely strong / flexible mass of resin that formed together and was difficult to remove. And because of how flexible the material was, it was difficult to get the locking keys to slot in and connect without bending or expanding.
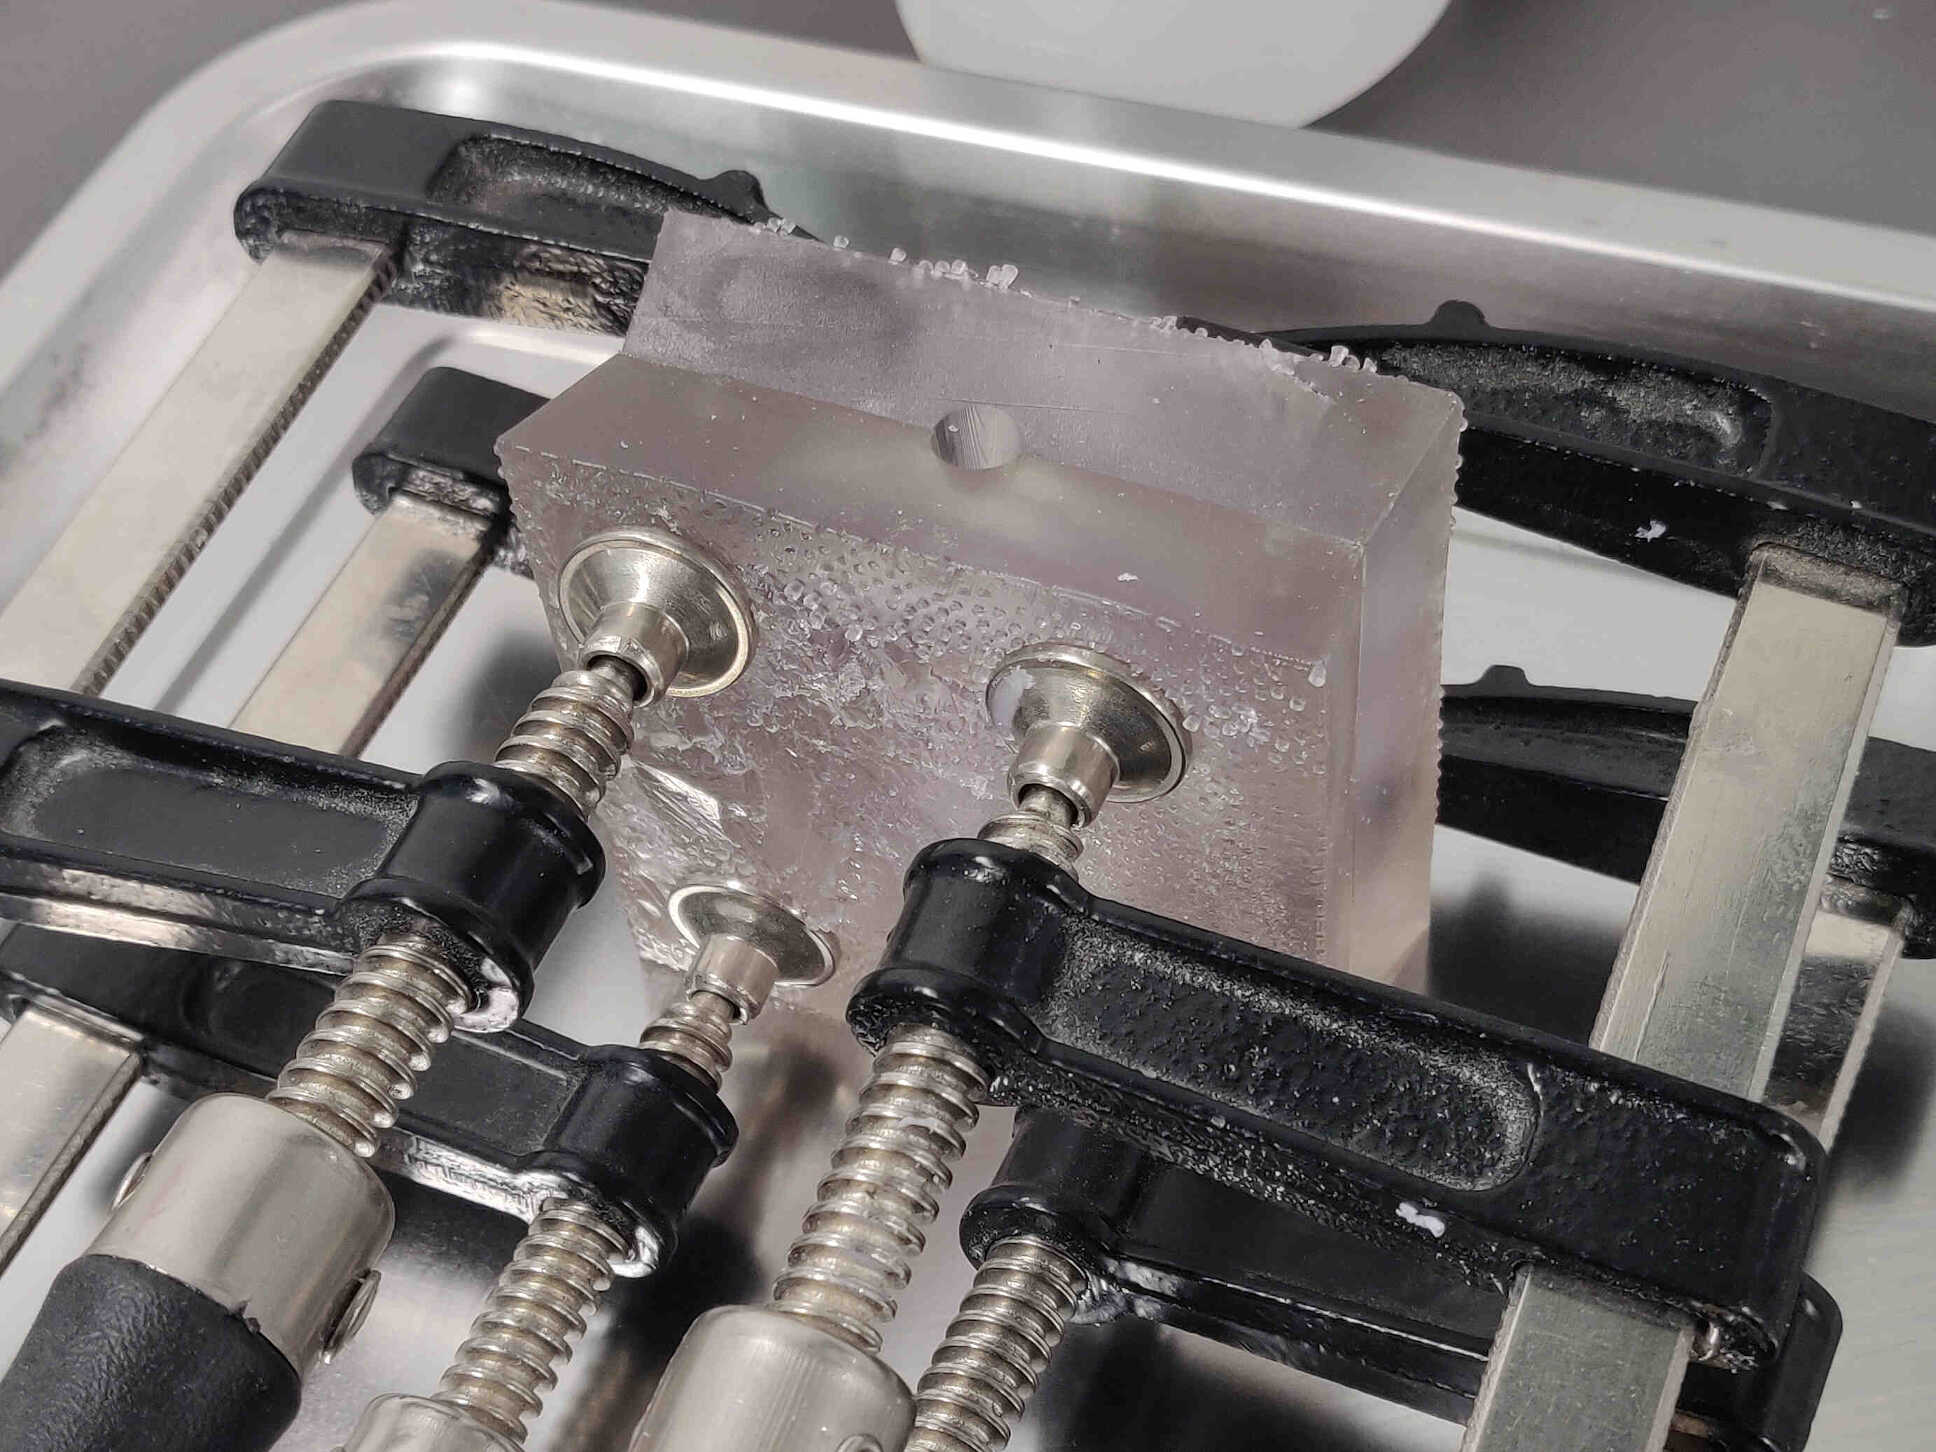
I clamped both molds together and started the Casting Process. This time I used Smooth Cast Liquid Plastic 1A:1B by Volume. The one I chose had a slightly longer Pot Life (7mins) and Cure Time (5mins) than the other option I had, however I still didn't expect how quickly it set. I didn't have a lot of confidence for this print as the Liquid Plastic and Flexible 80A resin didn't react as I expected.
This mold and cast were eventually destroyed in the remove process as the Liquid Plastic and Flexible Resin ended up being essentially glued together. It took 40 mins of strongarming, 2 flat-end chisels and 2 scapel knives to take the mold apart. In the process, the cast and molds were warped and destroyed. Though the results were the opposite of what I expected, I still learned valuable lessons from this process.
Washing and Curing SLA Resin Print
Create Molds with Key in 3D Blender
Trycut Prototyping Machining
____________
Conclusion / Reflection
Molding and Casting was another very useful design week that has a lot of potential for my product designs in the future. I was advised to keep my design simple and get the project done quickly so that I could focus on polishing my previous assignment documentation and catching up on my backlog. However, my idea of ‘simple’ ended up costing me a lot of time, trying to make a sword design in Blender but it wouldn’t form a proper workable mold due to issues with facing normals. There was probably a way to fix it but the design process was taking far too long and I needed to move on with my assignment. As a last attempt to make something useful for this assignment, I tried creating the ‘head’ of my final project design but ended up having the same issues creating a mold like I did with the sword.In my defeat, I settled for a very simple torus/donut design mold and focused on researching the techniques in making a proper mold and cast. Our first mold print (which was a rushed design made before the weekend) was made with Draft Resin and it resulted in a very smooth surface, sturdy and clean 3D print. Formlabs continues to be user friendly and produces highly detailed and satisfying results. There were a couple dented edges that were developed during the printing process which led to the Silicone Rubber cast leaking out and deforming my cast - but this could have been easily fixed by sellotaping the edges. Also proved something I researched over the weekend - that forming keys strictly through subtractive and additive boolean operations isn’t enough for a real world product - the keys need to be tapered, beveled and slightly resized for a satisfying result.
I intended on using a Flexible Resin Mold originally but the results were far less than satisfactory when I eventually did. Partly because of the supports that fused together into a very tough formed resin that was difficult to remove or shave off. After removing the supports, I noticed the mold became warped during the removal process, making it very awkward for the keys to slot in together properly. Along with these issues, I also used a Liquid Plastic mixture to cast which began to cure a lot sooner than the pot life suggested. During the removal process I basically had to destroy the flexible resin to remove the cast as the liquid plastic partly fused all around the mold - forcing me to remove the cast with a hammer and 2 flat-end chisels. I don’t intend on using flexible resin again unless I have a purpose for it.
Part of our Group Assignment was to compare 3D Printed Resin Molds and Machinable Wax Molds created through a milling process. I overlooked the process and the results were practically flawless. It took a while to get a purely smooth finish with very clean edges but the results were undeniable. We used Silicon Rubber for the mold and liquid plastic for the cast. I intend on using draft resin again for any future molds as I was very happy with the result and it was an incredibly easy process with great results - but the machinable wax milling (when done properly) produced the greatest result by far.
Keeping this assignment simple didn’t go as planned and the stress levels for completing my backlog is rising, but I learned a lot of useful tips and tricks this week and plan on continuing this research further in the future.
____________