Week 7: Computer Controlled Machining
-
Group assignment:
-
Complete your lab's safety training
-
Test runout, alignment, fixturing, speeds, feeds, materials and toolpaths for your machine
-
Document your work to the group work page and reflect on your individual page what you learned
-
-
Individual project
-
Make (design+mill+assemble) something big
-
Navigation
- Ideating
- First Draft and Measuring
- Designing in 3D and prototyping
- Working on the CNC
- Reflecting on the week
Ideating
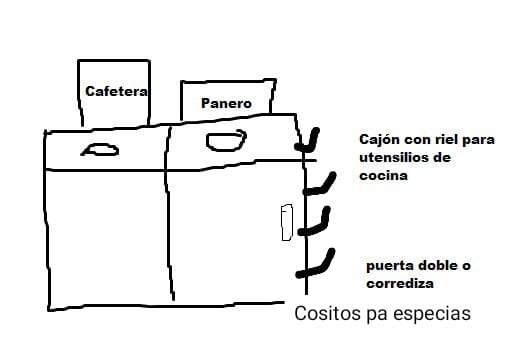
I had some wishes coming into this week, I wanted something useful for my house. In this past months, my boyfriend and me have started to develop habits of being healthier and making our own food and all. So we have many new appliances in our kitchen. Some of them are in some plastic shelvings that we truly don’t like, and that is not really too useful for us. So with his help, we came up with this:
First draft and measuring
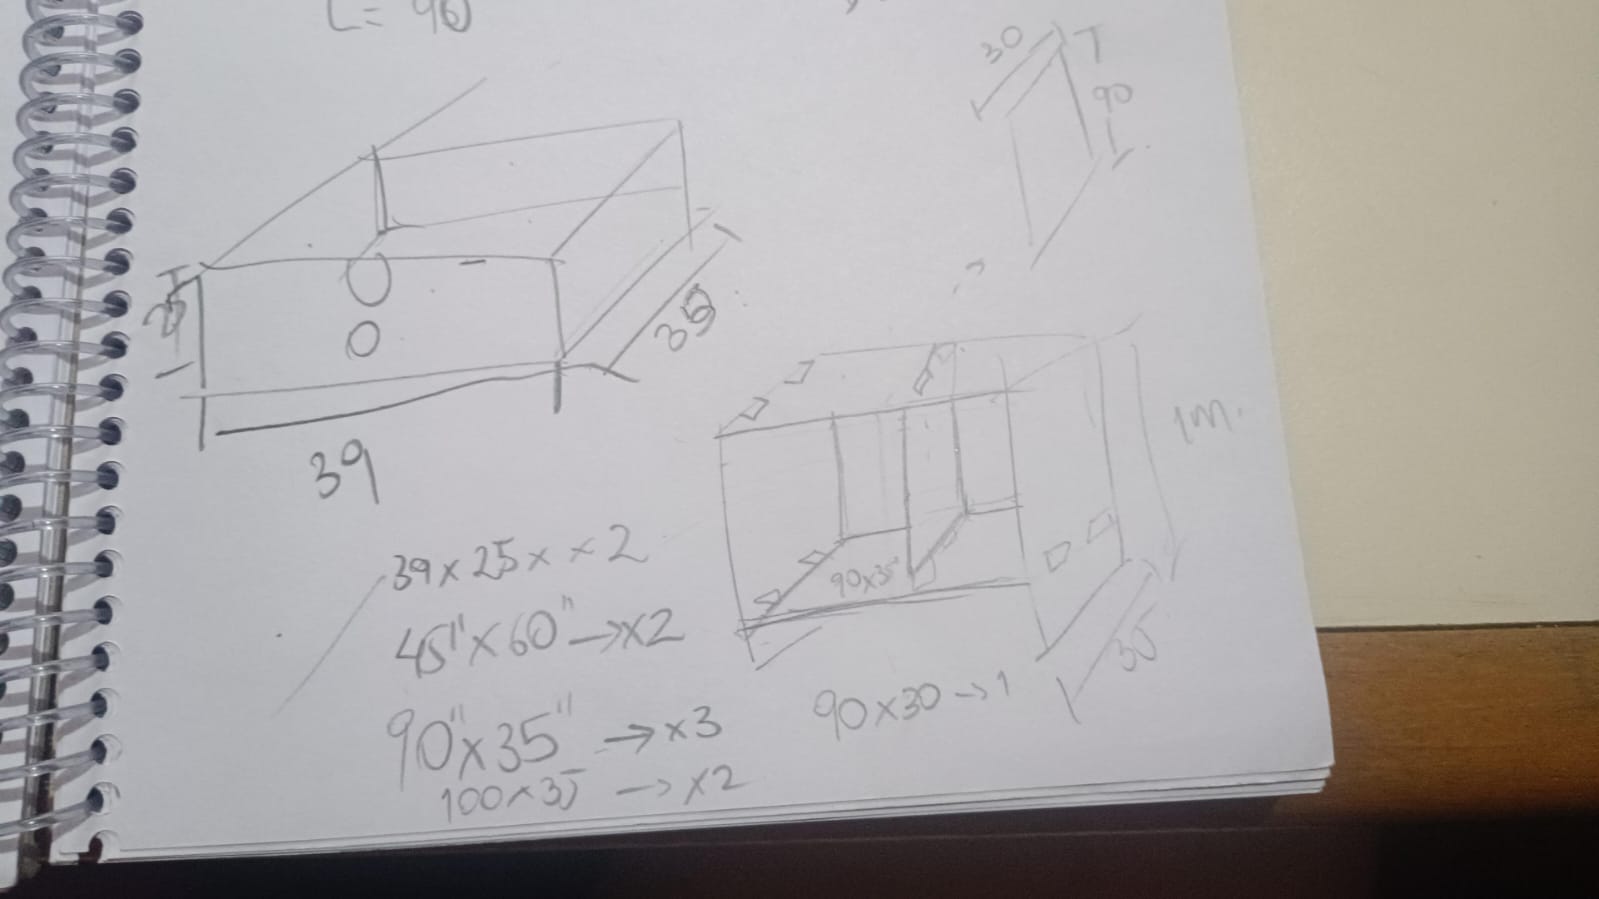
After that first idea, I went in my sketchbook and started to create a more isometric version so I could start envisioning how it would look in a 3D model. I also started to think on sizes and possibilities. At first I wanted to have some drawers too
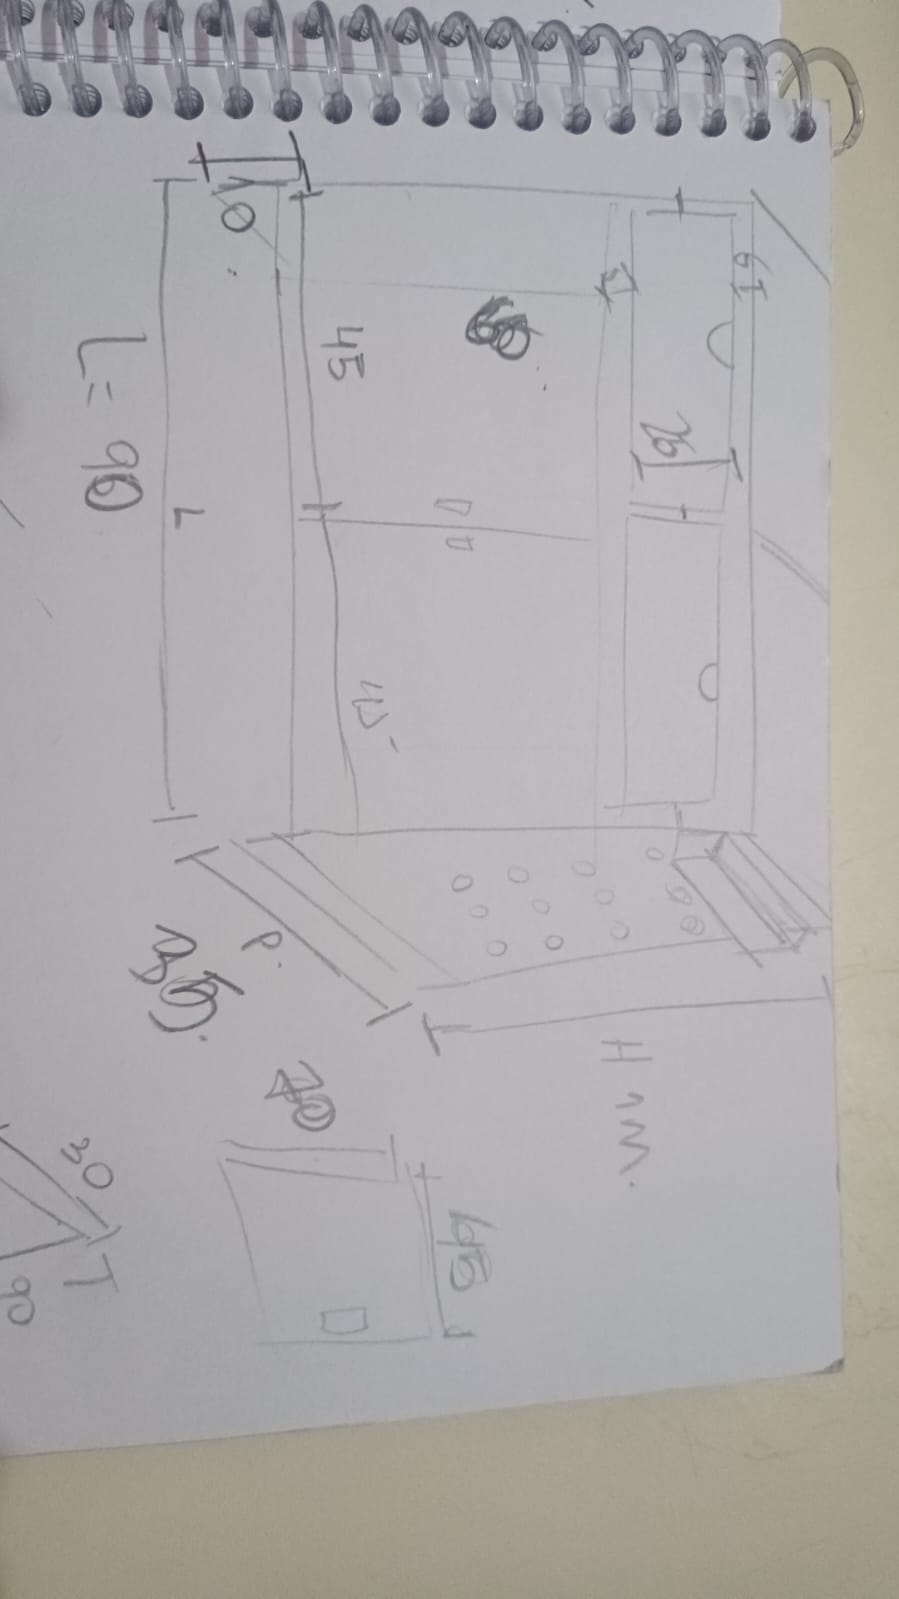
Then I went to see the stock that we had available in the lab, to start actually thinking if I had everything I would need. I started to write down the sizes of my parts with the measures and amounts of each on the side, and then measuring the stock so I could see which ones were better by putting my name on some of the pieces so they knew I was saving them for my usage
Designing in 3D and prototyping
I did a lot to design this. Here are my notes on how I did it, with some pictures so it can be understandable
-
Watched some tutorials to understand a bit how is better to create furniture.
This one was the best one:
-
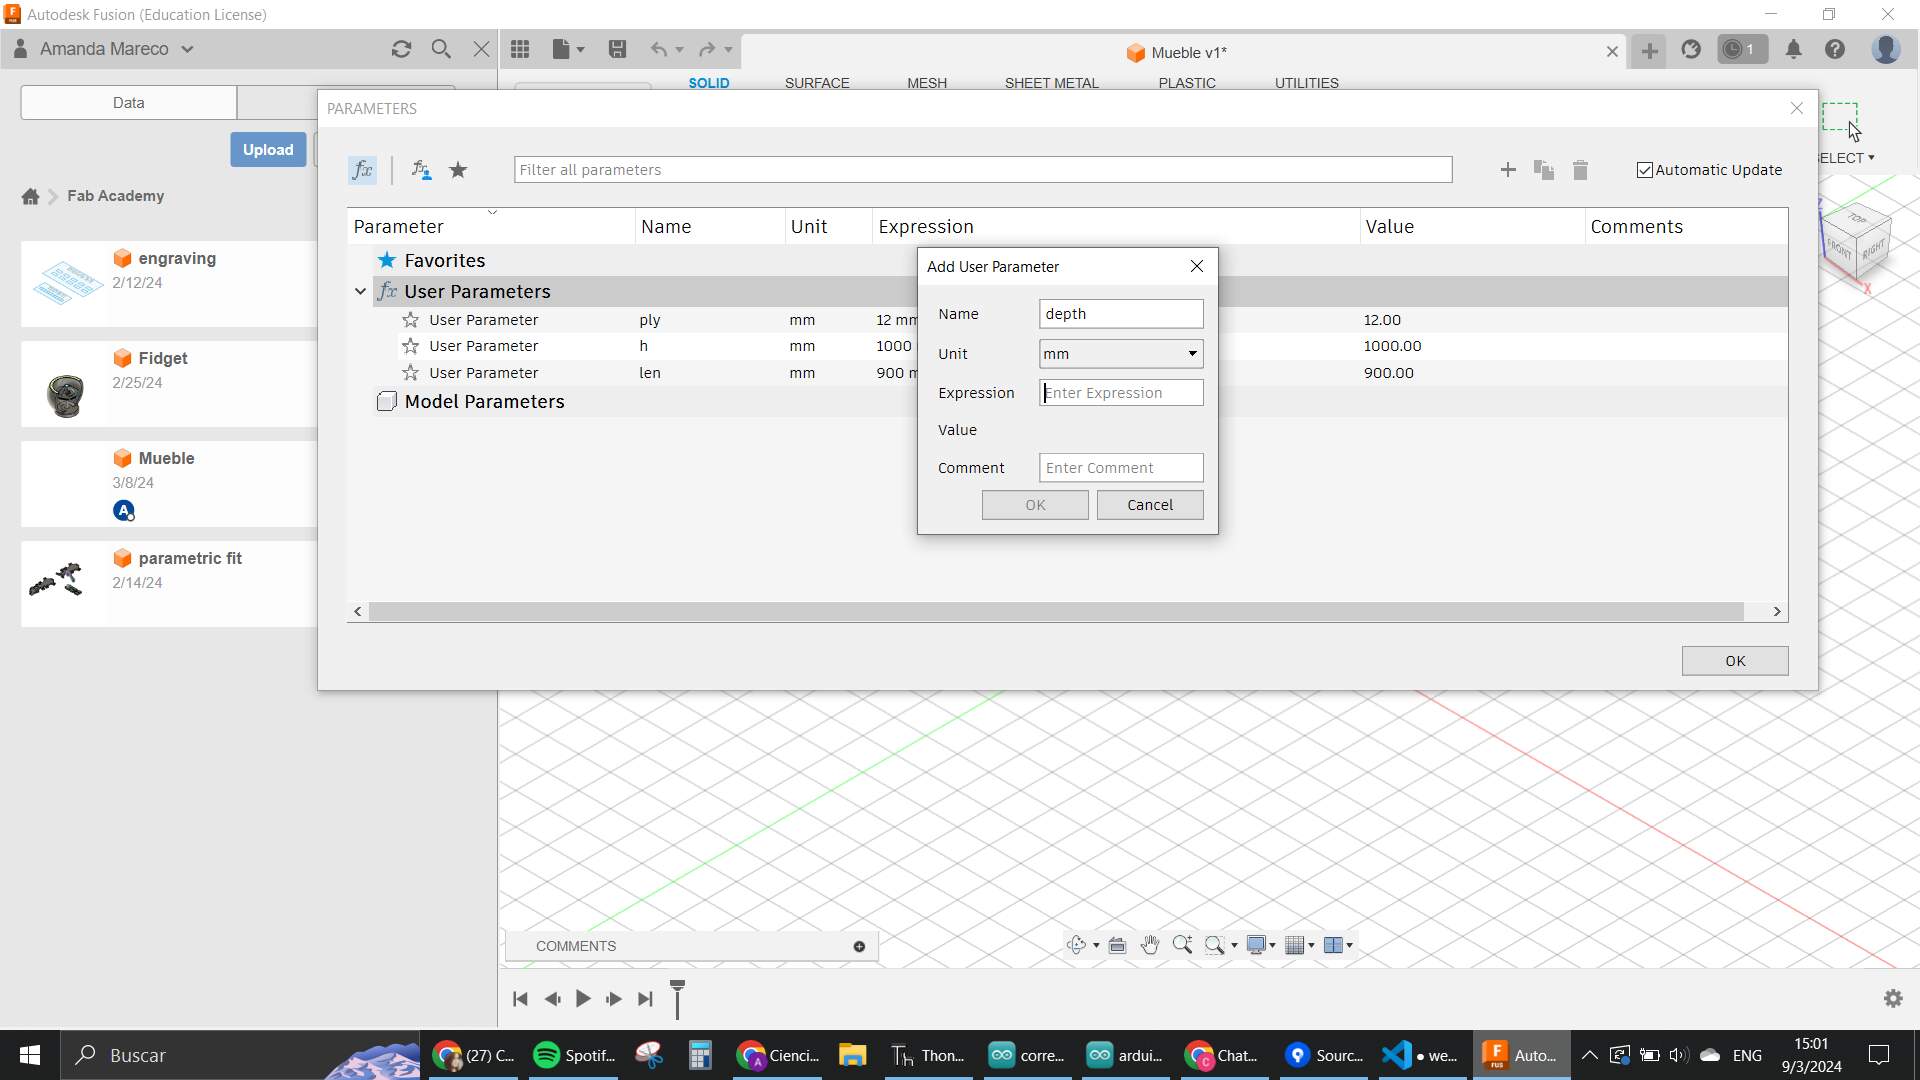
Creating parameters with the dimensions that I planned and with the thickness of the material that we have in the lab
-
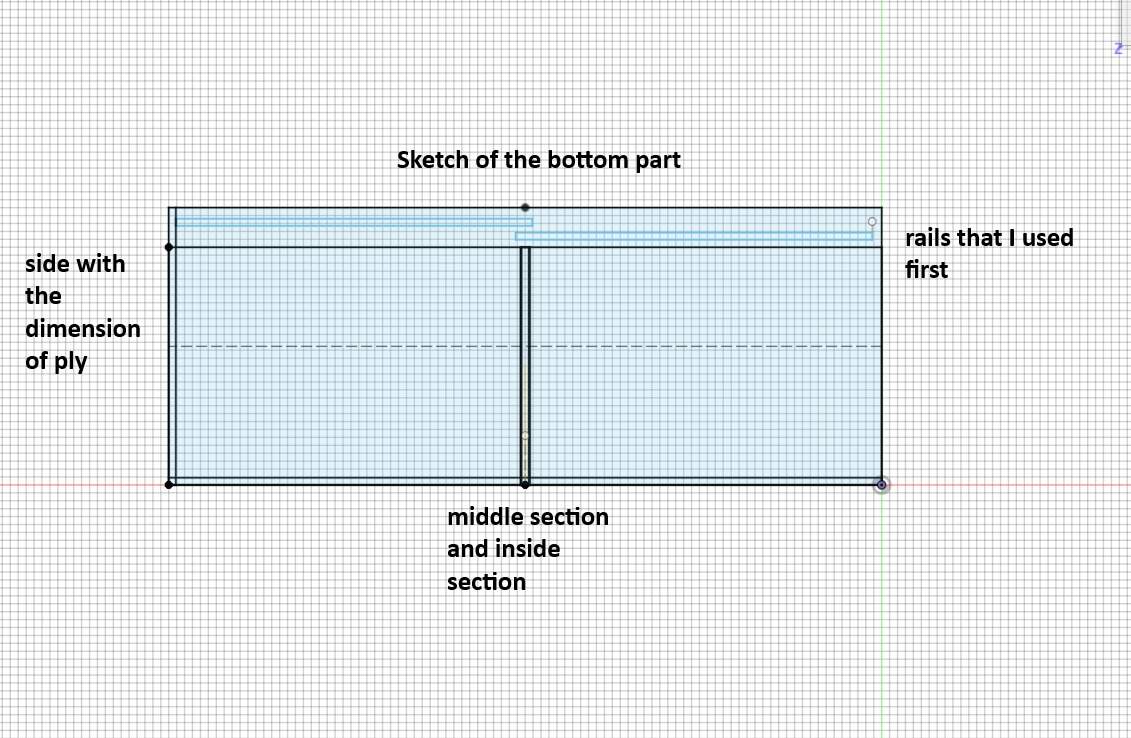
Starting with sketches based on my prototype and the general idea
-
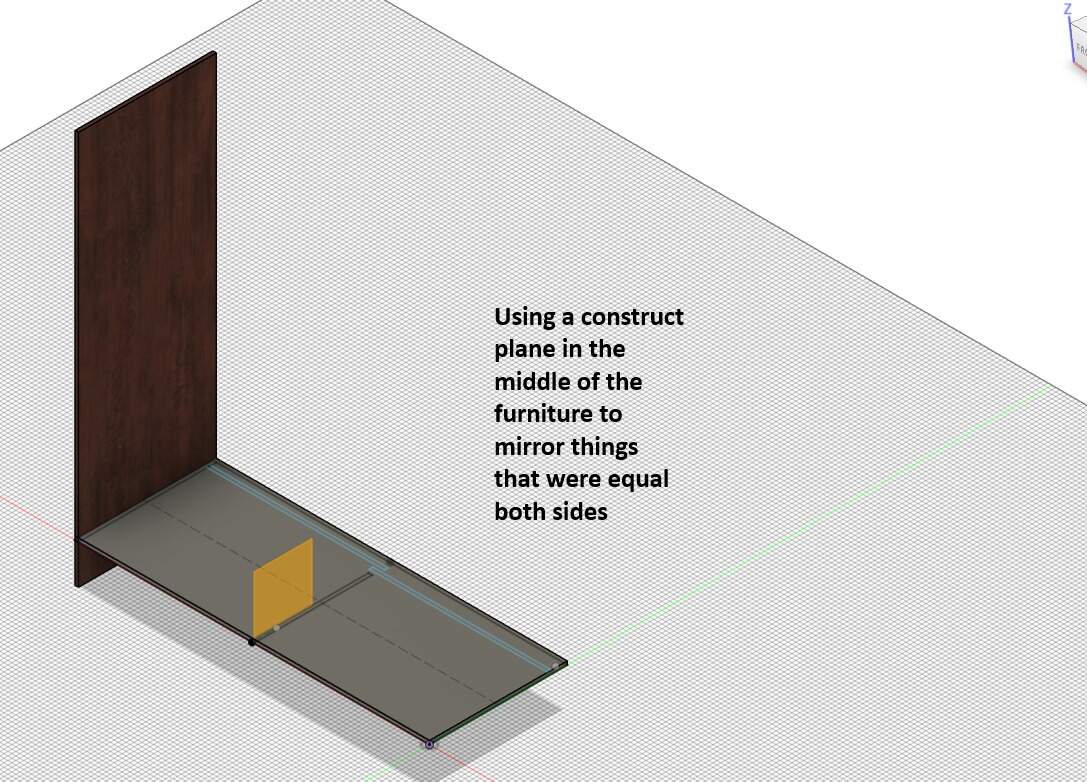
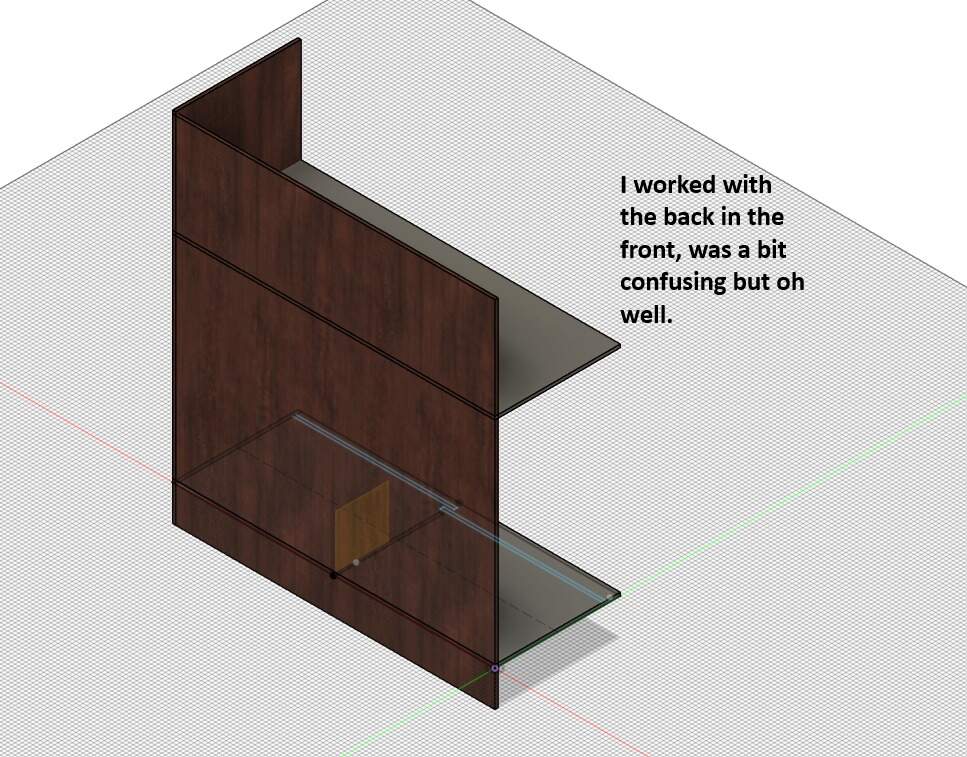
Extruding and creating planes to continue completing the whole furniture.

-
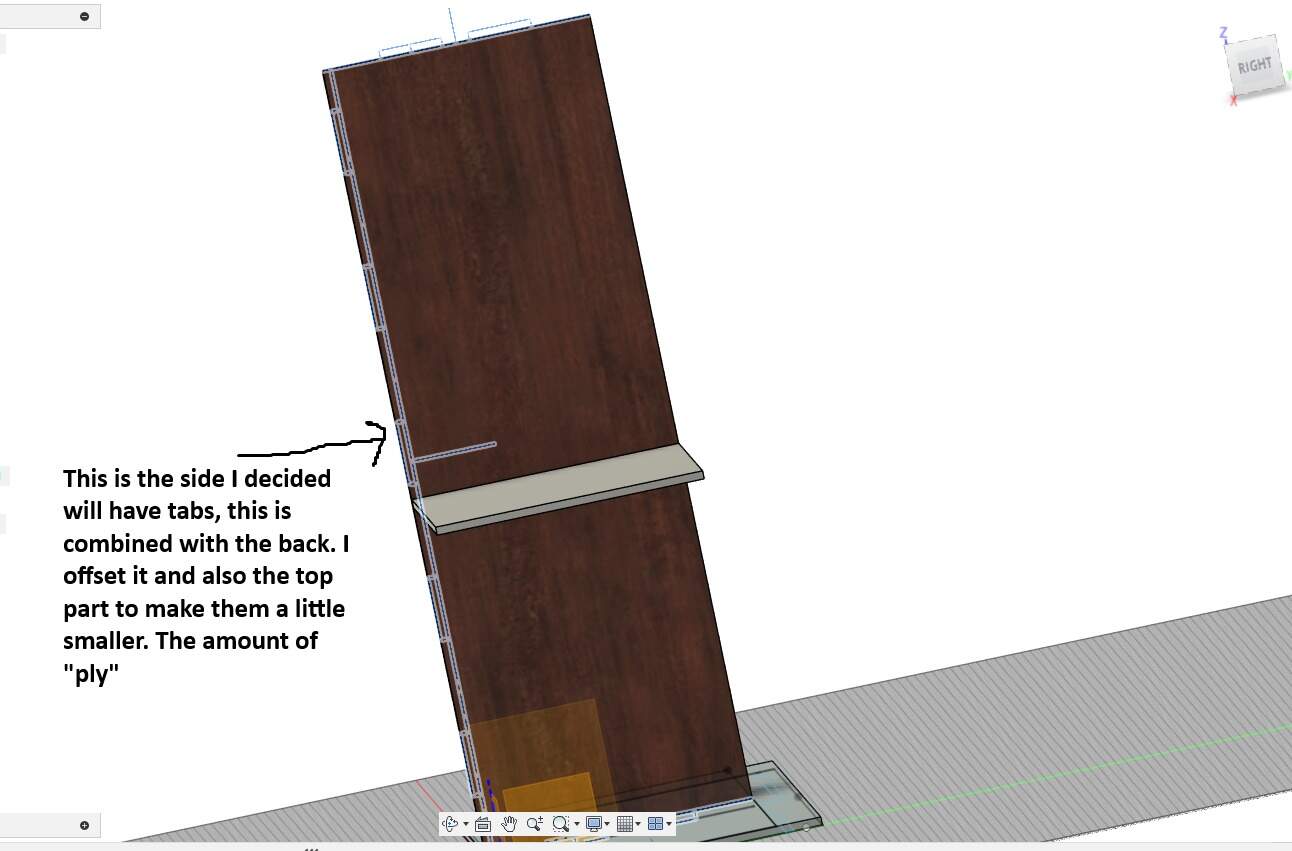
Realizing that my design didn’t take the tabs into account, so I used the “offset faces” feature for the ends where there is an intersection by deciding which parts are going to have the tabs and which ones are gonna have the holes.
-
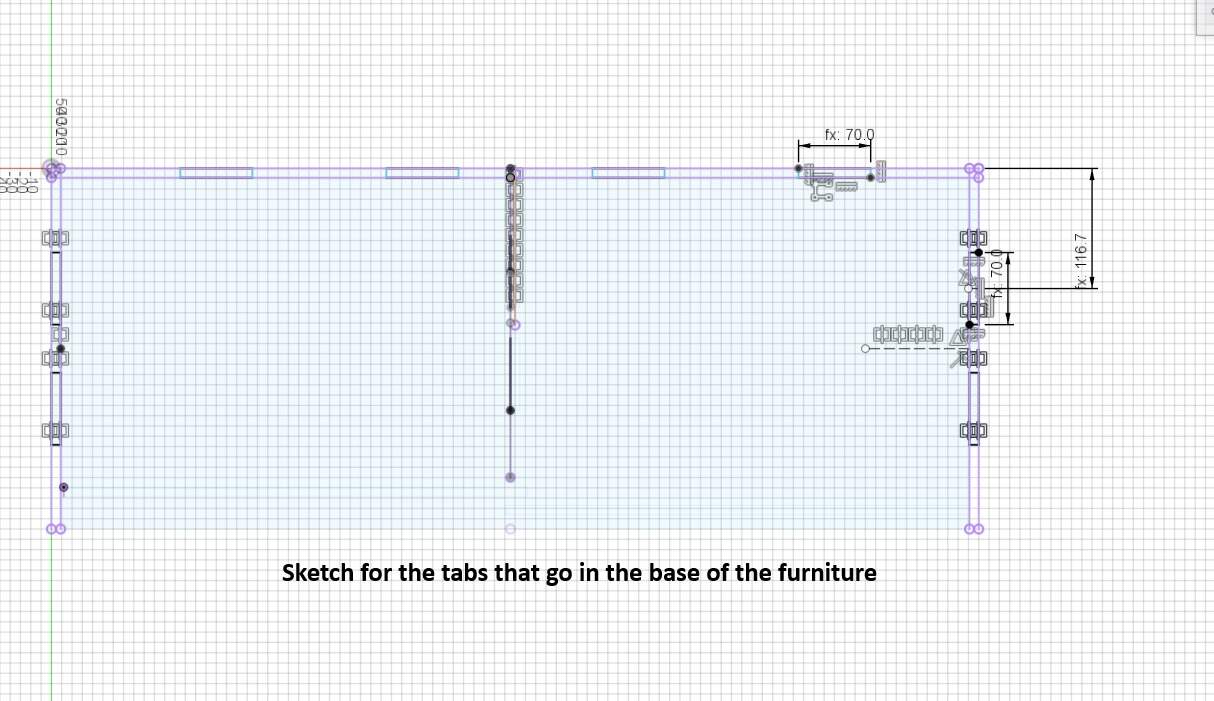
Making sketches for each section that is gonna have tabs
-
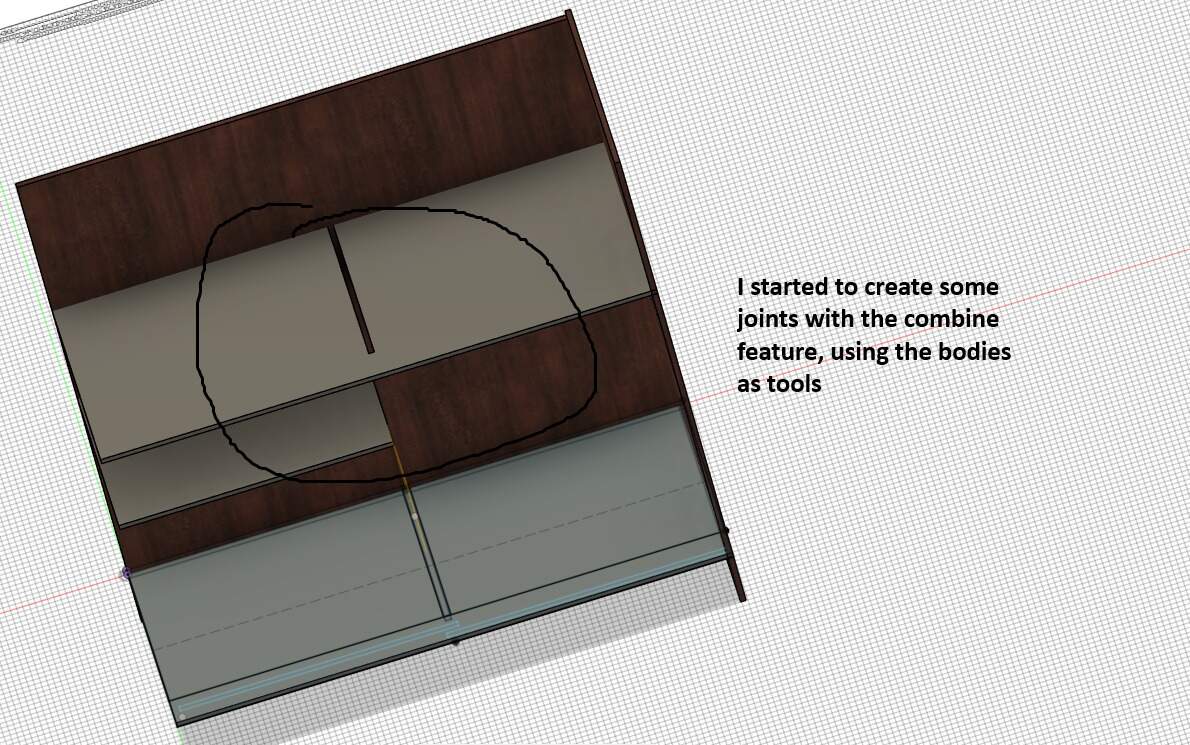
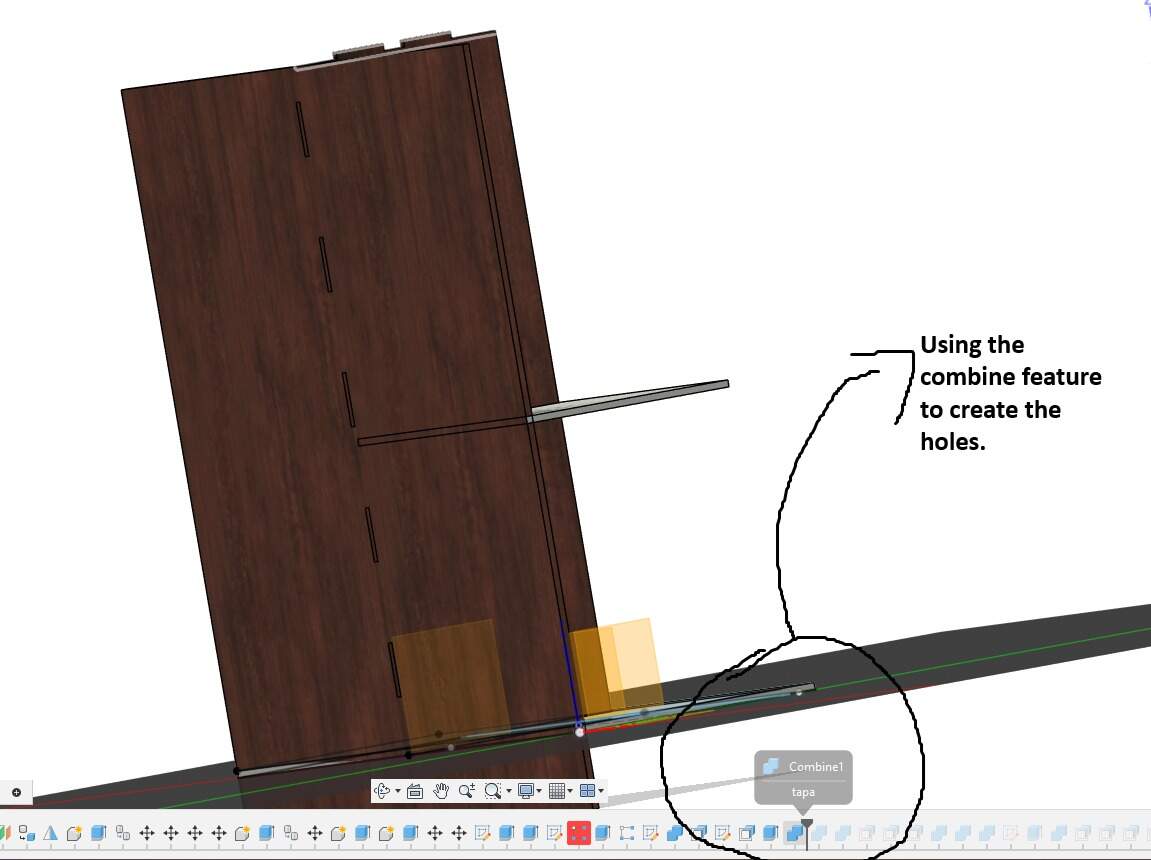
Combining the extruded tabs in the parts that created them with the ones that we need to have holes
Creating the shelfs, offset faces, tabs, combining into the parts where they go:
-
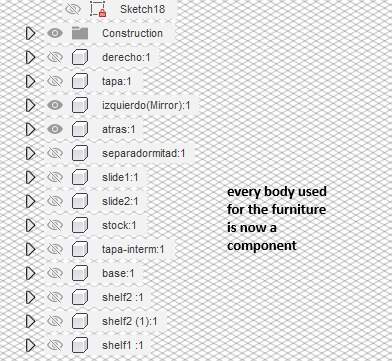
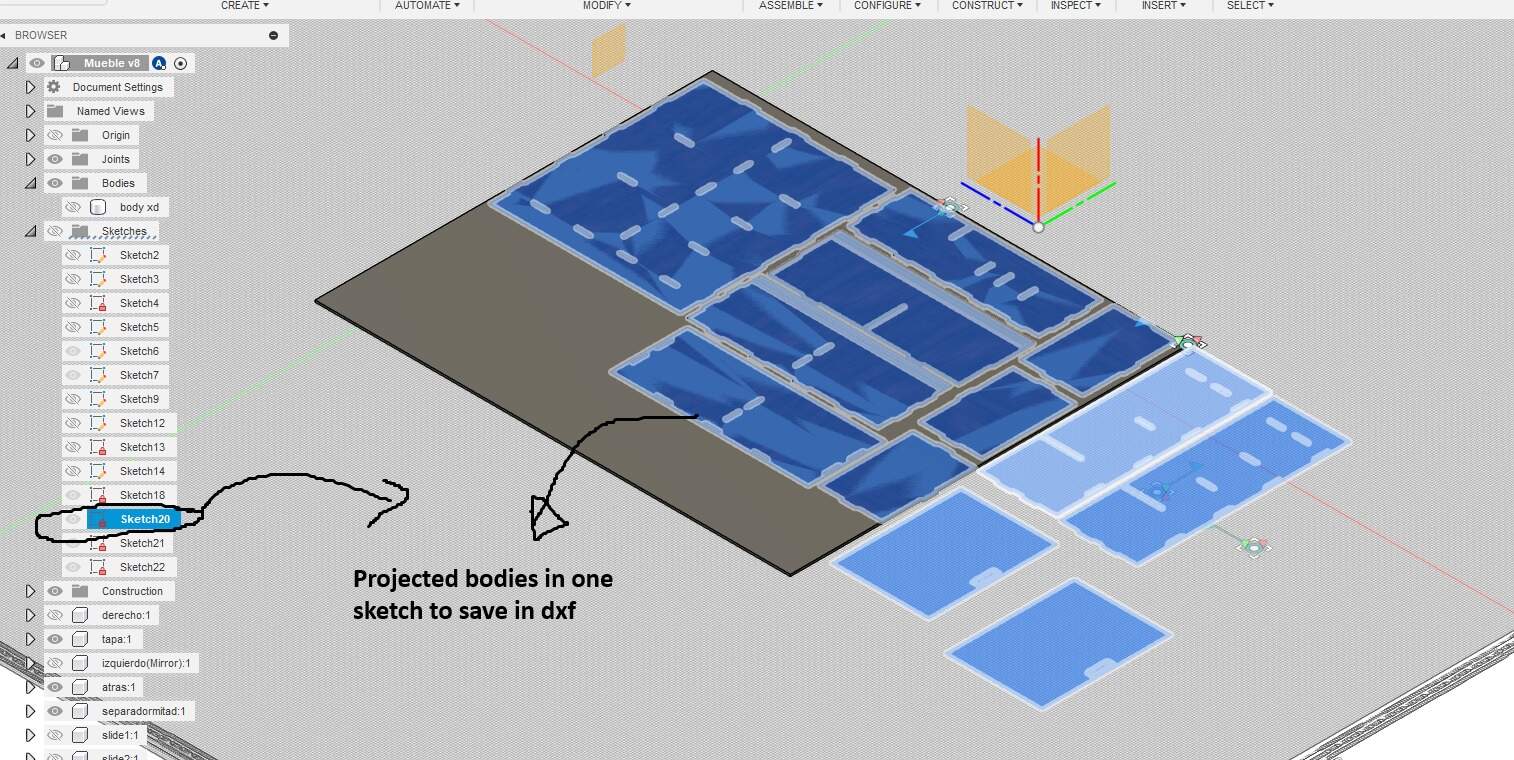
After finishing with the whole design, making all of the bodies into components to create a planar version for the cutting process.
-
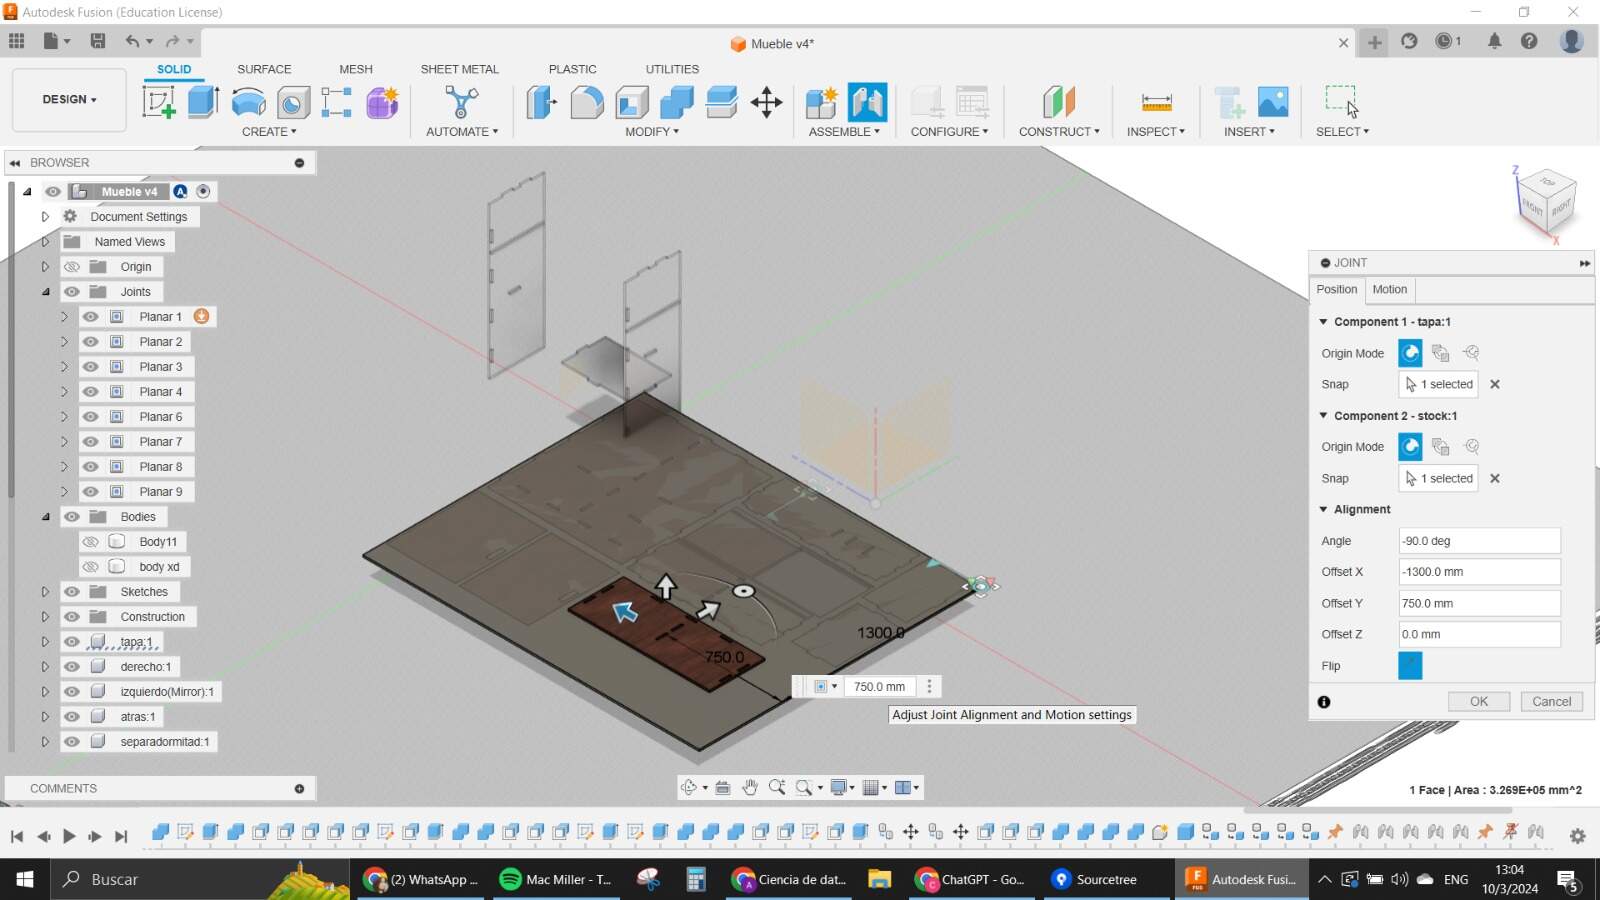
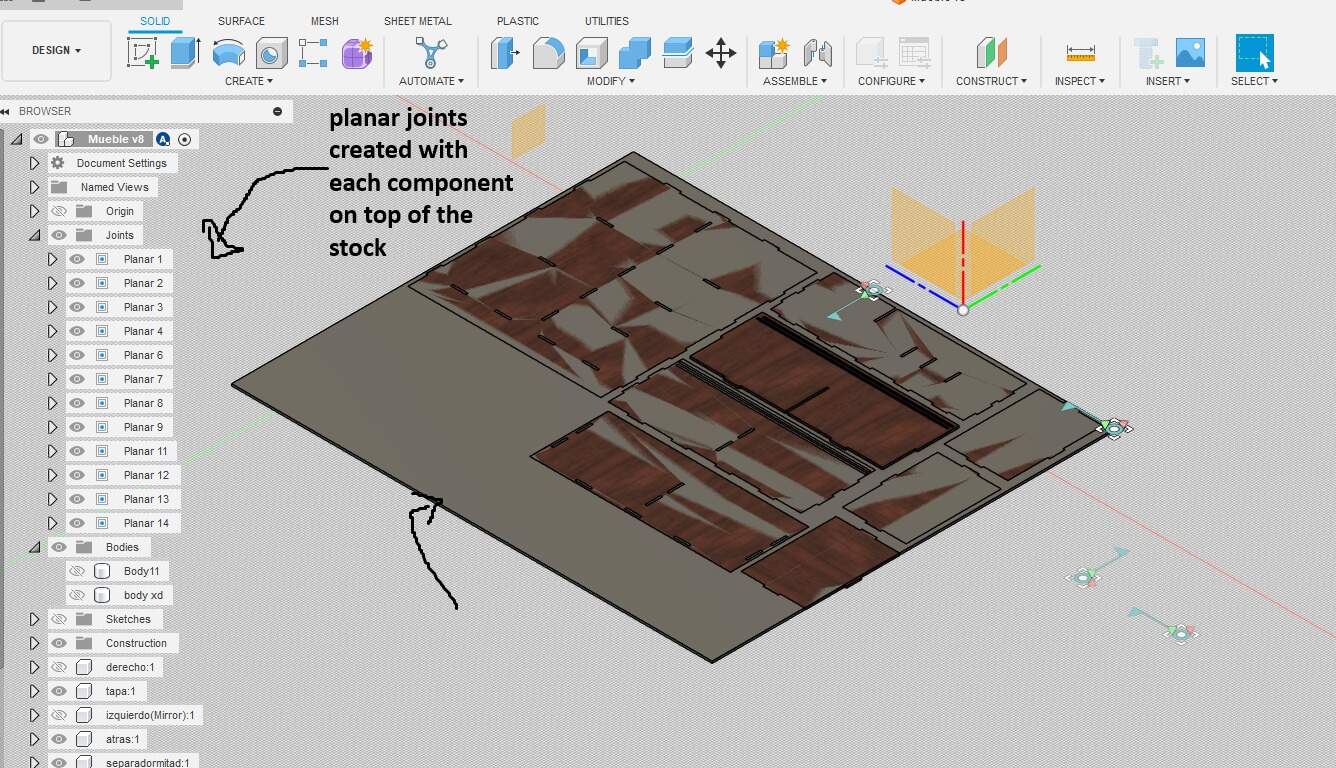
To create this planar version, we are going to need a new body that represents the stock with the dimensions of it. Using joints and making them planar with the stock body we just created. And placing all of them in there so they can be separated and arranged.
-
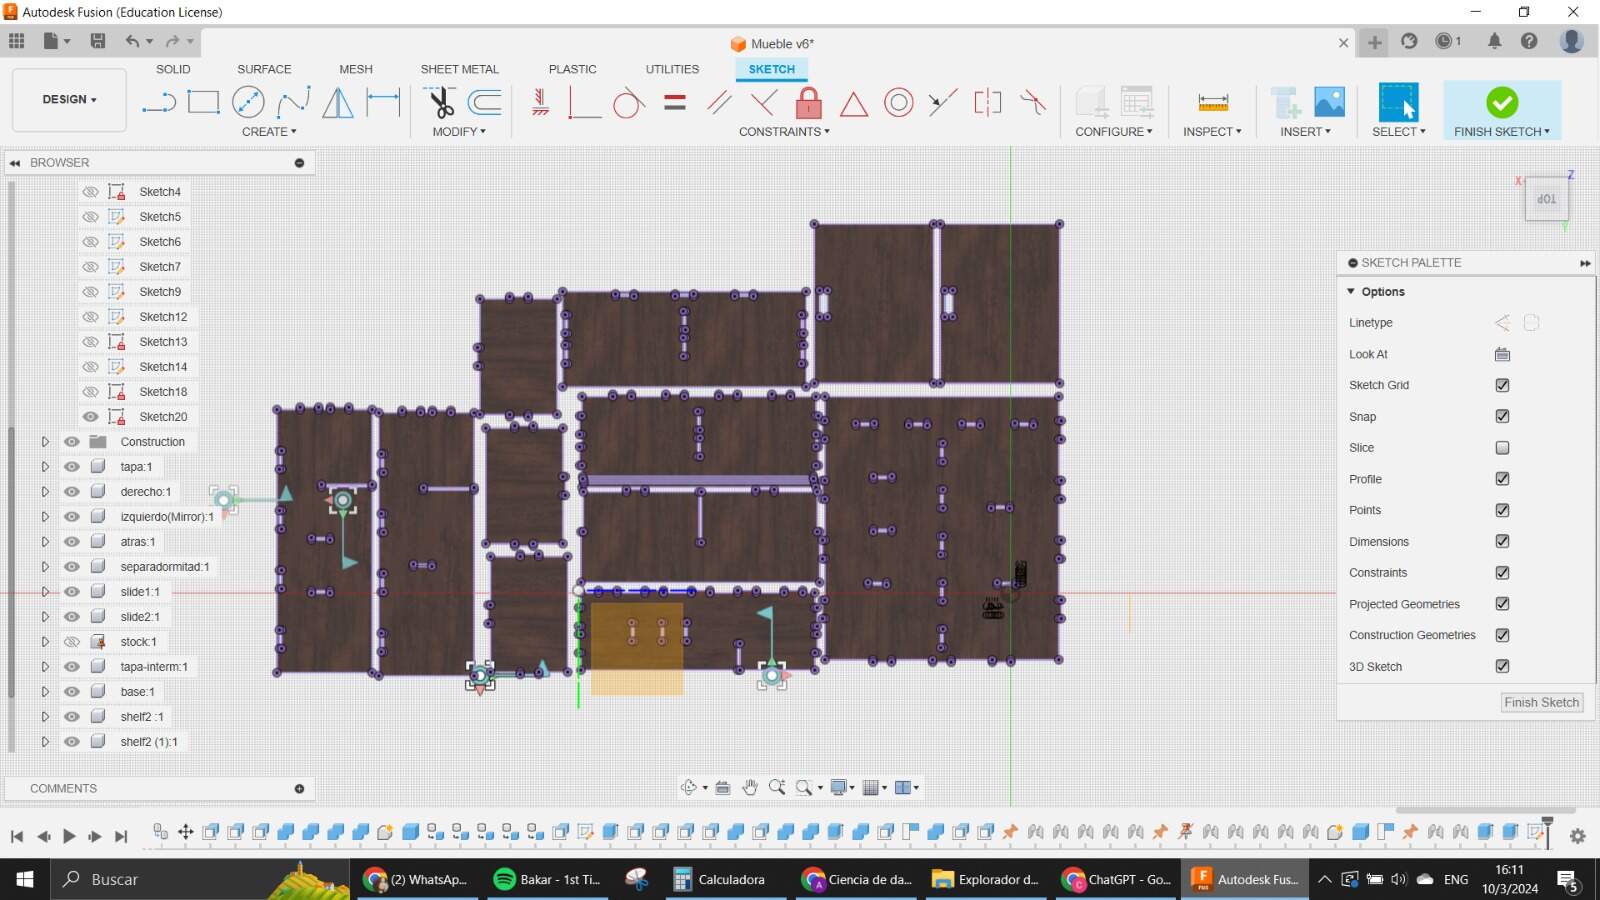
After having all of them ready, we create a sketch where we are going to project all of the bodies that we made planar with the features we need cut.Taking the sketch and saving it in dxf.
-
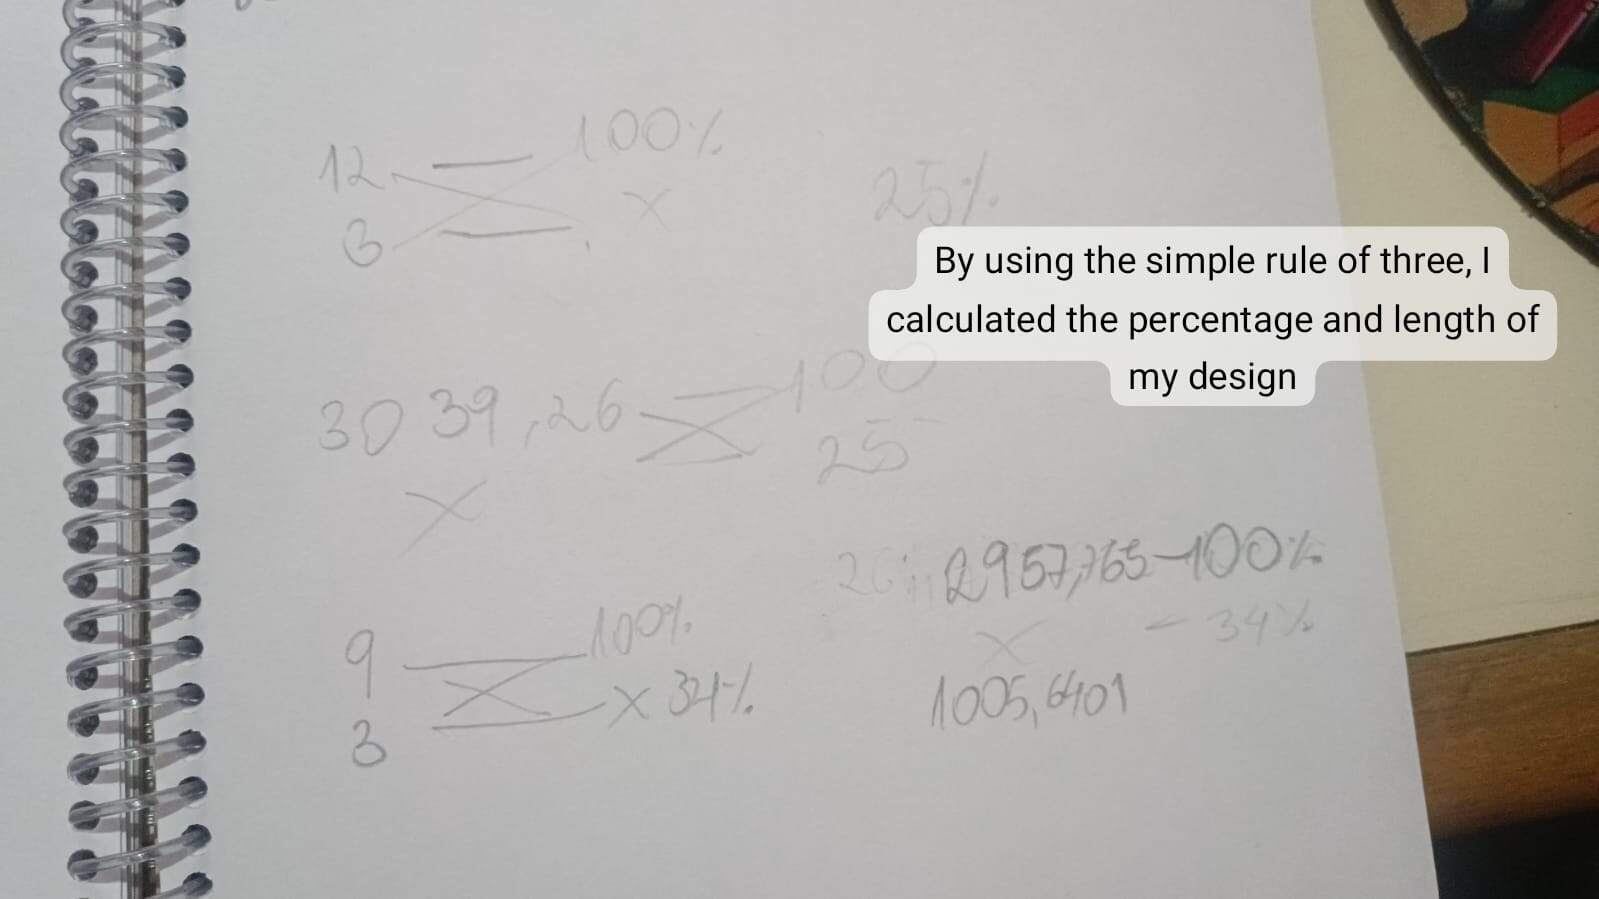
Scaling the design to be able to create a prototype with a MDF of 3mm. I did a little calculation first with 12mm that I thought I was going to use
-
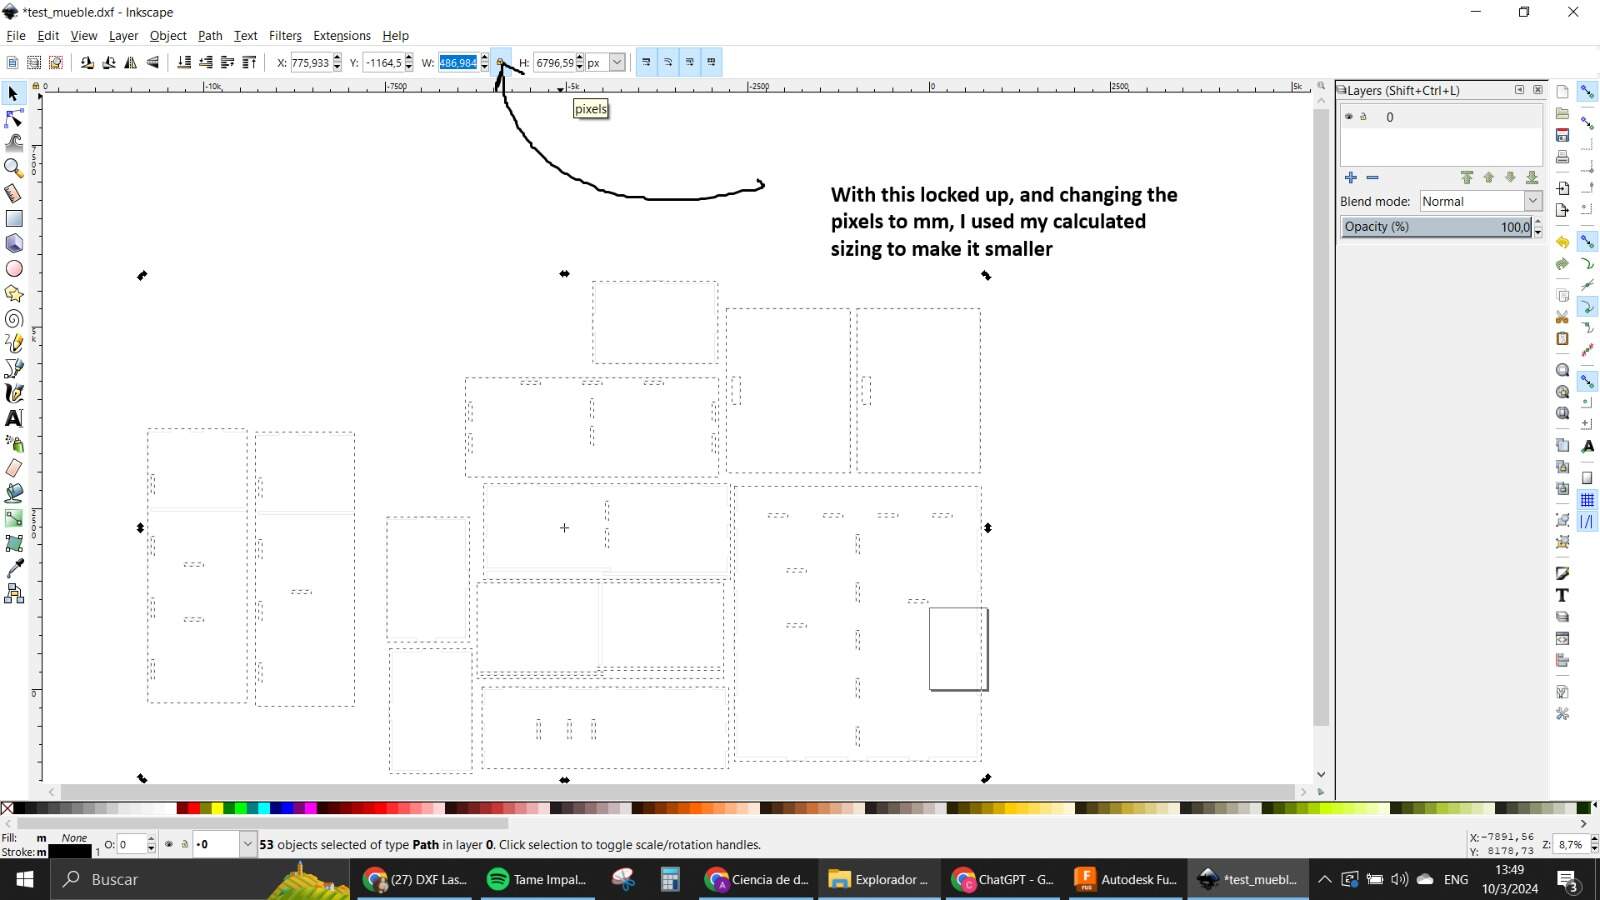
With that percentage, I used inkscape to change the size of the drawing. Maybe there is a better way, this was the one I came up with.
-
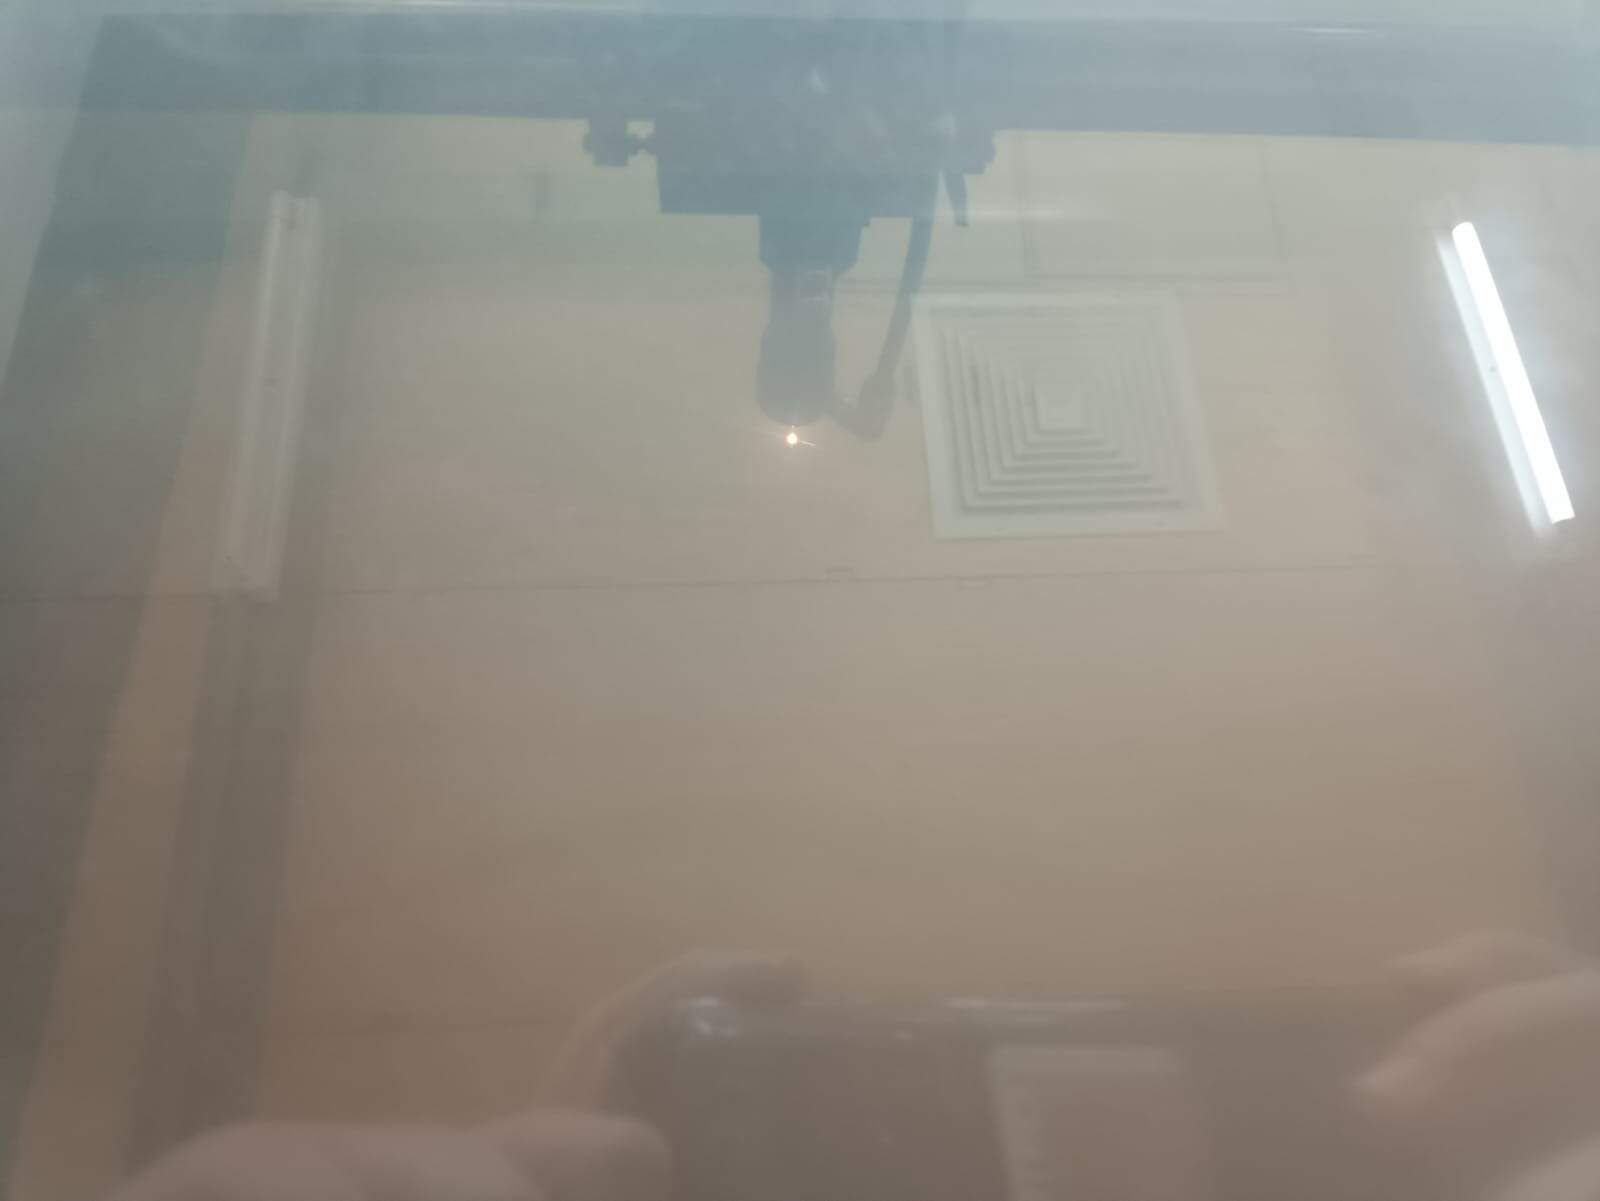
When you have the design ready with the scaling down, take it to the Laser cutter to make a prototype with laser.
-
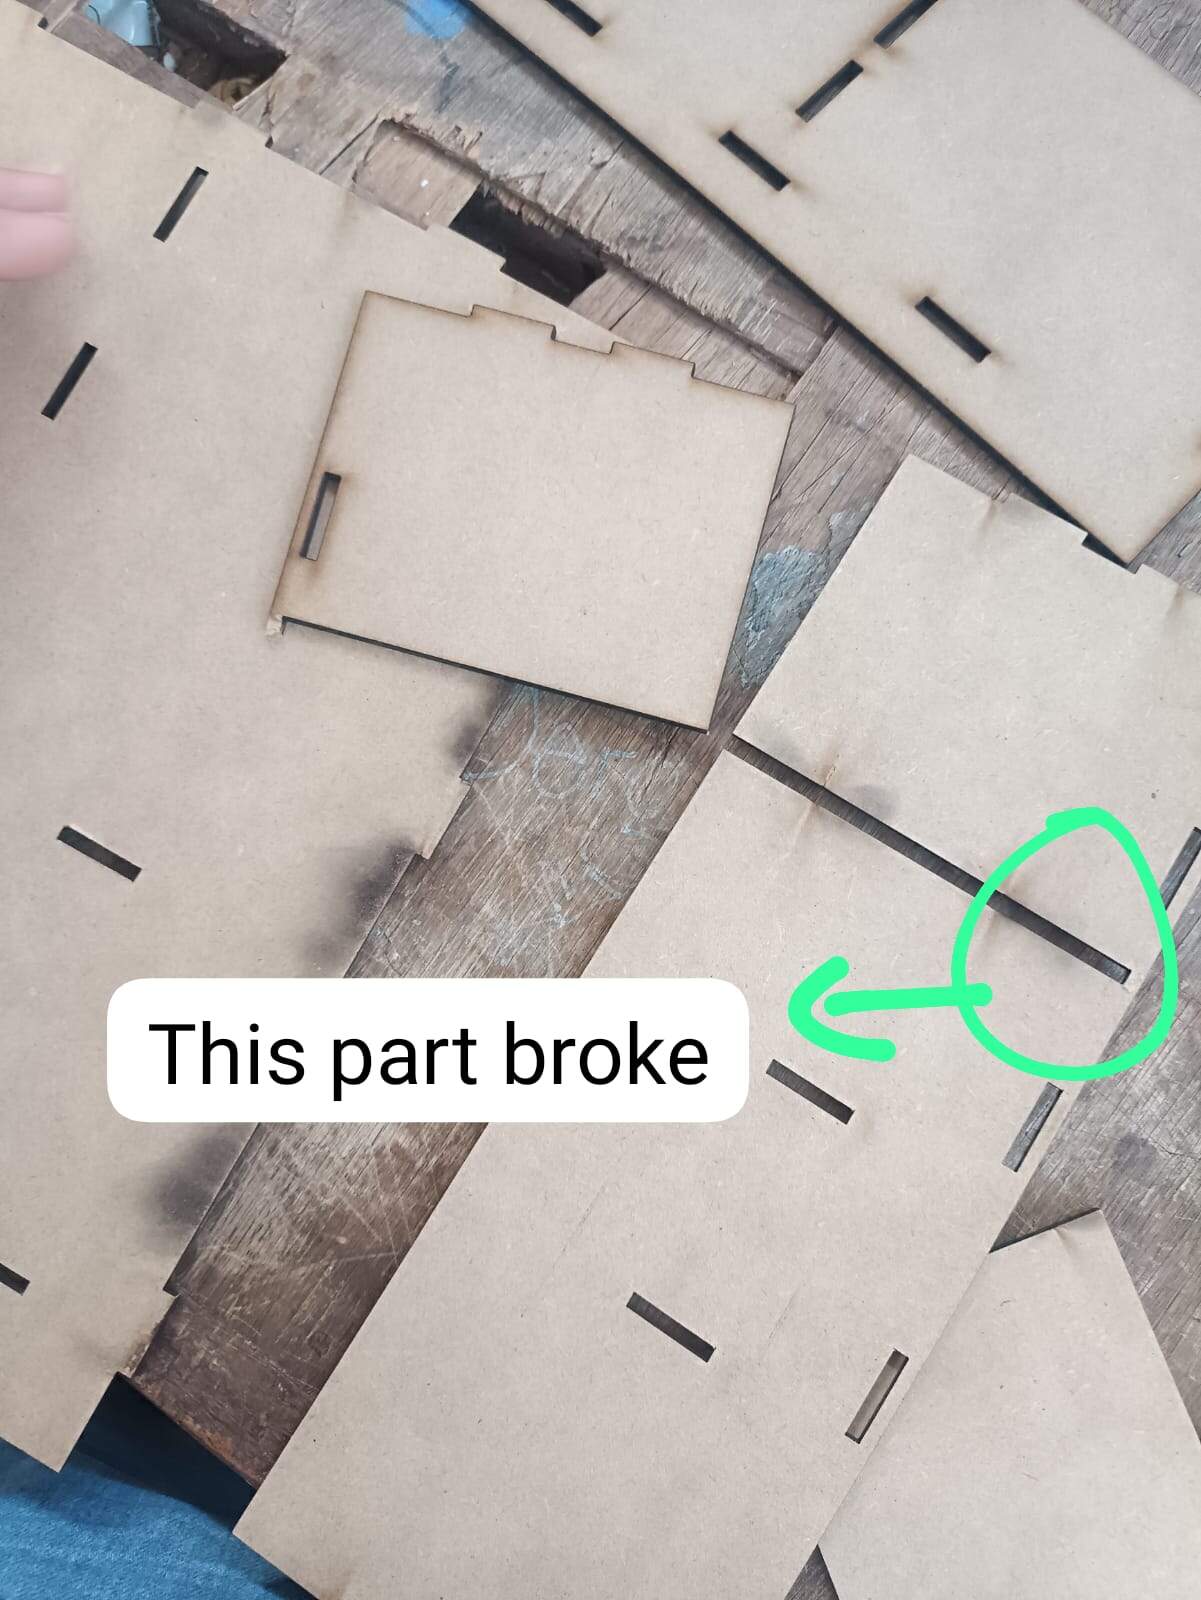
My first attempt was a fail because my design was not really that great in some places where I put a cut to allow the piece to enter. The cut was too big and also loosened. So one of my pieces broke instantly not letting me really have a complete prototype.
-
Went back and made that change, also adding tabs in that specific part to fit into the back as well for more support. Another change I made was the size of the ply, which now I decided to make it in 9mm MDF cause the 12mm one was too scarce and I didn’t really have time to parameterize for both sizes and the stock sizes which weren’t exact either, I went for the easier solution.
-
I remade the projection of the sketch with these new dimensions and the changes that I made to the design.
-
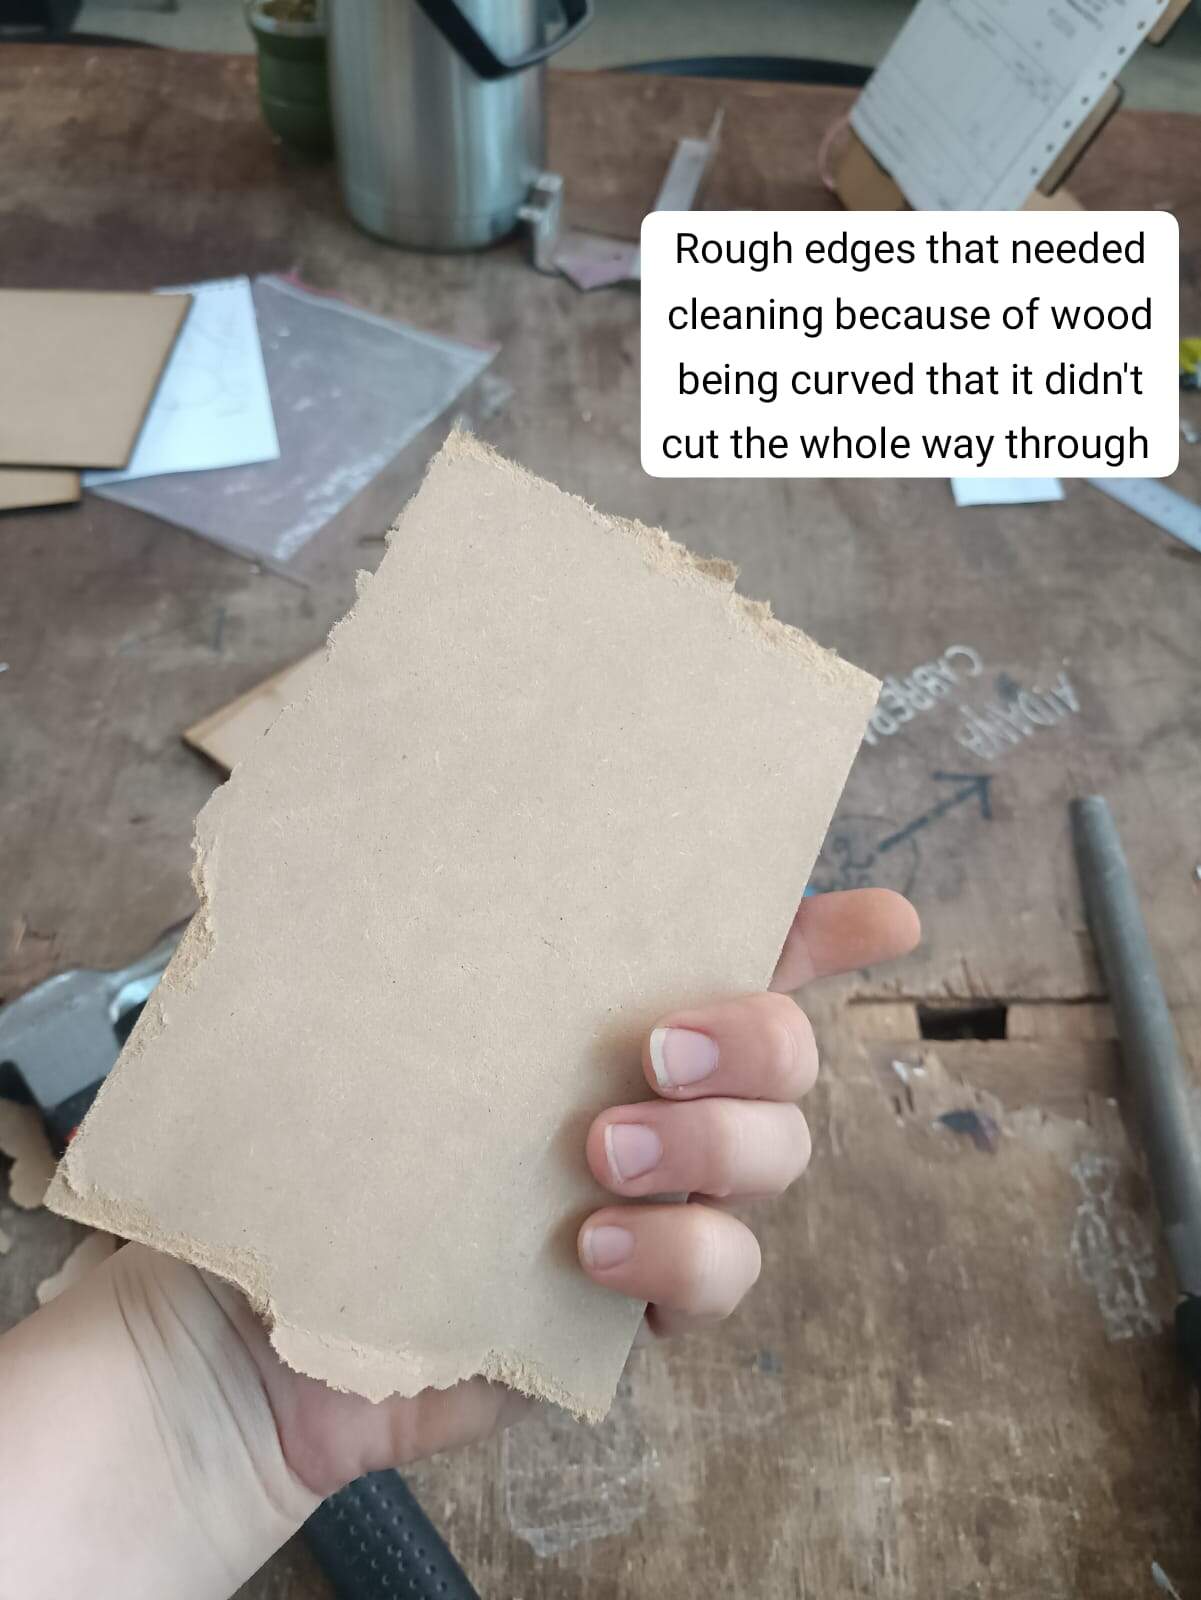
Round 2 of laser cutting was rough. The stock was not exactly flat so some parts were not cut in their entirety. So I had to redo some parts of them. I was pretty tired by this point. Laser was expelling a lot of smoke so we had to pause the job in parts to make it less dangerous.
-
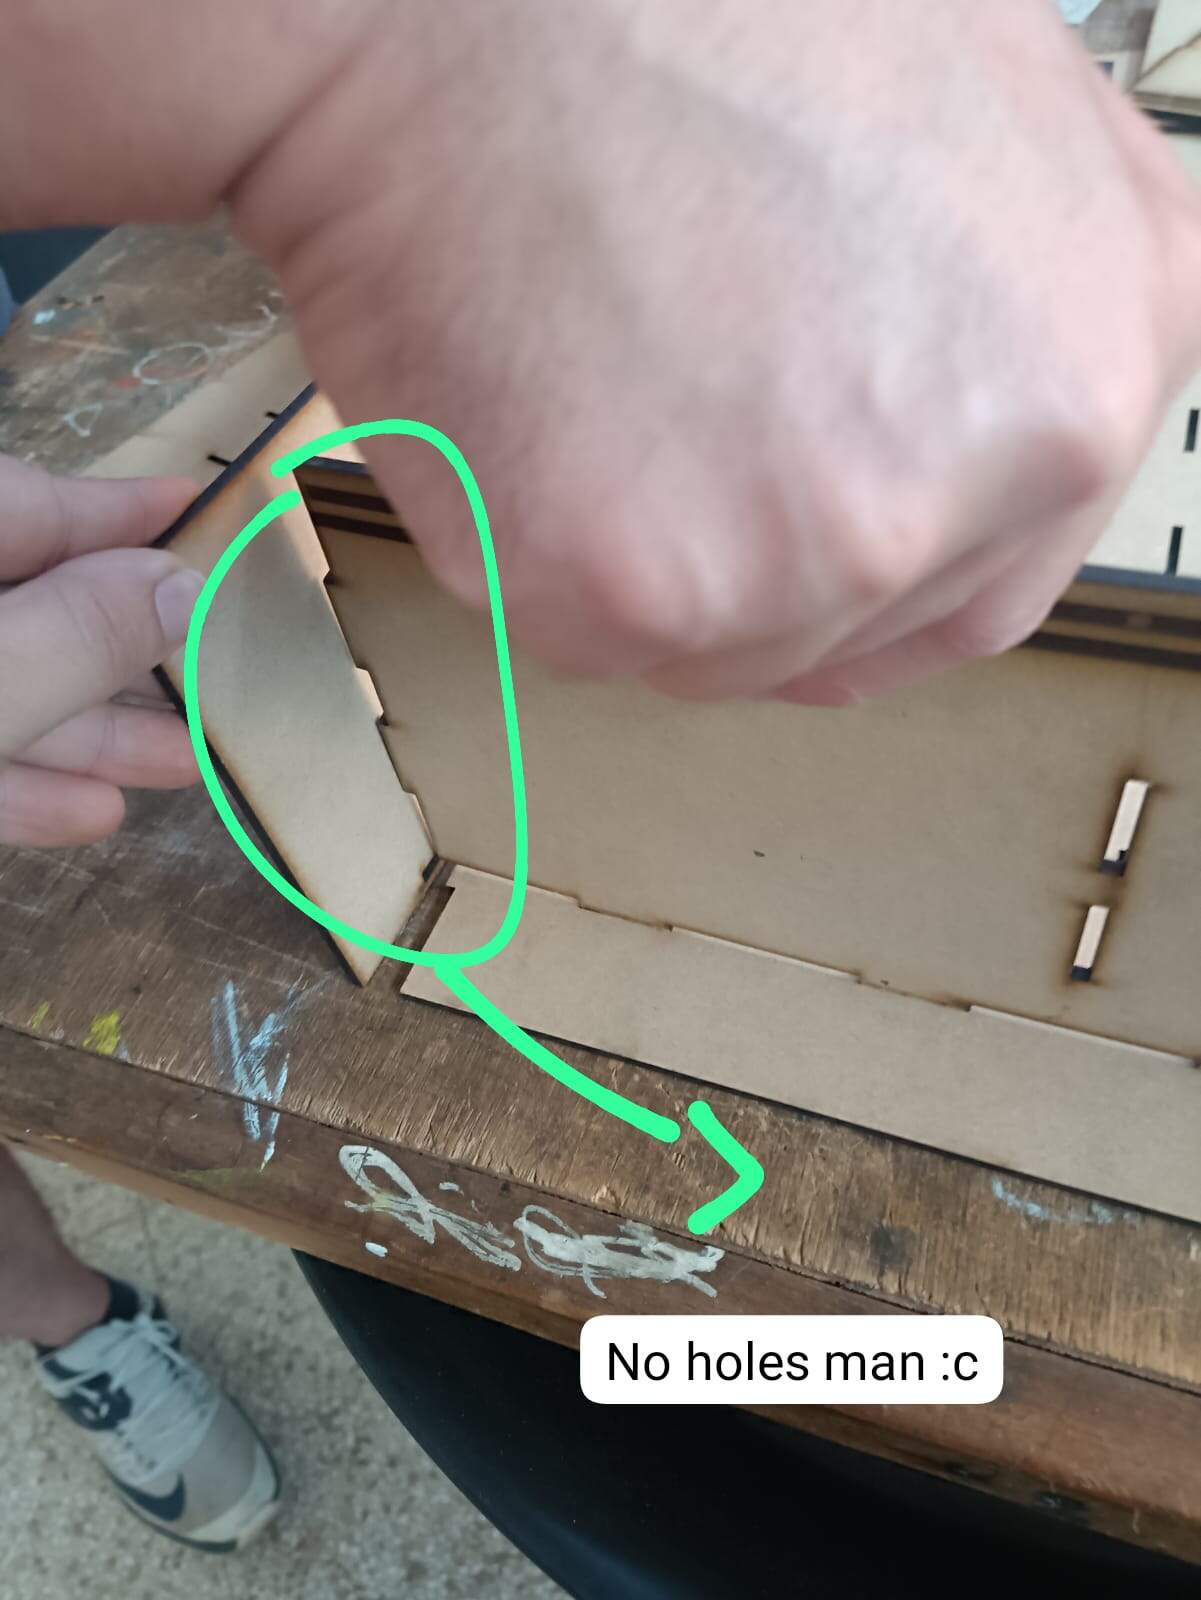
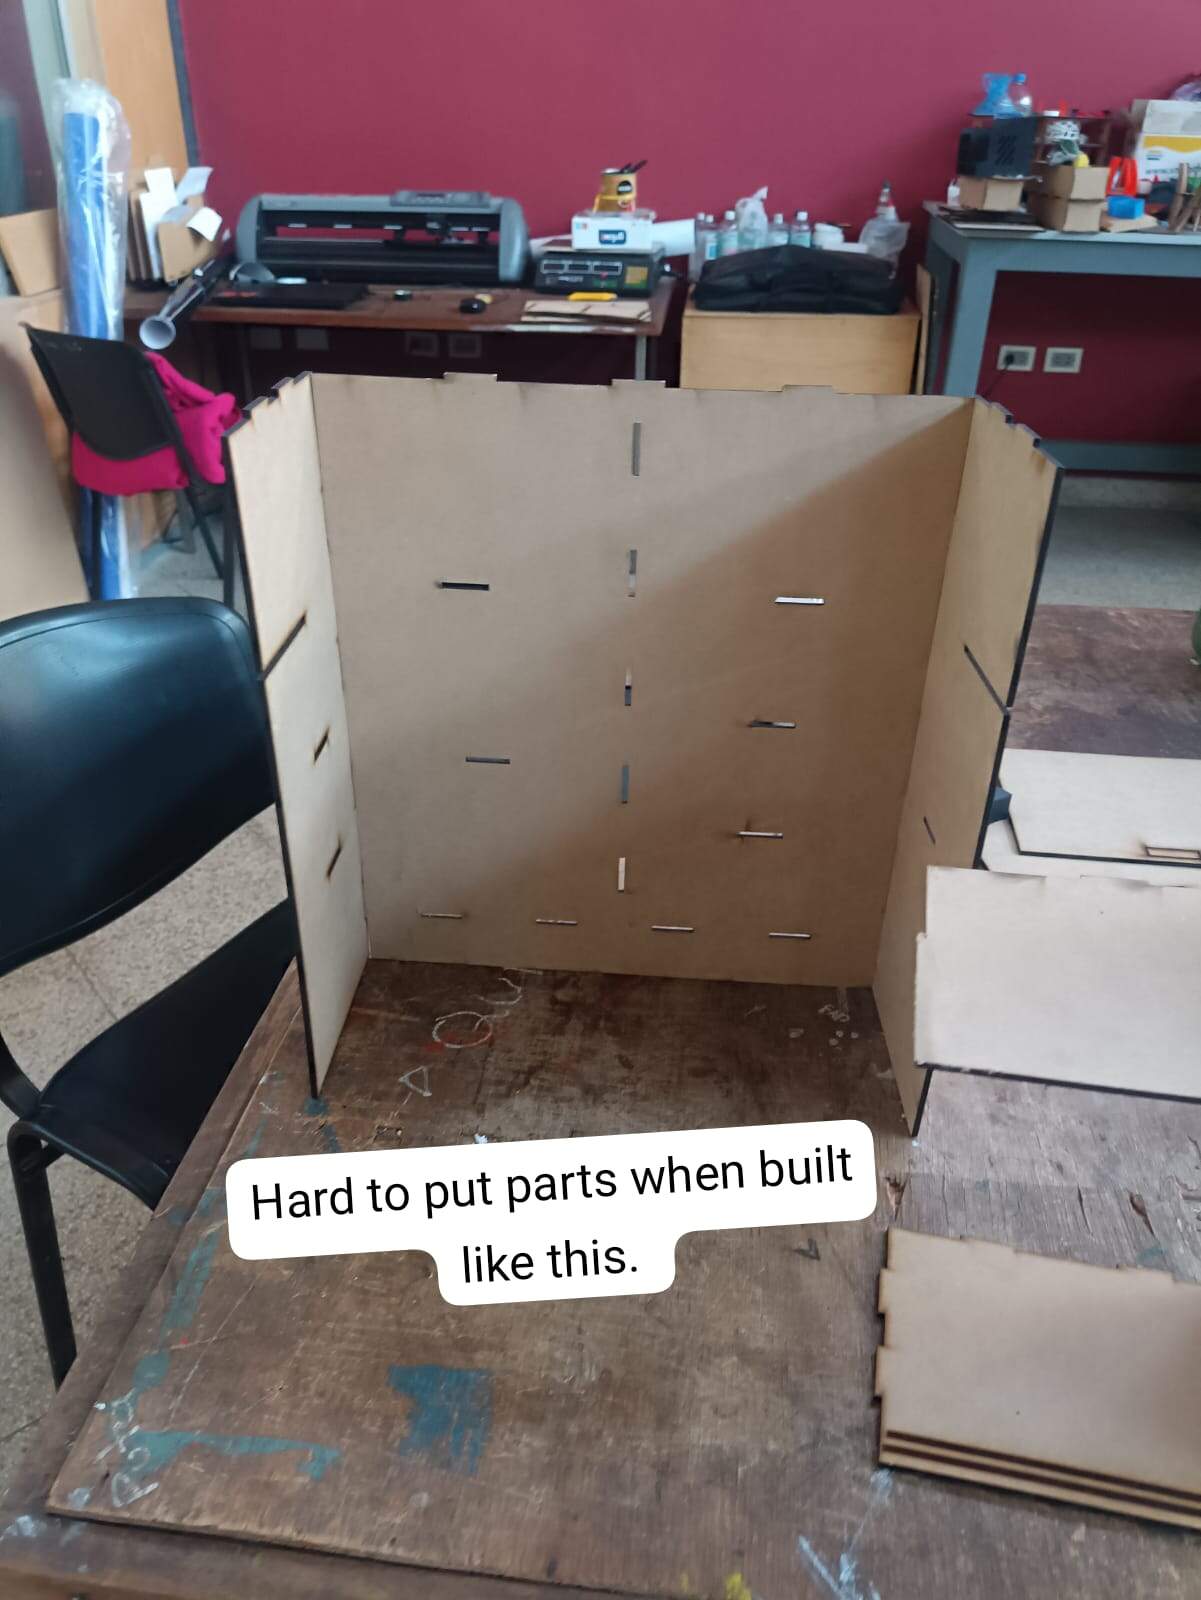
When I finally had the parts I started to test the fits and some of them where very tight. I didn’t really use any kind of kerf in my design cause apparently the CNC machine doesn’t really need it since you can program the cuts to be precise by how you set the drill. Another thing I realized was that one of my parts didn’t have all of the holes that I needed for the fits. Here you can see it!
-
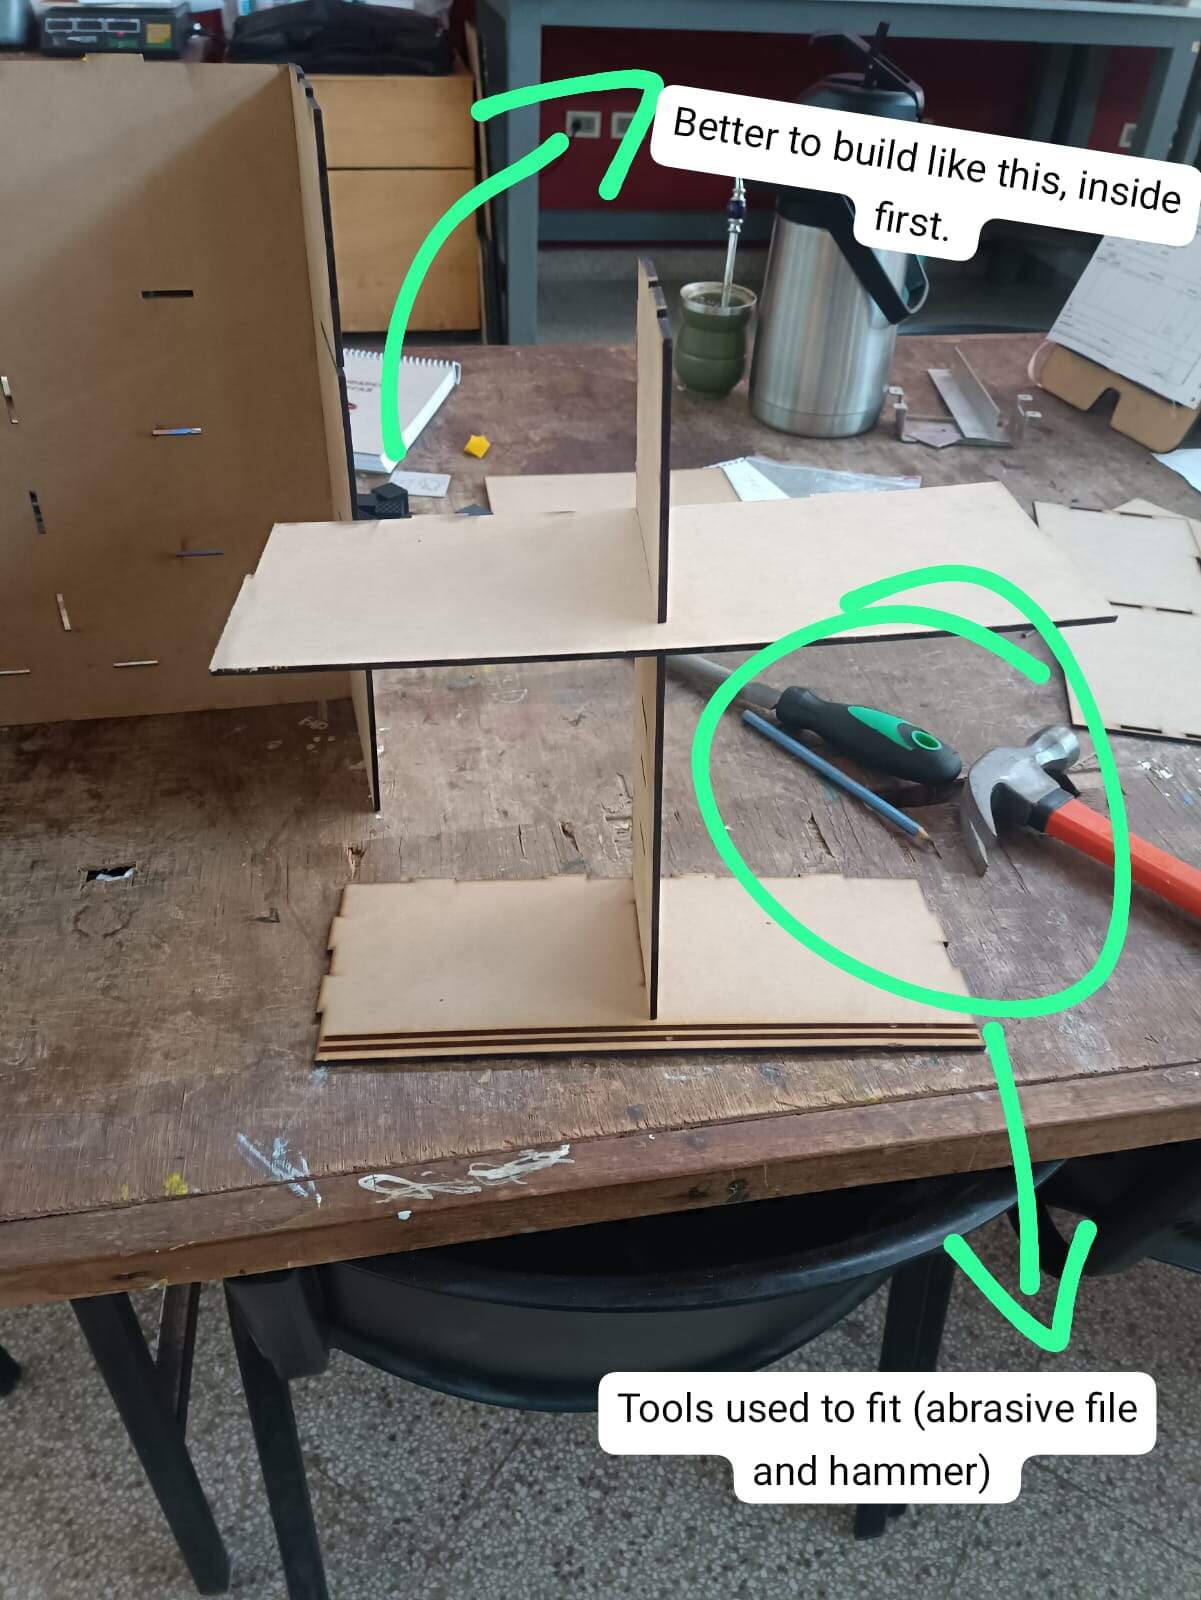
Back to the laser for the last part of my prototype. Finding some pieces of MDF from already worked on stock, so I don’t waste a new stock piece. When I had those ready I finished constructing the prototype. I realized the order was from the inside first. I also found out that there are parts that need to be in a certain way (up or down) when building.
-
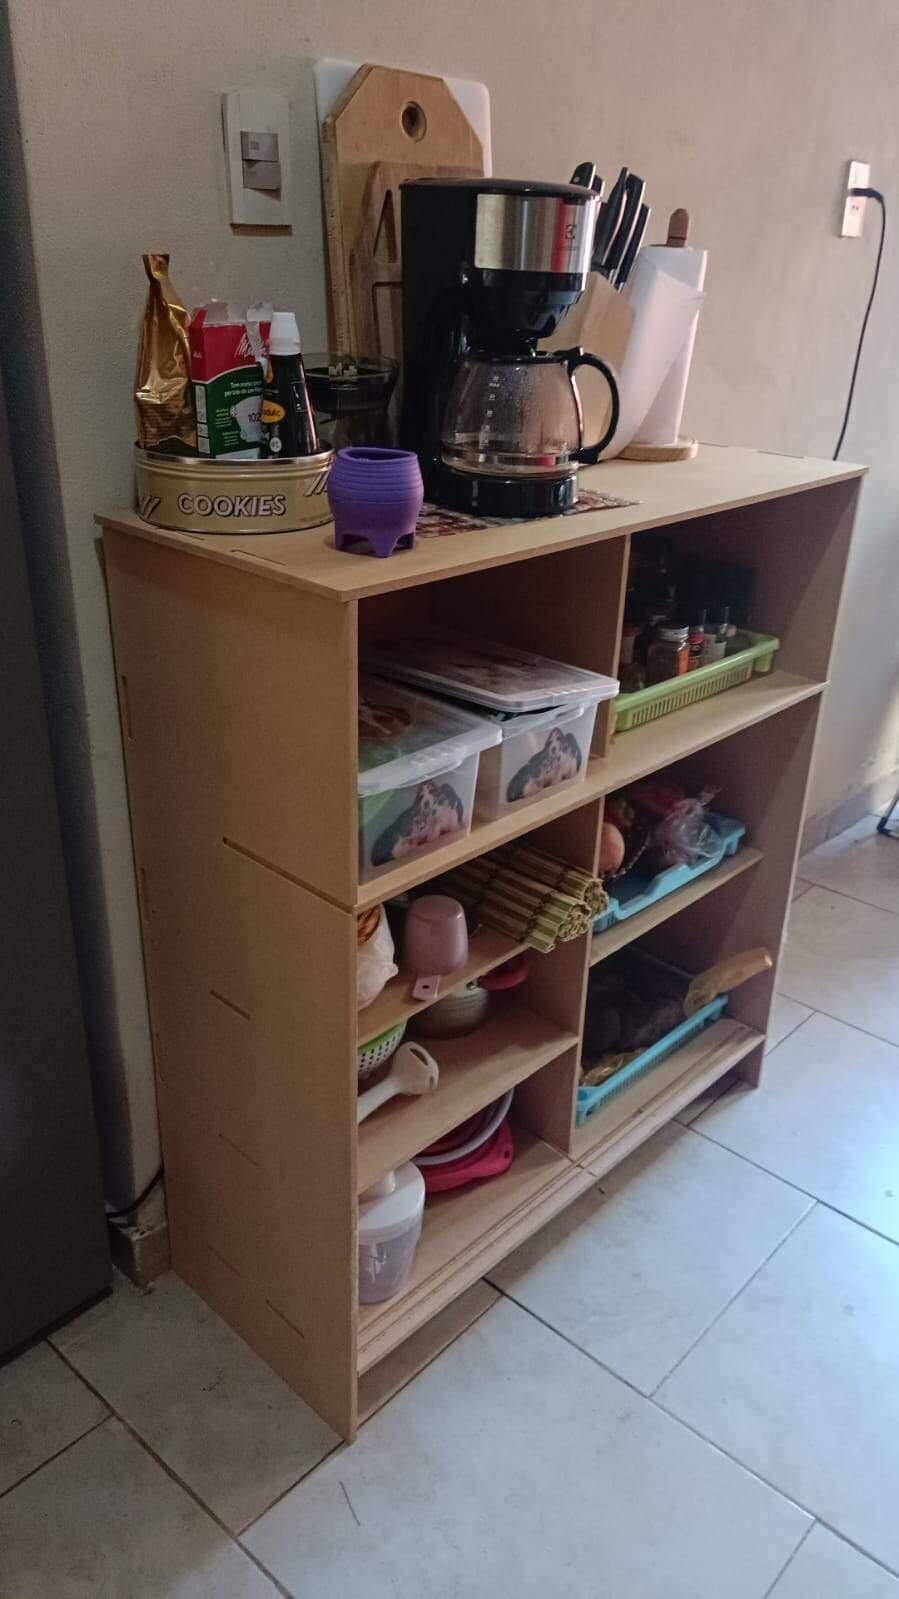
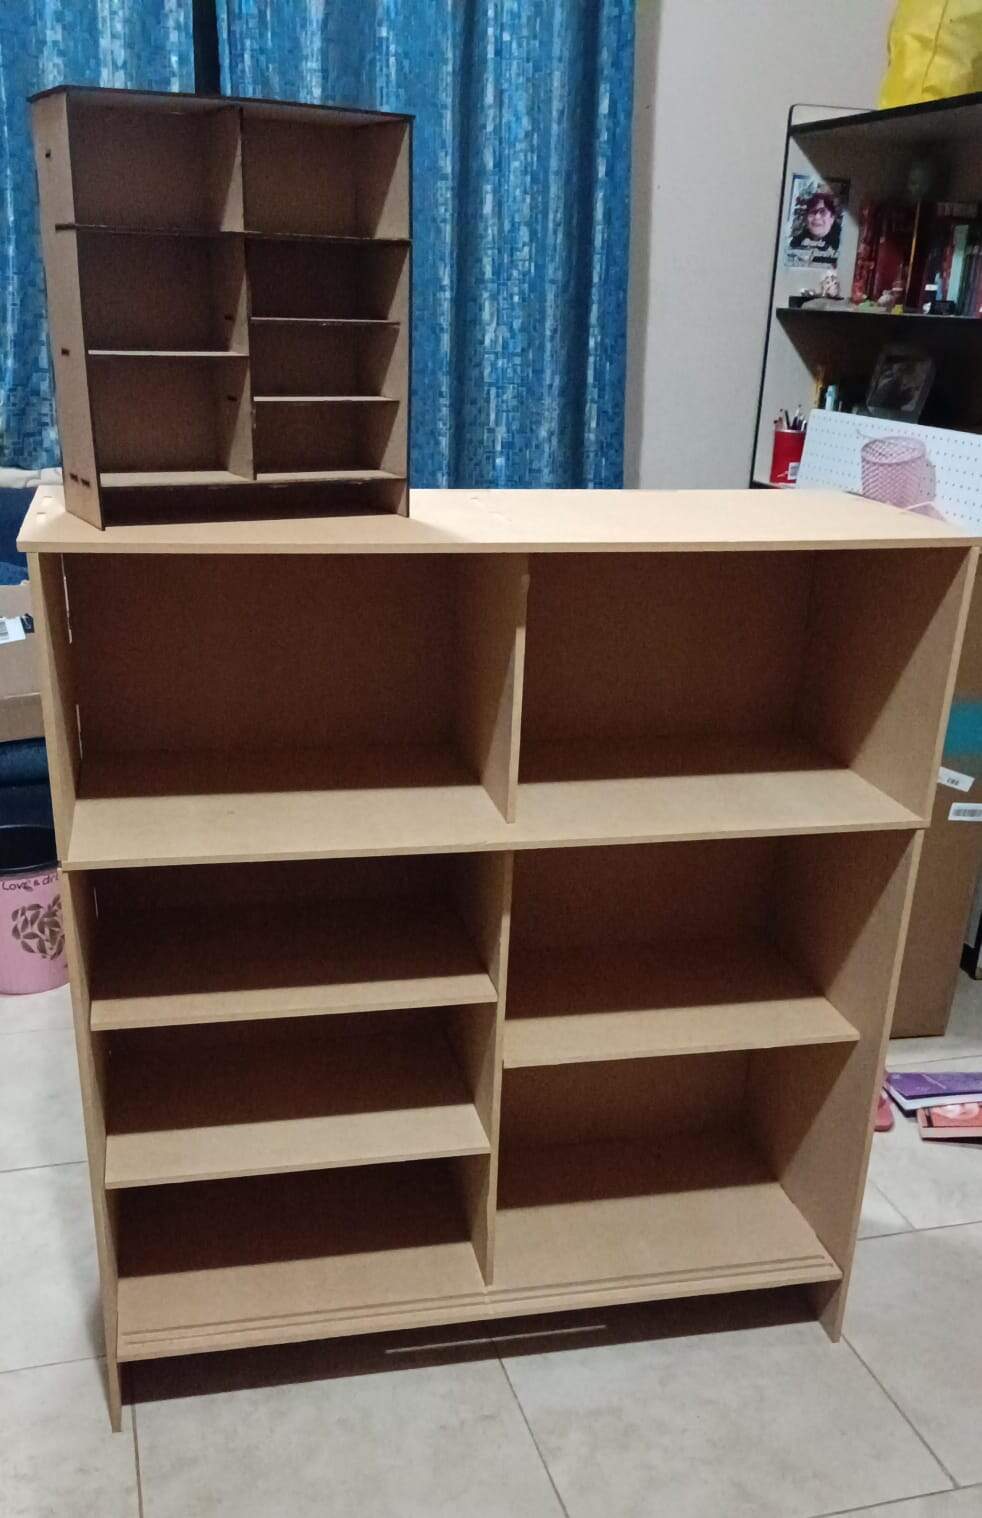
Here is how the prototype looks like. It's already quite big so I might use it as shelving as is
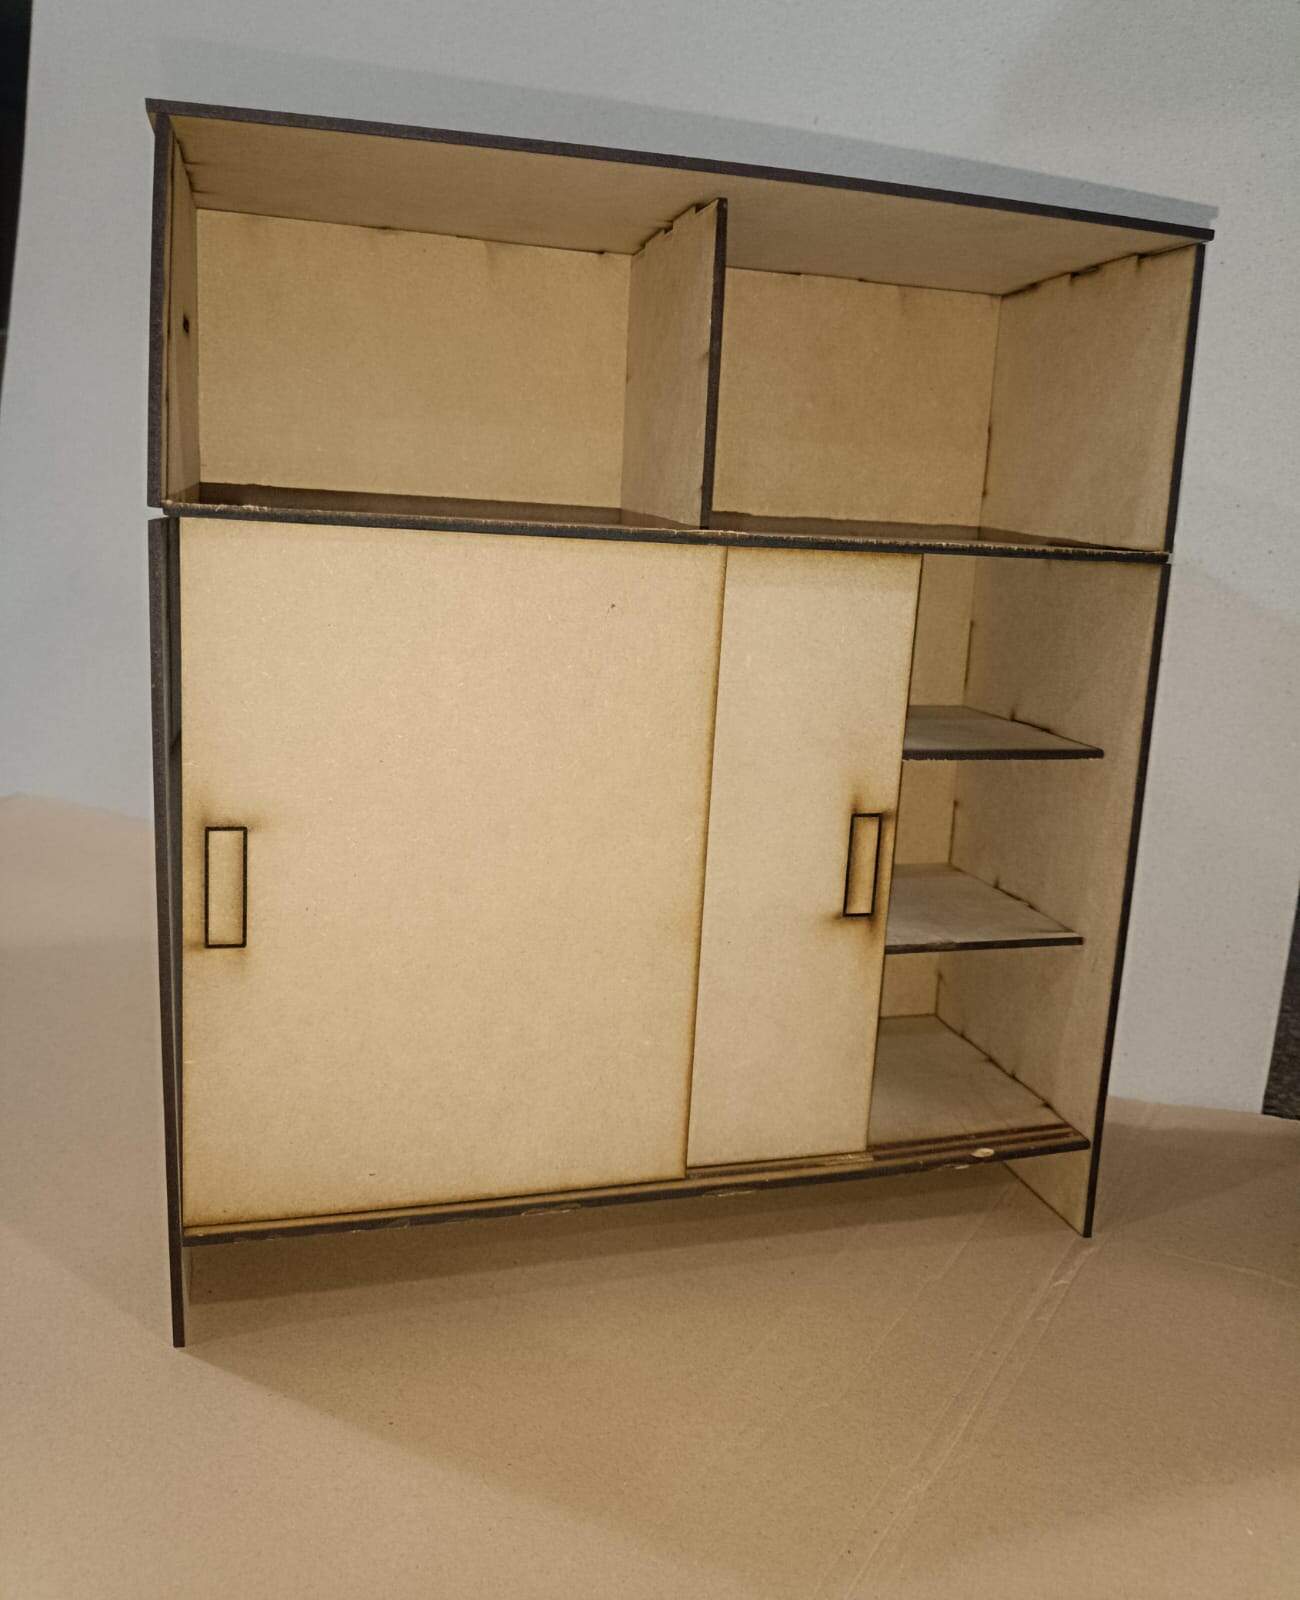
Obs: The section for the slides of the door didn’t quite work. But I thought it might be because engraving is not really for that. Now I think I could have used the Modela for that part, but well, I didn’t.
Working in the CNC
Now after having the design and prototype ready, next step was to begin actually cutting it.
We prepared the dxf files to send to VCarve, which is the tool we already learned in the safety and use training.
Like I said before, I decided to use the big stock of 9mm MDF in the lab. It would have been nice to work with thicker wood but it wasn’t available anymore (past academy students finished it off 😞). Anyway, some of my classmates helped me to cut the stock in the size that the machine allowed.
Now, this was at night time cause I came to the lab after work, the machine was still being used and when they finished I had to begin with my huge thingy
First step was uploading the first part of my design in the VCarve. I knew I was gonna need more than one stock because I had many parts.
Here I have to give a heads up because the lab assistant that was helping me with the process was in a hurry (this is important because I had errors in my first cut xddd)
I learned how to set up the material (here is where my first error came up). The program was already kind of set up because my classmates already used it before, so I thought that part was already configured with the correct size (big mistake, spoiler alert).
After having the size and disposition of the stock ready. You start making your designs fit in there (I had to cause I had done this in Fusion before, but with the whole stock, since we cut it, those didn’t match anymore. Made all of them fit in the work area using the tools from VCarve.
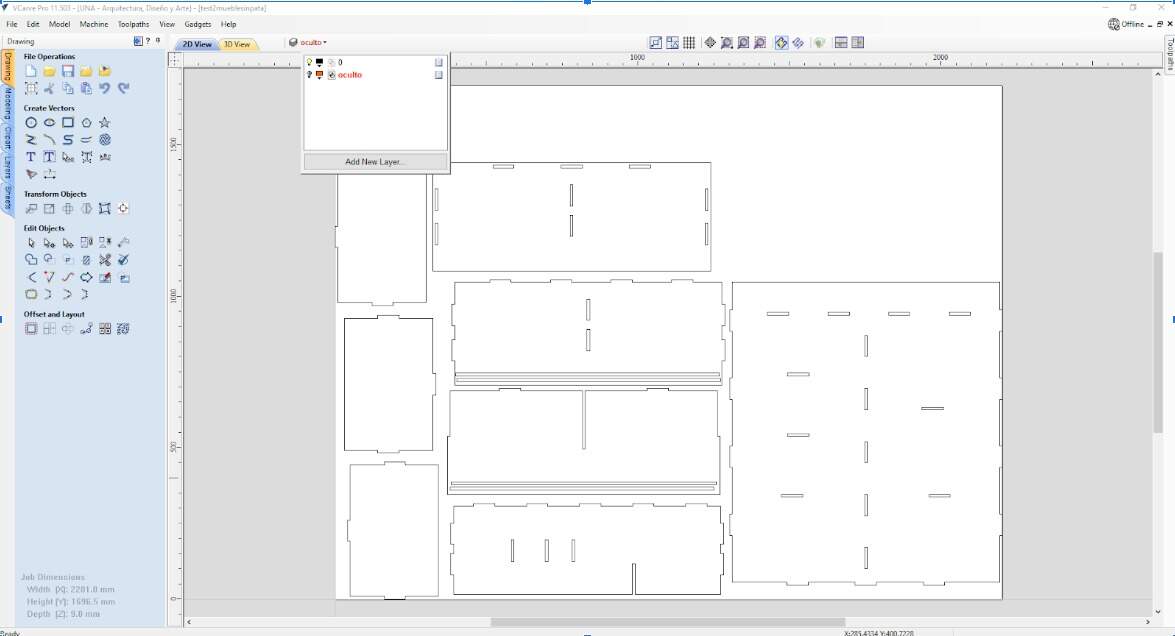
Something I didn’t do in Fusion cause I was told it was possible to be done in this software was the filets. All of my hole corners had to be done with dog bone filets.
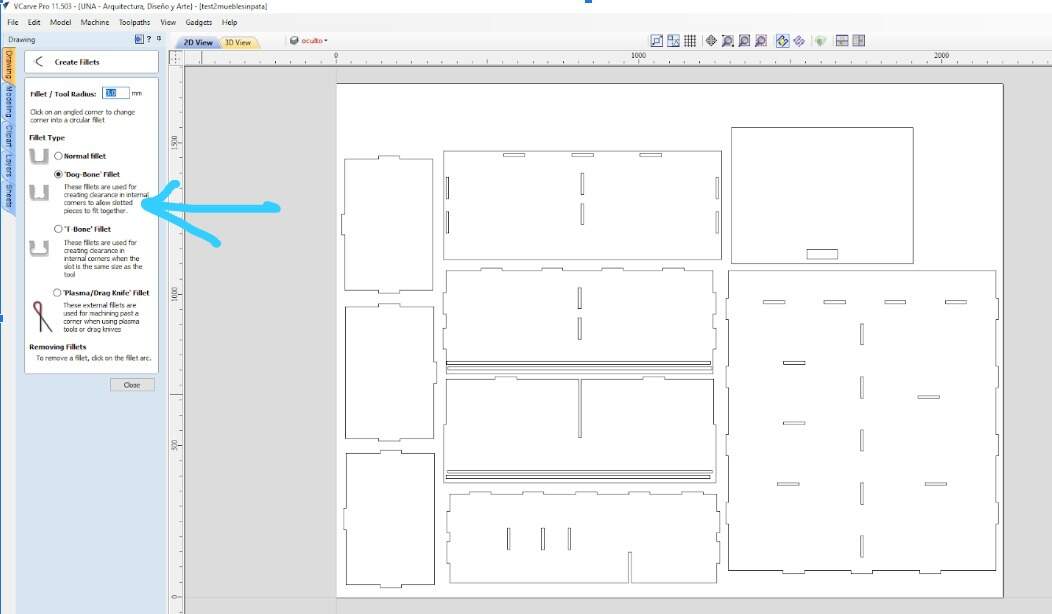
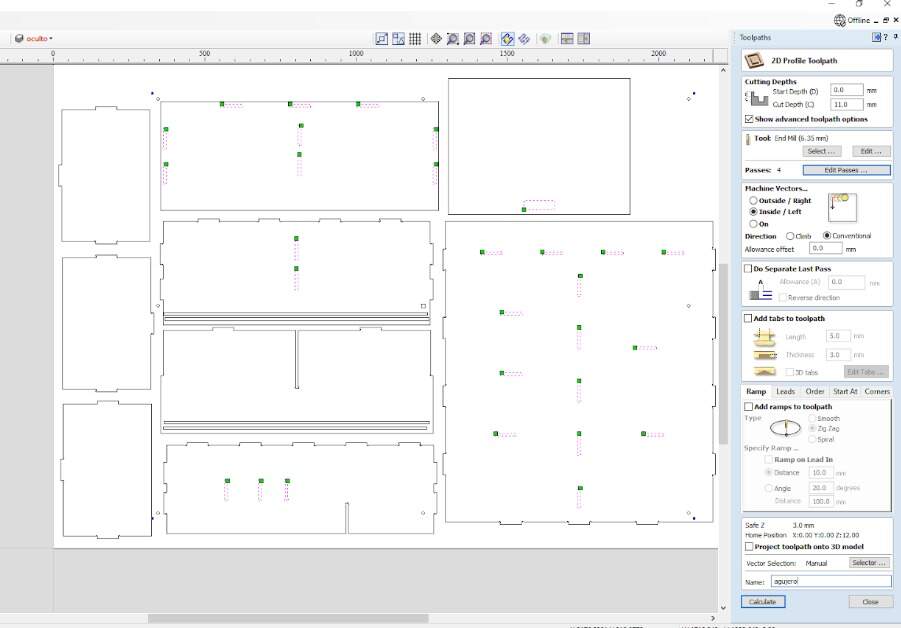
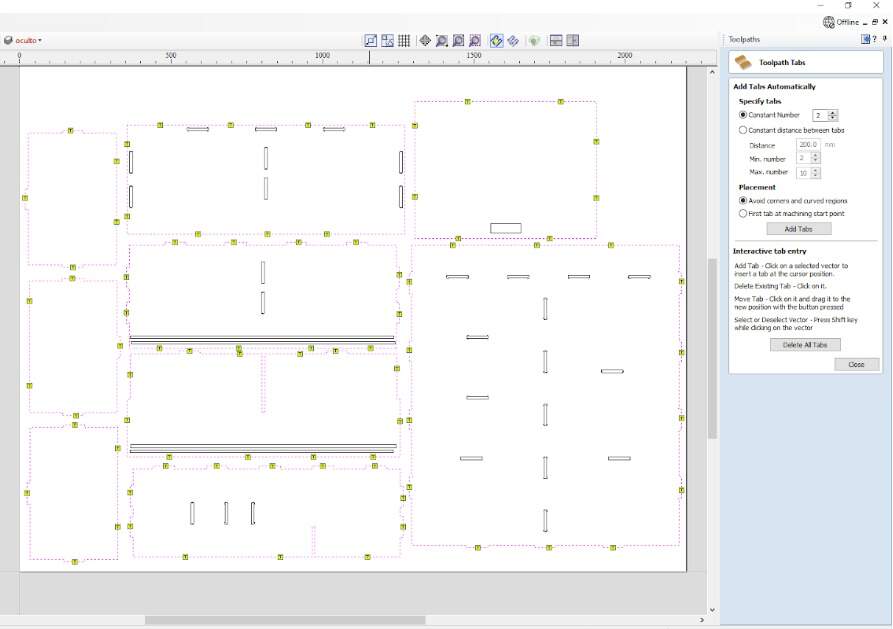
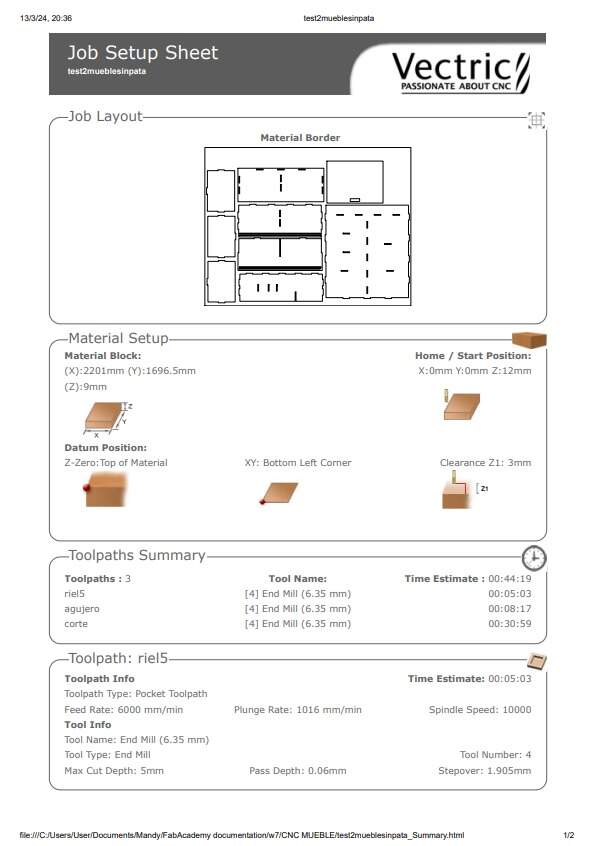
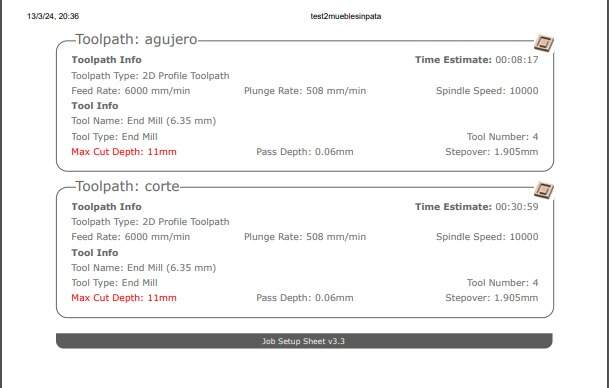
When that was done, you had to start with the toolpaths. I divided the workflow in 3 parts. The pocket for the rails, the holes with the filets in another and the outside cut in a last one
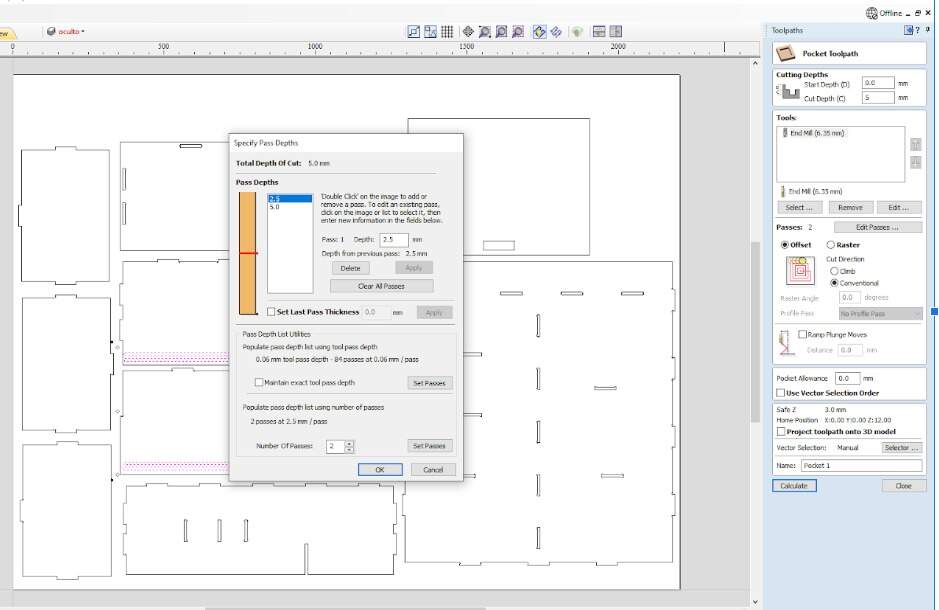
An important thing to note is that we had the wood from the stock curved in some sections, and that made the cuts in parts difficult. So we changed the size of the depth of the cut to 11mm instead of 9mm to compensate for this
Other properties for each toolpath were the end mill that we were gonna use. We had a 6.35mm drill. We needed to set the speed and feedrate. Also the passes that the machine has to make. This is a calculation that needs to be done. I showed how it is done in the pocket section
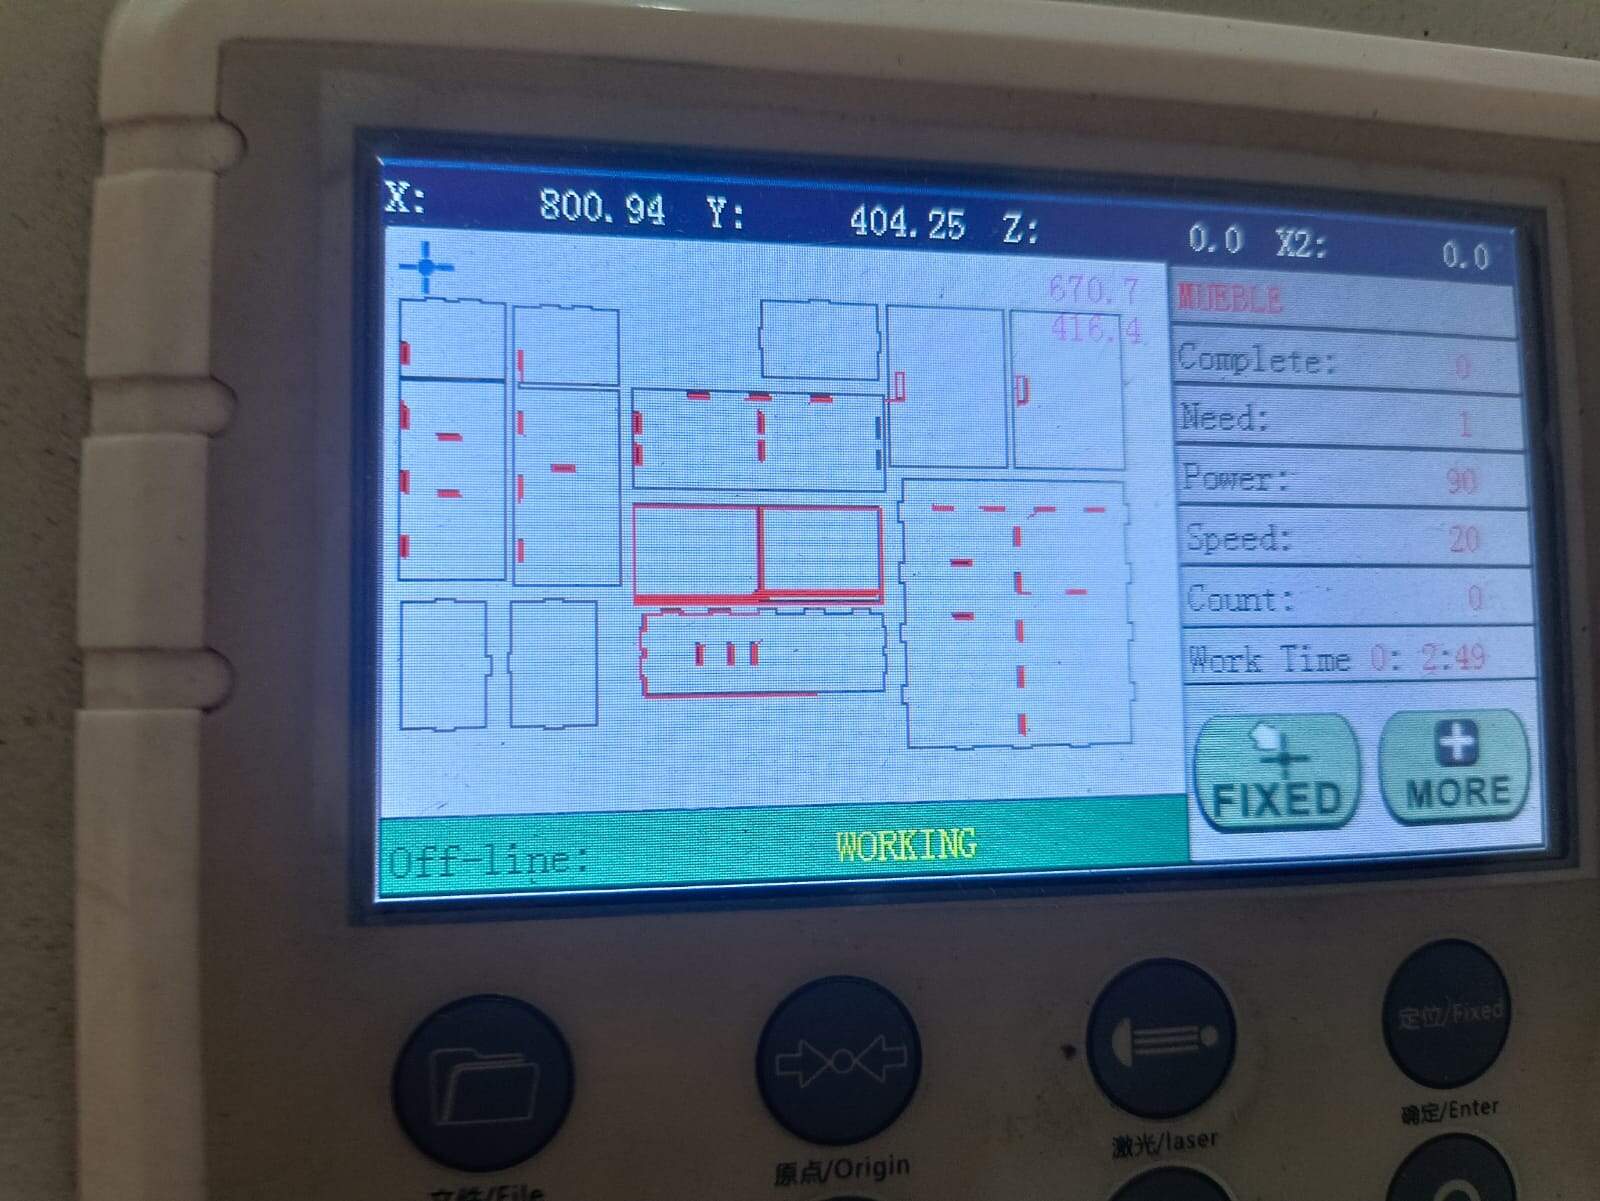
The complete job I made is in here
The other part to be done was to upload the job into the shopbot. And making the Zero axis be where we needed them to be
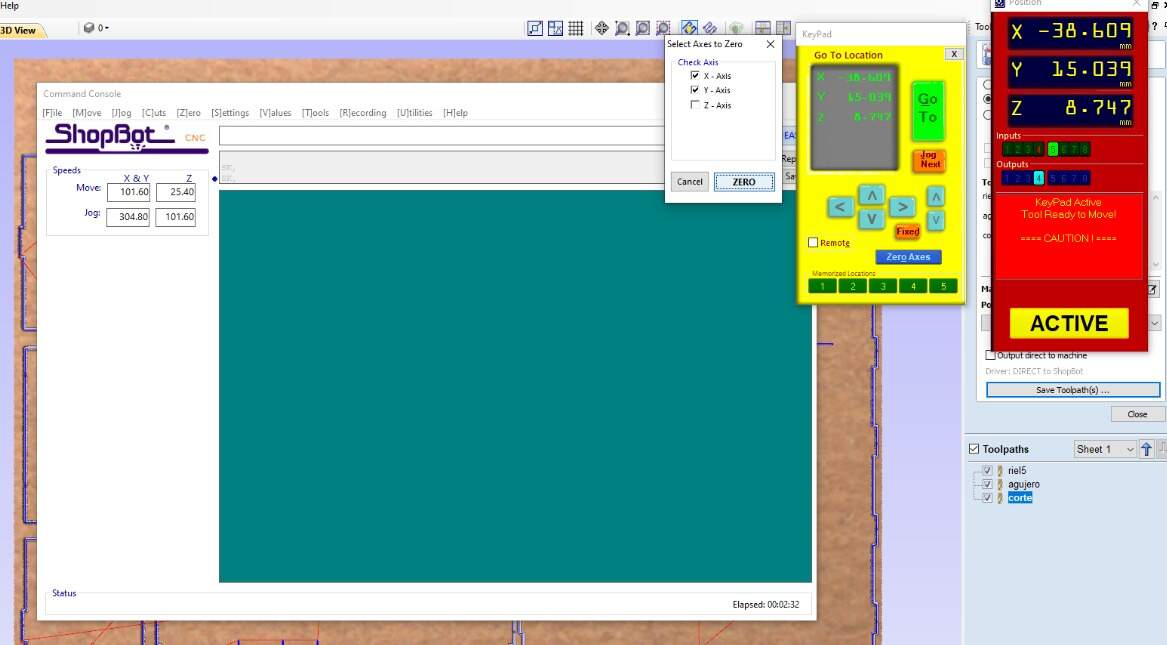
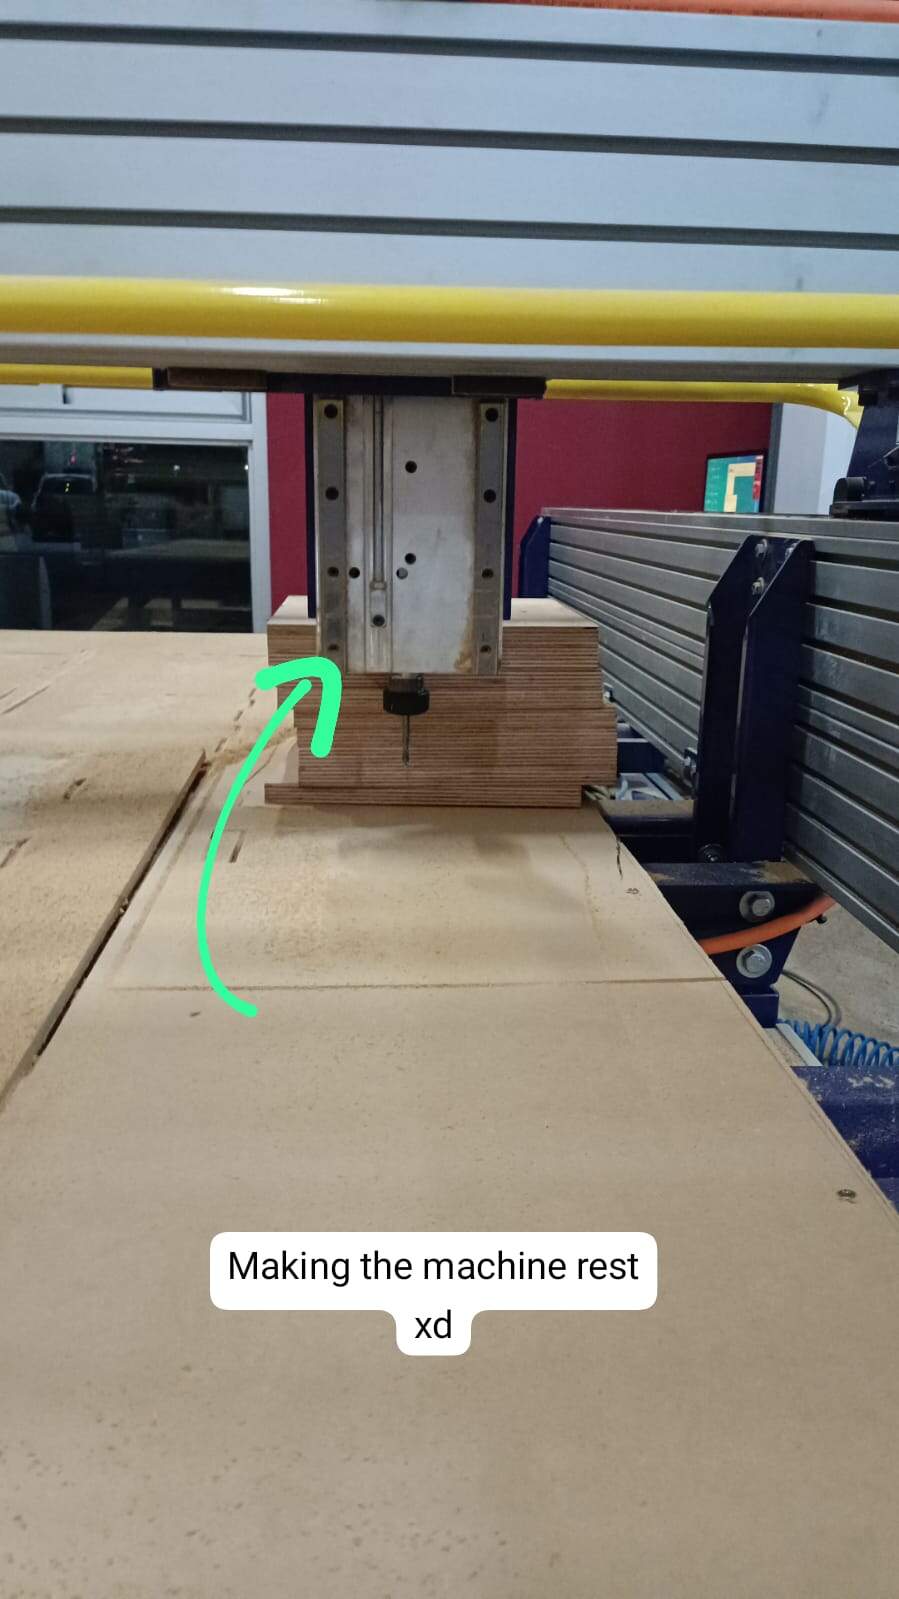
Then, the machine started working and I was anxious the whole time. I just had a bad feeling and was not feeling confident in the cnc job. And well, I was kinda right.
At one point, the machine went out of the stock and started to cut air, before it stopping completely and shutting the program down and just creating a general disaster (in my mind at least it was a disaster).
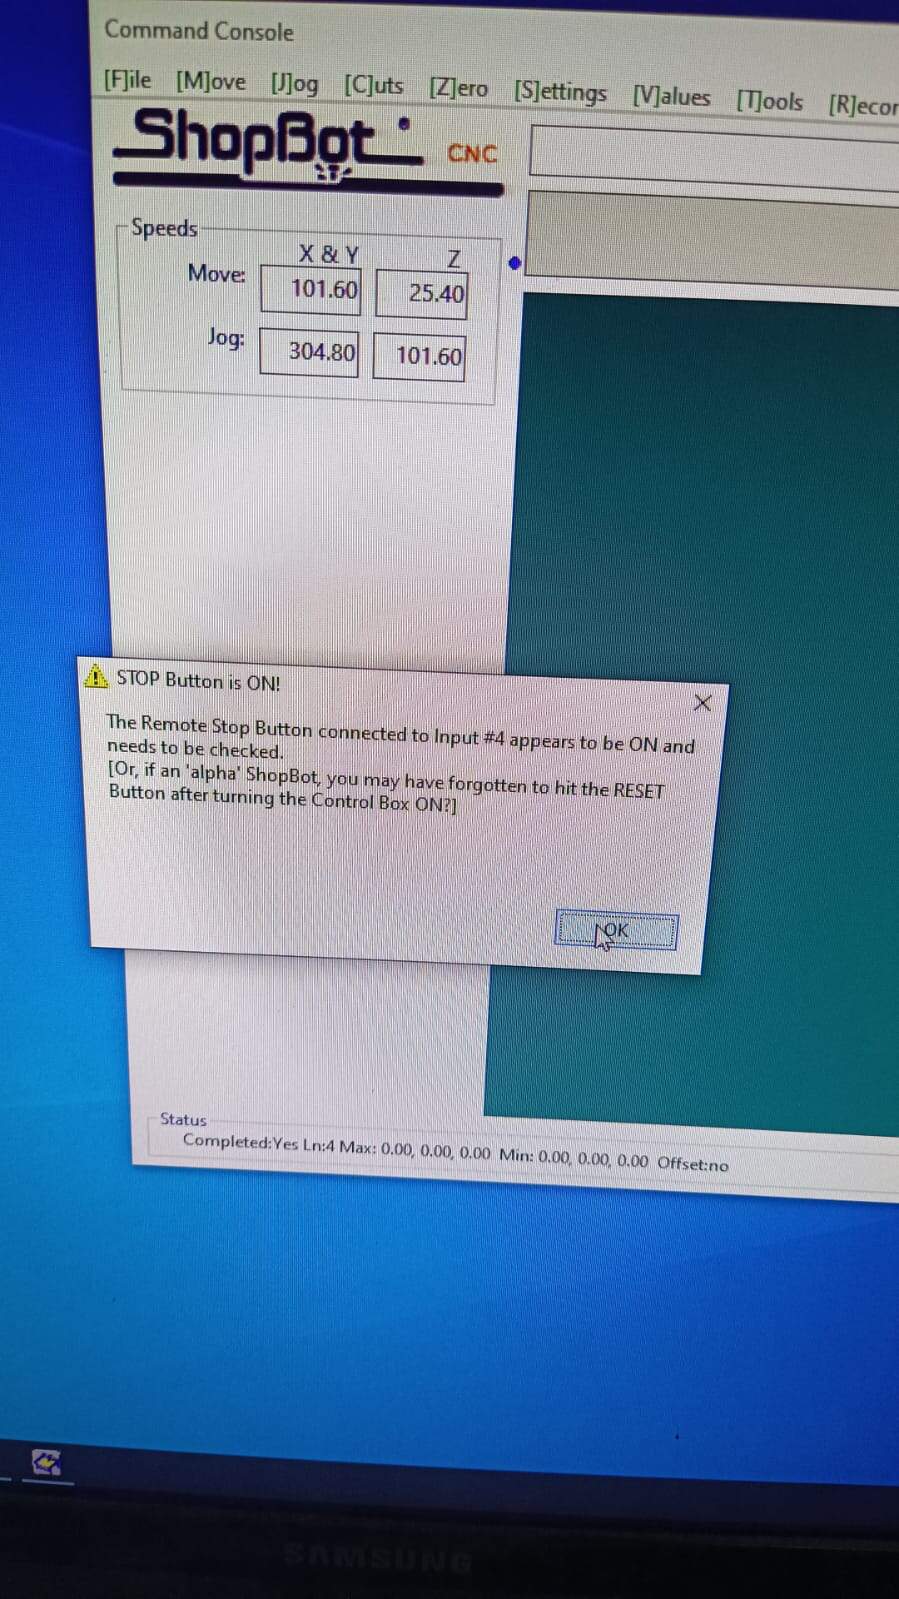
I panicked because the lab assistant was gone for the day already and some of the others were out eating and so. I texted one of my instructors and she gave me some directions via whatsapp
I asked one of my classmates for help to troubleshoot. So we just decided to let the machine rest. But my cut was not finished and one of them already had the holes but not the outside cutout done. I wanted to continue but it was already a bit late, everybody was leaving and I didn’t want to be handling the machine on my own. So I called it a day
Next day, the stock that was already there was taken away since another one of my classmates wanted to use the machine with a different stock. So when I came to the lab I still had to cut the parts that weren’t done from the night before and the ones that just didn’t fit in the first job anyway
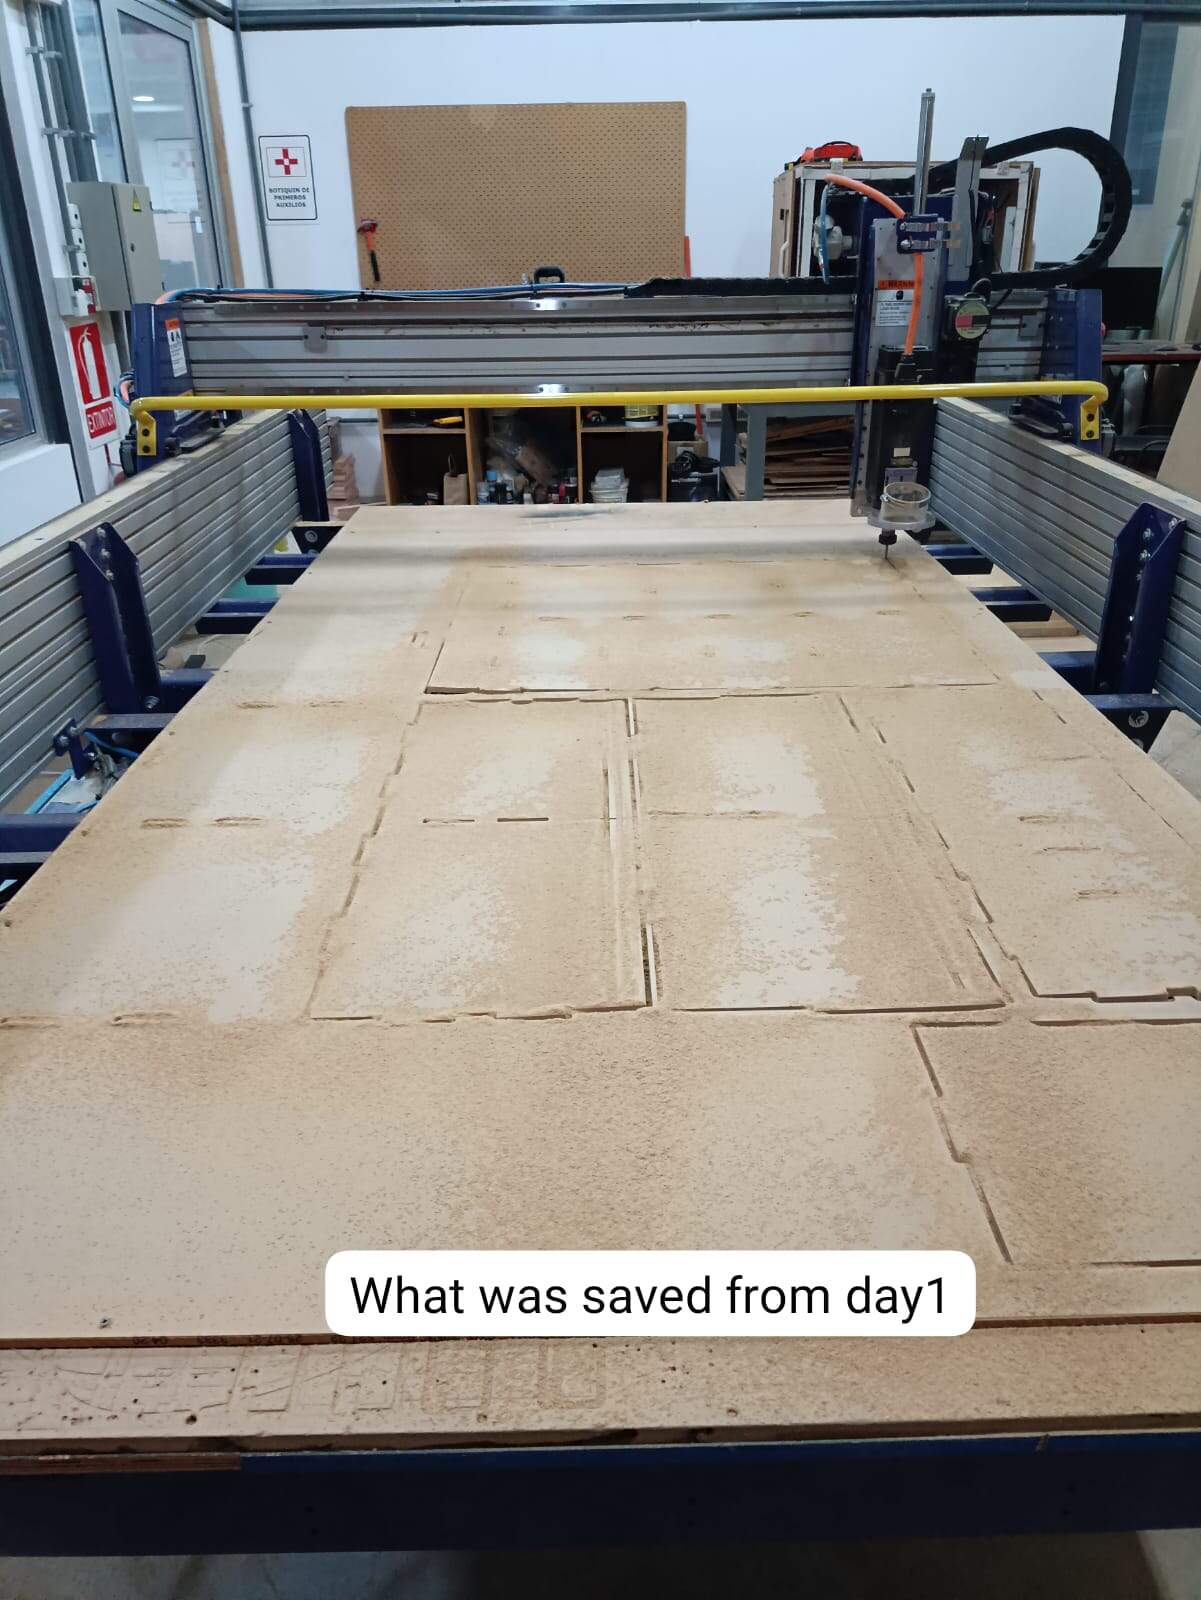
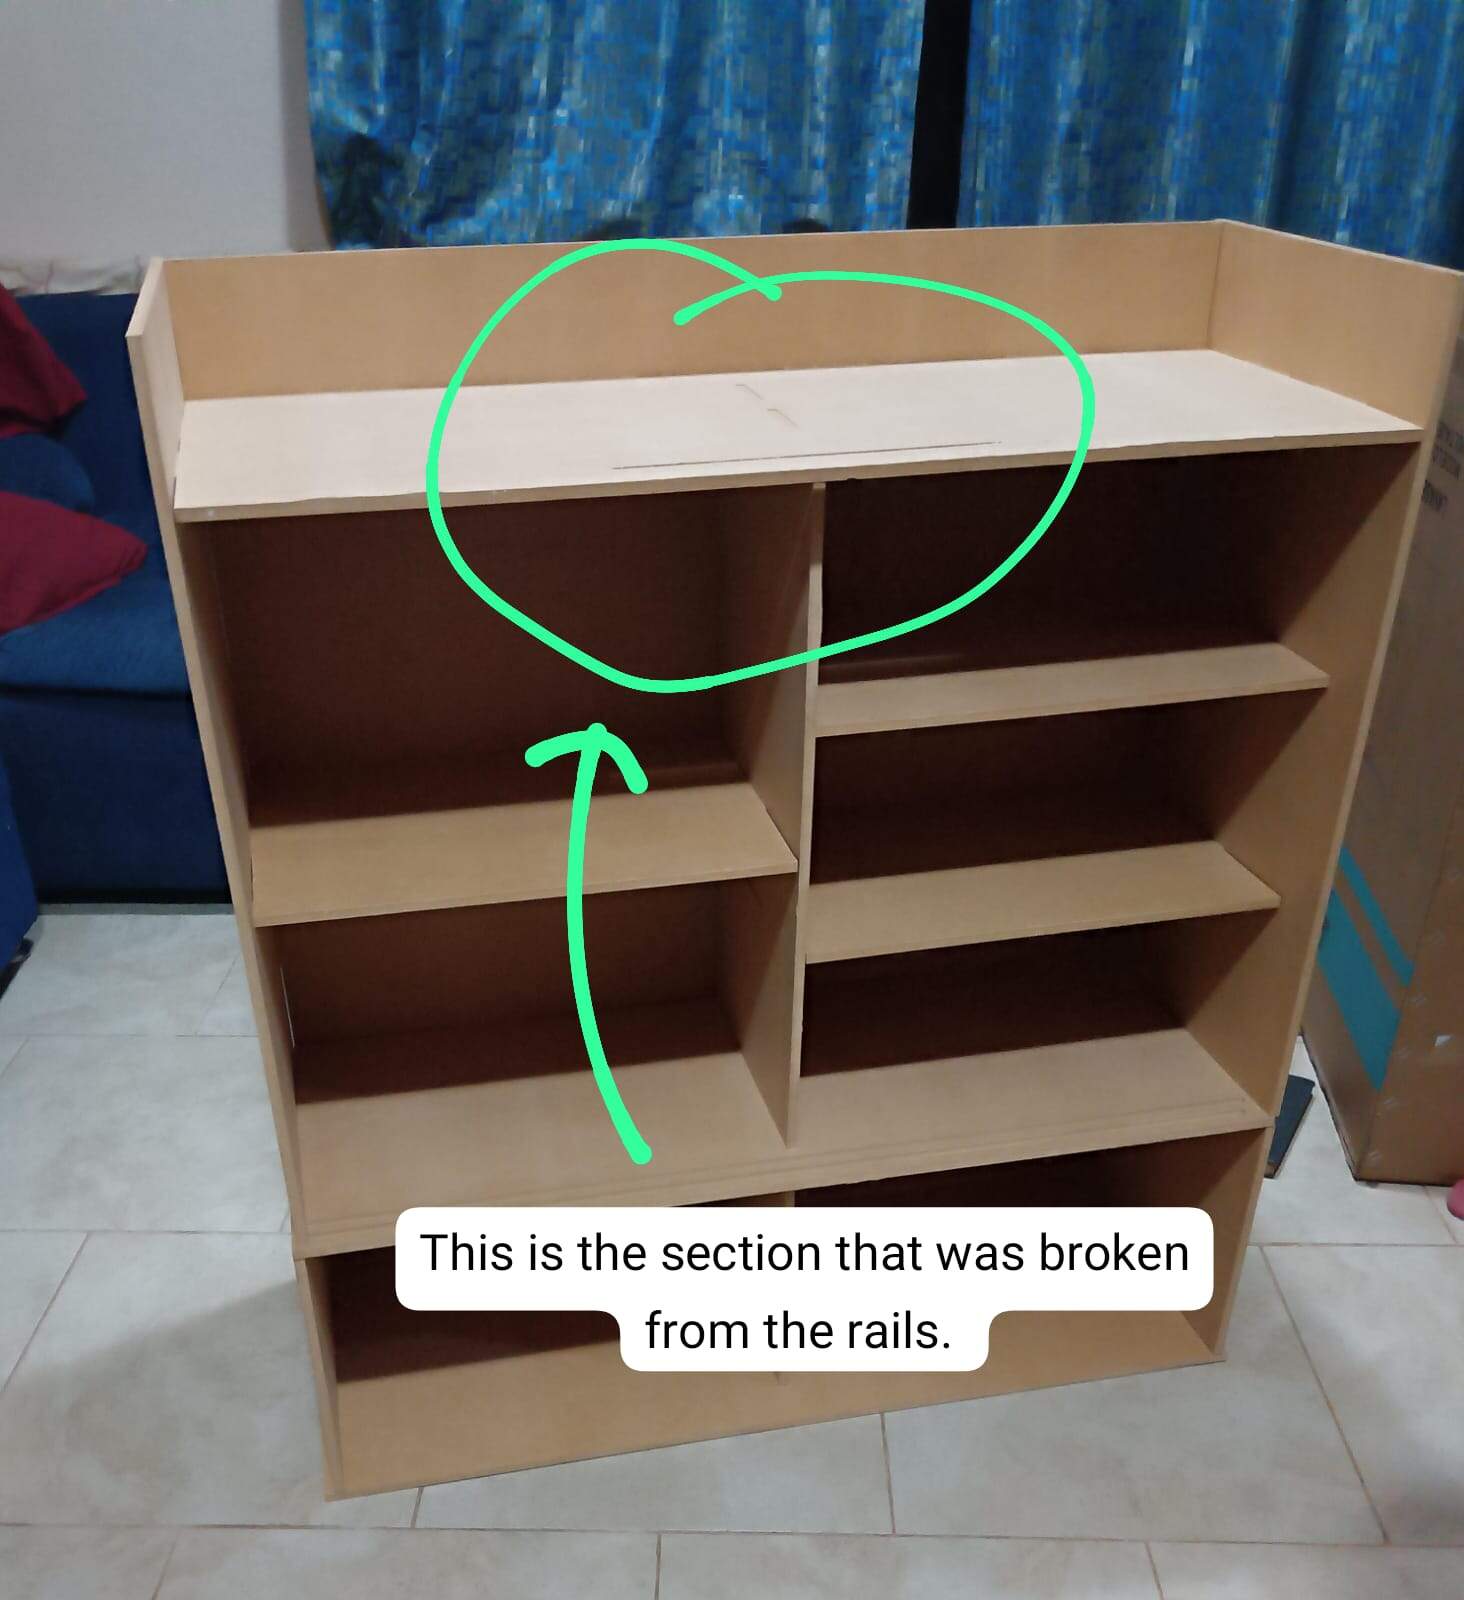
When I reviewed the parts that were cut in the previous night (I didn’t take them out because of the whole conundrum that happened), I saw that one of the rails I made went completely through the wood, making a hole where it wasn’t supposed to be. It probably happened because of the curved surface of the wood. I decided to use the part anyway, and if needed, to fix it with something on the bottom. (i forgot to take a picture of this)
My classmate asked me to put one part of his as well to be done in the same job. We did the whole setting up again. But weirdly, apparently when we saved it and uploaded it into the machine, we only saved the outside cutting process, not the part that had the holes. So the machine started cutting instead of doing the holes and also we realized that we put the stock in the other side (the x length in the y side xdd) so the machine was not going to work like we wanted it to
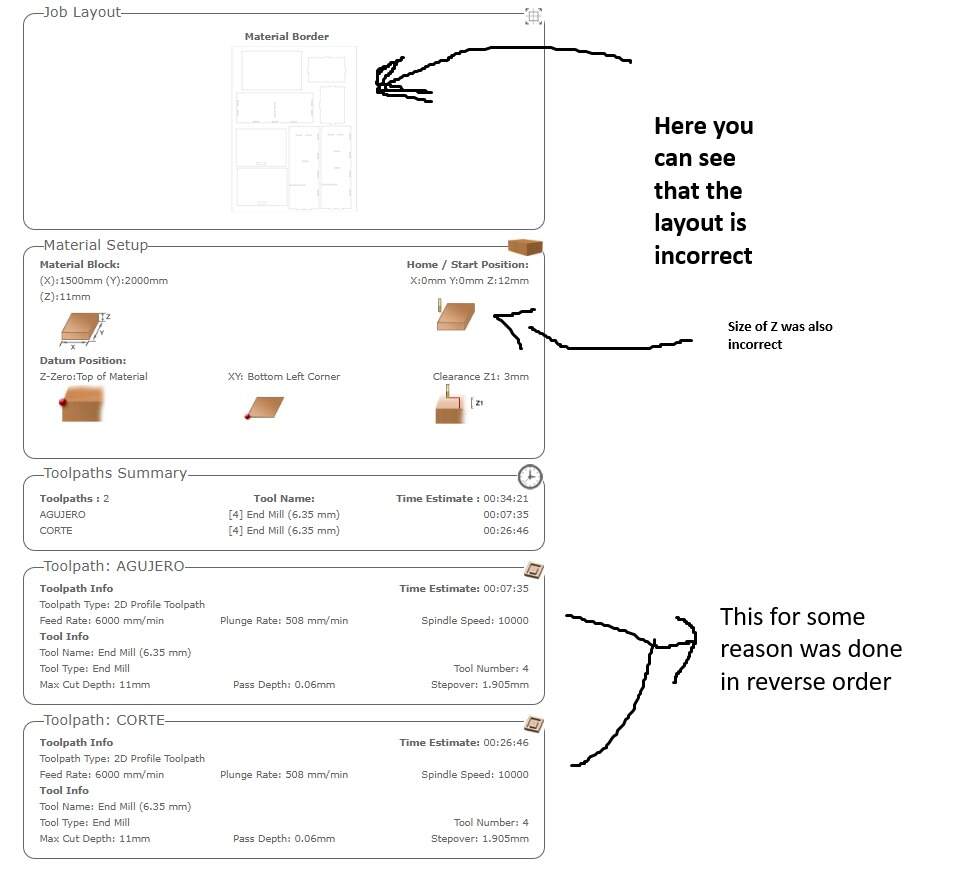
We stopped the job, created a new one. And that one went smoothly finally.
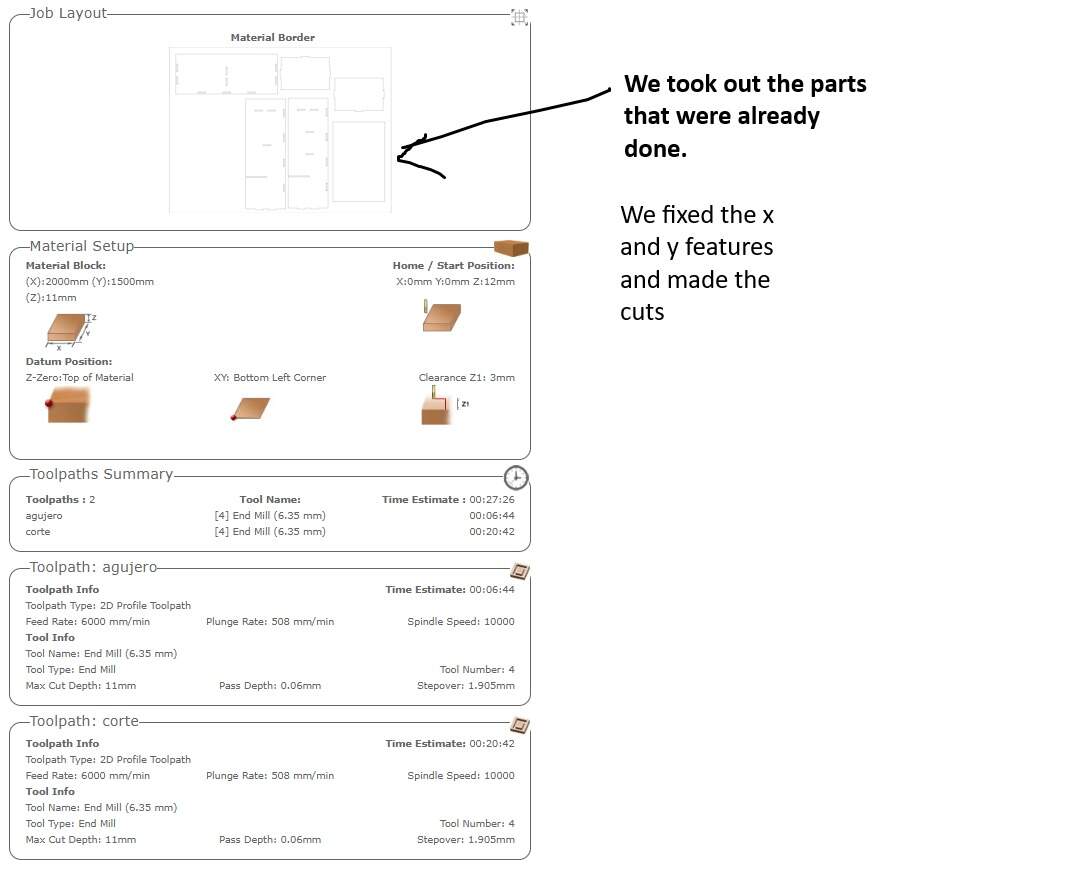
Final CNC parameters used for MDF of 9mm:
- End Mill: 6.35mm
- Feed Rate:6000mm/min
- Plunge Rate: 508mm/ min
- Spindle Speed: 10000
- Max Cut Depth: 11mm (to make sure it went through even in the parts where it was bending upwards)
- Pass depth: 0.06mm
While that was happening (the CNC working) I grabbed a file tool to take out the rough edges in the parts where it was needed from my cutouts.
When the CNC finished, I took the whole thing home to build since I didn’t want to transport it while it was already built cause it was gonna give me anxiety.
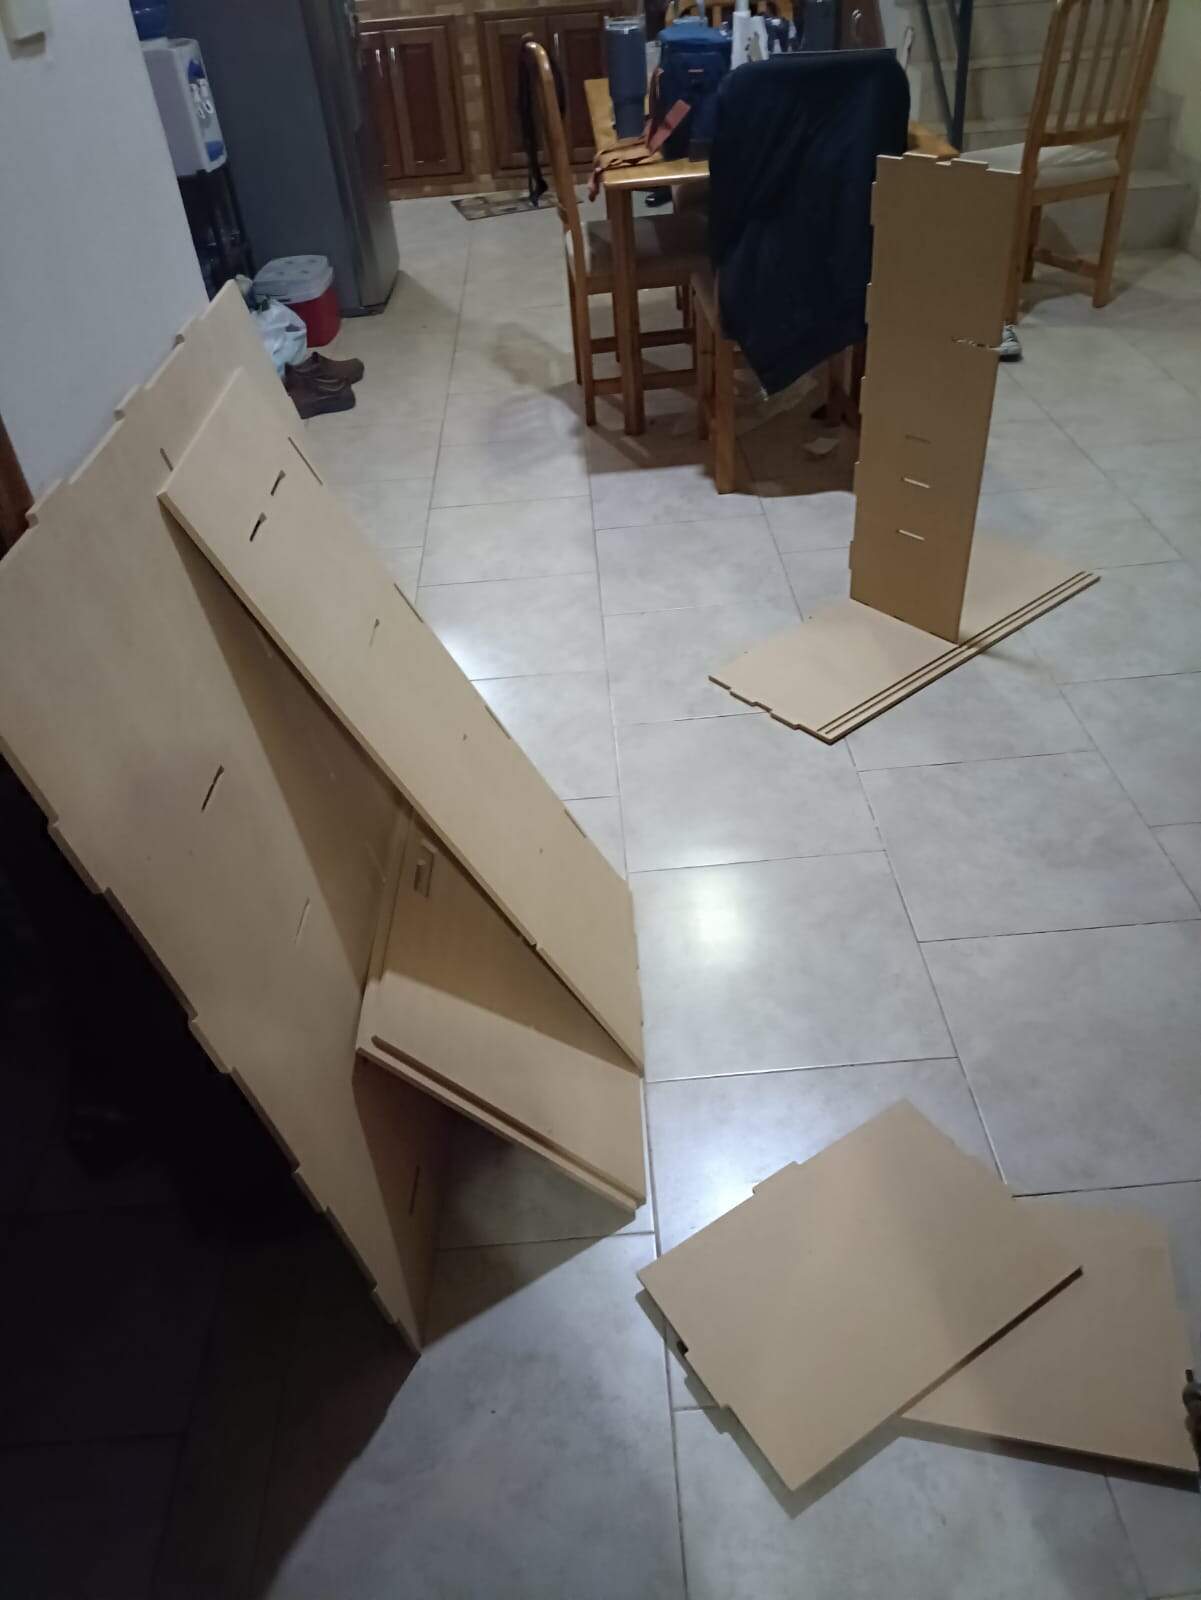
When I started building it with my boyfriend, we realized that some of the fits were not in the exact place, this was because the wood was curving weirdly in places, making it pretty difficult to work with it.
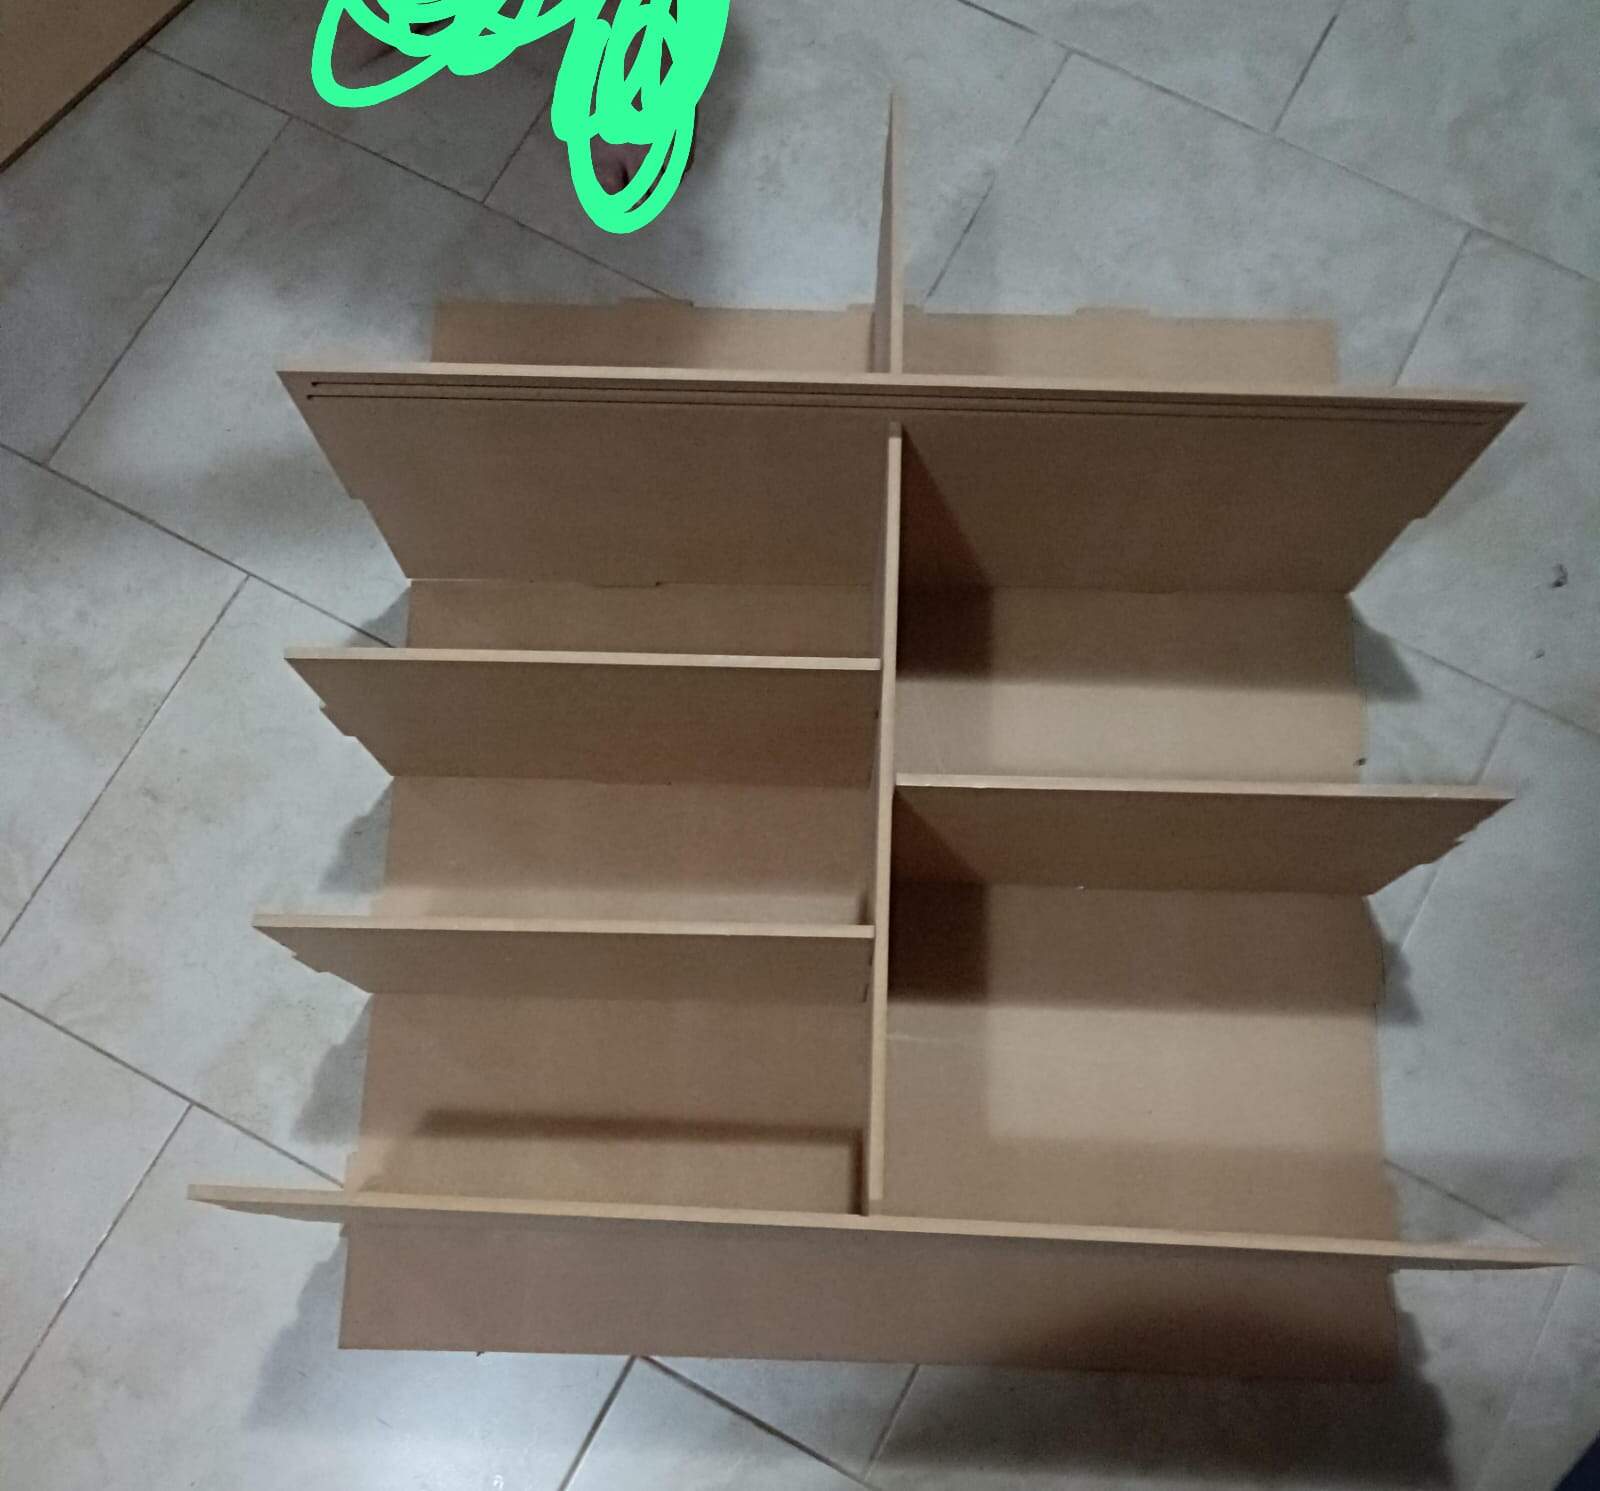
I tried to follow the same order of building that I did in my prototype, but at the end, putting the sides first helped to give the core some and shelves stability for it to be able to take the back part. We used some hammers to help us fit it nicely, and our bodies to bend the wood so it could get to the places it needed to be and after sweating a lot we managed to finish the thing! What we could not put in were the sliding doors. The carvings for the rails were not wide enough for them to fit easily, so they truly didn’t fit in. I still like it open tho
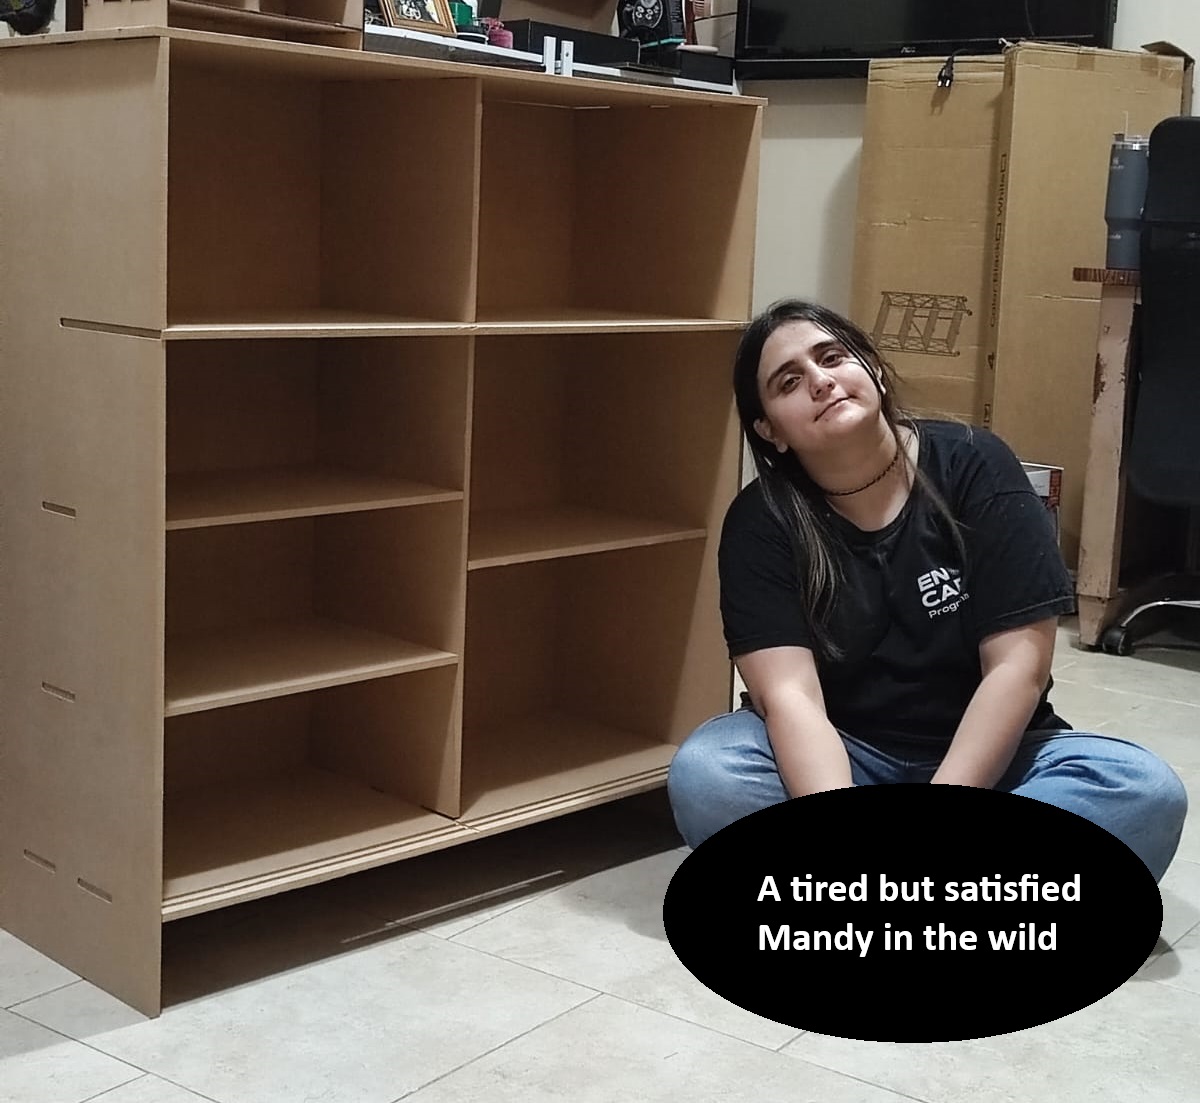
Here I am with it by my side
Reflecting on the week:
-
Overall, this was a fun week to work in, but I am the queen of learning by making mistakes and having as many problems as possible
-
Next time, I’ll try to be more organized with the parts of the design I’m making, so I don’t lose track of them so easily while designing and putting tabs, holes etc.
-
Regarding the machining, this is something I truly can’t do on my own, so for that reason I’m not the biggest fan of this. I like to not depend on anyone, but in this week I had a lot of help for using the bigger tools like the saw and the drilling of the stock to the machine, etc
-
Using the software when in a hurry and riddled with anxiety is not great, thankfully nothing bad truly happened.
-
Making things with not too great wood (curved) is pretty hard. You have to treat your stock before using it to have optimal results.
Update 28/03:
I finally could house it in its forever place!