Final Project: ToGO
ToGO Presentation Poster
ToGO Presentation Video
How much will they cost?
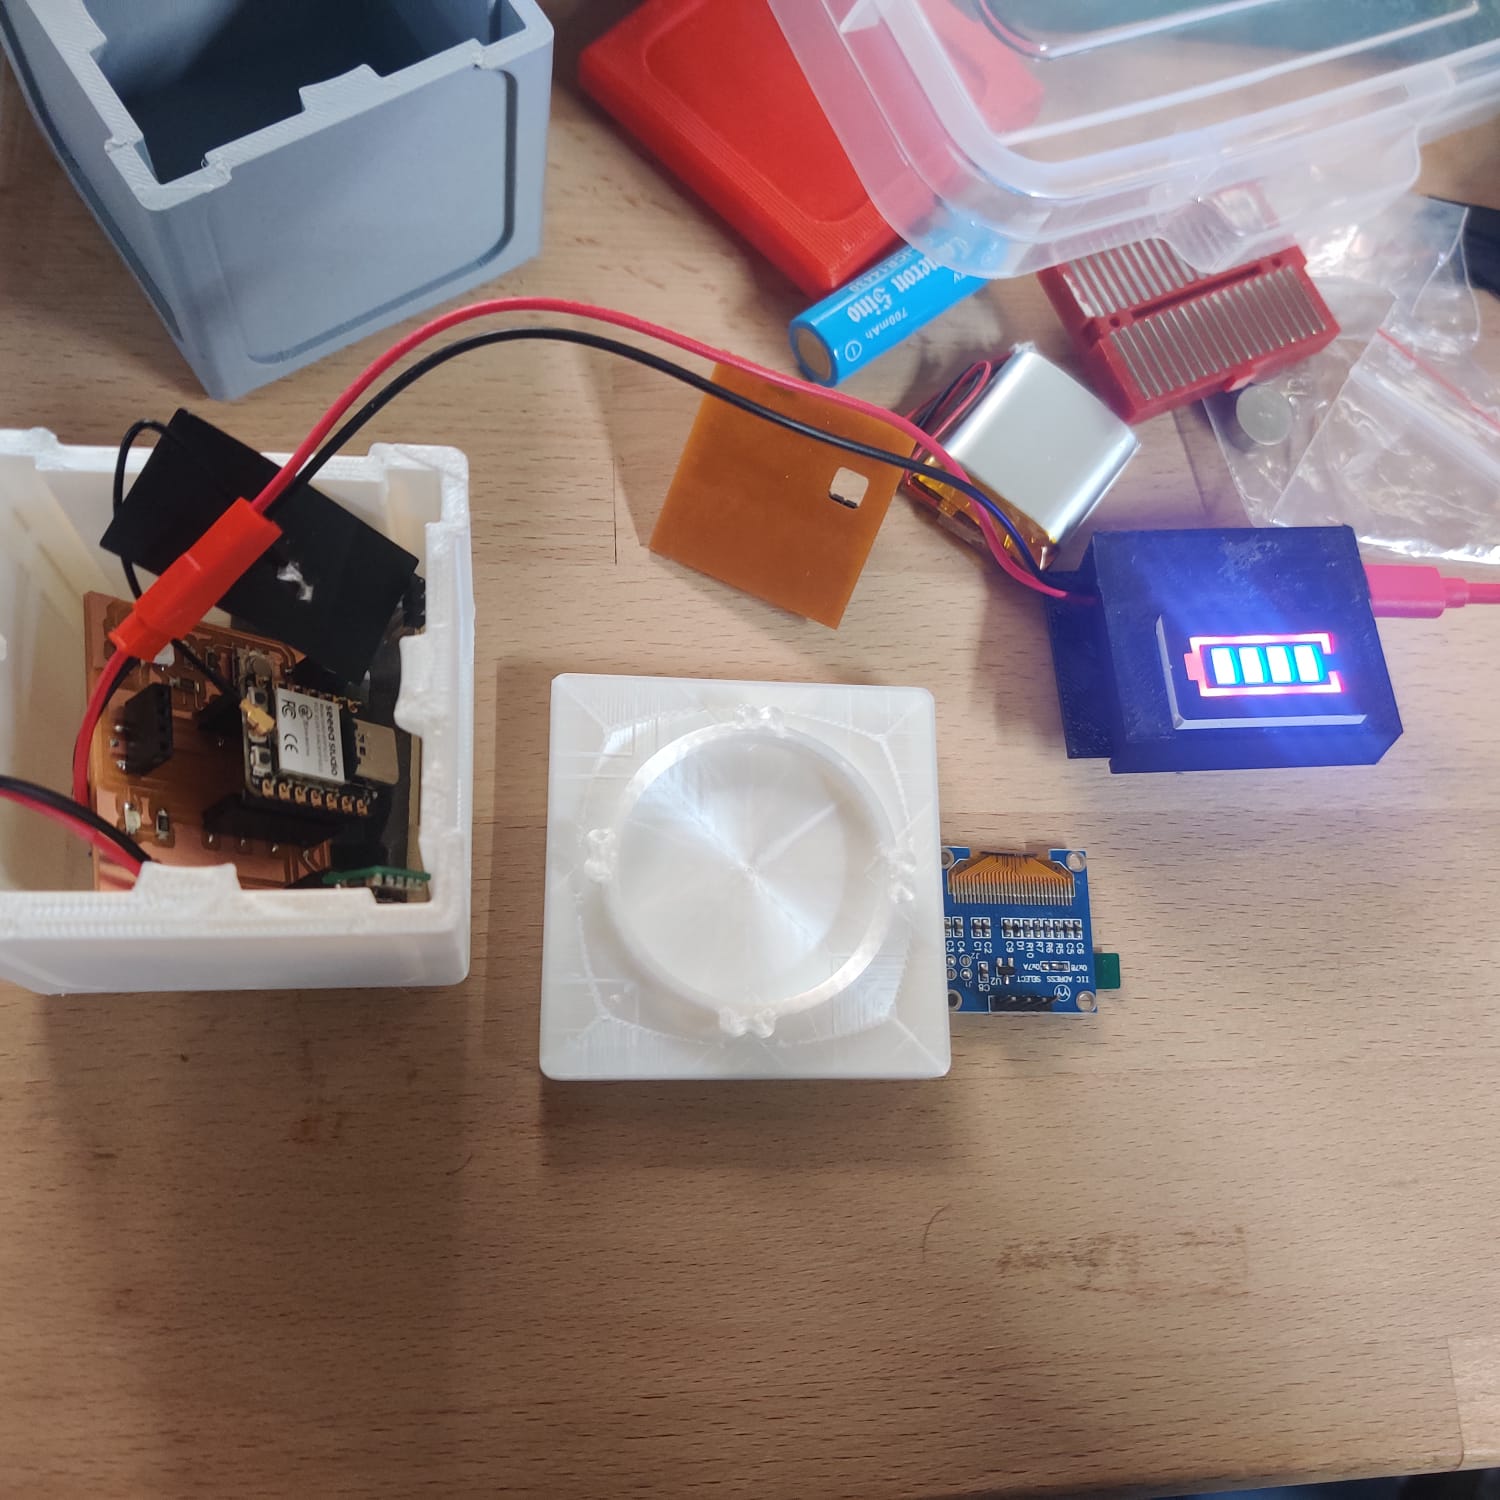
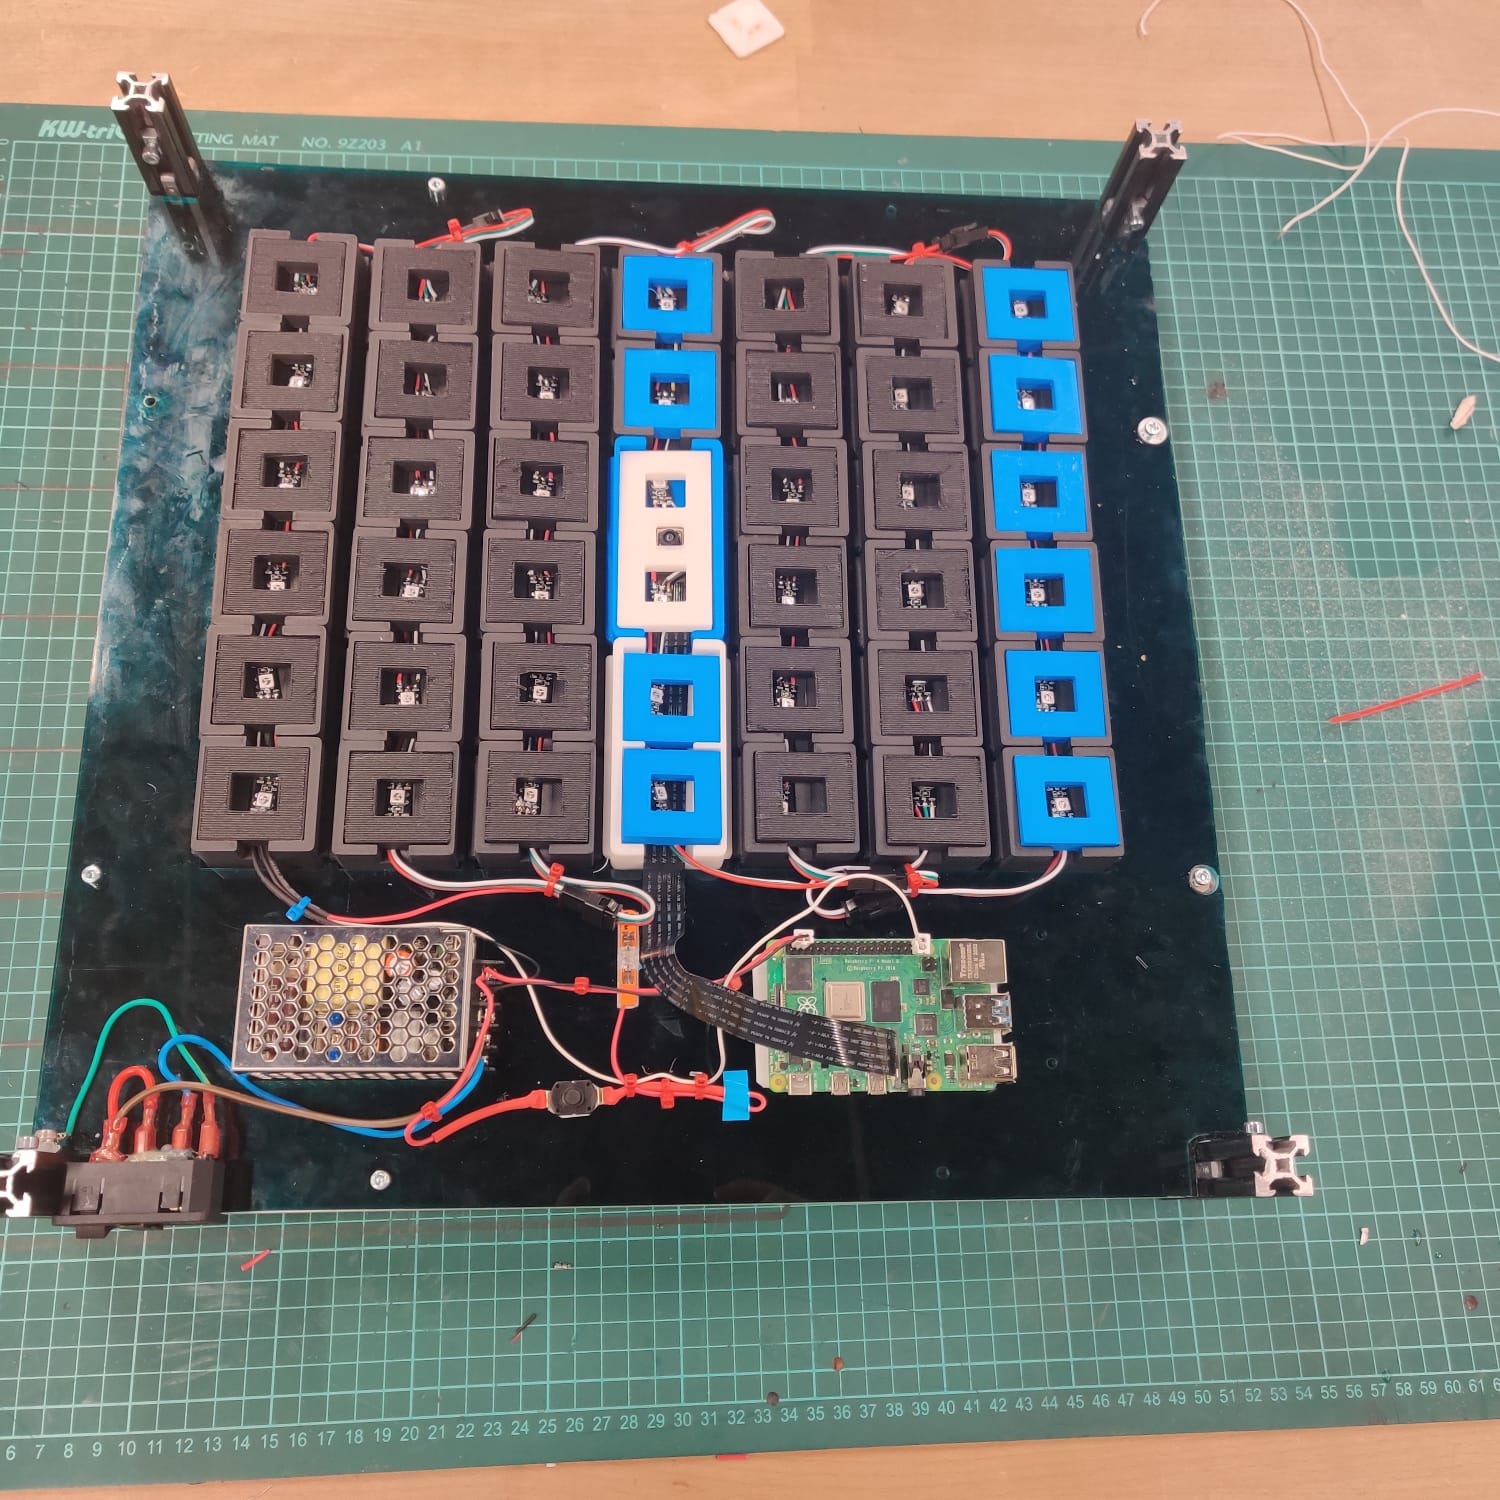
Cube Components
| Component | Quantity | Cost per Unit (USD) | Total Cost (USD) |
|---|---|---|---|
| ESP32-C3 Microcontroller | 1 | $5 | $5 |
| WS2812B SMD RGB LEDs | 1 | $1 | $1 |
| OLED Display (0.96") | 1 | $7 | $7 |
| Tactile Button | 1 | $0.50 | $0.50 |
| SMD LEDs | 3 | $0.20 | $0.60 |
| Capacitors and Resistors | 5 | $0.10 | $0.50 |
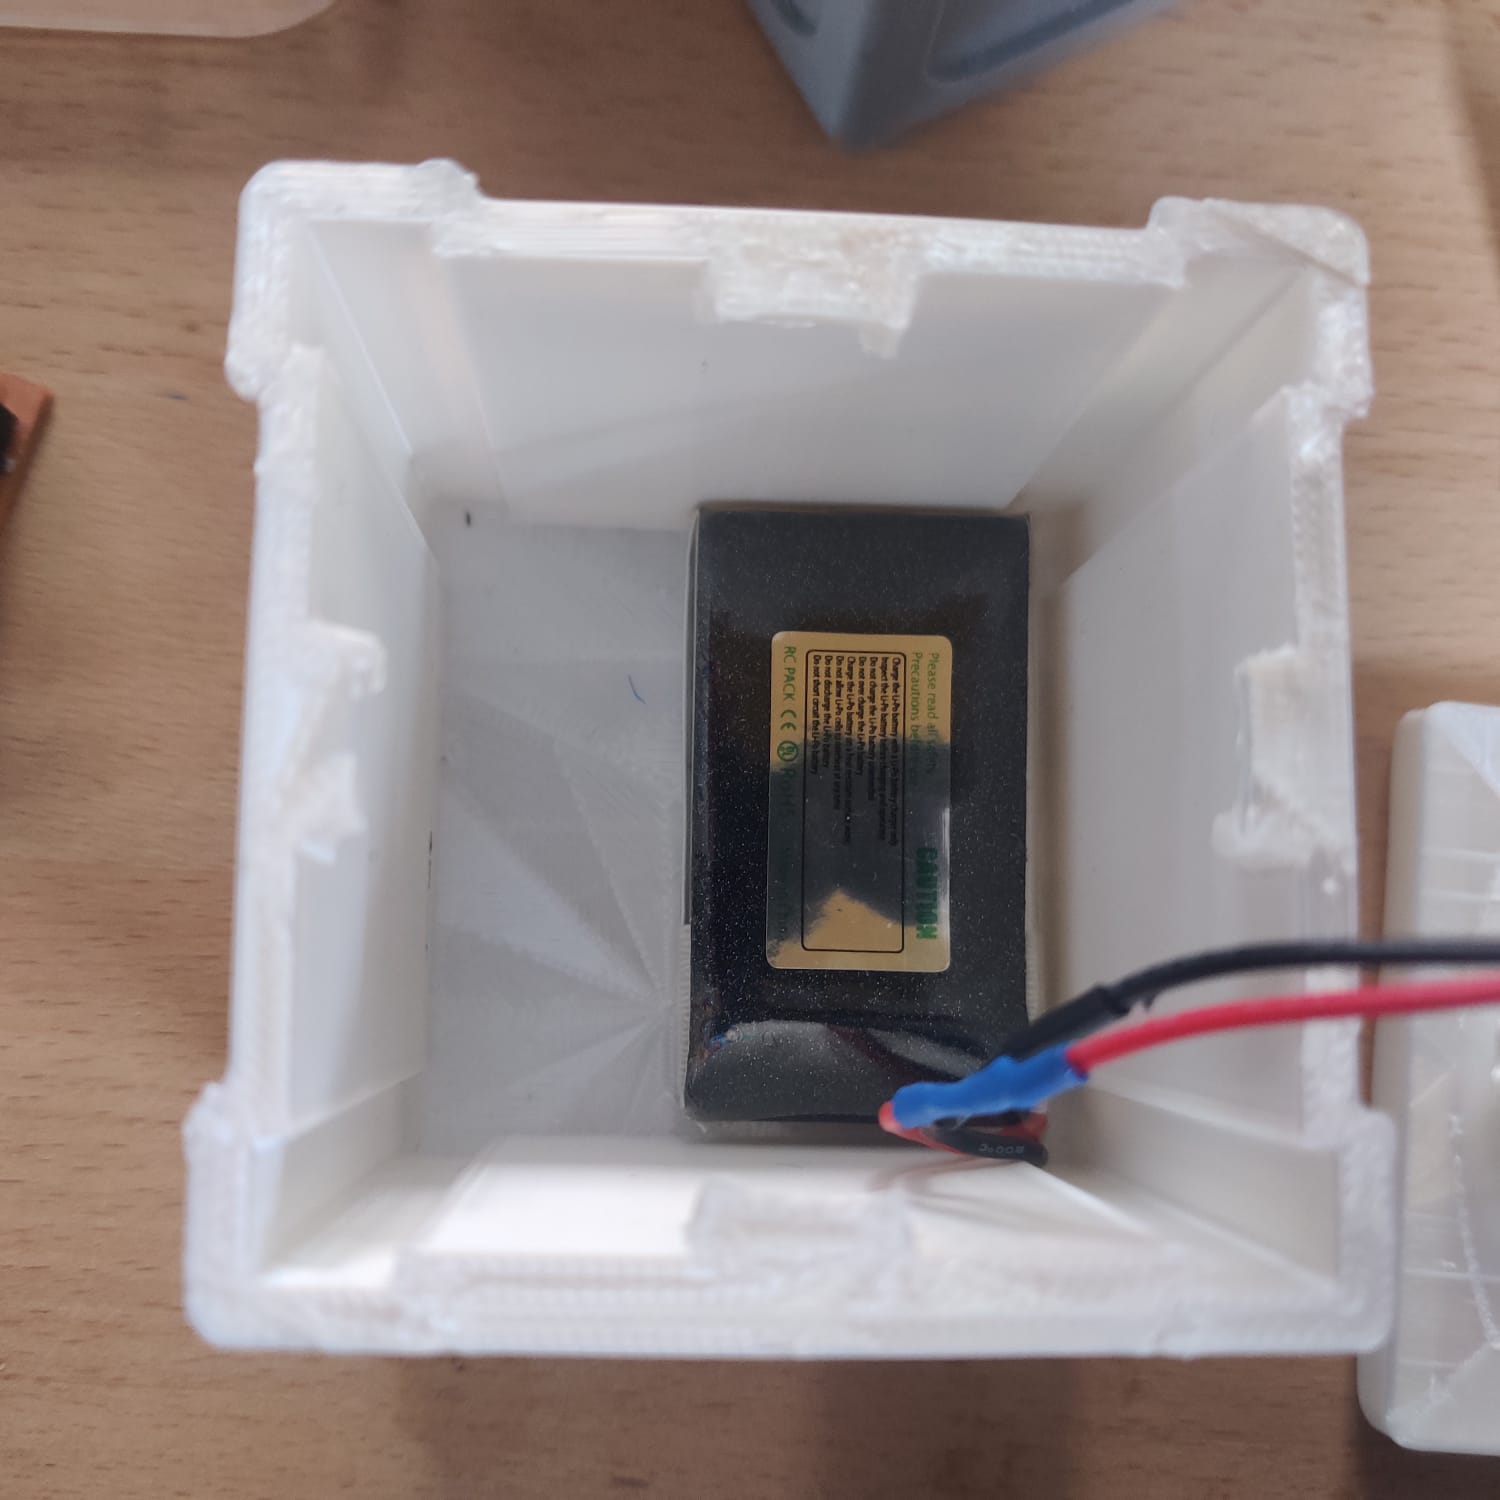
| LiPo Battery (3.7V, 1000mAh) | 1 | $8 | $8 |
| Step-Up Voltage Converter | 1 | $3 | $3 |
| PCB (Printed Circuit Board) | 1 | $5 | $5 |
Total Cost for One Cube: $30
Board Components
| Component | Quantity | Cost per Unit (USD) | Total Cost (USD) |
|---|---|---|---|
| Raspberry Pi 4 | 1 | $35 | $35 |
| Raspberry Pi Camera Module 2 | 1 | $25 | $25 |
| WS2812B Addressable LED Strip | 1 | $10 | $10 |
| Power Supply Units | 1 | $15 | $15 |
Total Cost for Board Components: $85
Other Materials
| Component | Quantity | Cost per Unit (USD) | Total Cost (USD) |
|---|---|---|---|
| 20mm x 20mm Sigma Profile | Various | $20 | $20 |
| Plexiglass Sheets | Various | $10 | $10 |
| Screws and Nuts | Various | $5 | $5 |
| Connecting Wires and Cables | Various | $5 | $5 |
| Power Cables | Various | $5 | $5 |
| Adhesives and Fasteners | Various | $5 | $5 |
Total Cost for Other Materials: $50
Total Estimated Cost: $165
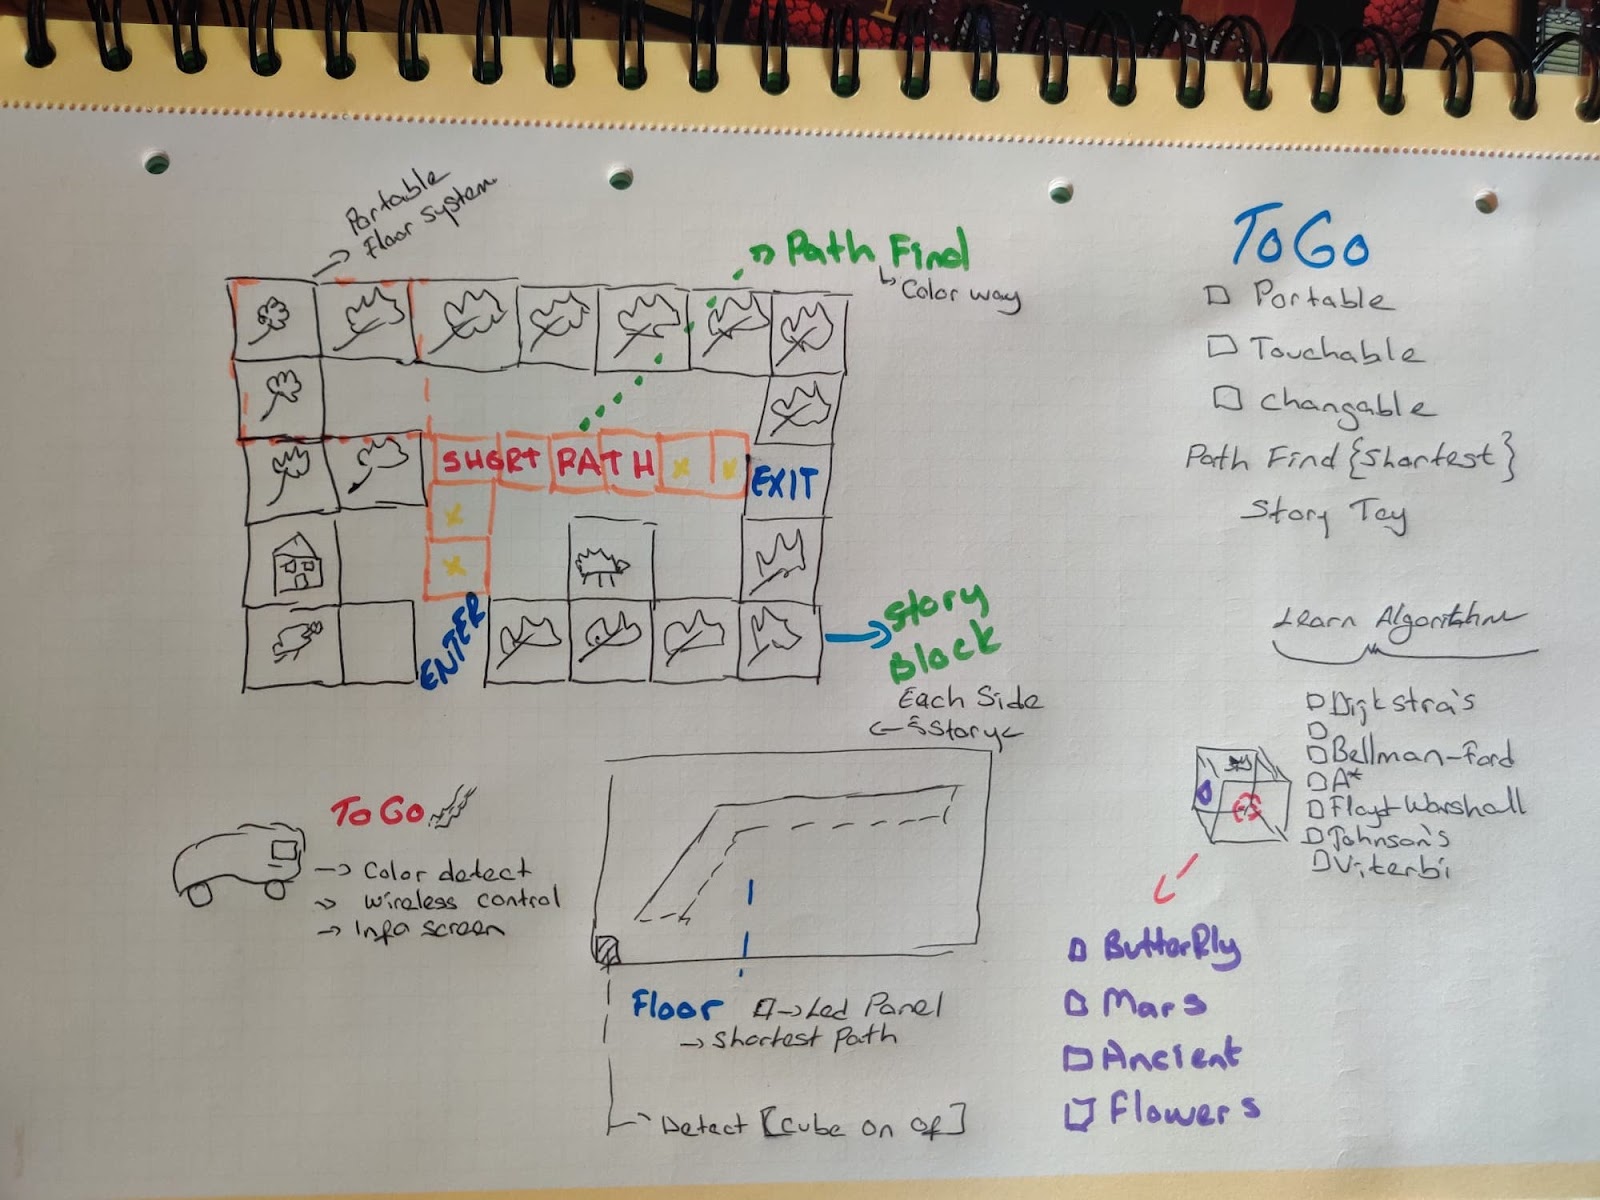
Sketch and Idea
Introduction
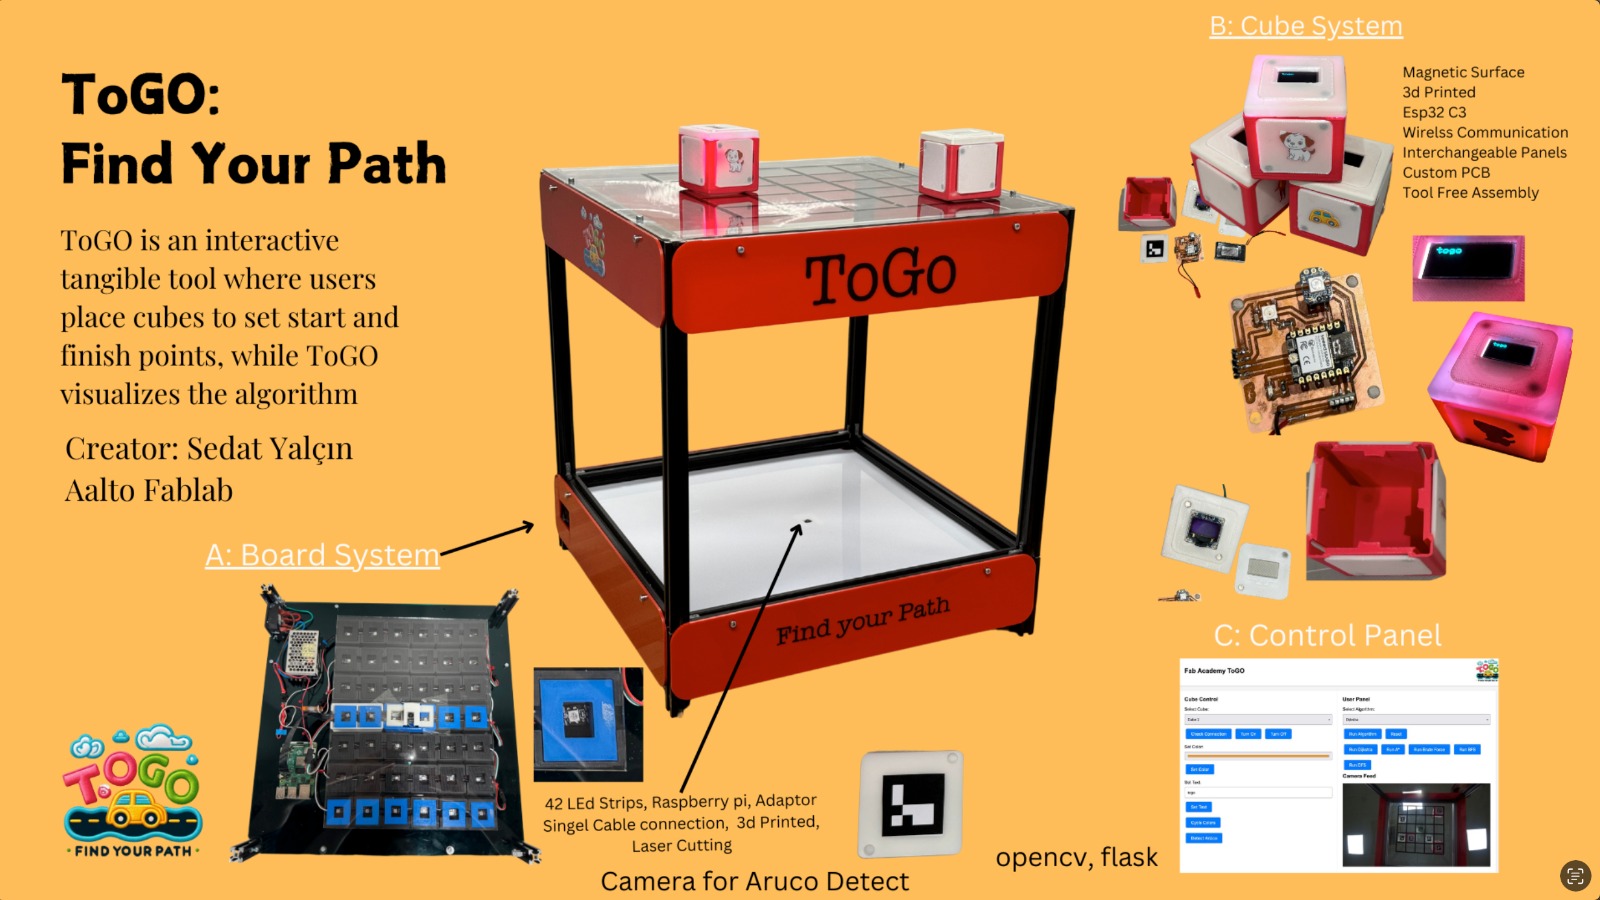
ToGO: Find Your Path is an innovative and interactive educational tool aimed at teaching algorithmic thinking and problem-solving to children and young learners. This interactive game board provides a tangible experience where users solve dynamic path-finding puzzles by placing physical cubes on the board—a fundamental introduction to algorithmic concepts.
ToGO - Interactive Pathfinding System
Project Overview
ToGO is an interactive pathfinding game designed to help players find the shortest path by traversing over cubes from the starting point to the finishing point. This project is part of the Fab Academy graduation requirements and involves various stages, from preparation and research to final evaluation.
Project Timeline
Gantt Chart
| Weeks | 1 | 2 | 3 | 4 | 5 | 6 | 7 | 8 | 9 | 10 | 11 | 12 | 13 |
|---|---|---|---|---|---|---|---|---|---|---|---|---|---|
| Preparation and Research | X | X | |||||||||||
| Design and Prototype | X | X | |||||||||||
| Implementation | X | X | X | X | |||||||||
| Production | X | X | |||||||||||
| Documentation and Presentation | X | X | |||||||||||
| Completion and Evaluation | X |
Weekly Tasks and Details
Week 1-2: Preparation and Research
Tasks:
- Create project plan and schedule
- Conduct requirement analysis and research
Details:
- Define project scope and objectives
- Research technologies and tools to be used
Week 3-4: Design and Prototype
Tasks:
- Create initial sketches and drawings
- Complete prototype design
Details:
- Determine dimensions and materials for the physical board and cubes
- Test basic game mechanics with the prototype
Week 5-8: Implementation
Tasks:
- Setup Raspberry Pi and system
- Create and recognize ArUco markers
- Setup Flask server and network communication
- Design and produce special PCB
Details:
- Install and configure Raspberry Pi OS
- Setup and test the camera module
- Develop algorithms for ArUco marker recognition
- Configure Flask server and communication with ESP32 modules
- Design and assemble electronic circuits and PCBs
Week 9-10: Production
Tasks:
- Design and produce cubes
- Integrate and test the system
Details:
- Prepare 3D design and laser cutting files for cubes
- Select materials and produce components
- Assemble all components and integrate the system
- Perform functional tests and optimization
Week 11-12: Documentation and Presentation
Tasks:
- Document the project
- Prepare and practice the presentation
Details:
- Write detailed project documentation
- Prepare presentation materials and practice the presentation
Week 13: Completion and Evaluation
Tasks:
- Conduct final tests and evaluation
- Make final adjustments based on mentor feedback
Details:
- Perform final system performance tests and evaluation
- Make adjustments based on mentor feedback
Project Stages and Deliverables
-
Preparation and Research
- Define project objectives and scope
- Conduct necessary research and create a detailed project plan
-
Design and Prototype
- Develop initial sketches and drawings
- Create a functional prototype to test game mechanics
-
Implementation
- Setup Raspberry Pi and necessary software
- Develop and test ArUco marker recognition algorithms
- Setup Flask server and establish network communication
- Design and produce PCBs for the cubes
-
Production
- Design, produce, and assemble cubes
- Integrate all components and test the system
-
Documentation and Presentation
- Document the entire project process
- Prepare and practice the final presentation
-
Completion and Evaluation
- Conduct final system tests and evaluations
- Incorporate mentor feedback and make final adjustments
ToGO Project Bill of Materials
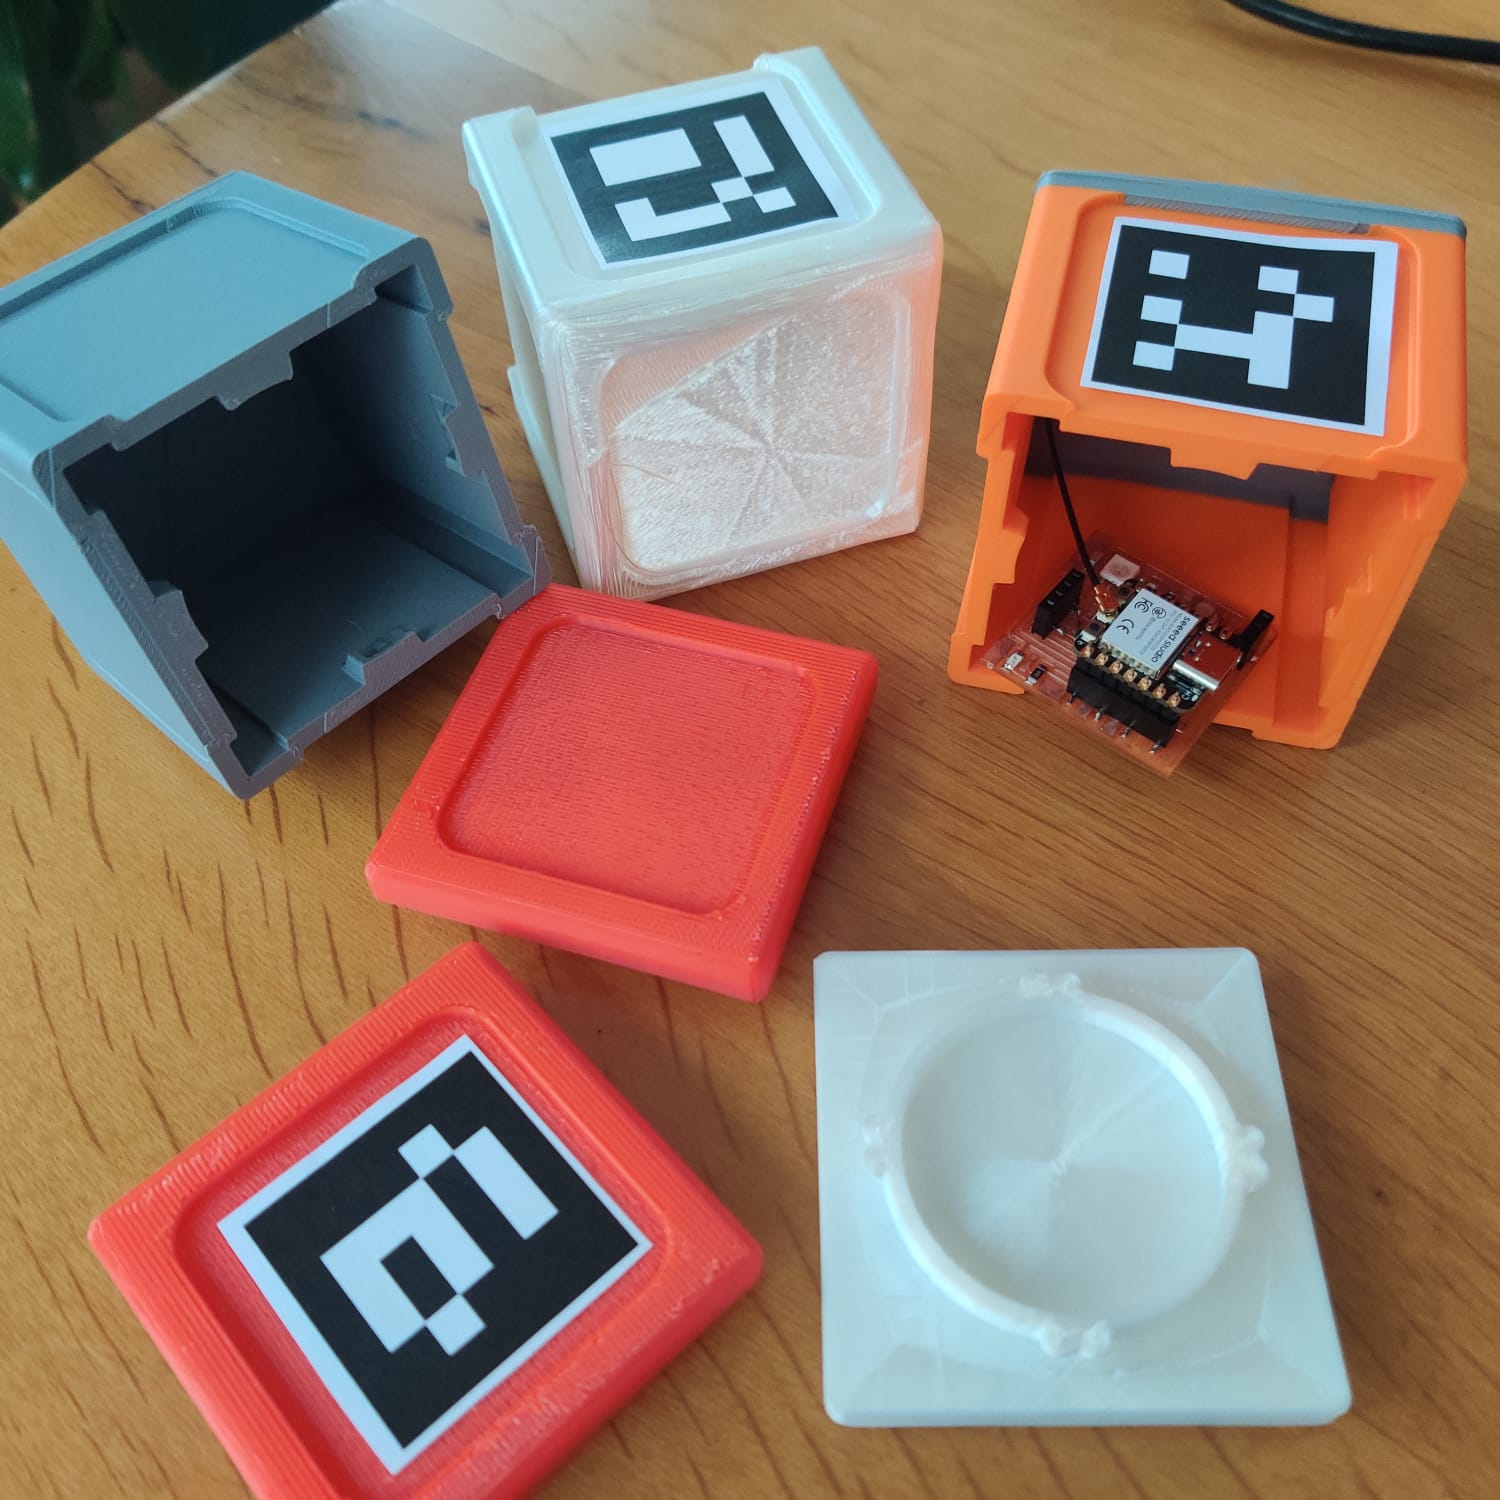
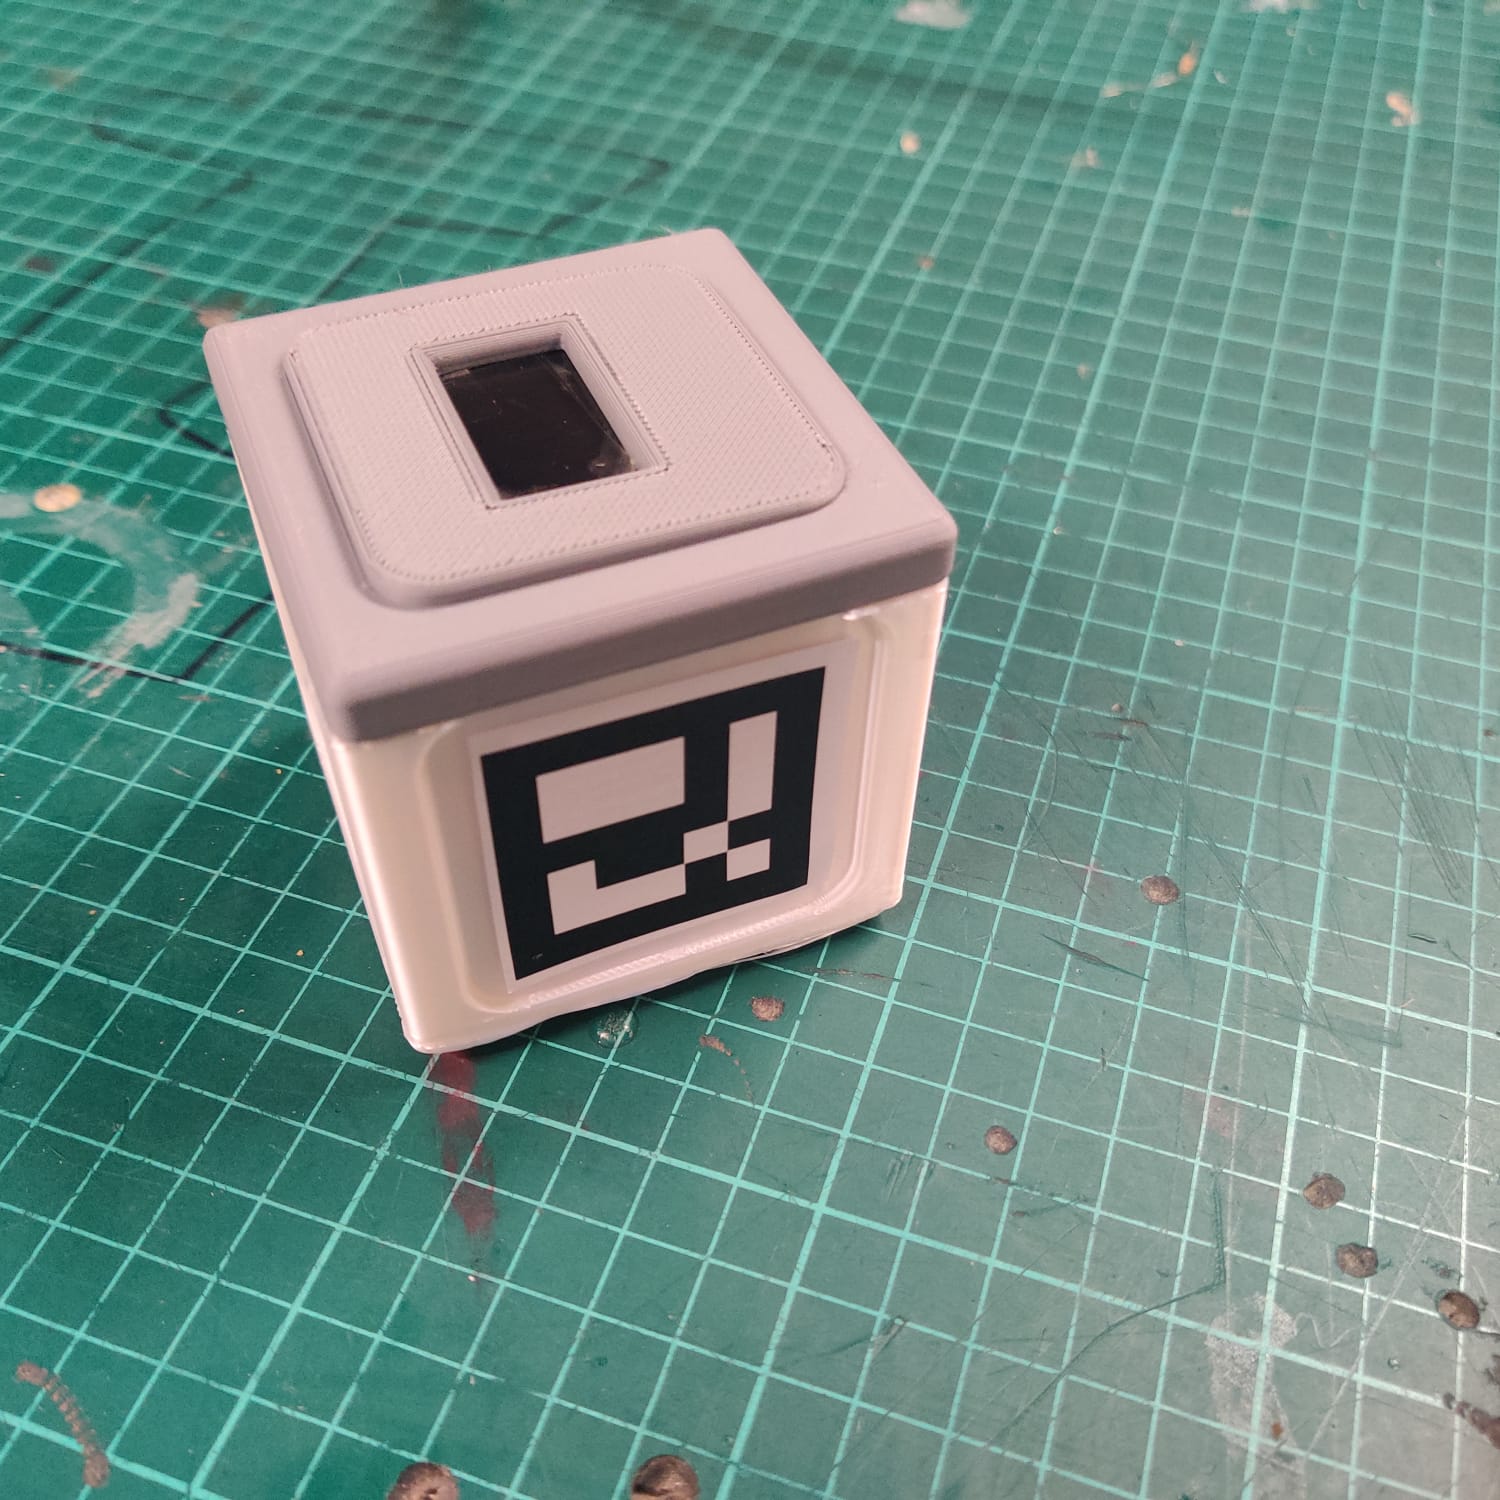
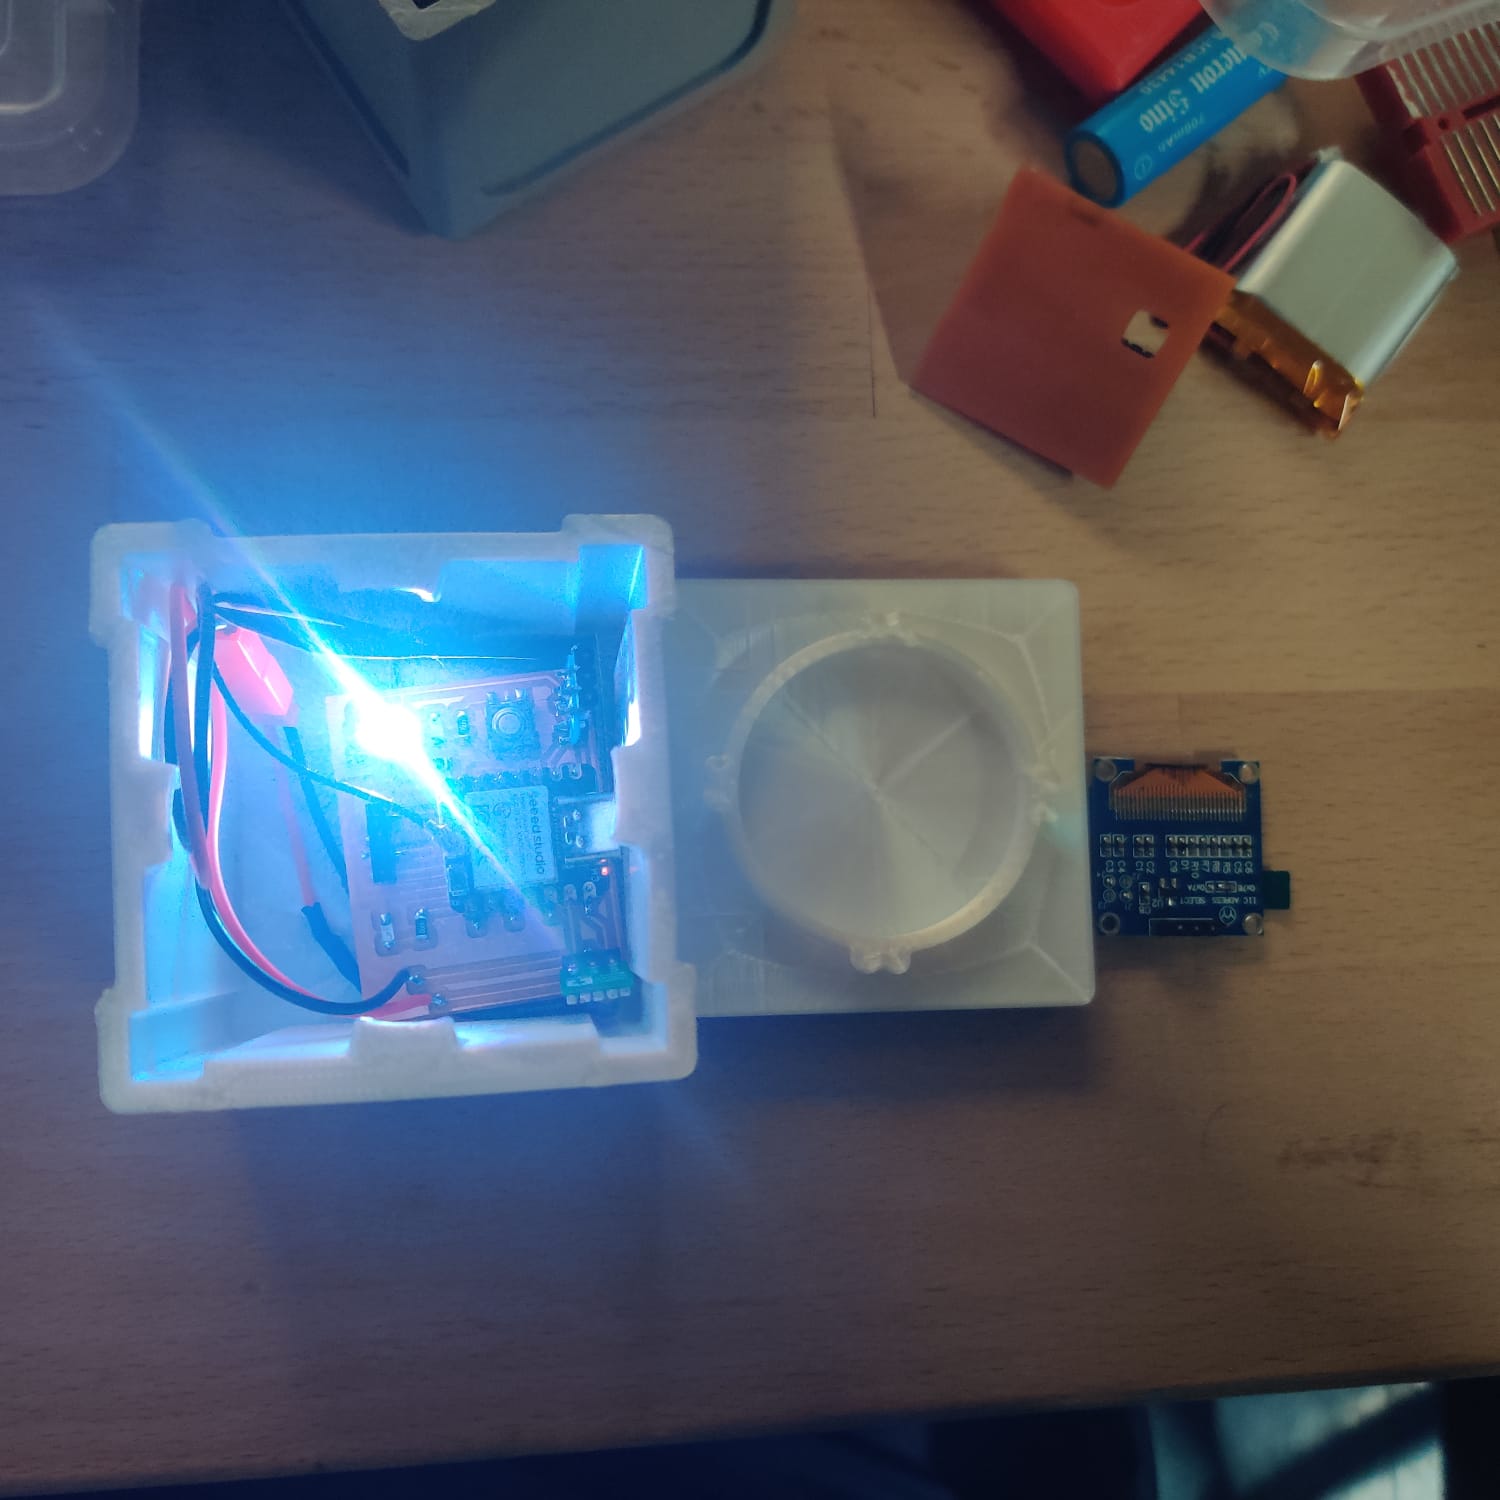
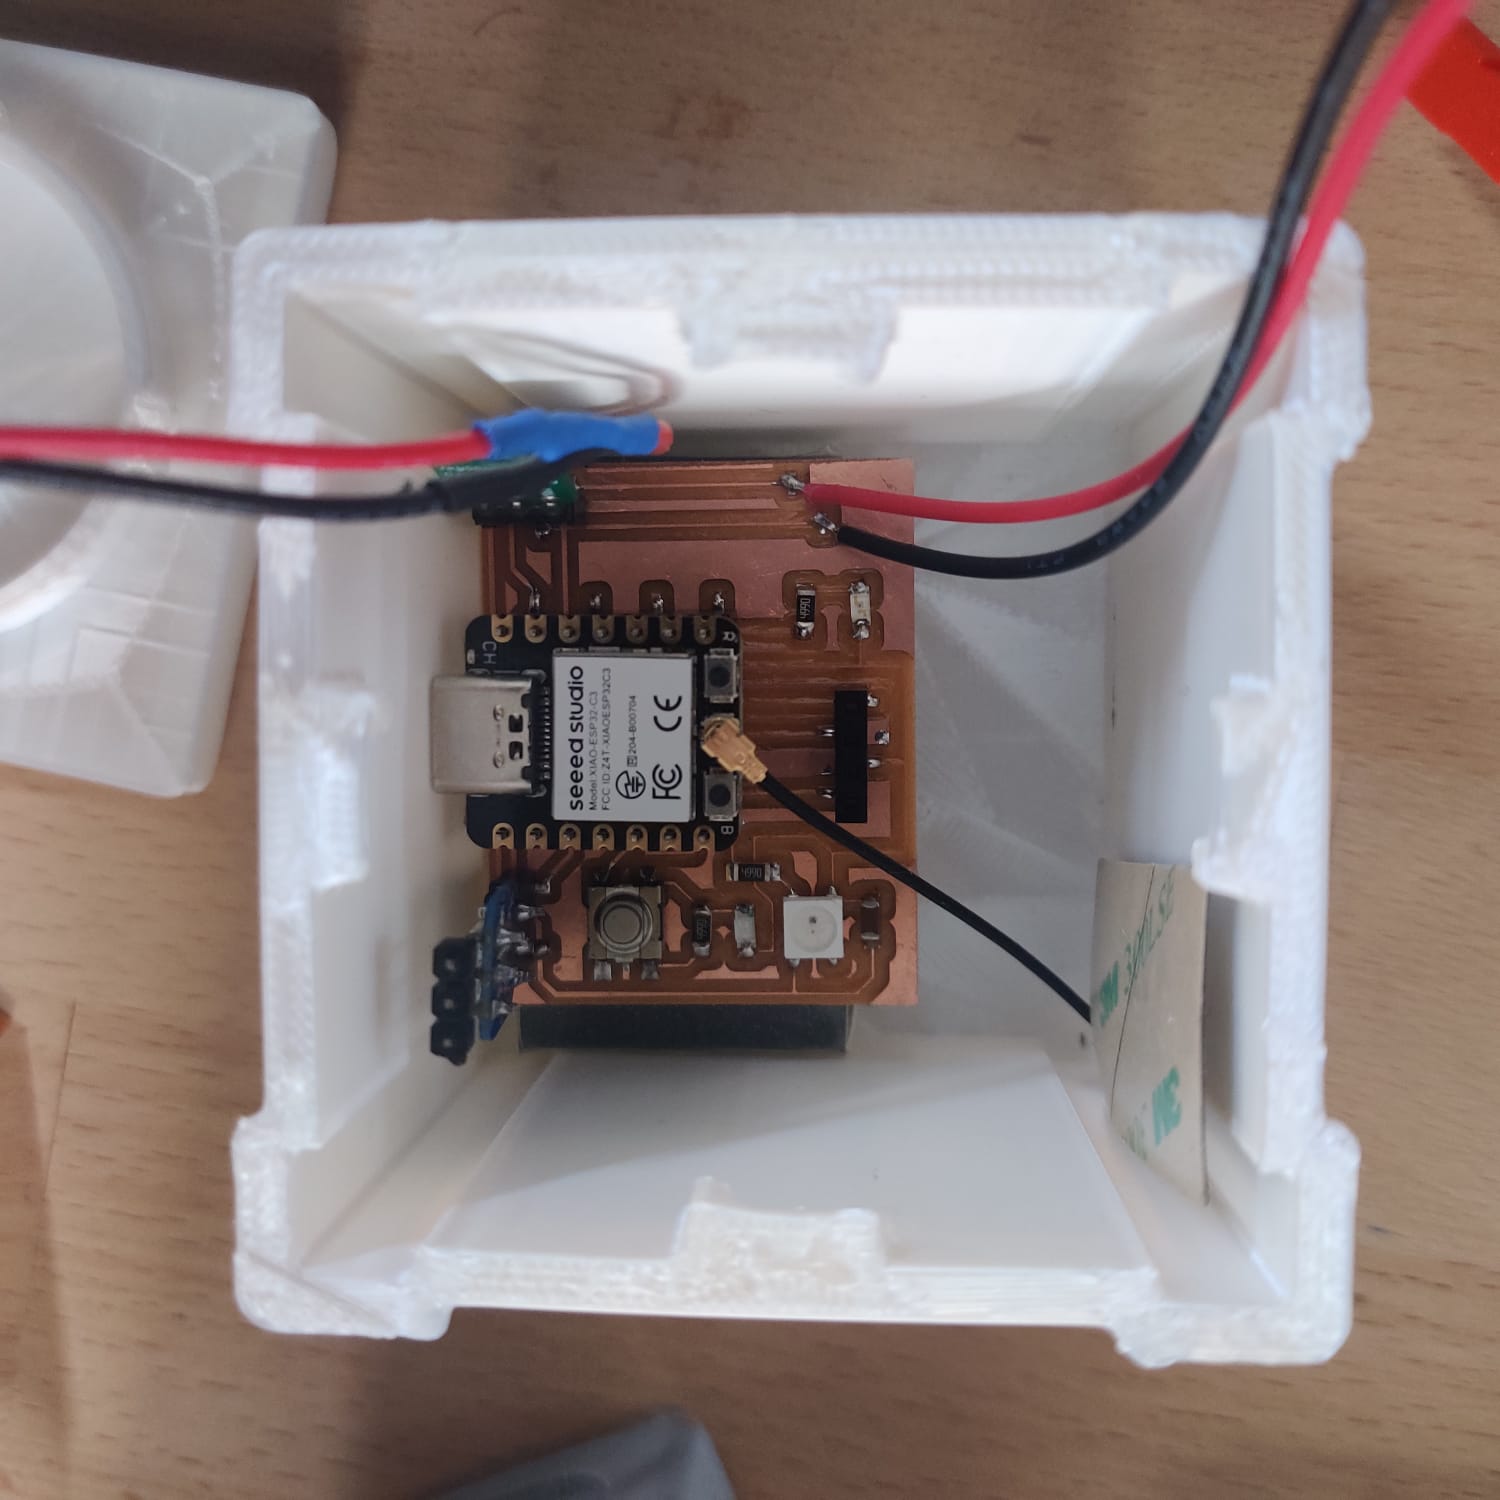
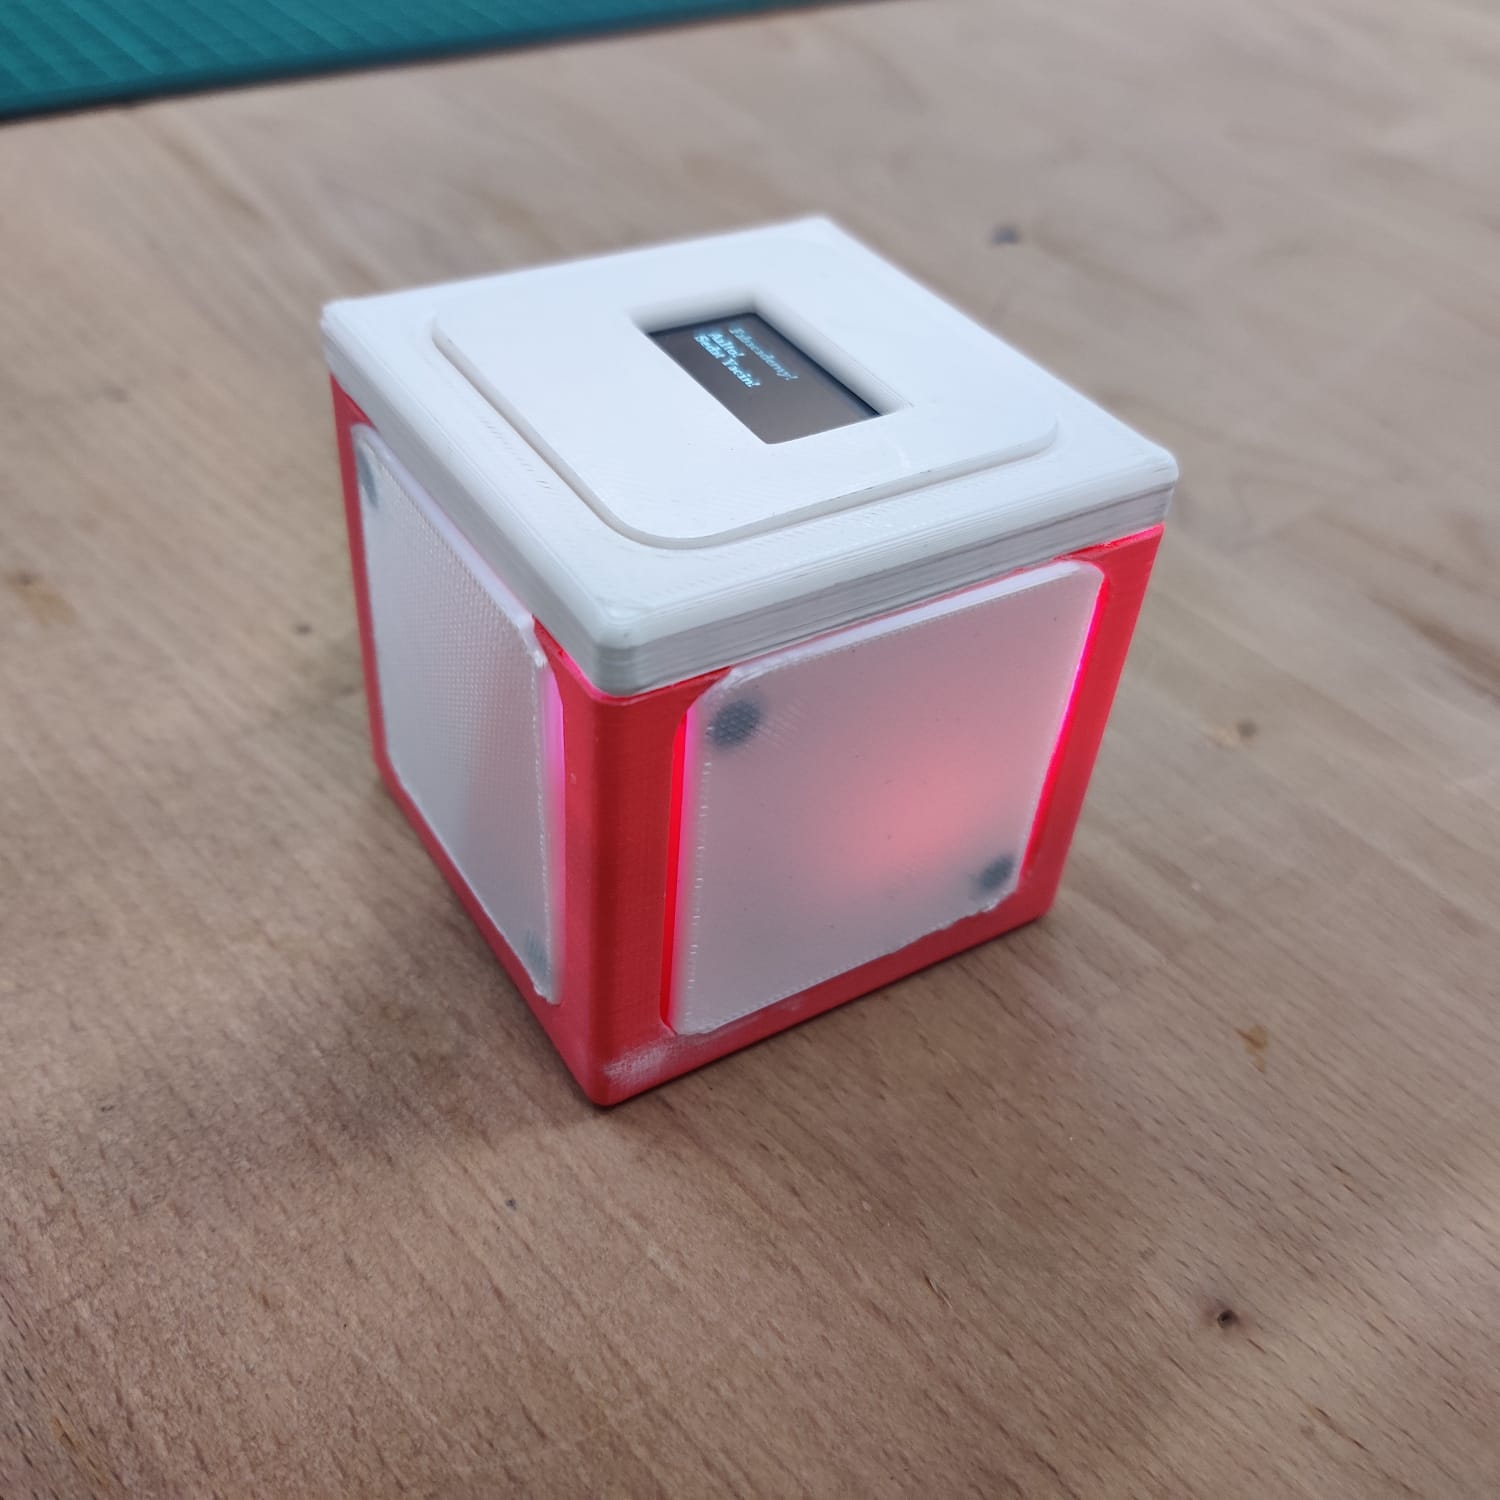
Cube Components
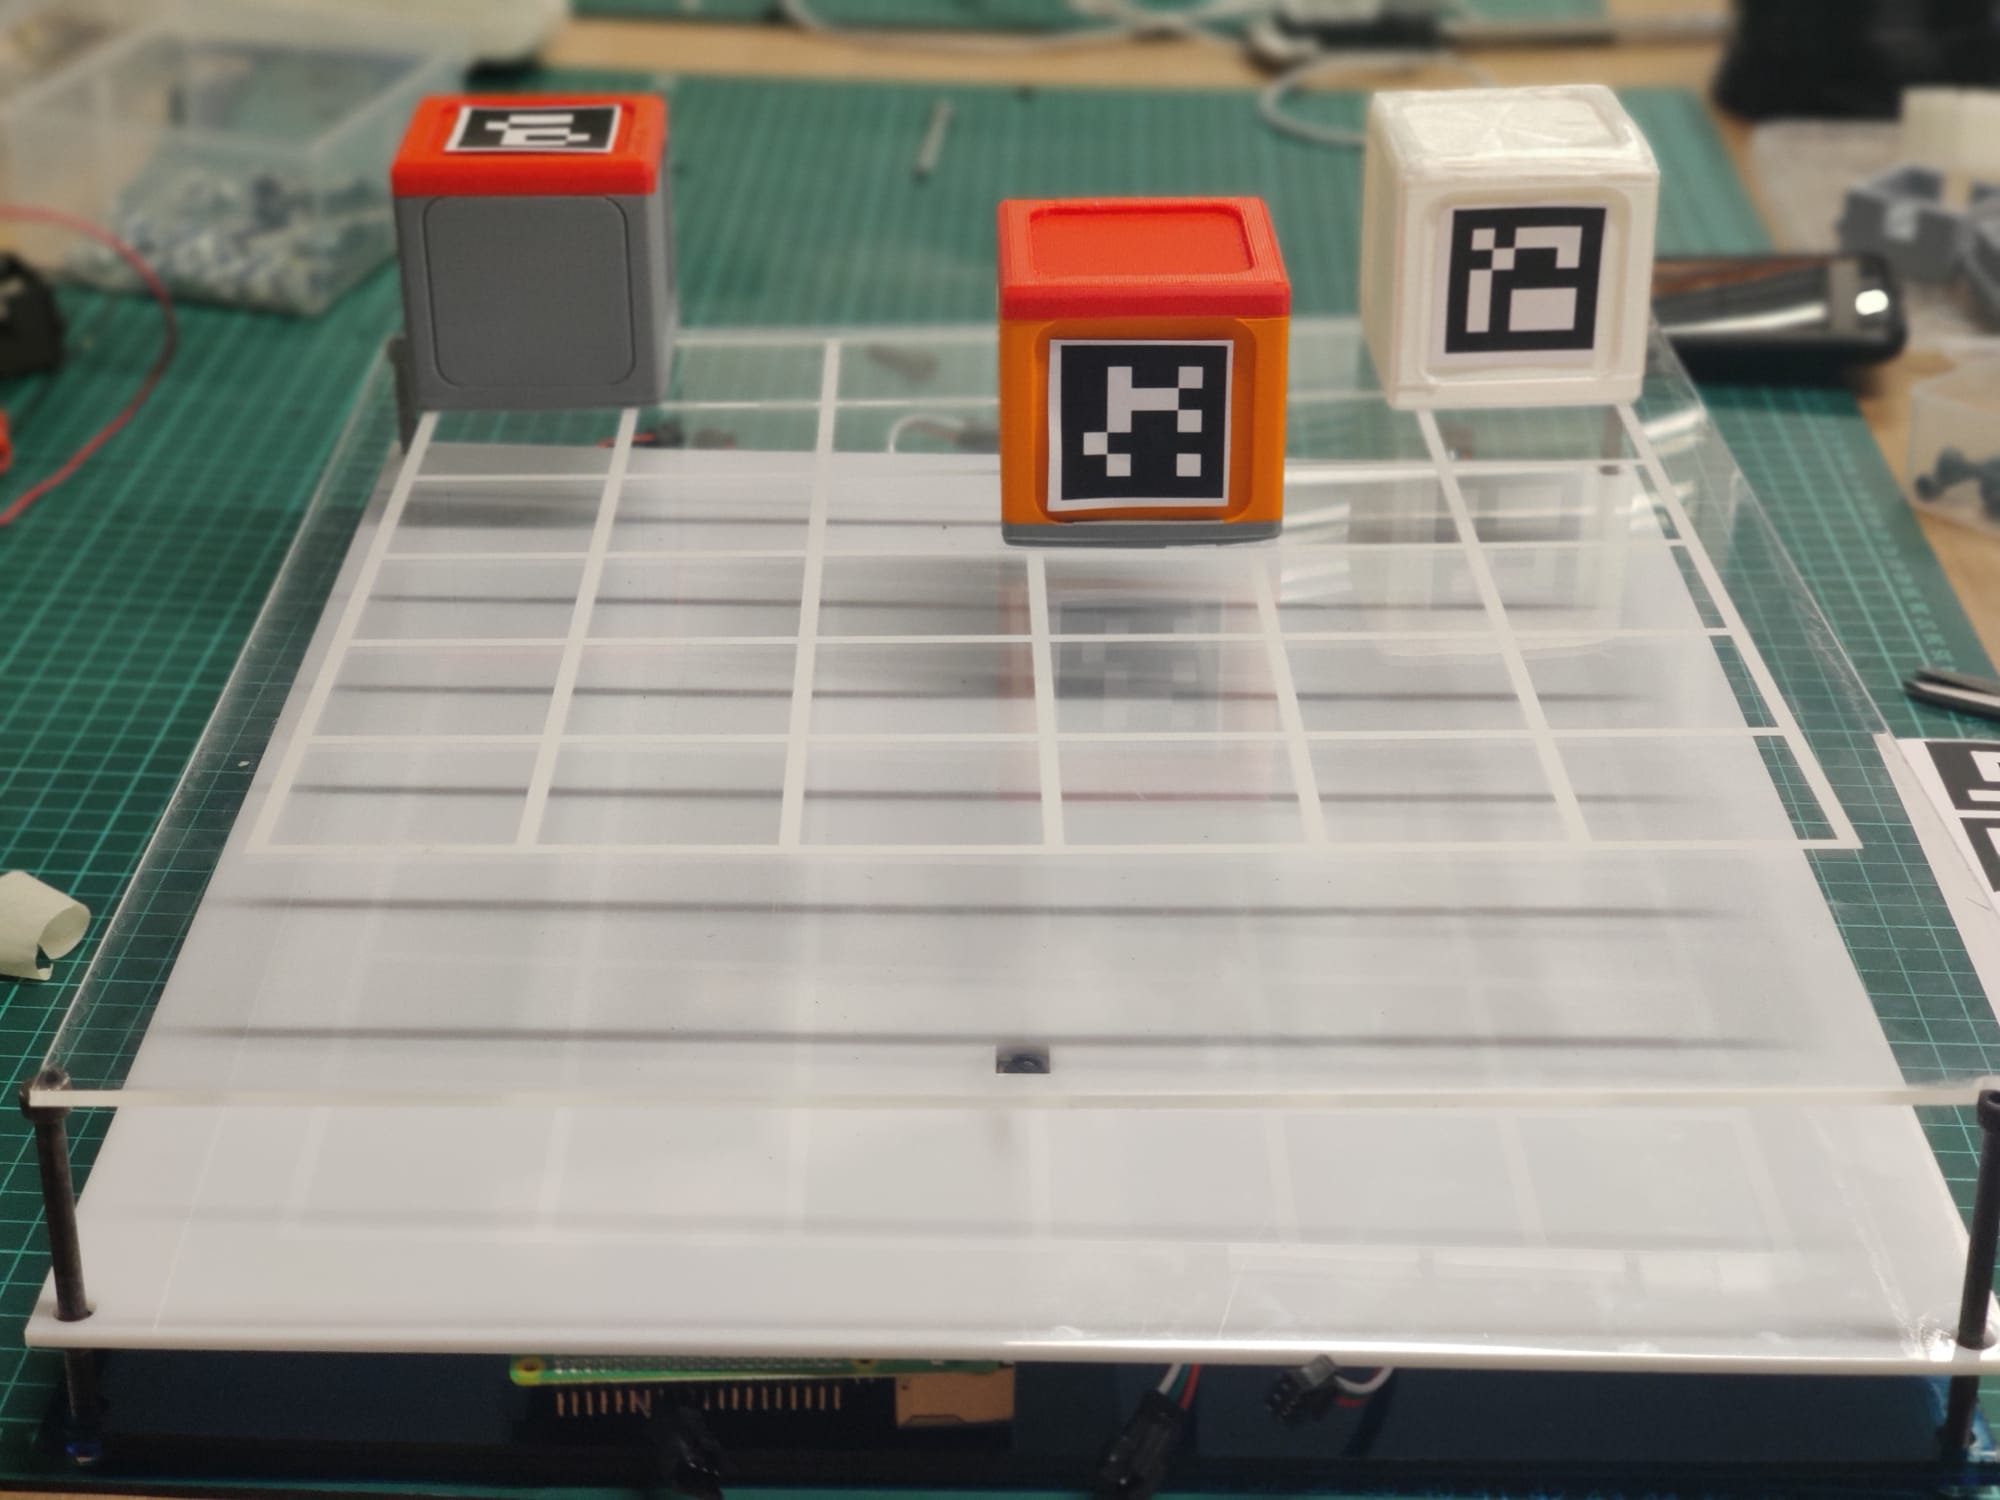
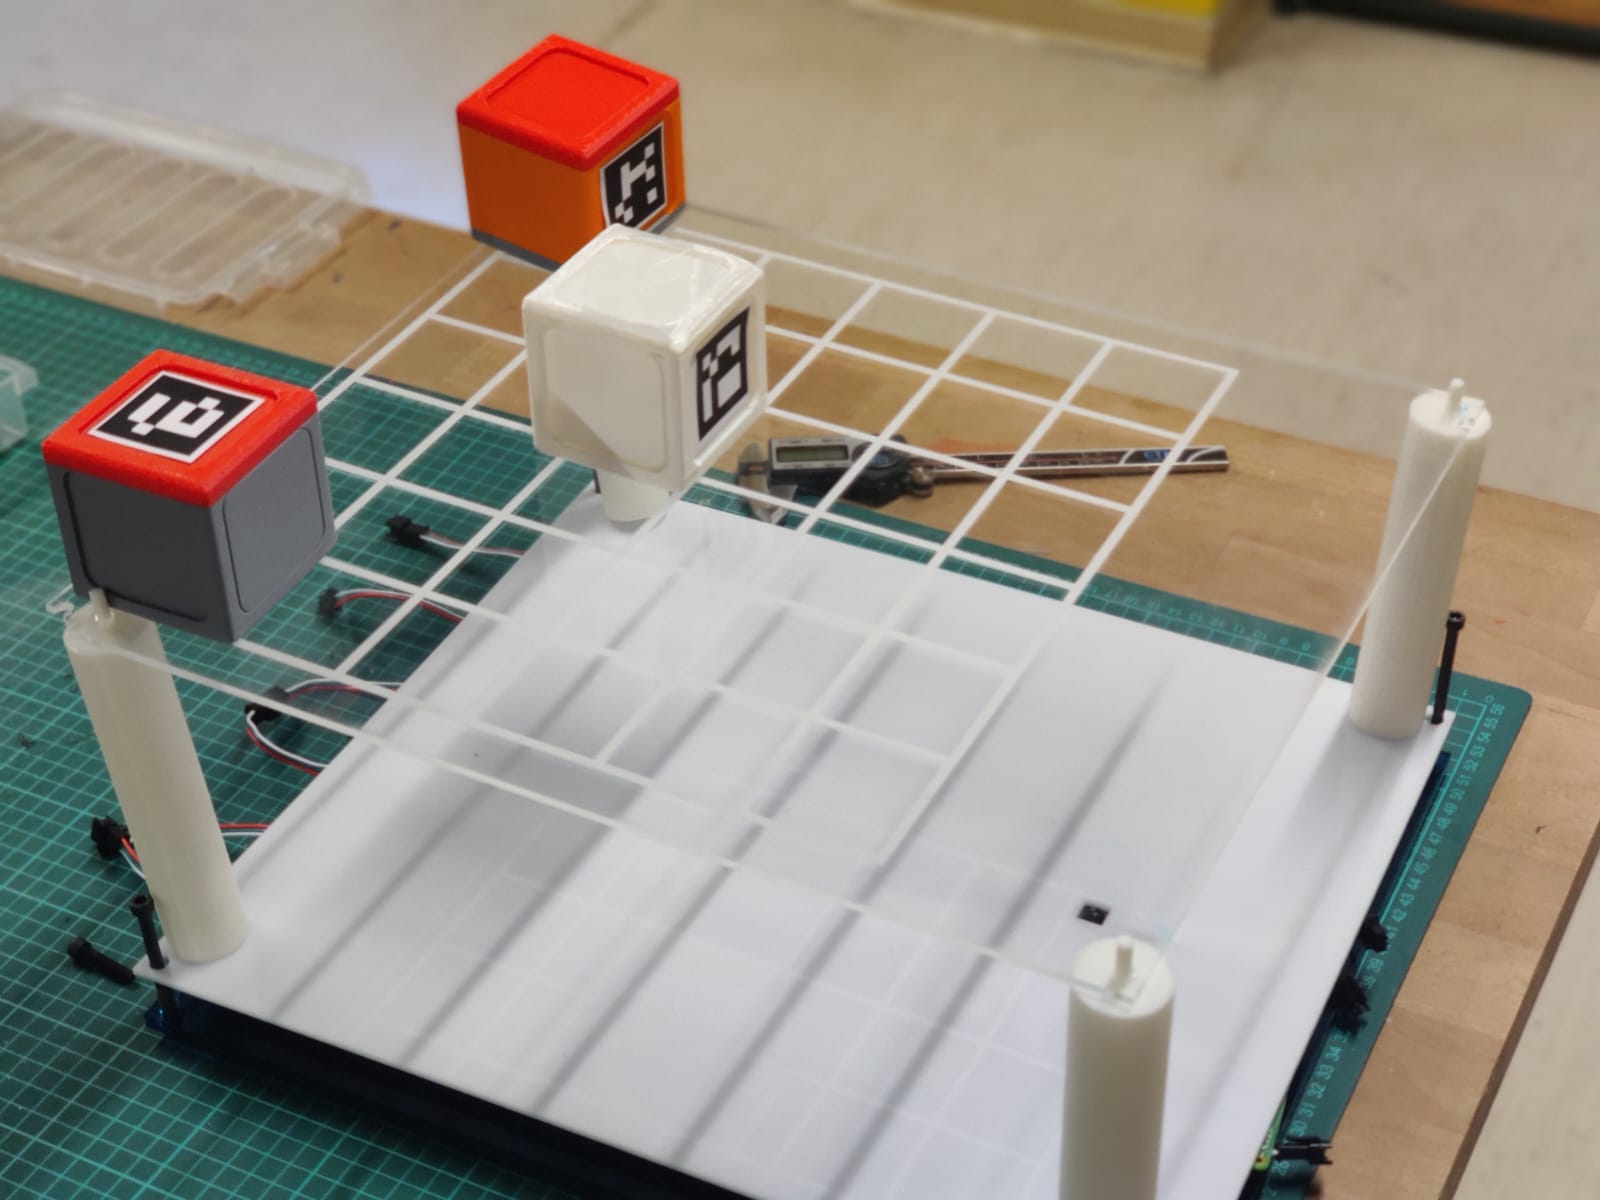
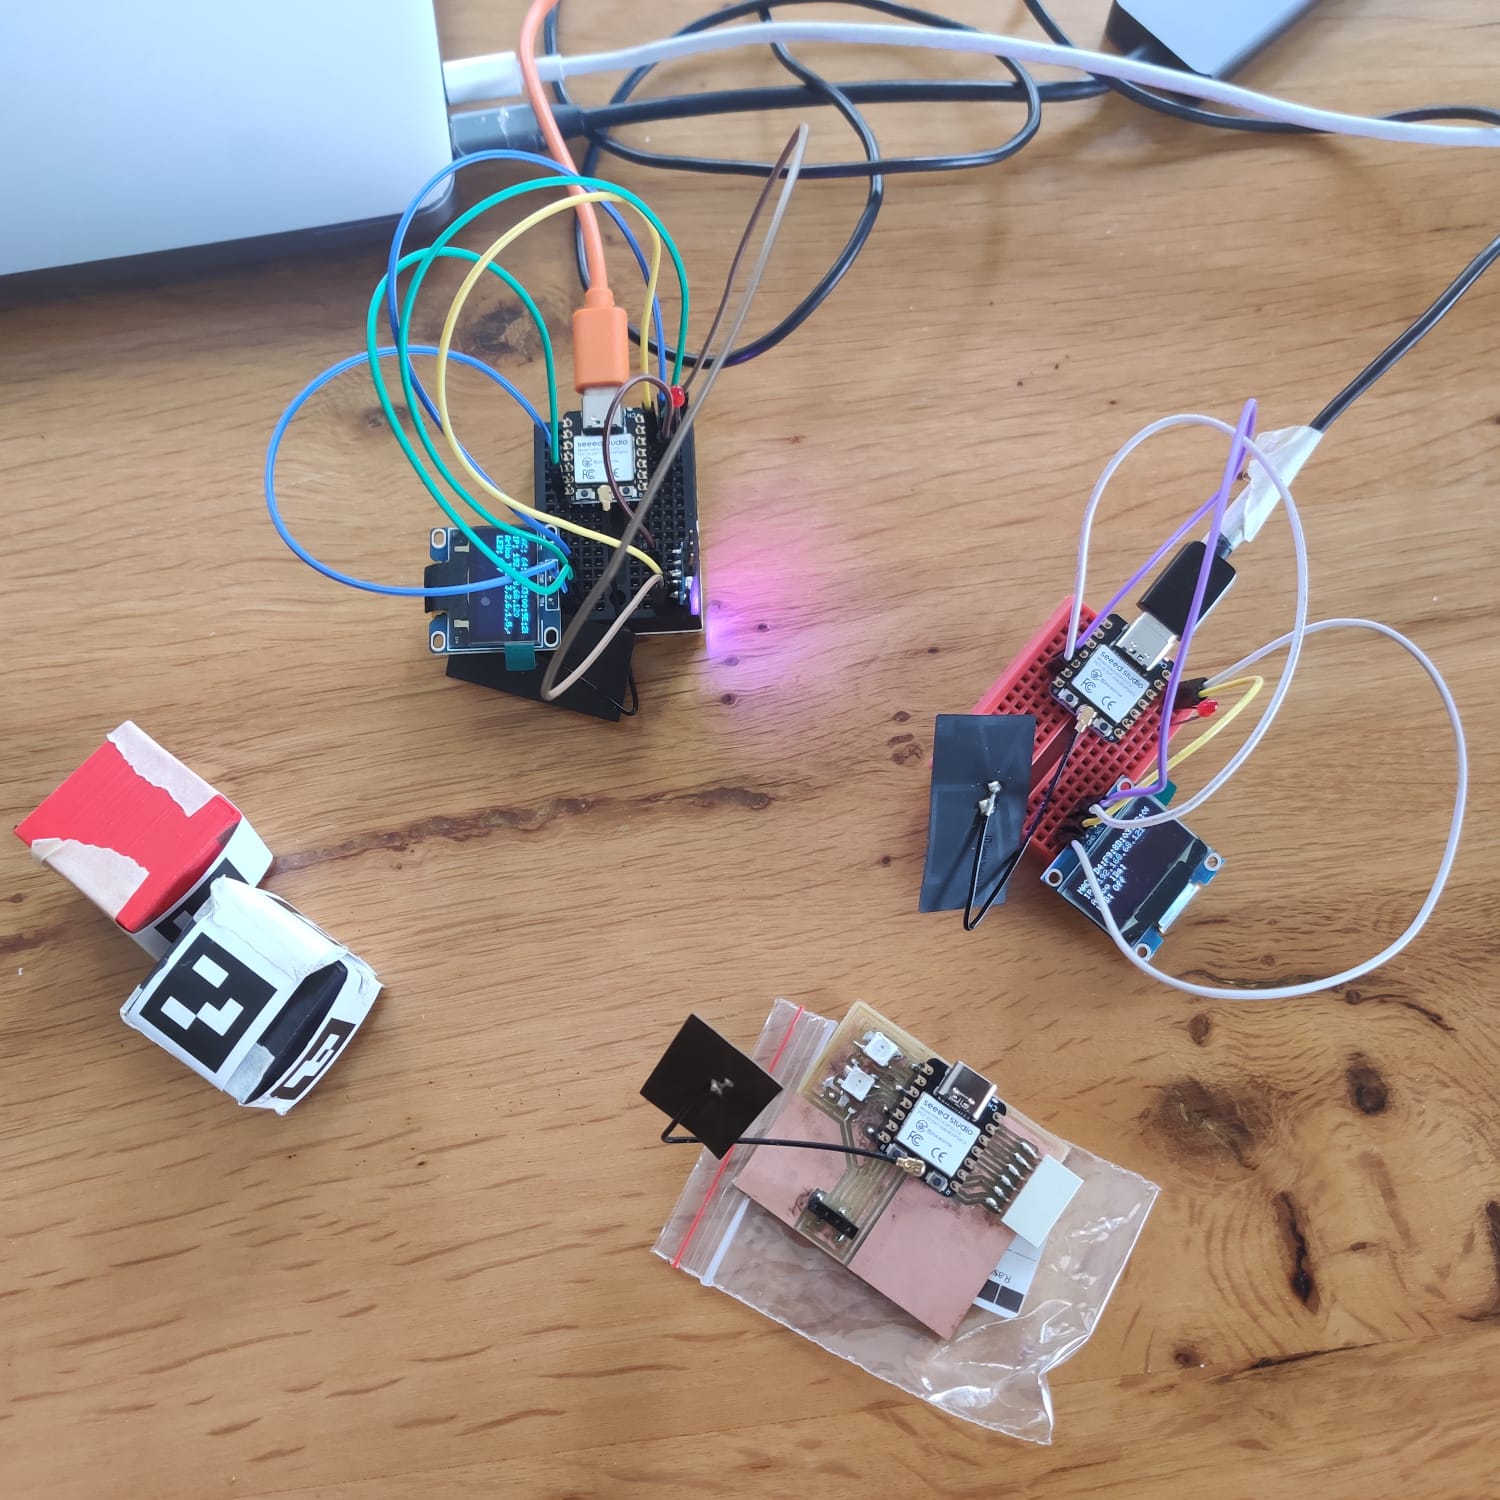
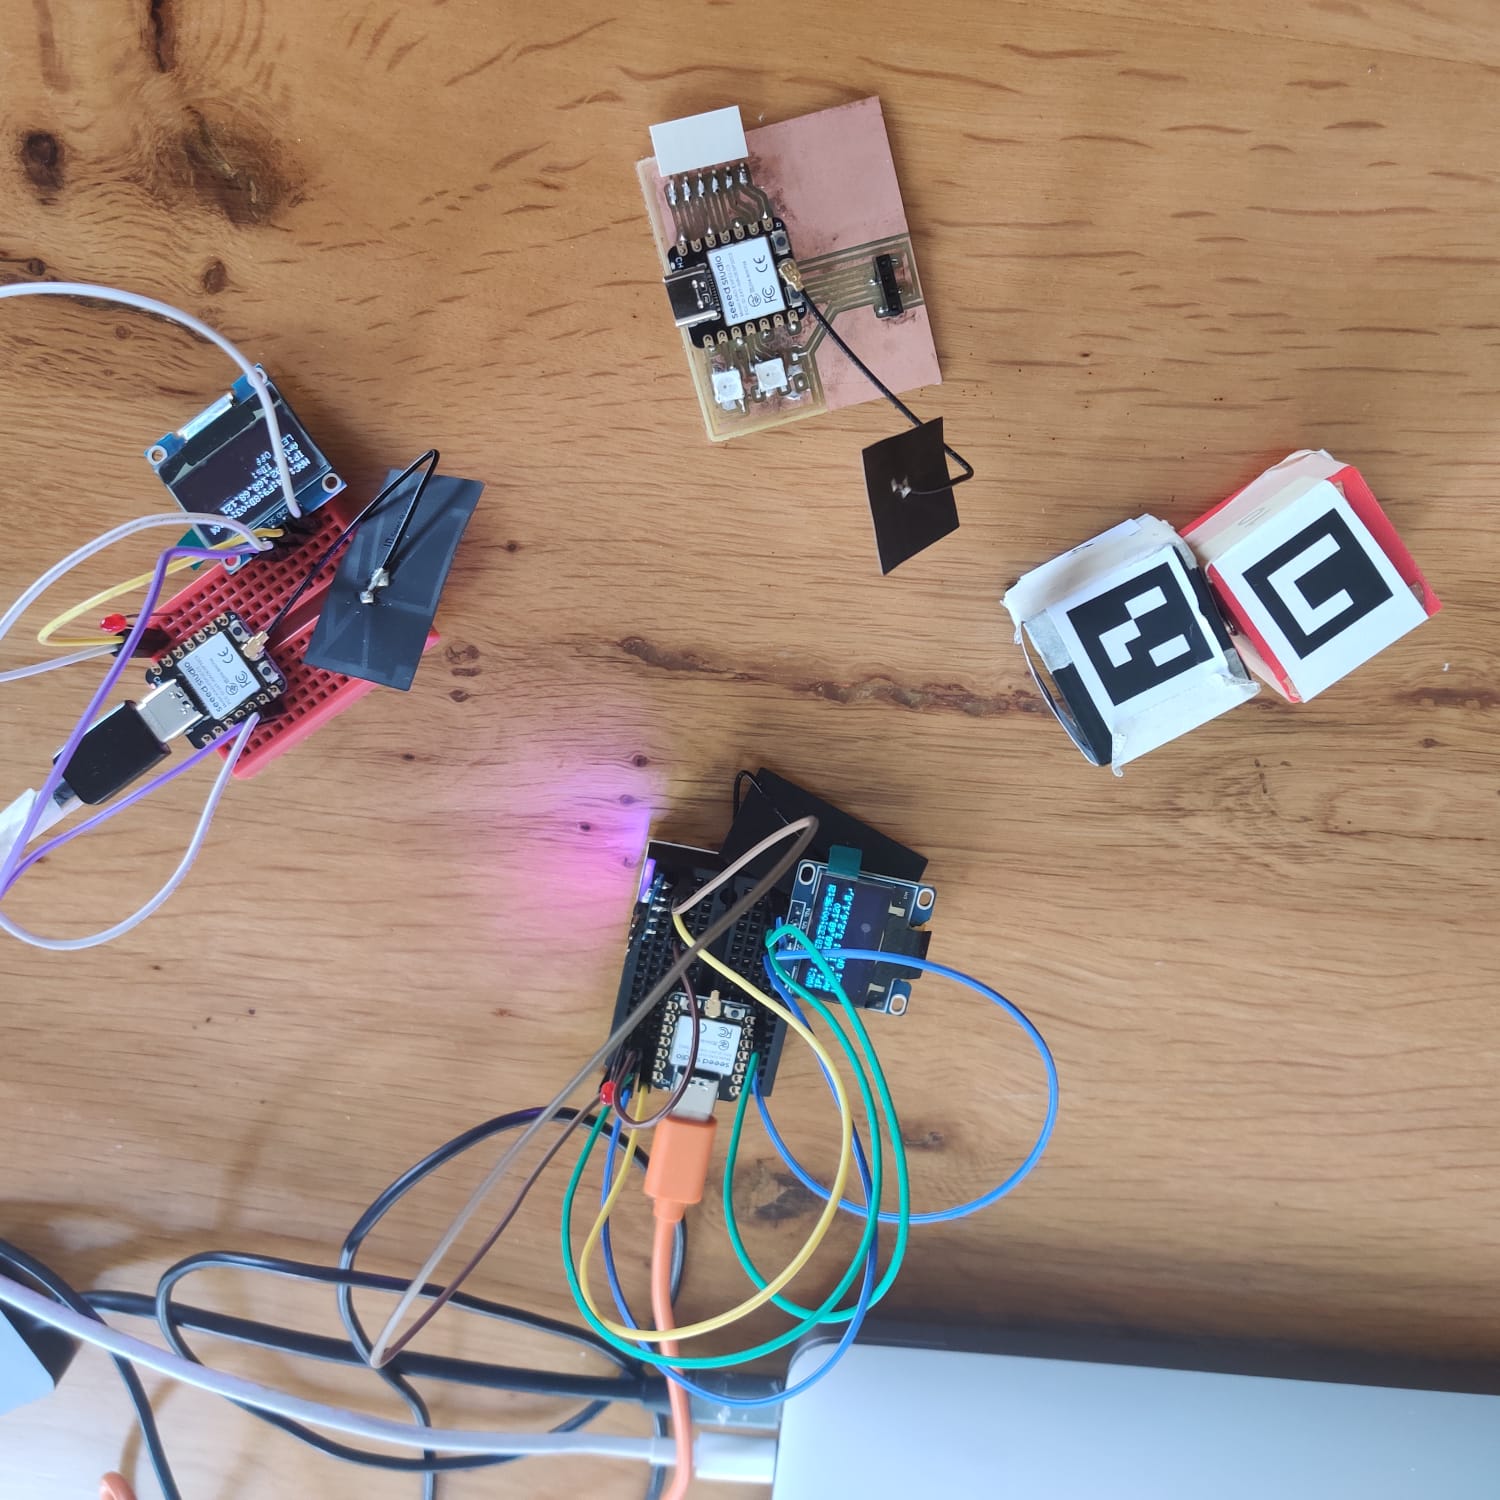
- ESP32-C3: Microcontroller for handling cube operations.
- WS2812B SMD RGB LED: Individually addressable RGB LED.
- OLED Display (0.96"): Small OLED screen for displaying information.
- Tactile Button: For user input and interaction.
- 3 SMD LEDs: Surface-mounted LEDs for additional indicators.
- Capacitor: For stabilizing power supply.
- 3 Resistors: For controlling current to LEDs and other components.
Board Components
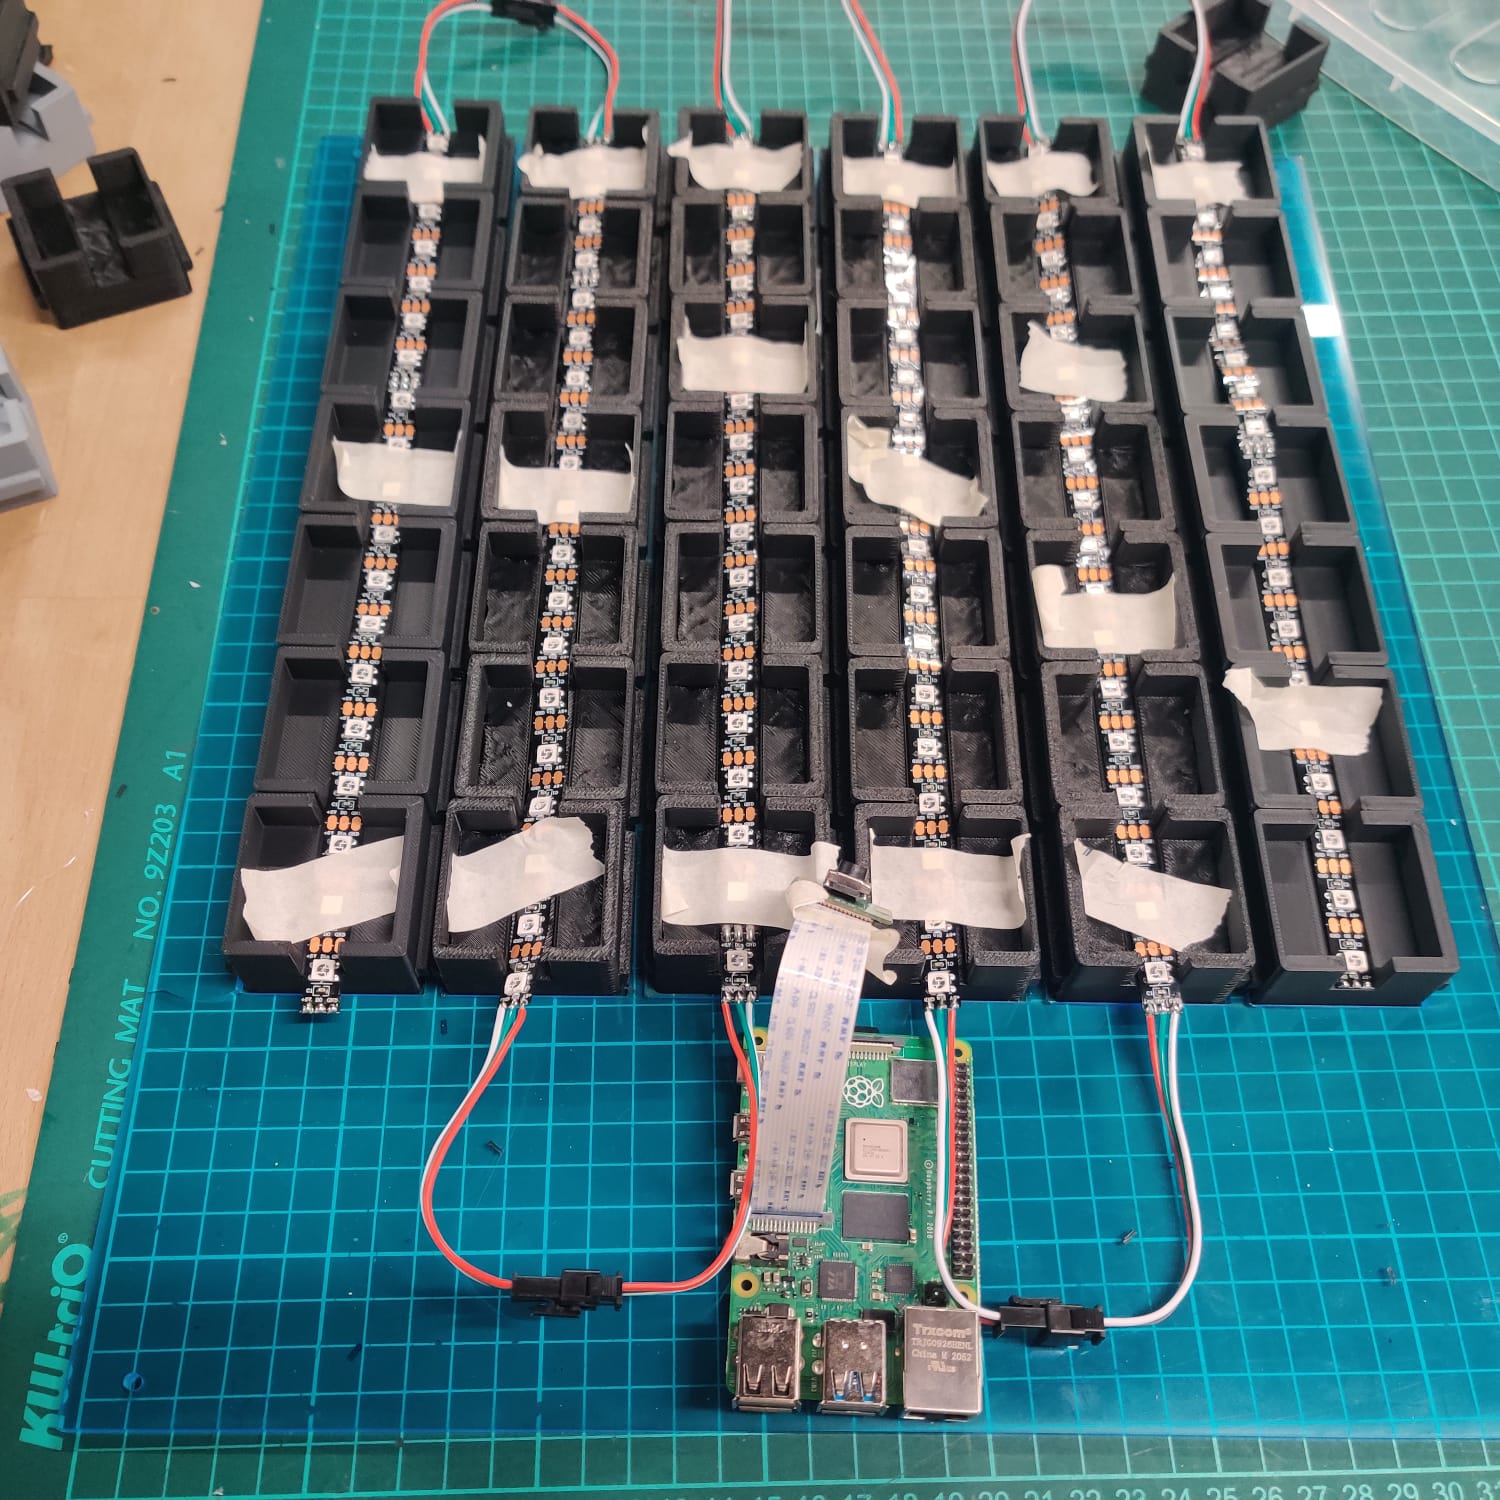
- Raspberry Pi 4: Central processing unit for the project.
- Raspberry Pi Camera Module 2: Camera module for image capture and processing.
- WS2812B Addressable LED Strip: Individually addressable LED strip for visual feedback.
Project Stages
The project consists of three stages:
-
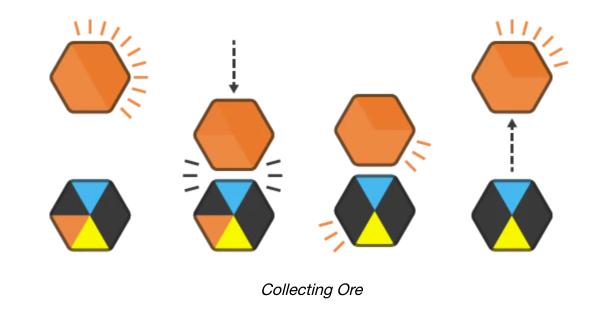
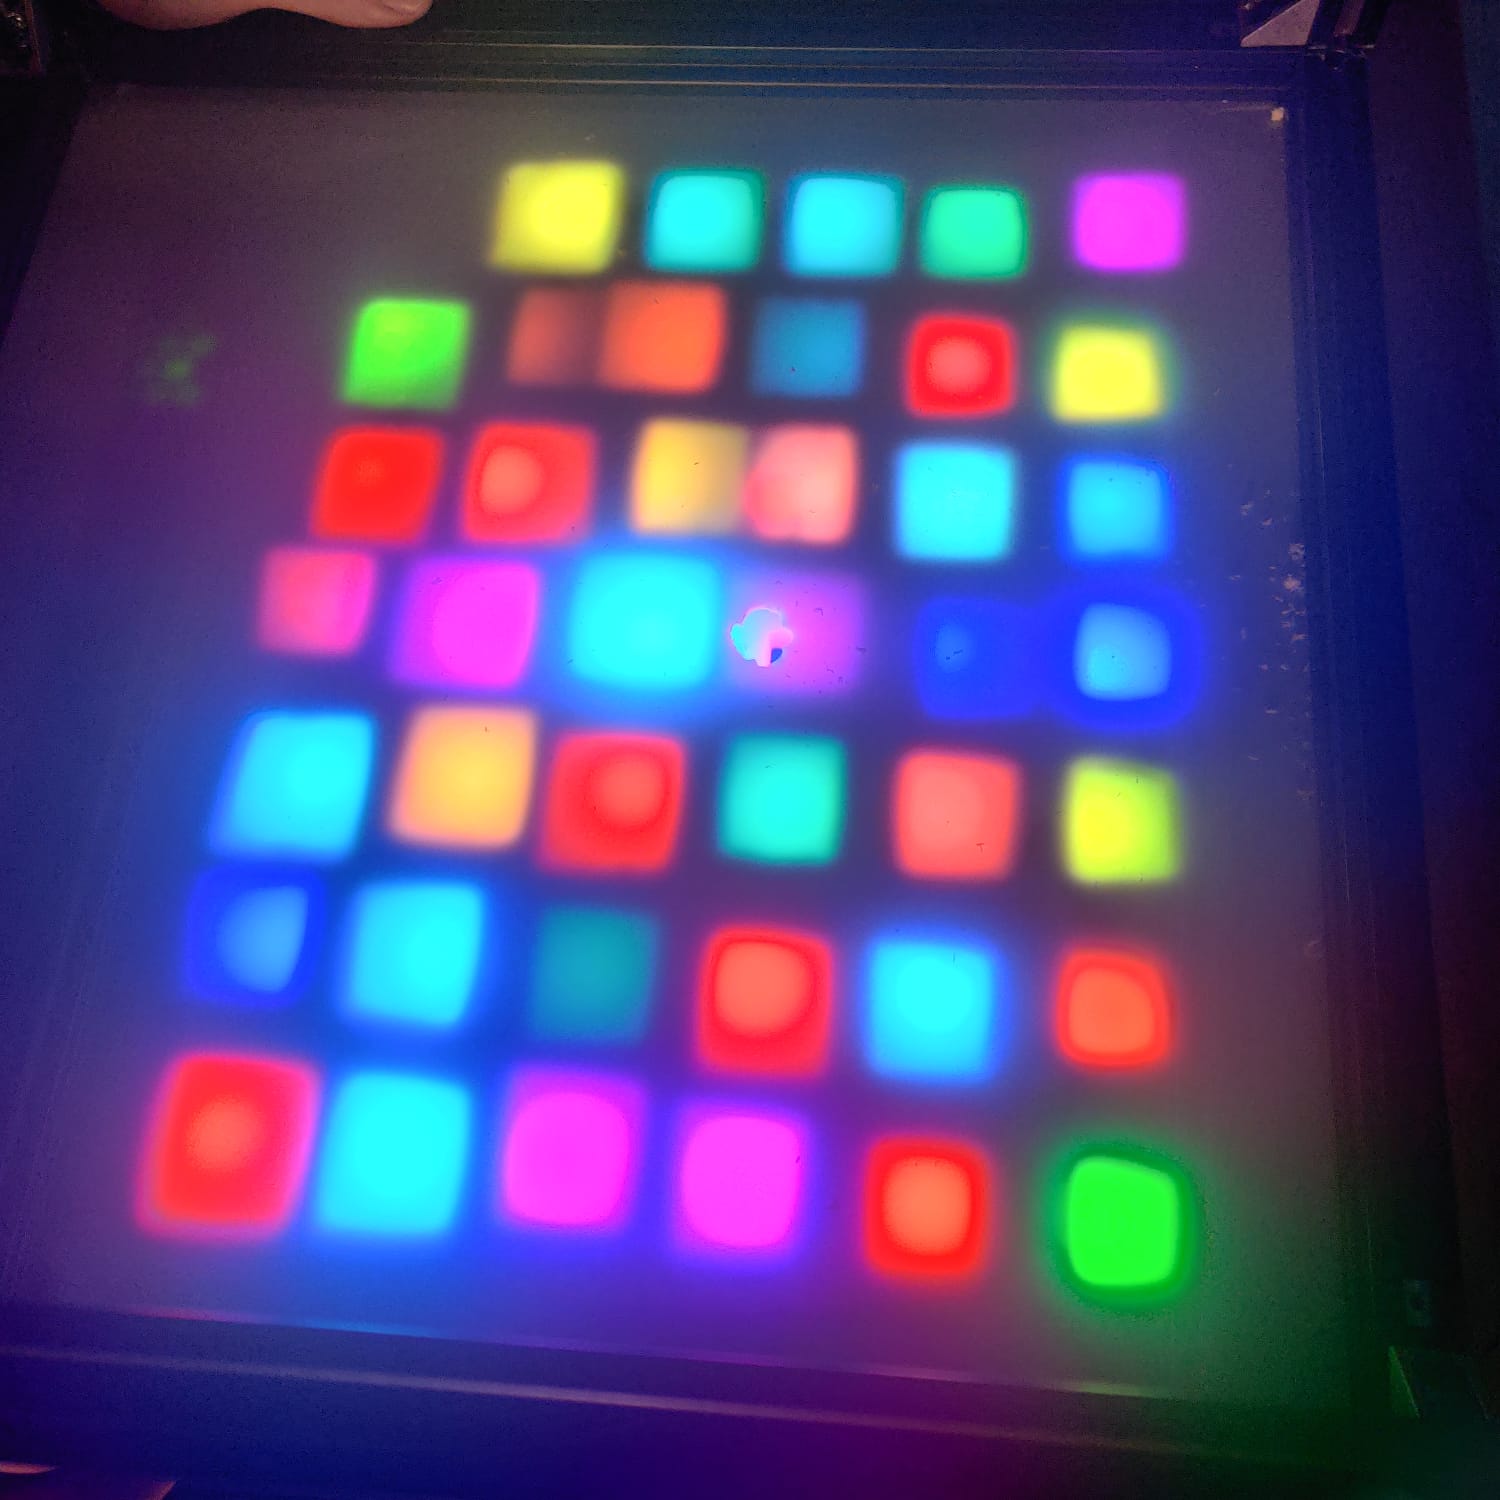
Physical Board: In the first stage, users interact with the physical board by placing cubes on it. Here, they experience fundamental algorithms like the shortest path, enhancing their problem-solving and algorithmic thinking skills.
-
Web-Based Simulation: In the second stage, the experience is extended through a web interface. Users can monitor and control the game board in real-time via the web application. This stage introduces more advanced algorithms and data structures.
-
Programming Interface: The third and final stage empowers users to program and test their path-finding algorithms via the web interface. This allows them to explore, learn through trial and error, and unleash their creativity while developing their solutions.
Each stage adds flexibility and educational value to the project. Even if time or resources are limited, the first stage alone provides a strong foundation, making it suitable as a Fab Academy final project.
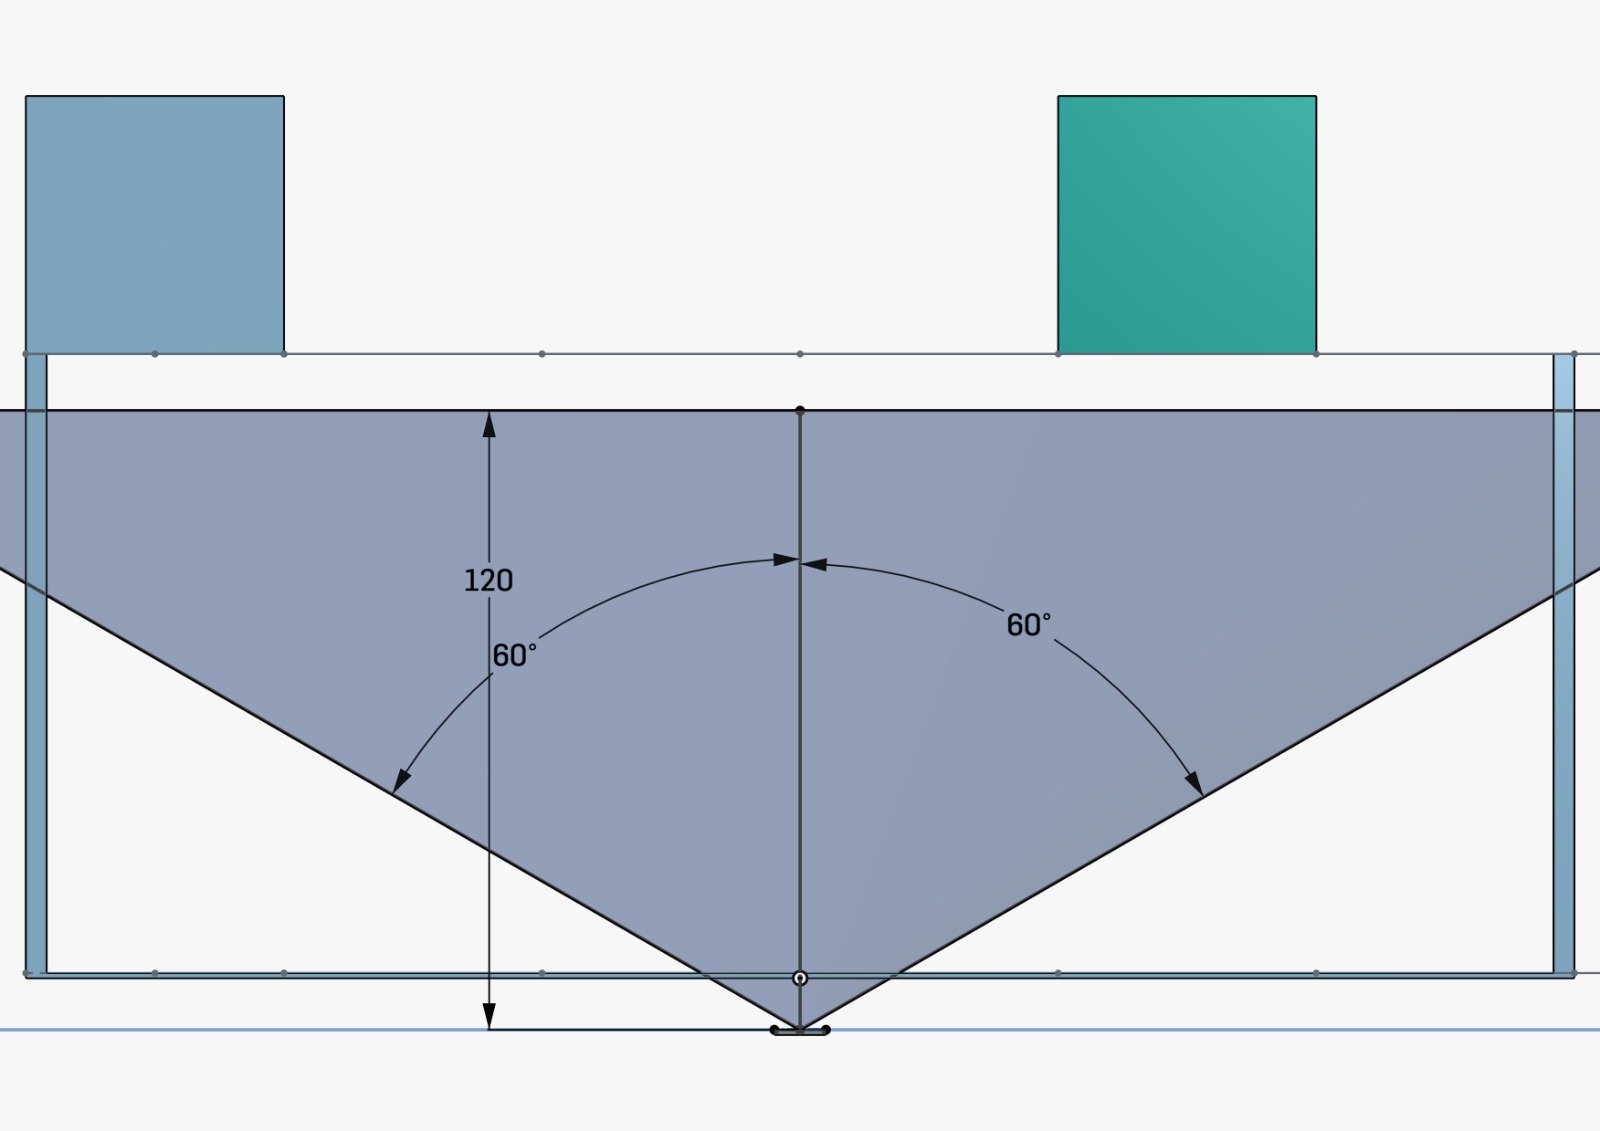
Design Recommendations and Features
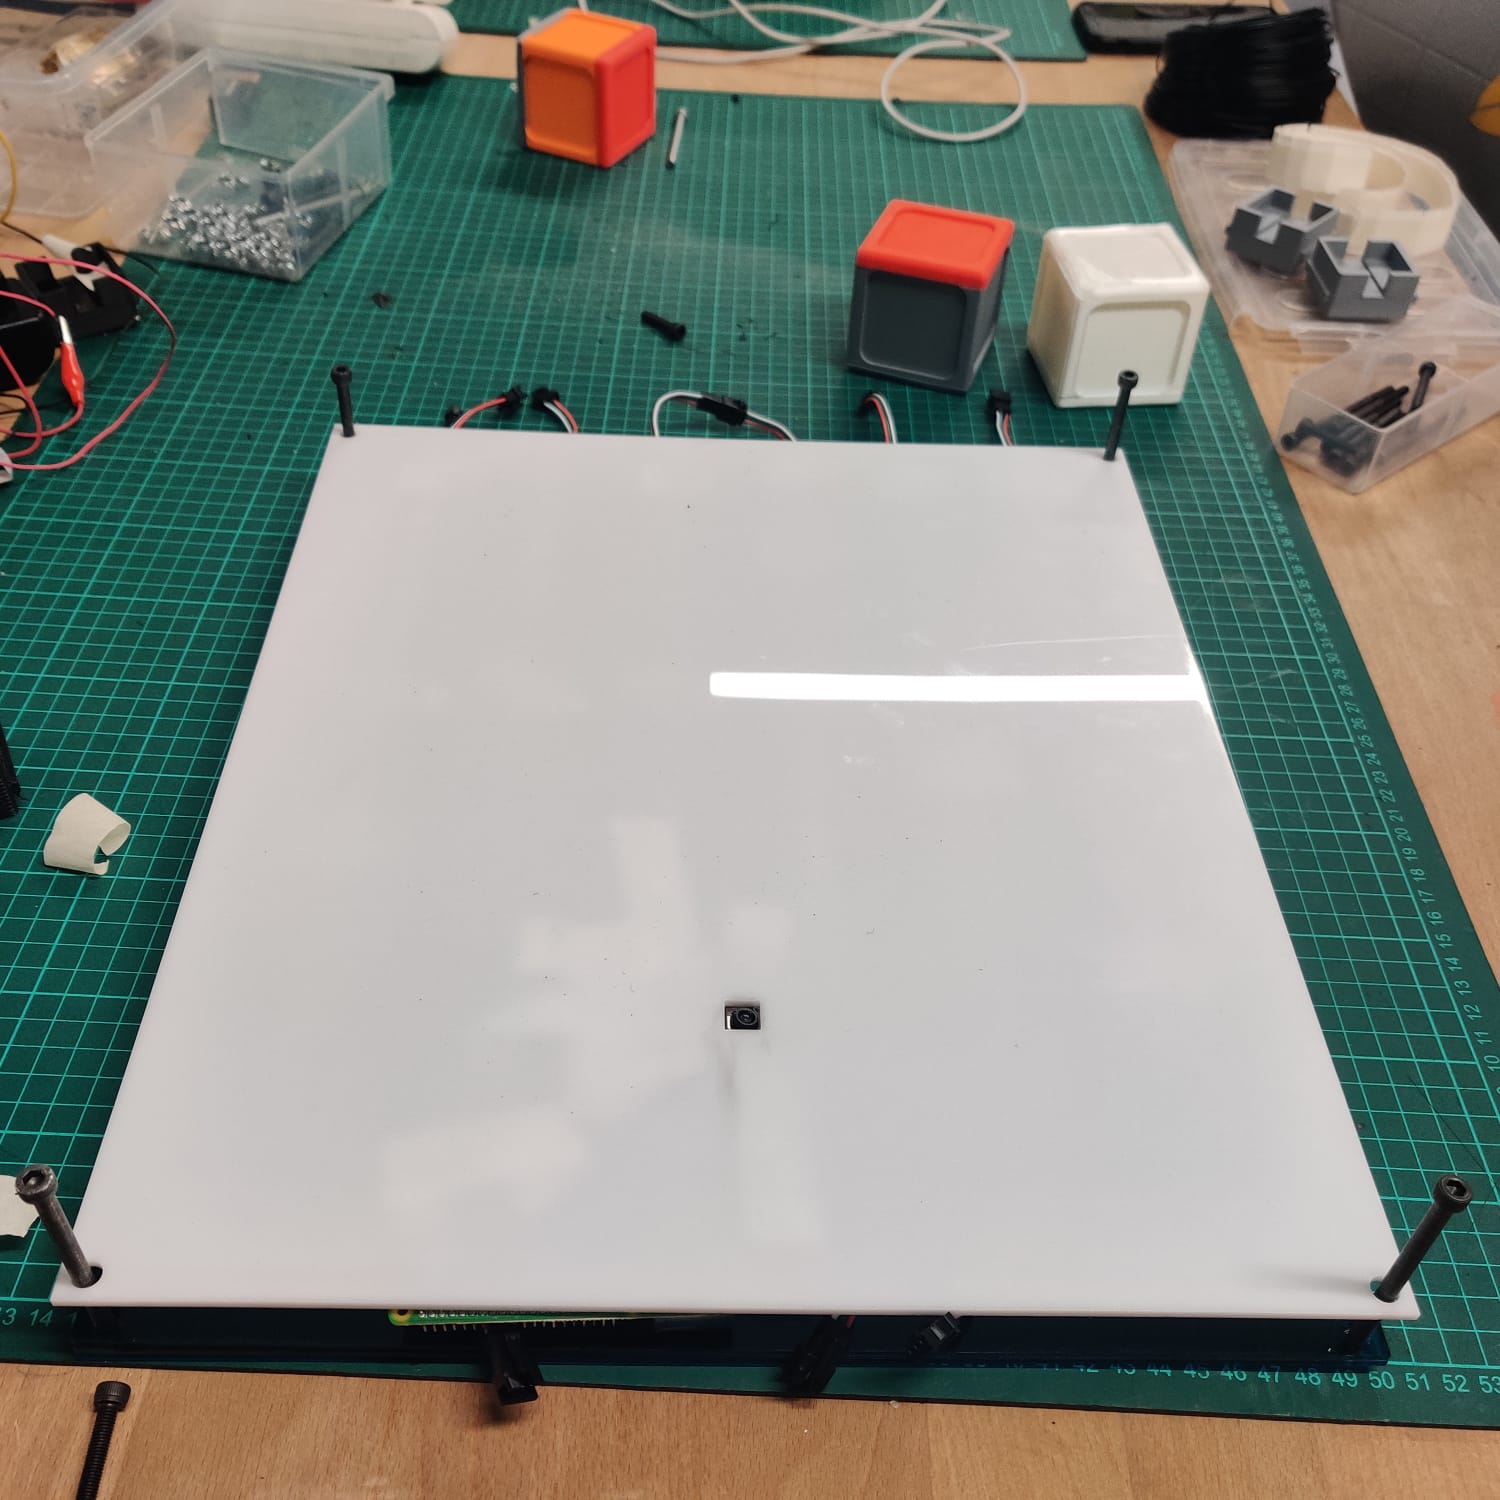
- Board Dimensions: A 50cm x 50cm board offers ample gameplay area while remaining portable.
- Cube Dimensions: Cubes measuring 4cm x 4cm are ideal for easy manipulation by both children and adults.
- Colors: Use vivid and high-contrast colors (e.g., blue and green for entry/exit points, yellow for the path) to facilitate visual distinction and enhance the user experience.
- Materials: Select durable and eco-friendly materials, such as lightweight but sturdy fiberboard for the board and wood or recyclable plastic for the cubes.
Color Palette:
Entry/Exit Points: Blue and
Green
Path:
Yellow
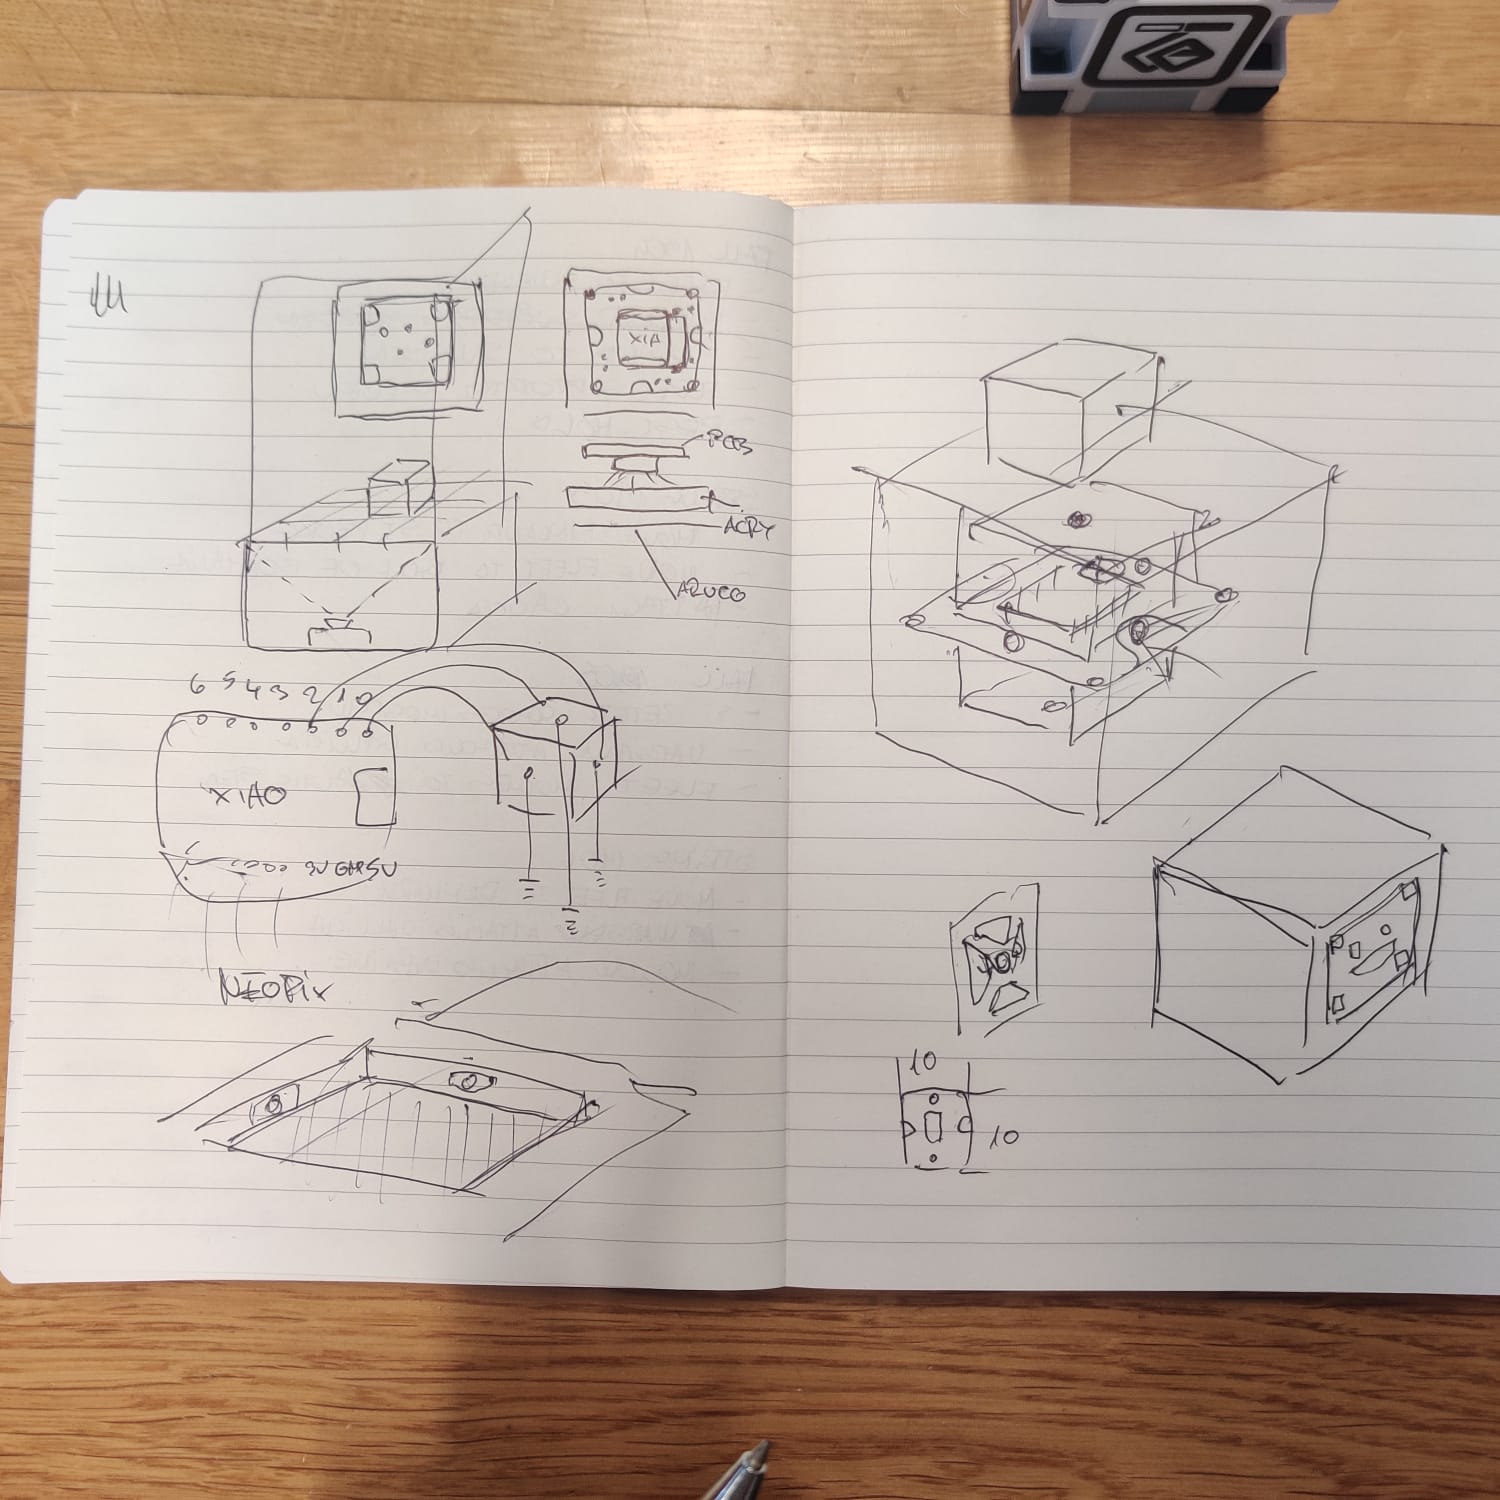
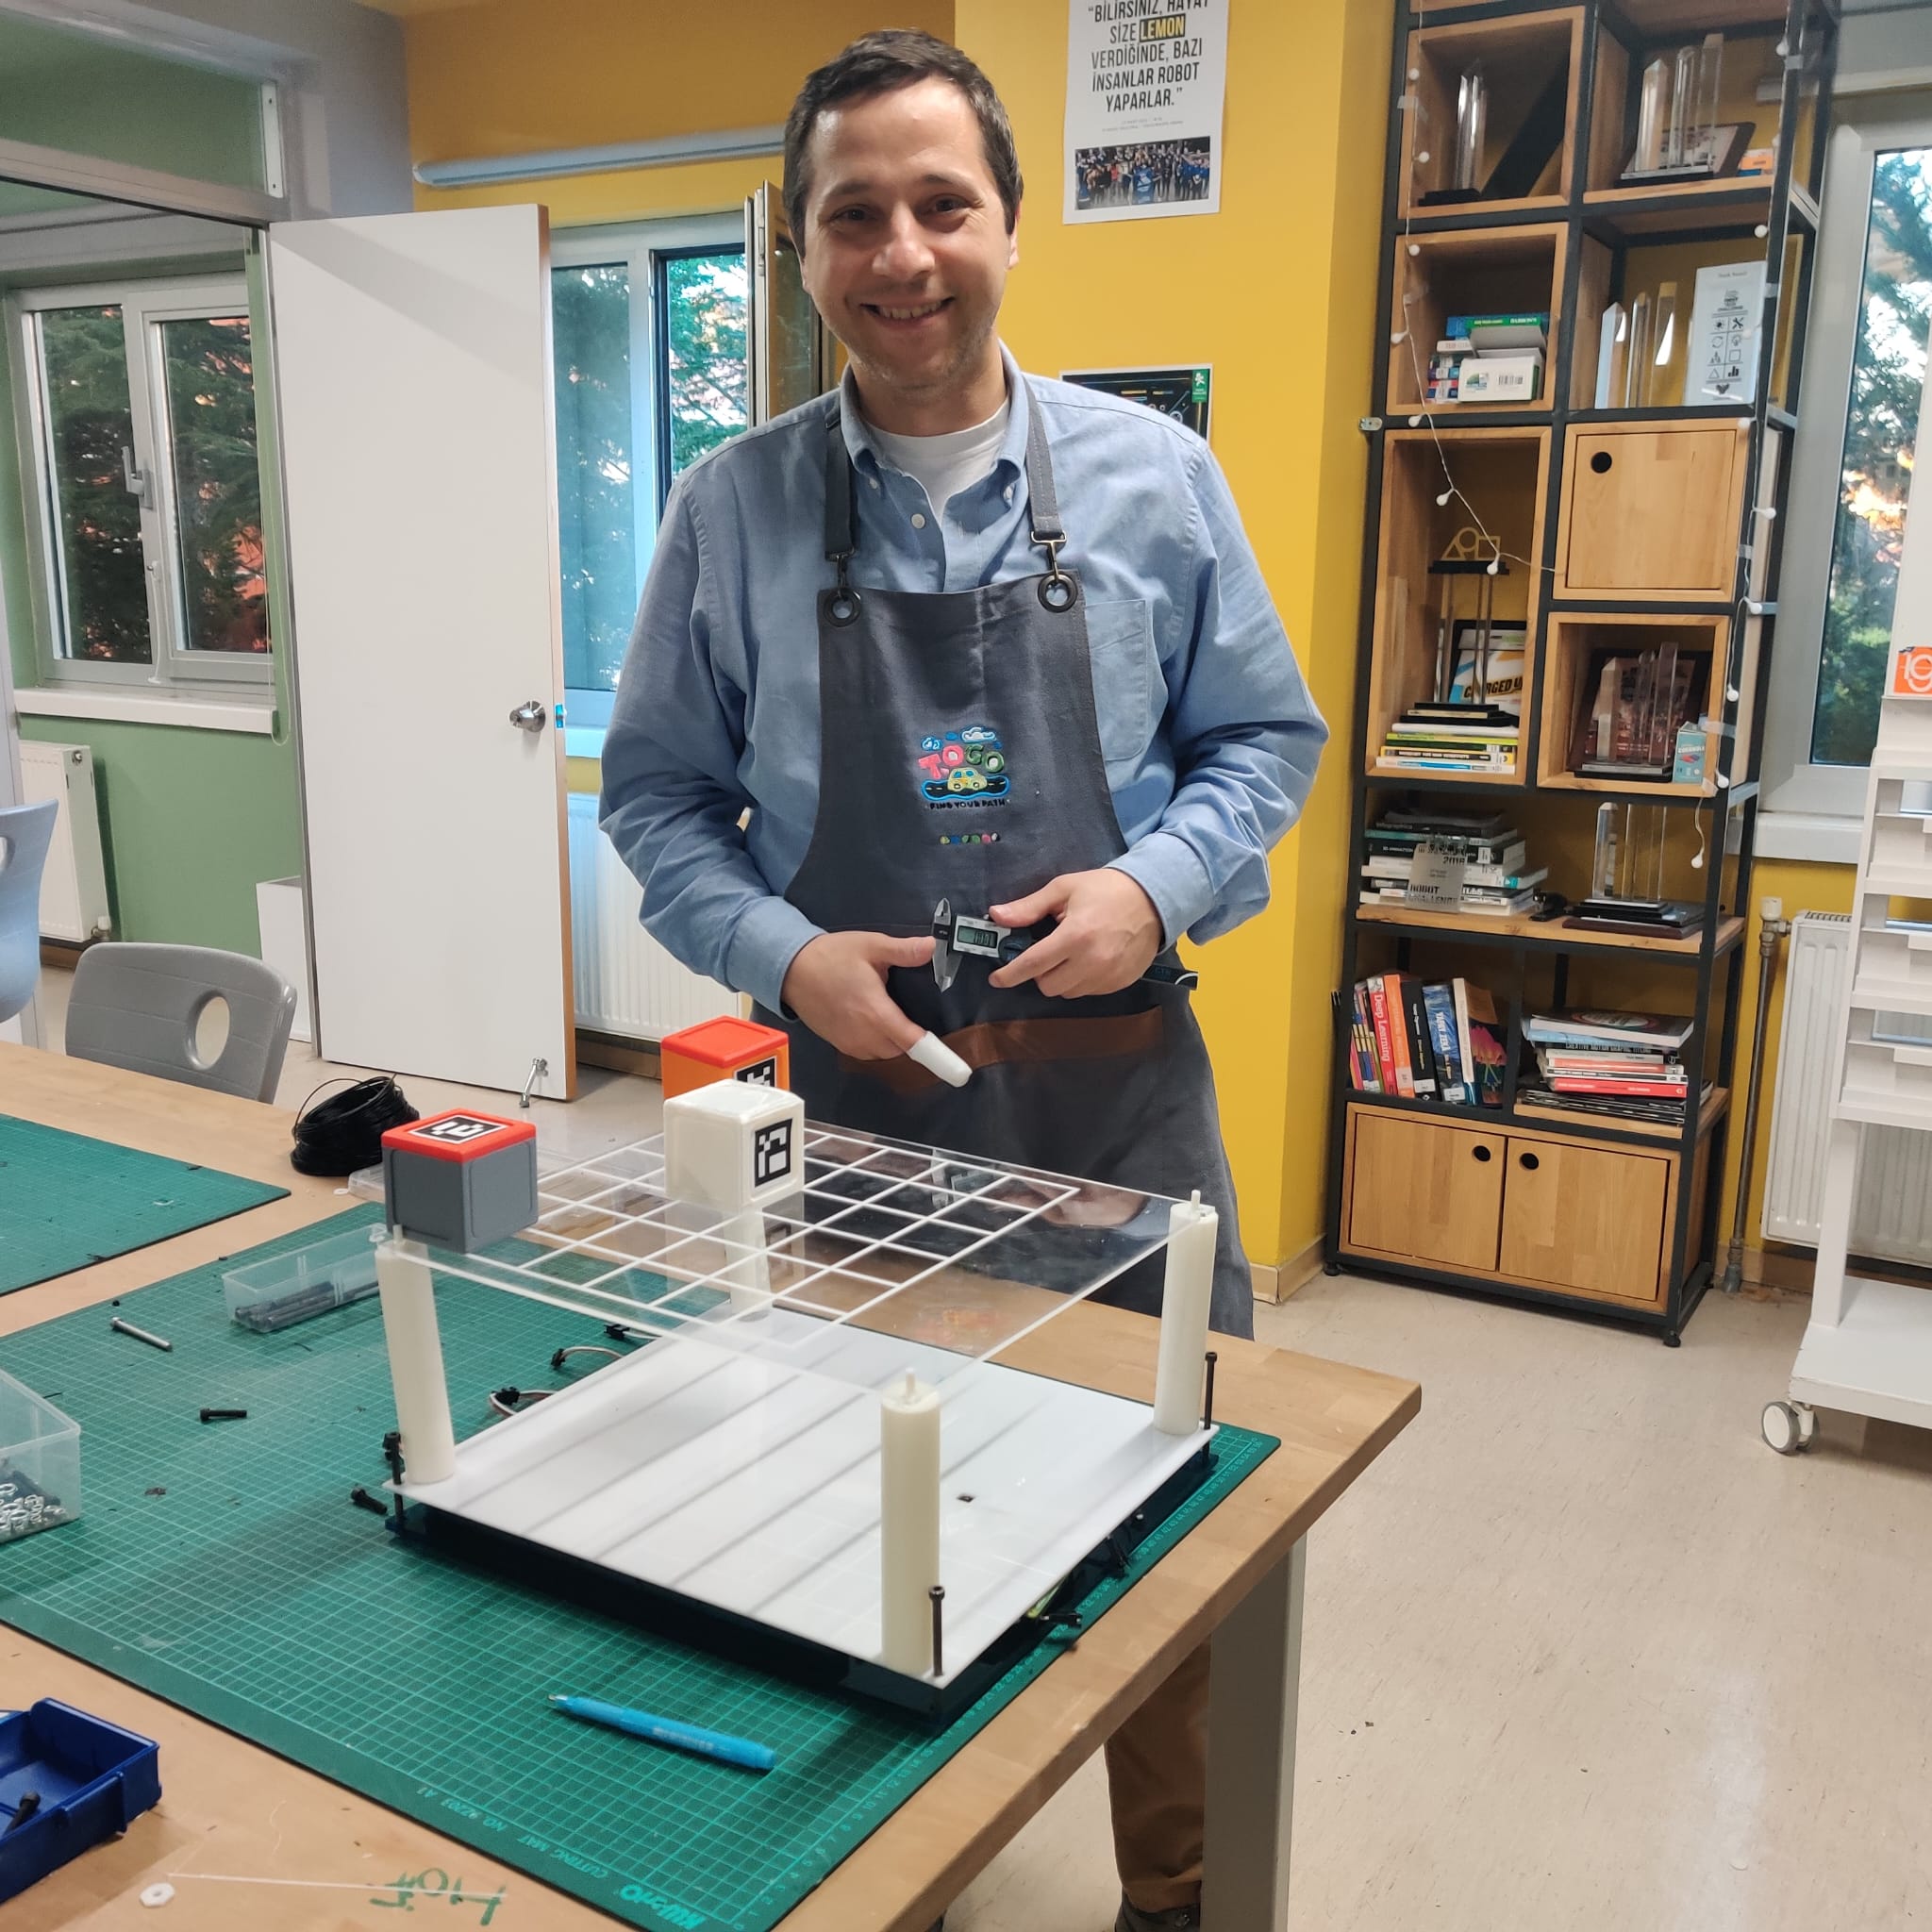
First Prototype
I have developed the initial prototype of the ToGO board using Swift Playground. Here’s a screenshot of the prototype in action:

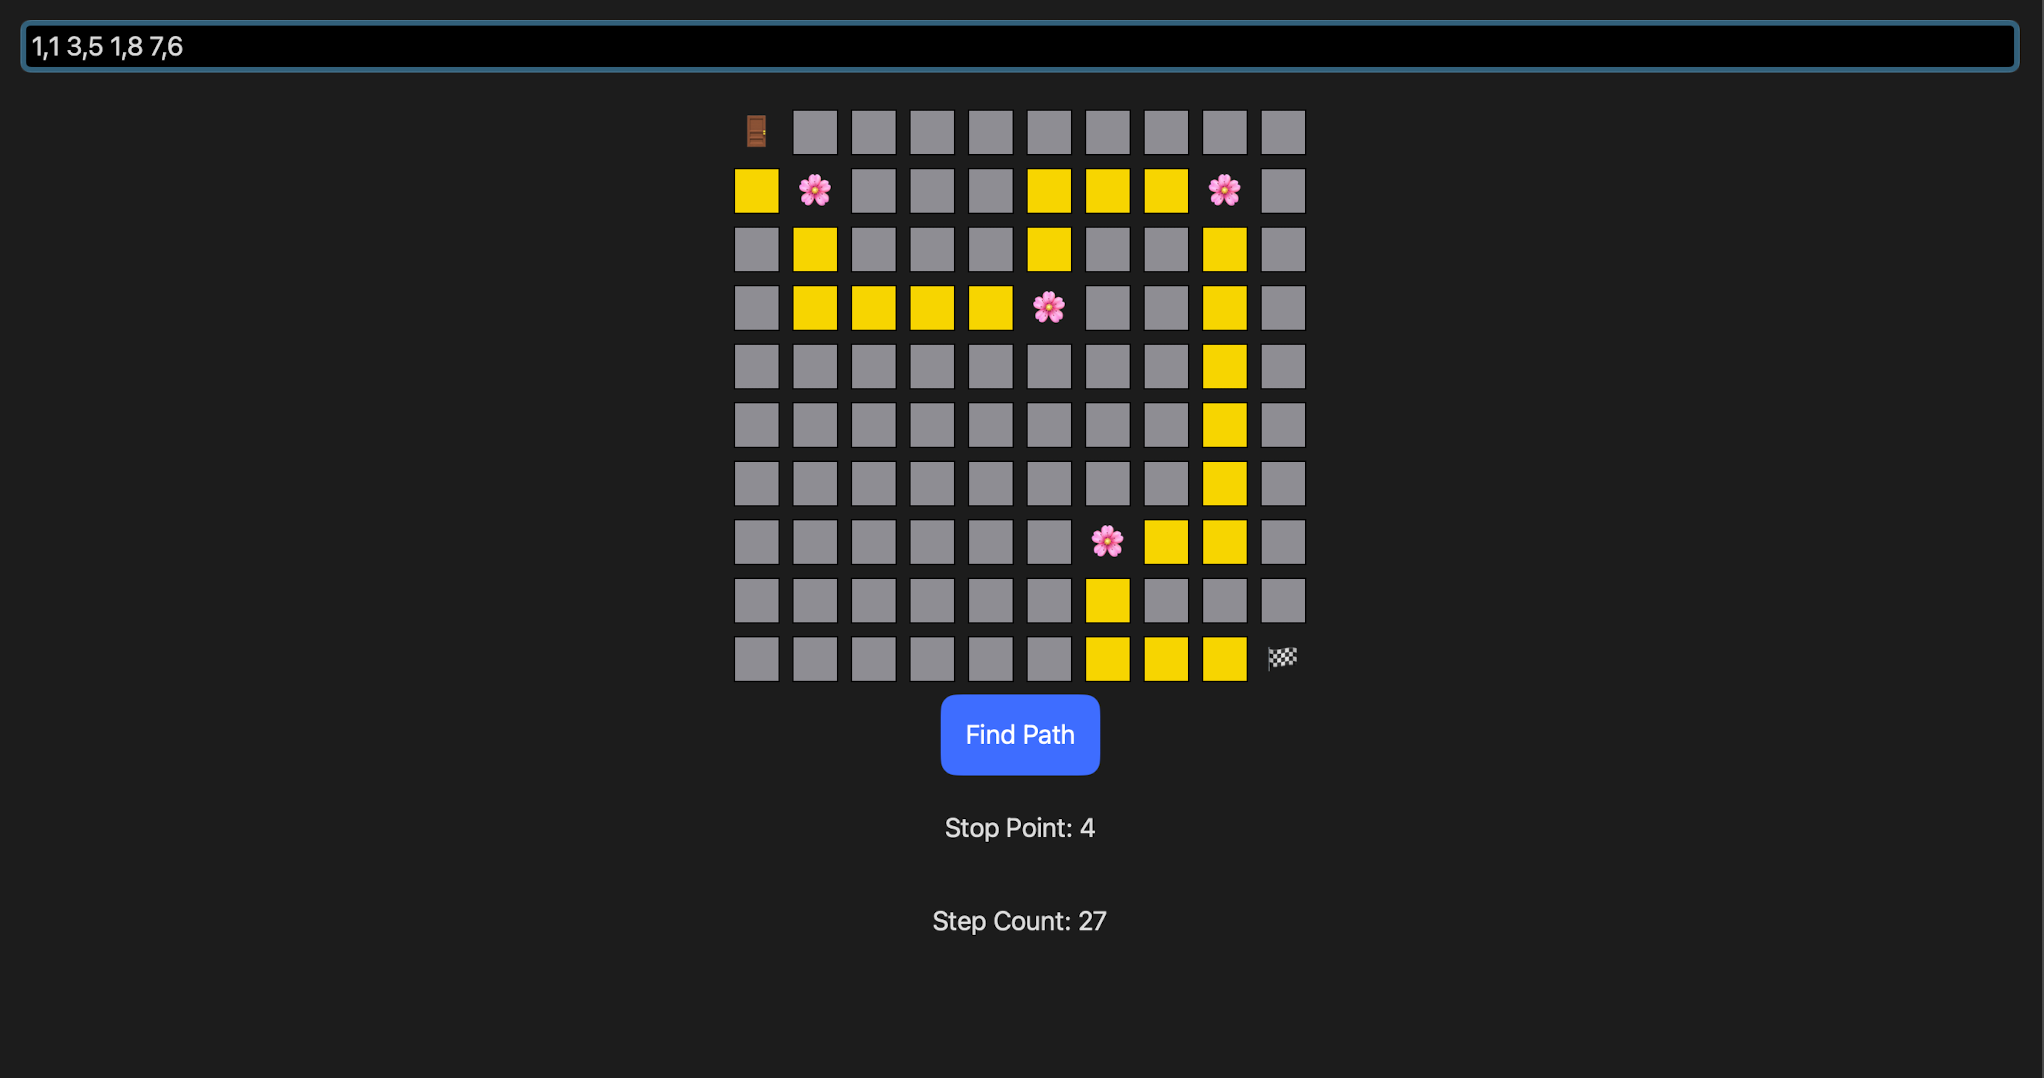
This prototype serves as the foundation for the physical board, allowing me to test and refine the game mechanics and algorithms.
Implementation
Research
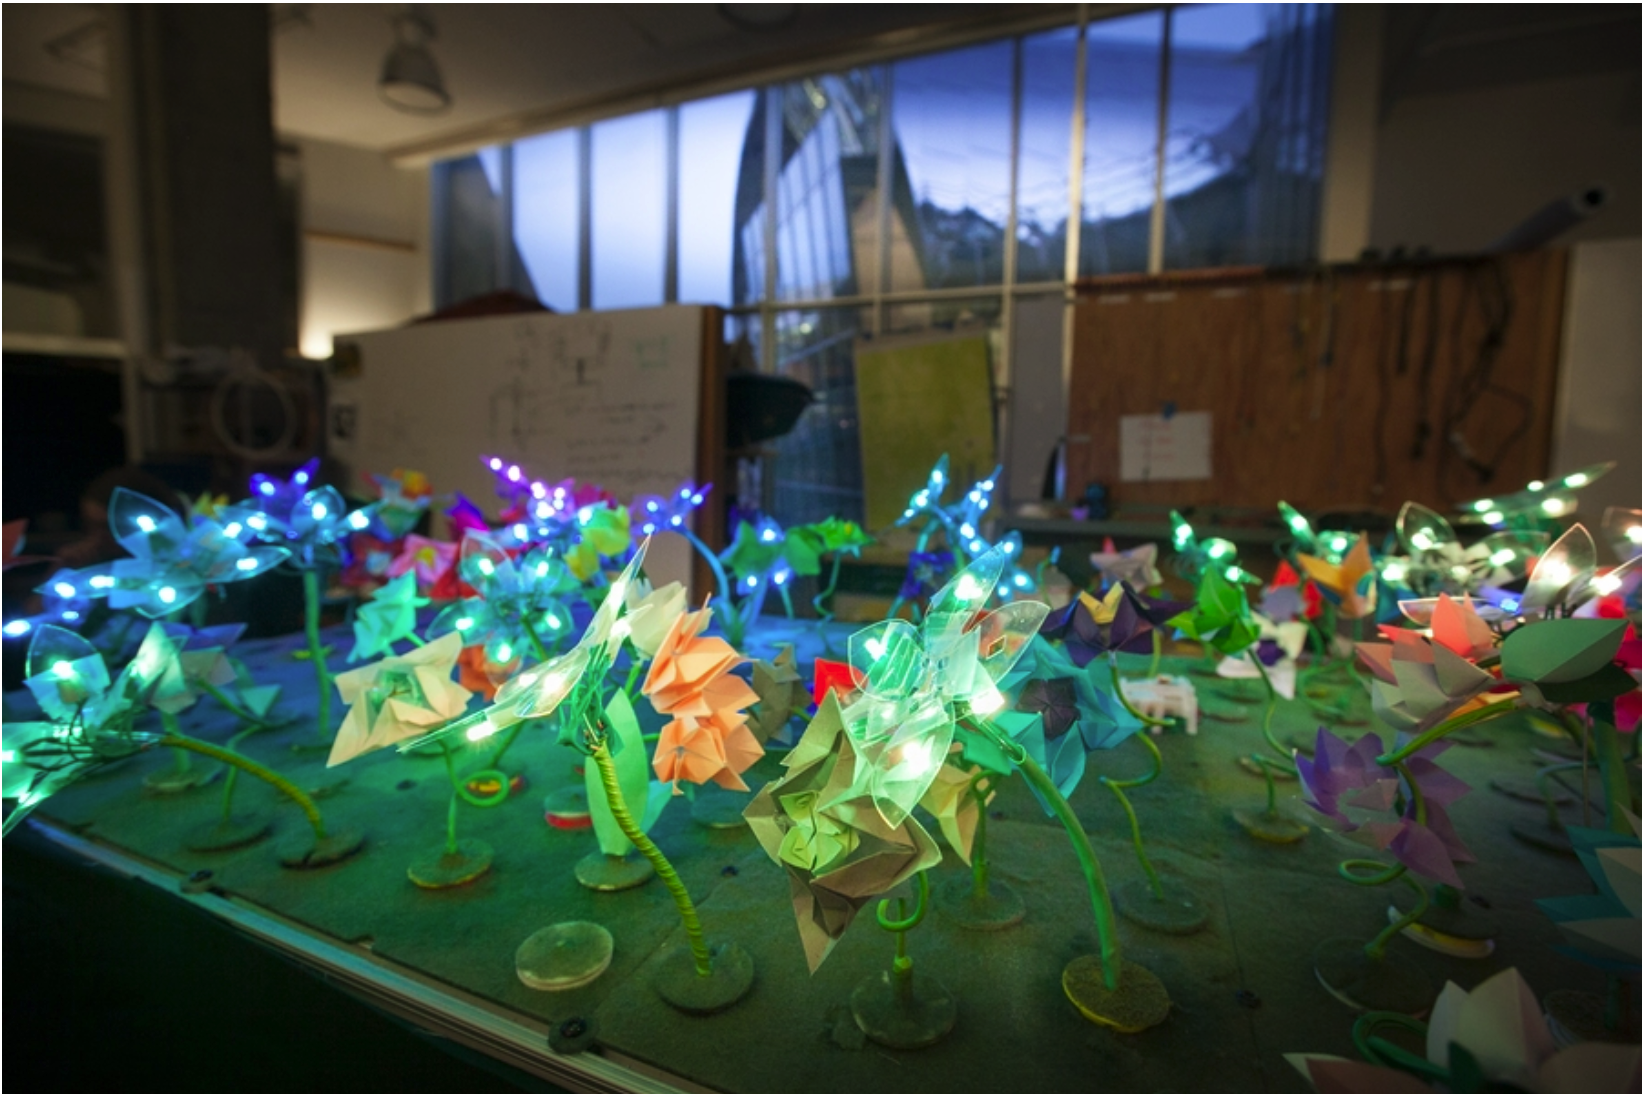
Robot Garden project - algorithm simulation & visualization
Blinks puzzle gameplay demonstration
Motivation
Motivation
I’m passionate about this project because I’ve experienced firsthand how crucial algorithms are. While writing an introductory AI book for high school students, I realized the vital role that algorithms like BFS (Breadth-First Search) and DFS (Depth-First Search) play in AI and problem-solving.
My love for these algorithms, coupled with my interest in Human-Computer Interaction (HCI) tangible studies, has inspired me to create the ToGO board. This board isn’t just a learning tool; it’s a way to make AI and algorithms accessible and engaging for students.
By turning these complex concepts into a game, my aim is to help students understand AI and algorithms in an enjoyable and educational way. This project is my contribution to making AI more approachable and to inspire the next generation of problem solvers.
Togo - Interactive Pathfinding System
Project Summary
Purpose: To develop an interactive system that allows users to define the shortest path using cubes placed on a physical 10x10 grid, each marked with unique ArUco markers. This system is designed as a fun and interactive tool for educational purposes.
Technical Information
- Key Technologies: Raspberry Pi, ESP32, LEDs, ArUco Markers, OpenCV, Flask.
- Design and Manufacturing Techniques: Laser cutting, 3D printing, electronic assembly, PCB design and production.
To-Do List
Raspberry Pi and System Setup
- Installation of Raspberry Pi OS.
- Configuration of Raspberry Pi as a WiFi Access Point.
- Camera module setup and testing.
- Installation of OpenCV and ArUco libraries.
ArUco Markers Creation and Recognition
- Selection of the necessary ArUco dictionary for marker creation.
- Development of algorithms for recognizing and processing created markers.
Flask Server and Network Communication
- Installation and configuration of Flask server.
- Creation of a REST API for communication with ESP32 modules.
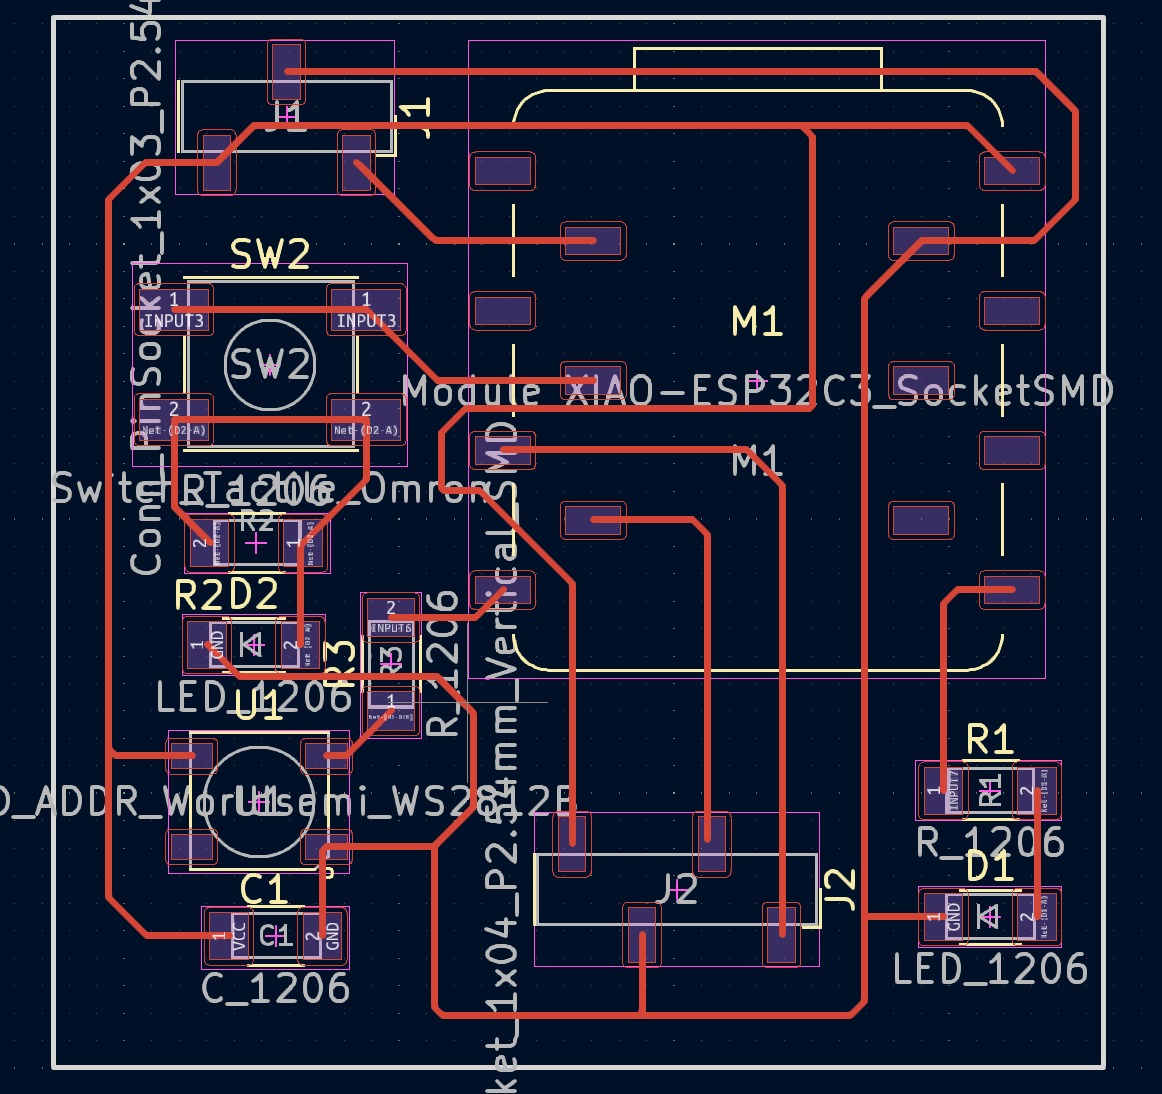
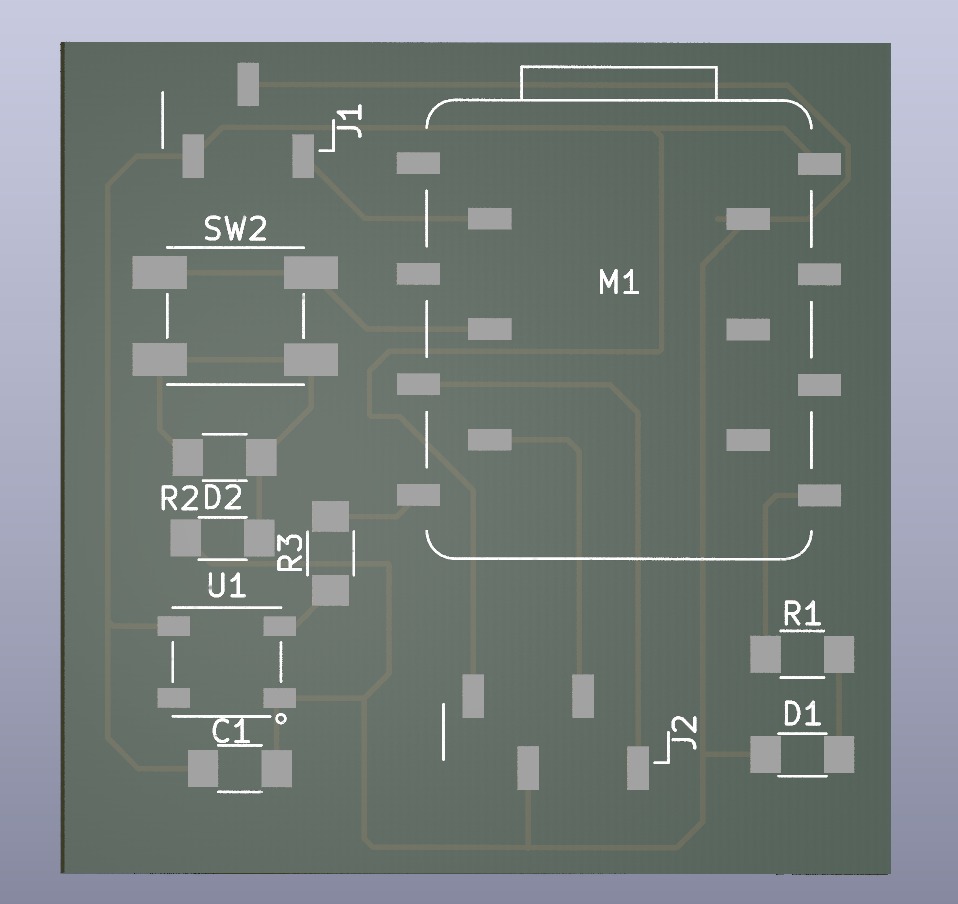
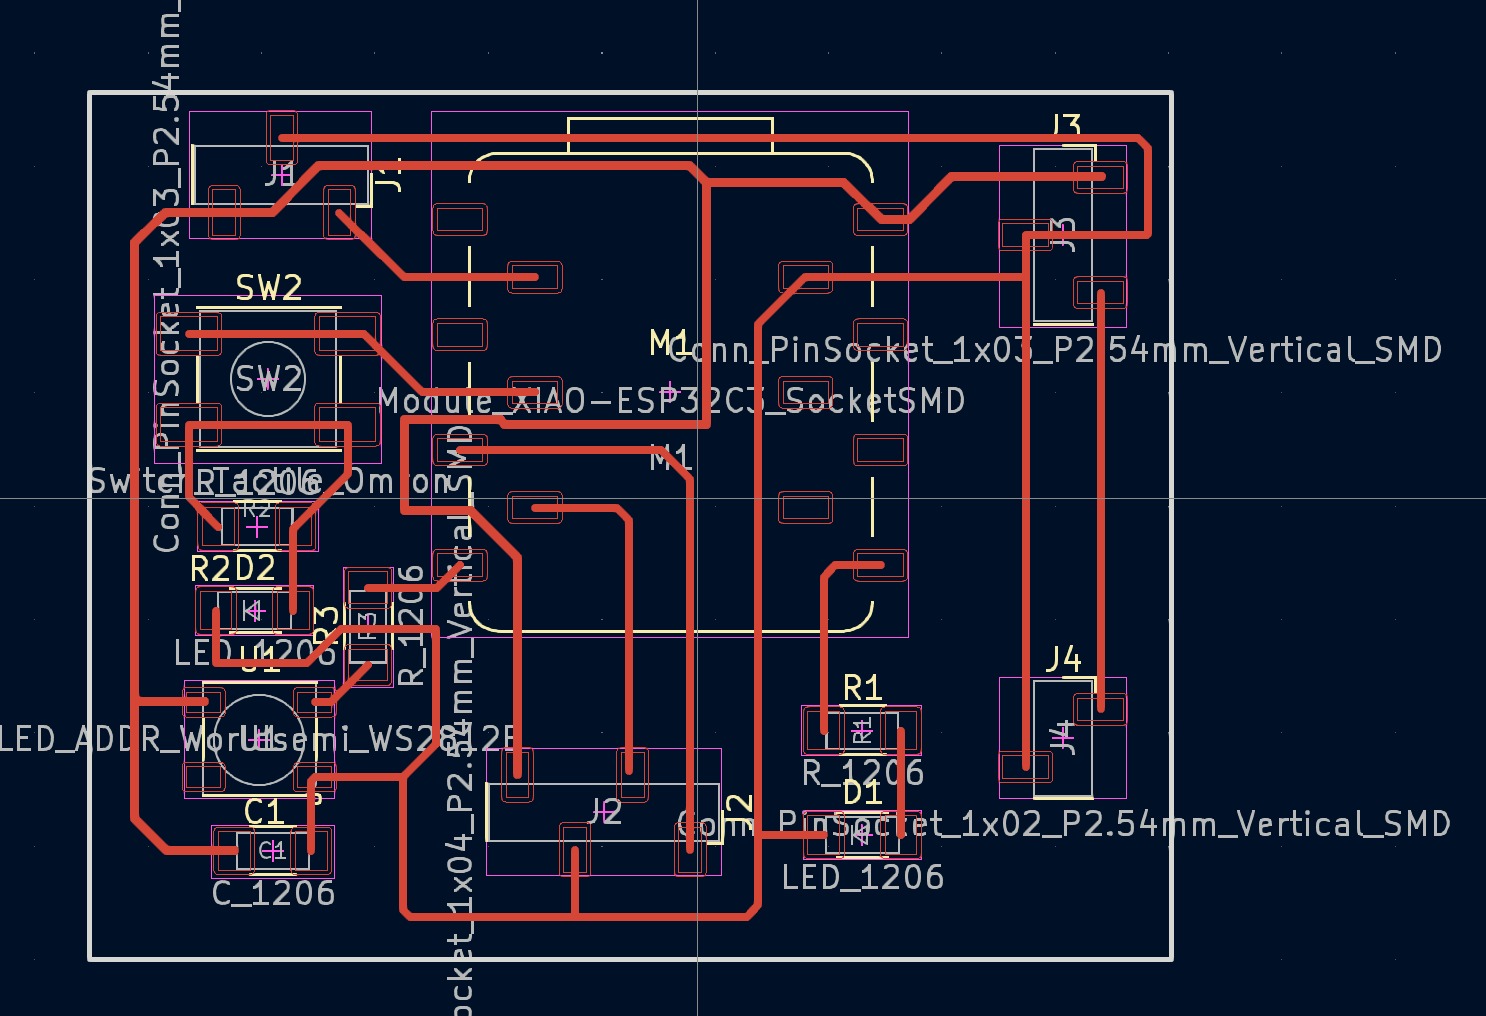
Special PCB Design and Production
- Design of electronic circuits and PCBs for inside the cubes.
- Production of PCBs and assembly of electronic components.
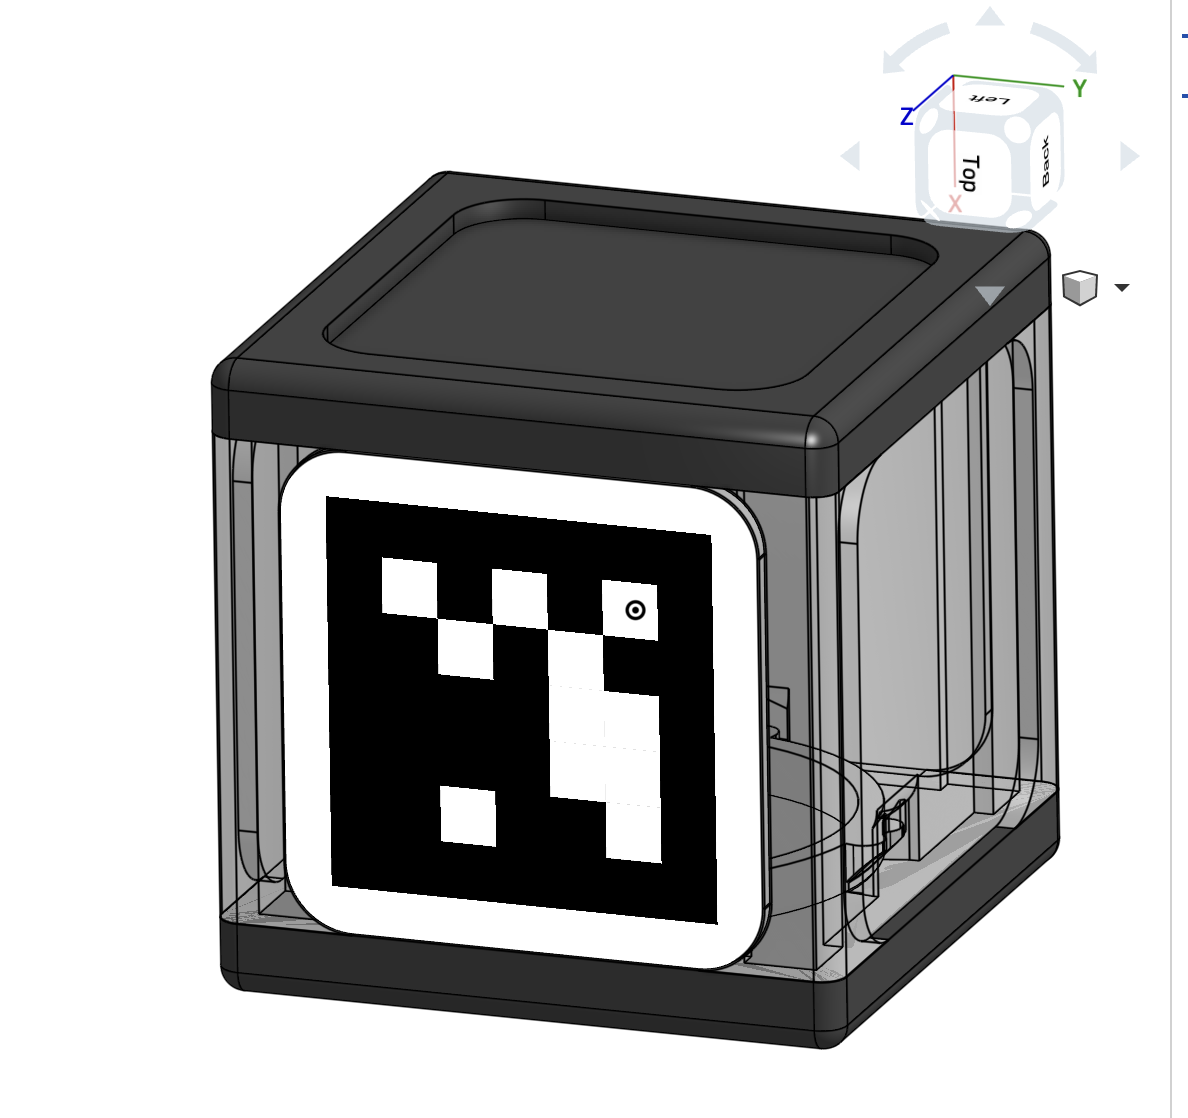
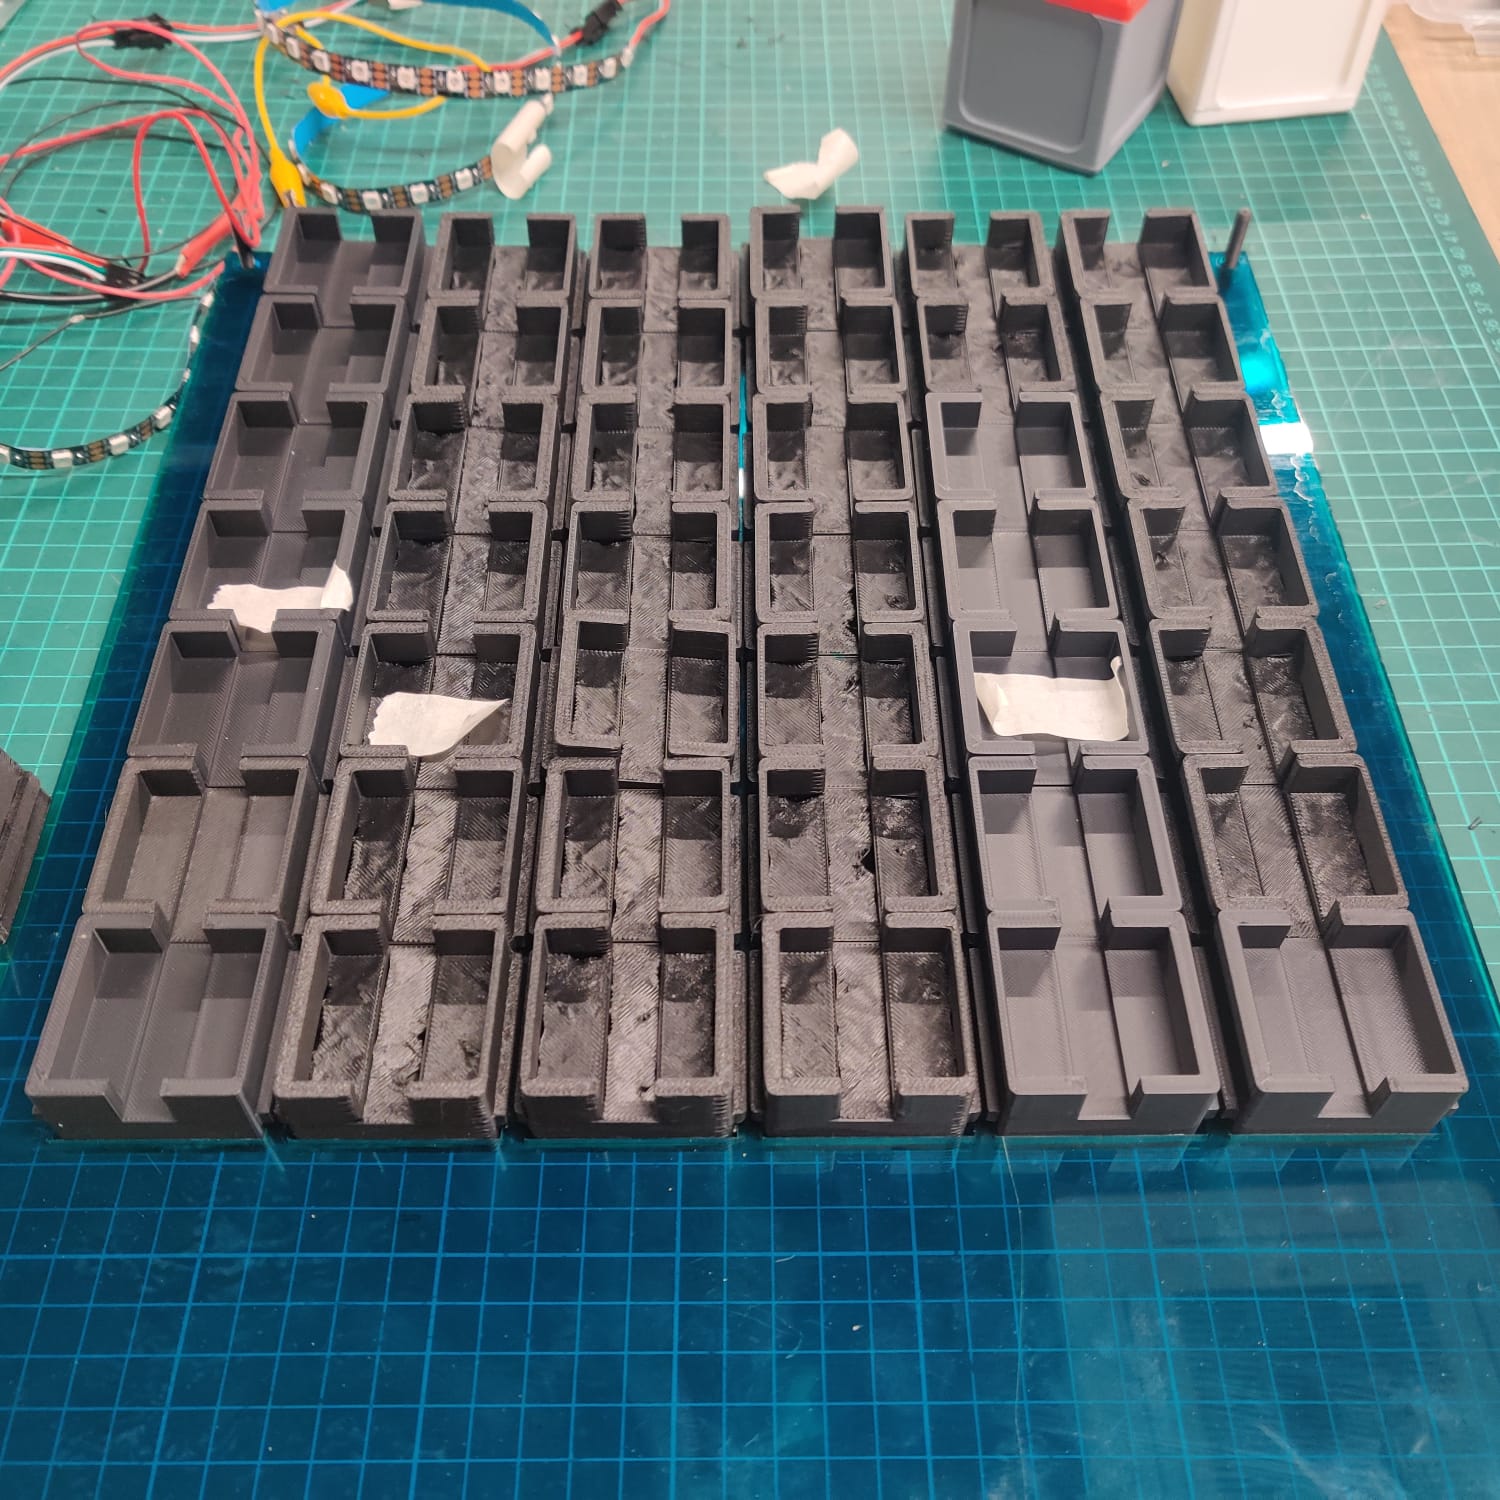
Cube Design and Production
- Preparation of 3D design and laser cutting files for cubes.
- Selection of materials and production.
System Integration and Testing Processes
- Assembly of all components and system integration.
- Functional testing of the system and optimization.
Documentation and Presentation
- Preparation of project documentation.
- Preparation of project presentation and video.
Current Progress and Milestones
Completed Tasks
- Definition of the project concept and design, selection of key components.
Ongoing Tasks
- Development of the initial prototype, basic electronic circuit and PCB design.
Challenges Encountered
- Achieving optimal performance for ArUco marker recognition, technical challenges encountered during system integration.
Next Steps
Short-Term Goals
- Completion of tests on the initial prototype, realization of system integration.
Long-Term Goals
- User testing, collection of feedback, and optimization of the final version of the project.
Programming Section
ArUco Marker Detection Project Documentation
Introduction
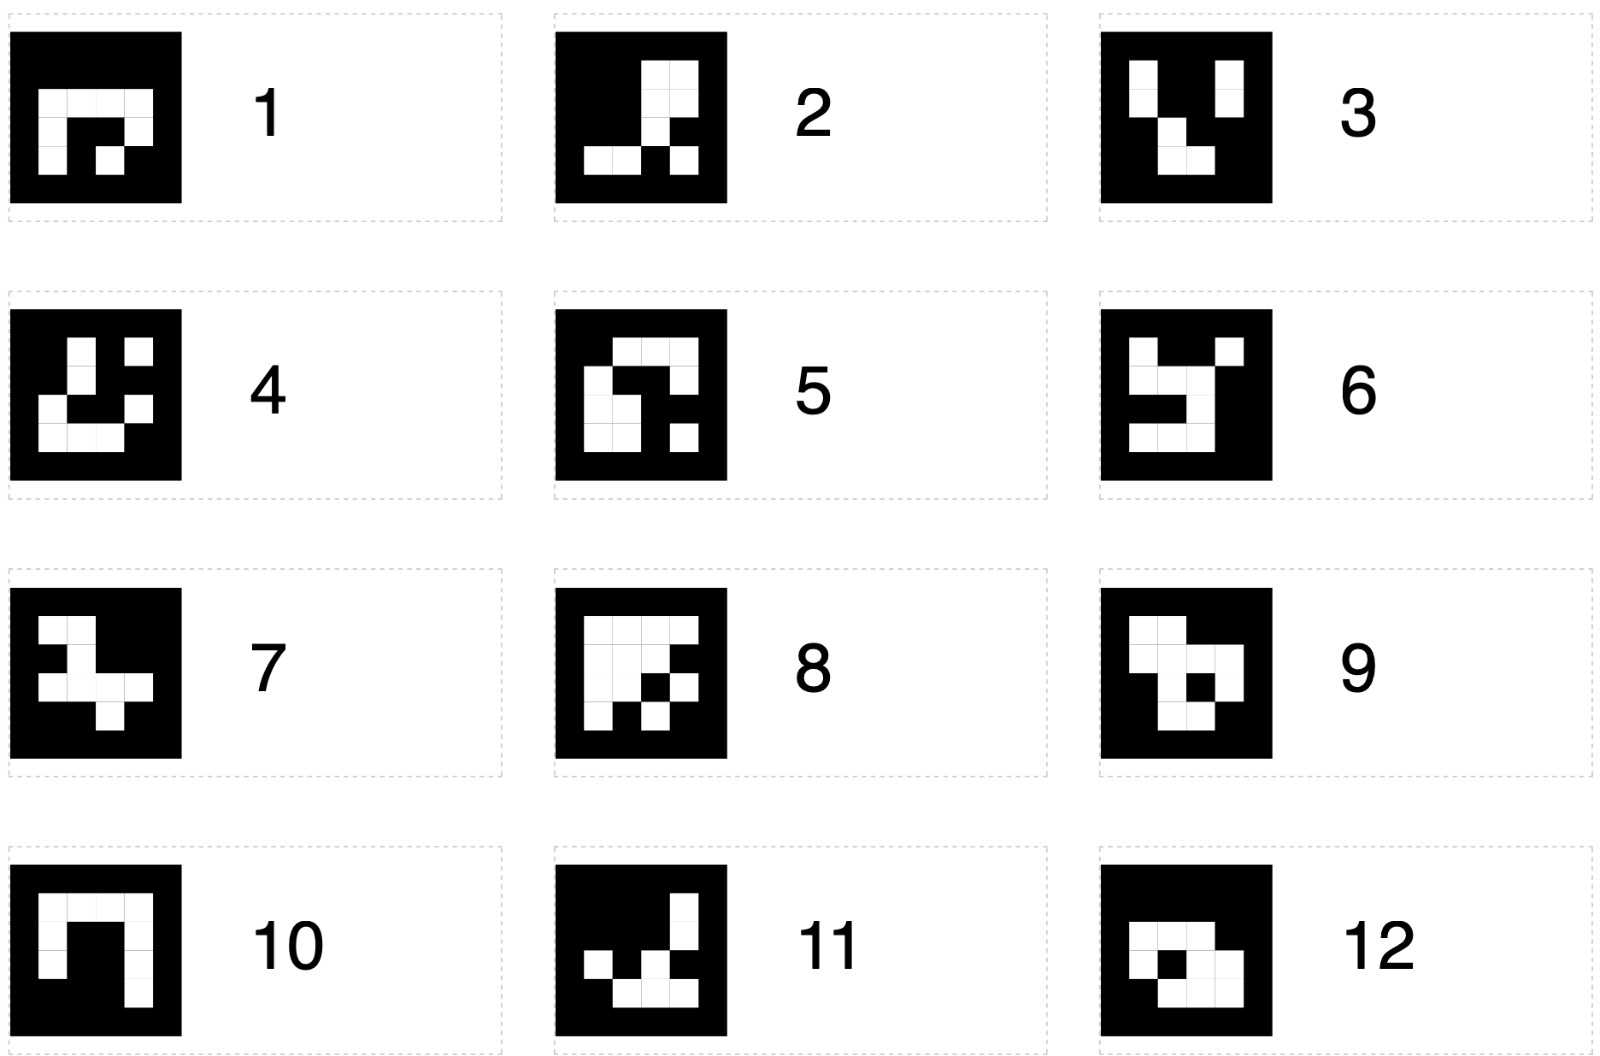
This document outlines the process for generating ArUco markers and detecting them using a Python script with OpenCV. The project involves creating 12 ArUco markers using a 4X4 dictionary and developing code to read these markers from live camera feed.
Generating ArUco Markers
Requirements
- OpenCV library with contrib package (
opencv-contrib-python)
Steps
-
Choose a Dictionary: For this project, we’re using the
DICT_4X4_250dictionary from OpenCV’s ArUco module. -
Generate Markers: Generate 12 unique ArUco markers with IDs ranging from 1 to 12.
-
Print and Prepare Markers: Print the generated markers and place them on your target objects.
import cv2
import cv2.aruco as aruco
import numpy as np

ARUCO_DICT = {
    "DICT_4X4_1000": cv2.aruco.DICT_4X4_1000,
    "DICT_5X5_1000": cv2.aruco.DICT_5X5_1000,
    # Add other dictionaries as needed
}

# Function to generate and save ArUco markers
def generate_and_save_aruco_markers():
    aruco_dict = aruco.getPredefinedDictionary(aruco.DICT_4X4_250)
    for i in range(1, 13):  # Generate 12 markers
        img = aruco.drawMarker(aruco_dict, i, 700)
        cv2.imwrite(f"marker_{i}.png", img)
        print(f"Marker {i} generated and saved.")

generate_and_save_aruco_markers()


Detecting ArUco Markers
Requirements

    A webcam or external camera
    OpenCV library with contrib package

Steps

    Setup Camera: Connect your camera to the computer.

    Run Detection Script: Use the following script to detect the ArUco markers from the camera feed.


import cv2
import cv2.aruco as aruco

def detect_aruco_and_display_id(frame):
    gray = cv2.cvtColor(frame, cv2.COLOR_BGR2GRAY)
    aruco_dict = aruco.getPredefinedDictionary(aruco.DICT_4X4_250)
    parameters = aruco.DetectorParameters_create()

    corners, ids, rejectedImgPoints = aruco.detectMarkers(gray, aruco_dict, parameters=parameters)
    if ids is not None:
        aruco.drawDetectedMarkers(frame, corners, ids)
        print(f"Visible IDs: {', '.join(str(id[0]) for id in ids)}")
    else:
        print("No ArUco markers detected.")
    return frame

cap = cv2.VideoCapture(0)  # Adjust the device index as needed
while True:
    ret, frame = cap.read()
    if not ret:
        break
    frame = detect_aruco_and_display_id(frame)
    cv2.imshow('Frame', frame)
    if cv2.waitKey(1) & 0xFF == ord('q'):
        break
cap.release()
cv2.destroyAllWindows()
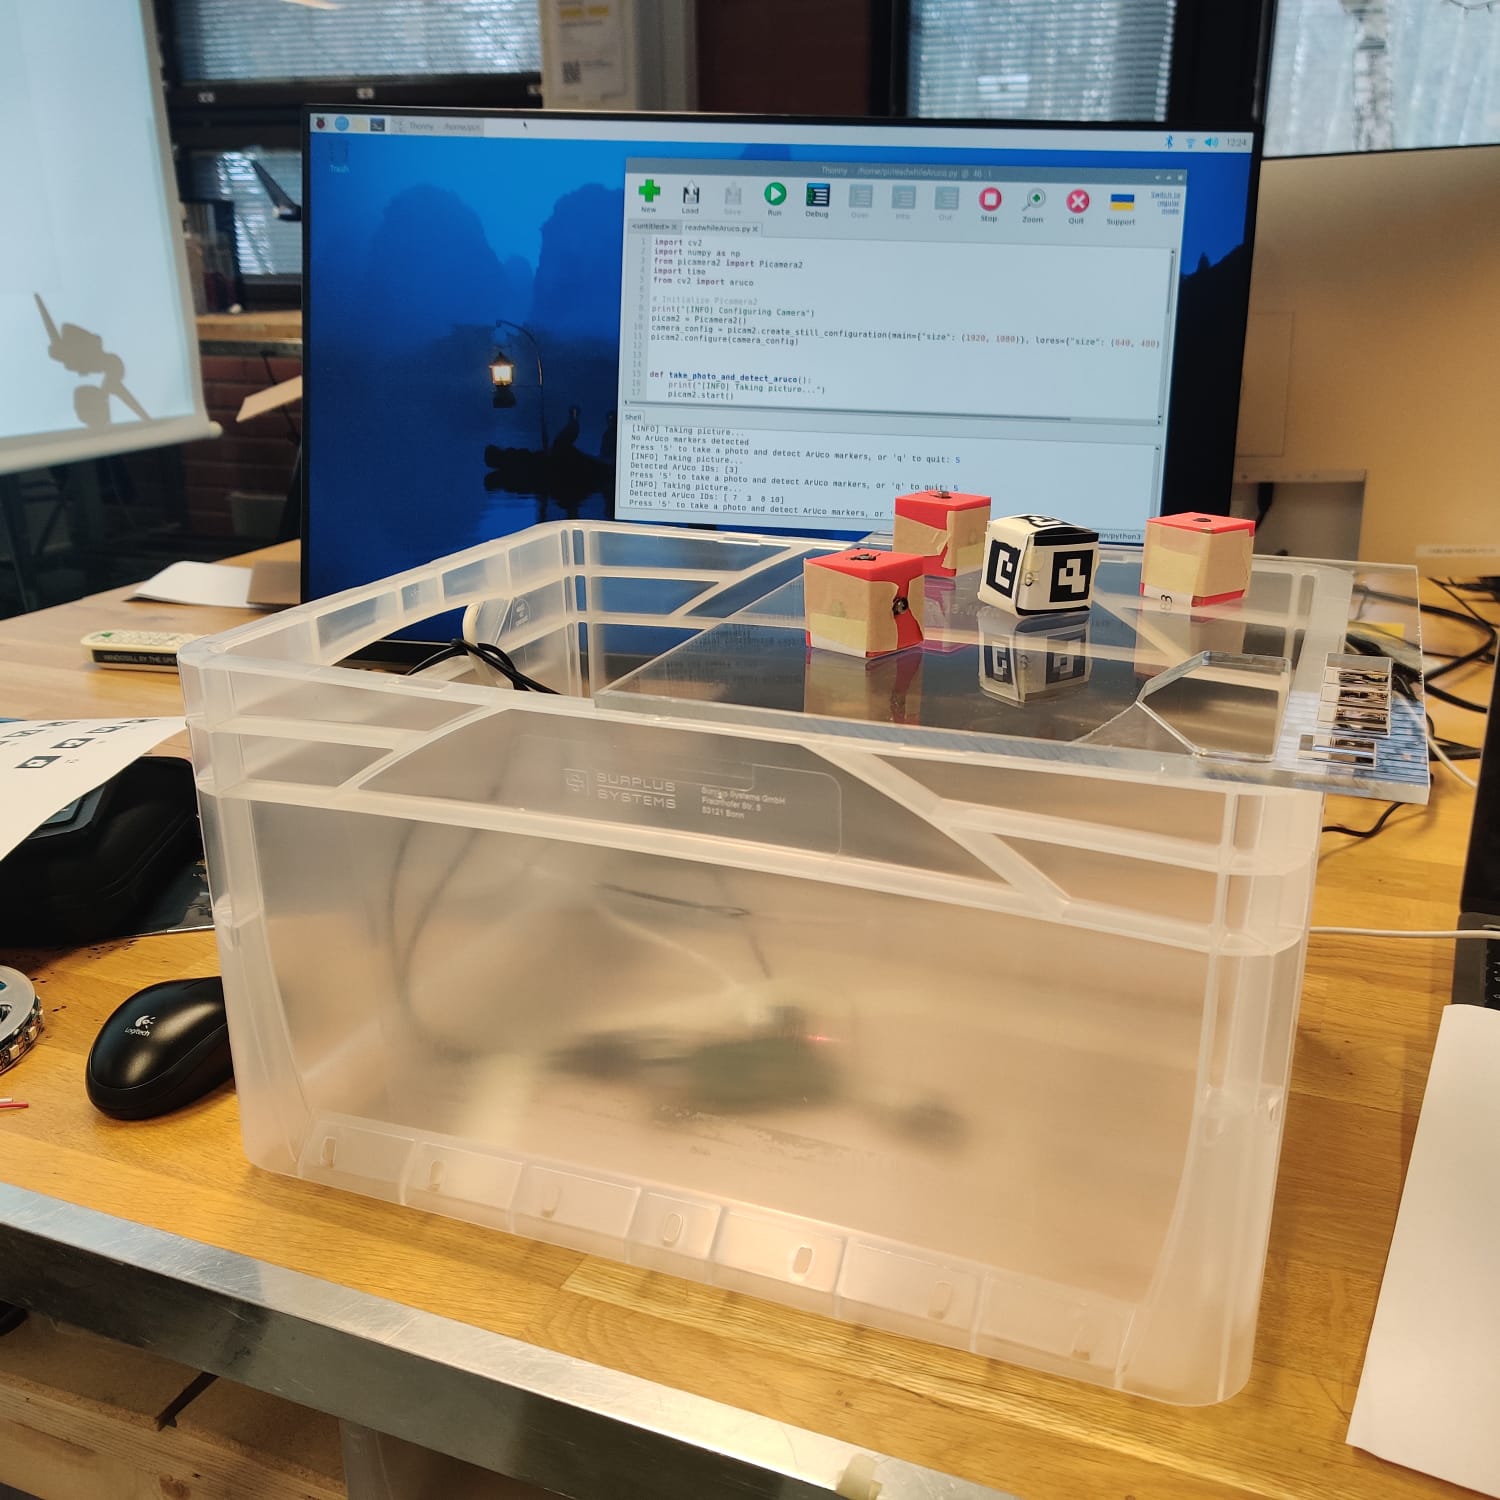
Aruco Detect and Comminicate with Cubes


Network Communication
Camera Detect
Test
Cube PCB Design
Code Section
Flask(app.py)
from flask import Flask, render_template, jsonify
import threading
import requests
import time
import cv2
from cv2 import aruco
import numpy as np
#import ledstrip
from picamera2 import Picamera2

app = Flask(__name__)

# Global değişkenler
picam2 = None

def setup_camera():
    global picam2
    picam2 = Picamera2()
    camera_config = picam2.create_still_configuration(main={"size": (1920, 1080)}, lores={"size": (640, 480)}, display="lores")
    picam2.configure(camera_config)
    print("[INFO] Camera is configured.")

def take_photo_and_detect_aruco():
    global picam2
    print("[INFO] Taking picture...")
    picam2.start()
    frame = picam2.capture_array()
    picam2.stop()
    gray = cv2.cvtColor(frame, cv2.COLOR_BGR2GRAY)
    aruco_dict = aruco.getPredefinedDictionary(aruco.DICT_4X4_50)
    parameters = aruco.DetectorParameters_create()
    corners, ids, rejectedImgPoints = aruco.detectMarkers(gray, aruco_dict, parameters=parameters)

    if ids is not None:
         # ArUco algılandığında LED'leri yeşil yap
        #ledstrip.flash_green(10)
        print(f"Detected ArUco IDs: {ids.flatten()}")
        control_led_by_id(ids.flatten().tolist())
        send_aruco_ids_to_esp(ids.flatten().tolist())
        return ids.flatten().tolist()
    else:
        print("No ArUco markers detected")
        return []
def send_aruco_ids_to_esp(ids):
    ids_str = ','.join(map(str, ids))
    try:
        response = requests.get(f"http://192.168.68.120/show_aruco?ids={ids_str}")
        print("ArUco IDs sent to ESP")
    except Exception as e:
        print(f"Error sending ArUco IDs to ESP: {e}")

def control_led_by_id(ids):
    esp_control = {
        "192.168.68.120": {"range": range(1, 7), "on": "http://192.168.68.120/D10/on", "off": "http://192.168.68.120/D10/off"},
        "192.168.68.121": {"range": range(7, 13), "on": "http://192.168.68.121/D10/on", "off": "http://192.168.68.121/D10/off"},
    }
    for esp_ip, info in esp_control.items():
        if any(id_ in info["range"] for id_ in ids):
            try:
                # LED'i aç
                requests.get(info["on"], timeout=2)
                print(f"LED turned on at ESP {esp_ip} for IDs {ids}")
                # 10 saniye sonra LED'i kapat
                threading.Timer(10, lambda esp_ip=esp_ip: requests.get(esp_control[esp_ip]["off"], timeout=2)).start()
            except Exception as e:
                print(f"Error controlling LED at ESP {esp_ip}: {e}")

@app.route('/')
def index():
    return render_template('index.html')

@app.route('/connect_camera', methods=['GET'])
def connect_camera():
    threading.Thread(target=setup_camera).start()
    return jsonify({'message': 'Camera connection is initiated.'})
    #threading.Thread(target=lambda: (setup_camera(), ledstrip.flash_yellow(5))).start()
    #return jsonify({'message': 'Camera connection is initiated and LEDs flashed yellow for 5 seconds.'})


@app.route('/take_photo', methods=['GET'])
def photo_route():
    ids = take_photo_and_detect_aruco()
    if ids:
        return jsonify({'detected_ids': ids})
    else:
        return jsonify({'message': 'No ArUco markers detected'})

if __name__ == '__main__':
    app.run(debug=True, host='0.0.0.0')
index.html
<!DOCTYPE html>
<html lang="en">
<head>
<meta charset="UTF-8">
<title>Camera and ESP Control</title>
<link rel="stylesheet" href="{{ url_for('static', filename='style.css') }}">
<style>
.device-status {
display: inline-block;
width: 20px;
height: 20px;
border-radius: 50%;
margin: 5px;
}
.active { background-color: green; }
.inactive { background-color: red; }
</style>
</head>
<body>
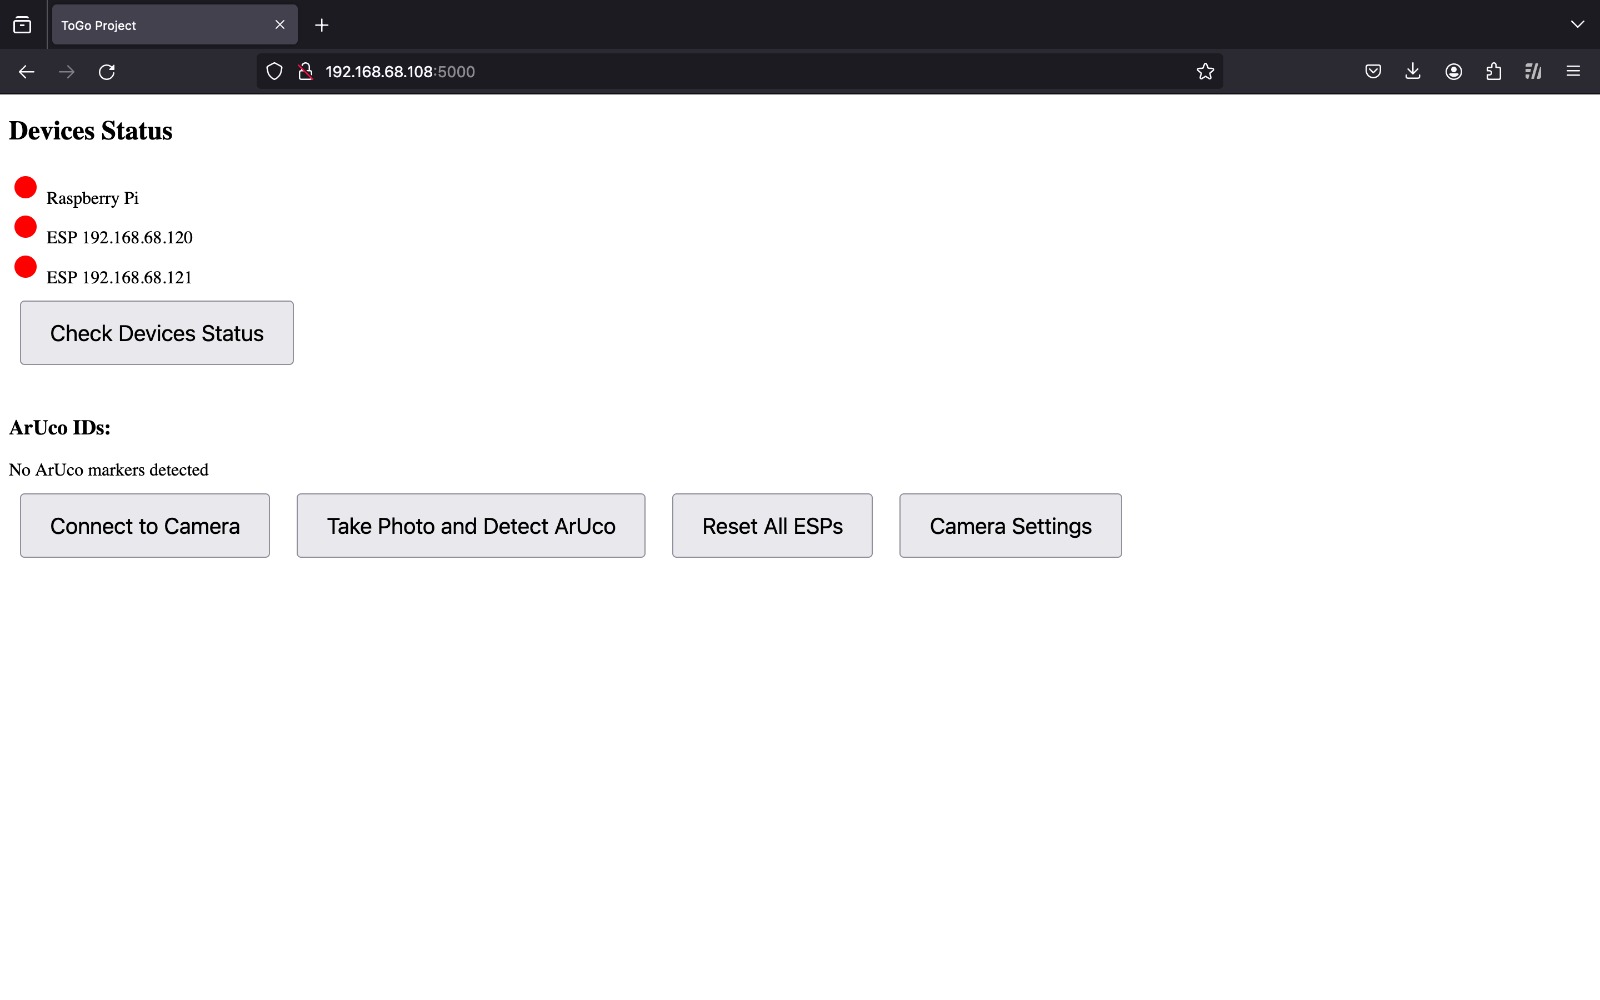
<h2>Devices Status</h2>
<div id="raspiStatus" class="device-status inactive"></div> Raspberry Pi<br>
<div id="esp120Status" class="device-status inactive"></div> ESP 192.168.68.120<br>
<div id="esp121Status" class="device-status inactive"></div> ESP 192.168.68.121<br>
<button onclick="checkDevicesStatus()">Check Devices Status</button>
<br><br>
<button onclick="connectCamera()">Connect to Camera</button>
<button onclick="takePhoto()">Take Photo and Detect ArUco</button>
<button onclick="resetAllESPs()">Reset All ESPs</button>
<script>
function connectCamera() {
fetch('/connect_camera')
.then(response => response.json())
.then(data => alert(data.message));
}
function takePhoto() {
fetch('/take_photo')
.then(response => response.json())
.then(data => alert('Detected IDs: ' + data.detected_ids));
}
function resetAllESPs() {
// Tüm ESP'leri sıfırlamak için sıfırlama URL'lerine istek gönder
fetch('http://192.168.68.120/reset')
.then(response => console.log('Reset request sent to ESP 192.168.68.120'))
.catch(error => console.error('Error:', error));
fetch('http://192.168.68.121/reset')
.then(response => console.log('Reset request sent to ESP 192.168.68.121'))
.catch(error => console.error('Error:', error));
// Durum göstergelerini sıfırla
updateDeviceStatus('raspiStatus', false);
updateDeviceStatus('esp120Status', false);
updateDeviceStatus('esp121Status', false);
}
function checkDevicesStatus() {
// Raspberry Pi durumu kontrol et (Örnek olarak, bu işlevsellik şu anda gerçekleştirilmemiştir)
fetch('/api/check_status/raspi')
.then(response => response.json())
.then(data => updateDeviceStatus('raspiStatus', data.isActive))
.catch(error => console.error('Error checking Raspberry Pi status:', error));
// ESP 192.168.68.120 durumu kontrol et
fetch('/api/check_status/esp120')
.then(response => response.json())
.then(data => updateDeviceStatus('esp120Status', data.isActive))
.catch(error => console.error('Error checking ESP 192.168.68.120 status:', error));
// ESP 192.168.68.121 durumu kontrol et
fetch('/api/check_status/esp121')
.then(response => response.json())
.then(data => updateDeviceStatus('esp121Status', data.isActive))
.catch(error => console.error('Error checking ESP 192.168.68.121 status:', error));
}
function updateDeviceStatus(elementId, isActive) {
const element = document.getElementById(elementId);
if(isActive) {
element.classList.remove('inactive');
element.classList.add('active');
} else {
element.classList.remove('active');
element.classList.add('inactive');
}
}
</script>
</body>
</html>
Cube Code
#include <WiFi.h>
#include <U8g2lib.h>
#include <Adafruit_NeoPixel.h>
#ifdef U8X8_HAVE_HW_SPI
#include <SPI.h>
#endif
#ifdef U8X8_HAVE_HW_I2C
#include <Wire.h>
#endif
#define PIN D9 // Pin connected to the RGB LED
#define NUMPIXELS 1 // Number of LEDs
#define NORMAL_LED D10 // Pin connected to the normal LED
bool ledState = false; // LED initially off
Adafruit_NeoPixel pixels(NUMPIXELS, PIN, NEO_GRB + NEO_KHZ800);
U8G2_SSD1306_128X64_NONAME_F_SW_I2C u8g2(U8G2_R0, SCL, SDA, U8X8_PIN_NONE);
const char* ssid = "*********";
const char* password = "**********";
WiFiServer server(80);
IPAddress local_IP(192, 168, 68, 122);
IPAddress gateway(192, 168, 68, 1);
IPAddress subnet(255, 255, 255, 0);
String header;
String arucoIDs = "";
void setup() {
Serial.begin(115200);
pixels.begin();
pixels.show(); // Turn off all LEDs initially
u8g2.begin();
u8g2.enableUTF8Print();
pinMode(NORMAL_LED, OUTPUT); // Set the normal LED pin as output
digitalWrite(NORMAL_LED, LOW); // LED initially off
if (!WiFi.config(local_IP, gateway, subnet)) {
Serial.println("STA Failed to configure");
}
WiFi.begin(ssid, password);
while (WiFi.status() != WL_CONNECTED) {
delay(500);
Serial.print(".");
}
Serial.println("");
Serial.println("WiFi connected.");
Serial.println("IP address: ");
Serial.println(WiFi.localIP());
server.begin();
}
void loop() {
WiFiClient client = server.available();
if (client) {
Serial.println("New Client.");
String currentLine = "";
while (client.connected()) {
if (client.available()) {
char c = client.read();
header += c;
if (c == '\n') {
if (currentLine.length() == 0) {
// Receive ArUco IDs and control LEDs
if (header.indexOf("GET /show_aruco?ids=") >= 0) {
int startPos = header.indexOf('=') + 1;
int endPos = header.indexOf(' ', startPos);
arucoIDs = header.substring(startPos, endPos);
Serial.println("Received ArUco IDs: " + arucoIDs);
digitalWrite(NORMAL_LED, HIGH); // Turn on the normal LED
// You can set the RGB LED to a specific color here
flashDifferentColors(); // Flash in different colors
pixels.clear(); // Turn off the LED
pixels.show();
}
if (header.indexOf("GET /D10/on") >= 0) {
Serial.println("Normal LED on");
digitalWrite(NORMAL_LED, HIGH); // Turn on the normal LED
ledState = true; // Update LED state
} else if (header.indexOf("GET /D10/off") >= 0) {
Serial.println("Normal LED off");
digitalWrite(NORMAL_LED, LOW); // Turn off the normal LED
ledState = false; // Update LED state
}
// Web server response
client.println("HTTP/1.1 200 OK");
client.println("Content-type:text/html");
client.println("Connection: close");
client.println();
client.println("<!DOCTYPE html><html>");
client.println("<head><meta name=\"viewport\" content=\"width=device-width, initial-scale=1\">");
client.println("</head><body>");
client.println("<h1>ESP32 Web Server</h1>");
client.println("</body></html>");
client.stop();
} else {
currentLine = "";
}
} else if (c != '\r') {
currentLine += c;
}
}
}
header = "";
Serial.println("Client Disconnected.");
}
// OLED screen updates and other processes...
// Print ArUco IDs and other information on the OLED
updateOledDisplay();
}
void updateOledDisplay() {
u8g2.clearBuffer(); // Clear the screen content
u8g2.setFont(u8g2_font_6x10_tf); // Set font size
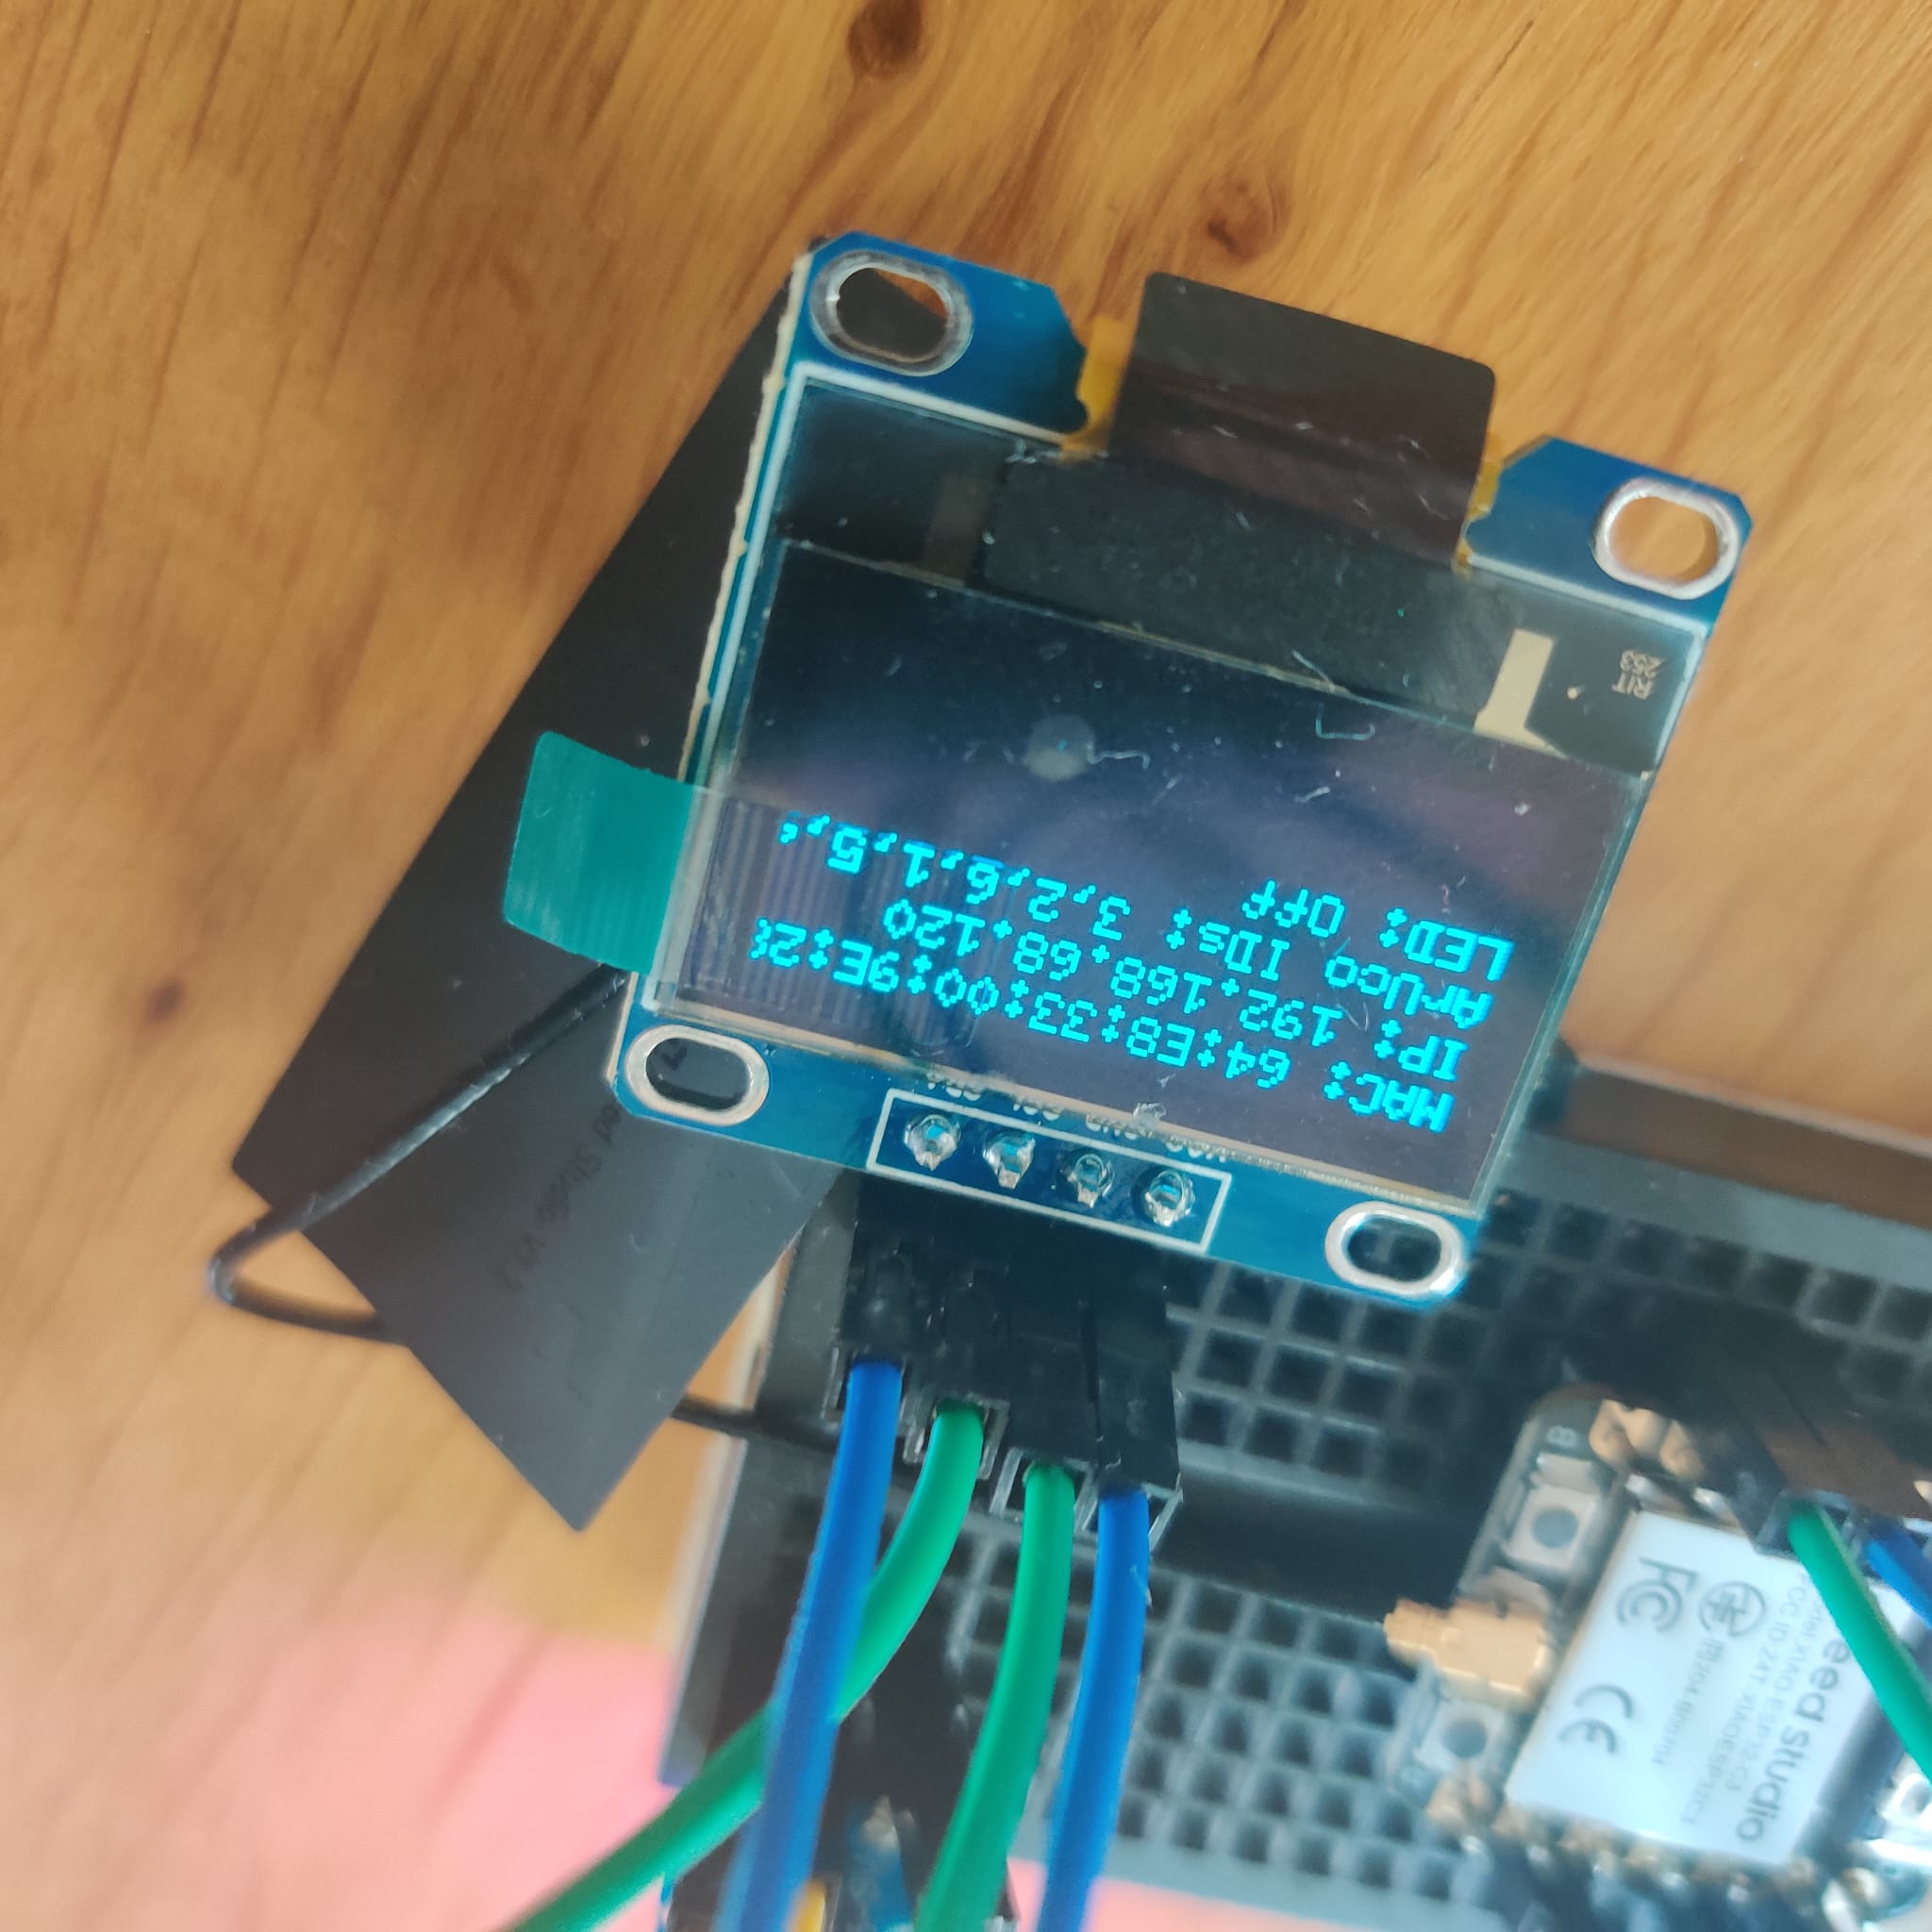
// Print the WiFi MAC address
u8g2.setCursor(0, 10); // Position the cursor
u8g2.print("MAC: ");
u8g2.print(WiFi.macAddress());
// Print the WiFi IP address
u8g2.setCursor(0, 20); // Position the cursor
u8g2.print("IP: ");
u8g2.print(WiFi.localIP());
// Print ArUco IDs
u8g2.setCursor(0, 30); // Position the cursor
u8g2.print("ArUco IDs: ");
u8g2.print(arucoIDs);
// Print LED status
u8g2.setCursor(0, 40); // Position the cursor
u8g2.print("LED: ");
u8g2.print(ledState ? "On" : "Off"); // Print "On" or "Off" based on LED status
u8g2.sendBuffer(); // Display updates on the screen
}
void flashDifferentColors() {
// Flash in different colors at specified intervals
for(int i = 0; i < 3; i++) { // 3 cycles for each color
pixels.setPixelColor(0, pixels.Color(255, 0, 0)); // Red
pixels.show();
delay(1000); // Wait 1 second
pixels.setPixelColor(0, pixels.Color(0, 255, 0)); // Green
pixels.show();
delay(1000); // Wait 1 second
pixels.setPixelColor(0, pixels.Color(0, 0, 255)); // Blue
pixels.show();
delay(1000); // Wait 1 second
}
}
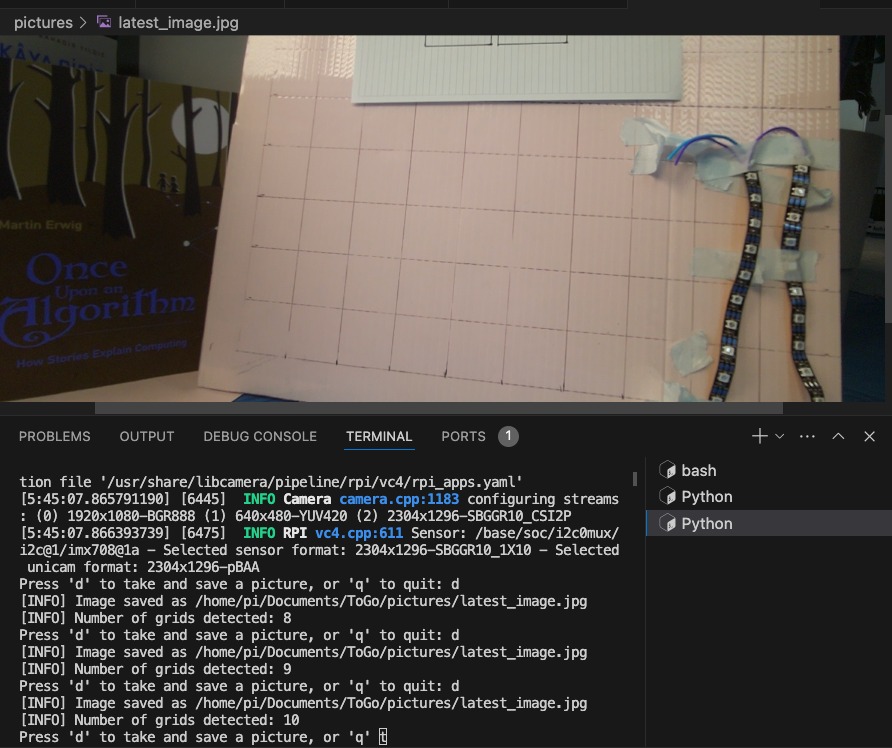
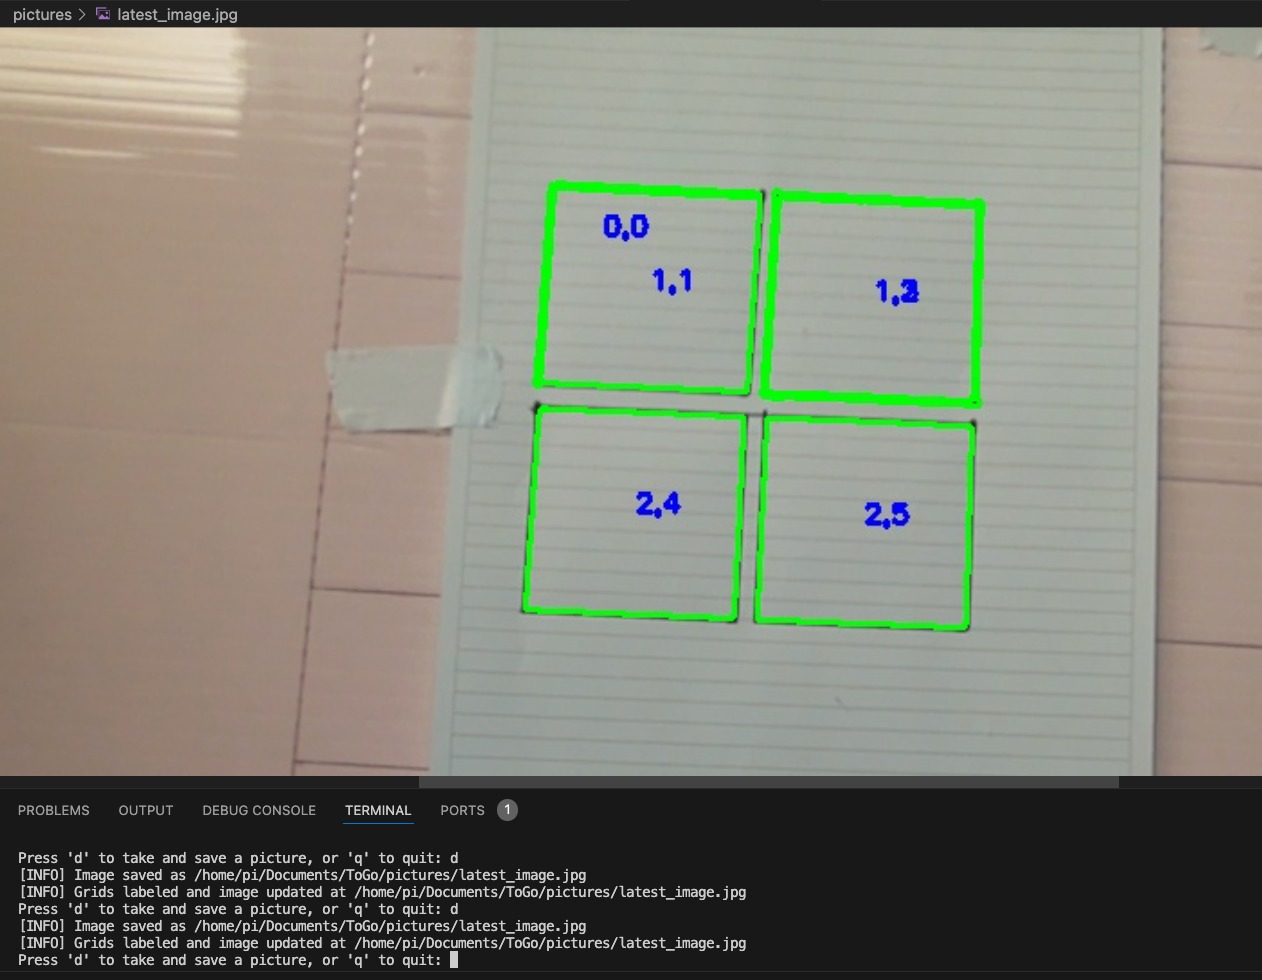
Grid Detection Code
import cv2
import numpy as np
from picamera2 import Picamera2
import time
import os
def setup_camera():
# Configures the camera settings using Picamera2 library.
print("[INFO] Configuring Camera")
picam2 = Picamera2()
try:
camera_config = picam2.create_still_configuration(main={"size": (1920, 1080)}, lores={"size": (640, 480)}, display="lores")
picam2.configure(camera_config)
except Exception as e:
print("[ERROR] Failed to configure camera:", str(e))
return None
return picam2
def save_image(frame, filename="latest_image.jpg", folder="/home/pi/Documents/ToGo/pictures"):
# Saves the captured frame as an image file to the specified directory.
if not os.path.exists(folder):
os.makedirs(folder)
path = os.path.join(folder, filename)
cv2.imwrite(path, frame)
print(f"[INFO] Image saved as {path}")
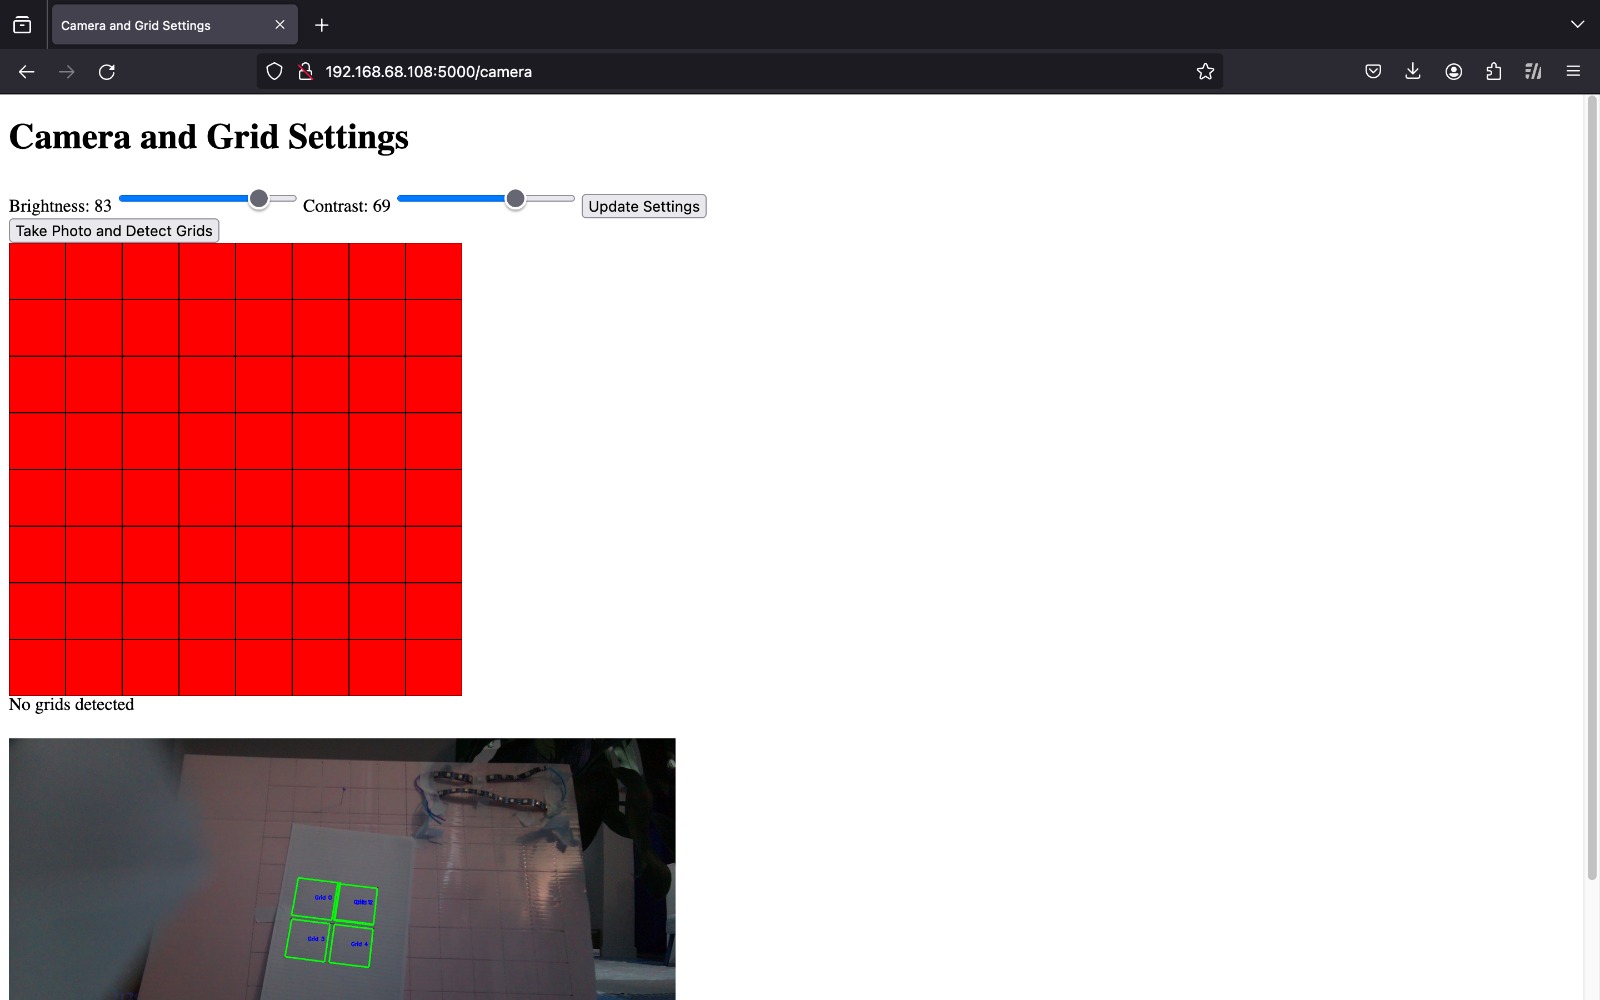
def detect_grid(image_path):
"""
This function loads an image from the specified file path and attempts to detect grid-like structures in the image
by analyzing its contours.
Parameters:
- image_path (str): The file path of the image to analyze.
Returns:
- list: A list of detected grid contours, if any.
"""
# Load the image from the specified path.
frame = cv2.imread(image_path)
if frame is None:
print("[ERROR] Failed to load image for grid detection.")
return
# Convert the image to grayscale to simplify the analysis.
gray = cv2.cvtColor(frame, cv2.COLOR_BGR2GRAY)
# Apply Canny edge detection to find edges in the image. The parameters can be tuned based on the specific requirements
# and quality of the image.
# - First parameter: lower threshold for the hysteresis procedure.
# - Second parameter: higher threshold for the hysteresis procedure.
# - apertureSize: The size of the Sobel kernel used for finding gradients.
edges = cv2.Canny(gray, 50, 150, apertureSize=3)
# Find contours in the edged image. The function returns a list of contours found.
# - Retrieval mode RETR_TREE retrieves all of the contours and reconstructs a full hierarchy of nested contours.
# - Approximation method CHAIN_APPROX_SIMPLE compresses horizontal, vertical, and diagonal segments and leaves only their end points.
contours, _ = cv2.findContours(edges, cv2.RETR_TREE, cv2.CHAIN_APPROX_SIMPLE)
detected_grids = []
# Loop through the contours to analyze if they form a grid.
for cnt in contours:
# Approximate the contour shape to another shape with fewer vertices depending upon the specified precision.
# - epsilon: Maximum distance from contour to approximated contour. It is an accuracy parameter.
# - True indicates that the approximated contour is closed.
epsilon = 0.1 * cv2.arcLength(cnt, True)
approx = cv2.approxPolyDP(cnt, epsilon, True)
# Check if the approximated contour has exactly four corners (indicating a rectangle or square, possibly a grid cell).
if len(approx) == 4:
# Calculate the area of the contour to filter out smaller or larger shapes.
area = cv2.contourArea(cnt)
# If the area is above a certain threshold, it is considered as a potential grid.
if area > 500:
detected_grids.append(cnt)
print(f"[INFO] Number of grids detected: {len(detected_grids)}")
return detected_grids
def main():
# Main function to initialize the camera and handle user commands.
picam2 = setup_camera()
if picam2 is None:
print("[ERROR] Camera setup failed. Exiting.")
return
try:
while True:
key = input("Press 'd' to take and save a picture, or 'q' to quit: ")
if key == 'd':
picam2.start()
time.sleep(1)
frame = picam2.capture_array()
picam2.stop()
if frame is not None:
save_image(frame) # Save the image
image_path = "/home/pi/Documents/ToGo/pictures/latest_image.jpg"
detect_grid(image_path) # Detect grids on the saved image
else:
print("[ERROR] No frame captured, frame is None.")
elif key.lower() == 'q':
print("[INFO] Exiting program.")
break
except KeyboardInterrupt:
print("[INFO] Program exited by user.")
if __name__ == "__main__":
main()
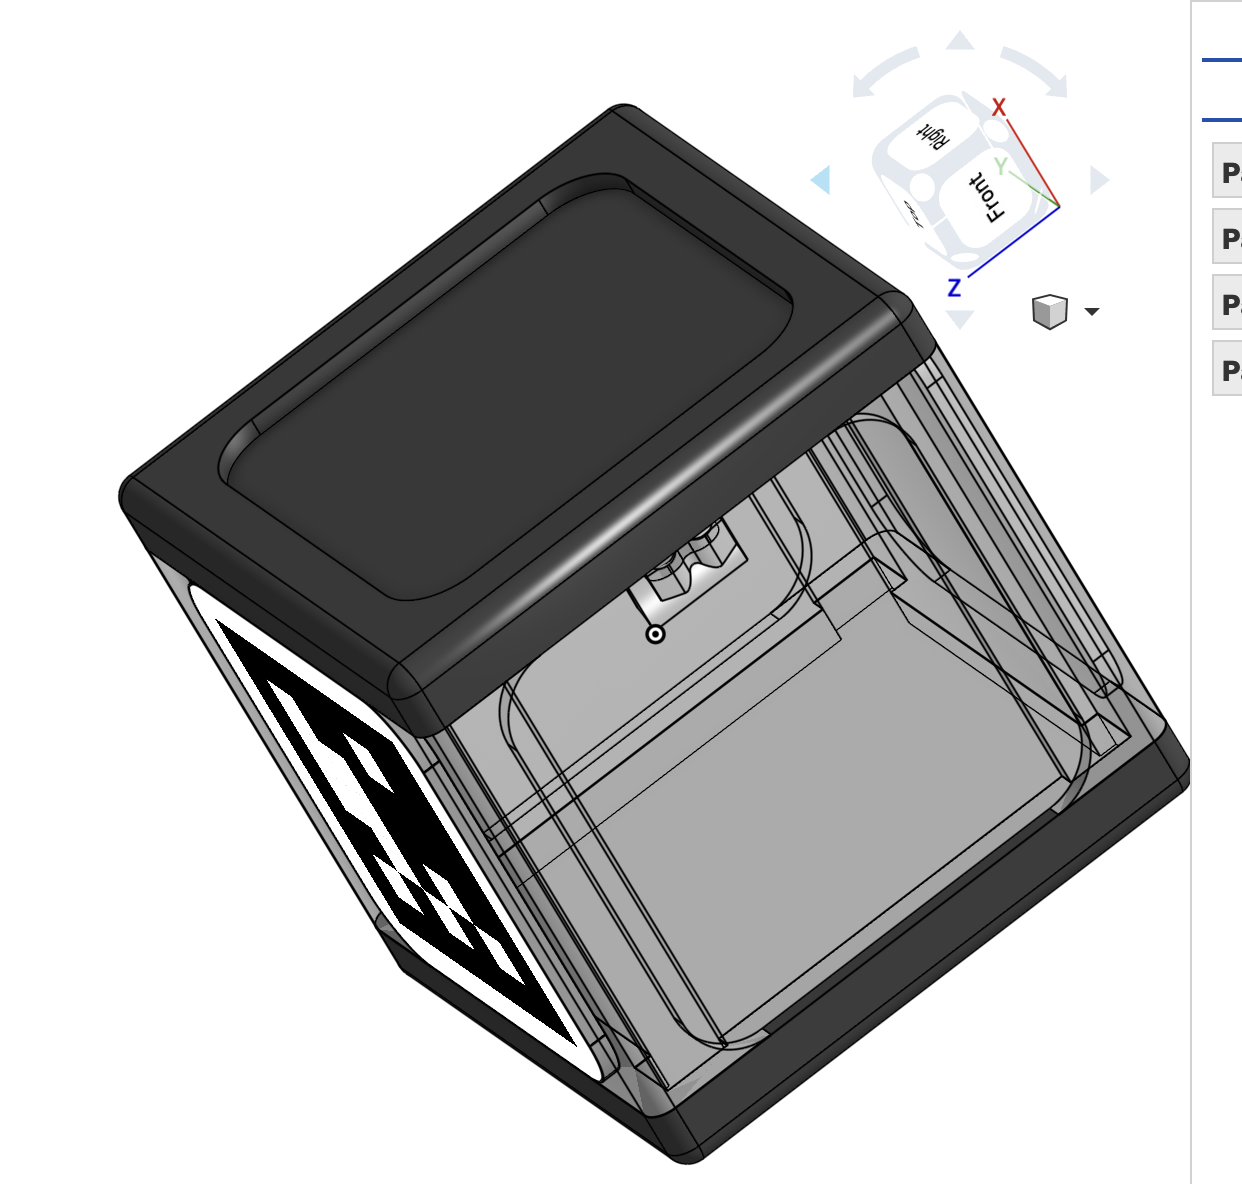
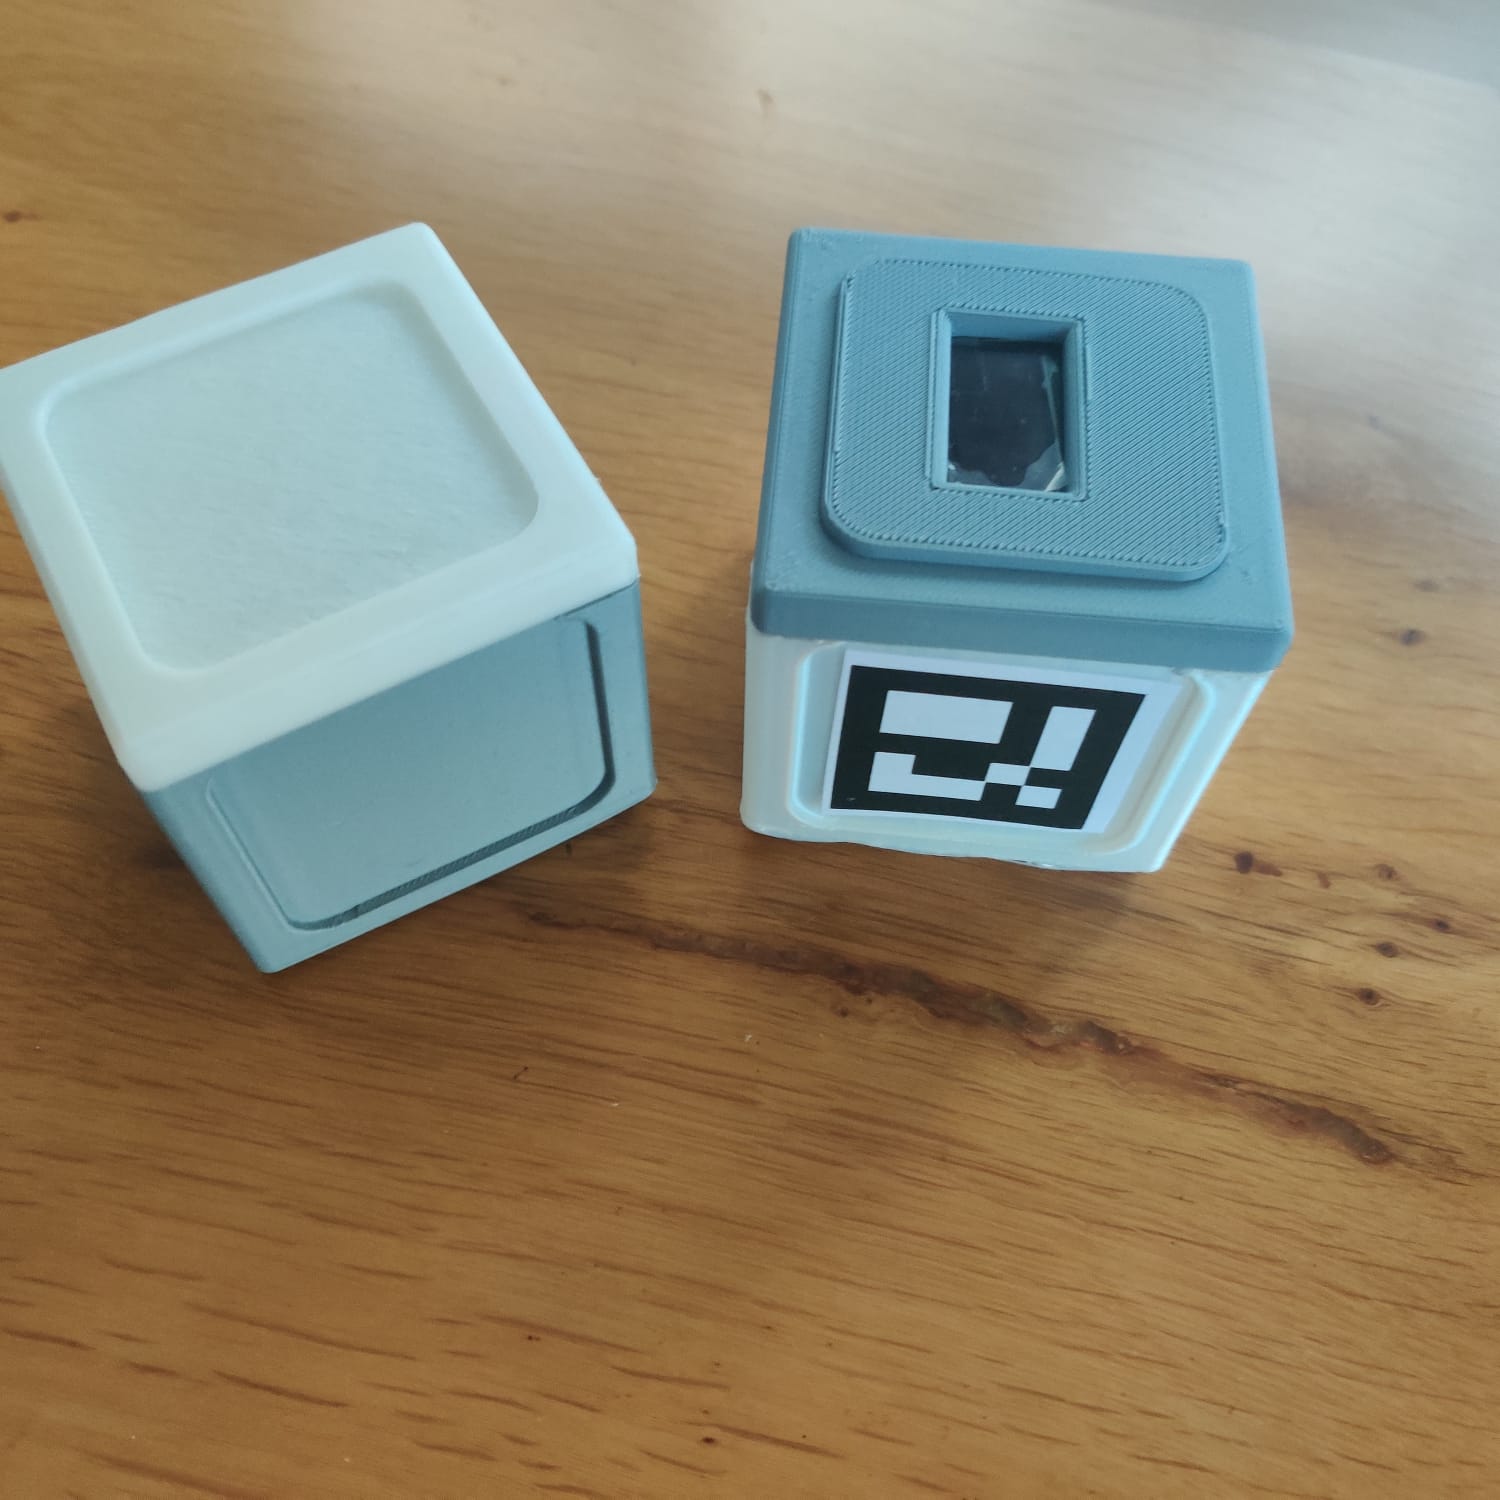
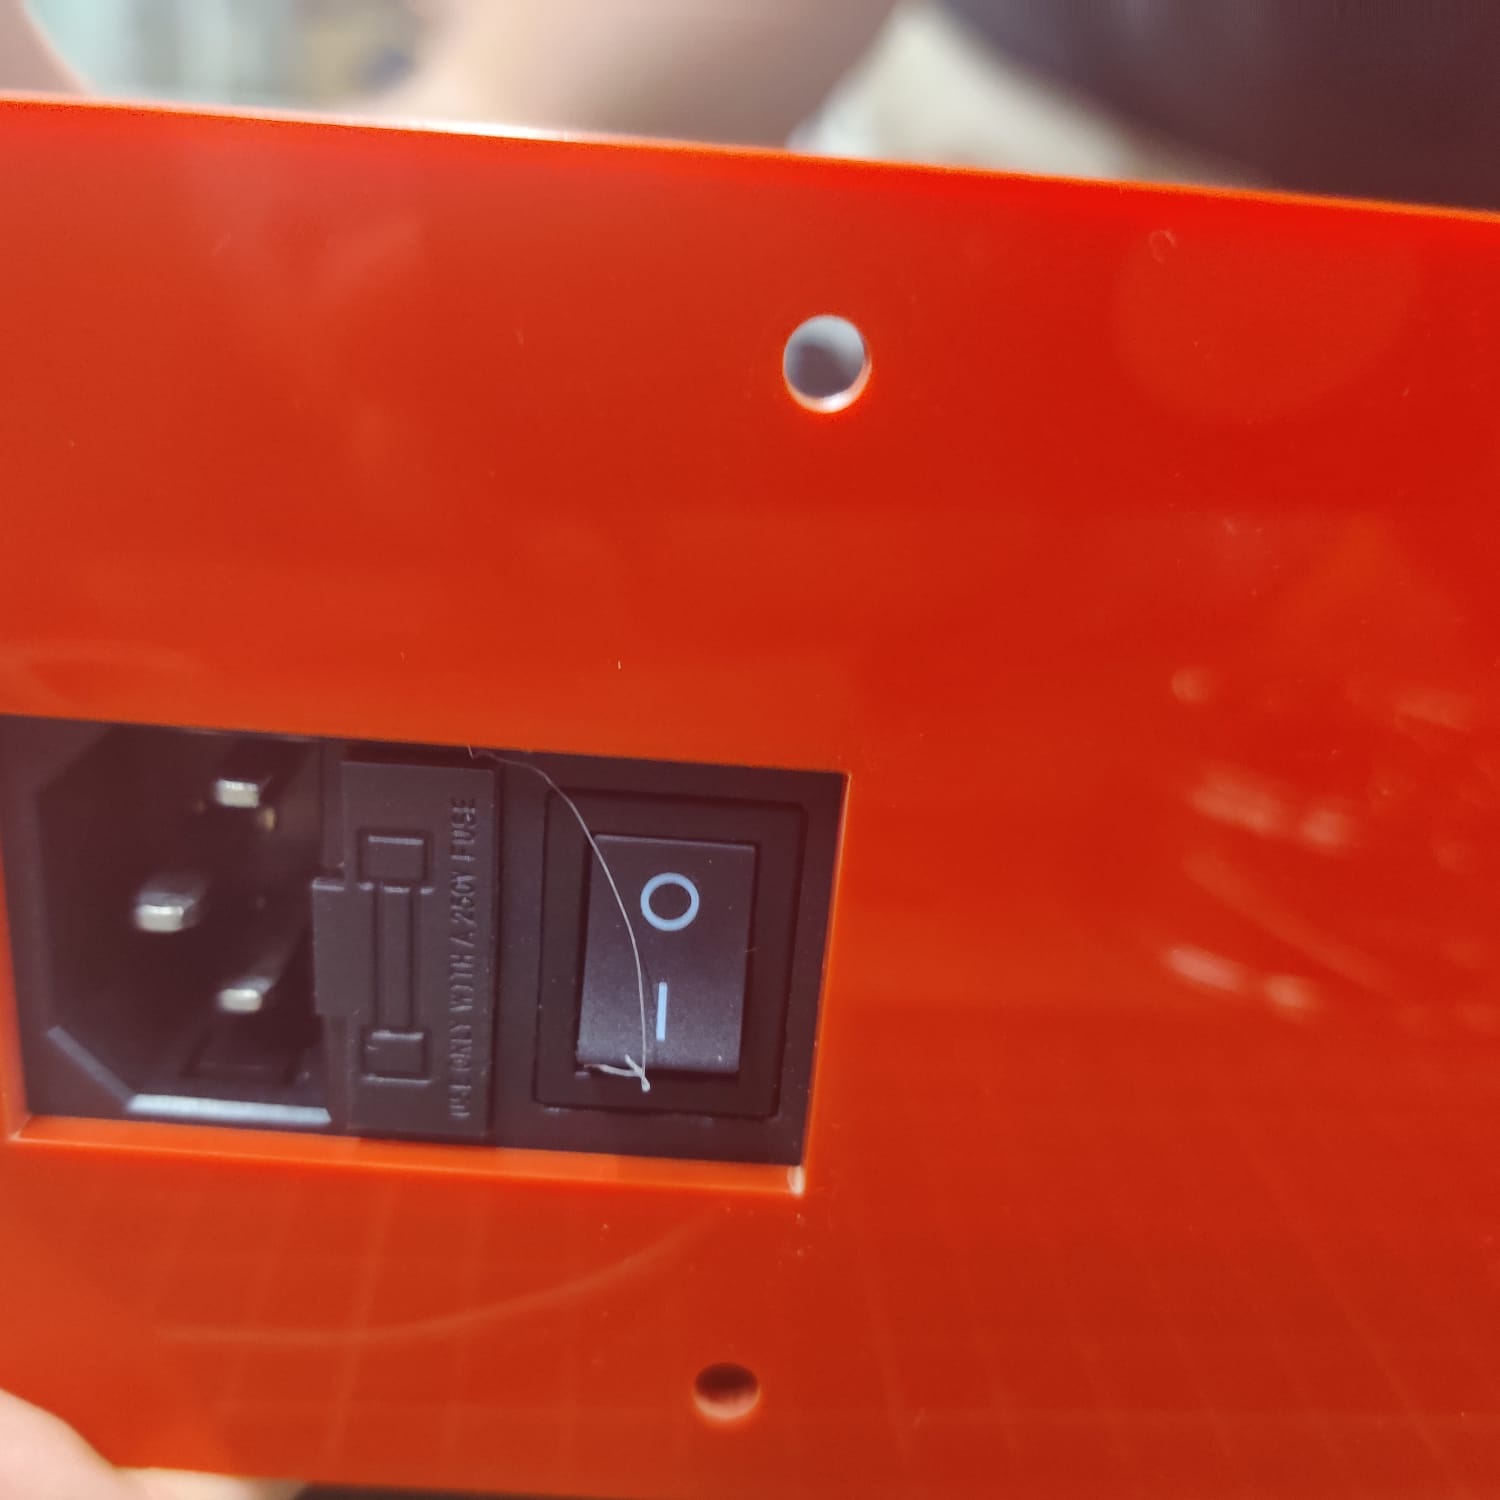
Design Stage
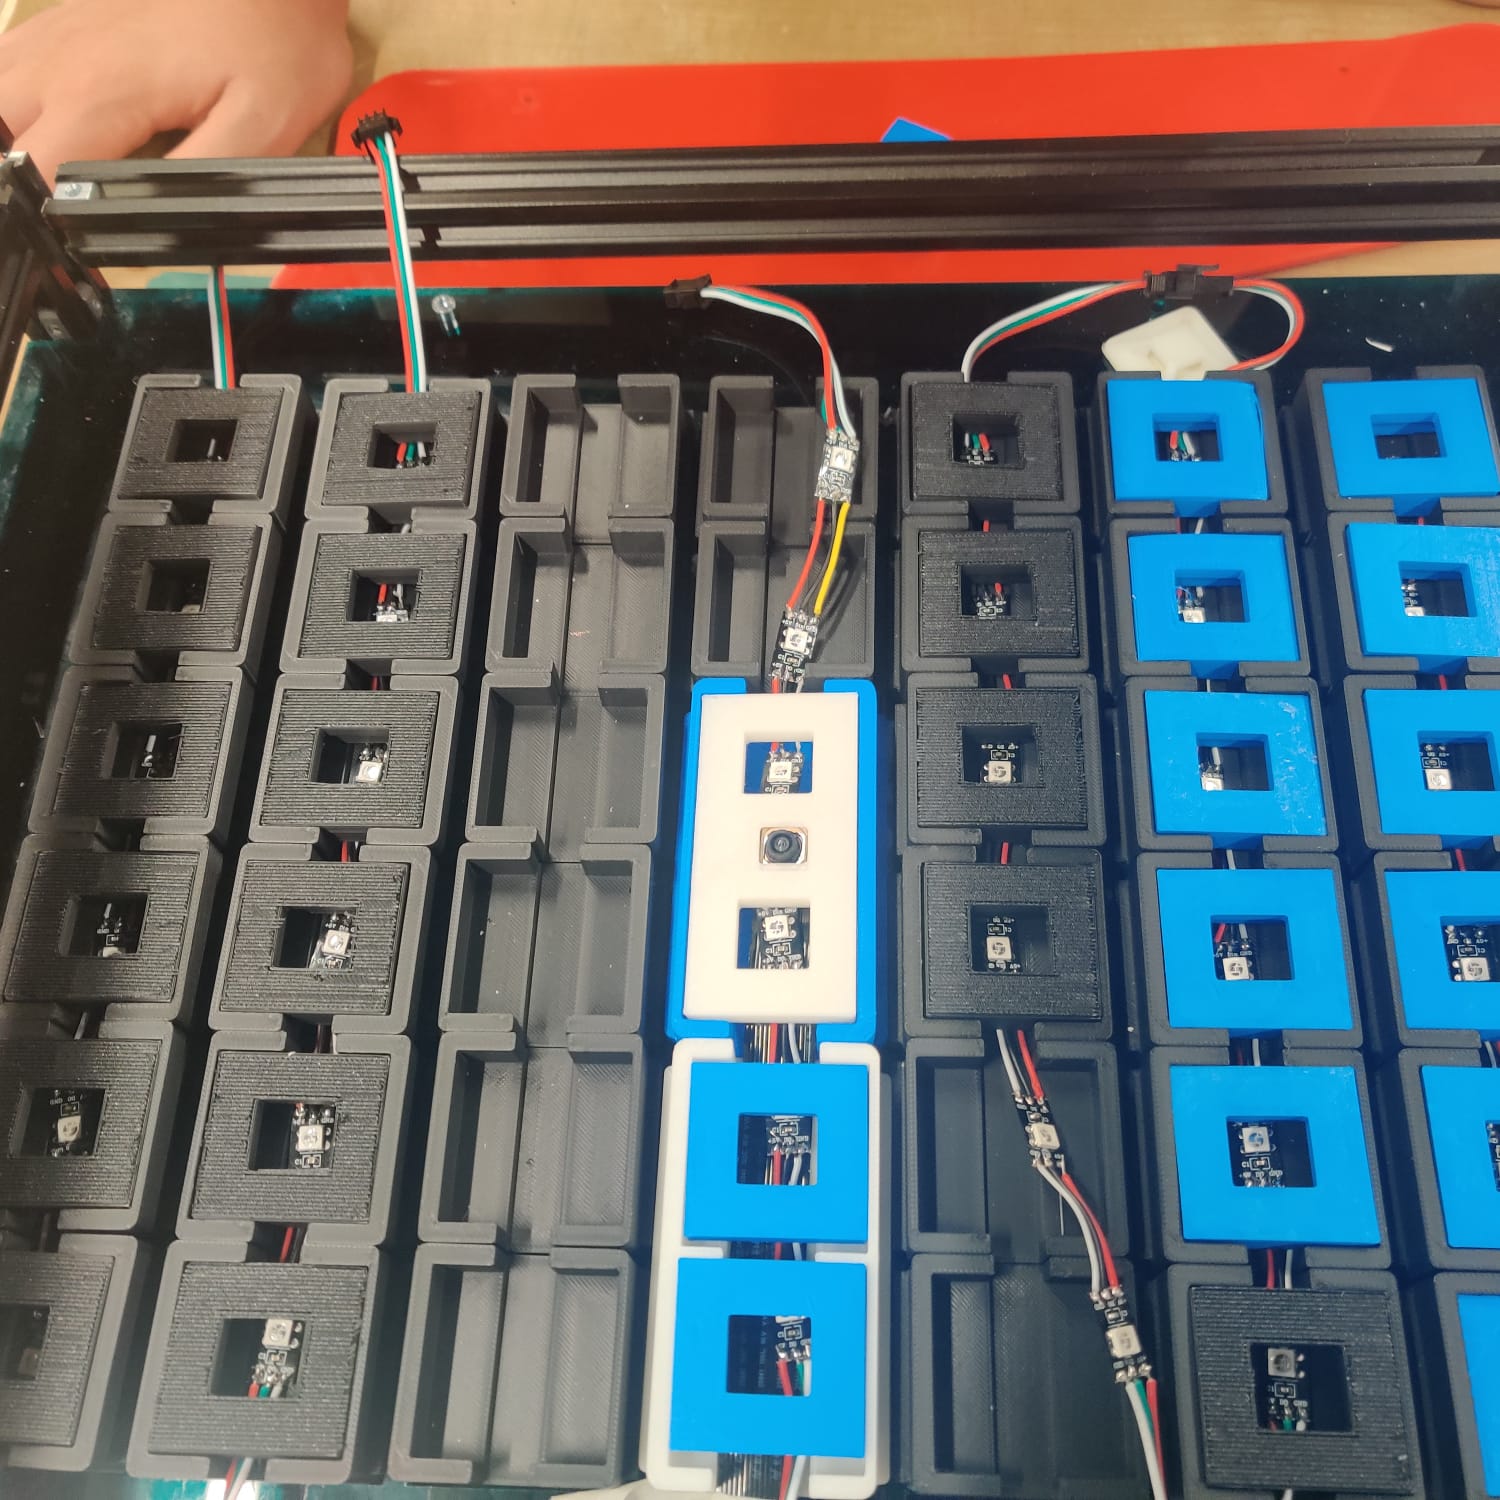
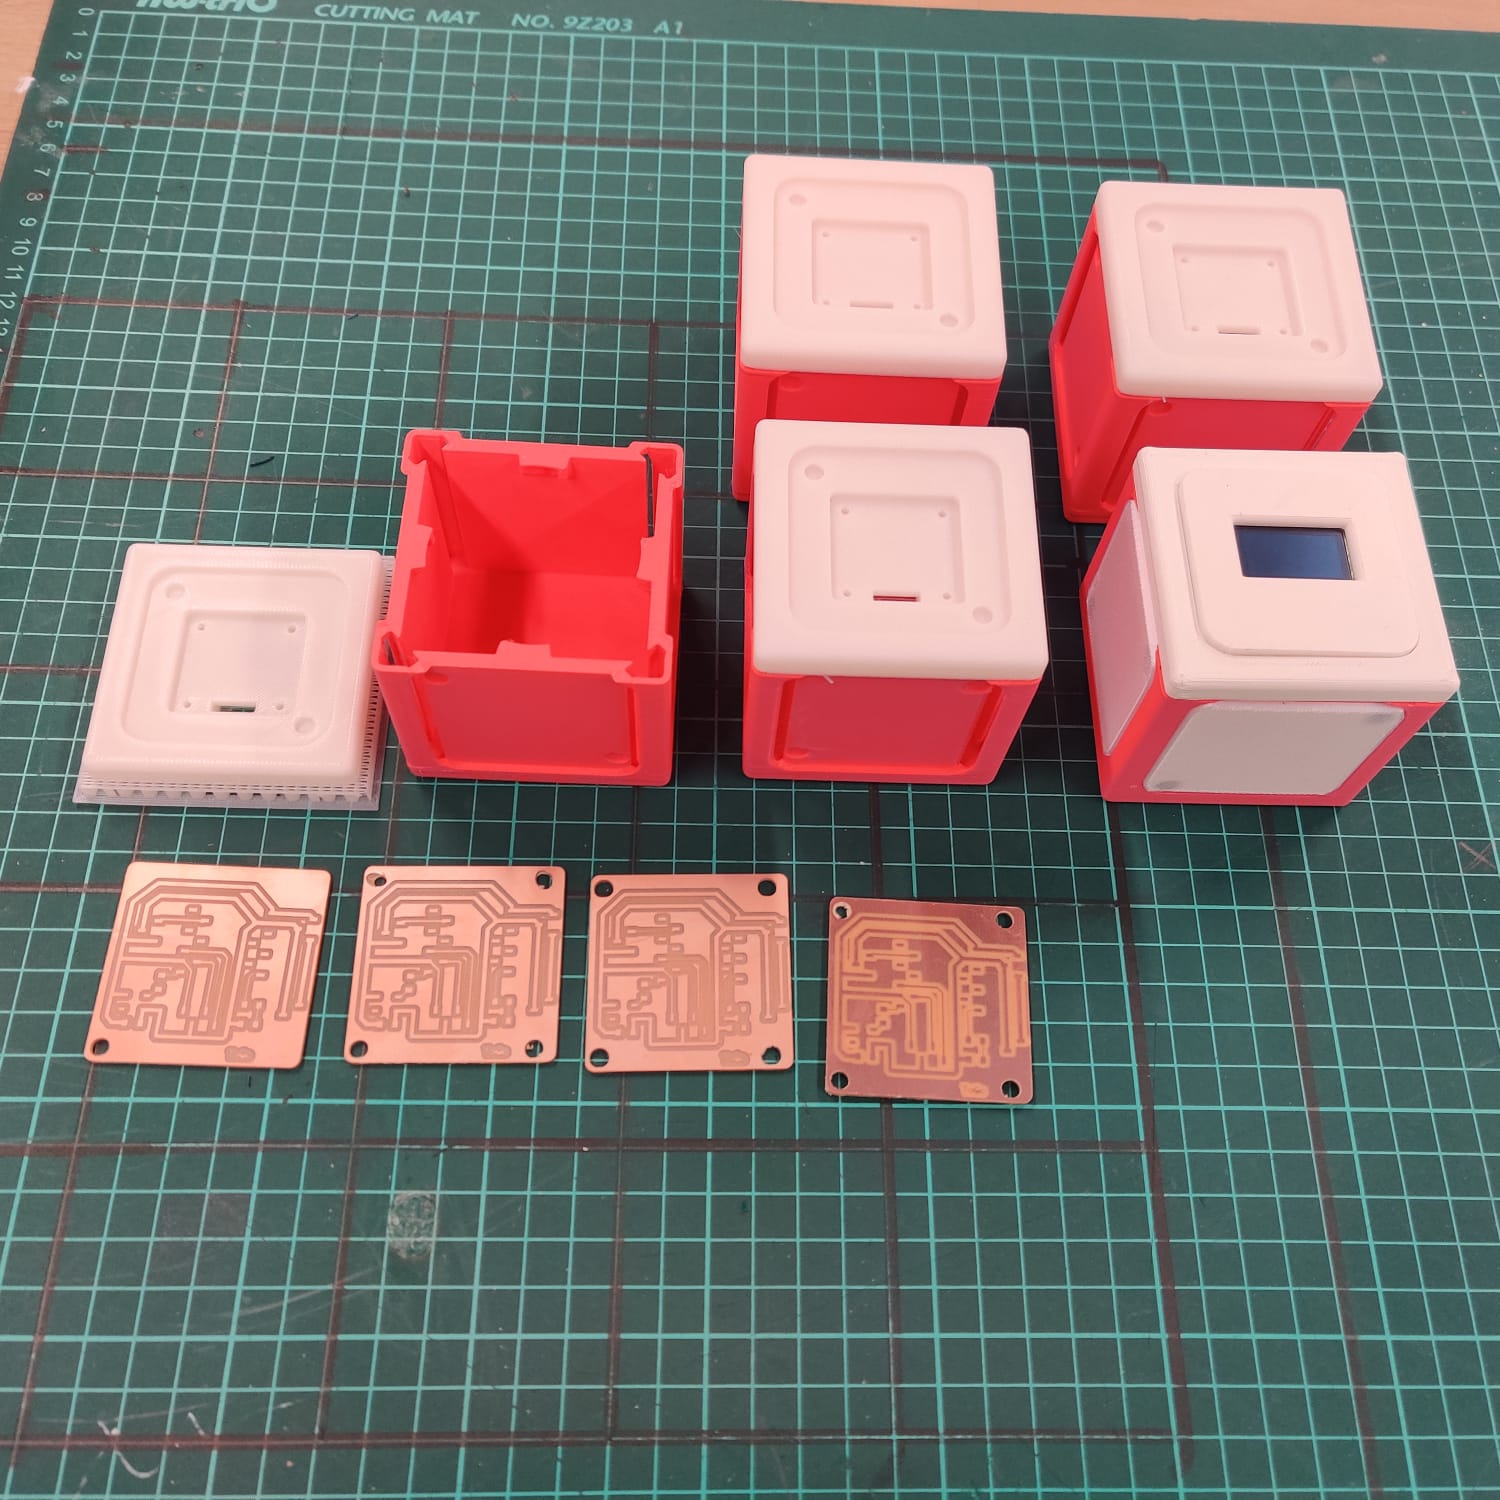
Cube Desing
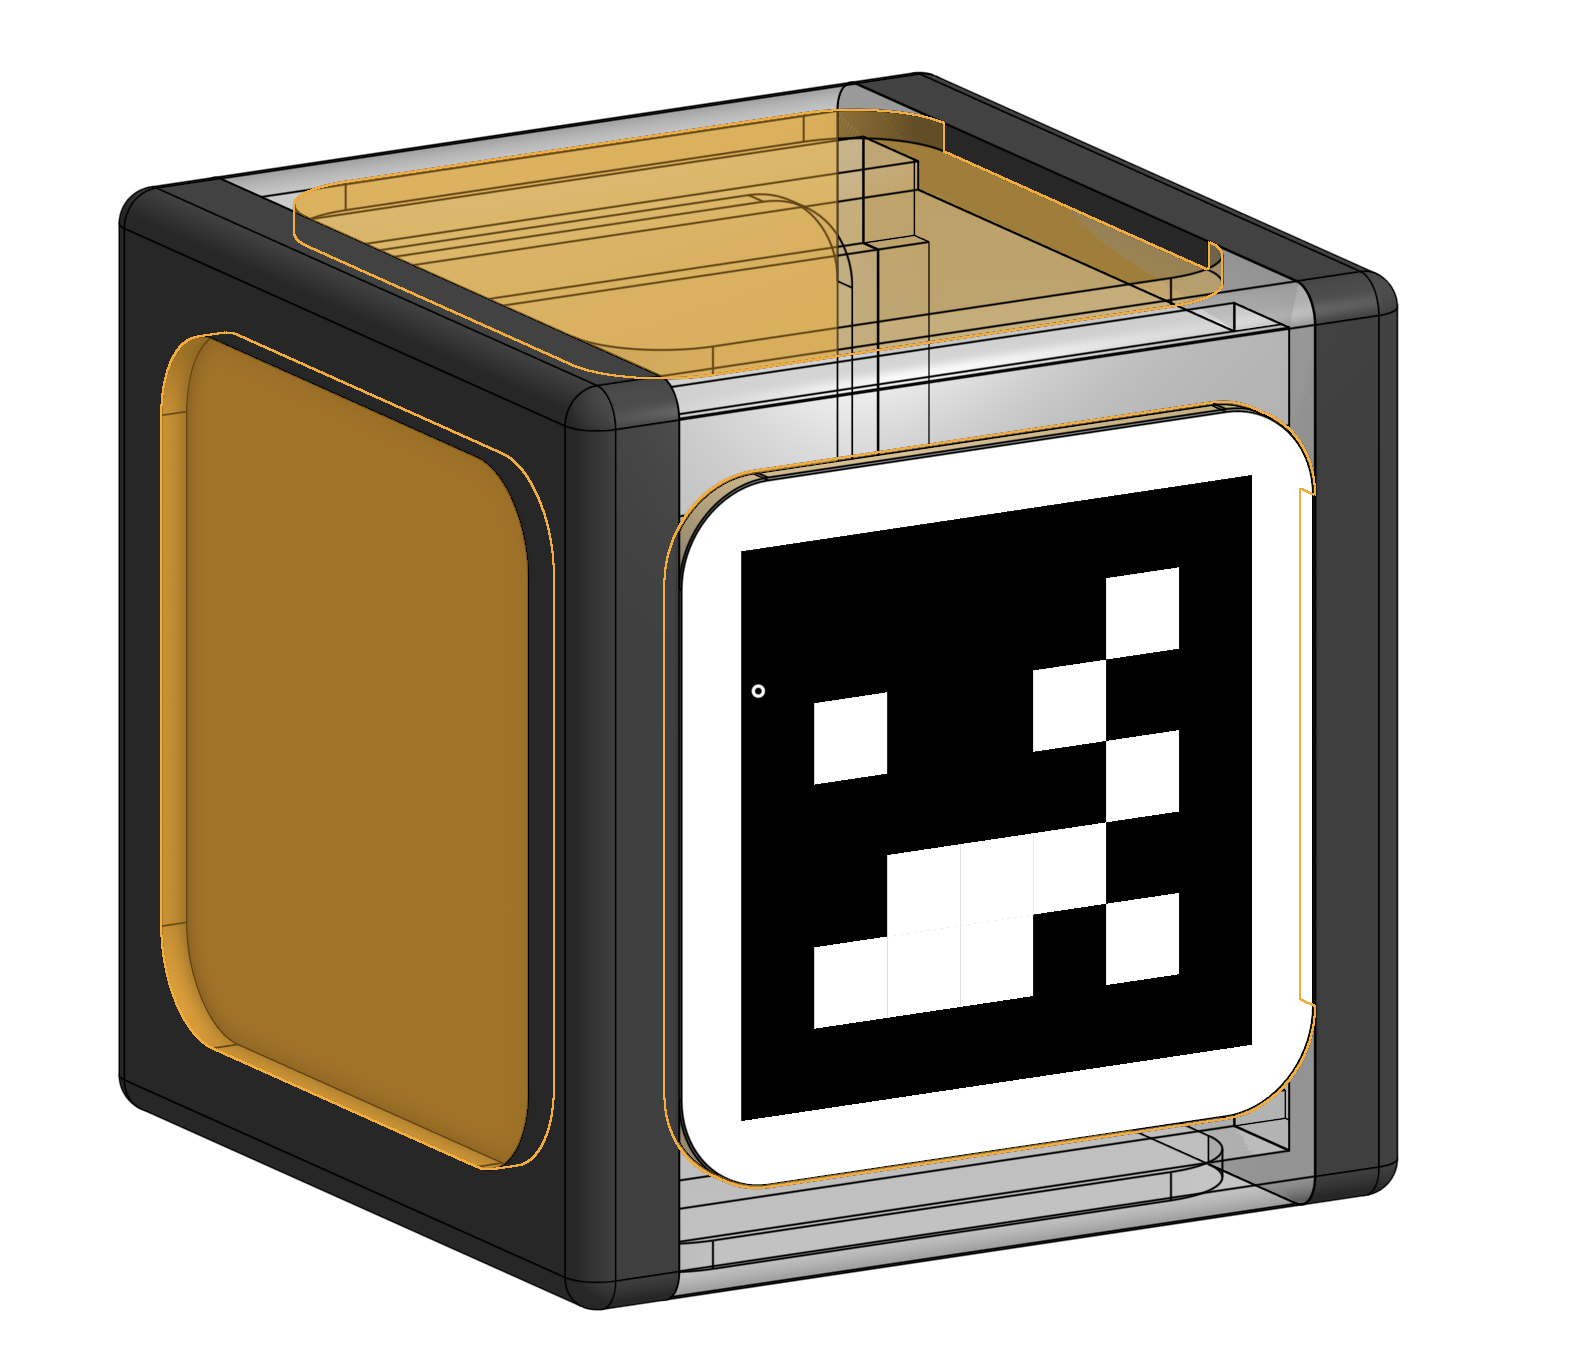
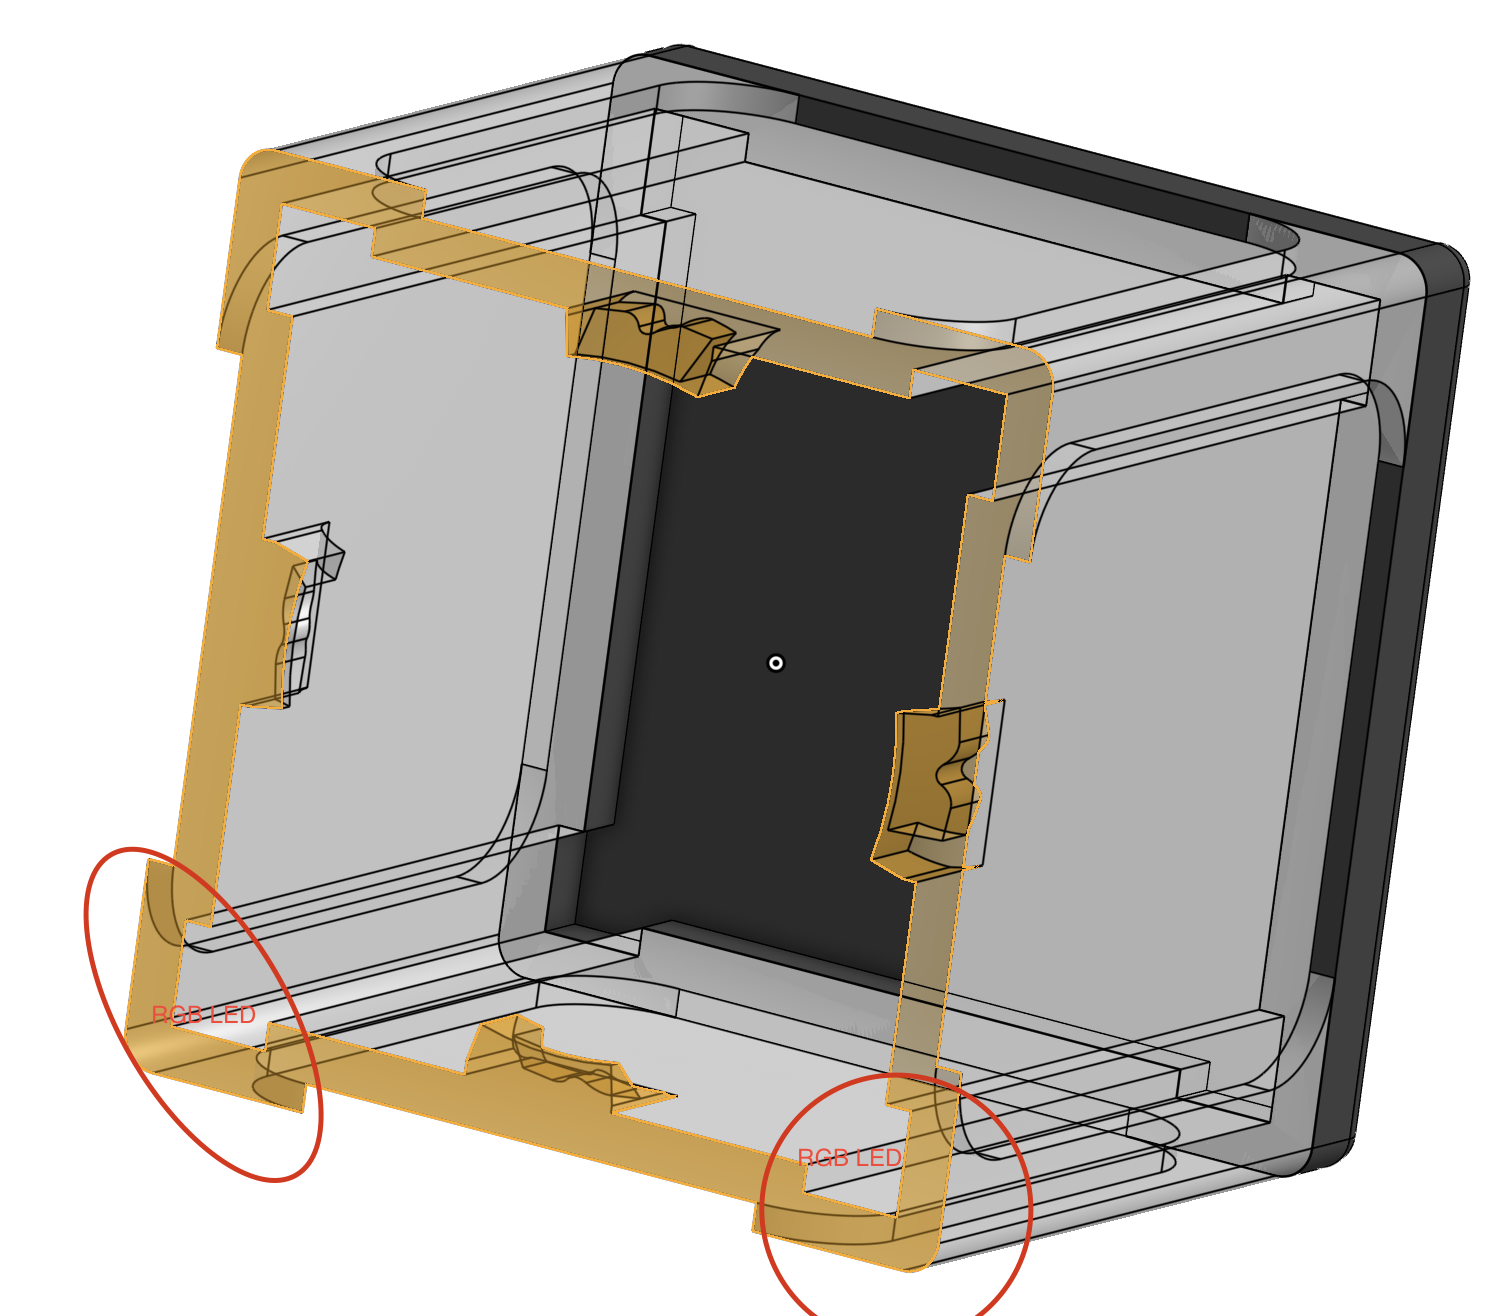
Cube Design II

Cube PCB Design II
Board Desing
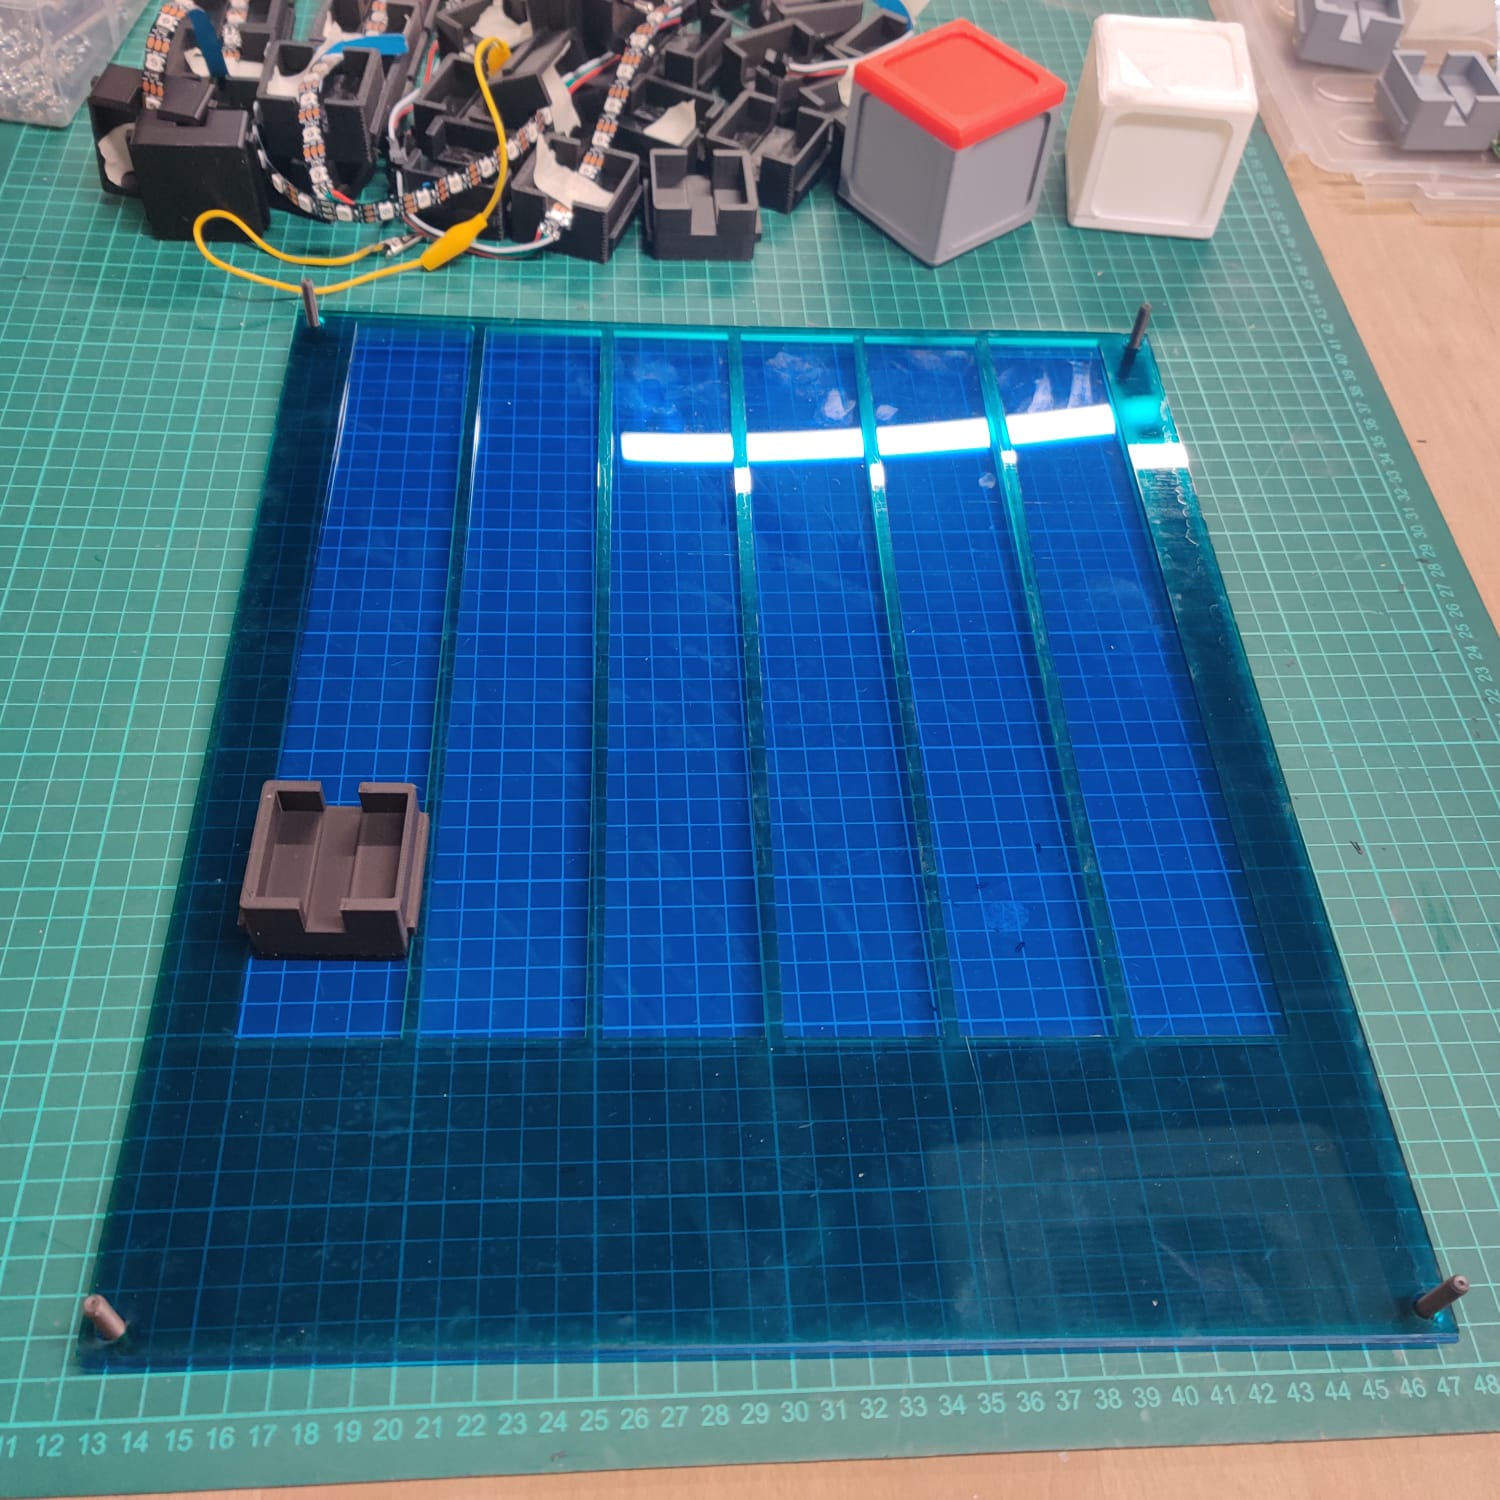
Path Design
Code Test

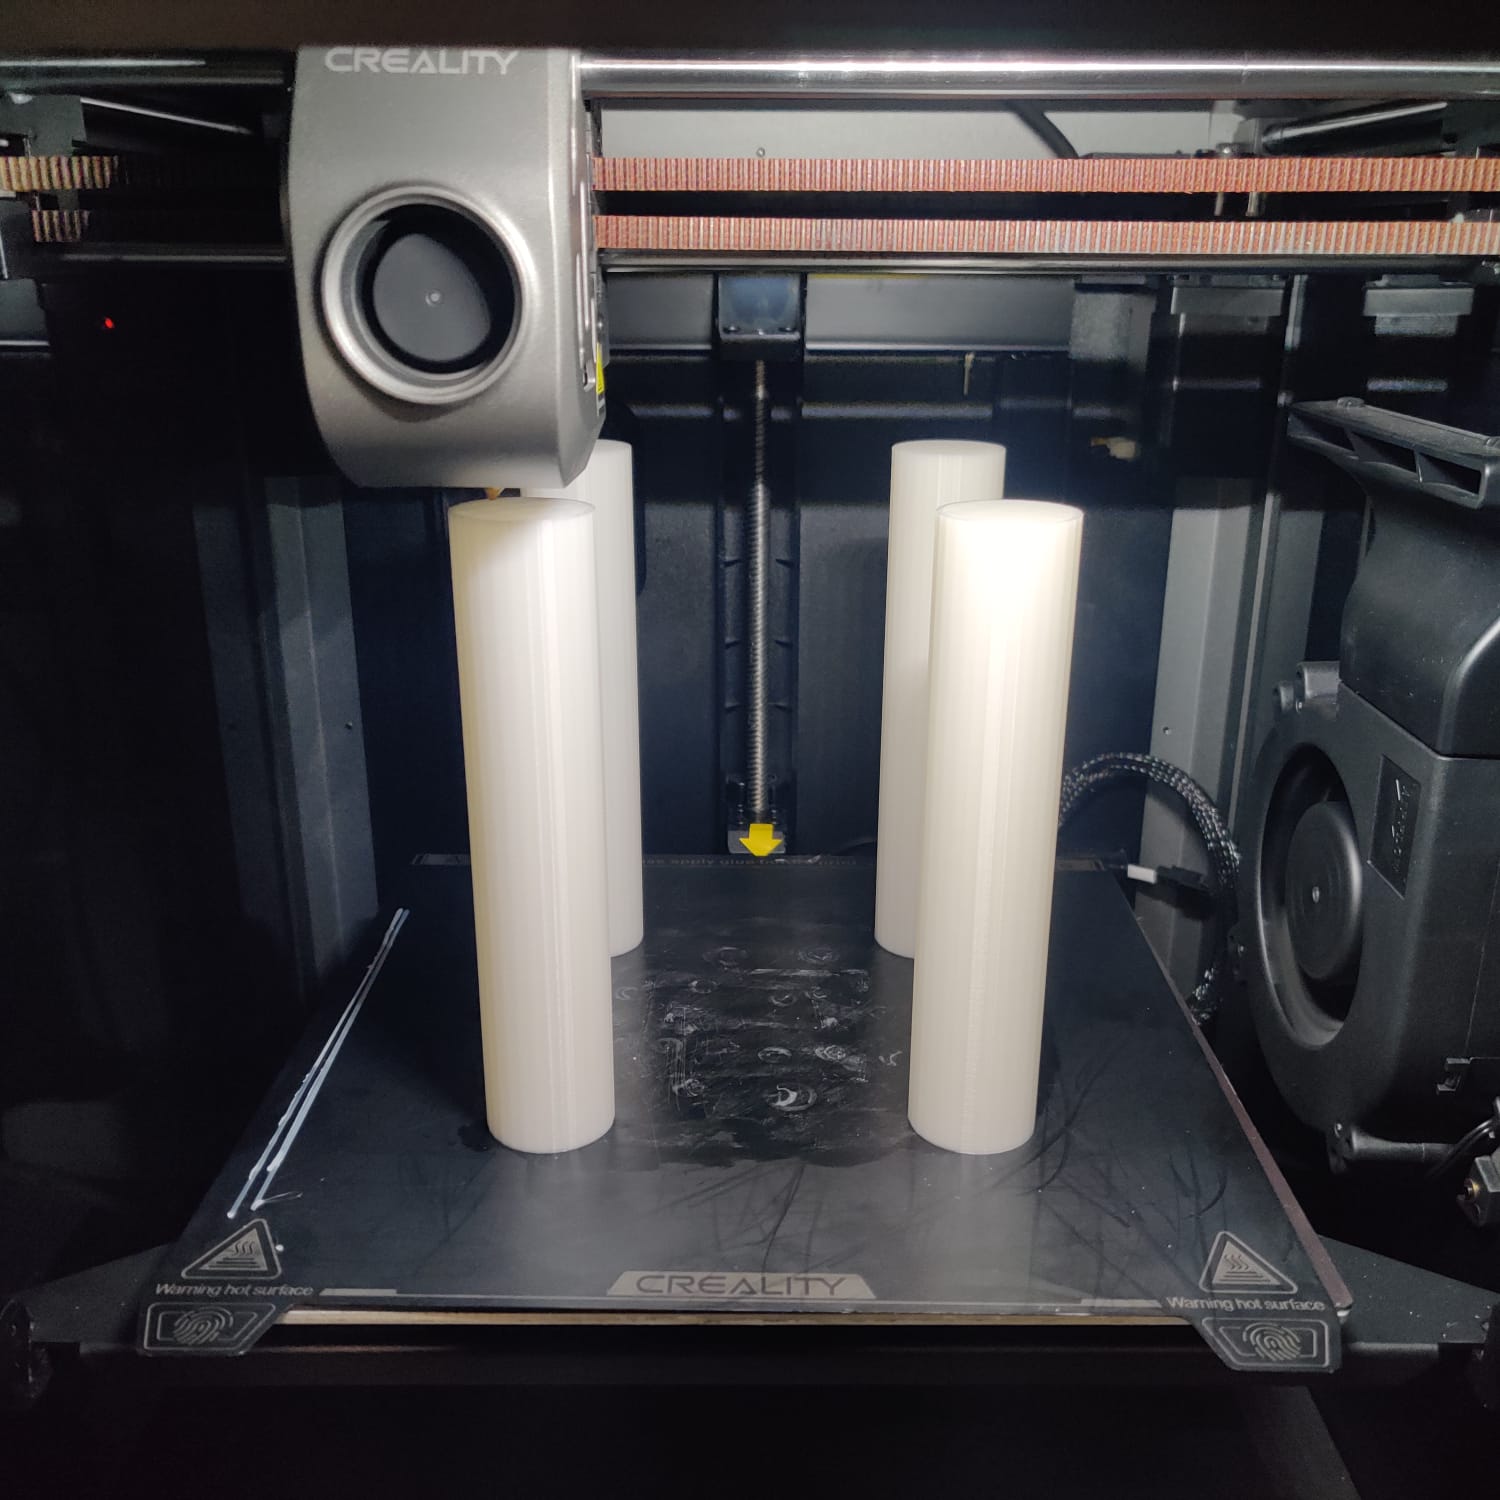
Assembly Process

Source Files
PCB Design Kicad Cube Design CAD Source Folder
License
This project is licensed under the Attribution-NonCommercial 4.0 International (CC BY-NC 4.0) License.
Summary of License Terms
- Attribution: You must give appropriate credit, provide a link to the license, and indicate if changes were made. You may do so in any reasonable manner, but not in any way that suggests the licensor endorses you or your use.
- NonCommercial: You may not use the material for commercial purposes.
What this means for you
- You are free to share, copy, and redistribute the material in any medium or format.
- You can also remix, transform, and build upon the material.
- However, you must give appropriate credit and may not use the material for commercial purposes.