- Assignments
- Boards this week
- Arduino
- Arduino & Processing
- Group assignment
- P5.js & Copilot
- P5.js & ChatGPT
- Multiple canvases in Jekyll
- Notes
Interface and Application Programming
Assignments
| Progress | Task |
|---|---|
| Done | Group assignment: compare as many tool options as possible & document them. |
| Done | Explained the GUI that you made and how you did it. |
| Done | Explained how your application communicates with your MCU board. |
| Done | Explained any problems you encountered and how you fixed them. |
| Done | Included original source code (or a screenshot of the app code if that’s not possible). |
| Done | Included a ‘hero shot’ of your application running & communicating with your board. |
Boards this week
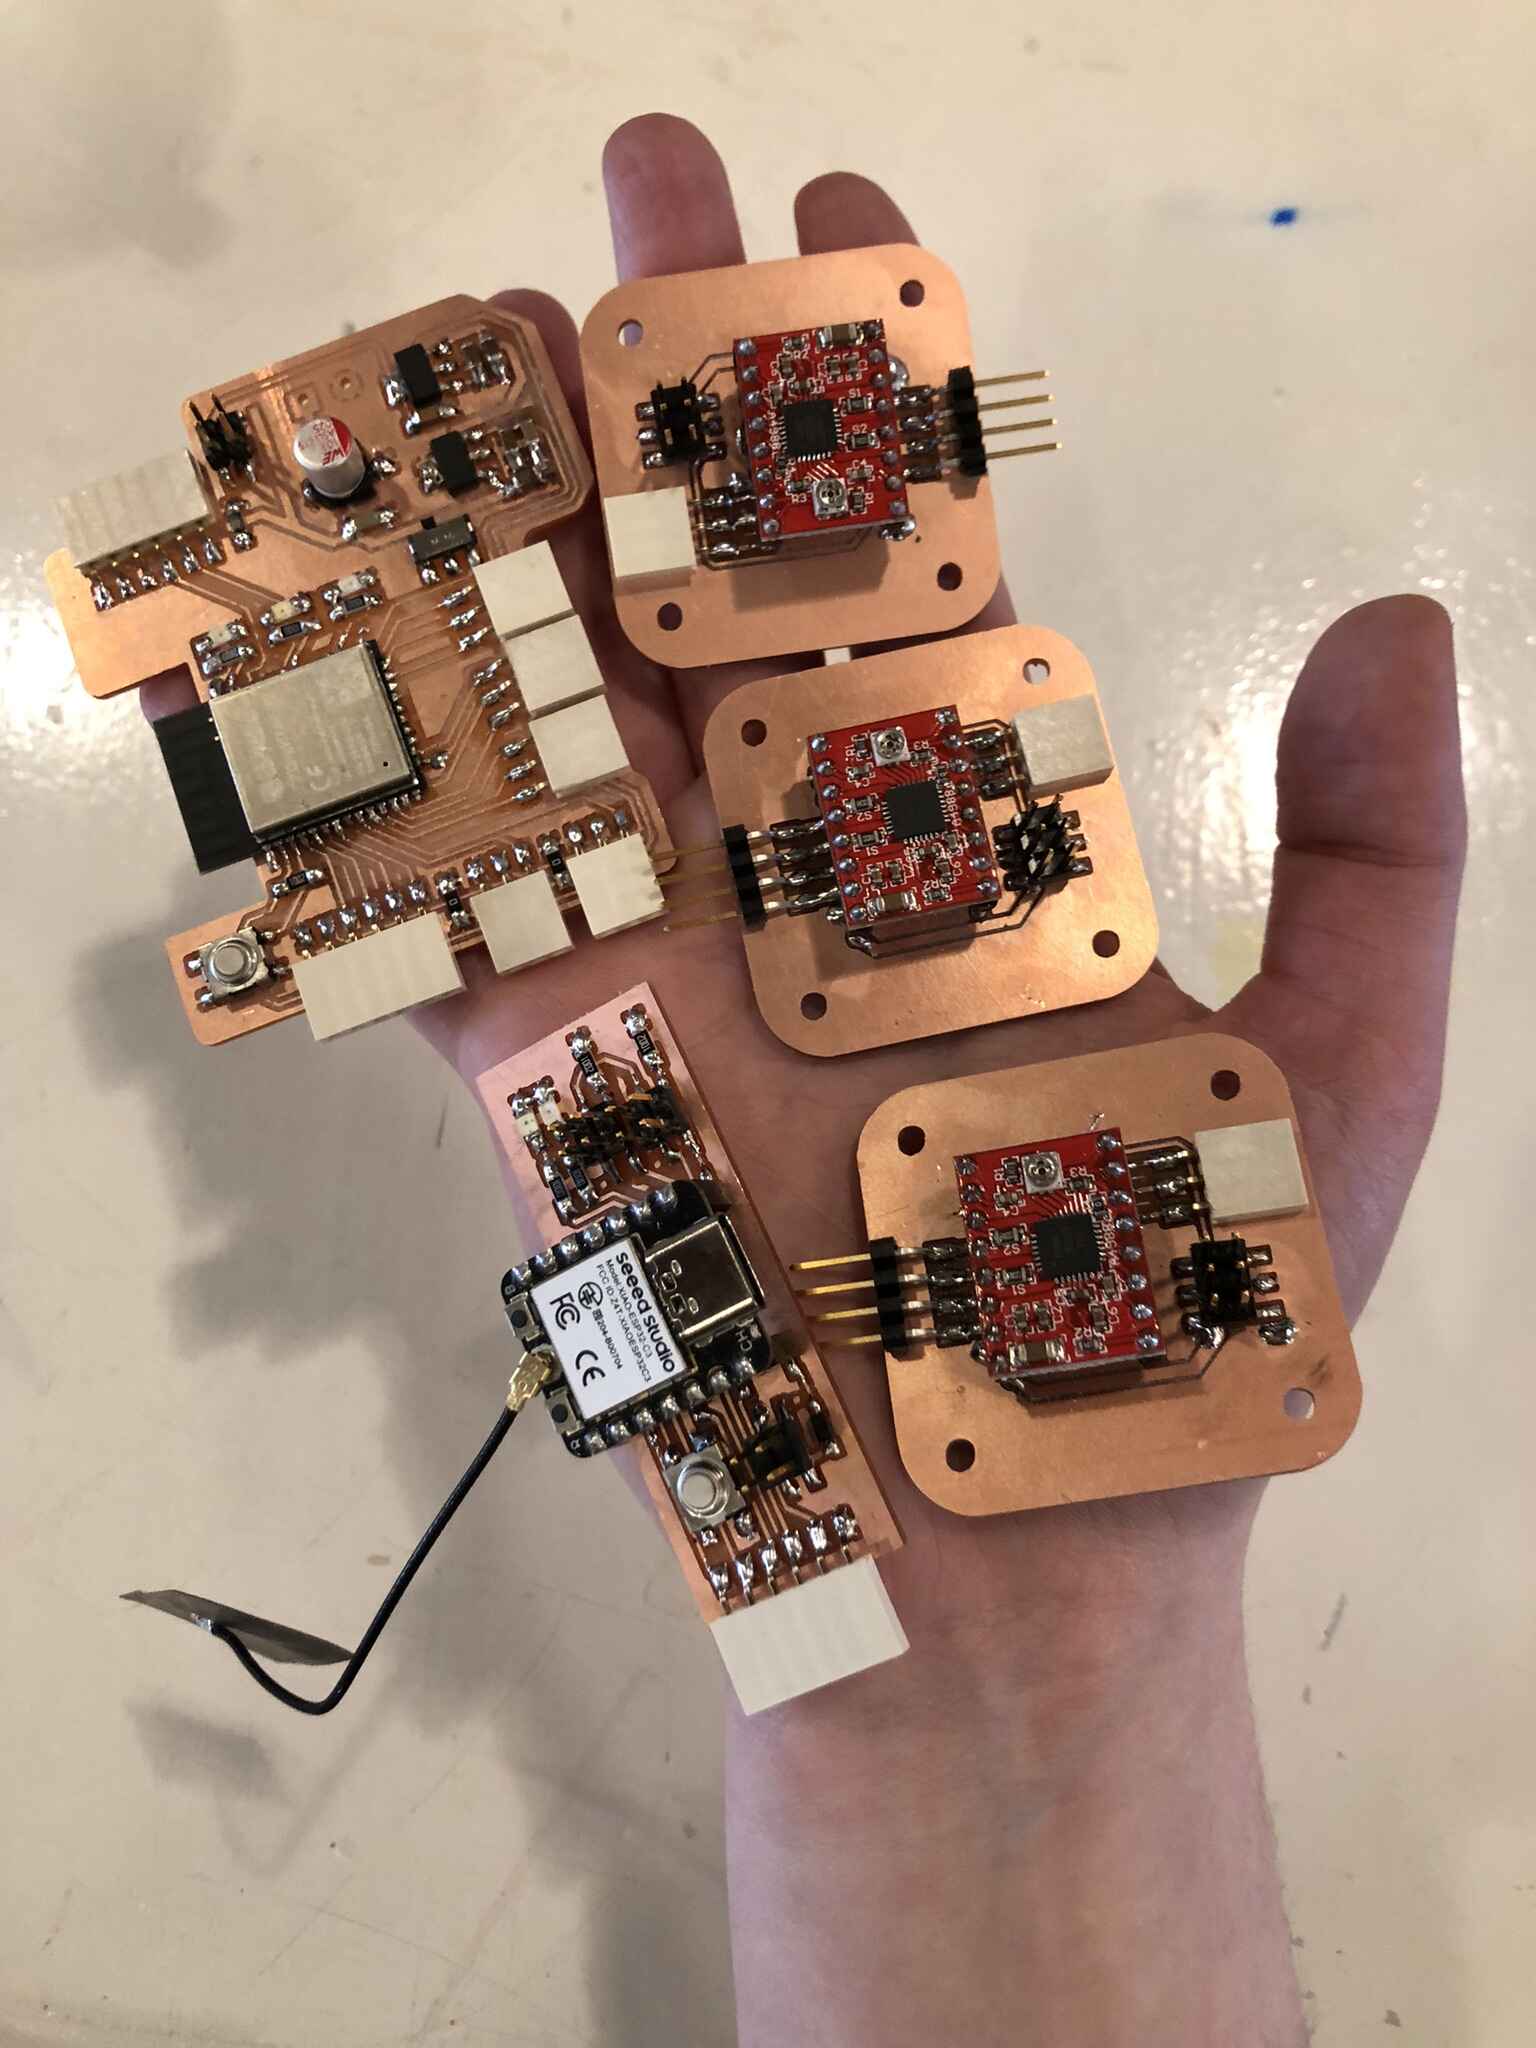
This week I made all of the PCBs for my final project. The PCB I made last week was pretty much useless since I missed a P in the name of the driver that we had, so I decided to redesign the entire board in a modular fashion. I made a main board with the ESP32 WROOM from last week and recycled some other components, and I made 3 modules to control the stepper motors with the 4988 stepsticks. I also made a board for the e-textiles input sensors. This board is the one I’m using for this week’s assignment. For the documentation on the electronics, see the final project development page.
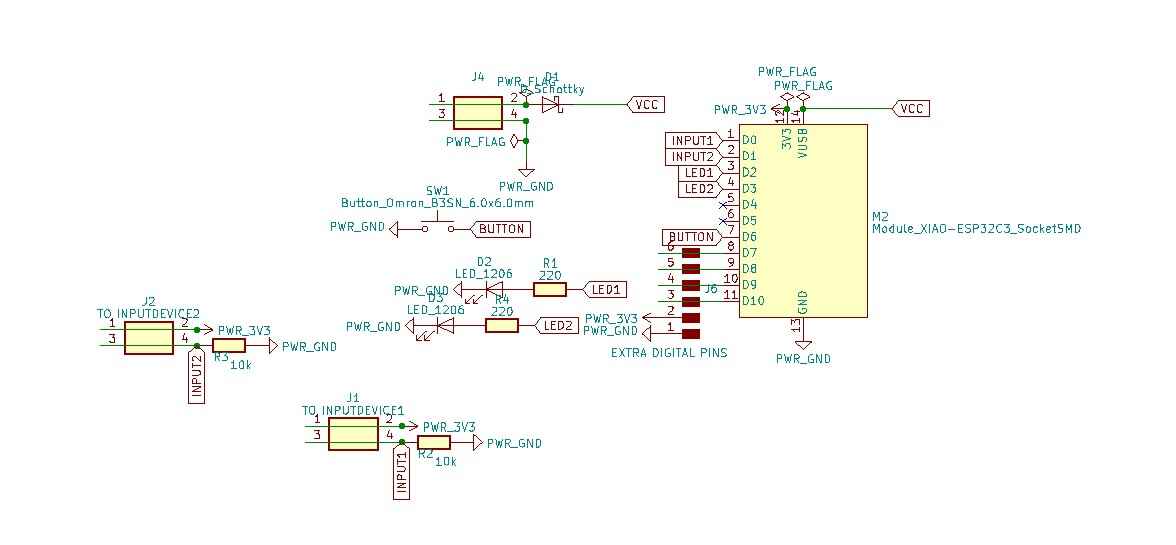
This is the schematic for the input board:
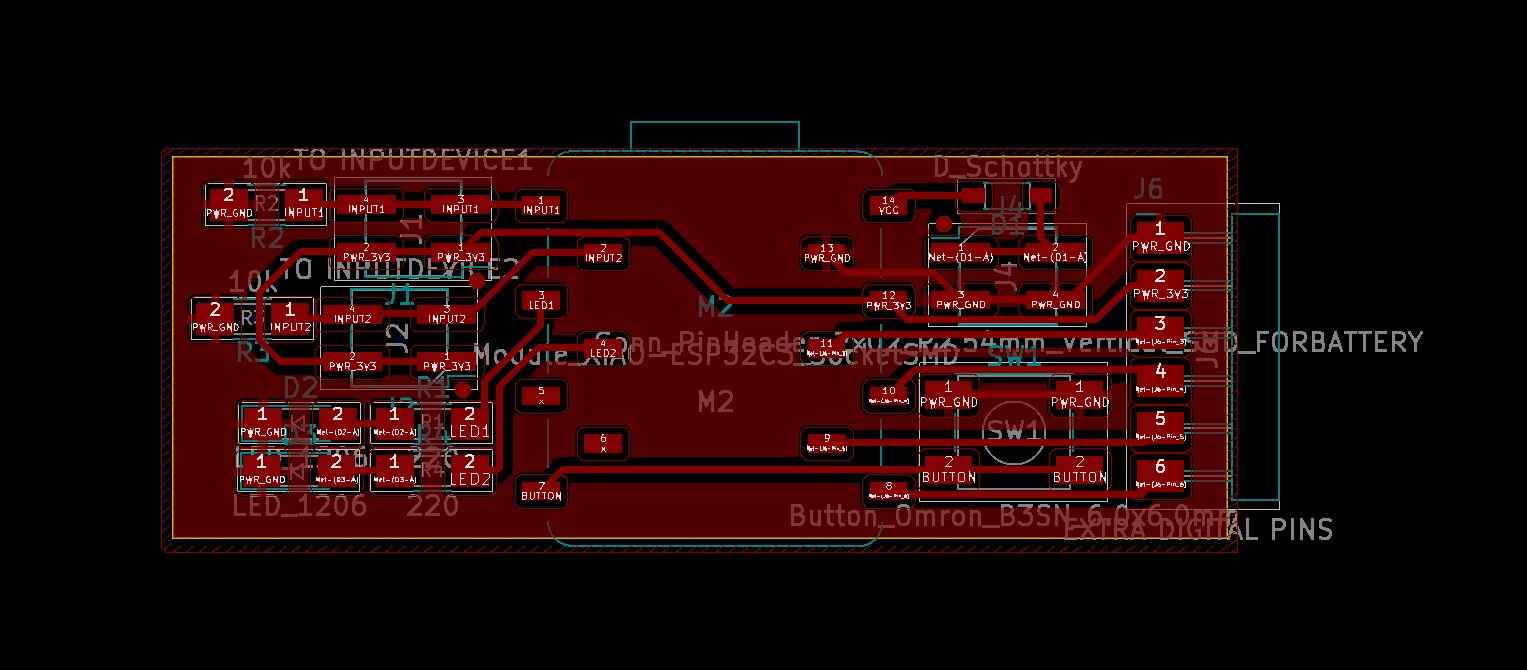
And the PCB layout:
I’m connecting the e-textiles input board to some samples I knitted a couple of months ago with yarn that I spun from dyed wool, alpaca and conductive yarn.

Arduino
For my new board, I started out with an adaptation of the calibration code that I made during the electronics production week for the embroidered sensor. Since I added a second sensor and a second LED to the board, I had to account for that. I also added a button to start the calibration to make the board way more usable, since it would only start the calibration code once in the setup otherwise. I used the button example from the Arduino examples to make sure that the button is debounced.
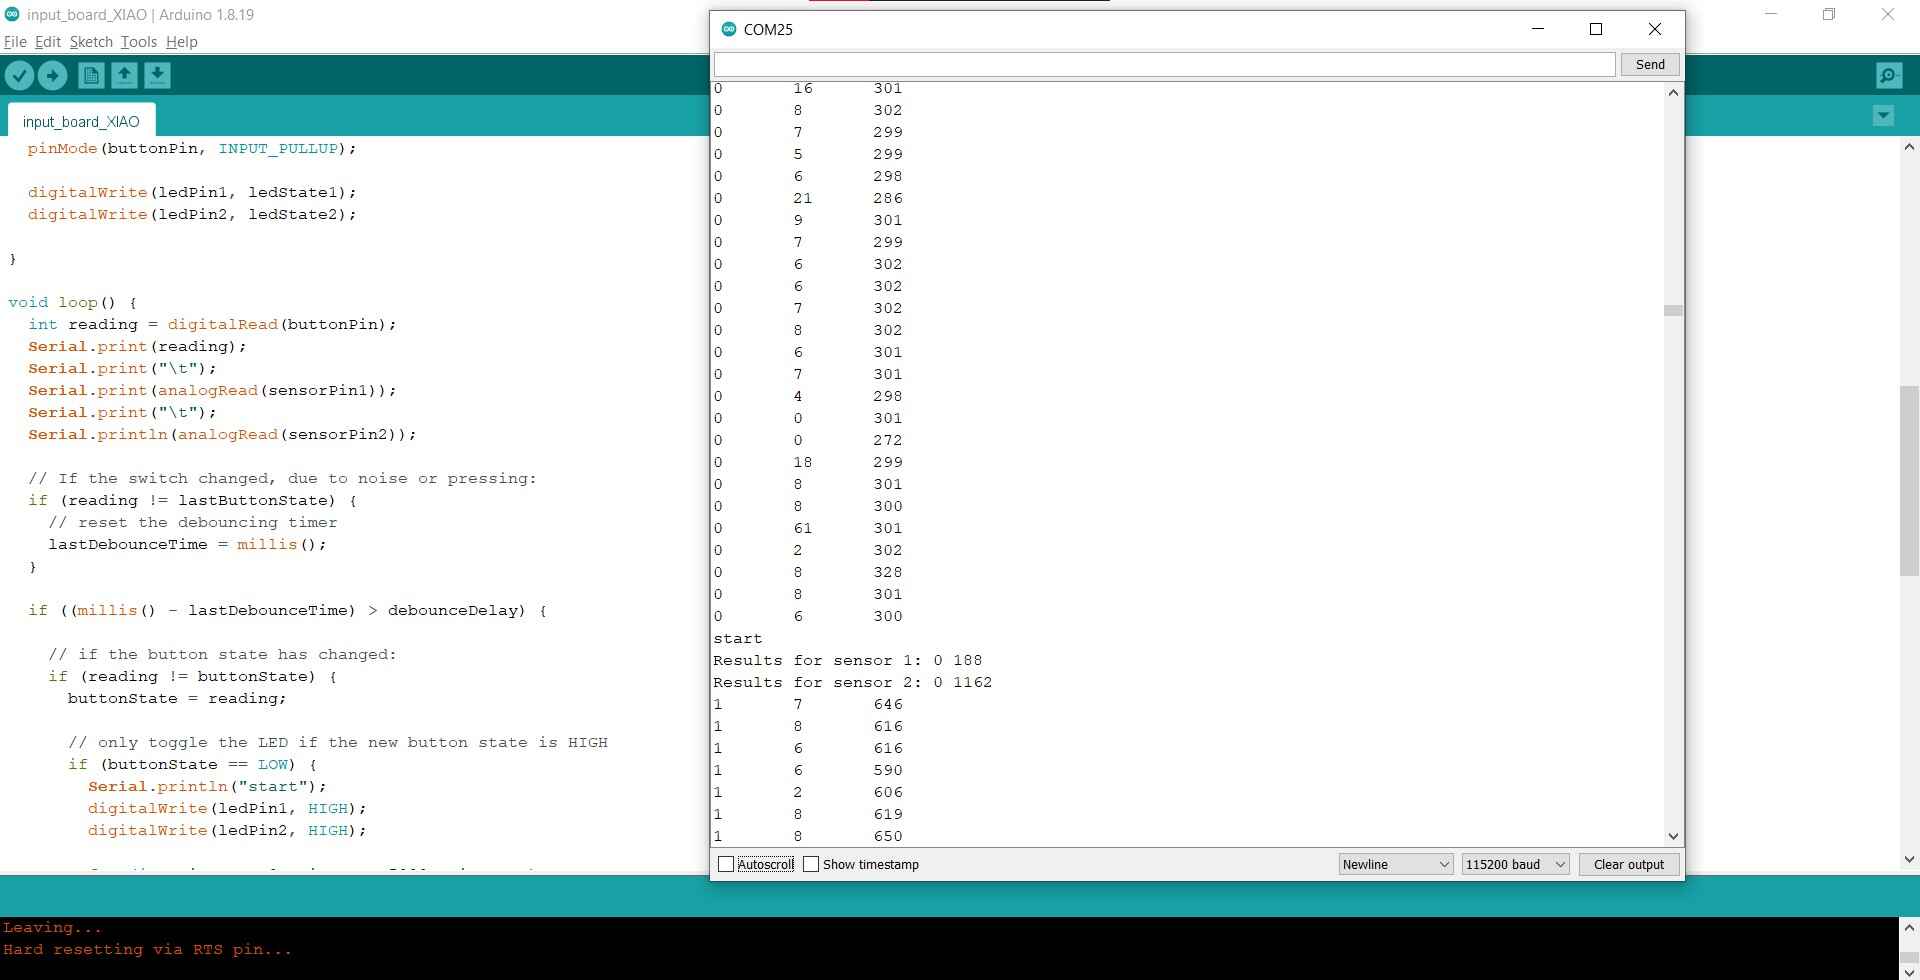
I then mapped and constrained the values from 0 to 255 (aanalogRead values go from 0 to 4095 on the ESP32’s 12bit architecture, analogWrite values from 0 to 255). Here you can see it working with the code below:
Code:
// These constants won't change:
const int sensorPin1 = 2;
const int sensorPin2 = 3;

const int ledPin1 = 4;
const int ledPin2 = 5;

const int buttonPin = 21;

int sensorValue1 = 0;   // the sensor value
int sensorMin1 = 4095;  // minimum sensor value
int sensorMax1 = 0;     // maximum sensor value

int sensorValue2 = 0;   // the sensor value
int sensorMin2 = 4095;  // minimum sensor value
int sensorMax2 = 0;     // maximum sensor value

int ledState1 = LOW;        // the current state of the output pin
int ledState2 = LOW;        // the current state of the output pin
int buttonState;            // the current reading from the input pin
int lastButtonState = LOW;  // the previous reading from the input pin

// the following variables are unsigned longs because the time, measured in
// milliseconds, will quickly become a bigger number than can be stored in an int.
unsigned long lastDebounceTime = 0;  // the last time the output pin was toggled
unsigned long debounceDelay = 50;    // the debounce time; increase if the output flickers


void setup() {
  // turn on LED to signal the start of the calibration period:
  Serial.begin(115200);
  while (!Serial) {
    ; // wait for serial port to connect. Needed for native USB port only
  }
  pinMode(ledPin1, OUTPUT);
  pinMode(ledPin2, OUTPUT);
  pinMode(sensorPin1, INPUT);
  pinMode(sensorPin2, INPUT);
  pinMode(buttonPin, INPUT_PULLUP);

  digitalWrite(ledPin1, ledState1);
  digitalWrite(ledPin2, ledState2);
}

void loop() {
  int reading = digitalRead(buttonPin);
  Serial.print(reading);
  Serial.print("\t");
  Serial.print(analogRead(sensorPin1));
  Serial.print("\t");
  Serial.println(analogRead(sensorPin2));

  // If the switch changed, due to noise or pressing:
  if (reading != lastButtonState) {
    // reset the debouncing timer
    lastDebounceTime = millis();
  }

  if ((millis() - lastDebounceTime) > debounceDelay) {

    // if the button state has changed:
    if (reading != buttonState) {
      buttonState = reading;

      // only toggle the LED if the new button state is HIGH
      if (buttonState == LOW) {
        Serial.println("start");
        digitalWrite(ledPin1, HIGH);
        digitalWrite(ledPin2, HIGH);

        // determine min and max values of both sensors for 5 seconds
        for (int timems = 0; timems < 5000; timems++) {
          sensorValue1 = analogRead(sensorPin1);
          sensorValue2 = analogRead(sensorPin2);

          // record the maximum sensor value
          if (sensorValue1 > sensorMax1) {
            sensorMax1 = sensorValue1;
          }
          // record the maximum sensor value
          if (sensorValue2 > sensorMax2) {
            sensorMax2 = sensorValue2;
          }

          // record the minimum sensor value
          if (sensorValue1 < sensorMin1) {
            sensorMin1 = sensorValue1;
          }
          // record the minimum sensor value
          if (sensorValue2 < sensorMin2) {
            sensorMin2 = sensorValue2;
          }
          delay(1);
        }
        // signal the end of the calibration period
        digitalWrite(ledPin1, LOW);
        digitalWrite(ledPin2, LOW);

        Serial.print("Results for sensor 1: ");

        Serial.print(sensorMin1);
        Serial.print("\t");
        Serial.println(sensorMax1);

        Serial.print("Results for sensor 2: ");

        Serial.print(sensorMin2);
        Serial.print("\t");
        Serial.println(sensorMax2);
      }
    }

    sensorValue1 = analogRead(sensorPin1);
    sensorValue2 = analogRead(sensorPin2);

    sensorValue1 = constrain(sensorValue1, sensorMin1, sensorMax1);
    sensorValue1 = map(sensorValue1, sensorMin1, sensorMax1, 0, 255);

    sensorValue2 = constrain(sensorValue2, sensorMin2, sensorMax2);
    sensorValue2 = map(sensorValue2, sensorMin2, sensorMax2, 0, 255);

    // fade the LED using the calibrated value:
    analogWrite(ledPin1, sensorValue1);
    analogWrite(ledPin2, sensorValue2);
    delay(1);
  }

  // save the reading. Next time through the loop, it'll be the lastButtonState:
  lastButtonState = reading;
}
Arduino & Processing
SerialCallResponse
You can communicate between the board and Processing with the Serial library. You can send data from Arduino to Processing by using Serial.print() and Serial.println(). You can read the data in Processing with Serial.read(). You can also send data from Processing to Arduino by using Serial.write(). In the example I used Serial.write() to send a byte to Processing from the board over serial (the letter A). When running the Processing code, it then checks if there is a byte sent and if so, if it’s an A. If that’s the case, contact is established and Processings starts reading the sensor data sent by the board.
Since I have two e-textiles sensors connected, I wanted to send both readings to Processing. This makes it a little bit more complicated. I adapted the example code from SerialCallResponse (Examples > 04.Communication) which checks if 3 bytes are ready to be read, then splits this into three values that are used as variables in the sketch. Since I only have two sensors I adapted the code a little bit (I still sent 3 bytes but two of the bytes are the same sensor value).
By doing this in my calibration code I was making my code unnecessarily complicated. I ran into this error:
Exception in thread "AWT-EventQueue-0" java.lang.OutOfMemoryError: Java heap space
I couldn’t open the serial monitor anymore nor upload anything and Arduino was running very sluggish. I added some delays and restarted the IDE and then I could upload again and open the serial monitor.
I wasn’t getting output (just a black canvas) in Processing so I took a step back and just used the SerialCallResponse code (slightly modified because I only have two sensors instead of 3 in the example). After some fidgeting I got some output in Processing:
It’s not very stable yet, because now I’m sending the analog data directly and dividing them by 4 to get a value between 0-255.
Calibrating sensor values
Now I wanted to combine my calibration code for the sensor values with Processing so I went back to my calibration code. I noticed that I had no issues calibrating the analogRead values and fading the LEDs accordingly, but only while the serial monitor was open. When the serial monitor is closed (which is necessary to open the one in Processing), the LEDs turn off. I put the Serial.write statements directly in the loop, and then it still only worked in the serial monitor but it also worked in Processing. Since I’m not using Processing in my final project, it’s fine by me so far since the code works fine when not writing to the serial monitor like I’m doing now. This is that code:
// These constants won't change:
const int sensorPin1 = 2;
const int sensorPin2 = 3;

const int ledPin1 = 4;
const int ledPin2 = 5;

const int buttonPin = 21;

int inByte = 0;         // incoming serial byte

int sensorValue1 = 0;   // the sensor value
int sensorMin1 = 4095;  // minimum sensor value
int sensorMax1 = 0;     // maximum sensor value

int sensorValue2 = 0;   // the sensor value
int sensorMin2 = 4095;  // minimum sensor value
int sensorMax2 = 0;     // maximum sensor value

int ledState1 = LOW;        // the current state of the output pin
int ledState2 = LOW;        // the current state of the output pin
int buttonState;            // the current reading from the input pin
int lastButtonState = LOW;  // the previous reading from the input pin

// the following variables are unsigned longs because the time, measured in
// milliseconds, will quickly become a bigger number than can be stored in an int.
unsigned long lastDebounceTime = 0;  // the last time the output pin was toggled
unsigned long debounceDelay = 50;    // the debounce time; increase if the output flickers


void setup() {
  // turn on LED to signal the start of the calibration period:
  Serial.begin(115200);
  while (!Serial) {
    ; // wait for serial port to connect. Needed for native USB port only
  }
  pinMode(ledPin1, OUTPUT);
  pinMode(ledPin2, OUTPUT);
  pinMode(sensorPin1, INPUT);
  pinMode(sensorPin2, INPUT);
  pinMode(buttonPin, INPUT_PULLUP);

  digitalWrite(ledPin1, ledState1);
  digitalWrite(ledPin2, ledState2);

  establishContact();  // send a byte to establish contact until receiver responds

}

void loop() {
  int reading = digitalRead(buttonPin);

  // If the switch changed, due to noise or pressing:
  if (reading != lastButtonState) {
    // reset the debouncing timer
    lastDebounceTime = millis();
  }

  if ((millis() - lastDebounceTime) > debounceDelay) {

    // if the button state has changed:
    if (reading != buttonState) {
      buttonState = reading;

      // only toggle the LED if the new button state is HIGH
      if (buttonState == LOW) {
        Serial.println("start");
        digitalWrite(ledPin1, HIGH);
        digitalWrite(ledPin2, HIGH);

        for (int timems = 0; timems < 5000; timems++) {
          sensorValue1 = analogRead(sensorPin1);
          sensorValue2 = analogRead(sensorPin2);

          // record the maximum sensor value
          if (sensorValue1 > sensorMax1) {
            sensorMax1 = sensorValue1;
          }
          // record the maximum sensor value
          if (sensorValue2 > sensorMax2) {
            sensorMax2 = sensorValue2;
          }

          // record the minimum sensor value
          if (sensorValue1 < sensorMin1) {
            sensorMin1 = sensorValue1;
          }
          // record the minimum sensor value
          if (sensorValue2 < sensorMin2) {
            sensorMin2 = sensorValue2;
          }
          delay(1);
        }
        // signal the end of the calibration period
        digitalWrite(ledPin1, LOW);
        digitalWrite(ledPin2, LOW);

        Serial.print("Results for sensor 1: ");

        Serial.print(sensorMin1);
        Serial.print("\t");
        Serial.println(sensorMax1);

        Serial.print("Results for sensor 2: ");

        Serial.print(sensorMin2);
        Serial.print("\t");
        Serial.println(sensorMax2);
      }
    }

    sensorValue1 = analogRead(sensorPin1);
    sensorValue2 = analogRead(sensorPin2);

    sensorValue1 = constrain(sensorValue1, sensorMin1, sensorMax1);
    sensorValue1 = map(sensorValue1, sensorMin1, sensorMax1, 0, 255);

    sensorValue2 = constrain(sensorValue2, sensorMin2, sensorMax2);
    sensorValue2 = map(sensorValue2, sensorMin2, sensorMax2, 0, 255);
    Serial.print(reading);
    Serial.print("\t");
    Serial.print(sensorValue1);
    Serial.print("\t");
    Serial.println(sensorValue2);

    // fade the LED using the calibrated value:
    analogWrite(ledPin1, sensorValue1);
    analogWrite(ledPin2, sensorValue2);
    delay(1);


    // Writing data to the serial port for Processing


    // get incoming byte:
    inByte = Serial.read();

    // send sensor values:
    Serial.write(sensorValue1);
    Serial.write(sensorValue1);
    Serial.write(sensorValue2);

  }

  // save the reading. Next time through the loop, it'll be the lastButtonState:
  lastButtonState = reading;
}

void establishContact() {
  while (Serial.available() <= 0) {
    Serial.print('A');   // send a capital A
    delay(300);
  }
}
Working code
I did notice that the two values that were supposed to be the same, were not the same in the serial monitor, so I removed some print statements and other lines that weren’t necessary for Processing. After that the values seemed to be correct and the code was working. I did notice that the values in the serial monitor were displayed in the opposite direction of the way I sent them from Arduino.
Here you can see clearer what the input is for the moving ball.
This is the code so far:
// These constants won't change:
const int sensorPin1 = 2;
const int sensorPin2 = 3;

const int ledPin1 = 4;
const int ledPin2 = 5;

const int buttonPin = 21;

int inByte = 0;         // incoming serial byte

int sensorValue1 = 0;   // the sensor value
int sensorMin1 = 4095;  // minimum sensor value
int sensorMax1 = 0;     // maximum sensor value

int sensorValue2 = 0;   // the sensor value
int sensorMin2 = 4095;  // minimum sensor value
int sensorMax2 = 0;     // maximum sensor value

int ledState1 = LOW;        // the current state of the output pin
int ledState2 = LOW;        // the current state of the output pin
int buttonState;            // the current reading from the input pin
int lastButtonState = LOW;  // the previous reading from the input pin

// the following variables are unsigned longs because the time, measured in
// milliseconds, will quickly become a bigger number than can be stored in an int.
unsigned long lastDebounceTime = 0;  // the last time the output pin was toggled
unsigned long debounceDelay = 50;    // the debounce time; increase if the output flickers


void setup() {
  // turn on LED to signal the start of the calibration period:
  Serial.begin(115200);
  while (!Serial) {
    ; // wait for serial port to connect. Needed for native USB port only
  }
  pinMode(ledPin1, OUTPUT);
  pinMode(ledPin2, OUTPUT);
  pinMode(sensorPin1, INPUT);
  pinMode(sensorPin2, INPUT);
  pinMode(buttonPin, INPUT_PULLUP);

  digitalWrite(ledPin1, ledState1);
  digitalWrite(ledPin2, ledState2);

  establishContact();  // send a byte to establish contact until receiver responds

}

void loop() {
  int reading = digitalRead(buttonPin);

  // If the switch changed, due to noise or pressing:
  if (reading != lastButtonState) {
    // reset the debouncing timer
    lastDebounceTime = millis();
  }

  if ((millis() - lastDebounceTime) > debounceDelay) {

    // if the button state has changed:
    if (reading != buttonState) {
      buttonState = reading;

      // only toggle the LED if the new button state is HIGH
      if (buttonState == LOW) {
        digitalWrite(ledPin1, HIGH);
        digitalWrite(ledPin2, HIGH);

        for (int timems = 0; timems < 5000; timems++) {
          sensorValue1 = analogRead(sensorPin1);
          sensorValue2 = analogRead(sensorPin2);

          // record the maximum sensor value
          if (sensorValue1 > sensorMax1) {
            sensorMax1 = sensorValue1;
          }
          // record the maximum sensor value
          if (sensorValue2 > sensorMax2) {
            sensorMax2 = sensorValue2;
          }

          // record the minimum sensor value
          if (sensorValue1 < sensorMin1) {
            sensorMin1 = sensorValue1;
          }
          // record the minimum sensor value
          if (sensorValue2 < sensorMin2) {
            sensorMin2 = sensorValue2;
          }
          delay(1);
        }
        // signal the end of the calibration period
        digitalWrite(ledPin1, LOW);
        digitalWrite(ledPin2, LOW);
      }
    }

    sensorValue1 = analogRead(sensorPin1);
    sensorValue2 = analogRead(sensorPin2);

    sensorValue1 = constrain(sensorValue1, sensorMin1, sensorMax1);
    sensorValue1 = map(sensorValue1, sensorMin1, sensorMax1, 0, 255);

    sensorValue2 = constrain(sensorValue2, sensorMin2, sensorMax2);
    sensorValue2 = map(sensorValue2, sensorMin2, sensorMax2, 0, 255);


    // get incoming byte:
    inByte = Serial.read();

    // send sensor values:
    Serial.write(sensorValue1);
    Serial.write(sensorValue1);
    Serial.write(sensorValue2);

  }

  // save the reading. Next time through the loop, it'll be the lastButtonState:
  lastButtonState = reading;
}

void establishContact() {
  while (Serial.available() <= 0) {
    Serial.print('A');   // send a capital A
    delay(300);
  }
}
Processing code:
import processing.serial.*;

int bgcolor;           // Background color
int fgcolor;           // Fill color
Serial myPort;                       // The serial port
int[] serialInArray = new int[3];    // Where we'll put what we receive
int serialCount = 0;                 // A count of how many bytes we receive
int xpos, ypos;                // Starting position of the ball
boolean firstContact = false;        // Whether we've heard from the microcontroller

void setup() {
  size(256, 256);  // Stage size
  noStroke();      // No border on the next thing drawn

  // Set the starting position of the ball (middle of the stage)
  xpos = width / 2;
  ypos = height / 2;


  myPort = new Serial(this, "COM25", 115200);
}

void draw() {
  background(bgcolor);
  fill(255);
  // Draw the shape
  ellipse(xpos, ypos, 20, 20);
}

void serialEvent(Serial myPort) {
  // read a byte from the serial port:
  int inByte = myPort.read();
  // if this is the first byte received, and it's an A, clear the serial
  // buffer and note that you've had first contact from the microcontroller.
  // Otherwise, add the incoming byte to the array:
  if (firstContact == false) {
    if (inByte == 'A') {
      myPort.clear();          // clear the serial port buffer
      firstContact = true;     // you've had first contact from the microcontroller
      myPort.write('A');       // ask for more
    }
  } else {
    // Add the latest byte from the serial port to array:
    serialInArray[serialCount] = inByte;
    serialCount++;

    // If we have 3 bytes:
    if (serialCount > 2 ) {
      xpos = serialInArray[0];
      ypos = serialInArray[1];
      bgcolor = serialInArray[2];

      // print the values (for debugging purposes only):
      println(xpos + "\t" + ypos + "\t" + bgcolor);

      // Send a capital A to request new sensor readings:
      myPort.write('A');
      // Reset serialCount:
      serialCount = 0;
    }
  }
}
Gradients
Now that the sensor values were doing their thing, it was time for more funky visuals. I first tried to let Copilot write Processing code to create a gradient on the screen depending on sensor input, but the code was pretty useless so I did it myself.
Based on the LinearGradient example, I made this sketch which draws a grayscale gradient based on input from both sensors. If you stretch the first sensor, the gradient moves from white to black to white, and if you stretch the second sensor the gradient moves from black to white to black. If you stretch both sensors, the gradient becomes more of a uniform color. This doesn’t really make sense, but it looks cool (according to Copilot).
If you replace the two setGradients with just setGradient(0, 0, width, height, b1, b2, Y_AXIS); it makes more sense: the top of the gradient is then determined by the first sensor, the bottom by the second sensor.
Code:
import processing.serial.*;

// Constants
int Y_AXIS = 1;
int X_AXIS = 2;
color b1, b2;

Serial myPort;                       // The serial port
int[] serialInArray = new int[3];    // Where we'll put what we receive
int serialCount = 0;                 // A count of how many bytes we receive
int a, b;
boolean firstContact = false;        // Whether we've heard from the microcontroller


void setup() {
  size(800, 400);  // Stage size
  noStroke();      // No border on the next thing drawn
  myPort = new Serial(this, "COM25", 115200);
}

void draw() {
  b1 = color(a);
  b2 = color(b);
  setGradient(0, 0, width/2, height, b1, b2, X_AXIS);
  setGradient(width/2, 0, width/2, height, b2, b1, X_AXIS);
}

void serialEvent(Serial myPort) {
  // read a byte from the serial port:
  int inByte = myPort.read();
  // if this is the first byte received, and it's an A, clear the serial
  // buffer and note that you've had first contact from the microcontroller.
  // Otherwise, add the incoming byte to the array:
  if (firstContact == false) {
    if (inByte == 'A') {
      myPort.clear();          // clear the serial port buffer
      firstContact = true;     // you've had first contact from the microcontroller
      myPort.write('A');       // ask for more
    }
  } else {
    // Add the latest byte from the serial port to array:
    serialInArray[serialCount] = inByte;
    serialCount++;

    // If we have 3 bytes:
    if (serialCount > 2 ) {
      a = serialInArray[0];
      b = serialInArray[2];

      // print the values (for debugging purposes only):
      println(a + "\t" + b);

      // Send a capital A to request new sensor readings:
      myPort.write('A');
      // Reset serialCount:
      serialCount = 0;
    }
  }
}

void setGradient(int x, int y, float w, float h, color c1, color c2, int axis ) {

  noFill();

  if (axis == Y_AXIS) {  // Top to bottom gradient
    for (int i = y; i <= y+h; i++) {
      float inter = map(i, y, y+h, 0, 1);
      color c = lerpColor(c1, c2, inter);
      stroke(c);
      line(x, i, x+w, i);
    }
  } else if (axis == X_AXIS) {  // Left to right gradient
    for (int i = x; i <= x+w; i++) {
      float inter = map(i, x, x+w, 0, 1);
      color c = lerpColor(c1, c2, inter);
      stroke(c);
      line(i, y, i, y+h);
    }
  }
}
Group assignment
For this week’s assignment Bas showed us Processing and P5 and how to use Copilot in VSC. He also has a nice tutorial on Processing here.
Processing is built on Java, and Arduino is a fork of Processing. P5 is a fork of Processing that runs in the browser. The typical use case for Processing is to create visuals, but it can also be used to create interactive applications (although it’s not the best tool for that). P5 is more suited for interactive applications on the web.
Copilot
Copilot is a tool that uses AI to help you write code. It’s a plugin for VSC that you can use to autocomplete code. You write something, then Copilot writes text that it thinks you want to write and previews it in a light gray color. If you want to use the text you can press tab to insert it. It’s not perfect, but it can be very useful. You can even use it to write your documentation (like I’m doing right now for this sentence). It’s interesting how Copilot tries to finish your sentences, although a bit uncanny. It’s also making me wait a bit for it to finish the sentence to see if I agree with it, but I think generally it’s too generic to use if for documentation and as a replacement for my own thoughts. Maybe if Copilot was updated to run on GPT-4 it would be more accurate, and even more so if I could feed it my former documentation pages to learn from. But for now it’s still faster to think for myself (luckily). I did play around with it to write P5.js code but it wasn’t very good at that: it likes to draw ellipses and rectangles. The Processing code was even worse and barely usable. Copilot also tries to refer to non-existing assets like images and objects that it wants to incorporate in the sketch.
It’s interesting to notice how immediately my workflow shifts from just typing what I think to typing a few words and then waiting to see if it’s what I want to say. In a way it’s making me slower. Most times I don’t like the suggestions because the language used feels very generic. When I was typing that sentence this is what Copilot suggested:
It’s also interesting to see how Copilot is trying to learn from me. It’s trying to learn my style of writing and the words I use. It’s also trying to learn from the code I write. I wonder if it’s also learning from the code I don’t use.
This did make me wonder how Copilot learns; I haven’t really looked into it yet (which is not a good think when letting an AI into your pages). I think I’m going to uninstall it after today (which Copilot hopefully wanted to finish with ‘but maybe I’ll use it again in the future’).
Here is an example of Copilot trying to draw a cat with a hat:

Code:
// A P5 sketch in instance mode that draws a cat with a hat.
// The cat is a class that is defined in cat.js.
// The hat is a class that is defined in hat.js.
// The cat and hat are drawn in the sketch.js file.


// Global variables
let cat;
let hat;

// Setup code goes here
function setup() {
    createCanvas(500, 500);
    cat = new Cat();
    hat = new Hat();
    }

// Draw code goes here
function draw() {
    background(0);
    cat.display();
    hat.display();
    }

// Cat class
class Cat {
    constructor() {
        this.x = width/2;
        this.y = height/2;
        this.size = 100;
        this.color = color(255, 0, 0);
        }

    display() {
        fill(this.color);
        ellipse(this.x, this.y, this.size, this.size);
        }
    }

// Hat class
class Hat {
    constructor() {
        this.x = width/2;
        this.y = height/2 - 100;
        this.size = 100;
        this.color = color(0, 255, 0);
        }

    display() {
        fill(this.color);
        rect(this.x, this.y, this.size, this.size);
        }
    }

// End of file
And here an example of confusing documentation that Copilot wanted to write for me:
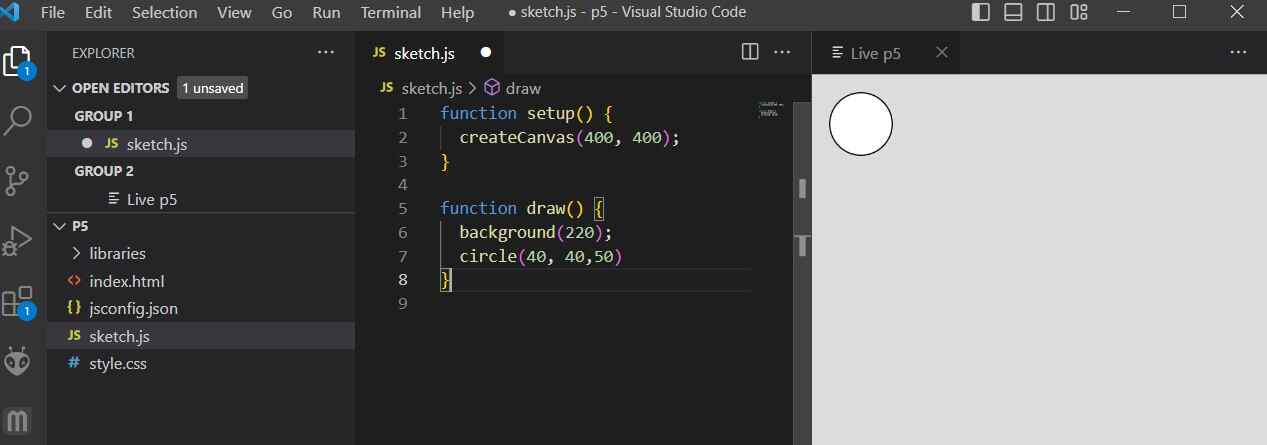
P5.js Workflow
P5.js can do anything that Processing can but directly in the browser and it’s very similar. You can use the editor directly on their website. You can also get P5 extensions for VSC: live-p5 and p5.vscode. This is what I’m using.
To start a new project in Visual Studio Code:
Press: F1 > Type: P5 > Select: Create P5 Project
Then to get the live updating canvas:
Press: F1 > Type: live > Select: Open live P5 panel
Go live in a web server and inspect to check mistakes; this button can be find in the bottom right corner in VSC in the blue bar.
function setup() {
  createCanvas(400, 400);
}

let w = 30;

function draw() {
  background(220);
  circle(200, 200, w);
}
Processing workflow
Processing works similar to P5 since P5 is basically the web based adaptation of Processing. I’ve used Processing in the past but the last time was a couple of years ago. I’ve never used it to create interactive applications, only for visuals; but I have used applications for machines that were made in Processing (for the HILO spinning machine that we made last year during the Fabricademy machine building week). The applications don’t run super well but they do work. Since Arduino is a fork of Processing, it’s pretty easy to switch to Processing and to exchange data between the two via a board, especially if you already have some programming experience.
Getting stuff on the web
If you want to incorporate your sketches directly in your documentation page, it’s best to use P5 since it’s basically Javascript with a library. Processing sketches need a bit more work to get them online (more on that here).
We also looked at how to connect boards to P5 sketches in the browser. For this you need a serial connection via USB. This is only possible in Chrome-based browsers because of their security sensors. You need a user interaction to start the serial connection; you can’t just connect automatically to USB ports from the browser without that because that would be very dangerous. I didn’t try this out because I don’t use Chrome anymore (I don’t like Google) and I had to help around with the fablab open day when Bas showed this to Pieter and Samson.
P5.js & Copilot
I played around with Copilot for a while. The only thing I wrote myself was Create disco rays, the rest was generated by Copilot. You have to click in the embedded canvas to create random spheres. This one doesn’t work yet, I tried to troubleshoot the Instance Mode code for too long but honestly, it’s not a very impressive sketch. If you want to see it, use the code below in the online P5 editor.
Code:
// Create disco rays with p5.js

// Global variables
var rays = [];

// Setup function
function setup() {
  createCanvas(windowWidth, windowHeight);
  background(0);
  noStroke();
}

// Draw function
function draw() {
  background(0);
  for (var i = 0; i < rays.length; i++) {
    rays[i].display();
  }
}

// Mouse pressed function
function mousePressed() {
  rays.push(new Ray());
}

// Ray class
function Ray() {
  this.x = mouseX;
  this.y = mouseY;
  this.diameter = random(10, 100);
  this.speed = random(1, 10);
  this.color = color(random(255), random(255), random(255));

  this.display = function() {
    fill(this.color);
    ellipse(this.x, this.y, this.diameter, this.diameter);
    this.x += this.speed;
    this.y += this.speed;
  }
}

// Window resized function
function windowResized() {
  resizeCanvas(windowWidth, windowHeight);
}

// End of code
I made another one that worked during the group assignment. For this one I got an error Uncaught (in promise) ReferenceError: random is not defined when trying to embed the canvas into this documentation page. I found an explanation here. Random functions have to be declared in setup to be made globally available.
In regular global mode, p5 variable and function names are not available outside setup(), draw(), mousePressed(), etc. (Except in the case where they are placed inside functions that are called by one of these methods.) What this means is that when declaring variables before setup(), you will need to assign them values inside setup() if you wish to use p5 functions.
However after that I kept getting more errors so I’m not sure how it ever worked. This was the other error: Uncaught (in promise) TypeError: URL.createObjectURL: Argument 1 is not valid for any of the 1-argument overloads. I couldn’t find a solution for that, and the sketch wasn’t that great, so let’s leave it at that.
Generated code (before moving random functions outside of Blob()):
// Create glowing blobs that increase in size when the mouse is pressed
// and decrease in size when the mouse is released.

// Global variables
var blobs = []; // array of Jitter objects

// Setup code goes here
function setup() {
  createCanvas(windowWidth, windowHeight);
  // Create objects
  for (var i=0; i<50; i++) {
    blobs.push(new Blob());
  }
}

// Draw code goes here
function draw() {
  background(0);
  // Move and display objects
  for (var i=0; i<blobs.length; i++) {
    blobs[i].move();
    blobs[i].display();
  }
}

// Blob class
function Blob() {
  this.x = random(width);
  this.y = random(height);
  this.diameter = random(10, 30);
  this.speed = 1;

  this.move = function() {
    this.x += random(-this.speed, this.speed);
    this.y += random(-this.speed, this.speed);
  };

  this.display = function() {
    ellipse(this.x, this.y, this.diameter, this.diameter);
  };
}

// When the user clicks the mouse
function mousePressed() {
  // Increase the size of all the blobs
  for (var i=0; i<blobs.length; i++) {
    blobs[i].diameter += 5;
  }
}

// When the user releases the mouse
function mouseReleased() {
  // Decrease the size of all the blobs
  for (var i=0; i<blobs.length; i++) {
    blobs[i].diameter -= 5;
  }
}

// When the user resizes the window
function windowResized() {
  resizeCanvas(windowWidth, windowHeight);
}
Completely not what I wanted:
I made it responsive by setting a fixed height and using the width of the id in which the canvas is drawn which is already responsive. For this one the code added to the Copilot code was the following (should be added to the code in the corresponding locations with the correct id).
// In global variables

var sketchWidth;
var sketchHeight;

// In Setup

  sketchWidth = document.getElementById("portrait").offsetWidth;
  sketchHeight = 500;
  let renderer = createCanvas(sketchWidth, sketchHeight);
  renderer.parent('portrait');

// Function at the bottom for resizing window

function windowResized() {
  sketchWidth = document.getElementById("portrait").offsetWidth;
  sketchHeight = 500;
  resizeCanvas(sketchWidth, sketchHeight);
}
Code in collaboration with Copilot:
// Draw a portrait of a person using p5.js

// Global variables
var x = 0;
var y = 0;
var w = 0;
var h = 0;
var r = 0;
var g = 0;
var b = 0;
var a = 0;

var sketchWidth;
var sketchHeight;

// Setup code goes here
function setup() {
  sketchWidth = document.getElementById("portrait").offsetWidth;
  sketchHeight = 500;
  let renderer = createCanvas(sketchWidth, sketchHeight);
  renderer.parent('portrait');
  background(255);
  noStroke();
}

// Draw code goes here
function draw() {
  for (var i = 0; i < 100; i++) {
    x = random(0, width);
    y = random(0, height);
    w = random(10, 50);
    h = random(10, 50);
    r = random(0, 255);
    g = random(0, 255);
    b = random(0, 255);
    a = random(0, 255);
    fill(r, g, b, a);
    ellipse(x, y, w, h);
  }
}

// Event code goes here
function mousePressed() {
  background(255);
}

// Event code goes here
function keyPressed() {
  background(255);
}

// Event code goes here
function keyReleased() {
  background(0);
}

// Event code goes here
function mouseDragged() {
  x = mouseX;
  y = mouseY;
  w = random(10, 50);
  h = random(10, 50);
  r = random(0, 255);
  g = random(0, 255);
  b = random(0, 255);
  a = random(0, 255);
  fill(r, g, b, a);
  ellipse(x, y, w, h);
}

// Event code goes here
function mouseMoved() {
  x = mouseX;
  y = mouseY;
  w = random(10, 50);
  h = random(10, 50);
  r = random(0, 255);
  g = random(0, 255);
  b = random(0, 255);
  a = random(0, 255);
  fill(r, g, b, a);
  ellipse(x, y, w, h);
}

// Event code goes here
function mouseWheel() {
  background(255);
}

// Event code goes here
function mouseReleased() {
  background(0);
}

function windowResized() {
  sketchWidth = document.getElementById("portrait").offsetWidth;
  sketchHeight = 500;
  resizeCanvas(sketchWidth, sketchHeight);
}
P5.js & ChatGPT
I was talking to a friend about Copilot and he mentioned that it sucks pretty bad since it’s based on an older version of GPT, so I figured I would finally cave and ask ChatGPT (free research preview, GPT 3.5) to code something for me. This way I can compare a VSC with Copilot workflow with a pure ChatGPT workflow (and play around a bit).
I started with the same question I had asked Copilot: to draw a cat with a hat. My prompt was Can you write P5.js code in instance mode that draws a cat with a hat?.
This is what ChatGPT wrote:
Certainly! Here’s an example P5.js code that draws a cat with a hat in instance mode:
let catHatSketch = function(p) {
  // Define variables
  let x, y, hatWidth, hatHeight, earSize;

  p.setup = function() {
    // Create the canvas
    p.createCanvas(400, 400);

    // Set the initial values for the variables
    x = p.width/2;
    y = p.height/2;
    hatWidth = 80;
    hatHeight = 50;
    earSize = 20;
  };

  p.draw = function() {
    // Draw the cat
    p.background(255);
    p.noStroke();
    p.fill(255, 165, 0);
    p.ellipse(x, y + 20, 100, 100);
    p.fill(0);
    p.ellipse(x - 25, y + 10, earSize, earSize);
    p.ellipse(x + 25, y + 10, earSize, earSize);
    p.ellipse(x - 15, y + 45, 10, 20);
    p.ellipse(x + 15, y + 45, 10, 20);
    p.rect(x - hatWidth/2, y - hatHeight/2, hatWidth, hatHeight);
    p.triangle(x - hatWidth/2, y - hatHeight/2, x + hatWidth/2, y - hatHeight/2, x, y - hatHeight/2 - 20);
  };
};

// Create a new instance of the sketch on the page
new p5(catHatSketch);
This code defines a new sketch called catHatSketch using instance mode, which contains the setup() and draw() functions that are called by P5.js. In the setup() function, we create the canvas and initialize some variables that we’ll use to draw the cat and the hat. In the draw() function, we draw the cat and the hat using various P5.js functions such as ellipse(), rect(), and triangle(). Finally, we create a new instance of the sketch using new p5(catHatSketch) to display it on the page.
And here is the result:
It’s definitely not a cat, but it’s also definitely way better than the Copilot sketch. I find it pretty cute to be honest. I only had to make some minor adjustments to the code so it could be responsive (forgot to ask) and that it had the id that I wanted it to have. I immediately noticed that ChatGPT was way faster in writing code, and also way more accurate.
The next prompt I decided to make a bit more detailed. I wrote Draw a cartoon cat in P5.js in instance mode. The cat should be 3D and wear a hat. If you click the cat, it should turn and smile at you. The code should be drawn on a canvas that is responsive.
This is the code that was generated; there is definitely something rotating in 3D, however it’s in the top left corner of the canvas and you can’t really see it, so I asked ChatGPT to center the cat and modify the code, but then I think I hit the limit of how much lines the code could be since every time I asked the code wasn’t finished. I tried to interrogate ChatGPT about this but I only got vague politically correct answers.
let catSketch = function(p) {
    // Define variables
    let x, y, z, catSize, hatWidth, hatHeight, earSize;
    let rotationAngle = 0;
    let isSmiling = false;

    p.setup = function() {
      // Create the canvas
      let canvas = p.createCanvas(800, 800, p.WEBGL);
      canvas.mouseClicked(catClicked);

      // Set the initial values for the variables
      x = 0;
      y = 0;
      z = 0;
      catSize = 100;
      hatWidth = 80;
      hatHeight = 50;
      earSize = 20;
    };

    p.draw = function() {
      // Set the background color
      p.background(255, 255, 230);

      // Set the camera position and rotation
      p.camera(p.width/2, p.height/2, (p.height/2) / p.tan(p.PI/6), p.width/2, p.height/2, 0, 0, 1, 0);
      p.rotateX(p.PI/3);
      p.rotateY(rotationAngle);

      // Draw the cat
      p.noStroke();
      p.fill(255, 165, 0);
      p.translate(x, y, z);
      p.box(catSize, catSize/2, catSize/2);
      p.fill(255);
      p.ellipse(-catSize/4, -catSize/4, catSize/4, catSize/4);
      p.ellipse(catSize/4, -catSize/4, catSize/4, catSize/4);
      if (isSmiling) {
        p.arc(0, catSize/6, catSize/2, catSize/2, p.PI, 0);
      }
      p.fill(0);
      p.ellipse(-catSize/4, -catSize/4, catSize/8, catSize/8);
      p.ellipse(catSize/4, -catSize/4, catSize/8, catSize/8);
      p.ellipse(-catSize/4, catSize/4, earSize, earSize);
      p.ellipse(catSize/4, catSize/4, earSize, earSize);
      p.ellipse(-catSize/5, catSize/3, 10, 20);
      p.ellipse(catSize/5, catSize/3, 10, 20);
      p.translate(0, -catSize/2, 0);
      p.fill(0);
      p.rect(-hatWidth/2, -hatHeight/2, hatWidth, hatHeight);
      p.triangle(-hatWidth/2, -hatHeight/2, hatWidth/2, -hatHeight/2, 0, -hatHeight/2 - 20);
    };

    function catClicked() {
      // Make the cat smile and turn its head
      isSmiling = true;
      rotationAngle += p.PI/6;
    }

    p.windowResized = function() {
      // Resize the canvas to fit the window
      p.resizeCanvas(p.windowWidth, p.windowHeight);
    };
  };

  // Create a new instance of the sketch on the page
  new p5(catSketch);
I asked multiple times to improve the code and make sure that it was finished code without external objects or images, and then I got this beauty:
I laughed out loud when I saw the result, I love him very much. You can move the hat by clicking the canvas.
Generated code:
let angle = 0;
let smile = false;

function setup() {
  let canvas = createCanvas(windowWidth, windowHeight, WEBGL);
  canvas.parent('canvas-container');
  noStroke();
}

function draw() {
  background(200, 220, 255);
  ambientLight(50, 50, 50);
  directionalLight(255, 255, 255, 0, 0, -1);
  push();
  translate(0, 0, -200);
  rotateY(angle);
  fill('#FFC0CB');
  cone(120, 100);
  translate(0, 0, 50);
  fill('#00BFFF');
  cone(150, 120);
  pop();
  push();
  translate(0, 50, 0);
  fill('#FFC0CB');
  ellipse(0, 0, 80, 100);
  fill('#ffffff');
  ellipse(-25, -10, 25);
  ellipse(25, -10, 25);
  fill('#000000');
  ellipse(-25, -10, 10);
  ellipse(25, -10, 10);
  stroke('#ffffff');
  strokeWeight(8);
  line(-20, 20, 20, 20);
  if (smile) {
    noStroke();
    fill(255, 255, 0);
    ellipse(0, 40, 40, 30);
  }
  pop();
}

function mouseClicked() {
  let d = dist(mouseX, mouseY, width / 2, height / 2);
  if (d < 150) {
    angle += PI / 2;
    smile = true;
    setTimeout(() => smile = false, 1000);
  }
}

function windowResized() {
  resizeCanvas(windowWidth, windowHeight);
}
Then I realized that I forgot to ask it to write it in instance mode, so I asked if it could be rewritten in instance mode, and that worked perfectly.
Generated code in instance mode:
let sketch = function(p) {
  let angle = 0;
  let smile = false;

  p.setup = function() {
    let canvas = p.createCanvas(p.windowWidth, p.windowHeight, p.WEBGL);
    canvas.parent('canvas-container');
    p.noStroke();
  }

  p.draw = function() {
    p.background(200, 220, 255);
    p.ambientLight(50, 50, 50);
    p.directionalLight(255, 255, 255, 0, 0, -1);
    p.push();
    p.translate(0, 0, -200);
    p.rotateY(angle);
    p.fill('#FFC0CB');
    p.cone(120, 100);
    p.translate(0, 0, 50);
    p.fill('#00BFFF');
    p.cone(150, 120);
    p.pop();
    p.push();
    p.translate(0, 50, 0);
    p.fill('#FFC0CB');
    p.ellipse(0, 0, 80, 100);
    p.fill('#ffffff');
    p.ellipse(-25, -10, 25);
    p.ellipse(25, -10, 25);
    p.fill('#000000');
    p.ellipse(-25, -10, 10);
    p.ellipse(25, -10, 10);
    p.stroke('#ffffff');
    p.strokeWeight(8);
    p.line(-20, 20, 20, 20);
    if (smile) {
      p.noStroke();
      p.fill(255, 255, 0);
      p.ellipse(0, 40, 40, 30);
    }
    p.pop();
  }

  p.mouseClicked = function() {
    let d = p.dist(p.mouseX, p.mouseY, p.width / 2, p.height / 2);
    if (d < 150) {
      angle += p.PI / 2;
      smile = true;
      setTimeout(() => smile = false, 1000);
    }
  }

  p.windowResized = function() {
    p.resizeCanvas(p.windowWidth, p.windowHeight);
  }
}

new p5(sketch);
Then I asked if it could also rotate and change color when clicked and have a face. The preloaded image didn’t exist anymore so I tried to link to another image but that didn’t work. It wasn’t created in instance mode though and asking ChatGPT to fix that created a different result. Here is a short recording of what the code does:
Generated code:
let angle = 0;

class Cat {
  constructor(x, y, size) {
    this.x = x;
    this.y = y;
    this.size = size;
    this.rotation = 0;
    this.color = [255, 255, 255];
    this.face = null;
  }

  display() {
    push();
    translate(this.x, this.y, 0);
    rotateY(this.rotation);
    fill(this.color);
    box(this.size, this.size, this.size);

    // draw the face on one of the box's faces
    if (this.face) {
      texture(this.face);
      beginShape();
      vertex(-this.size / 2, -this.size / 2, this.size / 2);
      vertex(this.size / 2, -this.size / 2, this.size / 2);
      vertex(this.size / 2, this.size / 2, this.size / 2);
      vertex(-this.size / 2, this.size / 2, this.size / 2);
      endShape();
    }

    // ears
    translate(-this.size / 2, -this.size / 2, 0);
    fill(255, 255, 255);
    box(this.size / 5, this.size / 2, this.size / 5);
    translate(this.size, 0, 0);
    box(this.size / 5, this.size / 2, this.size / 5);

    // whiskers
    translate(-this.size / 2, this.size / 2, 0);
    stroke(0);
    line(0, 0, -this.size / 4, -this.size / 4);
    line(0, 0, 0, -this.size / 4);
    line(0, 0, this.size / 4, -this.size / 4);

    // smile
    noFill();
    stroke(255, 0, 0);
    strokeWeight(this.size / 10);
    arc(0, this.size / 4, this.size / 2, this.size / 4, 0, PI);
    pop();
  }

  update() {
    this.rotation += 0.02;
  }

  clicked(x, y) {
    let d = dist(x, y, this.x, this.y);
    if (d < this.size / 2) {
      this.color = [random(0, 255), random(0, 255), random(0, 255)];
    }
  }

  setFace(face) {
    this.face = face;
  }
}

let cat;

function preload() {
  face = loadImage('https://i.imgur.com/0nIzv2t.png');
}

function setup() {
  createCanvas(windowWidth, windowHeight, WEBGL);
  cat = new Cat(0, 0, 100);
  cat.setFace(face);
}

function draw() {
  background(100);
  cat.update();
  cat.display();
}

function mouseClicked() {
  cat.clicked(mouseX - width / 2, mouseY - height / 2);
}
All of the P5 examples can be found on my gitlab page.
Multiple canvases in Jekyll
After adding the second canvas I noticed that the first one disappeared, something that Bas already mentioned happening in Hugo too. I looked it up and it’s because my sketches are in global mode, and to have multiple sketches they should be in instance mode.
I didn’t want to do this manually so I looked for a script which I found here. I tried to run it but I got this error:
PS C:\Users\mvoss\Documents\Processing> .\node_modules\.bin\p5-global2instance discorays.js
.\node_modules\.bin\p5-global2instance : File
C:\Users\mvoss\Documents\Processing\node_modules\.bin\p5-global2instance.ps1 cannot be loaded. The file
C:\Users\mvoss\Documents\Processing\node_modules\.bin\p5-global2instance.ps1 is not digitally signed. You cannot run
this script on the current system. For more information about running scripts and setting execution policy, see
about_Execution_Policies at https:/go.microsoft.com/fwlink/?LinkID=135170.
At line:1 char:1
+ .\node_modules\.bin\p5-global2instance discorays.js
+ ~~~~~~~~~~~~~~~~~~~~~~~~~~~~~~~~~~~~~~
    + CategoryInfo          : SecurityError: (:) [], PSSecurityException
    + FullyQualifiedErrorId : UnauthorizedAccess
I followed the link, but I didn’t want to change my safety settings to run the script. However changing it manually was also annoying and didn’t work right away so I still tried it by temporarily changing from AllSigned to Unrestricted but then I got this error:
PS C:\Users\mvoss\Documents\Processing> Set-ExecutionPolicy -ExecutionPolicy Unrestricted -Scope LocalMachine

Execution Policy Change
The execution policy helps protect you from scripts that you do not trust. Changing the execution policy might expose
you to the security risks described in the about_Execution_Policies help topic at
https:/go.microsoft.com/fwlink/?LinkID=135170. Do you want to change the execution policy?
[Y] Yes  [A] Yes to All  [N] No  [L] No to All  [S] Suspend  [?] Help (default is "N"): Y
node:internal/fs/utils:345
    throw err;
    ^
Error: ENOENT: no such file or directory, open 'C:\Users\mvoss\Documents\Processing\node_modules\p5-global2instance\discorays.js'
←[90m    at Object.openSync (node:fs:585:3)←[39m
←[90m    at Object.readFileSync (node:fs:453:35)←[39m
    at Command.<anonymous> (C:\Users\mvoss\Documents\Processing\node_modules\←[4mp5-global2instance←[24m\test.js:15:27)
    at Command.listener (C:\Users\mvoss\Documents\Processing\node_modules\←[4mcommander←[24m\index.js:315:8)
←[90m    at Command.emit (node:events:527:28)←[39m
    at Command.parseArgs (C:\Users\mvoss\Documents\Processing\node_modules\←[4mcommander←[24m\index.js:653:12)
    at Command.parse (C:\Users\mvoss\Documents\Processing\node_modules\←[4mcommander←[24m\index.js:474:21)
    at Object.<anonymous> (C:\Users\mvoss\Documents\Processing\node_modules\←[4mp5-global2instance←[24m\test.js:30:4)
←[90m    at Module._compile (node:internal/modules/cjs/loader:1105:14)←[39m
←[90m    at Object.Module._extensions..js (node:internal/modules/cjs/loader:1159:10)←[39m {
  errno: ←[33m-4058←[39m,
  syscall: ←[32m'open'←[39m,
  code: ←[32m'ENOENT'←[39m,
  path: ←[32m'C:\\Users\\mvoss\\Documents\\Processing\\node_modules\\p5-global2instance\\discorays.js'←[39m
So I changed it back to AllSigned.
I asked Copilot to create a code based on instance mode and it gave me this:
// Create a P5 sketch with instance mode that draws growing rectangles with random colors
// and random sizes. The rectangles are drawn from the center of the canvas.

// Create a new instance mode p5 sketch
var myp5 = new p5(function(sketch) {

        // Global variables
        var x, y, w, h, r, g, b;

        // Setup function
        sketch.setup = function() {
            sketch.createCanvas(400, 400);
            sketch.background(0);
            sketch.noStroke();
            sketch.frameRate(10);
        }

        // Draw function
        sketch.draw = function() {
            // Set random values for rectangle
            x = sketch.random(sketch.width);
            y = sketch.random(sketch.height);
            w = sketch.random(10, 50);
            h = sketch.random(10, 50);
            r = sketch.random(255);
            g = sketch.random(255);
            b = sketch.random(255);

            // Draw rectangle
            sketch.fill(r, g, b);
            sketch.rect(x, y, w, h);
        }

    }
);
This worked but again only in global mode, so back to manual troubleshooting. I asked Bas for help. He sent me his example code on Gitlab with which I managed to figure it out eventually by commenting out most of the unnecessary lines and following the same structure he used (apparently just trying to prepend sketch. to everything isn’t a super great workflow if you don’t know what you’re doing). It’s an annoying workflow because it’s a lot of extra text but if you don’t start from a messy Copilot code like I had, it’s pretty doable.
Here you can see global mode and instance mode getting mixed up, resulting in two canvases getting drawn within the same id.
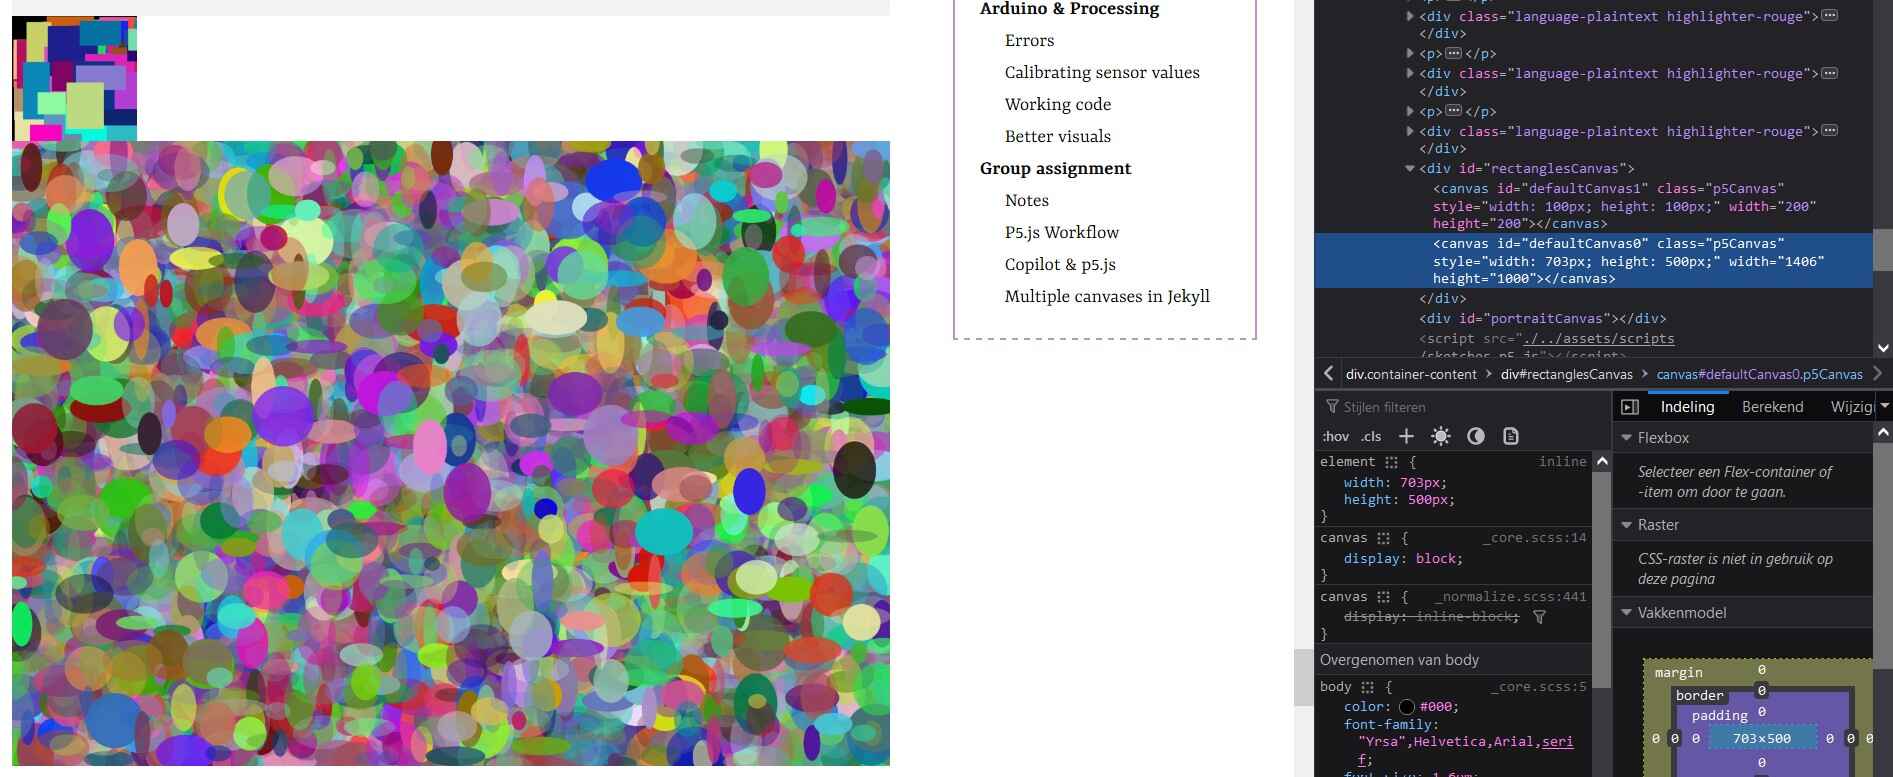
Now all of my sketches are in the same file and work in instance mode. Here is a the rectangle sketch from above working in instance mode:
And here the corresponding code:
const rectangles = (sketch) => {
    // Global variables
    var x, y, w, h, r, g, b;

    // Setup function
    sketch.setup = () => {
        sketchWidth = document.getElementById("rectanglesCanvas").offsetWidth;
        sketchHeight = 500;
        let renderer = sketch.createCanvas(sketchWidth, sketchHeight);
        renderer.parent('rectanglesCanvas');
        sketch.background(0);
        sketch.noStroke();
        sketch.frameRate(10);
    }

    // Draw function
    sketch.draw = () => {
        // Set random values for rectangle
        x = sketch.random(sketch.width);
        y = sketch.random(sketch.height);
        w = sketch.random(10, 50);
        h = sketch.random(10, 50);
        r = sketch.random(255);
        g = sketch.random(255);
        b = sketch.random(255);

        // Draw rectangle
        sketch.fill(r, g, b);
        sketch.rect(x, y, w, h);
    }

    sketch.windowResized = () => {
        sketchWidth = document.getElementById("rectanglesCanvas").offsetWidth;
        sketchHeight = 500;
        sketch.resizeCanvas(sketchWidth, sketchHeight);
    }
}

if (document.getElementById("rectanglesCanvas")) {
    let rectanglesCanvas = new p5(rectangles, 'rectanglesCanvas');
}
Links:
- https://github.com/processing/p5.js/wiki/Global-and-instance-mode
- https://github.com/processing/p5.js/issues/1400
- https://stackoverflow.com/questions/55113740/instantiating-object-in-p5-js-instance-mode
- https://stackoverflow.com/questions/53799973/having-trouble-using-instance-mode?rq=2
- https://stackoverflow.com/questions/55879820/how-to-create-more-than-one-canvas-with-p5
- https://discourse.processing.org/t/p5js-instance-mode-how-to-manage-functions/25369/4
Notes
- Classes: used to bundle variables together to create instances with similar properties.
-
You need a user interaction to open the serial port in browser. You can do that with a button for example to connect with (think modsproject). You can only do this in Chrome-based browsers. I’m using Firefox and I’m not very willing to switch to Chrome, so it’s not my priority (but still useful)
- Serial.write(): sends data directly; 1 byte (8 bit) max per write
- You can also send strings with println
- Input buffers: if you need to save data coming in temporarily to then do something with it.
- 1 byte is 8 bit: 0-255 values; one int is 4 bytes so 32 bit on 32 bit architecture; one int is 2 bytes on 8 bit architectures
- uint8_t can only be positive
Links
- http://puredata.info/
- https://p5js.org/
- http://www.fireflyexperiments.com/#home (link Arduino with Grasshopper)
- Touch Designer
- Processing to P5 converter