Week 7. Computer Controlled Machining
Before the Start
Introduction 🖊
This week relates to the CNC machine. Probably the most dangerous tool you can find in FabLabs … in fact, it can easily get on fire, or damage the human body if the user has his / her six instincts alert!
We will learn how to make big things with it, so it will be a very creative week again! My kind of week :)
Fab Assignments 📚
-
Group assignment:
- Complete your lab’s safety training
- Test runout, alignment, speeds, feeds, and toolpaths for your machine
- Document your work to the group work page and reflect on your individual page what you learned
-
Individual project:
- Make (design+mill+assemble) something big
My Goals 🎯
- What I think I already know
- I designed a chair during my bachelor’s period which was created to be made by the CNC machine. I already know the basics about how does the machine works, but not really all the input needed to design a finished product for it, or prepare the file needed for the machine.
- What I want to learn
- How actually I need to prepare my file to work with the machine, how to use it and make a chair with it.
Project Management
| Task | Time | Day |
|---|---|---|
| Research | 3h | 9, March |
| Group Assignment | 6h | 10, March |
| Design and prepare file | 8h | 11, March |
| Milling | 4h | 14, March |
| Sanding and Assembling | 2h | 14, March |
| Documentation | 8h | 10 / 11 / 12 / 14 , March |
Files 📂
| Name | Description | Link |
|---|---|---|
| File 0 | Rocking Chair | Link |
Research
FabAcademy Students:
- Haru
- Abdulrehman
- Palash Nandi
- Vincent Chow
- Abhinav Garg - outdoor chair
- Karan Tanna - totem chair
- María Sebastián - puff
- Caputo Gianfranco
- Kirstin
- Fablabbombay - chair with joins
- Valolí Chair
Open Soruce Chairs:
During the Process
Results 🖖
Rocking Chair Press Fit
Group Assignment Process 🏊♀️ 🏊🏾 🏊🏽♀️
A few days before the start, our local instructor Henk warned me to wear black clothes for the CNC experience. In fact, working with these machines results in being the most dangerous but also the dirtiest experience within Fablabs.
Safety steps 🦺
It is very important to follow Safety Instructions when using a CNC machine. These are some tips to work safely with general CNC machines at Fablabs. I found the info in the following website:
DO ✅
- Always ensure that you wear proper ear protection and a good pair of safety glasses when operating a CNC machine.
- Ensure that your safety glasses are firmly in place every time you are closely observing the cutting tools.
- Ensure that you wear suitable footwear such as safety boots at all times.
- If you have long hair, ensure that you keep it covered when you operate the CNC machine.
- Keep your hands away from any moving parts during machining processes.
- Stand clear of the machine whenever it is operational. - You should also warn any other people near the risk of being too close to it.
- Whenever you are handling or passing tools, avoid touching the cutting edges.
- Ensure that you turn the machine off completely and clean it whenever you have finished using it.
NEVER DO ❌
- You should never wear gloves while operating the CNC machine.
- You should never wear jewelry or any loose clothing.
- You should never try to reach into the machine while it’s running
- You should never put your hands anywhere near the spindle when it’s revolving.
- Never leave the machine when it’s not completely powered down.
Our local instructor Henk also introduced us some safety instructions to work at the Waag’s CNC:
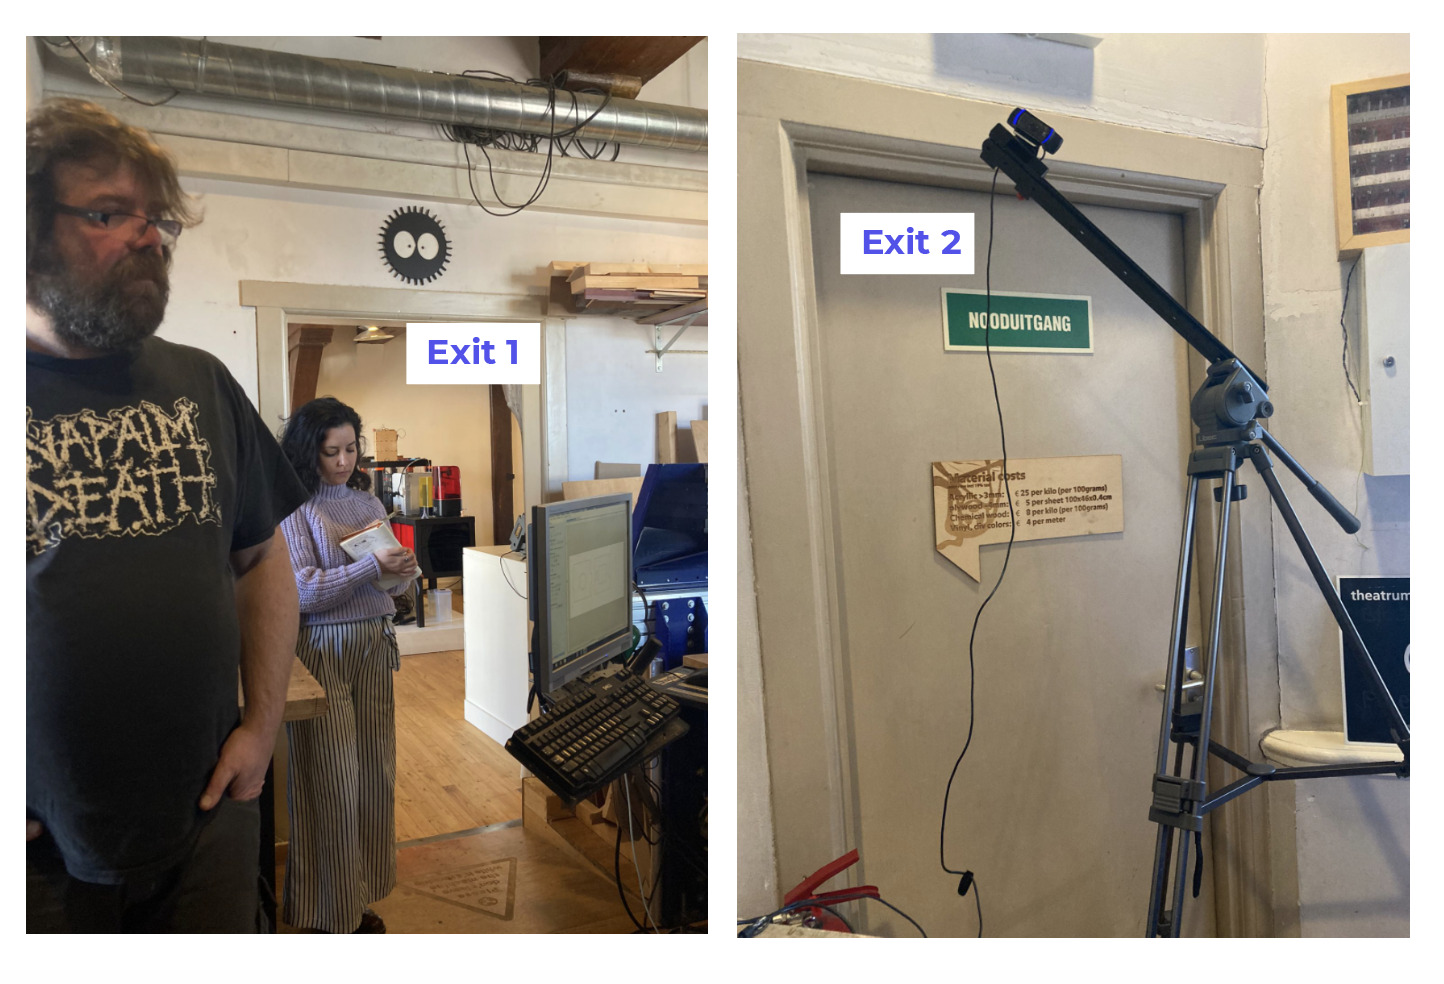
Escape doors
In case of need, the Waag’s fablab has two emergency doors located next to the CNC machine.
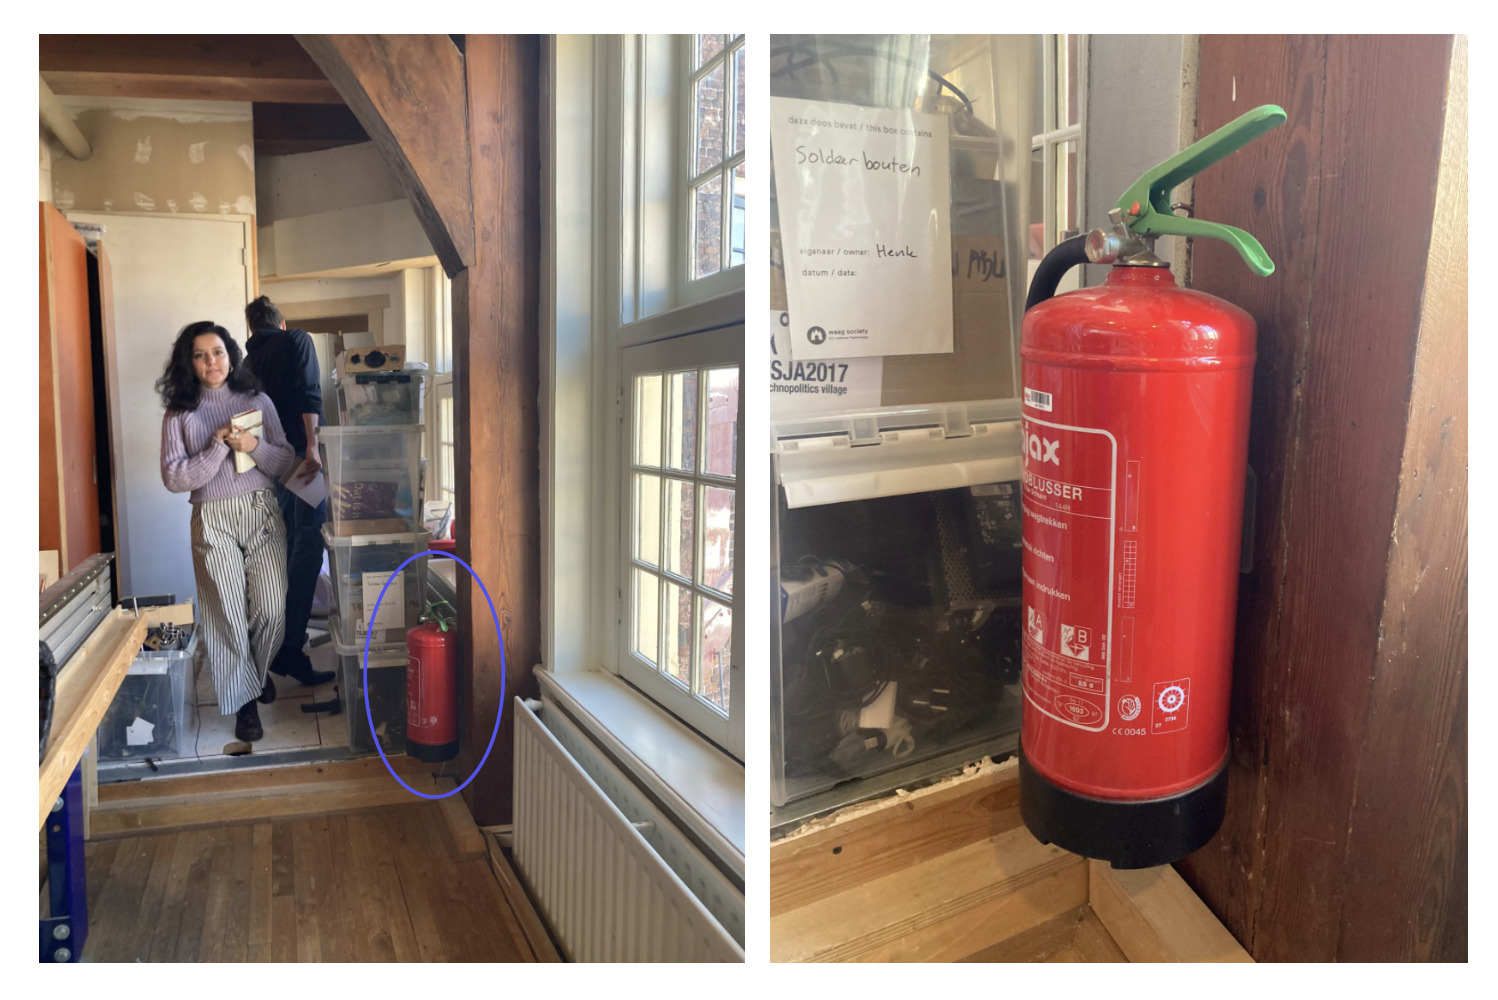
Extinguisher
Sometines, when the machine is not working properly, the dust can start making smoke within the dust bin. To prevent the fire, open the botton part of the dust bin and smell the air. If it smells like fire, use the extinguisher located next to the door to stop the fire.
Electronics
The electronics panel is located on the back side of the CNC machine. In case of fire, turn it OFF.

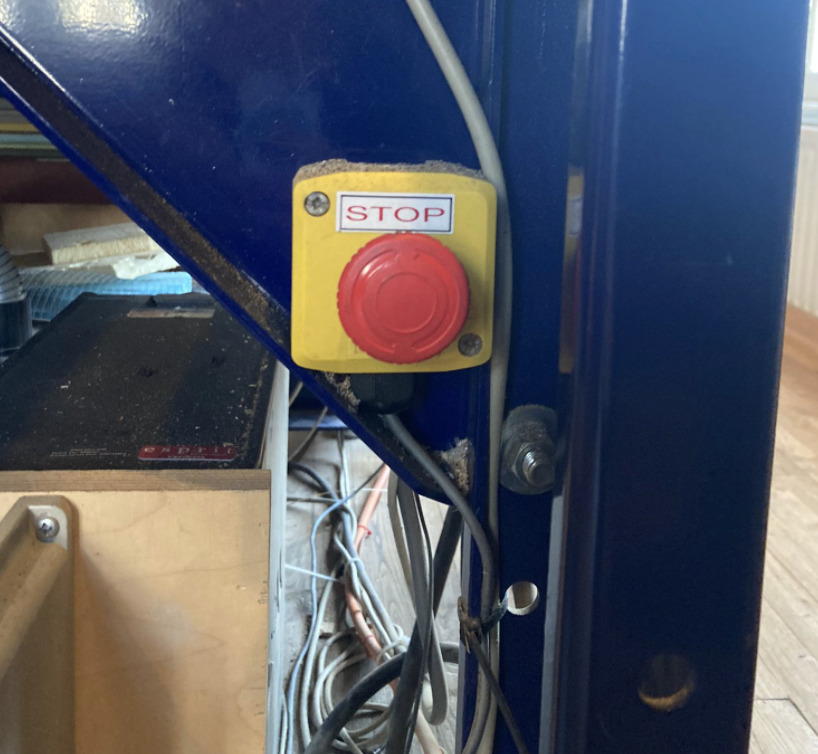
Emergency button
There is an EMERGENCY RED BIG BUTTON located on the machine’s front. Tap on it just in case of emergency. This button will completely stop the machine. Will be needed to re-calibrate, add files and set up the machine to continue with the work.
Start the machine
Put your hands up and stay in front of the machine when starting it. There are moving parts which could be dangerous if you are too close to them.
Always clean the surrounding of the machine, make sure there are no things resting on the machine before starting it.
Clean the sacrificial surface before starting the machine.
CNC Machine Components ⚙️
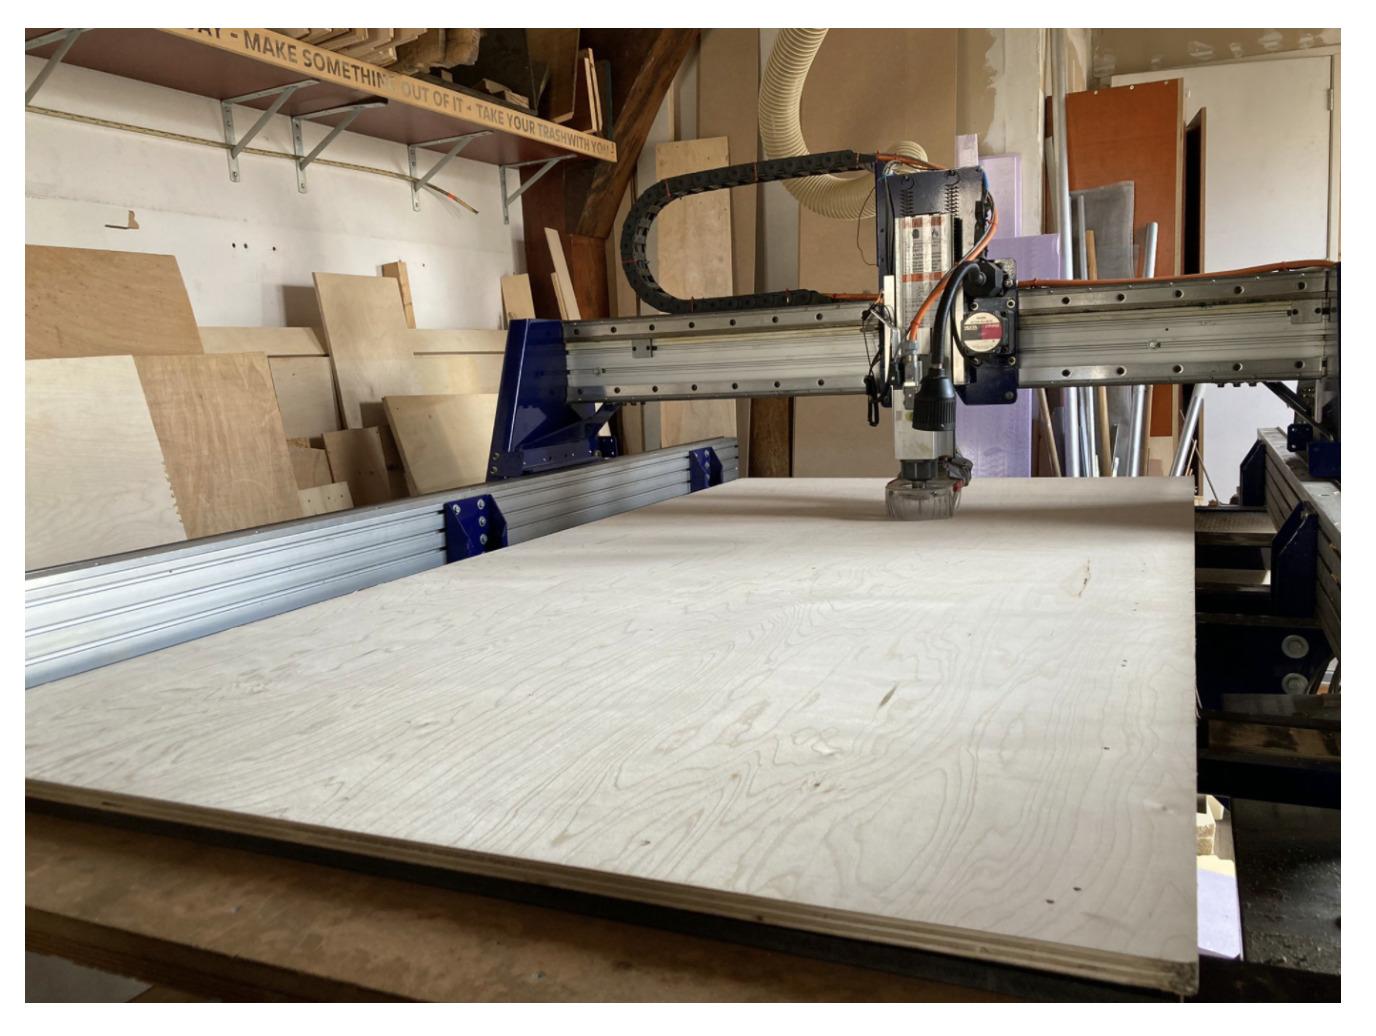
The Waag’s CNC machine is a ShopBot CNC Mill. Attached is a photo and a scheme of the Waag’s CNC machine area:
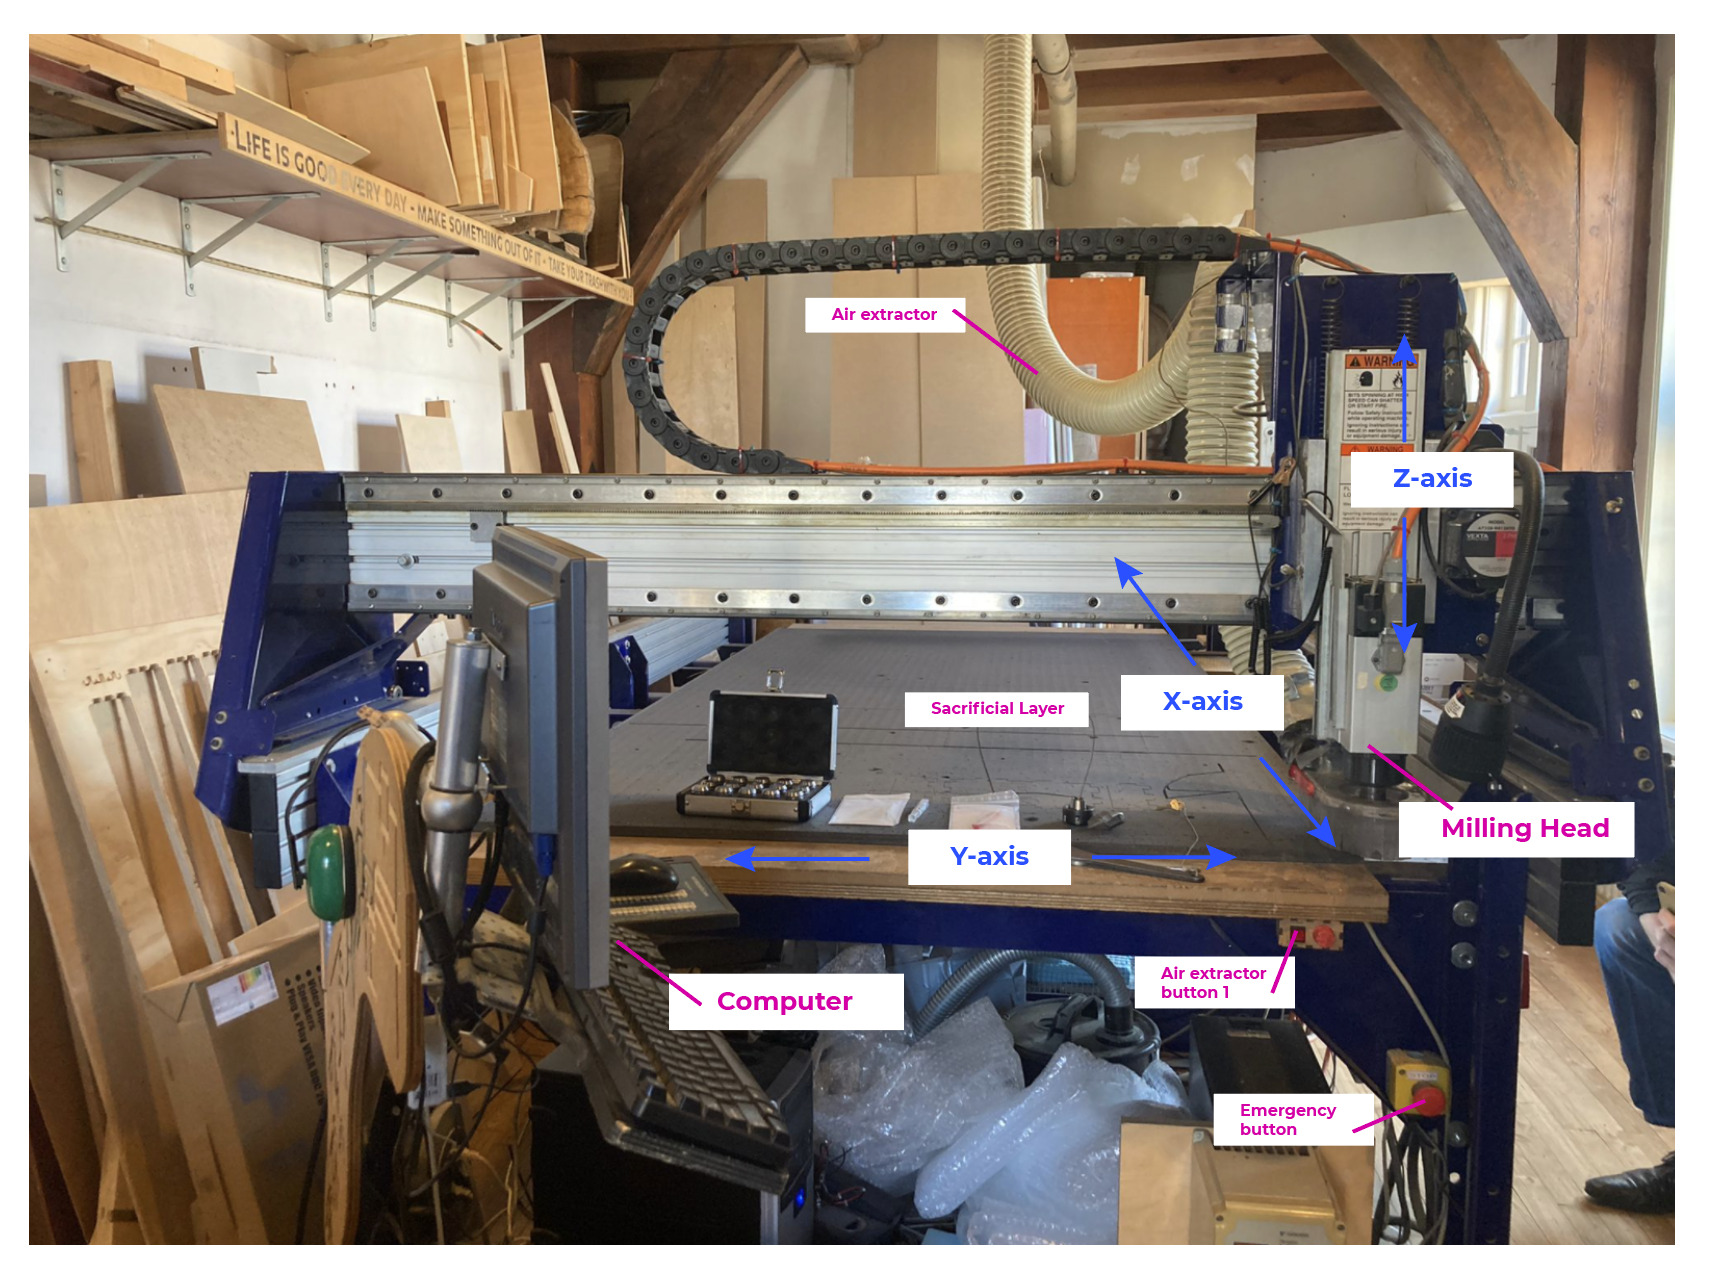
| Component | Task | Location* |
|---|---|---|
| Computer | It is the connection to the machine. Use the ShopBot software to calibrate, load files, and work with the machine. | Front / Left |
| X - axis | The X - axis points perpendicular to the user position | — |
| Y - axis | The Y-axis travels parallel to the user position | — |
| Z - axis | There is a bridge, where the Z-axis is located | — |
| Milling head | Where the bits are located | Above the Z-axis bridge |
| Sacrificial layer | MDF sacrificial layer to prevent to cut the CNC board | On top of the machine’s board |
| Emergency button | Use just in case of emergency to completly stop the machine. | Front / Right. Big button. Red color |
| Fire extinguisher | Extinguish the fire in case of emergency | Back / Righ. Next to the dust bin room |
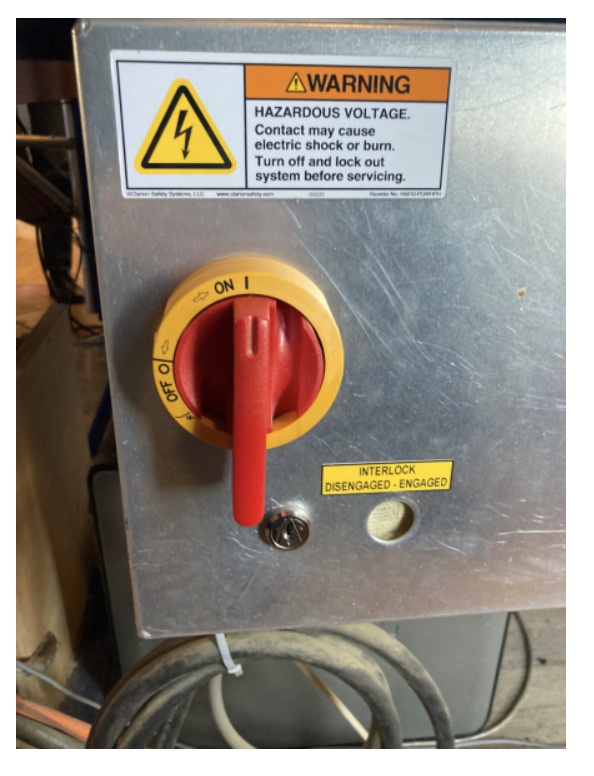
| CNC Button ON/OFF | Turn ON / OFF the machine. | Right / Down side. Red color |
| Air extractor | Extract the dust produced during the milling | Bblack / Right. White long tube connected to the ceiling |
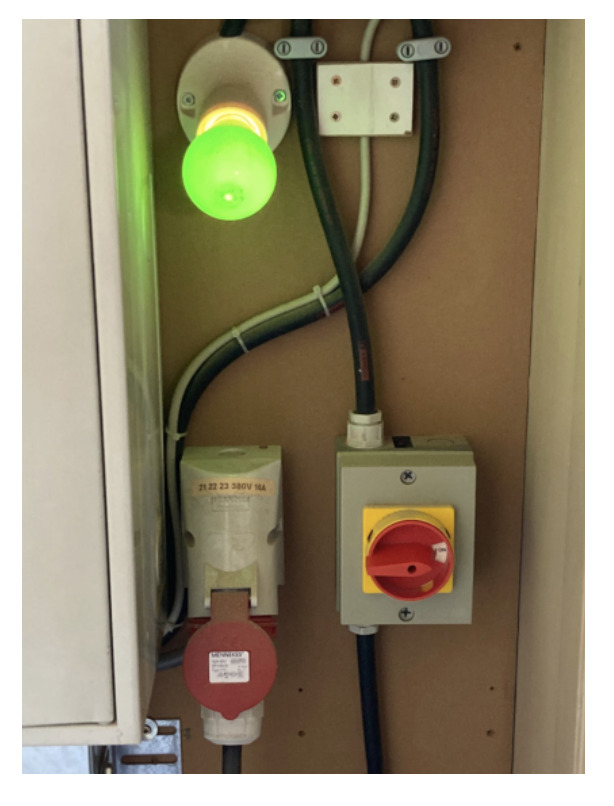
| Air extractor 1st button | Turn ON / OFF the air extractor | Back, next to the dust bin room. Once activated, a green light turns on. |
| Air extractor 2nd button | Turn ON / OFF the air extractor connection to the CNC machine | Right. Small button. Red color |
| Intensity Air extractor controller | Control the intensity of the air extractor | Right, next to the Air extractor button. Red color |
| Speed control | Here is were the speed of the machine is setted up to 18K r.p.m. | Front / Right. The white box with the red leds to controll the speed |
*Location relative to the user’s position
Machine Workflow 🔢
Attaching milling bits
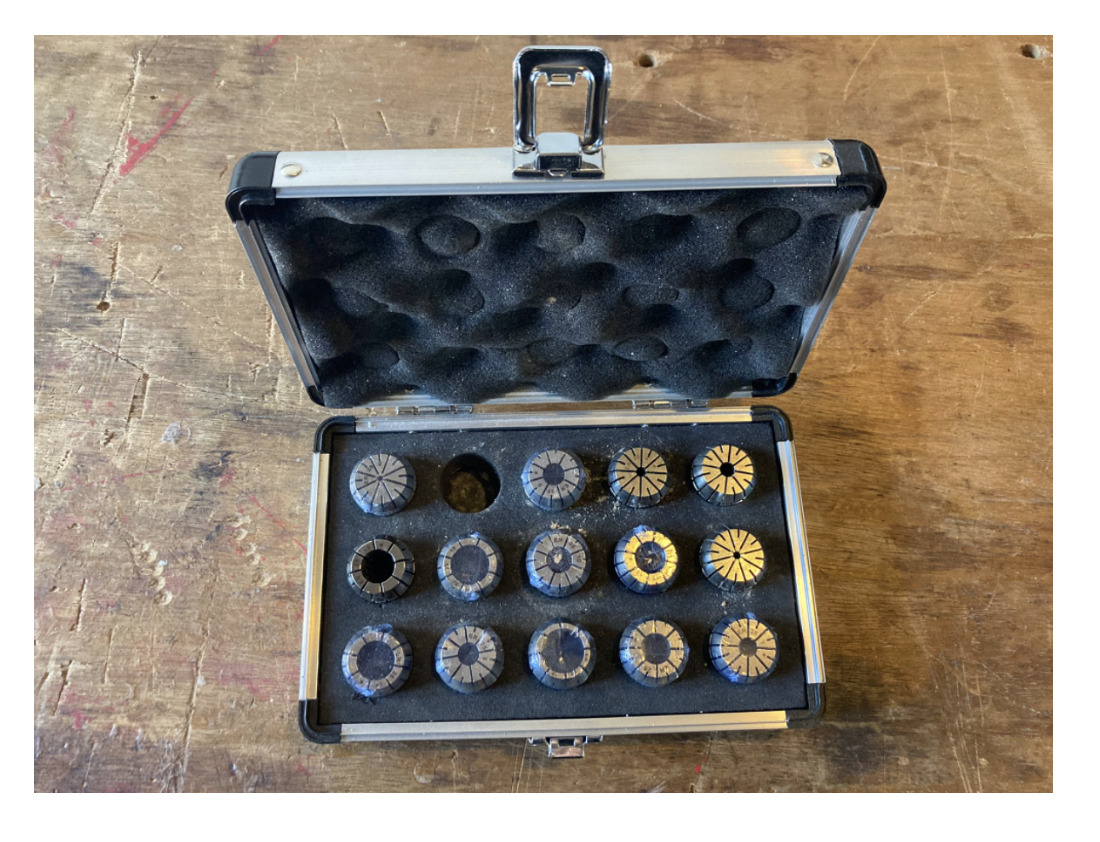
- Choose the milling bit you want to use. At the Waag’s Fablab we’ll use the 5 mm (diameter) - 2 flutes milling bit.
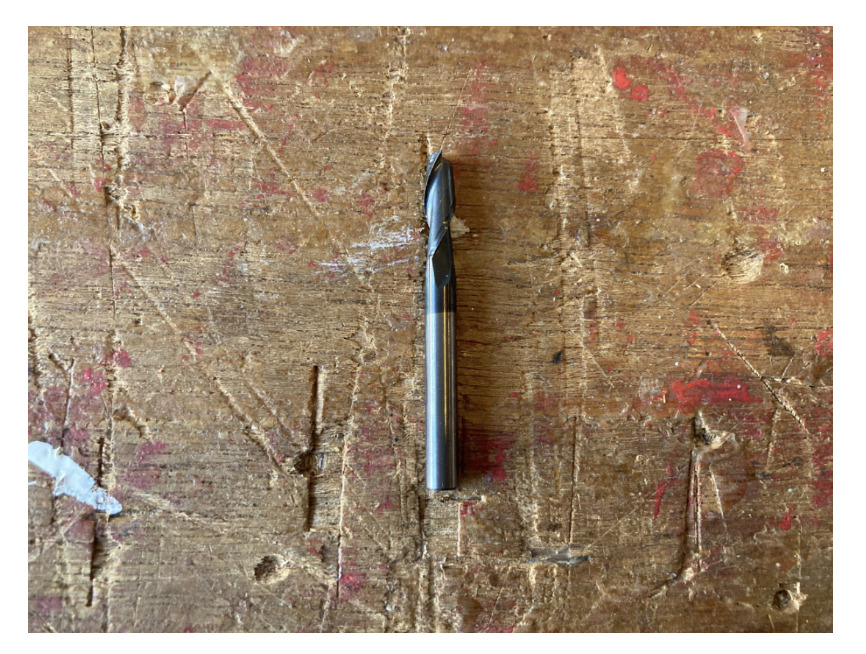
There are many different kind of milling bits, depending on the material, speed, and final result of your work.
- Fit the milling bits within a collet and a nut. The correct order to assemble the three parts is: first fit the nut inside the collet - make sure they make “click” -, then fit the milling bit inside the nut.
Important! 🆘: Is important to assemble the pieces in that order, otherwise, the milling bits will have a lot grades of freedom, not work properly and the machine will scream.
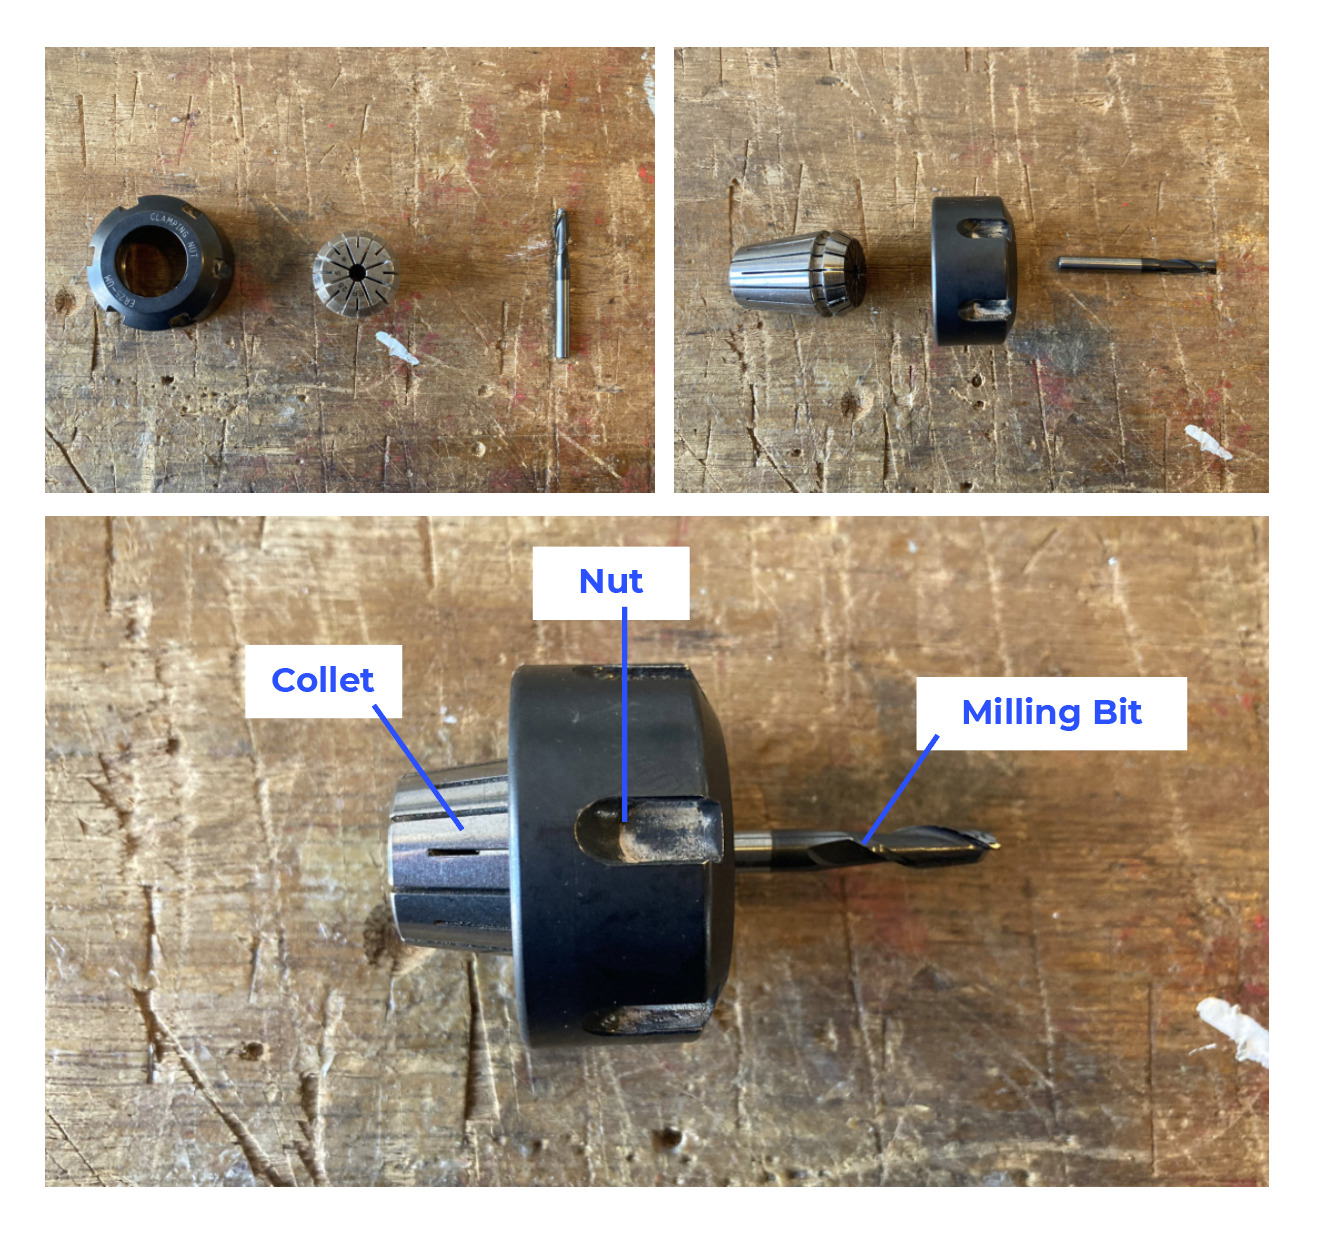
Tip 🛎️: leave 4 cm of the milling bit outside the nut, and check that the bit’s top is coincident with the inner part of the nut-like in the attached photo.
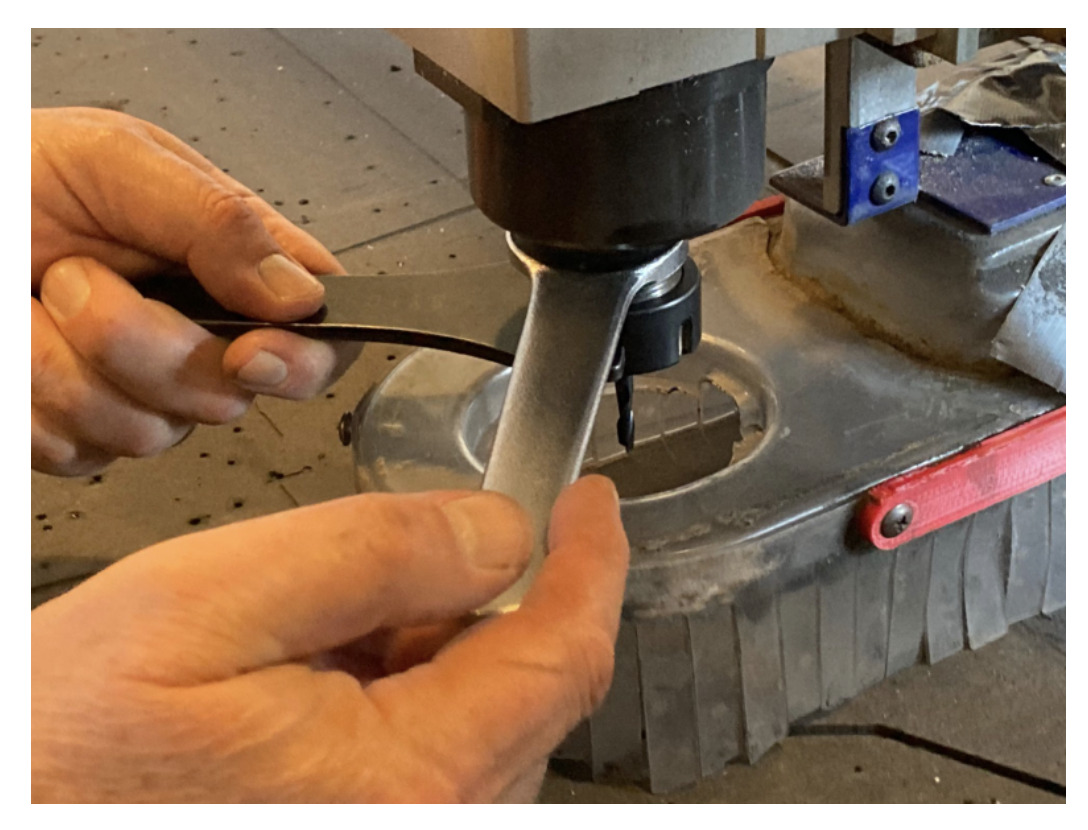
- Unscrew the dust skirt using the butterfly key located at the back of the Z-axis bridge. In this way, the Spindle will be accessible to attach the previously assembled components.

- Tighten the three components (collet + nut + milling bit) to the Spindle by using the key attached to the chord.
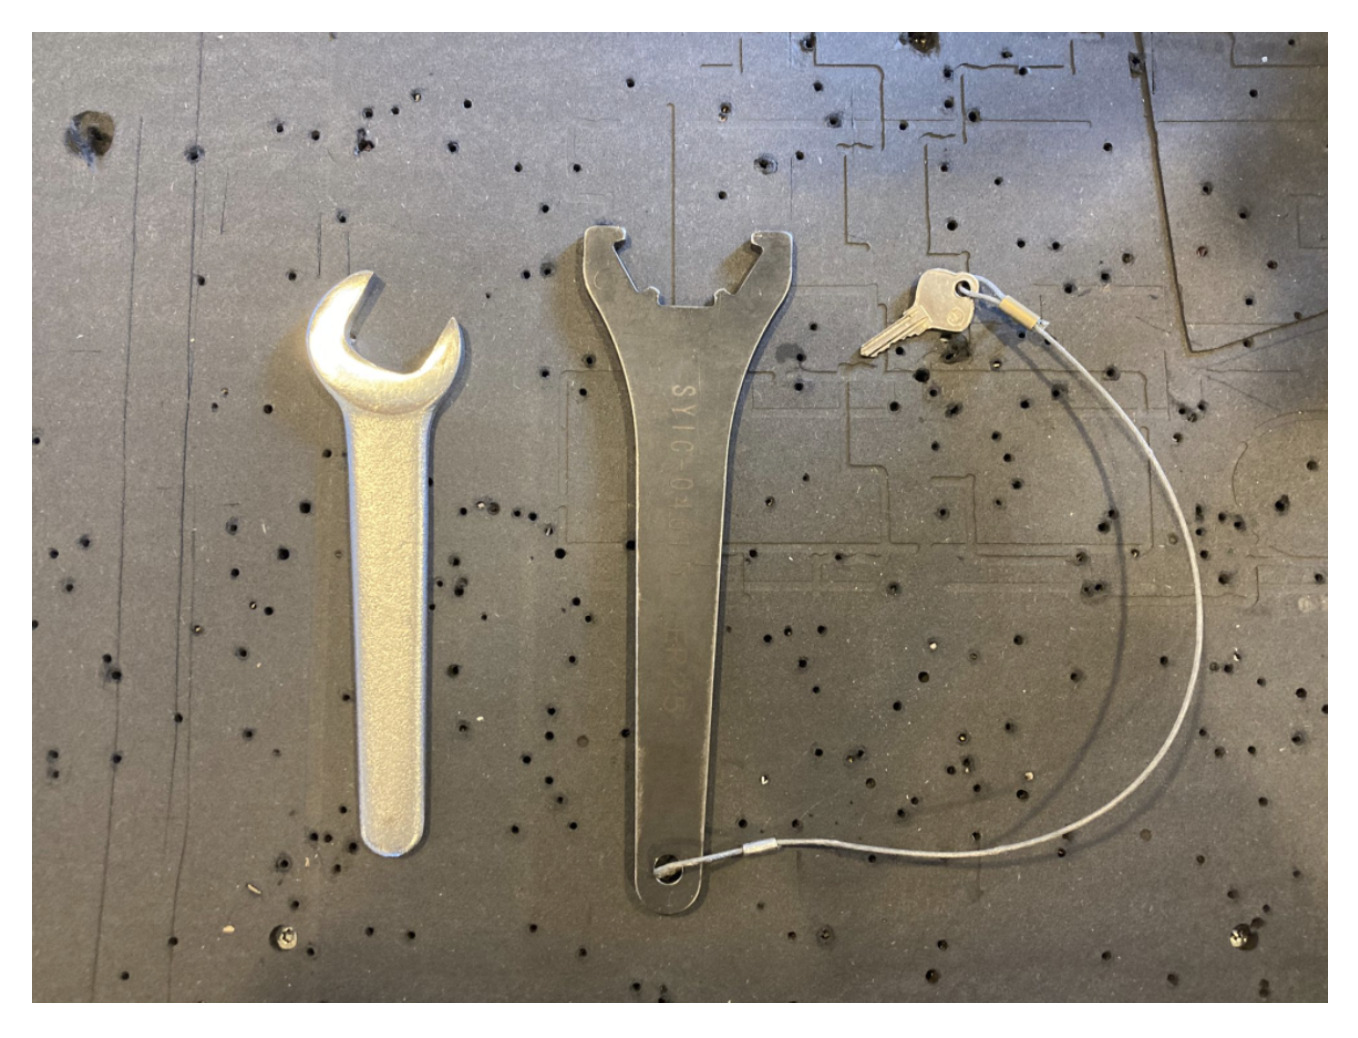
Tip 🛎️: Don’t fasten it too much, you also need to take it out!
-
Put back the dust skirt. This piece is key to ensure the following things:
- that the chips sticks and dust is extracted correctly by the air conductor.
- that the chips sticks don’t jump out the board and hurt the milling users.
Important! 🆘: Double-check that the dust skirt is well located, in order to ensure that it will not fall during the milling and damage the materials.
Preparing your file with V-CARVE software
V-Cave is the intermediate software needed to set up most of the parameters (ex.: speed, milling bit diameter, …) needed to work with the CNC machine. It will generate a G-code for the machine.
During the group assignment, we learned how to use the “pocket toolpath”, “drilling toolpath” and “profile toolpath” following these steps:
-
Create a new file. In case you want to import your design for the individual assignment, it is possible to import EPS files such as .DXF or .PDF
V-CARVE > File > New File -
The “Material setup” screen appears. Here we setted up the following parameters for our group assigment
| Name | Measure | Reference |
|---|---|---|
| Job Size | 17.5 | Material’s thickness. Measure it with the caliber. Plywood is never uniform, so it’s important to measure the thickness in different parts of the sheet and make an average before adding the info to the software |
| Material | Down | Refers to the Z-axis starting level |
| Datum position | Left / Down corner | Setting up of the X and Y axes referring to the material sheet |
| Units | mm | Its possible to choose between mm and in |
-
Set up the Pocket Toolpath - superficial cuts - following this steps:
- Select the circular pocket on the design. If you don’t do that, the software will send an error when tapping on “Calculate”.
- Select the “Pocket Toolpath” on the right menu.
- Set up the Cutting Depths:
- Start Depth = 0 mm
- Cut Depth = 6 mm
Here you can select the cut you prefer for your design. We chose 6 mm because the milling bit diameter is 5 mm. When milling with the CNC machine, we need to use half the diameter for each milling round to get the desired depth. In our case, since we want a depth of 6 mm, we will need 3 rounds to make it work. All this info is setted up at the “Tool info” options:
- “Tool Database” > FabLab Amsterdam > Endmill 2 Flutes
- Geometry (D)= 5 mm
- Cutting parameters
- Pass depth = 2.5 mm
- Stepover = 0.75 mm - 15%
- Feed and Speeds
- Spindle Speed = 18K r.p.m. -> Speed of the machine’s motor
- Feed Rate = 60 -> Spindle Speed
- Pluge Rate = 20
- Tool number = 1
-
“Offset” and “Climb” options are suggested.
-
Press “Calculate”.
-
Check the toolpath with the 3d simulation.
Important! 🆘: As we learned during the laser cutting week, it’s important to cut the pocket toolpath before the drilling and the profile, since the material can move during the milling. Resulting in the pocket designs not being centered and showing cut problems.
-
Set up the Profile Toolpath - cuts which are the whole way throught the material - There are two kind of profile toolpath, the outer cuts and the inner cuts. They both have the same settings on “Cuttin Depths”, " Tool" “Climb”, expect for the option inside/outside lines in the “Machine Vectors” panel. We setted up both options in our design following this steps:
-
Select the outer/inner profiles on your design. One at a time.
-
Select the “Profile Toolpath” on the right menu.
-
Cutting Depths
- Start Depth = 0 mm
- End Depth = 17.5 mm
- Select “Show advanced toolpath options”
-
Tool -> same tool
-
Machine vectors -> here is where you can select the option inside/outside lines + Climb.
-
Last Pass
- Select “Do separate last pass”
-
Tabs -> uswed to avoid the material movement when is cutted, but also parts flying around the room when milling.
- Edit the taps, locating them in a centered position in each side of your design. Use as much as you need depending on the size of your draws. Do not place tabs in the cornes.
- Lengh: 12 mm
- Thickness: 3 mm
-
Press “Calculate”.
-
Check the toolpath with the 3d simulation.
-
Important! 🆘: It is important to note here that the milling machine can not make 90º corners because of the geometry of the milling bits. This is why V-CARVE offers 3 different ways to design the corners on your design. For our group assignment, we decided to try the three of them in order to check how they look in the final result.
-
Set up the Drilling Toolpath - this is the screw toolpath, needed to drill holes where we will screw our Plywood sheet into the sacrificial layer - following this steps:
- Select the 3.5 mm diameter circles on your design.
- Select the “Drilling Toolpath” on the right menu.
- Cutting Depths:
- Start Depth: 0 mm
- End Depth: 12 mm
- Press “Calculate”.
- Check the toolpath with the 3d simulation.
-
Save your file by selecting the option “Save Toolpath” to save them in two files. One for the drilling holes, and a second one for the pockets, inside/outsside profiles.
Tip 🛎️: When saving the files, order them like this: Pocket Toolpath > Inside Toolpath > Outside Toolpath. In this way the machine will follow this order to avoid milling mistakes.
Turning On the machine
Once the milling bits and the design file are ready, you can turn ON the machine and leveled it before start the milling:
- Turn ON the big red button located on the CNC machine’s right side. The machine is now connected to the computer, allowing the user to set the X and Y axes. It will also start doing a loud sound.
Tip 🛎️: Let the machine warm up a little bit before the start.
- Turn ON the first air extractor button. Make sure a green light starts lighing.
Calibrating X - Y axes
Now that the machine is ON, it is possible to calibrate the axis for the group assigment. In order to do that, we followed this steps:
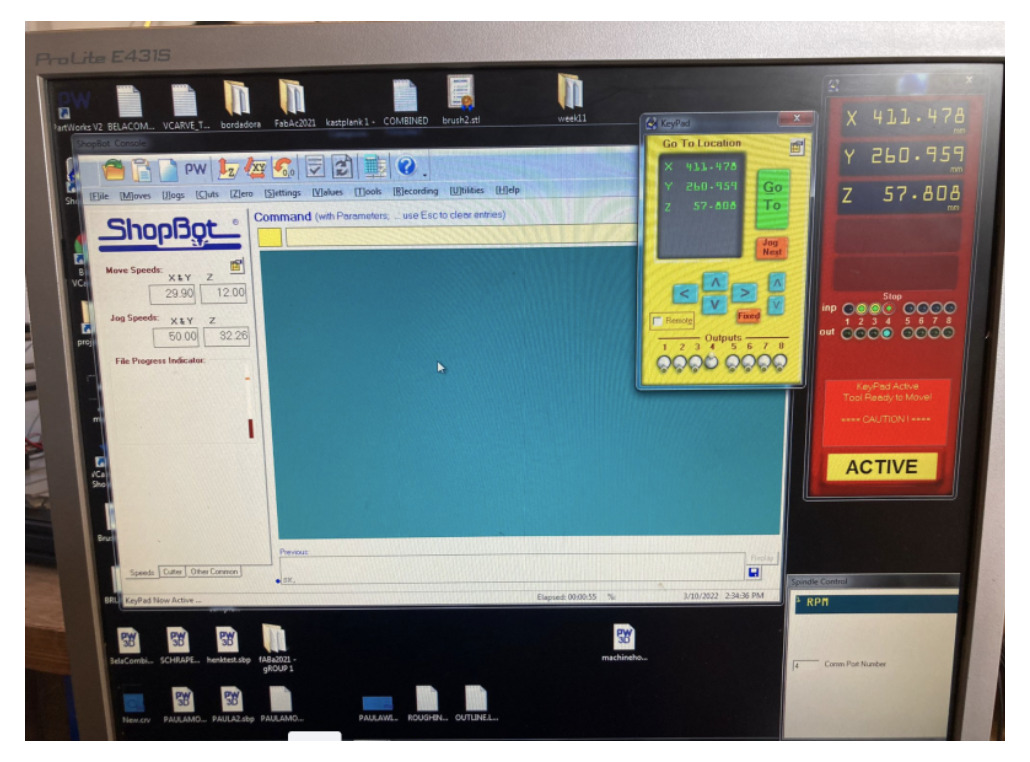
- Open Shopbot, this is the sofwtare we will use to calibrate axis, to load the files and to make work the machine. Our local instructor Henk, explained us that all the communication we will do with the software is by the computer keyboard.
Important! 🆘: Always turn ON the machine before opening the software, otherwise, Shopbot will give errors because the connection between the machine and the software is not setup up.
- Press “k” to operate with the machine. A yellow window will appear, and here is where the arrows to set up the axes are shown.
-
In order to move the axes, use the keyboard arrows to set up the X and Y axes, and the “page up” and “page down” to set the Z axis.
Z keyboard button -
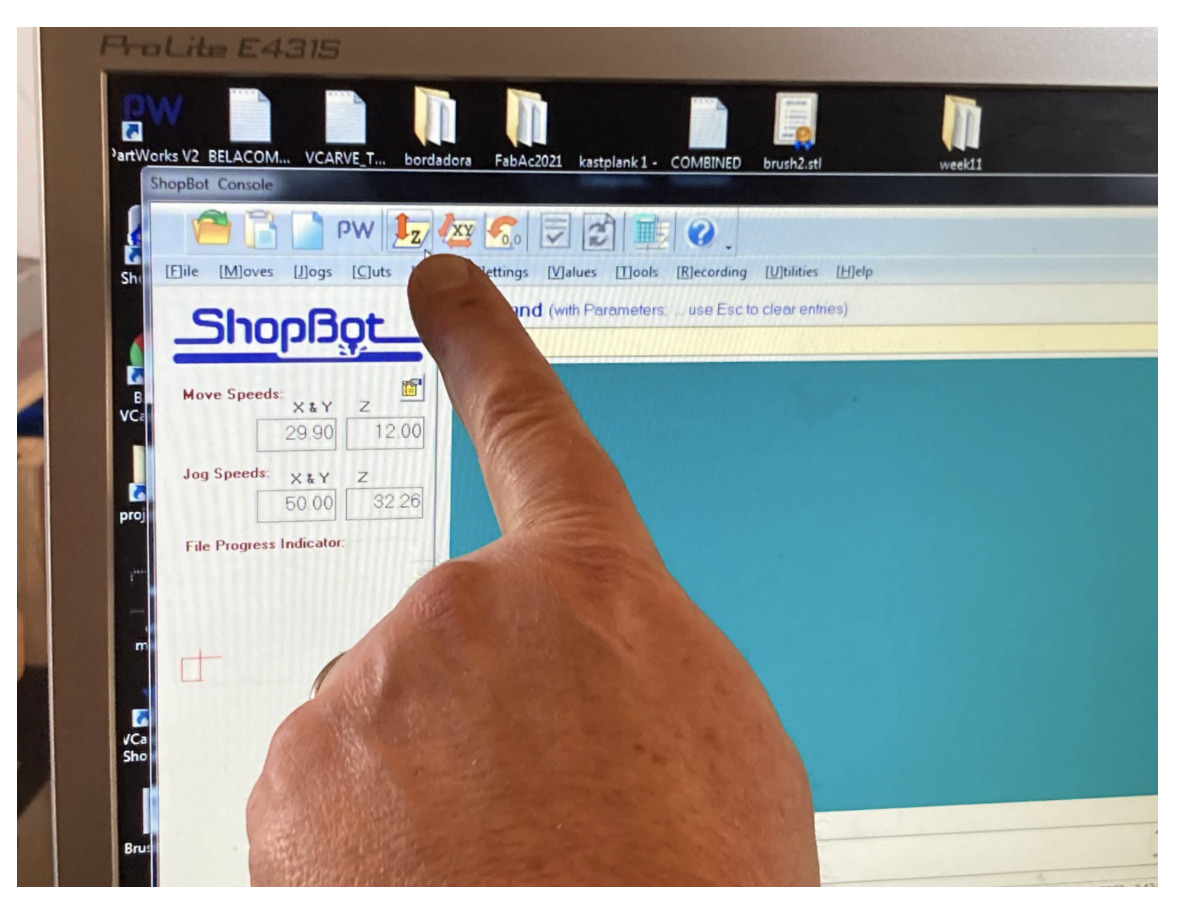
Press the “XY button” in the software header to make the machine’s spindle move to its origin X (0) and Y (0).
XY button
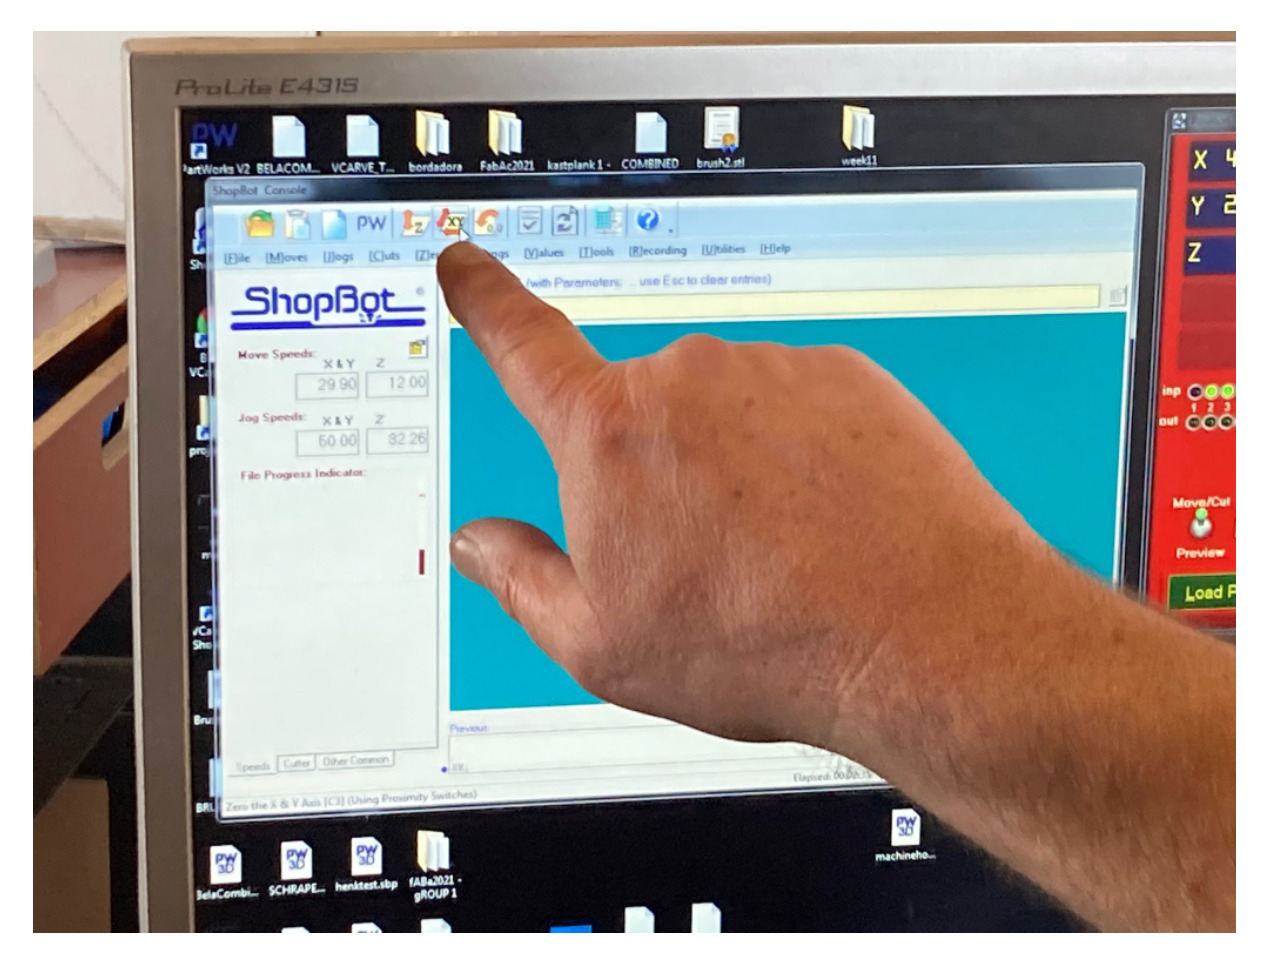
If you want to change the origin of the X and Y axes, use the keyboard arrows to move the Shopbot to the position wanted, and then press the header option:
[Z]ero > zero[2] axes (X & Y)
Tip 🛎️: When re-calibration the X and Y axes, good advice is to take a picture of the new coordinates, in order to be able to re-start the work in case of need because of a fuse, emergency, or other problems during the milling.
Calibrating Z
- To set up the Z-axis, move the spindle to a centered position in the sacrificial layer, in this way the calibration will be more accurate. Use the metal piece attached to the Shopbot to calibrate it. First, check that the spindle is detecting the piece of metal by doing so by hand. When the spindle will have contact with the metal piece, a green light button will be visible in the software’s window.
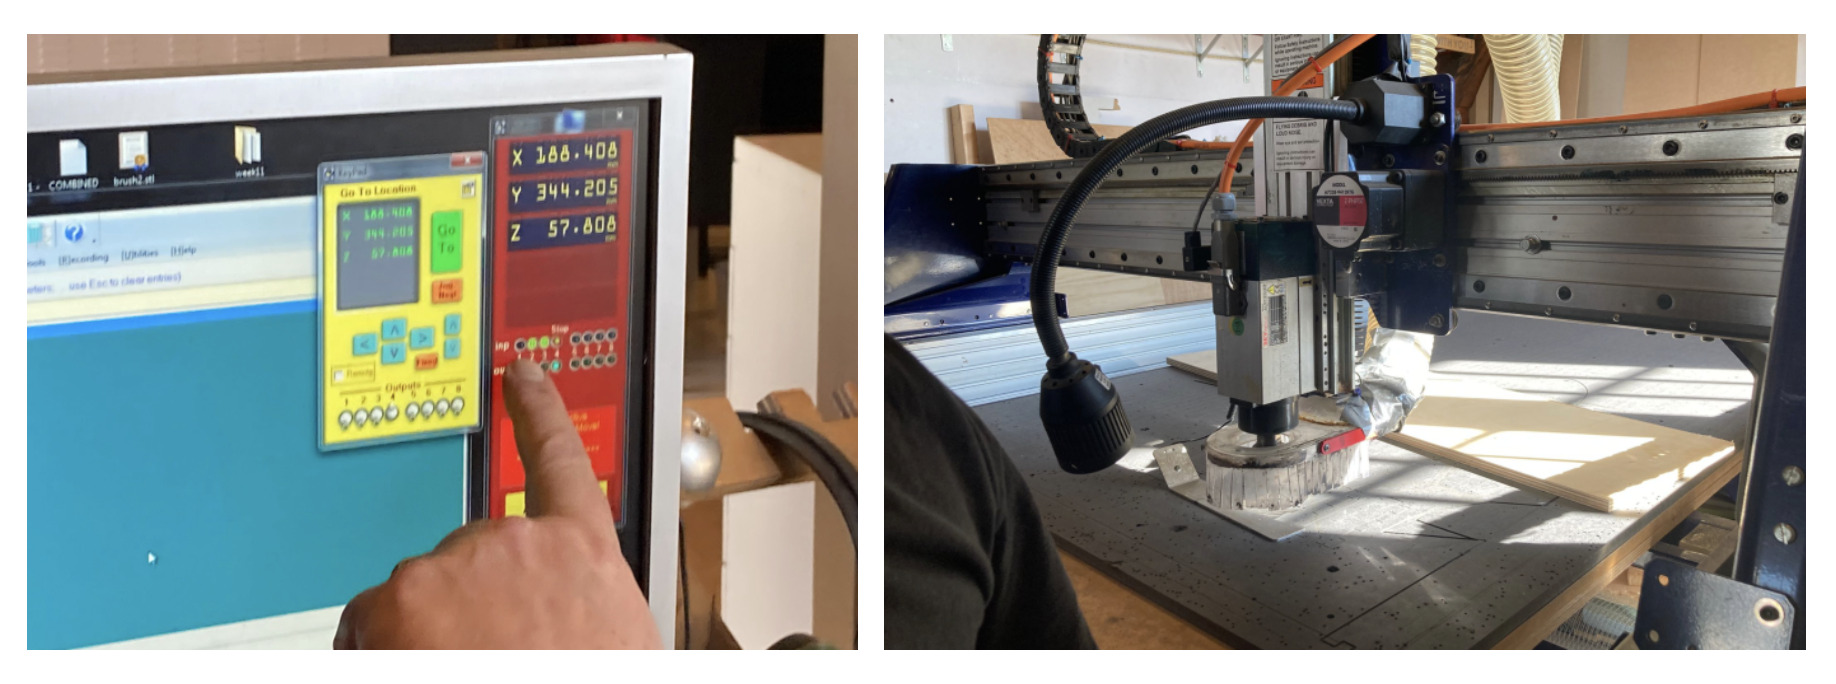
Important! 🆘: When calibrating the Z-axis in the CNC machine, the metal piece will be located on top of the sacrificial layer, and not on the material like we do when calibration the laser cutter machine.
- Press the “Z” button. The machine will automatically calibrate the axis. Before taking back the metal sheet, use the “page up” keyboard button to be sure that the spindle does not touch the sheet. Put back the metal sheets where it belongs when you are done.
Locate the material on the sacrificial layer
- Locate the material sheet on top of the sacrificial layer taking into account the parameter you set up with the V-CARVE software.
Load file
-
Once the machine is leveled, the material ready, and you have prepared your design files with V-CARVE, open the “Drilling Toolpath” file on ShopBot using this path:
File > Load Path File
Double-check everything is OK
-
Before pressing START, we shoud always to double check that:
-
The green extractor’s button is lighting
-
The area around the machine is safe / there are not external elements touching the CNC machine
-
The axes are located at the origin
-
The material sheet is correctly located in relation to the axes origin
-
Wear all safety equipment: gloves / glasses / earpods
-
Milling
Once you double-check everything is ok, Start the Milling process following this steps:
-
Turn ON the Spindle by turning the key attached to the wrench.
-
Turn ON the second air extractor red button and level it to the max intensity.
-
Press START on Shopbot. The machine will start reading the G-code and take over with the milling.
As explained before, first we will drill the circles where the screws will be drilled. This step is needed in order to ensure that the material sheet is well connected to the sacrificial layer, and does not move during the milling.

Load the second file with the pocket, inside and outside profiles and START again the program to mill them:

-
Unscrew the board from the sacrificial layer.
-
Use a small saw to take out the pieces from the board.
- Use sandpaper to sand the material and get a polished surface.
Result
Now we can check the features of our result:
- We needed to sand the material a few times to be able to properly connect the joints.
- The dog bone joints are looking smoother rather than the others.
- The profiles which are parallel to the materials grow have fewer amount of dust sticks rather than the profiles which are perpendicular.
Extra check with Saco Climb Vs. Conv.
With my fellow student Saco, we decided to check out the difference between the inside profiles step up with the “Climb” milling bit direction instead of the “Conventional” direction.
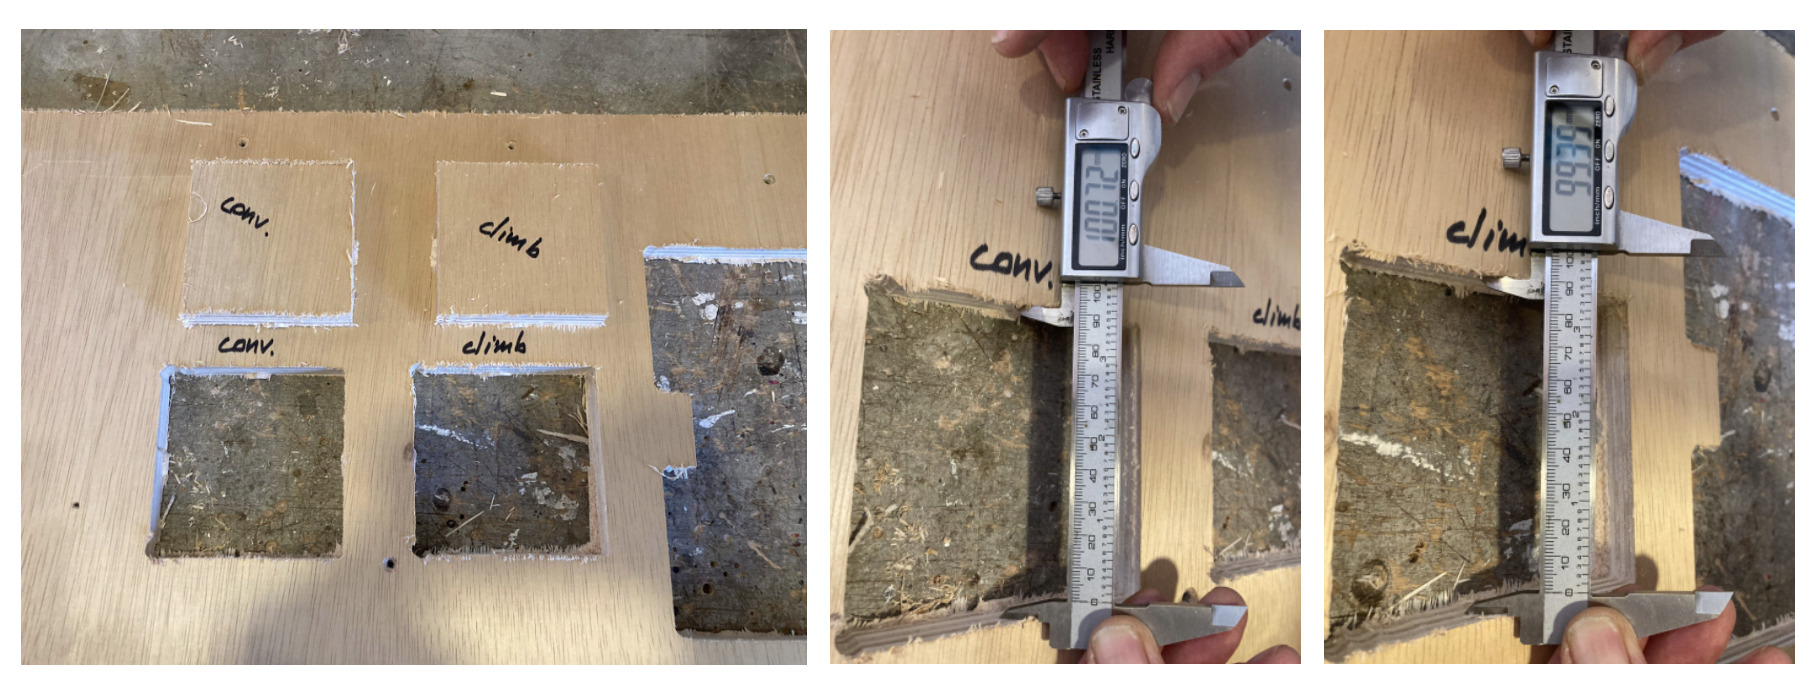
- Climb generates less ammount of dust
- Climb eats less material rather than Conv
- Conv has less desviation in the corners
Individual Assignment Process 🏊♀️
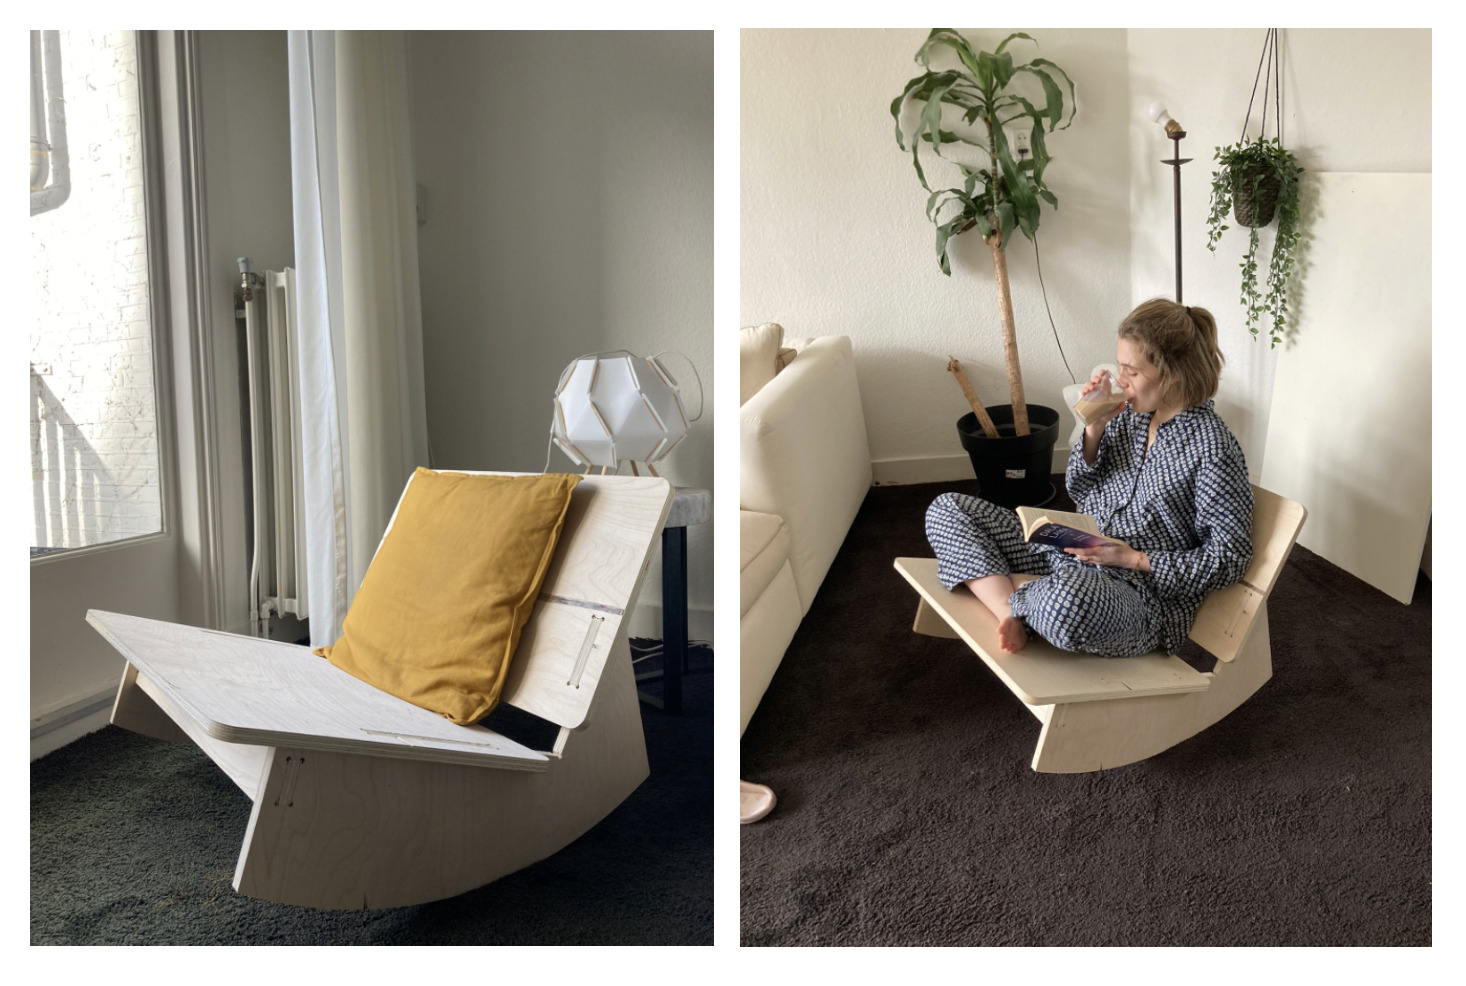
As the individual assignment, I decided to design a rocking chair. I will use it to listen to podcasts, read and drink coffee every morning before the start of the day! 🌸
Design Process
Early stages
I already designed an office chair during my bachelor’s degree, thought to be made with a CNC machine. I never had the opportunity to build it up, so I was looking forward for the Fab Academy to start to be able to design a new chair, or even build up that one.
Attached is the photo of the “Men’s chair” which is designed during my bachelor’s.
Moodboard
First of all, I did research about the CNC chair’s possibilities already existing in the market.
Attached is the link to the Pinterest mood board which I did before start designing my rocking chair.
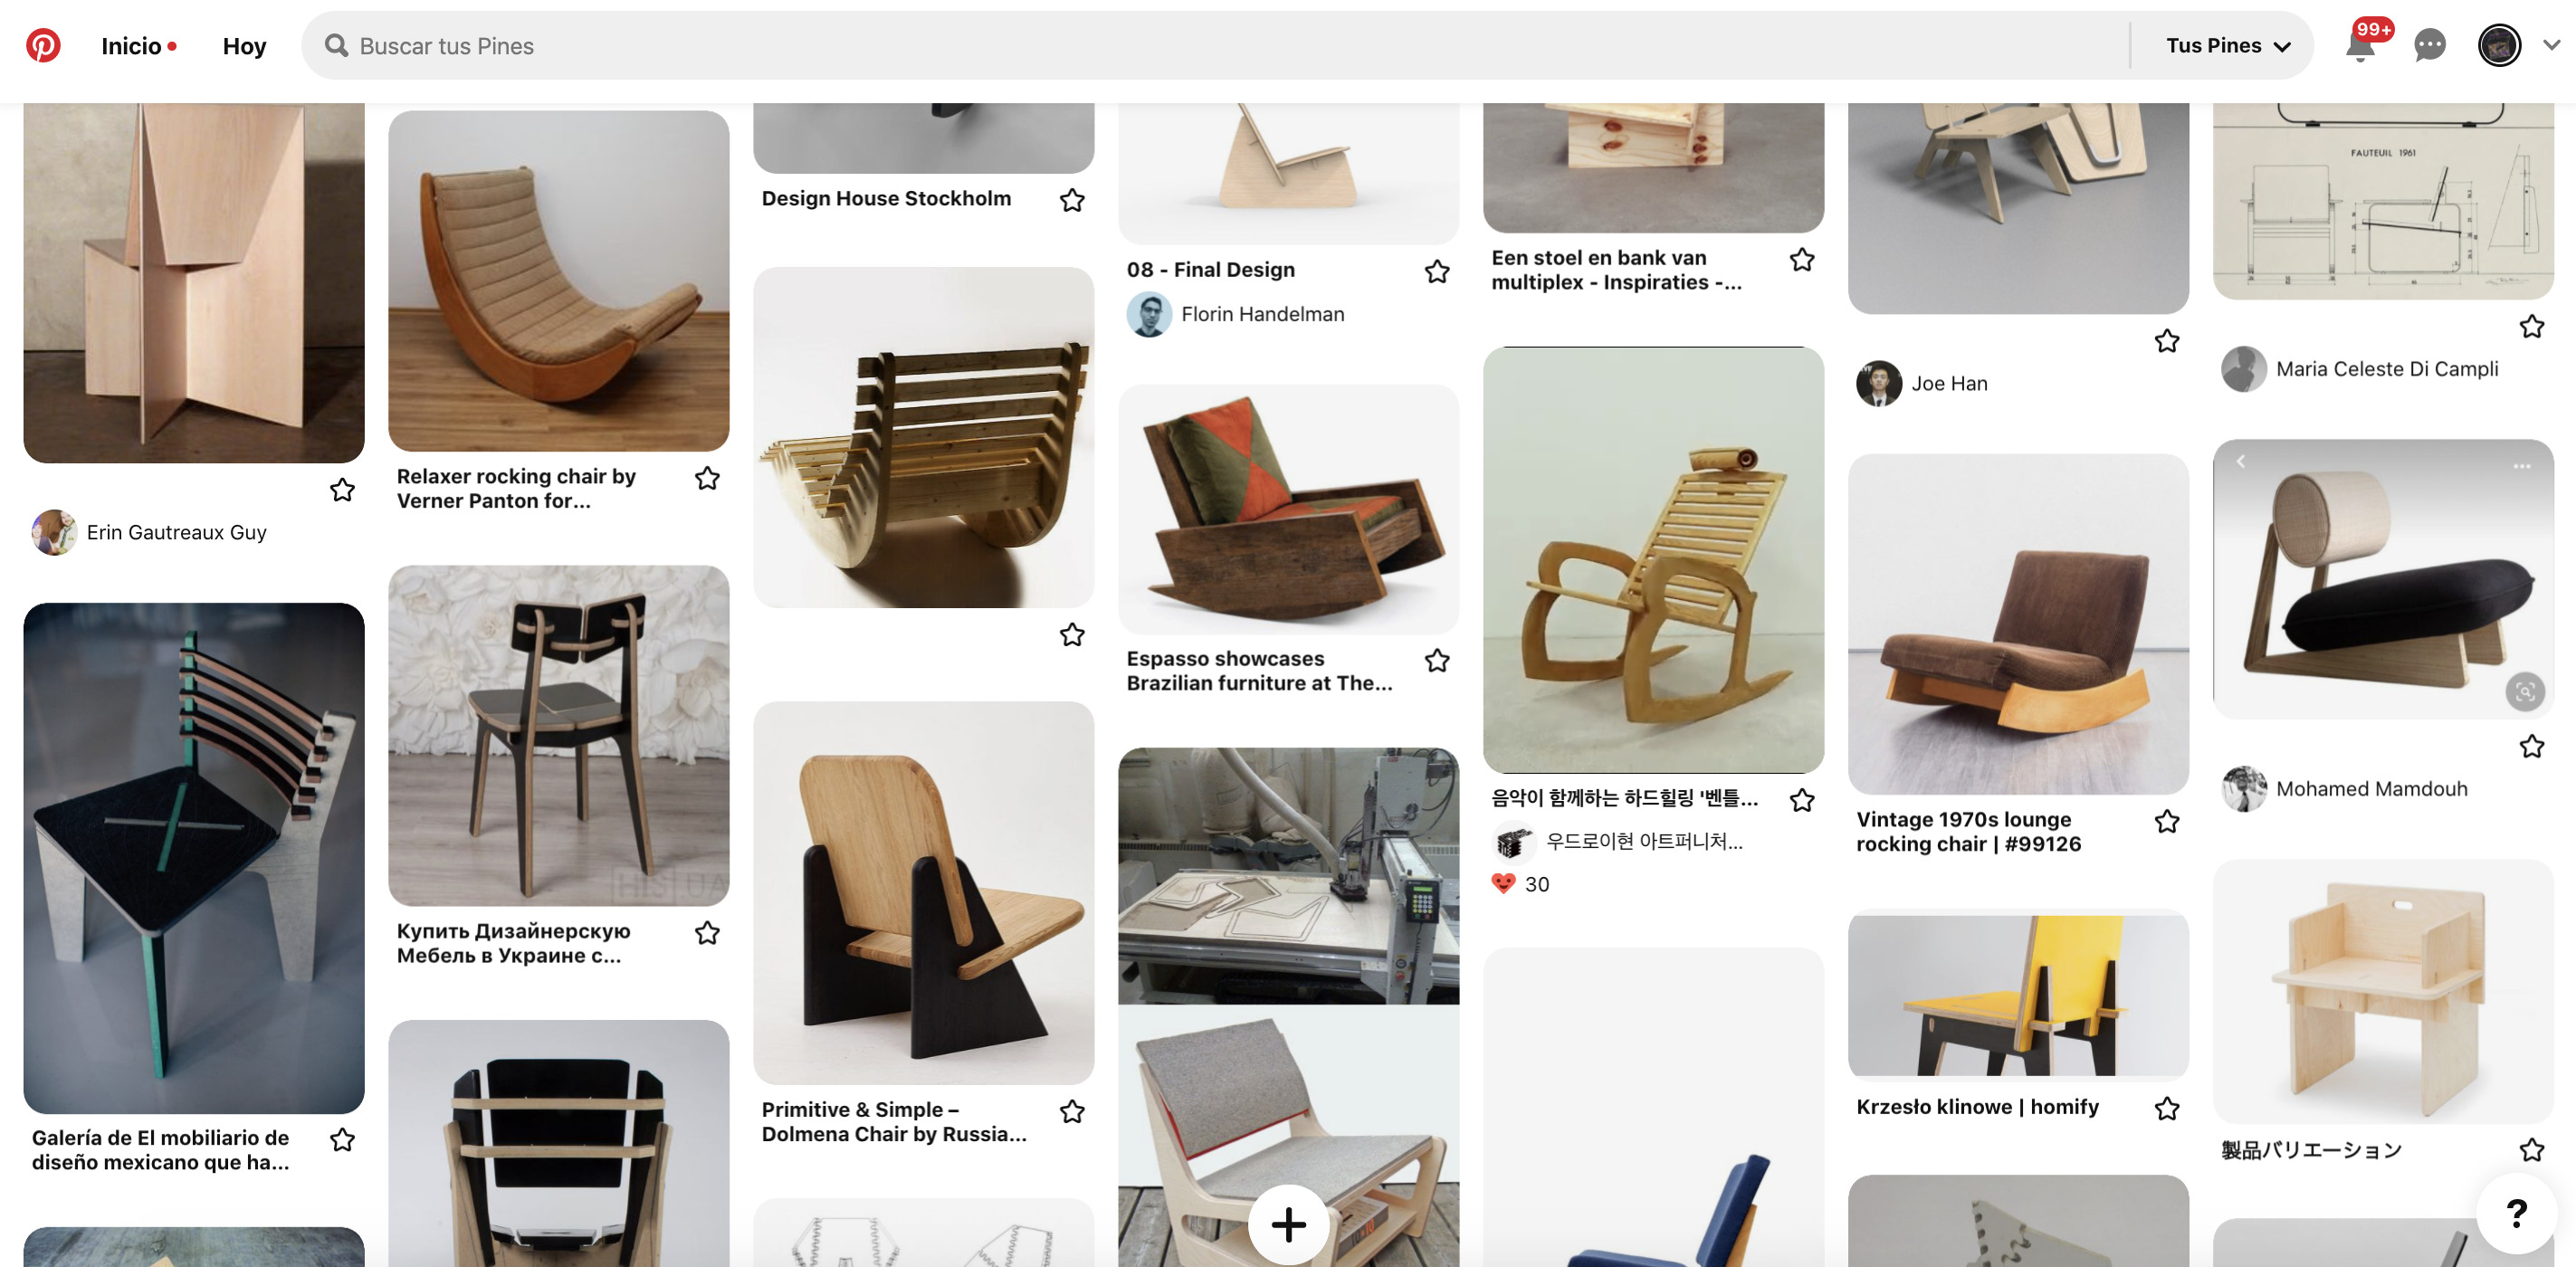
Since I recently started to take my time during the mornings to read and listen to podcasts while drinking my coffee, I decided that was a good idea to make a rocking chair where to enjoy my staring of the day.
Ergonomics
Probably the most important step of designing a chair is to study ergonomics around it. I did research about the angles and measures needed to make it work before starting my 3d model.
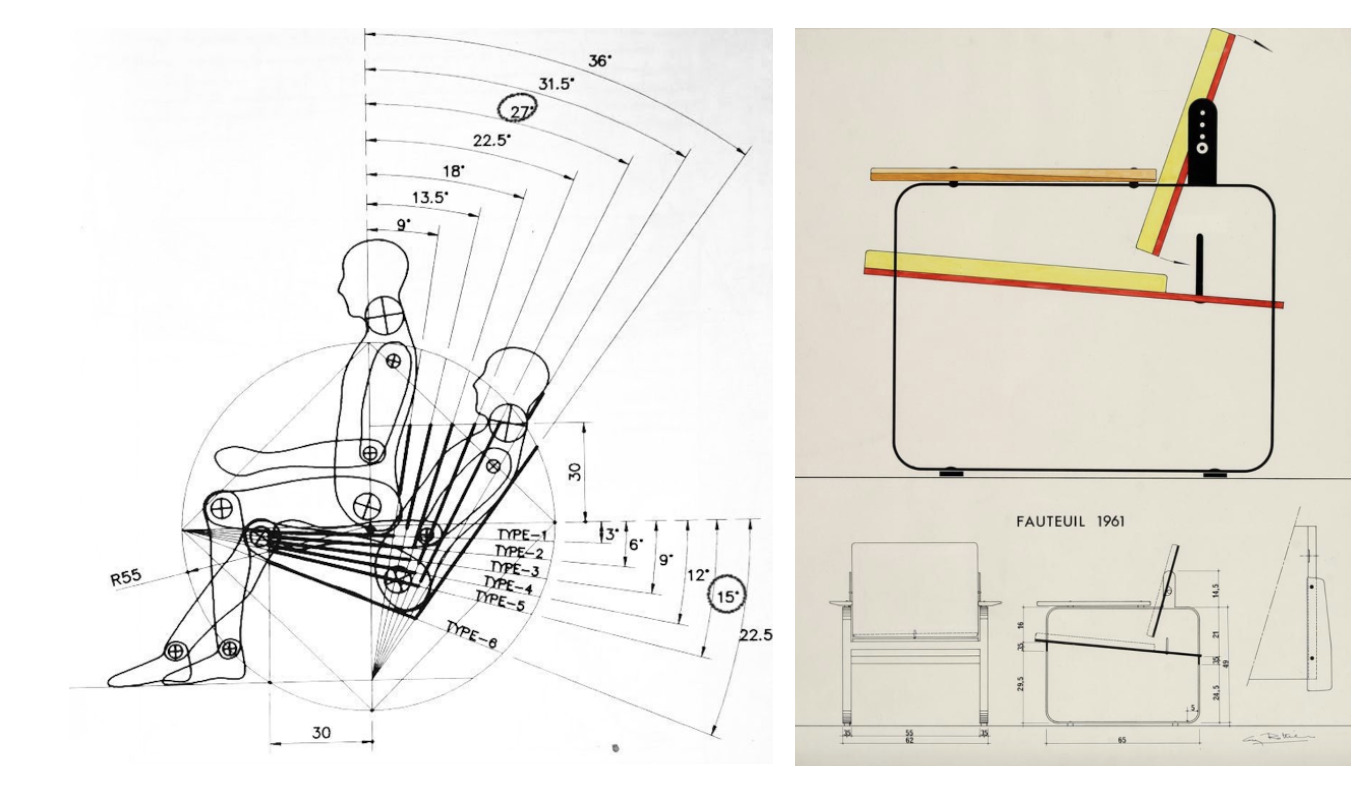
Since I want to make a rcoking chair, the measures which I will need to take in consideration are:
| Measure | Number |
|---|---|
| Angle with the X | 15º |
| Angle with the Y | 27º |
| Distance from the user sit position, to the end part of the chair’s sit | at least 30 cm |
I checked also the measures of the Fauteuil chair to consider the general size of my rocking chair:
| Measure | Number |
|---|---|
| front | 62 cm |
| side | 67 cm |
| height | 55 cm |
Sketching
On Friday night I felt inspired and decided to start designing my rocking chair. I did some sketches and prototypes using the cardboard from a shoebox.
As a designer, I think about my designs from a sustainable approach. Less is more, aesthetically talking, but also in terms of material consumption.
Since materials are square-shaped, I wanted to make a very minimalistic design. Using the less amount of material possible, but making the chair look simple and comfortable.

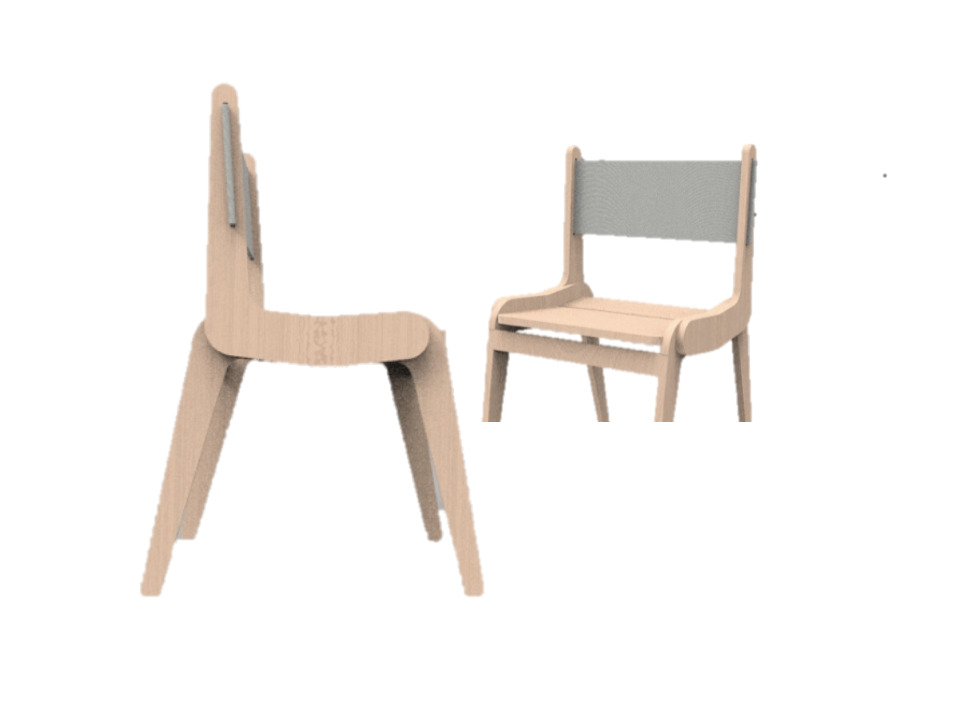
3d parametric design
I did use parameters for the 3d development of my design. I considered it cool to make as a parameter the joins dog bones, in this way I could play with them and choose the size which functionally-esthetically I liked the most.
I started designing the profile part, this is which take me the longest time to make it work with the rest of the poieces.

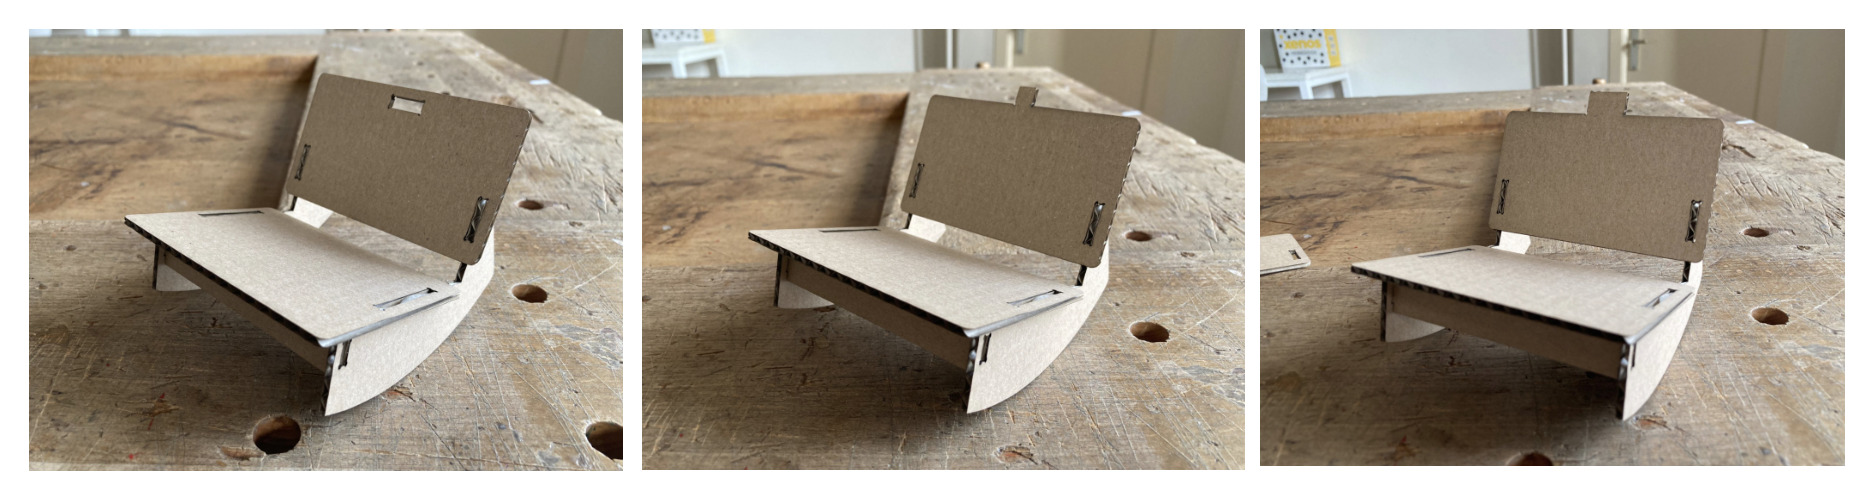
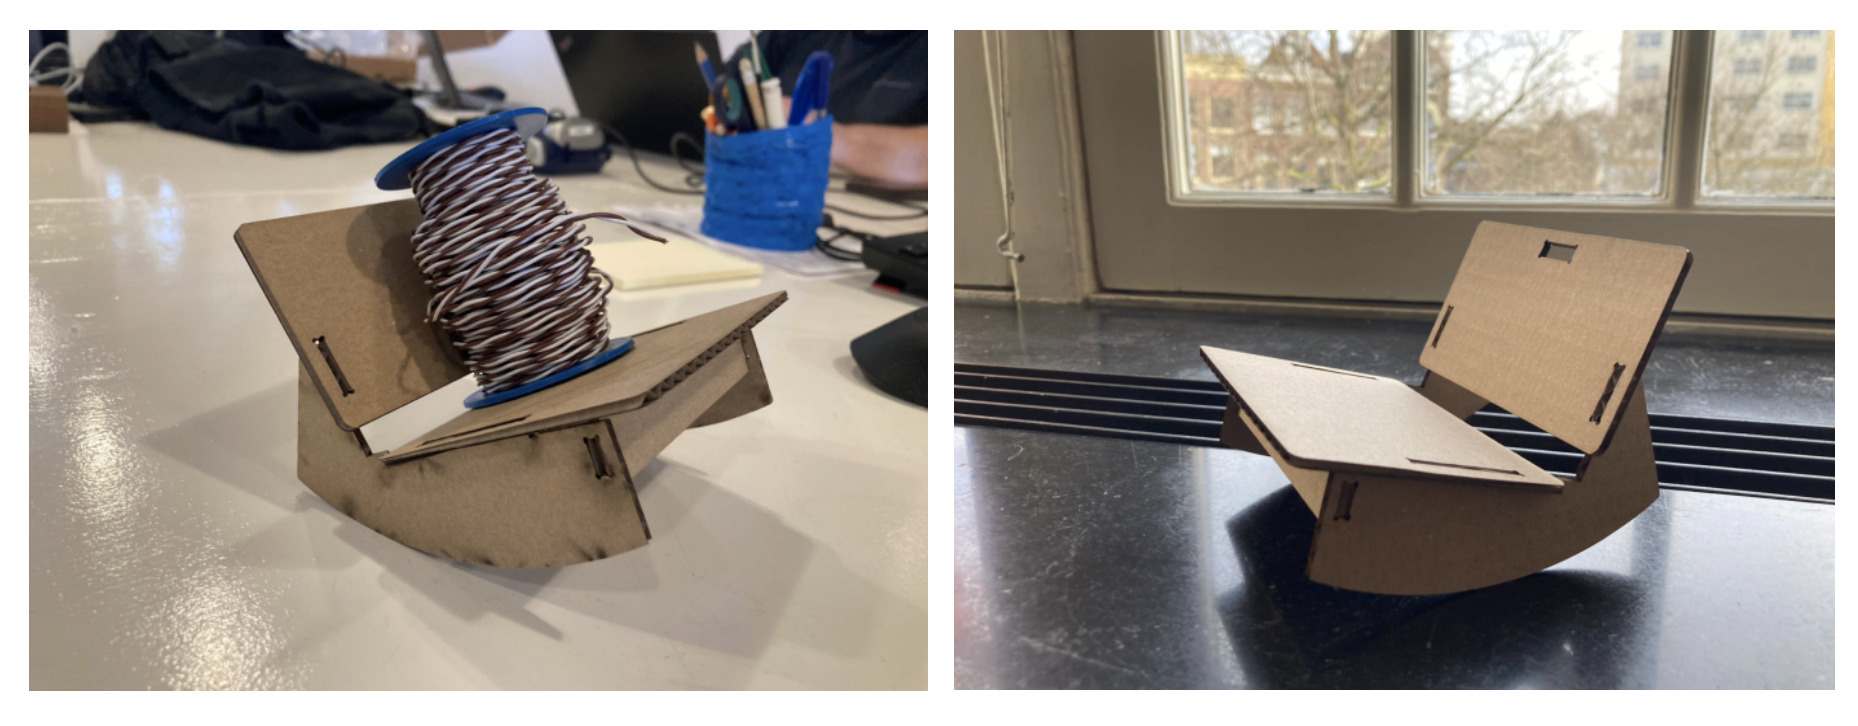
Prototyping with cardboard
Once I had my 3d model, a good practice is to always make prototypes to make sure things work actually fine - and not just in your mind.
I came to the Waag and make a few prototypes of the rocking chair using the laser cutter machine.
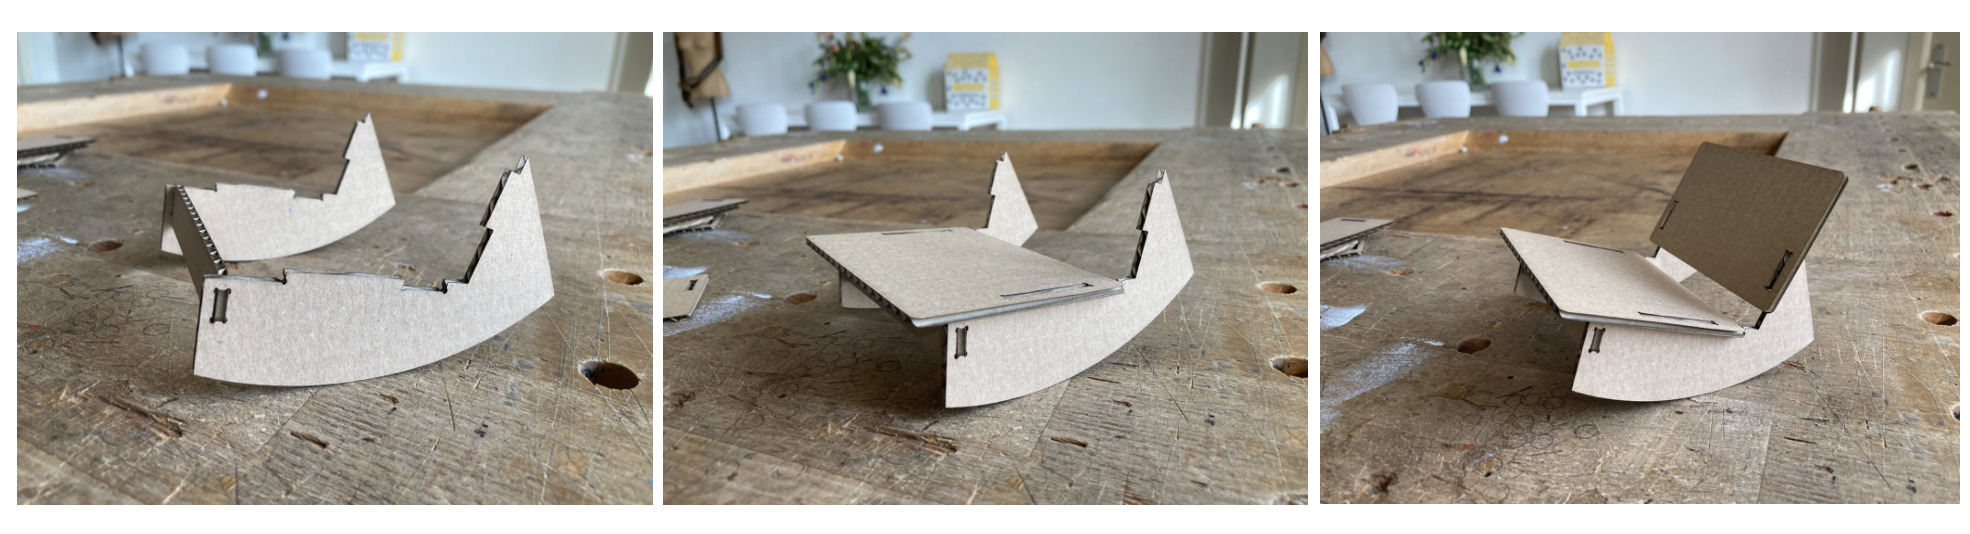
During this process, I thought it will be nice to have a hang holding to be able to easily move the chair. So I did some tests and finally choose a design with the dog bones joins.
Milling
In order to mill my rocking chair, I followed the steps previously learned for the Group Assignment.
I first measured the material thickness and did an average with 5 numbers measured in different parts of the board. My material thickness resulted in being around 17.6 mm, even if it should be 18 mm.
I then located the material on the CNC sacrificial layer with some extra help from our local instructor Henk.
I did have some mistakes when preparing the file with V-Carve.
Since our X axis is in the position of the Y axis if we look at the machine from the front. When preparing the file, I reversed the measurements to work with our CNC machine. So, starting to drill the holes, the machine crossed its limits.
Tip 🛎️: Always double-check your CNC axis before setting up the material features with V-CARVE.
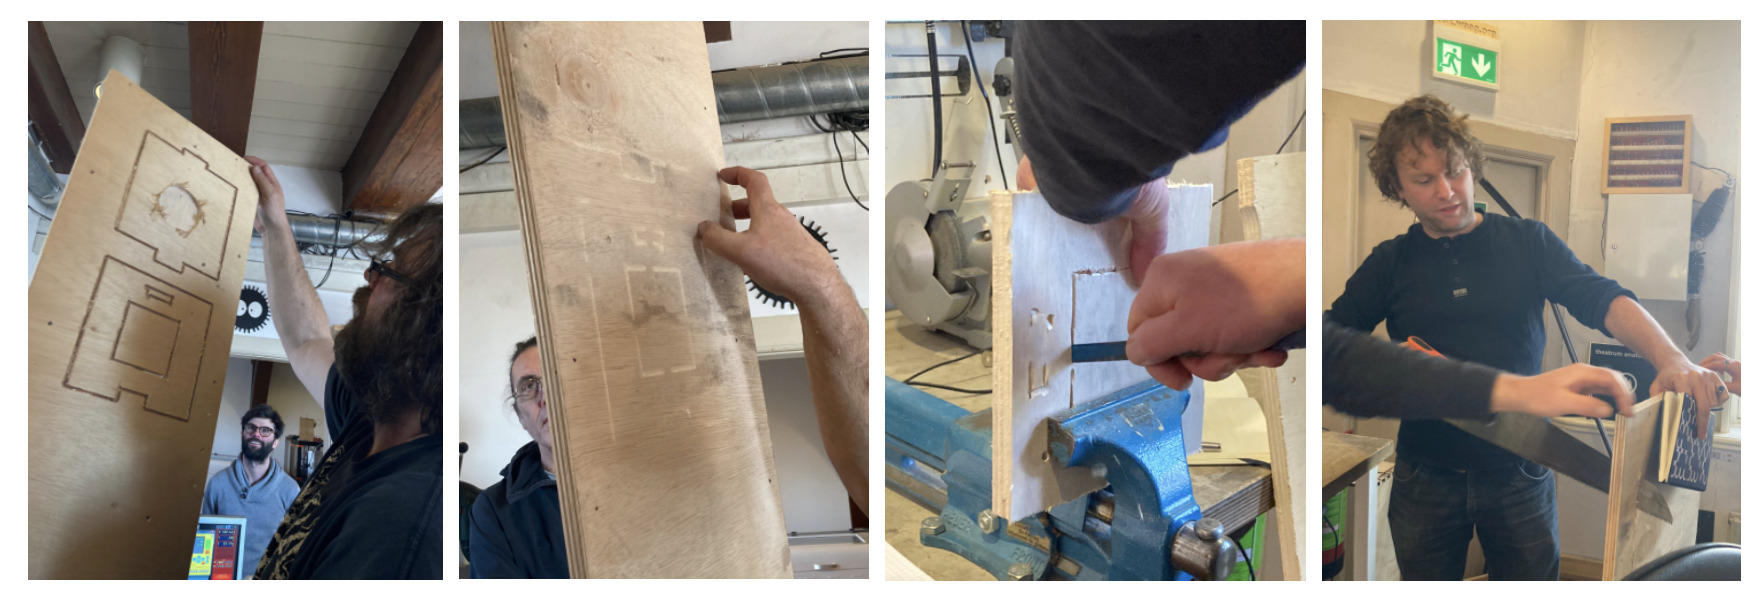
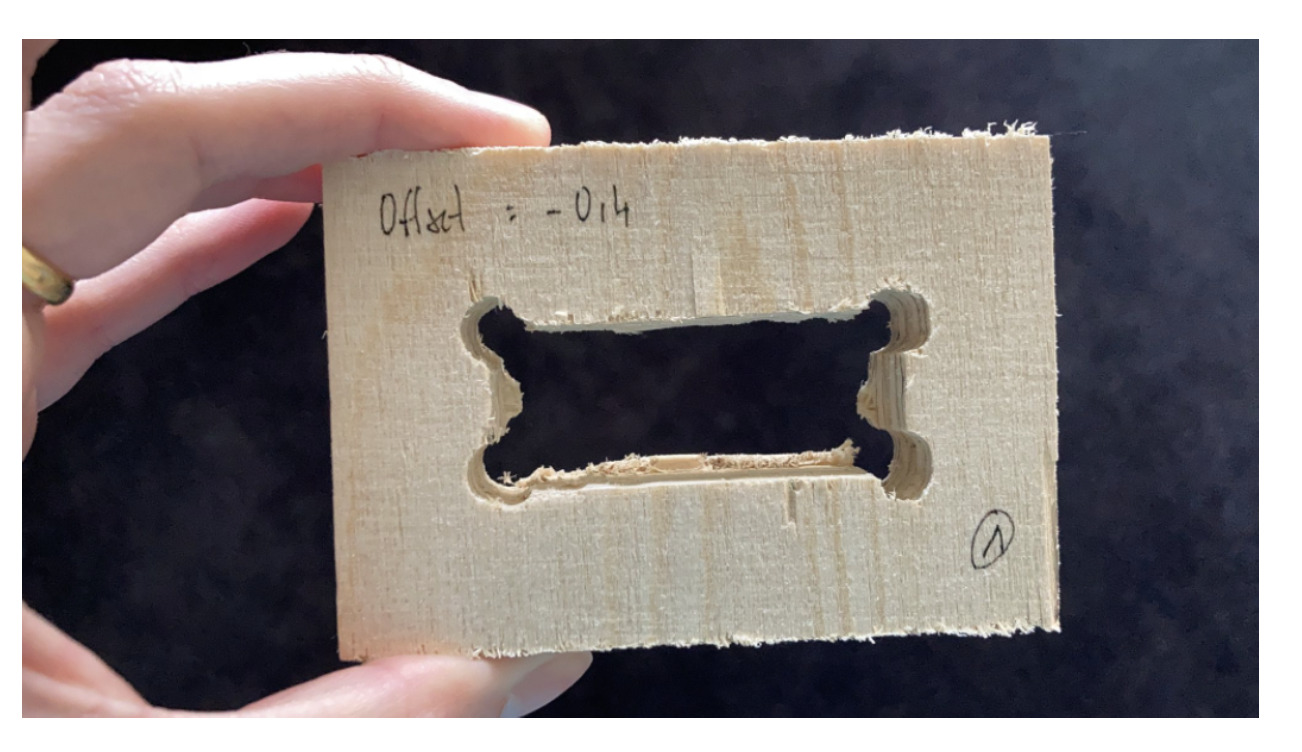
I did try 3 different offset numbers in order to find the perfect parameters to work with my design.
Firstly, I tried offset -0.4. Since I design my own dog-bones shape, the machine travel was eating too much material and the pieces were loose when fitting together.
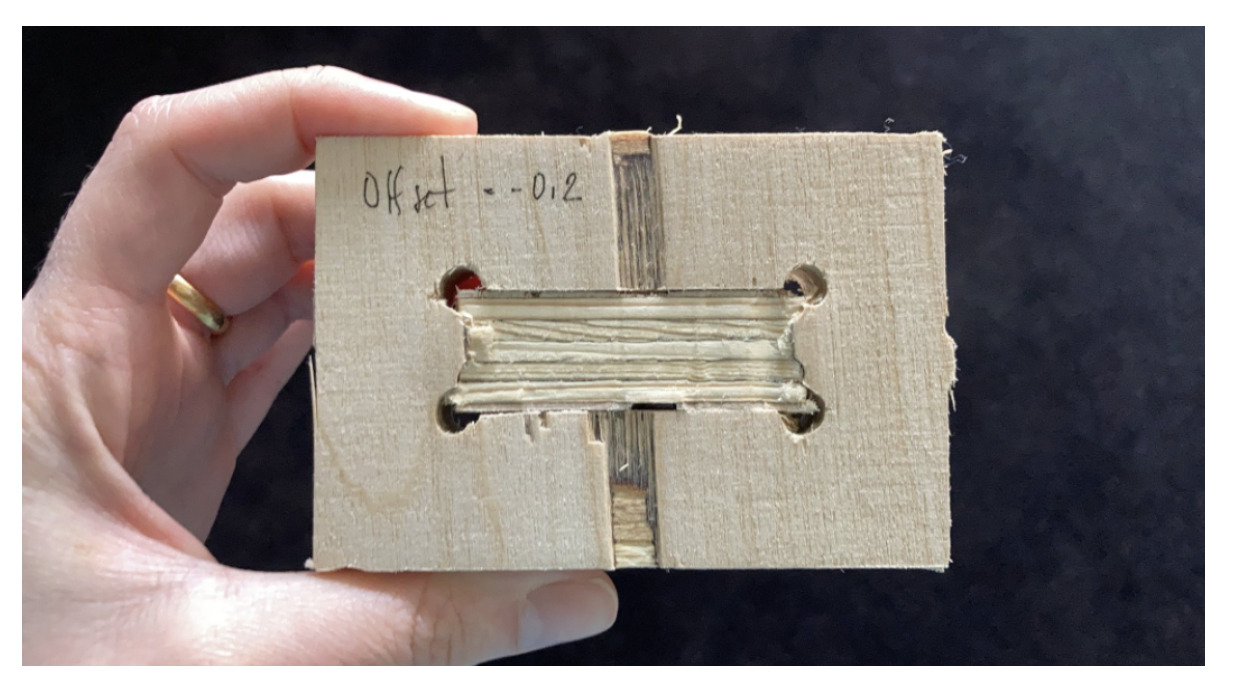
Secondly, I tried offset -0.2, adding also a “separate last pass” to the design to make the inside profile smoother. The result was fitting perfectly using the hammer, but I had some trouble taking out the tabs from the inner profile.
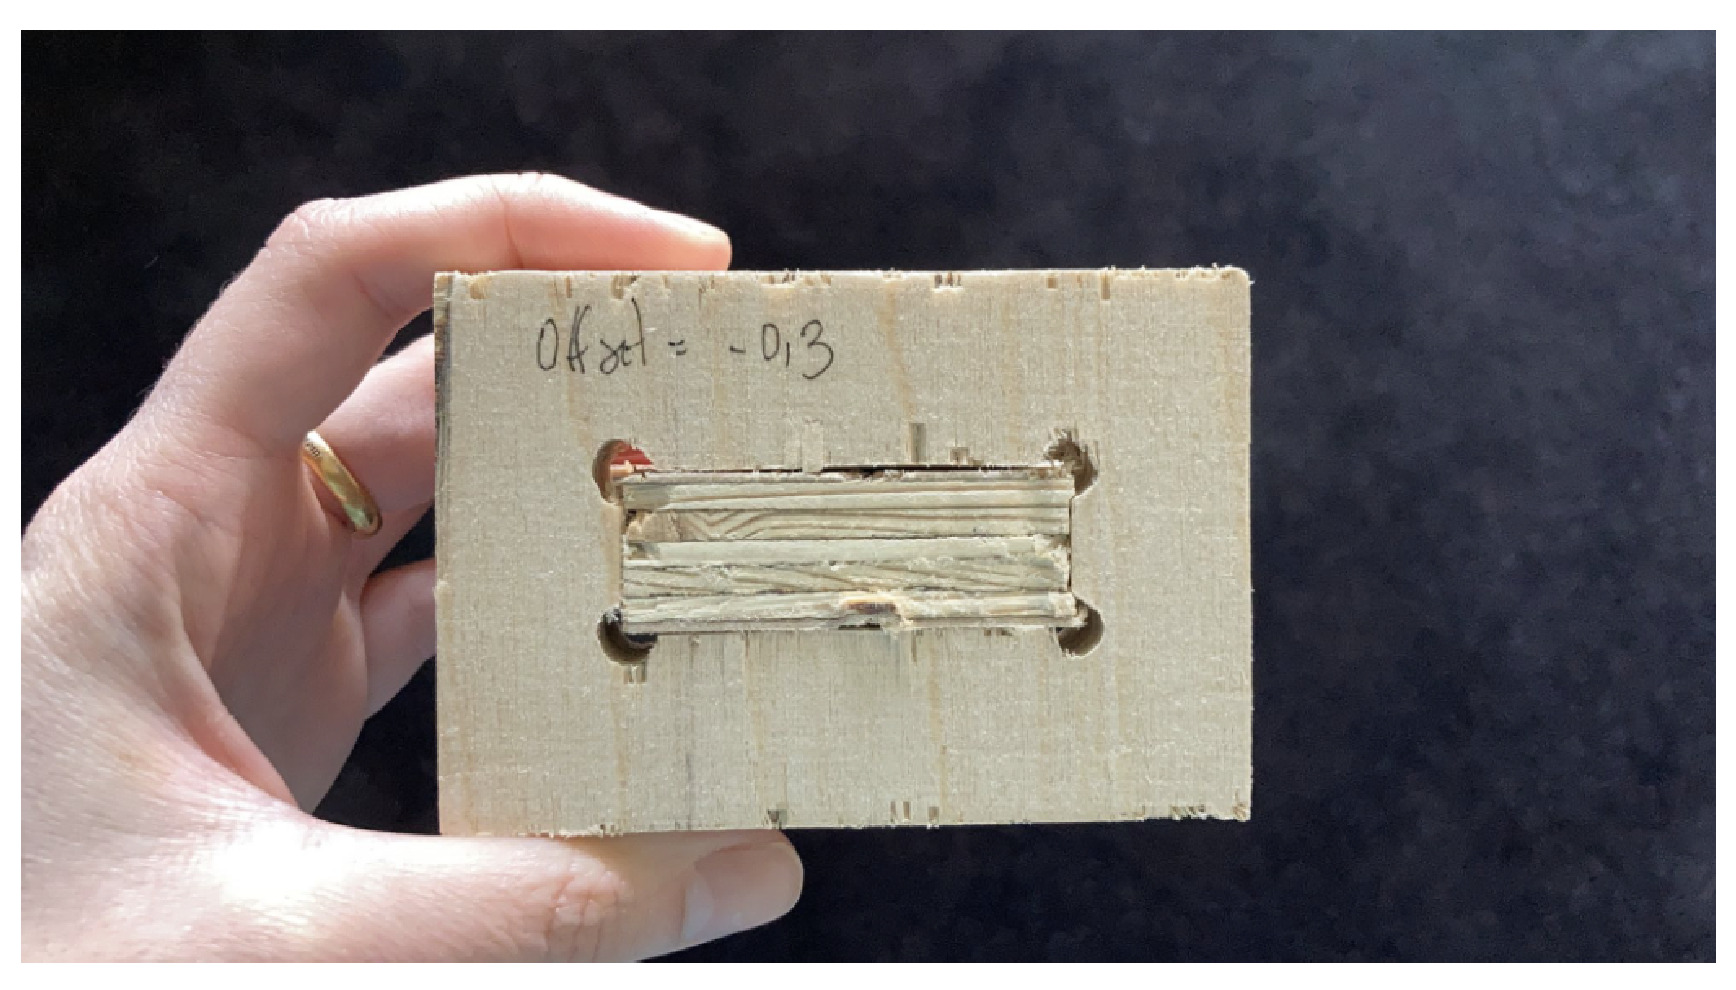
Finally, I tried the offset -0.3, using fewer tabs in the inner profiles. The result worked okay, but I could see in the -0.2 sample that the joins were fitting much better rather than in the -0.3 sample.
Finally, this are the parameters I used to set up the inside and outside profiles of my design:
| Measure | Number |
|---|---|
| Start Depth | 0 mm |
| End Depth | 17.6 mm |
| Tool | 5 mm milling bit - same parameters as the one used for the group assigment |
| Allowance offset | -0.2 |
| Do separate last pass | yes |
| Tabs Lenght | 8 mm |
| Tabs Thickness | 3 mm |
Tip 🛎️: Always recommend doing some first tries to check the tolerance needed for your material thickness if you want to make a design like mine without using glue to stick the parts to each other.
Another mistake that I did was starting the milling without turning on the machine spindle. Yeah, I know … but it can happen when making tests and turning ON/OFF the machine multiple times in a row … When making this mistake, luckily the milling bit did not broke because I saw the mistake in time, but the Z-axis did move so I had to re-calibrate the axis. Luckily since I had an empty part from the sample tests, I was able to recalibrate the axis using the sacrificial layer.
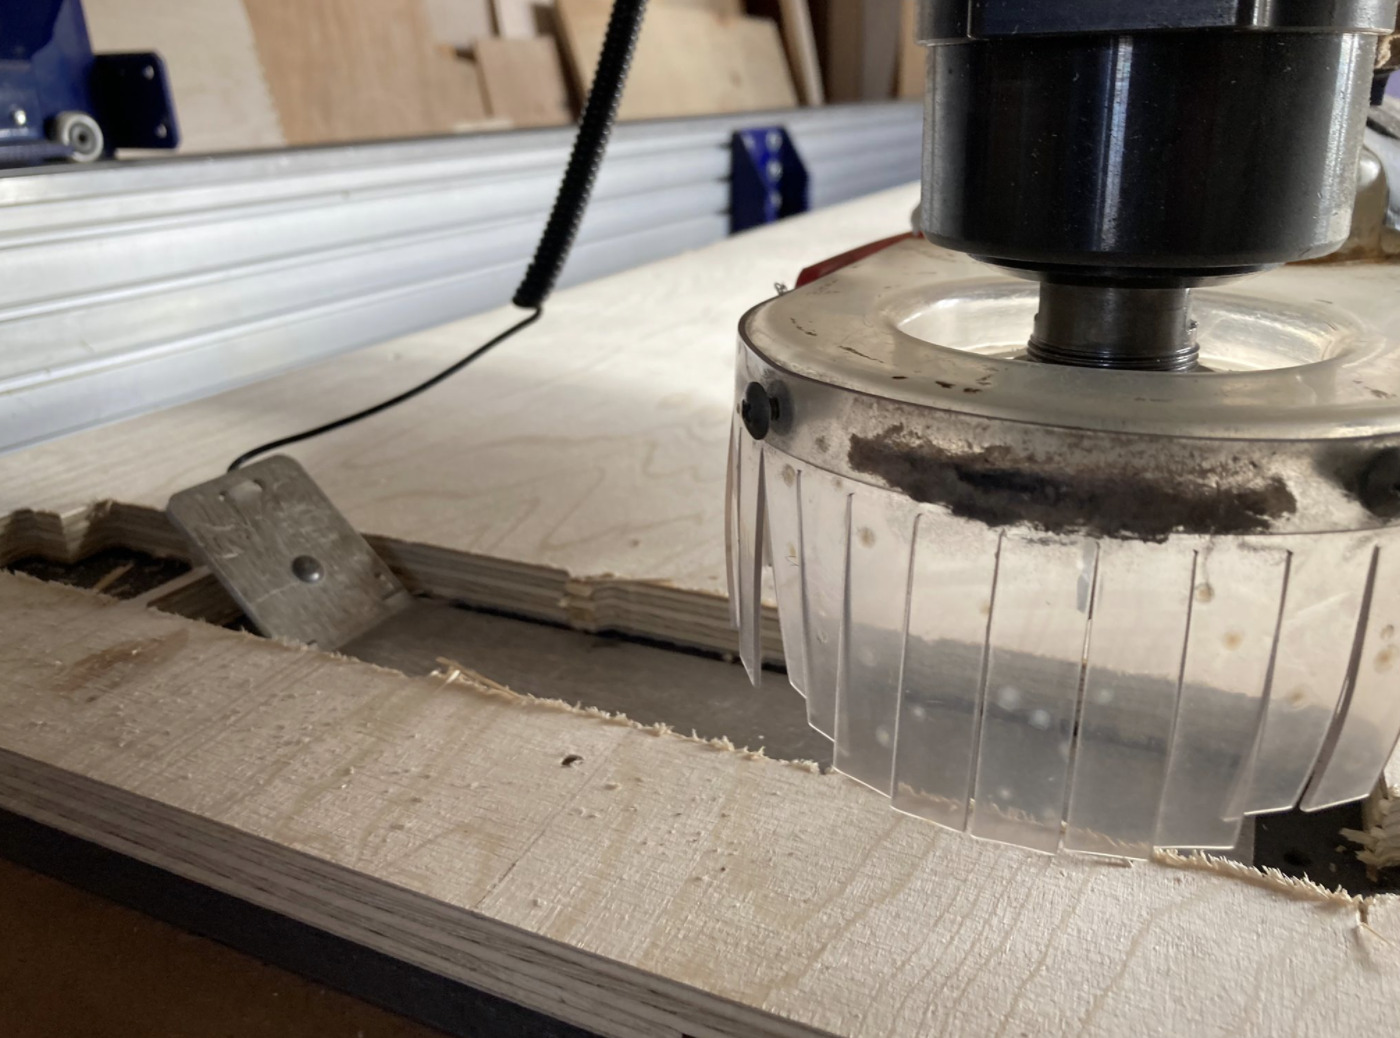
When milling the pieces, one of the inner profiles did not have enough tabs, so it moved and I had to stop the machine, take apart the leftover material and start it again.
Important! 🆘: When stopping the milling, always make sure that the milling bit is traveling from one point to another of your design, otherwise the friction between the material-bit when it is ON again could start a FIRE!
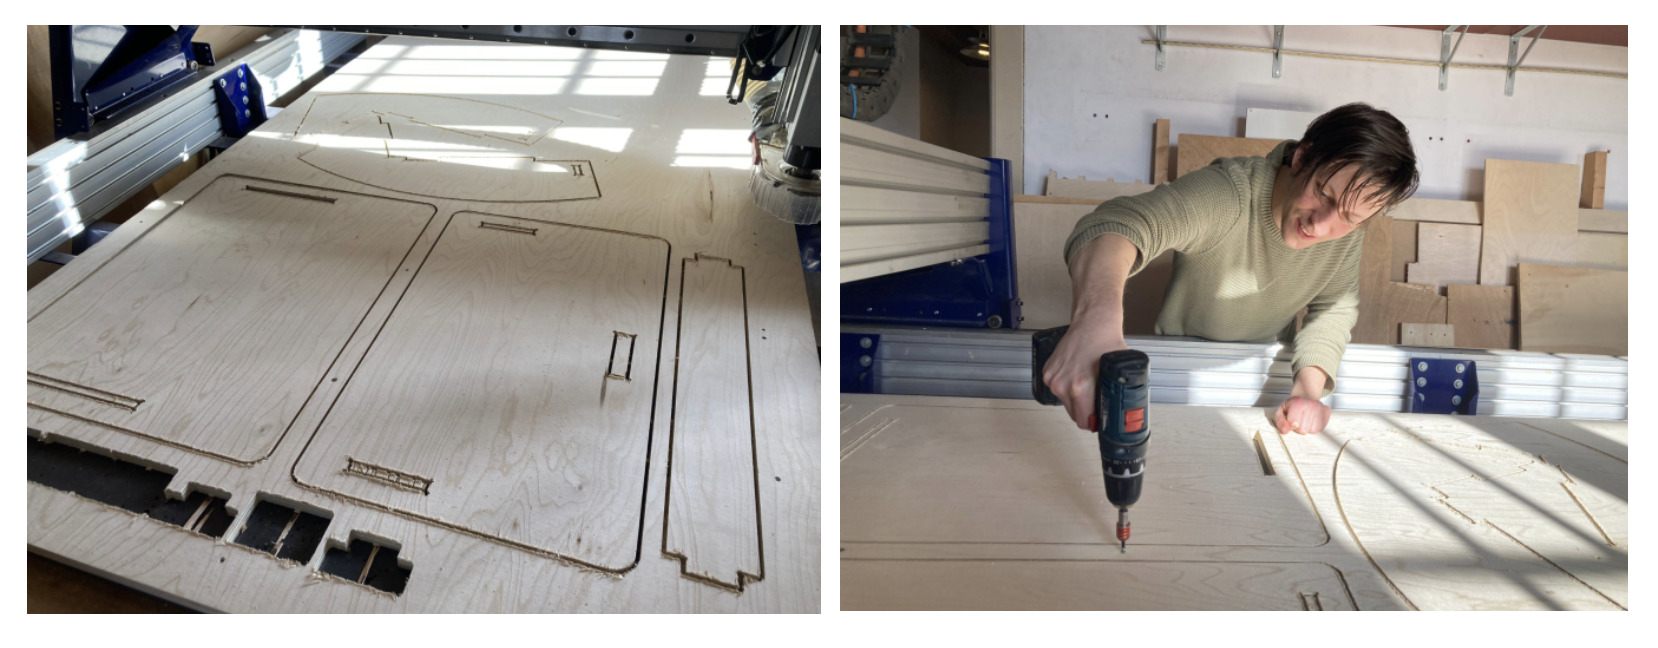
After a raw day of learning how to use the CNC machine, my design finally worked out and I could not be happier.
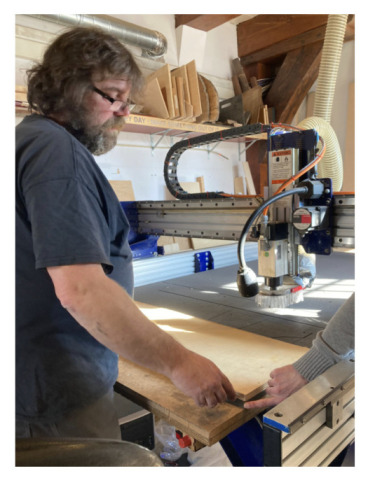
Attached are photos of the milling result and my fellow student Jonathan helping me to unscrewing the material sheet :)
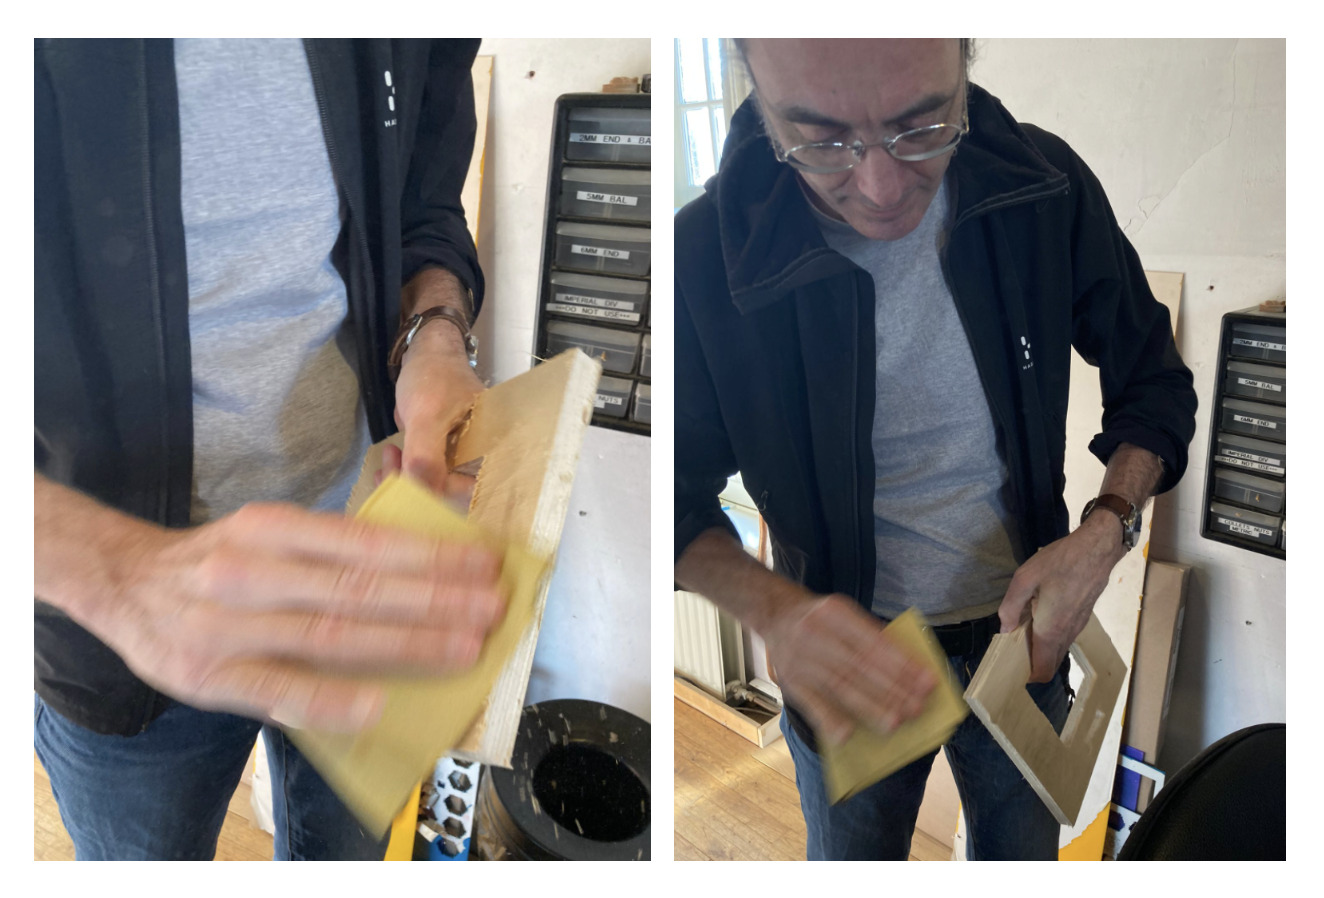
Sanding
Last but not least - in terms of time - I did the sanding of my new rocking chair. It took me a long time leave it smooth and well looking, but I did it!
I used a few tools which the Waag’s workshop has, like the sanding paper and the sanding machine to do the profiles.

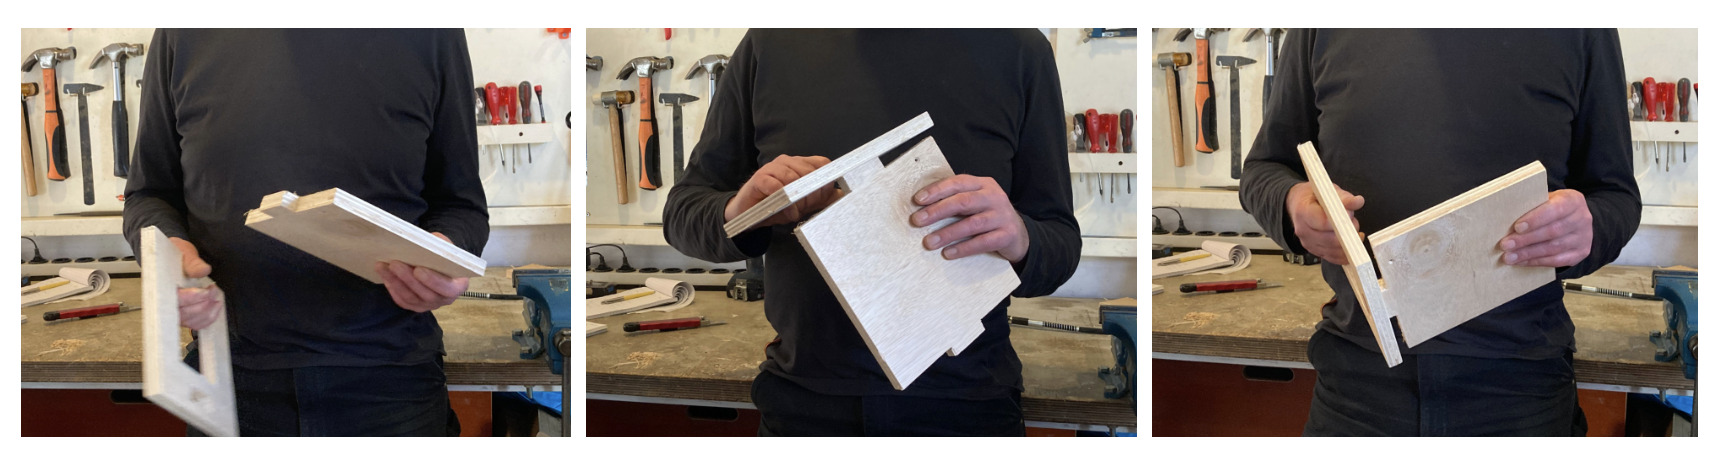
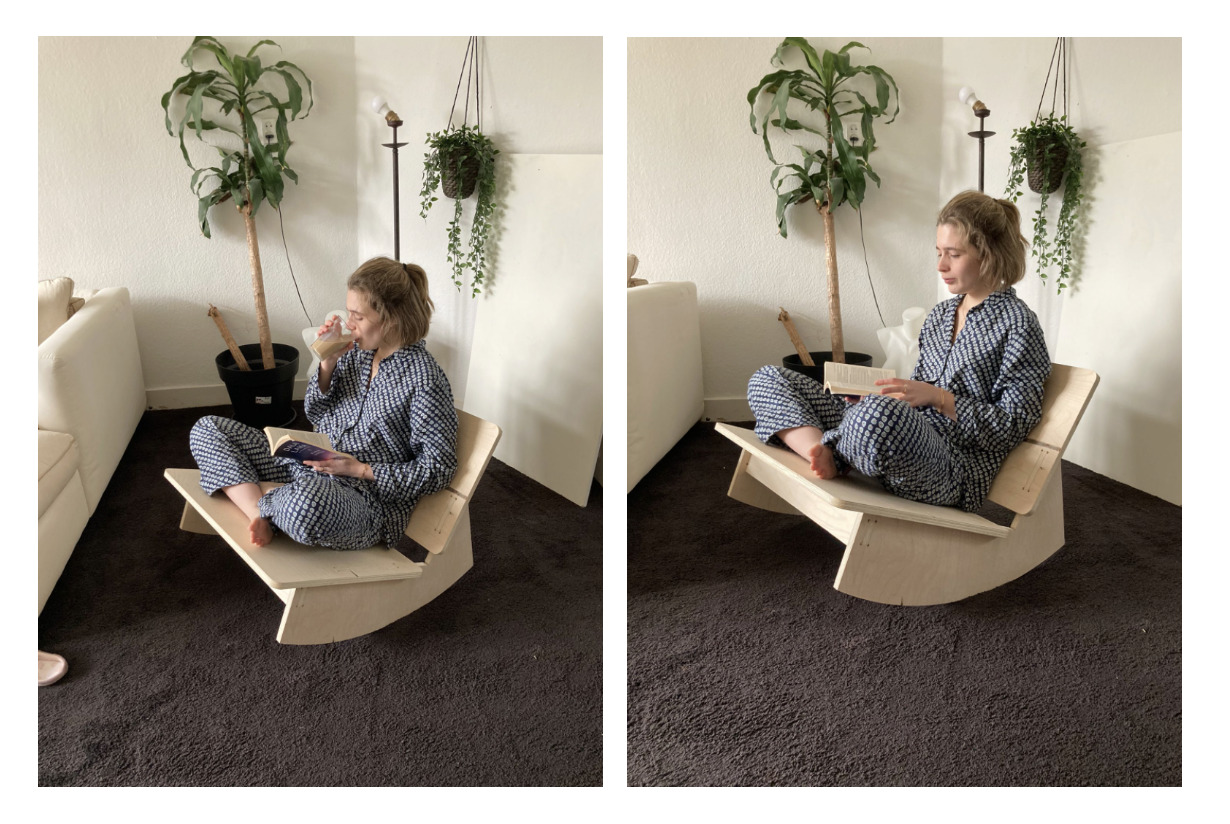
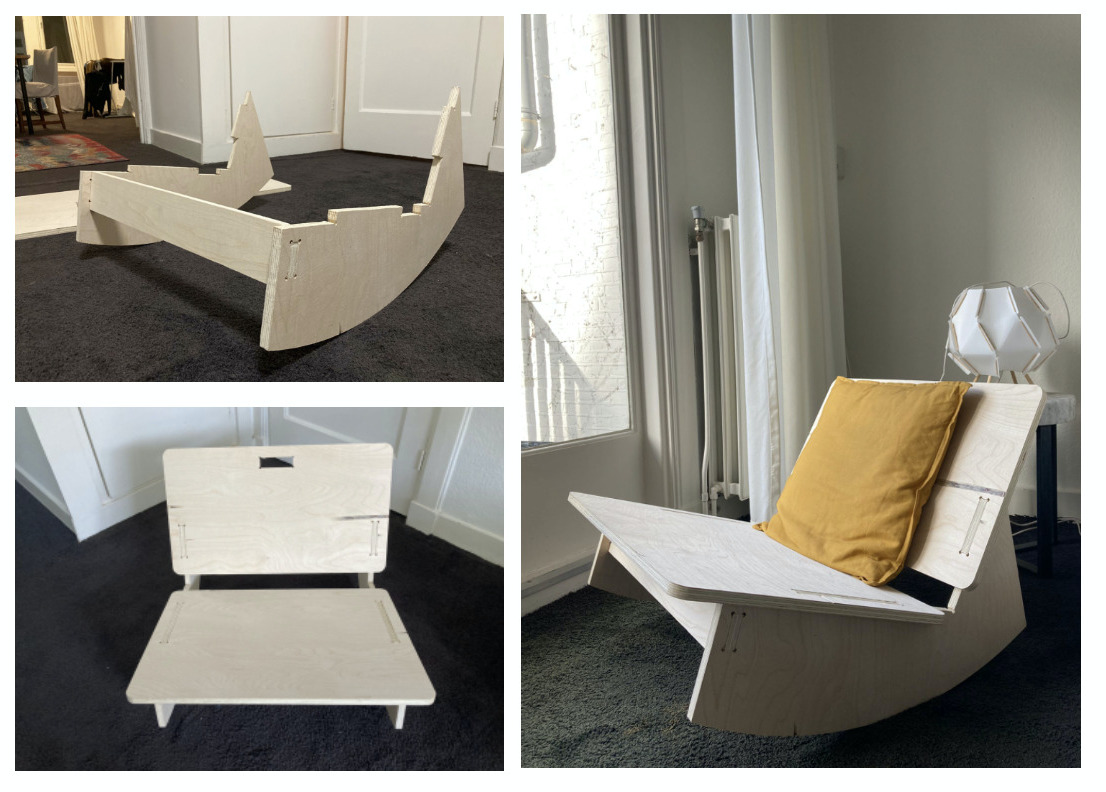
Assembling
The assembling part was probably the most satisfying. Putting all the pieces together, seeing that everything was perfectly fitting, and swinging on it was a really self-enhancing moment!
My roommates were also excited about the result and had some fun rocking for a while!
Retrospective 🤔
Probably the most empowering week since the Fab Academy started.
As an industrial designer is always a big pleasure being able to make real our ideas, passing from the prototype to reality is a big empowering step to do! I can say, thanks to this assignment I did a ✅ on my design to-do’s list.
Most of the problems that I had were with using V-CARVE and when using the milling machine for the first time. I did have luck because the mistakes which I did were not irreversible, so I could properly end the individual assignment and be proud of the result!
Working with the big CNC machine has been a challenge in terms of learning how to use it with respect and not being too much afraid of starting a fire / getting big troubles with it / or not making it properly work. I have to admit that its dimensions and the tragic stories behind it made being a bit afraid of it. Especially when I started the individual work.
At the end of the day, I felt that I at least learned the basic important principles to have good use of them, which has been a very empowering feeling. I already have new ideas which I would love to make with it. 🌸