Interface and application programming
Group Assignment
Compare as many tool options as possible.
Individual Assignment
Write an application that interfaces a user with an input and/or output device that you made
This week's assignment is exciting because we will develop the application for the users. Prof. Neil has shown no platforms to build the application for the Microcontroller during Wednesday's lecture. I have seen different platforms like MIT app Inventor, Processing, Python, Firebase, Matlab, Thinkspeak, etc. Initially, I decided to move with the Processing for the app development.
Processing
Processing is the language; with the help of this, we can learn to code with visual arts. Processing is helpful for students, artists, designers, researchers, and hobbyists who use Processing for learning and prototyping. Processing is the programming language for learning how to code in the context of the visual arts and visual literacy within technology. Processing is a free graphical library and integrated development environment (IDE) that facilitates computer programming in a visual setting for learners with limited programming knowledge. Processing employs the Java programming language; we can add classes, mathematical function operations, etc. It also includes a graphical user interface to help with the compilation and execution stages. Processing Website.
I have referred to this Electronics in the art documentation to use Processing for the electronics. Link. Processing Electronics Art Documentation.
This week, I have decided to move with Processing to control the Red, Green, and Blue colored LEDs with Processing. I have developed the Arduino and processing code for it. The detailed procedure for this week's assignment is shown below.
Processing -Simple text communication
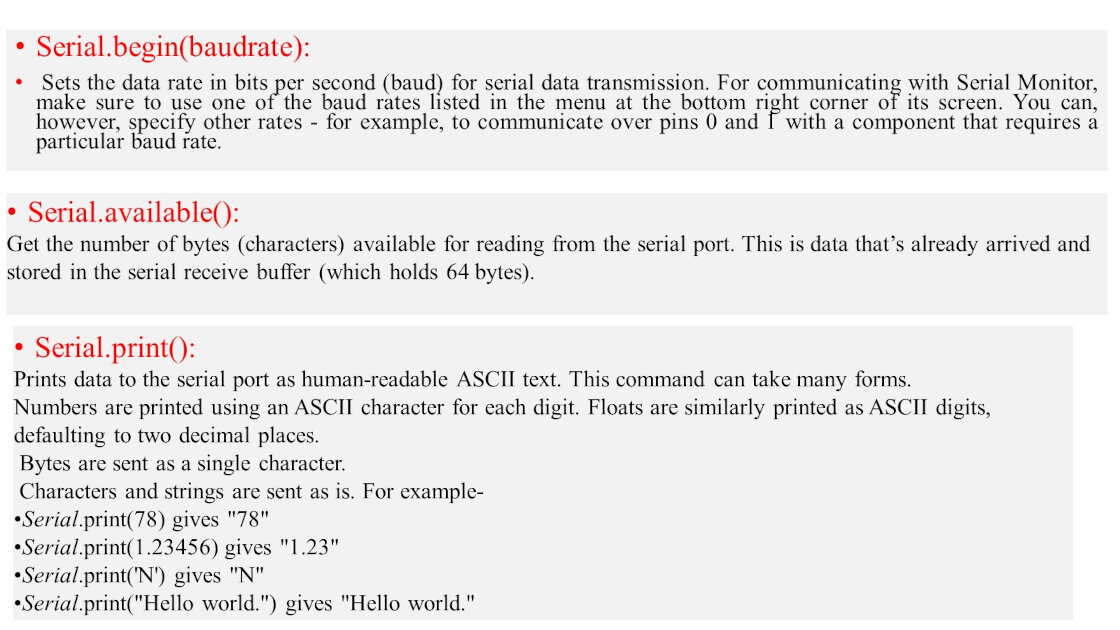
I started with a simple Arduino program that transmits a message over the serial port. I am using Arduino IDE for the programming of the Board. Some syntaxes required for serial communication using Arduino ide are shown below. Ref.:Arduino Website

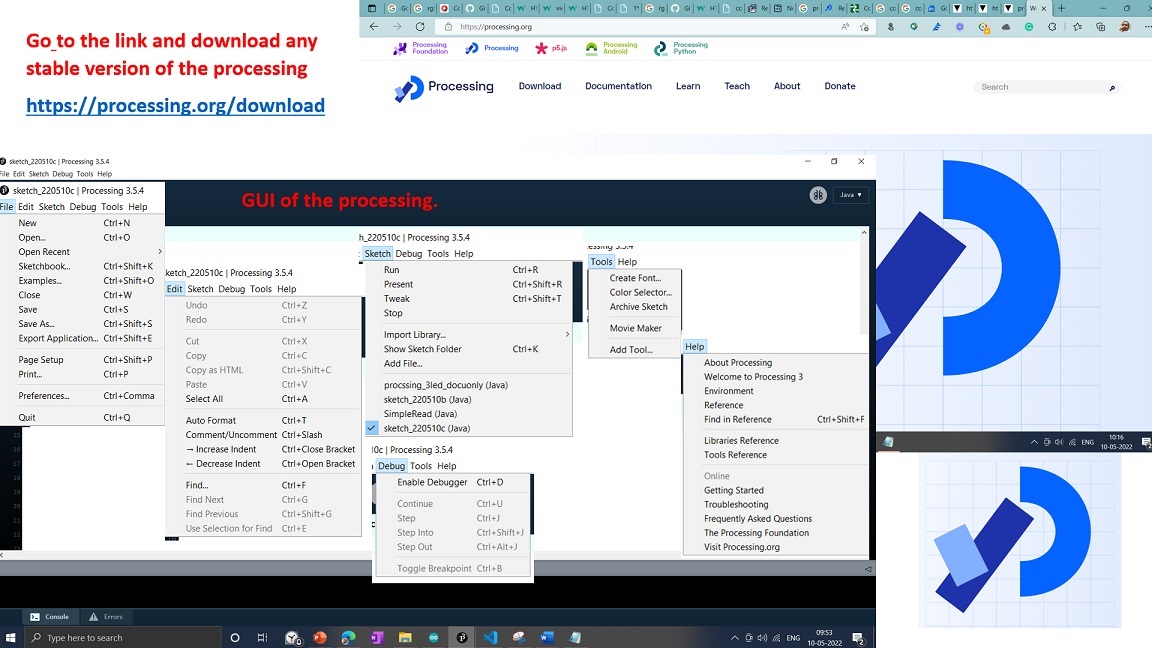
The graphical user interface of the Processing ide is just like the Arduino Ide. I have downloaded Processing software from the Processing official website.
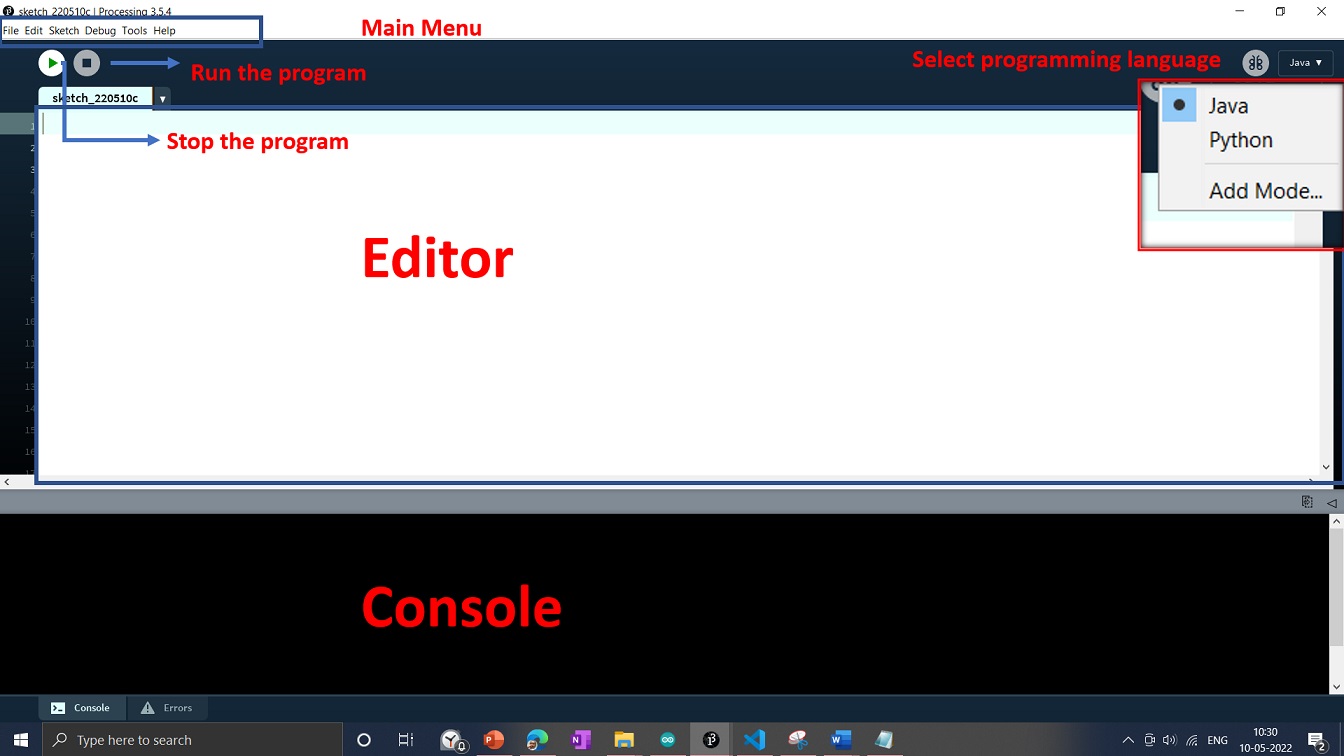
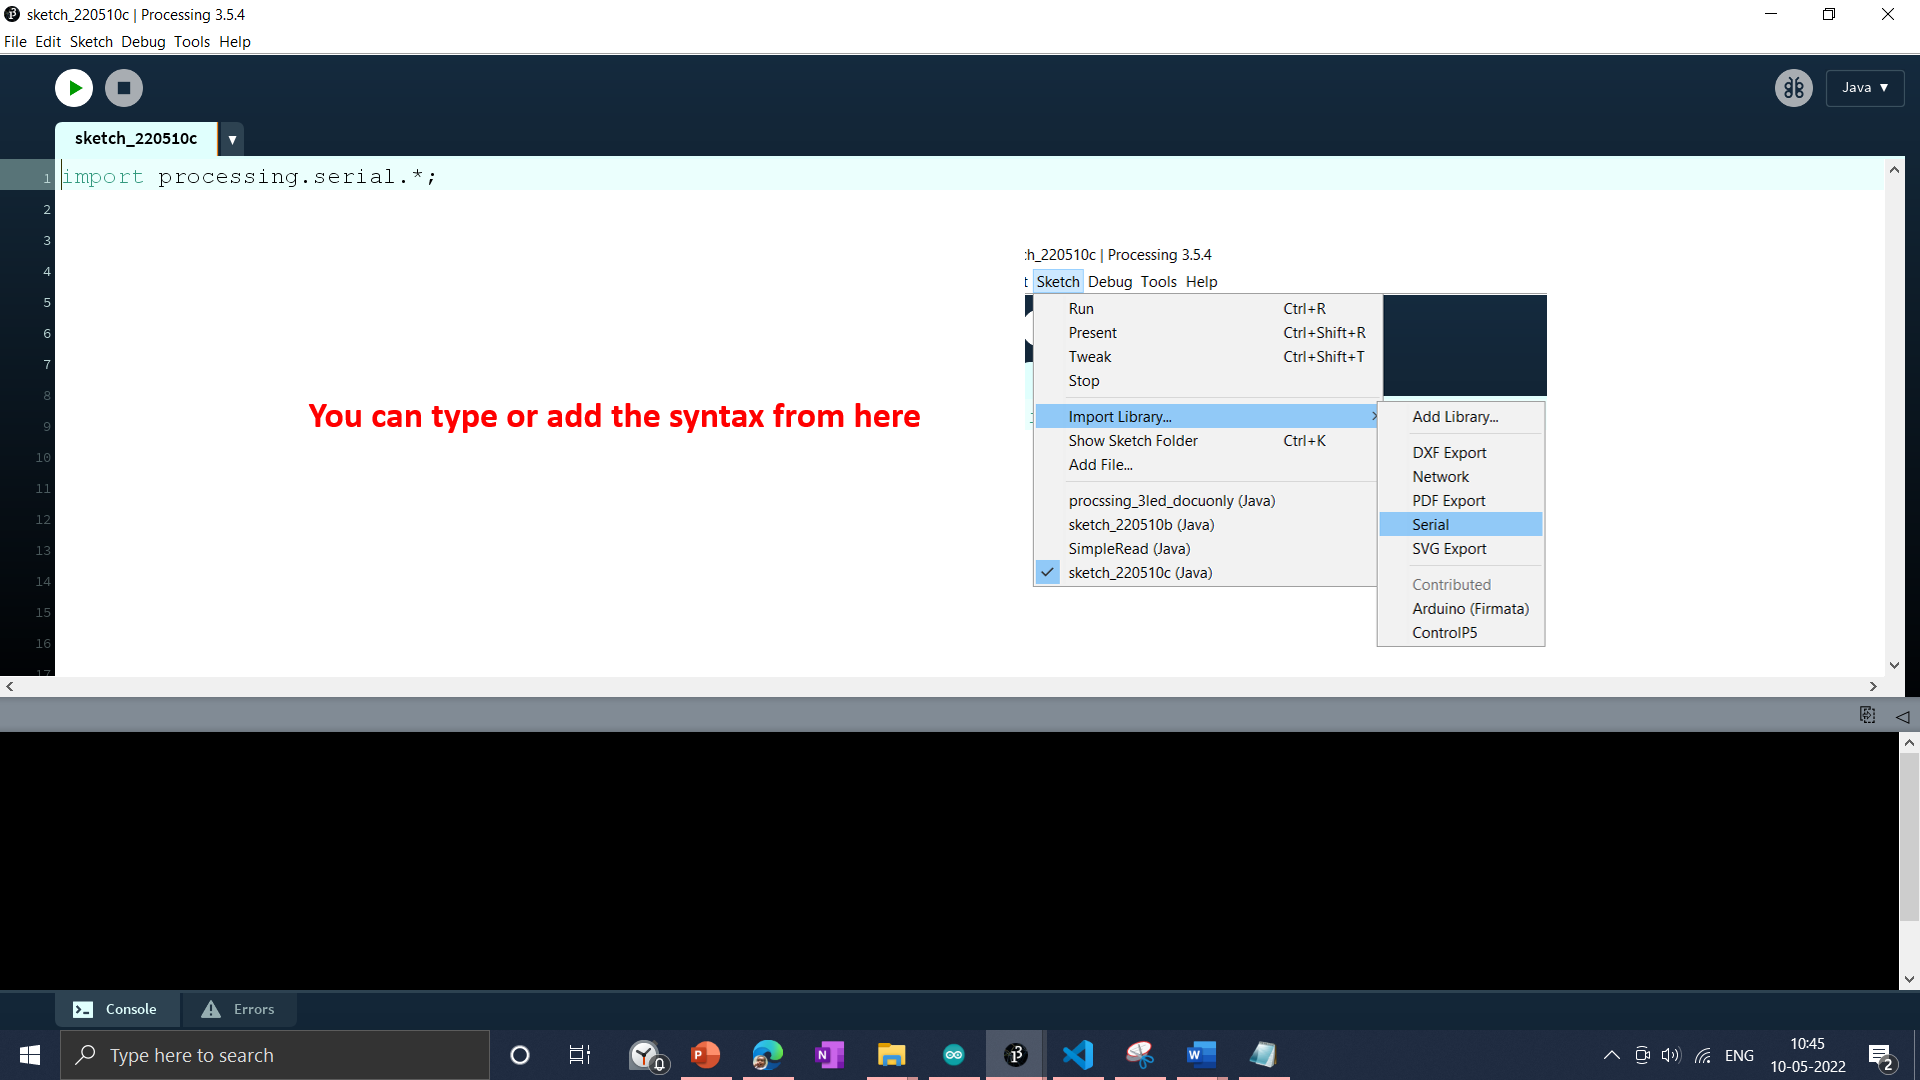
Different options are available in the menu bar shown below.
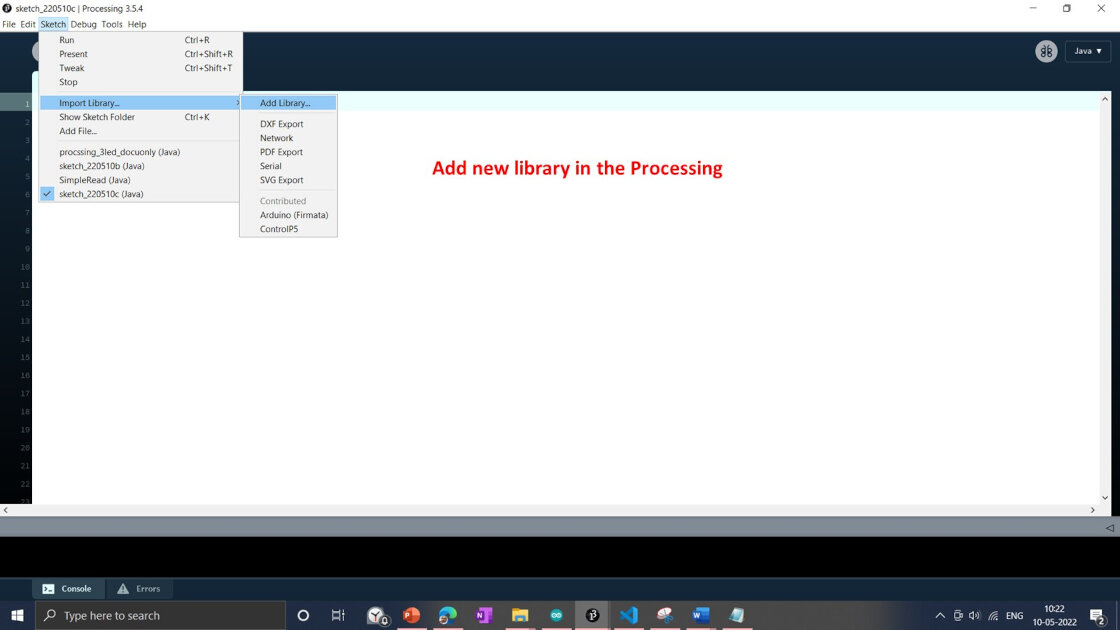
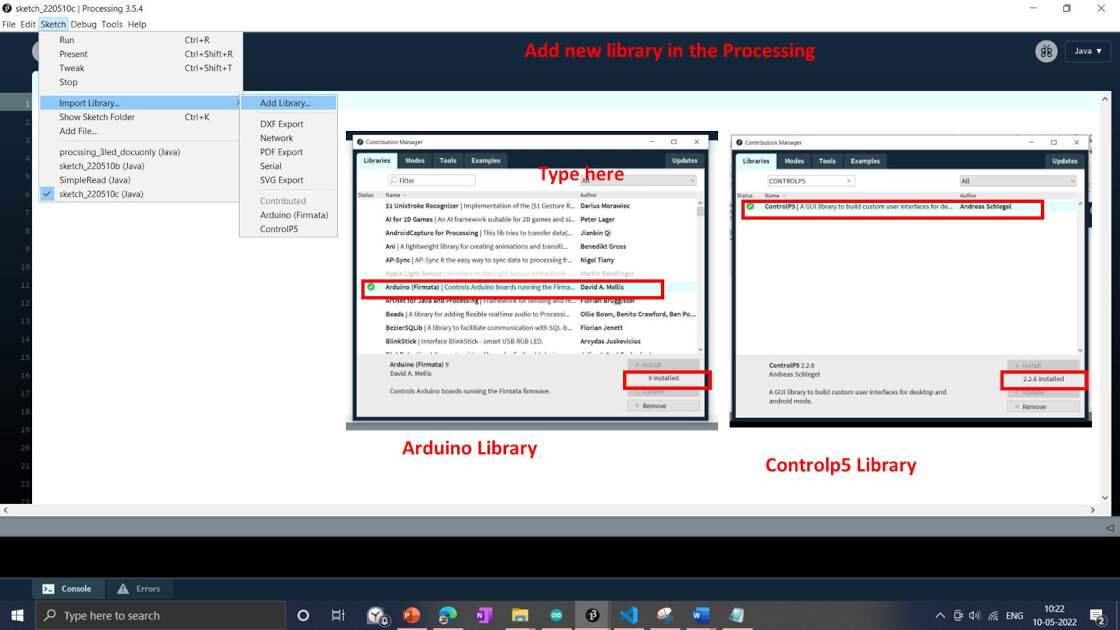
Just like Arduino, we can add the different libraries into Processing. Click sketch-Import library-add library After adding the library into the Processing, we can call the required library by either typing it or selecting it from the add library feature. In this case, I have added a serial library feature using import library and select serial it will add the required library function into the editor
Like Arduino, the Processing code consists of three sections: initially, we call the libraries and then declare variables. Then there's a void with Setup and another with the "draw" loop. printArray(Serial.list()); command is used to print the list of available COM ports for the serial communication. Then a list of the array gets available on the console; we need to select the com port that we have selected in the Arduino ide to send the command. Command used to select the COM port is Serial.list()[0].
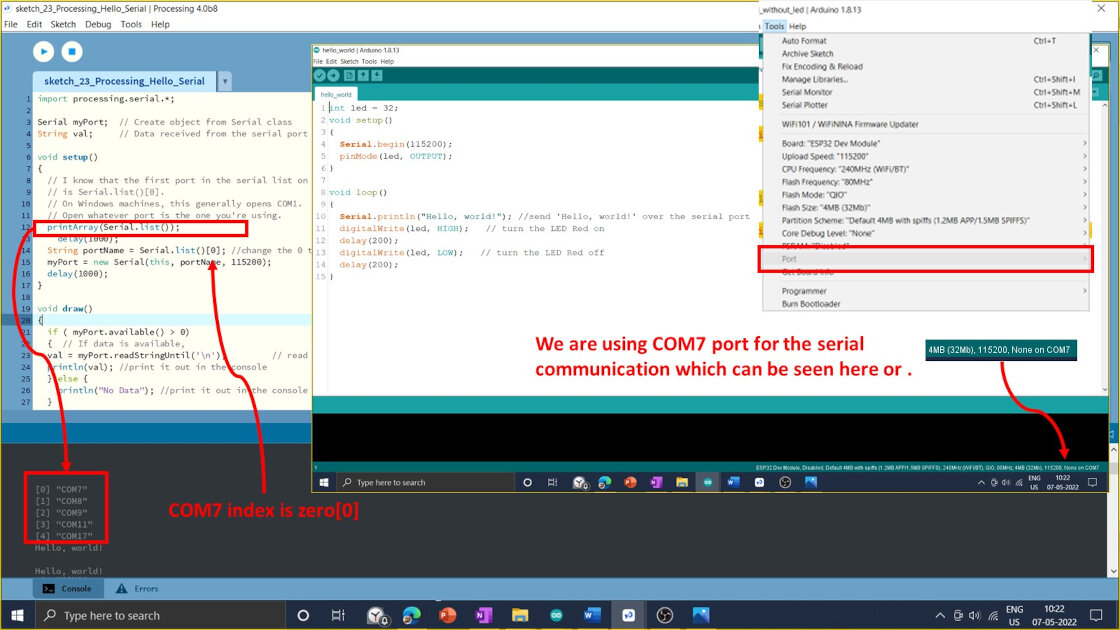
In my case, I am using COM7 for the serial communication; the processing console shows the list, and the com7 index is 0; hence I have inserted the command Serial.list()[0] and assigned the variable as port name to it.
We need to select the same COM port for Arduino ide and Processing with the same baud rate. We verify if it's connected to the serial port appropriately inside the draw loop. If that's the case, we obtain the message from the port, save it in the "val" variable, and output it to the console, as shown.
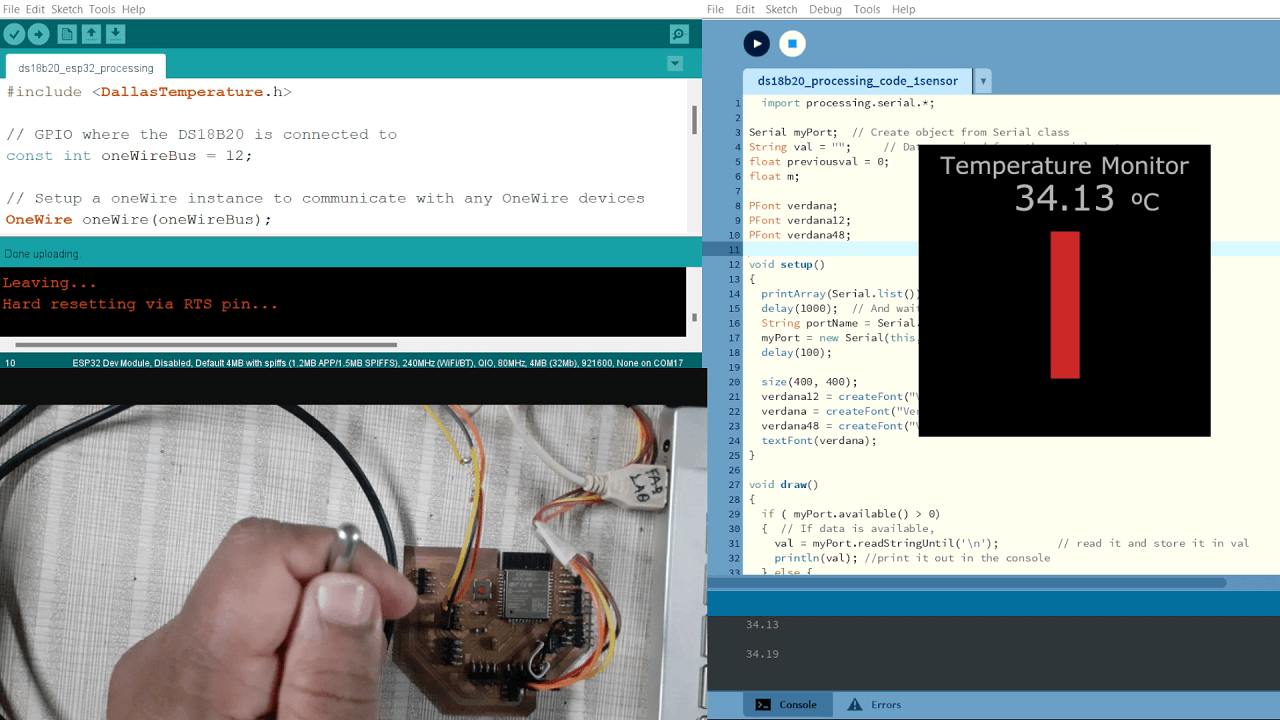
When I run the program onto the Processing, it connects to the com port and starts communicating to it. Command-line val = myPort.readStringUntil('\n') reads the data available onto the com port COM7 and sore it into the variable val. Then print(val) print the value of variable val onto the Processing console.
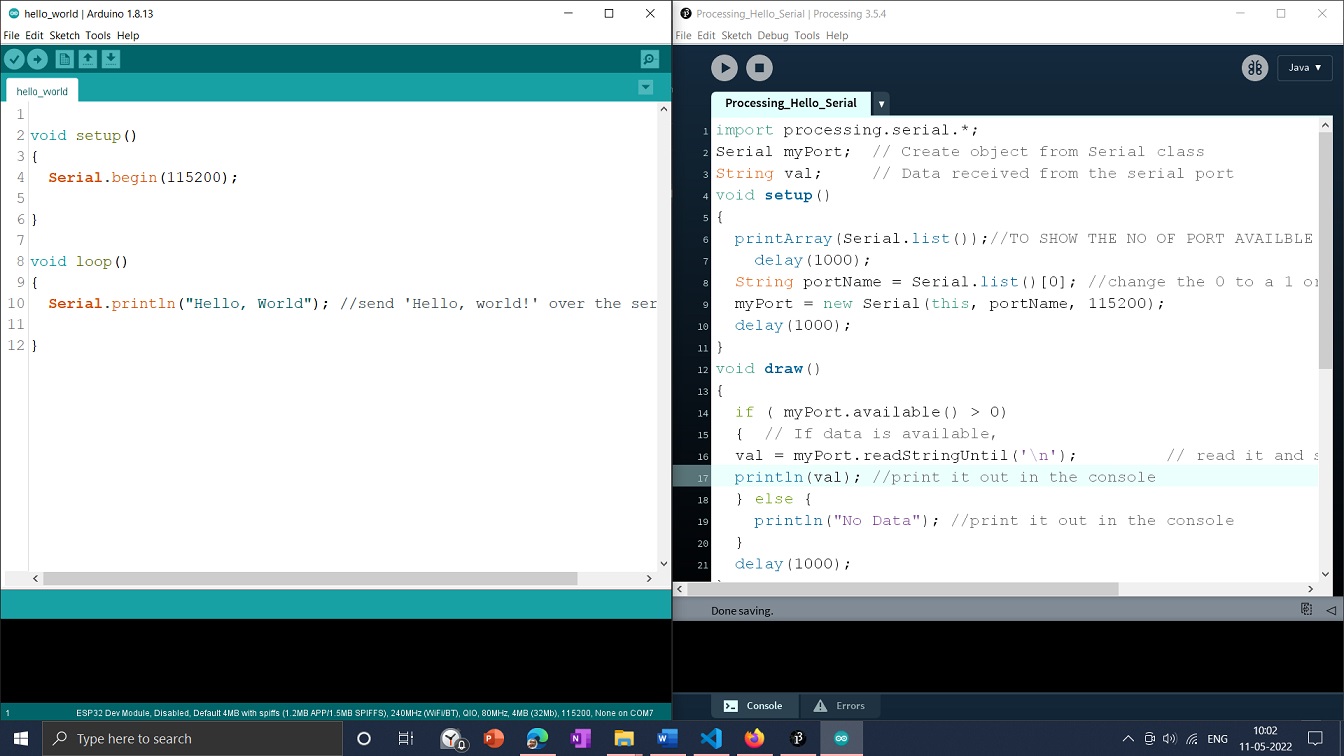
Arduino Code for Serial communication
A detailed video of the serial communication between Arduino ide-microprocessor and Processing software is shown below.
Processing Code for Hello World serial Communication
Processing -Controlling LEDs
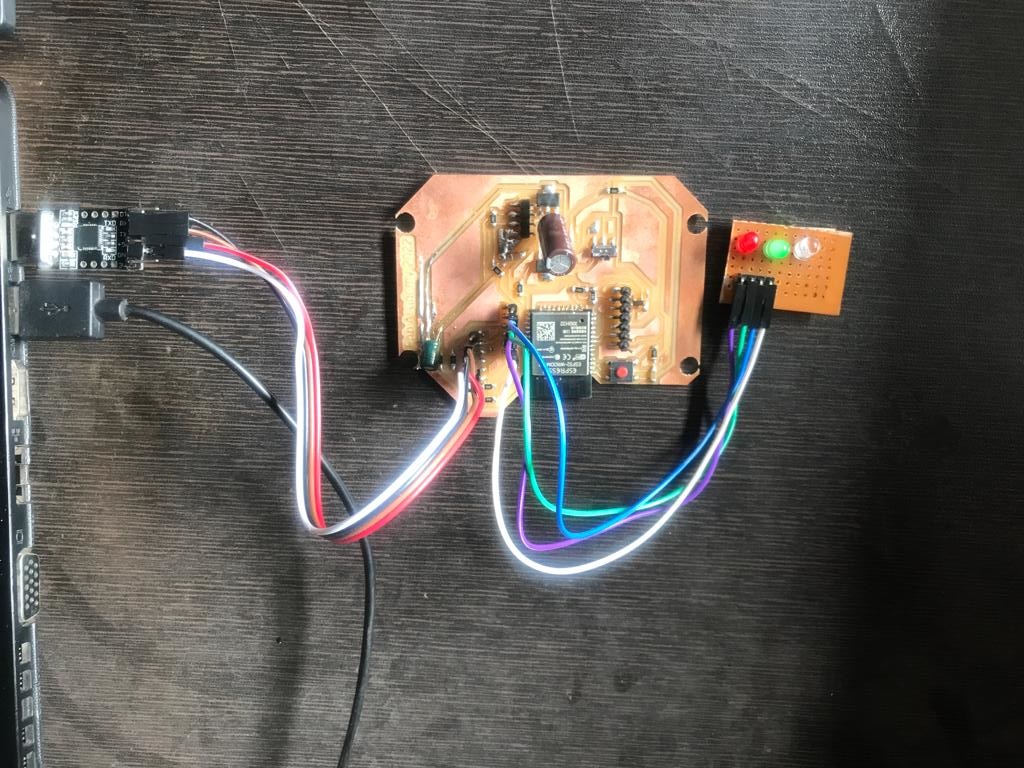
Last week, I developed the final project board used for the input devices. I have decided to use the same Board for the application assignment. I have referred to the documentation of Processing and decided to develop an application to control LEDs connected to the Board. For the project board, I have used the ESP 32 controller IC. I have mounted Red, Green, and Blue color LCD on the zero PCB and connected it to the Board.
I want to create the button for three different LEDs and control them during the Processing. While searching on the internet on, I found documentation about controlp5. controlP5 A GUI (graphical user interface) library for Processing. With the help of the controlp5 library, we can add include Sliders, Buttons, Toggles, Knobs, Textfields, RadioButtons, and Checkboxes, amongst others, and can be easily added to a processing sketch Ref: Controlp5 details . I have referred to some examples here. https://sojamo.de/libraries/controlP5/#examples I found this example for the button. Button Code Then I modified this code as per my requirement. Modifications in code and final code are shown below.
To add the buttons, I have added the controlp5 library using command line import controlP5.*;.
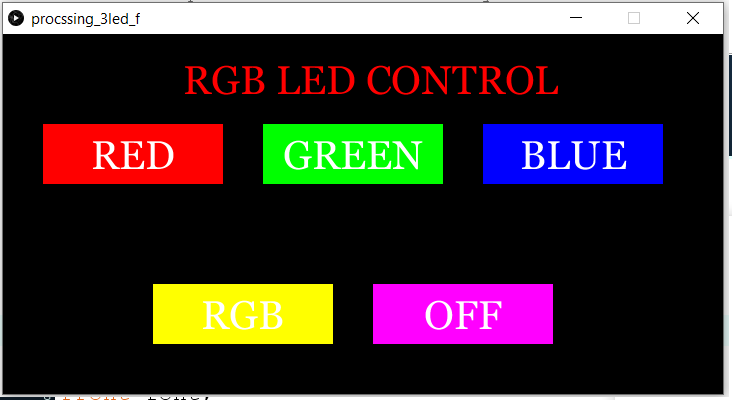
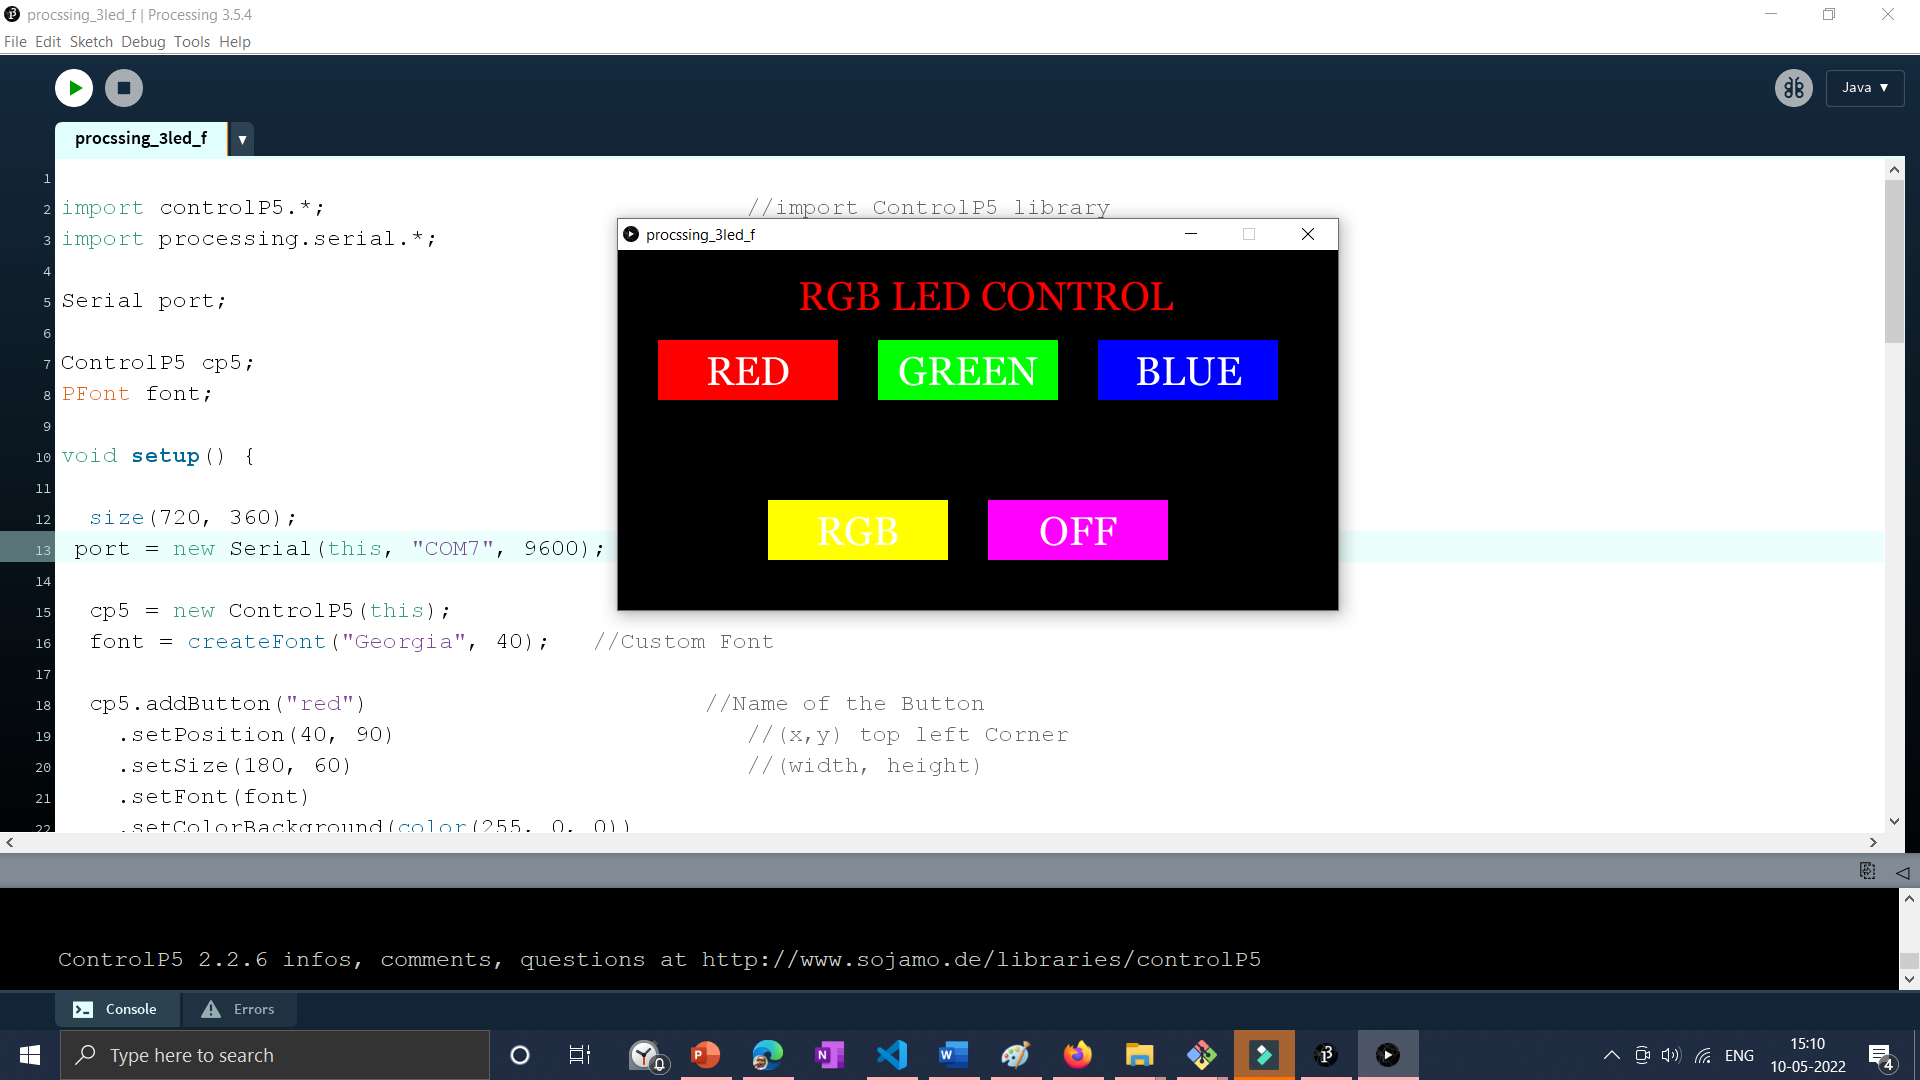
I have developed an application that consists of 5 buttons, three for individual LEDs, one for ON all LEDs at the time, and one for off all lEDs. Herewith I have explained all the procedures to create different tabs shown below.
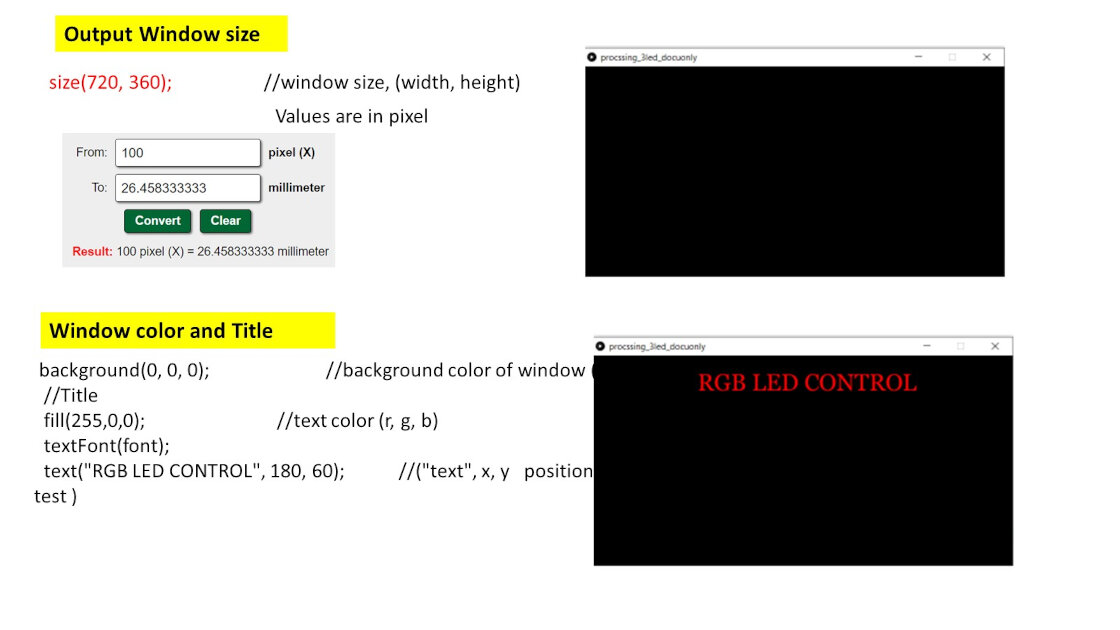
I have selected the size for the application window and added the title it the application.
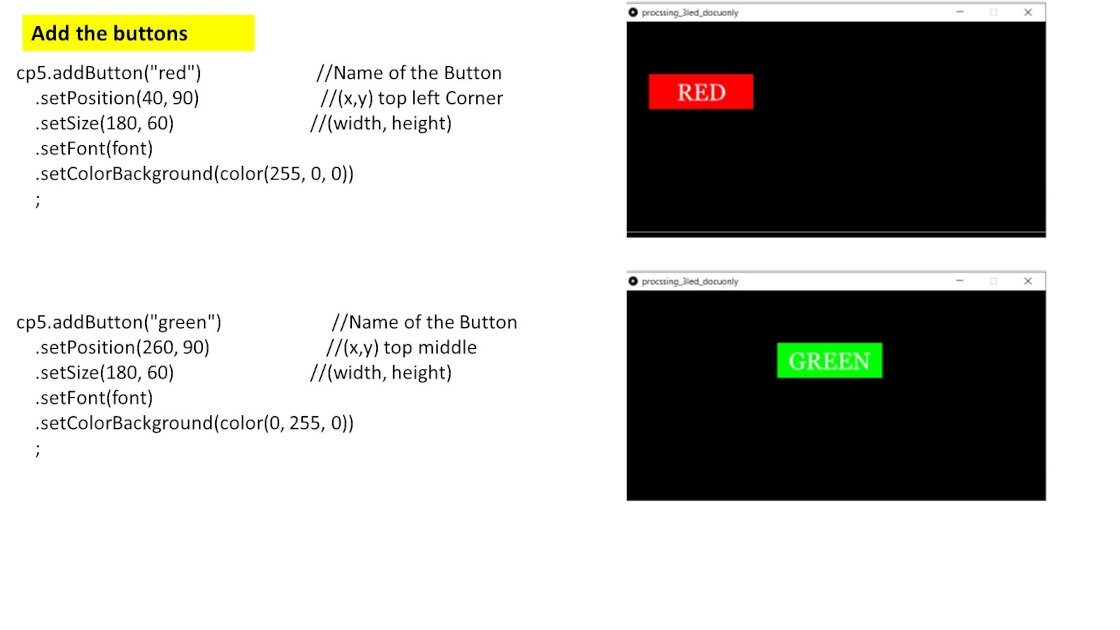
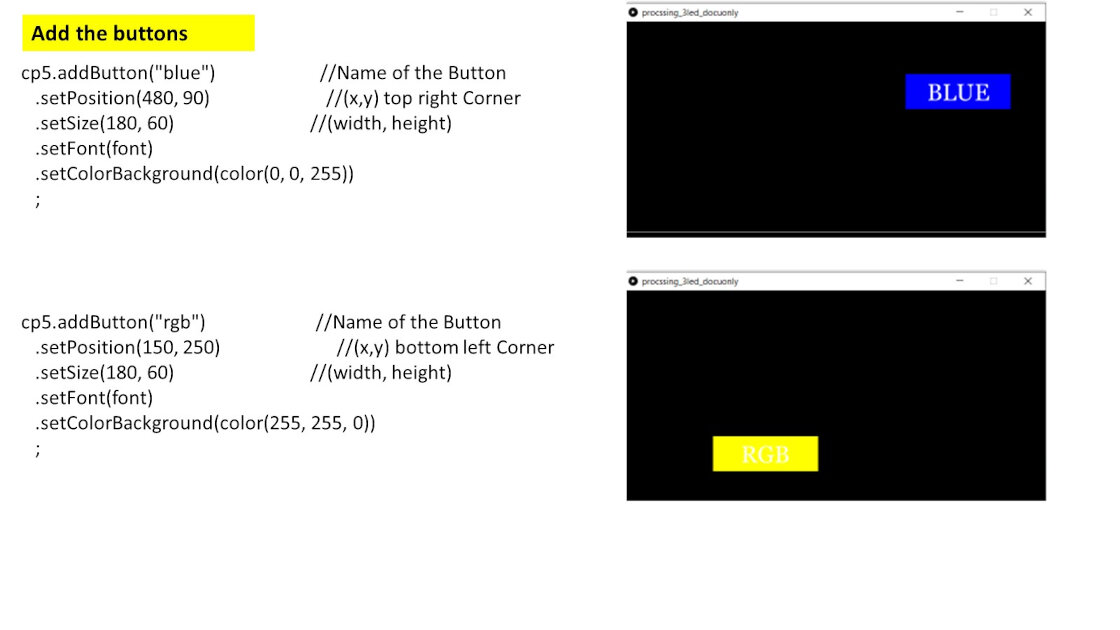
After setting up the application window, I added buttons to it. To add the buttons, I have added the controlp5 library using command line import controlP5.*;.
The final application of today's week is shown below. .
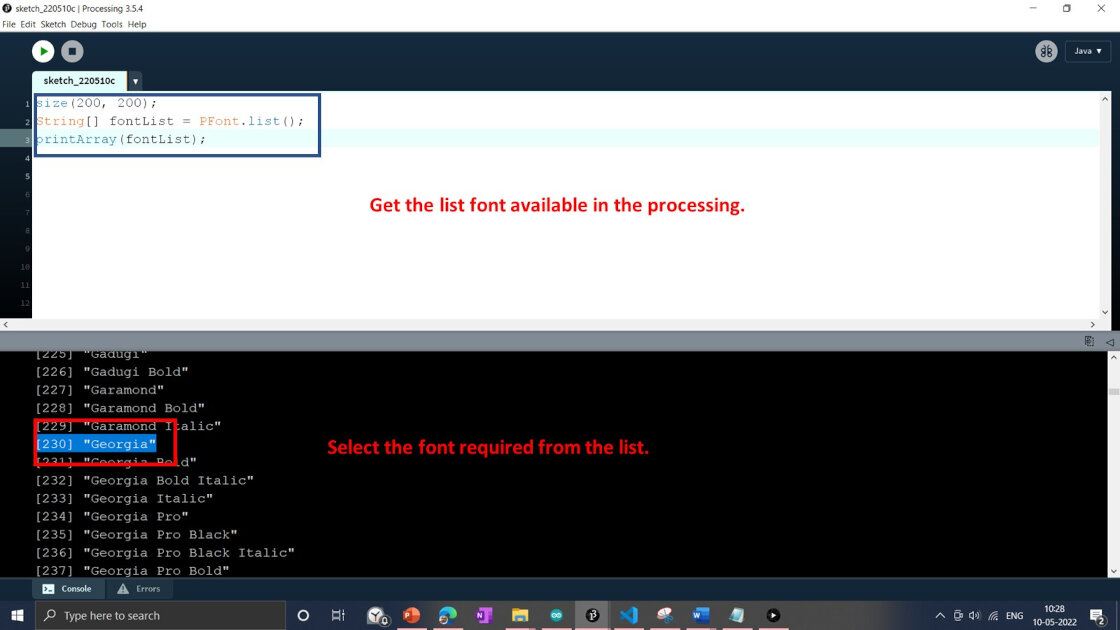
To set the font required for the buttons and title text, we can see available fonts using the following code and add them to the program.
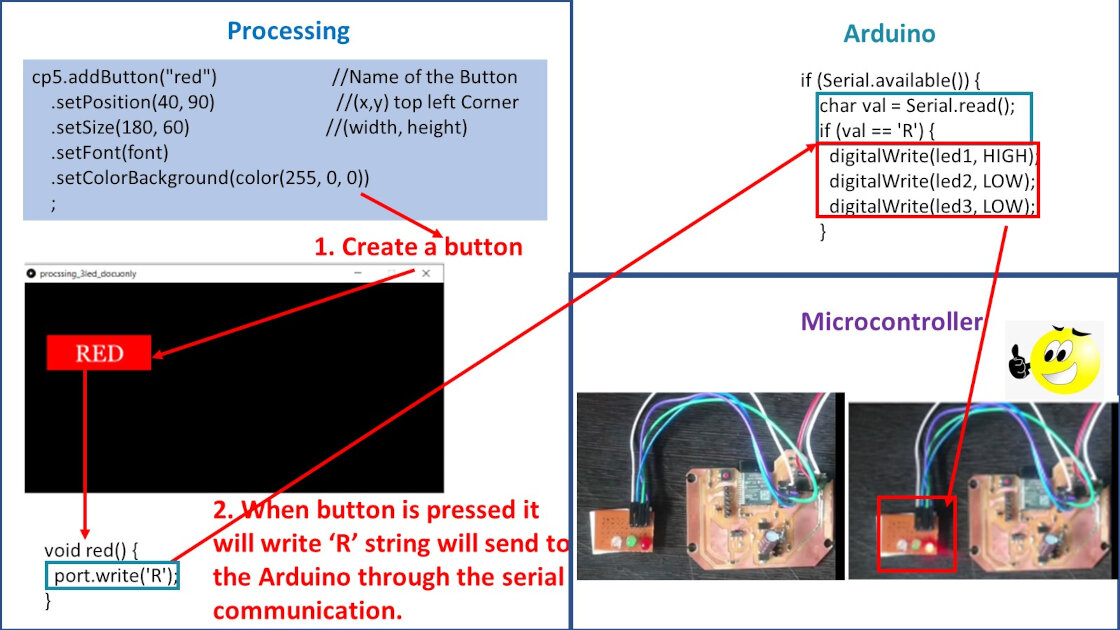
When I click on the red button in this program, it sends "R" string to the serial port, and Arduino reads "R" string which switches on the Red LED as shown in the program. In the same way, we can glow other LEDs and switch off all LEDs.
In my Final project board, I have the provision for connecting the three LED. I have used GPIO19, GPIO23 and GPIO18 to connect three LEDs. I have mounted three LEDs on zero PCB and soldered them for the assignment.
Arduino Code of Three LEDs On/Off
Processing Code of Three LEDs On/Off
Arduino code we need to upload first, and after compiling it, we need to run the processing code.
If by mistake, the Processing Output window remains open, and we try to upload the Arduino code,
it shows the error of COM port busy. Make sure to close the output window of the Processing
before uploading the Arduino code.
Also, make sure we have selected the same baud rate and
the same com port in both the programs.
The final processing application to control Reg,
Green, and Blue LED is shown below.
The following video shows the procedure followed to upload the code (in both Arduino and Processing) and the Use of the application to control the LEDs.
Group Assignment
Group Assignment link
In this week’s group assignment, we have different tools for the application. It was a lot of new learning and enjoying all. We have tried Processing, MIIT App Inventor, Blynk, etc., for this assignment. We have used the application to send and receive data from the Application and microcontroller board.
I have tried the Processing tool to develop an application with which we can control Red, Green, and Blue Led,s. I have used the Serial communication library and Control J5 library for serial communication and controlling Led from processing to Board through Arduino IDE.
Mr. Kishore and Fenil have used the MIT App inventor to receive sensor data on the mobile application over Bluetooth and wifi. Fenil Also tried to use the Blynk tool to control LED through the board.

Processing is the best suitable for the visualization and controlling of the microcontroller using the Desktop application. MIT App inventor and Blynk Application are suitable for Mobile applications that are easy to develop. But Blynk is Very advanced and has excellent scope for customization compared with the MIT app inventor.
Program files
Checklist
-
Linked to the group assignment page and
reflected what you learned individually of the group assignment
-
Documented your process-
-
Explained the UI that you made and how you
did it
-
Outlined problems and how you fixed them
-
Included original code (or a screenshot of
the app code if that’s not possible)
-
Included a ‘hero shot/video’ of your
application running with your board
Linked to the group assignment page and reflected what you learned individually of the group assignment
Documented your process-
Explained the UI that you made and how you did it
Outlined problems and how you fixed them
Included original code (or a screenshot of the app code if that’s not possible)
Included a ‘hero shot/video’ of your application running with your board
Updated on 10 May 2222