Computer-aided design
Model (raster, vector, 2D, 3D, render, animate, simulate, ...) a possible final
project, compress your images and videos, and post it on your class page
2D Software
Procreate (Raster)
Procreate is a drawing and
painting software for iOS. I mainly use it on an iPad along with the Apple Pencil. Procreate is
not really a CAD software, but it is essentially very similar to GIMP and
Adobe Photoshop. I am a hobby digital artist and I used to work with Photoshop and a graphics
tablet before switching to Procreate. Now I use the
software to paint and draw digital art (raster).
I most definitely fell in love with the app and would recommend it to everyone trying to paint
digitally.
Procreate vs. Photoshop (personal opinion) :)
- If you have an iPad and an Apple Pencil, it is the perfect app, since you don't need a graphics tablet (Painting in Photoshop wihtout a graphics tablet is possible, but horrible).
- If your main objective is to paint, Procreate offers all the options you'd wish for + you can easily animate.
- Procreate costs you 9,99€ once, while Photoshop is a monthly subscription.
- For the PC, Photoshop is probably still the more powerful option, especially if you create art professionally.
- If you use an iPad and digital art is your hobby -> Procreate gives you amazing results while being relatively cheap and super easy to use.
- If you are a professional and always need the best resolutions/quality/easy compatibility with other Adobe software-> Photoshop
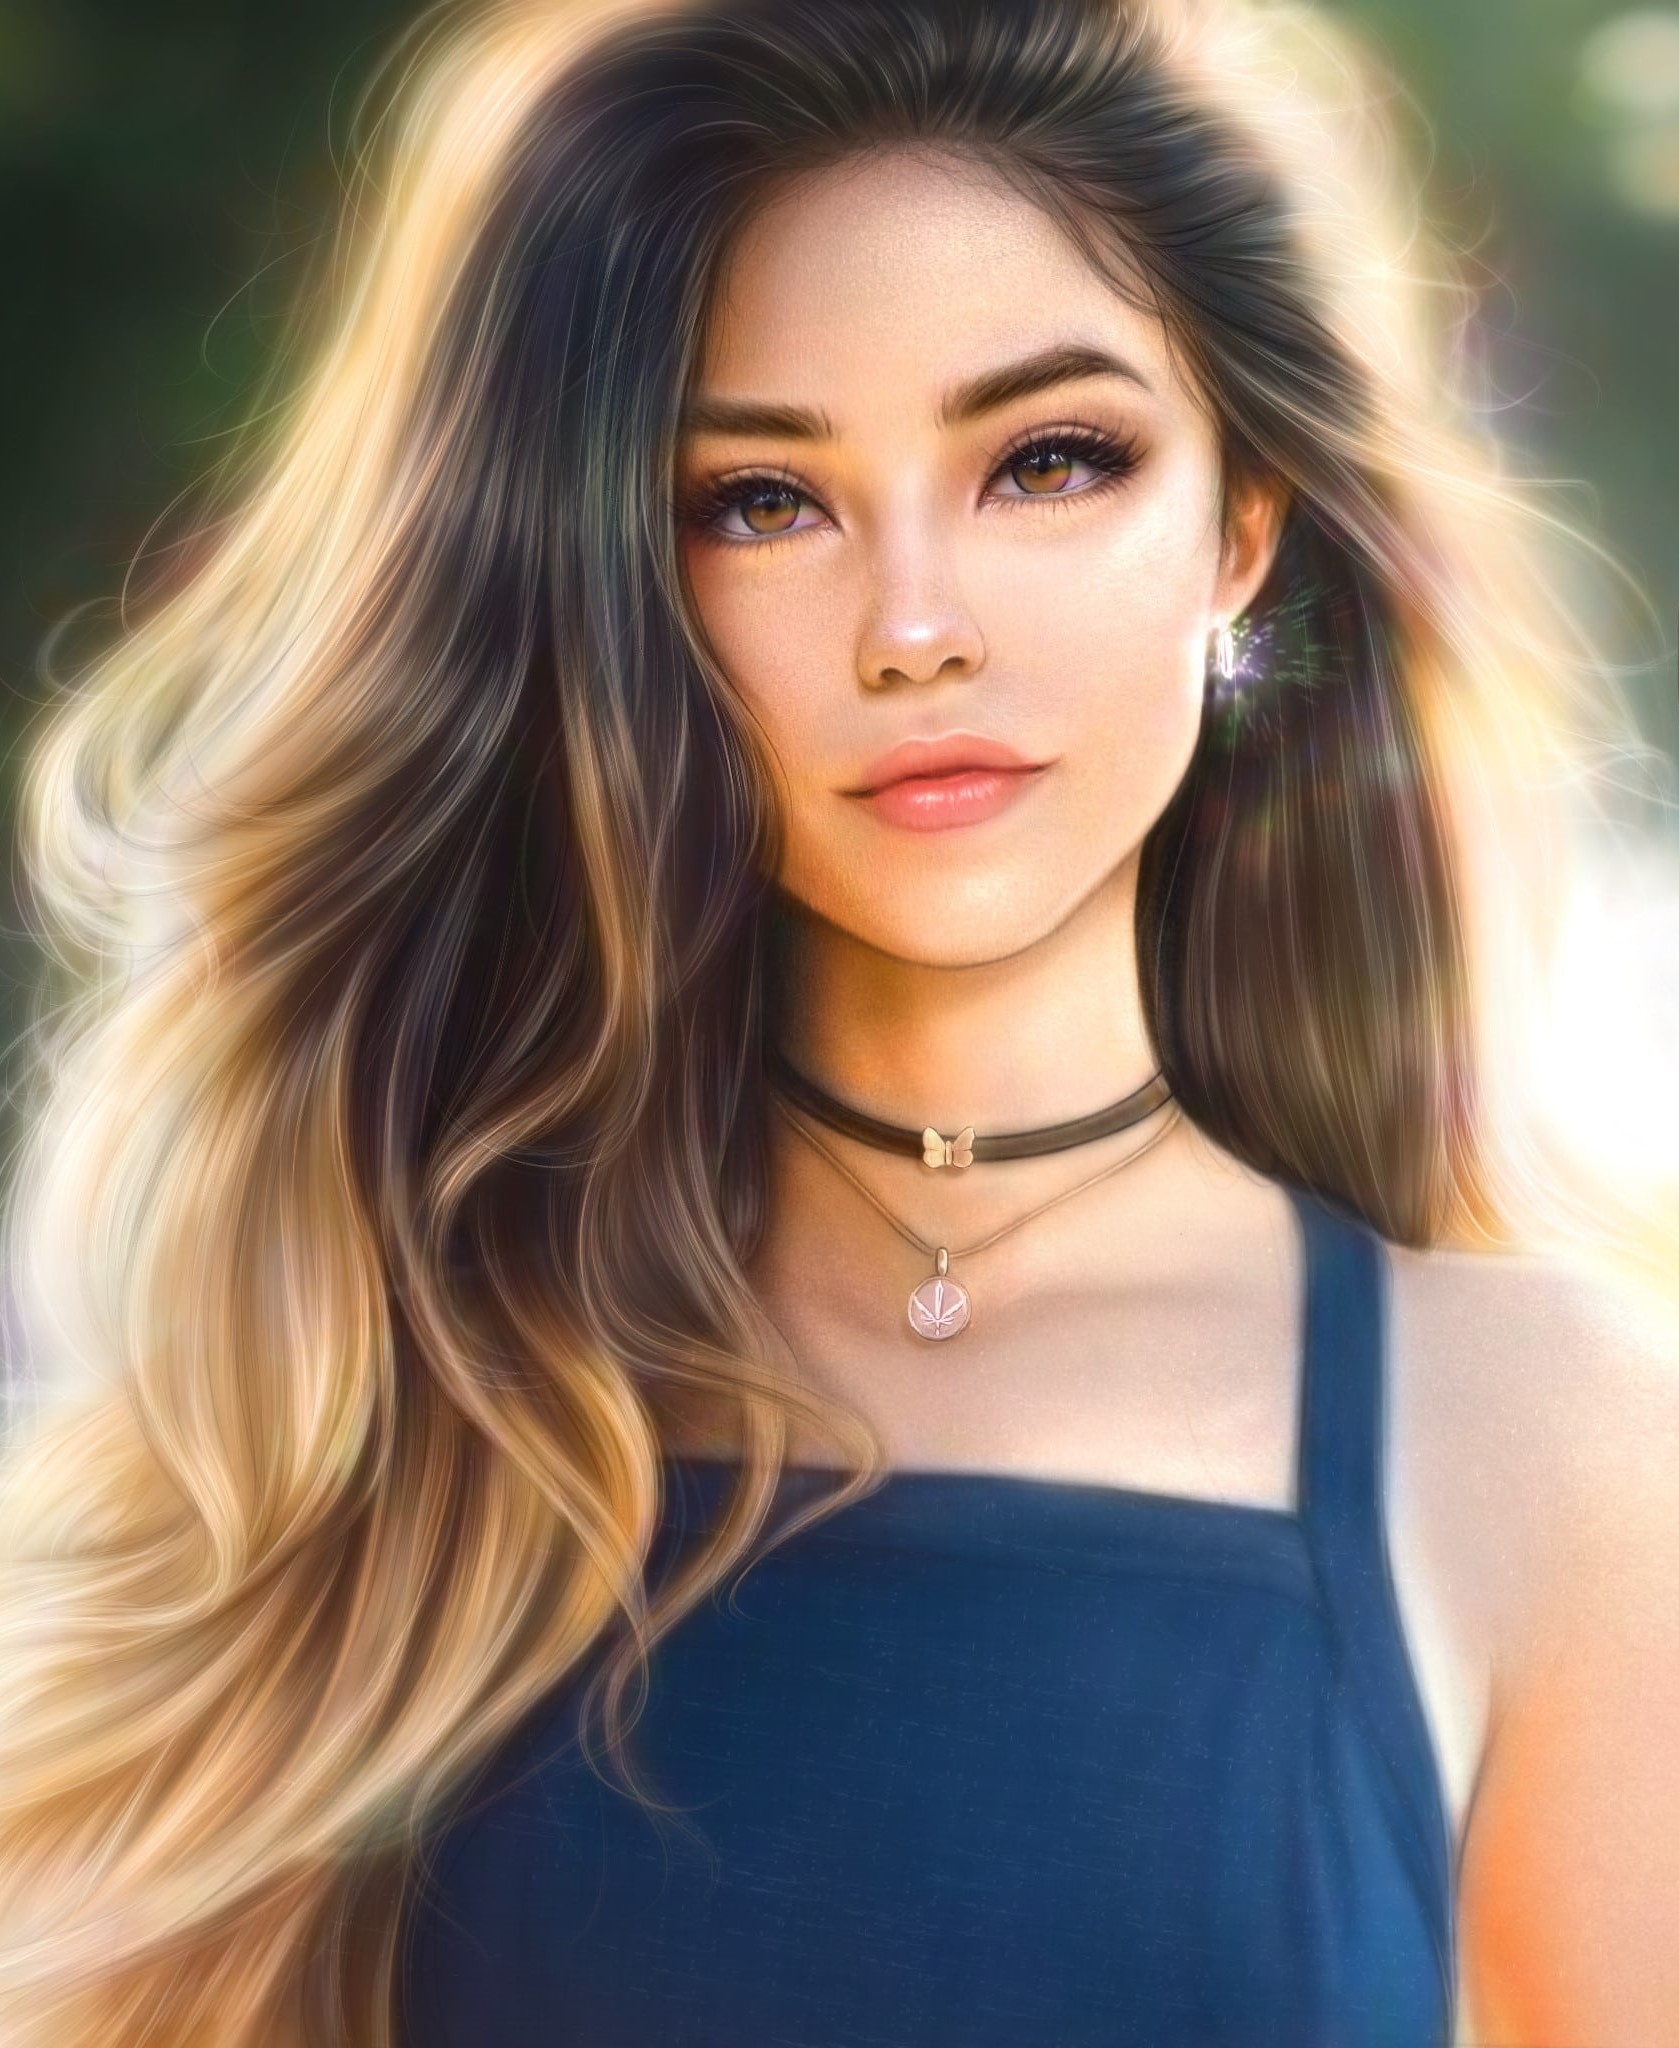
The reason I mentioned Procreate in the first place is, because I want to try engraving one of my artworks onto wood or acrylic glass (see the artwork on the right side).
GIMP (Raster)
I want to engrave one of my artworks onto a piece of acrylic glass or plywood. The file I need to
prepare for this is a 2D raster file for this weeks assignment. I watched a YouTube tutorial on
how to prepare an image for laser cutting in Photoshop, hoping to make it work in GIMP, since I
dont own Photoshop.
You can simply watch the video or
follow my steps:
- Open image in GIMP
- Adjust image size: Image>Image Size
- Change size how you want and resolution to 300 dpi
- Change to greyscale: Image>Mode>Greyscale
- Adjust brightness/contrast (if you need): Colors>Brightness/Contrast
- Change mode to RGB Color: Image>Mode>RGB Color
- Now you need to apply "Dithering" to the image, wich is not supported in all GIMP versions, to still do it, install the GMIC Plug-in for GIMP (https://www.youtube.com/watch?v=KSZqWXm7-zo)
- Install it and reboot GIMP, then open the plug-in with: Filters>G'MIC-Qt
- Choose the black and white dithering and adjust the settings to your liking, then hit "Apply"
- If needed, you can invert the colors of the image/mirror the image
.jpg)
.jpg)
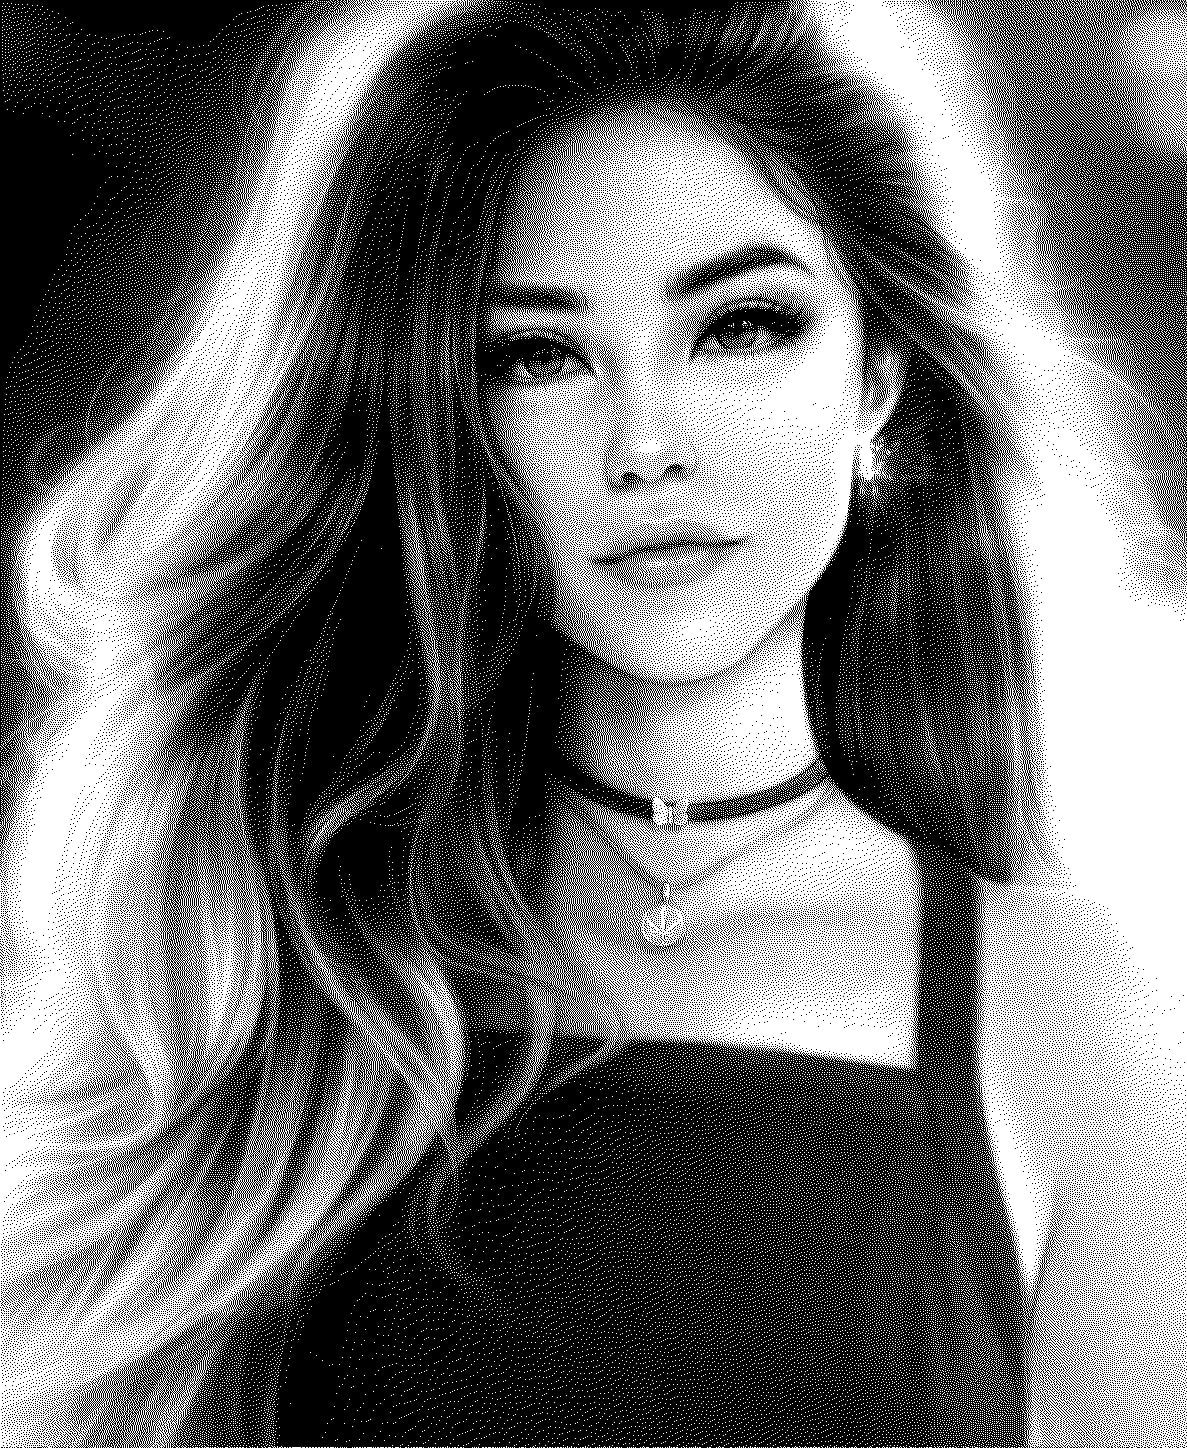 The prepared file.
Download finished file
Download GIMP file
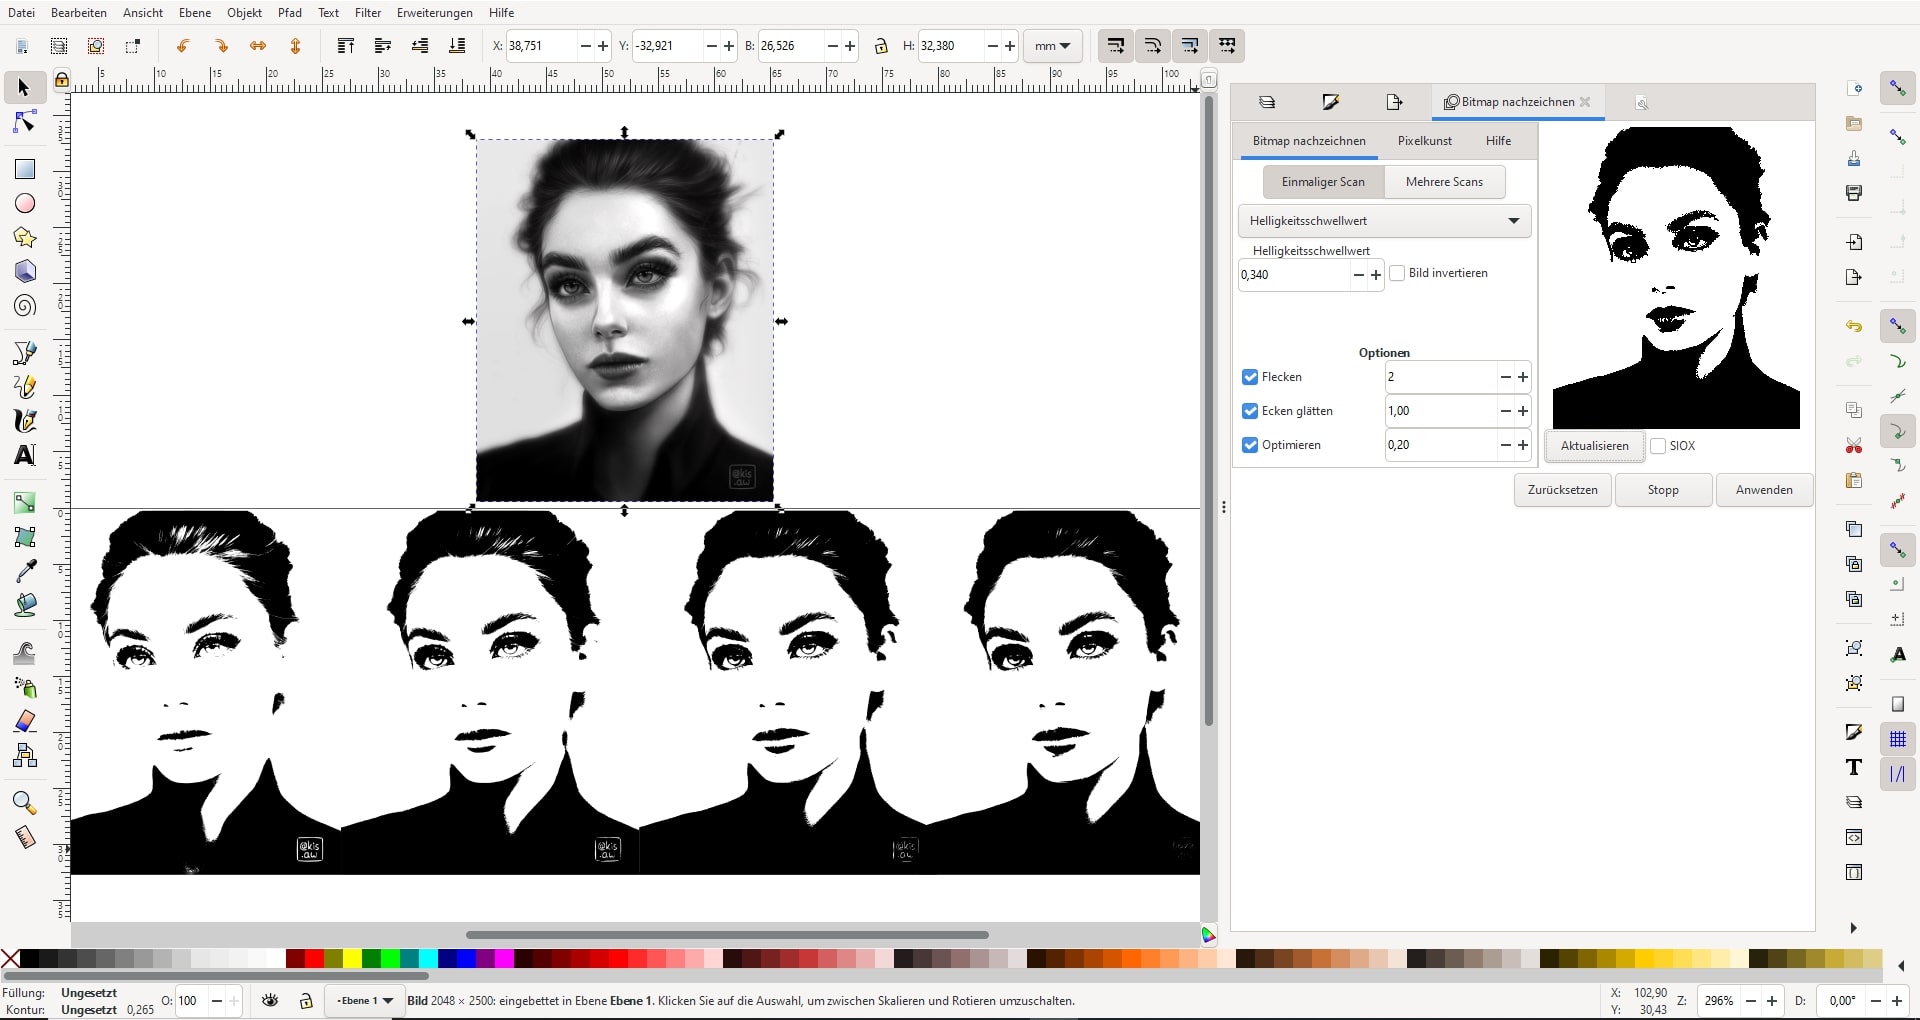
InkScape (Vector)
Inkscape is a free alternative to Adobe Illustrator and works with vectors. Vectors have the huge advantage over raster, that they do not lose quality when being scaled. I only had little experience with the tool. Most of the time I work with raster graphics and not with vector, therefore it was very interesting for me, if I could use Inkscape to make some of my raster art into vector art. I found a great tutorial that showed how easy this actually is:
- Create an Inkscape file
- Import your raster image (just drag it from your file system to the canvas)
- Select the image and go to Path>Trace Bitmap
- Adjust the settings to you liking (you have a preview that you can update)
- Hit OK and the vectorised art will pop up ontop of you raster image
 The SVG file
3D Software
Both Fusion 360 and Blender are well known 3D programs and have their respective advantages and disadvantages. Blender is essentially free while Fusions fullversion needs to be paid for. If you're interested in digital animation, VFX and game design alongside 3D printing, Blender is one of the best modeling and sculpting programs on the market. There are also numerous ways to get help through tutorials or forums. If you want quick and easy 3D printing, Fusion 360 is perfect. With your own designs, you'll be up and running in minutes. Autodesk updates frequently and the software is better tailored to product design. Therefore Blender is better for artistic or organic-looking prints and Fusion 360 for functional prints. After all, they're both free for hobbyist designers, so you can try both.
Fusion360
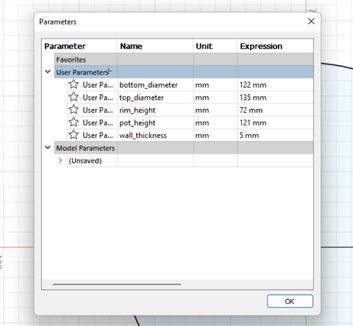
In Fusion360 your can set your own user parameters that you can use to define new dimensions in a sketch or when you are using dimension-changing tools like extrude. Using Parameters in your design is called parametric design/parametric modeling in Fusion360. They can also be very helpful when you want to change any dimensions afterwards, as you will be able to see the changes happen in real-time. Creating and changing parameters is easy to do and can be accessed the following way: Modify > Change Parameters. A table will then appear in which you can create a new parameter and assign a value to it or edit an existing one.
For the final project
To view the final-project-page documenting all my work for it, click here.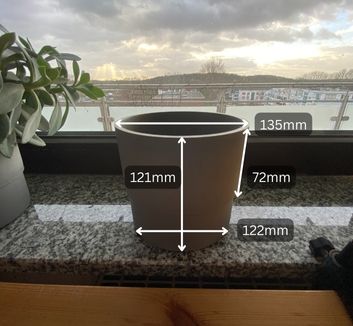 I decided to pursue idea 2 "Selfwatering flowerpot" first. For this week I will design
the
flowerpot in Fusion360.
To start off, I need to measure the dimensions of one of my other flowerpots, since I
want the
selfwatering one to fit in with the rest.
I decided to pursue idea 2 "Selfwatering flowerpot" first. For this week I will design
the
flowerpot in Fusion360.
To start off, I need to measure the dimensions of one of my other flowerpots, since I
want the
selfwatering one to fit in with the rest.
 Now over to Fusion:
Sincen I don't know if I'll make changes to the model in the following weeks, I am using
paramaters for all of the dimensions.
Like this, I can change the value of any parameter here in this very same window and the
changes
will be applied everywhere automatically.
Process:
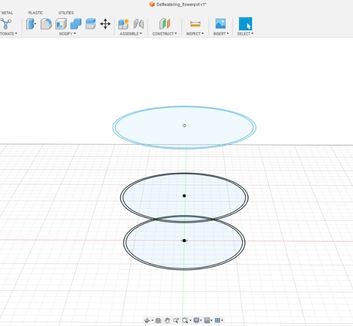
1. Use offset construction planes for sketches at different heights.
2. Extrude bottom and Loft between the different faces for an evenly interpolated volume.
3. Create new sketch for the watertank. Project the ground-sketch into this sketch and use constraints to fix the watertank to the border of the flowerpot.
Before I can go on with the design, I need to think about the electronic components I will be using. This is crucial since I need to know how much space they will occupy. Components and their dimensions (LxWxH):
- Selfmade PCB: apprx. 4 x 4 x 0,2cm
- (Waterpump) Kamoer NKP-DC-S10Y: 6.75 x 5.45 x 4.03cm
- 2x (Ultrasonic distance sensor) HC-SR04: 4.5 x 2.1 x 1.8cm
- Battery holder: 5.7 x 1.7 x 1.8cm
- (Mosfet) STP60NF06L: 1.04 x 0.46 x 0.915cm
- (Lithium battery charger module) Type-C USB 5V 1A 18650 TC4056A: 2.6 x 1.7cm
Process:
1. Create new sketch for the watertank. Project the ground-sketch into this sketch and use constraints to fix the watertank to the border of the flowerpot.
2. Now with the dimension of my components in mind, I design and extrude the watertank
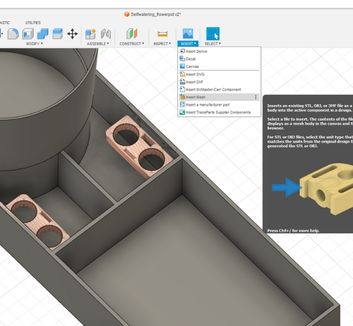
3. I found holders for the HC-SR04 on Thingiverse and inserted them in my design.
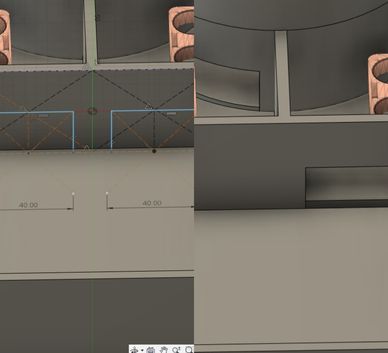
4. Created a sketch for the tunnels to connect the watertanks and cut them with the split tool.
5. Projected the sketch below to this height of the flowerpot wall to extrude ot further.
.jpg)
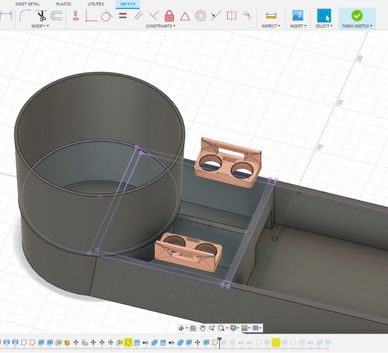
6. Same for the other tank.

7. The extruded walls.

8. Sketch using rectangular pattern for the gutter.
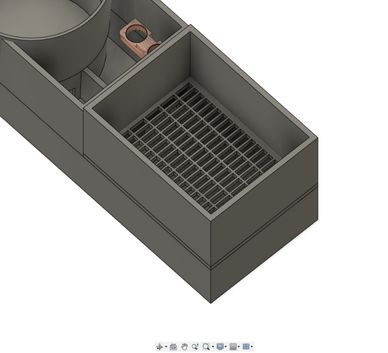
9. Extruded.
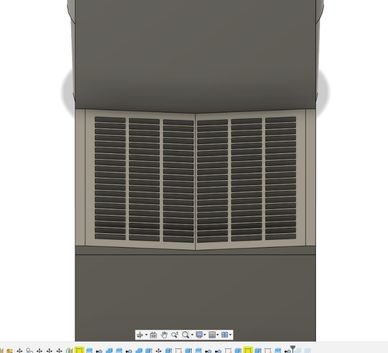
10. Beveled it for better flow of the water.
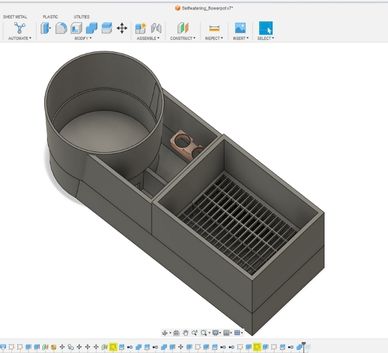
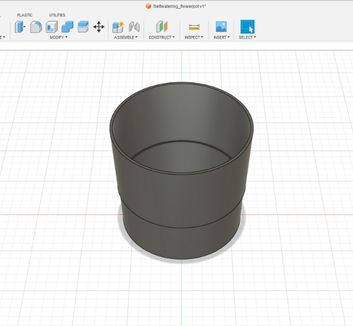
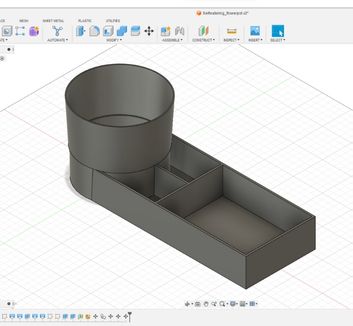
11. Current state.
Box
Last year, I designed a simple box to show the render and animate options in Fusion 360..jpg) At the start
of my design process I defined the needed parameters:
At the start
of my design process I defined the needed parameters:  Then I created
the sketch with the parameters:
Then I created
the sketch with the parameters:.jpg) I extruded
the wanted parts and made the joints with the "Combine" tool.
I extruded
the wanted parts and made the joints with the "Combine" tool..jpg) In Fusions
"Render" mode I set up an environment and adjusted the light setings to my liking to
create this render version of the box
In Fusions
"Render" mode I set up an environment and adjusted the light setings to my liking to
create this render version of the box.jpg) Lastly I
created a very simple animation in Fusions "Animation" workspace.
Lastly I
created a very simple animation in Fusions "Animation" workspace.Download Fusion360 file
Door sign design with Fusion
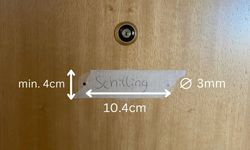 My doorsign + measurements
I recently moved into an apartment in Kamp-Lintfort and while I already feel pretty much at-home for
the most part, some things still need a little fixing.
For example the sign with my lastname on it at my apartment door. Currently it consists of masking
tape with my name written on it. But for this week I wanted to change that.
First things first: Measuring:
My doorsign + measurements
I recently moved into an apartment in Kamp-Lintfort and while I already feel pretty much at-home for
the most part, some things still need a little fixing.
For example the sign with my lastname on it at my apartment door. Currently it consists of masking
tape with my name written on it. But for this week I wanted to change that.
First things first: Measuring:
I also headed over to DaFont to choose a font I like.
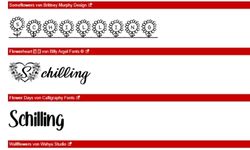 Not
choosing the one in the middle.
Not
choosing the one in the middle.
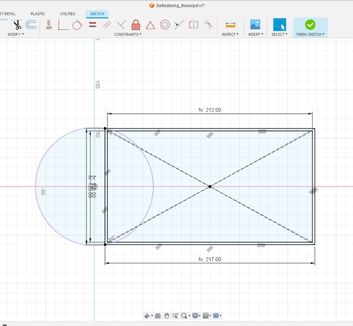
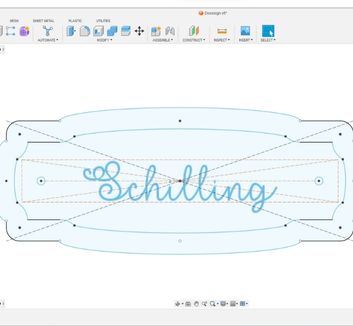 I sketched the form of the doorsign: I created a rectangle and
used fillets on the corners. Inner line is an offset of the outer line. Added the text
et voilà.
I sketched the form of the doorsign: I created a rectangle and
used fillets on the corners. Inner line is an offset of the outer line. Added the text
et voilà.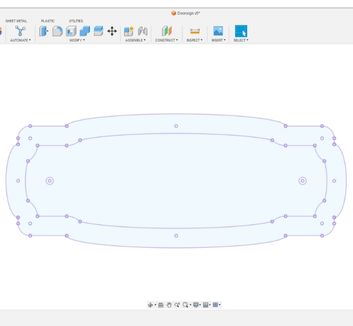 I used P (Project) to project all the lines I need for the
Cutting/Engraving to be in one sketch (hence the purlple lines). To get rid of
construction lines.
I used P (Project) to project all the lines I need for the
Cutting/Engraving to be in one sketch (hence the purlple lines). To get rid of
construction lines..jpg) I readded the
text.
I readded the
text..jpg) Right click on the
projected sketch in the browser and "Save as DXF".
Right click on the
projected sketch in the browser and "Save as DXF". 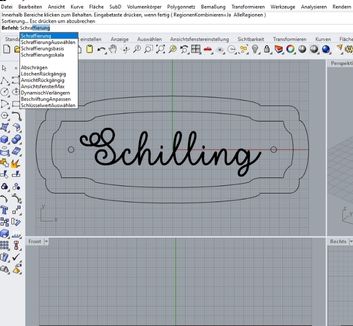 Impoted the file into Rhino and hatched the Text area so it's
one face to be engraved. Ctrl+P to send the file to the Epilog Software.
Impoted the file into Rhino and hatched the Text area so it's
one face to be engraved. Ctrl+P to send the file to the Epilog Software.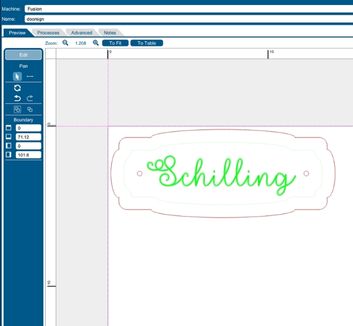 In here I applied colormapping and adjusted the power and speed
settings. Then hit print.
In here I applied colormapping and adjusted the power and speed
settings. Then hit print.Cutting and engraving the the Epilog Laser
The sign!
Blender
As I said in the paragraph above, Blender is better for more artistic, organic-looking models.
That being the case, I wanted to try sculpting with the program instead of working on a
parametric CAD design.
I do not have any experience with sculpting in blender or blender in general, so I found a nice tutorial on YouTube.
Just open Blender with a Sculpting file and follow along or try something yourself with the
brushes.
.jpg)
.jpg) Use the
snake hook tool to create an egg-like shape
Use the
snake hook tool to create an egg-like shape.jpg) Reduce
the brush size a bit and create the eye sockets (make sure symmetry is activated)
Reduce
the brush size a bit and create the eye sockets (make sure symmetry is activated).jpg) Use the
draw tool to create eyes and a beak
Use the
draw tool to create eyes and a beak.jpg) With
the snake hook tool, create this distinct eyebrow shape
With
the snake hook tool, create this distinct eyebrow shape.jpg) Use the
crease tool to create wings and to make the edges of the model sharper
Use the
crease tool to create wings and to make the edges of the model sharper.jpg) Go to
layout mode to add the feet
Go to
layout mode to add the feet.jpg) Add an
ico sphere, push the subdivisions up to 4 and scale it down
Add an
ico sphere, push the subdivisions up to 4 and scale it down.jpg) With
the sphere selected go back to sculpting mode and adjust the feet to your liking with
the tools from before
With
the sphere selected go back to sculpting mode and adjust the feet to your liking with
the tools from before - Kopie.jpg) Back in layout mode, duplicate the feet
Back in layout mode, duplicate the feetI most definitely had a very hard time during my first time using blender and this is the model I ended up with (it's supposed to be an owl):
.jpg)