Assignment 6 - 3D Scanning and Printing
Assignments
Group Assignment
- Test the design rules for your 3D printer(s)
- Document your work and explain what are the limits of your printer(s) (in a group or individually)
- Document your work to the group work page and reflect on your individual page what you learned
Individual Assignment
- Design and 3D print an object (small, few cm3, limited by printer time) that could not be easily made subtractively
- 3D scan an object, try to prepare it for printing (and optionally print it)
Group Assignment
The page for this weeks Group Assignment can be found here!
As I am in the middle of my exams this year in university I sadly only could be at the Lab in Kamp Lintfort for half a day. This is why I dont have a link to a Group Assignment Page yet. I will update this page here when I finally have the time to experiment with the printers at the lab.
As sort of a replacement, I can atleast show you my printer at home and show of my fist few test prints and a few more prints I did for this week. My printer at home is the FLSUN Super Racer (SR). My primary reason for buying this exact model was its small footprint on the X/Y-Axis as well as the cool way it is moving because it is a delta style printer. In comparison to other FDM printers like the Creality Ender 3 V2, a delta printer like the SR has a non-moving heated bed. All three axis movements are realised by the three arms that can move vertically independend from one another. Each movement of two different arms results in moving in one of the three directions. As for features, the Super Racer offers the following:
| Print Volume | Print Speed | Nozzle Diameter | Supported Filament Diameter | Filament Support | Nozzle Temeprature | Bed Temperature |
| 260mm*260mm*330mm (concentric, not squared) | 150mm/s - 200mm/s | 0.4mm | 1.75mm | PLA/PETG/(ABS) | ≥260°C | ≤100°C |
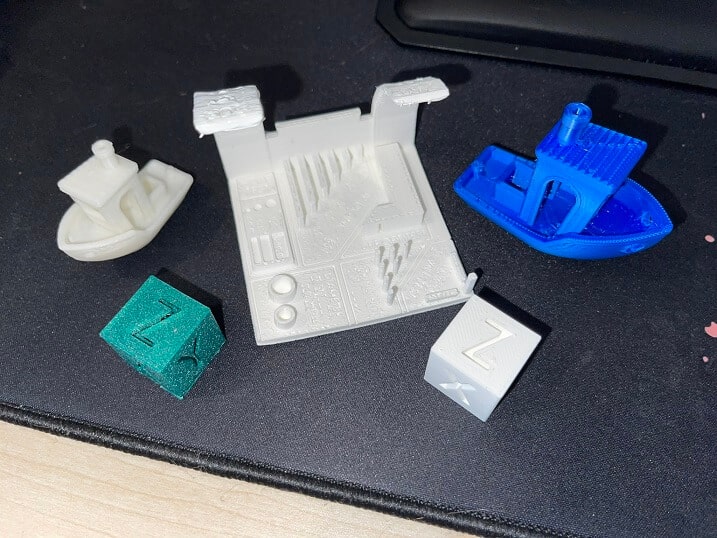
On top of that I changed the standard printing bed to a magnetic PEI shield with which I have yet to work flawlessly. The Super Racer also offers automatic bed levelling via a sensor unit that can be magnetically attached to the hot end. I dont own the printer for a long period of time yet but I still tested around with the settings quite alot. Changing Layer Heights, Temperatures, Different Support technics, different adhesion technics, wall counts, infills, and the list goes on. The amount of settings you are able to change withing the slicer software is incredible and for a noob like me very overwhelming. So most of the tipps and tricks to yield better results I simply get from the internet. Below I attached picture of a few test prints I did. Here are two Benchys with different filaments, two calibration cubes and a comprehensive printer test that contains almost every test we saw in the lecture:
Individual Assignment
Design and Print a 3D object that could not be easily made subtractively
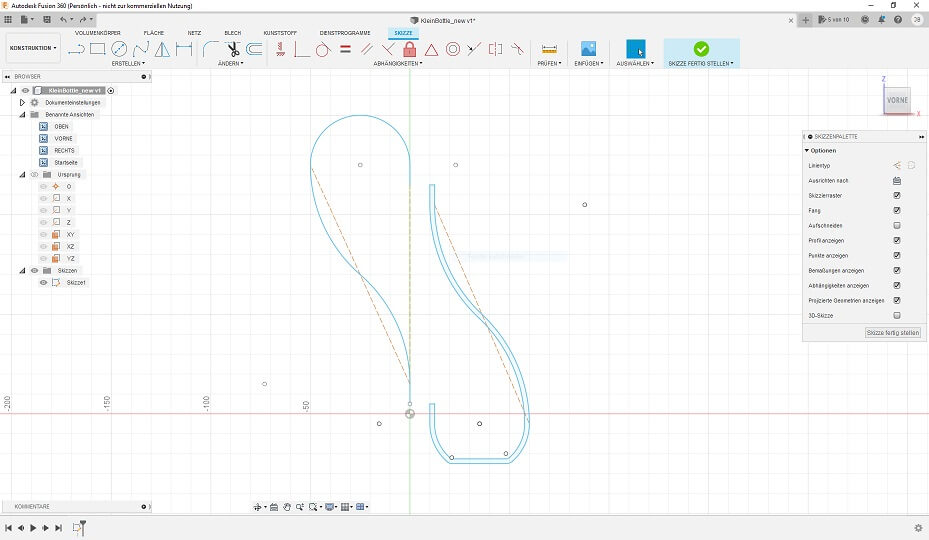
As I was very time constrained this week because of my exams, I took the chance and reused a design I did in one of the first weeks: My Klein Bottle! Instead of fully reusing the old asset I atleast made a new one for this assignment. I based my Klein Bottle on a video tutorial on youtube which you can find here. I followed the steps shown in the video loosely and applied my own scale I wished to have in the end. I started with the sketch of the base and the bottleneck:
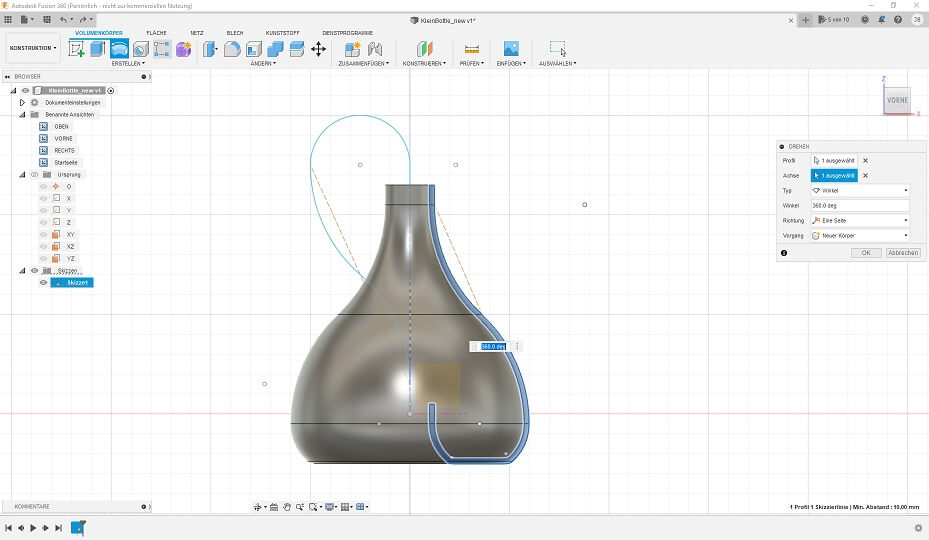
After that I used the revolve feature of Fusion360 to revolve the main part of the Bottle around the Z-Axis:
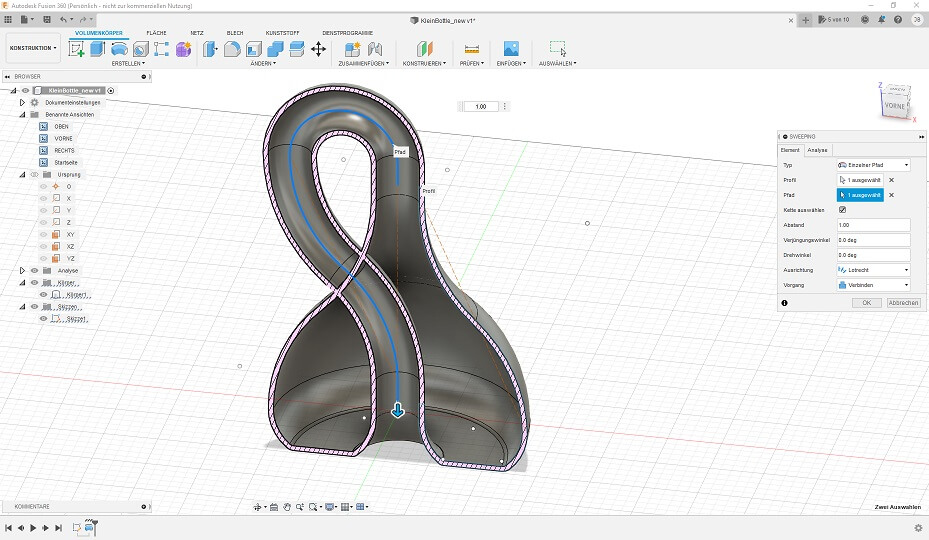
I then selected the upper face of the revolved shape and used Fusions sweeping tool to sweep this face along the sketch line I did for the bottleneck, connecting the upper part of the bottle with the inner part:
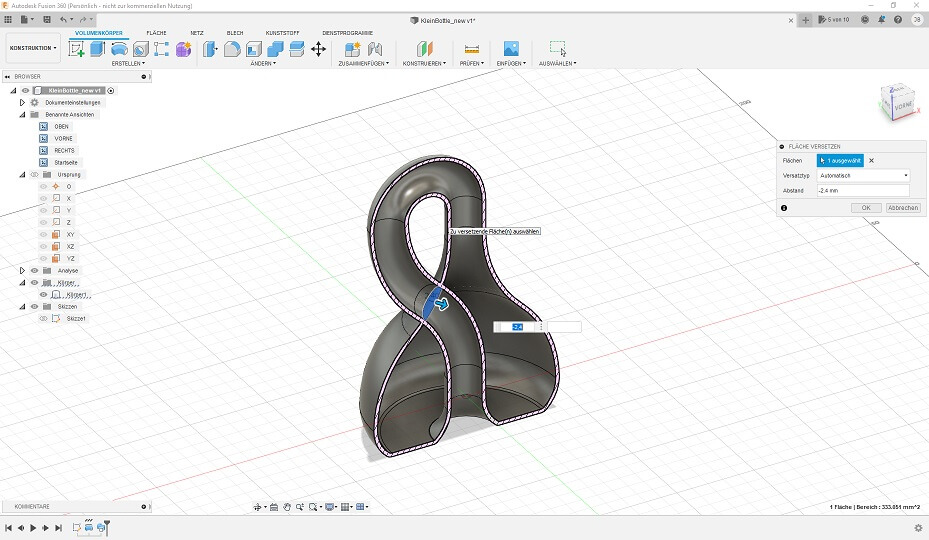
After that I had to get rid of the intersecting face between the bottleneck moving into the bottle and the bottle outer shell. For this I used the modify face function and just set the thickness of the face to 0:
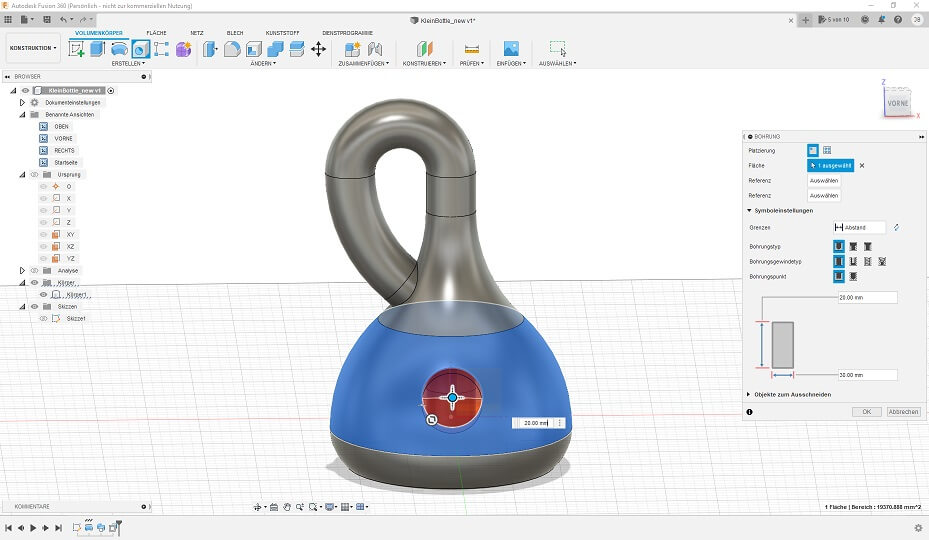
At last I wanted to take a look into the bottle so that everyone can see what a klein bottle really is. For this I simply added a drill hole on the side of the bottle:
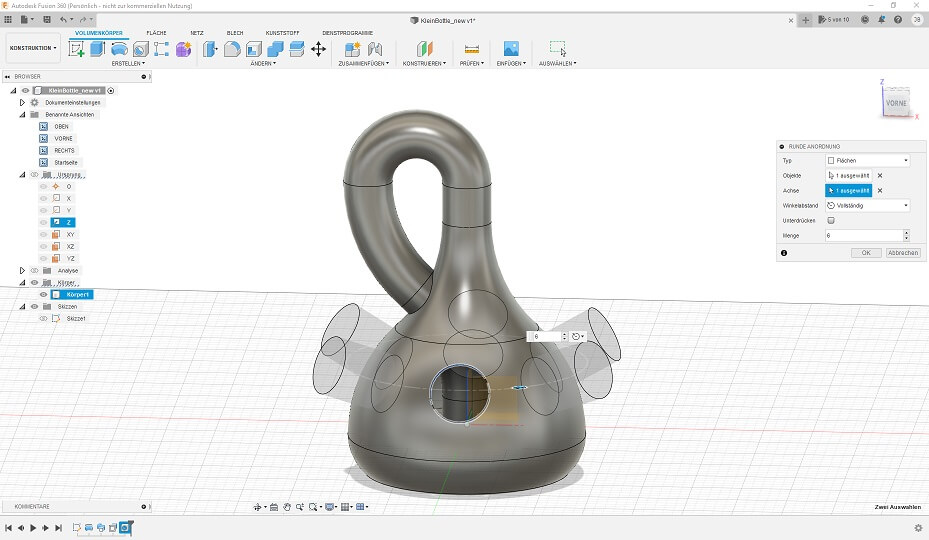
To have somewhat of an aesthetic, I then used the Circular repeat function to repeat the drill hole around the bottle. THis ways you can take a look on the inside from different angles!
After designing the bottle i tried to print it at home multiple times. As I mentioned above, I had just applied a magnetic PEI plate onto the standard glas plate that came with the printer. I did this because the eralier print on the glas plate were a pain to get off and I read that because of the flexibility of the PEI sheet, you could just bend it a little and every print would come off easily. For me atleast the prints are coming off a little too easy at the moment and I had several prints of the bottle fail because the hotend would somehow pick up the print and show it around the plate. At last i had a successfull print after releveling the printer and thoroughly cleaning the PEI sheet with water and after that with rubbing alcohol to make the print stick better. The print itself sadly is not perfect and I have to test more and more with the different settings and different filament types, but this is my final print of the klein bottle:
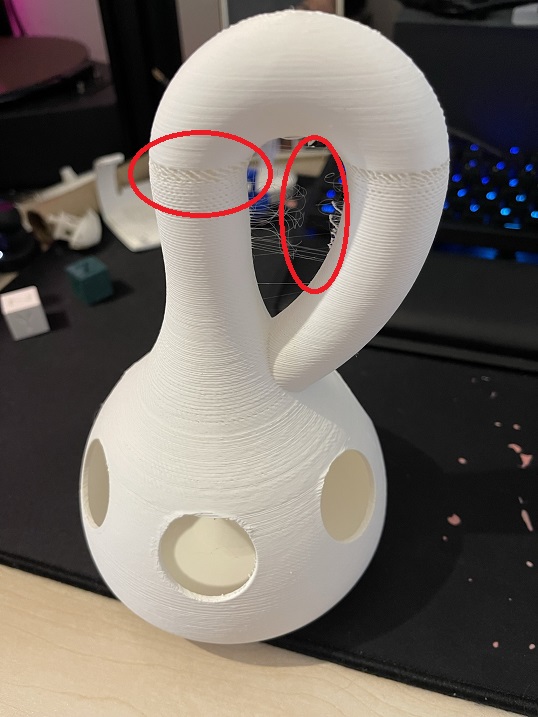
As you can see, there are quite a bunch of problems, some of which I even was able to fix mid print (more like next to the end of the print). I had sleight underextrusion all the way through which got even worse to the end as you can see at the top of the bottleneck, just before the bend. As it turned out, the fastener for the extruder was far too loose and somehow even loosened up more during the print. I simply tightened the fastener and since the bend of the bottleneck the layers look fine! There is also major stringing on the inner bottleneck. I guess I could minimize this by using the setting that randomizes the seam of the print, because it seems like the stringing is exactly at the seam withing the bottleneck. I am quite happy with the holes but the overhangs could always be a little better. All in all I am quite pleased with the print itself (apart from the underextrusion stuff). This Klein Bottle printed for approximately seven hours on my printer.
3D scan an object (optionally print it)
This Assignment was so much fun! Even with the small amount of time I had at the Lab this week, I was able to scan an object I brought with me. The whole process seems very complicated at first but is definetly much more easy than I had thought beforehand. But while being more easy than I thought the technical background of the scanning process is very cool and I was fascinated the whole way though Ahmeds' explanation and my own scanning.
The scanner we have at the Lab is the EinScanner Pro+ that is used together with the EinScanner Pro series software in our case with version 3.1.0.4. After connecting the Scanner to the PC and to power and after connecting the Turntable that is part of the scanning set to the PC, the software was opened. Here we first chose the model of our scanner, so the EinScanner Pro+. After that it was on to calibrating. The Calibration is done in a few steps with the enclosed calibration board:
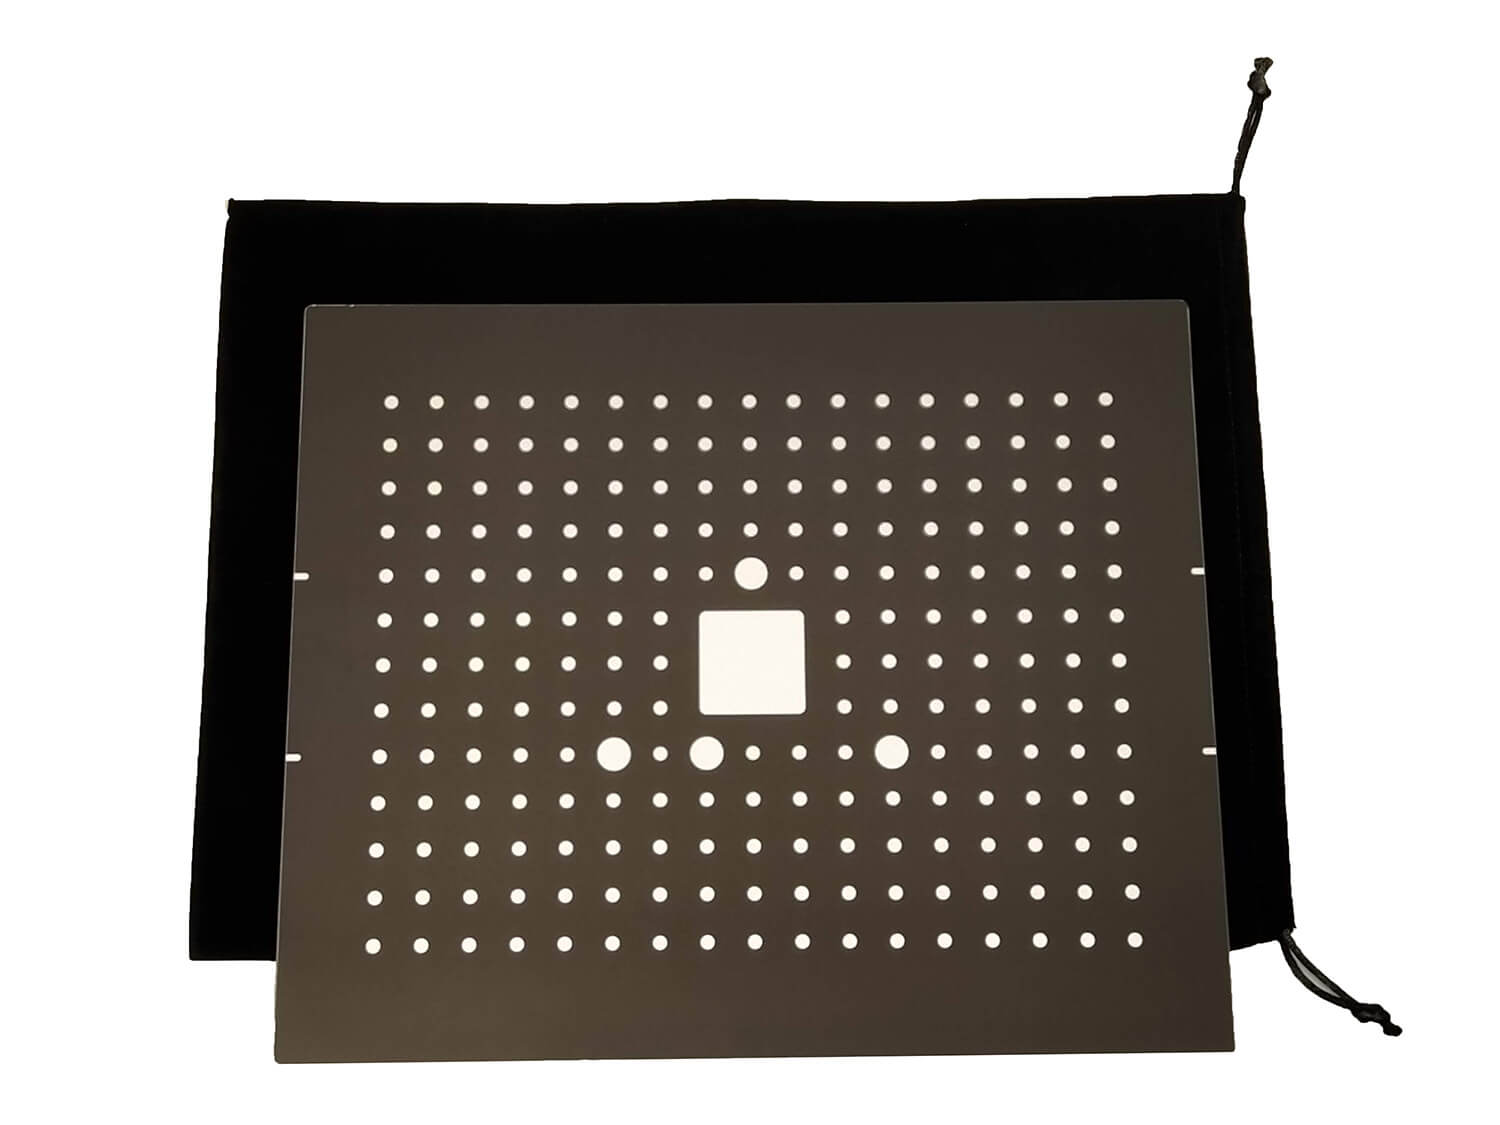
- The scanner head is aimed towards the calibration board which is lain flat on a table. Then the Scanner head is moved upwards. Meanwhile the software will tell the user if the calibration is going well by showing the user different height which are already calibrated and other height which are not. This way the user knows approximately where to hold the scanning head to finish this calibration step.
- The same process is now done with the calibration board tilted in different 45 degree angles using the angled bracket that comes with the scanner.
- Finally the calibration board can be turned around, exposing a plain white second side. This is used for calibrating the scanners white values.
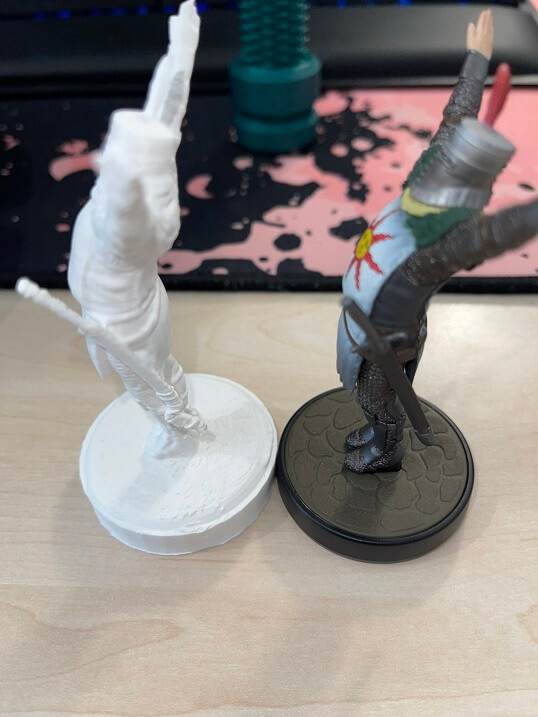
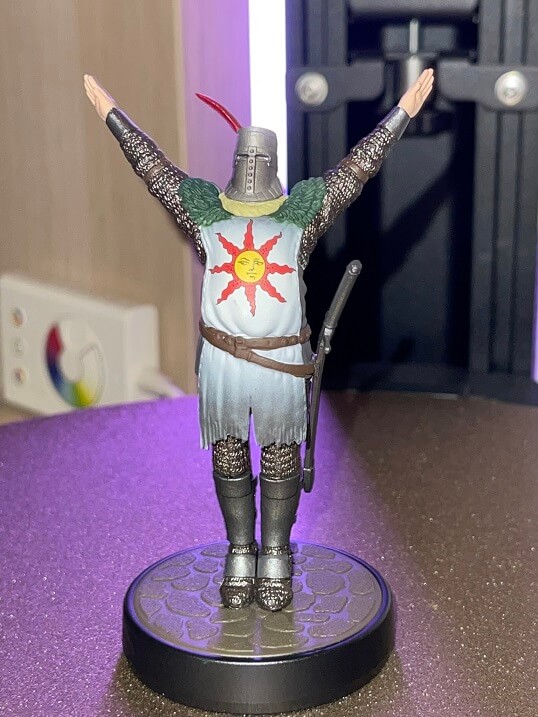
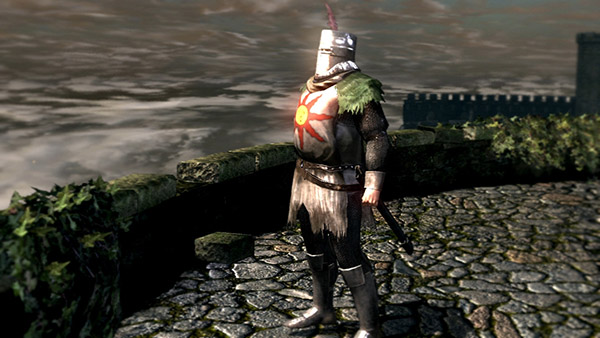
After the calibration and a few test scans made by Ahmed, it was my turn to scan the object I took with me for scanning. As I did not want to scan something very big but also not something very small, I chose one of my Amiibo figurines, which are equipped with a NFC tag and can be used to enhance some gaming titles from Nintendo. The figurine I chose was of the character Solaire of Astora, known from the video game series Dark Souls made by Fromsoftware. For a small comparison, here is the figurine and the character of Solaire with Dark Souls:
For scanning I went with Ahmeds recommendation and used the scan by feature setting instead of using the markers of the turntable. The difference in these two settings is, that with the turntable markers, the scanner will create a point cloud based on the position of these markers. When you use the feature setting, the scanner will determine specific features on thje scanned objects and will use these features to determine the pointcloud between scans. Next to this setting I also played around with the brightness setting and the number of ratations the turntable does for a whole revolvement alot. Differing these settings was important, as that allowed the scanner to see almost every detail because of different lighting conditions and different angles the object was looked at. On top of that I also changed the position of the figurine on the turntable itself. Here is a video of one of the scans:
After each scan, the software shows the user what it saw in form of a point cloud. Here the user has
to delete every voxel that the software saw, that is not part of the object to clean up the scan.
After that the user has to verify the changes and then the current scan will be added to the already
existing scans, further imporiving the already existing point cloud. After finishing many scans with
different settings, I could finally export the pointcloud as a model. For this I used the setting
Watertight Model and Medium Fidelity. After looking at the model, the only
thing that I would need to fix was the base of the model, as that was altered heavily during model
conversion:
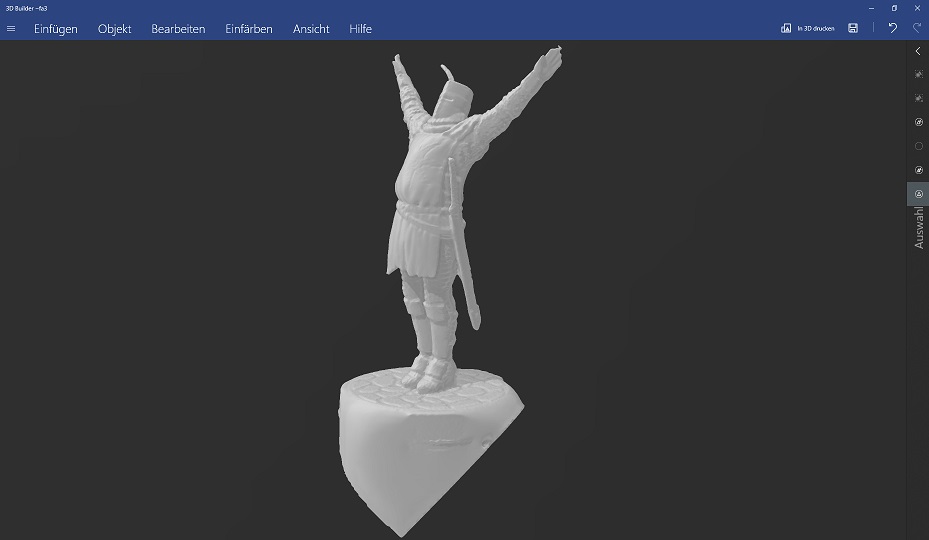
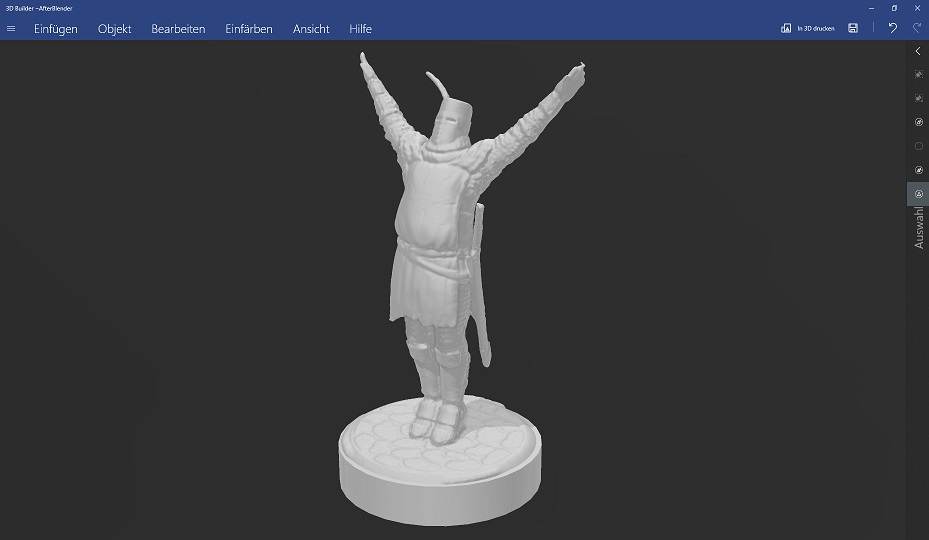
To change the base, I went into Blender and snapped of the lower part of the Base by looking straight at the Model. After that i created a cylinder and set it at the right spot using different camera angles. Finally I used the sculptipng tool to subtract any faces of the model into the cylinder. After that I joined the two objects and exported the Model as an .stl file.
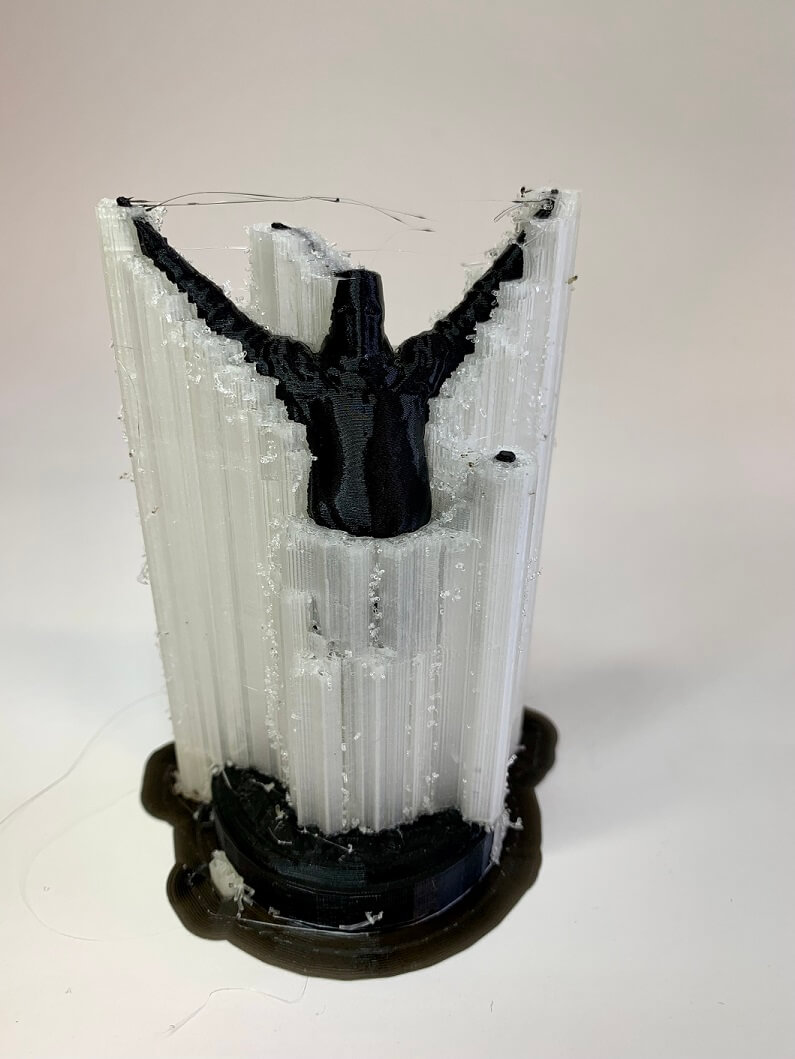
Since my time at the lab ran short I quickly sliced the model for on of our Ultimaker S5s using normal black PLA for the figurine itself and water soluable PVA for the supports. The print was estimated at around 11 hours. I was quite amazed at the possibility to print more than one filament at the same time, hopefully making the removing of support parts a much easier process than using only one type of filament. I left the lab in hopes that the print would succeed. And to my surprise, the next day Ahmed texted me with Images of the print:
As I did not have the time to visit the lab again since then, I will update this page here later with the resulting figurine without supports!
As to not be here empty handed I also printed the figurine on my printer at home. Instead of a layer height of 0.1mm like the Ultimaker S5, I used the finest setting available on my printer at 0.12mm layerheight. With (tree-)supports the print was estimated at roughly 2 and a half hours.
I have to say I am very surprised by the quality of this print. Apart from the sword, that got shifted withing the supportstructures somehow, everythhin else is quite on part with the original and I am very pleased with the endresult!