Final project
Final project presentation Video
Final project presentation Slide
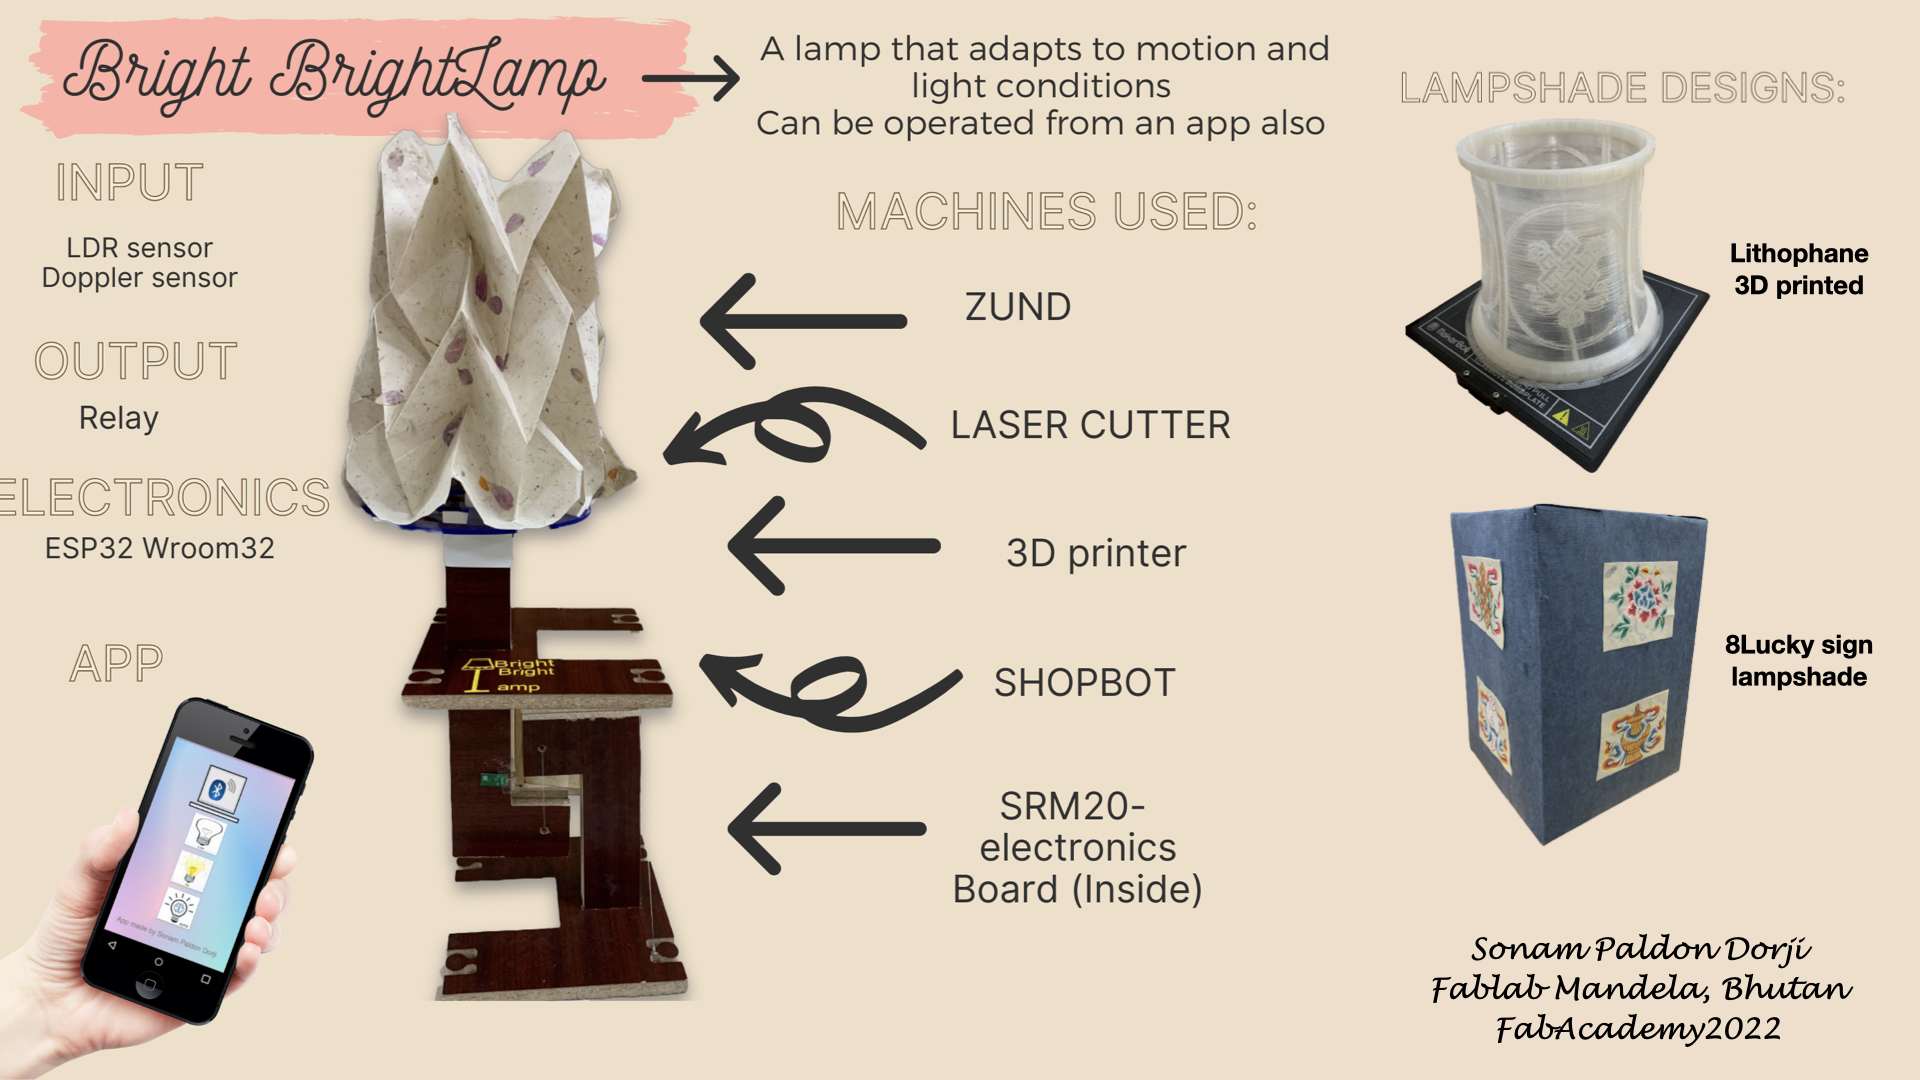
Motion sensor lamp
Bhutan has over 71 percent of its territory under forest cover and is the only carbon negative country in the world. I have always considered myself very fortunate to be part of such a green country and I wanted to contribute towards it, be it big or the smallest way possible. Bhutan generates electricity using natural and renewable resources (Hydro, solar, wind and bio-waste). Naturally, looking at the surrounding my interest in renewable energy grew. Studying electrical engineering has pushed my interest even more as I have learnt how greatly renewable energy helps conserve our green and beautiful forest.
I noticed that the street lights in our country are either operated manually or timer sensors are used whereby the street lights are kept on starting from 7pm in the evening till 6 am in the morning. Street lights are very important and keep the community safe but a lot of energy is wasted when the streets are empty. My plan for the long run is to build a solar powered motion sensor street lights in the country.
But every dream must start from a single step thats how i decided i wanted to work on motion sensor lamp as my final project for the Fabacademy. An intelligent motion sensor lamp which when it is dark outside activates LDR sensor and if any movement is sensed, the doppler sensor is activated which will give the signal to relay to turn on the LED and stays on for 5 seconds. As for the design of the lamp, i am planning to use different Bhutanese design and give it a touch of Bhutan's culture.

Why motion sensor lamps?
Even now, the lamps and lights are kept on throughout the night at the houses for security and safety reasons. If one house keeps one light on throught the night, just think about how much energy is wasted by a city (where there are thousands of houses)
- it is very common in other countries but a new concept in Bhutan
- Saves energy
- Very simple
- Easily applicable
- Effective and efficient
Planning:
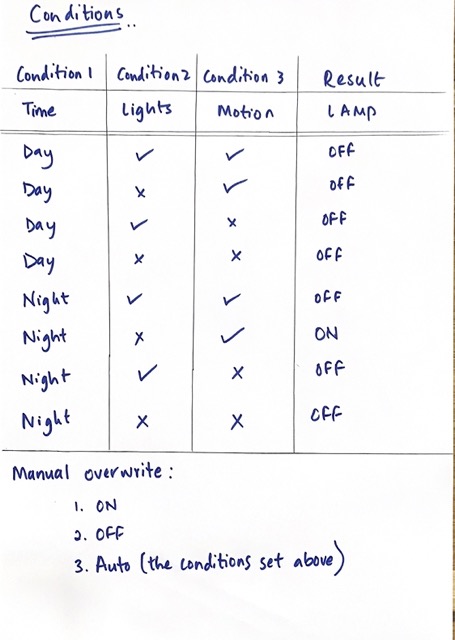
Conditions to set for lamp to glow:
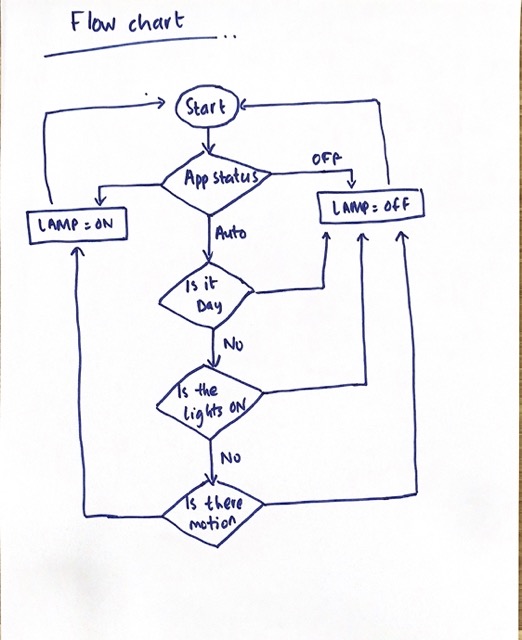
Flowchart
Lampshade design ideas:
The 2D and 3D design of the lamp are done during the week 2 assignment of the fabacademy.
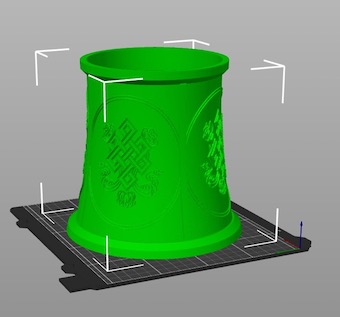
But I wanted to incorporate some bhutanese designs for the lamp shade for which I am going to use a 3D printer lithophane .
We can make pictures into 3D designs easily using lithophane maker

The design is called an endless knot and it is one of the popular designs in my country.
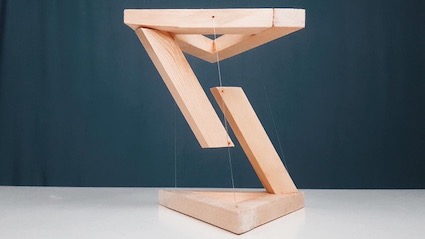
For the base or the support to the lamp, I wanted to make something different and unique. So, I want to making a tensegrity table
Work division
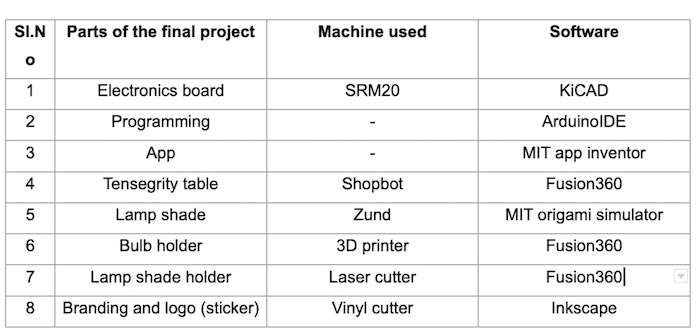
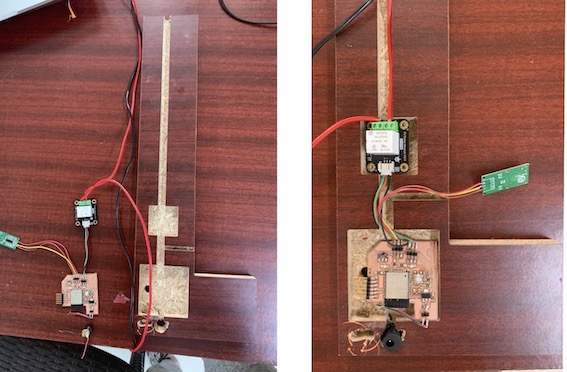
1. Electronics board
First of infinite attempts
- As much as I wanted my first designed, milled and soldered board to work in the first attempt, I failed miserably. I designed the board and realized I made many silly mistakes which I documented all in the output week. Some components came out and I had to hot glue them back.

Third times the charm
-
I designed another board in KiCAD and milled the final project for general use as well- keeping provision for I2C, 5V output and 3V output. But later while trying to integrate and fixing inside the tensegrity table, the board size was too big. On my 3rd attempt, I designed using the only required outputs and milled again.
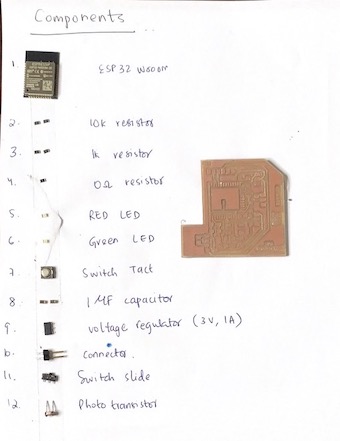
Design file for the electronic board done on KiCAD is here
2. Programming
Install Esp32 in arduino IDE
-
Follow the instructions here to install the esp32 board in the arduino IDE
-
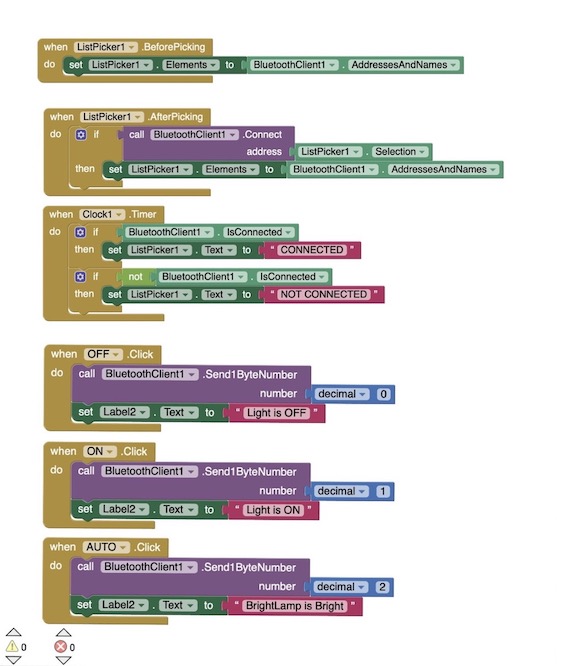
The goal for the final project has 2 aspects-
- Auto-mode= when it is dark outside (LDR sensor gets activated) and movement is sensed (doppler sensor gets activated), the LED glows for 3 seconds
- the lamp can be put on and off from the app irrespective the any condition described above
BluetoothSerial ESP_BT;

#define Sensor 13
#define LED 14
#define lightSensorPin 32
bool Detection = 0;
int lightSensorReading = 0;
int button = 0;


void setup() {
  Serial.begin(19200);
  ESP_BT.begin("ESP32_Control"); //Name of your Bluetooth interface -> will show up on your phone

  pinMode(Sensor,INPUT);
  pinMode(LED,OUTPUT);
  pinMode(lightSensorPin, INPUT);

}

void loop() {

  // --------- Receive Bluetooth signal --------
  if (ESP_BT.available())
    //Serial.print("current status:");
    //Serial.print(button);

  {
    incoming= ESP_BT.read(); //Read what we receive

    //incoming = 2;


    // separate button ID from button value -> button ID is 10, 20, 30, etc, value is 1 or 0

    button = incoming;
    Serial.print("new status:");
    Serial.print(button);
    if (incoming==0)
    {
        Serial.print("Button 1:");
        Serial.println(button);
        digitalWrite(LED, button);
    }

    else if(incoming==1)
    {
        Serial.print("Button 2:");
        Serial.println(button);
        digitalWrite(LED, button);
    }

    if(incoming==2)
    {
        Serial.print("Button 3:");
        Serial.println(button);
        Detection = digitalRead(Sensor);
        lightSensorReading = analogRead(lightSensorPin);
        Serial.println(lightSensorReading);

      if(lightSensorReading > 4000 && Detection== HIGH)

      {
          Serial.println("Motion detected !!");
          digitalWrite (LED, HIGH);
          delay(3000);
      }

      else
      {
        digitalWrite (LED, LOW);
        Serial.println("No motion detected");

      }
   }
  }
}
File for the final project program is here
3. App
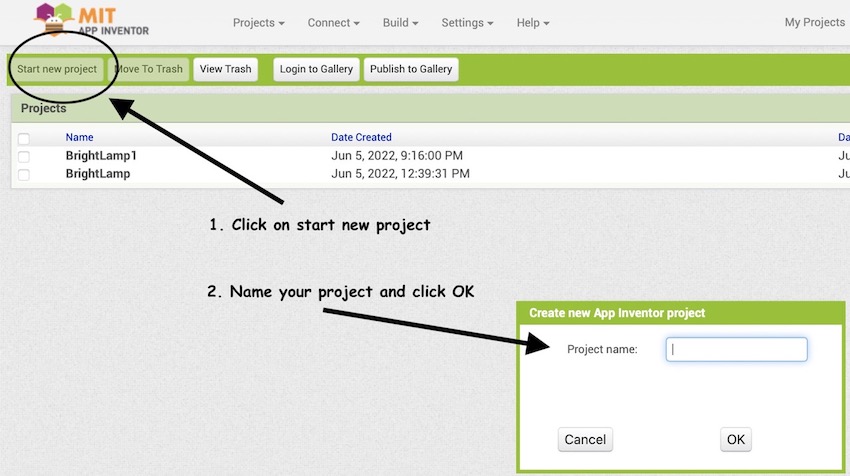
- I used the MIT app inventor to develop an app and its quite easy.
-
Click on start new project and name your project
-
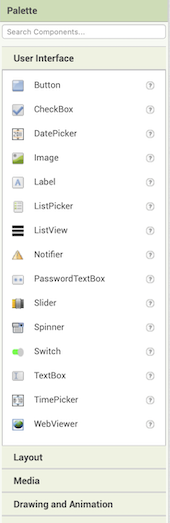
On the left hand side, you get the options to choose what you want in the app
-
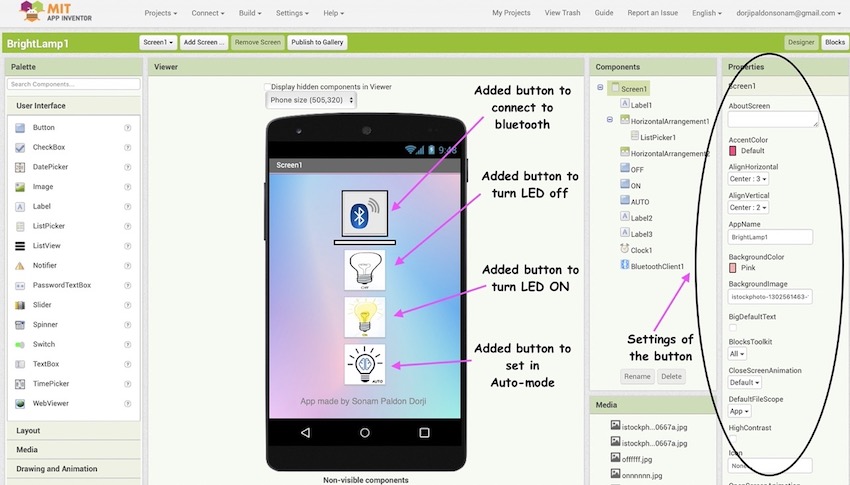
Added buttons and inserted image to the buttons
-
Click on buttons and give the conditions and results
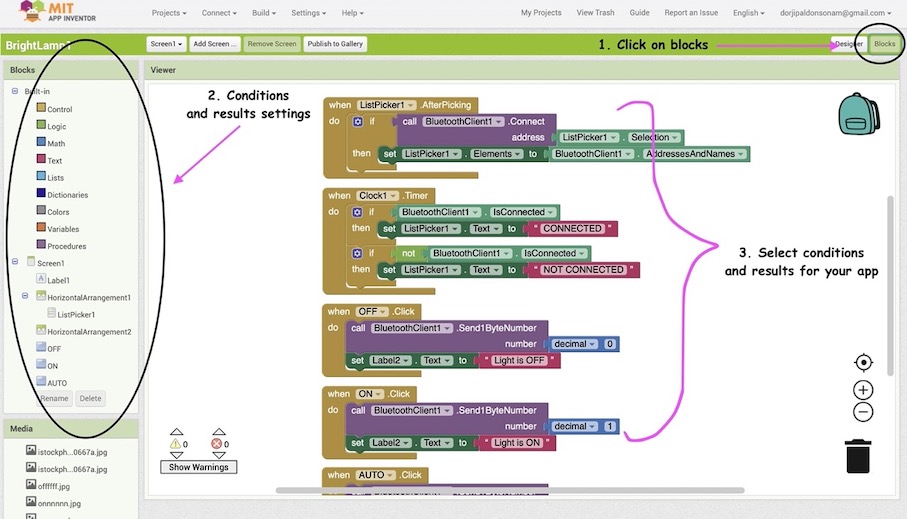
- The conditions and result for bright bright lamp
-
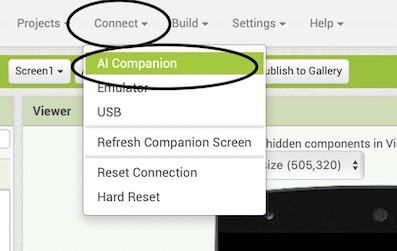
MIT app inventor can be connected to andriod phones only. To use the app in your phone, download the MIT app inventor app in your phone. From the Mac, click on connect-> AI companion and connect to the phone using the QR code that is generated from there.
The file for the app developed using MIT app inventor is here
4. Tensegrity table
-
To give some aesthetic to the lamp, I decided to use a tensegrity table as the base of the lamp.
-
I designed the table in the fusion360
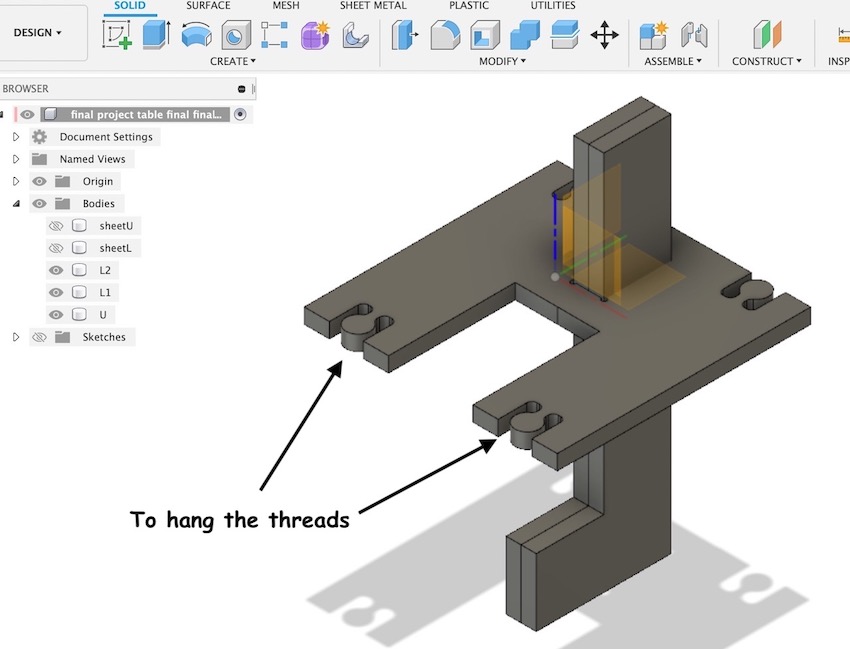
-
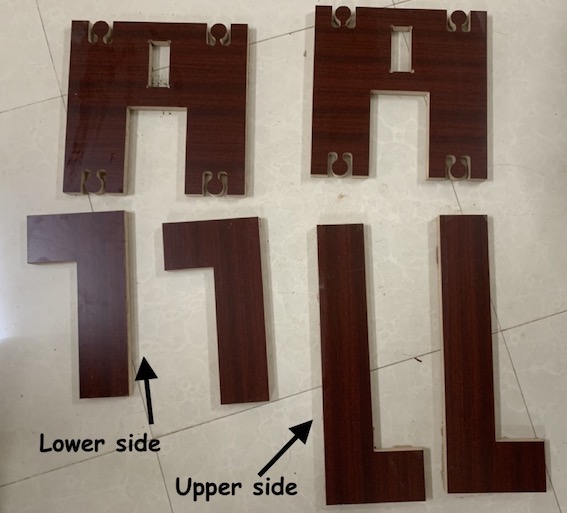
I cut the tensegrity table in the shopbot and the steps are documented in the Computer-Controlled Machining week.
-
Next, I wanted holes in the L-shape to hide the electronics components inside, so the lamp wont have wires hanging out and will look clean at the end.
Design files for tensegrity table is here
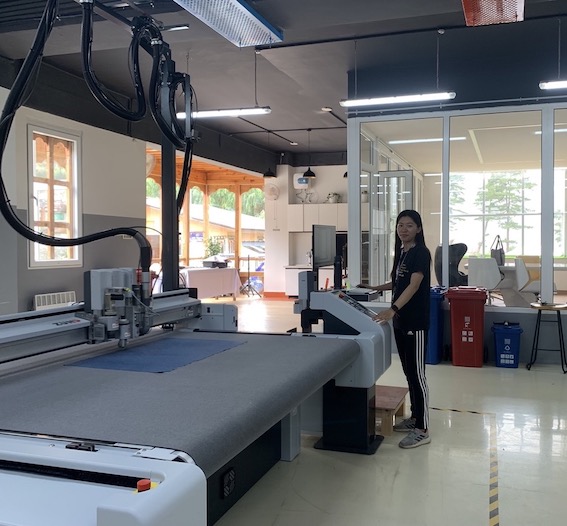
5. Lamp shade
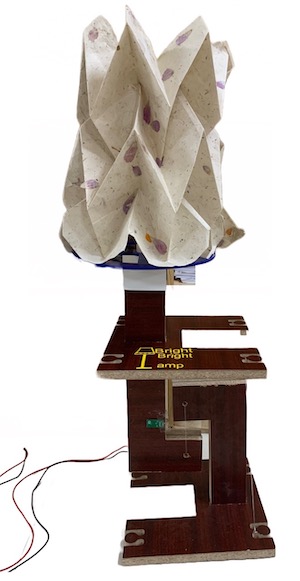
- I wanted to integrate a Bhutanese culture into the lamp shade, so I used desho paper which is of good quality and is sturdy also. Desho paper is a traditional paper made in Bhutan.

-
Using the MIT origami simulator, I chose miura-ori design which will look good on as a lampshade.
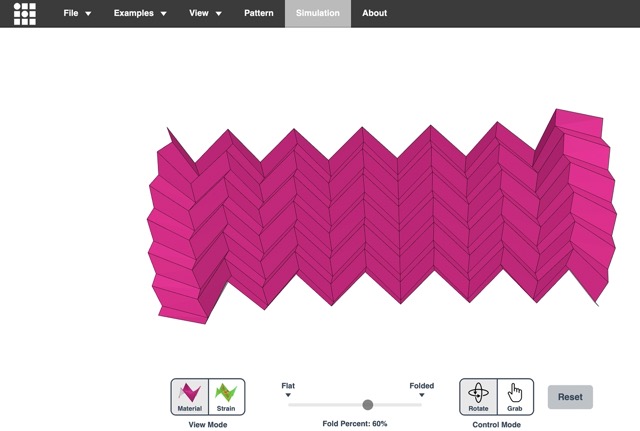
-
I used Zund to make the creases to make the valleys and mountains on the desho paper.
6. Bulb holder- holder
-
I needed something to join or hold the bulb holder and the tensegrity table together. So, I designed in Fusion360 and 3D printed.
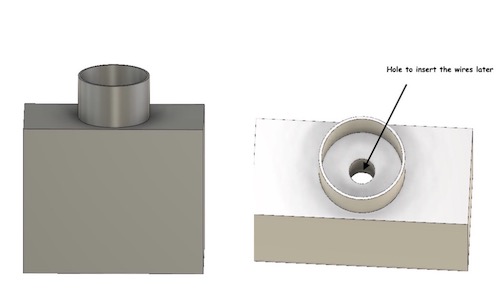
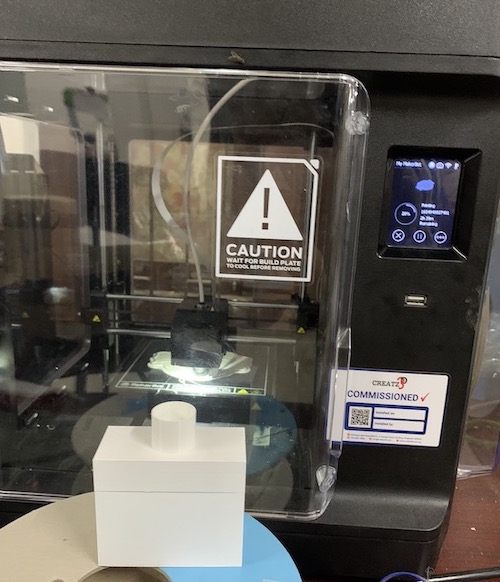
-
Integrating electronics board, tensegrity table and bulb holder
Design file for the bulb-holder is here
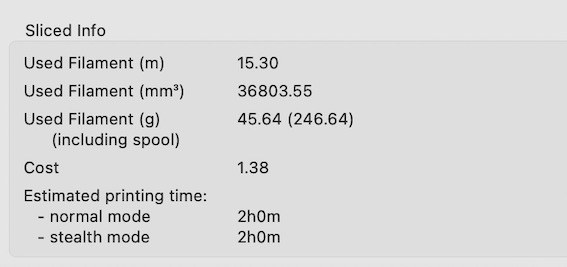
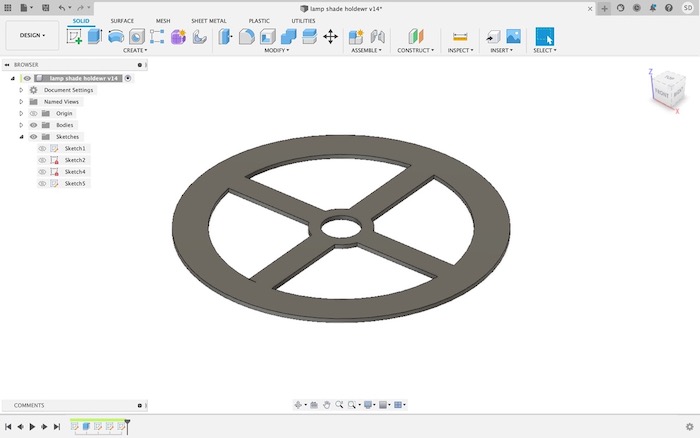
7. Lamp shade holder
-
I designed in fusion 360 and exported the file in stl format.
-
We have 2 different laser cutters in our lab. I used the epilog laser cutter during the Computer controlled cutting week and I opted for GCC laser pro laser cutter to laser cut this time.
-
To cut, go to file-> print-> choose T500-1.07-01 and click on print properties
-
Click on options and set the following parameters.
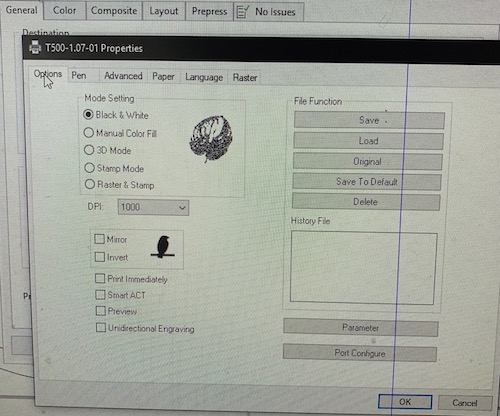
-
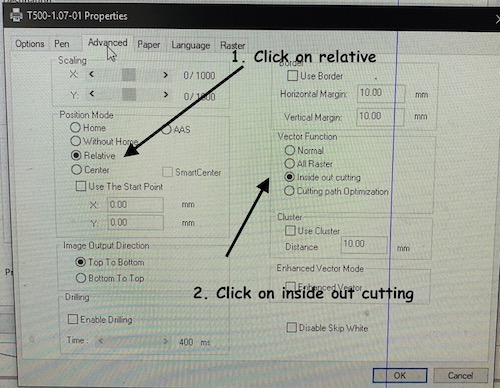
Then click on advanced and set the following parameters
-
The power, speed and PPI settings are given along with the machine depending on the material you use. the following setting is for acrylic material
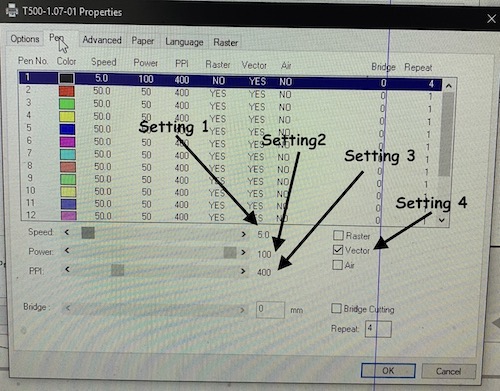
-
Click on okay and then give the print command. I cut the acrylic material 6 times to get a clean cut.
Design files for lamp shade holder in Fusion360 is here
8. Branding and logo
-
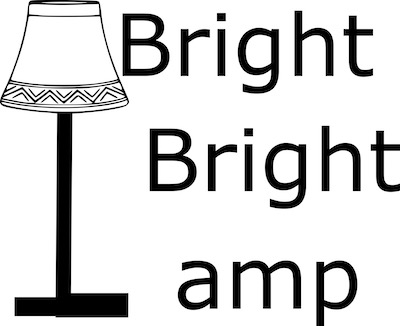
I needed a name for the product. What better name than to take the literal meaning. Thus, my final project will be called the Bright Bright lamp. The name is literally what the lamp function as . Firstly it is very bright as it can sense light intensity and motion and turn on and off the LED and secondly because the lamp is bright as it uses LED bulb.
-
I made a logo in inkscape and vinyl cut it
Design file for BrightBrightLamp in inkscape in svg format is here
FINAL- Integrating
Steps
-
First step is programming the board
-
Putting the electronics inside the tensegrity table
-
Assembling the tensegrity table using the fish thread
-
Placing the bulb holder on top of the tensegrity table
-
Placing the lamp shade holder on top of the bulb holder and inserting the bulb
-
Give the power supply to the bulb and the board and ENJOY!
Bill of material (BOM)
| Sl.no | Name | Source | Quantity | Price | Total |
|---|---|---|---|---|---|
| 1 | Desho paper | Local Market | 2 | $1.25 | $2.5 |
| 2 | Wires(red&black) | Local market | 2m | $0.5 | $1 |
| 3 | Bulb holder | Local market | 1 | $0.31 | $.31 |
| 4 | Bulb(LED) | Local market | 1 | $5 | $5 |
| 5 | Plug top | Local market | 1 | $0.56 | $0.56 |
| 6 | ESP32 Wroom32 | Fablab mandela | 1 | $4 | $4 |
| 7 | PCB - R10k SMD | Fablab Mandela | 2 | $ 0.05 | $0.1 |
| 8 | PCB - R1k SMD | Fablab Mandela | 2 | $ 0.05 | $ 0.1 |
| 9 | PCB - C0.1uF SMD | Fablab Mandela | 3 | $ 0.3 | $ 0.9 |
| 10 | PCB - Led SMD | Fablab Mandela | 2 | $ 0.2 | $ 0.4 |
| 11 | PCB - Connector strips SMD | Fablab Mandela | 1 | $ 1 | $ 1 |
| 12 | Voltage regulator- IC REG LINEAR 3.3V 1A SOT223 | Fablab mandela | 1 | $0.34 | $0.34 |
| 13 | Slide Switch SPDT Surface Mount, Right Angle | Fablab mandela | 1 | $0.92 | $0.92 |
| 14 | Tactile Switch SPST-NO Top Actuated Surface Mount | Fablab mandela | 1 | $0.92 | $0.92 |
| 15 | White PRO Series Tough PLA Filament - 1.75mm (1kg) | Fablab Mandela | 46g | $57/kg | $ 2.62 |
| TOTAL | $20.62 |
License
- Creative Commons is a global nonprofit organization that enables sharing and reuse of creativity and knowledge through free legal tools, with affiliates all over the world who help ensure our licenses work internationally and raise awareness about our work.
- The project is under the creative commons license.
Who's done what beforehand?
-
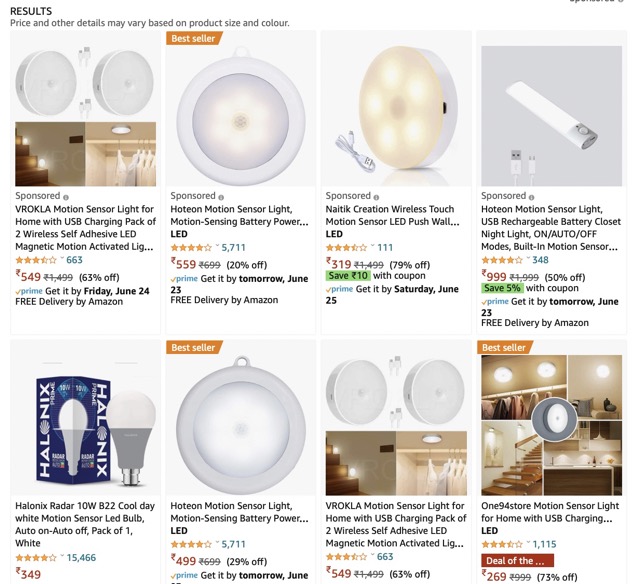
Motion sensor lamps are available in the markets which those are manufactured by the neighbouring countries. We don't have any motion sensor lamps that are manufactured in my country so far.
-
This is an example of the motion sensor lamps is displayed when I click on an indian shopping site
-
Since the fabacademy is an open source, I took the advantage of it and looked at the amazing works done by the previous graduates of fabacademy to get a kick-start at how should i proceed.
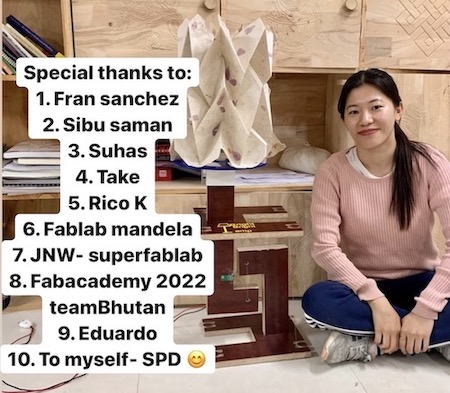
Acknowledgment
-
This project and the whole fab-academy would not be complete without them. So, a big shout-out and a thank you note to them to end my documentation. Thank you for everything.