Week 3- Computer controlled cutting
Introduction
- Hands-on training finally starts. This week we will be learning 2 machines- vinyl cutter and the laser cutter.
Assignments:
- Group assignment:
- characterize your laser cutter, making test part(s) that vary cutting settings and dimensions
- Individual assignment:
- cut something on the vinyl cutter
- design, lasercut and document a parametric press-fit construction kit
Group assignment
The group assignment is here
Vinyl cutter
-
A vinyl cutter is a type of computer-controlled machine. Vinyl cutting is the act of creating a design in a software program then sending that design through to a vinyl cutter, which will cut out the design using a blade on sheets of vinyl.
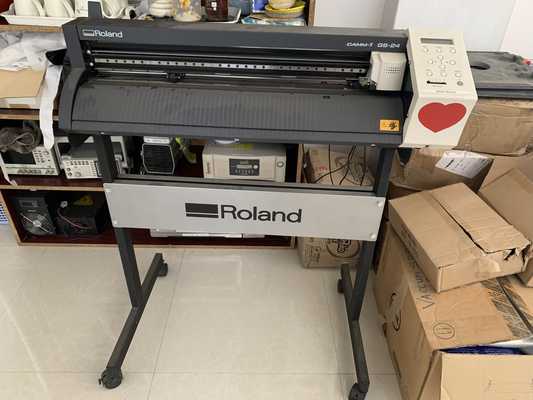
The machine: Roland CAMM-1 GS-24
Softwares: Inkscape and easy cut studio
-
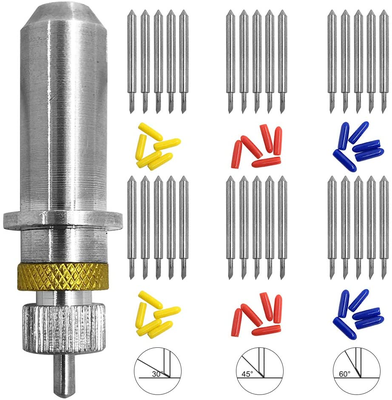
Our instructor, Mr.Take taught us about the blade of the vinyl cutter. Vinyl cutter depends on speed, force and angle depending on the material.
  -> 30° blade is used for very thin material
  -> 45° blade is used for general vinyl cutter
  -> 60° blade is suit for thick material like copper sheet, mirror sheet, sandblast resist sheet
Types of vinyl rolls
-
Rolls- Measures width. Origin on the left
-
Edge- Measures width. Origin on the bottom left
-
Piece- Measures width and length. Origin on the bottom left
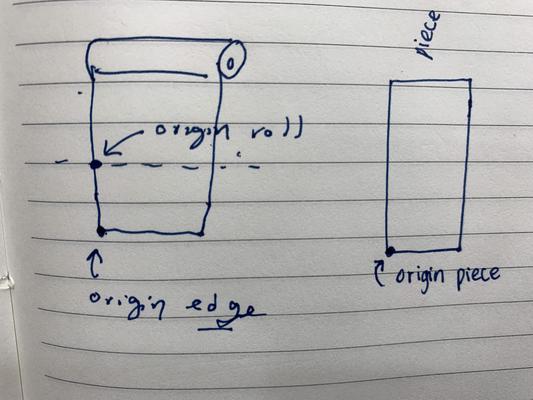
To set the origin
The origin will be set automatically when using edge and piece. In the case of rolls or when you want to set your own orgin, set to the desired spot (manually set the blade using up, down, right and left arrow) and hold the orgin button till it says origin set on the screen. Now the origin is set.
To load blade
The blades used in the vinyl cutter are 45 degrees which are for universal prupose. For finer details, blade with 60 degree angle is used.
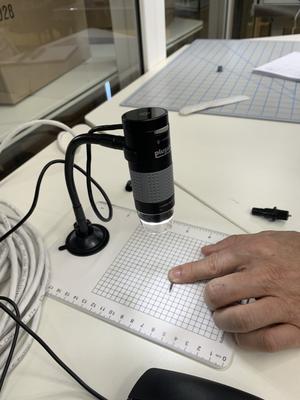
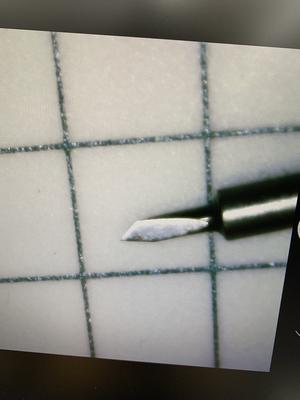
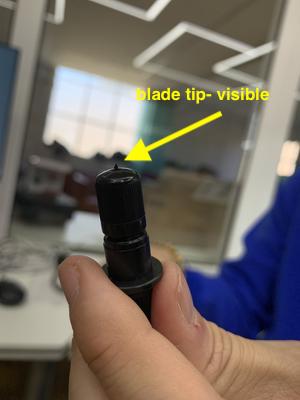
Inspect the Blade
-
Take out the blade.
-
Inspect the blade under the microscope.
-
If you can see the blade tip from the blade holder, then the blade is not fixed properly or the blade is broken
-
If you cant see the blade tip from the blade holder, then the blade is fixed properly
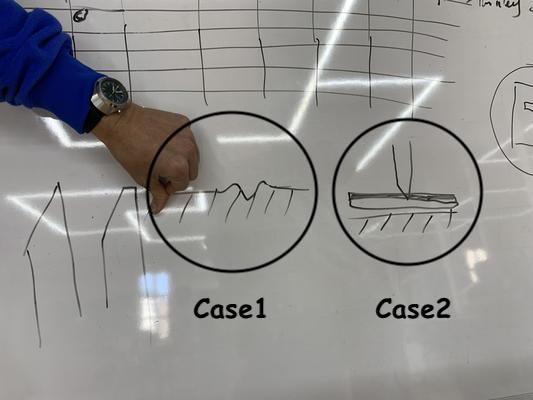
- Case1 (Wrong way): While cutting if the blade cuts through the vinyl and touches the surfaces, the blade will break.
- Case2 (Right way): While cutting, the blade should only cut the vinyl and not touch the surface.
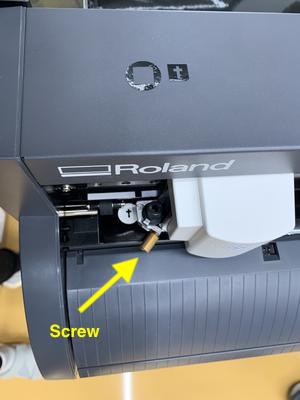
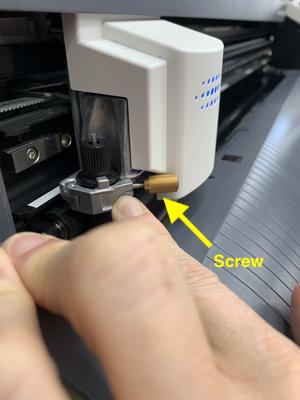
To load the blade
-
Put the blade in the bearing- its magnetic
-
Tigthen the screw
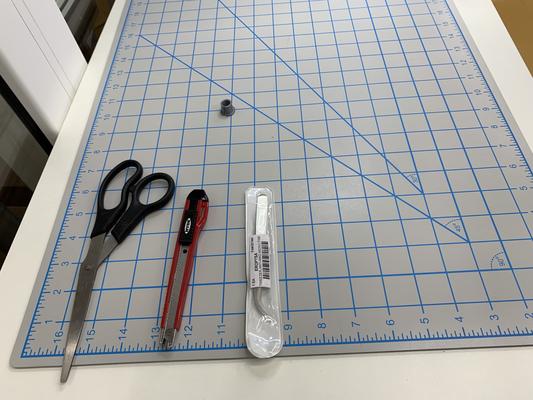
The vinyl cutter table
Make sure to always keep the following on the table
-
Tweezers
-
Scissors
-
A magnifying glass
-
Blade
Testing
-
For test printing, press and hold on test
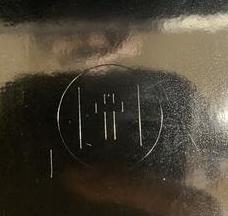
-
First take out the circle sticker
-
Then take out the square sticker
-
Then take out the cross sticker
-
Make sure to check if the backing paper is not cut through
-
To adjust the blade, take out the blade from the bearing and turn clockwise or anti-clockwise one mark at a time.

Ways to print
Using windows
-
Using Cut studio
File-> Cutting setup-> Media size-> cutting area-> get from machine Click on cutting to start
-
From inkscape
Extensions-> Roland cutstudio-> Open in cutstudio -> Cutting-> change-> media size- Change.
Using Linux
-
Install mods (have to do this step once only while setting up)
Open mods-> right click-> option-> view mods CE project-> clone (clone using the HTTPS)
-
Terminal
Open terminal-> cd mods-> ./install-mods
-
Mods
- Right click
- programs
- open program
- Roland GX-GS 24 vinyl cutters -Cut
- Read png-select png file
- Roland GX-GS 24 relative -> can set origin, force and speed
- cut raster-> calculate
- websocket device-> send to device
- OR websocket print-> select your printer
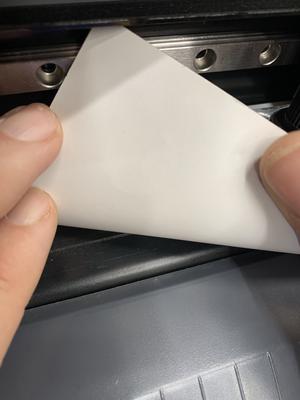
Vinyl cutting a sticker
-
I designed the image using inkscape and vectorized the image and saved in plain svg file.


-
Using cut studio, to print
-
Power on the machine
-
Release the lock on the top-left of the machine
-
Insert Vinyl
-
Ensure that the vinyl holder rollers are both within any two white Stickers
-
Clamp on the lock on the top-left
-
On the control panel, select the type (roll,sheet,edge) and hit entire
-
Open cutstudio.
-
Go to file-> cutting setup
-
Set the setting to “from machine”
-
Import your file
-
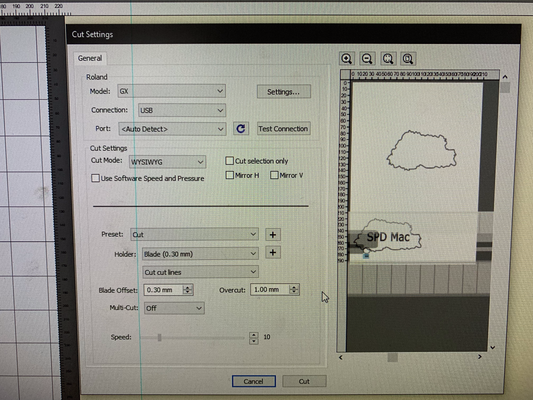
Check machine settings, for the current case I used cutting Force 30 gF, speed 20cm/sec and blade cutter with an cutting angle of 45degree.
-
Go to file and click cut
-
-
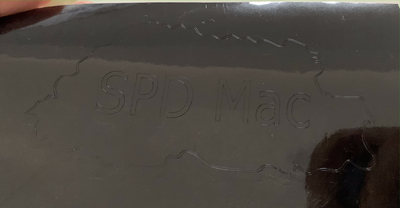
From the vinyl cutter, this is the output.
-
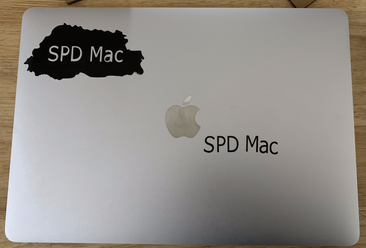
After removing the unwanted parts using tweezers, this is the final product which I have used as a sticker on my laptop. Use transfer roll to place your sticker.
Design files:
Laser cutter
What is a laser cutter?
-
A laser cutter is a type of CNC (Computer Numerical Controlled) machine, that is it is controlled by a computer. A maker can design their ideas on the digital software and send it to the laser cutter to be cut. Once the laser cutter receives the file, the machine uses a laser beam to cut into or etch into the material on the cutting bed.Laser cutters create patterns and designs by cutting into materials. A powerful laser beam is the source that melts, burns, or vaporizes the material. Common laser cutters are primarily used to cut materials like wood, acrylic, cardboard, paper and etc
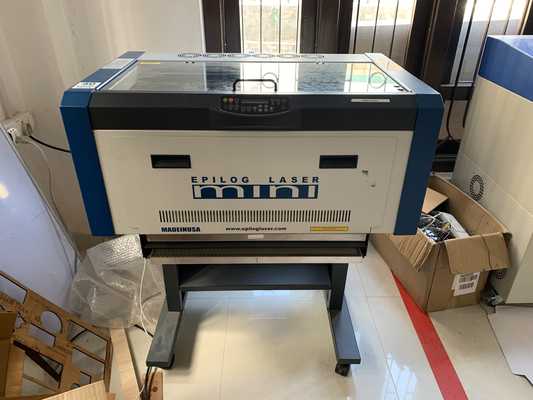
The machine: Epilog laser
Softwares: CorelDraw, DXF for laser, Fusion360
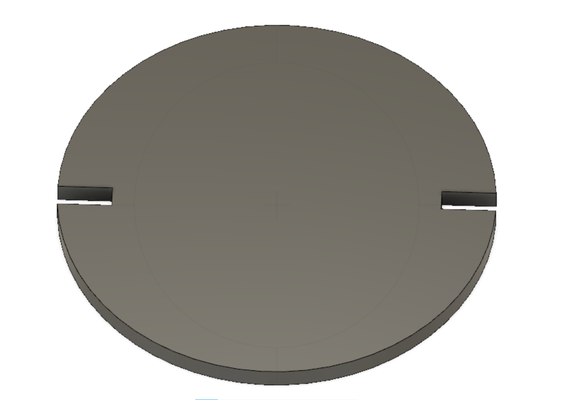
1. Designing a parametric press-fit construction kit
-
This week we have to create a parametric press-fit construction. I drew a rectangular and a circular cubes that can be taken apart and assembled in multiple ways. I used the finger joint and press fit joint on the cubes. A finger joint, also known as a comb joint, is a woodworking joint made by cutting a set of complementary, interlocking profiles in two pieces of wood, which are then glued. The cross-section of the joint resembles the interlocking of fingers between two hands, hence the name "finger joint".
-
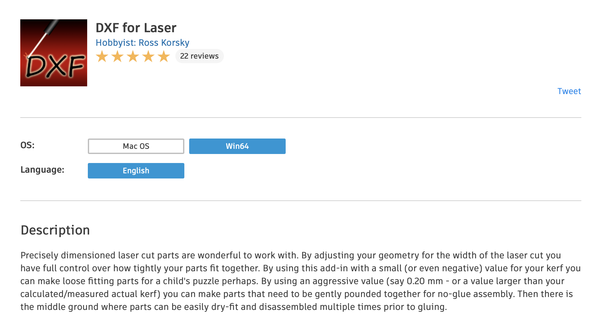
I referred to many tutorials on youtube on how to draw parametric press-fit constructions. I even went to fabacademy graduates websites and checked the softwares they used. The particular software which I came across and thought was useful was DXF for laser for fusion 360. This plugin can be found in the Fusion 360 app store. This plugin will generate a Kerf (laser cut width) compensated DXF file to produce laser cut parts with dimensions that match my drawing geometry. In other words, this plugin allowed me to export my sketch into DXF and to take the Kerf into account at the same time.
-
First i added some parameters for making my design parametric

-
In Fusion 360, it is advantageous to set parameters to create basic shapes. Setting parameters is an extra step that speeds up the design process. If I want to change the diameter of all the circles in your design, or increase the width of a box by a third, i can just change the value in the parameter.

-
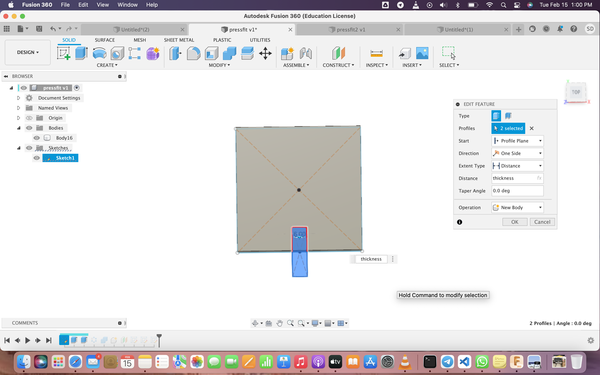
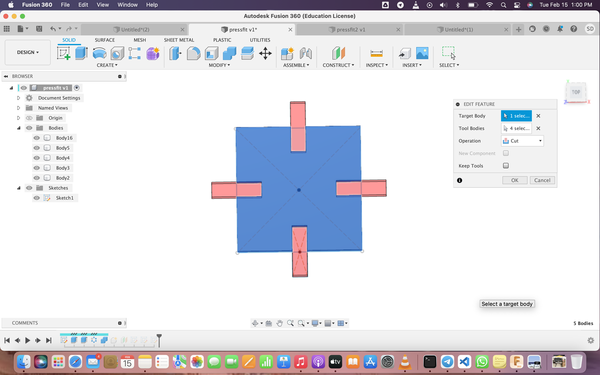
After creating a rectangle, i clicked on create-> central rectangle and extruded the fingers as body1

-
For the circular pattern, choose the type of the finger as body and on z-axis and i chose 4 quantities since I wanted a finger on each side of the rectangle.
-
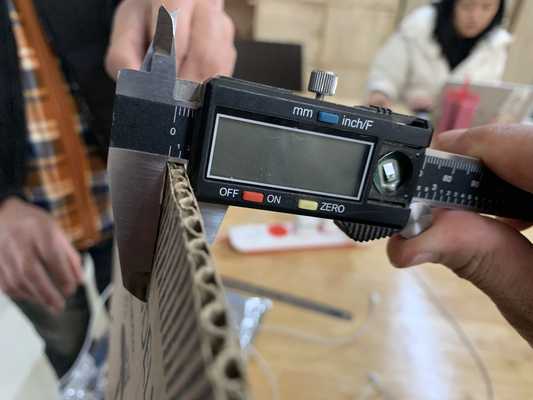
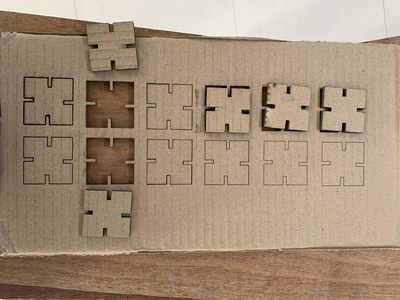
To find the thickness of the material, measure using a vernier caliper. The thickness of the cardboard that I used to make press-fit construction was 4mm.
Laser cutter in action
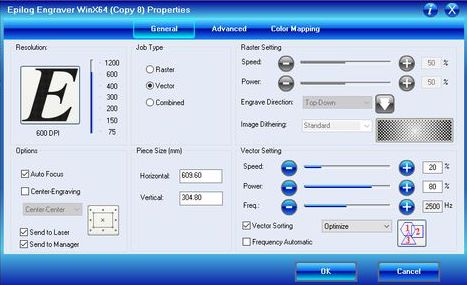
- From the group assignments, I learnt how to set different settings for power and speed for different materials. Since I used a cardboard, I used the following settings
- Power : 70% to 80% The higher the power, more materials around the slot is cut, Kerf increases
- Speed : 20 to 30% Lowering the speed and Power improves the cut but not beyond 60% as it won’t cut the material entirely.
- Frequency: 2500Hz
- Focus: Auto
-
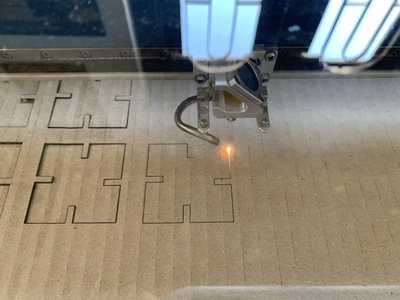
Put on the machine
-
Insert the cardboard in the laser cutter. Remember to put on the exhaust fan while laser cutter is running
-
Open your file in the corelDraw
-
Click on print, select the pritner and click on preferences

-
Put the settings as per requirement
-
Press "X/Y Off" button to set a new home/origin. Set home in the laser cutter and click go button on the laser cutter.
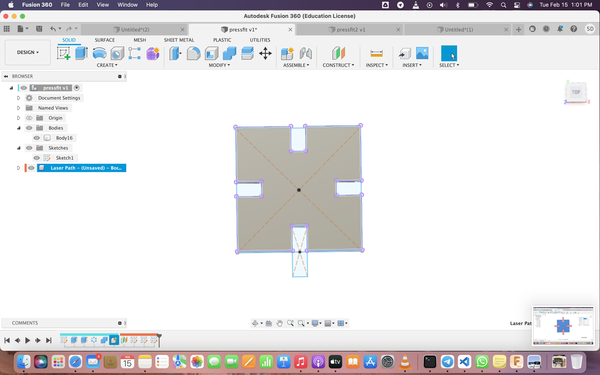
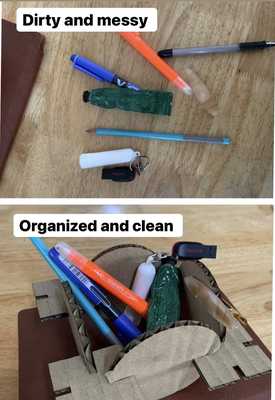
Press-fit construction parametric design after cutting
Final product
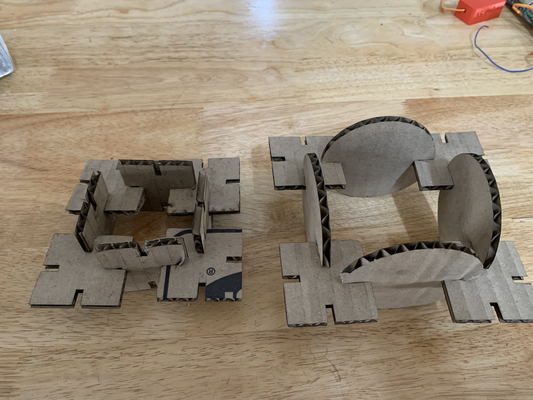
We can use this design to organize the things on the table and to keep it clean
Design files: