Week 5; 3D-printing and scanning
This week is all about 3D-printing and scanning, 3D-printing is a method that is not taking material away but is adding material in slices, which is a great method to make objects that would be impossible to make form one piece using more traditional methods. But, of course there are also quite some restrictions.
Wednesday Global Class
The basics about 3D-printing.
It started with the explanation of the limits of the process and how to test that.
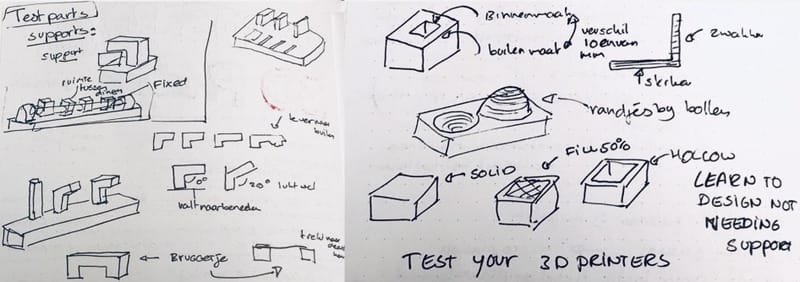 Important is of course the accuracy of the printer. There are options with different materials (PLA, ABS, PETG PMMA, HiPS). It is important to understand slicing an object.
Slicing
In order to send an object to the printer, first it is exported out of the 3D-CAD software. (as for example a STL file) and then it is imported in the slicer-software this software will slice the object in horizotal layers that will be printed from bottom to top. It exports the model in a .Gcode file which the printer can read and use.
after this class I was quite confused, but looking at: rafts-skirts-and-brims I learned a lot about the different unknown things.
Weekly Assignment
In my own words
Group assignment:
- Test the printer by sending different test-objects to it. and evaluate what the possibilities are. Individual assignments:
- design and print something on a 3D-printer that is hard to make on a machine which will cut away the material. The object can be a few cm3, so there is time to print it all.
- scan something with one of the scanner-tools.
Planning this week
Due to Corona, we have to split up the group in halves to work in the Waag, I am scheduled to be there on thursday (instruction and group assignment) and on monday and tuesday, the afternoons. I work on monday-morning, tuesday-morning and friday, so it is quite a tight schedule. I made my planning around this schedule.
| Day | Lesson | subject/activity | activities |
|---|---|---|---|
| Wednesday | global class | make this plan | |
| Thursday | local class explanation of the 3D-printers | group assignment 3D-printer-test | |
| Friday | 'work' for my work | build model | |
| Saturday | global open time | build model | |
| Sunday | work on documentation | finish model | family-time |
| Monday | afternoon local Fab time | get my first 3D-print | see what goes well |
| Tuesday | afternoon local Fab time | Try out different options with the print | Documentation |
| Wednesday | presentations | ready to present | fix last things |
3d printer instruction
Henk explained about 3D-printing: "It makes plastic Rubbish and it takes long" Then he explained about the Filaments, the different printers and the different slicing software that is used at Waag. There is a Prua I3-MK3S+ (using PrusaSlicer) And a Ultimaker 2+ (using Ultimaker Cura)
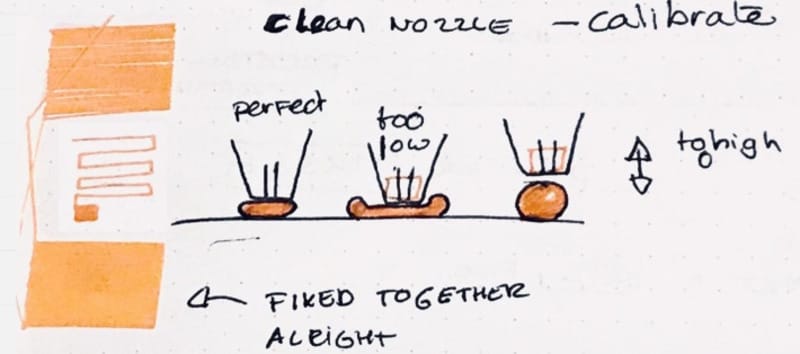
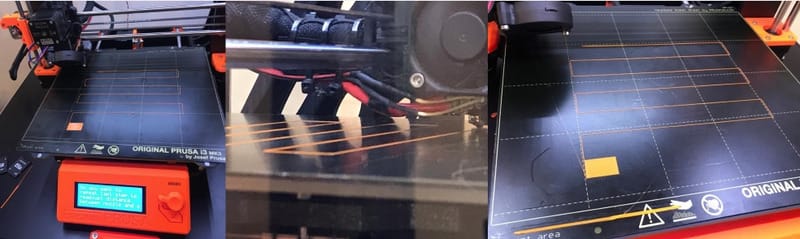
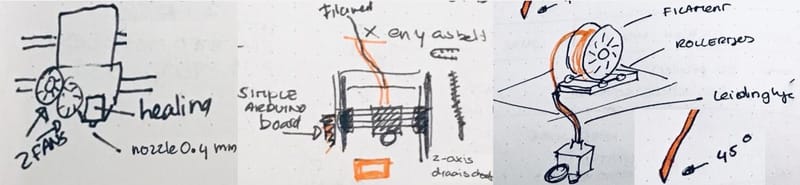 The Bed needs to be clean and calibrated, the Prusa can run a Wizard to Calibrate it. There is a 'pinda' to automatically calibrate the Z-axis, but during calibration we found that it is way to high and should be at around -1,000 mm lower. The Adjustment of the bed is very important, because it is the base of the model that is made here and if that is not done right, it wil not stick to the bed properly and that way it will end up in a lot of plastic spaghetti.
The filament (1,75 for the Prusa, larger for the Ultimaker) should always be cut at a 45 degree angle, so it is nice and clean and will fit through all the openings easily.
The Bed needs to be clean and calibrated, the Prusa can run a Wizard to Calibrate it. There is a 'pinda' to automatically calibrate the Z-axis, but during calibration we found that it is way to high and should be at around -1,000 mm lower. The Adjustment of the bed is very important, because it is the base of the model that is made here and if that is not done right, it wil not stick to the bed properly and that way it will end up in a lot of plastic spaghetti.
The filament (1,75 for the Prusa, larger for the Ultimaker) should always be cut at a 45 degree angle, so it is nice and clean and will fit through all the openings easily.
 Filament should always be kept airtight because it is vulnerable for humidity. So at the end of the day all the machines should be emptied from the filament and turned off.
If everything is calibrated, adjusted, cleaned and filled it is time to put an SD-card in the machine with the model in Gcode.

Group assignment
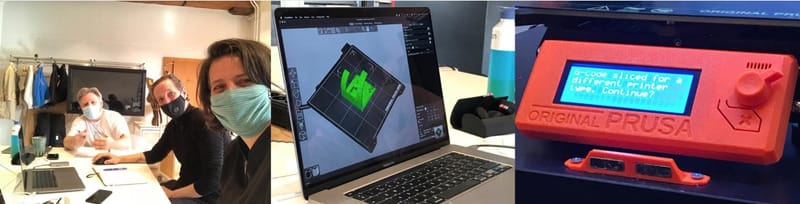
For the group assignment we were with 5 people and split up in two groups. I worked with Phil and Loes and we used the Prusa, while Douwe and Paula used the Ultimaker. We chose a testing-object, we found that 'Marian Tripka's 3D-printer-test-mini' would test a lot of things, had good imprints on the test-object and was a lot quicker that the other ones.
We used the Prusa-slicer to set up the model, using 100% infill (for testing purposes) No brim, accidentaly we did use a skirt, but that did not really matter and we made the Gcode-file.
 We put it in the Prusa, had to recalibrate, found after 5 rounds (-0.150, -0.700, -1.000 and -0.850) that -1.000 would do the trick and started printing.
 The test-print came out fine, which is sad, because it did everything that we tested. the overhang was not so nice anymore at the bottom of the 70 degree setting and really ugly at the 80 degree settings.
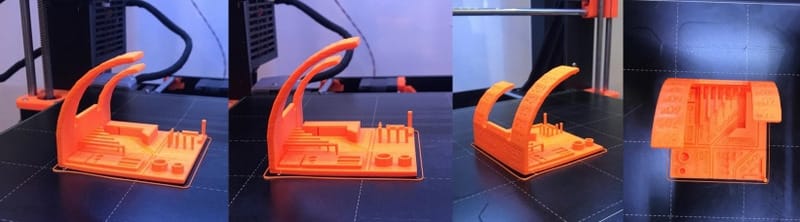 It could do the bridging up to 25 mm, but there was no higher value that failed, so it could even be better.
Comparing the tests
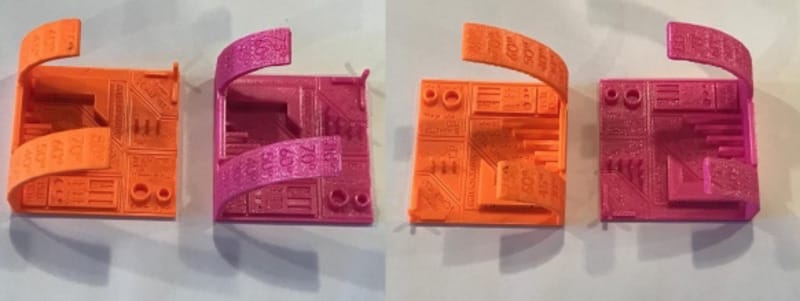
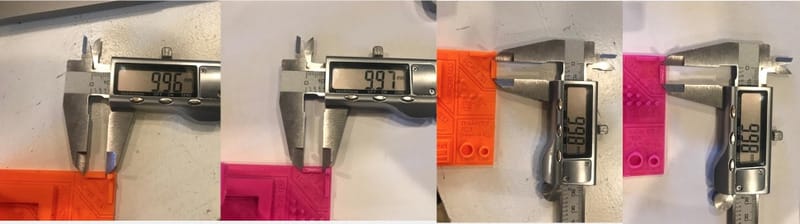
the fridaygroup did the same object on the Ultimaker in Pink, and so on monday I could do some real measurements and comparison. I noticed that the Ultimaker made the work more shiny and I don't know the exact settings that the group used on friday, but it seemed that it was less precise.
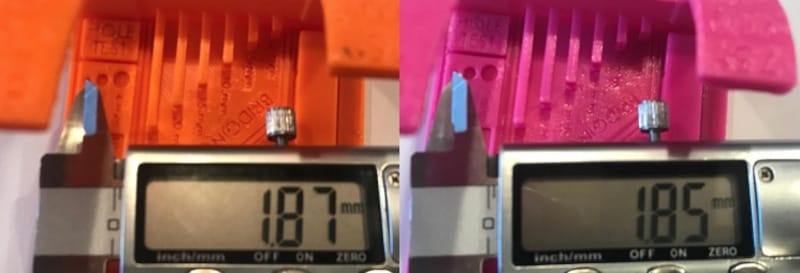
 the 2 mm hole was really a lot smaller. The difference between the 2 printers was not very clear. It was hard to measure, because it is under the overhang and you need to measure inside the hole. but I did manage. (in the images the right measurement is on the screen, but only pointing to the hole, because it was impossible to measure and photograph at the same time)
 the cylinders on the board had quite a difference, the Prusa made it actually a bit smaller and the Ultimaker (pink) made it larger

X and Y axis
there was not a lot of difference in the 10 mm bar in the x and Y direction
Individual assignments
Design and print something that is not easily made with a retractive process
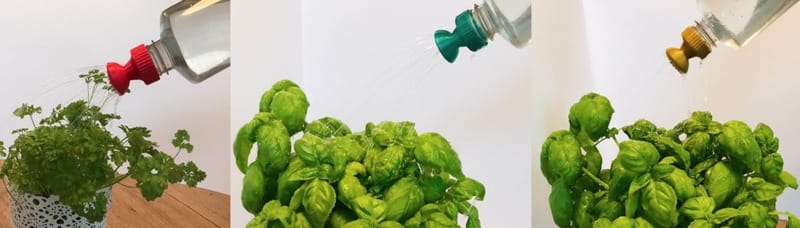
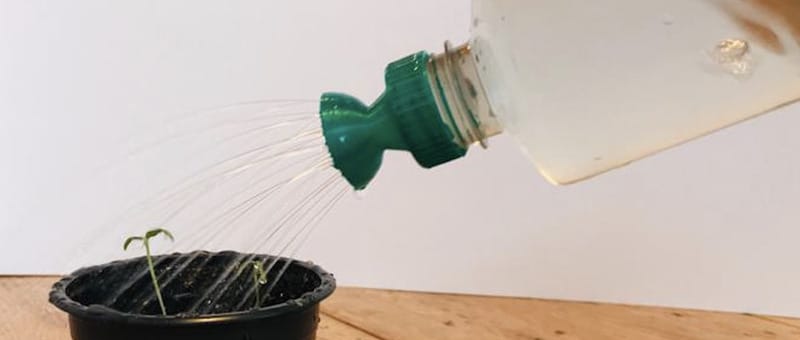
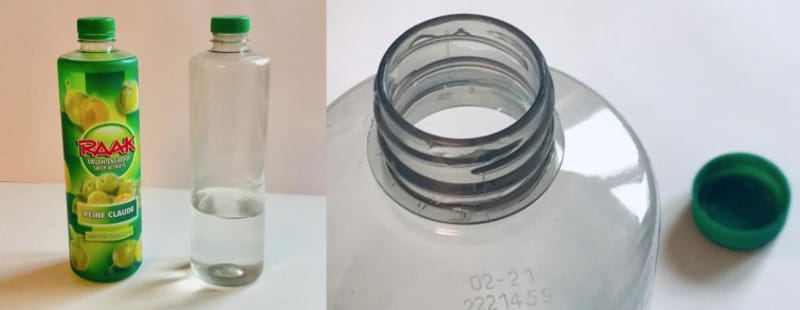 For this I walked around my house and thought of changing a lemonade-sirup bottle into a 'gietertje', a watering can with a funnel and a 'rose' (the front part of the watering-can that turns the waterjet into a gentle shower) for my tiny plant-seedlings that I grow for my garden.
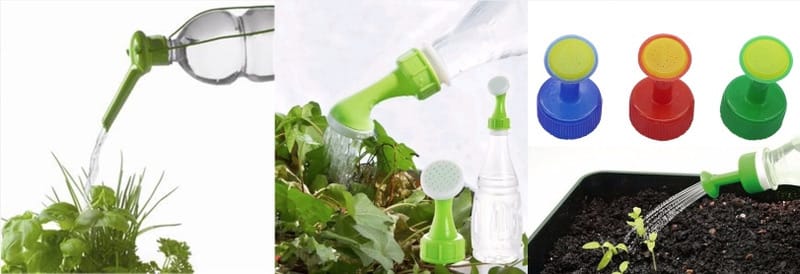 Inspiration for this came form the local plant store where I saw such a watering-rose last year, but thought it was ugly and way to expensive.
measurements
What I need is a bottle-cap with the right thread on the inside so it will fit the empty sirup-bottle. The top of the cap will have a hole so the water can go through and on top of that comes the miniature funnel with the rose.
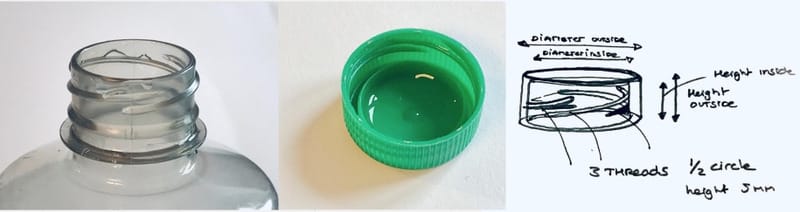
With my caliper I measured the bottle and the original cap and made drawings with that on paper with pen.
fusion 360
To make the thread I first wanted to use grabcad and see how they did that, but looking at different threads I found someone on Grabcad that made his model using a tutorial by Heine Ravnholt.
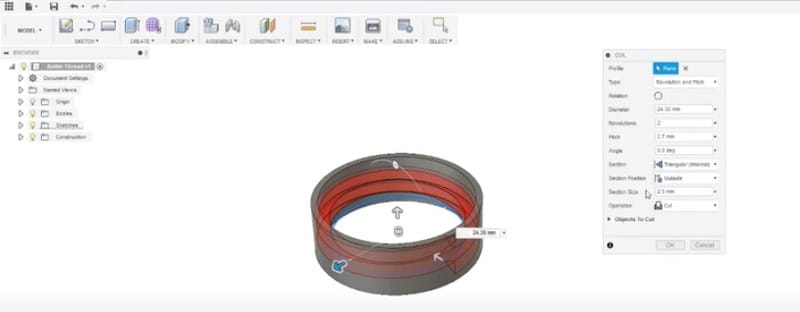
What I thought was really difficult was actually good to work with, so I sat at my computer, with my bottle and caliper and was nicely making my own thread.
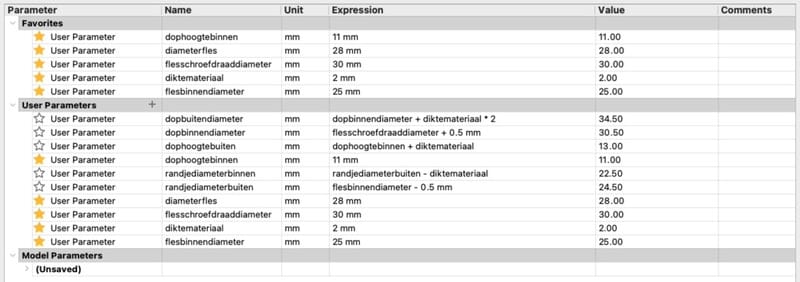
 Once I got that figured out I could also think of how to make it parametric and I remeasured everything and started a new model.
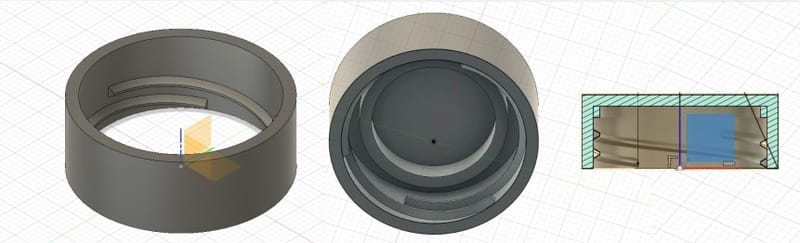
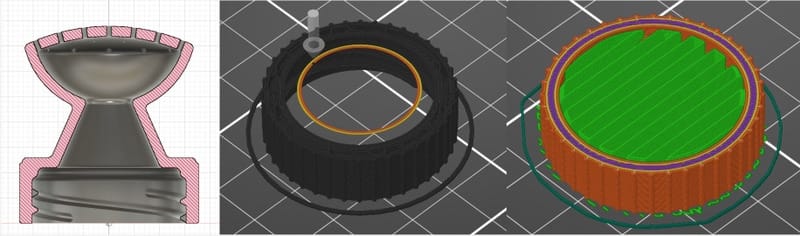
 With all the parameters ready I followed the steps of the tutorial again and had a nice bottle-cap. A niece copy of the real cap, although it could not work, as you can see on the middle drawing the cap is made watertight with an extra rim sticking down from the top. I have to remove that, because it cannot be printed. Instead of that I made a rim in the top corner that would be snug-fit with the bottle and hope that that makes is waterproof. (see the right drawing)
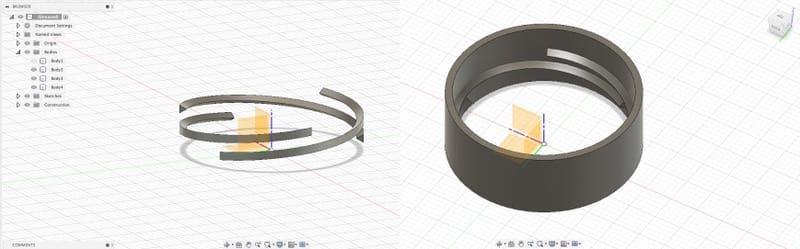
 After that the funnel-part. I needed some more info on revolving multiple objects, but it worked out fine. I used the existing parameters so everything is based on the bottle-diameter and the cap-height. This way the material-thickness can still vary without the design getting in trouble.
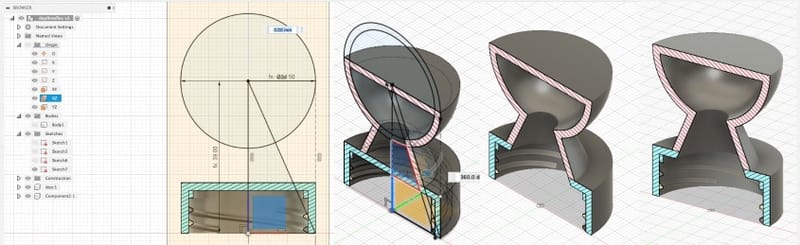
I got stuck with the top and trying to make the holes in it, I walked to the garden and found that a real 'rose' is part of a globe in stead of the flat top that I had made. Logical, because that way the water will spread like a shower. But not very easy to construct.
So I needed a new design and while looking for tutorials on spreading holes evenly I found information on patterns in Fusion360 and a great tutorial of making a golf-ball by Lars Christensen, with all the dents in it, that was really helpful.
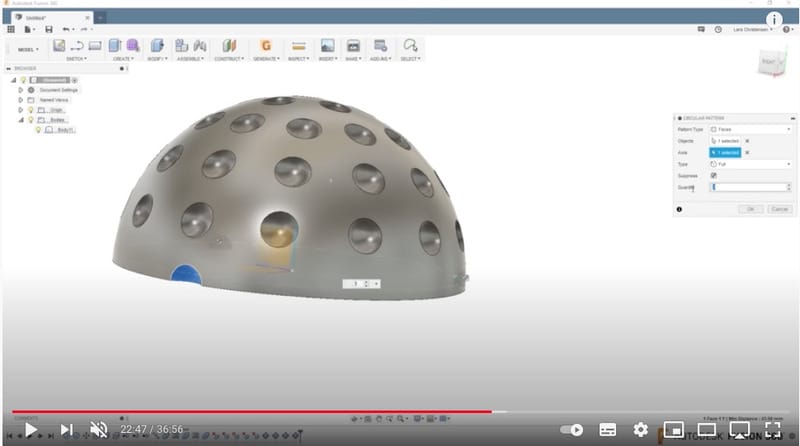
I used cylinders for making the holes instead of globes and made the origin of all cylinders and the globe in the origin of the drawing and made them 1,5 times the material-thickness , that way everything would stay parametric.
Saturday open time
So, I was all happy and asked the people at open time about the right wallthickness and about ways to make these 3D-printed things watertight. they gave me a lot of inspiration with which I could test this week:
- Use ABS and acetone to improve the walls, the ABS will flow and that way small gaps will close itself. It will weld the layers.
- use only three layer thick material and do a 100% fill, that way it does not make a mesh in the middle but will make a nicely filled wall.
- use a thick layer setting (layerheight 0,3 with a 0,4 nozzle), that way the plastic will heat up the previous layer and make a better connection.
- think of PETG, that is better watertight and foodsafe. Thank you Dan, Adrian, Pablo, and Rico, for all this great suggestions. I did play around with these.
I also learned about printer maintanance:
- always cool down fully until turning the printer of, else there is a chance of a clog just behind the printerhead, which is hard to get out. With that the printer will make a tikking sound.
- check the PTFE-tube and the connection of that with the printer-head regularly.
- the printerhead should be wel tightened so the filament is not coming out the wrong way.
Sunday
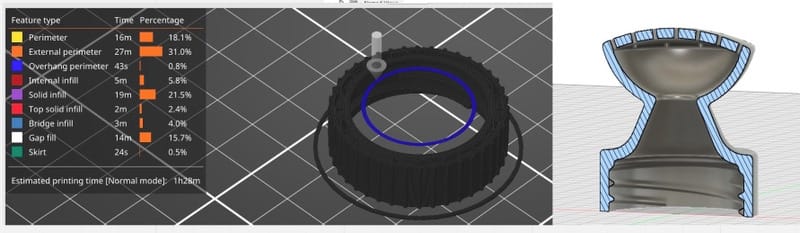
Thanks to Douwe, who said on sunday that he put his part in the slicer and it took way too long I realized that I could test in a slicer as well. so I downloaded Prusa-slicer and found that my model would tak 1 hour and 20 minutes. that looked fine. It is wonderful to look at all the layers that it makes and even the path that the printerhead will follow. But looking at the tricky parts I found that the Prusa-slicer would not make bridges, but would start making circles of plastic in mid-air. Of course, we learned about this in the group assignment. the 3D-printer cannot print horizontally, the maximum is about65-70 degrees. Hmmmmm how to fix this.
Using Support material would be very difficult to remove, especially to keep it nice and smooth fitting with the bottle and watertight. A part of the problem is in the top, above the funnel-part, there is would be impossible to remove.
 I tried adjusting the fillet on the top of the bottle-cap and after several tries the slicer would connect all the layers well enough and I would need no support there.
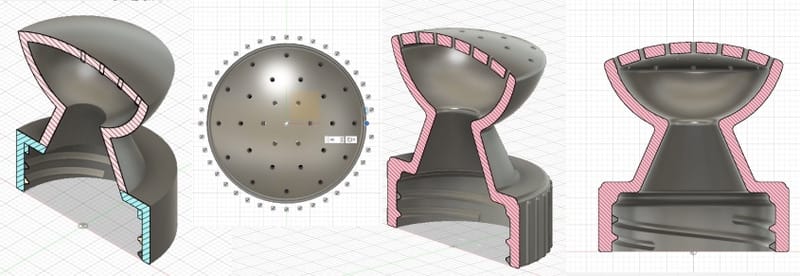
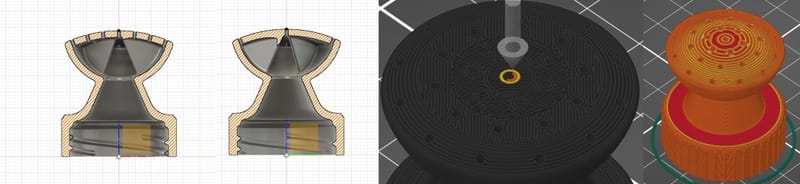
But the top part is a different case. Without making concessions to the design on the outside I have to make a solution on the inside. I thought of extra circles around the middle-hole, but that would only lower the problem. If I make it too full then the water cannot get to all the holes. I thought that a few small pillars would do the trick. they are connecting the part right next to the top-hole with the almost horizontal part next to the bottom-hole.

It would only partly solve the problem. The very top now seemed connected, but parts next to it only connected to air.
Instead I made these three ribs in the top-part. That way on every level there is something to bridge to and the water can flow freely around the ribs. Only problem is that my nicely spread holes make it hard to find a place where the ribs can be situated. turning them 20 degrees from the X-axis solved that problem. I made 3 ribs with fillets on every edge. It really looks nice.
I was all ready with my Gietertje set in Prusa-slicer for the Prusa-printer. The settings are for PLA (215 degrees celcius nozzle heat and 60 degree bed-heat, speed 100%) with a layerthickness of 0,2 mm (nice and quick), 100% infill (I need it to be waterproof) and no support material. I saved the G-code and was ready to print on monday
Monday Waag-time.
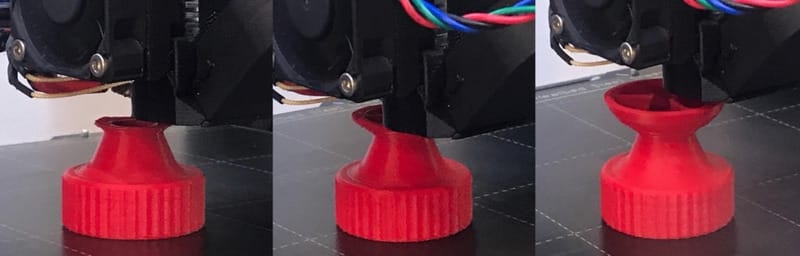
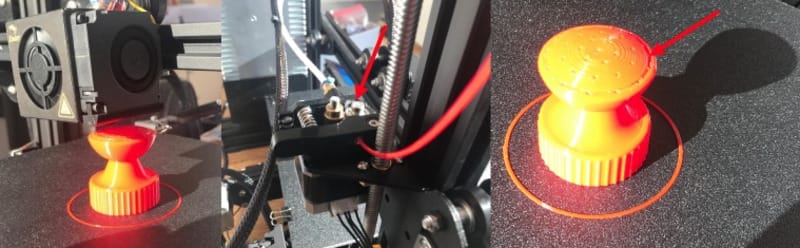
So all set and ready to print I went to Waag. There it was quite busy so I had to wait for a while until it was my turn, I had some trouble getting the the stuff on the SD-card, but then it went and took 1,5 hour to print. I thought I make my documentation meanwhile, but I was fascinated by the process and the way you can look inside your own product. So I actually spend 1,5 hours staring at my 'gietertje' being printed.
 Halfway it did have some trouble making the inside of the cap, you can see the threads in the right picture.
Halfway I thought, it is great like this also, I can use my bottle as a 'poffertjes-fles' to make Dutch miniature pancakes. The top part with the 3 ribs worked really well.
Halfway it did have some trouble making the inside of the cap, you can see the threads in the right picture.
Halfway I thought, it is great like this also, I can use my bottle as a 'poffertjes-fles' to make Dutch miniature pancakes. The top part with the 3 ribs worked really well.
Scanning part 1
I did find some time to try the scanner 'Sense 3D'. It is connected with usb to a local computer and comes with its own software and I tried everything with the standard-settings.
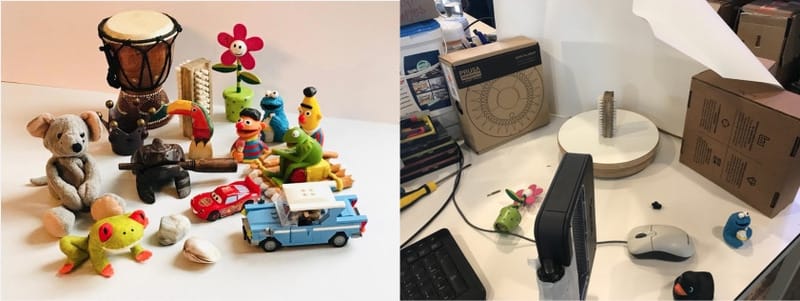
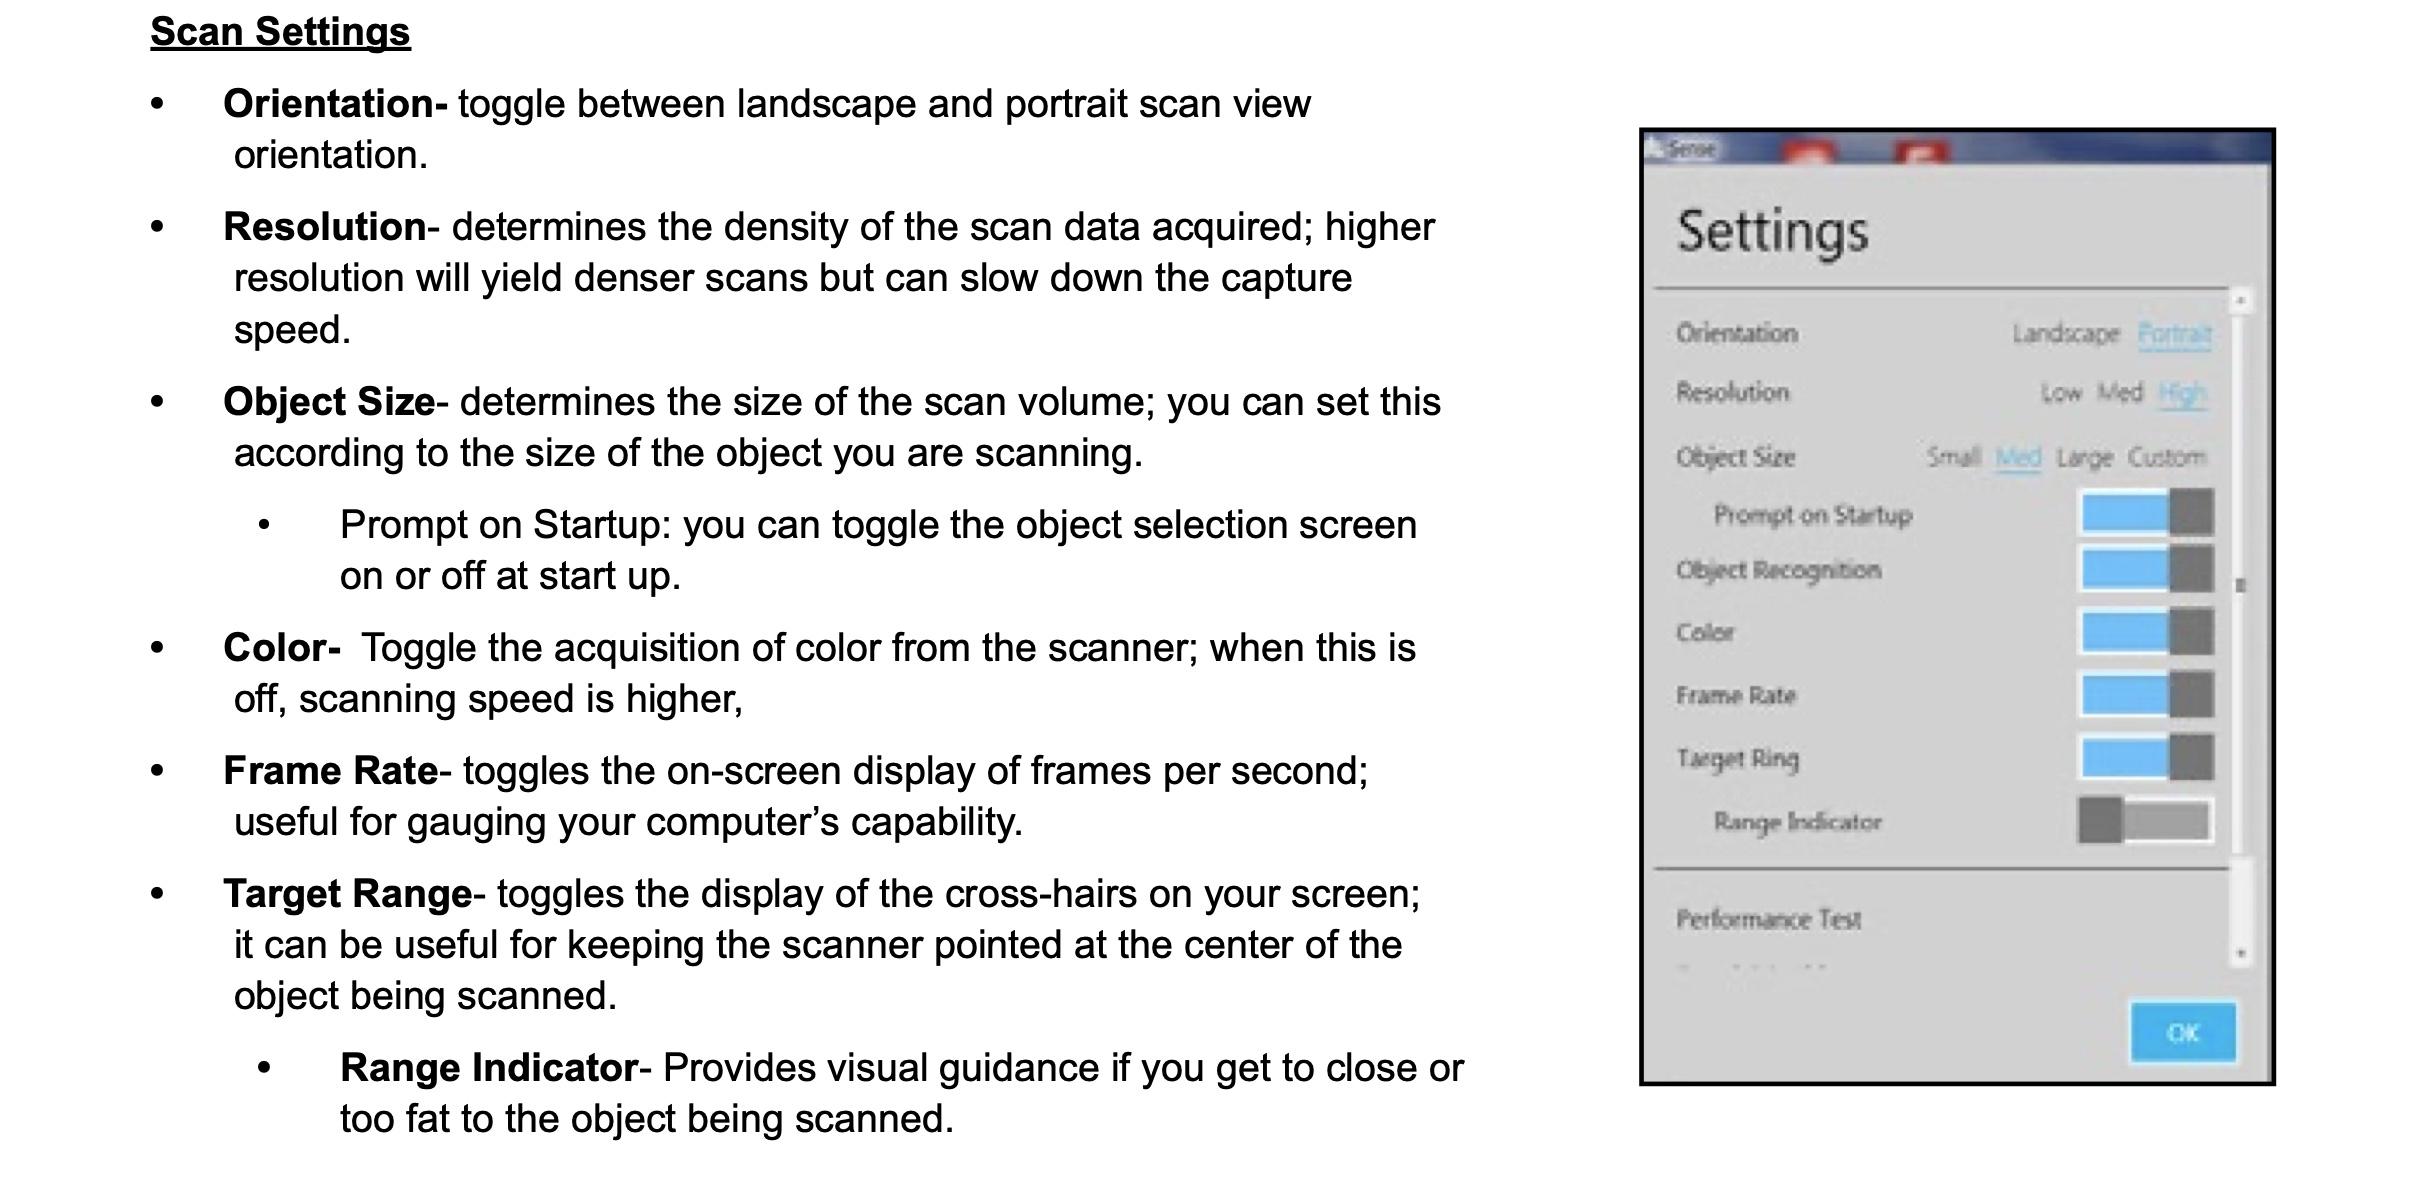 The scanner is not gear with a happy flow. While scanning, you have to move around the object and keep the scanner very stable pointed at the object. Most times, somewhere halfway the scanning, it will suddenly stop and there is no way to continue from there onwards. Reasons for it to stop are uncertain, it has more trouble with shiny and smooth objects, but if and object has a distinguished shape it will have trouble catching the corners. So everything I tried did not work out to well. We tried changing the light (spotlight, ambient light, darker lighter), the background (even, extra objects, lots of contrast) and Philip brought this small turning table and with a Waag-tripod to make a nice and stable setup. All objects that we found at Waag were not suitable to scan, I did not bring something to scan from home. Only my wallet would do the trick. But it is not a very beautiful object.
 I will bring some things from home tomorrow and try and scan that.
Success
To my great surprise, all my work on sundaynight fixing the slicer-problems worked. My 'gietertje' came out great. A few threads on the inside, but they can be cut away. Everybody was really happy with the friendly watering-cap, especially the only plant at Waag.

My own printer
While I was at Waag, the postman came with the packages from Germany and I arranged my friend Reini to pick me up by car. So in stead of working on my documentation and making a better version I worked on assembling my very own Crealty Ender-3. At the end of the night I could do some testprinting with benchy, but it was too late to do my 'gietertje'
Tuesdaymorning I had all these meetings for work and that is great to combine with 3D-printing. I sliced 'gietertje' in the Cura-slicer and gave it a try. (Settings: PLA 205 degrees bedheat 50 degrees layerthickness 0,2 and infill 100%)
 I looked online for some quick fixes and found that, next to cleaning the bed and making a rim you can
- heat the bed a bit more
- print the first layer really slowly
So I tried those and it worked.
 Almost at the end, I noticed that there was no filament coming out of the extruder anymore and when I found that the filament-filling-reel was loose I paused the print and fixed it with the alan-key. So the learning point is to check all the bolts on the machines, instead of only those that you have to tighten yourself!.
It missed 2 or 3 layers, but it could be finished. and now it has a nice little extra rim at the top, but is working.
after that I did not have time to make a new Gcode, so I tried to print the Gcode that I made earlier for the Prusa on the Ender and is worked very well, although the prusa-board is a bit bigger and the starting-line it does was in front of the board. I learned that I have to adjust the endstops on my ender.
Almost at the end, I noticed that there was no filament coming out of the extruder anymore and when I found that the filament-filling-reel was loose I paused the print and fixed it with the alan-key. So the learning point is to check all the bolts on the machines, instead of only those that you have to tighten yourself!.
It missed 2 or 3 layers, but it could be finished. and now it has a nice little extra rim at the top, but is working.
after that I did not have time to make a new Gcode, so I tried to print the Gcode that I made earlier for the Prusa on the Ender and is worked very well, although the prusa-board is a bit bigger and the starting-line it does was in front of the board. I learned that I have to adjust the endstops on my ender.
Tuesday in Waag
Scanning part 2
I brought a whole lot of things from home, rubber bathtoys, lego, a small djembe, some wooden souvenirs, and some stuffed toys. Again I used the '3D-sense'
 And I tried and tried and tried, but did not have a lot of success. the shiny plastic stuf would not work, most of the things were unable to really turn around. The scanner would loose the image after about 90 degrees, or would not connect it at 360degrees. So I ended up trying a lot, but not getting much that would be possible to 'finish'.
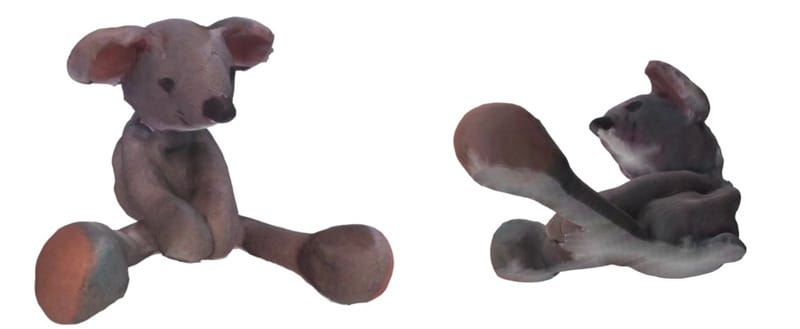
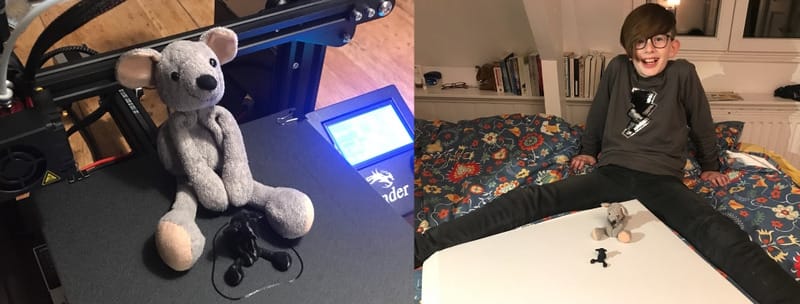
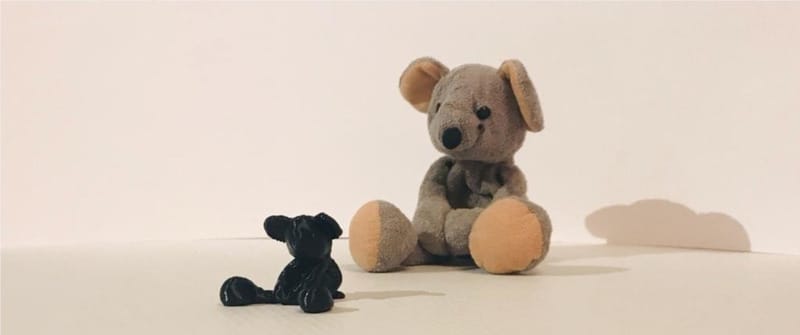
 Until I took away all the studio material and tried the stuffed toys, I think the scanner liked the matt cloth material and I got a great image of my sons little mouse 'Muisje'. The bottom is filled in automatically but most of the surface is looking great

Printing with different settings
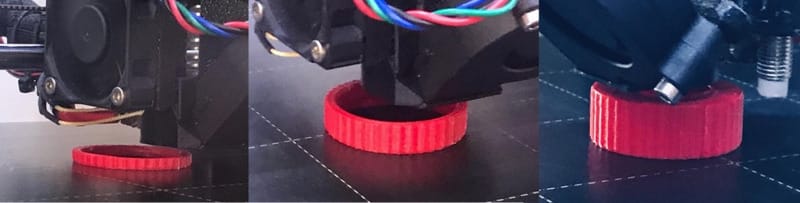
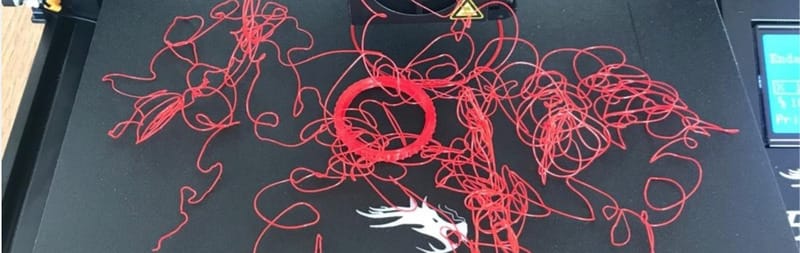
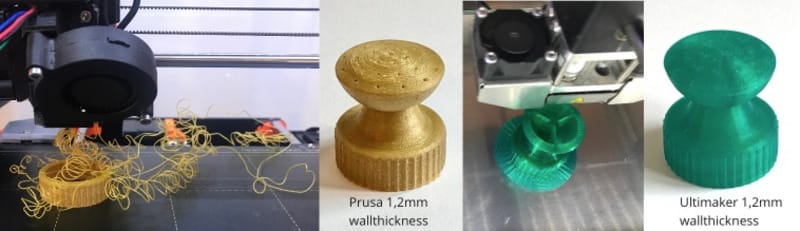
Printing with a thinner wall (1,2 mm in stead of 2mm), according to the advice on saturday and with a good layerheight. the bottom was to thin to stick to the board... Spaghetti. with a brim it would stick though. the golden one on the Prusa and the green one on the Ultimaker. The golden version was wider than the previous ones so sadly enough it is leaking.
the result
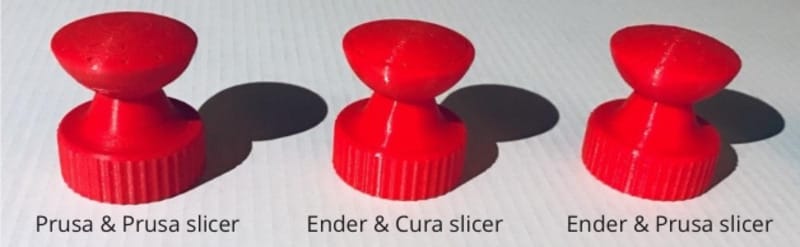
Eventually I made 5 caps, and they all work perfectly, and especially the first one is very good, that is because it has smaller holes in the top than it should have...
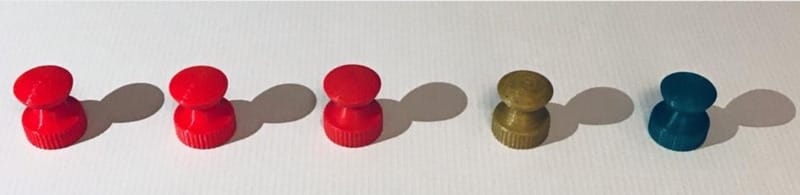 Here are my testing photo's.
Tuesdaynight at home
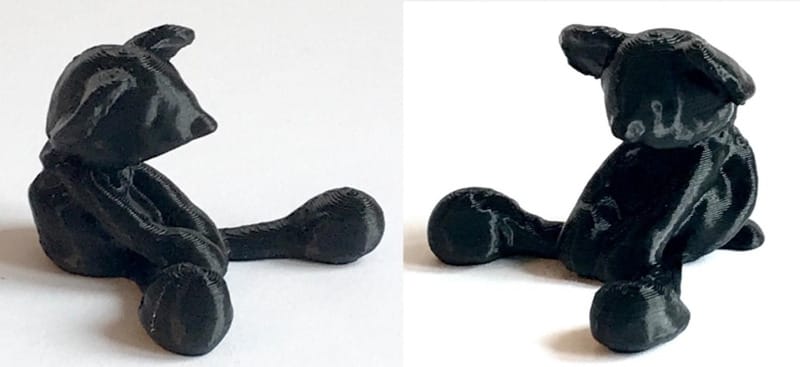
As a surprise for my son I started printing a miniature version of his 'Muisje' without telling him that I made it, He had to guess what it was. Only when the shoulders were printed he recognized his little friend. Arend was very happy with it.
I really like the shiny surface of the Ender-3 prints, Maybe the temperature of my ender 3 is a few degrees lower. At least the prints are really precise and shiny, no extra after-print finishing needed.
Learnings this week
This week was really nice, I did not think that I would enjoy using the 3D-printer. Actually I was quite sceptic about it. But I really liked it:
- I loved making the design in Fusion, it really was the joy that I had when I was working as a designer. It is really nice to have a design-goal and find out how to make it.
- I love the saturday open time, it is great to have all these enthousiastic people telling about their projects and knowledge. I really learn a lot on those afternoons.
- It is wonderful to make something which is not possible to buy in a store. I think I will really use the 3d-printer more than I thought.
- I am happy that I bought the Ender-3 printer, actually it was not me that wanted it really, but my son was the most enthousiastic. and since we can't go skiing we thought we get ourselfes this for a present.
- It is wonderfull to see the printer working, it is like watching an exploded view growing into the real product. It is like watching a fire, it never gets boring.
- Even the scanning and printing is wonderfull, especially if it is an object that is lovable.
- The scanning was really hard with the sense 3D, I want to try the Qlone app and see if that works better for me.
Links to Design-files
here are the links to the designfiles of this week: The watering rose:
Gcode for the Prusa (made with 'Prusaslicer'):
Gcode for the Ender (made with 'Ultimaker Cura slicer' ):
The scanned mouse