Week15: Wildcard-week
This week is great, You may choose your own assignment and a lot of explanation is done about Epoxy and composites. I really will enjoy this week, because I have two great clients that want me to make a longboard.
Wednesday Global Class
Neil explained about all there different techniques that we did not look at yet and I really enjoyed the possibilities that he showed. The explanation of the epoxy was thorough and that was really helpful, because I already looked into the subject and this way I learned a lot..
Weekly Assignment
In my own words
Group assignment:
- Check the different materials that you can make a composite with, with Epoxy. Read the datasheet and try out different layer-directions, and amounts. Individual assignments:
- design and make something with a technique that you have not tried yet, and use CAD/CAM somewhere in the process.
Planning this week
| Day | Lesson | subject/activity | activities |
|---|---|---|---|
| Wednesday | global class | make this plan | |
| Thursday | local class examples of the composites | group assignment composite test | reading the datasheet and safety-measures |
| Friday | woodworking to make slices | shopping for skateboard-trucks | sanding and fitting the boards |
| Saturday | global open time | fill the holes with colored epoxy | build model |
| Sunday | finish model | fill the holes second time | family-time |
| Monday | morning local Fab time get my milled board-mold | finish and assemble the mold | first layer of wood in |
| Tuesday | local Fab time | glassfiber and wood fill the river | Documentation |
| Wednesday | presentations | layers of glassfiber and epoxy | get documentation ready |
Thursday instruction
Henk explained about epoxy and the different composite-materials and showed some examples from previous students.
Group assignment
To start of with we had to read the data-sheet of the epoxy, since we had only 2 sets of papers and the whole group wanting to read it I ended up reading it out loud like a bedtime-story to all of the group. It was quite fun because we noticed differences in the text that did not fit and were surprised by the weird attention to making a bar-top throughout the instructions while not stating anything about composites and layered materials.
I wanted to know how to get the most beautiful finish of the cast epoxy, because of the plans for my individual assignment. So I suggested to do a epoxy-release-test.
Loes and I went to the lasercutter and cut a lot of small wooden testboards and we covered them all in different materials. I wrote on all the boards what the materials were. We tested different plastics, release agents and combinations of that.
Loes and Douwe cut little pieces of embedding-material and laid them on all the boards. Loes and Erwin made the epoxy resin and poured it over all the materials.

Layers of burlap.
We also did some tests with different layers of burlap soaked in epoxy, it was quite hard to keep them in place and in order to make them more straight we put them between two testboards and let them cure under the weight of the big wooden workbench.
I also tested some colorant, the red one that was available at waag and the one I bought.
 Online I found that it is possible to release air out of the epoxy with a gas-torch and luckily Henk had one. I used it and it worked really well, but the heat also melted the food-wrap-foil around my red colorant test. Hmmmm maybe a smaller flame would do the trick also.
At the end of the afternoon I worked with Philip to make a burlap frisbee while using a vacuum-bag and the vacuum cleaner. I noticed that placing the material in the mold was harder than we thought. The material really does not want to stay in place. But with the use of some baking-paper and the big vacuumbag we got a surface through which we could form the material and we left everything to dry overnight.
Online I found that it is possible to release air out of the epoxy with a gas-torch and luckily Henk had one. I used it and it worked really well, but the heat also melted the food-wrap-foil around my red colorant test. Hmmmm maybe a smaller flame would do the trick also.
At the end of the afternoon I worked with Philip to make a burlap frisbee while using a vacuum-bag and the vacuum cleaner. I noticed that placing the material in the mold was harder than we thought. The material really does not want to stay in place. But with the use of some baking-paper and the big vacuumbag we got a surface through which we could form the material and we left everything to dry overnight.
Individual assignments
Design and make something with a technique that is not used before
For this week I have a great assignment from my children. They want me to make a wood and epoxy longboard.
I already looked into this a week ago and ordered the necessary stuf to make a beautiful board.
I bought 160 grams ‘keper’ woven glassfiber. This is the thickest glassfiber that is invisible when soaked in epoxy.
And I bought glitter turqoise-blue epoxy colorant to make the middle part.
And I bought PE-tape, and a PE-scraper
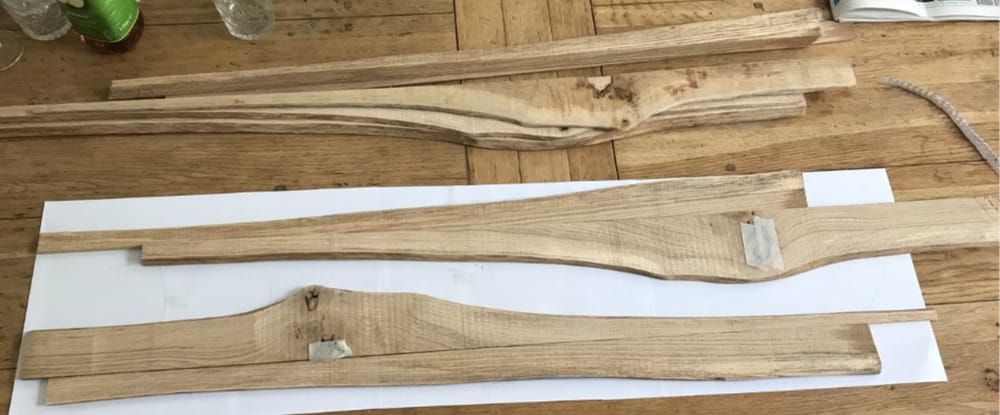
Together with my daughter I went to our local wood-shop ik Haarlem and there we found a few great oak end-parts with a good bump on the side and some knots in the wood, they are really good for this purpose.
What I did not expect is that they were also really long, and we were on our bicycle.

Friday woodworking
Anna sanded the outside of the beams, since there were a lot of splinters sticking out and I arranged with my good friend Maarten that we could try and slice it to make fineer layers with his bandsaw (named Linda).
Since the wood was way too long my daughter cut it in half. It was not straight either so first we made a first cut to slice away the crooked parts. It did not work completely so with the electrical planer we prepared the wood to be as straight as possible.
 We lined up the guide to cut 3 to 4 mm thick, but the knots and weird pieces of wood made everything crooked again. So we changed th guide into a smaller vertical bit, because the fineered part were bendable anyway.
 We managed to cut it in 9! Layers and especially the first 6 were really beautiful.
 The other half of this beam we cut also in layers, because the board will be broader and that way we make it all from one tree.
 Anna taped all the loose/semi-loose pieces from the knots to the slices.
Cycling back home was a lot easier.
shopping for parts
For the trucks and wheel I did quite some research. If you buy them at the specialized store here in Haarlem it us quite expensive to buy only trucks and wheels, because they only sell top-end parts that way. But we found some great trucks and wheels at the decathlon in the right size and for a good price.
fitting and designing
With the wood ready we looked at the right shape. Anna wants a fish-shaped board, but longer than the one that we saw at the decathlon.
I made some life-size-drawings and we tested the layout of the wood-slices.
 We decided that with 2 layers of wood 8mm it should work. Especially because the glassfiber can take the tension-force if it is applied at the bottom of the board.
preparing the wood
I sanded the selected pieces of wood with grain 40, 80 and 120 so in the epoxy the wood-grain can really show.
I wanted to fix the loose knot-parts to the slices before I would go to Amsterdam.
I do have 2component epoxy-glue at home, and according to woodworkingforums this is ideal to fill cracks and holes in wood.
Online I found that there are a lot of ways to colour epoxy with material I have at home.
I did a colouring-test and found that aquarel-paint does not dissolve in epoxy, sharpie changes colour, Pantone-marker refill seems to work well but I don’t have the right colour. Acrylic paint works great. Especially the set with a lot of small tubes of the action has a wonderful colour brown.
 I tested my PE-tape how well it would release (both sides) and taped the bottom of the holes shut. With toothpicks and a lot of patience I filled all the holes and glued the loose pieces in their place.
Saturday open time
So, during open time, I was happily filling the knots of the wood and asked about advice on cutting the galssfiber. Actually they adviced me to use burlap, but since my skateboard has to really bare the eight of the rider I chose to work with glassfiber anyway.
Photoshop and Illustrator.
With the image of the fish-cruiser-board from the decathlon I made an outline in Photoshop and converted it ti a path in Illustrator, but I got stuck in all the different artboards and layer that were generated that way. So I worked my second try differently, I filled selected the background, inverted that selection, fixed all the little mistakes and smoothed the outline the outline of the board in a new layer in photoshop. Then I filled this shape a solid black and saved as a JPG. In illustrator I traced the shape and converted it to make a vector. I divided this shape in the front and back and stretched the backpart to the desired length and shape. Now I divided the top from the bottom, and after that copied the bottom-half to the top (and mirrored it, so I gave a perfect symmetrical shape. I printed it on my home-printer and showed it to my client, we decided that it was a little to wide. I redid the last parts of my illustrator-work and made it the right width. When we were all happy I made the illustrator file ready to mill by adding drill-holes for the milling and while I am at it, I aso added drillholes for the places where the trucks would come. I measured the tricks, but since it is in inches I looked for a good image online to measure the distances.

Monday Waag-time
On monday i went to waag to mill and make the mold. I had decided that I want to make the mold from wood, since I want a really nide/glossy finish and With our home-made fineer I can only make a flat longboard. No 3d-milling for me this week. I only had to mill the outline of the mold and used a 12 mm thick plywood for that. To handle the mold better I drew an outline around it in v-carve.
It was really helpful that I made a good documentation of the settings for milling in the make something big week, because there were a lot of details to think about. (Like spindle-speed, step-over and milling-depth)
I did a drilling-run and after that my board outline.
Everything went fine.
 But when I did my mold-outline my Millingbit came loose and was left behind in my trace. I quickly hit the spacebar and had to reconnect the milling-bit. I definitely learned not to trust the milling-bit-tightening of the previous miller.
 When I took my board of I saw the result of my mistake. A deep imprint in the sacrificial layer. I checked my setting, but my toolpath had indeed a depth of 12 mm, exactly what I measured on the board I used. The outline if the board was not imprinted in the sacrificial layer so i I decided to confess it immediately to Henk and he said he would use it as a great example for next year, to always check the tightening of the millingbit.
Group assignment, the results of the release-test.
After milling I had time to look at our group assignment.

I noticed that indeed some materials released really well: PE-tape, PE-plastic (blue garbage-bag) and foodwrap. Everything covered in vaseline released very well and after some careful bending, the bakingpaper would release with a nice matte finish. The mold-release did very well also. The things which did not work were: Wood without anything Wood with mold-release-agent Vinyl without anything Cheap White furniture-board (which should have been melamine and release really well. Foam without anything and with release-agent.

Preparing the mold
After milling I sanded the rims really well and taped it with PE-tape. I did this really carefully, so the rim will be as smooth as possible.
I made the bottom of my mold from a piece of triplex which I covered in PE-sheet (from a ciarse dirt-bag). I glued the sheet to the board with spray-glue as flat as I could and taped it to the back.
 I screwed the 2 halves of the mold together.
Cutting the wood in the laser-cutter.
To do this I first made some tests in an extra piece of oak to find the right settings.
Then I took some paper and taped it to the lasercuttung-bed, and cut the longboard-model out. I kept the drill holes as a reference to the board.
I made the cutting-edge about 1 mm smaller then the board so I would leaf some space for epoxy on the outside
Then I layed my wood in place, taped it to stay in the right spot and cut the first layer.
 Then put the next layer in place and cut that as well, i glued the pieces of wood together with masking tape.
I sanded the black burn marks of the sides and cleaned the wood and the mold with alcohol.
it fit really nice and looks according plan

the first layer
Taped the two parts together with PE-tape. Filled the mold with a layer of epoxy With a brush filled the wood with a layer of epoxy.
Laid the wood in the epoxy
Put pressure on it with the cutout of the mold and some heavy boxes on top.
Let cure.

Tuesday
Revealed my epoxycoated wood form monday. Cleaned away the PE-tape. Cut away the weird drops of epoxy.
Cleaned everything with alcohol
Prepared the second layer of wood.
Cut the glassfiber to the right shape, only cover the wood.
Mix epoxy and brush on the wood.
Get the glassfiber soaked in that ans brush on more, brush o the second layer of wood and lay down carefully on the glasfiber.
Also do this for the other side.
Wait 4 hours.


Vacuumbag
To put the layers of glasfiber in place I will have to use a vacuum-bag, I tried to buy one at the Blokker, Action and the Zeeman, and sadly enough the bags were not big enough. So meanwhile I am thinking of a way to make a bigger vacuum-bag. I found that they should sell them at the Hema and I went with Loes to the big Hema in the citycenter to buy the big baby.
Filling the river
At the end if the afternoon
Measure the amount of epoxy needed to fill the ‘river’
I came to (length90 * overall width 5 * depth 0.8) = 360 ml.
That is a lot, luckily we still have enough tarbender in the 2 containers. We do not have a good container to mix it in, so I decided to mix it in 2 batches and pour them together just before pouring it in the shape.
The first batch I coloured with my colorant, but it was a bit too much, so the second batch I did not colour at all, together it was still too much, but way better than the first.
I poured it in the mold and made exactly the right amount, in th cup was only a few ml left over. (Loes could use it in her project, so nothing was wasted)
 It looked great, but tou can still see the pouring in the wet epoxy, so I decided to stir it a little in the mold, this gas a great effect, a bit like waves.
After a while I dissolved the bubbles with my new, extra long lighter. And now it will dry overnight.
It looked great, but tou can still see the pouring in the wet epoxy, so I decided to stir it a little in the mold, this gas a great effect, a bit like waves.
After a while I dissolved the bubbles with my new, extra long lighter. And now it will dry overnight.

Success

Learnings this week
This week was really great, I Enjoyed every bit of it. And because I have some real clients I want this project to work out great. So I even was a bit nervous while doing an action that I was not able to turn back.:
- I loved finding the wood and preparing it at Linda the bandsaw. It was really nice to work hands on.
- I liked learning about colouring the epoxy, I had no idea about the possibilities and had good fun triing the different colorants I have at home.
- It is wonderful to make something that hopefully will be beautiful and useful.
- I am happy that I used wood for the mold, and decided to work with a 2D-mold, my slices of wood would not bend and I think the result will not be as nice with a 3D-mold.
- It is wonderful and really scary to make this river with the blue epoxy, because I want it to turn out nice, so I cannot mess it up.
Links to Design-files
here are the links to the designfiles of this week, Everything fitted in one file, I used the EPS for the shopbot and the AI for the lasercutter:
After this week:
(a lot of finishing the project still to come)
Getting new epoxy
the whole group is using epoxy and therefor it is all finished. so Henk really had to get nwe stuff, but on wednesdays he does not have time for that. so I offered to bike by the formx in Amsterdam-west. Little did I know that it would be a long-long trip not in the most beautiful part of amsterdam. but luckily I got us 2 gallons of epoxy (and Ecoflex for other projects)
with my bike fully loaded I went to Waag

Extra piece of wood
at the back of the board one side is way thinner thatn the other side, I will fill it up with an extr piece of oak. I cut it in half and finished it so that is would fit nicely with the other wood. with the sandingplate I made the part that goes halfway the board really thin, so it would not give a weird bump.

i put a piece of glasfibre inbetween the layers, for extra strength.

and placed the 'half board' on top of that.
 I put the table completely level and poored the rest of the epoxy on the board, so the 'river would fill up ass well.
glassfiber and vacuum
After drying it is time for the glassfiber-layers. I decided that glassfiberlayers at the bottom of the board would take care of the tension in the board when you stand on it.
I followed the steps on the vacuum-process.
at Waag we don't have teh official holepuncher for this subject, but a thumbnail will do the trick as well. I punched a lot of holes in my nice PE-plastic.
 I made several preshaped glassfiber mats (160 grams, so they would stay 'see-throught') and I soaked them in epoxy, before putting them on top of my board (the top now, will be the bottom in the end-result) with my PE-plate I tried to get it as flat as possible . I used 3 layers of glassfiber, two with the strenght from front to back and sideways, and one on a 45 degree angle to prevent tork
 after applying the three layers I tried to take out a lot of air with the PE-plate.
 on top of the glassfiber I put the punctured plastic, on top of that a fibercloth to take the excess of epoxy and reflow the air while in vacuum. I put two small wooden plates where the trucks would be attached so that part would become more straight
with the big vacuumcleaner I made quite a nice vacuum. Online I read that you can make it even more vacuum with the vacuvin-pump, and since I have that at home I gave it a try. The valve would not work all the time and it looked like there was some stuff stuck in it. I decided to take the other vacuumbag out of the package and try it with that one. that worked better.

 After the vacuum, it was finally time to open up the package and see what the result is. It looks wonderful!...
Although there probably was some air stuck under the board because there are a few quite big dents on the topside.
 On the bottomside it was not a good idea to put in the wooden boards, a lot of air could not escape there and made these weird opaque looking spots. that does not look good.
the board is quite bendable and I am afraid to test it, because I am afraid it will break.
I decided to take tho board home and with my sander work away all the ugly spots so I can really finish this board beautifully!
fixing the bottom and topside
After sanding away all the bad spots, I filled the holes on the bottomside. (so they could dry before I make the extra layers)
then I turned the board in the mold and to prevent Epoxy drippng through at the bottom I taped it to the mold. I filled the bumps at the topside, used a toothpick and a cottonswab to get into all the holes. and left it to dry.
 The epoxy shrunk a lot, so the dents are not filled fully. I'll have to make another layer.
 after this it came out great, only the tape had stuck horribly to the bottomside. with a knive, stickerremover, aceton and sanding I finally got it clean again.

new layers of glassfiber and epoxy
to make the board a little stiffer I had decided to make some more layers of glassfiber underneath. I had enough cloth to make 4 more layers, 3 straight and one under 45 degrees.
with the lasercutter I made new nice shapes, using the paper-cutout-method I also used for the wood.
 that way I can place the glassfber needly in the right spot and cut it beautifully without any hairs flying in the air. At speed 50 and power 35 it would cut throught my cloth.
 So I learned quite a bit from my first vacuum-bagging. and I got myself even better prepared:
- I took the foam of a paintingroller and put PE-tape around the tube, this works much better for taking out the air underneath the soaked glassfiber.
- I put the epoxy straight on the board and let the glassfiber soak in that epoxy, that way theer is less air underneath and it is much easier to keep the glassfiber in shape.
- I have this yellow cloth for above the punctured plastic, I made it a bit bigger, so it can fold around the sides and suck away excess epoxy there as well. I put the different pieces perfect fit next to each otherm, to prefend the bumb I had last time.
- The plastic, because it is PE, no epoxy will attach to it and therefor I can re-use it again. I punctured extra holes in it, so the hole part is bigger then the board.
- I put the PE-tape on the side of the board and directly put a second layer on top of that. this way it is more sturdy and the epoxy will be on the non-sticking side, I hope I will loosen easier that way!
 I worked according plan and had quite some trouble making the bag vaccuum, the vacuvin-pump would not work this time. Everytime I used it it would let air in through the valve and so work counterproductive.
I hope the result is nice anyway.
I worked according plan and had quite some trouble making the bag vaccuum, the vacuvin-pump would not work this time. Everytime I used it it would let air in through the valve and so work counterproductive.
I hope the result is nice anyway.
 after waiting overnight I could take the whole set apart and all my plans worked. not too much air, the tape will come loose. The product looks very nice and still a bit bendable but way more stiff than before the extra layers of glassfiber
 Of course we had to do a test immidiately, a bit scary at first but a 12 year old can stand on the board!

After taking the board home I sanded the sides, filled the gaps with thick epoxy and covered teh sides and top with one more layer of epoxy.

The finishing was done by drilling the holes with the leftover-part of the milling as a template. I connected the trucks and wheels and it is finished!
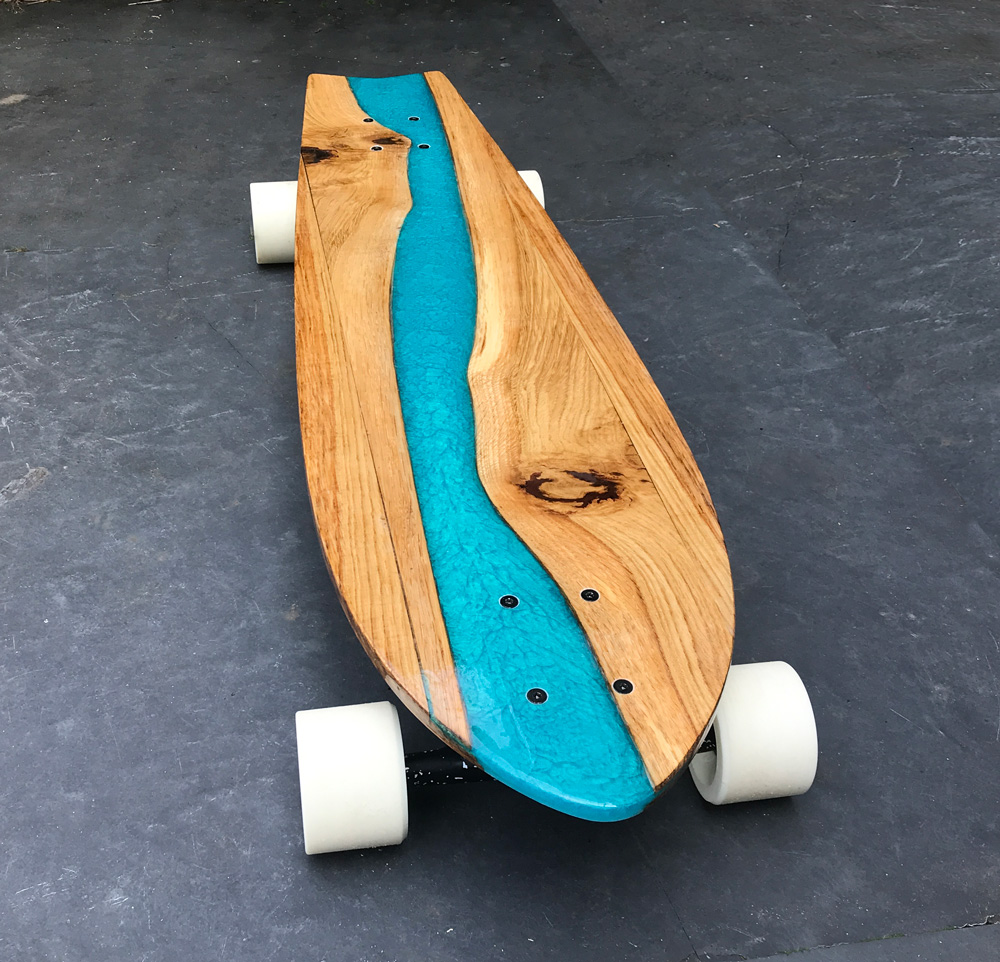
And the final test is of course in the park with the new owner on the board:
Learnings: Epoxy was great to work with, I really had fun.
- Due to the complexity of the plan it took longer than I thought. Since it was mandatory to work with composites during this assignment I first thought that I would only work with the wooden layers and epoxy inbetween and so make a composite. And as a backupplan add some glassfibre if it was still too flexible. The wood on its own did not seem strong enough when I decided to use only 2 or 3 layers so I added the glassfiberplan to it. That is why it is quite a complicated structure now. If I would do it again I would simplify it by taking one laye of wood of about 10 mm thickness and only add epoxy and glassfiber layers to it. The second vaccuum-process went much better than the first, learnings from that:
- the vacuumbags are not very trustworthy, a next time I would buy a different one than the one from the Hema, or think of an extra cover for the valve.
- cutting the glassfiber mat on the lasercutter worked really well. in order to prevent any fumes we left the fumeextracor on for a good long time, but the nice thing is that the shape fits really well and the cuts will stay together much better that by cutting it with scissors.
- with the second vaccuum process I used a paintroller (without the foam and with PE-tape around the plastic roller) to spread the epoxy evenly, that worked much better than the brush and spatula that I used earlier.
- when I put the plastic cover over the epoxy and glassfiber I made sure that most of the visible air was already spread to the sides, I prevented a lot of airbubbles with that.
- I spread the excess-blancket really carefully on the plastic cover the second time, the first time there were some spots where it was double and some where there was a small gap, that showed very much in the result.
- I carefully taped a double layer of PE-tape on the side of the board and that worked really well. tha bottom was fully covered and the weird sides were easily taken away because they could not stick to the sides.
- I tried to finish a few pieces of the board with a buffing, but that did not work out really well, Epoxy, drying in the air has a batter finish and is much more shiny