Week 8
In this week I will be programming the board that I fabricated in week 6 using Arduino language which is based on hardware programming language called processing, which is similar to the C language,This week assignment:
1. Group assignment:
compare the performance and development workflows
for other architectures
2.Individual assignment:
read a microcontroller data sheet
program your board to do something,
with as many different programming languages
and programming environments as possible
Learning outcomes
- Identify relevant information in a microcontroller datasheet
- Implement programming protocols.
Chips comparson :
so, for the group assignment we decided to compare the speed of two different chips to see how fast each can solve a differential equation using a benchmark test. The chips that we are going to compare are the atmega328p and the ATmega32U4 which is basically an arduino uno and an arduino leonardo.here are some camparison between the two chips:
| Atmega328p | ATmega32U4 | |
| Cost | $2.30 | $4.41 |
| # of Pins | 28 | 28 |
| Flash Memory | 32Kb | 32 KB (ATmega32u4) of which 4 KB used by bootloader |
| PWM Outputs | 6 | 7 |
| ADC inputs | 6 on PTH; 8 on SMD | 8 |
- This the benchmark code that we are going to be using:
- atmega328p speed test:
- ATmega32U4 speed test:
- Conclusion:
The difference between them is really small because they are basically from the same family just different package however, the atmega328p is slightly faster in solving ODE but it wouldnt matter that much, and I did some research about other chips turns out the arduino Arduino Due is the fastest one and it used a ATSAM3X8E Chip and it can solve the same ODE bench mark with an average of 230 milli-seconds which is pretty fast.
Attiny45 Data sheet :
- Reading 500 pages datasheet is nearly impossible so I focused on skimming through the graphs inside the data sheet and the first thing I saw was the attiny45 micro-controller. So this picture tells me that the attiny45 consists of 8-pins and each pin has a different job :
-
The very next page of the this data sheet shows the pin description which I will need to know because I'll be using those pins to program my pcb::
-
Another thing that got my attention while reading the datasheet is that these AVR micro-controllers has a sleep mode that enable the application to shut down unused module::
Basic programming information:
- In Arduino the code consists of 2 sections the setup and the loop:
Useful Arduino Codes:
| Code | Descirption |
|---|---|
Int |
Defining a variable |
digitalWrite() |
Write a HIGH or a LOW value to a digital pin. |
digitalRead() |
Reads the value from a specified digital pin, either HIGH or LOW . |
#Define |
gives a name to a constant value before the program is compiled. |
pinMode() |
Configures the specified pin to behave either as an input or an output. |
analogWrite() |
Writes an analog value (PWM wave) to a pin |
Serial.println() |
Prints out values to the serial monitor |
for loop |
used to repeat a block of statements and it is helpful for any repeating action, and it is frequently used with arrays to manipulate data/pin collections. |
if statement |
it checks for a condition and then excute a the statement if the condition is met or true. |
Programming my board:
I will be using my FABISP programmer that I made in week4 to program my PCB and here is how to do it :
- First download Arduino software on your computer from here
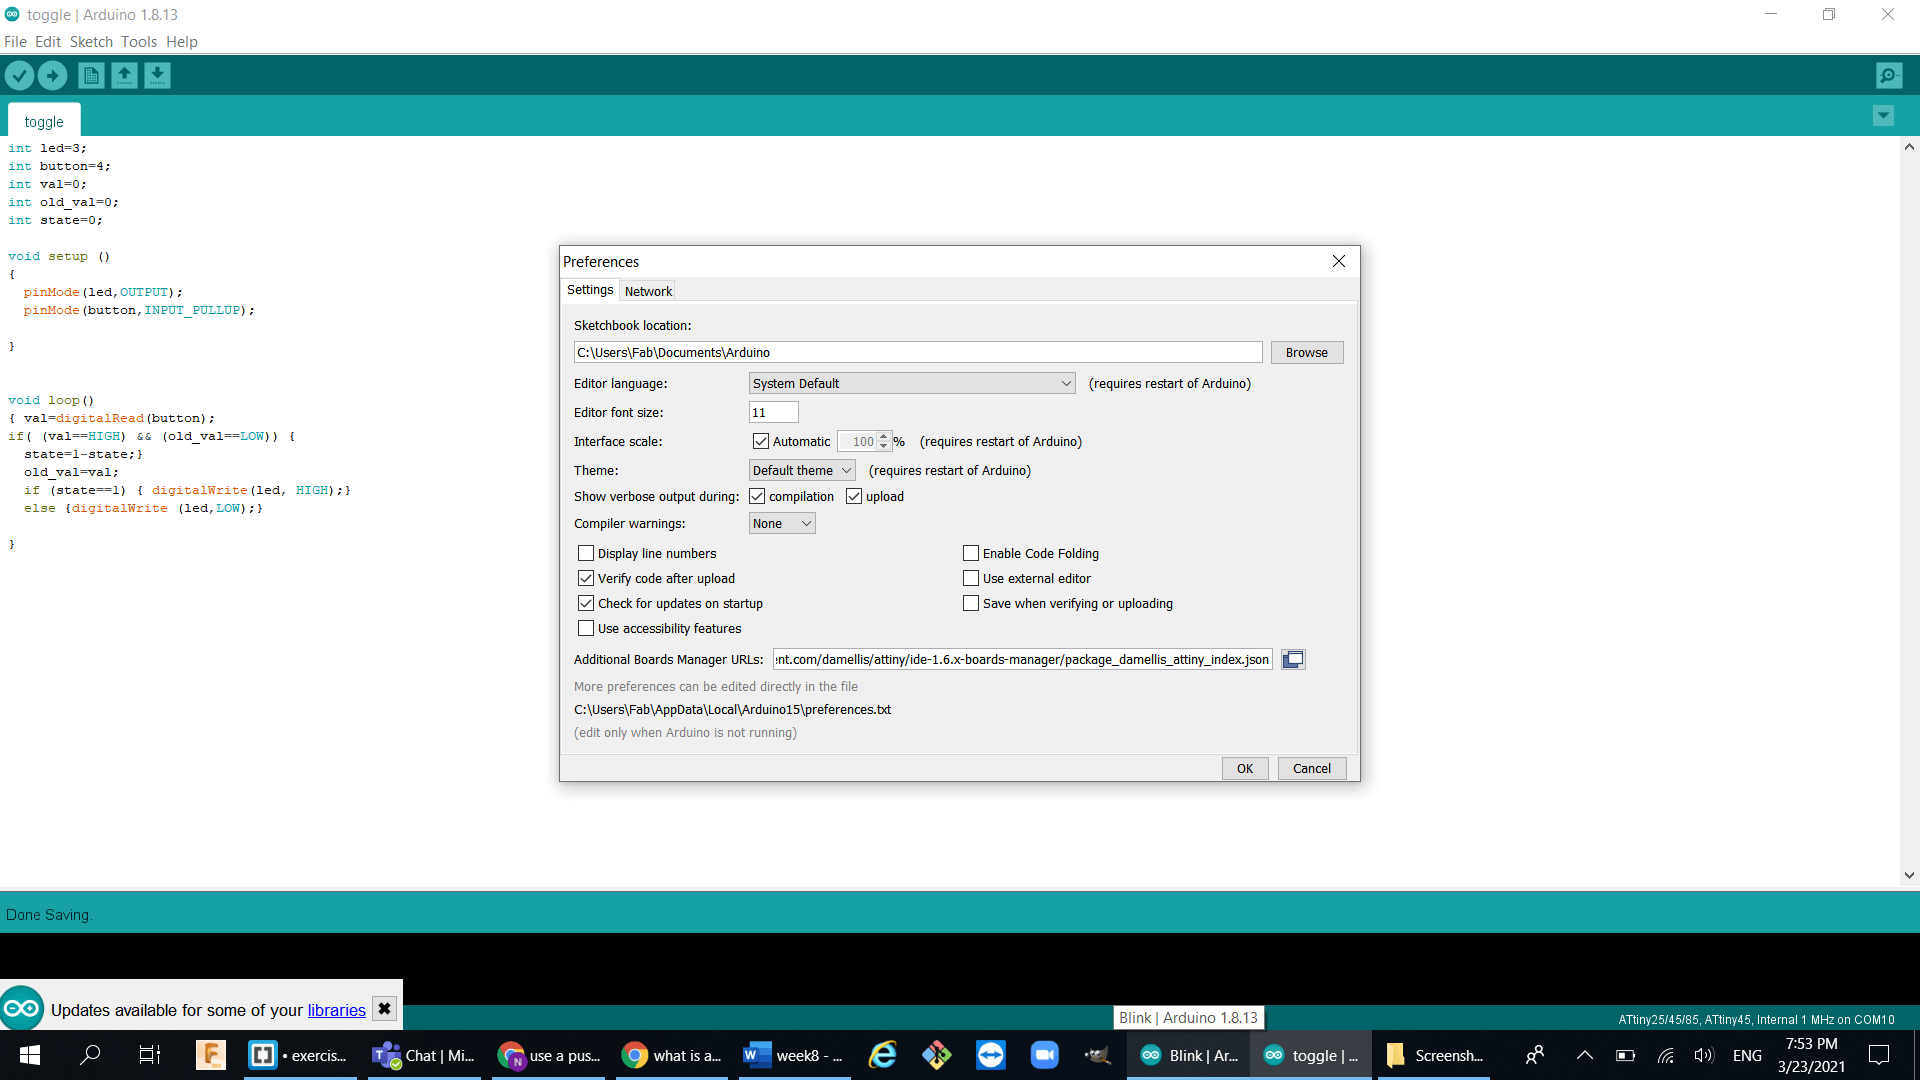
- Because I am are programming attiny45 micro-controller I need to download the attiny45 library in the Arduino boards manager that is created by Dave Mellis and to do that:
- go to File>preferences>additional boards manger URLs and paste this link
- Then go to Tools>boards manager>install the attiny45 package
- Now wire your circuit with your programmer and do the following settings:
- Now your circuit is ready to receive sketches from the Arduino software, I programmed my LED to light up when the button is pressed and here is the sketch I used :
- checking if it works :
- blinking an led is simple enough to do and I did it by simply toggling all the ports pins as explained in the code:
- testing the function:


