
Week 02. Computer-Aided Design
- Modelled experimental objects/part of a possible project in 2D and 3D software ✔
- Shown how you did it with words/images/screenshots ✔
- Included your original design files ✔
It works for me and it helps me to organize the week through the table, so I can be calmer and limit myself to having all the documentation uploaded. 😬 I leave Monday and Tuesday to investigate new programs. 👾
Design
For models and modeling we have always used the "analog" design, that is, photos on paper, ruler, pencil and graph paper. Then we went to cut the materials with cutter and paste them to make volumes or buildings. In 2015 I discovered the Fab Lab León and I didn't know how to design anything. I started by myself to watch FreeCad video tutorials thanks to Obijuan. Then little by little I discovered Rhinoceros thanks to Nuria until I made buildings or bridges designed by myself.
06/02/2020 17:00 After the regional review with Nuria and having decided what software I am going to use.
In this exercise I will use the following softwares, to finish doing a video simulation of my possible final project.
2D Design
Inkscape
Inkscape is a very simple tool that can be used, for example, to convert handmade drawings (captured with a photograph or scanned) or photographs from the internet; We go from a raster to a vector. For this I import the image and use the path function -> Trace Bitmaps. At the time of vectorization you can draw the vector through three functions: brightness, border or color. Depending on the treshold you can draw a more defined vector.
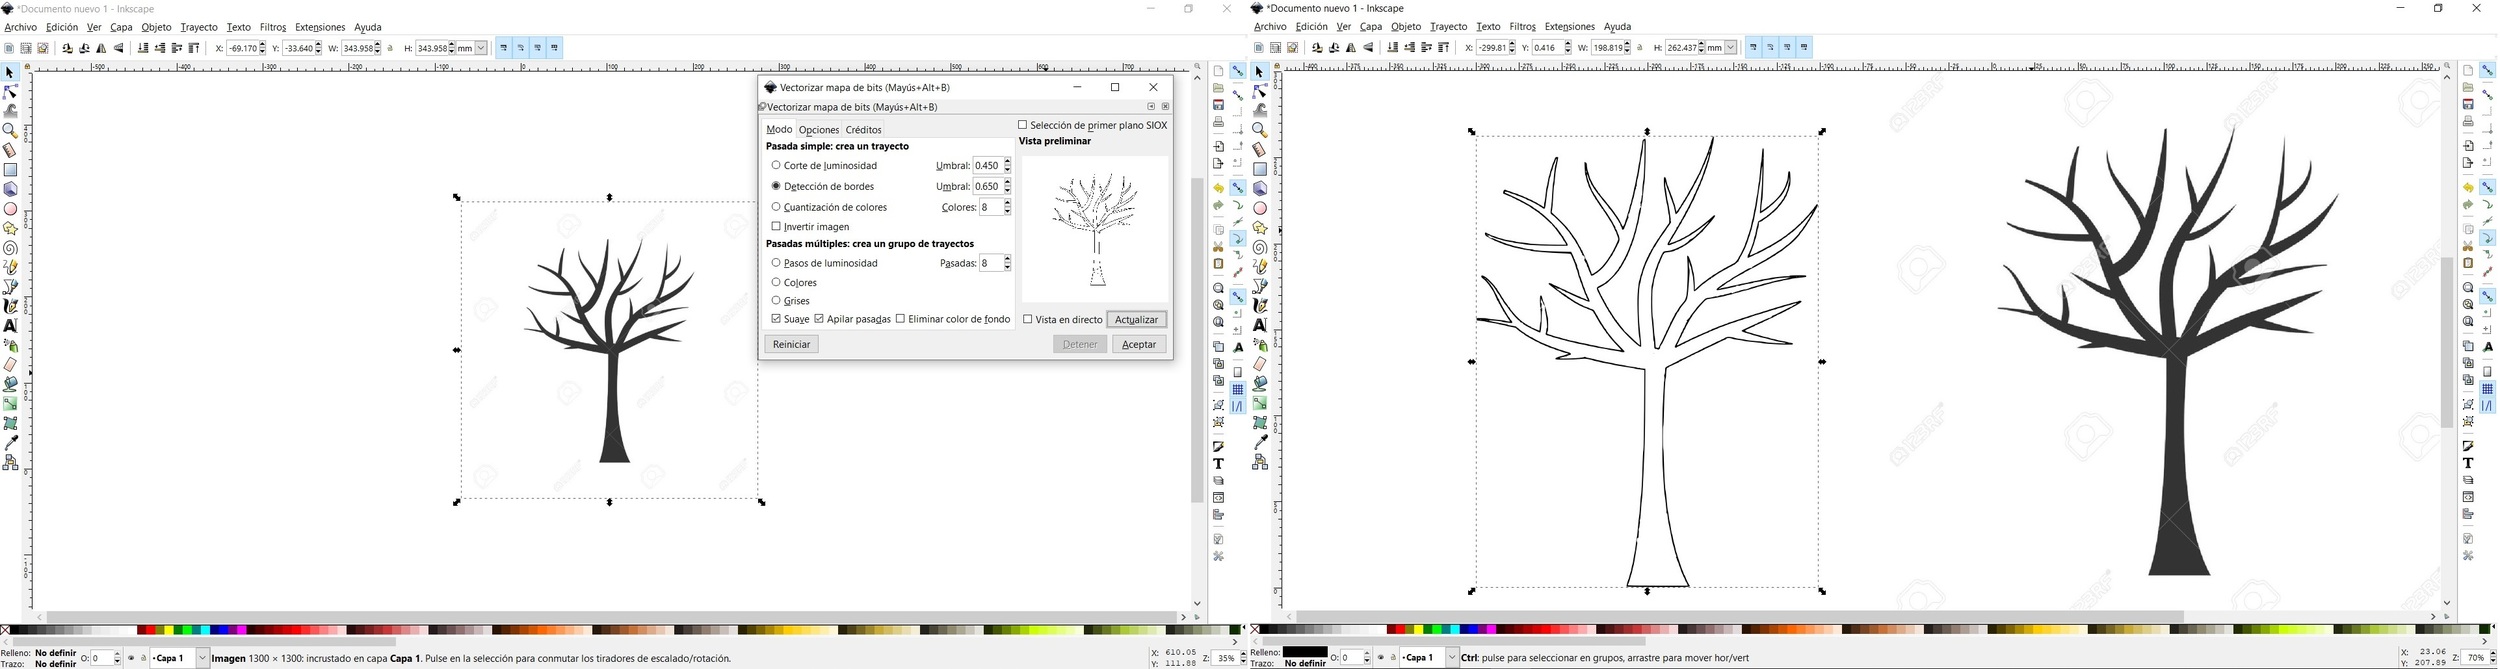
Once finished vectorizing the image, you drag and you can export it in PDF or SVG format as it has been in my case. Here is the file, Tree in 2D
Gimp
All the images you see on this website or even the logos of each assignment are edited with the Gimp program. During the regional review, a former FabAcademy student, Eduardo Segovia , recommended that I do some more 2D design or even try to design my future slide. So I started to "trace" the sketch I had done last week in the Project Management class.
So by capturing Freecad and Blender, I start creating different layers within Gimp to locate the different objects on the slide. Here a small example, I hope that the final slide in 6 months will be better. 😂
3D Design
Rhinoceros
Rhinoceros is the design tool that I use most. After vectorizing the image with Inkscape, I import it to Rhinoceros and create the 3D branches of a tree. I leave a series of lines that I extrude using the Surface or Revolution commands for the trunk for example. In this case I created a skeleton of a tree for a model.
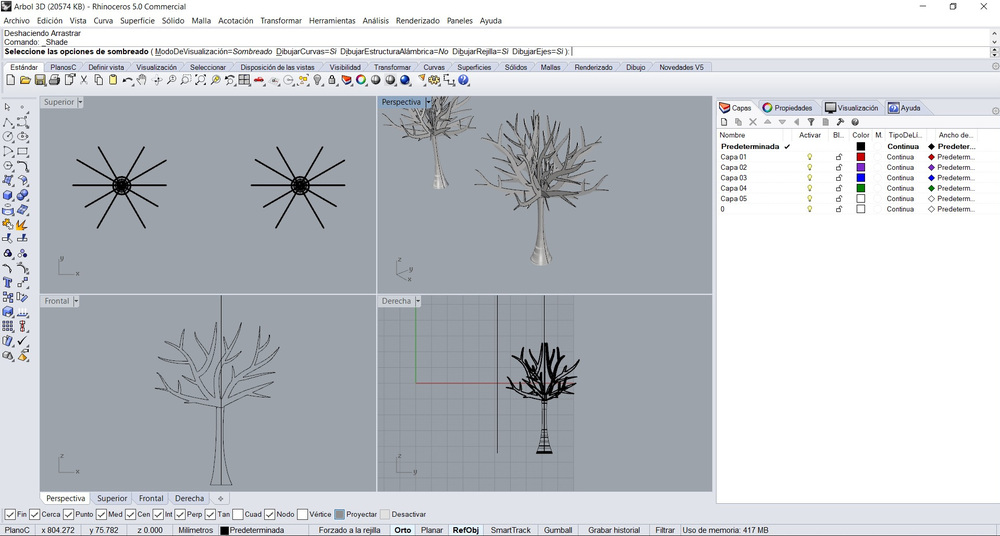
To save space on the GitLab, I have uploaded the file in 3D to a platform called SketchFab.
Freecad
As I explained at the beginning of this exercise in 2015 I didn't know how to design, so thanks to Obijuan's videos I started designing in FreeCad. It is a very powerful free software tool, I must confess that I do not take full advantage of it, at most 20%. I really like to design with primitive forms and use Boolean formulas.
In this case I use the "Draft" section where I draw the model profile of my final project. It is important, once we have finished drawing, to close the line to be able to extrude the plane. Then we go to the "Path" section, where we select the line and click the extrude button at the height we want and if we want to make a solid surface or not.
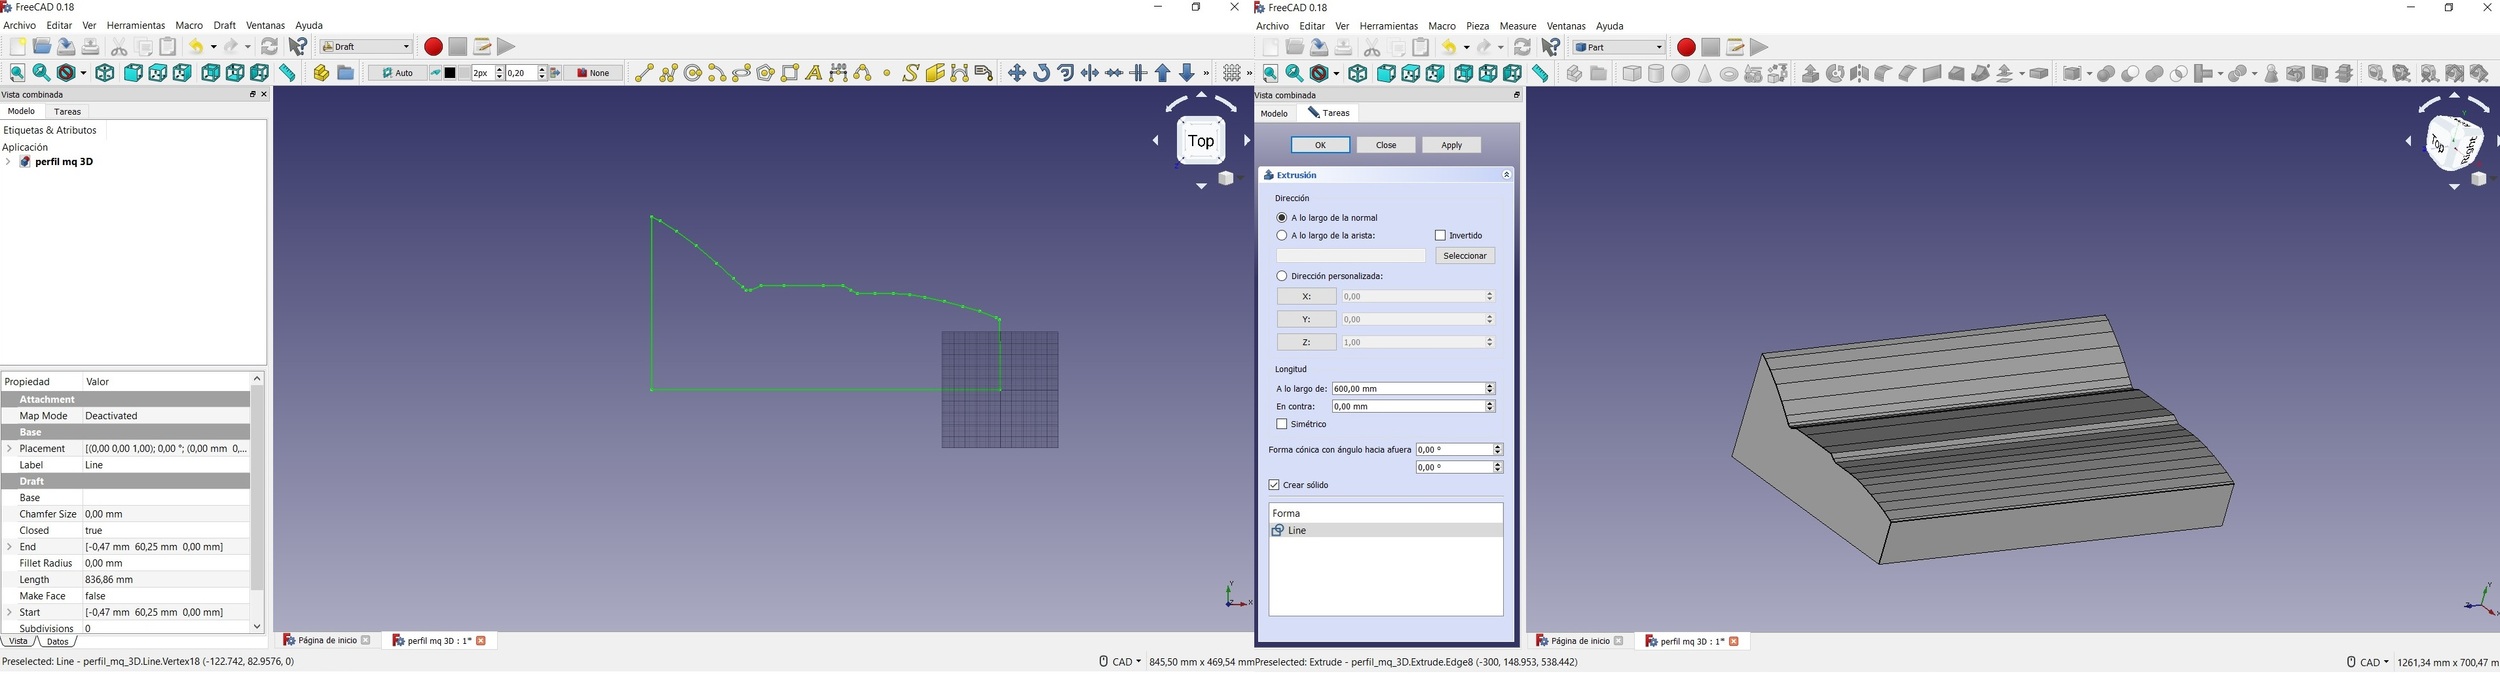
With that design in 3d, I will work with Blender to perform the simulation and animation. The files: Model Freecad file and Model STL
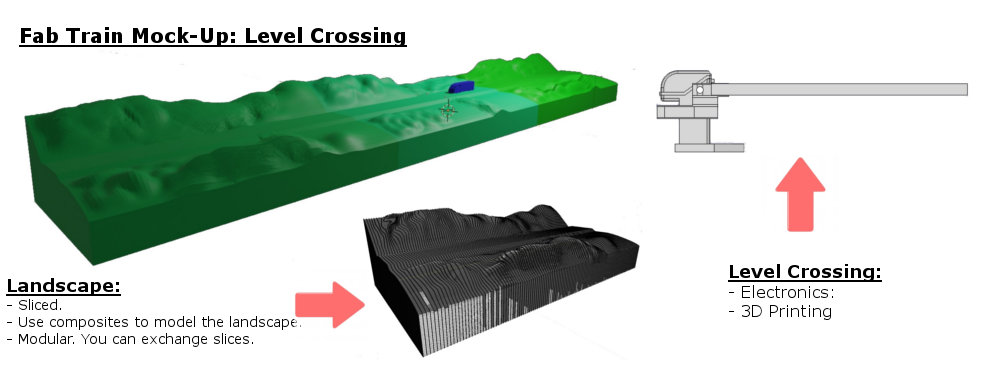
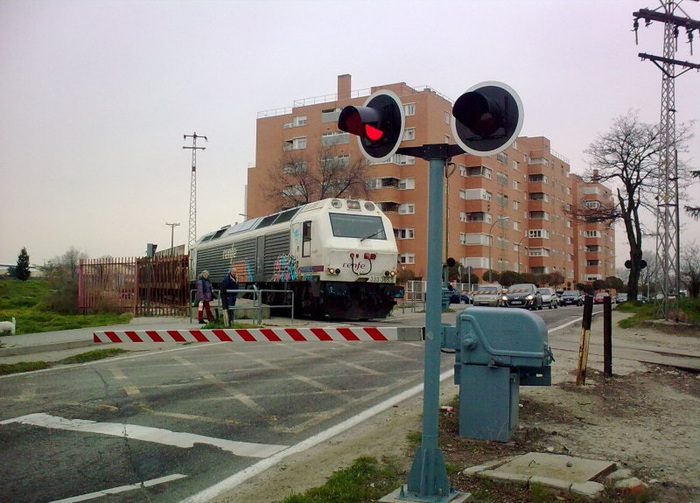
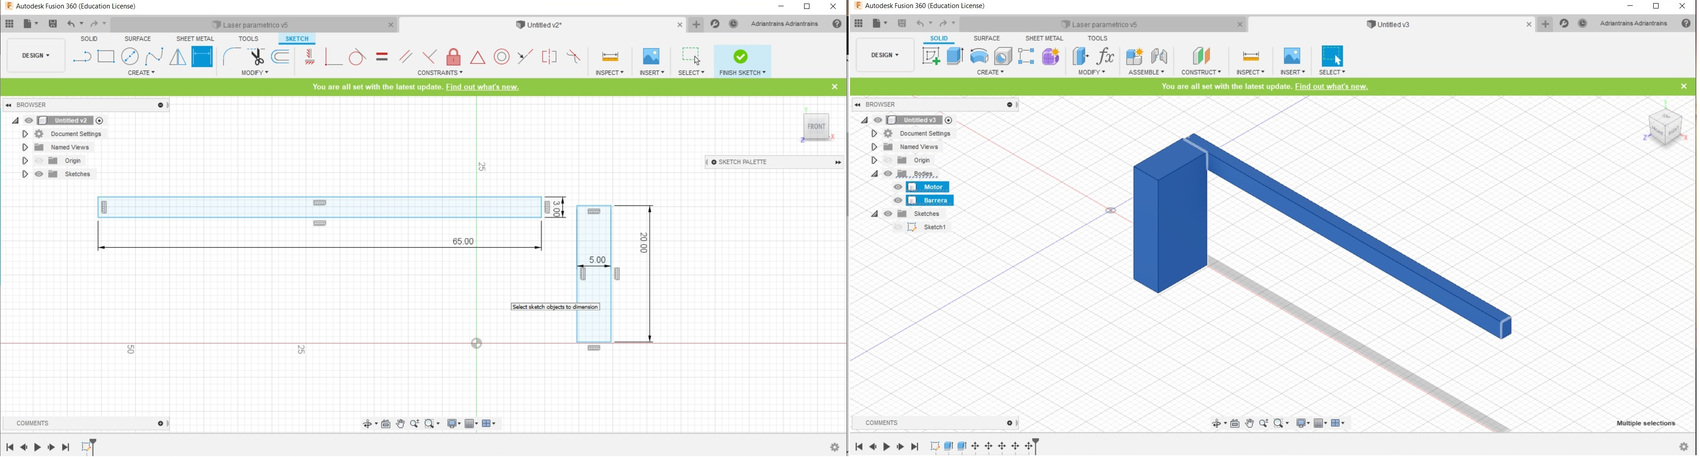
For my Final Project: Barriers of the Level Crossing.
As my final project represents a level crossing, the barriers are made in 3D Printing. This level crossing model is real and exists in Spain. I take the measurements of the original and scale it to 1:87 (H0 Scale) which is the scale that I will use in the model.
For this, I design with FreeCad through the Part section, using basic forms and Boolean formulas. On the one hand I design what is the motor that moves the barrier and on the other the barrier with the counterweight.
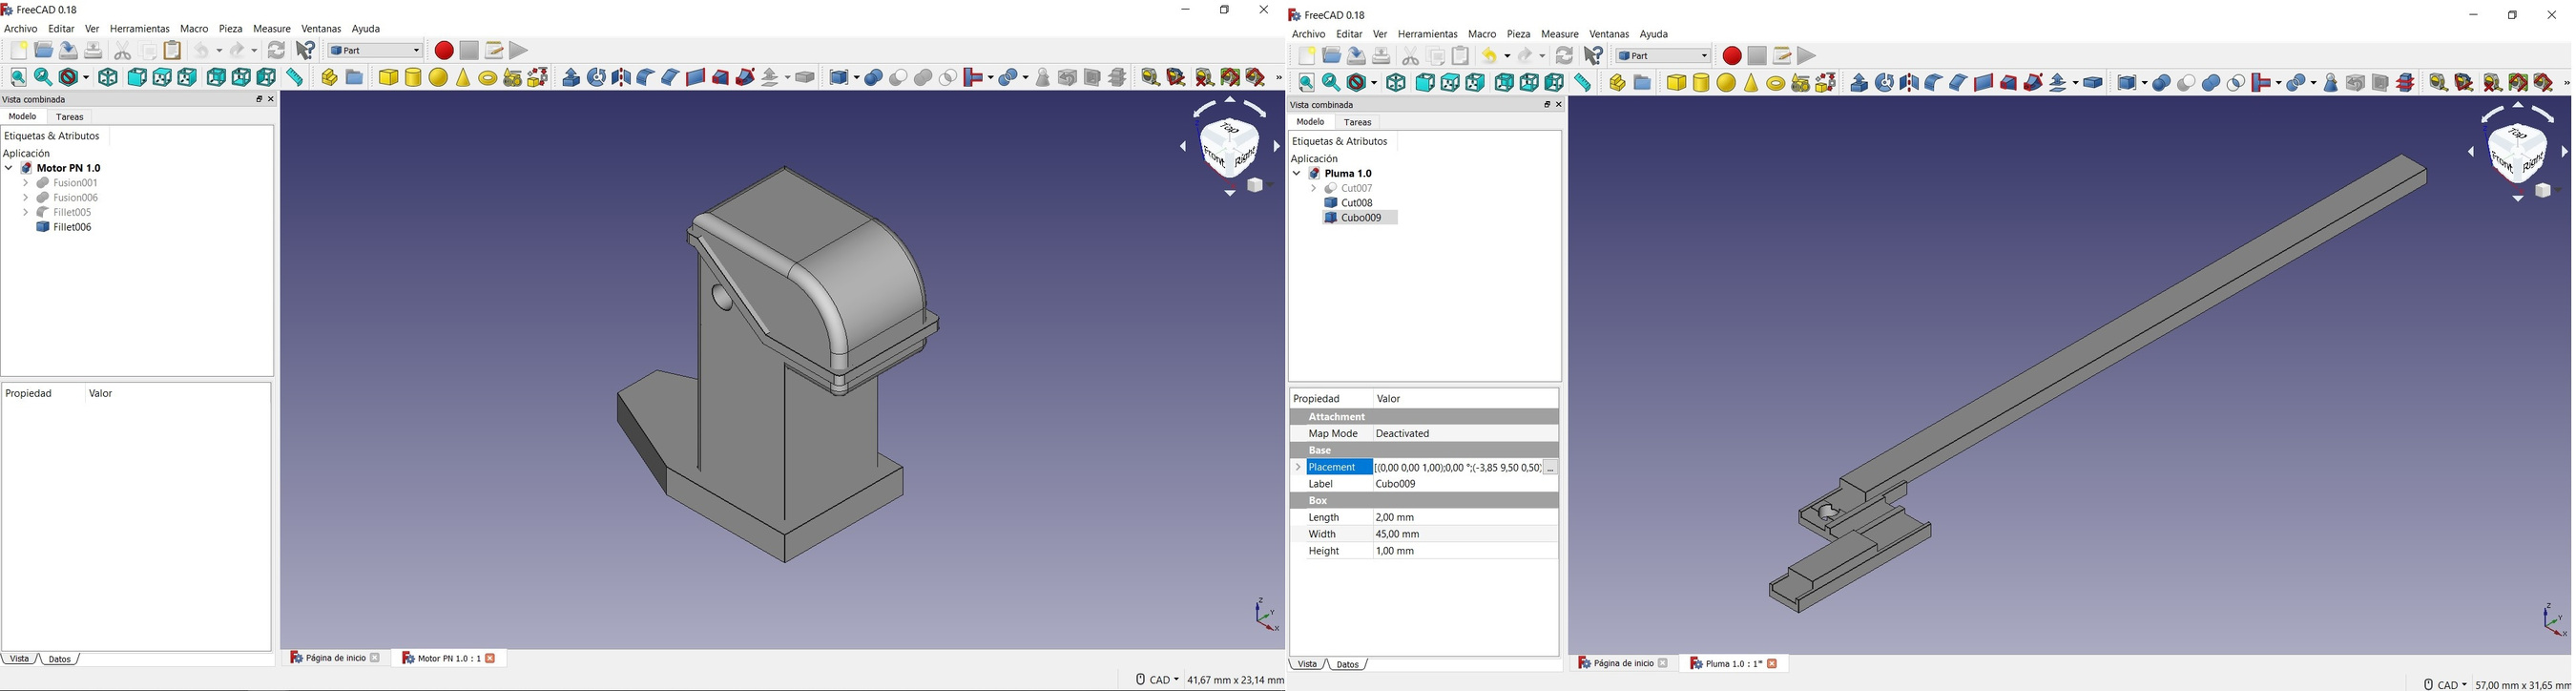
One of the multiple advantages of FreeCad is that it allows you to merge projects, so together with the engine and the barrier in a single project and work both pieces at once. Freecad also "saves" a history of parts, that is, all the original forms that you have been using throughout the project.
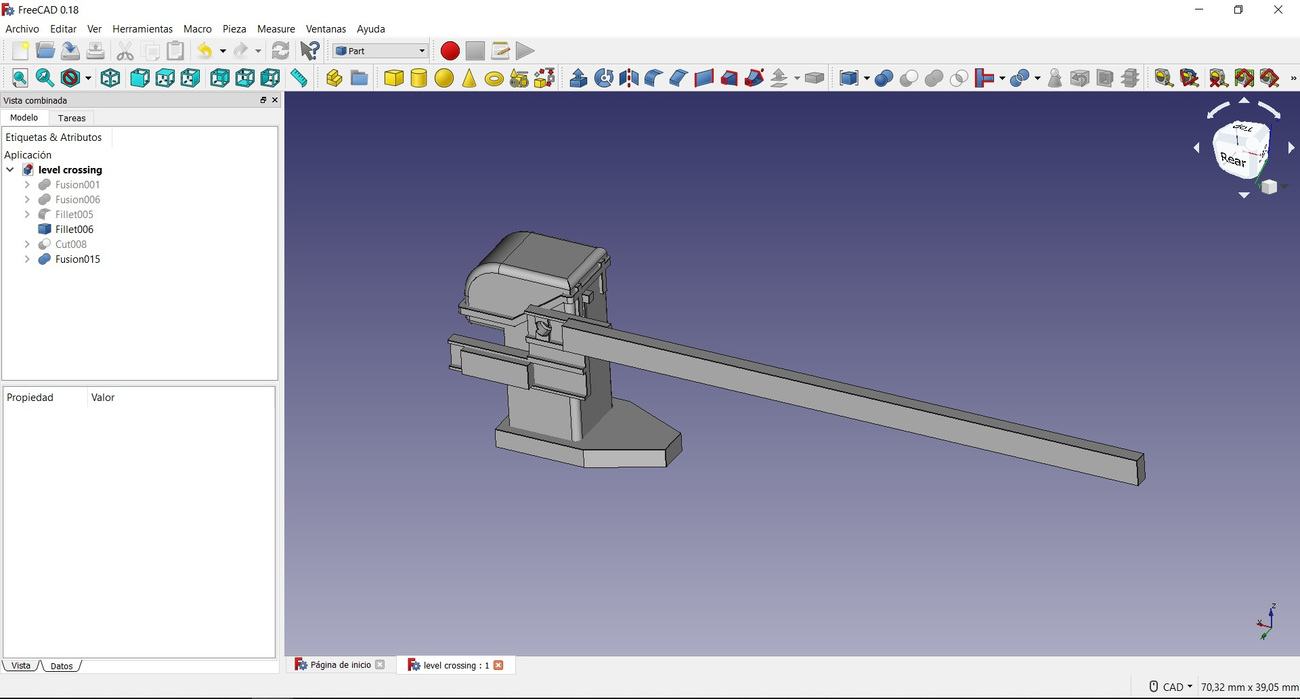
And here the final result of the level crossing barrier that I will use in my final project.
The files: Level Crossing Freecad File and Level Crossing STL
08/02/2020 18:00 I needed a train for simulation in Blender, I had two options: download it from the internet or design it myself. I chose the second. 😊
My little train designed using Freecad, using Sketch and extruding it. 🚄
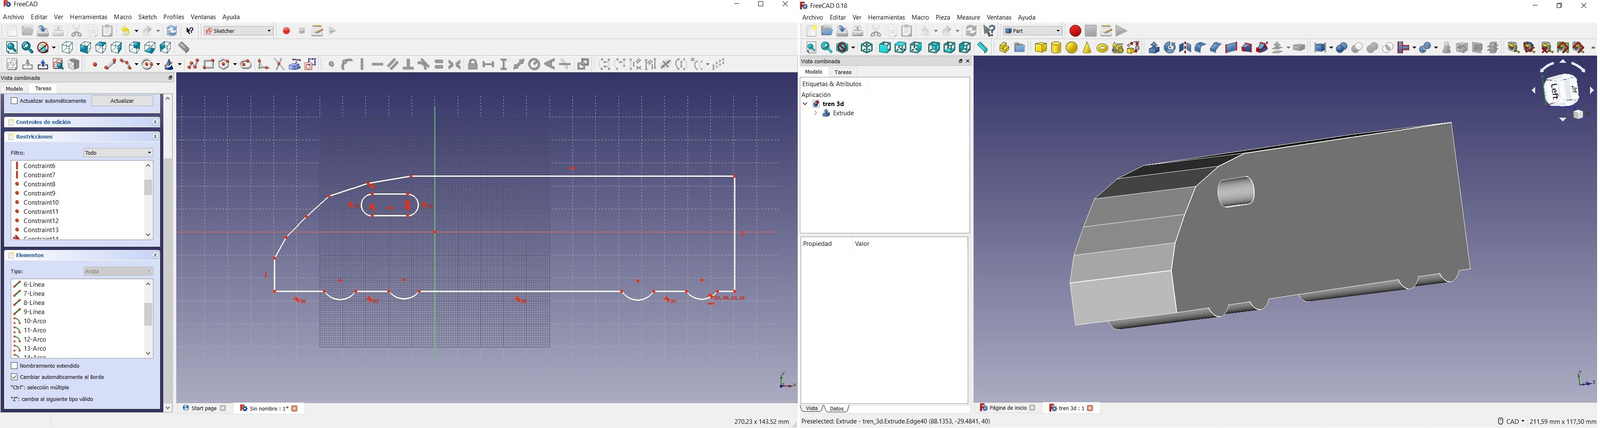
The files: Train FreeCad File and Train STL
Blender
07/02/2020 17:00 I have never used Blender, I have always heard that many people use it to model people or create a small video game. I've seen several videos on Youtube to know some of his commands.
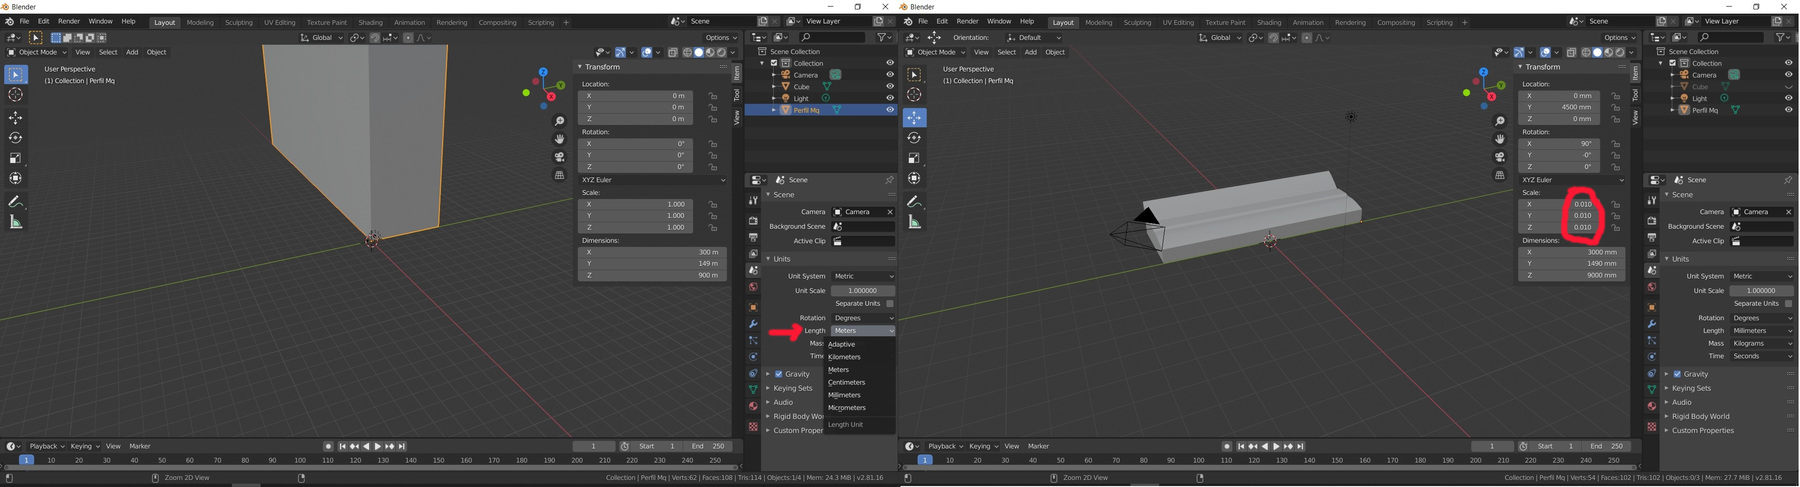
Once Blender is installed, by default you can open a general project where you will see a cube, a camera and a light. The first thing I did was erase the cube and then erase the light and the camera. First error; the light you need for textures, to simulate shadows; simulates the sun.
After solving the light problem by starting another project again, I import my model design made in FreeCad. When I place it I see that it is huge, that it almost leaves the workspace. 😣 IMPORTANT: Check the units you are working on (in my case I was in meters and wanted to work in millimeters) and the scale factor, I ended up using 0.010.
Once the problem of the units and the scale is solved, it is time to start sculpting the 3D model. In my case it will help me to shape the model landscape. For this I use the Sculping tool, which has different ways to sculpt.It can be sculpted in mirror mode, or block some axis. In my case I want to sculpt on the Z axis, that is, raise and lower the landscape. I keep the lock on the Y axis so as not to deform the model and work with the X and Z axis. Remember to deactivate the mirror mode, you will go crazy. 😂
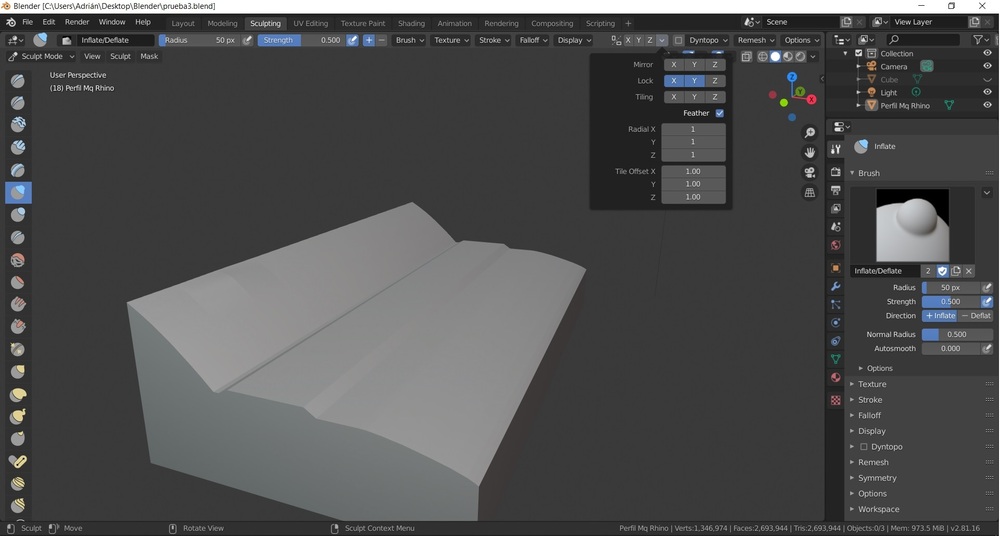
I start sculpting, but I realize that it is sculpted in a weird way, like I only sculpt the 3D mesh. I think it can be the blockages of the axes and I deactivate them all and neither. I try another way of sculpting.
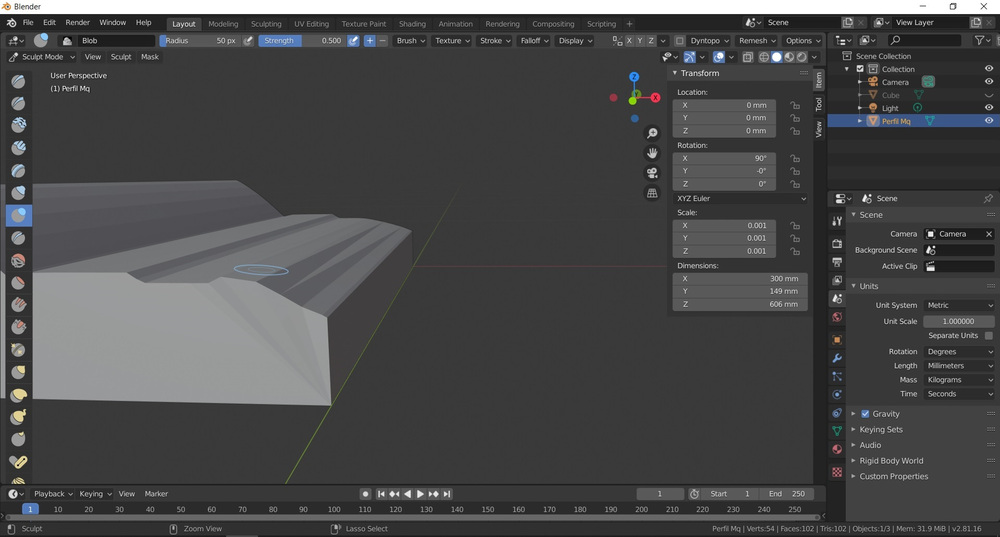
I think it can be the amount of meshes that the FreeCad file has. I create the same design with Rhinoceros and import the STL to Blender. The same thing still happens to me.
08/02/2020 15:00 With the problem of sculpting, I see again the video of Neil that is hung in the class and explains in a cube how to sculpt. I realize that I have missed a step...
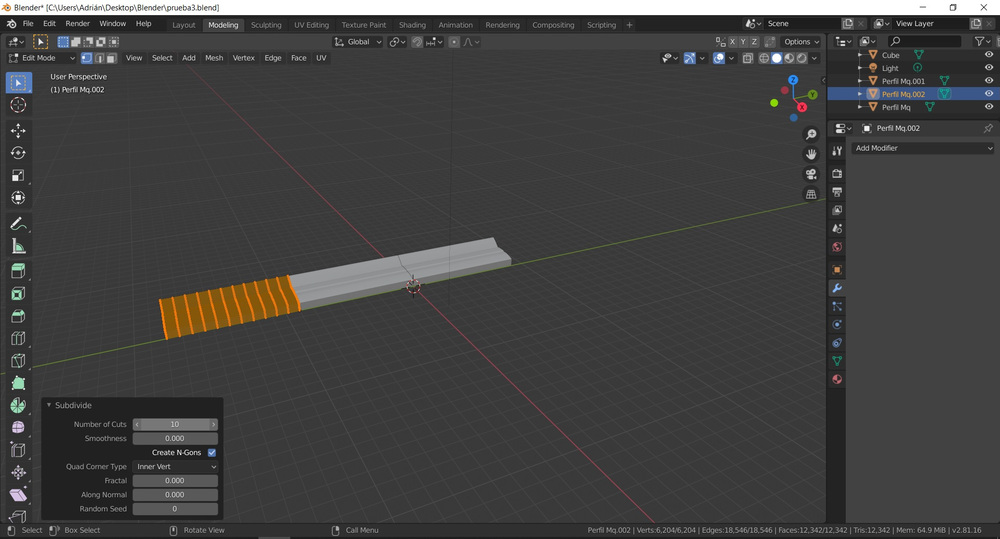
Within the Modeling menu, there is the Edge tab, where you make a Subdivide (a slicing) so you can work with different sections. In my case I tried 10 divisions of the element and ended up using 20. Then you have to go to the Layout and make a Shade Smooth to start sculpting.
To sculpt I use the commands "Crease", "Inflate" and "Grab". It can be added or subtracted, you can choose it from the menu on the right. And you have to go selecting cad element to go sculpting it, you cannot select several at once.
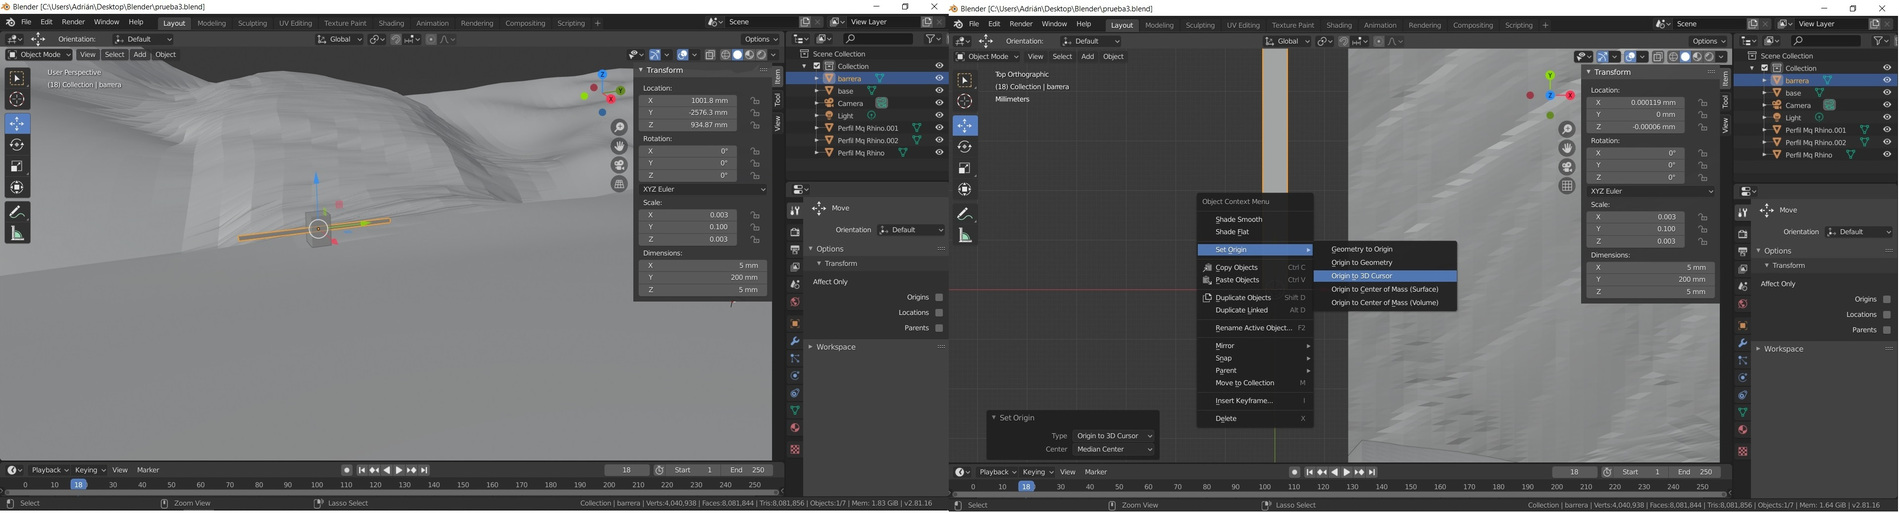
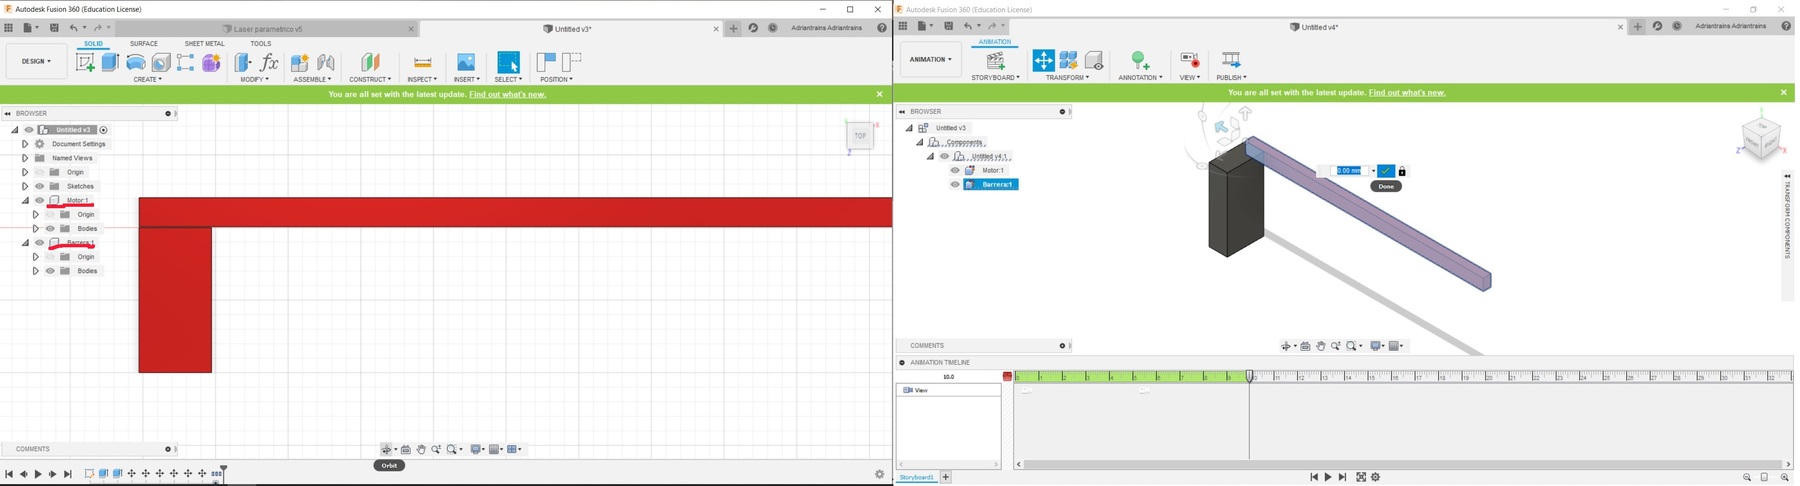
Each object you add has coordinates and an object origin. When animating objects, this is important because the origin is always located in the middle of the volume of the piece or object. To change this origin, we have to move the object to the origin (0,0,0) and once there select the 3D Cursor and move it where we want. In my case they are the barriers of the level crossing and they will rotate from an end 90 degrees.
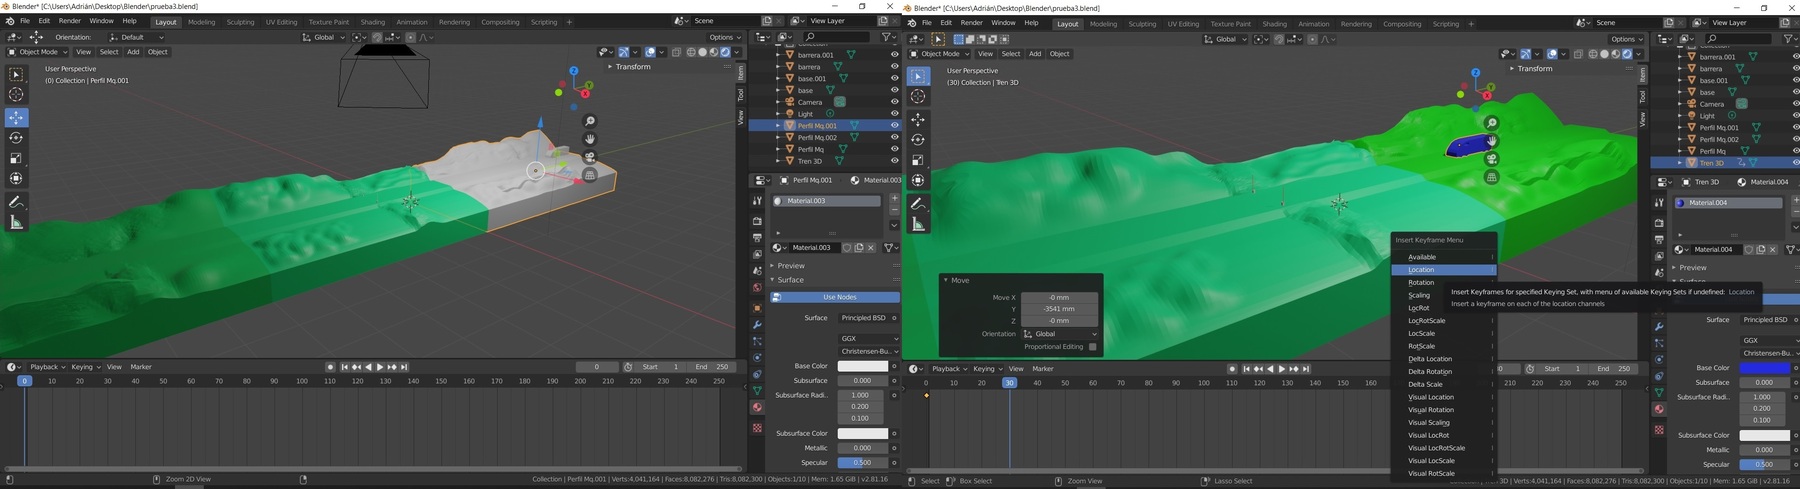
Then we continue with the texturing for this we look at the upper right corner there are four types of spheres. The first Wireframe, the second Solid, the third Material Preview and the last Rendered. We click on the latter and on the bottom menu we have an icon with a planet earth where if we click we can give material to each Blender object. Now comes the interesting part, animate all the objects in a timeline. Within the Layout menu, a timeline appears at the bottom. Moving this bar to the point we want, then move or rotate the object and finally with the right mouse button we select the option Insert Keyframe. So the times we want.
After checking that the transitions are well done, and I try different approaches with the camera and the light, I make the following video. I have used ShareX to make screenshots or screen recordings. It also incorporates an add-on to export the compressed videos with ffmpeg.
Fusion 360
09/02/2020 17:00 After having been documenting the previous softwares in the morning, I will investigate new ones. In this case Fusion 360.
Fusion 360 has several menus to work on: Design, Render, Animation, Simulation, Manufacture, Drawing. To carry out the 2D design of the level crossing barriers I use the Design section. In the Create section, with the Sketch I draw the base and the barrier. To move from 2D to 3D, without moving the page, there is the Solid tab. We extrude the pieces. And we already have our 3D design. Level Crossing STL
One of the advantages of Fusion 360 is that in the same project we can make a Render or an Animation of our objects. In the Render section we can texturize or select the final material of our project (steel, plastic ...) and we can calculate the weights and forces that are created; It is a part that I will investigate in the future. Incredible.
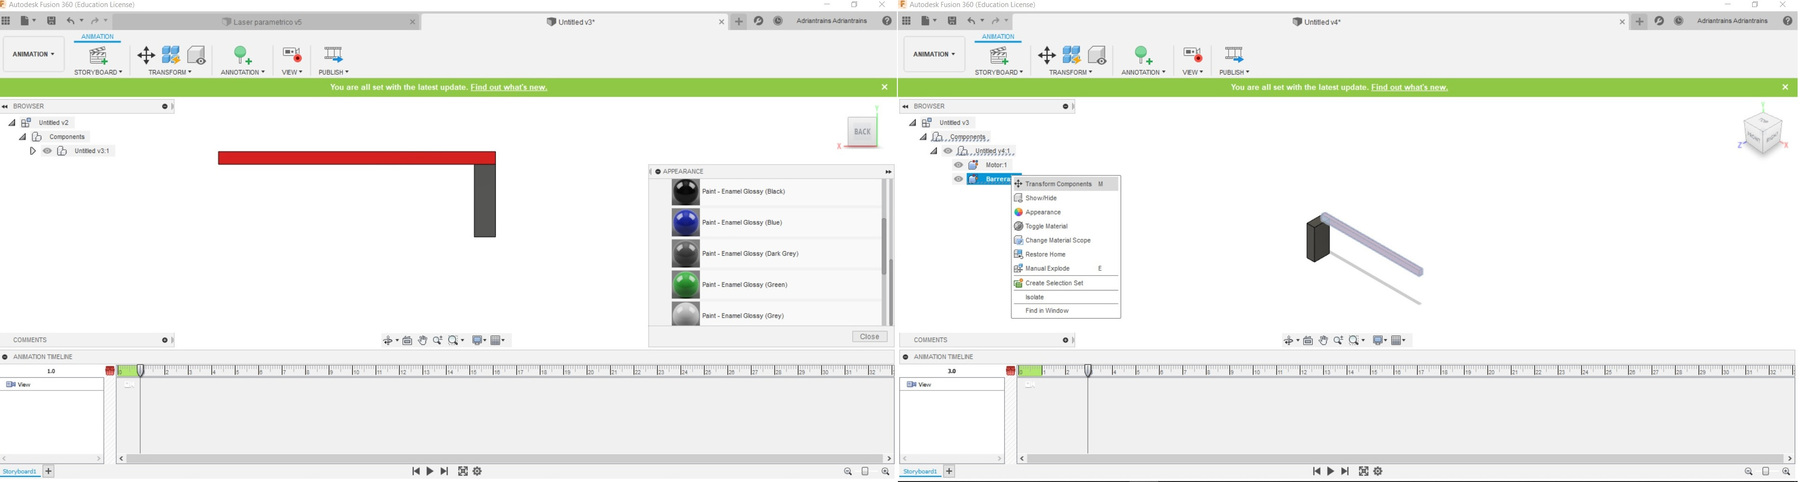
In the Animation section you will find the objects that we have designed. But I have a small problem, although the barrier and the base are different pieces, when I designed them I was in the same folder, that is, I did not put separate folders on each object. RECOMMENDATION: Create folders for each object, so you can texture them independently of each other as well as animate them.
Another element to consider as with Blender, is the origin of the objects. Each object has coordinates that can be in the center of the volume of the piece. In my case the barrier will rotate on an axis, so I need the origin in a corner.
As I said you can texturize with the final material or color the objects, it will be much easier for us to make the animation. The animation section has a timeline at the bottom of the program; The first thing we have to mark is the total animation time, in my case 12 seconds. Then we move the cursor through the timeline and at the same time select the object with the right button and click transform elements. So until the end of the animation.
Fusion 360 allows you to record the animation, but I preferred to take full screen capture. Here is the link to the project Level Crossing File in Fusion 360
Mods.
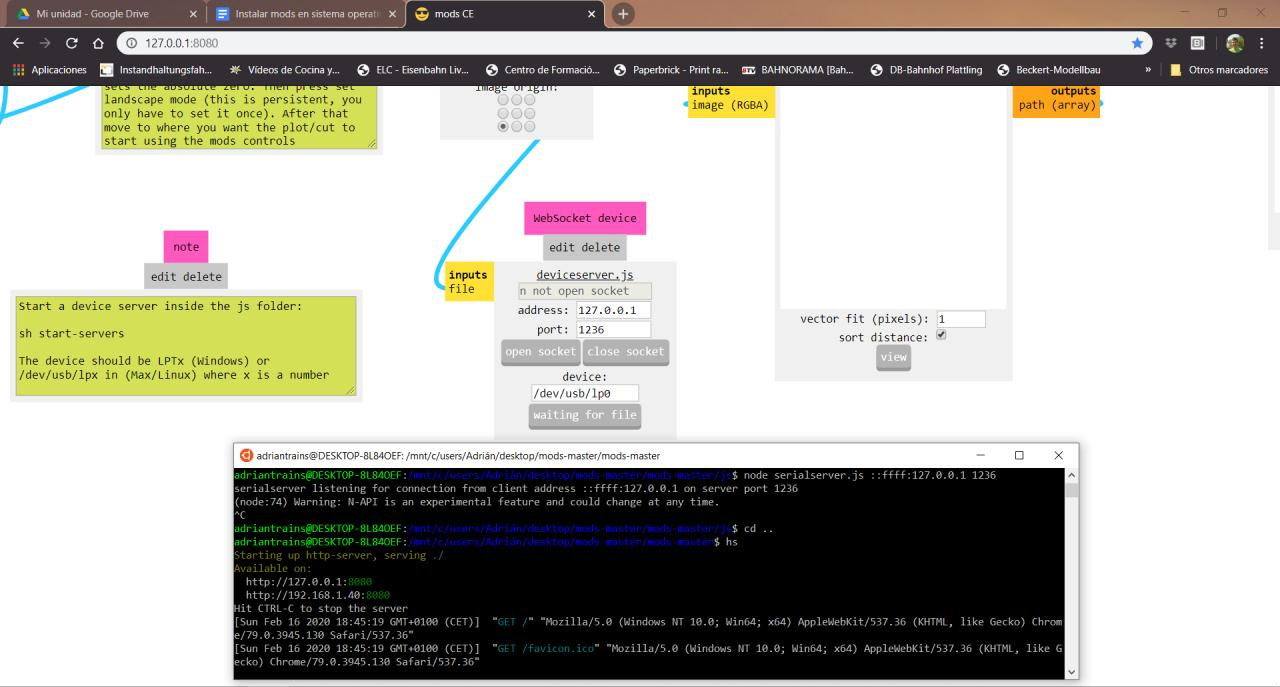
17/02/2020: I will try to use Mods for the Silhouette Cameo 4 vinyl cutter as Fran ( The Beach Lab ) commented in class. So I download Gsub mods from the Fab Foundation. My computer is Windows but I have an Ubuntu WSL installed.

I have tried to connect the Cameo through the deviceserver module and I can't. Also changing the deviceserver module for the printserver and neither. With the printserver module I try to connect the Cameo as if it were a printer and directly Windows does not let it be configured as a printer. I get the following errors and it may be that the Ubuntu WSL does not allow access to the hardware of the entire computer. Keep investigating.
23/02/2020 In Week 04 I worked with Mods CE in Linux.
Other Softwares:
- Vectorizer: Convert online raster images like PNGs, BMPs and JPEGs to scalable vector graphics (SVG, EPS, DXF) Click here
- Sharex: It is used to make screenshots or screen recordings. It also incorporates a plugin to export the compressed videos with ffmpeg. Download
- OBS Studio: It's another video capture that Youtuber's use a lot. In my case, I couldn't get it to work because the black recording screen appears. Several forums say that this problem occurs in laptops that have the integrated NVIDIA graphic. Keep investigating. Download
- QWinFF: It's a GUI interface to transform videos with ffmpeg. Download
- Gear Generator: Javi, a young maker of the Fab Lab León showed me this online gear generator. Thank you. Gear Generator
- Deepnest: Open source nesting software Download.
Files
Find below the files that I made for this assignment.