CNC milling
Class notes
CNC: it is a 2D design process it is a subtractive CAD it can cut strong materials such as a metal. it depends on the motor and the mill. plywood is used for making houses or making furniture. same logic of a laser cut but bigger QUESTION: can you get plywood with a laser machine  cnc machine vs laser-cutter a cnc machine functions according to depth and measurements laser cutting machines cannot really understand measurements
always prototype on a smaller scale what happens on the computer is always perfect. material and its tolerance in real life do vary.
it always makes more sense to create a waffle prototype in a smaller scale on a laser-cutter. this would be saving both time and money. (material, file preparation, etc..)
types of CNC machine
There are different types of CNC machines. - 2 Axis like a laser cutter. - 3 Axsis laser cutter - 4 Axis machine which is a 3 axis machine with an add-on, a rotary add-on. (we can also have this add-on for laser cutter) - 5 Axis machine (which i never think i will use personally) - hand-held machine
Parts of the machine
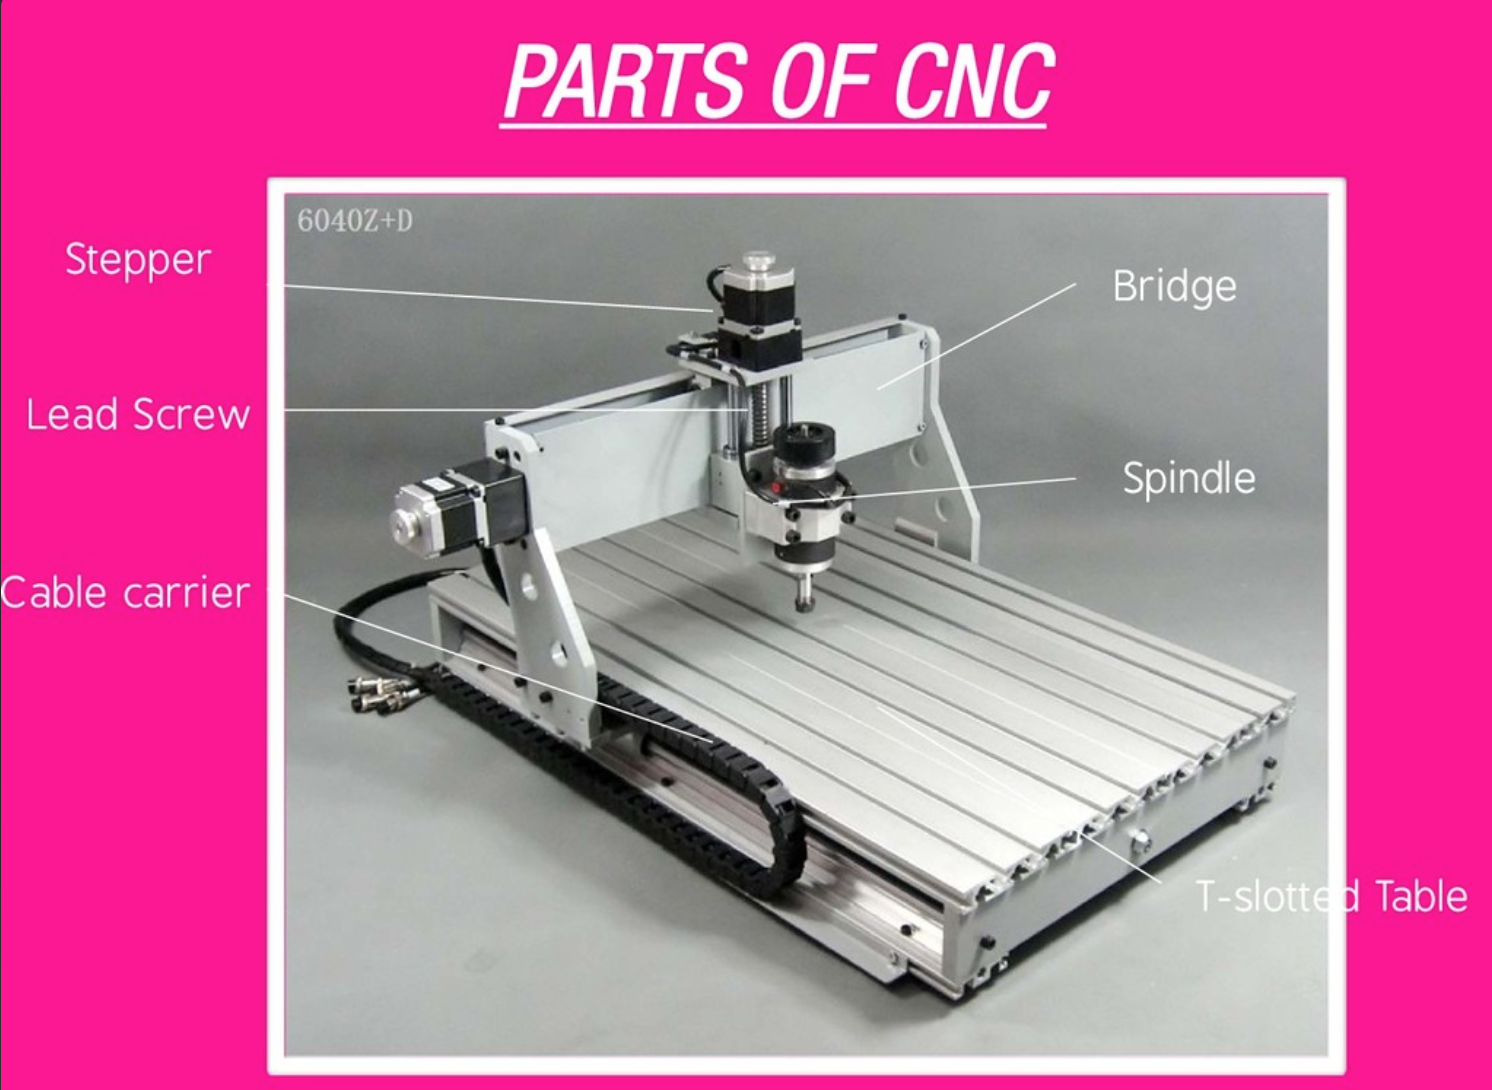
Stepper: it allows the step by step design in order to create efficace designs Spindle: it is quiet with more horse power. its cuts are small, and lasts long. it can have variable speeds or single speeds. Collet: the clamping tool that holds the end-mill. it is very important to clean the collet for both safety and acurracy. collets have variable sizes 1/8 inch 6.1 mm, which is not the equivalent of 6.0 mm, that 0.1mm is what would make the mill fly away.
Lubbing
Lubbing is really important, and there are two ways.
1- Automatically, you can do it, and it is important for metal cutting and strong materials to avoid incidents such a melting the mill and the material together.
Automatic lubbing usually takes place in closed CNCs environments.
2- Manual lubbing can also be done in open set-ups. It is cheaper and it works for cutting wood, goamd, plastic, soft composites, and the soft metals.
How to choose your tool: Guide to CNC mills
There are millions of types of types of mills. Usually, there are mill bibles related to that.
But there are four big families.

Straight: lets the material aculumate. good for plastics
Up: clockwise and up
Down: clockwise and down slowest one to cut. only cuts horizontally or else, there is no space for the material to escape
Compression: clockwise and both up and down. why does it work that way? It works for composites. composite
e.g.: if youre cutting 20 mm of wood, you need 10-10 mm
The most standard one is the up down.
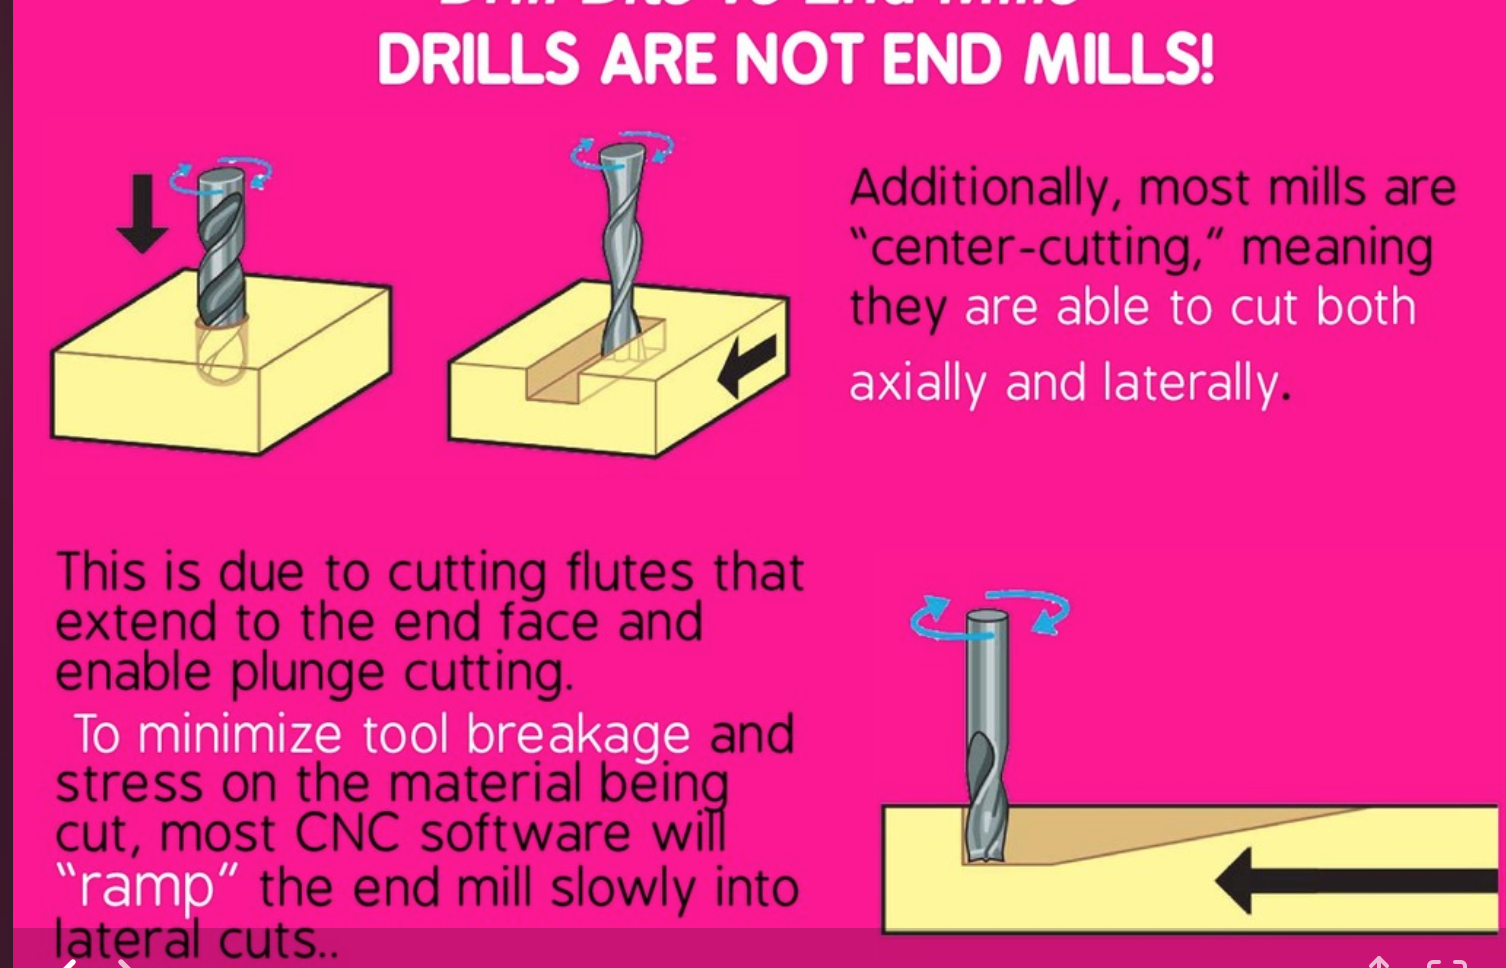
drill bits are not end-mill
drill bits only work vertically.
end-mills can work in different ways.
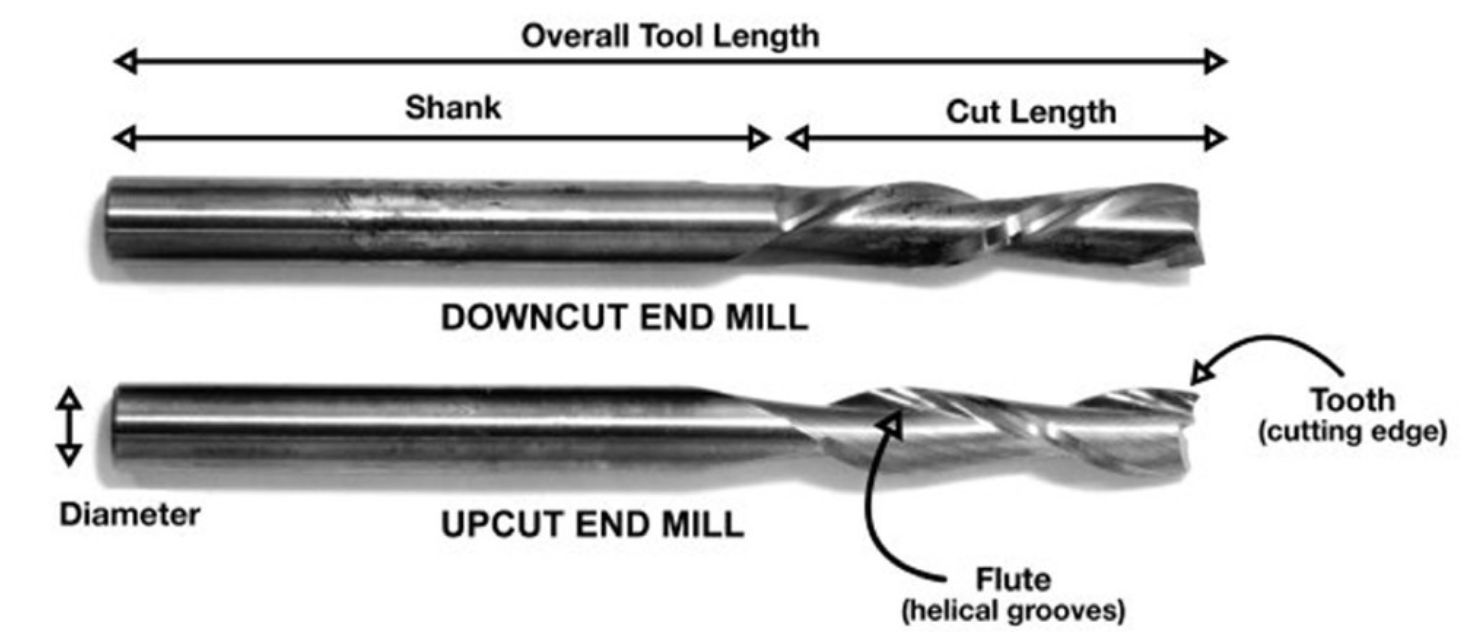
anatomy of an end-mill
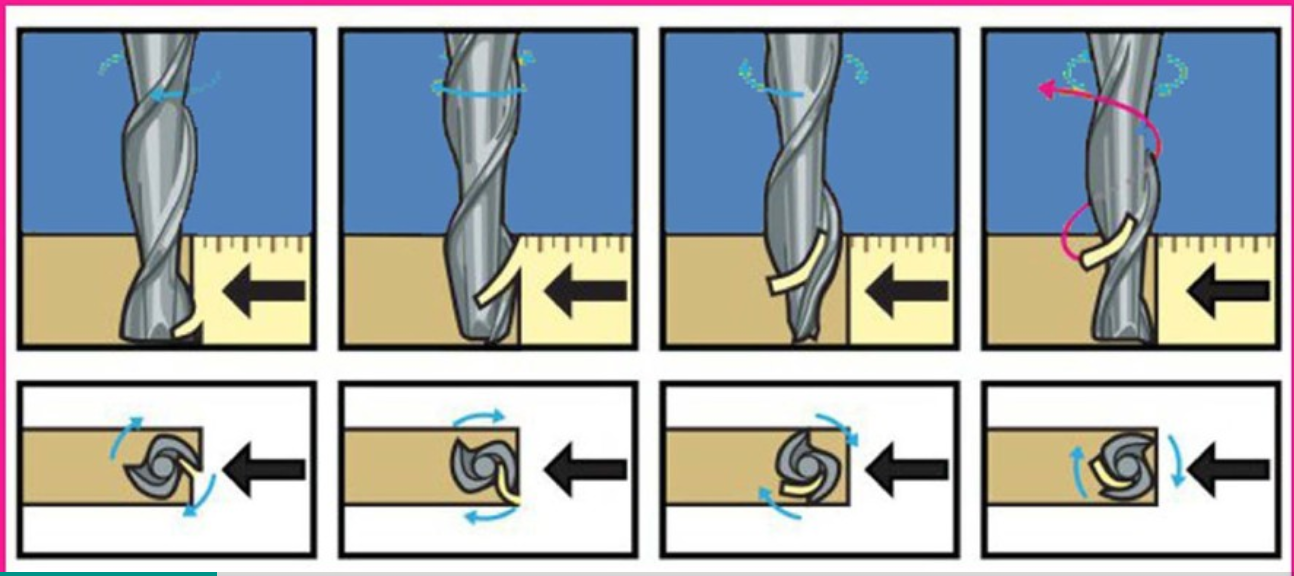
make sure that your end-mill has a higher length that your cutting depth, in order to allow for the material to escape.
This is how the material gets evacuated.
how to choose the milling machine
- bigger is better because it can cut a lot of material at once.
- the type of the tip depends on how we want to cut to be.
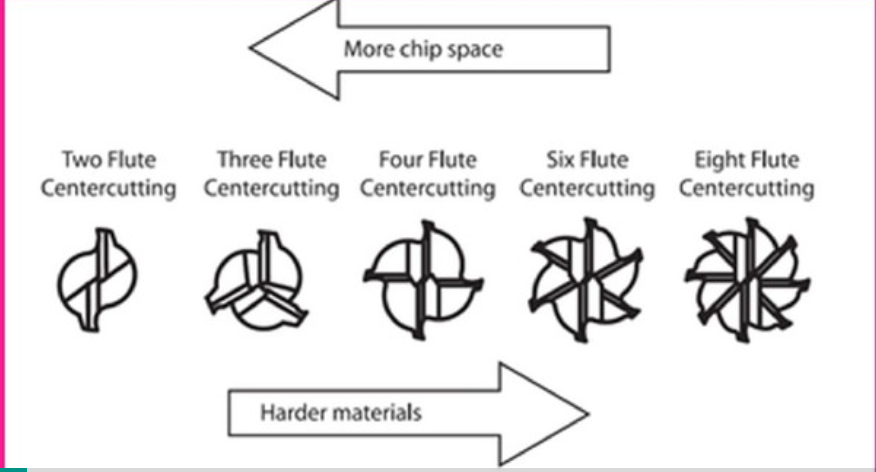
how many flutes more flutes –> better surface quality but that also means you need to move faster, the more flutes, the more chips, the more material cut.
/ when you cut you should see chips not dust.
Chips are the cutted material but also works as a cooling material as it eliminates the heat with it./
chip load
chip load = (speed / RPM * #F) 0.005 = (x / 18000 * 1) x = 90 inch/min 90 inch/min = 90 * 25.4 = 2300 mm/min
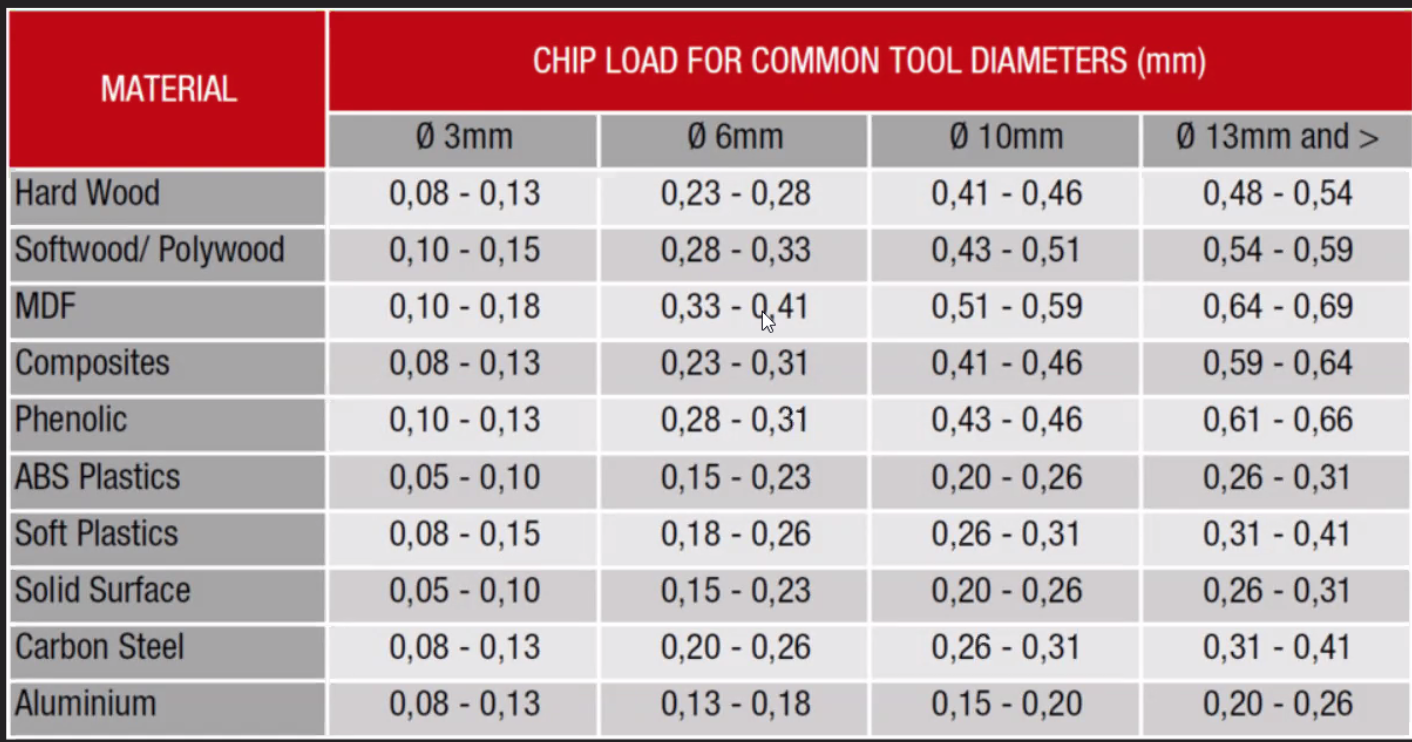
the chip load is usually written on the end-mill package. You can find chip load charts based on the end-mill and the material.
the chip load can be a range depedning on the humidity so usually you need to calculate the interval and try.
the speed is the incognito we are looking for.
the RPM is the speed which we are going to be cutting usually we want it to be higher.
Horizontal speed - feed rate vertical speed - rate
cut depth we cut in bits and layers. we always cut with half the of the end-mill size
cutting too fast or too slow
 SOUND:
the higher the pitch, the machine is eating too little material, needs more speed. the lower the pitch, the machine is eating too much material, needs less speed.
HEAT:
if it the end-mill is hotter than being able to touch it, it means its going too slow.
** hold down**
- vacuum tables are too expensive
- clamps wastes the clamped material
- screws are good but its important to locate them
- double-sided tape doesnt not have very strong fixation
Holding tap
how not to break the cnc machine 1. moving over the machine limits 2. drilling into the support 3. breaking the cutter/ the support 4. too high feed rates 5. forgetting to swtich on the spindle 6. forgetting to dix properly
materials
first rule of materials: never use an end-mill with the same material you’re cutting.
steel: the hardest thing to cut. cooling needed very hard and sharp chips
Wood:
Solidwood/plywood: good surface Mdf/hdf: hard to make a surface finish osb wood: cuts well Aglomerate wood: difficult to make a good surface JANKA TEST for tolerance of wood
Plastics: cuts generally very well
Foam:
expanded styrofoam most common large bubbles surface always rough –> more dense –> cuts awfully
extruded very good to test runs –> cuts really well insulation
Wax: great cutting
how to prepare the file
Scale: draw in mm, scale 1:1 Nest: space between parts Only vectors
kerf issues*
since the tool is circular, the angles will be circular, so we use this technique:
T-bone fillet Dog bone fillet
or you can explore circular joinery.

softwares Rhino cam Meshcam
12 steps golden rules
RhinoCam
1.Select Machine - 3 axis CNC_STEP_BCN


2.Box Stock:

Stock Geometry: origin in the top left buttom corner
Corner coordinates: 0, 0, 0
Dimensions: L, W, H

3.Screw material and then around the area you want to cut

4.Draw points in Rhino where you have located your screws

5.Go to Machining operations - 2 axis
Roughing
Pocketing (emptying part of the material)
Engraving (on cut) (choose it for making the "screws" spot and then select the points where you want to make the mark

6.Create/Select Tool

7.Fablab just have bold and flat mills.

For the screws choose flat (next parameters should be according to the one you are going to use)

Name it (this is an example of mill bit values, you have to choose your own)
Holder Dia: 30
Holder Len: 45
Shank Dia: 6
Tool Len: 105
Shoulder Len: 60
Flute Len: 45
Tool Dia: 6
Flute: 1
Spindle Parameters: Speed: 18000 RPM, Direction: CW, Cut (calculate with cheapload equation): 4500, Retract: same as Cut, Departure: same as Cut. Plunge ("half of cut"): 2000, Approach: same as plunge and Engage: same as plunge.
    Clearance Plane: Clearance Plane Definition: Part Max Z + Dist: 20 (Never Automatic)
    Cut Parameters: we only care about "Cut Depth Control": 3mm
    Entry/Exit:
Sorting: Minimum Distance Sort


For pocketing:

Feeds and Speeds: 18000 RPM
Clearance Plane: Clearance Plane Definition: Part Max Z + Dist: 20 (Never Automatic)
Global Parameters: Climb
Cut Patter: Offset
Do everything else!!!!!


For profiling/outside: use along path! when using profiling the machine doesn't recognize other pieces. So we'd like to use along path so it can slide and approach directly to the selected piece. Remember to add taps (bridges).
Ideas make myself a desk
setting up the file
-
name of the cnc machine set the dimensions of the board. the thickness usually is the average of 6 points the z is always on the top.
-
Import the file on the model in 3d model
- usually we create an offset for the screws to hold down the material. we do the same for each part ( we can also use deepnest software)
- we start with the top layers and and the outside to the inside. a. select incut, outcut or intercut. b. select 2-axis c. select and setup tool d. spindle parameters speed e. feed rates + plunge approach engage retract departure (2/3 of feed rate) f. cut clearance (+20) g. climb milling vs conventional milling climb cutting strongly then sanding conventional milling sanding then cutting strongly
the machine deos an offset alone after cutting. it is called step over. it is half of the mill diameter. the step over is for the (x,y) plane.
always better to have short and thick end-mill
understanding G code:
S18000: rpm speed M3: confirm mill is on G0: do a fast movement (defect values)