2. Project management
- Yes, I did built my own website from a ready made content management system using WordPress (TAKEONE.TECH).
- I have experience in building website using PHP and MySQL too, since I needed to connect my IoT project to databases and build API’s.
- At Fab Academy First Few Classes I Have Learned A New Method Called Markdown
this page where you are reading now is written in Markdown language / Method
I Would like to talk about Markdown Since Its A New Experience For Me.
About Markdown Engine
Markdown is a lightweight markup language with plain-text-formatting syntax. Its design allows it to be converted to many output formats, but the original tool by the same name only supports HTML.[9] Markdown is often used to format readme files, for writing messages in online discussion forums, and to create rich text using a plain text editor Referrance
My Experience In Trying Markdown
I added this picture to present to you that I wrote it down with mark down and how des it appear on the right side to the viewer. You can see the representation and how they look below

markdown is a simplified html & java script based marking method that’s helps build acceptable looking website good enough for documenting easy and fast to grasp
HTML VS Markdown
in html to make a text as a heading you have to open a h1 tag and close, you cad do h1, h2, h3 it all levels of heading for example
Headings
This is a comparison on heading in HTML vs Markdown
HTML HEADDING
<h1> This Text Is Heading 1 </h>
<h2> This Text Is Heading 2 </h>
<h3> This Text Is Heading 3 </h>
Markdown HEADDING
# This is Heading 1
## This is Heading 2
### This is Heading 3
Links
This is an example of links in HTML vs Markdown
HTML Links
<a href="URL"> Link Title Text </a>
Markdown Links
[Link Title Text] (URL)
HTML IMAGES
<img src="ImageURL"></img>
Markdown IMAGE

Note:
How ever you can always embed html iframes and division directly in Markdown
Utilizing Git & GitLab


here I will explain version control using git and explain what’s git, repository and how the thing works
Introduction
I am going to explain this in my own words here. in order to achieve Versioning, you need to have a local copy of file on your computer and you need a software that acts like a post man to submit it to a file bank. Its a special kind of file bank that doesn’t mirror what you have on your computer but takes your new copy of files and compares it with the old file and register the differences and then upload your changes to the file, this way when ever you want to go bac in time or attempts of commit you can still get the files on the state that you desire. the main key point that versioning system doesn’t save over your file blindly but keep track of changes with a comment from you for your self to read what you did before you upload the file to the file bank. in our case GitLab is our special featured file Bank.
Download & Install Git On Windows
in order to start 1st You Need To Download The Post Man Software (Git) that will be the link between your local files and your special file bank GitLab
Click Here To Git Download Page

There is nothing really about the step press next on all the up coming windows and finish the installation
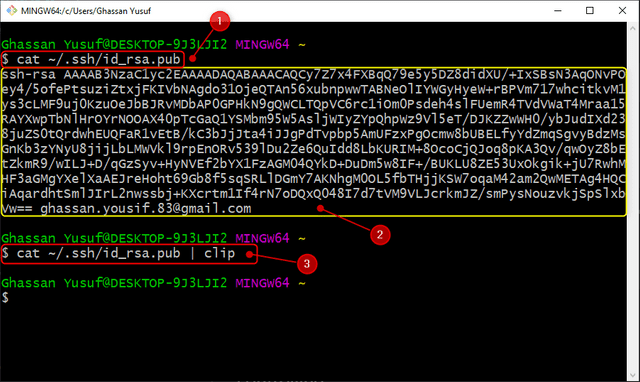
Running GitBash & Generating Public SSH Key
1st step In order to generate a public key you need to type the following
ssh-keygen -t rsa -b 4096 -C "Your Email Address"
At this point the key is generated, you can find it at this location
~/.ssh/id_rsa.pub
2nd step “Copy The SSH Key To Clip Board”
There are two ways
-
head to the file location
C:\Users\Ghassan Yusuf\.ssh\id_rsa.pubopen it with a text editor and copy its content -
On GitBash type the following code
cat ~/.ssh/id_rsa.pub | clipthis will automatically open the file and copy its content to the clip board
3rd Step Get Your GitLab Account Recognize & Authorize the Git access through your SSH Key
Head to your account on FabAcademy GitLab https://gitlab.fabcloud.org Login if necessary
on the top right you will find your (user picture) click on it a menu will drop down then select (settings)
- User Picture
- Setting Location On The Drop Menu

a menu bar on the right side of the window click on (SSH KEY)
- SSH Key Position On The Right Menu

on the SSH Key Page
- Position Where You Should Paste Your SSH Key
- Title Of The Computer You Are Using It To Communicate With GitLab
- Click On The Green Button To Add The Key

click on the button that says Add Key
4th Let Git Know Who You Are
Run Your Username Identifier
git config --global user.name "YourUsername"
Run Your Email Identifier
git config --global user.email "YourEmail"
There Rest Of The Tutorial I Created A Video To Guide You Exactly Where To Go And What To Do.
Git & GitLab Tutorials Video - That Includes All The Steps Needed