
Fab Academy 2019 - Lucas Lim
My Final Project Planning
My Final Project Planning
My Final Project Phases :
Project
Conception
Project
Planning
2D & 3D Design,
3D Print & Laser Cut
Electronics Design
and Fabrication
Programming &
Testing of
Electronics
Project
Presentation
In week 1, I thought of making something useful and decided to make a dust particle sensor for my Project Lab (a carpentry workshop), but as I am new to electronics, I only started planning in week 12 (7th April 2019), 'Output Device' week.
Reason for choosing this project :
In my Project Lab (Carpentry Workshop), air pollutants are inevitably produced.
There has not been any form of measurement of dust particulate carried out before in my Project Lab or other labs in our school of ABE.
1) Being a Registered Workplace Safety and Health Officer (WSHO) with the Ministry of Manpower in Singapore, I am curious to find out the out the amount of dust particulate generated from the students' activities in my Project Lab (as well as our FabSTUDIO which is next door) to see whether they are within healthy and acceptable range. If not, control measures, like purchase of air purifier, might be implemented to mitigate the risk.
2) Singapore sometimes exprience haze which are generated from the neigbouring countries when the local farmers use the 'slash and burn' method to clear the forested area for argiculture purpose.
3) Being totally new to electronics, I would like to start on something of a smaller scale which could be easily accompished in the next 5 months.
4) Keeping the project cost low. Like not exceeding USD $200.
Application and scope of project :
1) To take PM10 and PM2.5 reading / measurement of inhalable airborne dust particulate matter in the Project Lab and fabSTUDIO
2) Dust Sensor device can output an audible sound (by buzzer) if dust particle amount exceed the healthy range
Future Application (Spiral development) :
3) To provide logging for study
PM10 and PM2.5 definition :
PM10 is particulate matter 10 micrometers or less in diameter. PM10 is generally described inhalable coarse particles.
PM2.5 is particulate matter 2.5 micrometers or less in diameter. PM2.5 is generally described as fine particles.

Picture from Particulate matter, how small is it? by VFA Solutions
PM10 and PM2.5 unheathy range :
For a start, it will be useful to include a buzzer to be sounded off if the PM2.5 or PM10 reading reaches the 'Poor' range or above.

Extracted from Wikipedia : Air quality index
Proposed placement of fabricated dust sensor :
1) The fabricated dust sensor will be place indoor and on a table top.
2) It shall be placed in the middle of the workshop/fab lab.
(Eg. placed in the middle of the Project Lab and fabSTUDIO, whereby most human traffic is expected to be present or moving though)
3) It shall not be placed near the machinery that is expected to generate dust.
(Eg. saw which obviously generates lots of dust. The students/Staff are supposed to be wearing N95 dust mask while operating these machinery as stipulated in the Safe Work Proceduce (SWP))
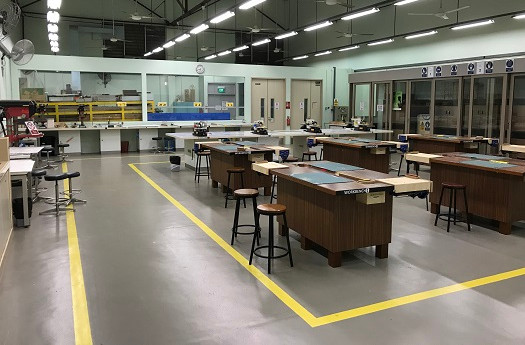
To measure dust particle in Project Lab (carpentry workshop) |
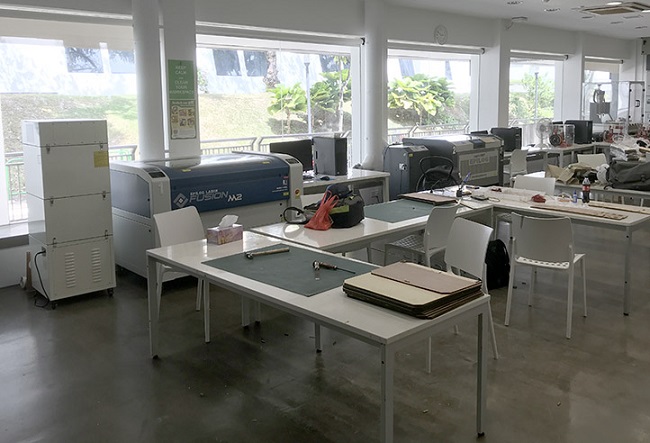
To measure dust particle in fabSTUDIO (Fab Lab in School of ABE) |
Dust Sensor (input device) working principle :
My fabricated dust sensor uses the principle of Laser Scattering Detection to detect suspended particulate matter in the air. namely laser irradiation in the suspended particulate matter in the air and generate scattering. Scattered light will be collected in a specified angle at the same time. According to the scattering intensity, time-varying curves can be obtained through the sensor. Being processed by the microcomputer processor, equivalent particle diameters and the number of suspended particulate matter with different sizes in per unit volume can be obtained.
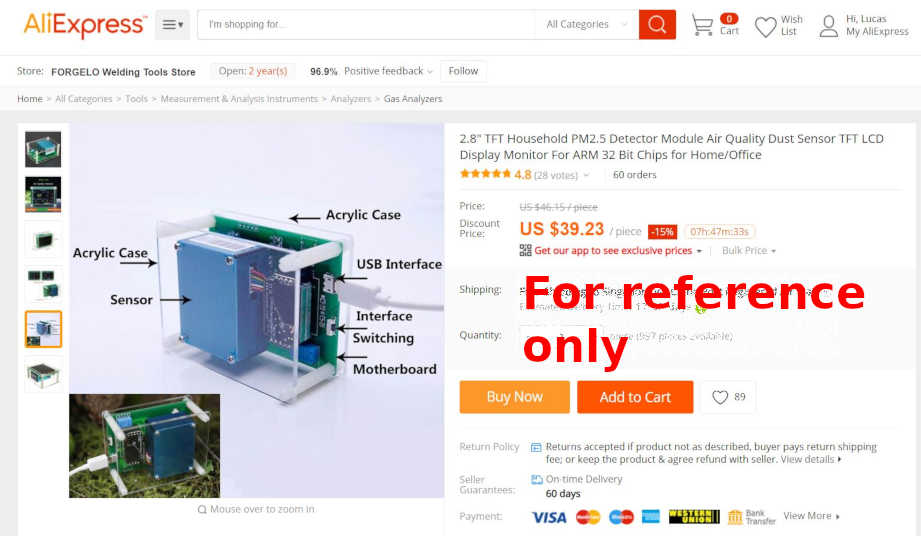
Reference : A sample product from AliExpress website
1) PM 2.5 Sensor running from an Arduino Uno Rev 3 board :
http://fab.cba.mit.edu/classes/863.16/section.EECS/people/Jain/articles/2016-12/final-project-planning.html
2) Arduino Tutorial : A dust sensor running from an Arduino Fio board :
http://arduinodev.woofex.net/2012/12/01/standalone-sharp-dust-sensor/
3) A 2.5 Sensor running connected to a Particle Photon :
https://www.hackster.io/edwios/air-quality-monitor-3f422f
4) A commerical product for home/office :
I had came across this "PM 2.5 dust detector with 2.8" TFT LCD display" which costs US $39.23.

Front view of sample unit showing the readings |
Side view of sample unit showing the assembly |
I will design :
1) The PCB or electronic board to take in reading form the dust sensor module and output to a LCD display module and a buzzer (if unhealthy limit is reach).
2) A 3D-print support frame to hold the electronics comonenets together. 3D Print is a form of additive manufacturing.
3) Wooden/acrylic plastic enclosure box. using laser cutting, a form of subtractive manufacturing.
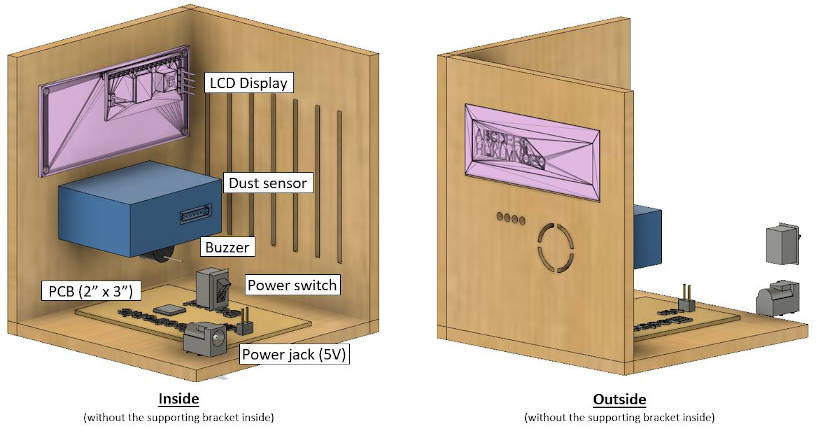
First impression of a 3D model of final project without the 3D print support frame (not design yet yet)
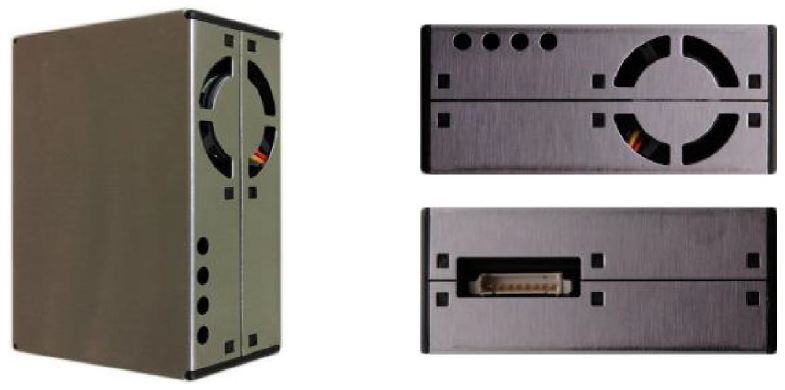
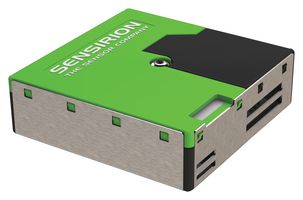
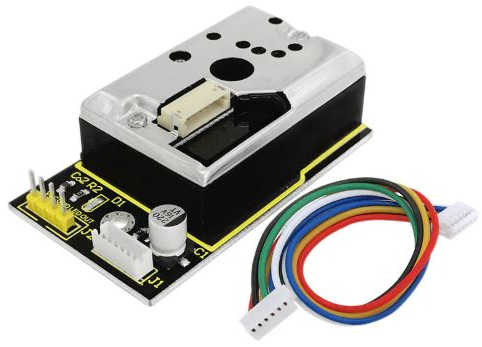
| Digital universal particle concentration sensor | Sensirion SPS30 - Particulate sensor, dust, 0.5um, laser | OMRON B5W-LD0101-1 - Air Quality Sensor, Optical, Light Scattering, Pulse Output, 5.5 V | Keyestudio GP2Y1014AU PM2.5 dust sensor module |
|---|---|---|---|
|
|

|
|
|
Brand : Plantower Model No. : PMS5003 |
Brand : SENSIRION Model No. : SPS30 |
Brand : OMRON Model No. : B5W-LD0101-1 |
Brand : keyestudio Model No. : GP2Y1014AU |
| Datasheet | Datasheet | Datasheet | Datasheet |
| This sensor uses laser scattering to radiate suspending particles in the air, then collects scattering light to obtain the curve of scattering light change with time. | This sensor uses laser scattering and Sensirion’s innovative contamination resistance technology. | This sensor uses laser scattering technology. Detection of particles down to 0.5 μm in diameter is possible while using an LED light source | This sensor is based on Sharp GP2Y1014AU and contain an infrared LED and a phototransistor diagonally arranged to allow it to detect the light reflected by dust in the air. |
|
No. of Pins : 5 VCC GND SET RXD TXD RESET |
No. of Pins : 5 VCC RX, SDA TX, SCL SEL GND |
No. of Pins : 5 VCC OUT1 GND IN OUT2 |
No. of Pins : 4 VCC GND MCU IO (module driven pin) MCU IO (Analog output) |
|
VCC rating : 5V SET,RX,TX,RESET VCC rating : 3.3V |
VCC max rating : 5.5V SEL max rating : 3.5V I/O pins (RX/SDA, TX/SCL) rating : 5.5V |
VCC max rating : 5.5V Vth max rating : 3.5V |
VCC rating : 3V to 5V |
| Price : USD 13.30 | Price : USD 51.28 | Price : USD 15.57 | Price : USD 9.49 |
| More info on aqicn.org website | More info on Digikey | More info on Digikey | More info on Digikey |
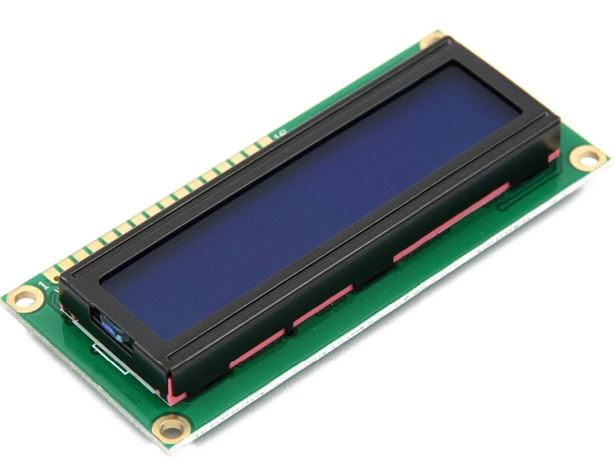
| LCD Display Module | Buzzer |
|---|---|
|

|
|
Brand : LANDZO Model No. : 1602 |
Brand : Soberton Inc. Model No. : 433-1028-ND |
|
- LCD Display Module 1206A (1602A) Datasheet 1 - LCD Display Module 1206A (1602A) Datasheet 2 |
Datasheet |
| This blue screen LCD Display Module display 2-lines X 16-characters. Viewing area size: 64.5mm x 16mm. | Buzzers Transducer, Externally Driven Magnetic 5V 50mA 2.4kHz 87dB @ 5V, 10cm Through Hole PC Pins |
|
No. of Pins : 16 |
No. of Pins : 2 |
|
VCC rating : 5V |
VCC max rating : 5V |
| Price : USD 1.32 | Price : USD 0.59 |
|
More info on Digikey |
More info on Digikey |
Electronic board - made
Enclosure box - made
Support frame to hole the Dust Sensor and LCD display module - made
The Bill of Material (BOM) show how much it would take to fabricated the dust particle sensor.
Most of the electronic components were sourced from Fab Lab, based on the Fab Lab Inventory list. Except for the speciliased module like the dust sensor, which have to be purchased from external source.
Pricing are estimation, does not include shipping charges and unused portion of stock material, or wastage resulted from fabrication error/re-work.
| No. | Part No. | Part Description | Qty | Price (USD) |
Total (USD) |
Remarks | Input device |
|---|---|---|---|---|---|---|
| 1. | PMS5003 | PM2.5 Air particle/dust sensor, laser inside, digital output module | 1 | 13.30 | 13.30 | AliExpress | Output device |
| 2. | LCD Screen 1602 | LCD Display Module (2 rows x 16 lines) 1602 5V Blue Blacklight | 1 | 1.32 | 1.32 | AliExpress |
| 3. | IIC/I2C adaptor | IIC/I2C adaptor for LCD 1602 display module | 1 | 0.88 | 0.88 | AliExpress |
| 4. | 433-1028-ND | Buzzers Transducer, Externally Driven Magnetic 5V 50mA 2.4kHz 87dB @ 5V, 10cm Through Hole PC Pins | 1 | 0.59 | 0.59 | DigiKey | Electronic Board |
| 5. | ATMEGA328P-AU-ND | ATMEGA 328P MCU 8BIT 32KB FLASH 32TQFP | 1 | 2.27 | 2.27 | Digikey |
| 6. | 535-9362-6-ND | 16MHz Ceramic Resonator Built in Capacitor 22pF | 1 | 0.44 | 0.44 | Digikey |
| 7. | 1276-1075-6-ND | CAP CER 10µF 25V X5R +10% 1206- | 1 | 0.24 | 0.24 | Digikey |
| 8. | 399-4674-1-ND | CAP CER 0.1µF ±10% 250V X7R 1206 | 1 | 0.48 | 0.48 | Digikey |
| 9. | 311-10.0KFRCT-ND | RES SMD 10K Ohm1% 1/4W 1206 | 1 | 0.11 | 0.11 | Digikey |
| 10. | 311-1.00KFRCT-ND | RES SMD 1 kOhm ±1% 1/4W 1206 | 1 | 0.11 | 0.11 | Digikey |
| 11. | SW262CT-ND | Switch Tactile 1206 SMD | 1 | 1.17 | 1.17 | Digikey |
| 12. | 160-1167-1-ND | LED Red Clear 1206 SMD | 1 | 0.41 | 0.41 | Digikey |
| 13. | 609-5161-1-ND | ISP Header Surface Mount 6 position 0.100" (2.54mm) | 1 | 0.91 | 0.91 | Digikey |
| 14. | S1011EC-40-ND | Connector Header Through Hole 40 position 0.100" (2.54mm) | 1 | 0.72 | 0.72 | Digikey |
| 15. | TOL-14974-ND | FR1 Copper clad board single sided 2.00"L x 3.00"W stock for PCB Fabrication | 1 | 1.38 | 1.38 | Digikey | Pin header connectors (female) for PMS 5003 sensor |
| 16. | VENSTPOW | 2.54mm Single row Dupont Connector Plastic Shell Plug Jumper Wire Cable Pin Header female | 8 | 0.16 | 0.16 | AliExpress | Wiring cables |
| 17. | ROBOTLINKING | Jumper Wire Female to Female, Dupont Line 10cm length | 9 | 0.86 | 7.74 | AliExpress | Power source |
| 18. | LJH-186 | AC/DC 100-240V Universal Power Adaptor Output 5V 0.5A (2.1mm dia) EU plug 5.5 mm x 2.1 mm | 1 | 1.71 | 1.71 | AliExpress |
| 19. | DC-050 | DC Power Jack Socket Connector DC005 5.5x2.1mm | 1 | 1.26 | 1.26 | AliExpress | Wooden Enclosure Box |
| 20. | 434-295 | Clear Acrylic Sheet, 500mm x 300mm x 3mm | 1 | 12.39 | 12.39 | Might be using recycled material from Fab Lab | Miscellanous : mounting fixture/support |
| 21. | PLA filament for 3D Printer, Innofil, 2.85mm, 750gram, silver color | 1 | 30.35 | - | Obtain from Fab Lab | |
| 22. | Small screws | 6 | 0.05 | - | Obtain from Fab Lab | |
| Total | 46.42 | |||||
Note :
Physical tools for digital fabrication require :
I had downloaded a simple gantt chart template for Excel called'Agile Gantt Chart' from from Microsoft Office Templates website. The gantt chart helps me to plan, visualize and track my project progress through the timeline. From the chart, it will be around 8 more weeks to Project Presentation. The gantt chart will serve as a guide for the upcoming activities expected and milestones/goal to meet.
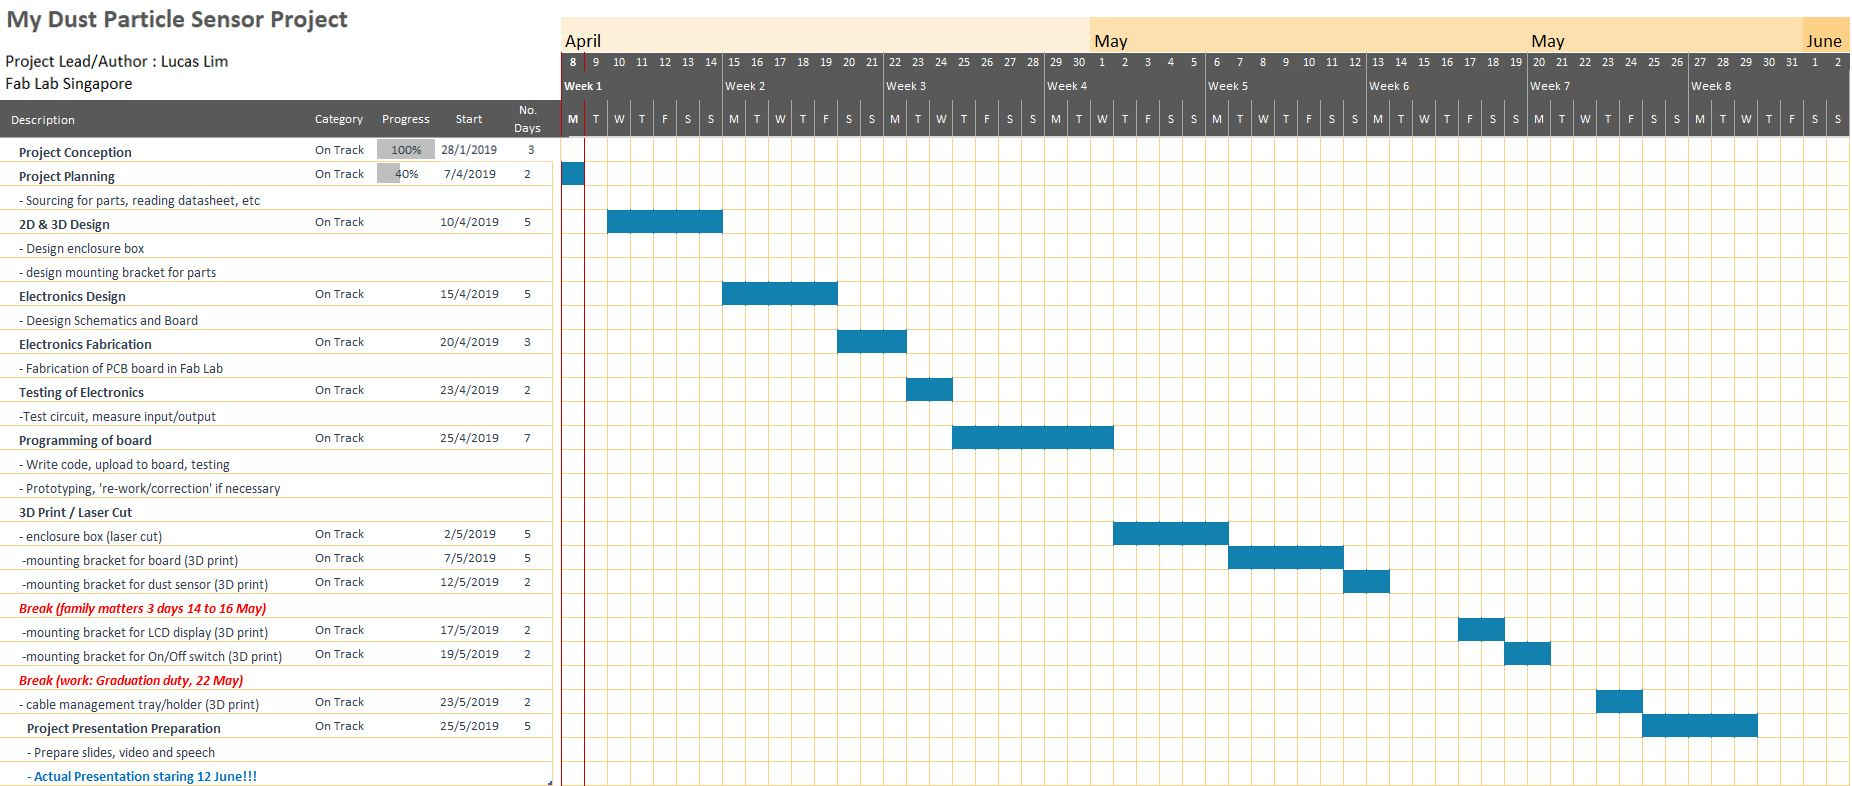
Updated on 8 Arp 2019.
As weekly lesson and assignment are still on-going, the draft project schedule is for guidance and setting milestones. Following are the actual activities performed vs the planned project timetime.
Project Planning : 6 to 7 Apr
- Consulted with instructor on project 4 Apr
- Created Project Planning website and based on the Project requirements/scope listed in upcoming Application week
- Searched for and downloaded datasheet of input and output devices on 6 Apr
- Created Project Gannt Chart on 7 Apr
- Created Bill of Materials (BOMs) on 11 Apr
2D & 3D Design
- After finished my first cut of the electronic board, I started to work on the 3D design on 18 Apr 2019.
Electronics Design
- Started designing my board on 11 Apr and completed my first draft of the PCB board on 18 Apr 2019. Took 1 week to do the first draft.
Electronics Fabrication
- Started PCB fabrication from 22 to 24th April, ran into some delay resulted from gcode generation for the pads of the ATMEgaa386 and through-hole drilling.
- Received the dust sensor module on 23rd Apr, after three weeks of order online.
- Connect pin header connectors (2.54mm) to JST wire (1.25mm) on 15 May 2019. This for the connection wiring of the dust sensor.
Testing of Electronics and initial programming
- Testing of sample PMS5003 code from Adafruit ® website on 15 May 2019 using Arduino Uno board and the PMS5003 sensor. Working ok!
3D Print
- Started to 3d print the support frame on 29 May 2019 to make sure the componenets able to fit in
Electronics Fabrication
- Continue to mill my PCB board from 29 May 2019. Facing a couple of problems with my PCB board design as well as from the etching process, so took longer than expected to complete.
Presentaiton slide and video
- Started with the presentation slide and video on 1 June 2019
3D Laser Cut
- Laser cut my enclosure on 11 June 2019
Programming of board and testing
- Programming of my board and testing from 12 June onward
Last update on 13 June 2019.