This week, I worked with tools for designing objects in 2D and 3D. The tools of my choice were Inkscape for creating vector graphics, TinkerCad for 3D design, and OpenScad for creating parametric designs.
Vector graphics vs. raster images
First, let's have a look at the difference between vector and raster graphics. Basically, they are different ways to describe the content of an image: by having a grid of points with a designated color value, or by having a list of geometric primitives that make up the image. Raster graphics use the first approach, and vector graphics the latter. They are thus suitable for different tasks: Vector graphics are arbitrarily scalable, thus they are the preferable tool for creating images that need to be sized to different scales without losing image quality (logos, for example). Raster images have a fixed size, and scaling may lead to loss of image quality; moreover, larger dimensions lead to large file sizes. However, it is usually easier to display color gradients with raster images, because the shapes making up a vector image mostly have only one color. Also, photos taken with a camera are raster images, and the most common file formats are for raster images. However, vector graphics are often preferred when printing or otherwise applied to physical objects (laser cutting, for example).
Designing a background image with Inkscape
I created a tesselated gradient as the background of the hero banner above, by following this tutorial. The idea is to create a couple of circles (or any objects, really), create a voronoi diagram, i.e. a triangulation of the page, from these objects, and fill the triangles with colors from a color gradient. The hero image for this page was made this way.
First, we create a circle. Holding the control key while resizing the circle retains the height to width ratio. Next, we align the circle on one side of the page using the align tool.
To duplicate an object, select it and press control + d. We can move the circle along the page edge by holding the control key while moving it. Create some circles and position them along the edge, with one object aligned to the top and bottom corner each. Copy the circles on the right side and align them to the left. Repeat the same process for the top and bottom edge, then fill in the middle with randomly placed circles.
Now, we create a voronoi diagram from the circles via triangulation. This voronoi diagram divides the plane into polygons such that each point on the plane is inside the polygon placed around the nearest circle. The polygons are then divided into triangles. Convert the circles to paths, via "Path"->"Object to path", and choose "Extensions"->"Generate from path"->"Voronoi diagram..."; the default settings are fine. The algorithm seems to be instable; if the triangulation is not optimal (i.e. there are overlapping triangles or there is a part of the outer rectangle missing), try to move and/or delete some circles and run it again. Also, make sure not to have duplicate circles right on top of each other. Ungroup the generated triangles and delete the circles, as they are no longer needed.
Now, we create the underlying gradient. Hide and lock the current layer; then, create a box that's at least as large as the page, and apply a mesh gradient. For a nice visual effect, choose a different color for each corner.
Finally, fill in the triangles with the color picker tool; to see which shapes are already colored and which are not, hide the layer with the gradient. Then, disable the stroke color for the triangles and delete the layer with the gradient. There might be small white stripes visible; to get rid of them, just select all triangles and copy them by pressing control + d.
Drafting a gimbal with TinkerCad
While experimenting with TinkerCAD, I created a simple draft of a small three axis gimbal. TinkerCAD is probably the simplest CAD program there is, but it is nevertheless quite powerful. It runs completely in the browser, there is no installation, but a registration is required. Everything is made up from shapes - mostly basic shapes like cubes or cylinders, but if those are not enough, one can define their own shapes via javascript. Shapes my be grouped to form new shapes; and every shape can be used as a "hole", i.e. it can be substracted from another shape. The designs may be exported as .stl or .obj files for 3D printing or as an .svg image for laser cutting.
We start with an empty workspace. On the right is a list of basic shapes we can use to create our object. We will start with two cubes, which we arrange to form an angle. To do this, we will use the alignment tool (one of the most useful tools) in the upper right corner. We can fuse them into one object by selecting both and grouping them together.
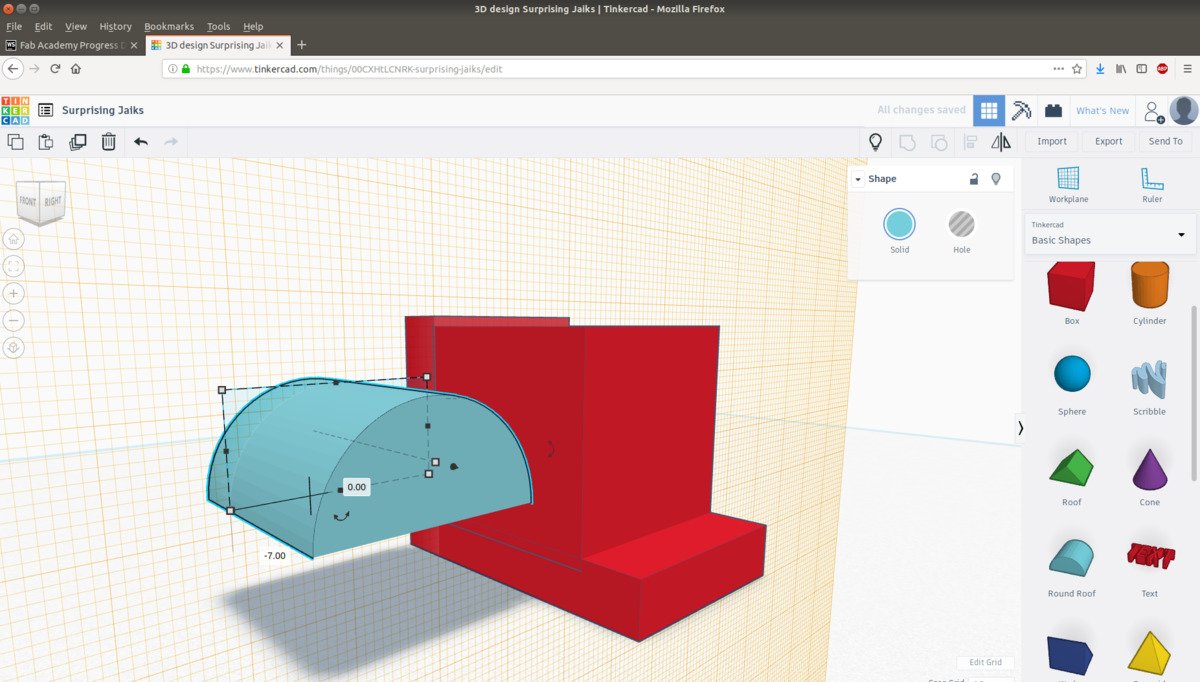
Next, we add a cylinder to model a simple motor replacement. Using the work plane tool, we can add two smaller cylinders to model the motors axis. Then, we rotate the cylinder and use the work plane tool to place it. To create a hole in the angle, we use a smaller cylinder, align it using the alignment tool, and turn it into a hole. Then we fuse the hole with the object by grouping them together.
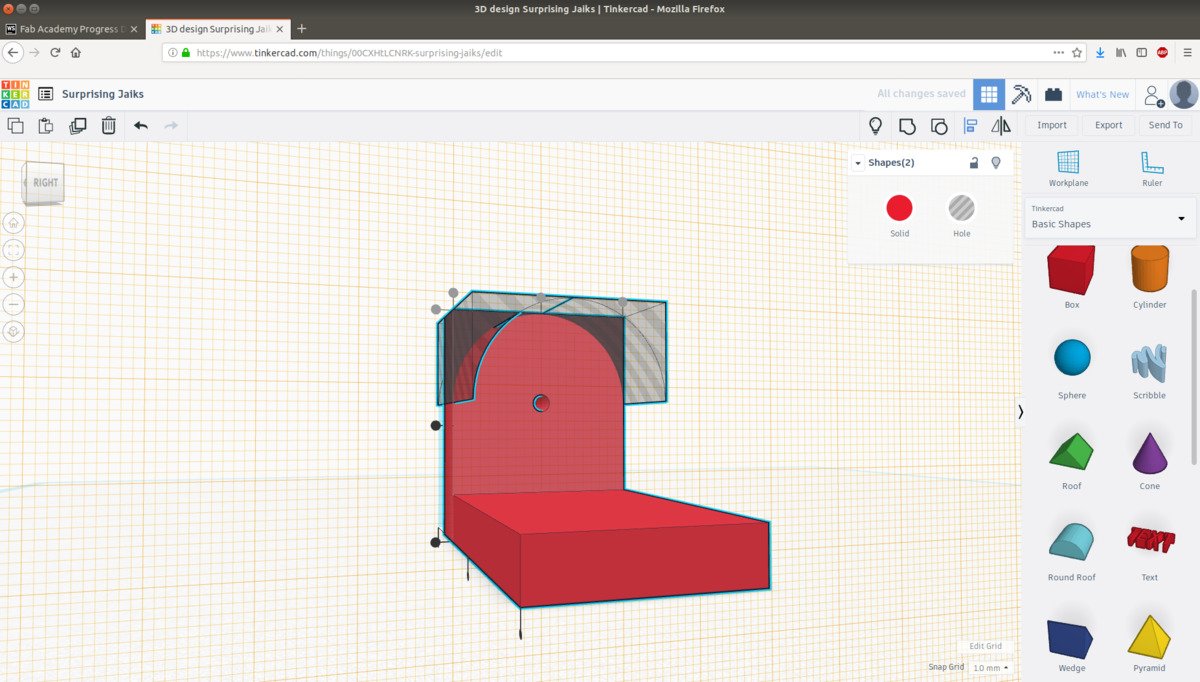
Now, we can duplicate the angle and rotate it appropriately. To ensure smooth rotation, we want to round the edges of the angles. However, there's no premade object with a suitable shape, so we have to make our own. We choose a cube and half a cylinder, substract the cylinder from the cube, and then substract the resulting shape from the angle.
With rounded angles and objects to mimic motors, we have everything to complete a first very simple draft of a 3-axis gimbal.
Creating a parametric design with OpenScad
I played around with OpenSCAD, an open source CAD tool. The interesting thing about OpenSCAD is the way you specify your models: you program them. Every object is described by source code, which can be compiled in order to render the object or to export it to STL, for example. This makes it really easy to create parameterized designs; just change some parameters, recompile and you got the new version of your object. On the other hand, this process is not always intuitive, and for large projects/files, the code might get overwhelmingly complex.
I tried to design a parametric snowflake in OpenSCAD. The snowflakes shape is depending on the given radius, branching level, and a random seed. Every time we rerender, we get a new snowflake. To fix the shape, set the seed variable to a fixed value. When working with OpenSCAD, it is always handy to have cheatsheet ready.
We start with a single unit cube. The first argument is a 3D vector specifying the size on the x-, y-, and z-axis. Additionally, we want our cube to be in the coordinate center:
cube([1,1,1], center=true);

Now, let's introduce a variable for the size of our cube.
$radius = 10;
cube([radius,1,1], center=true);
And since snowflakes are always hexagonal, we create a function that rotates our cuboid around the z-axis. Since we want to perform actions and do not return a value, we use a module:
module snowflake(radius) {
  for(i = [1:6]) {
    translate([radius/2, 0, 0])
      cube([radius, 1, 1], center=true);
  }
}
We can use our module just like any other function:
$radius = 10;

module snowflake(radius) {
  for(i = [1:6]) {
    rotate([0, 0, 60*i])
      translate([radius/2, 0, 0])
      cube([radius, 1, 1], center=true);
  }
}

snowflake($radius);

Next, we create a module to produce more interesting branches by adding cubes to the sides of the existing cubes:
module twig(length, branching) {
  translate([length/2, 0, 0]) cube([length, 1, 1], center=true);
  if(branching > 1){
    dist = 0.9 * length / branching;
    for(d = [0.1*length:dist:0.9*length]){
      translate([d, 0, 0]) {
        rotate([0, 0, 60]) twig(length/4, 1);
        rotate([0, 0, -60]) twig(length/4, 1);
      }
    }
  }
}
Then we update our snowflake module and introduce a branching parameter:
$radius = 10;
$branching = 5;

module snowflake(radius) {
  for(i = [1:6]) {
    rotate([0, 0, 60*i]) twig(radius, $branching);
  }
}

snowflake($radius);
To make it more interesting (and random), we add a module to create hexagons and randomly choose to create hexagons instead of branches. To create hexagons, we use approximations of circles with only 6 segments and extrude them:
module hexagon(size, height=1) {
  linear_extrude(height=height, center=true) {
    circle($fn=6, r=size);
  }
}
Then we update our twig module:
module twig(length, branching) {
  translate([length/2, 0, 0]) cube([length, 1, 1], center=true);
  if(branching > 1){
    dist = 0.9 * length / branching;
    for(d = [0.1*length:dist:0.9*length]){
      translate([d, 0, 0]) {
        p = rands(0, 1, 1, seed*d)[0];
        next_branching = rands(1, branching-1, 1, seed*d)[0];
        if(p > 0.8){
          hexagon(length/12);
        } else {
          s = (length - 0.5*d)/length;
          rotate([0, 0, 60]) twig(length/4, 1);
          rotate([0, 0, -60]) twig(length/4, 1);
        }
      }
    }
  }
}
Snowflakes are symmetric, so we have to make sure every twig looks the same. We achieve this by setting a seed value once at the beginning:
seed = rands(0, 123789, 1)[0];

Finally, we add a keyhole to the snowflake:
module keyhole(size=2) {
    difference() {
        cylinder(h=1, r=size, $fn=120, center=true);
        cylinder(h=1, r=0.8*size, $fn=120, center=true);
    }
}

Now, we can go even further and make a "snowglobe" instead of a snowflake by combining multiple instances:
snowflake();
  rotate([90,0,0]) snowflake();
  rotate([90,0,60]) snowflake();
  rotate([90,0,-60]) snowflake();
}
This would be hard to manufacture with substractive processes, because of the structure at the core of the globe. However, it should be possible to do with additive manufacturing approaches, like 3D printing.

Conclusions
This week was not particularly eventful. I learned how to work with different programs, and also got a feeling for the advantages and disadvantages that each of them provides. TinkerCad is great for a beginner, but too limited for more complicated projects. Later during the Academy, I worked with FreeCad, which is much more powerful, although it has quite a few bugs and odd behavior. Nevertheless, for the future I would prefer FreeCad over TinkerCad. Unless the thing I have to design is particularly repetitive, I would also prefer FreeCad over OpenScad, because the program code gets messy really fast. Also, FreeCad has an OpenScad plugin.
Although Inkscape is great for 2D design, it is not parametric design, which makes it difficult to design accurate sketches, in my opinion. I'm missing a constraint solver like FreeCad has.
I would really like to try Fusion for 3D design, but I can't run it on my linux machine. Maybe someday FreeCad will be stable and I won't need Fusion anymore.


