Downloading link for my archives: Archives


Assignment 5 - week 5 - Feb 25
This week assignment was about creating a 3D model which cannot be made subtractively and print it then try to 3D Scan an object. I made several experiments for both tasks, using different software and approaches.
I think that my modeling skills are not very advanced, and I don't consider myself an artist I'm an engineer. But I'm very fascinated from the 3D scans and prints. I used Blender -a software for 3D design- to modeling a solid that could not be made subtractively. Also I was interested in studying the inherent limits of the Fused Deposition Modeling (FDM) printing, as this is the technique used by the Dimension Elite 3D that we have in UTEC Garage and the Makerbot replicator that we have in Tecsup Fab Lab.
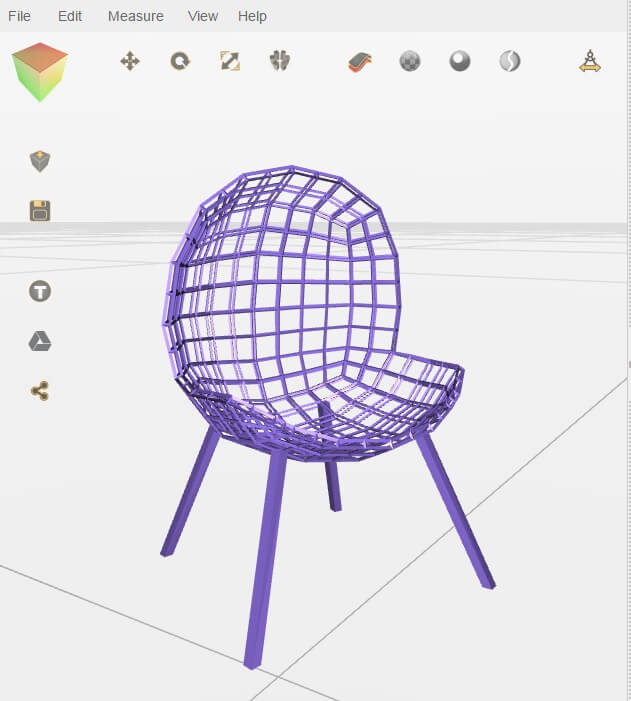
I started with a simple mesh created using Blender, resulting in an overall shape for a small chair.
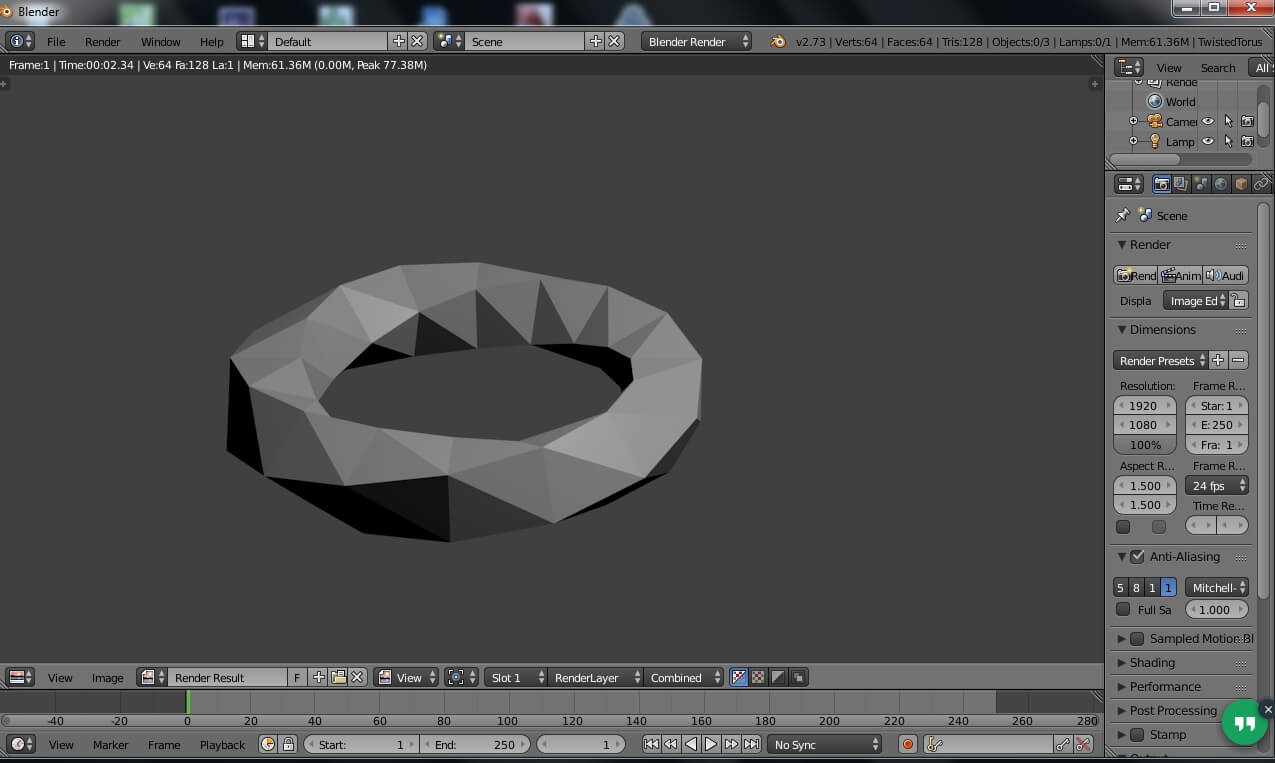
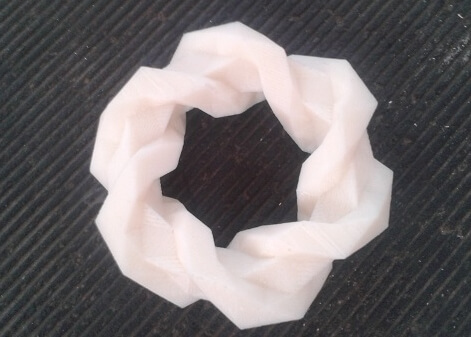
I created twisted torusI created twisted torus in Blender. but this object would take lot of time to print, even at a small scale. I learnt that many 3D printing experts in this case, usually create empty wireframes instead of solid objects to reduce printing time for big models.
 >
>
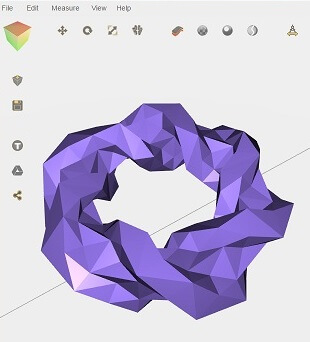
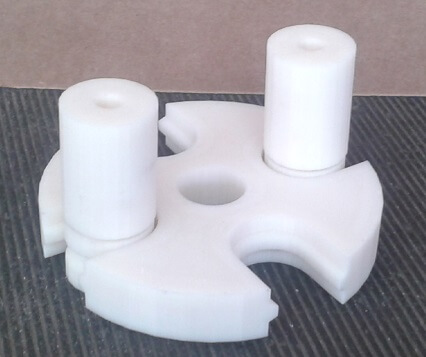
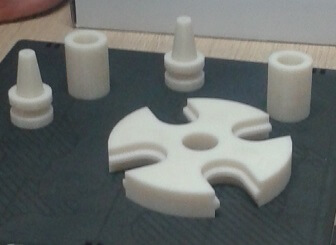
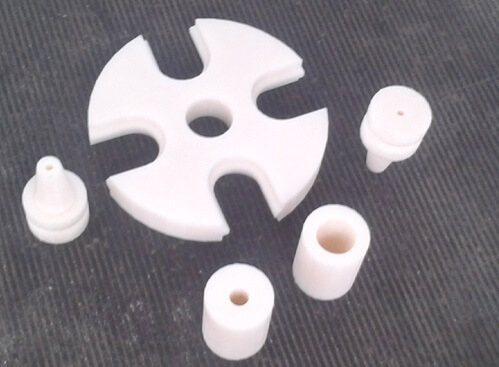
I moved the objects into the software provided with the Dimension Elite 3D and prepared it for printing. I used ABS to printed this object. The chair mesh required a support structure to be printed, and while this would be possible with other kind of objects, accessing and removing the support structure from the inside of the mesh wouldn't be possible, but I tried. Printed to the torus was very easy, The process required a bit less than two hours to be completed, given I scaled the object down to few centimeters in order to reduce the printing time. The printed object shows a significant amount of artifacts due to some filament "skipping" problems during the process, maybe caused by the very small areas covered during each layer, but overall look was retained. I think that in fact these artifact add even more realism to the object. I printed my objects with a Dimension Elite 3D, it must be an STL file, so i used another software to export the OBJ to STL binary. Then I oppened the model settings for Normal quality with exterior supports, 15% honeycomb infill and 0.1 mm layer height. For the printer settings the values were 210 degrees for extruder and 60 degrees for heated bed. Send to print and wait for it to finish, mine took 40 mins..
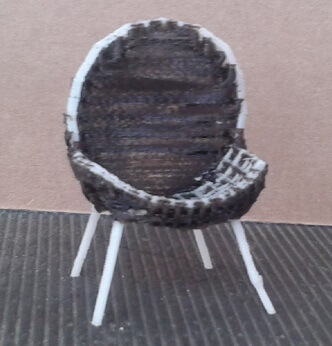
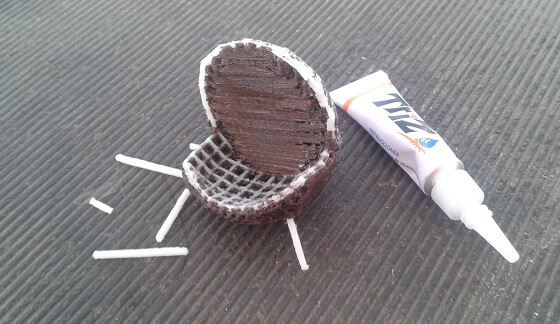
I had trouble removing the support material in the case of the chair, I broke the legs , because this was bound only by a few points in print. I decided not to continue with the removal of the support material.
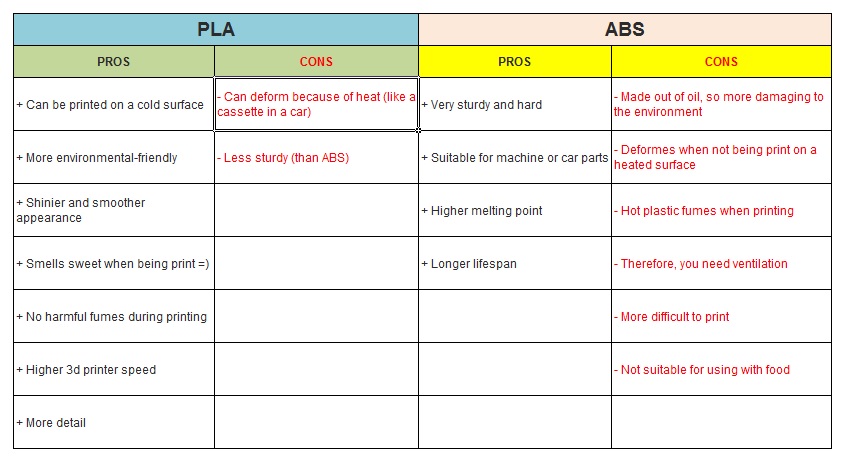
Shown below picture with difference between the use of ABS and PLA as material 3D printing


For 3D scanning I approached the task using the iOS version of 123D Catch application. I prefer using the app store version over taking pictures and uploading through a computer, mainly because the app checks if the picture is underexposed, this helps a lot with lighting issues or blurry photos. The catch process is really simple, you need a non reflective surface for the object to scan. It's important trying to keep the same distance from the camera to the object for each picture you take.
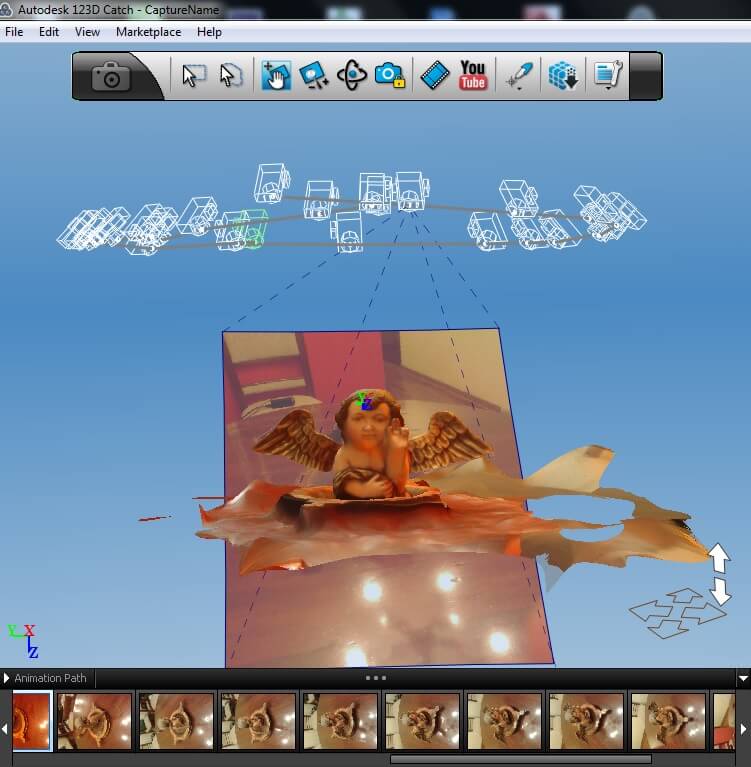
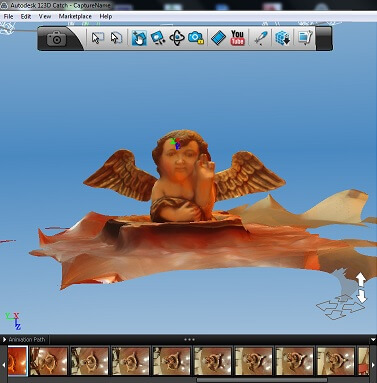
Unfortunately the processing is done on a cloud server farm, so this means that a large number of pictures must be uploaded to the server before processing takes place. I took several pictures for every angle, I guess too many as for the first test, maybe because of lack of good connectivity the upload wasn't successful and processing didn't take place. As everybody considers 123D Catch the best software in photogrammetry, I made another test. I took again pictures of the subject, limiting myself to just one picture per required angle. After a short upload, also because I was now using a wifi network connection, and some more processing time, I got what I believe is a quite good result.
The model produced by 123DCatch is available at the 123D Catch website
We had the opportunity to work with the scanner SENSE of 3D printring, when i worked small objects were difficult because much depends on the lighting, the object does not reflect light , so my first tests were bad.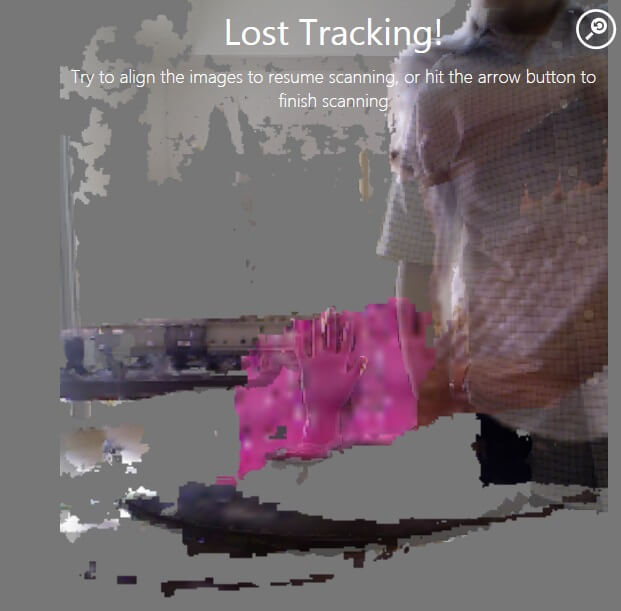
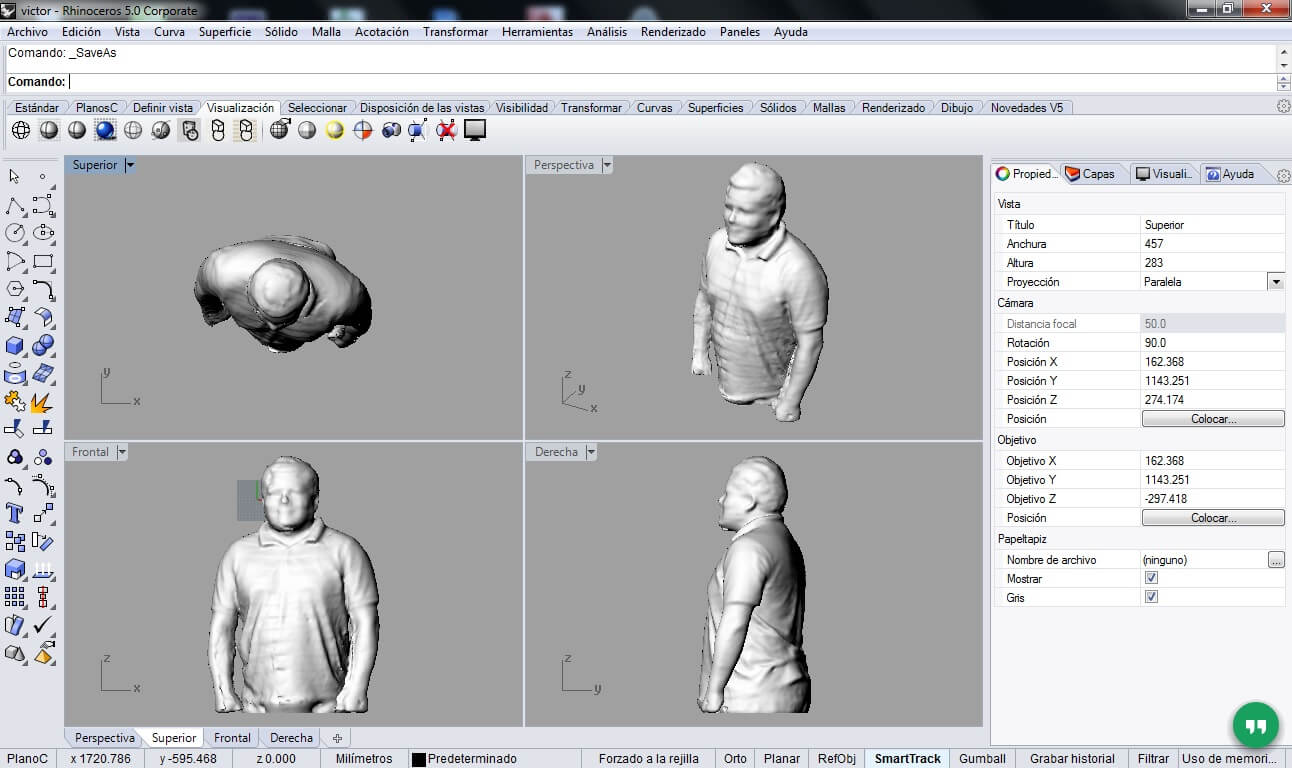
For experimenting with the Sense scanner I tried to scan my brother. The second test with the human model, probably because of a much bigger scale did produce a good result. The scanning process was again very slow, and few scanning sessions were required to complete the whole process. The scanned mesh was very detailed, presented no holes and cropping only the torso of the model was straightforward.

scannig conditions : Material: Human Body - Brightness material: opaque - Brightness: low artificial light 230 lx - Scannig distance : 40-50cm - Scanneo time : 3 min - Processing proprietary software.
To correct the mesh I use Meshmixer and Rhino, the process was very easy, in both software I could get generate stl files.

Downloading link for my archives: Archives
•Both ABS and PLA do best if, before use or when stored long term, they are sealed off from the atmosphere to prevent the absorption of moisture from the air. long term exposure to a humid environment can have detrimental effects, both to the printing process and to the quality of finished parts.
•Having a direct path from a real object to a 3D printed model is very promising and would really make 3D printing technology more useful for the every day life. The technologies I evaluated still require a significant amount of manual processing, and a lot of tweaking.
•For deposition 3D printing, the limitations of the technology require carefully made models to achieve good results, but I believe other approaches such as SLS will remove most of them. This is confirmed by the quality achieved by using 3D printing services such as shapeways.
•On the scanning side, I didn't have yet the opportunity to experiment with the structured light approach presented during the class, but I'm looking forward to build such a scanner myself and make some experience on this technology. I understood anyway that even the simpler technologies could be rewarding if one knows their limitations.
•Using Sense with large-sized objects could be really useful, for example to make small human figures. On the other side 123D Catch produced a really good, high-detail model of a small textured object in a short time, and can assist when looking to 3D print or have a reference of a mechanical part or an art piece.
• You may PLS Makeboot 3d Printer connected to a laptop using the program Makerboot desktop. You can print from an SD-Card, this method is faster than using the above procedure. The first procedure must first compile the STL file and then execute the print routine.
• The PLA is a biodegradable material printing, we recommend storage in closed, dry or else contrary to adsorb moisture problems occur in printing locations.
• You can use fans to the case of impressions in PLA
• When printing the Makerboot ABS must be closed because the temperature variation can break the material being printed.
• The ABS is a very common and very durable plastic ideal for printing of mechanical parts. It can be sanded wood with sandpaper and polish with acetone using a cloth slightly. You can also drill or paint. In general, the ABS react correctly to treatment of post-production. However, it is sensitive to changes in temperature plastic and learning time to achieve perfect prints can be a little longer. The extruder temperature should be about 230 degrees and the platform where the molten plastic is deposited around 120 degrees
• The PLA is ideal for thin-walled hollow parts biodegradable plastic. However, the PLA is more fragile than the ABS. It is also more difficult to post-production since it can not drill. But it is a more stable and easier to print plastic. Finally, the platform must be so cold that the printing process is faster
• For the Makerboot per impression must do maintenance on the platform house that does not happen with Dimention
• The PLA for example, has a very low toxic effect and there are plenty of supply in the market that continues to grow with time
• ABS: Acrylonitrile Butadiene Styrene is the cheapest among the most widely used plastics. Generally tolerable produces gases, which can be hazardous to people or pets sensitive. The ABS is quite versatile: Allows sanded, polished also supports acetone bath and make a very smooth finish. You can also paste with ease. The color of this plastic is matt