Week 6: Electronics Design

Class notes    and Week 6 Content 

Fabacademy 2015 03.04B Review05: 3D Scanning and Printing

Fabacademy 2015 03.04D Lesson06: Electronics Design

Assignment.

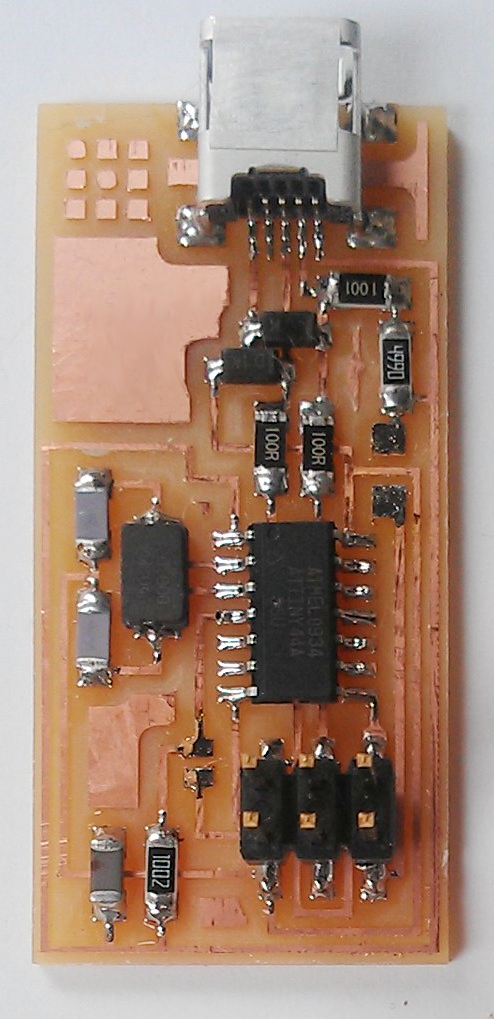
redraw the echo hello-world board,
      add (at least) a button and LED (with current-limiting resistor)
      check the design rules, and make it 

Another week of #fail, down to the on-going issues of milling.  Design side no problem using the RS tool Design Spark.  Unlike Eagle it has no limitations on size, but does require a library build.

This week the London team has been joined by Joe who is following the Fab Academy in Amsterdam for a few weeks.  Welcome Joe.

#fail. Tried many ways to get the milling machines working with fab modules to be able to take the output from the PCB software

  • You cannot install the iModella to a MAC – look at this option
  • you cannot install iModella and SRM20 on the same windows box
  • we now have 5 machines with the software all working in windows – but obvious not using fab modules
  • opted for new install in Ubuntu and new install of Fab Modules
  • still not joy……the installed version of Fab Modules does not look for the port on a continuous basis. It opens it and shuts it.
  • I will provide terminal access to the machine to anyone who can/ will like to help us.  We are in need a Linux/ Ubuntu expert


Week 5 : 3D Scanning and Printing

Course Structure is here . The video is here  

assignment
* design and 3D print an object (small, few cm) that could not be  made subtractively
* 3D scan an object (and optionally print it)

Designed a small item that spins in three axis with a pole added which means that subtraction production becomes impossible as it the tool and head cannot get into position.

upload compressed images 


2015-03-02 09.51.44 2015-03-02 09.52.02 2015-03-02 09.53.58 2015-03-02 09.54.15 2015-03-02 09.54.24


3D scanned images using Fuel3D scanner.


Week 4 – Electronic Production

Course outline is here Video of the session is here

This weeks assignment is to make (not design)  the FabISP in-circuit programmer using Neils ISP.44 version.

hello.ISP.44.cad board components traces interior
some other examples :  David, Andy & Valentin

As a Lab we struggled with fabmodules to the Roland milling machine …. last chance last night was to try back in Windows and output as flat.

New skills this week for the team are new partition, ubunto install, dual boot, fabmodule install, run locally.  For next year as an instructor – important lesson will be to go through to ensure all working.

Design parts are not the issue. Output to the milling machine is.

Given this I decided to use and  learn the RS components Free PCB board layout tool and circuit design tool  - download is here  FabLab London has purchased the components from RS and they have a library for all the components using ModelSource.

More later…..  last update 24/2/2015


Week 3 Computer-Controlled Cutting

Course outline is here,   Video of lecture is here

This week is a review of the methods and approaches to cutting materials.

This weeks assignment
design, make, and document a press-fit construction kit

There is no shortage of ideas for Geometric Shaped press fit designs

CaptureI have opted to go for laser cut cardboard repeat of the original toy I had back in the 1970’s which was a circle with cut outs that you could make into any shape.

Changed the design to a hex rather than a circle and used a shaped cut edge on the leading interferenceweek 3 v 1 (2) face to enable easier snap together. Designed  with  Stetchup and Inkscape and then used Fab Modules to create the cut simulation.  ( what settings are needed to add Trotec Speedy 300?

week 3 v 1 top

2015-02-16 15.18.02


Examples and pictures of the print and build

2015-02-16 15.14.38 2015-02-16 15.15.24 2015-02-16 15.17.54  2015-02-16 15.20.11


week3 model 4


2015-02-16 15.18.31

Week 2 – CAD

Week course is here,   Video of lecture is here

Purpose is to review several of the software packages for 2, 2,5 and 3D design.  I opted to focus on MyPaintInkscape and SketchUp with Toby, Nat and Ande taking other programs so we could share learning.

This weeks assignment is to model (draw, render, animate, simulate, …) a possible final project, and post it here. I picked SketchUp as Make is the free version for non-commercial work and we recommend it a lot in the Lab. Whilst I have played with it I had not done design work with it.

I modelled each section of my Project, scaled to the dimensions I wanted and then added the components to create a model and an simple animation. The video is here

The most import learning was how to create complex models using follow.  This starts with creating a sphere and then I used to create a half pipe.

basemotor and wheel pipe suctionbuildfinal 2final