 Week 14:: Interface and Application Programming
Assignments:
write an application that interfaces with an input and / or output device
To perform the tasks in this this week I decided to use the following software:
- Photoshop CS5: For the layout and retouching of images for the web.
- Corel Draw: For design schema connections.
- Arduino IDE: To program Fabkit.
- Notepad++: For edit/create python application
Design and prepare
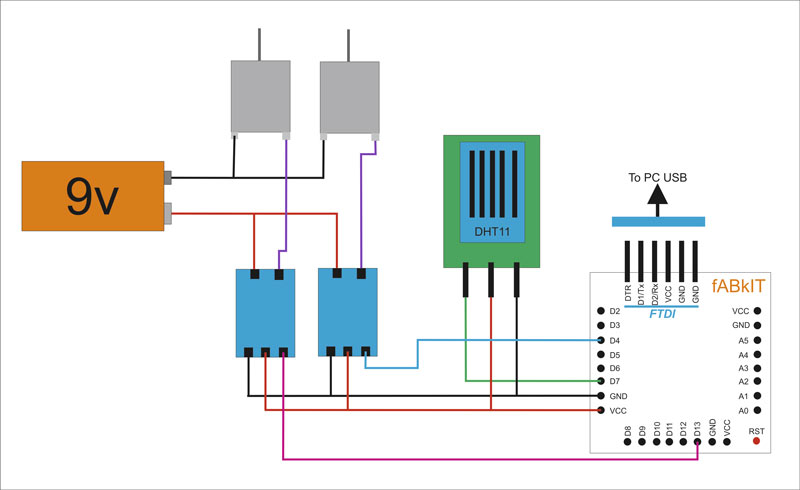
For the task this week I decided to use the fabkit board made the previous week. I will connect a sensor temperature / humidity for reading
data and two relays to turn on / turn off two engines.
The necessary equipment is:
1 x FabKit
1 x sensor DHT11
2 x DC motor
2 x relay 5v
1x FTDI connector
some wires.

Ok ... to program the Fabkit (which has the same bootloader Arduino UNO) will use the Arduino. For desktop program I will use Python programming language. I installed version 2.7 of Python and you need to install PySerial ( https://pypi.python.org/pypi/pyserial). In the task of the previous week (Networking and Communications) details are explained for connecting FabKit to PC (FDTI). The developed program will allow enable or disable the relays using buttons also can update the information in temperature or humidity when we want.
Preparing Project:

FabKit Code:

Python code:

Interface:

well ... Once everything is programmed time of making performance tests. The communication is based on sending characters to the serial port and the necessary acknowledgments. The funcionamiesto is expected, considering the final project can communicate with the device installed in the cradle of baby and trigger lights or motors child's toy, and also, get captured by the sensors need data.
Interface and Application Programming from Carlos Cano on Vimeo.
Fabkit Code:
#include <DHT.h>
#define DHT21_PIN 7
#define DHTTYPE DHT11 // DHT 11
#define PIN1 13
#define PIN2 4
DHT dht(DHT21_PIN, DHTTYPE);
void setup()
{
Serial.begin(9600);
pinMode(PIN1,OUTPUT);
pinMode(PIN2,OUTPUT);
digitalWrite(PIN1,LOW);
digitalWrite(PIN2,LOW);
dht.begin();
}
void loop()
{
if(Serial.available()>0)
{
switch(Serial.read())
{
case 'b':
Serial.println("OKI");
digitalWrite(PIN1,HIGH);
break;
case 'a':
Serial.println("OKI");
digitalWrite(PIN1,LOW);
break;
case 'c':
Serial.println("OKI");
digitalWrite(PIN2,LOW);
break;
case 'd':
Serial.println("OKI");
digitalWrite(PIN2,HIGH);
break;
case 'e':
Serial.println("OKI");
Serial.print(dht.readTemperature(), 1);
Serial.print("\n");
break;
case 'f':
Serial.println("OKI");
Serial.print(dht.readHumidity(), 1);
Serial.print("\n");
break;
default: Serial.println("?");
}
}
}
Interface Python code:
from Tkinter import * # Import tk module import tkFont import serial import time arduino=serial.Serial() #Serial comunication with fabKit (Arduino UNO compatible) arduino.port ="COM6" #Change this value for your COM / tty arduino.baudrate = 9600 #comunication to 9600 bauds arduino.open() def sendOrder(order): vf['text']="Waiting response..." v0.update_idletasks() arduino.flushInput() arduino.flushOutput() arduino.write(order+"\r\n") if arduino.readline()=="OKI\r\n": # "OKI\r\n" is the default response of fabkit program if order=="b": v2['text']="State Output 2: ON" v2['bg']="green" elif order=="a": v2['text']="State Output 2: OFF" v2['bg']="red" elif order=="d": v1['text']="State Output 1: ON" v1['bg']="green" elif order=="c": v1['text']="State Output 1: OFF" v1['bg']="red" elif order=="e": t1['text']="Temperature: "+arduino.readline().rstrip() + " C" elif order=="f": h1['text']="humidity: "+arduino.readline().rstrip() + " %" vf['text']="" print ("Hello") # Say hello in console (for debug, you can erase) v0 = Tk() # Tk() Main window v0.wm_title("Fab Academy - Interface and Application Programming") #v0.config(bg="black") # if you need change background color v0.geometry("800x600") # windows size for aplication helv16 = tkFont.Font(family="Helvetica",size=16,weight="bold") helv24 = tkFont.Font(family="Helvetica",size=24,weight="bold") helv14 = tkFont.Font(family="Helvetica",size=14,weight="bold") helv8 = tkFont.Font(family="Helvetica",size=8,weight="bold") l = Label(v0,font=helv16,text="Fab Academy - Interface and Application Programming") l.place(relx=.5, rely=.2, anchor="c") v1 = Label(v0,font=helv14,text="State Output 1: OFF",bg="red") v1.place(relx=.5, rely=.35, anchor="c") v2 = Label(v0,font=helv14,text="State Output 2: OFF",bg="red") v2.place(relx=.5, rely=.45, anchor="c") t1 = Label(v0,font=helv14,text="Temperature: --") t1.place(relx=.5, rely=.53, anchor="c") h1 = Label(v0,font=helv14,text="humidity: --") h1.place(relx=.5, rely=.60, anchor="c") b1=Button(v0,text="Activate output 1",width=20,command=lambda: sendOrder('d')) b1.place(relx=.3, rely=.7, anchor="c") #b1['text']="test" b2=Button(v0,text="Disable output 1",width=20,command=lambda: sendOrder("c")) b2.place(relx=.7, rely=.7, anchor="c") b3=Button(v0,text="Activate output 2",width=20,command=lambda: sendOrder("b")) b3.place(relx=.3, rely=.8, anchor="c") #b1['text']="test" b4=Button(v0,text="Disable output 2",width=20,command=lambda: sendOrder("a")) b4.place(relx=.7, rely=.8, anchor="c") b5=Button(v0,text="Update Temperature",width=20,command=lambda: sendOrder("e")) b5.place(relx=.85, rely=.53, anchor="c") b6=Button(v0,text="Update humidity",width=20,command=lambda: sendOrder("f")) b6.place(relx=.85, rely=.60, anchor="c") vf = Label(v0,font=helv8,text="Waiting response...") vf .place(relx=.5, rely=.97, anchor="c") vf['text']="" v0.mainloop() # launch the main window
