Assignment:
1# Make a machine, including the end effector, build the passive parts and operate it manually.
2# Automate your machine. Document the group project and your individual contribution.
For this weeks collective documetation you can visit our website, here.
Brainstorm
Languages:
Softwares:
 Visual Studio Code - it is my main IDE. I love to use Visual Studio Code for almost any language because with tons of available free extentions to it you can use it in any type you want.
Machines:
 The Raspberry Pi is a low cost, credit-card sized computer that plugs into a computer monitor or TV, and uses a standard keyboard and mouse.
  The 7″ touchscreen monitor for Raspberry Pi
 Seltzer Machine
Initial Idea
As the whole Wheaton College MA Fab Academy Team, we came together and decided on creating a Machine that can dispense desired Juice. Our initial Idea was to have carbonated drinks that can be ordered in many types of mixtures.
Unfortunately, after doing some research, we end up with many problems such as how are we going to store these drinks. If we store them in a fridge, how are we going to pump the carbonated lkiquids out of the fridge while maintaining structural integrity, or is the pump even food safe. After manhy considerations we have end up deciding on making a machine that dispenses only the selected non-carbonated low-sugar drinks.
Planning
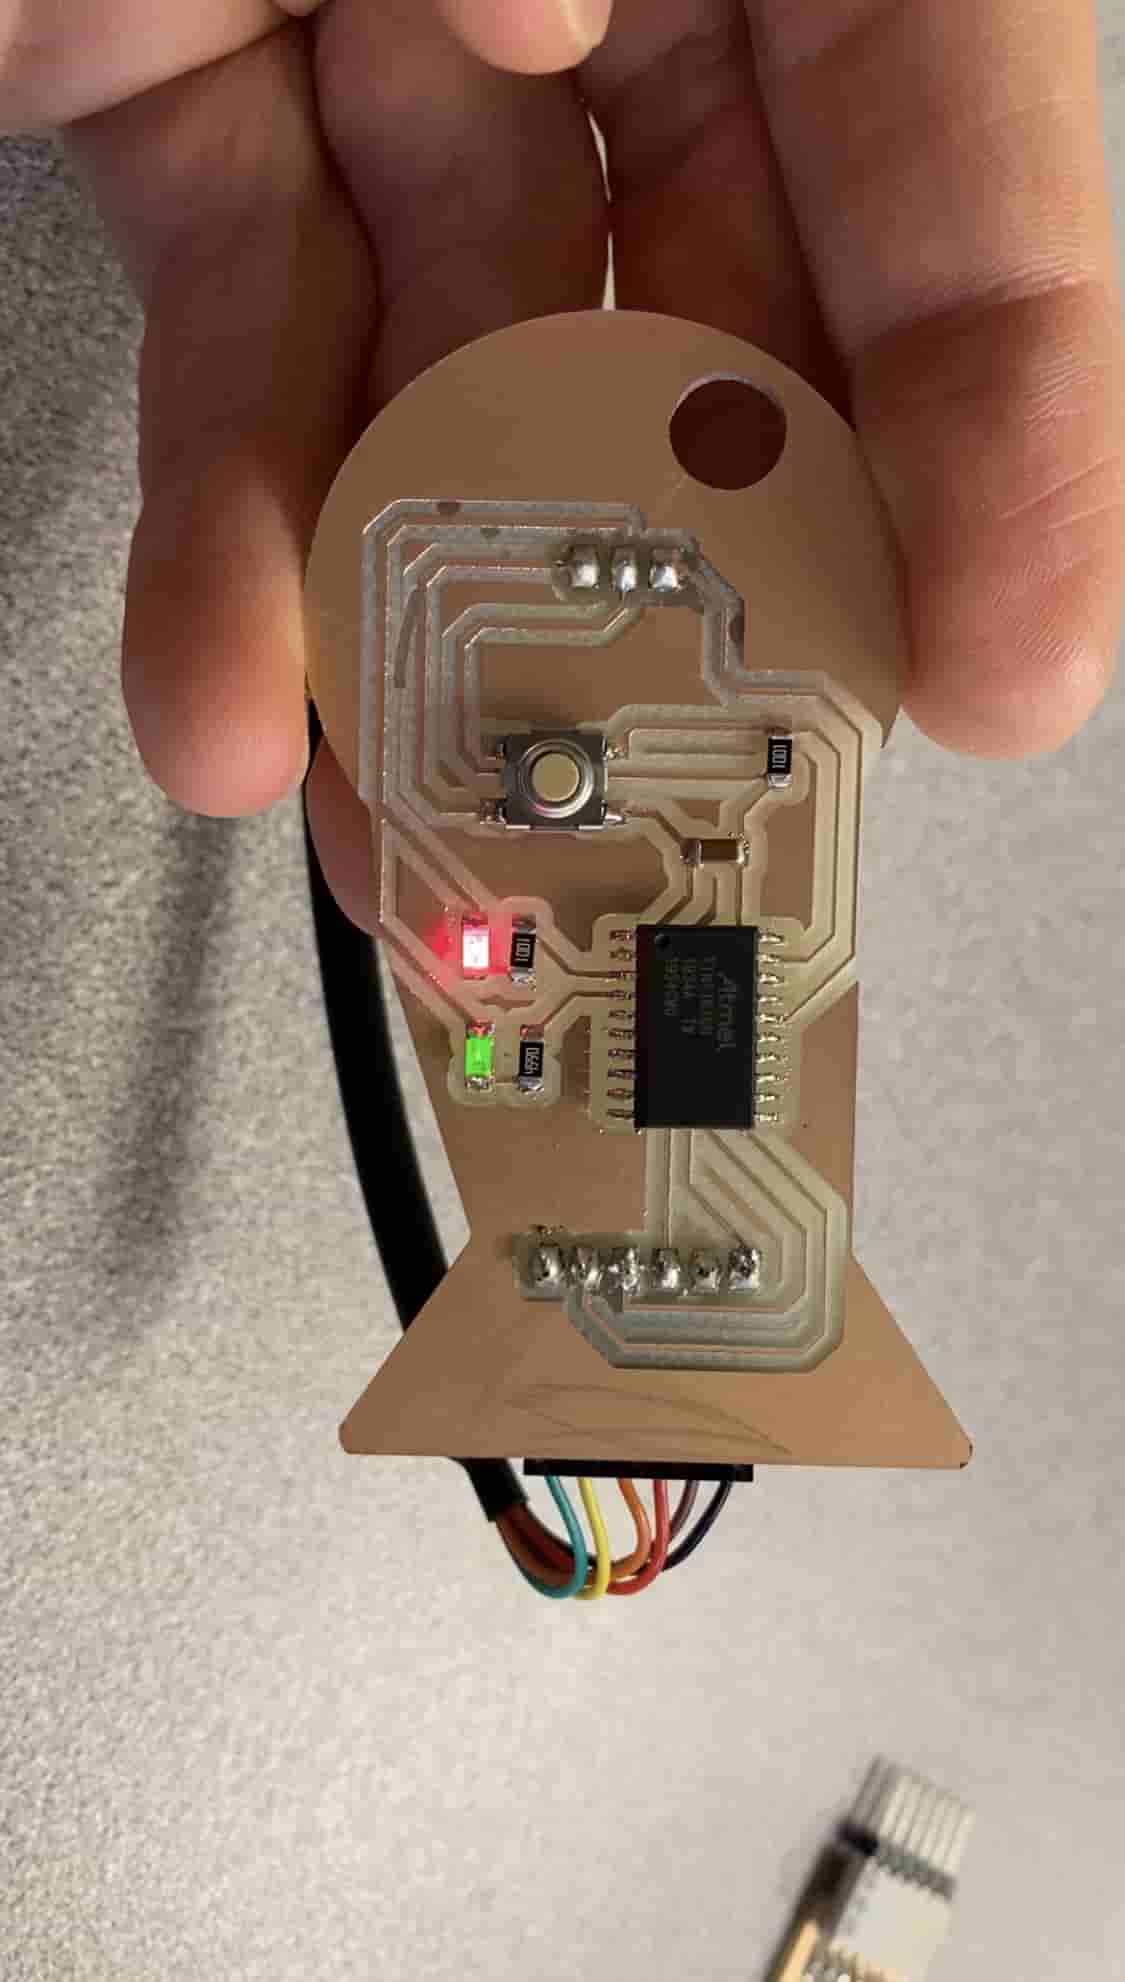
We have spent at least 3 weeks planning this idea. We, as a group, met multiple times and argued on what is possible and what is not. We came to conclusion that, we will be buying a freezer and changing the thermostat to make it a cheap fridge. Then, we will put all the valves and the pumps inside the fridge, for space saving and efficency reasons. In our initial idea we have planned to mix the drinks before serving but after giving some thought into it, we have decided that we won't be mixing drinks and if the user wants to mix them, they can simply select another drink and mix that in their cup. Because of this reason, we had to find a way to individually select from 4 different liquids. However, using 4 pumps would be so costly, that's why we have used 4 different valves and 1 pump. This allows us to use a binary tree, which lowers the price while maintaining the efficency. Moreover, the electronics team also used Roland SRM-20 Precision Mill to mill out a board to control the lighting, and the sounds on the machine. For the electronics part, we have designed an GUI using Python Flask App and uploaded it to a Raspberry Pi and displayedf it using the Touchscreen for Raspbery Pi. We have used ATtiny1616-SRN and Arduino IDE to program and control our Neopixels on the Seltzer Machine. We have also included a tiny speaker that can produce a melody once the item is ordered. We decided to use a Raspbery Pi for the GUI because rather than haivng a simple GUI made with LCD display we wanted to have more complex one using HTML and CSS. Hence, we used Python Flask.
Materials
This is the list of all the parts we have ordered. Click here to access the parts list
My Part
My part of this assignment was to program the GUI. For this I have used Python Flask App. Flask allows me to host a website locally and use python to add a backend to the website. Flask is used by many famous companies such as Netflix, AirBnB, Reddit, Lyft, MIT and many more. Flask is used for many great reasons. The most obvious is that, it makes web editing way more easier. You can create one layout HTML and have all your pages look like the same and only make different HTML files for the main content of the page. By doing so you do not have to recode the NavBar or the Footer again and again. Moreover, Flask also allows you to use Python code directly in HTML, for example you have a table in HTML but you don't now how many rows you need and it depends on user input. For this you can make a for loop using Python integration to HTML in FLASK. Moreover, Flask is great with databases. Pulling information and uploading new information back to databases is really easy with Flask.
Because of these reasons we have selected to use Python Flask App for making our GUI rather than LiquidLCD and Arduino.
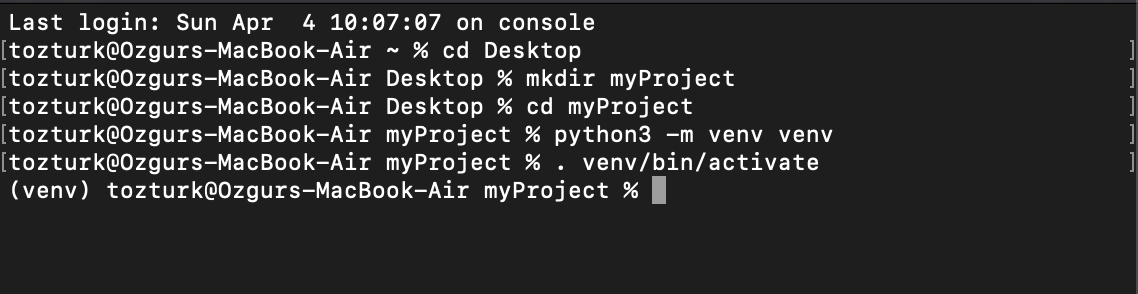
For making our Flask app I have went to the Documentation website of Flask. This Quickstart Tutorial in the Flask App Documentation is really easy to understand. Within minutes , you will have a working website. However, before we start coding, we need to instal Flask. for this again following the Quickstart Doc, we create a folder with our desired name, typing "$ mkdir myProject". Then cd into the folder. This folder will contain all the files we need for our Flask App. To download and run Flask we need to create a virtual environment and for this type "$ python3 -m venv venv". Now that we have the Virtual Environment, we have to activate it. For this type: "$ . venv/bin/activate".
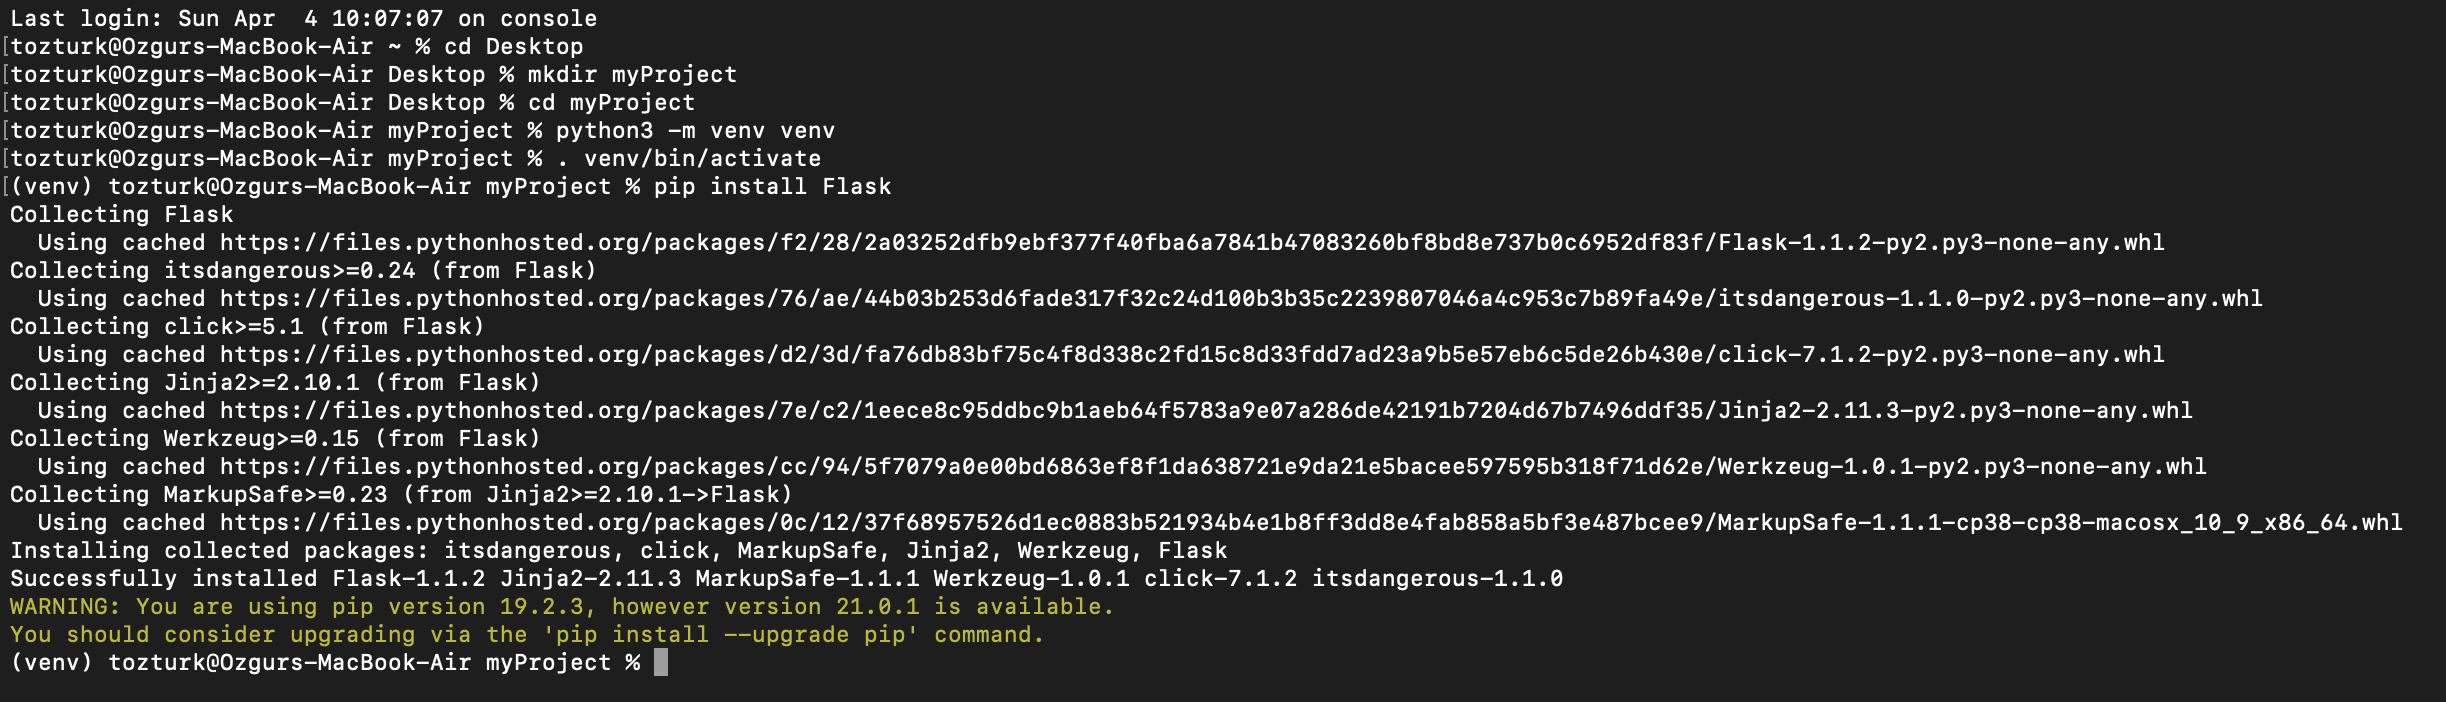
Now that we have actiavted our Virtual Environment, it should look something like above. Now, we need to install Flask, to do this simply type: "pip install Flask"
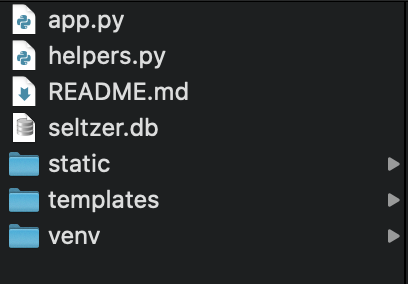
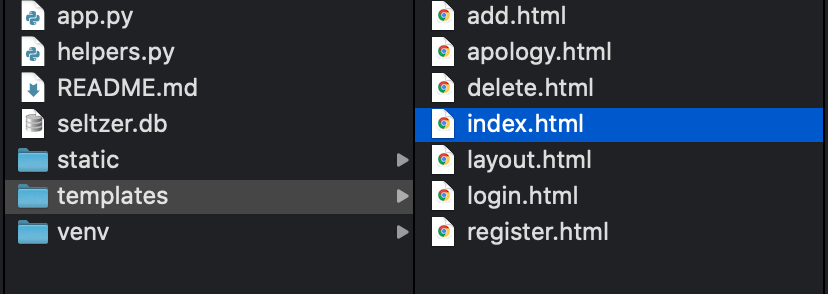
After typing that, it should look like this, and if it does not give any errors that means Flask is downloaded. If you go and open myProject Folder, you would see that there is a new folder called venv. This folder holds all the libraries and codes you need to start the Virtual Environment, Flask and other libraries. However, to start prgramming we need to create a python file called "app.py" in myProject folder. Once created following the Quickstart Doc you can fill it with code and start running. In it's most basic Flask depends on 2 more folders called "templates" and "static". "Templates" folder holds the HTML files, and the "static" folder holds the static files such as images, CSS files or JS files.
Moreover, if you want to add a database you can either use the CS50 SQL library and one of your favorite database providers. In my case I have used SQLlite. So my myProject folder looks like below:
Now finally comes, running the Flask App. After you have done your initial coding and set up the caching and cookies, you can run your Flask app. For this simply make sure that you are in the Virtual Environment. Then type: "export FLASK_APP=app.py". This will tell the virtual environment that you want to run app.py as our source code for the Flask APP. Then to run it type: "flask run".
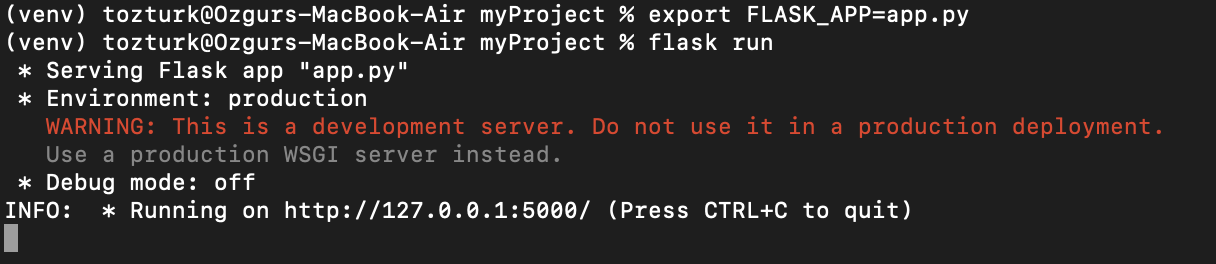
Once you start running your Flask App, it should give a message as above in the terminal. It says that we are running our Flask App at http://127.0.0.1:5000/. As you can see it's not a normal URL, rather, it is a local hosting URL. Hence, this websitee can only be accessed from your computer.
If I go to that URL using the code for our GUI I get this:
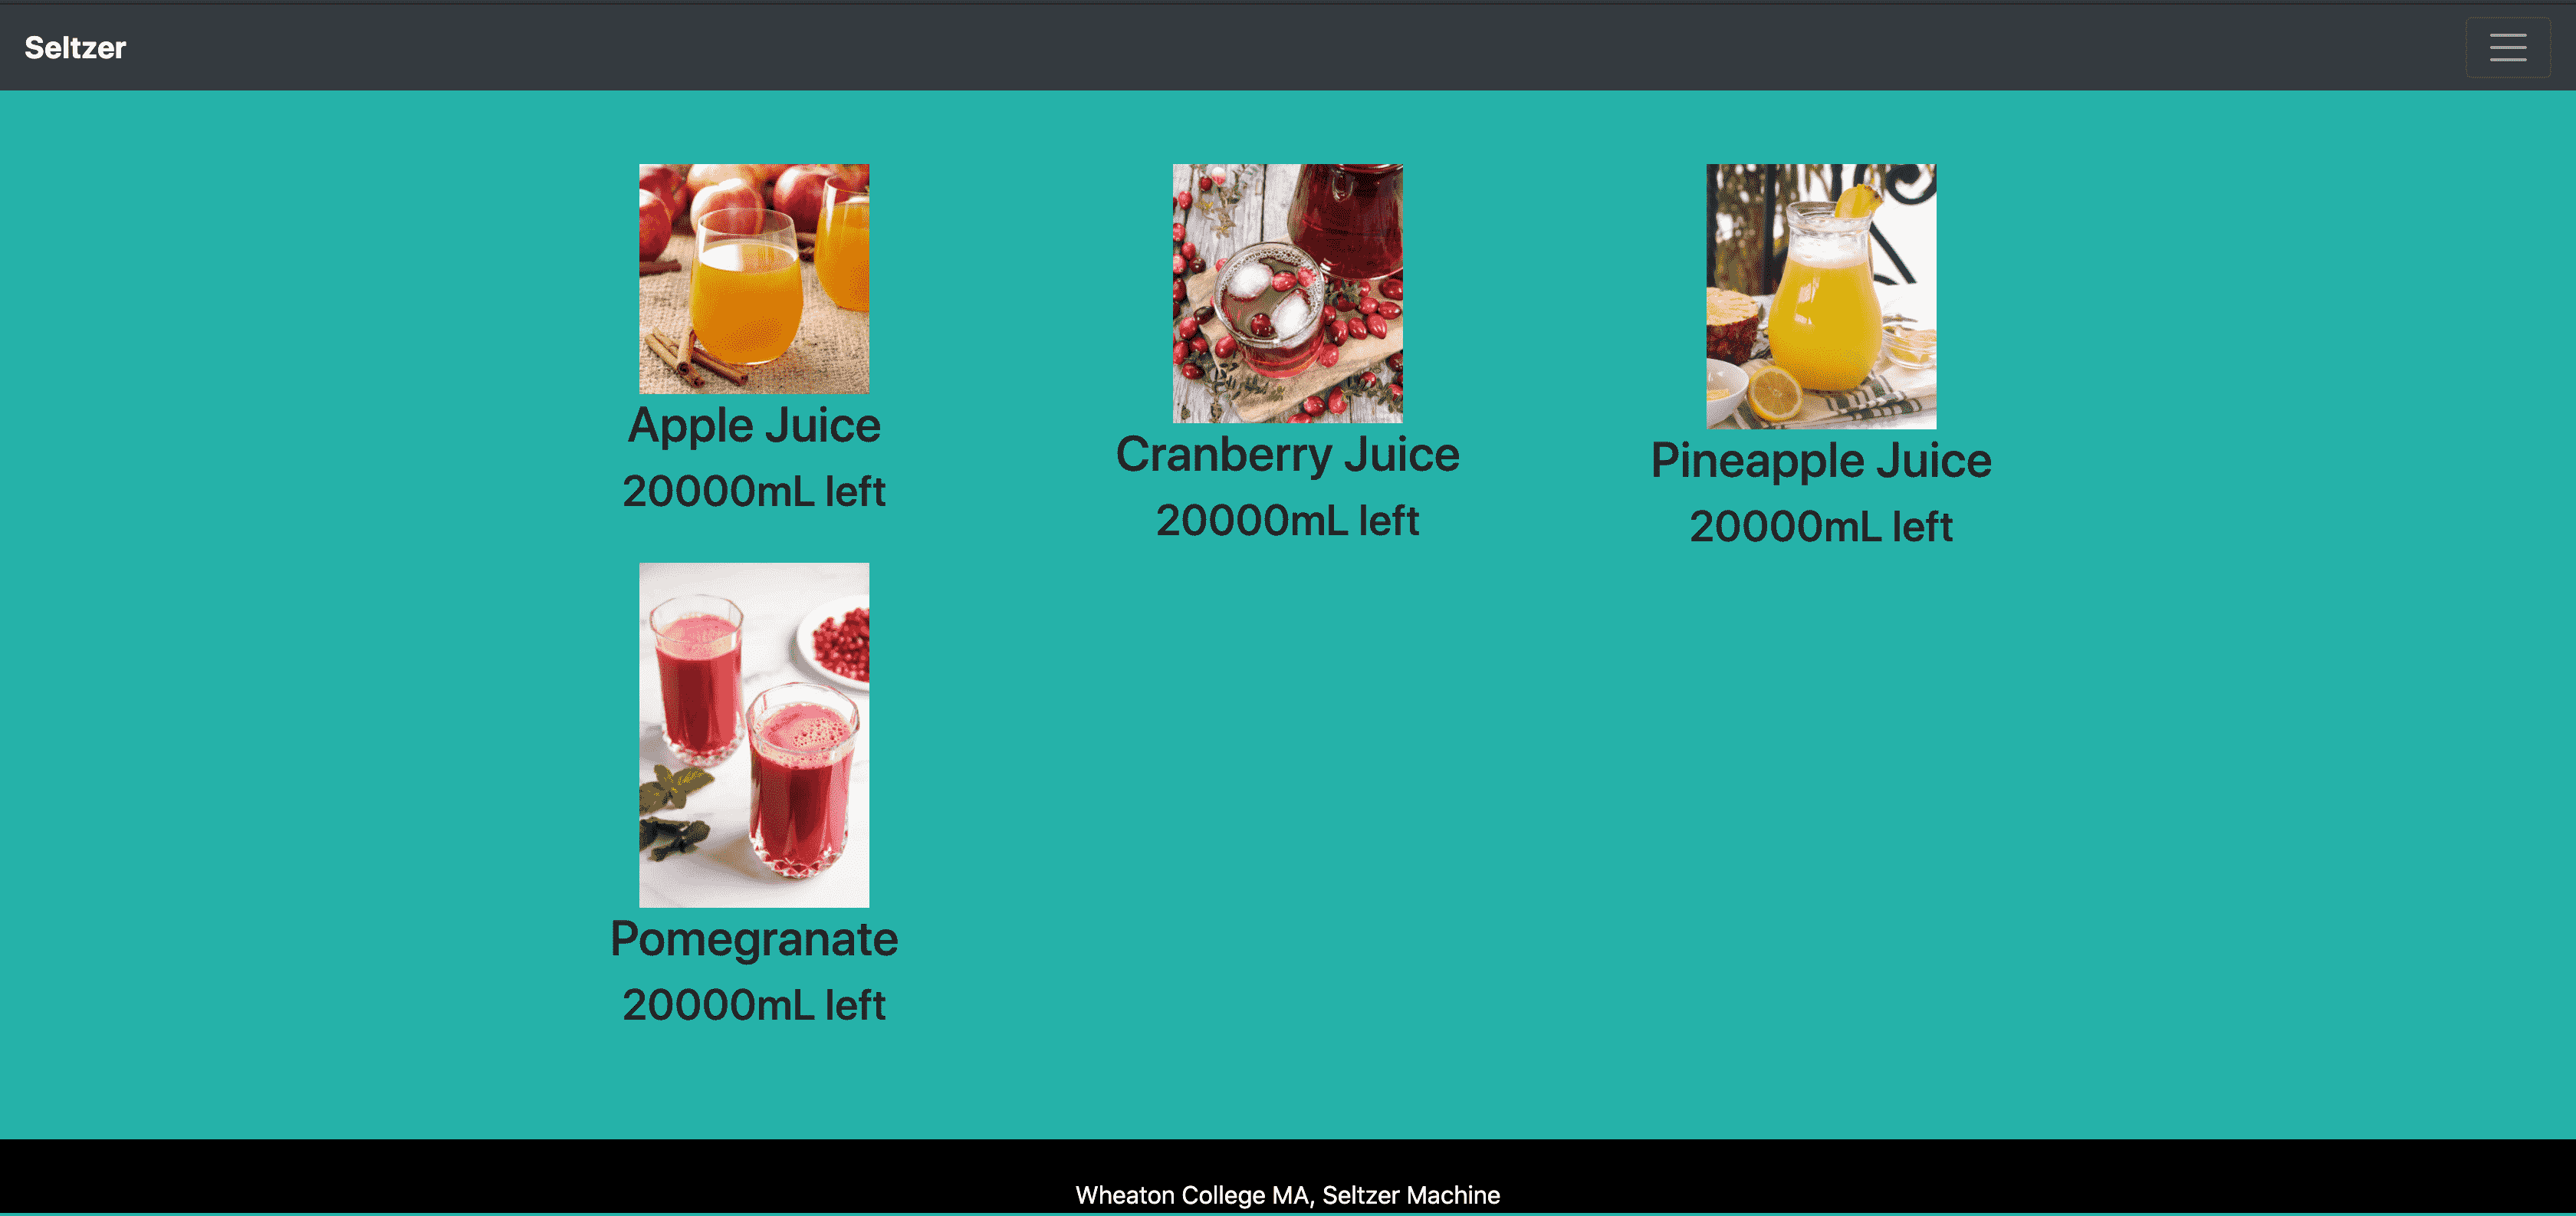
As you can see, I am pulling information from my database and displaying on the HTML. Now let's have a look into my HTML code.
As you can see there are soo many python code spread around and covered with {% %}. This allows the complier to differenciate between actual HTML code and the Python code. Moreover, you can see that this HTML file doesn't even have a body nor a head. This is because they are provided by the layout.html file which takes in this index.html file and puts in inside itself.
Moreover, you can see that I have included the CSS and JS code in the HTML file using the <\script> and <\style> tags. The reason I have done this is becuase now I can edit the CSS and JS of the file using Python too. This gives so much power to me in that I can even control the animations and how everyting looks, easily from my python code. For example, from the code above you can see that I have a python for loop for the javascript code and for each repeat I change the name of the variables and the fucntion. This allows me to have seperate functions for each of the Juice selections. Moreover, because I don't know how many Juice there can be at a time, this code works flawlessly because it reads the database and according to that it sets up everything automatically.
Moreover, there are multiple ways of doing the Backend. One of the good reasons for using Python is that we can both use it to get information from the Database and also turn on and off the GPIO pins on the Raspberry Pi. This unity makes everything work way smoother. Now let's dive in to the Python code. This code does not include the GPIO pin part since it was someone else's part in this project and I wouldn't want to take credit for their work.
As you can see, the Python code is not that long. However, it is still really powerful. It not only changes the HTML but also controls the inputs and outputs, the database, and the interractions between two. I have functions for each page of the Flask App. Each function provides a backend for each page. For example the login() function. The login() function is linked to the login.html and this allows them to talk between two. login() function can send data to the login.html and viceversa. In my case, the login.html takes username and password as input and sends them back to the login function once the user clicks the submit button.
To get the specific value of specific input all you need to do is call the value using the name="" at the input tag in html. After doing this we can call the Database and check-in with it, to see if the username & passoword entered is correct. To interract with the SQL Database we use the traditional SQL syntax however, the way I connect to the SQL database is different than traditional. I used CS50's SQL library which allows me to connect and control SQL Databases with incredible ease compared to other libraries.
Now let's check the SQL database:
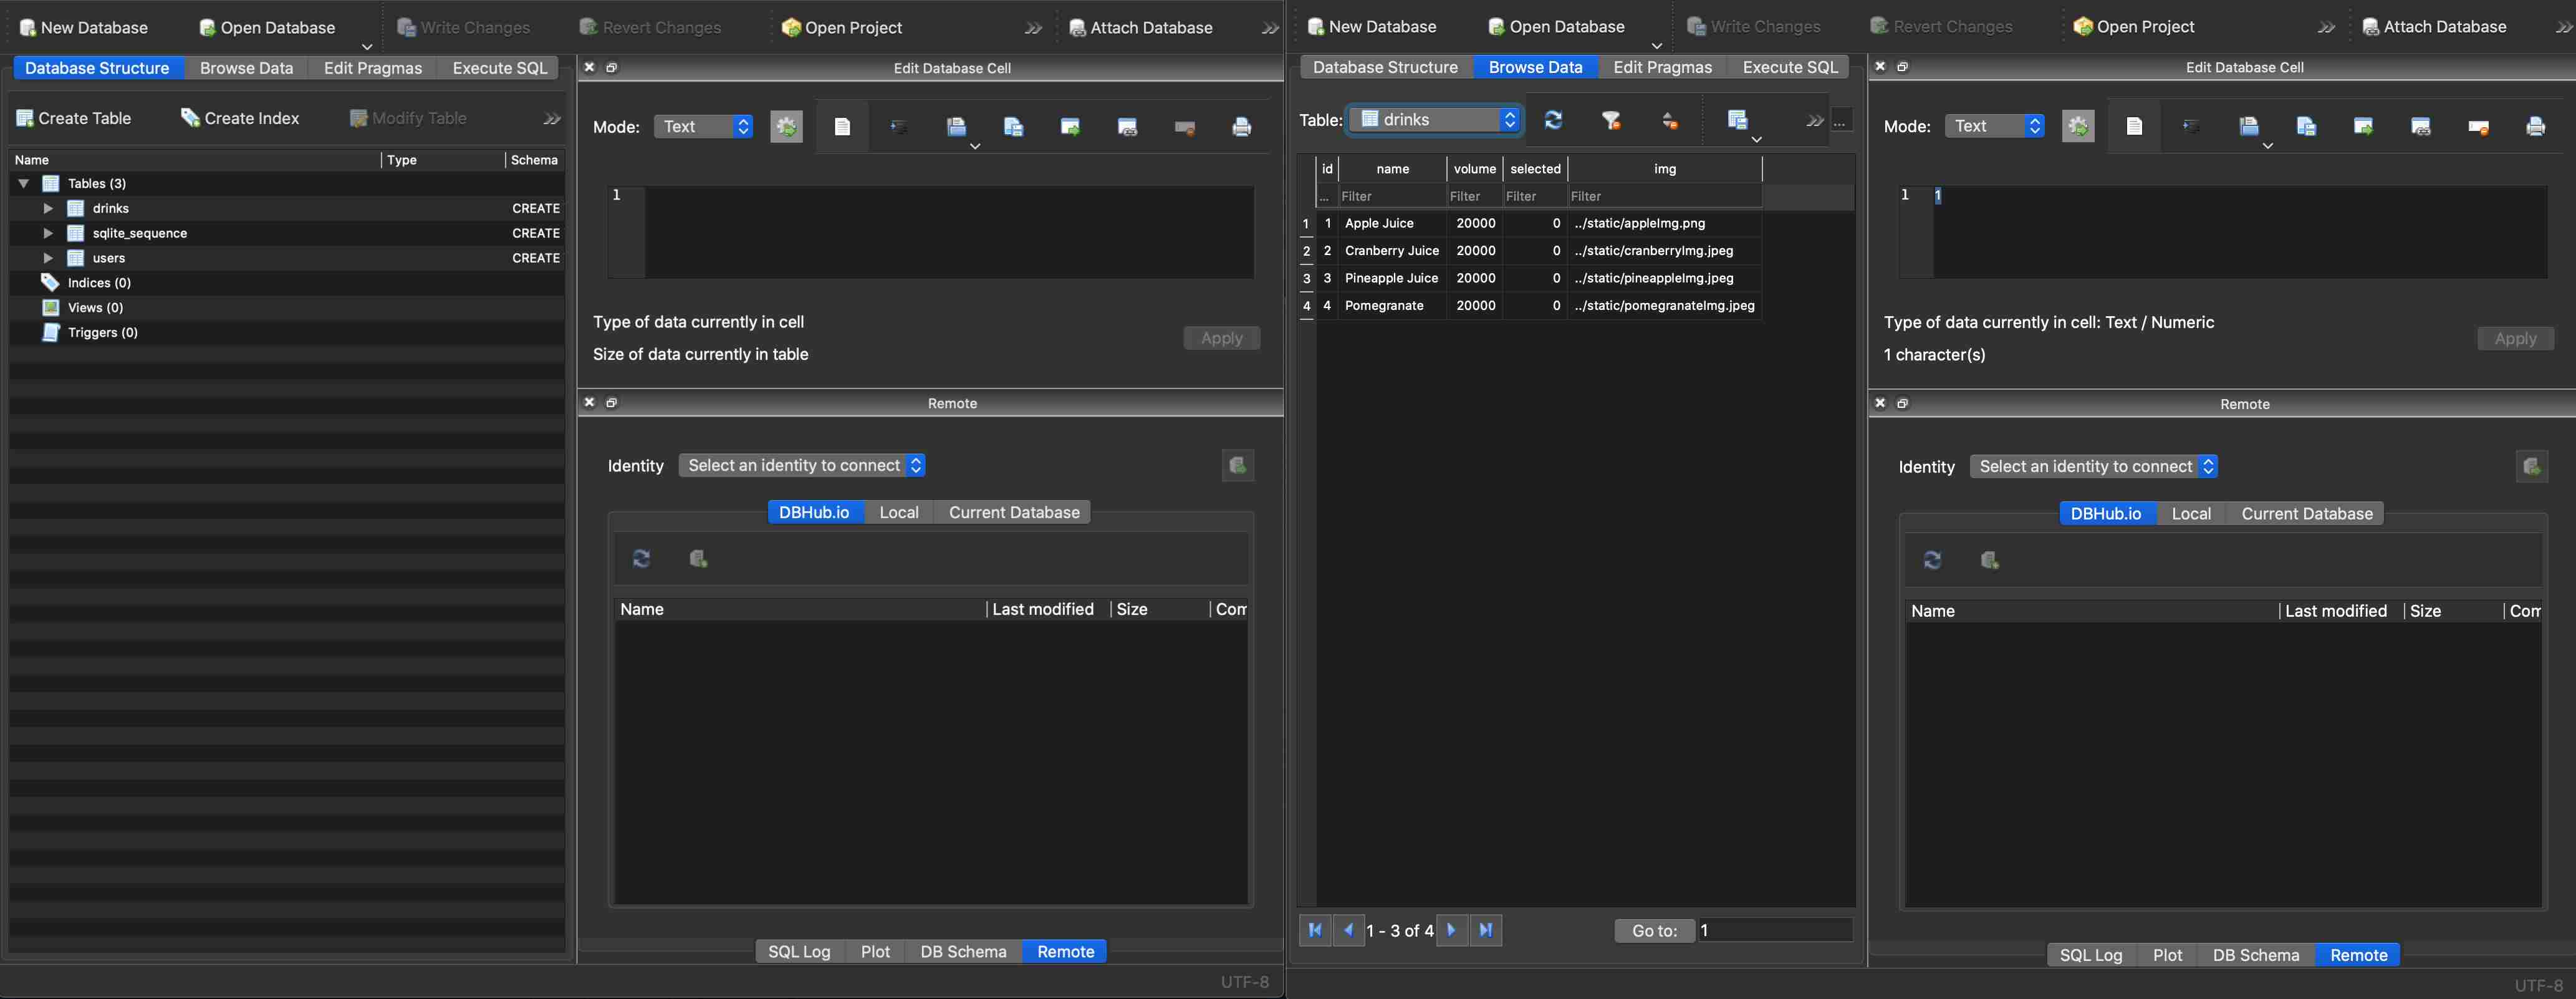
In the first image (left), we see 3 different tables: drinks, sqlite_sequence and users. Two of these are made by me and sqlite_sequence is made automatically. sqlite_sequence shows how many data points are there in total in the whole database. Drinks table holds the information about the drinks and the users table holds the information about the users. The reason why we have users on a simple Seltzer Machine is because we want to be able to add different drinks to the machine without taking the Raspberry Pi memory card and adding it manualy or by connecting it to the internet. We want to be able to do it using the touchscreen connected to the Raspberry Pi. There are two way to create these tables in the SQL Database. You can either create it using python code and SQL Syntax which would be something like "db.execute("CREATE TABLE table_name (column1 datatype, column2 datatype, column3 datatype, ..., PRIMARY KEYU(some column) )") This python code allows you to create a new table inside an SQL database. Another way of doing it is you can open the database using the SQLite app and click create a new table button and start creating your new table using given options. An example is below:
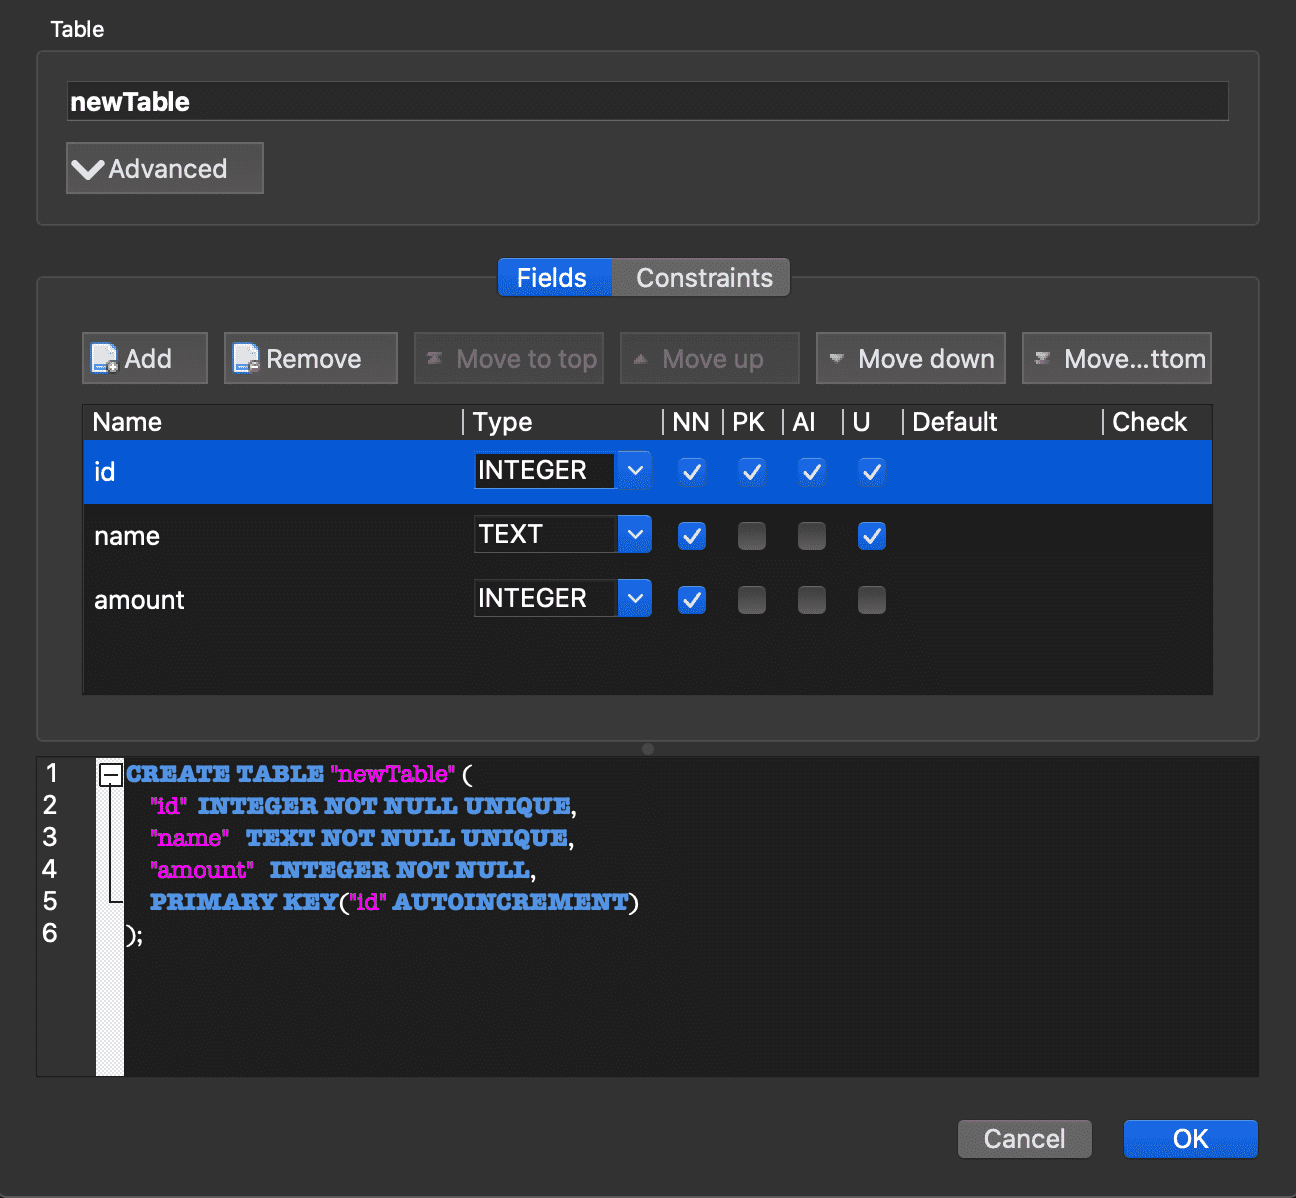
As you can see, once I clicked at "Create New Table" I was greeted by options that allows me to add or remove or change new data columns and define if they are the Primary Key (the thing that all the data is arranged by), or if the value can be null or empty or if it auto increments or if it is unique. Moreover, I can easily select the datatype by clicking and selecting one from: integer, teext, blob, real, numeric. You can also add a default value or constraints to your database. For example, you can have a constraint saying the database length cannot be longer than 4 items at a time. Finally, at the bottom you can see all your changes as SQL syntax too.
Hence, at the end I had a working backend and frontend for our GUI. Our Database for the drinks stores the drink id, drink name, current drink volume, image for the drink, and how many times the drink is selected.
A quick representation of how the program works can be seen through the GIF below:
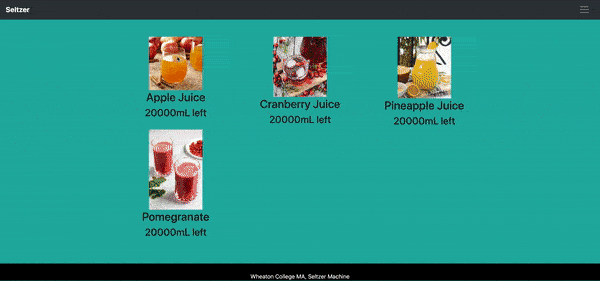
As you can see once the user selects a desired drink, a new window pop-up. In this window the user can select small, medium or big sizes which corelates to 250 ml, 500 ml and 750 ml. After selecting one, the GUI automaticallys changes the data at the database and reload itself and you can see that the selected drink's volume decreased from 20 L to 19.5 L.