Input Devises


Week Ten.

Group assignment:

  • Check an input device(s)’s analogy and digital signals.
  • Document everything!
  • Individual assignment:

  • Measure something: add a sound module to a microcontroller board that you have designed and read it.
  • Learning outcomes:

  • Demonstrate workflows used in recording something with input device(s) and MCU board.
  • This week I try to experience input devices that I may use in my final project.

  • I will use Fab ISP and ATtiny44 boards that I made in the previous weeks.
  • I will use the motion sensors as my input device.
  • Sound Module ISD1820

  • The device can performance as input and output device.
  • The sound module ISDI1820 allows you to record and play audio files.
  • Component needed:

  • ATtiny
  • A speaker with wires
  • The Arduino software
  • BC547 transistor
  • The pinout on the board:

    I programmed my ATtiny44, following the embedded programming week steps, using this code.

    below is the board design:

    I connected the pins on ATtiny to the pins on the ISD1820.

  • ISD1820 (GND) >> ATtiny44 (GND)
  • ISD1820 (VCC) >> ATtiny44 (VCC)
  • ISD1820 PlayL (P-L) >> ATtiny44 PA0 (Arduino pin 0)
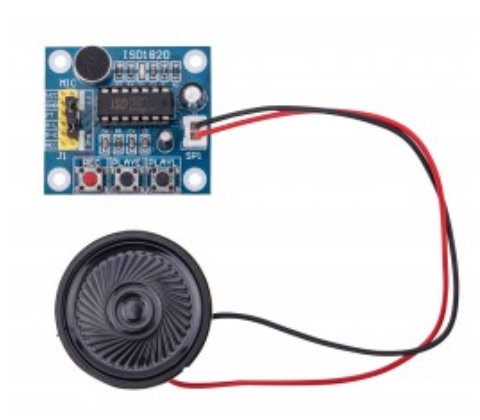
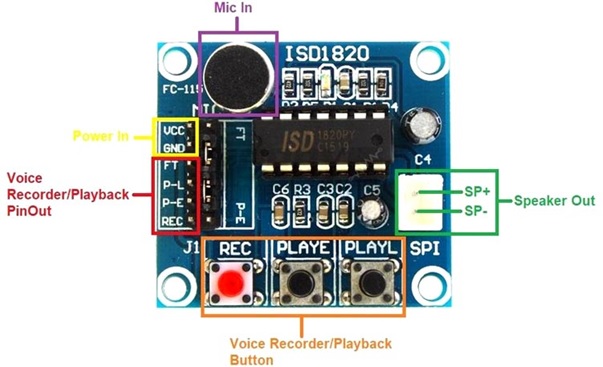
  • ISD1820 Record (REC) >> ATtiny44 PA1 (Arduino pin 1)
  • Test

  • I pressed for long time in the REC button and started speaking into the microphone.
  • To playback pressed for long time in the PLAY-L button
  • I hear it playback it was a fascinating experience.
  • The only problem I face is that the voice is too low I barely hear it.
  • Editing Audio

  • Audacity is an easy-to-use, multi-track audio editor and recorder. Audacity is used in this assignment to reduce audio record size by decreasing bit rate and sample rate. After having my voice recorded in mp3 I followed the steps in the picture bellow.
  • By using the Audacity application.
  • I was able to control the recordings and audio files.
  • Previous Next