Grace Schwan Silva
  • Home (current)
  • Student Agreement
  • About me
  • Assignments
    Week1:Principles and Practices, Project Management Week2:Computer-Aided Design Week3:Computer Controlled cutting Week4:Electronics Production Week5:3D Scanning and Printing Week6:Embedded Programming Week7:Computer-Controlled Machining Week8:Electronics Design Week9:Output Devices Week10:Mechanical Design, Machine Design Week11:Input Devices Week12:Molding and Casting Week13:Networking and Communications Week14:Interfaces and Applications Programming Week15:Wildcard Week Week16:Applications and Implications Week17:Invention, Intellectual property, and Income Week18:Project Development Final Project

WEEK 2

COMPUTER AIDED DESIGN

Assignment

* Model (raster, vector, 2D, 3D, render, animate, simulate, ...) a possible final project.

* Compress your images and videos.

* And post a description with your design files on your class page

After class on Wednesday I continued with my organization to be able to advance in this assignment.

FAB ACADEMY WEEKLY PROGRAM

CREATING IN 2D AND 3D SOFTWARE

This week we have to model (raster, vector, 2D, 3D, render, animate, simulate, among others) and document on our personal page. Neil spoke this week and showed us about different software for design and animation. Fab academy has a large collection of programs listed for students to familiarize themselves with. Explore as many as you can. You will find the 2022 list of programs here . A great challenge ahead!

2D RASTER

It is any type of digital image represented in meshes (Pixels). And what is a pixel? It is the smallest unit of color that makes up a digital image. To understand more, it is a bitmap image that divides the space into regular cells where each of them represents a single value.

Of all the ones I saw on the list I recognized some and others I did not know, I chose these 2, the program that I did not, GIMP and the PIXLR program, I do not know them but we will see what can be done with them.

In this assignment I experimented with some programs:

GIMP

The first program I installed was GIMP. It's open source raster image manipulation software, never heard of it, we'll see how it goes! :)

When starting GIMP it opens without a new working canvas. Go to file - new. Here you can create your designs.

How will I advance in my final project, I make the name, we will see how it turns out ;) I use the text tool and then I place a box using the Rectangle selection tool from the tools menu. On the Edit tab - Fill with a pattern.

Select the properties of the line in the tool options window. Now, to draw a line, you can do it freely as in my case I wrote my name or click the left mouse button on the starting point. Before moving the cursor hold down the Shift key and start moving the mouse to where you want your line to go. To end the line, click the mouse button again.

Here you will find the files

PIXLR

Exploring I found this program Pixlr is an online image editor that has two different tools, one more complete (Pixlr Editor) and the other simpler (Pixlr Express).

Pixlr Editor te permite:

  • Modify images: Crop them, resize them, rotate them, adjust colors.
  • Retouch images: brushes, effects and filters.
  • Treat images in layers.
  • Save your work on the computer or online.
  • Pixlr Express allows you to:

  • Modify images: Crop them, resize them, rotate them, adjust colors.
  • Retouch images: effects and filters, borders and frames, stickers.
  • Use tools to create collages and comics.
  • Save your work on the computer.
  • The first thing to do is register, you can do it with your gmail or with your facebook, I did it with my email, and that's it, you can enter.

    In my case I go to the PIXLR EXPRESS option “Fast and simple graphic design” it opens a window like this.

    IMPORT IMAGES:

    You click on “open image” and select one that you have in your images.

    A work table appears where you can edit the photo and you can also draw freehand or place texts among other interesting things, let's explore. Now I start to edit and place a text, I use the “text” toolbar and start looking for the model to insert. I can also use free text to place whatever you want.

    Once I'm done working on my design I save it, you have different formats you can save your design in, JPG, PNG, WebP and PXZ. I am saving it in JPG

    Here my finished design. It's a bit strange hahaha.

    Here you will find the files

    2D VECTOR

    And what is a Vector?

    I understand that it is a line segment directed to a certain side, from a point in space, in graphic design, it is the main element of vector images composed of independent geometric objects and is represented by points, lines and polygons.

    How incredible, let's continue exploring the programs.

    INKSCAPE

    What is Inkscape and what is it used for?

    What I could understand about what Inkscape is, is a vector graphics editor, that is, a set of vectors that allows you to design images with a very good quality. It allows you to create and edit diagrams, lines, graphs, logos, comics, brochures, among others. That you can use shapes, strokes, text, markers, clones, and other tools that the program has to create what you want.

    The first thing to do is download and you can do it for free from its page

    I enter the menu - import, I select an image that I made by hand, this program is very useful and powerful to be able to vectorize images of this type.

    Select from the menu “path”-Vectorize bitmap.

    It gives me as a result an image that does not lose quality even if I enlarge it more.

    Once you have finished vectorizing the image, you can save it in different formats or SVG as it has been in my case. Here is the file, 2D DESIGN.

    Here you will find the files

    ILLUSTRATOR

    I also chose Adobe Illustrator (AI) which is a vector graphics editor developed by Adobe Systems, it is used to make, edit illustration and much more, it is used for technical illustration or graphic design, among others. It is compatible with other programs in the Adobe suite. To my taste it is a little more complicated but my daughter recommended it to me, she is a graphic design student, thank you my beautiful Marianne :) .

    I use this program to draw my hand from a photo I had of my hand, which will serve as a model for my possible final project, in the menu select file-open-select the image to place and that's it.

    Now with the pen tool I draw my hand.

    We finish, we save it! I have to say that it has been a pleasant experience and to continue with the other programs that I have to explore

    Here you will find the files

    3D SOFTWARE

    BLENDER

    Blender is a very popular free 3D modeling software, not only because it is free, but also because the quality of rendering, modeling, lighting, animation and graphics creation is quite good.

    Blender is a very popular 3D modeling software, because the quality of rendering, modeling, lighting, animation and graphics creation is quite good.

    It is mesh based and can reshape basic geometry and animate almost anything.

    It is free and open source, community driven, has extensive learning resources, and is capable of doing most things that commercial CAD software can do.

    It's more versatile, as you can use Python to improve object creation, rendering, and handling of repetitive tasks.

    1.-To download it you must enter this link

    2.- Install Blender

    3.- I opened the program and this box appeared, which is where you can edit according to your needs.

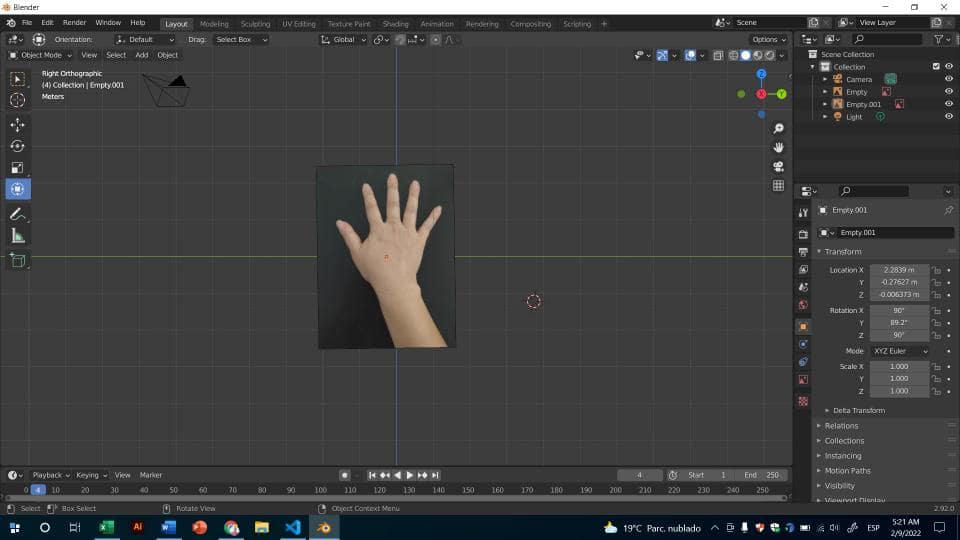
    4.- The first thing I do is import the image that I will use as a template.

    5. Then I place the cube parallel with the image.

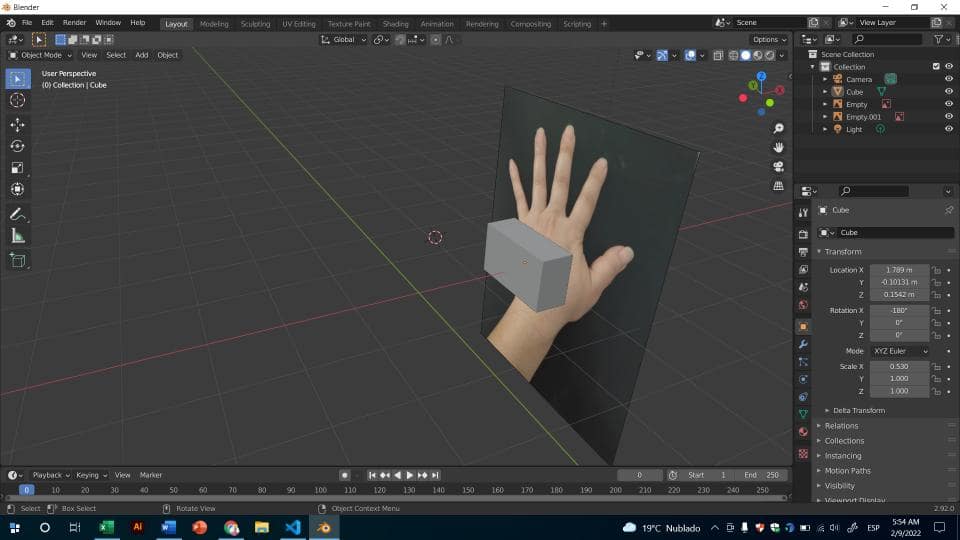
    6.- Place cube mesh and press R key to rotate the cube.

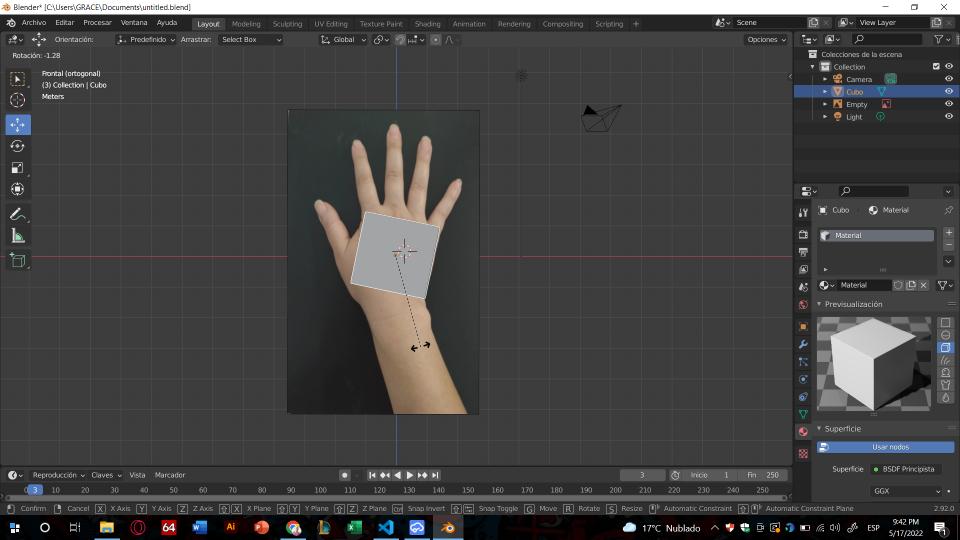
    7.-Select in view shading the structure mode to return translucent.

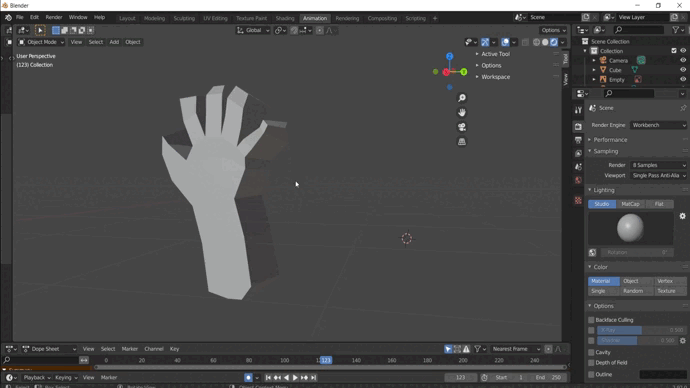
    8.- Extrude the faces of the object until you build the hand.

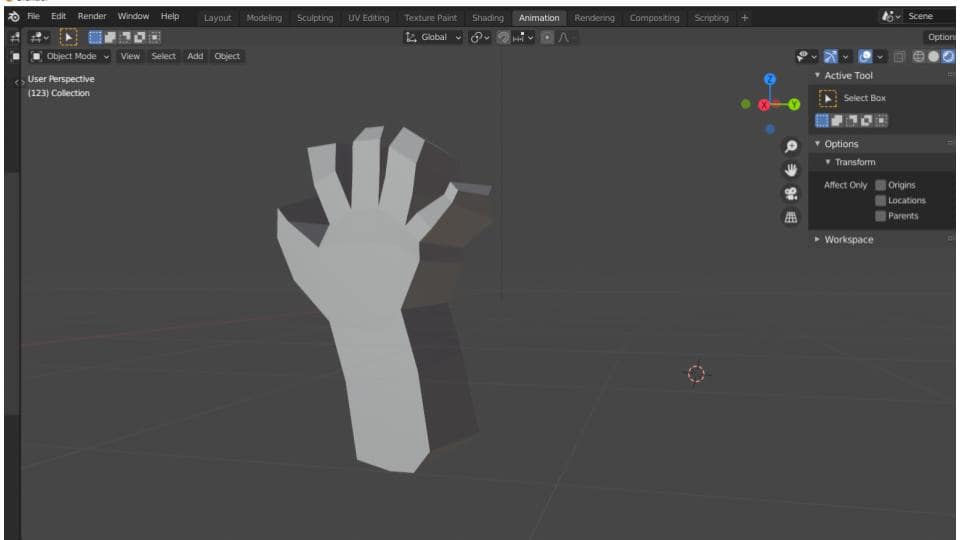
    9. Then I delete the image and keep the design of the hand, the truth is that for me it was quite complicated to use this program but it was interesting to explore it. -

    Here you will find the files

    FUSION 360

    Fusion 360 is a 3D design, manufacturing and simulation software developed by Autodesk. It allows you to create models, simulate their behavior and generate tool paths for manufacturing. It is used in various industries due to its integration and versatility. 
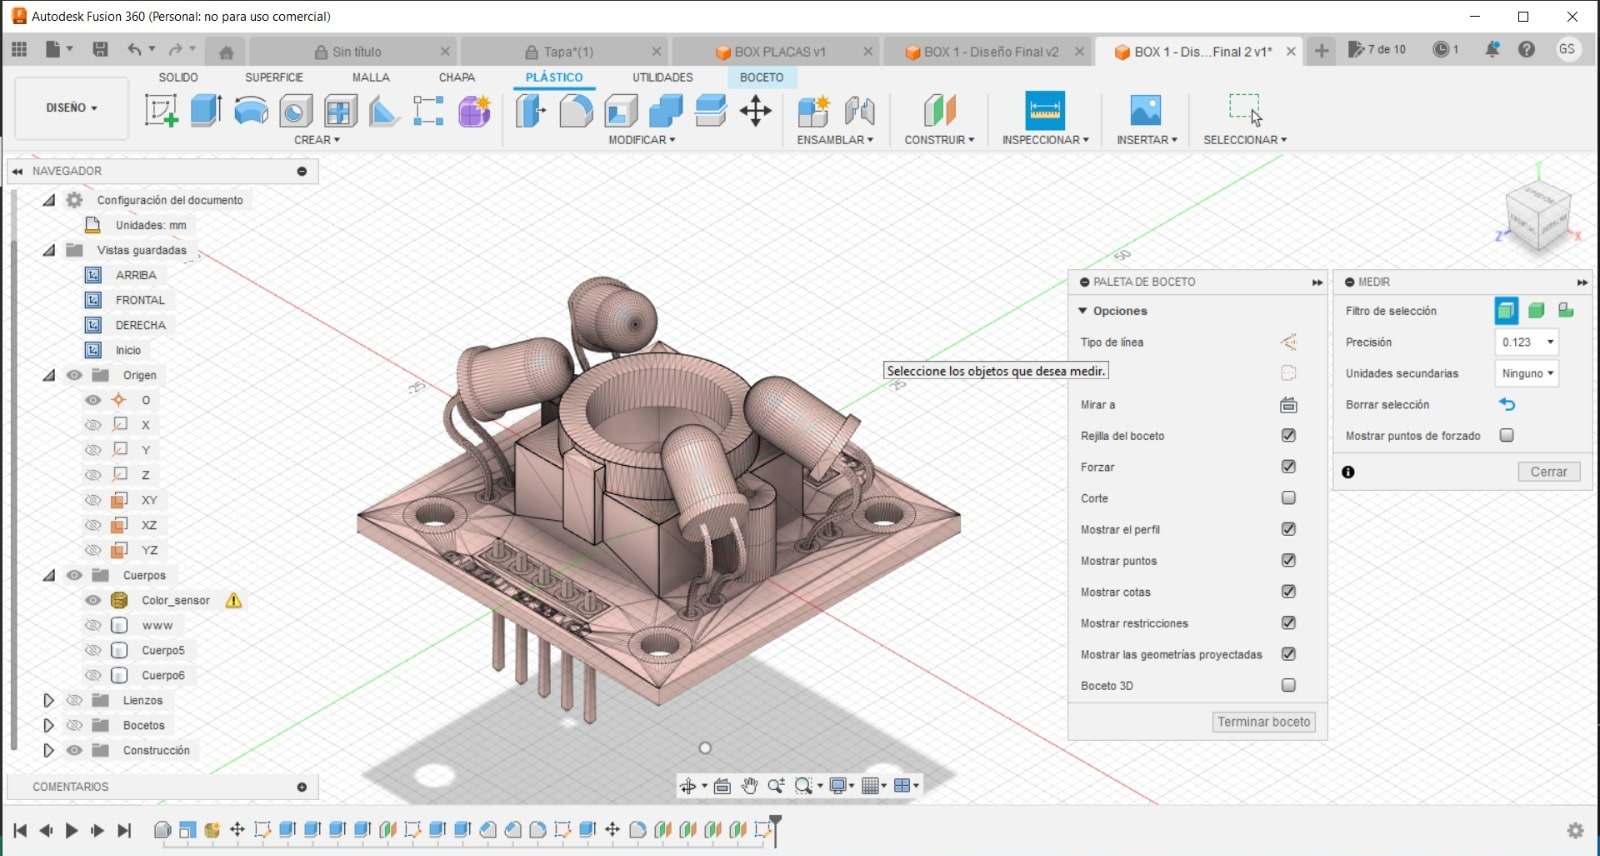
For my final project I decided to use this software because of the precision of the measurements.

    1. First I downloaded the program from the following link

    2. Then I entered the software and created my sketch of one of the boxes that I want to contain my color sensor for my final project.

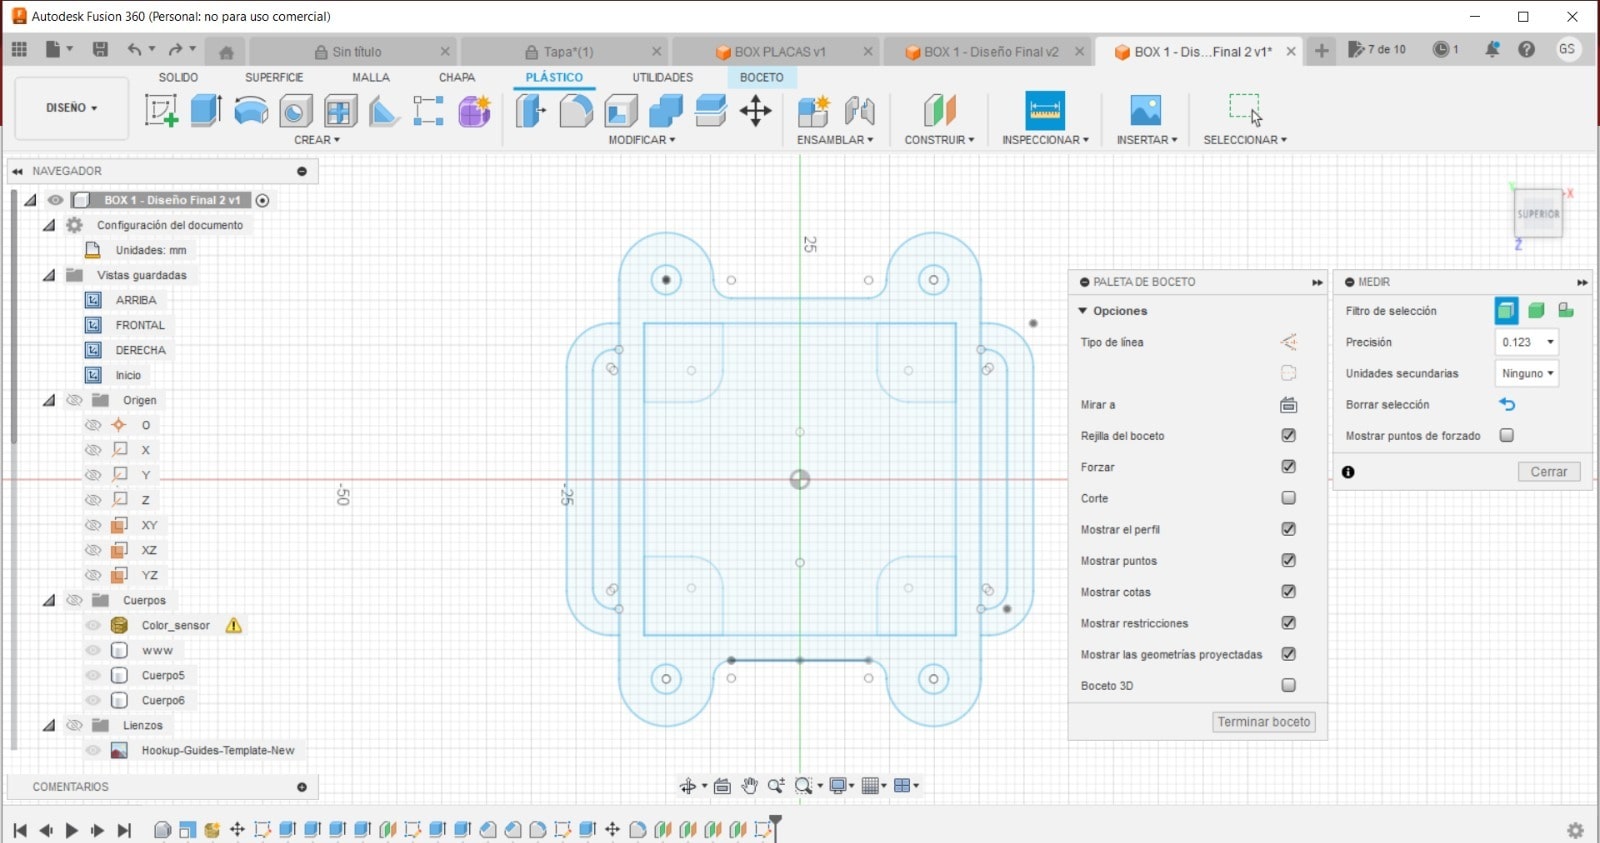
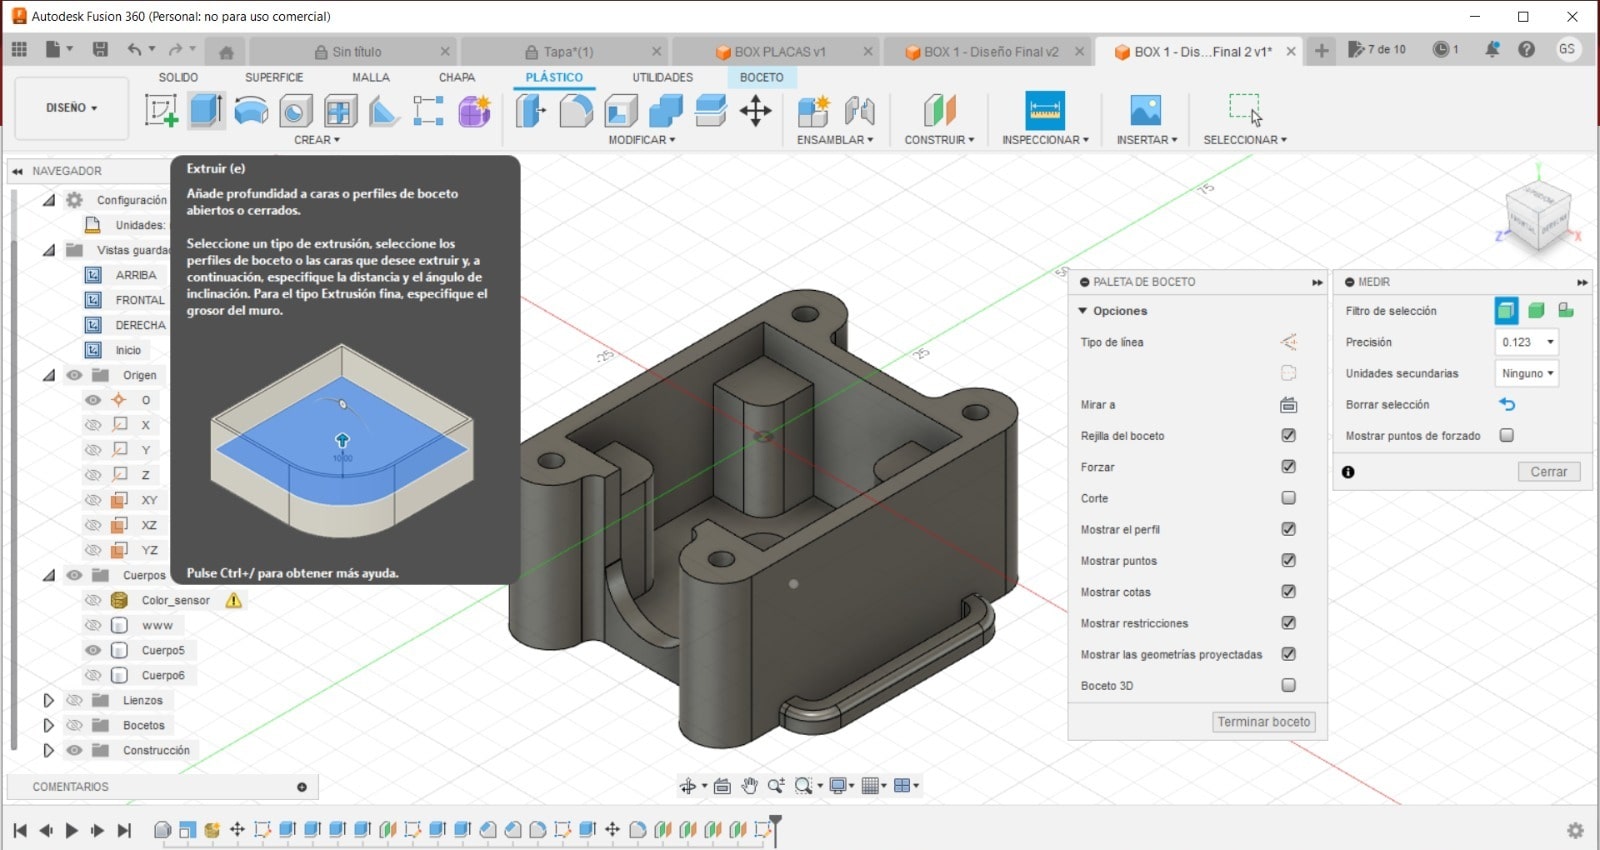
    3. I duplicated the part of the sketch above so I could create the base using the rectangular pattern tool.

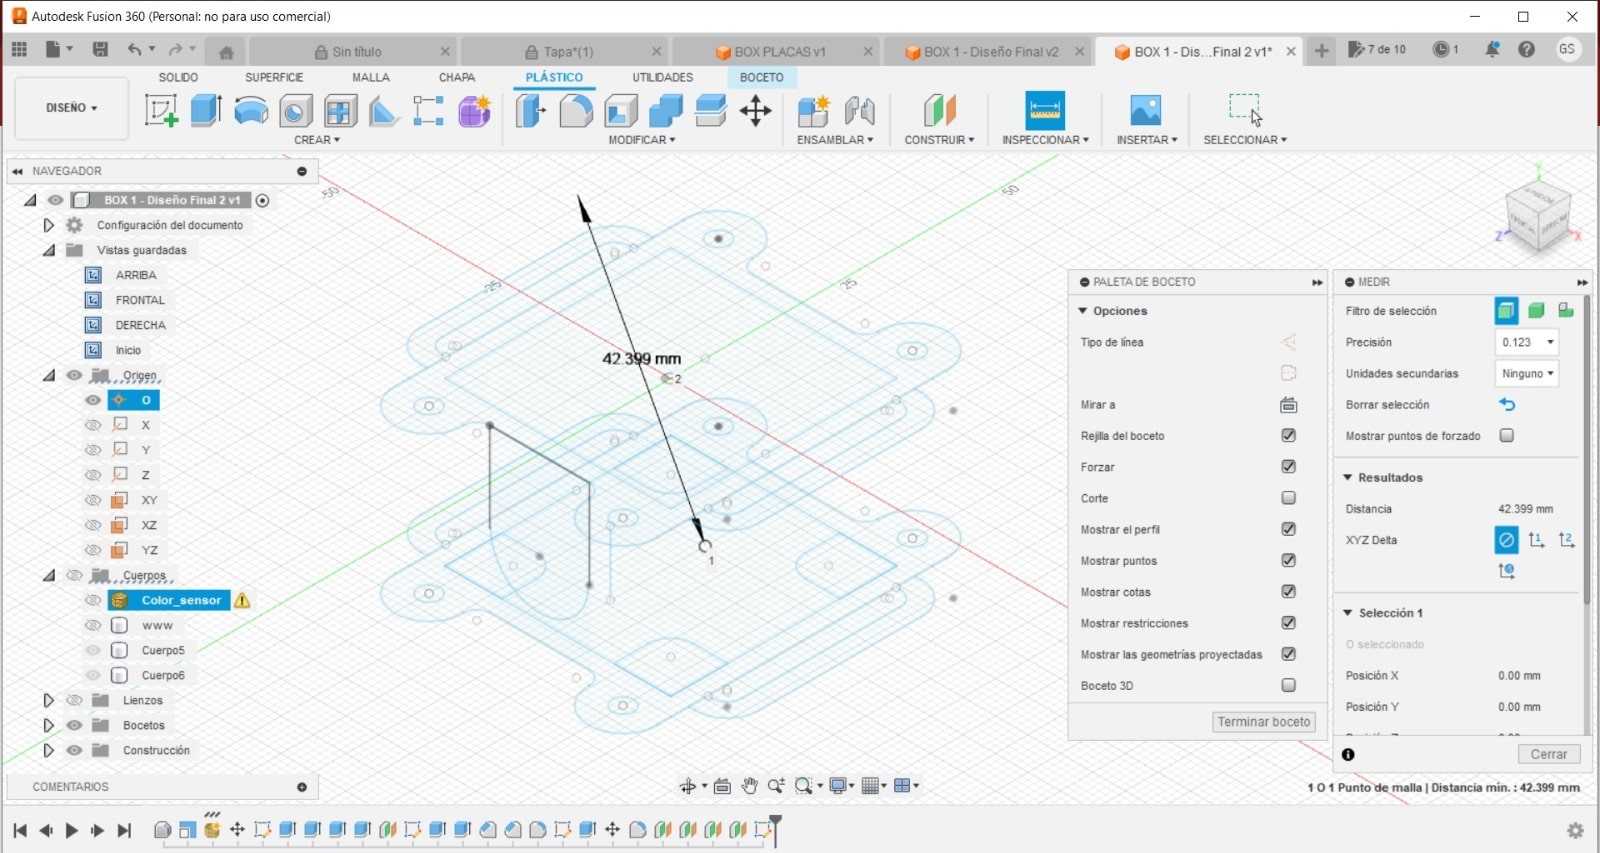
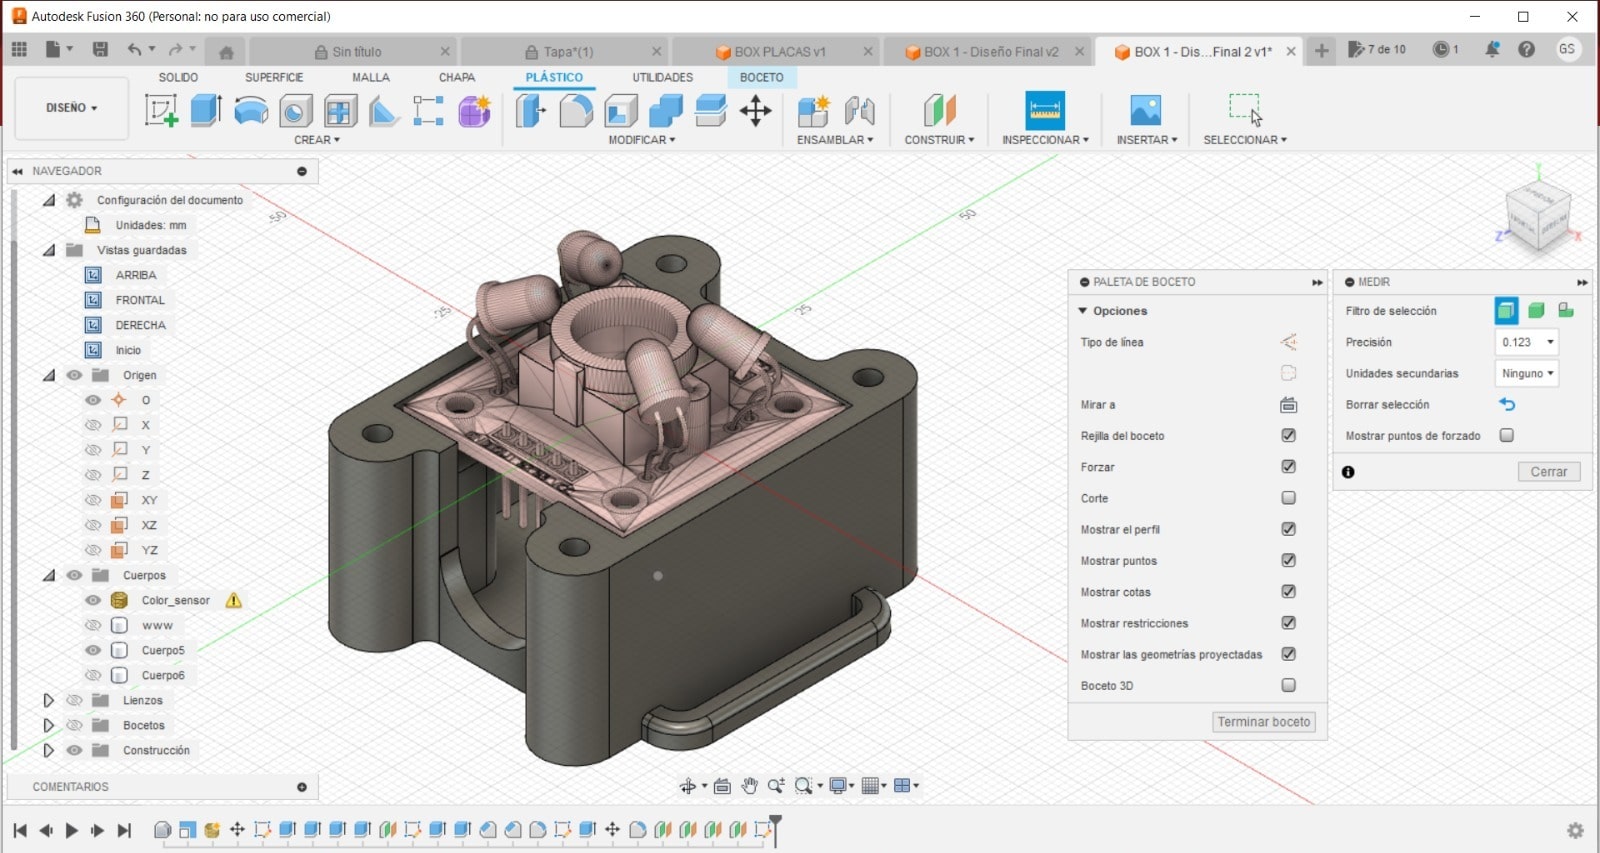
    4. Then, I extruded and made connections between the parts. I started by including the body in the component and then created a connection between them.

    5. To perform the rendering, I followed a video tutorial that provided me with the necessary assistance.

    6.To finish, I carried out the animation video Its user interface turned out to be very intuitive and I experienced no difficulties during the process.

    Here the video of animation from my box for my color sensor.

    Here you will find the files

    Conclusions

    For this week, I intended to explore more programs to understand their specific features, but I ran out of time. I spent too much time trying to get familiar with the features of Blender that I promise to explore more when possible, but I was able to advance part of my final project in Fusion 360 when I thought my designs were ready, I tried illustrator and Inkscape. I learned a lot from these programs and I can say that these programs in their 2D and 3D categories contribute a lot.

    I share this table with some characteristics that I have been able to identify.

    Program Type Features
    Gimp 2D Raster - Editing raster images
    - Retouching and manipulation tools
    - Advanced layers and filters
    Pxrl 2D Raster - Editing raster images
    - Focus on simplicity and ease of use
    - Basic editing tools
    Inkscape 2D Vector - Creating and editing vector graphics
    - Full support for SVG
    - Drawing and manipulation tools
    Illustrator 2D Vector - Powerful vector design tool
    - Extensive customization options
    - Support for logo creation and design
    Blender 3D - 3D modeling, animation, and rendering
    - Wide range of tools and features
    - Support for physical simulations
    Fusion 360 3D - CAD design and 3D modeling
    - Engineering and design tools
    - Integration with manufacturing and prototyping
    - Rendering and simulation

    Creative Commons License
    This work is licensed under a Creative Commons Attribution-NonCommercial-ShareAlike 4.0 International License

    WE CONTINUE
    • © Untitled. All rights reserved