Embeded Programing
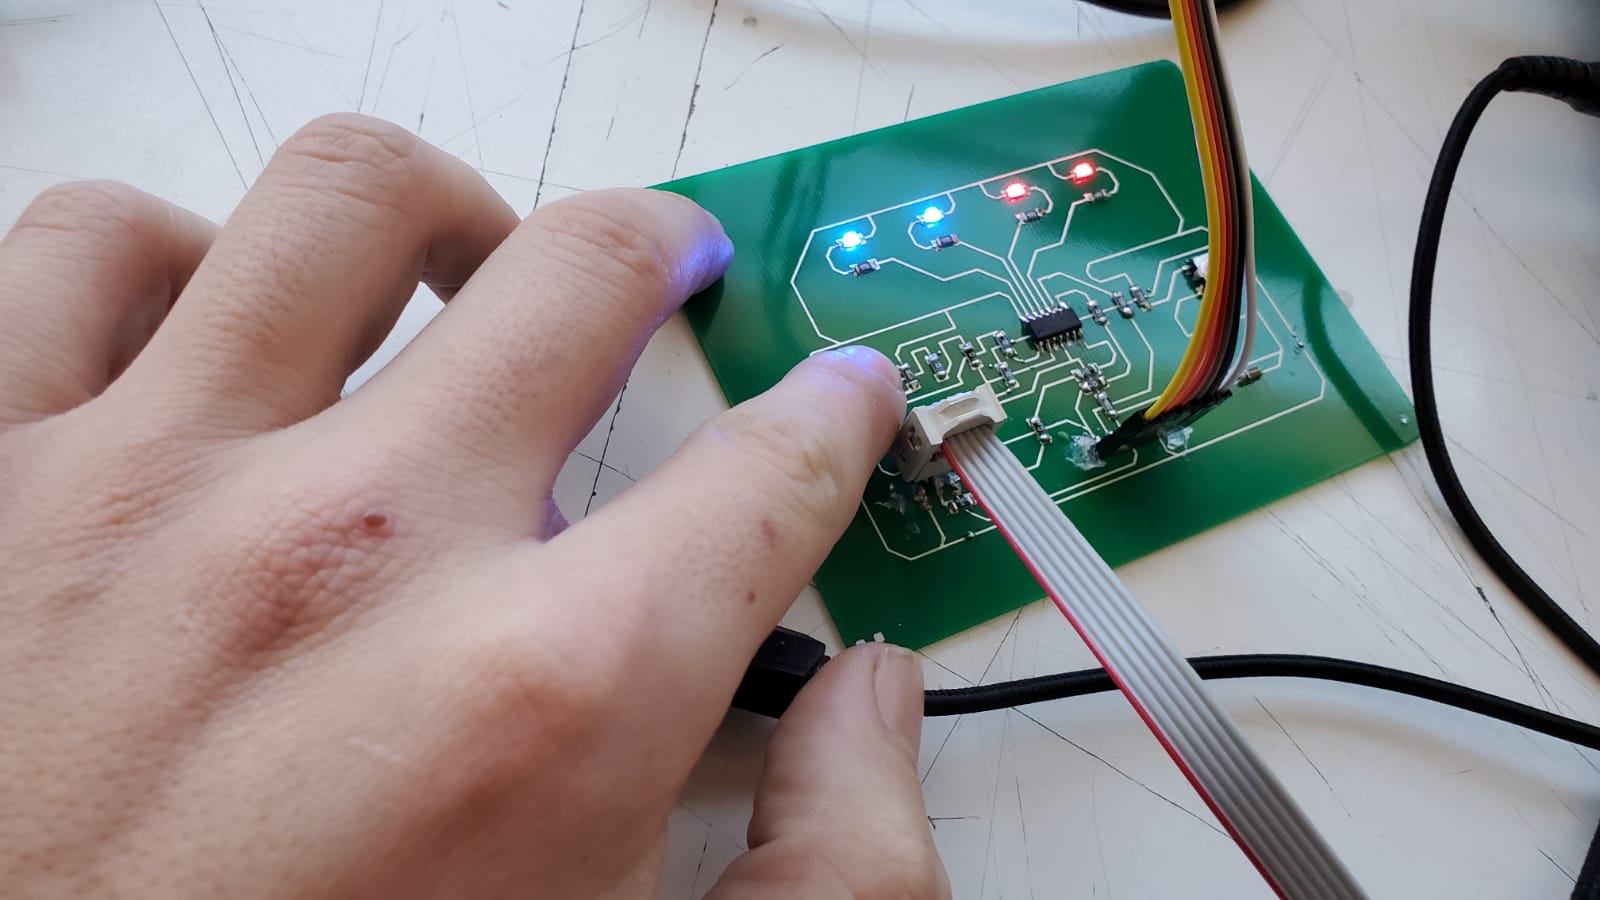
Welcome to this week's assignment, embeded programming! Do I need to tell you that I had no idea of how to program anything? Do I need to tell you that I'm as stubborn as the devil and I've created and programmed a HelloBoard with a Voltera? So yeah, I know, this is not the first Hello World Board with the Voltera, but I'm sure it's the first one that looks like a police car!
So follow me on this amazing journey of lights and music, and doing something I have no idea about.
Chapter One: To program a board, first you need a board
Yes, yes, I know. I should put this in my electronics design page. But I started from scratch, and I did it the other way round, I linked this page there. I'm programing this board because this is the board I wanted to make in that assignment, but I ran out of time making the first spiral, so because I went back to it because of this week, here's the very simple process.
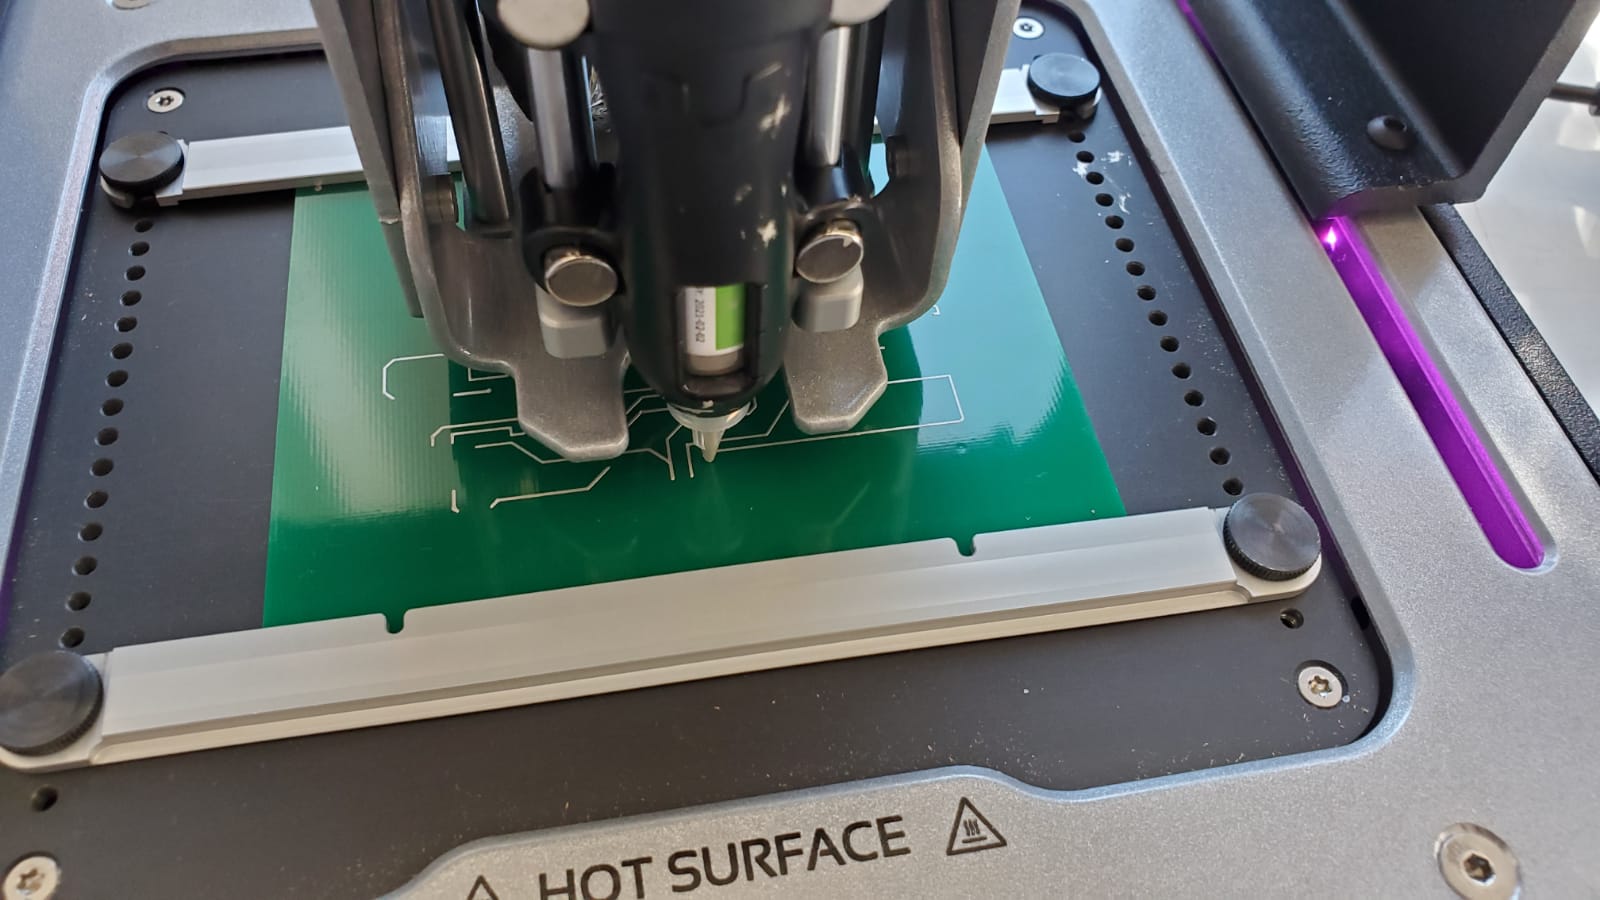
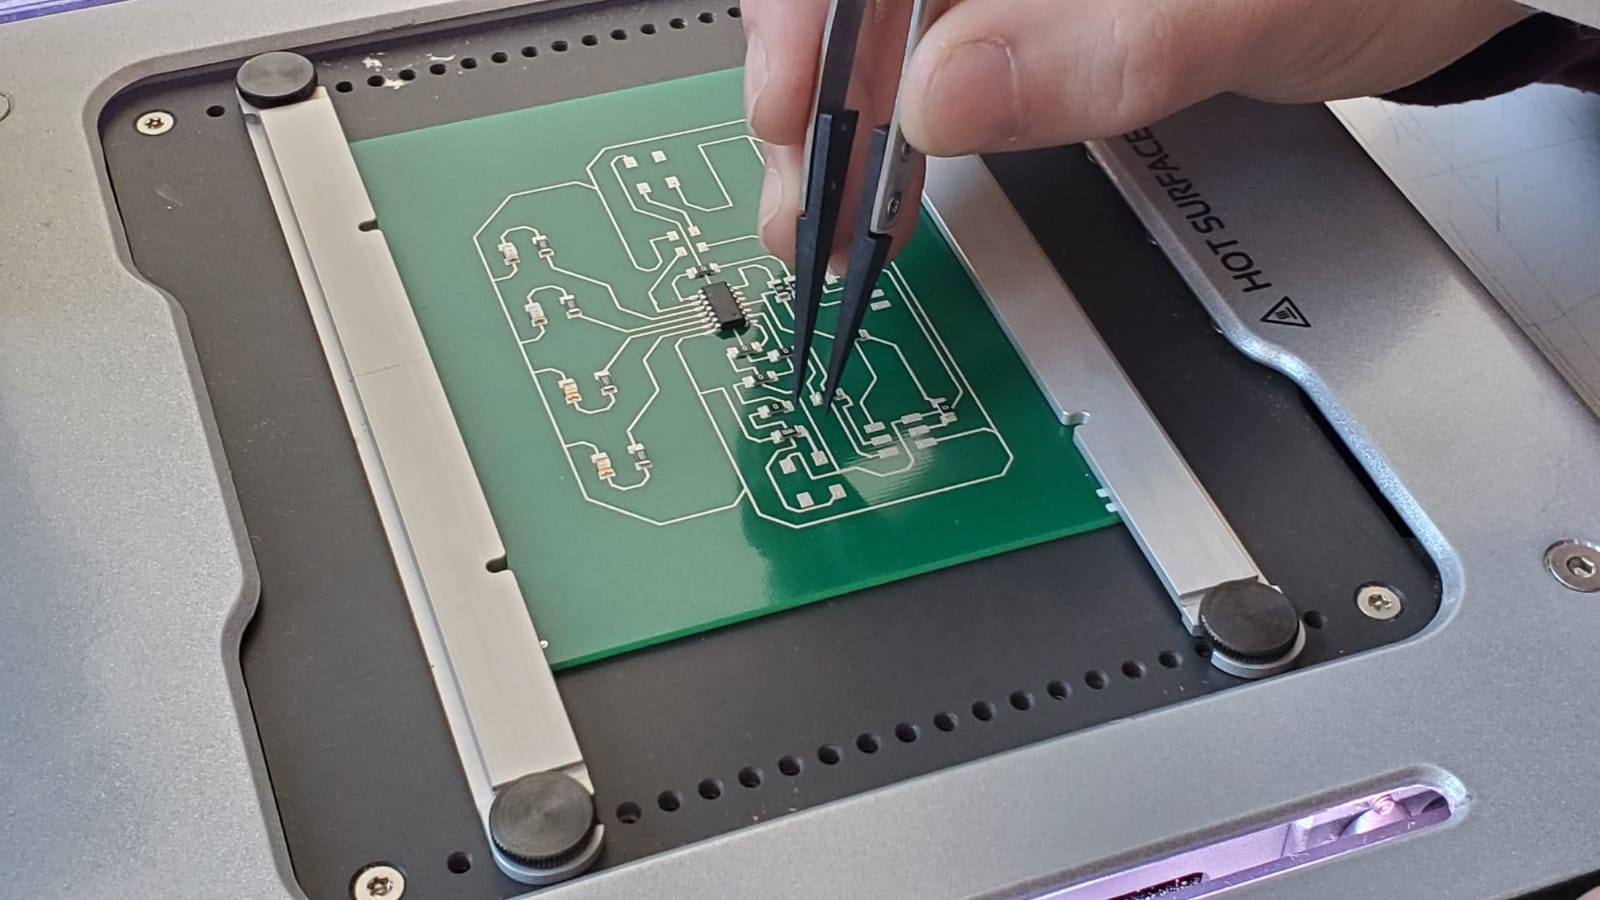
One nice thing about Eagle is that can save gerber files that can go straight to the Voltera. So I just designed my board and pressed play on the thing
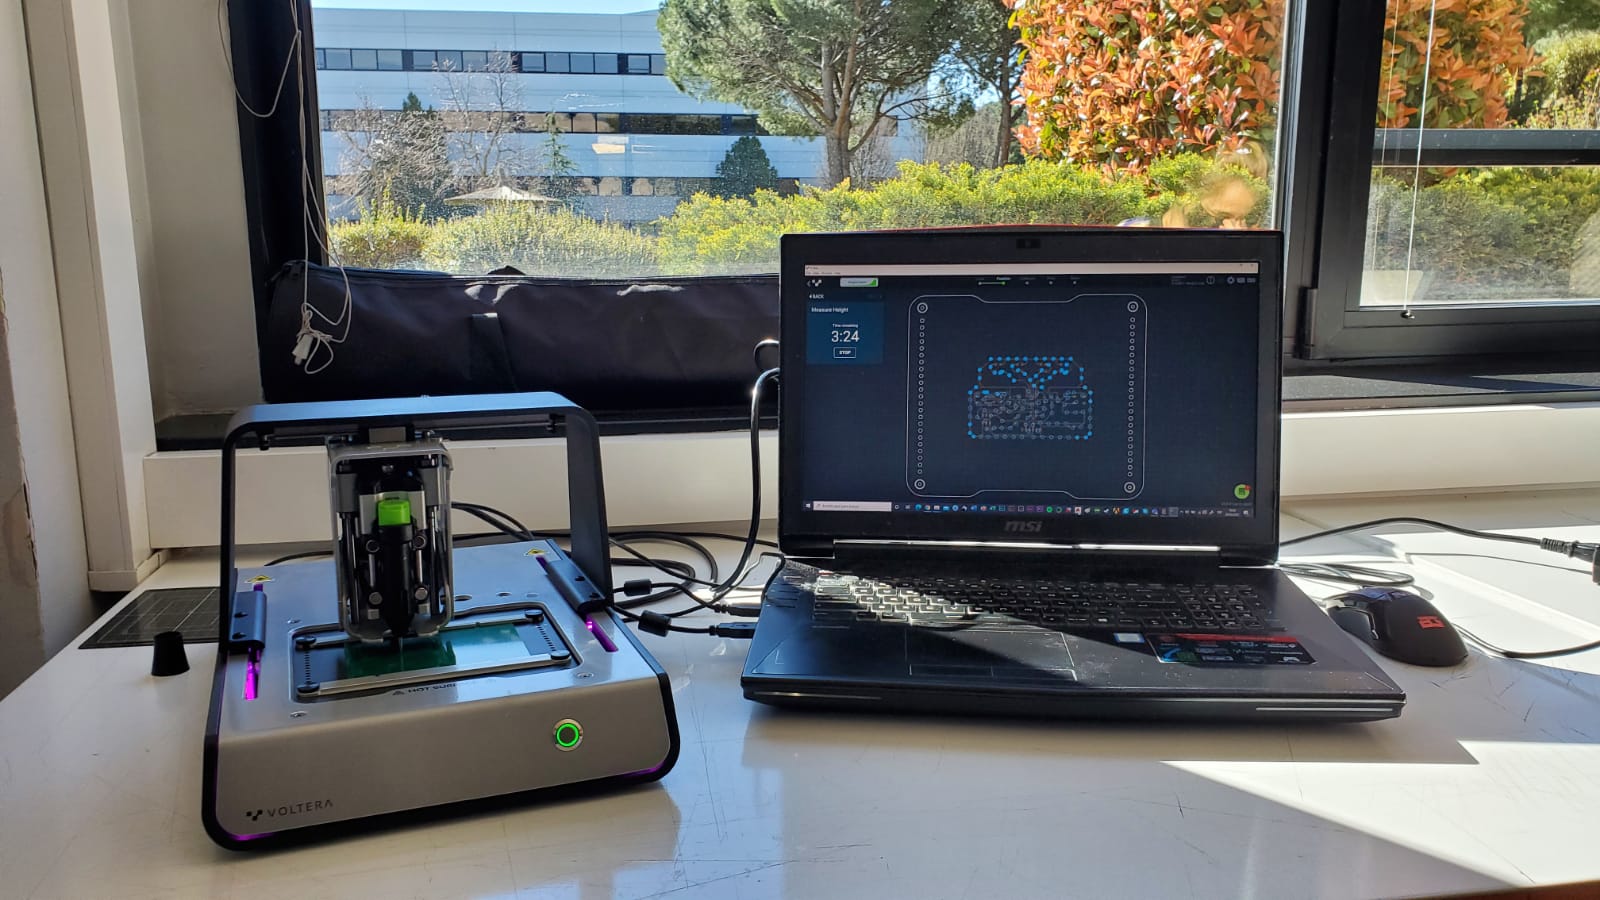
The Voltera first probes, and then puts the silver-based ink.
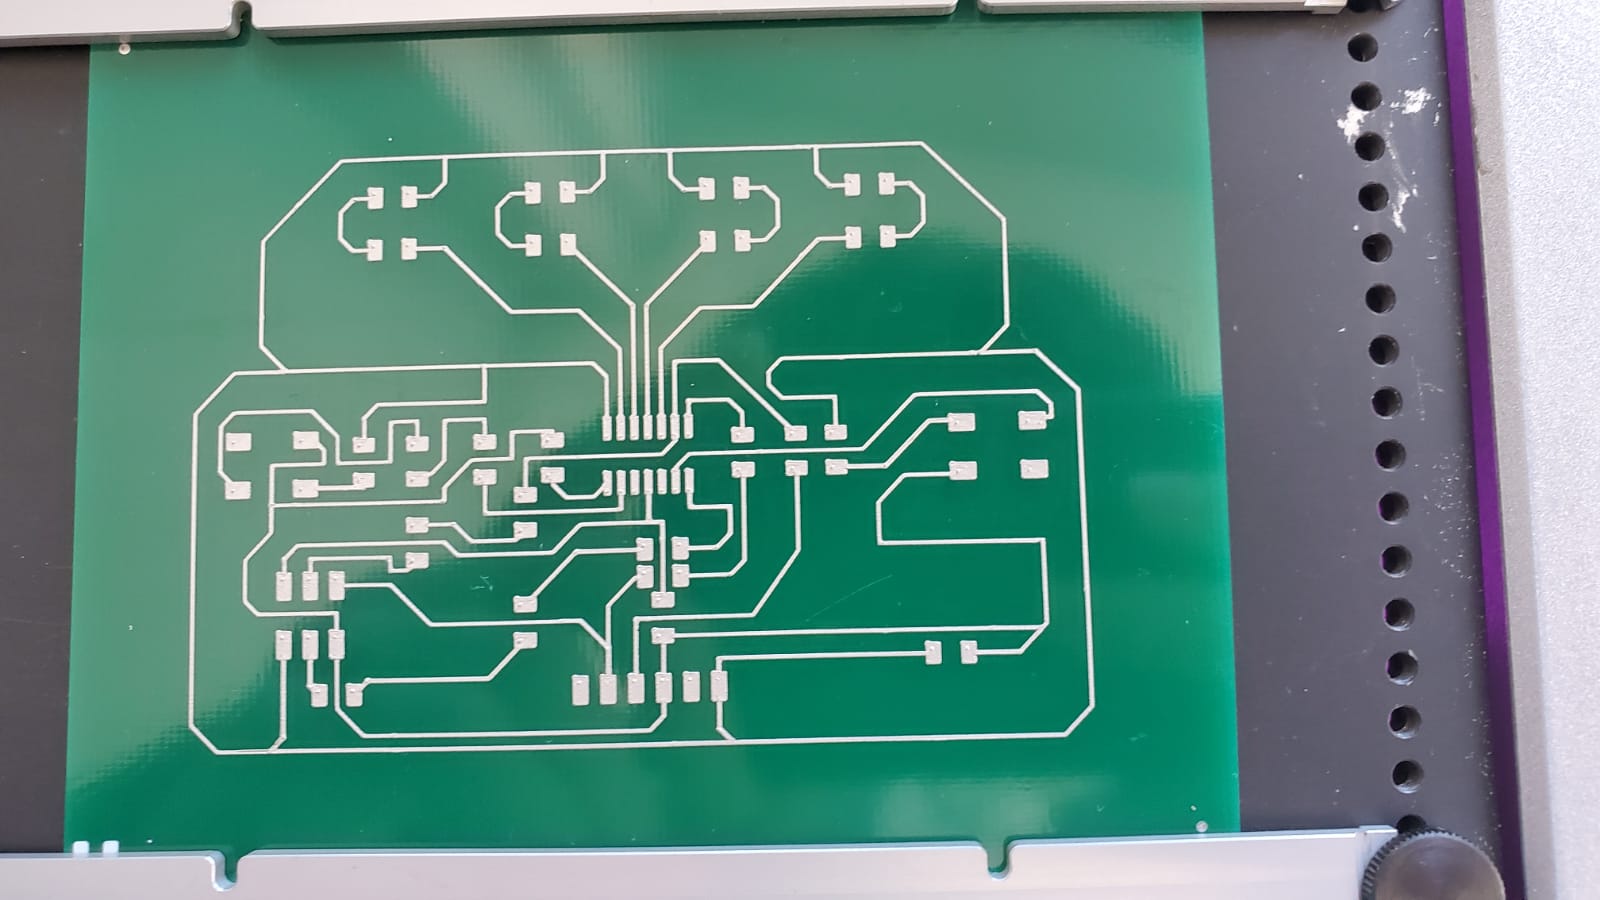
After a few minutes your board should look like this:
So for this board I've decided to follow the non-orthodox procedure of putting the components straight into the board when the ink is fresh, then apply some drops of solder paste on the points where I should weld, and then bake the board
I would like to say that it's a terrible procedure, but...
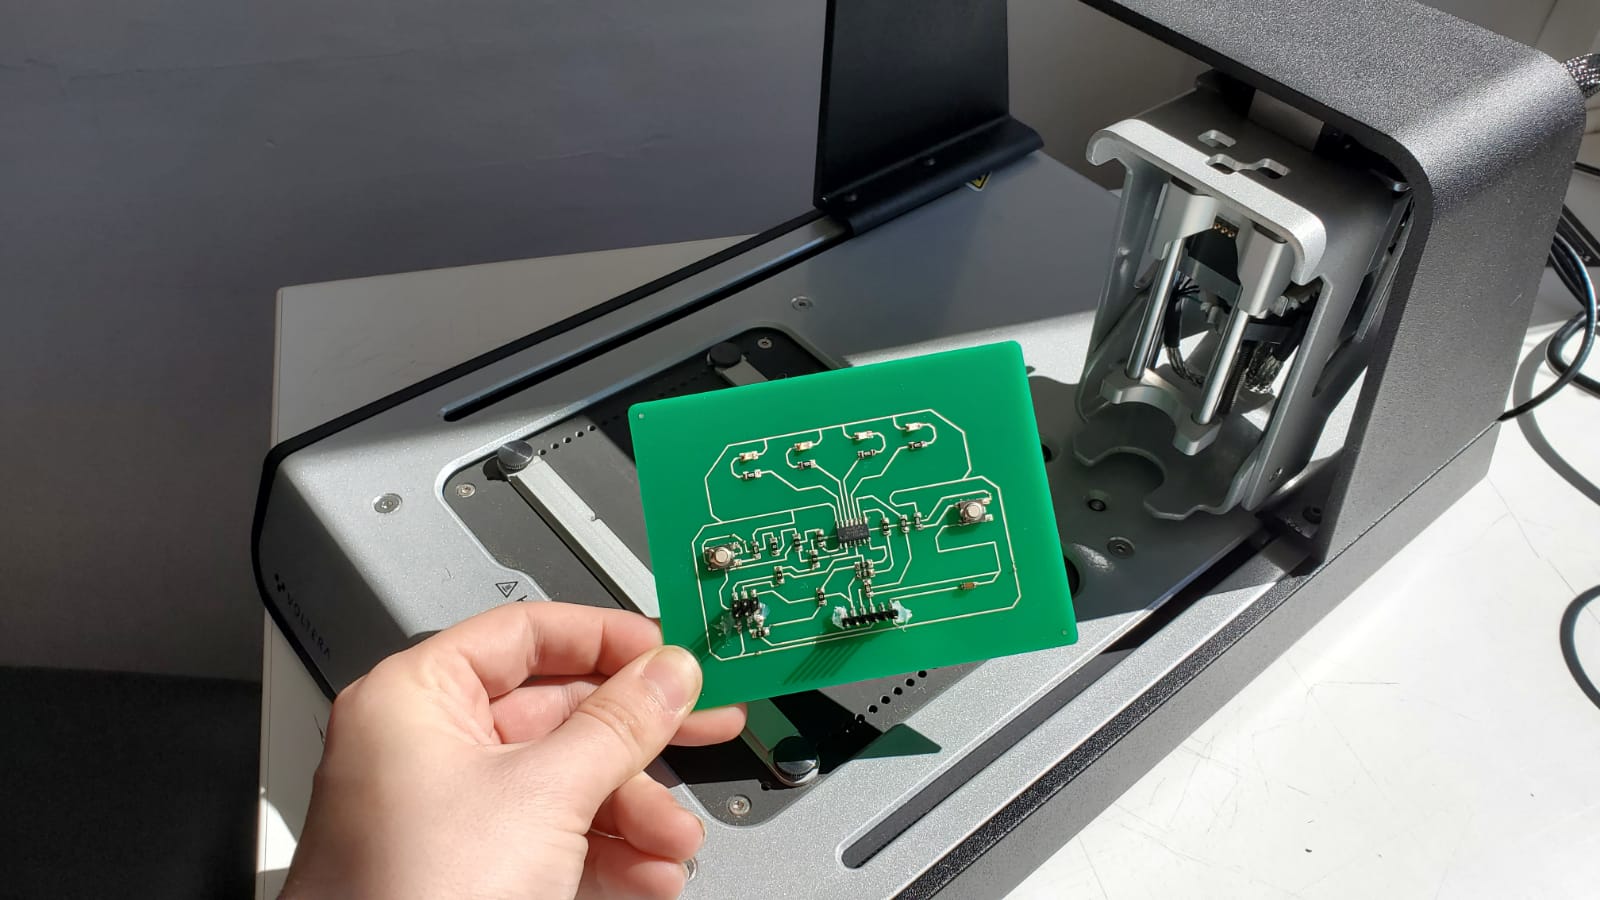
It worked! Moreover, no soldering iron or solder wire were needed to create this board. It was easy, just apply some solder paste with care, then bake. Voilà, freshly baked tastes better.
Chapter Two: read the (handy) datasheet
I really really encourage people to give a look at the datasheet or at least the pinout of the microcontroller before designing the actual board. The pinout of the Atttiny 44 and 45 is very easy to find on the internet and Benjamin Lemay had a nice schematic of it on his documentation, so I used it as a guide to design and program my board.
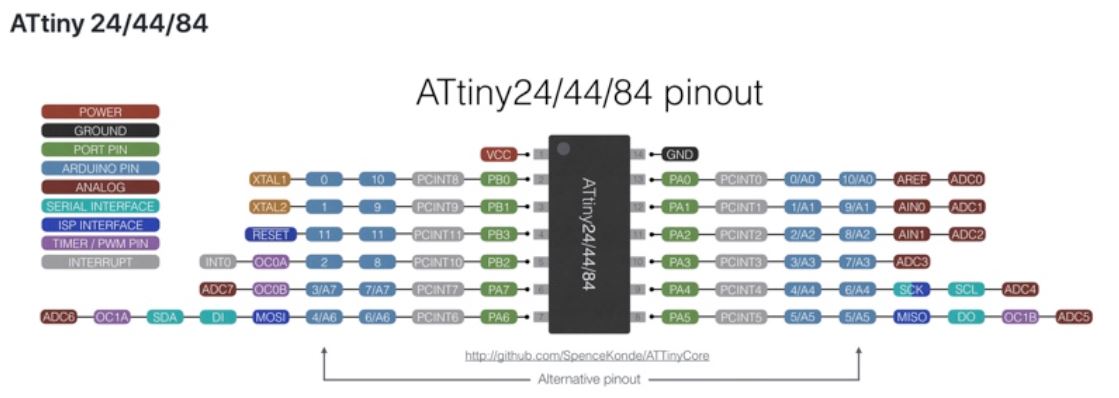
The datasheet was very important to know the internal crystal of my Attiny44, that happened to be 1mHz, and that was key to program what's next.
Chapter Three: Time to actually program the thing
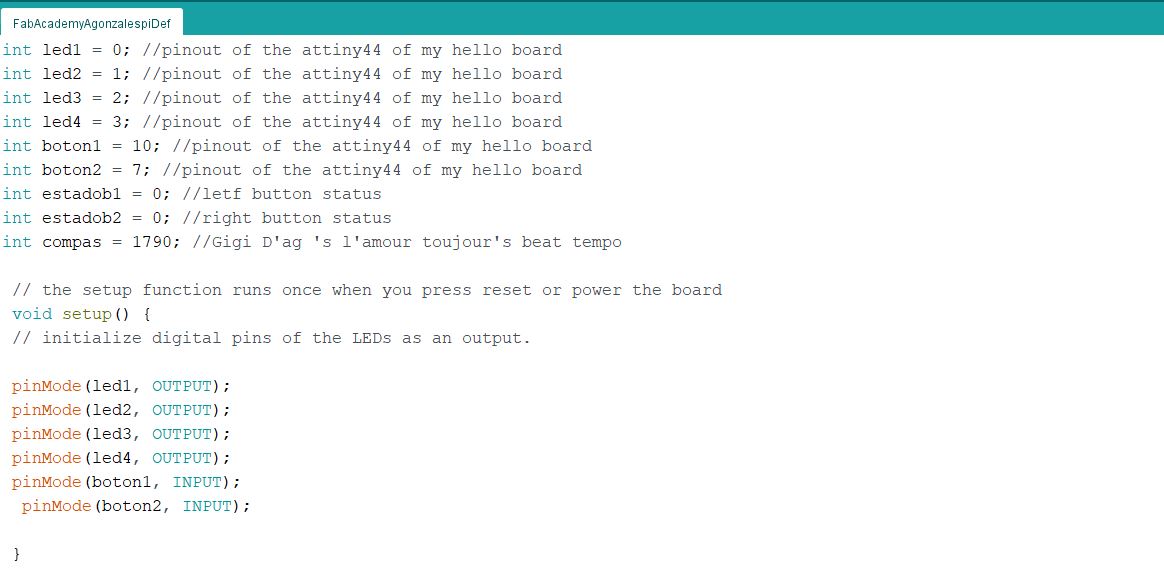
I started to give the board different programs. Last time I opened Arduino IDE was on high school, so it was my time to refresh a little bit all the things I could not remember. I tried to do the basic LED programs. Like the knight rider lights or simple blinks. I decided to settle for these two main programs:
Arduino IDE is relatively easy to operate. Once you know the different commands (define the variable, the delay, the for, the if - else...) they're relatively easy to learn but hard to master. In the point I am right now, I think I barely scratched the surface of what I can and can't do with my LED and my buttons. I'll try harder and I'll learn more with time. However. What is FabAcademy for? What's the point of doing all this work if we don't have fun? Get ready. It's time to party.
Chapter Four: cue the music
I encourage you to stop what you're doing right now. Set your speakers. Crank up the volume. And press play.
IF I END UP VOLUNTEERING IN WEDNESDAY'S CLASS, MUSIC STARTS AT 0.30
This was something I really wanted to do since I watched that video the first time. I really wanted to give it a light show. The fact that I'm mixing Neil's face with Gigi D'agostino and a police car is a scene that I hope will make Fran proud and will give everyone a laugh.
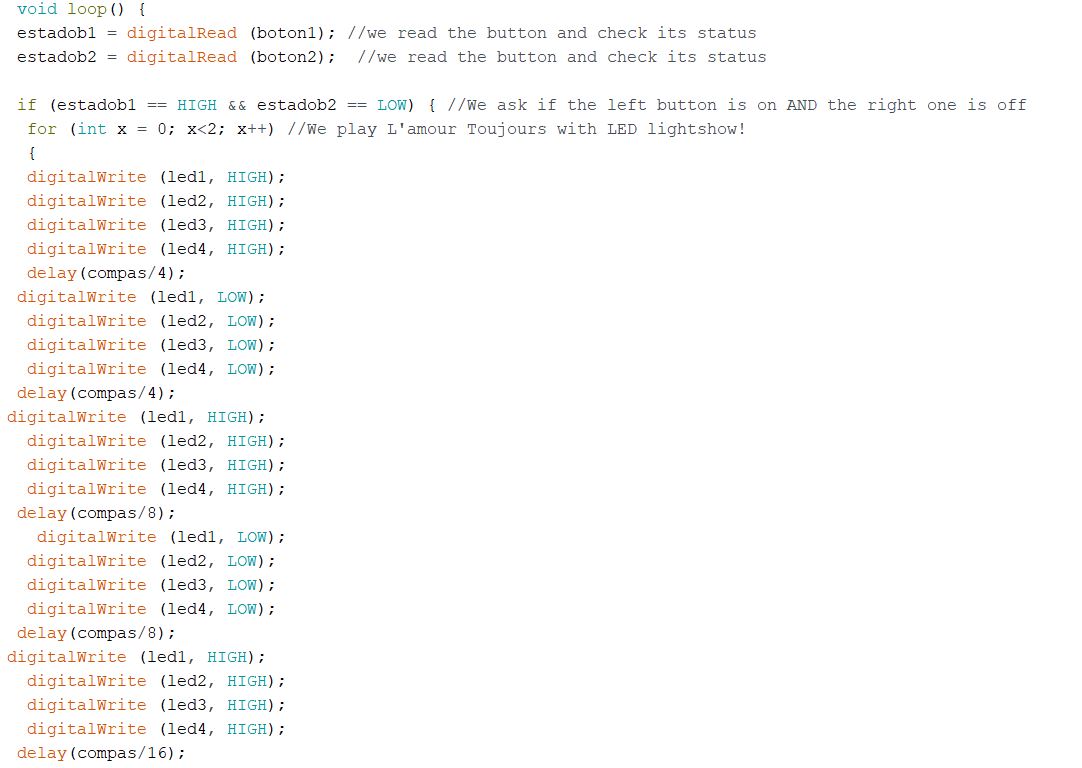
But how the hell I did that to match the song's beat?
First of all, you need the music sheet. You need to know which notes are quarter, which ones are eights. And then you have to program from that.
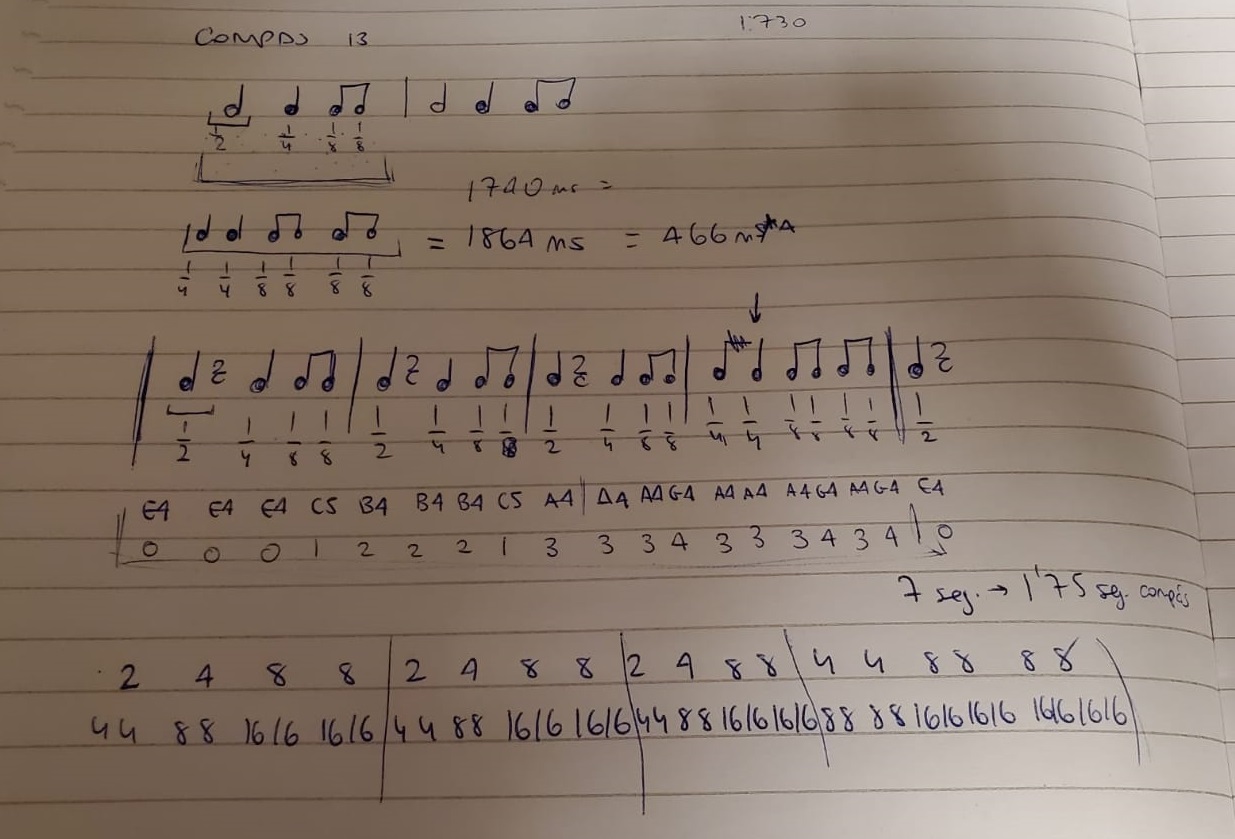
You need to know the time of the beat, though. So I got the beat (compás) as a variable in my code. So when I wrote the music (there are 5 different notes in this particular part of L'amour toujours, so I assigned each one of the notes an LED position) I gave each note a delay of the beat time divided by half of the note duration. This means that if the note is an eight, I give a 1/16th blink and a 1/16th time to the next blink
In this line of code you can see the difference between the blinks related to the tempo:
As a newbye in programming, I know this code could have been done in a better way, or at least in a more efficient one. My best advice that I can give to you is start programming with something that makes you happy and makes you smile, and so when the code fails you won't be so angry and you won't give up.
I think I made so many iterations on this before having the tempo as an actual variable... So another tip I can give you is, spend time thinking about what do you want your program to do and define the variables first.
And finally, if you want, here I leave you the full code.
Group Assignment, let's try the Micro:bit
As the group assignment we had to test the differences in performance of the microcontroller families, and also try different programming languages. I've found that the ATTINY 44 and 45 have less memory to load the programs than the new ATTINY1614s but for programming them I've only used the Arduino IDE. So, because I wanted to try something new, my classmate Lorena handed me her Micro:bit board, similar to the one they have in Fab Lab León. It's a small board that can be programmed online and can have many features. Following Adri's advice, I watched this BricoGeek video tutorial to get to know it a little more.
Before connecting the board to the computer, I watched the video and then followed Adri, Sergio and Lorena's documentation and opened Micro:bit Editor. The board appears on the left, in the center there is a column with the different basic instructions and on the right the area of the program where you can do it with blocks or in JavaScript.
The microbit is a fun little board. I made it play Gigi d'Agostino's music
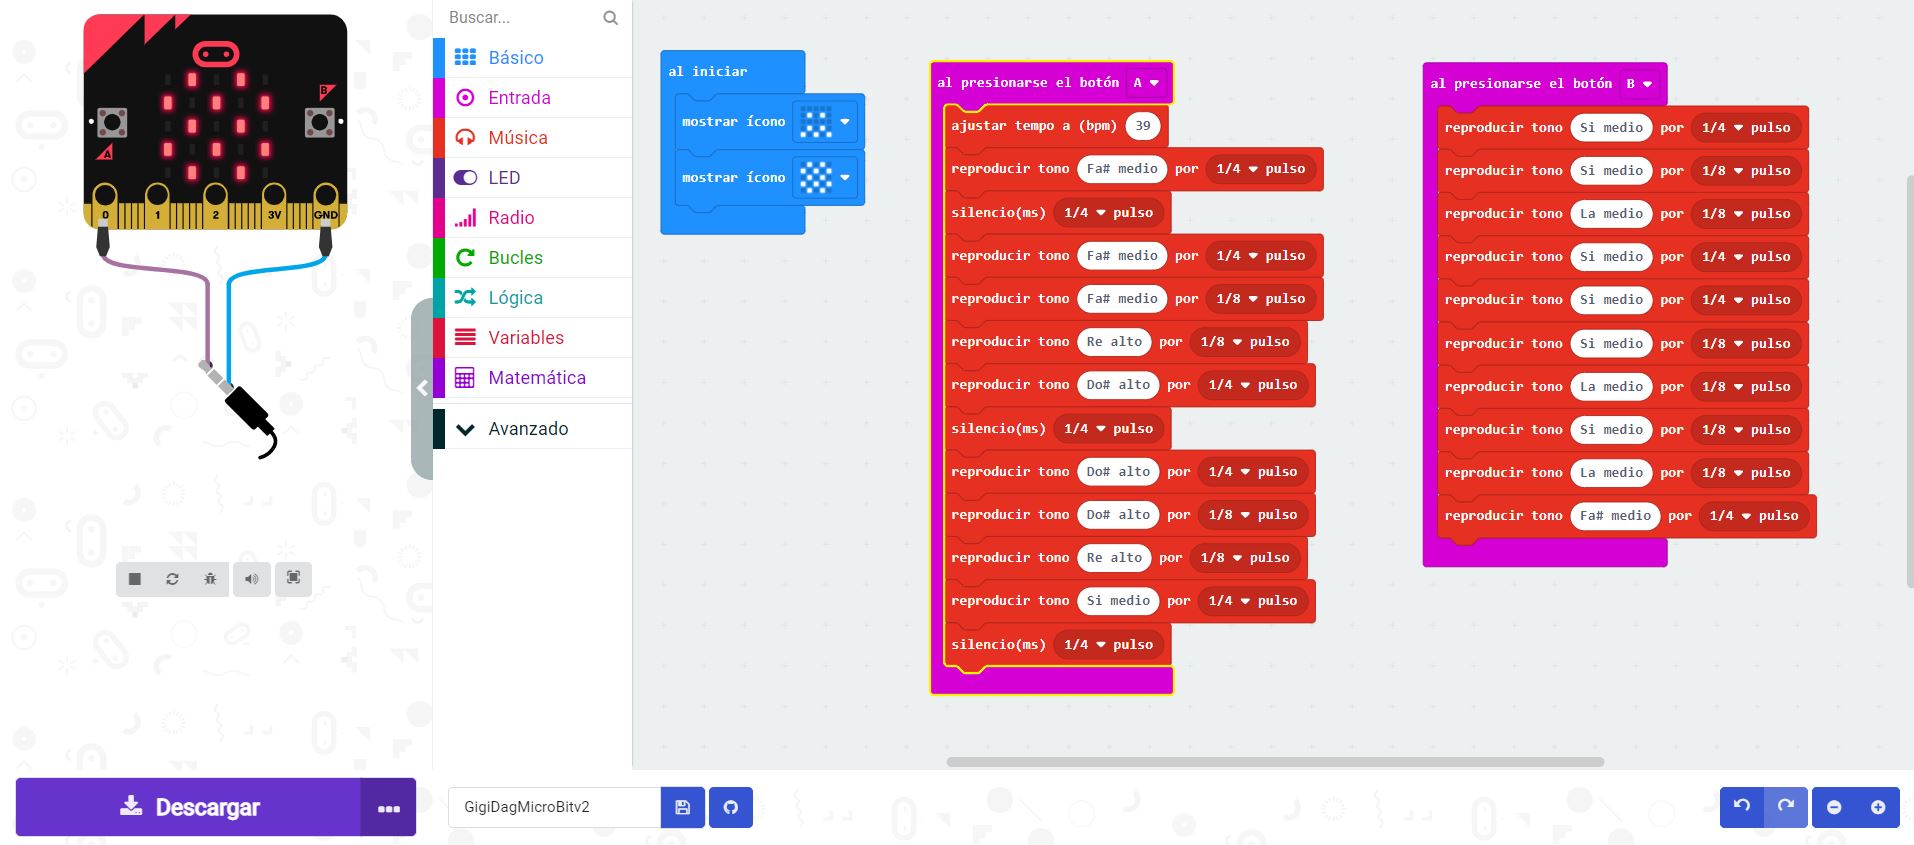
However, Lorena's Microbit does not have a speaker, so it does not sound. I made a video about it here:
So that's all for this week, my friends. I hope you had fun watching this video and see you in next week's assignment!