Week 1 : Principles & Practices, Project Management
☛ Assignment
☐ 1. Plan and Sketch a Possible Final Project
☐ 2. Work Through a GIT Tutorial
☐ 3. Build a Personal Site in the Class Archive Describing you and your Final Project
This first week is an introduction to the tools we are going to use during the Fab Academy in order to document our assignments and collaborate. We were all provided a Gitlab account and we have to use Git in order to document the way we approach these assignments.
A quick presentation of Git and Gitlab : Git is an open source distributed version control system, it was created by Linus Torvalds in 2005. What it does is that it keeps tracks of the changes made to files and stores those changes as several versions of the project into a repository. This is also a software making collaboration easier as several people can make changes at the same place.
Gitlab, which is open source as well, is a web-based Git repository manager, created in 2011 by Dmitriy Zaporozhets and Valery Sizov. It allows to manage Git repositories, issue tracking, activity feeds, and wikis.
A quick note before starting : Git is quite new to me, I tried to use it at the beginning of the Pre Fab Academy but I felt more "secure" using the web interface at first, then I switched to SourceTree, a Git GUI, and now it will be Git. I have been using Gitlab since October, 2020, for taking notes, and for documenting my activities in the fablab.
I will now document how I went through this week, using Git (or trying to), setting up Gitlab, and then working on this website.
▸ Installing & setting up Git
I already got Git Bash installed on my computer, I went on their website and downloaded it to do so.
Then I relied on this documentation to go through the next steps.
I set up Git to my "profile" using these commands :
git config --global user.name
git config --global user.email
▸ Setting up the SSH Key
SSH stands for "Secure Shell", it is a cryptographic network protocol which uses public-key cryptography. From what I understand it creates a pair of keys, one is private, the other is public, the private key should remain on the remote computer, and the public key is meant to be copied, in our case in Gitlab, in order to authenticate our user identity and to have a remote acces to our repository.
I relied on this documentation for generating my SSH Key.
I used this command in the Git Bash terminal :
ssh-keygen -t ed25519 -C "my computer name as a comment"
Then, the terminal informed me that the public/private ed25519 key pair is generating and asked for the file path where to save it. After giving this information the keys are created, so I used Atom to read the file, from which I copied it to my gitlab.fabcloud.org account (User Menu > Settings > SSH Keys).
I used this command to clone my repository :
git clone git@gitlab.fabcloud.org:academany/fabacademy/2021/labs/digiscope/students/selena-pere.git
But instead of cloning my repository git displayed this message :
git@gitlab.fabcloud.org: Permission denied (publickey).

fatal: Could not read from remote repository.

Please make sure you have the correct access rights

and the repository exists.
I use this command line ssh -T git@gitlab.fabcloud.org to test the SSH set up, but the same message appeared. It took me a while without finding an resolution to my problem, so I cloned my repository using SourceTree in order to go forward. I explain the steps I went through further down in the documentation.
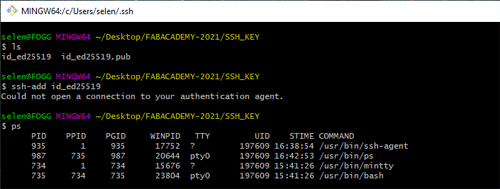
A few days later I went back into this issue : how to proceed to make the SSH key works through Git Bash. I tried to add the SSH Key into the SSH authentication agent using ssh-add id_ed25519 but it resulted in an error message again.
Then I found a useful Github documentation to Setup SSH Authentication for Git Bash on Windows. Apparently, what I did miss was to set up Git Bash for the SSH protocol : several folders have to be created in our user home folder in order to do so.
.ssh/config.bash_profile.bashrc
In order to configure SSH for the Git Hosting Server the following text had to be in the
.ssh/config file :
Host gitlab.com

Hostname gitlab.com

IdentityFile ~/.ssh/id_ed25519
To enable the SSH Agent to start whenever Git Bash is started a few lines had to be added to the
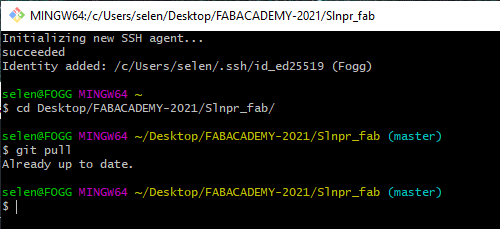
.bash_profile and the .bashrc files. I still have to ask for a clear explanation on what those lines are doing exactly, but this solved my problem and as I restarted Git Bash I was able to git pull without a fatal error.
Later I could experiment my future routine :
- Using
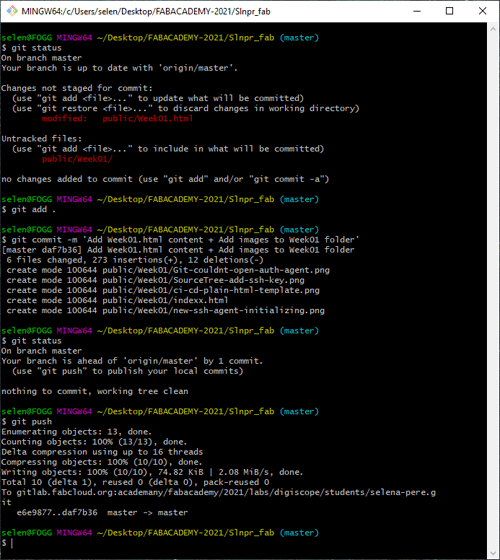
git statusto see what changes has been made - Using
git add .to stage all files that were modified, orgit add filenameto stage a particular file - Using
git commit -m 'Comment'to commit the changes - Repeating 1. to 4. while working locally
- Finally using
git pushto push the local changes to the server.
Cloning my repository using SourceTree
I found SourceTree much more cooperative than Git to achieve cloning my repository, the steps are :
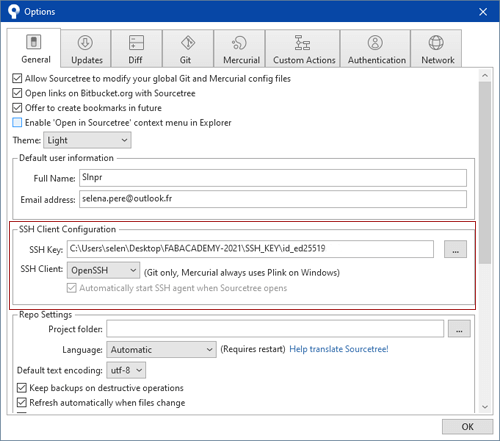
- In the toolbar, select Tools > Options, a window appears, in the "SSH Client Configuration" part the default SSH client is PuTTY/Plink, make sure to change that to "OpenSSH". You can then add you SSH key by informing the file path of the private key.
- Then create a new file and choose the "Clone" option. Insert the link to clone the repository with the SSH protocol and specify a path where to save it on your computer. Click Clone, and there it is.
▸ Building a personal site
Regarding the Personal Website building I had several previous experiences with diferent tools :
- I used Cargo Collective to make a portfolio years ago, it involved a little bit of HTML and CSS to personnalize it but I relied on pre-made "effects".
- My last portfolio has been made using Adobe Muse, it is a WYSIWYG website editor which convert the design into an HTML file, it looks a lot like Adobe InDesign but to publish to the web.
- During the Pre Fab Academy I used GitBook to display my documentation-attempts into static pages.
Approaching HTML
- I decided I would use HTML after attending the bootcamp session from the 21st of January, from 1:20:00 approximatively in this session, Krisjanis Rijnieks from Aalto fablab is explaining how to do a basic documentation page using plain HTML.
- I used W3 Schools tutorials to experiment with HTML using their online editor.
- From here I installed Atom and started building these pages.
- I wanted my website to look like something simple, quite like GitBook but lighter. I started working on the index.html using the Fixed Sidebar tutorial it resulted in this page which was satisfying as a base, but when using the responsive view in the Chrome Development tools the menu isn't responsive and take all the screen on a smartphone.
- I made it responsive using the Responsive Sidebar Tutorial. The HTML code for the navigation bar is almost the same, the major difference is this CSS code :
/* On screens that are less than 700px wide, make the sidebar into a topbar */

@media screen and (max-width: 700px) {

  .sidebar {

    width: 100%;

    height: auto;

    position: relative;

  }

  .sidebar a {float: left;}

  div.content {margin-left: 0;}

}


/* On screens that are less than 400px, display the bar vertically, instead of horizontally */

@media screen and (max-width: 400px) {

  .sidebar a {

    text-align: center;

    float: none;

  }
The @media screen and (max-width: 400px) {} sets an anchor point in pixels, depending of this parameter the page layout will change.
I used those lines to build the Assignments page, I declared four anchor points to be sure that this menu composed of images with text inside would remain readable in most cases.
I met an issue caused by a long link in the text of this documentation : the width of HTML body was reducing as the width of the monitor displaying it was reducing. I found a solution to this problem in this thread.
it was advised to add this line in the CSS to allow the word breaking in the text :
p {

word-break: break-word;

   }
Image processing
I use Adobe Photoshop to resize and export my picture for the web, most of the images displayed on this website were already prepared from my previous personal projects.
CI/CD Pipelines
When my website pages were satysfying enough I deleted the files in my repository and added my html files.
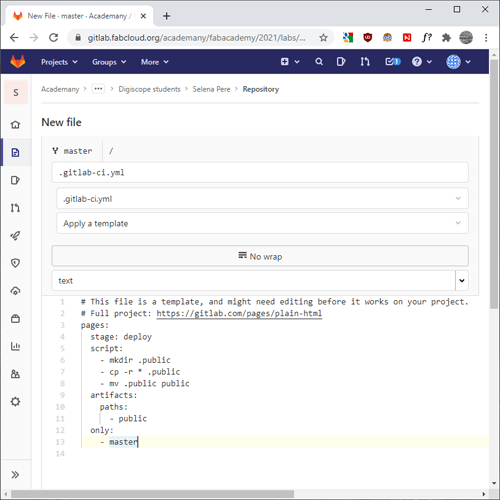
I had to create a .gitlab-ci.yml file, from the web based version of Gitlab. Following these steps : New file > Select .gitlab-ci.yml as a template file > Select HTML as a template
The next part was to create a public folder, from which the html pages will be deployed.
▸ Useful ressource
Pigment package on Atom
This is a helpful package to install in atom, which allows to display the colors in the text editor.
☛ Final Project Proposal
As a final project for the Fab Academy I would like to develop a personal research on a composite material made with sawdust that I began in November 2020, and to improve a project that I made as part of my graphic design diploma.
▸ Composite material from sawdust and casein glue
This title explains pretty much everything, I made tests mixing sawdust and casein glue, putting the mixture into 3D printed molds, then making it dry. And it produced samples that seems to be strong enough to make things out of it. I would like to make more tests in order to evaluate the properties of this material, and I would like to make functional objects using it.
▸ Tools for exercising breath control
Two years ago I made prototypes of tools that could be useful for exercising breath in a speech therapy context. I made it as my graduation project with the help of a speech therapist who gave me feedback during the research, and a computer sciences students who made all the electronic part of the project. I would like to improve this project in order to make it more functional, and to document it properly so it can be shared. The original project can be fin on my website
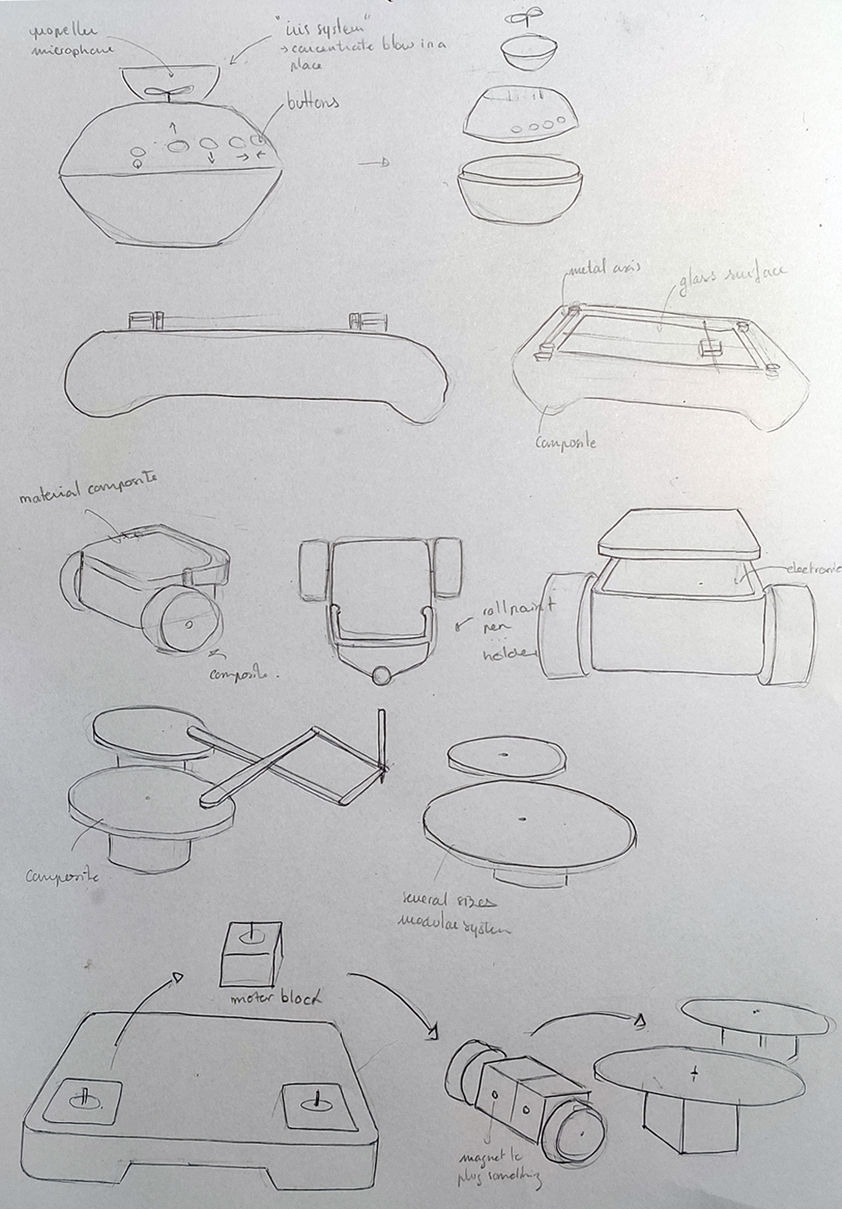
It works in a simple way, the controller is made with propellers on which the user has to blow in order to use the machines. But the current prototypes are prototypes with a lot of issues that need to be resolved :
- The Blow Controller
- Add a potentiometer or something similar in order to calibrate the blow that needs to be produced by the user.
- Use only one propeller, and not four. It make the user turn his head to blow on a different propeller, involving searching for the propeller by looking at it, and therefore it is harder to focus on the drawing activity. One propeller should be used with directional buttons. How to place the buttons that are well placed for the user ?
- Make the "box" of the controller with composite material, using molds or other processes.
- Data recording for visualization & analytics of the training ?
- The Sketcher
- Use belts instead of wire and rubber to move the axis. I am fond of low tech systems but I would like to upgrade this part to gain precision in the drawings produced.
- Add a system to lift up the pen from the paper so it is not constantly drawing. I'd like it to be a discreet system.
- This is an option that could be interesting : Add a "retro lighting" under the drawing surface, it could display patterns that the user could reproduce.
- Make circuit and PCB.
- Make the "box" of the controller with composite material, using molds or other processes.
- The Drawing Car
- Center the pen in the middle of the wheels axis, so the car can draw ninety degrees angles.
- Add a system to lift up the pen so it is not constantly touching the surface it is drawing on.
- Make circuit and PCB.
- Make it with composite material.
- The Harmonograph
- Improve the ergonomy.
- Make circuit and PCB.
- Make it with composite materials ? I don't know if the sawdust composite with a thin thickness would be strong enough to not break because of friction or repeated movement, but it worth trying.
- The modularity
- All of the machines are working with two motors, so I think that modularity could be an interesting aspect.
This is the machine controlling the others, it "captures" the blow and translates it as a signal to a microcontroller.
This is a two axis drawing machine, but the prototype is lacking of accuracy and precision, because of the materials I used.
This is a little car which carry tools to draw. The current protoype is lacking of ergonomy and precision.
So this machine is not part of the same project but it is a machine I want to improve and make with composite materials in a smaller scale.
▸ A quick overview of the existing prototypes :
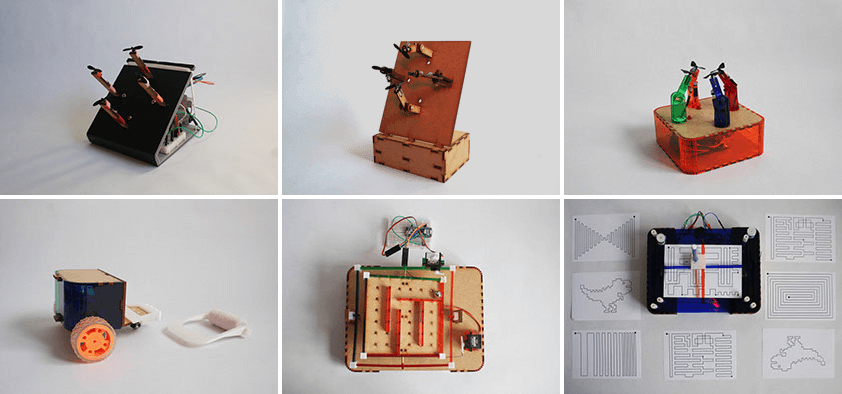
The first row of images shows the evolution of the controller from the second to the last iteration made so far. It is composed of 4 propellers installed on axis. They are linked to an arduino which receive signals when the propellers are turning. The circuit also involves a transmitter-receiver bluetooth module in order to control the robots remotely. Each propeller represents a direcction, the axis were conceived so they can be adjusted to fit the user's position when blowing.
The second row of images presents the existing "robots" or "tools", from the left to the right, the first picture is a drawing-car if you use the pen holder or the paint roller, it is a simple car without these options, working with two micro metal gearmotors. The second picture is a labyrinth, it is working with two servomotors, and made with MDF and PMMA. The last picture is a drawing machine, working with two micro metal gearmotors.
▸ Retro Planning
| Weeks | Development Steps |
|---|---|
| Week 1 | Plan and sketch final project proposition |
| Week 2 | Model a possible final project |
| Week 3 | |
| Week 4 | Intro to PCB |
| Week 5 | mModel an ergonomic controller out of clay, scan it & print it |
| Week 6 | Make a PCB for the controller + a PCB to control two motors |
| Week 7 | Can I begin to mill molds this week ? |
| Week 8 | Programming of the microcontroller |
| Week 9 | |
| Week 10 | |
| Week 11 | More molds to test the composite capabilities |
| Week 12 | |
| Week 13 | Add bluetooth to control the machines wirelessly |
| Week 14 | Create an interfface for visualizing utilisation datas ? |
| Week 15 | |
| Week 16 | |
| Week 17 | |
| Week 18 |