Setting up MkDocs
- Original tutorial by: Krisjanis Rijnieks
- Your lab name: Aalto Fablab
- License: CC-SA-BY
- Last Review Date: 18 Jan 2019
- Last Modified by: Krisjanis Rijnieks
Summary
This tutorial describes how to use MkDocs to build a skeleton for your Fab Academy documentation website.
HTML, CSS and JavaScript can take a long time to learn and many years to master. If you have no or little background in it, choose MkDocs and learn Markdown
MkDocs is an open source static website generator. Text files written in Markdown are used as input, complex HTML is generated as output.
Step 1. Installing MkDocs
To be able to build your documentation on your personal computer, you should install MkDocs on it. That will give you the opportunity to edit Markdown and preview final website side-by-side on your desktop (or laptop) computer.
If you use Terminal often and you know what a package manager is (such as apt-get, dnf, homebrew, yum, chocolatey, etc.), try to install mkdocs with it. Below is an example with Homebrew on MacOS X.
brew install mkdocs
You can also install MkDocs with Python. However make sure that you have Python installed first. Use the following line. It should output the version of Python installed on your system (output should look similar to Python 2.7.2).
python --version
You will also need the Pip package manager. Test if you have it first with the command below. It should output the version of your Pip (output should look similar to pip 1.5.2).
pip --version
If you do not have Python and/or Pip installed, follow instructions on the MkDocs website to install them first.
With Python and Pip installed, use the following command to install MkDocs.
pip install mkdocs
Confirm successfull installation of MkDocs by using the command below. It should output the current version of MkDocs installed on your system (such as mkdocs, version 0.15.3).
mkdocs --version
Step 2. Creating new MkDocs Project
If you have a ready MkDocs solution on your GitLab repository already, you can use that. However this tutorial will explain a bit more how it works.
In Terminal navigate to directory where you want to create your documentation website project. In my case I will assume it is /home/kris. Use the following command to create a new project.
mkdocs new fabacademy-docs
If you use ls (list) you will see a new directory fabacademy-docs. Use cd (change directory) to enter it.
cd fabacademy-docs
The following file structure should have been created inside.
- docs
  - index.md
- mkdocs.yml
The mkdocs.yml file is a configuration file for your newly created MkDocs project. The docs directory is where you will write your actual documentation as text files in Markdown format.
Edit the mkdocs.yml file to change the name of your website.
site_name: Kris Does Fab Academy
Step 3. Launching Test Server
MkDocs can convert Markdown to HTML website and act as a webserver so you can see how changes will look on the generated website almost on-the-fly. Use the following command to try it out.
mkdocs serve
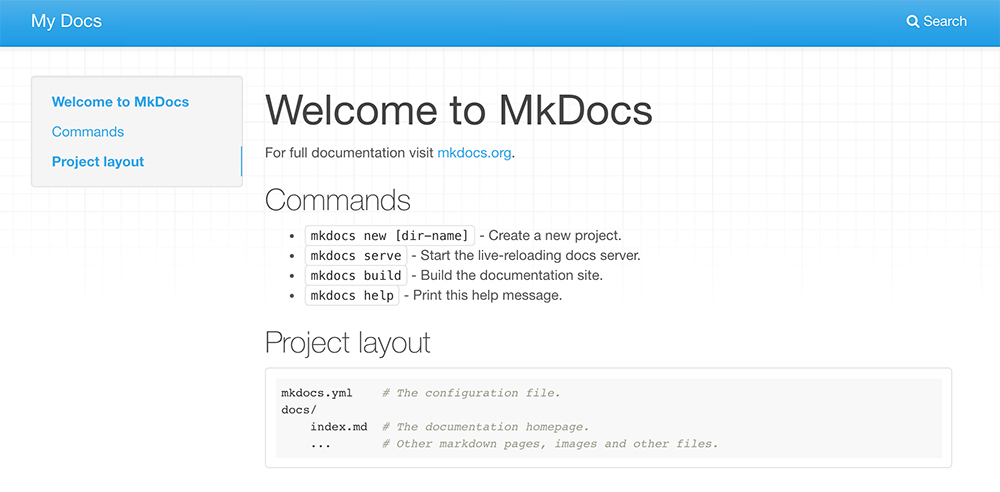
You should see interesting things showing up in your terminal.
INFO    -  Building documentation...
INFO    -  Cleaning site directory
[I 190118 22:15:30 server:292] Serving on http://127.0.0.1:8000
[I 190118 22:15:30 handlers:59] Start watching changes
[I 190118 22:15:30 handlers:61] Start detecting changes
Here you see that a server is started for IP address 127.0.0.1 and the MkDocs web server is accepting connections on port 8000. Usually the address 127.0.0.1 translates to localhost and you should be able to see your new MkDocs website by using http://localhost:8000 as the website address.
Step 4. Adding Structure
Usually a Fab Academy documentation website will have a page about you, your final project and assignments. Let's make a basic structure that will be enough for the first week of the academy (and probably for the whole course).
- About
- Final Project
- Assignments
  - Week 01
The structure above is what we have to translate to a directory structure under docs.
- docs
  - index.md
  - final-project.md
  - assignments
    - week01.md
Note the index.md file. It will translate to index.html when HTML is going to be generated. It is usually the file name your web browser is going to look for first when loading a web page from a server. It should be there as an entry point to your documentation website. It will also be our About page.
Create this structure either by using Terminal or the file browser of your system. You can use the following commands in terminal.
cd docs
mkdir assignments
touch final-project.md assignments/week01.md
This will enter the docs directory, then use mkdir (make directory) for assignments and create empty files with the touch command (you add more filenames, separating them with a space, to create many files with one command).
Step 5. Adding Content
At this point you should open your favorite text editor and start adding content. Try adding content similar to the following in your index.md file.
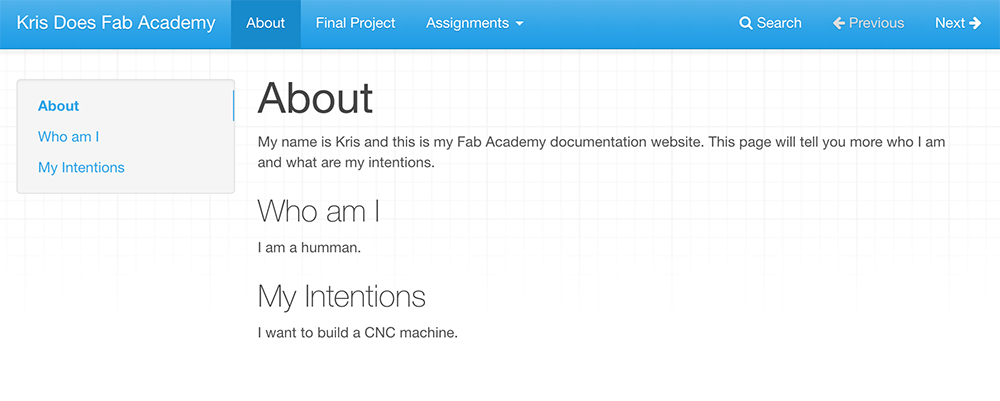
# About

My name is Kris and this is my Fab Academy documentation website. This page will tell you more who I am and what are my intentions.

## Who am I

I am a humman.

## My Intentions

I want to build a CNC machine.
This is Markdown. Every line with a # in front of it is going to become wrapped in <h1> (heading 1) tags. In this case our # Hello! will become the following. Lines starting with ## will be translated to <h2> (heading 2) tags. Also, the first heading (About) is going to be the label of the section in the MkDocs website menu.
Check the Markdown Cheatsheet to learn its syntax. It is one of the easiest markup languages to learn. There are many more uses of it. Try Deckset or Remark to make presentations. Fast.
final-project.md
# Final Project
This page describes my final project idea. It is going to be an automated fishing system. I have made a first working prototype with an Arduino, but the wiring is all over the place and I have decided to improve.

Here we use Markdown way of inserting images. The basic syntax is ![]().
- Exclamation mark.
- Square brackets.
- Round brackets.
Explamation mark tells MkDocs that there will be an image. In the square brackets we add text that should describe the image and will be seen if the image will fail to show up for whatever reason. Finally in the round brackets we enter the path to the image. In this case I made a new directory docs/images where I placed a image called final-project.jpg.
For this to work you also need to create a directory fabacademy-docs/images and put the final-project.jpg image in there.
assignments/week01.md
# Week 01. Principles and Practices

The first week of Fab Academy! I did a sketch of my project and added it to the [Final Project](../final-project.md) page.
Here I use a concept that is called the relative link. Notice the ../ part before final-project.md. Since the week01.md file is in the assignments directory, we have to tell MkDocs to look for the final-project.md file one level up from where week01.md file is. ../ does that - it is a common way to point to a directory one level up from the current directory level.
Step 6. Final Test
Now you should have a ready MkDocs skeleton for your Fab Academy documentation website. Do test and see how it looks like. Navigate to the root of the fabacademy-docs directory and use the following command to launch the MkDocs development server.
mkdocs serve
Open your web browser (Firefox, Chrome or other) and enter http://localhost:8000. You should see the following output.
Problems Faced and Solutions
Now that you have a basic skeleton for documenting your Fab Academy progress, there will be a few challenges ahead.
Adding videos is one challenge. The consistent way is to add videos as files and use the <video> tag in Markdown (yes, HTML is allowed in Markdown) to load it as HTML5 video. Loading YouTube or Vimeo videos might be a bit more complicated. There are also Python Markdown plugins that can be used.
(More on that in a following tutorial)
Another problem you will possibly face is the integration of this MkDocs site with the Fab Academy GitLab.
(More on that in a following tutorial)
You might also want to tweak the appearance of your website. Use the official MkDocs documentation website. You should be able to find solutions there.