The molding and casting group page can be found here.
This week is all about creating molds!
This week was done after getting back (safely) from the lockdown.
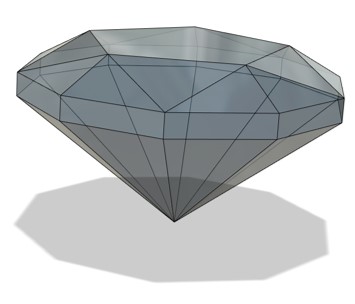
Due to the limited time we have now. I wanted to create something that was easy to design, create a mold of, and cast. And so I went with a simple Diamond using Fusion 360!
I also created a box which would serve as the stock for the mold. The dimensions I used for the stock are the following:
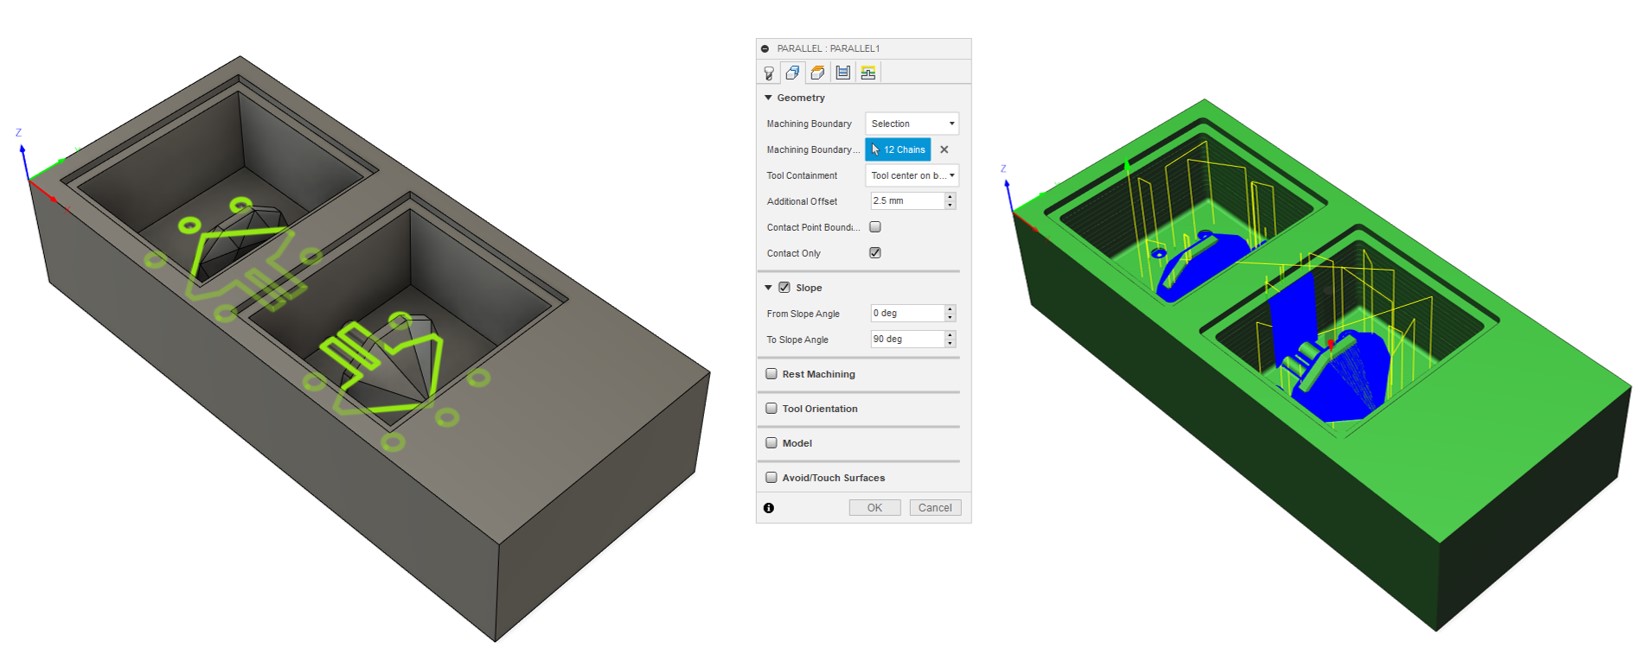
176 mm76 mm39 mmAnd then created pockets with 30 mm depth in the stock to place my design object. I split the design in half, placed one half in the pocket, and then mirrored the other half so the design is completely symmetrical.
I added registration spheres, so the mold would align perfectly when I am casting later, and two cylinders; one to pour the cast , and one for the air to emerge.
I made sure to add a draft of 2 degrees to the sides of the stock, that way it’ll be easier to remove the mold. I also added a small step around the pockets courtesy of Adrian’s note to improve the extraction of the wax mold.
Another important point to follow is to combine all bodies into one component to able to do the cam/manufacture process correctly.
Next, is generating the toolpath using Fusion 360 Cam/manufacture workspace. I followed Hashim’s instructions and documentation to execute the following steps.
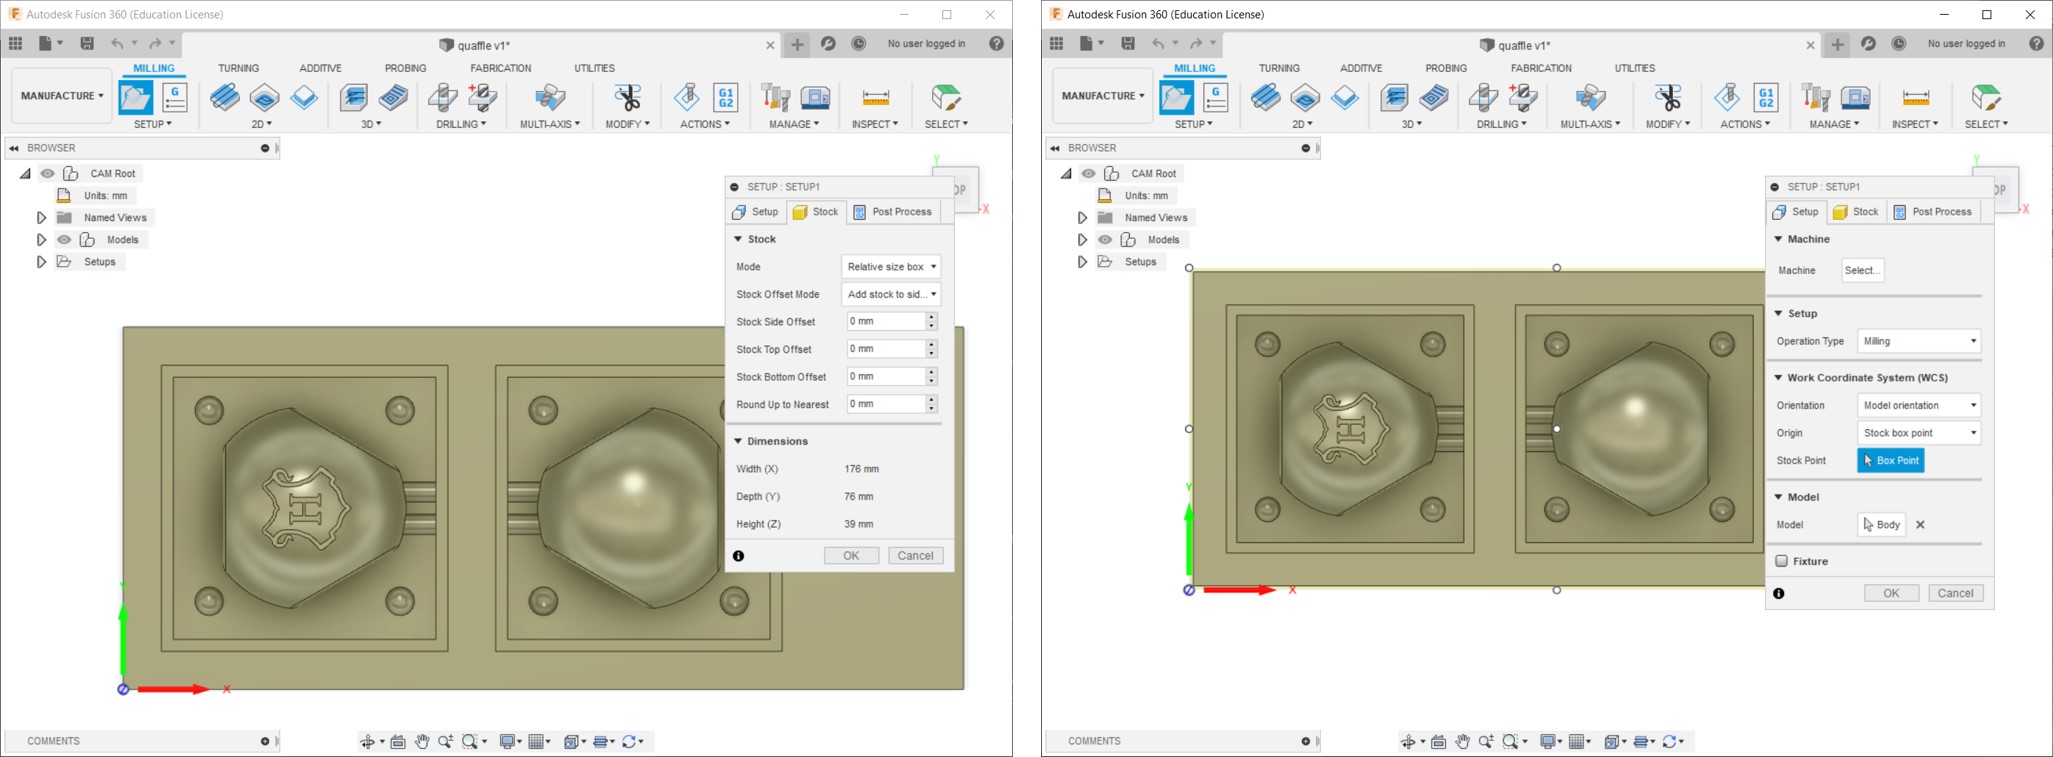
To start the manufacturing process, we first need to define the model we’re working on. I created the setup by clicking on setup > new setup. I selected the stock component as my model, and the lower left corner as the origin point.
When selecting the model, it automatically sets the dimensions of the stock according the size of the model, so the only thing I needed to do is to remove the offset to ensure an accurate measurement.
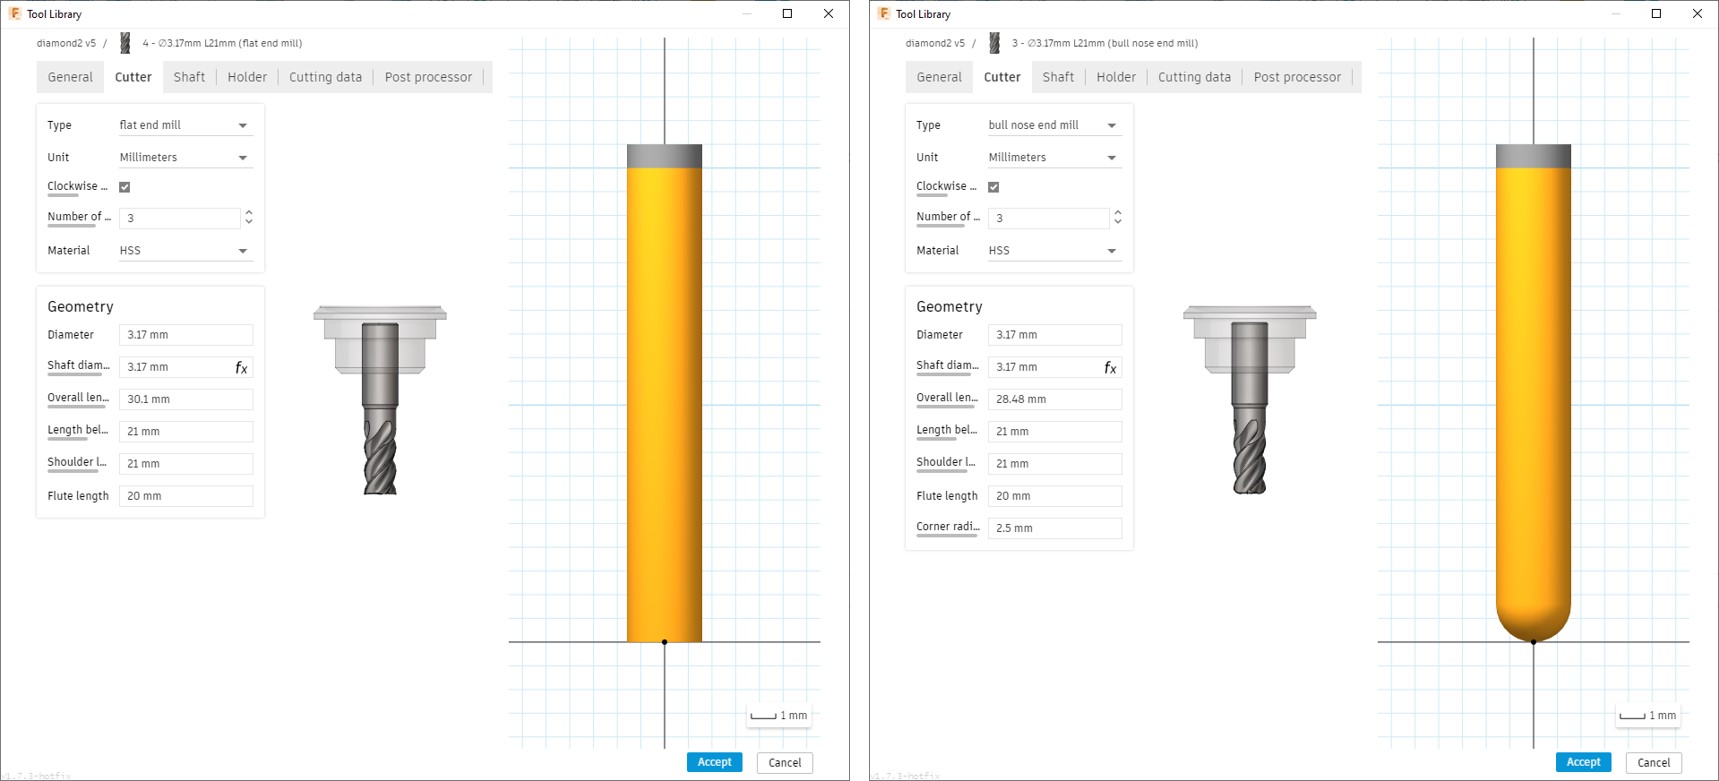
Next is adding the tools by heading to manage > tool library > add new tool. I added 2 tools to use, The 1/8 inch flat end mill and the 1/8 inch bull nose end mill.
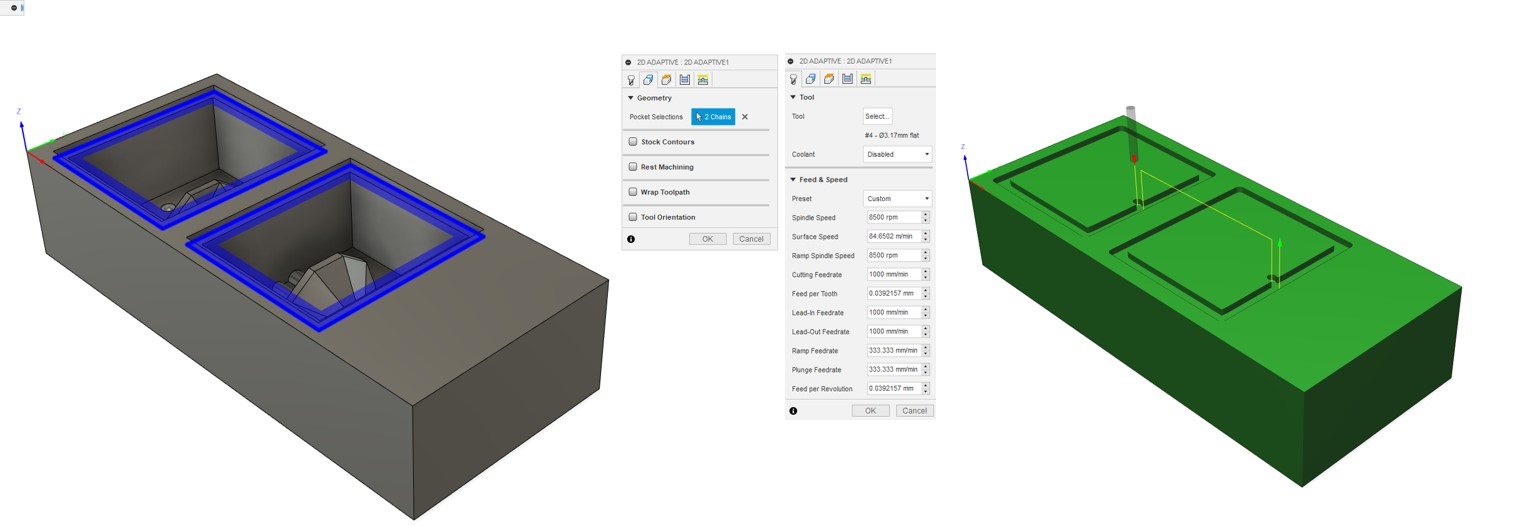
First, I need to remove the excess material of the taper edge of the step. For this I am using the 2D adaptive clearing operation, by going to the 2D tab > adaptive clearing.
I am using a flat end mill for this operation to clear the horizontal space, and selecting only the outline of the step to cut.
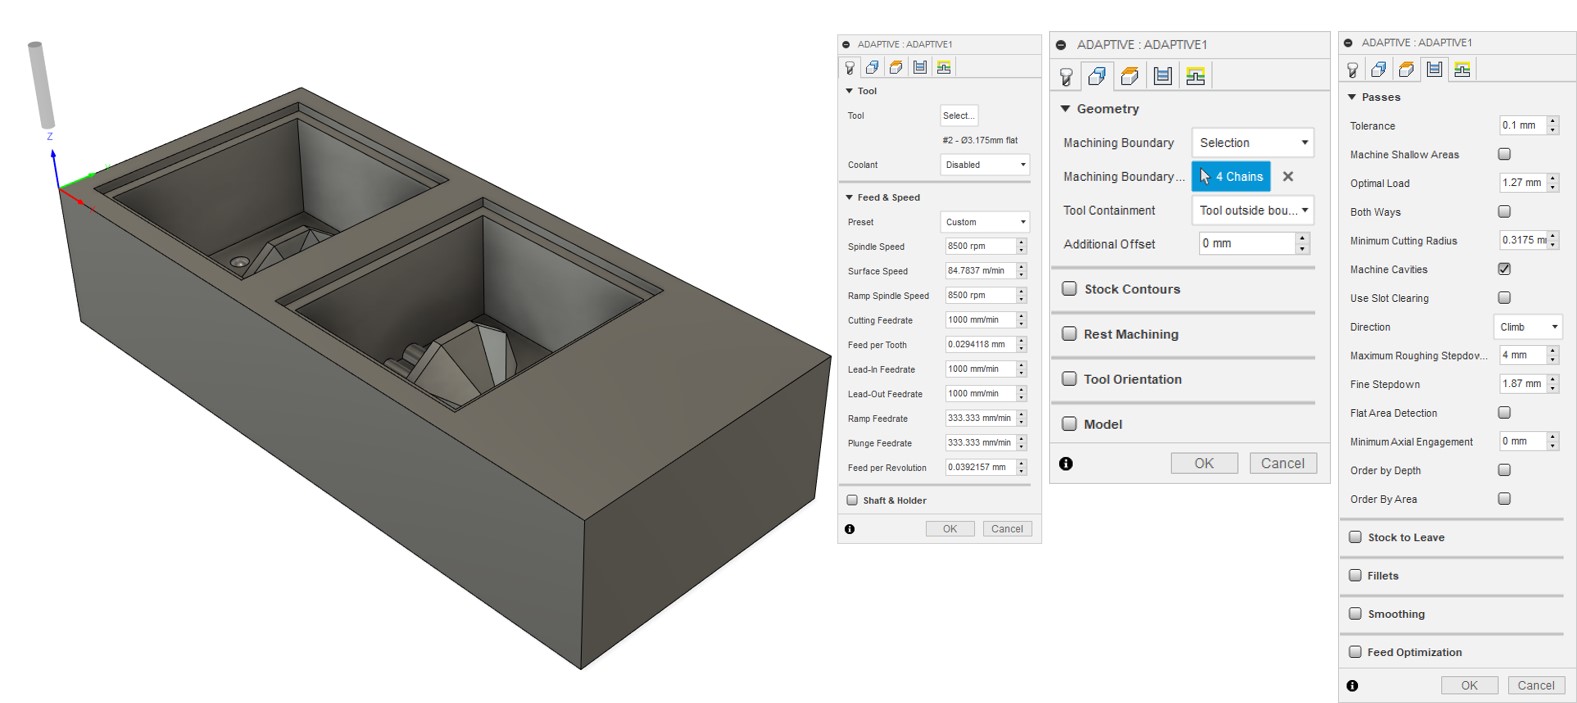
For the rough cut, I am using 3D adaptive clearing which would remove large quantities of material and give me a rough shape of the design.
This is done by going to the 3D tab > adaptive clearing. Again, I am selecting the flat end mill for this operation as it will work best to clear the excess material. My target here is to clear all the material off the pocket, so I am selecting the bottom boundary, and changing the stepover (in the passes tab) to 4 mm, and fine step over to 1.87 mm which is approximately half of the diameter of the tool I am using. This will ensure that the end mill goes in smaller steps/passes thereby decreasing the load on the tool.
I noticed when testing different operations, that going from the adaptive clearing straight to the finishing operation did not yield the result I wanted. Through the simulation I can see that the bottom surface of the pocket was not even, and the spheres were not shaped properly. Thus, I used the horizontal operation by going to the 3D tab > Horizontal and selected the bull nose end mill. This operation automatically detects flat/horizontal surfaces and evens it out.
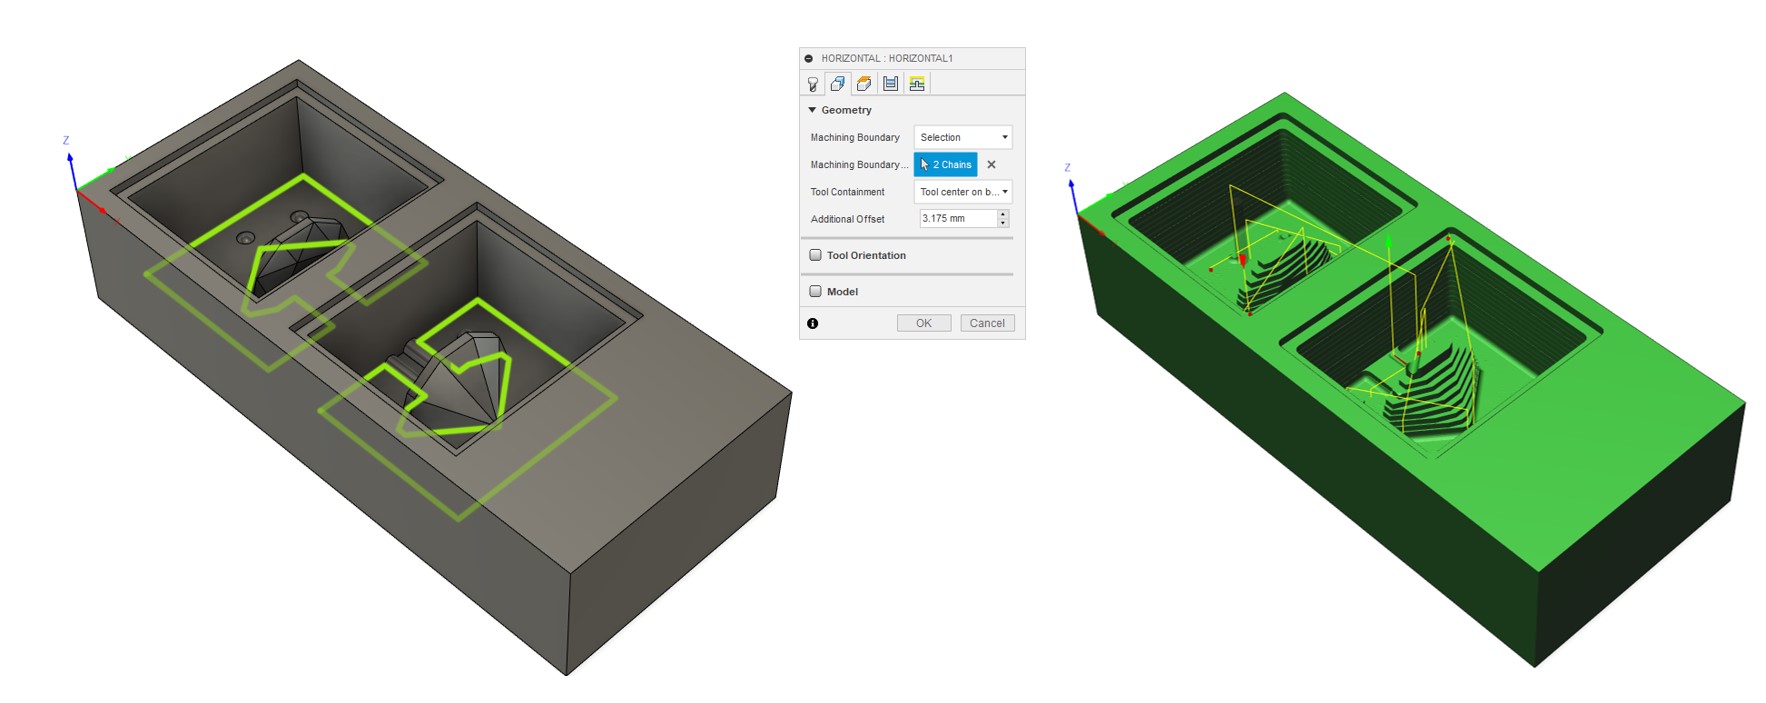
The parallel operation provides fine finishing for the model to display the final detailed shape. Head to the 3D tab > parallel. I am using the bull nose end mill again for this operation as it will provide a smooth finish on the surface. I am selecting the features I need to operate on, and added an additional offset of 2.5 mm to ensure that the tool would run along all the surfaces of the diamond. Under the passes tab, I set the stepover to 0.1 for the best finish.
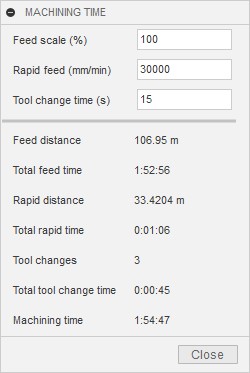
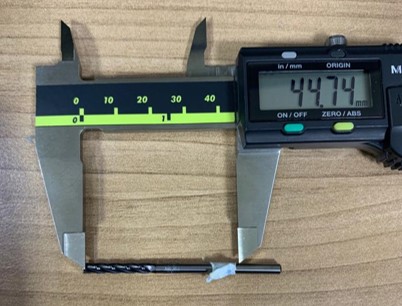
To check the full machining time, I right-clicked on the setup, and selected machining time. Mine turned out to be 1 hour 54 mins and 47 seconds!, it’s long, but hopefully worth it.
To export the cam files, I selected each process at a time, right-clicked on it, and selected Post process. This operation generates the Gerber files for the milling machine to read. The things I need to modify are the following:
post configuration under all vendors, I selected the ROLAND DG.Roland RML.MDX-40.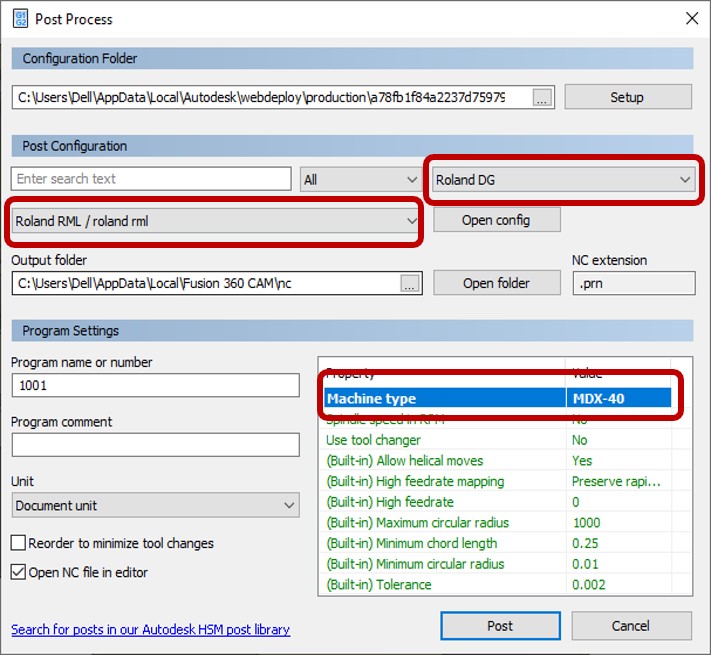
My full setup sheet can be found here.
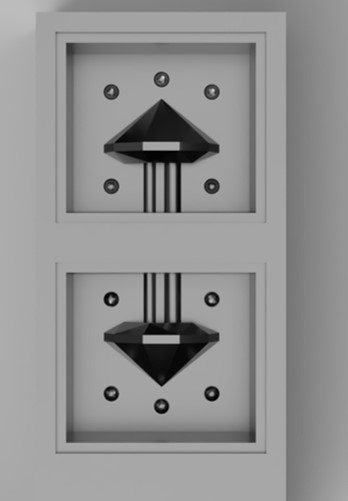
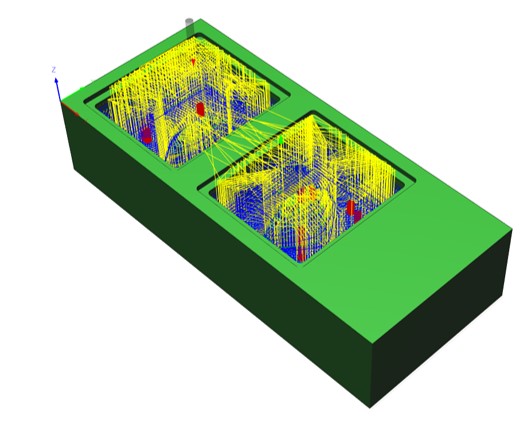
I used the simulation tool to see the toolpath of the machine, and the final result of the milling:
I prepared the stock I am using for milling, which is machinable wax. I placed some double sided tape on the back, and placed it on the milling machine holder. A thing I missed noticing is that the tool will not be able to go all the way to the left where I imagined my origin point is. Thankfully, I had a bit of stock left on the side so the relocation didn’t affect much.
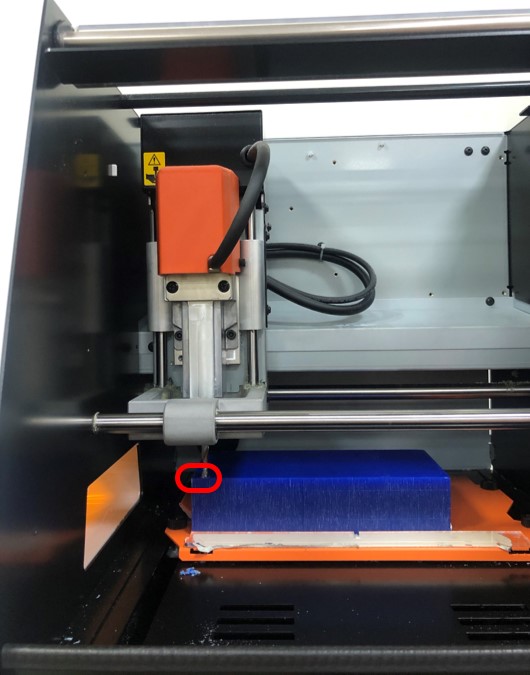
I set up the XY origin points, Zeroed the Z and selected the 2D adaptive to start milling.

Next, is the 3D Adaptive clearing. I used the same tool as the previous operation, so I just selected the second file to start milling.
Halfway through the milling, I noticed that the tool was following the toolpath in the air. It was not milling the material, but instead going down the entry points, up and then around in the air.
After discussing this issue with Hashim, it turns out that the tool I was using was too short for the depth I set. Thus I switched to two other tools for my processes. To ensure the height is enough, I simply placed a sticker on the top of the tool where the collet starts, measured that, and entered the value as the overall length, changed the tool in the settings, and exported the file.
Now, without changing the XY origin point, and only Zeroing the Z, I can select the modified 3D adaptive file and run!
The milling is much better now, and the tool is going all the way through.
Next, I changed the tool to the 1/8 bull nose end mill, Zeroed the Z, and selected the horizontal file. Once that was done, I kept the same tool and selected the Parallel file to run.
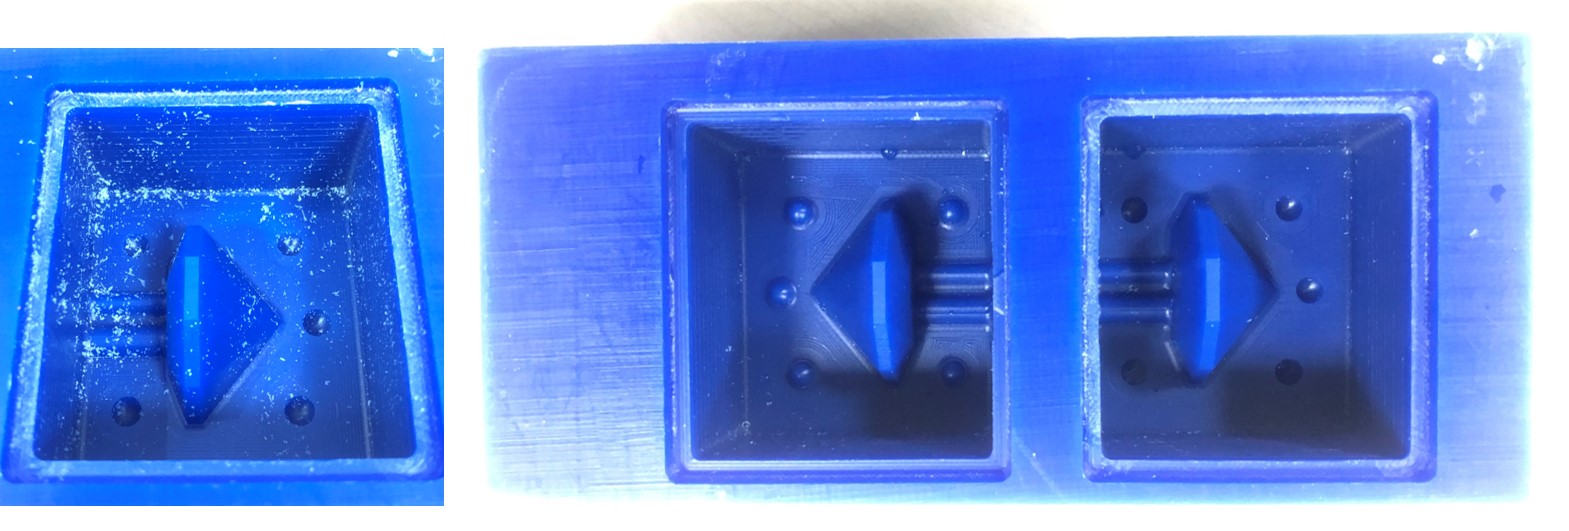
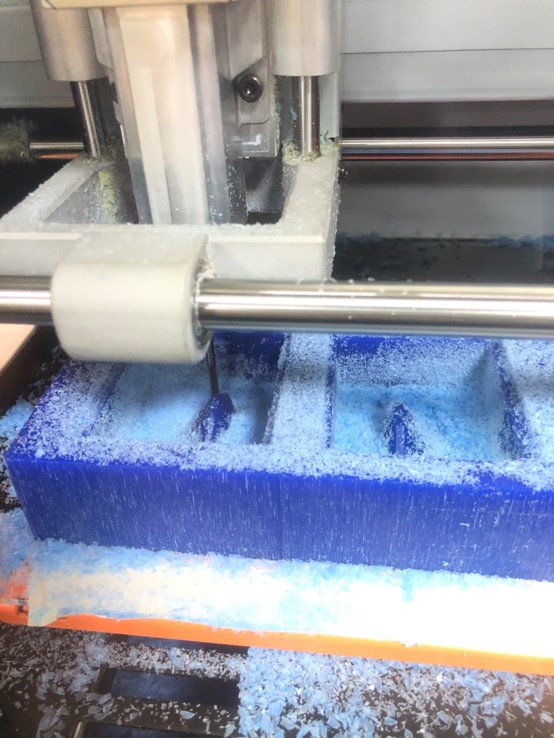
After a long wait (2 hours turned into 5), lots of ups and downs (some frustration included too), I managed to get a pretty good result of the machinable wax.
The registration spheres are milled and smoothed out nicely, the angles of the diamond are highlighted and the shape is great overall!
I wanted my final diamond to be made in resin, so I will be using Mold Max™ 14NV. This material is the best option I had for casting resin.
I read the technical datasheet which highlighted the key features of the material, the safety precautions against it, and the periods of time to use it.
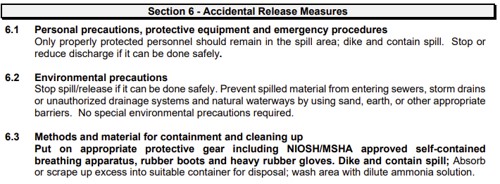
This is a summary of the key points on the safety datasheet:
As per the safety instructions, I taped my Abaya sleeves so nothing is loose and dangling, wore two vinyl gloves on each hand, and taped it to my sleeves to prevent the material from touching skin, goggles (on top of my own glasses!), a plastic apron to prevent spillage over my clothes, and an extra mask on industrial masks on top of my own covid-19 protection mask.
In summary, I looked like a short version of an evil doctor in a horror movie - minus the blood-!
We also covered our working space with plastic to protect the surface.
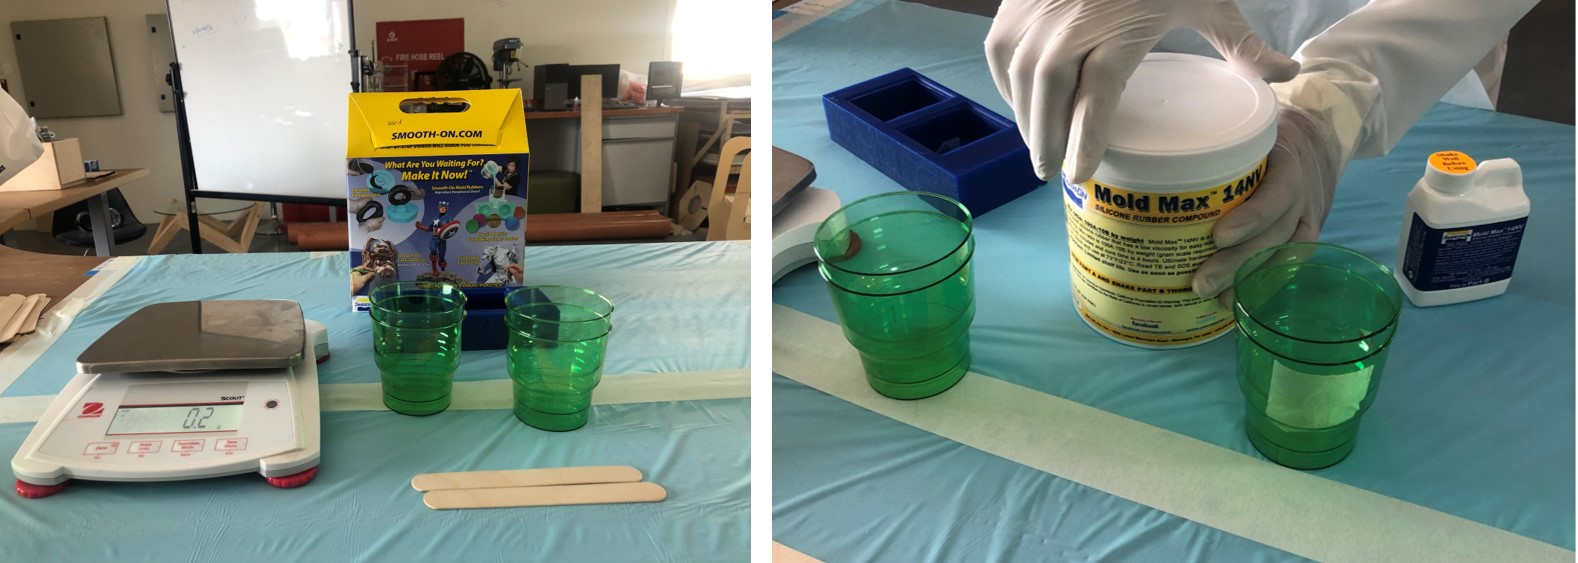
The first step in making the mold is measuring the amount of material required. I did this by filling both sides of my wax with water, then transfer the water into a cup, and mark the level of water as the level of the material required. I did this a couple of times to confirm the amount I needed.
I made sure to dry the cup and the wax thoroughly, then I started mixing the part A and part B as the instruction suggests in the following order:
Mix part A in its container for 1 minute using a wooden stick, also , shake part B for one minute. This step helps re-disperse the fillers that may have settled in the bottom of the containers.
Zero the scale with the empty cup on to eliminate the weight of the cup, then pour Part A into the cup until the mark and take note of the weight.
The ratio of Part A to Part B is 10:1, So measure 10% of the weight of Part A measured previously, and add this amount of part B to the cup.
Mix for 1 minute with a wooden stick making sure to scrape the sides and the bottom, then pour the mixture into another cup, and mix for another minute.
Pour the mixture in the wax starting from the lowest point keeping the flow as uniform as humanly possible to minimize entrapped air.
Set the wax in a shaded area , and wait for 4 hours to cure! (we came back to it after 24 hours).
Clean the area used from any spillage, or contaminated tools.
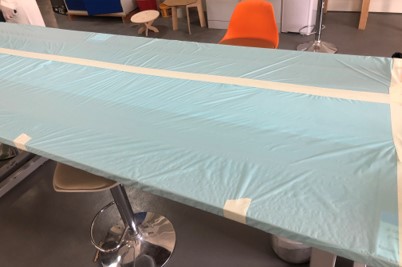
After 24 hours of waiting, we revealed our set silicon molds! The mold came out easily out of the wax, the step and the draft made it very easy to pull it away! I was impressed with the details of the diamond in the mold! I thought since the design was small, the details won’t be visible, but I was gladly mistaken!
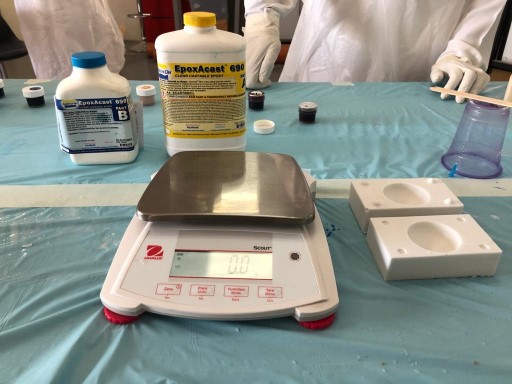
For casting I am using EpoxAcast™ 690 epoxy resin and hardener. I was told that this material is much more dangerous than the molding material, so going back to evil doctor look is a must XD!
The steps in casting are very similar to the steps in molding. We made sure to cover the workspace with plastic, and read the technical datasheet meticulously.
Here I measured the amount of material required using the water method again. I made sure to tape the two halves of the mold together, pour in the water and then empty the water in the cup marking the level of water. I redid this again with a syringe as well to ensure the volume needed.
Again, I dried the cup and my mold with tissue paper, and started preparing the mix in the following order:
Shake PART A and PART B of the mix for a minute to re-disperse the fillers.
Zero the scale with the empty cup on, and pour the PART A until mark. (while measuring the amount needed I noticed that the amount is suspiciously very small so I increased the amount a bit).
The ratio of PART A to PART B is 10:3, so measure 30% of the PART A, and add this amount of PART B to the cup.
Mix for 1.5 mins with a wooden stick, making sure to scrape the sides and the bottom.
Add the color of choice. I am using blue from SO-Strong™ urethane colorants. I accidentally added a single drop of the color, which proved to be way too much as the color turned dark blue!
Add glitter! since it’s a diamond it had to be sparkly, so I added a very small amount of silver glitter, mixed it in with the -now very dark blue- epoxy, and then realized that because of the very pigmented color, the glitter was not showing properly! So I added more, and then a tad more. Approximately about 1/4 of teaspoon of glitter XD!
Tape the two sides of the mold together so that the epoxy won’t spill, then pour the mix into the mold slowly and steadily. I ended up having more resin than what I needed for my diamond mold, luckily, we had some extra molds created by previous students to use! So I poured in it.
Let cure for 24 hours!
clear the area used from any tools or extra materials.
After 24 hours of curing, its time to reveal the shapes! The wood has soaked in the resin almost completely, leaving plenty of glitter on the surface!
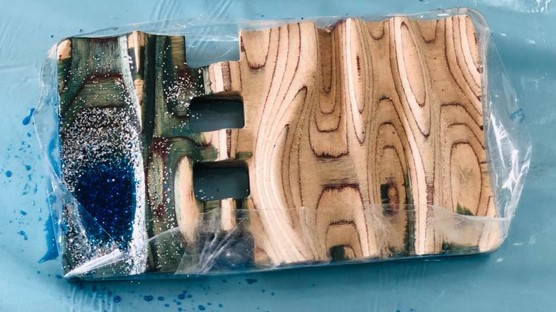
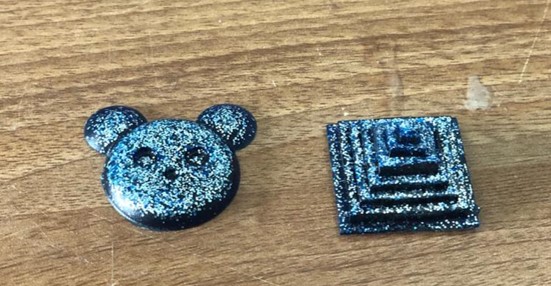
Then I tried removing the teddy bear and the Aztec pyramid, it released from the mold pretty easily, but the resin was soft and pliable. It as not hard as I expected, even though the curing time was supposedly enough. Nevertheless, it looked rather nice, even if all the glitter sank to the bottom (apparently, the glitter was much heavier than the resin).
I decided to keep my diamond in the mold for a little longer to cure better, and searched for the cause of this failure. I found out that the most common reasons were either the curing time wasn’t enough, or perhaps there was too much moisture in the mix (maybe because of the colors? or the glitter?).
After 5 more hours of curing, I released the diamond from the mold carefully, and viola! the diamond looks dazzling! and the details showed nicely on the surface of the diamond! It is in a very dark blue (as expected), and just like the previous objects, the glitter sank to the bottom, and it was still soft!!!!
I trimmed the extra lining, and the pouring tubes on top, to look like this!

I went for a second trial with the resin, I wanted it to be almost clear with different interwind colors. Something that might resemble a galaxy. I was a bit skeptic about mixing the colors, as the working time with the resin we had was 5 hours. Mixing the colors initially then pouring it in the mold would just create one mutual color.
So I searched the idea, and found out that letting the resin cure for a while and get dense might work in decreasing the merging of colors.
I did just that, I prepared my mix of PART A and PART B using the same steps mentioned before, then used a torch to eliminate any bubbles in the resin.
Then I separated the mix into four cups, keeping one cup clear, and adding the tiniest amount of color to each cup. I added red, purple and green. And let the resin cure for about an hour. Then I poured the colored resin into the clear one, mixing only once with the wooden stick, and then poured it into the mold. Just like the previous time, I am letting this cure for 24 hours (maybe more).
This time I left the resin in the mold for about 28 hours. The diamond looks amazing, almost transparent, tinted in pink. Unfortunately, there were many faults in this version too. The colors got merged again (I think I need to wait more before mixing), and the top surface was weirdly non-existent (Even though I made sure to fill it to the brim), and the saddest of all, it was still soft :(
