Output Devices

This Week's Objective


Add an output device to a microcontroller board you've designed,and program it to do something

Group assignment

Link for the group assignment


Individual assignment

Discovering the output device


Again this week I want to do something related to my final project. I will use a Solenoid as an output device.


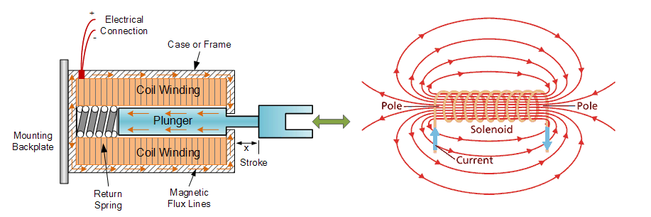
So what's a Solenoid

A solenoid is a type of electromagnet, the purpose of which is to generate a controlled magnetic field through a coil wound into a tightly packed helix. The coil can be arranged to produce a uniform magnetic field in a volume of space when an electric current is passed through it.


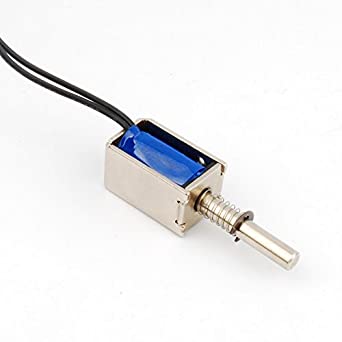
The core of a solenoid is usually made of two sections, a movable actuator, or plunger, and a fixed end core or back stop.The efficiency of a solenoid is a factor of mechanical geometry, electrical configuration and magnetic permeability of core, plunger and housing.The plunger is free to travel in the center of winding in a linear direction. When the coil is energized by the electric current "i ", a magnetic force is created between plunger and end core, causing the plunger to travel. The higher the permeability of steel used, the better the performance.


Making the Board

Before starting the manufacturing of the card I will clarify the circuit and also write a simple code to see how the solenoid works. So for the circuit we need an Arduino Uno , Solderless breadboard,TIP120 ,Jumper Wires, 2.2 KΩ Resistor,Freewheeling or Flyback Diode and of course a 5v Solenoid.


The Freewheeling Diode will prevent current discharging back through the circuit when the solenoid coil discharges.
The current draw of our solenoid is higher than a standard transistor can handle so we will be using a TIP120 Darlington Transistor. A Darlington transistor is actually a pair of transistors that act as a single transistor with a high current gain. Here you can find the datasheet of TIP120 transistor
We use the 2.2 KΩ resistor placed on the base pin of the transistor,to limit the current going to the base (control line) of the transistor; no resistor would result in no current limit, and could result in a transistor blowing up.


Download code


In this video, you can see the selonoid in function, it is important to mention that it is a pull selonoid and is not a pull-push selonoid.


Passing to the board, I used my hello board and added the necessary components and two pins for the selenoid so that I can connect it easily, here is the schematic of my new board and the brd file.


Download file.sch


Download file.brd