12. Interface and application programming
What I’ve done this week
- To help the work of my final project, I created the interface to control the color of the neopixels between laptop and esp32 dev board using Arduino IDE and processing.
Weekly Assignment Requirement
Individual assignments
- write an application that interfaces a user with an input &/or output device that you made
Group assignment
- compare as many tool options as possible
Description of Assignment Work
I’m going to use ESP32 for MCU of my final project so it was nice to choose it for this week’s assignment. but unfortunately, due to the covid-19, there was no access to FabLab Kamakura to cut my own board at the moment. so I tried testing around the interface and application programing with ESP32 DEV board instead of using self created one.
the device I would control via the interface this week, I decided to use neopixels because I would use them in the important part of my final project.
first plan
I was thinking to create the interface to control devices through the internet because it would be available from any digital devices which could connect to the internet.
In the research for this week, I found MQTT which was a kind of protocol easy to use from the perspective of amount of data. it seemed the best way for communication between even low spec MCUs. so I would keep it as a future plan though I did not try it this week.
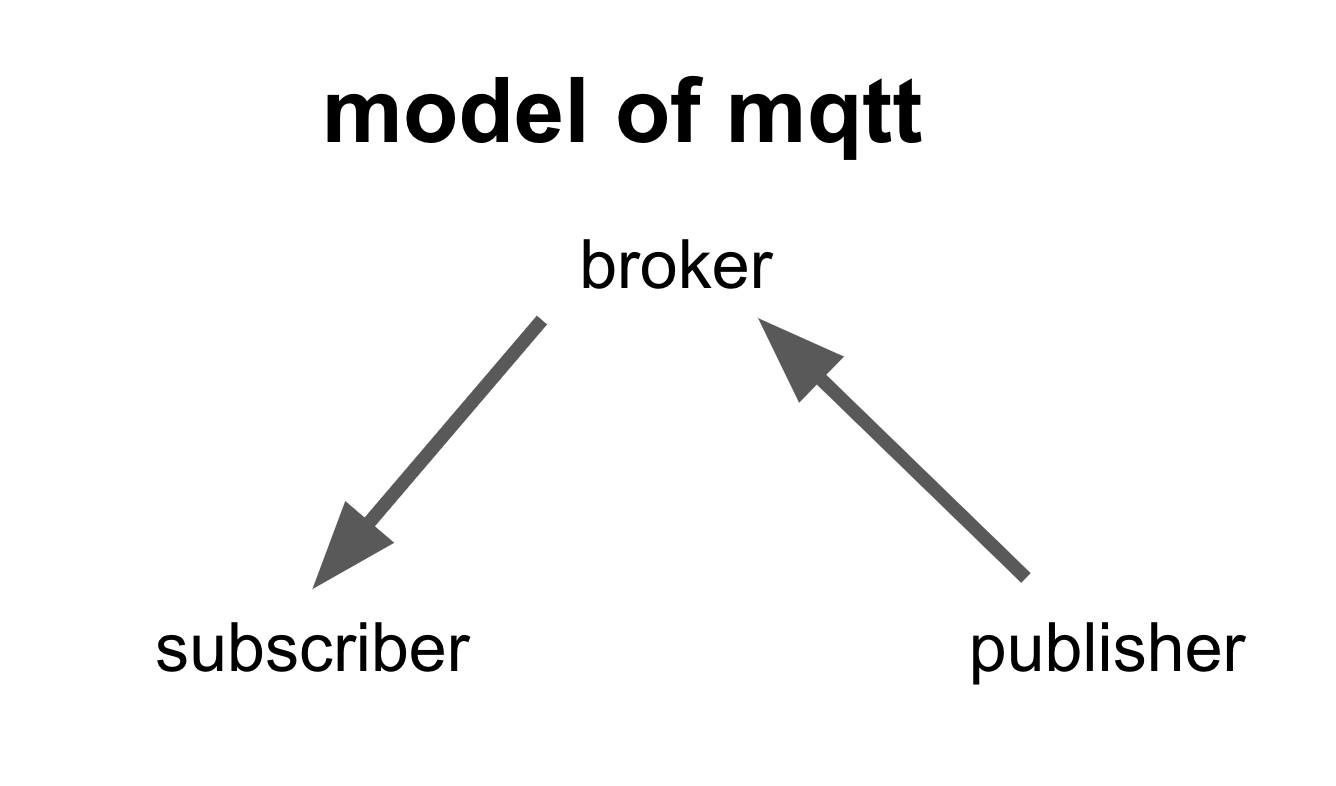
the system consists of three roles. publisher sends message which could be a key for controlling devices. broker is a kind of server which deliver the messages from broker to subscriber actually. and subscriber is the terminal device which receive the message and execute something by it.
to create an interactive contents, using processing seemed easy and it could connect to the internet. and there was a more internet-friendly processing-like application called P5.js. so I chose it for creating the interface firstly.
making color wheel interface by P5.js
P5.js is a library of javascript and it enable us to use processing on the WEB easily.
There is a huge internet community and lots of users share their own programs.
This time, for base of my program, I borrowed the color-picker program created by slow_izzm.
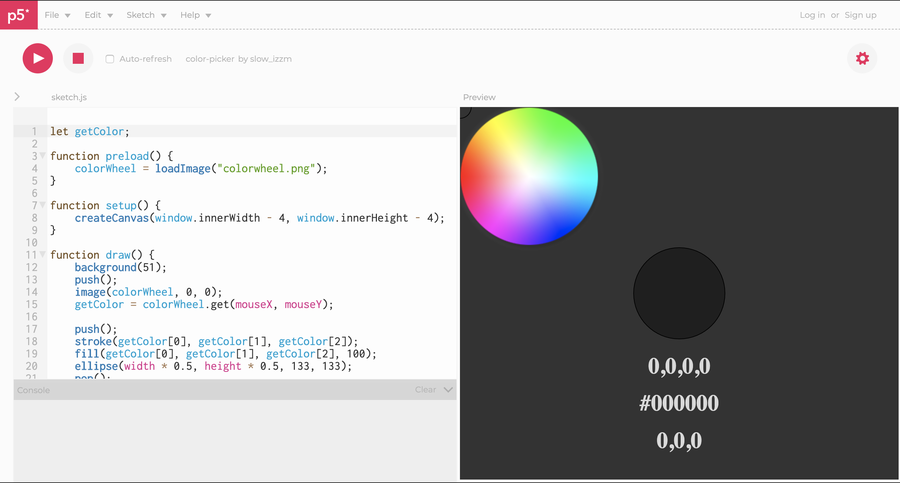
Edited this program for my interface mainly for visual aspect.
My version
let getColor;

// loading png file. used for loading color wheel this time
function preload() {
    colorWheel = loadImage("colorwheel.png");
}

function setup() {
    createCanvas(window.innerWidth - 4, window.innerHeight - 4);
}

//set colorwheel
function draw() {
    background(255);
    push();
    image(colorWheel, 0, 0);
    getColor = colorWheel.get(mouseX, mouseY); //pick the color where I put mouse

// draw square
    push();
    stroke(getColor[0], getColor[1], getColor[2]);
    fill(getColor[0], getColor[1], getColor[2], 255);
    rect(width * 0.6, height * 0.1, 100, 100);
    pop();


// small circle showing where mouse on
    fill(getColor);
    ellipse(mouseX, mouseY, 10, 10);
    pop();

// show info of color code beneath the square
    push();
    fill(217);
    noStroke();
    textSize(33);
    textFont('Helvetica');
    textAlign(CENTER, CENTER);
    textStyle(NORMAL);
    text(getColor, width * 0.7, height * 0.35);
    pop();


}
for my interface, I would use only 8bit RGB color code which controlling color by the value 0-255 of red, green, and blue. So I cut off extra information from the original to make it easier to understand at first sight.
converting P5.js to Processing
While I editing P5.js, I thought I should check wether I could exchange the data between processing-thing and arduino-thing because it seemed to take time and confuse me to check two new things(communication two apps and networking via internet) at a time. so I decided to test only communication among two apps at first. and also I could find more example codes on processing than P5.js so I changed using application from P5.js to processing for this week.
converted code
int getColor;
PImage colorWheel;


void setup() {

  colorWheel = loadImage("colorwheel.png");
  size(560, 250);

}

void draw() {
  background(0);
  push();
  image(colorWheel, 0, 0);
  colorWheel.resize(0, 250);
  colorMode(RGB, 255);
  color getColor = colorWheel.get(mouseX, mouseY);


  push();
  stroke(getColor);
  fill(getColor, 255);
  rect(width * 0.62, height * 0.2, 120, 120);
  pop();


  fill(getColor);
  ellipse(mouseX, mouseY, 10, 10);
  pop();

  push();
  fill(217);
  noStroke();
  textSize(33);

  textAlign(CENTER, CENTER);

  text("R:" + int(red(getColor)) + " G:" + int(green(getColor)) + " B:" + int(blue(getColor)), width * 0.72, height * 0.75);

  pop();

  }
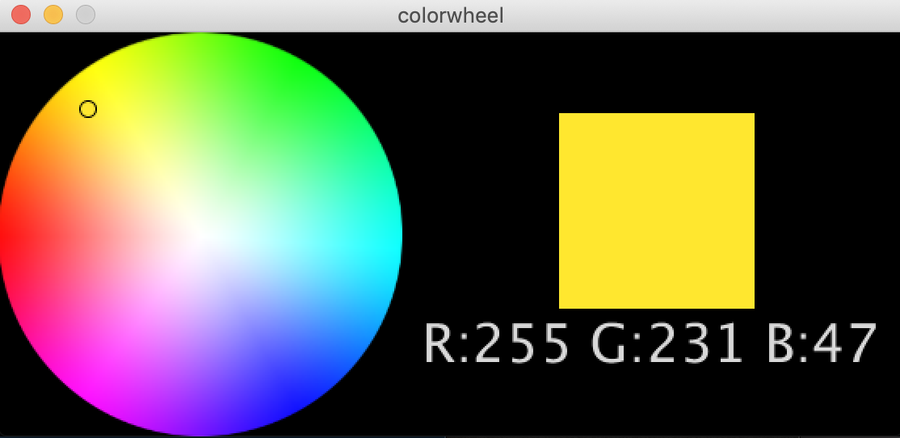
some parts were changed obviously. I changed lots of type of function and value. and in the P5.js, it was okay to use only get() function to get 8bit color code information. but in processing, I had to get color code information for each RGB element of the color. like red color needed to use red(). green and blue also needed to do this. and also I had to set color mode in advance using “colorMode(RGB, 255);”
At this moment, color code only shown on display. So I had to make it sendable. I would try to put them in console as a preparation for sending data to ESP32.
connecting Processing to ESP32(Arduino IDE) via serial communication
If I can pick the color code from the color wheel in Processing like I tried, I can use it as a part of the code of the Arduino program. It would be accomplished by using serial communication between the two programs. I just need to send the color code from Processing to Arduino.
To try that, I developed the Processing code which I’ve already made and created new Arduino code for this.
Processing part
import processing.serial.*;

Serial port;
int getColor;
PImage colorWheel;
String r;
String g;
String b;

void setup() {
  colorWheel = loadImage("colorwheel.png");
  size(560, 250);
  port = new Serial(this, "/dev/cu.SLAB_USBtoUART", 115200);
}

void draw() {
  background(0);
  push();
  image(colorWheel, 0, 0);
  colorWheel.resize(0, 250);
  colorMode(RGB, 255);
  color getColor = colorWheel.get(mouseX, mouseY);
  println("r: " + red(getColor) + " g: " + green(getColor) + " b: " + blue(getColor) +  " HUE: " + hue(getColor));

  push();
  stroke(getColor);
  fill(getColor, 255);
  rect(width * 0.62, height * 0.2, 120, 120);
  pop();


  fill(getColor);
  ellipse(mouseX, mouseY, 10, 10);
  pop();

  push();
  fill(217);
  noStroke();
  textSize(33);
  textAlign(CENTER, CENTER);
  text("R:" + int(red(getColor)) + " G:" + int(green(getColor)) + " B:" + int(blue(getColor)), width * 0.72, height * 0.75);
  pop();
  //println(str(int(red(getColor))) + "," + str(int(green(getColor))) + "," + str(int(blue(getColor)))+ "e");
  r = str(int(red(getColor)));
  g = str(int(green(getColor)));
  b = str(int(blue(getColor)));


  if (mousePressed) {
  port.write(r + "," + g + "," + b + "e");
  println("sent to arduino!");
  }
}
Basically, I added the codes for serial communication to the processing program I already prepared. imported the library and set up for serial port. And then prepared the data sending to Arduino. Fortunately, I already had color code for each color element so I just needed to convert it as string data using str() function. and store those data to the variables and sent them as a sequence of serial data by port.write() function. for reading the data properly on Arduino, I added “,” and “e”. I would explain them at Arduino code part. processing part had been sorted now.
Arduino part
int i = 0;
char buf[20];
int color[5];

// NeoPixel Ring simple sketch (c) 2013 Shae Erisson
// Released under the GPLv3 license to match the rest of the
// Adafruit NeoPixel library

#include <Adafruit_NeoPixel.h>
#ifdef __AVR__
#include <avr/power.h> // Required for 16 MHz Adafruit Trinket
#endif

// Which pin on the Arduino is connected to the NeoPixels?
#define PIN        32 // On Trinket or Gemma, suggest changing this to 1

// How many NeoPixels are attached to the Arduino?
#define NUMPIXELS 4// Popular NeoPixel ring size

// When setting up the NeoPixel library, we tell it how many pixels,
// and which pin to use to send signals. Note that for older NeoPixel
// strips you might need to change the third parameter -- see the
// strandtest example for more information on possible values.
Adafruit_NeoPixel pixels(NUMPIXELS, PIN, NEO_GRBW + NEO_KHZ800);


#define DELAYVAL 500 // Time (in milliseconds) to pause between pixels

void setup() {
  // These lines are specifically to support the Adafruit Trinket 5V 16 MHz.
  // Any other board, you can remove this part (but no harm leaving it):
#if defined(__AVR_ATtiny85__) && (F_CPU == 16000000)
  clock_prescale_set(clock_div_1);
#endif
  // END of Trinket-specific code.
  Serial.begin(115200);
  pixels.begin(); // INITIALIZE NeoPixel strip object (REQUIRED)
  pixels.show();            // Turn OFF all pixels ASAP
  pixels.setBrightness(50); // Set BRIGHTNESS to about 1/5 (max = 255)
}

void loop() {
  if (Serial.available()) {
    pixels.clear(); // Set all pixel colors to 'off'
    buf[i] = Serial.read();
    if (buf[i] == 'e') { // set 'e' at the end of the last caracter
      buf[i] = '\0';
      //Serial.println(buf);

      color[0] = atoi(strtok(buf, ","));
      color[1] = atoi(strtok(NULL, ",")); // use NULL from second group
      color[2] = atoi(strtok(NULL, ","));

      pixels.setPixelColor(0, color[0], color[1], color[2], 0);
      pixels.setPixelColor(1, color[0], color[1], color[2], 0);
      pixels.setPixelColor(2, color[0], color[1], color[2], 0);
      pixels.setPixelColor(3, color[0], color[1], color[2], 0);
      pixels.show();   // Send the updated pixel colors to the hardware.

      //send back data to processing
      Serial.println("color[0],color[1],color[2]");
//      Serial.println(color[1]);
//      Serial.println(color[2]);
      i = 0;
    }
    else {
      i++;
    }
  }
I recreated the program which I made for Neopixel on week11. I added the serial communication part to it. Using “Serial.available()”, the program would run if the serial data sent to Arduino from Processing.
The data included the character “e” and it meant the end of data. So I programed that if it found “e” in the data, it would stop reading.
and it also included comma which meant the division of the data. the data was sent as a sequence from Processing so I had to slice it at proper length in Arduino. Then the comma worked as a mark where to cut. To divide the data, I used “strtok()” function. and then divided pieces were converted from string data to int data by “atoi()” function and put into the array “color[]”.
Finally, the divided data used in the code for Neopixel.
Worked!
The point of the mouse cursor picked the color and show it as the filling color of the square next to the wheel and also indicate its color code beneath it. If I click on the color wheel, the color of the Neopixels are changed as you picked.
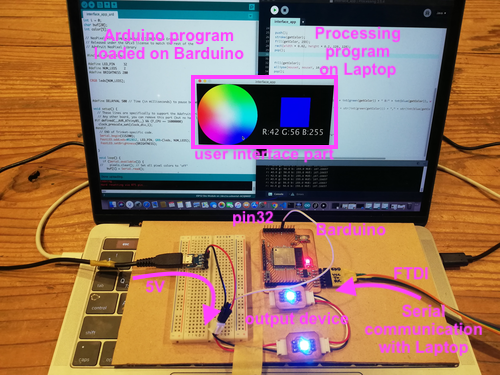
After finishing my final presentation, I retried these programs with the PCBs I actually made. I created Barduino by myself before so I decided to use it for the main PCB to control the output devices which I had used for my final project. I loaded the Arduino program on it and it communicated with the other program written in Processing in my laptop via FTDI cable. Neopixels loaded on the output device PCBs got 5V from a power supply adapter and signals to change its color from the 32 pin on Barduino. In terms of the programs, I changed the Arduino library for neopixel from Adafruit_NeoPixel.h to FastLED.h as well as I did in my final project. In Processing program, I only changed the name of serial port because I changed the main board.
The program run without problems this time too. You can download the final files from the link part below.
Group Assignment
Consequently, I used the content about trying with P5.js as a this week’s group assignment.
Please see the link below.
Kamakura Group assignment week12
Description of Important Weekly Learning Outcome
I used serial communication to control Arduino from processing. It had seemed so difficult at first but I could use it somehow at the end. I thought the style like put the data sent from another application into array and using it might work in a lot of situation. So if I have to use any other programing language and so on, I would look back to the trial this week.
Links to Files and Code
processing program for the final test (.zip)
arduino program for the final test (.ino)
Appendix
processing.org reference colorMode()
processing.org reference get()
processing.org reference red()
serial communication between processing and Arduino (Japanese source)
how to divide the data into several data by comma (Japanese source)